

Page 1
http://www.auna-multimedia.com
IR-140 INTERNETRADIO
DAB / DAB+ / UKW / WLAN / LAN / AUX
10028094 10028095 10028096
Page 2

2
Inhalt
Bedienungsanleitung
Technische Daten 3
Warnung / Sicherheitshinweise 3
Kleine Objekte / Verpackungsteile 3
Transport des Gerätes 4
Reinigung der äußeren Oberäche 4
Bedienelemente 4
Tasten Funktionen 6
Anschlüsse und Inbetriebnahme 7
Systemeinstellungen 8
Internet Radio 10
Music Player (UPnP, USB) 10
DAB Radio 11
FM Radio 12
AUX 12
Wecker und Sleep-Timer 12
Kopfhörer 13
Hinweise zur Entsorgung / Konformitätserklärung 13
Instruction Manual 14
Page 3

3
Sehr geehrter Kunde,
zunächst möchten wir Ihnen zum Erwerb Ihres Gerätes gratulieren.
Bitte lesen Sie die folgenden Anschluss- und Anwendungshinweise sorgfältig durch und befolgen Sie diese um möglichen technischen Schäden vorzubeugen.
Technische Daten
Artikelnummer 10028094 10028095 10028096
Stromzufuhr AC100-240V ~50/60Hz
Netzteil 12V, 1.5A
FM Frequenzband 87.5 - 108MHz
DAB/DAB+ Frequenzen 174 - 240MHz
Warnung
Zur Reduzierung der Gefahr von Brand, elektrischem Schlag und Beschädigung:
• Setzen Sie dieses Gerät nicht dem Regen aus.
• Stellen Sie keine mit Flüssigkeiten gefüllten Gefäße, wie Vasen, auf dieses Gerät.
• Verwenden Sie ausschließlich vom Hersteller empfohlenes Zubehör.
• Reparieren Sie dieses Gerät nicht selbst. Wenden Sie sich zur Wartung an qualiziertes Kundendienstpersonal.
• Lassen Sie keine Gegenstände aus Metall in dieses Gerät fallen.
• Stellen Sie keine schweren Gegenstände auf dieses Gerät.
• Reinigen Sie das Gerät nur mit einem trockenen Tuch.
• Blockieren Sie keine Belüftungsönungen.
• Installieren Sie die Geräte nicht in unmittelbarer Nähe von Hitzequellen wie Heizungen, Herden, Öfen oder ande-
ren heiß werdenden Geräten (wie z.B. Verstärkern o.a.)
• Stellen Sie vor der ersten Inbetriebnahme sicher, dass die Spannungsversorgung der auf dem Gerät angegebenen
entspricht.
• Trennen Sie die Netzverbindung bei Stürmen und Gewitter, wenn das Gerät längere Zeit nicht in Benutzung ist
oder wenn Sie die Wohnung verlassen.
• Dieses Gerät ist kein Spielzeug. Kinder sollten es nur unter Aufsicht benutzen und auf keinen Fall Gegenstände in
Belüftungsönungen stecken.
Aufstellung
• Achtung - Stellen Sie keine Quellen oener Flammen, z.B. brennende Kerzen, auf das Gerät.
• Stellen Sie das Gerät auf eine trockene, ebene, wasserfeste und hitzebeständige Oberäche.
• Suchen Sie einen Aufstellort, an dem Kinder nicht an das Gerät gelangen können.
• Die Steckdose muss leicht zugänglich sein, um im Notfall das Gerät schnell vom Stromkreis trennen zu können.
• Installieren oder positionieren Sie dieses Gerät nicht in einem Bücherregal, Einbauschrank oder einem sonstigen
engen Raum. Stellen Sie eine gute Belüftung des Gerätes sicher.
• Stellen Sie das Gerät nicht auf Verstärker oder andere Geräte, die heiß werden können. Diese Hitze könnte das
Gerät beschädigen.
• Setzen Sie dieses Gerät keinen übermäßigen Erschütterungen aus.
Page 4
4
Kleine Objekte/Verpackungsteile
(Plastikbeutel, Karton, etc.)
Bewahren Sie kleine Objekte (z.B. Schrauben und anderes Montagematerial, Speicherkarten) und
Verpackungsteile außerhalb der Reichweite von Kindern auf, damit sie nicht von diesen verschluckt
werden können. Lassen Sie kleine Kinder nicht mit Folie spielen. Es besteht Erstickungsgefahr!
Transport des Gerätes
Bitte bewahren Sie die Originalverpackung auf. Um einen ausreichender Schutz beim Transport des Gerätes zu erreichen,
verpacken Sie das Gerät in der Originalverpackung.
Reinigung der äußeren Oberäche
Verwenden Sie keine üchtigen Flüssigkeiten, wie Insektensprays. Durch zu starken Druck beim
Abwischen können die Oberächen beschädigt werden. Gummi- oder Plastikteile sollten nicht über einen längeren
Zeitraum mit dem Gerät in Kontakt sein. Nutzen Sie ein trockenes Tuch
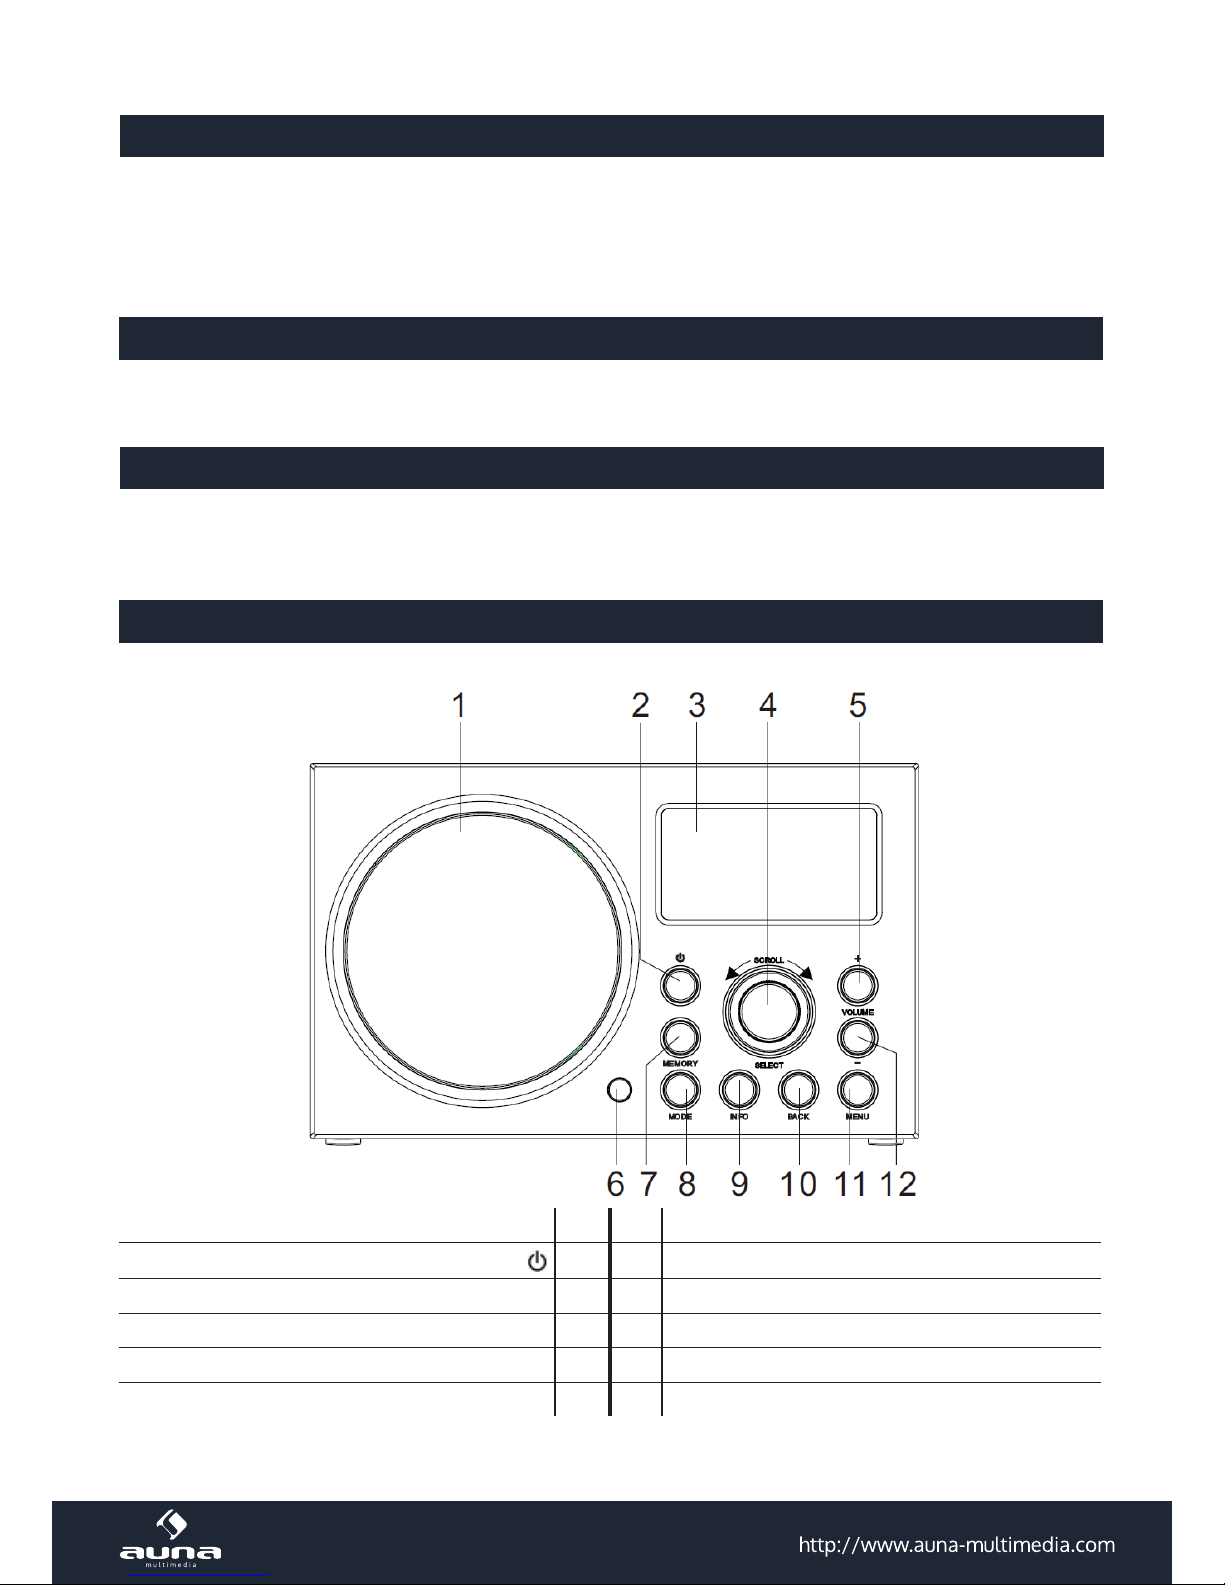
Bedienelemente
Front
Lautsprecher 1 7 MEMORY (Speichermodus)
Power On / O
2 8 MODE (Funktionswahl)
Display 3 9 INFO
SCROLL (Blättern) (Vor/Zurück) / SELECT 4 10 BACK (zurück/aufwärts)
VOL+ 5 11 MENU
Infrarot-Sensor 6 12 VOL-
Page 5
5
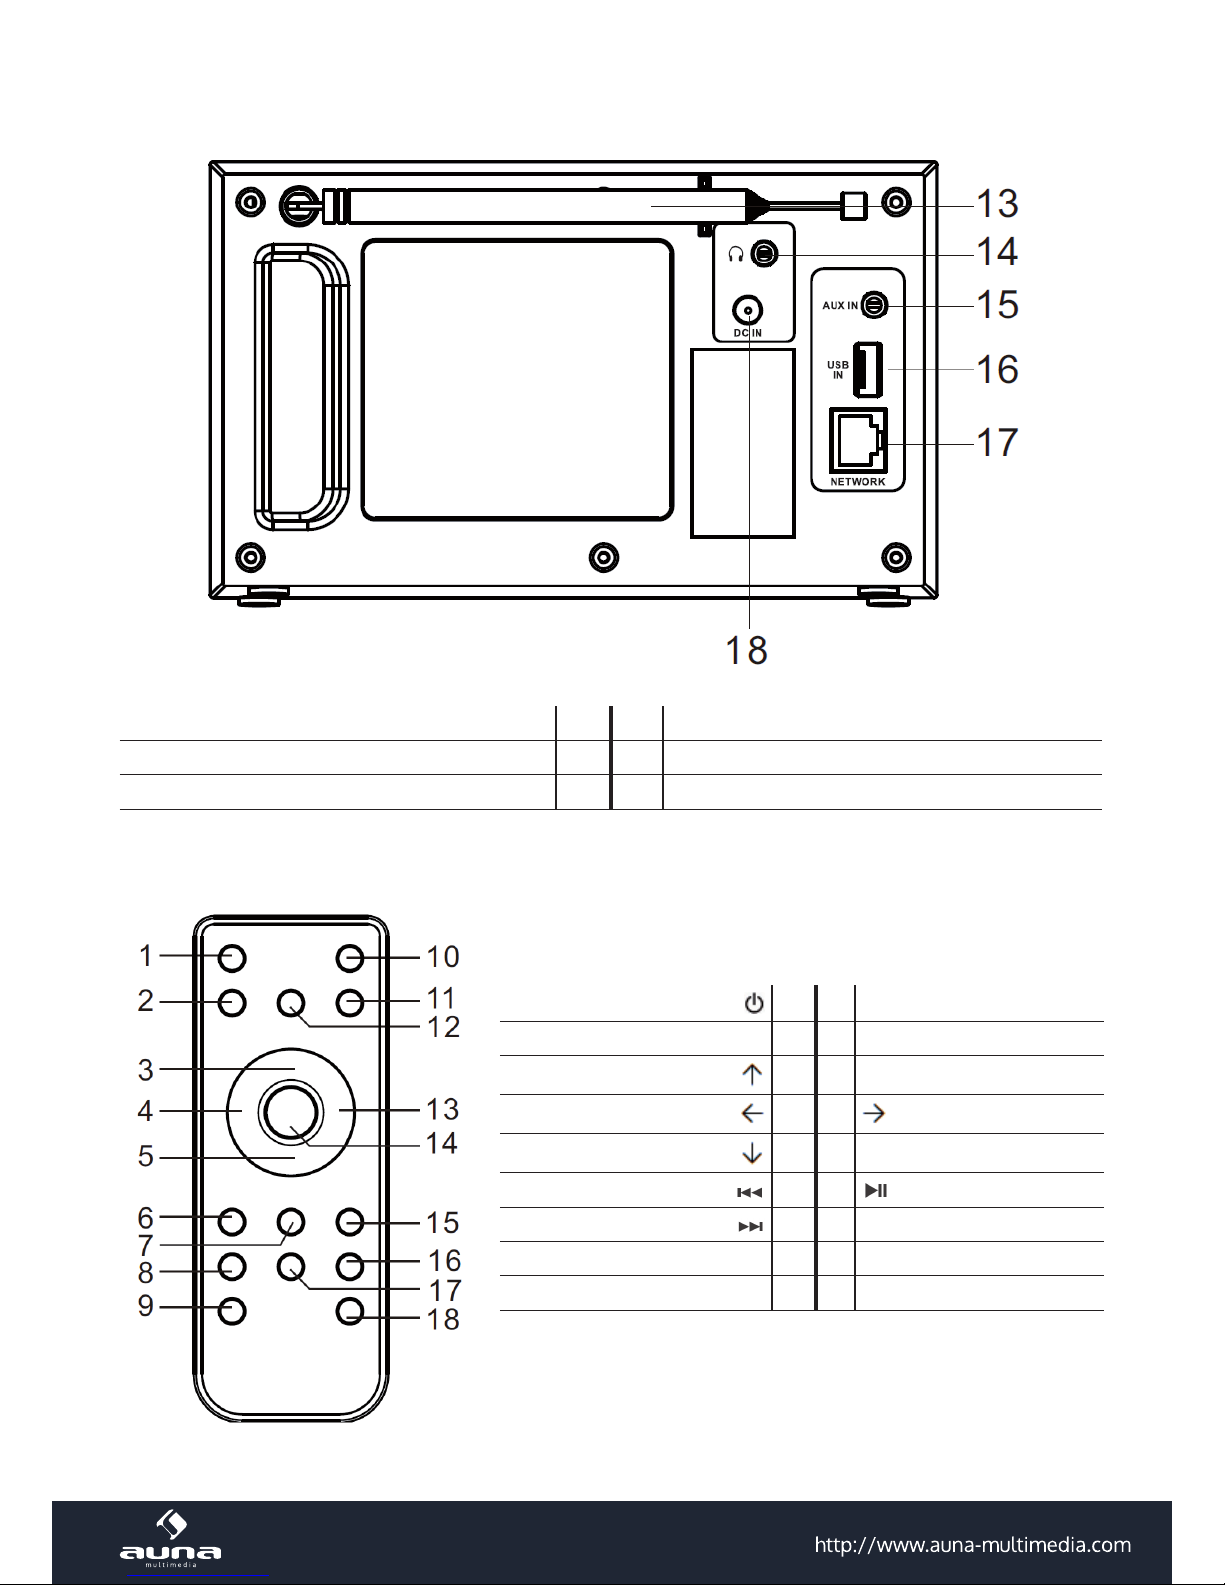
Rückseite
Antenne 13 16 USB-Port
Kopfhörer-Anschluss 14 17 Netzwerk-Anschluss (RJ45)
AUX-Anschluss 15 18 Netzteil-Anschluss
Fernbedienung
Power On / O
1 10 MODE
MENU 2 11 INFO
3 12 SLEEP / SNOOZE
4 13
5 14 SELECT (Auswahl)
6 15
7 16 ALARM (Wecker)
MUTE (Stummschalten) 8 17 MEMORY
VOL- 9 18 VOL+
Page 6
6
Hinweise zur Fernbedienung:
Um das Gerät mit der Fernbedienung zu bedienen, richten Sie diese in einem Winkel von maximal 30° auf den InfrarotSensor an der Gerätefront (6). Die Reichweite beträgt etwa 5 Meter. Hindernisse können die Funktion stören.
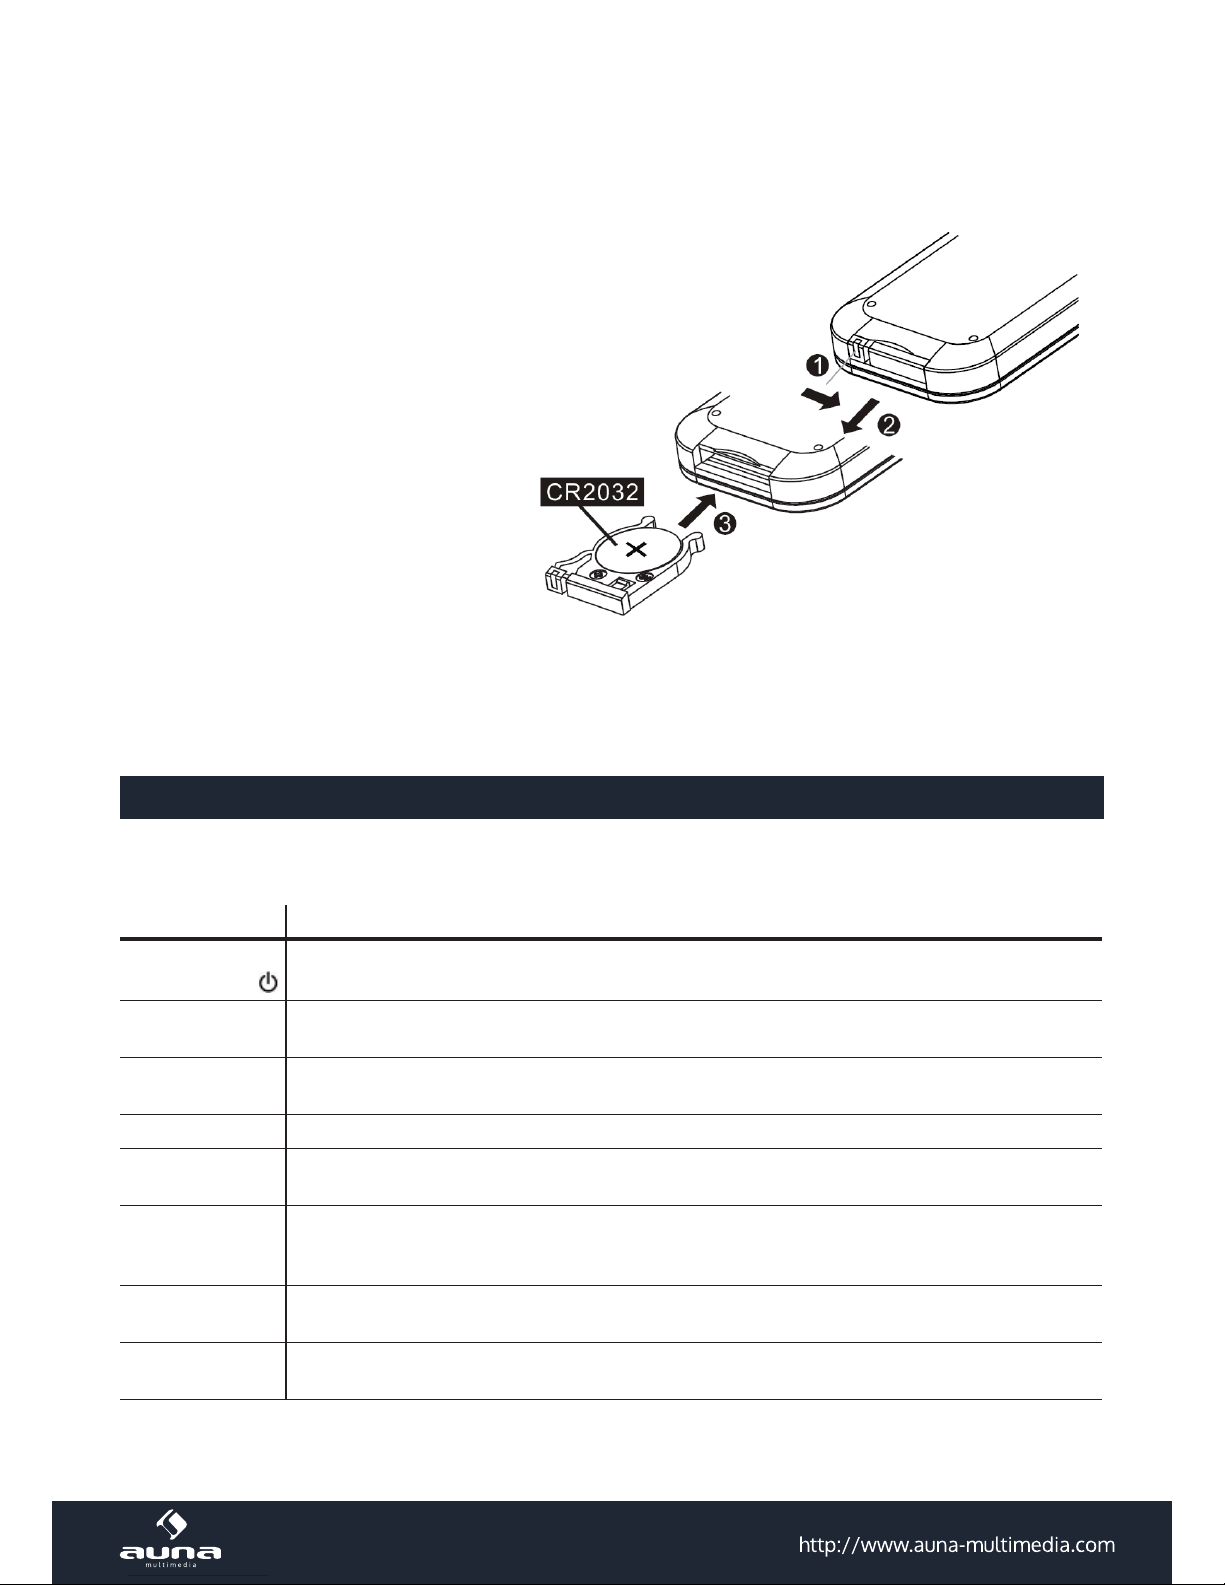
Die Fernbedienung wird inklusive einer passenden Batterie vom Typ CR2032 geliefert.
Entnehmen Sie vor der ersten Inbetriebnahme die Isolierende Folie auf dem Batteriefach.
Beim Batteriewechsel gehen Sie bitte vor, wie
in der nebenstehenden Skizze.
ACHTUNG:
• Tauschen Sie die Batterie ausschließlich
gegen Modelle des gleichen Typs aus.
• Stellen Sie unbedingt sicher, dass die Po-
larität der in der Skizze angegebenden
entspricht.
• Entnehmen Sie die Batterie, wenn Sie die
Fernbedienung über einen längeren Zeit-
raum hinweg nicht gebrauchen und bewahren Sie sie an einem geeigneten Ort (ohne weitere Metallteile und bestenfalls in einem kleinen Plastikbeutel
oder ähnlichem) auf.
• Laden Sie Batterien niemals auf. Überhitzung und Zerplatzen können die Folge sein, verbunden mit dem Austritt
ungesunder Substanzen.
• Halten Sie Batterien unbedingt von Quellen großer Hitze, Feuer und direktem Sonnenlicht fern.
Tasten-Funktionen
Die meisten Tasten auf der Gerätefront nden eine Entsprechung auf der mitgelieferten Fernbedienung (siehe
„Bedienelemente“ ab S. 4).
Taste Funktion
Einschalten / Standby
MODE
Funktionswahltaste. Mehrfach drücken, um Internet Radio, Music Player, DAB, FM oder AUX anzuwählen.
INFO
Weiterführende Informationen über den aktuell eingestellten Sender, das Programm, die Moderatoren, den aktuellen Song und ähnliches anzeigen.
MENU Das Menü für den aktuellen MODE anzeigen. Nochmal drücken, um zurückzukehren.
BACK
Zum vorherigen Bildschirm zurückkehren;
im PLAY-Modus: zurück zur vorherigen Track- oder Sender-Liste
ALARM
ALARM-Assistenten starten;
wenn der Weckton ertönt: ALARM ausschalten;
im Standby-Modus: Zwischen den eingestellten Alarmen hin- und herschalten.
SLEEP/SNOOZE
Bei laufendem Radio: SLEEP-Modus und -Zeit einstellen;
wenn der Wecker läuft: SNOOZE (Weckwiederholung nach einzustellender Zeitspanne)
MEMORY
Senderspeicher-Menü aufrufen. Blättern Sie mit SCROLL/SELECT (4), um den gewünschten Senderspeicherplatz anzuwählen und bestätigen Sie mit Druck auf SCROLL/SELECT (4).
Page 7
7
Taste Funktion
SCROLL/SELECT
Blättern Sie durch Titel-, Abspiel- oder Senderlisten bzw. Menüs und bestätigen Sie jeweils mit
kurzem Druck auf den Button.
Kurz drücken: Zurück;
im Radio-Modus: Sendersuchlauf abwärts;
gedrückt halten: schneller Rücklauf.
Kurz drücken: Vor;
im Radio-Modus: Sendersuchlauf aufwärts;
gedrückt halten: schneller Vorlauf.
Play / Pause
VOL- Lautstärke senken
VOL+ Lautstärke erhöhen
MUTE Stummschalten
In Menüs oder Listen: nach oben
In Menüs oder Listen: nach unten
In Menüs oder Listen: zurück
In Menüs oder Listen: weiter
SELECT Auswahl
Anschlüsse und Inbetriebnahme
Netzverbindung
Schließen Sie das mitgelieferte Netzteil an einer Steckdose an und verbinden Sie mit dem Netzteil-Anschluss an der
Rückseite des Geräts,
Netzwerk-Verbindung
Stellen Sie fest, ob Ihr Router einwandfrei funktioniert und in Betrieb ist und verbinden Sie das Radio mit einem RJ45Kabel mit einem freien LAN-Anschluss Ihres Routers.
Kabellose Netzwerk-Verbindung
Stellen Sie fest, ob Ihr W-LAN-Router einwandfrei funktioniert und in Betrieb ist. Es ist empfohlen, den InstallationsAssistenten („Setup Wizard“) für die Verbindungseinstellungen zu nutzen. Wände und andere Hindernisse können das
W-LAN-Signal beeinträchtigen. Wählen Sie daher einen Aufstellungsort, an dem Sie auch mit anderen Geräten (Laptop/Smartphone o.ä.) guten WiFi-Empfang haben.
Schalten Sie das Gerät mit
ein.
Das Hauptmenü wird auf dem Display angezeigt. Wählen Sie mit SCROLL/SELECT (4) zwischen Internet Radio, Music
Player, DAB, FM, AUX, Sleep, Alarms und System Settings.
Um im Vorfeld alle Einstellungen für den weiteren Gebrauch des Geräts zu tätigen, wählen Sie bitte System Settings.
Page 8

8
Systemeinstellungen (System Settings)
Wählen Sie im Hauptmenü den Punkt System Settings, um Zugri auf die Einstellungsoptionen Setup Wizard (Einstellungs-Assistent), Equalizer (Klangregelung), Network (Netzwerk), Language (Spra-
che), Factory Reset (Zurücksetzen in den Werkszustand) sowie Software Update und Info zu haben.
Setup wizard (Einstellungs-Assistent)
Wählen Sie den Setup Wizard, um eine automatische Einstellung der W-LAN-Verbindung sowie von Zeit und Datum
vornehmen zu lassen. Die Funktion ist nicht notwendig, wenn Sie eine kabelgebundene Netzwerkverbindung nutzen.
• 12/24h Display
Wählen Sie zwischen der präferierten Zeit-Anzeige (24-std./12h), indem Sie mit SCROLL/SELECT (4) auswählen
und bestätigen.
• Time/Date (Zeit/Datum)
Zeit und Datum werden bei Empfang von FM-, DAB- oder Internet-Sendern automatisch aktualisiert (auto update),
können aber auch manuell eingestellt werden.
• Auto Update:
• Wählen Sie mit SCROLL/SELECT (4) die Option auto update from DAB, FM or Network.
• Wählen Sie die korrekte Zeitzone, für den Fall, dass die automatische Aktualisierung per Internet erfolgt
(Deutschland: GMT+1).
• In Deutschland müssen Sie weiterhin die „Daylight Saving“-Option (Sommerzeit) einschalten.
• Manuelle Einstellung:
• Falls Sie „no update“ (kein automatisches Update) wählen, werden Sie vom Einstellungs-Assistenten auf-
gefordert Uhrzeit und Datum manuell einzugeben. Das Datum wird im Format TT-MM-JJJJ angezeigt, Die
Uhrzeit im Format hh:mm.
• Die jeweils zu bearbeitende Zier blinkt. Wählen Sie den jeweils gewünschten Wert mit SCROLL/SELECT
aus und bestätigen Sie.
• Network (Netzwerk-Einstellungen)
Das Gerät ist kompatibel mit allen gängigen Netzwerk-Protokollen und der WPS-Verschlüsselungsmethode. Bei
einer unverschlüsselten Netzwerk-Verbindung klinkt sich das Gerät automatisch in diese ein und es sind keine
weiteren Einstellungen nötig.
• Verbindung mit einem herkömmlich verschlüsselten Netzwerk:
Werden Sie aufgefordert, das Netzwerk-Passwort einzugeben, tun Sie dies bitte, ebenso wie bei bereits genannten Einstellungen, mithilfe des SCROLL/SELECT-Knopf (4).
• Verbindung mit einem WPS-verschlüsselten Netzwerk
WPS-verschlüsselte kabellose Netzwerke werden über ihren Namen identiziert; eine entsprechende Liste der
empfangbaren Netzwerke wird auf dem Display angezeigt. Sie können auf verschiedene Arten mit dem Router
verbinden:
• Push: Das Gerät fordert Sie auf, die Verbindungs-Taste an Ihrem Router zu betätigen. Das Radio scannt und
verbindet dann automatisch mit diesem Netzwerk.
• Pin: Das Radio generiert eine 8-stellige Pin. Geben Sie diese, falls möglich, über das Browser-Interface
Ihres Routers als freigegebenes Gerät ein. Konsultieren Sie die Bedienungsanleitung Ihres Routers für weitere Informationen zu diesem Thema.
• WPS: Geben Sie den Netzwerkschlüssel im Radio ein.
Page 9

9
Equalizer (Klangregelung)
Wählen Sie zwischen den Voreinstellungen Normal, Flat, Jazz, Rock, Movie, Classic, Pop und News oder stellen Sie die
Klangregelung mit den Reglern für Bass, Höhen und Loudness nach Ihren individuellen Wünschen ein.
Network (Netzwerk)
• Einstellungen anzeigen:
Zeigen Sie die Verbindungseigenschaften der aktuellen Netzwerkverbindung an (Aktive Verbindung, MAC Adresse, WLAN Region, DHCP, SSID, IP Adresse, Subnet Mask, Gateway, DNS (1 und 2)).
• WLAN Region:
Wählen Sie eine Region für optimale Verbindung aus (Europa, USA, Kanada, Spanien, Frankreich, Japan, Singapur,
Australien, Korea).
• Manuelle Einstellungen:
Stellen Sie eine kabelgebundene oder kabellose Verbindung her und aktivieren/deaktivieren Sie DHCP.
• Netzwerk-Prol:
Das Gerät speichert die letzten vier verbundenen Netzwerke. Hier können Sie diese einsehen und bei Bedarf löschen.
Language (Sprache)
Die voreingestellte Menüsprache ist Englisch. Wählen Sie die gewünschte alternative Menüsprache mit SCROLL/SELECT (4)
Factory Reset
Setzen Sie das Gerät in den Werkszustand zurück. Bitte beachten Sie: Alle Zeit-, Datum- und Netzwerk-Einstellungen
werden hierbei gelöscht, ebenso wie alle gespeicherten Sender.
Die aktuelle Firmware (die Software des Radios) ist hiervon nicht betroen.
Software Update
Von Zeit zu Zeit sind Software-Updates verfügbar. Sie können manuell danach suchen, oder einstellen, dass das Gerät
automatisch nach aktuellen Software-Updates ausschau hält. Falls eine neue Software-Version gefunden wird, werden
Sie zur Bestätigung des Downloads aufgefordert. Die Software wird automatisch installiert. Bestehende Einstellungen
und Presets bleiben erhalten.
Achtung: Unterbrechen Sie Software-Updates nicht, indem sie den Netzstecker ziehen oder den Router abschalten.
Dies kann zu Beeinträchtigungen des Geräts führen, so dass es im schlimmsten Fall nicht mehr funktionsfähig ist.
Info
Anzeige der aktuellen Firmware-Version sowie der Radio ID.
Page 10

10
Internet Radio
Empfangen Sie mit dem IR-140 tausende Radiosender sowie Podcasts von der ganzen Welt mit einem Breitband-Internet-Zugang. Sobald mit MODE oder SCROLL/SELECT (im Hauptmenü) das Internet Radio zum ersten Mal ausgewählt
wird (und die Internet-Verbindung bereits eingerichtet ist), verbindet sich das Gerät automatisch mit dem „Frontier
Silicon Internet Radio Portal“ und lädt eine Senderliste herunter.
Senderliste
• Stations (Sender)
Wählen Sie Sender anhand der verschiedenen Kategorien aus: Ort (Location), Genre, Popular (beliebt), New (neu).
Der Name sowie die Beschreibung des gewählten Senders wird jeweils angezeigt. Drücken Sie für darüber hinaus
gehende Informationen mehrfach INFO an der Gerätefront oder auf der Fernbedienung.
• Podcasts
Wählen Sie Podcasts nach Ort (Location) oder Genre aus. Eine weitere Möglichkeit bietet Ihnen das Suchfeld: Geben Sie hier Schlagwörter ein, um bestimmte Podcasts zu nden.
• My Favourites (Favoriten)
Ihre gespeicherten Favoriten sind werden online gespeichert (im Frontier Silicon Internet Radio Portal) und sind
daher von allen Internet-Radios abrufbar, mit denen Sie auf Ihren Account zugreifen.
Um einen Account auf dem Portal anzulegen
• Besuchen Sie www.wiradio-frontier.de.
• Registrieren Sie sich mit Ihrer EMail-Adresse, einem Passwort sowie der Radio ID und dem Access Code.
Die Radio ID nden Sie hier: Hauptmenü -> System Settings -> Info
Den Access Code erhalten Sie unter Internet Radio -> Senderliste -> Hilfe -> Access Code
Um einen gespielten Sender unter den Favoriten abzuspeichern, halten Sie SCROLL/SELECT gedrückt, bis „zu Favoriten hinzugefügt“ auf dem Display angezeigt wird.
• My Added Stations (Meine Sender)
Auch, wenn über das online Portal tausende Sender gefunden und gelistet werden können, mag es sein, dass Sie
einen bestimmten nicht gelisteten Sender hören möchten. Suchen sie diese über das Portal und fügen Sie sie Ihrer
Senderliste hinzu. Sie sind dann über Internet Radio -> Senderliste -> Meine Sender zu nden.
Presets (Senderspeicher)
Presets werden im Gerät lokal gespeichert und sind daher nicht von anderen Geräten einseh- oder abrufbar. Um einen
Sender auf einem Speicherplatz abzulegen, halten Sie MEMORY gedrückt, bis das Display den Speichern-Bildschirm
anzeigt. Wählen Sie mit SCROLL/SELECT (4) den gewünschten Speicherplatz und bestätigen Sie mit SELECT (4). Gehen Sie beim Speichern von Presets für FM- und DAB-Radio-Sender auf dieselbe Weise vor.
Music Player
Mit der Music Player Funktion können Sie Ihre Musik-Bibliothek vom Computer über das lokale Netzwerk streamen. Es
können MP3-, AAC-, WMA- sowie FLAC-Dateien gestreamt werden. Um dies zu ermöglichen, geben Sie die entsprechenden Ordner auf Ihrem Rechner im Netzwerk frei.
UPnP erlaubt Ihnen, die auf Ihrem Rechner gespeicherte Musik von einem externen Gerät wie dem IR-140 nach Kategorien zu durchsuchen oder zu ltern. Voraussetzung dafür sind durchgängig getaggte (mit ID3-Tag versehene) Dateien
und ein geeignetes Server-System, also zum Beispiel ein PC mit Windows Media Player 10 (oder höher). Folgen Sie
diesen Schritten:
• Vergewissern Sie sich, dass der PC sowie das Radio im selben Netzwerk angeschlossen und registriert sind.
• Önen Sie den Windows Media Player und fügen Sie die Dateien und Ordner zu der gewünschten Bibliothek hinzu.
• Aktivieren Sie Medienstreaming (Medienbibliothek -> Streamen -> Medienstreaming aktivieren).
• Stellen Sie sicher, dass das Radio Zugrisrechte hat, indem Sie es anwählen und „Erlauben“ klicken.
Page 11

11
• Das IR-140 kann nun Medieninhalte von Ihrem Rechner streamen. Der UPnP-Service läuft als Hintergrundprozess,
so dass der WMP gar nicht gestartet werden muss, um die Medienwiedergabe zu ermöglichen.
Um den Music Player aufzurufen, wählen Sie ihn mit
MODE oder SCROLL/SELECT (4) im Hauptmenü aus.
Wählen Sie im Music Player Untermenü Shared Me
-
dia und dann einen Computer mit geteilten Inhalten
aus der Liste verbundener UPnP-Geräte (falls Sie Medienstreaming auf mehreren Computern aktiviert haben).
Die Steuerung der Wiedergabe erfolgt über die konvetionellen Tasten , und , die Navigation über
die Pfeiltasten (auf der Fernbedienung) oder über SCROLL/SELECT (4) und BACK (10) an der Gerätefront.
USB Playback
Im Submenü des Music Players nden Sie des weiteren die Option USB Playback. Wählen Sie diese, um Medieninhalte von einem am Gerät angeschlossenen USB-Speichermedium (USB-Stick, Portable Festplatte, MP3-Player o.ä.)
abzuspielen. Die Steuerung und Navigation funktioniert wie gewohnt mit den konvetionellen Tasten
, und
, die Navigation über die Pfeiltasten (auf der Fernbedienung) oder über SCROLL/SELECT (4) und BACK (10) an der Gerätefront.
Prune Servers
Von Zeit zu Zeit kann es notwendig werden, nicht mehr erreichbare oder nicht empfangbare Server von der Serverliste
zu streichen. Dies erreichen Sie mit der Funktion Prune Servers. Wählen Sie YES zur bestätigung.
Repeat / Shule
Spielen Sie bestimmte Tracks in Endlosschleife (Repeat) oder spielen Sie Ordner oder Wiedergabelisten im Zufallsmodus (Shule) ab, indem Sie die jeweilig gewünschte Option mit „ON“ aktivieren.
DAB-Radio
Wählen Sie durch mehrfachen Druck auf MODE oder mit dem SCROLL/SELECT-Rad (4) den DAB-Modus aus, um digital
sendende Radiostationen zu empfangen.
Sendersuchlauf
• Wenn Sie den DAB-Modus zum ersten Mal aufrufen, ist die Senderliste noch leer. Das Gerät startet automatisch
einen Sendersuchlauf und zeigt anschließend die Liste gefundener Sender an. Sollte diese Liste Ihrer Meinung
nach nicht vollständig sein, überprüfen Sie bitte, ob der Empfang zu verbessern ist oder ob einige gewünschte
DAB-Sender evtl. lediglich eine begrenzte tägliche Sendezeit haben.
• Führen Sie für diese Fälle einen erneuten Sendersuchlauf aus, indem Sie im DAB-Menü Manual Tune wählen.
Senderwahl und -speicher
• Um den Sender Ihrer Wahl zu spielen, wählen Sie diesen mit SCROLL/SELECT (4) aus. Infos zum Sender und wei-
terführende Infos zum Programm können Sie auf dem Display anzeigen lassen, indem Sie mehrfach INFO auf der
Gerätefront oder der Fernbedienung drücken.
• Verfahren Sie zum Speichern und Abrufen von Sendern analog zur im Abschnitt „Internet Radio“ vorgestellten
Vorgehensweise.
Page 12

12
Weitere Einstellungen
• Prune Invalid
Von Zeit zu Zeit kann es notwendig werden, nicht mehr erreichbare oder nicht empfangbare Sender von der Senderliste zu streichen. Dies erreichen Sie mit der Funktion Prune Invalid. Wählen Sie YES zur bestätigung.
• Manuelle Sendersuche
Wählen Sie MENU -> Manuelle Sendersuche. Drehen Sie SCROLL/SELECT (4), um durch das DAB-Frequenzband
zu blättern.
• DRC (Dynamic Range Compression)
Die automatische Klangkompression kann in geräuschvollen Umgebungen nützlich sein. Schalten Sie sie ein, damit leise Klänge angehoben und besonders laute Spitzen abgesenkt werden.
• Station Order (Sender-Reihenfolge)
Sie können mit dieser Option aussuchen in welcher Reihenfolge DAB-Sender angezeigt werden sollen (z.B.: alphanumerisch).
FM-Radio
Wählen Sie den FM-Modus mit mehrfachem Druck auf MODE oder mit SCROLL/SELECT. Halten Sie oder gedrückt, um zum nächsten empfangbaren Sender in der entsprechenden Richtung (das Frequenzband hinauf/herab) zu
springen.
Auf 10 verfügbaren Speicherplätzen (Presets) können Sie Sender ablegen. Verfahren Sie dazu analog zu der unter „Internet Radio“ (S. 10) vorgestellten Weise.
Weitere Einstellungen
• Scan Optionen: Wählen Sie hier die Empndlichkeit beim automatischen Sendersuchlauf aus. Bei hoher Empnd-
lichkeit werden auch Sender mit schwachem Signal (Rauschen) gefunden.
• Audio Einstellungen: Wählen Sie zwischen Mono und Stereo (bei schwachem Empfang kann die Mono-Option
u.U. ein geringeres Rauschen und somit ein angenehmeres Hören ermöglichen).
AUX
Verbinden Sie einen externen Musik- oder Medienplayer (CD-/MP3-Player, Smartphone, Laptop, Computer oder ähnliches) per 3,5mm-Audiokabel mit dem Aux-Eingang des IR-140.
Nutzen Sie den externen Player wie gewohnt. Achten Sie darauf, dass an diesem die Lautstärke hoch genug eingestellt
ist.
Wählen Sie den AUX-Modus mit mehrfachem Druck auf MODE oder mit SCROLL/SELECT.
Wecker (Alarm) und Sleep-Timer
Der IR-140 stellt zwei voneinander unabhängige Alarme mit Snooze-Funktion zur Verfügung. Um den Wecker zu stellen
/ einzustellen
• Wählen Sie ALARM 1 oder ALARM 2 über das Hauptmenü aus oder drücken Sie ALARM auf der Fernbedienung.
• Stellen Sie die folgenden Parameter ein:
• Enable / Aktiv: Aus, Täglich, Einmal, an Wochenenden, an Wochentagen
• Zeit: HH:MM
• Weck-Modus: Buzzer (Piepton), Internet Radio, DAB, FM
• Preset: Zuletzt gehört oder Preset 1-10
• Lautstärke: 0 - 32
• Um die neue Einstellung zu speichern und zu aktivieren, blättern Sie mit SCROLL/SELECT ans Ende des Menüs und
wählen Sie SAVE. Die aktiven Alarme werden als Icons in der linken unteren Display-Ecke angezeigt.
Page 13

13
Sleep-Timer
Drücken Sie den SLEEP-Taster mehrfach, um den Sleep-Timer einzustellen. Die einstellbaren Schritte sind 15min 30min - 45min - 60min - 75min - 90min.
Nach der entsprechenden Zeit schaltet sich das Gerät automatisch ab und in den Standby-Modus. Eingestellte Wecker
bleiben aktiv.
Kopfhörer
Auf der Rückseite des Geräts nden Sie den Anschluss für einen Kopfhörer. Sie können einen solchen mit einem handelsüblichen 3,5mm-Klinke-Audiokabel am Gerät anschließen. Die integrierten Lautsprecher werden in dem Moment
abgeschaltet.
Achtung: Achten Sie auf eine Nutzung mit ungefährlicher Lautstärke. Beachten Sie, dass man sich mit der Zeit an hohe
Lautstärke gewöhnen kann und diese dann als normal wahrnimmt, dies aber schädigend für Ihr Gehör sein kann. Das
zu lange und zu laute Hören mit Kopfhörern kann zu dauerhaftem und irreparablem Gehörverlust führen.
Hinweise zur Entsorgung
Elektroaltgeräte
Bendet sich die diese Abbildung (durchgestrichene Mülltonne auf Rädern) auf dem Produkt, gilt
die Europäische Richtlinie 2002/96/EG. Diese Produkte dürfen nicht mit dem normalen Hausmüll entsorgt werden. Informieren Sie sich über die örtlichen Regelungen zur getrennten Sammlung elektrischer und elektronischer Gerätschaften. Richten Sie sich nach den örtlichen Regelungen und entsorgen Sie Altgeräte nicht über den Hausmüll. Durch die regelkonforme Entsorgung
der Altgeräte werden Umwelt und die Gesundheit ihrer Mitmenschen vor möglichen negativen
Konsequenzen geschützt. Materialrecycling hilft, den Verbrauch von Rohstoen zu verringern.
Konformitätserklärung
Der Hersteller dieses Produktes ist die CHAL-TEC Vertriebs- + Handels GmbH, Wallstraße 16, 10179
Berlin.
Dieses Produkt entspricht den folgenden Europäischen Richtlinien:
1999/05/EG (R&TTE)
2011/65/EG (RoHS)
Page 14

14
Dear Customer,
Congratulations on purchasing this product. Please read and follow these instructions, in order to avoid damaging
the item. We do not cover any damages that may arise from improper use of the item or the disregard of the safety
instructions.
Important Safety Instructions
• Read all instructions before using.
• Do not place on or near a hot gas or electric burner or in a heated oven.
• To protect against a re, electric shock or personal injury, do not immerse cord, electric plugs or device in water
or other liquids.
• Do not expose the appliance to extreme temperatures. The appliance shall be used in moderate climates.
• Disconnect the appliance from the power source if it is not going to be used for a long time, if there is a thunder-
storm or if it isn‘t working properly.
• The use of attachments that are not recommended by the appliance manufacturer may result in re, electric shock
or personal injury.
• Do not open the unit by removing any cover parts. Do not attempt to repair the unit. Any repairs or servicing should
be done by qualied personell only.
• Only qualied persons may perform technical work on the product. The product may not be opened or changed.
The components cannot be serviced by the user. The manufacturer is not responsible for any radio or TV interference caused by unauthorized modications.
• The appliance is not a toy. Do not let children play with it. Never let children insert foreign objects into the appli-
ance.
• Do not use the appliance for other than intended use. This appliance has been designed solely for domestic use;
the manufacturer‘s liability shall not be engaged in the event of any professional use, by any misuse or by any use
not complying with the operating instructions.
• Before turning on the power for the rst time, make sure that the power cord is properly installed and the voltage
switch is correctly set.
• Never clean the surface of the device with solvents, paint thinners, cleansers or other chemical products. Instead,
use a soft, dry cloth or soft brush.
• Save these instructions.
Controls
Front
Page 15

15
Speaker 1 7 MEMORY
Power On / O
2 8 MODE
Display 3 9 INFO
SCROLL / SELECT 4 10 BACK
VOL+ 5 11 MENU
IR Sensor 6 12 VOL-
Rear:
Antenna 13 16 USB-Port
Headphone Jack 14 17 Network Port (RJ45)
AUX-IN 15 18 DC IN
Remote Control:
Power On / O
1 10 MODE
MENU 2 11 INFO
3 12 SLEEP / SNOOZE
4 13
5 14 SELECT
6 15
7 16 ALARM
MUTE 8 17 MEMORY
VOL- 9 18 VOL+
Page 16

16
Remote Sensor
To operate the unit with the remote control, point the remote at the Remote Sensor on the front of the main unit and
press the appropriate button. The remote control has an eective operating range of approximately 20 feet and an
angle of no more than 30°.
NOTE: Bright sunlight may interfere with the operation of the remote control.
Exchanging The Battery
• Press the battery compartment gently ac-
cording to the direction indicated in the
illustration.
• Slide to open the battery compartment.
• Insert the supplied CR2032 battery into
the compartment according to the polarity markings („+“ and „-“) inside the compartment and on the battery. Replace the
battery compartment until it clicks.
Battery Precautions
• Warning -Danger of explosion if battery is incorrectly replaced. Replace only with the same or equivalent type.
• Use only the size and type of battery specied.
• Be sure to follow the correct polarity when installing the battery as indicated in the Battery Compartment. A rever-
sed battery may cause damage to the device.
• If the device is not to be used for a long period of time, remove the battery to prevent damage or injury from pos-
sible battery leakage.
• Do not try to recharge a battery not intended to be recharged; it can overheat and rupture. (Follow battery
manufacturer‘s directions.)
• Battery shall not be exposed to excessive heat such as sunshine, re or the like.
Summary of Controls (Unit & RC)
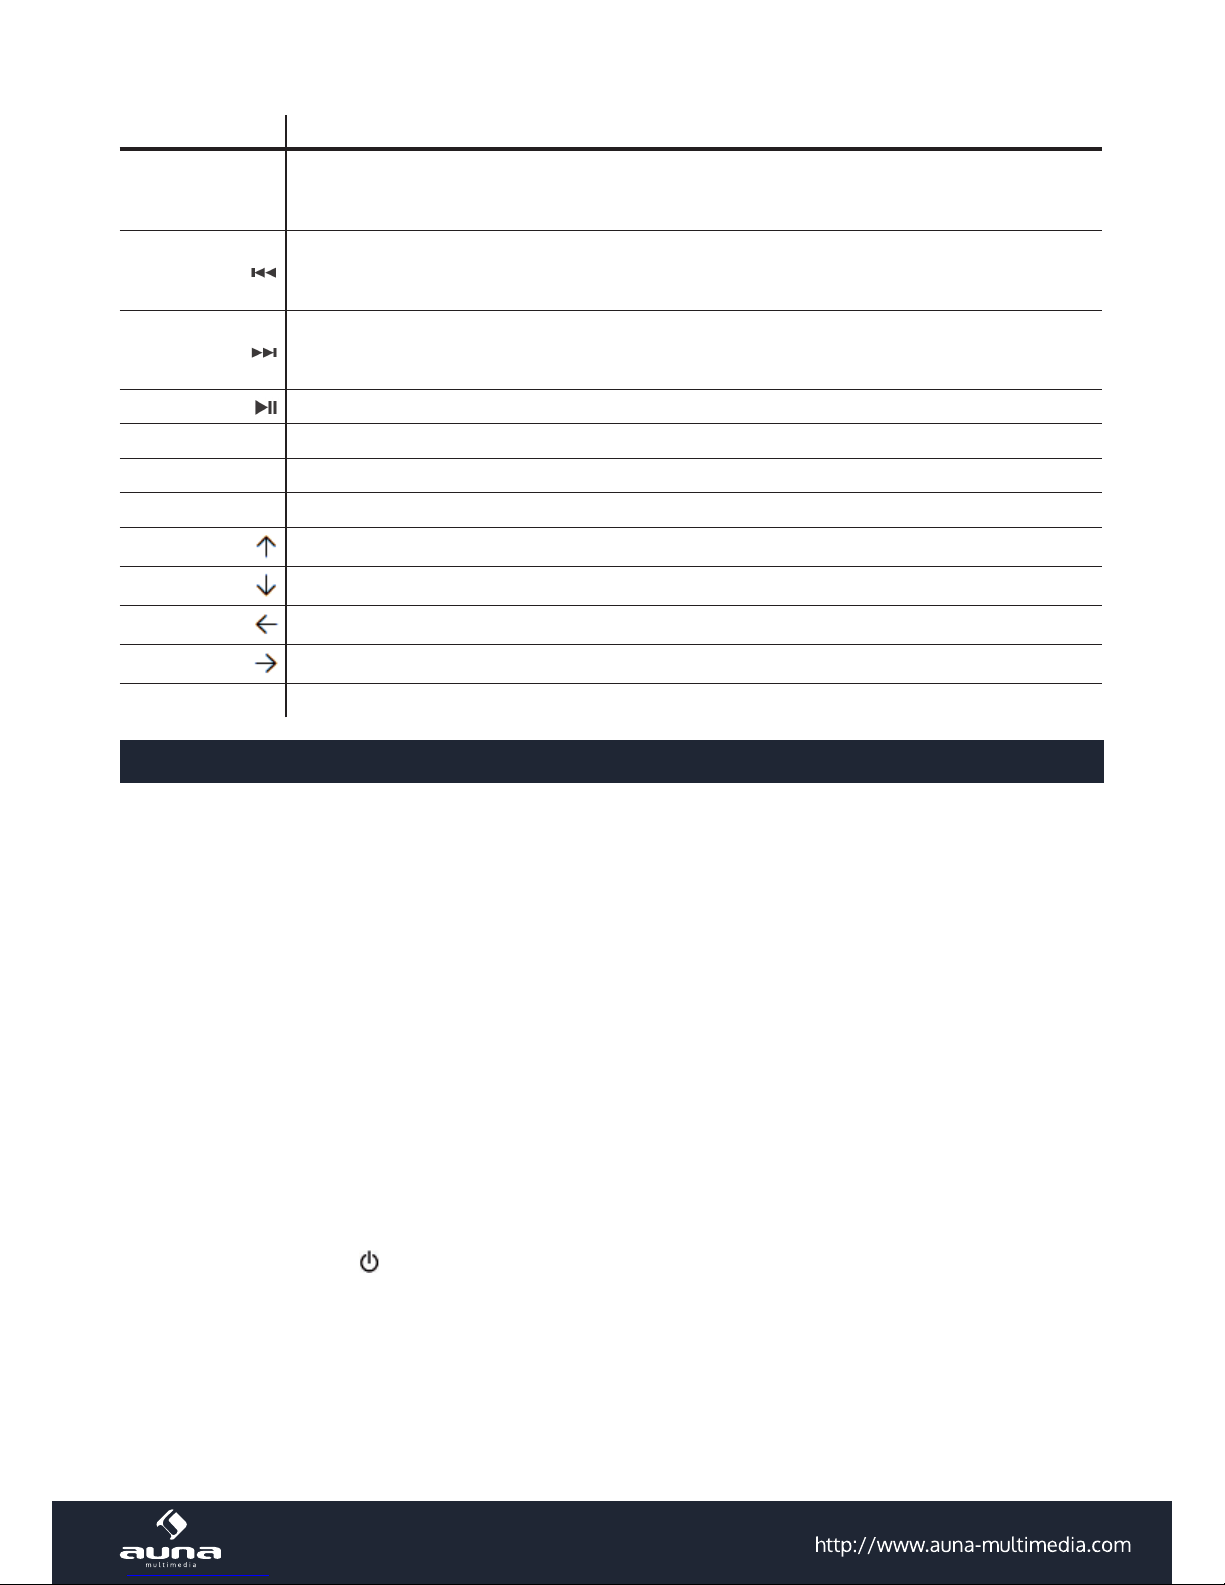
Button Function
Press to turn on or back to standby mode(showing clock and date).
MODE Press to cycle through the modes: Internet radio, Music player, DAB radio, FM radio, Aux in.
INFO
Press to view more information about the station or track playing. Press again to cycle through
further information screens then return to the normal Now playing screen.
MENU Press to show menu for the current mode. Press again to show Now playing screen.
BACK
Press to return to previous screen. In play mode, this button may be used to return to the last
track list or station list.
ALARM
Press to enter alarm wizard, turn o alarm(when alarm is sounding) and toggles between alarms
in standby.
Page 17

17
Button Function
SLEEP/SNOOZE
When playing, standby after a set time.
When alarm is sounding, snooze for a set time.
MEMORY
Press for the Preset recall/Save menu, Scroll up/down to select the preset number then press
Select to conrm.
SCROLL/SELECT
On unit, Turn to scroll through a menu or station list. The chosen option is highlighted in reverse
text(white characters on a dark background). Press to select.
Press to previous track or hold to scan down/rewind.
Press to next track or hold to scan up/fast forward.
Play / Pause
VOL- Decrease volume
VOL+ Increase Volume
MUTE Mute audio output
Press to scroll up through a menu or station list.
Press to scroll down through a menu or station list.
Press to scroll back.
Press to scroll forward.
SELECT Select the chosen option.
Setup & Connections
Mains Connection
• Connect the AC power cord to the unit via the AC socket at the back.
• Plug the AC power cord to the AC mains outlet.
Wired Network Connection
• Check rst of all whether the control lamps (LINK/ACT) of your LAN connection or your router light up.
• Use an Ethernet cable with RJ45 connector to connect the NETWORK socket of the radio with the LAN port of your
router.
• Proceed for the operation as described in the below “GETTING STARTED”. But no need to run through the setup
wizard Note:Information on the LAN connection can be obtained from the user manual of the router manufacturer.
Wireless Network Connection
• Check rst of all whether the control lamps (LINK/ACT) of your WLAN connection or your router light up.
• Proceed for the operation as described in the below “GETTING STARTED”. It is highly recommended to run through
the setup wizard in the system settings section.
• Note:Information on the WLAN/WiFi network connection can be obtained from the user manual of the router ma-
nufacturer. Walls or other obstacles may inuence the WiFi range. Try to nd the best location to avoid interruption
and interference while operating.
Press the POWER button once to switch on the radio, the display will show the main menu. To go to a function or open
a sub-menu, rotate the SELECT control followed by pressing on it to conrm. Each function is selected via a menu
consisting of several levels.
Page 18

18
Getting Started
Main menu
The following modes can be selected in the main menu: Internet radio, Music player, DAB radio, FM radio, AUX in,
Sleep, Alarms, System settings. To select your desired function, rotate the SELECT control followed by pressing on it
to conrm.
System settings
Set up wizard
The setup wizard is available in the system settings section, you can run through this to congure settings for date/
time and network, once this has nished, your radio is ready to use. Note: No need to run through the setup wizard if
a wired network is used.
• 12/24 hour display
To select your preference between 12 or 24 hour clock display format - rotate the SELECT control followed by
pressing on it to conrm.
• Time/Date
The time and date can be manually set or automatically via the network, DAB or FM.
Auto update
The auto update works with data sent over DAB, FM or the Internet. The clock is only updated when in a corresponding mode, so it is recommended to select a mode that you use regularly.
• Select auto update from DAB, FM or Network.
• Select the appropriate time zone if the auto update is done by the Internet.
• If your country uses daylight saving, the automatically update time may be wrong by one hour. Set th daylight
savings to ON when daylight savings are in eect.
Manual set
• If “No update” is selected, the wizard will prompt you to set the time and date manually. The date and time are
displayed in dd-mm-yyyy and hh:mm AM/PM format.
• The value to be set will ash, rotate the SELECT control to adjus the value followed by pressing on it to go for
the next setting, rs set the date then nally the time.
• Network
The unit is compatible to all standard network protocols and encryption methods, including Wi-Fi Protected Setup
(WPS). In case of an unencrypted network, the unit will automatically establish connection and no further settings
are necessary.
Standard encrypted network
• To enter the network key (password), rotate the SELECT control to move the cursor through the characters to
be selected and press on it to conrm.
• The key that is entered will be displayed in the upper part of the display.
WPS-encrypted network
WPS-encrypted networks are identied by their network names as soon as the unit starts searching for available
network connection. Select one of the following connection methods:
• Push button: The radio prompts you to press the connection button on the router, it then scans for a corre-
sponding network and establishes the connection.
• Pin (code number): The radio generates an 8-digit code number. Enter this code number into the wireless
router or access device.
• WPS: Enter the network key for a standard encrypted network.
Page 19

19
Note: Additional information on setting up the WPS-encrypted networks can be obtained in the user manual of
your WPS router.
Completion
The radio establishes connection with the selected network. If connection is failed, the radio returns to the previous display and prompts you to retry. If an existing network connection is lost, it would automatically attempt to
retry for reconnection.
• Equaliser
Several preset EQ modes are available: Normal, Flat, Jazz, Rock, Movie, Classic, Pop, News.
In addition, user-dened settings are possible you can set up the equalizer with bass, treble and loudness according to your personal taste.
• Network
• View settings: You can check the following information on the currently connected network: Active connec-
tion, MAC address, WLAN region, DHCP.SSID, IP address, subnet mask, gateway address, rst and second
DNS.
• WLAN region: Select a WLAN region for optimal WLAN connectivity: Most of Europe, USA, Canada, Spain,
France, Japan, Singapore, Australia, Republic of Korea.
• Manual settings: Select either a wireless or wired connection and activate/deactivate DHCP.
• Network prole: The radio stores the last four wireless networks that were connected and attempts each time
to reconnect to one of them. You can view a list of the registered networks. From here you can delete unwanted networks by turning the SELECT control followed by pressing on it to conrm delete.
• Language
The default language is English. To select other languages, rotate the SELECT control followed by pressing on it
to conrm.
• Factory reset
Perform a factory reset returns the unit to factory settings. All manual settings such as time, date, network conguration and presets are deleted.
The radio‘s current software version is not aected and remains as it was registered in the Internet-Radio- Portal.
Favourites in the Internet radio remain until newly registered with another account in the Internet portal.
• Software update
Software updates are made available from time to time. You can either check manually or let the radio to check automatically. If a new software version is found, the radio prompts you to conrm. The new software will be downloaded and installed upon getting your conrmation. User settings are maintained. Note: Before downloading
software, ensure that the radio is plugged into a stable mains power connection. Interrupting the mains supply
during a software download can lead to functional disturbances and/or damage to the unit!
• Info
Displays the rmware version and the Radio ID
Internet Radio
This radio can play thousands of radio stations and podcasts from all over the world via a broadband internet connection. When the Internet Radio mode is selected, the radio connects with the Frontier Silicon Internet radio portal to
download a list of stations. Once a station is selected, the radio will connect directly to that station.
To enter Internet Radio mode, either press MODE until the display shows “Internet radio” or select “Internet radio” in
the main menu by the use of the SELECT control.
Note: The station list menu is provided from the Internet radio portal, so it is only accessible when the radio is connected to the Internet. Station lists and submenus may change from time to time.
Page 20

20
Last listened
When Internet radio is restarted, a list of the last-listened stations is automatically selected. For a list of stations that
are occasionally selected, active the “Station list” function. These stations then appear at the beginning of the list.
Station list
• Stations
Select the stations from various categories in the menu: Location, Genre, Popular, New. You can also search stations using various keywords. The name and a description of the current station is displayed when it is tuned. To
view further information, press the INFO button upon each press, another set of information is displayed cycling
through name/description, genre/location, reliability, codec/sampling rate, playback buer and current date.
• Podcasts
Select podcasts from the categories in the menu: Location, Genre. You can also select a particular episode by entering keywords to search podcasts.
• My favourites
Favourites are stored in the Internet radio portal and are available to all Internet radios that are registered with the
same account. You must register the radio in the Internet radio portal before making use of the favourites.
To register you radio with the portal, rst get your radio‘s unique portal access code.
To get the access code, go to the “Station list>Help>Get access code” menu. Then write down the access code.
Visit the portal website at www.wiradio-frontier.com.
Register yourself to obtain an account by entering the following information: Access code, Email address, Password, Wi-Fi radio model or Radio ID (optional).
Note: The Radio ID is a combination of numbers and letters and is permanently assigned to this radio, it is displayed in the menu of the “Internet radio” function under “>System settings> Info>”.
To store a playing station as a favourite, press and hold the SELECT control until the display shows “Favourite added”. The station will then appear in the list of favourites.
• My added stations
Even though the Internet radio portal contains thousands of stations, you may want to listen to stations not listed.
You can add your own stations via the portal. These added stations are accessible by selecting “Station list>My
added stations>[Station]”
Presets
Presets are stored in the radio and cannot be accessed from other radios. To store an Internet radio preset, press and
hold the MEMORY button until the display shows the “Save to Preset” screen. Select one of the 10 presets to store the
current station.
To select a preset, press the MEMORY button once, then select one of the listed preset stations. When a preset station
is playing, “Pn” (P1, P2 etc…) will appear in the lower part of the display. Note: Operation of presets is identical for
Internet radio, DAB and FM.
Music Player
The Music Player mode plays audio les such as MP3s, AACs, WMAs or FLACs from a computer on the local network. In
order for the radio to play music les from a computer, the computer must be set up to share les or media.
UPnP media sharing allows devices like you radio to play music from a shared media library, navigating through tag
menus such as Artist, Album or Genre. If you are running a suitable server system such as a PC with Windows Media
Player 10 or later (WMP), and you music library is well-tagged, then it is recommended to use media sharing. Only the
UPnP server needs to be set up. To set up WMP for media sharing, perform the following steps:
Page 21

21
• Ensure that the PC is connected to the network.
• Ensure that the radio is powered on and connected to the same network.
• In WMP, add to the media library the audio les and folders you want to share with your radio. (Library>add to
Library…).
• In WMP, enable media sharing (Library>Media sharing…).
• Make sure that the radio has access to the shared media by selecting it and clicking “ALLOW”. You can also set a
name for the shared media in “Settings…”. Click “OK” to close the dialogue boxes.
• The PC is now ready to stream the music to the radio, The WMP UPnP service runs in the background; there is no
need to start WMP explicitly.
To enter Music Player mode, either press MODE until the display shows “Music player” or select “Music player” in the
main menu by the use of the SELECT control.
Press the BACK button to quickly move back to the previous menu during playback of a title. Press the arrow buttons
to select the previous or next track. Press and hold the rev/w buttons to rewind or fast forward. Press PLAY/PAUSE
to interrupt playback or resume playback.
The name of the track/title and the artist is displayed during playback. A progress bar indicating the elapsed and total
playing time is also displayed. An icon in the lower part of the display indicates the selected resource. To view further
information, press the INFO button - upon each press, another set of information is displayed cycling through track or
title//artist/progress/track or title duration, album, codec/sampling rate, playback buer and current date.
Shared media
If you have set up shared media, you should see an entry consisting of <computer name>: <Shared media name>. If
you have more than one computer sharing media, the alternatives are listed. Select the shared media you want to play.
From this point on, the shared les menus are generated by the server. The rst menu shows a list of media types, e.g.
music, videos, images and playlists. The radio can playback titles from music and playlist sections.
There is a also search function for nding tracks or titles which is similar to the Internet radio search. For music, a large
number of options is available for selecting tracks or titles which including genre, artist, album, composer and rating.
Once you have located a track you want to play, press on the SELECT control.
USB Playback
• Insert the USB into the port at the rear. „USB disk attached-open folder? (Yes or No) - Select “Yes”.
• Select your music, then press select button to playback.
• Select „Music player“ mode.
• Select “USB playback”
• Select your music, then press select button to playback.
Prune servers
From time to time it may be necessary to remove servers displaying question marks in front of the server name from
the server list. To perform this function, go to the “Prune servers” section and select YES.
Repeat/Shule
You can repeat tracks or play them in random order by selecting “Repeat play” or “Shule play” to “On”.
Page 22

22
DAB Radio
DAB radio mode receives DAB/DAB+ digital radio and displays information about the station, stream and track
playing.
To enter DAB mode, either press MODE until the display shows “DAB radio” or select “DAB radio” in the main menu
by the use of the SELECT control.
Scanning for stations
The rst time you select DAB radio mode, or the station list is empty, the radio will automatically performs a full scan
to see what stations are available. You may also need to run a scan manually to update the list of stations for the following reasons:
• Available stations might change from time to time.
• If the reception is not good for the original scan, this may result in an empty or incomplete list of available stations.
Once the scan is completed, the radio shows a list of available stations.
Selecting stations
To listen or change a station, rotate the SELECT control followed by pressing on it to conrm. The information of the
station selected will be displayed.
To view further information, press the INFO button - upon each press, another set of information is displayed cycling
through DLS text, programme type, ensemble name/frequency, signal strength/error rate, bit rate/codec/channels
and current date.
Presets
To store a DAB preset, press and hold the MEMORY button until the display shows the “Save to Preset” screen. Select
one of the 10 presets to store the current station.
To select a preset, press the MEMORY button once, then select one of the listed preset stations. When a preset station
is playing, “Pn” (P1, P2 etc…) will appear in the lower part of the display.
Other Settings
• Prune invalid
To remove stations that are listed but unavailable, press the MENU button and select “Prune invalid>[YES]”
by the use of the SELECT control.
• Manual tune
• To select manual tune, press the MENU button and select “Manual tune”.
• Rotate the SELECT control to move through the DAB channels, the display will show “5A to 13F” and their as-
sociated frequencies.
• When your desired frequency appears in the display, press on the SELECT control to conrm.
• DRC (Dynamic range compression)
If you are listening to music with high dynamic range in a noisy environment, you may wish to compress the audio
dynamic range. To change DRC, press the MENU button then enter into the “DRC” section, and select DRC high,
low, or o by the use of the SELECT control.
• Station order
You can choose the order of the DAB station list to be either alphanumeric, ensemble or valid. To change station
order, press the MENU button then enter into the “Station order” section, and select Alphanumeric, Ensemble or
Valid by the use of the SELECT control.
FM Radio
FM radio mode receives analogue radio from the FM band and displays RDS information about the station if
available.
To enter FM mode, either press MODE until the display shows “FM radio” or select “FM radio” in the main menu by the
use of the SELECT control.
Page 23

23
Selecting stations
To search for a station, press on the SELECT control once, the radio will start to scan up the frequency band, and it will
stop automatically once a station has been found. Alternatively, you can also press and hold NEXT/PREVIOUS buttons
to scan up or down the frequency band. To tune manually, rotate the select control for your desired frequency.
Presets
To store a FM preset, press and hold the MEMORY button until the display shows the “Save to Preset” screen. Select
one of the 10 presets to store the current station.
To select a preset, press the MEMORY button once, then select one of the listed preset stations. When a preset station
is playing, “Pn” (P1, P2 etc…) will appear in the lower part of the display.
Display information
While the radio is playing, the frequency will be displayed, and if RDS information is available, station name and any
further RDS information such as programme name, track title and contact details can be displayed. Stereo broadcasts
are indicated with an icon at the top of the screen. To view further information about the broadcast, press the INFO
button.
Other Settings
• Scan settings
FM scan is defaulted to stop at any available station, this would result the poor reception from weak stations. To
change the scan settings to stop only at stations with good signal strength, press the MENU button then enter into
the “Scan setting” section and select YES by the use of the SELECT control.
• Audio settings
• The radio will automatically switch between FM stereo and mono reception, but you can override this and
switch this function manually which is helpful for poor signal reception.
• To select listening in mono, press the MENU button then enter into the “Audio setting” section and select YES
by the use of the SELECT control.
Note: During FM stereo reception, the received L/R stereo sound will be automatically combined to one single
channel to suit the single speaker design of this radio.
AUX in
AUX in mode plays audio from an external audio source such as MP3 player. To play audio with Aux in mode:
• Decrease the volume level on both the radio and the audio source device.
• Connect the external audio source to the AUX IN (3.5mm) stereo socket.
• Either press MODE until the display shows “AUX in” or select “AUX in” in the main menu by the use of the SELECT
control.
• Set the desired volume on the radio and the external audio device if necessary.
Note: To further enhance energy saving, unit will go into standby mode after about 15 minutes from Aux in mode if
without signal input .
Alarms & Sleep Timer
Alarms
There are two wake-up alarms with snooze function and one sleep function to turn the radio o after a set period. Each
alarm can be set to start in a particular mode. To set or change an alarm:
• Select either Alarm 1 or 2 in the main menu or press the ALARM button on the remote control.
• Select the Alarm number (1 or 2) and set the following parameters:
Page 24

24
Enable: O, Daily, Once, Weekends, Weekdays
Time:
Mode: Buzzer, Internet radio, DAB, FM
Preset: Last listened or 1-10
Volume: 0-32
• To activate the new settings, scroll down the menu using the SELECT control and select “Save”. Th display will
show the active alarms with an icon at the bottom left.
• The alarm will be triggered at the preset time. To temporarily silence it, press the SNOOZE button. The Radio will
switch to standby for the set period, and the silenced alarm icon ashes in the display.
• During alarm, you can change the snooze period by repeatedly pressing on the SNOOZE button.
Sleep
To activate the sleep function, either select it in the main menu by the use of the SELECT control or repeatedly pressing
on the SLEEP button. The display will show the sleep time and you can choose from: Sleep O, 15, 30, 45, 60, 75, 90
minutes. Once the sleep time has been set, it will return to the main menu.
Headphones
A 3.5mm type stereo headphone jack is located at the back of the unit. Connect a set of stereo headphones (not included) to this jack for private listening without disturbing others. The speakers are automatically disconnected when the
headphones are in use.
IMPORTANT: When using headphones always set the volume to a low level before you put the headphones on. Then
insert the headphones and gradually increase the volume to a comfortable listening level.
Environment Concerns
According to the European waste regulation 2002/96/EG this symbol on the product or on its
packaging indicates that this product may not be treated as household waste. Instead it should be
taken to the appropriate collection point for the recycling of electrical and electronic equipment.
By ensuring this product is disposed of correctly, you will hep prevent potential negative consequences for the environment and human health, which could otherwise be caused by inappropriate waste handling of this product. For more detailled information about recycling of this product,
please contact your local council or your household waste disposial service.
Declaration of Conformity
Producer: CHAL-TEC Vertriebs- + Handels GmbH, Wallstraße 16, 10179 Berlin.
This product is conform to the following European directives:
1999/05/EC (R&TTE)
2011/65/EC (RoHS)
 Loading...