

Page 1
IR-120
Internet-Radio / UPnP & DLNA Media Player
10032046 10032047
http://www.auna-multimedia.com
Page 2

Sehr geehrter Kunde,
zunächst möchten wir Ihnen zum Erwerb Ihres Gerätes gratulieren.
Bitte lesen Sie die folgenden Anschluss- und Anwendungshinweise sorgfältig durch und befolgen Sie diese um möglichen technischen Schäden vorzubeugen.
Technische Daten
Artikelnummer 10032046, 10032047
Stromzufuhr Netzteil
Netzwerk-Prol und Verschlüsselung IEEE802.11b/g/n; WEP/WPA/WPA2,WPS
Streaming UPnP, DLNA
Unterstütze Dateiformate WMA, MP3, WAV; AAC
(Eingang: 100-240 V~ 50/60 Hz, 0,3 A max.
Ausgang: 5 V, 1 A)
Sicherheitshinweise
Zur Reduzierung der Gefahr von Brand, elektrischem Schlag und Beschädigung:
• Setzen Sie dieses Gerät nicht dem Regen aus.
• Stellen Sie keine mit Flüssigkeiten gefüllten Gefäße, wie Vasen, auf dieses Gerät.
• Verwenden Sie ausschließlich vom Hersteller empfohlenes Zubehör.
• Reparieren Sie dieses Gerät nicht selbst. Wenden Sie sich zur Wartung an qualiziertes Kundendienstpersonal.
• Lassen Sie keine Gegenstände aus Metall in dieses Gerät fallen.
• Stellen Sie keine schweren Gegenstände auf dieses Gerät.
• Blockieren Sie keine Belüftungsönungen.
• Installieren Sie die Geräte nicht in unmittelbarer Nähe von Hitzequellen wie Heizungen, Herden, Öfen oder ande-
ren heiß werdenden Geräten (wie z. B. Verstärkern o. a.)
• Stellen Sie vor Inbetriebnahme sicher, dass die Spannungsversorgung der auf dem Gerät angegebenen entspricht.
• Trennen Sie die Netzverbindung bei Stürmen und Gewitter, wenn das Gerät längere Zeit nicht in Benutzung ist
oder wenn Sie die Wohnung verlassen.
• Dieses Gerät ist kein Spielzeug. Kinder sollten es nur unter Aufsicht benutzen und auf keinen Fall Gegenstände in
Belüftungsönungen stecken.
Aufstellung
• Achtung - Stellen Sie keine Quellen oener Flammen, z. B. brennende Kerzen, auf das Gerät.
• Stellen Sie das Gerät auf eine trockene, ebene, wasserfeste und hitzebeständige Oberäche.
• Suchen Sie einen Aufstellort, an dem Kinder nicht an das Gerät gelangen können.
• Die Steckdose muss leicht zugänglich sein, um im Notfall das Gerät schnell vom Stromkreis trennen zu können.
• Installieren oder positionieren Sie dieses Gerät nicht in einem Bücherregal, Einbauschrank oder einem sonstigen
engen Raum. Stellen Sie eine gute Belüftung des Gerätes sicher.
• Stellen Sie das Gerät nicht auf Verstärker oder andere Geräte, die heiß werden können. Diese Hitze könnte das
Gerät beschädigen.
• Setzen Sie dieses Gerät keinen übermäßigen Erschütterungen aus.
Kleine Objekte/Verpackungsteile
Bewahren Sie kleine Objekte (z. B. Schrauben und anderes Montagematerial, Speicherkarten) und Verpackungsteile außerhalb der Reichweite von Kindern auf, damit sie nicht von diesen verschluckt
2
Page 3
werden können. Lassen Sie kleine Kinder nicht mit Folie spielen. Es besteht Erstickungsgefahr!-Transport des Gerätes
Bitte bewahren Sie die Originalverpackung auf. Um einen ausreichender Schutz beim Transport des Gerätes zu erreichen,
verpacken Sie das Gerät in der Originalverpackung.
Reinigung der äußeren Oberfläche
Verwenden Sie keine üchtigen Flüssigkeiten, wie Insektensprays. Durch zu starken Druck beim
Abwischen können die Oberächen beschädigt werden. Gummi- oder Plastikteile sollten nicht über einen längeren
Zeitraum mit dem Gerät in Kontakt sein. Nutzen Sie ein trockenes Tuch
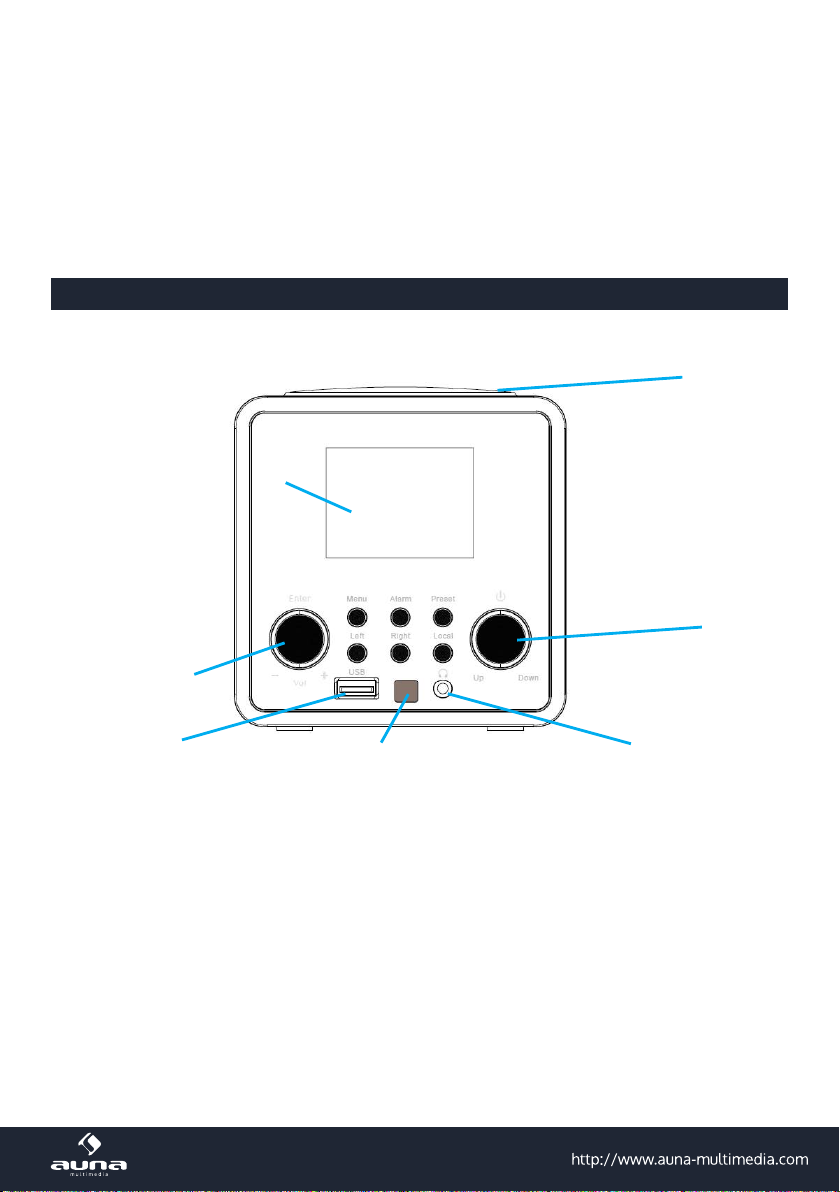
Bedienelemente
Front
1
7
6
5
1 Lautsprecher
2 Ein - Aus / hoch - runter
3 Kopfhöreranschluss
4 Infrarotempfänger
5 USB-Anschluss
6 Enter (Eingabe) / Lautstärkeregler
Bestätigungstaste/ Lautstärke hoch- und runterregeln
7 Display
2,4-Zoll-Bildschirm
8 Menü
Zum Önen des Hauptemenüs
9 Alarm
Zum Einstellen des Weckers
10 Preset
Senderspeicher
8
9
11 12 13
4
11 Left (links)
12 Right (rechts)
13 Local
10
voriges / zurück
nächstes / vor
Einstelungen für das Lokalradio
2
3
3
Page 4
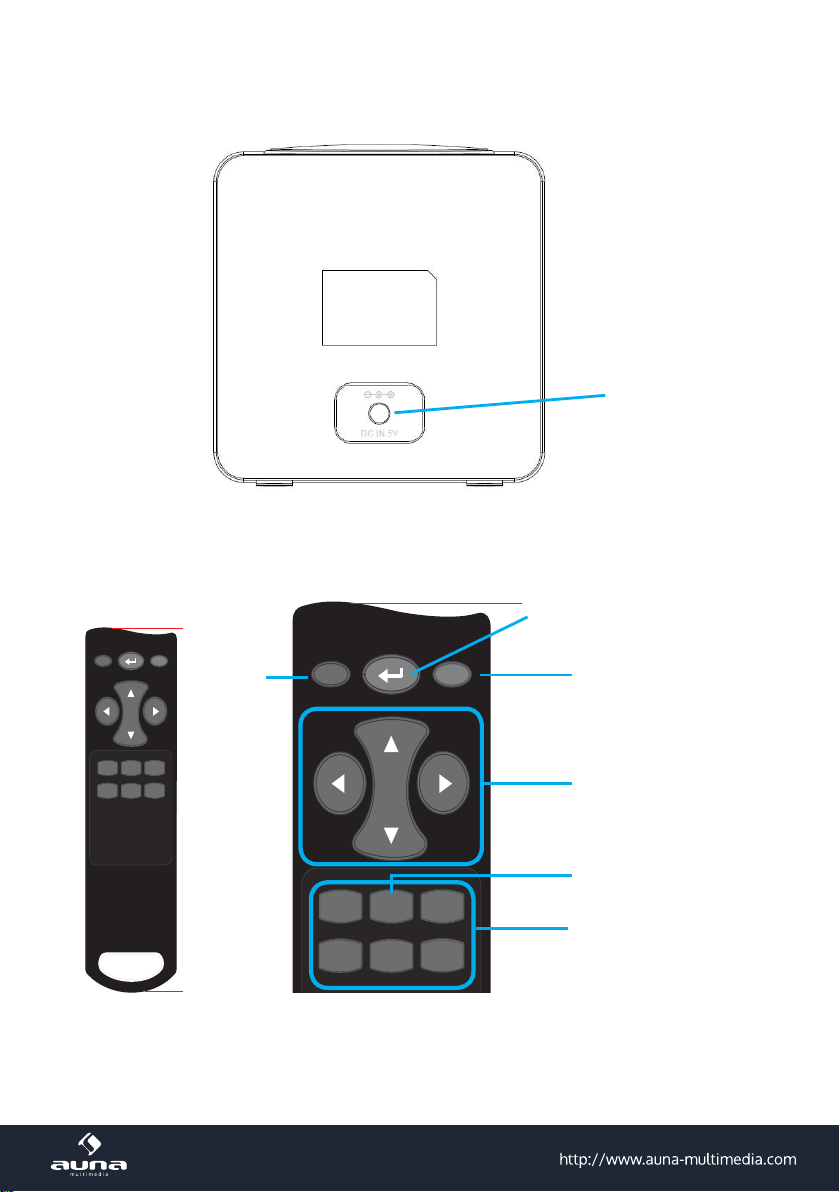
Rückseite
mm 09.341
00
04
08
05
06
01
09
03 07 0B
40
44
48
Power Mute
Vol+
Vol-
Menu Mode
Preset Alarm
mm 09.341
00
04
08
05
06
01
09
03 07 0B
40
44
48
Power Mute
Vol+
Vol-
Menu Mode
Preset Alarm
Fernbedienung
Anschluss für das
Netzgerät
Enter
4
Ein/
Standby
Stummschalten
Wieder lautschalten
Navigationstasten
UPnP/USB/Radio
Die Funktionen sind dieselben
wie im Bedienfeld
Page 5
Erste Inbetriebnahme
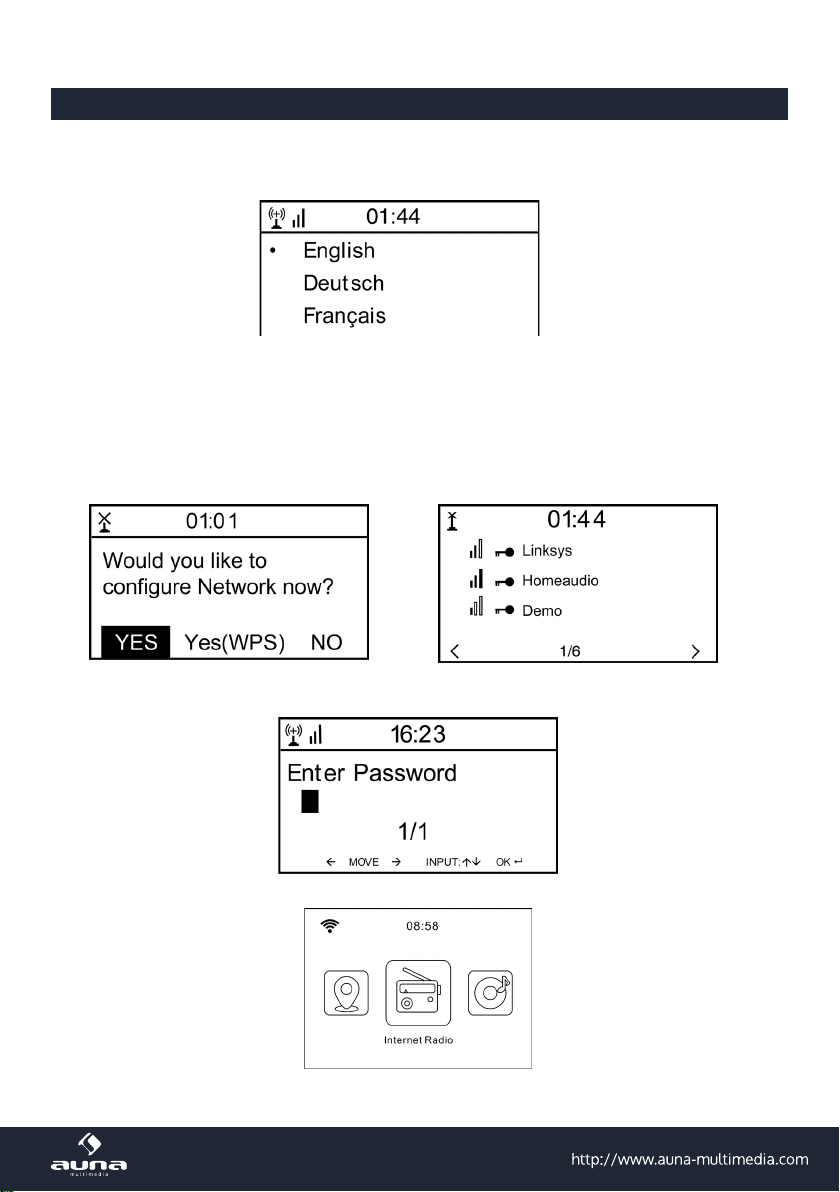
Verbinden Sie das Gerät mit dem Netzteil mit einer Steckdose. Das Display leuchtet auf und begrüßt Sie mit „Welcome“. Sie haben daraufhin die Möglichkeit, eine Menüsprache auszuwählen. Wählen Sie mit den Pfeiltasten und
bestätigen Sie Ihre Auswahl mit OK.
Das Gerät fragt Sie als nächstes, ob es sich beim Einschalten automatisch in ein gespeichertes W-Lan einklinken soll.
Es wird empfohlen, „YES“ zu wählen um zu bestätigen.
Einrichten des W-Lan
Der folgende Bildschirm erscheint. Wählen Sie „YES“, um das Gerät für ein vorhandenes W-Lan einzurichten. Wählen
Sie „YES [WPS]“, falls Ihr Router WPS unterstützt. Das Gerät beginnt mit der Suche nach vorhandenen Netzwerken.
Dies kann einen Moment dauern. Gefundene Netzwerke werden in Listenform angezeigt:
Wählen Sie den entsprechenden Router aus der Liste. Geben Sie nach Auorderung den Netzwerkschlüssel (Passwort)
ein (Ziern- und Buchstabentasten auf der Fernbedienung, per Dial/Enter oder mit LEFT/RIGHT sowie ENTER).
Den erfolgreichen Verbindungsaufbau mit Ihrem W-Lan bestätigt das Gerät mit der Anzeige „Network OK“. Dann wird
das Hauptmenü angezeigt:
5
Page 6

Internet-Radio
Wählen Sie Internet-Radio aus den Möglichkeiten im Hauptmenü. Sie haben die Auswahl zwischen verschiedenen Optionen. Um gleich zu hören, wählen Sie „Radiosender/Musik“ und suchen nach Ihrem gewünschten Sender.
Meine Favoriten
Zeigen Sie die Liste der zuvor als Favoriten gespeicherten Sender an. Um einen Sender als Favoriten abzuspeichern,
halten Sie beim Abspielen des gewünschten Radiosenders die
Bildschirm erscheint:
-Taste auf der Fernbedienung gedrückt, bis dieser
Das Icon
bis zu 250 Presets speichern.
Mit kurzem Druck auf können Sie die Favoritenliste bearbeiten. Drücken Sie , um die folgenden Optionen für den
jeweilig ausgewählten Sender aufzurufen:
Wählen Sie DELETE (um den ausgewählten Sender von der Liste zu entfernen), SHIFT UP/DOWN (um den ausgewählten Sender innerhalb der Liste zu verschieben) oder RENAME (um den angezeigten Namen des ausgewählten Senders
ändern). Drücken Sie PLAY, um den ausgewählten Sender abzuspielen.
Bitte beachten Sie: Die Presets 1 - 5 sind feste Speicherplätze, die nicht vom Nutzer belegt werden können.
Radiosender/Musik
Gefundene Sender werden hier nach den Gesichtspunkten „Weltweite Top 20“, „Genre“, „Land/Region“ sowie „Empfehlungen“ in entsprechenden Untermenüs angezeigt.
Lokale Stationen: Liste der lokal verfügbaren Sender
Zuletzt gehörte Sender: Liste der zuletzt gehörten Sender
Service: Geben Sie hier unter „Sender suchen“ den Namen eines gewünschten Radiosenders ein, um gezielt nach
diesem zu suchen. Wenn Sie bereits eine URL zur Hand haben, geben Sie diese unter „Neuen Sender hinzufügen“ ein.
Sobald Sie einen Sender abspielen, wird (falls vorhanden) ein Icon des Senders übermittelt und auf dem Display an-
gezeigt.
zeigt an, dass der Sender gespeichert wurde. Die Favoriten werden alphabetisch geordnet. Sie können
6
Page 7

Air Music App
Einige für Android erhältliche Apps (z. B. Air Music Control) erlauben die Steuerung des Internet-Radios vom Smartphone aus. Verbinden Sie das Smartphone nach dem Herunterladen und Installieren entsprechender Apps mit demselben
Netzwerk, in dem auch Ihr IR-6 verbunden ist.
Sobald die Geräte miteinander verbunden sind, erscheint auf dem Smartphone bzw. Tablet dieselbe Menüstruktur wie
beim Internetradio. Sie können dieselben Funktionen wie am Gerät bedienen. Die Anzeige der gewählten Funktionen
und Menüpunkte verändern Sie sich je nach Bedienung auf dem mobilen Gerät. Die App zeigt das Hauptmenü mit den
Punkten „Lokale Stationen, Internet Radio, Media-Center, Konguration und Information an.
Zur Funktionsweise entsprechender Apps konsultieren Sie bitte die Nutzerhinweise der jeweiligen Hersteller sowie die
Bedienungsanleitung Ihres Smartphones oder Tablets.
Bitte beachten Sie, dass während der App-Nutzung die Media-Player-UPnP-Verbindung nicht möglich ist.
Download der App:
• für iOS: https://itunes.apple.com/de/app/airmusic-control/id848176615?mt=8
• für Android: https://play.google.com/store/apps/details?id=air.net.mediayou.AirMusicControlApp&hl=de
Media-Center
Mit der Music-Player-Funktion können Sie Ihre Musik-Bibliothek vom Computer über das lokale Netzwerk streamen. Es
können MP3-, AAC-, WMA- sowie FLAC-Dateien gestreamt werden. Um dies zu ermöglichen, geben Sie die entsprechenden Ordner auf Ihrem Rechner im Netzwerk frei.
UPnP erlaubt Ihnen, die auf Ihrem Rechner gespeicherte Musik von einem externen Gerät wie dem IR-6 nach Katego-
rien zu durchsuchen oder zu ltern. Voraussetzung dafür sind durchgängig getaggte (mit ID3-Tag versehene) Dateien
und ein geeignetes Server-System, also zum Beispiel ein PC mit Windows Media Player 11 (oder höher). Folgen Sie
diesen Schritten:
• Vergewissern Sie sich, dass der PC sowie das Radio im selben Netzwerk angeschlossen und registriert sind.
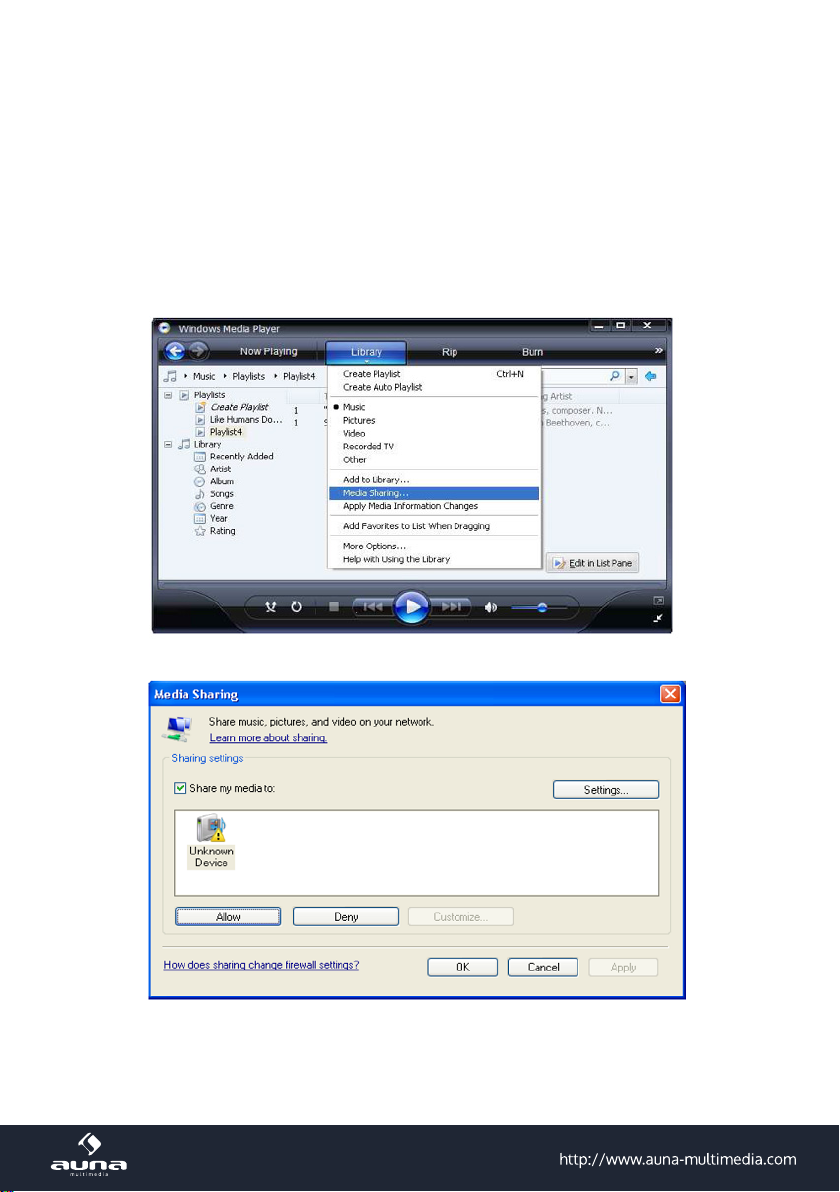
• Önen Sie den Windows Media Player und fügen Sie die Dateien und Ordner zu der gewünschten Bibliothek hinzu.
• Aktivieren Sie Medienstreaming (Medienbibliothek -> Streamen -> Medienstreaming aktivieren).
• Stellen Sie sicher, dass das Radio Zugrisrechte hat, indem Sie es anwählen und „Erlauben“ klicken.
• Das IR-6 kann nun Medieninhalte von Ihrem Rechner streamen. Der UPnP-Service läuft als Hintergrundprozess, so
dass der WMP gar nicht gestartet werden muss, um die Medienwiedergabe zu ermöglichen.
Um nun andererseits das IR-6 an die UPnP-Freigabe des Rechners zu koppeln, wählen Sie im Hauptmenü des Radios
Media Player -> UPnP aus. Schalten Sie in dem entsprechenden Untermenü (RIGHT) UPnP ein.
Das Gerät sucht nun nach verfügbaren UPnP Servern. Nach erfolgreichem Scan werden diese auf dem Display angezeigt. Wählen Sie den gewünschten Server aus und betätigen Sie mit OK auf der Fernbedienung bzw. ENTER am Gerät.
Der Rechner wird die Meldung ausgeben, dass ein Gerät versucht, sich mit dem UPnP Server zu verbinden. Önen
Sie „Media Sharing“ im Windows Media Player und klicken Sie im sich önenden Dialogfeld auf „Allow“ / „Erlauben“.
Um den Music Player aufzurufen, wählen Sie ihn mit MODE oder im Hauptmenü aus. Wählen Sie im Music Player Untermenü Shared Media und dann einen Computer mit geteilten Inhalten aus der Liste verbundener UPnP-Geräte (falls
Sie Medienstreaming auf mehreren Computern aktiviert haben).
Die Steuerung der Wiedergabe erfolgt über die konventionellen Pfeiltasten und PLAY/PAUSE, die Navigation über die
Pfeiltasten (auf der Fernbedienung) oder über DIAL/ENTER sowie LEFT/RIGHT an der Gerätefront.
7
Page 8
8
Page 9

Informations-Center
Wetter-Informationen
Zeigen Sie hier Wetter-Informationen /-Vorhersagen an. Sie können die Anzeige auch zum Standby-Display hinzufügen. Drücken Sie dazu
Wechsel nach jeweils 10 Sekunden) auf dem Standby-Display angezeigt. Lösen Sie den Wechsel alternativ mit ENTER
aus. Mit LEFT/RIGHT können Sie durch die Vorhersagen für die nächsten Tage blättern.
Finanz-Informationen: Anzeige von Börsen-Informationen
Systeminformationen: Anzeige der Firmware-Versionsnummer, MAC- und IP-Adressen
und bestätigen Sie mit ENTER / OK. Die aktuelle Uhrzeit sowie das Wetter werden nun (im
Einstellungen
Zeianzeige: Analog / Digital
My MediaU Management
Verwalten Sie die Senderlisten bequem von Ihrem Rechner aus, indem Sie MediaU aktivieren (unter Einstellungen ->
My MediaU Management).
Besuchen Sie http://www.mediayou.net/ und registrieren Sie auf dem Portal Ihr Radiogerät. Folgen Sie den Auor-
derungen der Website.
Organisieren Sie nach erfolgter Anmeldung nun online Ihre Favoritenliste. Die Änderungen (bis zu 5 Nutzer können
sich mit der Seriennummer des Radios registrieren) werden mit dem IR-6 synchronisiert.
9
Page 10

Netzwerk
• Funknetz-Einstellung: Wählen Sie, um nach verfügbaren W-LANs zu scannen und diese als Liste anzuzeigen.
• Funknetz (WPS PBC): Wählen Sie, um nach verfügbaren WPS aktivierten Netzwerken zu scannen.
• Manuelle Konguration: Stellen Sie DHCP und SSID manuell ein oder löschen Sie die aktuelle Netzwerkverbin-
dung.
• Netzwerk prüfen beim Anschalten: Aktivieren Sie, um bei jedem Neustart des Geräts automatisch mit dem letzten
genutzten W-LAN zu verbinden.
Datum & Zeit
Stellen Sie hier die Uhrzeit sowie das aktuelle Datum ein. Nutzen Sie die Pfeiltasten (oben / unten), um die Werte zu
verändern sowie die Pfeiltasten (rechts/links), um die Cursorposition zu verändern.
Einstellungen des Zeitformats: 12 Std / 24 Std;
Einstellungen des Datumformats: JJ/MM/TT, TT/MM/YY oder MM/TT/JJ
DST = Sommer/Winterzeit aktivieren/deaktivieren
Wecker
• Aktivieren / deaktivieren Sie Wecker1 und/oder Wecker2. Folgen Sie jeweils der Menüführung, um das Wiederholungsintervall (z.B. täglich / nur an bestimmten Tagen), die Uhrzeit sowie den Weck-Typ (Ton/Melodie/Internet
Radio) auszuwählen.
• Schlummer-Wecker: Halten Sie einen „Power Nap“ und stellen Sie eine bestimmte Minutenzahl ein. Überspringen Sie so die Uhrzeit-Einstellungen der Optionen Wecker1/2..
• Wecker-Lautstärke: Stellen Sie hier die Wecker-Lautstärke ein.
Timer: Countdown (max. 100 Minuten)
Geplante Wiedergabe: Sie können die Start- und Stoppzeit für die Wiedergabe einstellen, und dann kann das Produkt
die in der Voreinstellung gespeicherten Kanäle pünktlich abspielen und zur eingestellten Zeit beenden.
Sprache
Wählen Sie zwischen Englisch, Deutsch, Spanisch, Französisch, Portugiesisch, Niederländisch, Italienisch, Russisch,
Schwedisch, Norwegisch, Dänisch oder Finnisch als Menüsprache.
Dimmer
Dimmen Sie hier das Display. Wählen Sie Dimm-Level für den Energiesparmodus (wird nach einigen Minuten ohne
Operation aktiviert) und den normalen Nutzungsmodus.
Display: Farbe Monochrom
Energie Verwaltung
Stellen Sie hier die Dauer ein, nach der sich das Gerät automatisch in den Standby-Modus begibt, wird es nicht benutzt.
Sie können zwischen 5, 15 und 30 Minuten wählen oder die Funktion abschalten.
10
Page 11

Schlaf Timer
Stellen Sie den Schlaftimer auf 15, 30, 60, 90, 120, 150 oder 180 Minuten. Nach Ablauf der gewählten Zeitspanne schaltet das IR-6 automatisch in den Standby-Modus.
Zwischenspeicher (Buffering)
Legen Sie die Mindest-Buering-Zeit auf 2, 4 oder 8 Sekunden fest. Eine längere Zwischenspeicher-Zeit kann bei einer
langsamen oder störungsanfälligen Netzwerk- oder Internetverbindung ein stabileres Streaming ermöglichen.
Wetter
Stellen Sie die Wetter-Anzeige beim Standby-Bildschirm, die Temperatureinheit (°C oder °F) sowie Ihre Region ein.
Lokale-Station-Einstellung
Das Gerät ndet verfügbare lokale Radiosender automatisch und zeigt diese unter dem entsprechenden Punkt in Internet Radio an. Wählen Sie hier „Manuell einstellen“, um die lokalen Sender einer anderen Region einzustellen falls
gewünscht.
FM(IR)/DAB(IR)/HD(IR): Das Gerät empfängt den lokalen Kanal in FM, DAB und HD. Wenn einer von ihnen auf
„deaktivieren“ gestellt wird, kann das Gerät den Kanal nicht empfangen.
Wiedergabe-Einstellung
Wählen Sie hier zwischen den Wiedergabe-Modi „Wiederholen alle“ (wiederholt beim UPnP-Streaming alle Dateien im
Ordner), „Wiederholen eins“ (wiederholt den aktuellen Titel) oder „Zufällige“ (spielt die verfügbaren Titel in zufälliger
Reihenfolge ab).
DLNA-Einstellung
Ändern Sie hier den Namen des Geräts für die Anzeige bei DLNA-Verbindungen.
Fortsetzen der Wiedergabe beim Anschalten
Wählen Sie hier „An“, damit das Gerät bei jedem Neustart den jeweils zuletzt gehörten Sender / die zuletzt gehörte
Musikquelle wieder (und weiterhin) abspielt.
Software-Update
Informationen zu verfügbaren Upgrades der Firmware können hier eingesehen werden. Installieren Sie verfügbare
Software Updates.
Auf Werkseinstellung zurücksetzen
Setzen Sie das Gerät zurück in den Ursprungszustand. Alle Sender- und Favoritenlisten (sofern lokal gespeichert) sowie Einstellungen werden gelöscht. Das Gerät springt anschließend automatisch zur Sprachauswahl und den W-LAN-
Einstellungen.
11
Page 12

Problem Vorgehen / Ursachen
Die W-LAN-Verbindung kann nicht
etabliert werden.
Das Radio ist mit dem Internet ver-
bunden, aber einige Sender werden
nicht abgespielt.
Sie können keine UPnP Geräte n-
den, oder der gesuchte Rechner wird
nicht angezeigt.
Sie können keinen Ordner für UPnP
freigeben, weil die Funktion gar nicht
verfügbar ist (grau).
Scan-Error
Endlos-Buering
Troubleshooting
• Stellen Sie sicher, dass das Radio und ein mit dem Netzwerk verbundener Rechner (der eine funktionierende Internetverbindung hat), im selben Netzwerk angemeldet sind.
• Ist ein DHCP-Server verfügbar oder haben Sie eine statische IP-Adresse
eingegeben?
• Ist eventuell eine Firewall so eingestellt, dass ausgehende Ports blo-
ckiert sind?
• Manche Access Points / Repeater / Router könnten so eingestellt sein,
dass nur Geräte mit registrierter MAC-Adresse verbunden werden.
Schauen Sie im Handbuch Ihres W-LAN-Equipments nach und fügen Sie
die MAC-Adresse des Radios gegebenenfalls zur „Erlaubt“-Liste des Ac-
cess Points hinzu.
• Stellen Sie sicher, dass Sie das richtige Passwort (bei verschlüsselten
/ gesichterten W-LANs) eingegeben haben. Achten Sie auf die korekte
Schreibweise.
• Falls Ihr W-LAN „versteckt“ ist (eine mögliche Einstellung bei vielen Rou-
tern), geben Sie den Netzwerknamen manuell im IR-6 ein. Gehen Sie
dazu ins Einstellungsmenü -> Netzwerk -> Manuelle Konguration ->
Funknetz -> SSID eingeben.
• Vielleicht liegt der Sender in einer anderen Zeitzone und sendet im Moment gar nicht.
• Zu viele User versuchen, den Sender zu erreichen und dessen Kapazität
/Bandbreite reicht nicht aus.
• Der Link ist abgelaufen / existiert nicht mehr.
• Der Sender existiert nicht (mehr).
• Sie sind nicht im Netzwerk angemeldet (siehe oben).
• Es ist eine Firewall installiert und so eingestellt, dass geteilte Dateien
nicht für externe Geräte verfügbar sind.
• Das Radio ist nicht in der selben Arbeitsgruppe oder Domäne wie der
entsprechende Rechner angemeldet.
• Aktivieren Sie Filesharing.
• Es ist möglich, dass Fehler auftreten, wenn das IR-6 Ordner auf einem
PC scannt, zum Beispiel weil die Windows File Sharing Applikation abläuft. Verbinden Sie den PC per Kabel mit dem Netzwerk, um die Scan.
Geschwindigkeit deutlich zu erhöhen.
• Bei einer hohen Rate an Streaming-Abbrüchen oder einer unsicheren
Verbindung kann es vorkommen, dass das IR-6 gar nicht mehr aus dem
„buering“, also dem Zwischenspeichern des Streams herauskommt.
Überprüfen Sie die Netzwerk-, Modem- und Internetverbindung und
setzen Sie sich gegebenenfalls mit Ihrem Internet Service Provider in
Verbindung.
12
Page 13

Hinweise zur Entsorgung
Elektroaltgeräte
Bendet sich die diese Abbildung (durchgestrichene Mülltonne auf Rädern) auf dem Produkt, gilt die
Europäische Richtlinie 2012/19/EU. Diese Produkte dürfen nicht mit dem normalen Hausmüll entsorgt
werden. Informieren Sie sich über die örtlichen Regelungen zur getrennten Sammlung elektrischer
und elektronischer Gerätschaften. Richten Sie sich nach den örtlichen Regelungen und entsorgen
Sie Altgeräte nicht über den Hausmüll. Durch die regelkonforme Entsorgung der Altgeräte werden
Umwelt und die Gesundheit ihrer Mitmenschen vor möglichen negativen Konsequenzen geschützt.
Materialrecycling hilft, den Verbrauch von Rohstoen zu verringern.
KONFORMITÄTSERKLÄRUNG
Hersteller:
Chal-Tec GmbH, Wallstraße 16, 10179 Berlin,
Germany.
Dieses Produkt entspricht den folgenden Europäischen
Richtlinien:
2011/65/EU (RoHS)
2015/53/EU (RED)
Die vollständige Konformitätserklärung des
Herstellers nden Sie unter folgendem Link.
Scannen Sie dazu diesen QR-Code oder geben
Sie die URL ein.
use.berlin/10032046
13
Page 14

Dear Customer,
Congratulations on purchasing this product. Please read and follow these instructions, in order to avoid damaging
the item. We do not cover any damages that may arise from improper use of the item or the disregard of the safety
instructions.
Technical Data
Item number 10032046, 10032047
Power supply, Power adapter
Network prole and coding IEEE802.11b/g/n; WEP/WPA/WPA2,WPS
Streaming UPnP, DLNA
Supported le formats WMA, MP3, WAV; AAC
(Input: 100-240 V~ 50/60 Hz, 0,3 A max.
Output: 5 V, 1 A)
Important Safety Instructions
• Read all instructions before using.
• Do not place on or near a hot gas or electric burner or in a heated oven.
• To protect against a re, electric shock or personal injury, do not immerse cord, electric plugs or device in water
or other liquids.
• Do not expose the appliance to extreme temperatures. The appliance shall be used in moderate climates.
• Disconnect the appliance from the power source if it is not going to be used for a long time, if there is a thunderstorm or if it isn‘t working properly.
• The use of attachments that are not recommended by the appliance manufacturer may result in re, electric shock
or personal injury.
• Do not open the unit by removing any cover parts. Do not attempt to repair the unit. Any repairs or servicing should
be done by qualied personnel only.
• Only qualied persons may perform technical work on the product. The product may not be opened or changed.
The components cannot be serviced by the user. The manufacturer is not responsible for any radio or TV interfer-
ence caused by unauthorised modications.
Small objects / packaging parts (plastic bags, cardboard, etc.)
Keep small objects (for example, screws and other assembly materials, memory cards) and packaging parts out of
reach of children so that they
cannot be swallowed. Do not let small children play with plastic bags. Risk of suocation.
Transporting the device
Please keep the original packaging. To ensure adequate protection when
transporting the device, pack the device tin its original packaging.
Cleaning the outer surfaces
Do not use volatile uids, such as insect sprays. The surface can be damaged by excessive pressure during wiping.
Rubber or plastic parts should not be left in contact with the device for an extended period of time. Use a dry cloth.
14
Page 15

Control panel
1 Speakers
2 On - off / up - down
Standby button/Navigation wheel
3 Headphone socket (3.5mm)
4 Infrarotempfänger
5 USB connection
6 Enter/Vol+/Vol-
Volume Up / Down and conrm button
7 2.4" TFT Screen
Display
8 MENU
Open main menu
9 Alarm
Alarm setting
10 Preset
Preset recall my favourites
11 Leftt
Return / Back
12 Right
Next / Forward
13 Local
Local Radio setup
Back
Controls
7
6
5
8
9
11 12 13
4
1
10
2
3
DC input
15
Page 16

mm 09.341
00
04
08
05
06
01
09
03 07 0 B
40
44
48
Power Mute
Vol+
Vol-
Menu Mode
Preset Alarm
mm 09.341
00
04
08
05
06
01
09
03 07 0B
40
44
48
Power Mute
Vol+
Vol-
Menu Mode
Preset Alarm
Remote Control
Enter
On/
Standby
Switch o sound
Switch on sound again
Navigation keys
UPnP/USB/Radio
Same functions as in control panel above.
Initial Use
Plug the connector plug of the mains adaptor into the DC jack on the unit. Connect the other end of the adaptor to the
wall socket. Caution: Use only the main adaptor supplied with the radio. Connecting a power supply with a dierent
rating will cause permanent damage to the radio and may be hazardous.
The display on the front of the radio will light up and say „Welcome“. Then you can ENTER your prefer language on
the radio.
It will ask you if you want to Enable the “Check Network” when Power on”, it is suggested to choose “Yes”. Then the
radio will always check the available WiFi network automatically.
16
Page 17

The screen above (left) will appear. You can choose Yes to proceed to search for the available WiFi network. If your
router has the WPS function, you can ENTER the “Yes[WPS]” to proceed. It will then start scanning the network. After
the search is done, it will display a list of the available router (above right).
Choose your router from the list, enter the WEP(Wired Equivalent Privacy) or WPA(Wi-Fi Protected Access) code. If your
network is not congured to be with the WEP or a WPA code, the unit will connect to the router automatically.
Note: The encryption code would have been set up by the person who set up and congured your network.
Please refer to the “Remote control character list” for you to enter the passwords. Press the RIGHT button to go to the
next word, press LEFT to delete the wrong word you have entered.
If you want to enter the passwords on the radio main unit, you can use the Volume Dial rotary knob. Follow the steps
below:
- Rotate the knob to ENTER the character
- Press the RIGHT button to go to the next entry
- After you nish the entries, push down the Rotary knob to conrm.
The radio will start connecting to the network.
After the router is connected successfully, it will show “Network OK” and display the menu screen:
17
Page 18

Internet Radio
Choose ‘Internet Radio’ from the menu, you can see dierent functions as below:
To start listening the worldwide radio stations, ENTER “Radio Station/Music”,
My Favorites
This is to show the list of your Favorite stations which have been assigned to the presets. To preset a station: While you
are playing the favorite station, simply hold and press the
The folder icon will appear in the upper left corner of the display, indicating that the station is added to the radio preset.
The presets will be stored in ascending order. You can store up to 250 presets.
You can edit your Favorite list with the following options: Delete – To delete the ENTERed station; Shift up/Shift down
– To shift the ENTERed station to a particular ranking on the list; Rename – To rename the ENTERed station; Play –
press and play the ENTERed station
To do the edit, simply press the RIGHT (or the right arrow on the RC) button briey to enter the Preset station list.
Choose the radio station that you want to make with the above changes. Then press the Right key, it will enter into the
list with the options listed above. Then choose your desire action.
key until the follow screen appears.
To recall a preset station Press the
future use and cannot be preset for radio stations.
Radio Station / Music: ENTER this option to ENTER your desired radio station by Category, Genere or Location.
Local Radio: If you want to access quickly the radio station located in your area, ENTER this function and it will display
the list of the stations available in your area.
History: Show the radio stations that you have listened in the past.
Service: Contains the sub menus Search Stations (You can nd your desire radio station by entering the name of the
radio) and Add New Radio Station (If you cannot nd your desire station from the Radio station list and you have the
URL address, you can input the link here and add to your favourite list).
When the radio station is playing, the display will show a color image transmitted from the radio station.
button and choose your desired station. Please note Preset 1-5 is reserved for
18
Page 19

Air Music
Some apps for Android, e.g. Air Music Control, allow you to control the internet radio from your smartphone or tablet.
As soon as the devices are connected, the same menu structure shown on the Internet radio will appear on the smart-
phone/tablet. You can ENTER all functions just like on the radio. The ENTERed functions / menu items shown on the
radio will change according to the actions taken on your mobile device.
If you are controlling the Internet Radio via app, a UPnP connection to Windows Media Player may not be possible.
After the smartphone is connected to the same network as the Internet radio connected, launch the app “Air Music
Control”. The App shows the main menu with Local Radio, Internet Radio, Media Center, Conguration,Information
modes.
For further information on the Air Music Control app or similar products, as well as for hints concerning your
smartphone or tablet, please see the help les or user manuals supplied by the respective manufacturers
or distributors.
Dowload sources:
• für iOS: https://itunes.apple.com/de/app/airmusic-control/id848176615?mt=8
• für Android: https://play.google.com/store/apps/details?id=air.net.mediayou.AirMusicControlApp&hl=en
Aux In
You can enjoy the music from other audio devices by connecting the audio cable to the AUX IN connector at the rear of
the unit, such as mobile phone, MP3 player, etc.
DLNA
The Internet radio supports DLNA. It allows you to stream music from other devices which has DLNA feature to listen
on this internet radio, provided that the Internet radio and other DLNA devices are under the same Wi-Fi network.
The radio will appear as “AirMusic” when you try to search it on other devices. If you want to change the name from
AirMusic to another, go to Conguration and DLNA setup to make the change.
Please note: The IR-6 DLNA feature is compatible and works with corresponding Android APPs. Apple devices
are not supported.
Media Center
UPnP (Universal Plug and Play)
You can stream music from the Networked device which supports UPnP function, allow sharing of the data and entertainment. For instance, most of the latest computer laptop supports UPnP, and you can stream the music from Win-
19
Page 20

dows Media Player application on the computer and listen on your radio.
• If your PC is running Microsoft Windows XP, then you can use Windows Media Player 11(WMP11) to act as your
UPnP( Universal Plug and Play) media server. (For Windows 7 or above, please download the correspond version
of Windows Media Player). Windows Media Player 11 may be downloaded from Microsoft’s website and install by
following the instructions detailed in its installation wizard.
• Once installed, Windows Media Player 11 will create a library from all the media les available to it on your PC. To
add new media les to the library, ENTER’ File > Add to Library…> Advanced Options’, Click ‘Add’ and choose the
les you wish to add and click’ OK’.
• You will now need to connect your Internet radio to Windows Media Player 11 and congure it to allow the radio to
access your media library. In order to this, you will need to do the following:
• Go to the main menu of the radio, ENTER <Media Player> -> <UPnP>.
• It will scan for all available UPnP servers . Note, this may take a few seconds for the radio to complete its scan
and before the scan has completed, the radio will display ‘[Empty]’. The radio will continue to display ‘[Empty]’
if no UPnP servers and found.
• After a successful scan. ENTER your UPnP server, by rotating the dial if there is more than one UPnP server, and
then press ENTER (note, your radio will display’ Access Denied’ at this stage)
• Your PC will now prompt you that a device has attempted to connect to your UPnP server. In order to allow the
radio to have access to the media les, you will need to click the ‘Library’ tab from Windows Media Player 11 and
ENTER the <Media Sharing> item to open the ‘Media Sharing’ window.
ENTERing ‘Media Sharing‘ for Windows Media Player 11:
• From the ‘Media Sharing’ windows , the radio will be listed as an unknown device. Click on the unknown device
listed, then click the ‘Allow’ button and then click ‘OK’. Allowing the Radio to Connect:
Note: When you are playing the music under UPnP, you are able to change the mode of playback via ENTERing Media
Player/Playback Mode.
20
Page 21

Information Center
Weather: View world wide weather forecasts.
• Add to Standby Display
Press RIGHT to display the “add to standby display”, then press ENTER to conrm.
“Current Date & Time” and “Current Weather” will be on alternation display every 10 seconds under the standby
mode if the weather forecast display is started.
Remark: In standby mode, you can also press “Enter” button for switching manually between “Current Date &
Time” and “Current Weather”, and you can press the arrow (LEFT/RIGHT) buttons to display the previous/next day
weather forecast.
Remark: The weather is just for reference only. It may have deviation to the actual weather.
Financial Information: View information of Stock Markets all over the world.
System Information: View information of the radio such as the version of rmware / WLan Mac / IP address etc.
Configuration
Manage my mediaU
You can customize your own favourite station list using your computer. First, enable “Manage my MediaU” on your
radio. Go to Conguration -> Manage my MediaU -> Enable. Then you will see “My mediaU” appear on the main menu.
On your computer, go to http://www.mediayou.net/web/index.php, this is the radio portal playing on your radio.
Register as member by ENTERing “Join now”. After you have become the member, then you can login and register your
radio. ENTER “Radio” on the following screen and do the radio registration.
You can then organize your own favourite stations or add any new station which is currently not found on the station
list. Once the changes are done, your radio will synchronize the changes immediately and you will nd your favourite
list under “My MediaU” on the radio menu.
It allows maximum 5 users to register with the same radio and you can switch to listen the favorite list under one user
at a time
21
Page 22

Network
• Wireless Network Conguration
Press “Enter” to scan for wireless network and list out.
Wireless Network Conguration (WPS): This is the option for you to use WPS function, which means you can set
the wireless without enter any passwords for Wi-Fi protected if your router has the function.
Manual Configuration: You can set the DHCP on or o, and enter the SSID as you known, or delete the connected
WiFi.
Check network when power on. This is set to enable or disable “Check network when power on”.
Date & Time: Current Date & Time setting: You can press UP/DOWN for parameter setting, and move cursor with
LEFT/RIGHT and press ENTER to conrm.
• Time Format setting: 12hours / 24hours
• Date Format setting: YY/MM/DD, DD/MM/YY or MM/DD/YY
• Daylight Saving Time (On / O)
• GMT: Set the currently time as GMT
Alarm Clock (Switch 2 separate alarms on/o)
• Alarm Clock types
You can ENTER your favorite Alarm setting for every day, once or particular day in the week.
• Alarm Clock NAP function
If you would like to take a nap or need the Alarm in short time, you can use this function. You can ENTER the time
from 5 minutes up to 120 minutes. No Snooze function available for the NAP alarm.
• Alarm Sounds setting (Beep/Melody/Internet Radio) Please note: The NAP Alarm will only with beeping sound.
• When the Alarm Clock goes on, press any key except for “Power” button, to enter the “Snooze” mode. You can
press POWER ON/OFF to stop the ringing when the alarm goes on 5 minutes later again.
Remark. You can ENTER any internet radio station as Alarm tone from the favourite station. When the internet station does not work in 1 minute, it will auto set into Beep.
Timer: Countdown timer (max. 100min)
Scheduled playing: You can set the start and stop time for playing, and then the product can play the channels stored
in the preset on time and end at the set time.
Language: English /Deutsch / Espanol / Francais / Portugese / Nederlands / Italiano / Pyccknn / Svenska Norske /
Dansk / Magyar /Cesky /Slovensky / Polski / Turkce / Suomi.
22
Page 23

Dimmer: You can adjust the backlight of the LCD with below settings: Power saving - backlight level /
Turn On - backlight level
Display: Colour / Monochrome
Power Management
This function is to allow the radio to go to Standby if there is no internet signal received in order to save power. The
default setting is 30 minutes. When the radio does not receive any Wi signal, the radio will go into Standby after 30
minutes. Other time frame for 5 minutes and 15 minutes are available.
Sleep Timer
You can set the timer to put the radio on standby after certain time elapsed, from 15 minutes to 180 minutes with the
step of every 15 minute.
You also can do the setting with the “Sleep” button from remote control, when you press “Sleep”, then you can see the
sleep timer on the top right corner of the display.
Buffer: ENTER your preferred buering time.
Weather: Activate/deactivate the weather forecast for the standby display. Choose your preferred temperature unit (°F
or °C) and then proceed entering your location. When activated, the weather forecast is shown in turns with the clock
display on the standby screen (each 10 secs).
Local Radio Setup
The radio will detect your local area stations automatically and it will display under the “Internet radio” you will nd all
the stations under “Internet radio” -> “Local Radio”. If you would like to change the Local area stations to other countries, you can choose “Manual setup” to make the change.
FM(IR)/DAB(IR)/HD(IR): The product will receive the local channel of FM, DAB and HD. If one of them is turned to
“disable”, the product cannot receive it.
Playback Setup: ENTER REPEAT ONE / REPEAT ALL / SHUFFLE
Device
Default device name for DLNA is “AirMusic ”. You may rename it for DLNA setup on the PC or mobile. QR code for download and install “AirMusic”
control App on mobile
DLNA Setup
When the radio is connected by other DLNA devices, the name of the radio will appear as “AirMusic”. This is the name
in default. You can change other name here as you desire.
Equalizer. ENTER your prefer music eect.
Software update
• Upgrade information will pop up on the display when there is an upgrade version available on the server.
• When there is an upgrade version available on the server, you can do the manual upgrade from the update menu.
Reset to default
You can do this factory reset to empty all of the settings and it comes back to default settings. Please note that all station presets, settings and conguration will be lost after performing the factory reset.
Remark: Playing is stopped when it comes back to default settings. The device will skip into the language setting automatically. After that it will turn to the internet settings.
23
Page 24

Problem Possible Reasons / Proceeding
If you have trouble connecting the
radio to your wireless network,
these steps may help to resolve the
problem:
If your radio can connect to the
network successfully, but is unable to
play particular stations, it may be due
to one of the following reasons:.
When you scan for PCs under UPnP
function, none can be found, or the
PC you are looking for does not ap-
pear in the list:
24
Troubleshooting
• Conrm that a Wi-Fi or Ethernet Wired connected PC can access the internet (i.e. can browse the web) using the same network.
• Check that a DHCP server is available, or that you have congured a
static IP address on the radio.
• Check that you rewall is not blocking any outgoing ports.
• Some access points may be set so that only equipment with registered
MAC addresses can connect to them. This is one possible cause of the
Internet Radio being unable to connect to the Wi-Fi network, and the
Internet Radio display will show Bad ESSID or key. To overcome this
problem you will need to add the Internet Radio’s MAC address to the
list of allowed equipment in your access point. The Internet Radio’s MAC
address can be found using the menu <Information Center ->System In-
formation -> Wireless Info MAC address>. You will need to refer to the
guide for you Access Point in order to enter the Internet Radio as an allowed piece of equipment.
• If you have an encrypted network, check that you have entered the correct key or passphrase into the radio. Remember that text-format keys
are case sensitive.
• If your wireless network name(ESSID) is ‘Hidden’(a setting on the wireless access point), then you can either turn on the name, or you can manually enter the name into the internet radio and media player, ENTER
<Congure -> Network -> Manual Conguration-> Wireless -> Enter ESSID>. Conrm if the Network is encrypted, e.g. requires a WEP or WPA
key, then enter the network name.
• The station is not broadcasting at this time of the day (remember it may
be located in a dierent time zone).
• The station has too many people trying to attach to the radio station
server and the server capacity is not large enough.
• The station has reached the maximum allowed number of simultaneous
listeners.
• The station is not broadcasting anymore.
• The link on the radio is out of date. This is updated automatically every
day, so the next time you turn on the link will be recognised.
• The internet connection between the server (often located in a dierent
country) and yours is slow. Some internet service providers may fail to
stream in certain geographical areas. Try using a PC to play back the
stream via the broadcaster’s web site. If you can play back the station
with a PC, please report to the customer service where you bought this
radio. If you have a laptop, try connecting it if your Internet Radio cannot
nd the station.
• You have not connected to the wireless Access point. On the internet
radio, ENTER ‘Conguration’, ‘Network ’, ‘Wireless network connection’
and then ENTER your Wireless network. (You may need to enter a secu-
rity key to access the network wirelessly).
• You have a rewall set on your PC which is stopping you accessing
shared les.
• If you have a third party rewall (Like Norton, or Zone Alarm) that will
have its own control panel and you will need to consult the manual for
your rewall.
• If your PC is connected to a managed network, with a server sometimes
the PC being searched for needs to be server Workgroup.
Page 25

You can see the PC you want to play
music from, but cannot nd any fold-
ers on the PC:.
I can’t share a folder, as the option is
not highlighted:
Scan Error:
Playlists:
If the Internet Radio keeps re-buer-
ing the radio station:
• -You have a rewall running which is preventing the internet radio from
seeing the shared folder. As a quick check, you can disable rewalls like
Norton to see if this overcomes the problem, if this resolves the issue
then you can either leave the rewall o, or allow le sharing through
the re wall.
• Note: If you rewall is required to provide security for your system, it
should not be left o.
• When the internet radio is scanning the content of the folders on a PC, it
is possible that a scan error may occur if the windows le sharing application times out. This is most likely to occur if both the PC with the media
content and the Internet Radio are connected wirelessly.
• Try re-connecting the PC with the media content into the network via cable. This will dramatically increase the speed at which the Internet Radio
is able to scan the content of the Media PC.
• Some media ripping applications allow ‘Playlists’ to be created. The Internet Radio is able to detect and stream these playlists, but they must
be stored in the folder with the rest of the Media content and they must
have the le extension.m3u.
• Windows Media player can create suitable playlist, just ENTER ‘create
new playlist’, drag and drop the tracks you want into the playlist, then
use ‘Save as’ to ensure the le type is .m3u. (Existing play lists can be
opened and re-saved in this format) When the Internet Radio detects
you have playlists, it will enable a new menu option allowing the playlist
to be ENTERed and added to the queue.
• If you re-connect to another PC of folder, which does not have any Playlists in the .m3u. format, the playlist option will not be presented in the
menu.
• The Internet Radio is streaming the data from the radio station via your
broadband connection, if there is a high error rate on your broadband
connection, or the connection is intermittent, then it will cause the Internet Radio to pause until the connection is re-established and it has
received enough data to start playing again.
• If your Internet Radio keeps stopping, please check the DSL modem to
ensure that the Broadband line is not suering a high error rate or disconnections. If you are experiencing these problems, you will need to
contact your broadband supplier.
What is Buering?
• When playing a stream, the Internet Radio/Media player, downloads a
small amount of the stream before it starts playing. This is used to ll
in any gaps in the stream that may occur if the internet or the wireless
network is busy.
• The Internet Radio streams music data from the PC while you are listening. If a stream gets blocked or experiences Internet congestion while
transferring it may stop/interfere with the quality of play. If this happens,
check your internet connection speed- it must be faster than the speed
of the streams.
25
Page 26

Environmental Concerns
According to the European waste regulation 2012/19/EU this symbol on the product or on its packaging indicates that this product may not be treated as household waste. Instead it should be taken to
the appropriate collection point for the recycling of electrical and electronic equipment. By ensuring
this product is disposed of correctly, you will help prevent potential negative consequences for the
environment and human health, which could otherwise be caused by inappropriate waste handling
of this product. For more detailed information about recycling of this product, please contact your
local council or your household waste disposal service.
DECLARATION OF CONFORMITY
Producer:
Chal-Tec GmbH, Wallstraße 16, 10179 Berlin,
Germany.
This product is conform to the following European
Directives:
2011/65/EU (RoHS)
2015/53/EU (RED)
The complete declaration of conformity of the
manufacturer can be found at the following link.
Scan this QR code or enter the URL.
use.berlin/10032046
26
 Loading...