

Page 1

Glastonbury
Micro System
Micro système
10031824
www.auna-multimedia.com
Page 2

Page 3
Sehr geehrter Kunde,
wir gratulieren Ihnen zum Erwerb Ihres Geräts. Lesen Sie die folgenden
Hinweise sorgfältig durch und befolgen Sie diese, um möglichen Schäden
vorzubeugen. Für Schäden, die durch Missachtung der Hinweise und
unsachgemäßen Gebrauch entstehen, übernehmen wir keine Haftung.
DE
INHALT
Technische Daten 3
Sicherheitshinweise 4
Lieferumfang 5
Geräteübersicht 6
Fernbedienung 8
Stromversorgung 11
Audioeinstellungen 13
DAB-Sender/DAB-Sender und Radioeinstellung 14
UKW-Radio 17
Abspielen von Audio CDs und MP3/WMA-Discs 18
USB-Wiedergabe 21
Weckfunktion 23
Anhören externer Audiogeräte 24
Hinweise zur Entsorgung 27
TECHNISCHE DATEN
Artikelnummer 10031824
Stromversorgung 220- 240 V~ 50/60 Hz
Leistung 22 W
UKW-Frequenzbereich 87.5 - 108 MHz
DAB/DAB+ Frequenzbereich (Band III) 174,928 - 239,200 MHz
Lautsprecherimpedanz 4 Ohm
BT-Standard
Hardware-Version
Software-Version
Frequenzbereich
Maximal übertragener Leistungspegel
Maximale Übertragungsreichweite
Unterstützte BT-Prole
Abmessungen 310 x 169 x 230 mm
V 2.1 und EDR Spez.
V 1.0
V 2.0
2402 - 2480
4 dBm
ca. 8 m
A2DP
Scannen Sie den
QR-Code, um Zugri
auf die aktuellste
Bedienungsanleitung
und weitere
Informationen rund
um das Produkt zu
erhalten.
3
Page 4

DE
SICHERHEITSHINWEISE
• Lesen Sie die Bedienungsanleitung und bewahren Sie sie auf.
• Beachten Sie alle Sicherheitshinweise.
• Befolgen Sie die Anleitungen.
• Verwenden Sie das Gerät nicht in der Nähe von Wasser.
• Nur mit einem sauberen Tuch reinigen.
• Blockieren Sie nicht die Lüftungsönungen. Stellen Sie das Gerät nur
nach den Hinweisen des Herstellers auf.
• Nicht in der Umgebung von Wärmequellen wie Radiatoren,
Heizgeräten, Öfen, oder anderen Geräten, die Wärme abstrahlen (z. B.
Verstärker)
• Achten Sie darauf, nicht auf das Netzkabel zu treten, es zu knicken vor
allem an Steckdosen und dort, wo das Netzkabel am Gerät steckt.
• Verwenden Sie ausschließlich vom Hersteller angegebenes Zubehör.
• Nur mit dem Wagen, Ständern, Regalen oder Auagen benutzen, die
vom Hersteller angegeben sind. Beim Bewegen des Gerätes vorsichtig
sein, um ein Umfallen zu vermeiden.
• Ziehen Sie während eines Gewitters den Netzstecker, auch wenn Sie
das Gerät für längere Zeit nicht nutzen.
• Wenden Sie sich bei Reparaturen an qualizierte Fachleute. Reparaturen
werden erforderlich, wenn das Gerät irgendwie beschädigt wurde, das
Netzkabel oder der Netzstecker beschädigt wurden, Flüssigkeit auf dem
Gerät vergossen wurden, Gegenstände hineingefallen sind, das Gerät
Regen oder Feuchtigkeit ausgesetzt wurde, nicht normal funktionier
oder fallen gelassen wurde.
• Das Gerät darf Wassertropfen und -spritzern nicht ausgesetzt werden.
Behältnisse mit Flüssigkeiten wie Vasen dürfen nicht auf das Gerät
gestellt werden.
• Die Batterie darf nicht großer Hitze durch Sonneneinstrahlung, Feuer
usw. ausgesetzt werden.
• Das Gerät wird duch den Netzstecker vom Strommnetz getrennt.
Während des Stromnetzanschlusses bleibt das Gerät betriebsbereit.
• Klasse 1 Laser: Dieses Gerät verwendet einen Laser. Eine von dieser
Bedienungsanleitung abweichende Bedienung, Einstellung oder
Handlung kann zum Aussetzen gefährlicher Laserstrahlung führen.
Gewährleisten Sie, dass vor dem Umstellen des Geräts das CD-Fach
leer ist. Nehmen Sie die CD, wenn das Gerät nicht in Gebrauch ist.
4
Page 5
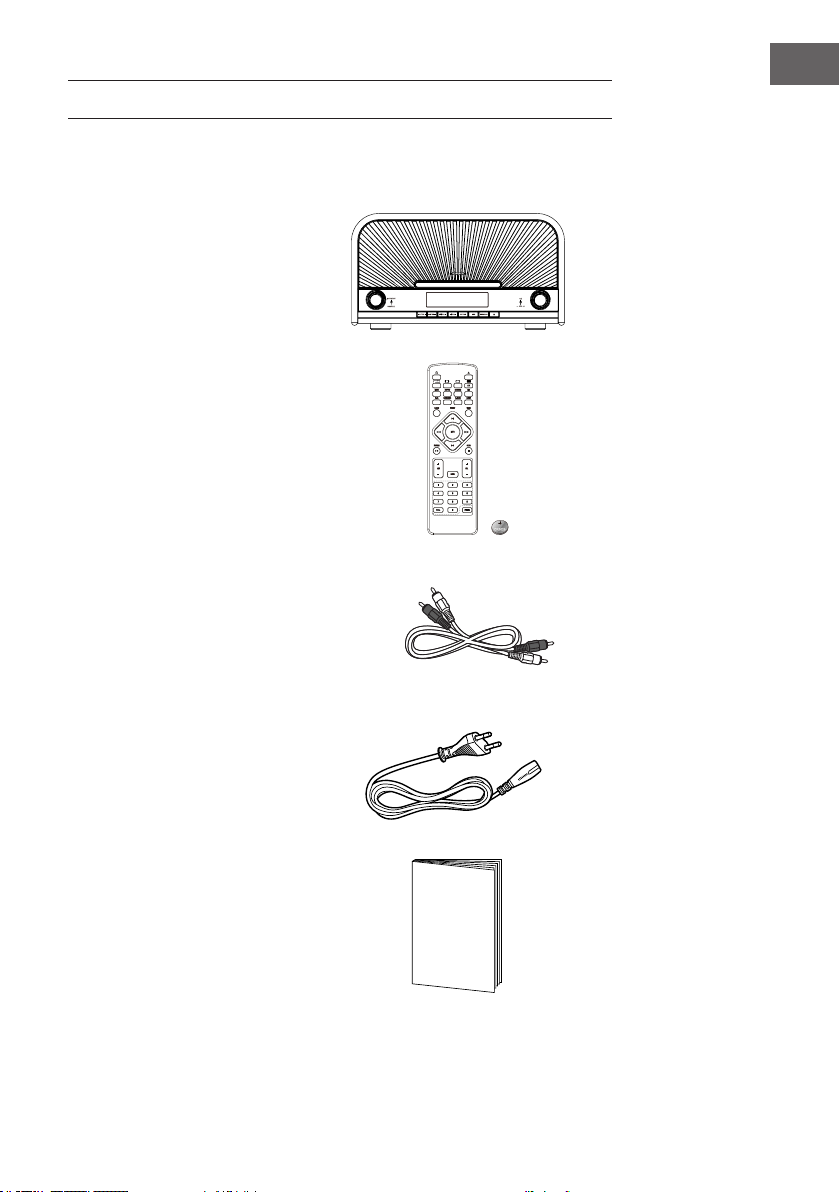
LIEFERUMFANG
BT
BT
BT
Anlage
Fernbedienung
Audiokabel
DE
BT
Netzkabel
Bedienungsanleitung
5
Page 6
DE
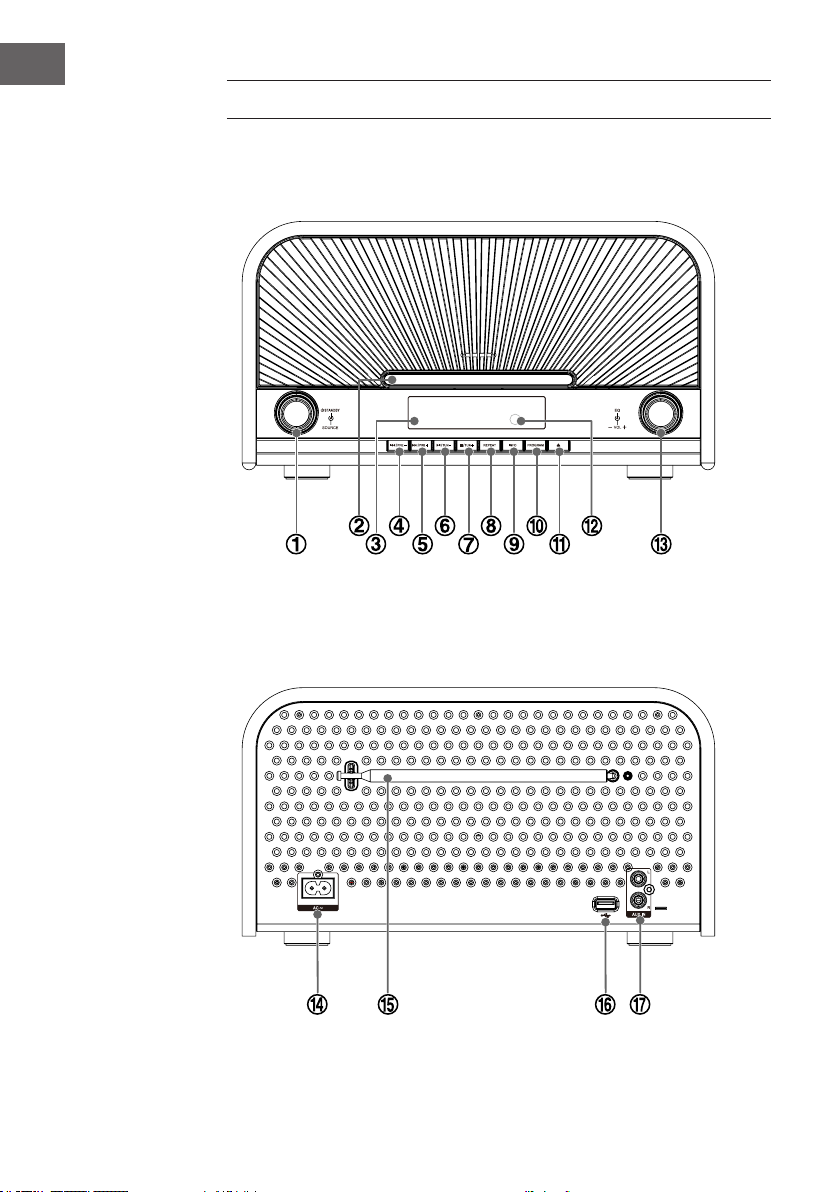
GERÄTEÜBERSICHT
Vorne
Rückseite
6
Page 7

1 Drücken: Standby ( STANDBY)
Drehen: Source (SOURCE)
2 CD-Fach
3 Displaylinse
4 /voriger Titel
Langes Drücken: Rückwärtssuche
Sender auf kleinerem Listenplatz speichern (PRE-)
5 /nächster Titel
Langes Drücken: Vorwärtssuche
Sender auf größerem Listenplatz speichern (PRE +)
6 Wiedergabe/Pause
Vorheriger Radiosender (TUN -)
7 STOP ()
Nächster Radiosender (TUN +)
8 Wiederholung eines Titels (REPEAT)
Stereo/Mono auswählen (REPEAT)
9 Information (INFORMATION)
10 Programmauswahl (PROGRAM)
Automatischer Suchdurchlauf (PROGRAM)
Speichern (PROGRAM)
11 Öffnen/Schließen
12 Fernbedienungssensor
13 Drücken: Equalizer einstellen (EQ)
Drehen: Lautstärke (VOL)
14 Stromanschluss
15 Teleskopantenne
16 USB-Anschluss
17 AUX-Eingang
DE
7
Page 8
DE
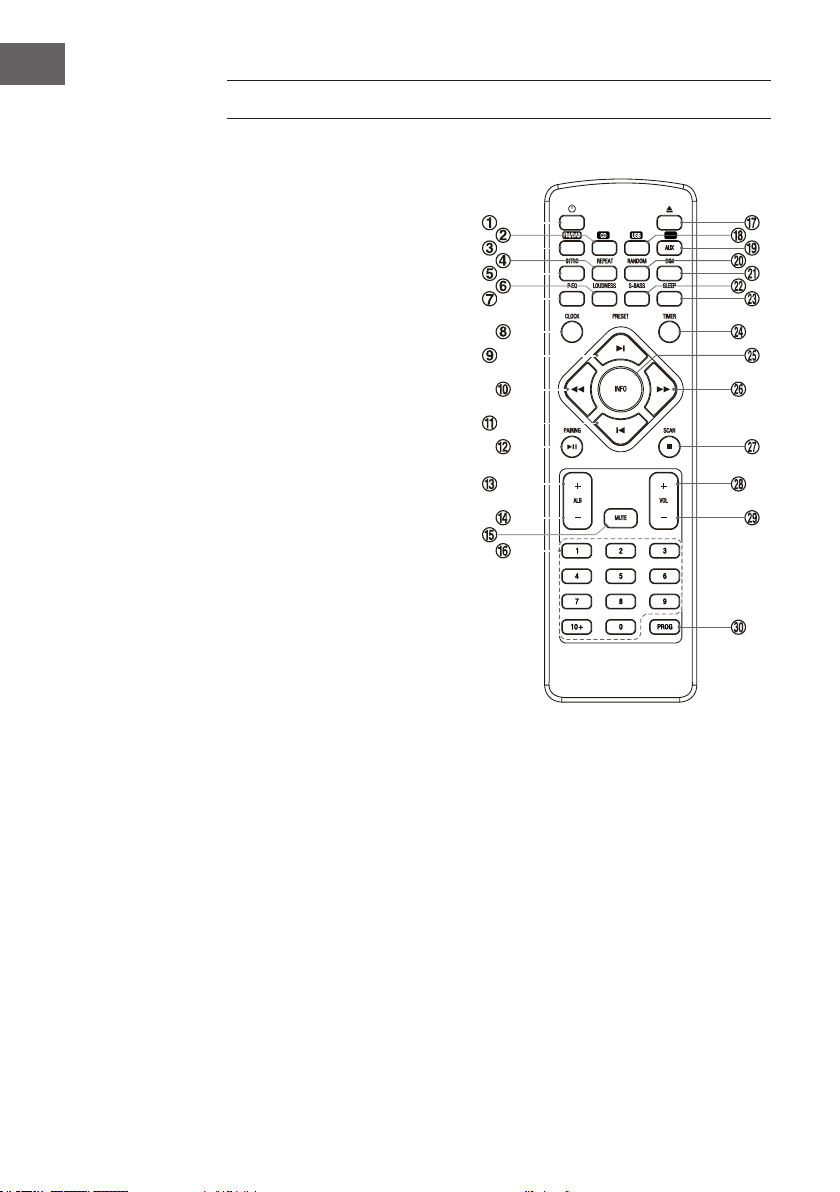
FERNBEDIENUNG
1 Standby
2 CD-Modus
3 Radio-Modus (UKW/DAB)
4 Wiederholen eines Titels
(REPEAT)
Stereo-/Monoauswahl
(REPEAT)
5 Intro (INTRO)
6 Lautstärke anpassen
7 Equalizer einstellen (EQ)
8 Uhrzeit einstellen (CLOCK)
9 Nächster Wiedergabetitel/
Höherer Listenplatz (PRESET)
10 Langes Drücken:
Rückwärtssuche
vorherige Radiosender
11 Vorheriger Wiedergabetitel
/ Niedrigerer Listenplatz
(PRESET )
12 Wiedergabe / Pause
Deaktivieren der BT-Funktion
(PAIRING)
13 Album weiter oben (ALB +)
14 Album weiter unten (ALB -)
15 Stummschaltung (MUTE)
16 Zahlenfeld (0-9, 10+)
17 Önen/Schließen
18 USB-Modus
19 BT-Modus
20 Zufallswiedergabe (RANDOM)
21 Displaybeleuchtung dimmen
(DIM)
22 Super Bass (S-BASS)
23 Sleep-Taste (SLEEP)
24 Timer (TIMER)
25 Information (INFO)
26 Langes Drücken:
BT
Vorwärtssuche / nächster
Radiosender
27 Stopp
Suche (SCAN)
28 Lautstärke erhöhen (VOL +)
29 Lautstärke verringern (VOL -)
30 Programm/Speichern/
Automatischer Sendersuchlauf
(PROG)
8
Page 9

Einsetzen der Batterien
1. Entfernen Sie den isolierenden Plastikstreifen von der
Batterieabdeckung. Er bendet sich an der unteren Hinterseite der
Fernbedienung.
2. Lösen Sie die Schraube an der Batterieabdeckung mit einem
Schraubenzieher. Ziehen Sie das Batteriefach mit Ihren Fingernägeln
heraus.
3. Setzen Sie eine vollständig aufgeladene Batterie (Größe 2025) korrekt
in das herausgezogene Batteriefach ein. Stecken Sie das Batteriefach
inklusive der Batterie wieder in die ursprüngliche Position zurück. Ziehen
Sie die Schraube mit einem Schraubenzieher fest.
DE
9
Page 10
DE
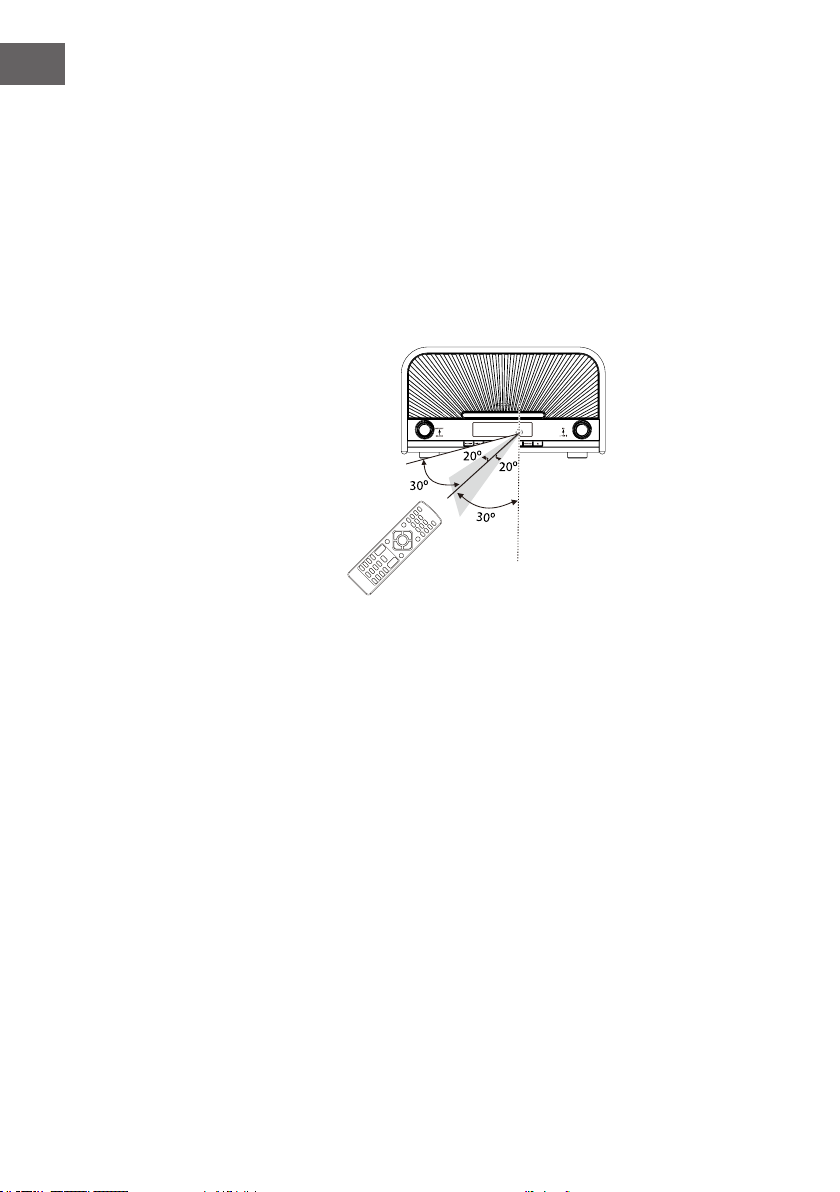
Reichweite der Fernbedienung
Halten Sie die Fernbedienung in einer Entfernung von maximal 6 Metern
zum Fernbedienungssensor am Gerät und halten Sie die Fernbedienung 60°
horizontal und 40° vertikal zur Vorderseite des Geräts. Die Reichweite der
Fernbedienung kann je nach Raumhelligkeit variieren.
Hinweis:
Vergewissern Sie sich, dass kein Hindernis zwischen Fernbedienungssensor
und Fernbedienung ist. Wenn Sie das Gerät beispielsweise in einem
Schrank mit Glastür platzieren, kann die Reichweite bei geschlossener Tür,
abhängig von der Dicke und Farbe der Tür, abnehmen.
• Setzen Sie den Infrarot Sensor der Fernbedienung keiner direkten
6m directly
6 m direkt vor
in front of the unit
dem Gerät
Sonneneinstrahlung oder anderen starken Lichtquellen, wie beispielsweise
uoreszierendem Licht, aus.
Halten Sie die Fernbedienung in einer Entfernung von maximal 6 Metern
zum Fernbedienungssensor am Gerät und halten Sie die Fernbedienung 60°
horizontal und 40° vertikal zur Vorderseite des Geräts. Die Reichweite der
Fernbedienung kann je nach Raumhelligkeit variieren.
Hinweis:
Vergewissern Sie sich, dass kein Hindernis zwischen Fernbedienungssensor
und Fernbedienung ist. Wenn Sie das Gerät beispielsweise in einem
Schrank mit Glastür platzieren, kann die Reichweite bei geschlossener Tür,
abhängig von der Dicke und Farbe der Tür, abnehmen.
Setzen Sie den Infrarot Sensor der Fernbedienung keiner direkten
Sonneneinstrahlung oder anderen starken Lichtquellen, wie beispielsweise
uoreszierendem Licht, aus.
10
Page 11
STROMVERSORGUNG
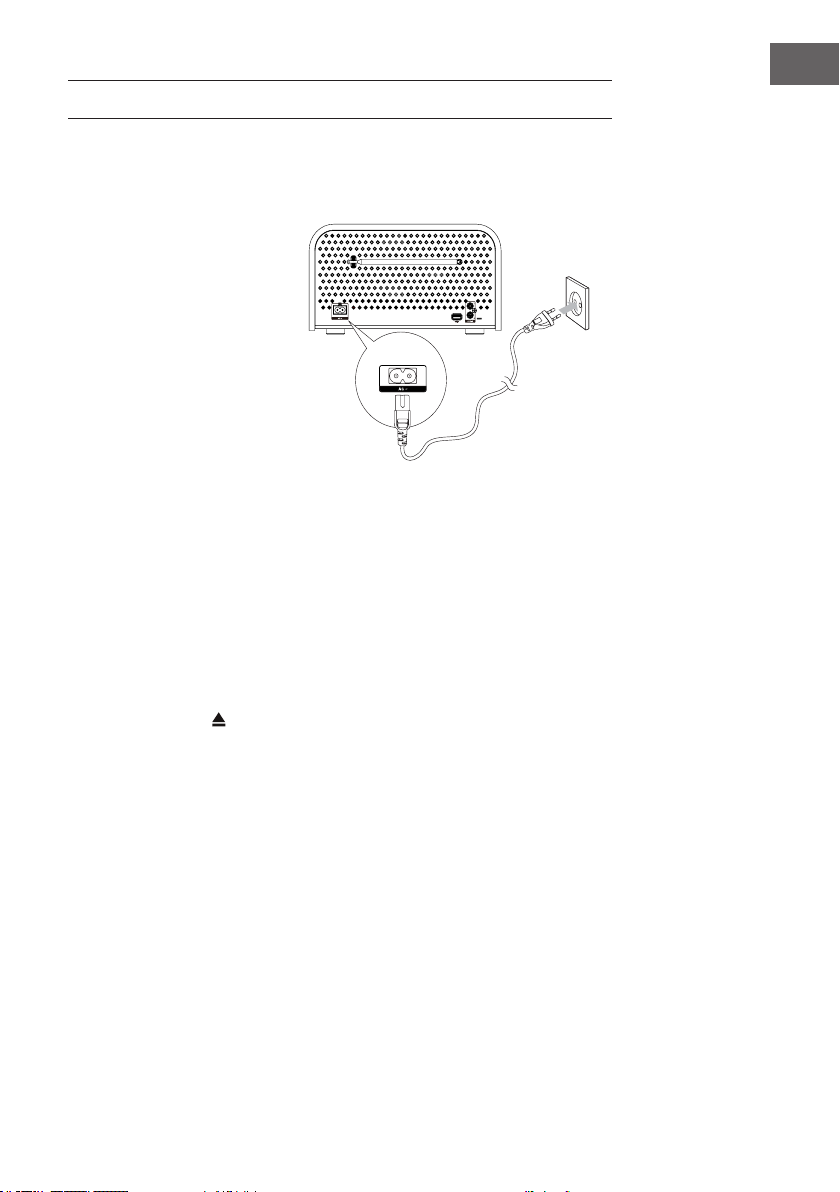
Anschluss
Verbinden Sie das
Wechselstromkabel mit
der dafür vorgesehenen
Schnittstelle an Ihrem
Gerät und stecken Sie den
Netzstecker am anderen Ende
des Kabels in die Steckdose.
Achtung: Achten Sie darauf,
dass Sie den Netzstecker
aus der Steckdose ziehen,
wenn Sie das Gerät über
einen längeren Zeitraum nicht
verwenden oder den Raum
für längere Zeit verlassen
ECO-Power/Standby Modus
Das Gerät Ein-/Ausschalten
Wenn Sie das Gerät das erste Mal an den Strom anschließen, wird es im
Standby-Modus sein.
• Drücken Sie den Knopf STANDBY am Gerät oder auf der
Fernbedienung. Das Gerät wird dann zur zuletzt ausgewählten Quelle
wechseln. (Wenn Sie das Gerät zum ersten Mal verwenden, wird es
automatisch zur Werkseinstellung wechseln.)
• Drücken Sie die -Taste und das Gerät wechselt in den DISC Modus
und önet das CD-Fach.
• Drücken Sie die Tasten FM/DAB, CD und USB ,BT/AUX, der
Fernbedienung, um zum gewünschten Programm zu kommen.
• Drücken Sie den Knopf STANDBY auf dem Gerät oder auf der
Fernbedienung, um in den Standby-Modus zurück zu gelangen.
DE
ECO- und Standby Modus
• Drücken Sie lange die STANDBY-Taste auf dem Gerät oder die Ein/Aus-
Taste auf der Fernbedienung für mehr als 2 Sekunden, um in den ECOoder Standby-Modus zu wechseln.
• Im ECO-Modus können Sie die CLOCK-Taste drücken, um in den
Standby-Modus zu wechseln und die Zeitanzeige zu sehen (falls die
Uhrzeit eingestellt wurde).
• Im Standby-Modus wird die Zeitanzeige auf dem Display des Geräts
11
Page 12

DE
angezeigt (falls die Uhrzeit eingestellt wurde).
Hinweis: Wenn das Gerät länger als 90 Sekunden im Standby-Modus ist,
wechselt es automatisch in den ECO-Modus.
Automatische Abschaltung
As a power-saving feature, the unit will automatically switch to Standby
mode if you do not press any buttons within 15 minutes after playback is
stopped.
Manuelle Zeiteinstellung
Hinweis: Sie können die Uhrzeit nur einstellen, wenn sich das Gerät im
Standby-Modus bendet.
1. Drücken Sie im Standby-Modus für mehr als 2 Sekunden die CLOCKTaste auf der Fernbedienung, um die Zeiteinstellung zu aktivieren. Die
Zeitformate [24--H] oder [12--H] werden dann aufblinken.
2. Drücken Sie zur Auswahl des Zeitformats die Taste / auf dem
Gerät oder / auf der Fernbedienung.
3. Drücken Sie die Taste CLOCK, um die Einstellung zu speichern und bis
die Stundenanzeige aufblinkt.
4. Wiederholen Sie die Schritte 2-3 um die Stunden- und Minutenanzeige
einzustellen.
Hinweis:
• Um ohne zu Speichern aus dem Zeiteinstellungsmodus heraus zu
kommen, drücken Sie die STOP-Taste.
• Wenn länger als 10 Sekunden keine Taste gedrückt wird, verlässt das
Gerät den Zeiteinstellungsmodus automatisch.
• Wenn der Netzstecker des Geräts aus der Steckdose gezogen wird bzw.
das Gerät ohne Strom ist, wird die Zeiteinstellung gelöscht und muss
hinterher neu eingestellt werden.
Automatische Synchronisation der Uhrzeit
Wenn Sie die Uhrzeit nicht manuell einstellen, kann das Gerät über DAB/
DAB+RDS Kanäle (mit CT), die Zeit automaisch einstellen.
Uhrzeitanzeige
Die Uhrzeit kann in jedem Modus angezeigt werden, wenn Sie die Taste
CLOCK drücken.
12
Page 13

AUDIOEINSTELLUNGEN
Anpassung der Lautstärke
Drehen Sie den Knopf - VOL + des Geräts, um die Lautstärke zu erhöhen
oder zu senken oder drücken Sie die Tasten VOL +/- der Fernbedienung.
Stummschaltung
Sie können die Lautstärke vorübergehend stummschalten. Drücken Sie
hierfür während der Wiedergabe die MUTE-Taste. Drücken Sie die Taste
MUTE erneut, um die Stummschaltung zu deaktivieren.
Hinweis: Wenn Sie während der Stummschaltung die Laustärke oder die
Quelle verändern, oder die Tasten P-EQ, LOUDNESS oder S-BASS drücken,
wird die Stummschaltung automatisch deaktiviert.
Anpassung des Super Bass
Sie können den Bass-Sound verstärken, um die volle, reichhaltige BassLeistung auch bei niedriger Lautstärke zu gewährleisten. Drücken Sie
hierfür die Taste S-Bass der Fernbedienung, um den gewünschten Eekt zu
erreichen. Das Display Ihres Geräts wird dann „DBB-ON“ anzeigen. Drücken
Sie die Taste S-Bass erneut, um den Eekt zu deaktivieren. Nach dem
Deaktivieren, wird das Display „DBB OFF“ anzeigen.
DE
Lautstärkeregelung
Dieses Gerät hat eine Lautstärkefunktion, die den Basseekt bei geringer
Lautstärke automatisch anpasst. Die Funktion kann den Basseekt auch
bei hoher Lautstärke verstärken, allerdings fällt das Verstärken bei hoher
Lautstärke eher gering aus. Drücken Sie die Taste LOUDNESS auf der
Fernbedienung, um die Laustärkenkontrolle zu aktivieren. Das Display wir
dann „LOUD ON“ anzeigen. Zur Deaktivierung der Lautstärkenkontrolle
drücken Sie erneut die Taste LOUDNESS. Das Display wird nach dem
Deaktivieren „LOUD OFF“ anzeigen.
Equalizer Anpassung
Sie können den Sound an das von Ihnen gewählte Musikgenre anpassen.
Drücken Sie während der Wiedergabe mehrfach die Taste EQ auf dem Gerät
oder die P-EQ Taste auf Ihrer Fernbedienung, um zu Ihrer gewünschten
Soundeinstellung zu gelangen. Sie können zwischen Flat, Pop, Rock, Classic
und Jazz wählen.
13
Page 14

DE
Helligkeitseinstellung Display
Um die Helligkeit des Displays zu intensivieren/zu verringern, drücken Sie
mehrfach die DIM Taste Ihrer Fernbedienung, bis Sie den gewünschten
Helligkeitsgrad erreicht haben.
DAB-SENDER/DAB-SENDER UND
RADIOEINSTELLUNG
Hinweis: Vergewissern Sie sich vor dem Einschalten des Radios bitte, ob die
Teleskopantenne am hinteren Teil des Geräts richtig angepasst ist.
DAB-Sendereinstellung
• Drehen Sie entweder mehrfach am SOURCE Knopf Ihres Geräts oder
drücken Sie mehrfach die Taste FM/DAB Ihrer Fernbedienung, um den
DAB-Sendersuch-Modus zu aktivieren. Das Display Ihres Geräts wird
„DAB“ anzeigen.
• Das Gerät beginnt automatisch die Suche nach verfügbaren Band III
Sendern.
• Alle verfügbaren Sender werden automatisch programmiert.
• Das Gerät wird alle verfügbaren Sender nach dem Suchlauf automatisch
speichern und mit dem Abspielen eines Senders beginnen.
• Falls keine DAB-Sender verfügbar sein sollten, zeigt das Display „NO
DAB“ an.
Manuelle Einstellung eines DAB-Senders
1. Drücken und halten Sie die PLAY/PAUSE Taste der Fernbedienung für
mehr als 2 Sekunden, um zur manuellen Sendersuche zu gelangen.
2. Drücken Sie die TUN +/- Tasten des Geräts oder die / Taste der
Fernbedienung, um die Vorwärts- oder Rückwärtssuche nach Ihrem
Sender zu beginnen.
3. Drücken Sie PLAY/PAUSE, um den eingestellten Sender zu bestätigen
und mit der Wiedergabe zu beginnen.
Automatische DAB-Senderspeicherung
Drücken Sie die Taste SCAN Ihrer Fernbedienung, um zum automatischen
Programmierungsmodus zu gelangen. „SCAN“ wird für einige Sekunden
auf dem Display angezeigt. Alle verfügbaren Sender werden automatisch
programmiert. Das Gerät wird alle verfügbaren Sender nach dem Suchlauf
14
Page 15

automatisch speichern und mit dem Abspielen eines beliebigen Senders
aus der Liste beginnen.
Manuelle DAB-Senderspeicherung
1. Stellen Sie den gewünschten DAB-Radiosender ein.
2. Drücken Sie die Taste PROGRAM Ihres Geräts oder die PROG-Taste
Ihrer Fernbedienung, um den Speichermodus zu aktivieren. Die
voreingestellten Zahlen w erden auf dem Display aufblinken.
3. Drücken Sie so lange die Taste PRE +/- auf Ihrem Gerät bzw. die Taste
PRESET/ der Fernbedienung, bis Sie zur gewünschten Listennummer
gelangt sind(1-20), bei der Sie den Sender speichern wollen.
4. Drücken Sie zum Speichern des Senders erneut die Taste PROGRAM
Ihres Geräts bzw. die PROG-Taste der Fernbedienung.
5. Wiederholen Sie die Schritte 1-4 für jeden Sender, den Sie auf einem
bestimmten Platz in der Liste speichern wollen.
Hinweis: Die gespeicherten Sender werden nicht gelöscht, wenn das Gerät
ausgesteckt wird oder ohne Strom ist.
Aufrufen eines gespeicherten DAB-Radiosenders
Drücken Sie so lange die Taste PRE +/- auf Ihrem Gerät oder PRESET/
auf Ihrer Fernbedienung, bis der gewünschte Sender auf dem
Display angezeigt wird. Das Gerät wird den von Ihnen gewählten Sender
automatisch abspielen.
DE
Informationsanzeige DAB/DAB+ Sender
Beim Empfang eines DAB/DAB+ Senders können Sie die dazugehörigen
Informationen in mehreren Modi sehen. Je nachdem, welchen Sender Sie
eingestellt haben, kann es vorkommen, dass manche Informationen nicht
verfügbar sind. Drücken Sie mehrmals die Taste INFO, um die folgenden
Informationen zu sehen:
Name des Senders
Wenn ein DAB/DAB+ Sender empfangen wird, zeigt das Display den
Namen des Senders an.
Der Ensemblename zeigt die Mehrfachverbindung an, die den gewünschten
Radiosender enthält. Bei einer Mehrfachverbindung werden mehrere
Sender gebündelt und über dieselbe Frequenz übertragen Es gibt nationale
und lokale Mehrfachverbindungen. Lokale Verbindungen beinhalten nur die
regionsspezischen Sender.
15
Page 16

DE
Hinweis: Im Gegensatz zum normalen Radio, werden bei DAB/DAB+
mehrere Radiosender zusammen über die gleiche Frequenz übertragen.
Uhrzeit
Die Uhrzeit wird automatisch vom aktuell eingestellten Radiosender
bereitgestellt.
Datum
Das Datum wird automatisch vom aktuell eingestellten Radiosender
bereitgestellt.
DLS (dynamisches Label Segment)
Das Dynamische Label Segment ist eine optionale Nachricht des
Radiosenders, die im Display während der Wiedergabe eingeblendet
werden kann. Die Nachricht enthält in den meisten Fällen Informationen,
wie beispielsweise Programmdetails etc.
Signalstärke
Es wird eine Zahl zwischen 0 und 100 auf dem Display eingeblendet,
um die Signalstärke anzuzeigen. Je besser das Signal, desto höher die
eingeblendete Zahl.
Art des Senders
Hier wird der „Musikstil“ oder das „Genre“ des gewählten Senders
angezeigt.
Frequenz
Die aktuelle Frequenz des gewählten Radiosenders wird hier angezeigt.
Audio Bit Rate
Das Display zeigt die aktuell empfangene Audio Bit Rate an.
Stereo/Mono
Das Display des Geräts zeigt an, ob der Sender auf Stereo oder Mono
empfangen wird.
16
Page 17

UKW-RADIO
Hinweis: Bevor Sie die Radiofunktion verwenden, achten Sie bitte darauf,
dass die Antenne richtig eingestellt ist (Länge und Richtung).
Einstellen der Radiofunktion
1. Drehen Sie mehrfach am SOURCE Knopf des Geräts oder drücken
Sie die Taste FM/DAB auf Ihrer Fernbedienung, um zum Radio
Wiedergabemodus zu gelangen. Das Display zeigt dann „TUNER“ an.
2. Sie können nach den unten beschriebenen Methoden einen Sender
auswählen.
Automatische Sendereinstellung
Drücken Sie für länger als 2 Sekunden die TUN +/- Taste Ihres Geräts
oder / auf der Fernbedienung. Die Frequenz erhöht/verringert sich
automatisch, bis ein Sender gefunden wurde.
Manuelle Sendereinstellung
Drücken Sie mehrfach die Tasten TUN +/- Ihres Geräts oder die / -Taste
der Fernbedienung, um die Frequenz so lange zu ändern, bis Sie Ihren
gewünschten Sender gefunden haben.
Senderspeicherung (erst möglich, nachdem die Sender eingestellt wurden)
Drücken Sie die Tasten PRE +/- des Geräts oder PRESET/ auf
der Fernbedienung, um den gewählten Sendern eine Listennummer
zuzuweisen. Die jeweilige Frequenz und Bandbreite, werden auf dem
Display angezeigt.
DE
Radiosender einstellen und speichern
Sie können maximal 20 Radiosender in der Liste einspeichern (FM).
Automatische Senderspeicherung
• Drücken Sie länger als 2 Sekunden die Taste PROGRAM Ihres Geräts
oder die PROG-Taste Ihrer Fernbedienung, um den automatischen
Speichermodus zu aktivieren.
• „Auto“ wird auf dem Display angezeigt und alle verfügbaren Programme
(maximal 20) werden gespeichert.
• Der erste gespeicherte Sender der Liste wird automatisch
wiedergegeben.
Hinweis: Um den automatischen Speichermodus zu deaktivieren, bevor 20
Sender gespeichert wurden, drücken Sie die -Taste .
17
Page 18

DE
Manuelle Senderspeicherung
1. Stellen Sie einen Radiosender ein.
2. Drücken Sie die Taste PROGRAM Ihres Geräts oder die PROG-Taste Ihrer
Fernbedienung, um den Speichermodus zu aktivieren. Die eingestellte
Listennummer wird blinken.
3. Drücken Sie die Tasten PRE +/- des Geräts oder PRESET/ auf der
Fernbedienung, um den gewählten Sendern eine Listennummer (1-20)
zuzuweisen.
4. Drücken Sie erneut die Tasten PRE +/- des Geräts oder PRESET auf
der Fernbedienung, um den Sender auf dem von Ihnen gewählten
Listenplatz zu speichern.
5. Wiederholen Sie die Schritte 1-4 für jeden weiteren Sender, den Sie
speichern wollen.
Hinweis: Die gespeicherten Sender werden beim Ziehen des Netzsteckers,
oder wenn das Gerät ohne Strom ist, nicht gelöscht.
Änderung des FM-Empfangsmodus
Drücken Sie die Taste REPEAT, um zwischen Stereo und Mono auszuwählen
und dadurch den besten FM-Empfang zu haben.
RDS Informationsanzeige
RDS (Radio Data System) ermöglicht es FM-Sendern zusätzliche
Informationen anzuzeigen. Wenn Sie einen RDS-Sender einstellen, werden
das RDS-Symbol und der Name des Senders auf dem Display angezeigt.
1. Stellen Sie einen RDS-Sender ein.
2. Drücken Sie so lange die Taste INFO, bis Sie alle gewünschten
Informationen haben (falls verfügbar):
Art des Senders (Nachrichten), (Sport), (POP MUSIK) etc.
RDS Uhr
ABSPIELEN VON AUDIO CDS UND MP3/WMADISCS
Wiedergabe
1. Drehen Sie den SOURCE Knopf Ihres Geräts oder drücken Sie die CDTaste auf Ihrer Fernbedienung, um in den Disc-Modus zu wechseln. Ihr
Display zeigt dann „DISC“ an.
2. Zum Önen des CD-Fachs drücken Sie und legen Sie die CD/Disc mit
der bedruckten Seite nach oben in das Fach.
3. Drücken Sie erneut , um das CD-Fach zu schließen. Das Gerät wird die
18
Page 19

CD/Disc automatisch lesen und abspielen. Hinweis: Wenn sich das Gerät
im Stopp-Modus bendet, drücken Sie die Taste BF, um die Wiedergabe
zu starten.
4. Wenn Sie während der Wiedergabe die Taste drücken, wird diese
kurzzeitig unterbrochen. Drücken Sie die Taste erneut, um die
Wiedergabe fortzusetzen.
5. Drücken Sie die Taste , um wie Wiedergabe zu beenden.
Hinweis: Wenn das Gerät ausgesteckt wird oder kurzzeitig ohne Strom ist,
An-/oder ausgeschaltet wird oder sich im Standby-/ECO-Modus bendet,
wird der letzte wiedergegebene Titel gespeichert und die Wiedergabe wird
bei erneutem Einschalten dort fortgesetzt.
Musiktitel überspringen, suchen und wiedergeben
• Drücken Sie einmal oder mehrfach die Taste Ihres Geräts oder
auf Ihrer Fernbedienung, um einen oder mehrere vorherige Titel der CD
zurückzuspringen.
• Drücken Sie die Taste des Geräts oder auf der Fernbedienung, um
den nächsten oder mehrere Titel der CD zu überspringen.
Suche und Wiedergabe
Drücken Sie die / Taste Ihres Geräts oder die / -Taste der
Fernbedienung, um die gewünschte Wiedergabeposition zu suchen.
Textanzeige während der Wiedergabe
DE
Für Audio CDs
Drücken Sie wiederholt die Taste INFO um die aktuelle Titelnummer und die
bereits vergangene Wiedergabezeit des Titels oder die noch verbleibende
Wiedergabezeit bzw. die gesamte bereits vergangene Wiedergabezeit der
CD oder die gesamte verbleibende Wiedergabezeit der CD anzuzeigen.
Für MP3/WMA- Discs
Drücken Sie wiederholt die Taste INFO, ID3 Informationen (z.B. Liedtitel,
Künstler etc.) werden für einige Minuten auf dem Display eingeblendet.
Programmierbare Wiedergabe bei CDs und Mp3/WMA-Discs
Sie können bis zu 20 Wiedergabetitel einspeichern und in einer von Ihnen
festgelegten Reihenfolge abspielen.
1. Legen Sie eine CD/Disc ein und drücken Sie STOP, sobald die
Wiedergabe beginnt, die Taste L.
2. Drücken Sie PROGRAM auf Ihrem Gerät oder die PROG-Taste Ihrer
Fernbedienung bis „001 P—01“ auf dem Display angezeigt wird.
19
Page 20

DE
3. Drücken Sie die Taste / auf dem Gerät bzw. /0-9 auf der
Fernbedienung, um die gewünschte Speicherposition für einen
Wiedergabetitel festzulegen.
4. Drücken Sie erneut die Taste PROGRAM des Geräts bzw. PROG auf der
Fernbedienung, um die festgelegte Wiedergabeposition zu speichern.
Für Titelnummer 12 wird dann beispielsweise die Wiedergabeposition
„012 P—02“ auf dem Display angezeigt.
5. Wiederholen Sie die Schritte 3 und 4 für alle weiteren Titel, die Sie
auswählen und einspeichern möchten.
6. Drücken Sie die -Taste; um die Wiedergabe der gespeicherten Titel zu
starten.
7. Zum Stoppen des Wiedergabemodus der gespeicherten Titel drücken
Sie einmal die -Taste. Drücken Sie die STOP-Taste zweimal, um die
gespeicherten Titel zu löschen.
Wiedergabe des Anfangs (Intro) jedes Wiedergabetitels
Drücken sie die INTRO Taste Ihrer Fernbedienung um das Intro jedes
Titels, beginnend beim ersten Titel der CD/Disc, abzuspielen. Die ersten 10
Sekunden jedes Titels werden dann abgespielt. Wenn Sie den gewünschten
Titel hören, drücken Sie die Taste , um diesen vollständig abzuspielen.
Zufallswiedergabe
Wenn Sie die Taste RANDOM auf Ihrer Fernbedienung drücken, werden alle
Titel in einer zufällig festgelegten Reihenfolge wiedergegeben. Das Display
zeigt in diesem Modus „SHUF“ an. Um zum normalen Wiedergabemodus
zurück zu kehren, drücken Sie die Taste RANDOM erneut.
20
Auswahl eines Albums (bei MP3/WMA-Discs)
• Im Wiedergabemodus: Drücken Sie die Taste ALB +/- auf der
Fernbedienung, um den nächsten/vorherigen Ordner auszuwählen. Der
erste Titel des Ordners wird dann automatisch abgespielt.
• Im Stoppmodus: Drücken Sie die Taste ALB +/- auf der Fernbedienung,
um den nächsten/vorherigen Ordner auszuwählen. Drücken Sie dann
die Taste , um die Wiedergabe des ersten Titels des Ordners zu
starten.
Wiederholung eines Titels
Drücken Sie während der Wiedergabe eines Titels die Taste REPEAT, um
den Titel zu wiederholen.
Page 21

Bei Audio-CDs
• Einmaliges Drücken der Taste REPEAT: Der aktuelle Titel wird in
Dauerschleife wiedergegeben und das Display des Geräts zeigt „REP“
an.
• Zweimaliges Drücken der Taste REPEAT: Alle Titel werden in
Dauerschleife wiedergegeben und das Display zeigt „REP ALL“ an.
• Dreimaliges Drücken der Taste REPEAT: Die Wiederholung aller
Titel wird abgebrochen und das Gerät wechselt in den normalen
Wiedergabemodus.
Bei MP3/WMA-Discs
• Einmaliges Drücken der Taste REPEAT: Der aktuelle Wiedergabetitel
wird in Dauerschleife abgespielt und das Display zeigt „REP“ an.
• Zweimaliges Drücken der Taste REPEAT: Das aktuelle Album wird in
Dauerschleife abgespielt und das Display zeigt „REP ALB“ an.
• Dreimaliges Drücken der Taste REPEAT: Alle Wiedergabetitel werden in
Dauerschleife abgespielt und das Display zeigt „REP ALL“ an.
• Viermaliges Drücken der Taste REPEAT: Die Wiederholung aller
Titel wird abgebrochen und das Gerät wechselt in den normalen
Wiedergabemodus.
USB-WIEDERGABE
DE
Hinweis: Vergewissern Sie sich, dass Ihr USB-Gerät abspielbare AudioDateien in von Ihrem Gerät unterstützten Formaten enthält. Für die
allgemeinen Funktionshinweise lesen Sie bitte den Abschnitt
Abspielen von Audio CDs und MP3/WMA-Discs.
1. Stecken Sie das USB-Gerät in den durch das Symbol gekennzeichneten
Anschluss an Ihrem Audiosystem.
2. Drehen Sie entweder den SOURCE-Drehknopf Ihres Geräts oder drücken
Sie die USB-Taste Ihrer Fernbedienung, um zum USB-Wiedergabemodus
zu gelangen. Das Display zeigt dann „USB“ an.
3. Die auf dem USB-Gerät gespeicherte Musik wird automatisch abgespielt.
(Falls sich das Gerät im Stoppmodus bendet, drücken Sie die Taste
PLAY/PAUSE, um die Wiedergabe zu starten.)
4. Drücken Sie die Taste PLAY/PAUSE, um die Wiedergabe kurzzeitig
zu unterbrechen. Drücken Sie die Taste PLAY/PAUSE erneut, um die
Wiedergabe fortzusetzen.
5. Drücken Sie die / Tasten Ihres Geräts, oder auf der
Fernbedienung, um einen bestimmten Wiedergabetitel auszuwählen.
21
Page 22

DE
6. Drücken Sie die STOP-Taste um die Wiedergabe zu beenden.
Auswahl eines Albums
• Im Wiedergabemodus: Drücken Sie die Taste ALB +/- auf der
Fernbedienung, um den nächsten/vorherigen Ordner auszuwählen. Der
erste Wiedergabetitel des Ordners wird automatisch abgespielt.
• Im Stoppmodus: Drücken Sie die Taste ALB +/- auf der Fernbedienung,
um den nächsten/vorherigen Ordner auszuwählen. Drücken Sie die
PLAY7PAUSE-Taste, um den ersten Titel des Ordners abzuspielen.
Aufladen eines Geräts über den USB-Anschluss
• Sie können über den USB-Anschluss mit dem Symbol ein Gerät
auaden. Verbinden Sie das Gerät hierfür über ein Kabel mit dem USB-
Anschluss ihres Audiosystems.
• Die maximale USB-Ladekapazität beträgt 5V 1A
• Nicht alle Geräte sind für das Laden über den USB-Anschluss geeignet
• Beim Verändern des Wiedergabemodus, kann das Laden kurzzeitig
beeinträchtigt werden.
Wiedergabe über BT
1. Drehen Sie den SOURCE-Drehknopf, bis das Display „BT“ anzeigt und
das BT-Symbol blinkt oder drücken Sie wiederholt die Taste BT/AUX auf
Ihrer Fernbedienung.
2. Schalten Sie bei Ihrem BT-Gerät de BT-Funktion ein (Siehe
Bedienungsanleitung BT-Gerät)
3. Wählen Sie zum Verbinden mit dem Audiosystem „Glastonbury“
auf Ihrem BT-Gerät aus. Bei älteren Geräten müssen Sie als
Verbindungspasswort „0000“ eingeben.
4. Wenn die Verbindung über BT erfolgreich hergestellt wurde, zeigt das
Display permanent an.
5. Starten Sie die Wiedergabe der Titel auf Ihrem BT-Gerät. Sie können
Ihr Audiosystem und die dazugehörige Fernbedienung zur Einstellung
benutzen:
• Zum Pausieren/Fortsetzen der Wiedergabe drücken Sie .
• Um einen Titel zu überspringen, drücken Sie .
• Zum Erhöhen/Senken der Lautstärke, drücken Sie VOL +/-
6. Zum Deaktivieren der BT-Funktion drücken Sie länger als 2 Sekunden die
Taste PAIRING auf Ihrer Fernbedienung. Das BT-Symbol blinkt dann auf
dem Display auf.
22
Page 23

Hinweis:
• Die Reichweite der BT-Verbindung kann durch Hindernisse
eingeschränkt werden.
• Wenn sich das BT-Gerät außerhalb der Reichweite Ihres Audiosystems
bendet, wird die Verbindung automatisch unterbrochen. Wenn Sie das
BT-Gerät wieder verbinden wollen, müssen Sie es in Reichweite des
Audiosystems platzieren.
• Eine Kompatibilität mit allen verfügbaren BT-Geräten wird nicht
garantiert.
Automatisches Ausschalten (Sleep Timer)
• Drücken Sie während das Gerät eingeschaltet ist die Taste SLEEP der
Fernbedienung, um den gewünschten Zeitraum bis zum automatischen
Ausschalten des Geräts einzustellen.
• Sie können zwischen den folgenden Zeiträumen wählen (in Minuten):
120, 90, 75, 60, 45, 30, 15.
• Wenn die Zeit abgelaufen ist wird der Sleep Timer automatisch aktiviert
und das Display zeigt „ Zz“ an.
• Zum Deaktivieren des Sleep Timers drücken Sie die taste SLEEP so
lange bis das Display [SLEEP 00] anzeigt. Nach dem erfolgreichen
Deaktivieren des Sleep Timers verschwindet die Anzeige „Z^z“
WECKFUNKTION
DE
Hinweis: Achten Sie darauf, dass die Uhrzeit richtig eingestellt ist.
1. Drücken Sie im Standby-Modus die Taste TIMER der Fernbedienung
für länger als 2 Sekunden. das Uhrsymbol wird auf dem Display
eingeblendet und die Quelle (z. B. DISC) blinkt.
2. Drücken Sie die / Tasten Ihres Geräts oder die / Tasten der
Fernbedienung, um die gewünscht Wiedergabequelle (z.B. DISC, TUNER
etc.) auszuwählen.
3. Drücken Sie die TIMER Taste, um die gewünschte Uhrzeit einzustellen.
Die Stundenanzeige blinkt dann.
4. Wiederholen Sie die Schritte 2-3, um Stunden und Minuten der Weckzeit
einzustellen.
Hinweis:
• Wenn Sie keine Weckzeit speichern wollen, drücken Sie die -Taste,
um die Einstellung zu beenden.
• Wenn DISC/USB ausgewählt wurde und diese nicht abgespielt werden
23
Page 24
DE
kann, wird automatisch das Radio (TUNER) aktiviert.
• Wenn für mindestens 10 Sekunden keine Taste gedrückt wird, beendet
das Gerät das Einstellen der Weckfunktion automatisch.
Deaktivierung und Reaktivierung der Weckfunktion
Drücken Sie die Taste TIMER um den Wecker ein- oder auszuschalten. Wenn
der Wecker aktiviert wurde, zeigt das Display das Uhrsymbol an.
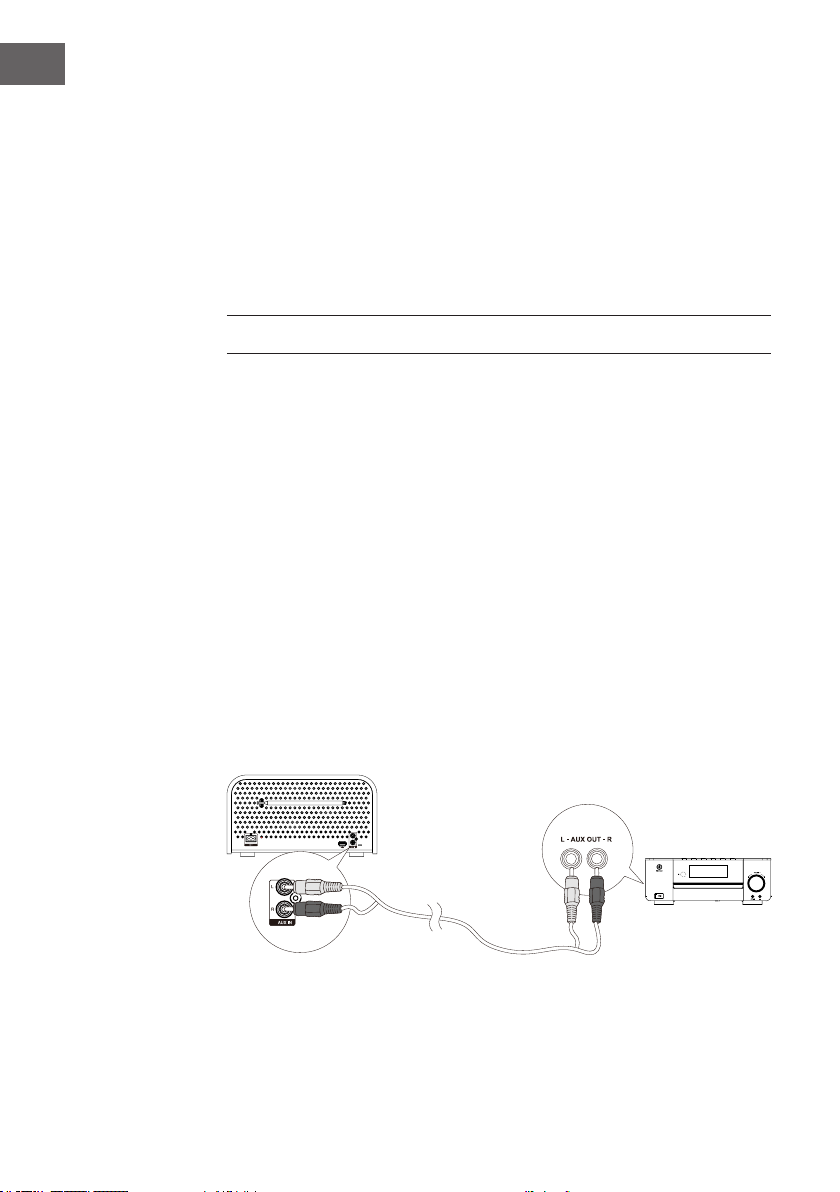
ANHÖREN EXTERNER AUDIOGERÄTE
1. Verbinden Sie den AUX-INPUT Ihres Geräts mit dem AUX-OUTPUT Ihres
externen Audio-Geräts, wie unten dargestellt, über ein Audio Kabel.
2. Drehen Sie den SOURCE-Drehknopf des Geräts oder drücken Sie die
Taste BT/AUX der Fernbedienung, um das externe Audio-Gerät als
Wiedergabequelle auszuwählen. Das Display zeigt dann „AUX“ an.
3. Starten Sie die Wiedergabe auf Ihrem externen Audiogerät (Siehe
Bedienungsanleitung des externen Audiogeräts).
24
Page 25
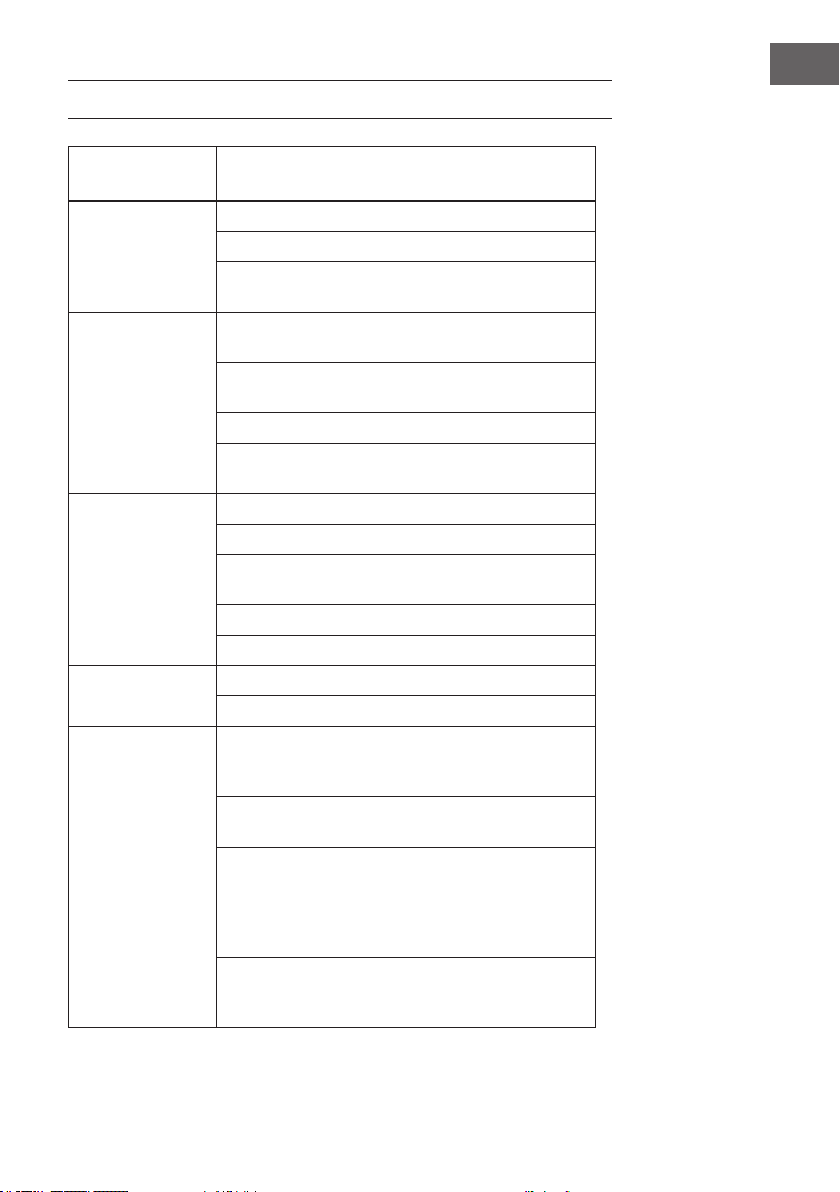
FEHLERBEHEBUNG
Problem Möglicher Grund / Abhilfe
Überprüfen Sie, ob der Netzstecker in der Steckdose ist.
Kein Strom
Fernbedienung
funktioniert nicht
CD/Disk wird nicht
abgespielt
Kein Ton oder sehr
leise
CD/Disk wird nicht
abgespielt
Überprüfen Sie, ob die Steckdose eingeschaltet wurde.
Das Gerät schaltet nach 15 Minuten ohne Benutzung in
den Standby-Modus, um Strom zu sparen.
Verringern Sie den Abstand zwischen Gerät und
Fernbedienung.
Legen Sie die Batterien korrekt gepolt in das Batteriefach
ein (+/- auf Batterie und im Batteriefach beachten).
Wechseln Sie die Batterien.
Halten Sie die Fernbedienung genau in Richtung des
Fernbedienungssensors.
Legen Sie eine CD/Disk ins Fach ein
Überprüfen Sie, ob die CD/Disk richtig eingelegt wurde.
Warten Sie, bis die Linse des Geräts frei von
Kondensationswasser ist.
Reinigen oder ersetzen Sie die CD/Disk
Überprüfen Sie, on die CD/Disk das richtige Format hat.
Passen Sie die Lautstärke an.
Überprüfen Sie, ob das Gerät stummgeschaltet ist.
Legen Sie eine vom Gerät lesbare CD/DISK ein und
vergewissern Sie sich, dass die Beschriftung nach oben
zeigt.
Überprüfen Sie die CD/Disk auf Kratzer und
Verschmutzungen.
Feuchtigkeit könnte ins Gerät gelangt sein. Entfernen Sie
die CD und lassen Sie das Gerät für ungefähr eine Stunde
eingeschaltet. Ziehen Sie den Netzstecker anschließend
aus der Steckdose. Stecken Sie den Netzstecker wieder in
die Steckdose und schalten Sie das Gerät ein.
Das Gerät wird nach Beenden der Wiedergabe nach 15
Minuten automatisch abgeschaltet, um Strom zu sparen.
Überprüfen Sie, ob das der Fall ist.
DE
25
Page 26

DE
Problem Möglicher Grund / Abhilfe
Schlechter
Radioempfang
Einige Dateien des
USB-Geräts können
nicht angezeigt
werden
Einige Dateien des
USB-Geräts können
nicht angezeigt
werden
USB-Gerät wird nicht
unterstützt
Musik kann auch
nach erfolgreicher
BT-Verbindung nicht
Wiedergegeben
werden
Schlechte
Tonqualität über BT
Verbindung mit der
Stereoanlage ist
nicht möglich
Timer funktioniert
nicht
Uhrzeit/
Timereinstellung
wurde gelöscht
Überprüfen Sie, ob die Länge der Antenne und die
Richtung, in die sie zeigt, richtig angepasst sind
Die Anzahl an Ordnern auf dem USB-Gerät übersteigt
eine gewisse Begrenzung. Dieses Phänomen ist keine
Funktionsstörung.
Das Format der Dateien wird nicht unterstützt.
Die Anzahl an Ordnern auf dem USB-Gerät übersteigt
eine gewisse Begrenzung. Dieses Phänomen ist keine
Funktionsstörung.
Das Format der Dateien wird nicht unterstützt.
Das USB-Gerät ist inkompatibel mit der Stereoanlage.
Versuchen Sie ein anderes USB-Gerät zu benutzen.
Das BT-Gerät kann über eine drahtlose Verbindung keine
Musik abspielen
Der BT-Empfang ist schlecht. Legen Sie Ihr externes
BT-Gerät näher an die Stereoanlage und entfernen
Sie gegebenenfalls Gegenstände, die die Verbindung
zwischen den beiden Geräten stören könnte.
Ihr externes Gerät erfüllt die Anforderungen zum
Verbinden mit der Stereoanlage nicht.
Die BT-Funktion Ihres externen Geräts ist ausgeschaltet.
Lesen Sie gegebenenfalls in der Bedienungsanleitung des
externen Geräts nach, wie die BT-Funktion aktiviert wird.
Die Stereoanlage bendet sich nicht im
Verbindungsmodus.
Die Stereoanlage ist bereits mit einem anderen Gerät
über BT verbunden. Deaktivieren Sie das andere Gerät
und versuchen Sie es erneut.
Stellen Sie die Uhrzeit richtig ein.
Schalten Sie den Timer ein.
Die Stromverbindung war unterbrochen oder das
Netzwerkkabel wurde herausgezogen.
Stellen Sie die Uhrzeit/Timer neu ein.
26
Page 27

HINWEISE ZUR ENTSORGUNG
Bendet sich die linke Abbildung (durchgestrichene
Mülltonne auf Rädern) auf dem Produkt, gilt die Europäische
Richtlinie 2012/19/EU. Diese Produkte dürfen nicht mit dem
normalen Hausmüll entsorgt werden. Informieren Sie sich
über die örtlichen Regelungen zur getrennten Sammlung
elektrischer und elektronischer Gerätschaften. Richten Sie
sich nach den örtlichen Regelungen und entsorgen Sie
Altgeräte nicht über den Hausmüll. Durch die regelkonforme
Entsorgung der Altgeräte werden Umwelt und die
Gesundheit Ihrer Mitmenschen vor möglichen negativen
Konsequenzen geschützt. Materialrecycling hilft, den
Verbrauch von Rohstoen zu verringern.
Das Produkt enthält Batterien, die der Europäischen
Richtlinie 2006/66/EG unterliegen und nicht mit dem
normalen Hausmüll entsorgt werden dürfen. Bitte
informieren Sie sich über die örtlichen Bestimmungen zur
gesonderten Entsorgung von Batterien. Durch regelkonforme
Entsorgung schützen Sie die Umwelt und die Gesundheit
Ihrer Mitmenschen vor negativen Konsequenzen.
DE
Konformitätserklärung
Hersteller: Chal-Tec GmbH, Wallstraße 16, 10179 Berlin.
Dieses Produkt entspricht den folgenden Europäischen
Richtlinien:
2011/65/EU (RoHS)
2014/53/EU (RED)
2014/35/EU (LVD)
27
Page 28

Page 29

Dear Customer,
Congratulations on purchasing this equipment. Please read this manual
carefully and take care of the following hints on installation and use to
avoid technical damages. Any failure caused by ignoring the items and
cautions mentioned in the operation and installation instructions are not
covered by our warranty and any liability.
CONTENTS
Technical Data 29
Safety Instructions 30
Scope of Supply 31
Remote Control 34
POWER SUPPLY 37
Sound Quality 39
FM Radio Operation 42
Disc (audio CDs and MP3/WMA discs) Operation 44
Use the USB 46
Setting the Sleep Timer 47
Listening to an external device 48
Troubleshooting 49
Disposal Considerations 51
TECHNICAL DATA
EN
Scan the QR code to
get access to the latest
user manual and other
information about the
product.
Item number 10031824
Power supply 220- 240 V~ 50/60 Hz
Power consumption 22 W
FM range 87.5 - 108 MHz
DAB/DAB+ frequency range (band III) 174,928 - 239,200 MHz
Speaker impedance 4 ohms
BT-Standard
Hardware version
Software version
Frequency range
Maximum power transmitteted
Maximum communication range
Compatible BT proles
Dimensions 310 x 169) x 230 mm
V 2.1 und EDR Spec.
V 1.0
V 2.0
2402 - 2480
4 dBm
ca. 8 m
A2DP
29
Page 30

EN
SAFETY INSTRUCTIONS
• Read these instructions. Keep these instructions.
• Heed all warnings.
• Follow all instructions.
• Do not use this apparatus near water.
• Clean only with dry cloth.
• Do not block any ventilation openings. Install in accordance with the
manufacturer’s instructions.
• Do not install near any heat sources such as radiators, heat registers,
stoves, or other apparatus (including ampliers) that produce heat.
• Do not defeat the safety purpose of the polarized or grounding-type
plug. A polarized plug has two blades with one wider than the other.
A grounding type plug has two blades and a third grounding prong.
The wide blade or the third prong are provided for your safety. If the
provided plug does not t into your outlet, consult an electrician for
replacement of the obsolete outlet.
• Protect the power cord from being walked on or pinched particularly at
plugs, convenience receptacles, and the point where they exit from the
apparatus.
• Only use attachments/accessories specied by the manufacturer.
• Use only with the cart, stand, trip acket, or table specied by the
manufacturer, or sold with the apparatus. When a cart is used, use
caution when moving the cart/apparatus combination to avoid injury
from tip-over.
• Unplug this apparatus during lightning storms or when unused for long
periods of time.
• 14. Refer all servicing to qualied service personnel. Servicing is
required when the apparatus has been damaged in any way, such
as power-supply cord or plug is damaged, liquid has been spilled or
objects have fallen into the apparatus, the apparatus has been exposed
to rain or moisture, does not operate normally, or has beendropped.
• The apparatus shall not be exposed to dripping or splashing and
no objects lled with liquids, such as vases, shall be placed on
theapparatus.
• The battery shall not be exposed to excessive heat such as sunshine, re
or the like.
30
Page 31

SCOPE OF SUPPLY
BT
BT
BT
The Unit
Remote
Audio cable
EN
BT
AC Power cord
Instruction manual
31
Page 32

EN
Product OverviewVorne
Front view
32
Rear view
Page 33

1 Press: Standby Button ( STANDBY)
Rotate: Source Knob (SOURCE)
2 Disc Tray
3 Display Lens
4 Previous Button
Long press: Search Backward Button
Preset Down Button (PRE -)
5 Next Button
Long press: Search Forward Button
Preset Up Button (PRE +)
6 Play/Pause Button
Tuning Backward Button (TUN -)
7 Stop Button
Tuning Forward Button (TUN +)
8 Repeat Button (REPEAT)
Stereo/mono Select Button (REPEAT)
9 Information Button (INFO)
10 Program Button (PROGRAM)
Auto Scan Button (PROGRAM)
Memory Button (PROGRAM)
11 Open/Close Button
12 Remote Sensor
13 Press: Preset Equalizer Button (EQ)
Rotate: Volume Control Knob (- VOL +)
14 AC Power Socket
15 Telescopic antenna
16 USB Socket
17 AUX IN
EN
33
Page 34

EN
REMOTE CONTROL
1 Standby Button
2 CD Function Button
3 Tuner Function Button
DAB Function Button.
4 Repeat Button (REPEAT)
Stereo/mono Select Button
(REPEAT)
5 Intro Button (INTRO)
6 Loudness Button (LOUDNESS)
7 Preset Equalizer Button (P-EQ)
8 Clock Button (CLOCK)
9 Next Button
Preset Up Button (PRESET )
10 Long press: Search Backward
Button
Tuning Backward Button
11 Previous Button
Preset Down Button (PRESET )
12 Play/Pause Button
Disable the Bluetooth function
Button (PAIRING)
13 Album Up Button (ALB +)
14 Album Down Button (ALB -)
15 Mute Button (MUTE)
16 Number Button (0-9, 10+)
17 Open/Close Button
18 USB Function Button
19 Bluetooth Function Button
AUX Function Button (AUX)
20 Random Button (RANDOM)
21 Dimmer Button (DIM)
22 Super Bass Button (S-BASS)
23 Sleep Button (SLEEP)
24 Timer Button (TIMER)
25 Information Button (INFO)
26 Long press: Search Forward
Button
BT
Tuning Forward Button
27 Stop Button
SCAN Button (SCAN)
28 Volume Up Button (VOL +)
29 Volume Down Button (VOL -)
30 Program Button (PROG)
Memory Button (PROG)
Auto Scan Button (PROG)
34
Page 35

Installation of Battery
1. Remove the insulating mylar strip from the battery. It is located at the
bottom back side of the remote control.
2. Loosen the screw on the battery compartment cover with a screwdriver.
Pull out the battery compartment with your ngernails.
3. Replace a new battery (size 2025) correctly and fully insert the battery
compartment back to the original position. Tighten the screw with a
screwdriver.
EN
35
Page 36

EN
Remote Control Operation Range
Range
Point the remote control to the unit no more than 6 meters from the remote
control sensor and within 60° horizontally and 40° vertically of the front of
the unit. The operating distance may vary according to the brightness of the
room
Note:
• Make sure that there is no obstacle between the infrared remote
sensor of the unit and remote control. If you install the unit on rack, etc,
theremote controllable range may decrease depending on the thickness
or colour of glass door of rack.
6m directly
in front of the unit
• Do not expose the infrared remote sensor todirect sunlight or other
strong light, such as inverteruorescent light.
36
Page 37

POWER SUPPLY
Connecting the AC Power Cord
Connect the AC~ socket on
the unit to power plug to
the wall outlet with an AC
power cord.
Caution:
Be sure to unplug the power
plug from the outlet
when going out or when the
unit is not in use for an
extended period of time.
ECO-Power/Standby Mode Features
Switching the unit ON / OFF
When you rst connect the unit to the AC power, the unit will be in standby
mode.
EN
• Press the STANDBY button on the unit or on the remote control, the unit
switches to the last selected source. (For rst time use, the unit switches
to the factory default source.)
• Press the OPEN/CLOSE button, the unit switches to the DISC source and
open the disc tray.
• Use the corresponding FM/DAB, CD,USB, BT/AUX buttons on the
remote control, the unit switches to the corresponding source.
Switching the unit to ECO Power/Standby mode
• Long pressing the STANDBY button on the unit or on the remote contorl
for more than 2 seconds to switch to ECO Power or standby mode.
• In the Eco Power mode, you can press the CLOCK button to switch to
the standby mode and view the clock (if set).
• In the standby mode, the clock is displayed on the display (if set).
Note: If the unit remains in the standby mode for more than 90 seconds, it
switches to the Eco Power mode automatically.
37
Page 38

EN
Power-saving automatic standby
As a power-saving feature, the unit will automatically switch to Standby
mode if you do not press
any buttons within 15 minutes after playback is stopped.
Setting the Clock
Note: You can set the clock in standby mode only.
1. In standby mode, long pressing the CLOCK button on the remote control
for more than 2 seconds to activate the clock setting mode, the time
format [24--H] or [12--H] will blink.
2. Press the / buttons or on the unit or ⁄ on the remote
control to select a time format.
3. Press the CLOCK button to store the setting, the hour digits blink.
4. Repeat above steps 2-3 to set the hour and minute.
Note:
• To exit clock setting mode without storing, press the STOP button.
• If no button is pressed in 10 seconds, the unit exits clock setting mode
automatically.
• If a power failure occurs or the unit is disconnected from the mains, the
clock setting will be lost.
Automatically Synchronzes Clock Time
In DAB/DAB+/RDS station, when you don’t set the clock, the unit can
synchronize with time transmitted by DAB/DAB+/RDS station (with CT
information) automatically rst time.
38
Display the Clock
In any source mode, the built-in clock shows the time on the display by
press the CLOCK button.
Page 39

SOUND QUALITY
Adjusting the Volume
To increase or decrease the volume, rotate the - VOL + knob on the unit or
press the VOL +/- buttons on the remote control.
Mute sound
You can mute the sound temporarily.
During play, press the MUTE button to mute or unmute sound.
Note: If you change the volume, source, P-EQ, LOUNDNESS or S-BASS when
the sound is muted, muting is cancelled.
Adjusting the Super Bass
You can reinforce the bass sound to maintain rich, full bass at low volume.
Press the S-BASS button on the remote control to get the eect, “DBB ON”
is displayed on the display. Press again to cancel the eect, “DBB OFF” is
displayed on the display.
Controlling the Loudness
This unit has a loudness function, which can automatically increase the bass
sound eect at low volume. It can also increase the bass sound eect at
high volume, but it will be relatively less when it is at high volume.
Press the LOUDNESS button on the remote control to obtain the loudness
function, “LOUD ON” is displayed on the display. Press again to cancel the
eect, “LOUD OFF” is displayed on the display.
EN
Presetting Equalizer
You can adjust the sound according to the genre of the music your taste.
During play, repeatedly press the EQ button on the unit or P-EQ button on
the remote control
to select your preferred sound mode.
- FLAT
- POP
- ROCK
- CLASSIC
- JAZZ
Changing the Front Panel Darkness
To dim or brighten the display, repeatedly press the DIM button on the
remote control to the
desired brightness.
39
Page 40

EN
DAB/DAB+ Radio Operation
NOTE: Before listening to the radio, please check that the telescopic
antenna on the rear of the unit is correctly adjusted for length and direction.
Tuning to DAB/DAB+ for the first time
Rotate the SOURCE knob on the unit or repeatedly press the button on the
remote control to select DAB source. “DAB” is displayed on the display.
• The unit will start a quick scan to search for all available Band lll
channels automatically.
• All available stations are programmed.
• The unit will store all detected stations at completion of the scanning,
the unit will turn to a station on the list.
• If no DAB/DAB+ service is available, “NO DAB” will be display.
Manual tuning to a DAB/DAB+ radio station
1. Press and hold the PLAY/PAUSE button on the remote control for more
than 2 seconds to enter the manual tuning mode.
2. Press the TUN +/- buttons on the unit or / buttons on the remote
control to select your desired DAB channels backward/forward.
3. Press the PLAY/PAUSE button to conrm and tune to your selected
channel.
Store DAB/DAB+ radio stations
Automatically
40
Press the SCAN button on the remote control to activate automatic program
mode. “SCAN” is displayed a few seconds on the display.
• All available stations are programmed.
• The unit will store all detected stations at completion of the scanning,
the unit will turn to a station on the list.
Manually
1. Tune to a DAB/DAB+ radio station.
2. Press the PROGRAM button on the unit or PROG button on the remote
control to activate program mode. The preset number will blink.
3. Repeatedly press the PRE +/- buttons on the unit or PRESET/ on the
remote control buttons on the remote control to allocate a number from
1–20 for this DAB/DAB+ radio station.
4. Press the PROGRAM button on the unit or PROG button on the remote
control again to store the station.
5. Repeat above steps 1 to 4 for each station you want to store in memory
Page 41

with a preset number.
Note: If the unit is unplugged or if a power failure occurs, the preset stations
will not be losted.
Tuning to preset DAB/DAB+ radio stations
Repeatedly press the PRE +/- buttons on the unit PRESET/ buttons on
the remote control until the desired preset station is displayed.
The unit will tune to the selected station automatically.
DAB/DAB+ Information Display
You can view the DAB/DAB+ service information in the following modes.
Depending on the DAB/DAB+ radio station you are tuning to, some
information modes may be unavailable. Repeatedly press the INFO button
to view the following information.
Station Name
When a DAB/DAB+ radio station is received, the name of that station will
be displayed.
Ensemble Name
This displays the name of the multiplex that contains the station you are
listening to. A multiplex is a collection of radio stations that are bundled
and transmitted on one frequency. There are national and local multiplexes.
Local ones contain stations that are specic to that area.
Note: DAB/DAB+ – unlike normal radio, groups together several radio
stations and transmits them on one frequency.
EN
Clock
This displays the current time provided automatically by the broadcaster.
Date
This displays the current date provided automatically by the broadcaster.
DLS (Dynamic Label Segment)
Dynamic label segment is a scrolling message that the broadcaster may
include with their transmissions. The message usually includes information,
such as programme details etc.
Signal Strength
This shows a number to indicate the signal strength which is between 0
and 100, for example 12, 70 or 100. The stronger the signal, the greater the
number.
41
Page 42

EN
Programme Type
This describes the “style” or “genre” of the programme that is being
broadcast.
Frequency
This shows the frequency of the current station.
Audio Bit Rate
The display will show the digital audio bit rate being received.
Stereo/Mono
The display will show if the station being received is in mono or stereo.
FM RADIO OPERATION
NOTE: Before listening to the radio, please check that the telescopic
antenna on the rear of the unit is correctly adjusted for length and direction.
Tuning in to a Station
1. Rotate the SOURCE knob on the unit or repeatedly press the FM/DAB
button on the remote control to select TUNER source. “TUNER” is
displayed on the display.
2. Select a station using one of the following methods.
Auto Tuning
Long pressing the TUN +/- buttons on the unit or / buttons on the
remote control for more than 2 seconds, the frequency changes down or up
automatically until a station is found.
42
Manual Tuning
Repeatedly press the TUN +/- buttons on the unit or / buttons on the
remote control to change the frequency until you nd the station you want.
Preset Tuning (Available only after the stations are preset)
Repeatedly press the PRE +/- buttons on the unit or PRESET/ buttons
on the remote control to select the desired preset number. Its band and
frequency are displayed on the display.
Program radio stations
You can program a maximum of 20 preset radio stations (FM).
Page 43

Automatically
Long pressing the PROGRAM button on the unit or PROG button on the
remote control for more than 2 seconds to activate automatic program
mode.
• “AUTO” is displayed on the display.
• All available stations are programmed.
• The rst programmed radio station is broadcast automatically.
Note: To exit automatic program mode without storing enough 20 preset
radio stations, press the STOP button.
Manually
1. Tune to a radio station.
2. Press the PROGRAM button on the unit or PROG button on the remote
control to activate program mode. The preset number will blink.
3. Repeatedly press the PRE +/- buttons on the unit or PRESET/
buttons on the remote control to select a number from 1–20 for this
radio station.
4. Press the PROGRAM button on the unit or PROG button on the remote
control again to store the station.
5. Repeat above steps 1 to 4 for each station you want to store in memory
with a preset number.
Note:If the unit is unplugged or if a power failure occurs, the preset stations
will not be losted.
EN
To change the FM Reception Mode
Press the REPEAT button to select the STEREO or MONO channel to receive
the best FM reception mode.
Show RDS information
RDS (Radio Data System) is a service that allows FM stations to show
additional information. If you tune to an RDS station, an RDS icon and the
station name are displayed.
1. Tune to an RDS station.
2. Repeatedly press the INFO button to scroll through the following
information (if available):
- Program type such as [NEWS] (news), [SPORT] (sport), [POP M] (pop
music)
- RDS clock
43
Page 44

EN
DISC (AUDIO CDS AND MP3/WMA DISCS) OPERATION
Disc Playing
1. Rotate the SOURCE knob on the unit or directly press the CD button
on the remote control to select DISC source. “DISC” is displayed on the
display.
2. Press the button to open the disc door and place the disc on the disc
tray (with the printed side up).
3. Press the OPEN/CLOSE button to close the disc door, the unit will read
the disc and play it automatically.
Note: If in stop mode, please press the PLAY/PAUSE button to start playing
the disc.
4. Press the button to temporarily stop the playing, press the button
again, it will continue to play.
5. Press the STOP button to stop the disc playing.
Note: If the unit is unplugged or if a power failure occurs or if switching the
unit on/o or switching the unit to ECO power/standby mode , the position
of last play will memory.
To Skip Search and Play
• Press the button on the unit or button on the remote control once
or more to skip previous one or more tracks on the disc.
• Press the button on the unit or on the remote control once or more
to skip forward one or more tracks on the disc.
44
To Search and Play
Long pressing the ⁄ buttons on the unit or ⁄ on the remote control
to search for the position that you intend to start playing.
Text Display During Playback
For audio CD
Repeatedly press the INFO button to show the current track number and
single elapsed time or single remain time or total elapsed time or total
remain time.
For MP3/WMA Disc
Repeatedly press the INFO button, ID3 information (e.g. song title, artist,
Page 45

etc.) scrolls on the display for a few minute.
Programme Play (For audio CDs and MP3/WMA discs)
You can programme up to 20 tracks to play in any desired order.
1. Insert a disc and press the button when it starts playing.
2. Press the PROGRAM button on the unit or PROG button on the remote
control, „001 P--01“ is displayed on the display.
3. Press the ⁄ buttons on the unit or /0-9 buttons on the remote
control to select the desired track number.
- To select track number 12, directly press 1,2 buttons, “012 P--01” is
displayed on the display.
4. Press the PROGRAM button on the unit or PROG button on the remote
control to conrm the track number to be stored.
- The track number 12, “012 P--02” is displayed on the display.
5. Repeat above steps 3-4 to select and store all desired tracks.
6. Press the PLAY/PAUSE button to start programme play.
7. Press the button once to stop the programme play. Press the
button twice to clear programme.
Playing the Beginning (Intro) of each Track
Press the INTRO button on the remote control to start play the beginning of
each track consecutively from rst song. The playing time of each track is 10
seconds.
When you hear the desired track, press the PLAY/PAUSE button.
Random Play
All tracks are played in a random sequence by pressing the RANDOM
button on the remote control, “SHUF” is displayed on the display. Press this
button again to return to normal play.
EN
To Select Album (For MP3/WMA discs)
• In playing mode, press the ALB +/- buttons on the remote control to
select the next/previous folder and the rst le is play automatically.
• In stop mode, press the ALB +/- buttons on the remote control to select
the next/previous folder and press the PLAY/PAUSE button to start play
from rst le.
Playing Repeatedly
During play, repeatedly press the REPEAT button to select:
• For audio CD
- First press : The current track is played repeatedly, the “REP” is
displayed.
- Second press : All tracks are played repeatedly, the “REP ALL” is
45
Page 46

EN
displayed.
- Third press : To cancel the repeat playing.
• For MP3/WMA Disc
- First press : The current track is played repeatedly, the “REP” is
displayed.
- Second press : To repeat playing album, the “REP ALB” is displayed to
a few seconds.
- Third press : All tracks are played repeatedly, the “REP ALL” is
displayed.
- Fourth press : To cancel the repeat playing.
USE THE USB
Note: Ensure that the USB device contains playable audio contents for
supported formats.
Some basic operating functions, please refer to „Disc (audio CDs and MP3/
WMA discs) Operation“
Play from USB
1. Insert the USB device into the USB socket on the rear of the unit.
2. Rotate the SOURCE knob on the unit or directly press the USB button
on the remote control to select USB source. “USB” is displayed on the
display.
3. The device‘s stored music will be played automatically.
46
Note: If in stop mode, please press the PLAY/PAUSE button to start playing.
4. Press the PLAY/PAUSE button to temporarily stop the playing, press the
button again, it will continue to play.
5. Press the ⁄ buttons on the unit or buttons on the remote
control to select a le.
6. Press the button to stop the playing.
To Select Album
• In playing mode, press the ALB +/- buttons on the remote control to
select the next/previous folder and the rst le is play automatically.
• In stop mode, press the ALB +/- buttons on the remote control to select
the next/previous folder and press the PLAY/PAUSE button to start play
from rst le.
Page 47

Charging your device
You can charge your device through the socket on this product with a USB
cable.
Notes:
• The maximum current for USB charging is 5V 1A.
• Not all devices for USB charging are guaranteed.
• When the play mode is switched, the charge will stop slightly.
Play from BT device
1. Rotate the SOURCE knob on the unit or repeatedly press the BT/AUX
button on the remote control to select BT source. “BT” is displayed and
the BT symbol blinks on the display.
2. Activate the BT function in your BT device (see the device user manual).
3. Select „Glastonbury“ on your device for pairing. For elder devices, you
need to input “0000” as pairing password.
4. When connection successful, the BT symbol is displayed on the display.
5. Start music play on your BT device, you can use this unit and remote
control to control the function to your BT device.
- To pause/resume play, press PLAY/PAUSE.
- To skip to a track, press .
- To increase or decrease the volume, press VOL +/-.
6. Long pressing the PAIRING button on the remote control for more than
2 seconds to disable the BT function from your BT device, the BT symbol
blinks on the display.
EN
Note:
• Any obstacle can reduce the operational range.
• The device will also be disconnected when the device is moved beyond
the operation range.
• If you want to reconnect the device to the unit, place it within the
operational range.
• Compatibility with all BT devices is not guaranteed.
SETTING THE SLEEP TIMER
When the unit is turned on, repeatedly press the SLEEP button on the
remote control to select a set period of time (in minutes): 120, 90, 75, 60,
45, 30, 15
When sleep timer is activated, the “Zz” is displayed.
47
Page 48

EN
To deactivate sleep timer
Press the SLEEP button repeatedly until [SLEEP 00] is displayed.
When sleep timer is deactivated, the “Zz” is disappears.
Set the alarm timer
Caution: Make sure that you have set the clock correctly.
1. In standby mode, long pressing the TIMER button on the remote control
for more than 2 seconds, the is displayed and the source (e.g. DISC)
will blink on the display.
2. Press the ⁄ buttons on the unit or /⁄on the remote control
to select a source (e.g. DISC, TUNER etc.).
3. Press the TIMER button to store the setting, the hour digits blink.
4. Repeat steps 2-3 to set the hour, minute and adjust volume.
Note:
• To exit alarm setting mode without storing, press the button.
• If DISC/USB source is selected and the audio cannot be played, TUNER
is activated automatically.
• If no button is pressed in 10 seconds, the unit exits timer setting mode
automatically.
To deactivate or re-activate an alarm timer
Repeatedly press the TIMER button to activate or deactivate timer, if timer
is activated, the clock symbol is displayed.
48
LISTENING TO AN EXTERNAL DEVICE
1. Connect the AUX Input terminals on the unit to the AUX output terminals
on the auxiliary equipment with an audio cable illustrated below.
2. Rotate the SOURCE knob on the unit or repeatedly press the BT/AUX
button on the remote control to select auxiliary equipment source. “AUX”
is displayed on the display.
3. Start to play the external device (see the user manual of the external
device).
Page 49

TROUBLESHOOTING
Problem Possible Reason / Solution
Ensure that the AC adaptor plug of the unit is connected
properly.
No power
Remote control does
not work
No disc detected
No sound or poor
sound
Disc does not play
Ensure that there is power at the AC outlet..
To save power, the unit switches to standby automatically
15 minutes after a play reaches the end and no control is
operated.
Before pressing any function button, rst select the
correct source with the remote control instead of the
main unit.
Reduce the distance between the remote control and the
unit.
Replace the batteries Insert the battery with its polarities
(+/–signs) aligned as indicated..
Aim the remote control directly at the sensor on the front
of the unit
Insert a disc.
Check if the disc is inserted with the print side facing
inward.
Wait until the moisture condensation at the lens has
cleared.
Replace or clean the disc
Use a nalized CD or correct format disc.
Adjust the volume.
Check if in muting.
Insert a readable disc and ensure that the label side faces
up..
Check for any scratches or smudges on the disc.
Moisture has condensed inside the unit. Remove the disc
and leave the unit turned on for about an hour.
Disconnect and reconnect the AC adaptor plug, and then
turn on the unit again.
As a power-saving feature, the unit turns o automatically
15 minutes after disc play reaches the end and no control
is operated.
EN
49
Page 50

EN
Problem Possible Reason / Solution
Poor radio reception
Cannot display some
les in USB device
USB device not
supported
Music playback
is unavailable on
this unit even after
successful Bluetooth
connection
The audio quality
is poor after
connection with a
Bluetooth-enabled
device
Cannot connect with
this unit.
Timer does not work
Clock/timer setting
erased
Check the telescopic antenna is correctly adjusted for
length and direction.
The number of folders or les in the USB device has
exceeded a certain limit. This phenomenon is not a
malfunction.
The formats of these les are not supported.
The USB device is incompatible with the unit. Try another
one..
The device cannot be used to play music through this unit
wirelessly.
The BT reception is poor. Move the device closer to this
unit or remove any obstacle between them..
The device does not support the proles required for this
unit.
The BT function of the device is not enabled. Refer to the
user manual of the device to nd out how to enable the
function.
This unit is not in pairing mode.
This unit is already connected with another BT-enabled
device. Disconnect that device and then try again.
Set the clock correctly..
Switch on the timer.
Power has been interrupted or the AC adaptor plug has
been disconnected.
Reset the clock/timer.
50
Page 51

DISPOSAL CONSIDERATIONS
According to the European waste regulation 2012/19/EU this
symbol on the product or on its packaging indicates that this
product may not be treated as household waste. Instead it
should be taken to the appropriate collection point for the
recycling of electrical and electronic equipment. By ensuring
this product is disposed of correctly, you will help prevent
potential negative consequences for the environment
and human health, which could otherwise be caused by
inappropriate waste handling of this product. For more
detailed information about recycling of this product, please
contact your local council or your household waste disposal
service.
Your product contains batteries covered by the European
Directive. 2006/66/EC, which cannot be disposed of with
normal household waste. Please check local rules on
separate collection of batteries. The correct disposal of
batteries helps prevent potentially negative consequences
on the environment and human health.
Declaration of Conformity
Producer: Chal-Tec GmbH, Wallstraße 16, 10179 Berlin.
Germany
This product is conform to the following European Directives:
2011/65/EU (RoHS)
2014/53/EU (RED)
2014/35/EU (LVD)
EN
51
Page 52

EN
52
Page 53

Chère cliente, cher client,
Toutes nos félicitations pour l’acquisition de ce nouvel appareil. Veuillez
lire attentivement et respecter les instructions de ce mode d’emploi
an d’éviter d’éventuels dommages. Nous ne saurions être tenus pour
responsables des dommages dus au non-respect des consignes et à la
mauvaise utilisation de l’appareil.
Scannez le code QR pour avoir accès au dernier manuel de l‘utilisateur et à
d‘autres informations sur le produit.
SOMMAIRE
FR
Fiche technique 54
Consigenes de sécurité 55
Contenu de l'emballage 56
Aperçu de l'appareil 57
Télécommande 59
Alimentation 62
Paramètres audio 64
Station DAB/DAB+ et réglage de la radio 65
Radio FM 67
Lecture de CD (audio CDs and MP3/WMA discs) Operation 70
Lecture par USB 72
Lecture par BT 73
Arrêt automatique (Sleep Timer) 74
Alarme de réveil 75
Écoute d'appareils audio externes 75
Résolution des problèmes 76
Informations sur le recyclage 78
53
Page 54

FR
FICHE TECHNIQUE
Item number 10031824
Alimentation 220- 240 V~ 50/60 Hz
Puissance 22 W
Plage de fréquences FM 87.5 - 108 MHz
Plage de fréquences DAB/DAB+ (Band
III)
Impédance des enceintes 4 Ohm
Standard BT
Version de hardware
Version de software
Plage de fréquences
Niveau de puissance maximale
transmise
Portée maximale de transmission
Prols BT compatibles
Dimensions 310 x 169) x 230 mm
174,928 - 239,200 MHz
V 2.1 et EDR Spec.
V 1.0
V 2.0
2402 - 2480
4 dBm
ca. 8 m
A2DP
54
Page 55

CONSIGENES DE SÉCURITÉ
• Lisez le mode d'emploi et conservez-le.
• Respectez toutes les consignes de sécurité.
• Suivez les instructions.
• N'utilisez pas l'appareil près de l'eau.
• Nettoyez l'appareil avec un chion propre uniquement.
• Ne bloquez pas les ouvertures de ventilation. Installez l'appareil
conformément aux instructions du fabricant uniquement.
• Ne l'installez pas à proximité de sources de chaleur telles que
radiateurs, appareils de chauage, cuisinières ou autres appareils
émettant de la chaleur (amplicateurs, par exemple).
• Veillez à ne pas marcher sur le cordon d'alimentation, ne le pliez pas, en
particulier au niveau des prises et de son raccordement à l'appareil.
• Utilisez uniquement les accessoires spéciés par le fabricant.
• Utilisez l'appareil uniquement avec le chariot, les supports, les étagères
ou tablettes spéciés par le fabricant. Faites attention lorsque vous
déplacez l'appareil pour éviter de tomber.
• Débranchez le cordon d'alimentation pendant un orage, de même
lorsque vous n'utilisez pas l'appareil pendant une longue période.
• Consultez des professionnels qualiés pour les réparations. Des
réparations seront nécessaires si l’appareil a été endommagé de
quelque manière que ce soit, si le cordon d’alimentation ou la che
ont été endommagés, si du liquide a été renversé sur l’appareil, si des
objets sont tombés dessus, si l'appareil a été exposé à la pluie ou à
l'humidité, ou n'a pas fonctionné normalement ou a fait une chute.
• L'appareil ne doit pas être exposé à des gouttes d'eau ni à des
éclaboussures. Les récipients contenant des liquides tels que des vases
ne doivent pas être placés sur l'appareil.
• La batterie ne doit pas être exposée à une chaleur excessive due à
l'ensoleillement, au feu, etc.
• L'appareil se déconnecte de l'alimentation par la che secteur. Tant qu'il
est branché au secteur, l'appareil reste prêt à fonctionner.
• Laser de classe 1 : Cet appareil utilise un laser. Toute utilisation, réglage
ou manipulation non indiquée dans ce mode d'emploi peut entraîner
une exposition à un rayonnement laser dangereux. Assurez-vous que le
lecteur CD est vide avant de déplacer l'appareil. Retirez le CD lorsque
l'appareil n'est pas utilisé.
FR
55
Page 56

FR
BT
BT
BT
CONTENU DE L'EMBALLAGE
Appareil
BT
Télécommande
Câble audio
56
Câble d'alimentation
Mode d'emploi
Page 57

APERÇU DE L'APPAREIL
Face avant
FR
Dos de l'appareil
57
Page 58

FR
1 Appuyez : veille ( STANDBY)
Tournez : Source (SOURCE)
2 Lecteur CD
3 Lentille d'affichage
4 Titre précédent
Appui long : recherche arrière
Mémoriser la station sur un emplacement mémoire inférieur (PRE-)
5 Titre suivant
Appui long : recherche vers l'avant
Mémoriser la station sur un emplacement mémoire supérieur (PRE +)
6 Lecture/Pause
Station de radio précédente (TUN -)
7 Stop Button
Station de radio suivante (TUN +)
8 Répétition d'un titre (REPEAT)
choix entre Stéréo/Mono (REPEAT)
9 Information (INFORMATION)
10 Sélection de programme (PROGRAM)
Recherche automatique (PROGRAM)
Mémoriser (PROGRAM)
11 Ouverture / fermeture
12 Capteur de la télécommande
13 Appuyer : réglage de l'égaliseur (EQ) Tourner : volume (VOL)
14 Prise d'alimentation
15 Antenne télescopique
16 Port USB
17 Entrée AUX
58
Page 59

TÉLÉCOMMANDE
1 Veille
2 Mode CD
3 Mode Radio (FM/DAB).
4 Répétition d'un titre (REPEAT)
Sélection stéréo/mono
(REPEAT)
5 Intro (INTRO)
6 Réglage du volume
7 Réglage de l'égaliseur (EQ)
8 Réglage de l'heure (CLOCK)
9 Titre suivant / emplacement
mémoire suivant (PRESET)
10 Appui long : recherche arrière
station de radio précédente
11 Titre précédent /
emplacement mémoire
précédent (PRESET)
12 Lecture / Pause Désactivation
de la fonction BT (PAIRING)
13 Album suivant (ALB +)
14 Album précédent (ALB -)
15 Fonction muet (MUTE)
16 Touches numériques (0-9, 10+)
17 Ouverture / fermeture
18 Mode USB
19 Mode BT
20 Lecture aléatoire (RANDOM)
21 Réglage de la luminosité de
l'écran (DIM)
22 Super Bass (S-BASS)
23 Touche Sleep (SLEEP)
24 Minuterie (TIMER)
25 Information (INFO)
26 Appui long
recherche avant / station de
radio suivante
FR
BT
27 Stop
Recherche (SCAN)
28 Augmenter le volume (VOL +)
29 Diminuer le volume (VOL -)
30 Programme/mémorisation
Recherche automatique (PROG)
59
Page 60

FR
Installation des piles
1. Retirez la bande de plastique isolante du couvercle du compartiment à
piles. Il se trouve sous la télécommande.
2. Desserrez la vis du compartiment à piles avec un tournevis. Aidez-vous
de vos ongles pour ouvrir le compartiment à piles.
3. Insérez correctement une pile (taille 2025) bien chargée dans le
compartiment à pile démonté. Remettez le compartiment à piles avec la
pile dans sa position initiale. Serrez la vis avec un tournevis.
60
Page 61

Portée de la télécommande
Tenez la télécommande à une distance maximale de 6 mètres du capteur
de télécommande sur l'appareil et maintenez la télécommande à 60 °
horizontalement et à 40 ° verticalement vers l'avant de l'appareil. La portée
de la télécommande peut varier en fonction de la luminosité de la pièce
Remarque :
• Assurez-vous qu'il n'y a pas d'obstacle entre le capteur et la
télécommande. Par exemple, si vous placez l’appareil dans une armoire
à portes vitrées, la portée peut diminuer avec la porte fermée, en
fonction de l’épaisseur du verre et de sa teinte.
• N'exposez pas directement le capteur infrarouge de la télécommande à
l'ensoleillement ni à d'autres sources lumineuses puissantes telles que
les ampoules uorescentes par exemple.
6m directly
in front of the unit
FR
• Tenez la télécommande à une distance maximale de 6 mètres
du capteur de télécommande sur l'appareil et maintenez-la à 60°
horizontalement et à 40° verticalement vers l'avant de l'appareil. La
portée de la télécommande peut varier en fonction de la luminosité de
la pièce.
• Remarque :
• Assurez-vous qu'il n'y a pas d'obstacle entre le capteur et la
télécommande. Par exemple, si vous placez l’appareil dans une armoire
à portes vitrées, la portée peut diminuer avec la porte fermée, en
fonction de l’épaisseur du verre et de sa teinte.
• N'exposez pas directement le capteur infrarouge de la télécommande à
l'ensoleillement ni à d'autres sources lumineuses puissantes telles que
les ampoules uorescentes par exemple.
61
Page 62

FR
ALIMENTATION
Branchement
Branchez le câble
d’alimentation à l’interface
prévue sur votre appareil
et branchez la che
d’alimentation à l’autre
extrémité du câble.
Attention : Assurez-vous
de débrancher le câble
d'alimentation lorsque vous
n'utilisez pas l'appareil ou que
vous quittez la pièce pendant
une période prolongée..
ECO-Power/mode veille
Pour allumer/éteindre l'appareil
Lorsque vous branchez l'appareil sur le secteur pour la première fois, il se
met en mode veille.
62
• Appuyez sur le bouton STANDBY de l'appareil ou de la télécommande.
L'appareil se met alors sur la dernière source sélectionnée. (Lorsque
vous utilisez l'appareil pour la première fois, il passe automatiquement
aux réglages par défaut.)
• Appuyez sur la touche l'appareil passe en mode DISC et ouvre le
lecteur CD.
• Appuyez sur les touches FM/DAB, CD et USB, BT/AUX de la
télécommande pour accéder au programme voulu.
• Appuyez sur le bouton STANDBY de l'appareil ou de la télécommande
pour retourner en mode veille.
Modes ECO et veille
• Appuyez longuement sur la touche STANDBY de l'appareil ou sur la
touche marche/arrêt de la télécommande pendant plus de 2 secondes
pour passer en mode ECO ou veille.
• En mode ECO, vous pouvez appuyer sur la touche CLOCK pour passer
en mode veille et voir l’heure s'aicher (si l’heure a été réglée).
• En mode veille, l’aichage de l’heure apparaît sur l’écran de l’appareil
Page 63

(si l’heure a été réglée).
Remarque : Si l'appareil est en mode veille depuis plus de 90 secondes, il
bascule automatiquement en mode ECO
Arrêt automatique
Pour économiser de l'énergie, l'appareil passe automatiquement en mode
veille si vous n'appuyez sur aucun bouton dans les 15 minutes après la n de
la lecture.
Réglage manuel de l'heure
Remarque : vous ne pouvez régler l'heure que lorsque l'appareil se trouve
en mode veille.
1. En mode veille, appuyez plus de 2 secondes sur la touche CLOCK de la
télécommande pour activer le réglage de l'heure. Les formats d'aichage
de l'heure [24--H] ou [12--H] clignotent alors.
2. Pour sélectionner le format d'aichage de l'heure, appuyez sur la touche
de l'appareil ou bien sur la touche / de la télécommande.
3. Appuyez sur la touche CLOCK pour valider le réglage et jusqu'à ce que
l'aichage des heures clignote.
4. Répétez les étapes 2 et 3 pour régler les heures et les minutes.
Remarque :
• Pour quitter le mode de réglage de l'heure sans enregistrer, appuyez sur
la touche STOP.
• Si vous n'appuyez sur aucune touche pendant plus de 10 secondes,
l'appareil quitte automatiquement le mode de réglage de l'heure.
• Si la che secteur de l'appareil est débranchée ou si l'appareil est mis
hors tension, le réglage de l'heure est supprimé et devra être refait.
FR
Synchronisation automatique de l'heure
Si vous ne réglez pas l'heure manuellement, l'appareil peut la régler
automatiquement par les canaux DAB/ DAB+RDS (avec CT).
Affichage de l'heure
Vous pouvez aicher l'heure dans n'importe quel mode en appuyant sur la
touche CLOCK.
63
Page 64

FR
PARAMÈTRES AUDIO
Réglage du volume
Tournez le bouton - VOL + de l’appareil pour augmenter ou diminuer le
volume ou appuyez sur les touches VOL +/- de la télécommande.
Fonction muet
Vous pouvez temporairement couper le volume. Pendant la lecture, appuyez
sur la touche MUTE. Appuyez à nouveau sur la touche MUTE pour désactiver
la fonction muet.
Remarque : Si vous modiez le volume ou la source pendant la coupure de
volume, ou si vous appuyez sur les touches P-EQ, LOUDNESS ou S-BASS, la
fonction muet est automatiquement annulée.
Réglage de Super Bass
Vous pouvez amplier le son des graves pour avoir des basses riches et
puissantes, même à faible volume. Appuyez sur la touche S-Bass de la
télécommande pour obtenir l’eet souhaité. "DBB-ON" apparaît alors sur
votre appareil. Appuyez à nouveau sur la touche S-Bass pour désactiver
l'eet. Après la désactivation, l'écran aichera "DBB OFF".
Réglage du volume
TCet appareil dispose d’une fonction de volume qui règle automatiquement
l’eet de basse à faible volume. La fonction peut amplier l’eet de basse
même à fort volume, mais l’amplication à fort volume est relativement
faible. Appuyez sur la touche LOUDNESS de la télécommande pour activer
le contrôle du volume. L'aicheur indiquera "LOUD ON". Pour désactiver le
contrôle du volume, appuyez à nouveau sur la touche LOUDNESS. L’écran
aichera "LOUD OFF" après la désactivation.
64
Ajustement de l'égaliseur
Vous pouvez ajuster le son au style de musique de votre choix. Pendant
la lecture, appuyez plusieurs fois sur la touche EQ de l'appareil ou sur
la touche P-EQ de votre télécommande pour accéder au réglage de son
souhaité. Vous pouvez choisir entre Flat, Pop, Rock, Classic et Jazz.
Réglage de la luminosité de l'écran
Pour augmenter / diminuer la luminosité de l'écran, appuyez plusieurs fois
sur la touche DIM de votre télécommande jusqu'à atteindre le niveau de
luminosité souhait .
Page 65

STATION DAB/DAB+ ET RÉGLAGE DE LA RADIO
Remarque : Avant d’allumer la radio, assurez-vous que l’antenne
télescopique située à l’arrière de l’appareil est correctement réglée.
Réglage d'une station DAB
• Tournez plusieurs fois le bouton SOURCE de votre appareil ou appuyez
plusieurs fois sur la touche FM / DAB de votre télécommande pour
activer le mode de recherche de station DAB. "DAB" s'aiche à l'écran
de votre appareil.
• L'appareil commence automatiquement à rechercher les canaux
disponibles de la bande III.
• Toutes les stations disponibles sont programmées automatiquement.
• L’appareil mémorise automatiquement toutes les stations disponibles
après la recherche et lance la lecture d’une station.
• Si aucune station DAB n'est disponible, l'écran aiche "NO DAB".
Réglage manuel d'une station DAB
1. Appuyez sur le bouton PLAY / PAUSE de la télécommande pendant plus
de 2 secondes pour passer au réglage manuel.
2. Appuyez sur les touches TUN +/- de l'appareil ou sur les touches /
de la télécommande pour rechercher vers l'avant ou vers l'arrière votre
station.
3. Press the PLAY/PAUSE button to conrm and tune to your selected
channel.
FR
Mémorisation automatique d'une station DAB
Appuyez sur la touche SCAN de votre télécommande pour passer en
mode de programmation automatique. "SCAN" s'aiche à l'écran pendant
quelques secondes. Toutes les stations disponibles sont programmées
automatiquement. L’appareil mémorise automatiquement toutes les
stations disponibles après la recherche et lance la lecture d'une station de
la liste au hasard.
Mémorisation manuelle d'une station DAB
1. Réglez la station de radio DAB souhaitée.
2. Appuyez sur la touche PROGRAMME de votre appareil ou sur la touche
PROG de votre télécommande pour activer le mode mémoire. Les
numéros préréglés clignotent à l'écran.
3. Appuyez sur la touche PRE +/- de votre appareil ou sur la touche
65
Page 66

FR
PRESET/ de la télécommande jusqu'à avoir atteint le numéro
souhaité dans la liste (1-20) pour mémoriser la station.
4. Appuyez à nouveau sur la touche PROGRAM de votre appareil ou sur la
touche PROG de la télécommande pour mémoriser la station.
5. Répétez les étapes 1 à 4 pour chaque station que vous souhaitez
mémoriser à un emplacement spécique de la liste.
Remarque : Les stations mémorisées ne sont pas supprimées lorsque
l'appareil est débranché ou hors tension.
Rappel d'une station de radio DAB mémorisée
Appuyez sur la touche PRE +/- de votre appareil ou sur la touche PRESET/
de la télécommande jusqu'à ce que l'écran aiche le numéro souhaité.
L'appareil lit alors automatiquement la station que vous avez sélectionnée.
Affichage des informations de la station DAB/DAB+
Lorsque vous recevez une station DAB / DAB +, vous pouvez voir les
informations correspondantes dans plusieurs modes. Selon la station que
vous avez réglée, certaines informations peuvent ne pas être disponibles.
Appuyez plusieurs fois sur INFO pour voir les informations suivantes.
Nom de la station
Lorsque vous recevez une station DAB / DAB +, l’écran aiche son nom.
Le nom de l'ensemble
Le nom de l'ensemble indique la connexion multiple comprenant la station
de radio souhaitée. Dans une connexion multiple, plusieurs stations sont
groupées et transmises sur la même fréquence, avec des connexions
multiples nationales et locales. Les connexions locales incluent uniquement
les stations spéciques à la région.
Remarque : contrairement à la radio normale, DAB / DAB + transmet
plusieurs stations de radio ensemble sur la même fréquence.
66
Heure
L'heure est automatiquement fournie par la station de radio en cours
d'écoute.
Date
La date est automatiquement fournie par la station de radio en cours
d'écoute.
DLS (Dynamic Label Segment)
Le segment dynamique est un message facultatif de la station de radio qui
Page 67

peut être aiché à l'écran pendant la lecture. Dans la plupart des cas, le
message contient des informations telles que les détails du programme,
etc.
Force du signal
Un nombre entre 0 et 100 apparaîtra sur l'écran pour indiquer la force du
signal. Plus le signal est bon, plus le nombre aiché est élevé.
Type de station
Ici, le "style de musique" ou le "genre" de la station sélectionnée est aiché.
Fréquence
La fréquence de la station de radio en cours d'écoute s'aiche ici.
Audio Bit Rate
L’aichage indique le débit binaire audio actuellement reçu.
Stéréo/Mono
L'écran de l’appareil indique si la station est en stéréo ou en mono.
RADIO FM
Remarque : Avant d’utiliser la fonction radio, veuillez vous assurer que
l’antenne est réglée correctement (longueur et direction).
FR
Réglage de la fonction radio
1. Tournez plusieurs fois le bouton SOURCE de l’appareil ou appuyez sur
la touche FM / DAB de votre télécommande pour passer en mode de
lecture radio. L'écran aichera ensuite "TUNER".
2. Vous pouvez sélectionner une station selon les méthodes décrites cidessous.
Réglage automatique des stations
Appuyez plus de 2 secondes sur la touche TUN +/- de votre appareil ou sur
la touche / bde la télécommande. La fréquence augmente / diminue
automatiquement jusqu'à ce qu'une station soit trouvée.
67
Page 68

FR
Réglage manuel des stations
Appuyez plusieurs fois sur les touches TUN +/- de votre appareil ou sur
les touches / de la télécommande pour modier la fréquence jusqu'à
trouver la station désirée.
Preset Tuning (Available only after the stations are preset)
Repeatedly press the PRE +/- buttons on the unit or PRESET/ de la
télécommande pour modier la fréquence jusqu'à trouver la station désirée.
Réglage et mémorisation d'une station de radio
Vous pouvez enregistrer un maximum de 20 stations de radio dans la liste
(FM).
Vous pouvez enregistrer un maximum de 20 stations de radio dans la liste
(FM)
Appuyez sur la touche PROGRAMME de votre appareil ou sur la touche
PROG de votre télécommande pendant plus de 2 secondes pour activer le
mode de mémorisation automatique.
• "Auto" s'aiche à l'écran et tous les programmes disponibles (maximum
20) sont mémorisés.
• La première station mémorisée dans la liste est lue automatiquement.
La première station mémorisée dans la liste est lue automatiquement.
Remarque : pour désactiver le mode de mémorisation automatique avant
que 20 stations aient été mémorisées, appuyez sur la touche .
68
Mémorisation manuelle de stations
1. Réglez une station de radio.
2. Appuyez sur la touche PROGRAMME de votre appareil ou la touche
PROG de votre télécommande pour activer le mode mémorisation. Le
numéro de la liste de réglage clignote.
3. Appuyez sur les touches PRE +/- de l'appareil ou PRESET/ sur la
télécommande pour attribuer un numéro de liste (1-20) aux stations
sélectionnées.
4. Appuyez à nouveau sur la touche PRE +/- de l'appareil ou sur la touche
PRESET de la télécommande pour mémoriser la station dans la position
de liste que vous avez sélectionnée.
5. Répétez les étapes 1 à 4 pour chaque station supplémentaire que vous
souhaitez mémoriser.
Remarque : Les stations mémorisées ne sont pas supprimées lorsque la
che d'alimentation est débranchée ou lorsque l'appareil est hors tension.
Page 69

Modification du mode de réception de la FM
Appuyez sur la touche REPEAT pour choisir entre stéréo et mono pour la
meilleure réception FM.
Affichage des informations RDS
RDS (Radio Data System) permet aux stations FM d’aicher des
informations supplémentaires. Lorsque vous dénissez une station RDS,
l’icône RDS et le nom de la station apparaissent à l’écran.
1. Réglez une station RDS.
2. Appuyez sur la touche INFO jusqu’à ce que vous ayez toutes les
informations souhaitées (si disponibles):
- Type de station (informations), (sport), (POP MUSIK) etc.
- Heure RDS
FR
69
Page 70

FR
LECTURE DE CD (AUDIO CDS AND MP3/WMA DISCS) OPERATION
Lecture
1. Tournez le bouton SOURCE sur votre appareil ou appuyez sur la touche
CD de votre télécommande pour passer en mode disque. Votre écran
aichera "DISC".
2. Pour ouvrir le tiroir à disque, appuyez sur et placez le disque face
imprimée vers le haut dans le lecteur.
3. Appuyez à nouveau OPEN/CLOSE pour fermer le compartiment à CD.
L'appareil décode et lit automatiquement le disque. Remarque : lorsque
l'appareil est à l'arrêt, appuyez sur la touche BF pour lancer la lecture.
Note: If in stop mode, please press the PLAY/PAUSE button to start playing
the disc.
4. Si vous appuyez sur la touche pendant la lecture, elle s'interrompt
pendant un instant. Appuyez à nouveau sur la touche pour reprendre la
lecture.
5. Appuyez sur la touche pour terminer la lecture.
Remarque : Si l'appareil est débranché ou est hors tension, s'il est allumé
ou éteint, ou s'il est en mode veille / ECO, la dernière piste lue sera
sauvegardée et la lecture reprendra à la prochaine mise sous tension.
Saut de titre, recherche et lecture
• Appuyez une ou plusieurs fois sur la touche de votre appareil ou bien
sur la touche de la télécommande pour sauter un ou plusieurs titres
en arrière sur le CD.
• Appuyez sur la touche de votre appareil ou bien sur la touche de la
télécommande pour sauter un ou plusieurs titres en avant sur le CD.
70
Recherche et lecture
Appuyez sur la touche ⁄ de votre appareil ou bien sur la touche ⁄
de la télécommande pour rechercher la position de lecture souhaitée.
Affichage de texte pendant la lecture
Pour les CD Audio
Appuyez plusieurs fois sur la touche INFO pour aicher le numéro de la
piste en cours et sa durée écoulée, ou le temps de lecture restant ou la
durée de lecture totale du CD ou la durée totale de lecture restante du CD.
Page 71

Pour les disques MP3/WMA
Appuyez plusieurs fois sur la touche INFO, les informations ID3 (telles que le
titre de la chanson, l'artiste, etc.) apparaissent à l'écran pendant quelques
minutes.
Lecture programmable pour les CD et les disques Mp3/WMA
Vous pouvez enregistrer jusqu'à 20 pistes de lecture et les lire dans l'ordre
que vous avez spécié.
1. Insérez un CD / disque et appuyez sur dès que la lecture commence.
2. Appuyez sur la touche PROGRAM de votre appareil ou sur la touche
PROG de votre télécommande jusqu'à ce que "001 P-01" apparaisse à
l'écran.
3. Appuyez sur la touche ⁄ de votre appareil ou sur la touche /0-9
de la télécommande pour dénir l'emplacement mémoire pour un titre
à lire.
4. Appuyez à nouveau sut la touche PROGRAM de l'appareil ou sur la
touche PROG de la télécommande pour mémoriser l'ordre de lecture
attribué. Pour le titre numéro 12 par exemple, l'écran aiche la position
de lecture "012 P—02".
5. Répétez les étapes 3 et 4 pour toutes les autres pistes que vous
souhaitez sélectionner et mémoriser.
6. Appuyez sur la touche PLAY/PAUSE pour démarrer la lecture des titres
mémorisés.
7. Pour arrêter le mode de lecture des titres mémorisés, appuyez une fois
sur la touche button once to stop the programme play. Appuyez deux
fois sur pour eacer la liste mémorisée.
FR
Lecture du début de chaque titre (Intro)
Appuyez sur la touche INTRO de votre télécommande pour lire le début e
chaque titre en commençant par le premier du CD/Disc. Les 10 premières
secondes de chaque piste sont alors lues. Lorsque vous entendez la piste
désirée, appuyez sur la touche pour la lire en entier.
Lecture aléatoire
Lorsque vous appuyez sur la touche RANDOM de votre télécommande,
toutes les pistes sont lues dans un ordre aléatoire. Dans ce mode, l'écran
aiche "SHUF". Pour revenir au mode de lecture normal, appuyez à nouveau
sur la touche RANDOM.
Sélection d'un album (pour les disques MP3/WMA)
• En mode de lecture: Appuyez sur la touche ALB +/- de la télécommande
pour sélectionner le dossier suivant / précédent. Le premier titre du
dossier est alors lu automatiquement.
71
Page 72

FR
• En mode d'arrêt: Appuyez sur la touche ALB +/- de la télécommande
pour sélectionner le dossier suivant / précédent. Puis appuyez sur la
touche pour démarrer la lecture du premier titre du dossier.
Répétition d'un titre
Pendant la lecture d’un titre, appuyez sur la touche REPEAT pour le répéter:
• Pour les CD Audio
Appuyez une fois sur la touche REPEAT : le titre en cours est lu en boucle
et l’écran indique "REP".
• Appuyez deux fois sur la touche REPEAT : tous les titres sont lus en
boucle et l’écran indique "REP ALL".
• Appuyez trois fois sur la touche REPEAT : la répétition est annulée et
l'appareil passe en mode de lecture normale.
• Pour les disques MP3/WMA
- Appuyez une fois sur la touche REPEAT : le titre en cours est lu en
boucle et l'écran indique "REP".
- Appuyez deux fois sur la touche REPEAT : l'album en cours est lu en
boucle et l'écran aiche "REP ALB".
- En appuyant trois fois sur la touche REPEAT : tous les titres sont lus en
boucle et l'écran indique "REP ALL".
- Appuyez quatre fois sur la touche REPEAT : la répétition est annulée et
l’appareil passe en mode de lecture normale.
LECTURE PAR USB
72
Remarque : Assurez-vous que votre périphérique USB contient des chiers
audio lisibles dans des formats pris en charge par votre appareil. Pour les
instructions générales de fonctionnement, veuillez lire la section
Lecture de USB
1. Branchez le périphérique USB dans la prise marquée du symbole sur
votre système audio.
2. Tournez le bouton SOURCE de votre appareil ou appuyez sur la touche
USB de votre télécommande pour passer en mode de lecture USB.
L'écran aiche alors "USB".
3. La musique stockée sur le périphérique USB sera lue automatiquement.
Si l'appareil est en mode arrêt, appuyez sur la touche PLAY / PAUSE pour
lancer la lecture.)
4. Appuyez sur la touche pour mettre la lecture en pause. Appuyez à
nouveau sur la touche pour reprendre la lecture.
Page 73

5. Appuyez sur la touche ⁄ de votre appareil ou bsur la
télécommande pour sélectionner un titre à lire en particulier.
6. Appuyez sur la touche pour terminer la lecture.
Sélection d'un album
• En mode de lecture : Appuyez sur la touche ALB +/- de la télécommande
pour sélectionner le dossier suivant / précédent. La première piste du
dossier est automatiquement lue.
• En mode arrêté : Appuyez sur la touche ALB +/- de la télécommande
pour sélectionner le dossier suivant / précédent. Appuyez sur la touche
PLAY7PAUSE pour lire la première piste du dossier.
Chargement d'un appareil sur le port USB
You can charge your device through the socket on this product with a USB
cable.
Notes:
• Vous pouvez charger un appareil via le port USB portant l'icône.
Connectez l'appareil via un câble au port USB de votre système audio.
• La capacité de charge USB maximale est de 5V 1A
• Tous les appareils ne sont pas adaptés pour charger via le port USB
• Lors du changement de mode de lecture, la charge peut être
temporairement compromise.
FR
LECTURE PAR BT
1. Tournez le bouton SOURCE jusqu'à ce que "BT" apparaisse à l'écran et
que l'icône BT clignote ou appuyez plusieurs fois sur la touche BT / AUX
de votre télécommande.
2. Activez la fonction BT de votre appareil BT (reportez-vous au manuel de
l'utilisateur de l'appareil BT).
3. Pour vous connecter au système audio, sélectionnez "Glastonbury" sur
votre appareil BT. Pour les appareils plus anciens, vous devez entrer
"0000" comme mot de passe de connexion.
4. Lorsque la connexion est établie avec succès via BT, l’écran aiche en
permanence.
5. Commencez à lire les pistes sur votre appareil BT. Vous pouvez utiliser
votre système audio et la télécommande associée pour eectuer des
réglages
- Pour mettre en pause / reprendre la lecture, appuyez sur PLAY/PAUSE.
- Pour sauter un titre, appuyez sur .
73
Page 74

FR
- Pour augmenter/réduire le volume, appuyez sur VOL +/-
6. Pour désactiver la fonction BT, appuyez sur la touche PAIRING de votre
télécommande pendant plus de 2 secondes. L'icône BT clignote ensuite
à l'écran.
Remarque :
• La portée de la connexion BT peut être limitée par des obstacles.
• Si le périphérique BT est hors de portée de votre système audio, la
connexion est automatiquement perdue. Si vous souhaitez reconnecter
le périphérique BT, vous devez le placer à portée du système audio.
• La compatibilité avec tous les appareils BT disponibles n'est pas
garantie.
ARRÊT AUTOMATIQUE (SLEEP TIMER)
• L’appareil étant en marche, appuyez sur la touche SLEEP de la
télécommande pour régler la durée souhaitée jusqu’à ce que l’appareil
s’éteigne automatiquement.
• Vous pouvez choisir entre les durées suivantes (en minutes) : 120, 90, 75,
60, 45, 30, 15.
• Lorsque le temps est écoulé, la minuterie d'arrêt est automatiquement
activée et l'écran aiche "Zz".
• Pour désactiver la minuterie d'arrêt, appuyez sur la touche SLEEP jusqu'à
ce que l'écran aiche [SLEEP 00]. Lorsque la minuterie d'arrêt est
désactivée, l’aichage "Zz" disparaît“.
74
Page 75

ALARME DE RÉVEIL
Remarque : Assurez-vous que l'heure est réglée correctement.
1. En mode veille, appuyez sur la touche TIMER de la télécommande
pendant plus de 2 secondes. le symbole de l'horloge s'aiche à l'écran
et la source (DISC par ex) clignote.
2. Appuyez sur la touche ⁄ de votre appareil ou bien /⁄ on
the remote control to select a source (e.g. DISC, TUNER etc.).
3. Press the TIMER button to store the setting, the hour digits blink.
4. Repeat steps 2-3 to set the hour, minute and adjust volume.
Note:
• Si vous ne souhaitez pas enregistrer une alarme, appuyez sur la touche
pour quitter le réglage.
• Si DISC / USB a été sélectionné et que la lecture est impossible, la radio
(TUNER) est automatiquement activée.
• Si vous n'appuyez sur aucune touche pendant au moins 10 secondes,
l'appareil quitte automatiquement le réglage de l'alarme.
Désactivation et réactivation de la fonction d'alarme
Appuyez sur la touche TIMER pour activer ou désactiver l’alarme. Lorsque
l'alarme est activée, l'écran aiche l'icône de l'horloge.
FR
ÉCOUTE D'APPAREILS AUDIO EXTERNES
1. Reliez l'entrée AUX de votre appareil à la sortie AUX de votre appareil
audio externe via un câble audio comme indiqué ci-dessous.
2. Tournez le bouton SOURCE de l’appareil ou appuyez sur la touche BT
/ AUX de la télécommande pour sélectionner le périphérique audio
externe comme source de lecture. L'écran aiche "AUX".
3. Commencez la lecture sur votre périphérique audio externe (voir le
manuel du périphérique audio externe).
75
Page 76

FR
RÉSOLUTION DES PROBLÈMES
Problème Caus possible / solution
Vériez si la che d'alimentation est dans la prise.
Pas de courant
La télécommande ne
fonctionne pas
Le CD/Disque n'est
pas lu
Pas de son ou trop
faible
Le CD/Disque n'est
pas lu
Mauvaise qualité de
réception radio
Vériez si la prise a été allumée.
L'appareil passera en mode veille au bout de 15 minutes
sans utilisation pour économiser de l'énergie.
Réduisez la distance entre l'appareil et la télécommande.
Insérez les piles en respectant la polarité dans
le compartiment à piles (+/- sur la pile et dans le
compartiment à piles).
Changez les piles.
Tenez bien la télécommande dans la direction du capteur
de télécommande.
Insérez un CD / disque dans le compartiment
Vériez que le disque est inséré correctement.
Attendez qu'il n'y ait plus d'eau de condensation dans la
lentille de l'appareil.
Nettoyez ou remplacez le CD / disque
Vériez que le CD / disque a le bon format.
Ajustez le volume.
Vériez si la fonction muet est activée.
Insérez un CD / DISQUE lisible par le périphérique et
assurez-vous que l'étiquette est tournée vers le haut.
Vériez que le disque n'a pas de rayures et n'est pas sale.
De l'humidité a peut-être pénétré dans l'appareil. Retirez
le CD et laissez l’appareil sous tension pendant environ
une heure. Débranchez ensuite le cordon d’alimentation
de la prise murale. Rebranchez la che secteur dans la
prise et allumez l'appareil.
L'appareil s'éteint automatiquement au bout de 15
minutes après la n de la lecture pour économiser de
l'énergie.
Vériez que la longueur de l'antenne et la direction dans
laquelle elle pointe sont correctement ajustées
76
Page 77

Problème Caus possible / solution
Certains chiers du
périphérique USB
ne peuvent pas être
aichés
L'appareil USB n'est
pas reconnu
La musique ne peut
pas être lue même
après une connexion
BT réussie
Mauvaise qualité
sonore en BT
La connexion à la
chaîne stéréo n'est
pas possible
La minuterie ne
fonctionne pas
Le réglage de l'heure
/ de la minuterie a
été supprimé
Le nombre de dossiers sur le périphérique USB dépasse
une certaine limite. Ce phénomène n'est pas un
dysfonctionnement.
Le format des chiers n'est pas supporté.
Le périphérique USB est incompatible avec la chaîne
stéréo. Essayez d'utiliser un autre périphérique USB.
L'appareil BT ne peut pas diuser de la musique via une
connexion sans l
La réception BT est mauvaise. Rapprochez votre appareil
externe BT de la chaîne stéréo et retirez tous les objets
susceptibles de gêner la connexion entre les deux
appareils.
Votre appareil externe ne remplit pas les conditions pour
la connexion à la chaîne stéréo.
La fonction BT de votre appareil externe est désactivée.
Si nécessaire, reportez-vous au mode d'emploi du
périphérique externe pour savoir comment activer la
fonction BT.
La chaine stéréo n'est pas en mode connexion.
La chaîne stéréo est déjà connectée à un autre appareil
via BT. Désactivez l'autre périphérique et réessayez.
Réglez l'heure correctement.
Allumer la minuterie.
La connexion électrique a été interrompue ou le câble
réseau a été débranché.
Réglez à nouveau l’heure/la minuterie.
FR
77
Page 78

FR
INFORMATIONS SUR LE RECYCLAGE
Vous trouverez sur le produit l’image ci-contre (une poubelle
sur roues, barrée d‘une croix), ce qui indique que le produit
se trouve soumis à la directive européenne 2012/19/UE.
Renseignez-vous sur les dispositions en vigueur dans
votre région concernant la collecte séparée des appareils
électriques et électroniques. Respectez-les et ne jetez pas
les appareils usagés avec les ordures ménagères. La mise
en rebut correcte du produit usagé permet de préserver
l’environnement et la santé. Le recyclage des matériaux
contribue à la préservation des ressources naturelles.
Ce produit contient des piles qui sont soumises à la directive
européenne 2006/66/CE selon laquelle elles ne doivent
pas être éliminées avec les ordures ménagères. Renseignez-
vous sur les dispositions en vigueur concernant la mise en
rebut séparée des piles. La mise en rebut correcte du produit
usagé permet de préserver l’environnement et la santé.
Déclaration de conformité
Fabricant : Chal-Tec GmbH, Wallstraße 16, 10179 Berlin.
Allemagne
Ce produit est conforme aux directives européennes
suivantes :
2011/65/UE (RoHS)
2014/53/UE (RED)
2014/35/UE (LVD)
78
Page 79

FR
79
Page 80

FR
80
Page 81

Page 82

 Loading...