

Page 1
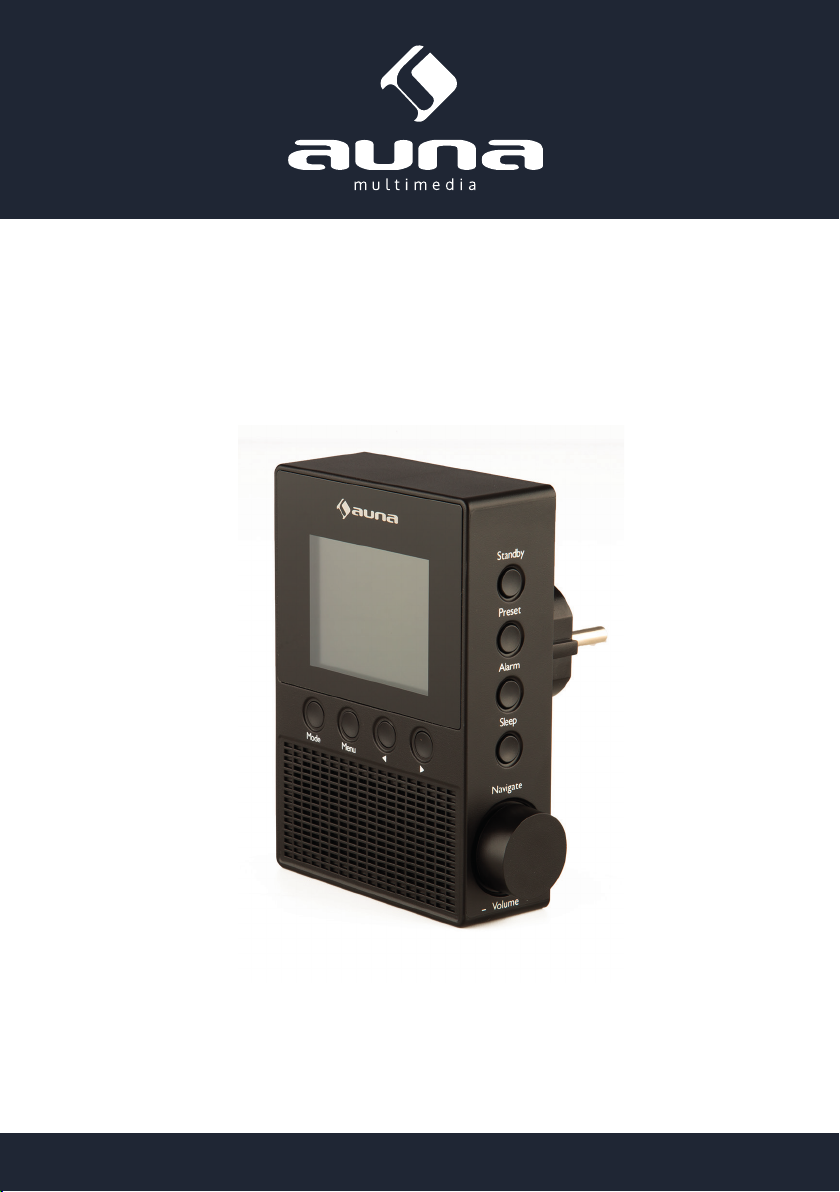
Digi Plug
Internetradio
www.auna-multimedia.com10030656 10030657
Page 2

Sehr geehrter Kunde,
wir gratulieren Ihnen zum Erwerb Ihres Gerätes. Lesen Sie die folgenden Hinweise sorgfältig durch und
befolgen Sie diese, um möglichen Schäden vorzubeugen. Für Schäden, die durch Missachtung der Hinweise und unsachgemäßen Gebrauch entstehen, übernehmen wir keine Haftung.
Sicherheitshinweise
• Lesen Sie vor der Verwendung alle Bedienungshinweise.
• Tauchen Sie das Gerät nicht in Wasser, um einen Brand, einen Stromschlag oder eine Personenverletzung zu vermeiden.
• Setzen Sie das Gerät nicht extremen Temperaturen aus. Das Gerät darf nur in moderaten Klimazonen verwendet werden.
• Die Verwendung von Zubehör, das nicht vom Hersteller empfohlen wird, kann zu einem Brand,
einem Stromschlag oder einer Personenverletzung führen.
• Önen Sie das Gerät nicht, indem Sie das Gehäuse entfernen. Versuchen Sie nicht, das Gerät zu
reparieren. Reparaturen dürfen ausschließlich von qualizierten Personal ausgeführt werden.
• Nur qualiziertes Personal darf technische Veränderungen am Gerät ausführen. Das Gerät darf
nicht geönet oder geändert werden. Vom Verbraucher können keine Komponenten ausgetauscht
werden. Der Hersteller ist nicht für Störungen bei Radios und Fernsehgeräten verantwortlich, die
durch unerlaubte Veränderungen am Gerät erfolgen.
• Das Gerät ist kein Spielzeug. Lassen Sie Kinder nicht damit spielen. Lassen Sie Kinder keine
Fremdkörper in das Gerät einführen.
• Reinigen Sie das Gerät nicht mit Lösungsmitteln, Verdünnern, Reinigungsmitteln oder chemischen
Erzeugnissen. Verwenden Sie stattdessen ein weiches, trockenes Tuch oder eine weiche Bürste.
• Das Gerät und die Steckdose müssen stets leicht zugänglich sein. Das Gerät hat keinen Netzschalter und wird durch Herausziehen von der Stromversorgung getrennt.
Hinweis: Die Gewährleistung verfällt bei Fremdeingrien in das Gerät!
Kleine Objekte/Verpackungsteile (Plastikbeutel, Karton, etc.):
Bewahren Sie kleine Objekte (z.B. Schrauben und anderes Montagematerial, Speicherkarten) und Verpackungsteile außerhalb der Reichweite von Kindern auf, damit sie nicht von diesen verschluckt werden
können. Lassen Sie kleine Kinder nicht mit Folie spielen. Es besteht Erstickungsgefahr!
Transport des Gerätes:
Bitte bewahren Sie die Originalverpackung auf. Um ausreichenden Schutz beim Transport des Gerätes
zu erreichen, verpacken Sie das Gerät in der Originalverpackung.
Reinigung der äußeren Oberäche:
Verwenden Sie keine üchtigen Flüssigkeiten, wie Insektensprays. Durch zu starken Druck beim Abwischen können die Oberächen beschädigt werden. Gummi- oder Plastikteile sollten nicht über einen
längeren Zeitraum mit dem Gerät in Kontakt sein. Nutzen Sie ein trockenes Tuch.
2
Page 3

Technische Daten
Artikelnr.
Stromversorgung 220-240 V~, 50-60 Hz
Netzwerk
Streaming UPnP, DLNA
Unterstützte Dateitypen WMA, MP3, OGG
Lieferumfang
10030656, 10030657
802.11b/g/n(WLAN)
Verschlüsselungsprole: WEP, WPA, WPA2 (PSK), WPS
Gerät, Bedienungsanleitung
3
Page 4
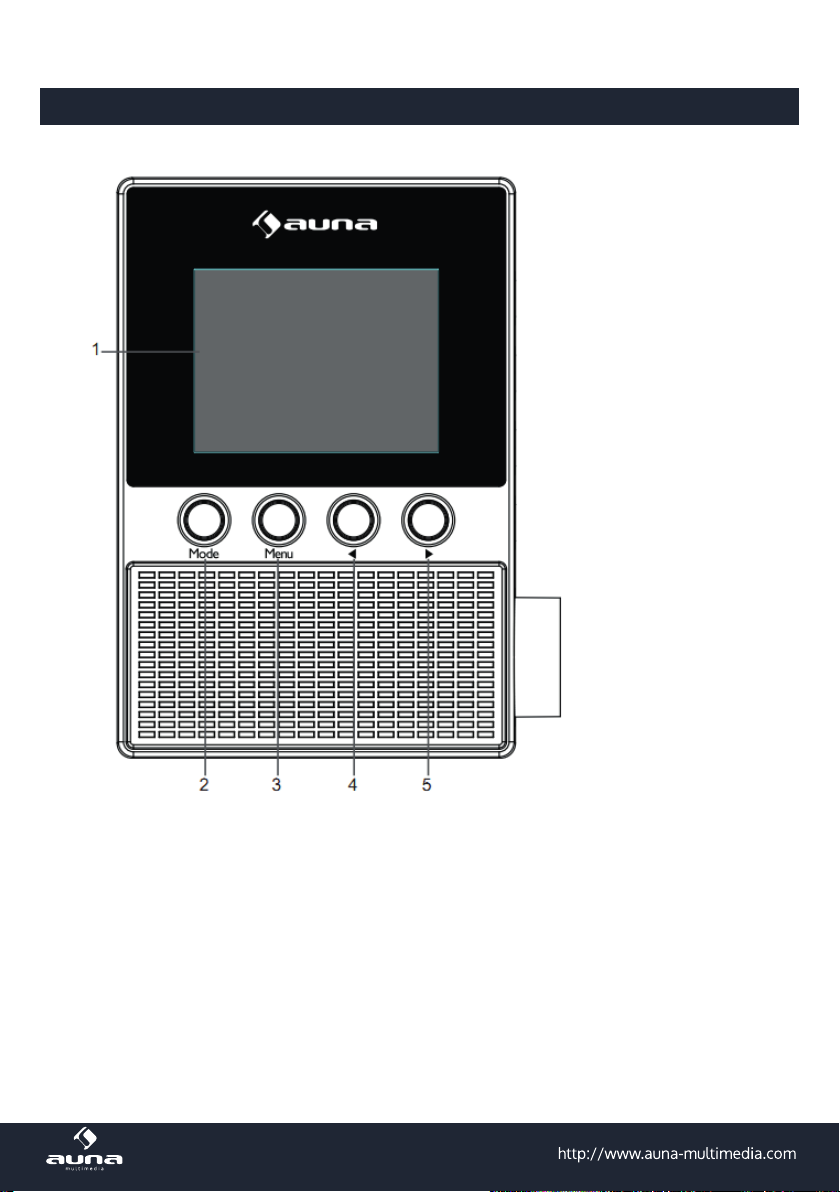
Bedienelemente
4
Page 5
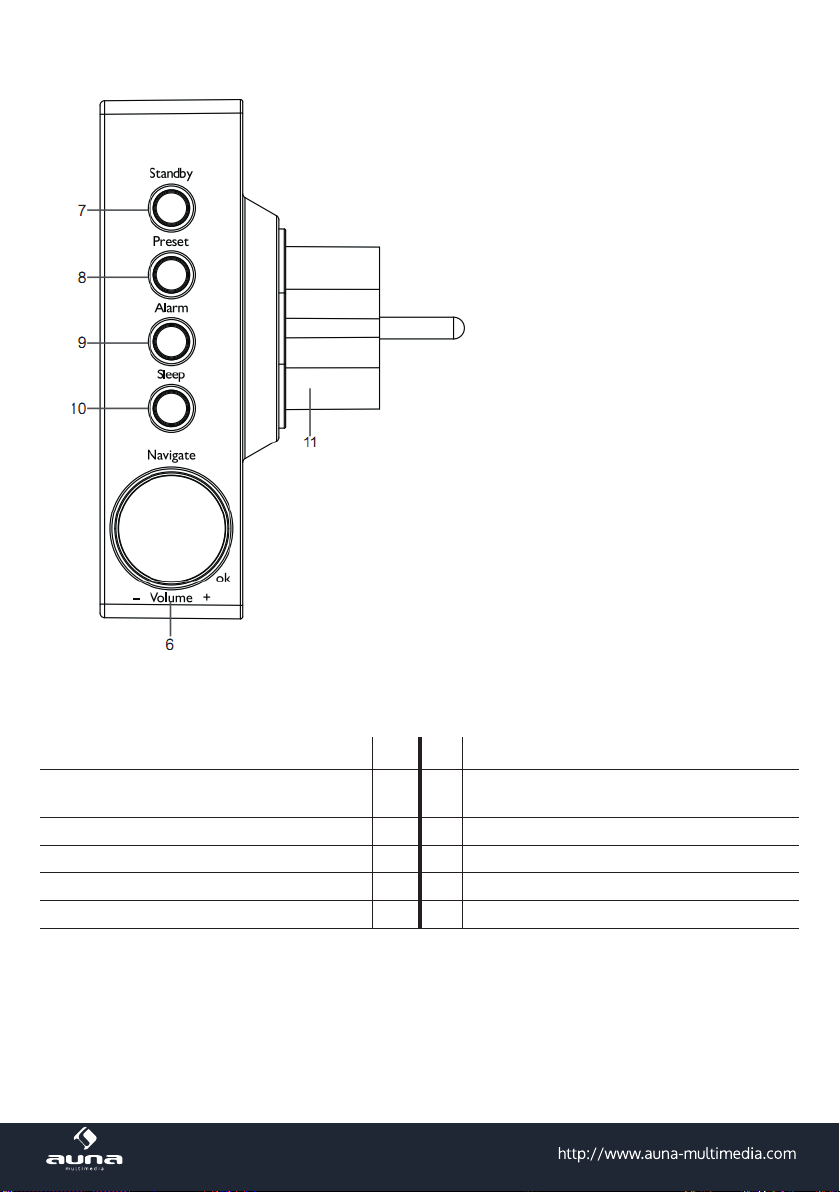
TFT-Bildschirm 1 6 Lautstärke/Navigation/Eingabe
MODE
Wechsel zwischen UPnP und Internetradio
Menü 3 8 Sendereinstellung
Navigation links 4 9 Alarm
Navigation rechts 5 10 Sleep - Einschlafautomatik
2 7 STANDBY / ON
11 Stecker (Stromanschluss)
5
Page 6
Erste Inbetriebnahme
• Das Gerät mit einer Netzsteckdose verbinden.
• Schalten Sie das Gerät ein (seitlicher Schalter auf STANDBY).
• Beim ersten Einschalten sucht das Gerät zunächst nach verfügbaren Funknetzwerken. Dabei wird
ein Verlaufsbalken auf dem Display angezeigt. Anschließend wählen Sie durch Drehung des NAVRads die gewünschte Display-Sprache aus und wählen Sie, ob das Netzwerk konguriert werden
soll. Wählen Sie die gewünschte Option jeweils durch Drehen von NAV und anschließenden Druck
auf NAV/OK.
• Drücken Sie POWER/STANDBY, um das Gerät in den Standbymodus zu schicken. Uhrzeit, Datum
sowie aktivierte Alarme werden dann weiterhin auf dem Display angezeigt.
Menüfunktionen: Übersicht
Standby
Hauptmenü: Internet Radio | Media-Center | Informations-Center | AUX | Einstellungen
Conguration <--> Anzeigemodus <--> Analog / Digital
My MediaU
Wireless Network Conguration |Wireless
Netzwerk <-->
Network (WPS PBC)| Manual Conguration
Check Net when PwR on
Date&Time <-->
Alarm <-->
Timer
Sprache
Dimmer <--> Power Saving / On
6
Set Date/Time | Time Format | Date
Format
Alarm 1 (I/O) | Alarm 2 (I/O)
Schlummer-Wecker (I/O) | Wecker-Lautst.
Page 7

Anzeige <--> Color / Monochrome
Energieverwaltung
Sleep Timer
Buer
Weather <--> Show on Standby | Temp Unit | Location
Local Radio Setup <--> Country | City | Autodetect
Playback Setup <--> O / Repeat All / Repeat 1 / Shule
DLNA Setup <--> Rename (AirMusic)
Equalizer
Resume When Pwr On <--> On/O
Software-Update
Werkseinstellungen
Internet Radio <-->
Medien Center <--> UPnP | My Playlist | Clear My Playlist
Information Center <--> Weather Information | Financial Information | System Information
My Favourites | Radio Station/Music | Local Radio | History
Service
7
Page 8

Menüfunktionen
• Schalten Sie das Gerät ein und drehen Sie NAV, um das Hauptmenü und seine Menüpunkte auf-
zurufen
• Drücken Sie NAV/OK, um die jeweiligen Einstellungen bzw. Untermenües aufzurufen (rechte Spal-
te) und drehen Sie wiederum, um zu blättern. Drücken Sie BACK zum Zurückkehren ins vorige
Menü.
• Hier nden Sie die oben zusammengefassten Menü-Funktionen ausführlicher dargestellt:
Internet Radio
Nach erfolgreicher Verbindung zu einem beliebigen Sender werden die Bitrate sowie das Senderformat
auf dem Display angezeigt.:
Wählen Sie mit NAV/OK den Modus INTERNET RADIO. Wählen Sie dann mit NAV/OK:
Meine Favoriten:
Die Liste Ihrer persönlichen Favoriten, fasst bis zu 250 Einträge. Um einen Sender hinzuzufügen, halten
Sie während der Sender läuft PRESET/BT am Gerät gedrückt.
Ein Sender kann nicht mehrfach zur Favoritenliste hinzugefügt werden.
Drücken Sie OK am Gerät, um die Liste anzuzeigen. Blättern Sie mit NAV oder den Pfeiltasten durch die
Liste. Drücken Sie die Pfeiltaste RECHTS um das Untermenü für den gerade angewählten Sender aufzurufen mit den Optionen Löschen, Verschieben, Umbenennen, Abspielen und Als Alarm Verwenden.
Radiosender/Musik:
Unter diesem Punkt sind Sender in den Kategorien Global Top 20, Genre sowie Country/Location
abgelegt. Önen Sie die jeweiligen Unterkategorien, um die Senderlisten zu durchsuchen. Drücken Sie
NAV/OK zum Abspielen.
Jeder angewählte (farblich hinterlegter) Sender hat ein Untermenü, das Sie mit der Pfeiltaste (rechts)
anwählen können. Die Unterpunkte sind:
• Zu Favoriten hinzufügen
• Auto Scan
• Abspielen
• Als Alarm Verwenden.
Wählen Sie Auto Scan, um alle in dem jeweiligen Ordner vorhandenen Sender für je 30 Sekunden
abspielen zu lassen. Drücken Sie SELECT, um das Springen zu stoppen und den zur Zeit aktiven Sender
beizubehalten.
8
Page 9

Lokale Station: Zugri auf lokale Radiosender.
Zuletzt gehörte Sender: Die zehn zuletzt gehörten Sender werden hier aufgelistet.
Service: Suchen Sie über Sender Suchen Radiosender nach Schlüsselwörtern oder fügen Sie Sender
Ihrer Favoritenliste über die Funktion Sender Hinzufügen hinzu.
Media Center
Wählen Sie die Modi USB/UPnP oder Wiedergabeliste per NAV/OK-Button.
UPNP:
Spielen Sie Audiodaten ab, die auf einem Computer im Netzwerk freigegeben sind.
Zu beachten: Für die UPnP-Funktion benötigen Sie den Windows Media Player ab Version 11 oder Software wie Twonky Media.
Die Datei-Freigabe muss über die Netzwerk- oder Ordnereinstellungen bzw. im Media Player einge-
stellt sein.
Meine Playlist: Legen Sie eine persönliche Playlist an: Indem Sie bei den gewünschten Titeln Select
gedrückt halten, fügen Sie diese jeweils hinzu.
My media U
Anzeige und Steuerung Ihrer eigenen mediaU-Sender. Erstellen Sie zunächst einen mediaU-Account:
• Besuchen Sie www.mediayou.net
• Erönen Sie ein Konto mit Ihrem Benutzernamen und einem frei wählbaren Passwort. Loggen Sie
sich nach Erhalt der Bestätigungsmail ein.
• Registrieren Sie Ihr Radio auf der Webseite. Sie benötigen dazu die MAC-Adresse des Geräts. Die-
se nden Sie über Hauptmenü -> Information Center -> System Information -> Wireless Info.
• Über den mediaU-Account können Sie Ihre Radiosender und Stream verwalten und haben vom
Radio aus direkten Zugri auf diese (Passwort und Nutzername müssen dort nicht eingegeben
werden).
9
Page 10

Information Center
Nur wenn Netzwerk & Internet verbunden.
Rufen Sie das Informations-Center per NAV/OK aus dem Hauptmenü auf.
Wetter
Wählen Sie Ihren Standort aus, um eine Wettervorhersage für die nächsten vier Tage anzuzeigen (Back/
Forward für nächster/voriger Tag). Im Standby werden dann Wetter und Uhrzeit im Wechsel angezeigt.
Finanzinformationen
Wählen Sie die für Sie interessanten Items aus der Liste. Die verknüpften Informationen werden dann
automatisch angezeigt.
System-Informationen
Anzeige der Software-Version, MAC-Adresse, ID und IP-#
Einstellungen
Anzeigemodus
(Uhrzeit)
My MediaU • Zur Einstellung der mediaU-Serververbindung
Network
Datum & Zeit
Wecker
• Analog
• Digital
• Funknetz-Einstellung: Liste der gefundenen Netzwerke in Reichweite.
Wählen Sie mit NAV/OK und geben Sie dann das passende Passwort ein.
• Funknetz (WPS PBC): Drücken Sie in dieser Option innerhalb von 120 Se-
kunden die WPS-Taste Ihres Routers (um sich zu legitimieren). Das Radio
wird dann automatisch mit diesem verbunden.
• Manuelle Konguration: Stellen Sie die Verbindung mit dem gewünschten WiFi manuell durch Eingabe von DHCP, IP und SSID her.
• Netzwerk prüfen beim Einschalten: Aktivieren Sie, damit das Radio
beim Einschalten mit dem zuvor eingestellten Netzwerk verbindet.
• Datum und Zeit einstellen
• Zeitformat einstellen (12h / 24std)
• Datumsformat einstellen (YYYY/MM/DD - DD/MM/YYYY - MM/DD/
YYYY)
• Wecker 1 (ein/aus/Wiederholung/Zeit/Sound)
• Wecker 2 (ein/aus/Wiederholung/Zeit/Sound)
• Schlummer-Wecker (aus/5min (Standard) /10min/20min/.../120min)
• Wecker-Lautstärke
• You can set up the alarm volume by “Alarm Volume”.(Volume 7is acquiescent)
10
Page 11
Timer Countdown-Timer (max. 100min)
English / Deutsch / Espanol / Francais / Portugese / Nederlands / Italiano/
Sprache
Dimmer Energiesparmodus / An
Anzeige Farbig/monochrom
Energieverw. Automatisch ausschalten nach...
Schlaftimer Sleep-Zeit einstellen
Zwischenspeicher Einstellung des Zwischenspeichers für Medienstreaming
Pyccknn / Svenska / Norske / Dansk / magyar / Cesky / slovensky / polski /
Turkce / Suomi
Wetter
Lokale Station Manuelle Einstellung nach Stadt/Land oder automatisch
Wiedergabe
Gerät. Rename (AirMusic) | Air Music Control App
Equalizer Normal/mittig/Jazz/Rock/Soundtracks/Klassik/Pop/Nachrichten
Forts. d. Wiederg.
Software-Update Updaten der Firmware, falls neue Version zur Verfügung steht
Werkseinstellungen
Ort und Temperatureinheit einstellen, Anzeige bei Standby aktivieren/deaktivieren
Play-Modi: Alle wiederholen / eins wiederholen / zufällige Abspielreihenfolge
(für Mediacenter)
Aktivieren/deaktivieren Sie hier die fortgesetzte Wiedergabe beim Einschalten des Radios
Setzen Sie das Gerät hier auf die Werkseinstellungen zurück. Achtung: Gespeicherte Einstellungen und Sender gehen hierbei verloren und müssen wieder
gesucht werden.
11
Page 12

DLNA Streaming und App-Steuerung
Nutzen Sie Ihren Computer als Medien-Server und streamen Sie Audio-Inhalte via DLNA über das Radio.
Sie können Dateien in der Formaten MP3, WMA, WAV und AAC streamen.
UPnP
• Stellen Sie sicher, dass Ihr Computer mit demselben Netzwerk verbunden ist, wie Ihr Radio.
• Starten Sie eine geeignete Plattform für UPnP (zum Beispiel den Windows Media Player, ab Version 11).
• Erstellen Sie eine Abspielliste und erlauben Sie die Freigabe für UPnP.
• Bitte konsultieren Sie die Hilfedatei der Software (zum Beispiel durch Druck auf F1) für weitere
Informationen über die UPnP-Freigabe und zu weiteren Themen)
•
• Gehen Sie bei Smartphones/Tablets, von denen Sie streamen möchten, analog vor: Laden Sie sich
eine geeignete Streaming Software von Google Play herunter, verbinden Sie das Gerät mit dem
Netzwerk und fügen Sie die Musikdateien, die Sie streamen möchten, der Freigabe hinzu.
DLNA
Auch das DLNA-Protokoll wird für das Streamen von Musik unterstützt. DLNA wird von Windows ab
Version 7 und dem Windows Media Player ab Version 12 unterstützt
• Önen Sie erst Systemeinstellungen > Netzwerk und Internet > Freigabeoptionen > Medien Stre-
aming und fügen Sie das Radio hinzu.
• Starten Sie dann den Windows Media Player und erlauben Sie die Remote-Bedienung des Radio.
Hinweise
• Für das Streaming von Smartphones oder Tablets empfehlen sich frei verfügbare apps wie bub-
bleUPnP, oder Twonky Beam.
• Während des DLNA Streams können am Radio nur die Lautstärke sowie Standby/Power bedient
werden. Andere Funktionen sind inaktiv. Trennen Sie die Verbindung Rechner- bzw. Smartphone-
seitig.
12
Page 13

Hinweise zur Entsorgung
Bendet sich die diese Abbildung (durchgestrichene Mülltonne auf Rädern) auf
dem Produkt, gilt die Europäische Richtlinie 2012/19/EU. Diese Produkte dürfen
nicht mit dem normalen Hausmüll entsorgt werden. Informieren Sie sich über die
örtlichen Regelungen zur getrennten Sammlung elektrischer und elektronischer
Gerätschaften. Richten Sie sich nach den örtlichen Regelungen und entsorgen
Sie Altgeräte nicht über den Hausmüll. Durch die regelkonforme Entsorgung der
Altgeräte werden Umwelt und die Gesundheit ihrer Mitmenschen vor möglichen
negativen Konsequenzen geschützt. Materialrecycling hilft, den Verbrauch von
Rohstoen zu verringern.
Konformitätserklärung
Wir, die
CHAL-TEC GmbH
Wallstraße 16
10179 Berlin
erklären hiermit, dass das nachfolgend bezeichnete Produkt:
10030656, 10030657 (Internetradio)
allen den folgenden einschlägigen Bestimmungen entspricht.
Niederspannungsrichtlinie 2014/35/EU
RED-Richtlinie 2014/53/EU
VERORDNUNG (EU) Nr. 801/2013 bezüglich der Ökodesign-Richtlinie 2009/125/EG
RoHS-Richtlinie 2011/65/EU
Angewandte harmonisierte Normen:
EN 60065:2014
EN 62311:2008
EN 60950-1:2006+A11:2009+A1:2010+A12:2011+A2:2013
EN 301489-17 V2.2.1
EN 391489-1 V1.9.2
EN 300328 V1.9.1
EN 50564:2011
i. V. Sebastian Jäger
Berlin, den 23.06.2017
13
Page 14

Dear Customer,
Congratulations on purchasing this product. Please read and follow these instructions, in order to avoid
damaging the item. We do not cover any damages that may arise from improper use of the item or the
disregard of the safety instructions.
Important Safety Advice
• Read all instructions before using.
• To protect against a re, electric shock or personal injury, do not immerse the device in water or other
liquids.
• Do not expose the appliance to extreme temperatures. The appliance shall be used in moderate climates.
• The use of attachments that are not recommended by the appliance manufacturer may result in re,
electric shock or personal injury.
• Do not open the unit by removing any cover parts. Do not attempt to repair the unit. Any repairs or
servicing should be done by qualied personnel only.
• Only qualied persons may perform technical work on the product. The product may not be
opened or changed. The components cannot be serviced by the user. The manufacturer is not respon-
sible for any radio or TV interference caused by unauthorized modications.
• The appliance is not a toy. Do not let children play with it. Never let children insert foreign objects into
the appliance.
• Never clean the surface of the device with solvents, paint thinners, cleansers or other chemical prod-
ucts. Instead, use a soft, dry cloth or soft brush.
• Save these instructions.
• The device and the socket must always be easily accessible. The device does not have a mains switch.
The power is being cut o by pulling the plug.
Small objects
Keep small objects (i.e. screws, mounting material, memory cards etc.) and packaging out of the range of
children. Do not let Children play with foil. Choking hazard!
Transporting the device
Please keep the original packaging. To gain suicient protection of the device while shipment or transportation, make sure to put it back in its original packaging.
Cleaning the surface
Do not use any volatile liquids, detergents or the like. Use a clean dry cloth.
14
Page 15

Technical Data
Item no.
Power supply AC 220-240 V, 50-60 Hz
Network
Streaming UPnP, DLNA
Supported letypes WMA, MP3, OGG
Scope of delivery
10030656, 10030657
802.11b/g/n (WLAN)
Encryption: WEP, WPA, WPA2 (PSK), WPS
Device, user manual
15
Page 16

Control Panel
16
Page 17

TFT screen 1 6 Volume/Navigator/OK---Combine key
Mode---Press to switch between UPnP and
internet radio
Menu - Show Menu for the current mode 3 8 Preset -To save and recall the radio stations
Left ---Turn left 4 9 Alarm- Alarm setting
Right---Turn right 5 10 Sleep--- Quick set for sleep timer
2 7
Standby- Press to switch between
standby and on
11 Plug
17
Page 18

Initial Use
• Connect the device to a household mains socket
• Press STANDBY on the side to wake the device up from standby mode.
• When it is the rst time running the device, the system will ask you to set Language and Network
Congurations. You may setup the network connection immediately, or set it later. Use NAV (=rotate to
scroll) to select the desired option. Press NAV/OK to conrm.
• Press STANDBY for standby. Date and time, as well as alarms - if activated - will still be shown on the
display when in standby mode.
• Tips: When you need input the internet password, please press Navigate button to choose the chara
cters.In this condition,press Back button can turn left and delete the left characters at the same time:
Note: Below characters are available for the radio:
• Numbers (from 0-9)
• English letters (from A to Z and from a to z)
• Other characters (DEL,@,Blank,!,”,#,$,%,&,*,’,+ and (,).
•
Menu: Overview
Standby
Main menu
Conguration <--> Time Display <--> Analog / digital
18
Internet Radio | Media-Center | Information Center | Conguration | Local
Radio
Manage my mediaU
Wireless Network Conguration |Wireless
Network <-->
Date&Time <-->
Alarm <-->
Network (WPS PBC)| Manual Conguration
Check Net when PwR on
Set Date/Time | Time Format | Date
Alarm 1 (I/O) | Alarm 2 (I/O)
Nap-Alarm (I/O) | Alarm Volume.
Format
Page 19

Timer
Language
Dimmer <--> Power Saving / On
Display <--> Color / Monochrome
Power Management
Sleep Timer
Buer
Weather <--> Show on Standby | Temp Unit | Location
Local Radio Setup <--> Country | City | Auto Detect
Playback Setup <--> O / Repeat All / Repeat 1 / Shule
Device <--> Rename (AirMusic) | Air Music Control App
Equalizer
Resume When Pwr On <--> On/O
Software-Update
Reset to default
Internet Radio <-->
Media Center <--> UPnP | My Playlist | Clear My Playlist
Information Center <--> Weather Information | Financial Information | System Information
My Favourites | Radio Station/Music | Local Radio | History
Service
19
Page 20

Menu / Functions
• Switch on (STANDBY) and rotate NAV to scroll through the main menu. Press OK (to enter sub menues
or conrm settings)
• Press BACK to return to the previous menu.
Internet Radio
After the connection of any station is succeeded, the bit rate and the format of the station will display on
the playing screen.
• My Favourites
List of my favourite preset stations. It supports 250 favourite entries including stations and folder. During the station playing screen, press and hold PRESET on the device to save the station as my favourite.
You may replace the previous saved station to the new one.
If the Selected station have been saved, you cannot save it again. The saved stations are showed under
this menu. You may also press PRESET to enter the saved station list.
Under the preset station list, move to your station, press OK to listen. You may also press Right button
to enter its submenu to Delete, Shift Up/Down along the list, Rename, Play, or Use as Alarm Sound (if
you chose internet as alarm sound in alarm conguration).
• Radio Station / Music
Stations are categorized into Global Top 20, Genre and Country/Location (Australia, Canada, United
Kingdom, USA). Enter to continue the subcategories and choose the station to listen.
For each station, press OK to play directly. Press Right button to enter its submenu. When you choose
Auto Scan, it becomes the playback of marquee for each station in the subcategory. Each station plays
30 seconds until all have played or you press Select to stop the marquee listening. Press Info to view
the display information of the playing station.
• Local stations
• History: List of the ten recently listened stations.
• Service: Search radio station - Enter your keyword to search radio station from the list. Add new radio
station - The added stations will be stored in My Favorite. Note that the maximum character of the
station name is 250.
20
Page 21

Media Center
Select the USB/UPnP mode or playlist mode with NAV/OK button.
• UPnP
If you have set up shared media, you should see the shared media from UPnP. If you have more than
one computer sharing media, the alternatives are listed. Select the shared media you want to play. Use
Play/Pause, Next/Prev and Stop Press Info to view the display information of the playing track.
Hints: The radio can only read the track with the le name less than 40 characters. The characters
should be in European language. If you encounter failure of reading the track under UPnP mode, you
may try to rename the le. However, if the track is still unable to play, you can try converting the le
to dierent formats.
• My Playlist: You can create a playlist of favourious music from UPnP. When you playing the music,
press and hold Select to save it into My Playlist.
My media U
Display and playback your own mediaU station list on the mediaU server. Set your account rst. To activate
your own station list, follow the steps below:
• Access http://www.mediayou.net/. Join my mediaU membership. Login to the website;
• Enter the wireless MAC addresses of Radio to the mediaU website. This information can be obtained
in Information Center > System Information > Wireless Info;
• When successfully congured, you are able to save and view your own mediaU station playlist(s).
Username and password are not required to enter to the Radio.
• If there are dierent accounts stored in Radio, you can choose the one you currently use under Congu-
ration menu. On the website, you may save stations to Favorite Station, set Favorite Location/Genre
and My Local City, or add stations manually. The stations can be viewed from My MediaU mode on the Radio.
Information Center
• Weather
There are weather information and forecasts for 2000 cities. Select the country and then the city for
the weather details. Press Rotate NAV button to see the weather forecasts. The device is able to display the weather information on the standby mode. On the weather information page, press Select to
set the city to displaying on the standby mode. Then turn on the weather display.
• Financial Info
View the stock index from around the world.
• System Information
Check out the version of the system, and the details of connected network. The information includes
MAC address which you are required to ll in when registration of my mediaU membership.
21
Page 22

Settings Menu
Display
(time display)
My MediaU
Network
Date & Time
Analog / digital
When it is enabled, My mediaU will exist on the main menu. If various mediaU ac-
counts exist in the Radio, Select the default login account in here.
• Wireless Network Conguration: Enable/disable WiFi network. When you
enable the WiFi network, the system will automatically select the required AP.
Enter WEP or WPA code to connect the WiFi.
• Wireless Network (WPS PBC): If you are using a router with WPS/QSS but-
ton, you may set up the network connection simple via WPS function. Enter
it and go to press the WPS/QSS button on your router within 120 seconds.
The connection between the router and Music Link will then be congured
automatically.
• Manual Conguration: You can choose DHPC (which IP assigned automati-
cally) or manually input IP address for wireless network connection. When
you select manual setting for wired connection, the following have to be entered: SSID (name of access point), IP Address, subnet mask, default gateway,
preferred DNS server, alternate DNS server.
• Check Network When Power On: Enable/disable WiFi network. When you
enable the WiFi network, the system will automatically search the available
AP. Select required AP.
• Setup the date and time
• Set time format display as 12 Hour or 24 Hour
• Set date format (YYYY/MM/DD - DD/MM/YYYY - MM/DD/YYYY)
There are three independent alarms - 2 alarms of absolute time setting (Alarm 1
and Alarm 2) and 1 alarm for relative time setting (Alarm NAP). Press Alarm on the
remote control to enter this menu directly.
Alarm
22
Note that the alarm source is from the preset Internet radio if Alarm Sound is set
to be Internet Radio. It can only set one same IR station for Alarm 1 and Alarm 2.
When the alarm time is reached, the unit connects to the Internet if the set network
is available. Therefore there may be some delay from the alarm to the radio play.
If no network is connection can be established within one minute, the alarm will
change to Melody automatically.
When Alarm NAP is set, it alarms once in 5/10/20/30/60/90/120 minutes depending on which one you have set.
Choose Alarm Volume to congure the volume of the alarms.
Page 23

Timer Countdown timer (max. 100min)
English / Deutsch / Espanol / Francais / Portugese / Nederlands / Italiano/
Language
Dimmer Dimmer Power saving/ Turn On
Display colored/monochrome
Power Mgmt
Sleep Timer
Buer Congure the buer time of the music playback, 2/4/8 seconds.
Weather
Local Radio Setup
Pyccknn / Svenska / Norske / Dansk / magyar / Cesky / slovensky / polski / Turkce
/ Suomi
Congure to go to standby mode automatically during in the menu or/and without
Wi signal. Choose the power management timer (5/15/30mins) to set the duration of the radio to switch standby mode automatically when you are not controlling it. Choose Turn o to ignore the power management function.
Turn o or set the sleep time of 15/30/60/90/120/150/180 minutes. Once the time
is set, there will be a bed icon with remaining minutes at the top right corner and
the device will turn to standby then. Press Sleep on the remote control for the
shortcut of this function.
Activate/deactivate the weather forecast for the standby display. Choose your preferred temperature unit (°F or °C) and then proceed entering your location. When
activated, the weather forecast is shown in turns with the clock display on the
standby screen (each 10 secs).
There is a shortcut Local Radio under Internet Radio so that you can easily go
to the station list of your location. You may Manual Setup your location, or let
the system Auto Detect your current location. The system detects the location
according to the IP address of your connected network. Press Local Station to
enter this local radio list directly.
Playback Setup
Device
Equalizer
Resume When
PWR ON
Select the playback mode of media center – O (no repeat or shule), Repeat all,
Repeat one, or Shule.
Default device name for DLNA is Digi Plug. You may rename it for DLNA setup
on the PC or mobile.
Default equalizer is Normal, you may change to Flat, Jazz, Rock, Movie, Classical,
Pop, or News. Press EQ on the remote control to swap among the EQ mode for
shortcut.
The system is default to resume internet radio playback if you were listening to
internet radio or media center before switch o the unit. If turn this setting o, the
system will remain in the main menu when switching on the unit.
23
Page 24

Software Update
Reset
Update software. If there is an updated software version on the server, the system
will notify you when you return to the main menu.
Restore the default settings. After the Digi Plug is reset, the system will move to
language setting menu. And it will automatically turn to network setting menu
once the OSD language is elected.
DLNA / UPnP
You may change the defautl DLNA name as you like. The information below is the introduction of how to
setup up media streaming from PC or other media server. Study the own instruction of the software or apps
you use to enjoy music streaming if necessary. Make sure the music les are in the format of MP3, WMA,
WAV or AAC for music streaming to the radio.
UPnP
• Connect the PC to the network.
• Ensure the Radio is powered on and connected to the same network.
• Open the UPnP platform Windows Media Player (11 or later). Alternatively, other platforms or server
such as Windows Media Connection may be used.
• Allow to share your media to Radio.
• Add the audio les and folders you want to share with radio to the media library.
You may also enjoy the streaming music from other music server, such as smart phone (Android platform):
• Connect the mobile to the network
• Search and install media sharing apps from Google Play.
• Add the audio les from your mobile you want to share.
• After setup the shared server, choose the music and control playback on the Radio.
DLNA
Besides UPnP, Radio supports DLNA function, you share the music les from PC or Android mobile, and you
use your PC, Android mobile or iPhone / iPad to control music playback on the Radio. (It is not required to
control each playback on the Radio.)
• The PC system requirement for DLNA is Windows 7 and Windows Media Player 12. Setup as below:
• First, share the media on your PC to Radio.
• Control Panel > Network and Internet > Network and Sharing Center > Media streaming options
• Open Windows Media Player to enable Allow remote control of my Player.
• Right click any music in the library and choose Play to Radio.
• There will be a window for controlling music playback on Radio.
24
Page 25

You may search and install any free or commercial DLNA apps from Google Play or Apple Store if you are
using Android mobile, tablet or iPhone / iPad. It is suggested to use bubbleUPnP, Twonky Beam on Android
mobile, tablet or Twonky Beam on iPhone/iPad. Some apps may not support streaming music from iPhone/
iPod but iPhone/iPod could still be used to control streaming music from other servers.
Procedures for playing shared music on the app are as follows:
• Select Radio as the player. Some apps may allow to play the music to multi players at the same time.
• Select music server and choose the music. Some app can create a playlist if you choose several music.
Please note: When using DLNA music streaming function on Music Link, you can only control the volume
and standby via the unit. It is restricted to control the other functions. Stop DLNA on PC, mobile or tablet
before you resume Music Link’s own control.
25
Page 26

Environmental Concerns
According to the European waste regulation 2012/19/EU this symbol on the product or
on its packaging indicates that this product may not be treated as household waste.
Instead it should be taken to the appropriate collection point for the recycling of
electrical and electronic equipment. By ensuring this product is disposed of correctly,
you will help prevent potential negative consequences for the environment and human health, which could otherwise be caused by inappropriate waste handling of this
product. For more detailed information about recycling of this product, please contact
your local council or your household waste disposal service.
Declaration of Conformity
We, the
CHAL-TEC GmbH
Wallstraße 16
10179 Berlin
hereby declare that the product referred to below
10030656, 10030657 (Internet Radio)
complies with the following relevant regulations:
Low Voltage Directive 2014/35/EU
Radio Equipment Directive 2014/53/EU
COMMISSION REGULATION (EC) No 801/2013 with regard to Directive 2009/125/EC
RoHS 2011/65/EU
Applied harmonized standards:
EN 60065:2014
EN 62311:2008
EN 60950-1:2006+A11:2009+A1:2010+A12:2011+A2:2013
EN 301489-17 V2.2.1
EN 391489-1 V1.9.2
EN 300328 V1.9.1
EN 50564:2011
by proxy Sebastian Jäger
Berlin, 23 June 2017
26
Page 27

Chère cliente, cher client,
Toutes nos félicitations pour l’acquisition de ce nouvel appareil. Veuillez lire attentivement les instructions suivantes de branchement et d’utilisation an d’éviter d’éventuels dommages. Le fabricant ne
saurait être tenu pour responsable des dommages dus au non-respect des consignes de sécurité et à la
mauvaise utilisation de l’appareil.
Consignes de sécurité
• Lisez toutes les consignes d‘utilisation avant de vous servir de l‘appareil.
• Ne plongez pas l‘appareil dans l‘eau pour éviter un incendie, un choc électrique ou une blessure
corporelle.
• N‘exposez pas l‘appareil à des températures extrêmes. L‘appareil ne peut être utilisé que dans des
climats modérés.
• L‘utilisation d‘accessoires non recommandés par le fabricant peut provoquer un incendie, une
électrocution ou des blessures.
• N‘ouvrez pas l‘appareil en retirant le boîtier. N‘essayez pas de réparer l‘appareil. Les réparations
ne peuvent être eectuées que par un personnel qualié.
• Seuls les personnels qualiés peuvent apporter des modications techniques à l‘appareil.
L‘appareil ne doit être ni ouvert ni modié. L‘utilisateur ne peut échanger aucun composant lui-
même. Le fabricant n‘est pas responsable de toute interférence avec les radios et les téléviseurs
causée par des modications non autorisées de l‘appareil.
• L‘appareil n‘est pas un jouet. Ne laissez pas les enfants jouer avec. Ne laissez pas les enfants introduire des corps étrangers dans l‘appareil.
• Ne nettoyez pas l‘appareil avec des solvants, des diluants, des détergents ou des produits chimiques. Utilisez plutôt un chion doux et sec ou une brosse douce.
• L‘appareil et la prise doivent toujours rester facilement accessibles. L‘appareil n‘a pas
d‘interrupteur, l‘alimentation se coupe en débranchant le câble.
Remarque : la garantie expire en cas d’intervention étrangère sur l’appareil !
Petits éléments / éléments d’emballage (sacs en plastique, cartons, etc.):
Conservez les petits éléments (par exemple vis, matériel de montage) et éléments d’emballage hors
de portée des enfants pour éviter les risques d’étouement. Ne pas laisser les enfants jouer avec les
emballages plastiques, il y a risque d‘étouement!
Transport de l‘appareil :
Veuillez conserver l’emballage d’origine. Pour garantir la meilleure protection de l’appareil lors de son
transport, veuillez le remettre dans son emballage d’origine.
Nettoyage des surfaces externes :
Ne pas utiliser de liquides volatils tels que le spray insecticide. Une pression trop forte lors de l’essuyage
peut endommager les surfaces. Les matières en plastique ou en caoutchouc ne doivent pas rester en
contact avec l’appareil pendant une période prolongée. Utilisez un chion sec.
27
Page 28

Fiche technique
Numéro d'article
Alimentation 220-240 V~, 50-60 Hz
Réseau
Streaming UPnP, DLNA
Formats de chiers
supportés
Livraison
10030656, 10030657
802.11b/g/n(WLAN)
Méthodes de cryptage : WEP, WPA, WPA2 (PSK), WPS
WMA, MP3, OGG
appareil, mode d‘emploi
28
Page 29

Eléments de commande
29
Page 30

30
Écran TFT 1 6 Volume/Navigation/Saisie
MODE 2 7 STANDBY / ON
Basculer entre UPnP et radio Internet 2 7 STANDBY / ON
Menu 3 8 Réglage des stations
Navigation gauche 4 9 Alarme
Navigation droite 5 10 Sleep – arrêt automatique
11 Fiche (prise d'alimentation)
Page 31

Première mise en service
• Branchez l‘appareil sur une prise de secteur.
• Allumez l‘appareil (interrupteur latéral sur STANDBY).
• Au premier démarrage, l‘appareil recherche d‘abord les réseaux sans l disponibles. Une barre de
progression est aichée sur l‘écran. Tournez ensuite la molette NAV pour sélectionner la langue
d‘aichage souhaitée et choisissez si besoin de congurer le réseau. Pour sélectionner l‘option
désirée, tournez le bouton NAV, puis appuyez sur NAV/OK.
• Appuyez sur POWER/STANDBY pour mettre l‘appareil en mode veille. L‘heure, la date ainsi que
l‘alarme active restent aichées à l‘écran.
Fonctions du menu : aperçu
Standby
Menu principal : Radio Internet | Media-Center | Centre d‘informations | AUX | Paramètres
Conguration <--> Mode d‘aichage <--> Analogique/numérique
My MediaU
Conguration du réseau sans l |réseau
Réseau <-->
sans l (WPS PBC)| Conguration manuelle
Rechercher le réseau au démarrage
Date et heure <-->
Alarme <-->
Minuterie
Langue
Dimmer <--> Economie d‘énergie / on
Régler la date/heure | format de l‘heure |
format de la date
Alarme 1 (I/O) | Alarme 2 (I/O) réveil à
intervalles (I/O) | volume du réveil
31
Page 32

Aichage <--> Couleur/monochrome
Gestion de l‘énergie
Minuterie d‘arrêt
automatique
Mémoire tampon
Météo <-->
Réglage des radios
locales
Paramètres de lecture <--> O / tout répéter / répéter 1 / aléatoire
DLNA Setup <--> Renommer (AirMusic)
Égaliseur
Reprendre au démar-
rage
Software update
Paramètres d‘usine
Internet Radio <-->
Media center <--> UPnP | My Playlist | Clear My Playlist
Information Center <--> Météo | bourse | informations système
mes favoris | Station de radio /Musique | Radio locale | Historique
Aicher en veille | unité de température |
Localisation
<--> Pays | ville | Auto detect
<--> On/O
Service
32
Page 33

Fonctions du menu
• Allumez l‘appareil et tournez le bouton NAV pour aicher le menu principal et ses options
• Appuyez sur NAV/OK pour accéder aux paramètres ou sous-menus respectifs (colonne de droite)
et tournez à nouveau pour faire déler. Appuyez sur BACK pour revenir au menu précédent.
• Vous trouverez ici le détail des fonctions de menu résumées plus haut :
Radio Internet
Après établissement d‘une connexion à une station, le débit et le format de la station s‘aichent sur
l‘écran :
Utilisez NAV / OK pour sélectionner le mode INTERNET RADIO. Puis sélectionnez avec NAV / OK :
Mes favoris :
La liste de vos favoris personnels peut contenir jusqu‘à 250 entrées. Pour ajouter une station, maintenez
la touche PRESET/BT pendant que vous écoutez la station.
Vous ne pouvez pas ajouter plusieurs fois la même station à la liste des favoris.
Appuyez sur OK sur l‘appareil pour aicher la liste. Faites déler la liste en utilisant NAV ou les touches
échées. Appuyez sur la èche vers la DROITE pour entrer dans le sous-menu de la station actuellement
sélectionnée et accéder aux options eacer, déplacer, renommer, lire et utiliser comme alarme.
Stations de radio / musique :
Sous cet item, les stations de radio sont placées dans les catégories Global Top 20, Genre et Pays/
Lieu. Ouvrez les sous-catégories respectives pour rechercher les listes de stations. Appuyez sur NAV/
OK pour lire.
Chaque station sélectionnée (surlignée en couleur) possède un sous-menu que vous pouvez sélection-
ner avec la touche échée (droite). Les sous-éléments sont :
• Ajouter aux favoris
• Auto Scan
• Lecture
• Utiliser comme alarme.
Sélectionnez Auto Scan pour lire toutes les stations contenues dans un dossier pendant 30 secondes.
Appuyez sur SELECT pour stopper le changement automatique et rester sur la station en cours de lec-
ture.
33
Page 34

Stations locales : accès aux stations de radio locales.
Dernières stations écoutées : liste des dix dernières stations de radio écoutées.
Service : recherchez des stations à l‘aide de mots clés avec la fonction recherche de stations ou bien
ajoutez des stations à votre liste de favoris avec la fonction ajout de station.
Media Center
Sélectionnez les modes USB / UPnP ou Playlist via le bouton NAV / OK.
UPNP :
Lisez des chiers audio partagés sur un ordinateur sur le réseau.
A noter : la fonction UPnP requiert Windows Media Player à partir de la version 11 ou un logiciel comme
Twonky Media.
Le partage de chiers doit être déclaré dans les paramètres de réseau ou de dossier ou dans le lecteur
multimédia.
Ma Playlist : construisez votre Playlist : en maintenant la touche Select sur les titres souhaités, ajoutez
ces derniers.
My media U
Aichage et contrôle de vos propres stations mediaU. Commencez par créer un compte mediaU :
• Allez sur le site www.mediayou.net
• Ouvrez un compte avec votre nom d‘utilisateur et un mot de passe de votre choix. Connectez-vous
après avoir reçu l‘email de conrmation.
• Enregistrez votre radio sur le site Web. Vous aurez besoin de l‘adresse MAC de l‘appareil. Vous les
trouverez dans Menu principal -> Centre d‘information -> Informations système -> Info sans l.
• Vous pouvez gérer vos stations de radio et vos ux via le compte mediaU et avoir un accès direct
depuis la radio (ici, pas besoin de saisir le mot de passe et le nom d‘utilisateur).
34
Page 35

Centre d’information
Avec connexion au réseau & à Internet uniquement.
Accédez au centre d‘information via NAV / OK depuis le menu principal.
Météo
Sélectionnez votre position pour voir les prévisions météo pour les quatre prochains jours (arrière/
avant pour le jour suivant/précédent). En veille, la météo et l‘heure s‘aichent alternativement.
Bourse
Sélectionnez les éléments qui vous intéressent dans la liste. Les informations liées seront aichées
automatiquement.
Informations système
Aichage de la version de software, des adresses MAC, ID et IP-#
Réglages
Mode d‘aichage
(heure)
My MediaU • Pour paramétrer la connexion au serveur mediaU
Network
Date & heure
Réveil
• Analogique
• Numérique
• Paramétrage du réseau sans l : Liste des réseaux accessibles trouvés.
Sélectionnez avec NAV / OK, puis entrez le mot de passe approprié.
• Réseau sans l (WPS PBC): Dans cette option, appuyez sur le bouton
WPS du routeur dans les 120 secondes (pour vous authentier). La radio
est alors automatiquement connectée.
• Conguration manuelle : Connectez-vous manuellement au WiFi souhaité en entrant DHCP, IP et SSID.
• Recherche du réseau au démarrage : Activer pour permettre à la radio
de se connecter au démarrage au dernier réseau conguré.
• Réglage de la date et de l‘heure
• Réglage du format de l‘heure (12 h / 24 h)
• Réglage de format de la date (YYYY/MM/DD - DD/MM/YYYY - MM/DD/
YYYY)
• Alarme 1 (on/o/répétition/heure/son)
• Alarme 2 (on/o/répétition/heure/son)
• Réveil avec intervalles (o/5 mn (standard) /10mn/20mn/.../120mn)
• Volume
• Vous pouvez régler le volume de l‘alarme avec “Alarm Volume”.(Volume
7 est convenable)
35
Page 36

Minuterie Minuterie de compte à rebours (max. 100 mn)
English / Deutsch / Espanol / Français / Portugese / Nederlands / Italiano/
Langue
Dimmer Mode d'économie d'énergie / on
Aichage couleur/monochrome
Pyccknn / Svenska / Norske / Dansk / magyar / Cesky / slovensky / polski /
Turkce / Suomi
Gestion de
l'alimentation
Minuterie d'arrêt
automatique
Mémoire tampon Réglage de la mémoire tampon pour le streaming de média
Météo
Stations locales Réglage manuel par ville/pays, ou automatique
Lecture
Appareil renommer (AirMusic) | Air Music Control App
Égaliseur
Reprise de la
lecture
Software-Update Mise à jour du rmware lorsqu'une nouvelle version est disponible
Paramètres usine
Arrêt automatique au bout de...
Réglage de l'arrêt automatique
Réglage de la localisation et de l'unité de température, activer/désactiver
l'aichage en mode veille
Modes de lecture : répéter tous / répéter un titre / lecture aléatoire (pour le
mediacenter)
normal/neutre/jazz/rock/bande originale de lm/classique/pop/informations
Activez /désactivez ici la reprise de la lecture au démarrage de la radio
Remettez votre appareil aux paramètres d'usine. Attention : les paramètres
et les stations mémorisés seront perdus et vous devrez les rechercher à
nouveau.
36
Page 37

Streaming DLNA et contrôle par appli
Utilisez votre PC comme un serveur de médias et diusez des contenus audio via DLNA sur votre radio.
Vous pouvez diuser des chiers aux formats MP3, WMA, WAV et AAC.
UPnP
• Vériez que votre ordinateur est connecté au même réseau que votre radio.
• Lacez une plateforme adaptée pour UPnP (par exemple le lecteur Windows Media Player, à partir
de la version 11).
• Créez une playlist et autorisez le partage pour UPnP.
• Veuillez consulter le chier d‘aide du logiciel (en appuyant par exemples sur F1) pour plus
d‘informations sur le partage via UPnP-et sur d‘autres sujets)
• Procédez de même avec les smartphones/tablettes à partir desquels vous souhaitez diuser :
téléchargez le logiciel de diusion en continu approprié sur Google Play, connectez l‘appareil au
réseau et ajoutez au partage les chiers musicaux que vous souhaitez diuser.
DLNA
Le protocole DLNA est également pris en charge pour la diusion de musique. DLNA est pris en charge
sur Windows 7 ou version ultérieure et Windows Media Player 12 ou version ultérieure.
• Ouvrez d‘abord Paramètres système > Réseau et Internet > options de partage > Streaming de
médias et ajoutez votre radio.
• Démarrez ensuite le lecteur Windows Media Player et autorisez la commande à distance de la
radio.
Remarques
• Pour diuser depuis un smartphone ou une tablette, nous vous recommandons d‘utiliser des applications gratuites comme BubbleUPnP ou Twonky Beam.
• Pendant le streaming DLNA, seul le volume et le mode veille/alimentation sont fonctionnels sur la
radio. Les autres fonctions sont inactives. Déconnectez du côté de l‘ordinateur ou du smartphone.
37
Page 38

Conseils pour le recyclage
Le pictogramme ci-contre apposé sur le produit signie que la directive européenne 2012/19/UE s‘applique (poubelle à roues barrée d’une croix). Ces produits ne
peuvent être jetés dans les poubelles domestiques courantes. Renseignez-vous
concernant les règles appliquées pour la collecte d’appareils électriques et électroniques. Conformez-vous aux réglementations locales et ne jetez pas vos anciens
produits avec les ordures ménagères. Le respect des règles de recyclage des vieux
produits aide à la protection de l’environnement et de la santé de votre entourage
contre les conséquences négatives possibles. Le recyclage des matériaux aide à
réduire l’utilisation des matières premières.
38
Page 39

Chal-Tec GmbH | Wallstr.16 | 10179 Berlin | Deutschland
Chal-Tec GmbH ∙ Wallstraße 16 ∙ 10179 Berlin
Geschäftsführer: Peter Chaljawski
Handelsregister: HRB 98898
Bankverbindung: Hypo Vereinsbank
BIC|SWIFT-Code: HYVEDEMM488
EU-Konformitätserklärung
Wir, die
CHAL -TEC GmbH
Wallstraße 16
10179 Berlin
erklären hiermit, dass der nachfolgend bezeichnete Funkanlagentyp:
Auna Radio DigiPlug Artikelnr. 10030656, 10030657
allen folgenden einschlägigen Bestimmungen entspricht:
RED-Richtlinie 2014/53/EU
LVD-Richtlinie 2014/35/EU
RoHS-Richtlinie 2011/65/EU
Angewandte harmonisierte Normen:
EN 62311:2008
EN 60065:2014
EN 301 489-1 V2.2.0:2017
EN 301 489-17 V3.2.0:2017
EN 300 328 V2.1.1:2016
EN 55032: 2012+AC:2013
EN 61000-3-2:2014
EN 61000-3-3:2013
EN 55020:2007+A12:2016
Berlin, 05. April 2018 ___________________________
Sebastian Jäger
Produktmanager
www.chal-tec.com
www.electronic-star.de
Fon: +49 (0) 30 3001385-500
Fax: +49 (0) 30 3001385-999
E-Mail: frontdesk@chal-tec.com
Amtsgericht: Berlin - Charlottenburg
USt-ID-Nr.: DE 814529349
WEEE-Nr.: DE 46906833
Konto Nummer: 355 986 675
BLZ: 100 208 90
IBAN: DE91100208900355986675
 Loading...