

Page 1
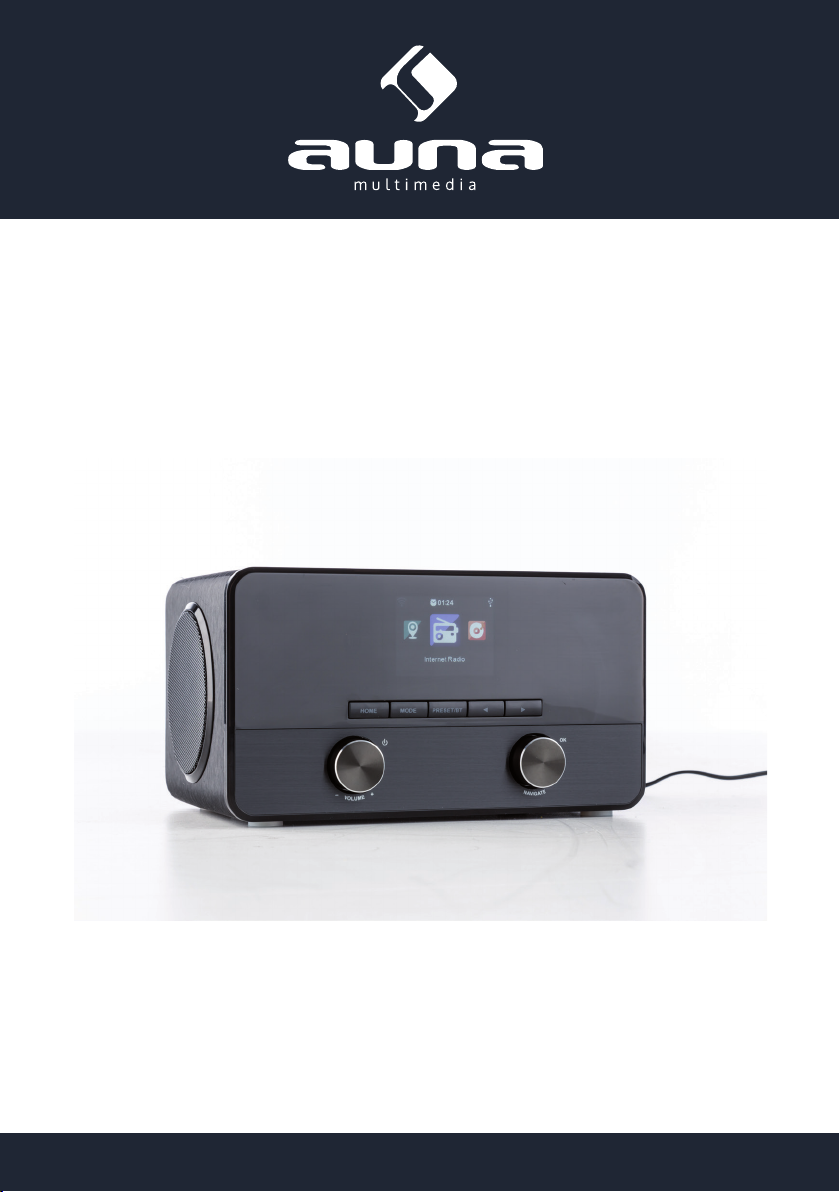
Connect 100
Internet Radio, BT, AUX, LineOut
www.auna-multimedia.com10029864 10029865
Page 2
Bedienungsanleitung 3
Warnung / Sicherheitshinweise 3
Technische Daten 4
Bedienelemente 4
Inbetriebnahme 6
Menüfunktionen 7
Menüfunktionen: Bedienung & Einstellungen 8
Medienplayer / DLNA Streaming 13
Hinweise zur Entsorgung / Konformitätserklärung 14
Instruction manual 15
Mode d‘emploi 27
Manual de instrucciones 39
Instruzioni 51
2
Page 3

Sehr geehrter Kunde,
zunächst möchten wir Ihnen zum Erwerb Ihres Gerätes gratulieren.
Bitte lesen Sie die folgenden Anschluss- und Anwendungshinweise sorgfältig durch und befolgen Sie diese
um möglichen technischen Schäden vorzubeugen.
Warnung
• Diese Bedienungsanleitung dient dazu, Sie mit der Funktionsweise dieses Produktes vertraut zu machen. Bewahren Sie diese Anleitung daher stets gut auf, damit Sie jederzeit darauf zugreifen können.
• Sie erhalten bei Kauf dieses Produktes zwei Jahre Gewährleistung auf Defekt bei sachgemäßem Gebrauch.
• Bitte verwenden Sie das Produkt nur in seiner bestimmungsgemäßen Art und Weise. Eine anderweitige Verwendung führt eventuell zu Beschädigungen am Produkt oder in der Umgebung des Produktes.
• Ein Umbauen oder Verändern des Produktes beeinträchtigt die Produktsicherheit. Achtung Verlet-
zungsgefahr! Önen Sie das Produkt niemals eigenmächtig und führen Sie Reparaturen nie selber aus!
• Behandeln Sie das Produkt sorgfältig. Es kann durch Stöße, Schläge oder den Fall aus bereits geringer
Höhe beschädigt werden.
• Halten Sie das Produkt fern von Feuchtigkeit und extremer Hitze.
• Lassen Sie keine Gegenstände aus Metall in dieses Gerät fallen.
• Stellen Sie keine schweren Gegenstände auf dieses Gerät.
• Reinigen Sie das Gerät nur mit einem trockenen Tuch.
• Blockieren Sie nicht die Belüftungsönungen.
• Verwenden Sie ausschließlich vom Hersteller oder vom qualizierten Fachhandel empfohlenes Zubehör.
Die Gewährleistung verfällt bei Fremdeingrien in das Gerät.
Kleine Objekte/Verpackungsteile (Plastikbeutel, Karton, etc.):
Bewahren Sie kleine Objekte (z.B. Schrauben und anderes Montagematerial, Speicherkarten) und Verpackungsteile außerhalb der Reichweite von Kindern auf, damit sie nicht von diesen verschluckt werden kön-
nen. Lassen Sie kleine Kinder nicht mit Folie spielen. Es besteht Erstickungsgefahr!
Transport des Gerätes:
Bitte bewahren Sie die Originalverpackung auf. Um ausreichenden Schutz beim Transport des Gerätes zu
erreichen, verpacken Sie das Gerät in der Originalverpackung.
Reinigung der äußeren Oberäche:
Verwenden Sie keine üchtigen Flüssigkeiten, wie Insektensprays. Durch zu starken Druck beim Abwischen
können die Oberächen beschädigt werden. Gummi- oder Plastikteile sollten nicht über einen längeren
Zeitraum mit dem Gerät in Kontakt sein. Nutzen Sie ein trockenes Tuch.
3
Page 4

Technische Daten
Artikelnr.
Stromversorgung DC 12V (Netzteil für AC 220-240V, 50-60Hz im Lieferumfang enthalten)
Lautsprecher 2 x 5W
Netzwerk
Streaming UPnP, DLNA
Unterstützte Dateitypen WMA, MP3, WAV
Anschlüsse DC, USB, 3,5mm AUX, 3,5mm Line-Out
Abmessungen & Gewicht 210 x 115 x 126mm, 1,53kg
Lieferumfang
10029864, 10029865
802.11b/g/n(WLAN)
Verschlüsselungsprole: WEP, WPA, WPA2 (PSK), WPS
Gerät, Netzteil, 3,5mm Audiokabel, Fernbedienung, Bedienungsanleitung
Bedienelemente
4
Page 5

Bedienelemente
5
Page 6

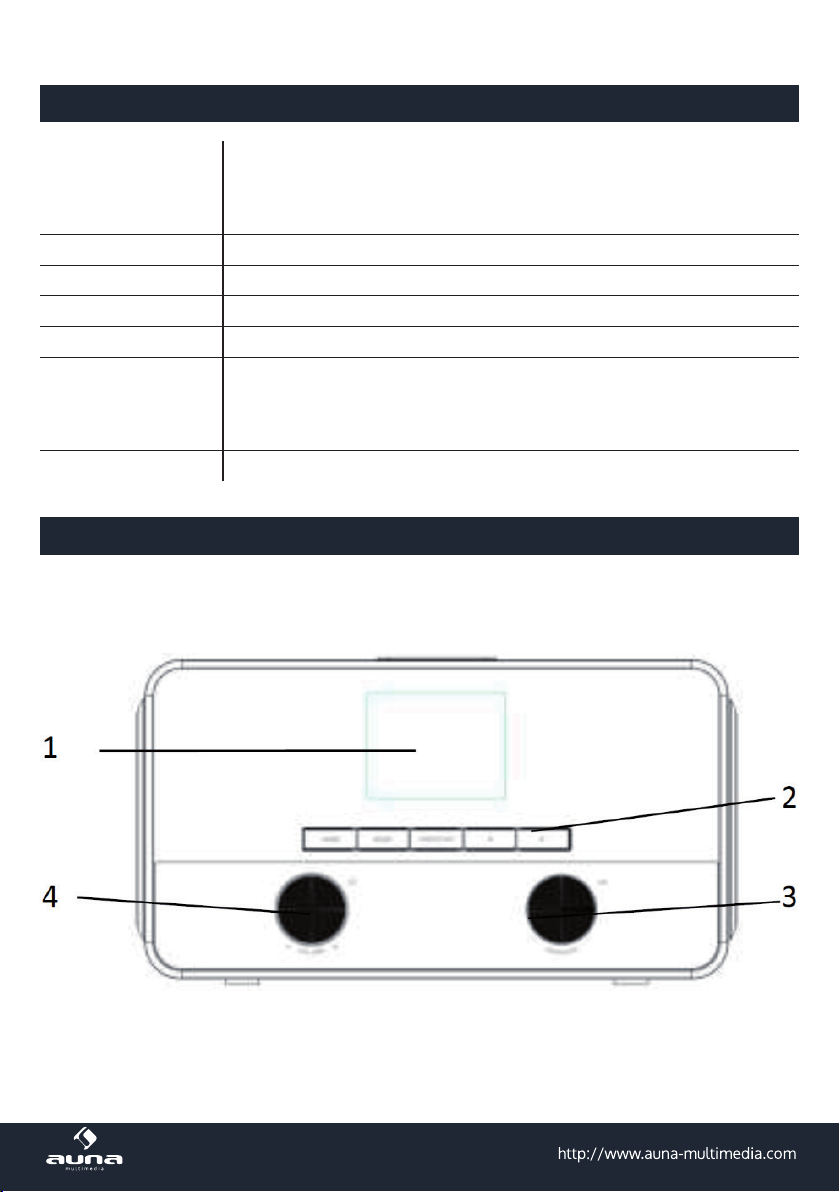
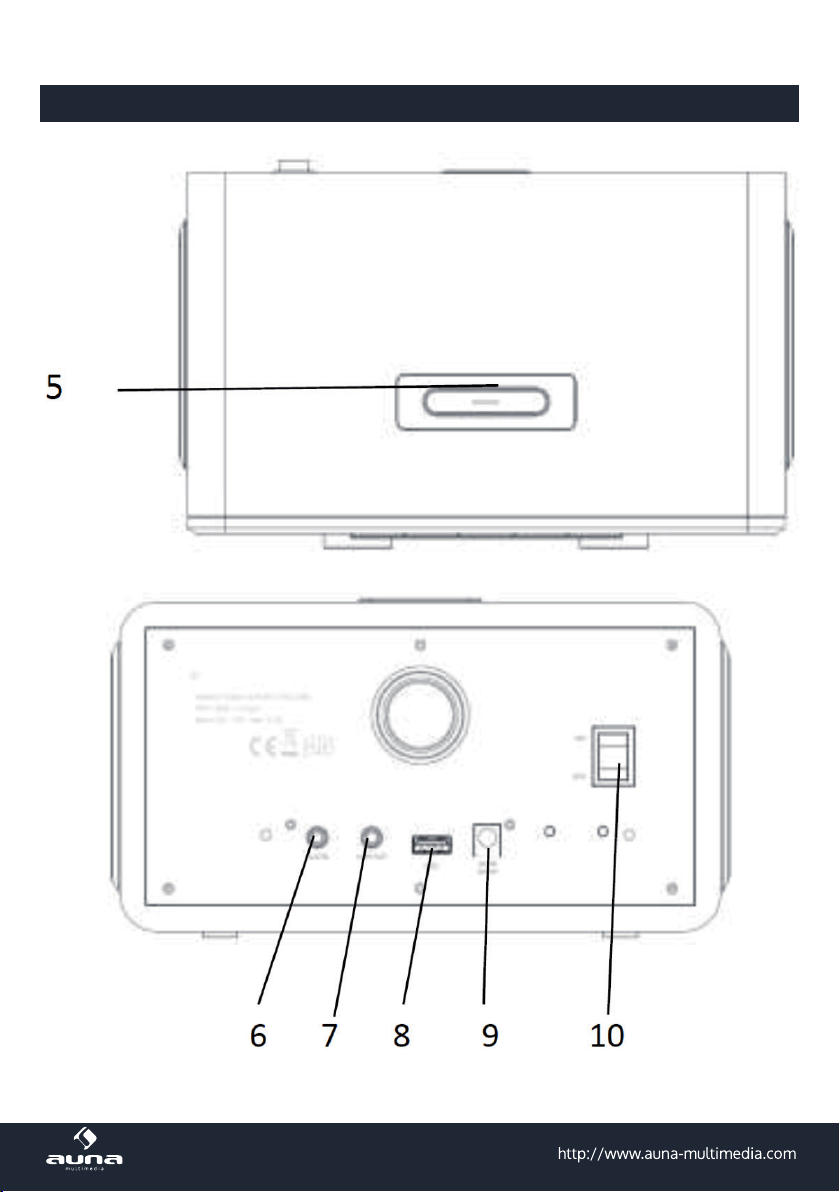
Display 1 6 Aux In
Bedientasten:
HOME, MODE; PRESET, TUN+, TUN+
NAV / OK 3 8 USB Port
VOL+/- / Power 4 9 Netzteilanschluss
SNOOZE 5 10 Netzschalter
2 7 Line Out
Fernbedienung:
• Entfernen Sie vor der ersten Benutzung der Fernbedienung die Folie, die zum Transport- und Entladungsschutz im Batteriefach der Fernbedienung steckt.
• Achten Sie beim Batteriewechsel darauf, eine baugleiche Batterie (CR2025, 3V) in der korrekten Pola-
rität (Pluspol nach oben zeigend) einzusetzen.
Erste Inbetriebnahme
• Nutzen Sie das mitgelieferte Netzteil, um das CONNECT 100 mit einer Netzsteckdose zu verbinden.
• Schalten Sie das Gerät ein (rückseitiger Netzschalter auf EIN, POWER an der Front drücken).
• Beim ersten Einschalten sucht das CONNECT 100 zunächst nach verfügbaren Funknetzwerken. Dabei
wird ein Verlaufsbalken auf dem Display angezeigt. Anschließend wählen Sie durch Drehung des NAVRads (3) die gewünschte Display-Sprache aus und wählen Sie, ob das Netzwerk konguriert werden
soll. Wählen Sie die gewünschte Option jeweils durch Drehen von NAV und anschließenden Druck auf
NAV/OK.
• Drücken Sie POWER/STANDBY (4), um das Gerät in den Standbymodus zu schicken. Uhrzeit, Datum
sowie aktivierte Alarme werden dann weiterhin auf dem Display angezeigt.
6
Page 7
Menüfunktionen: Übersicht
Standby
Hauptmenü:
My mediaU <--> Untermenü
| |
Internet Radio <--> My Favorites
| | Radio Station / Music
| | Local Radio <--> Untermenües
| | History
| | Service
| |
Media Center <--> UPnP <--> Untermenües
| | My Playlist
| | Clear My Playlist
| |
BT
| |
AUX IN
| |
Information Center <--> Wetter
| | Finanzen <--> Untermenües
| | System
| |
Mode - Manage My MediaU - Netzwerk
Datum&Uhrzeit - Alarm - Timer
Spracheinstellungen - Dimmer - Display Power
Einstellungen <-->
Management - Sleep Timer - Buer - Wetter
Local Radio Setup - Playback Setup - DLNA
Setup
Equalizer - Resume When Power On - Software
Update - Werkeinstellungen
<--> Untermenües
7
Page 8

Menüfunktionen: Bedienung & Einstellungen
• Schalten Sie das Gerät ein und drehen Sie NAV, um das Hauptmenü und seine Menüpunkte aufzurufen
(siehe linke Spalte der Übersicht auf S.6).
• Drücken Sie NAV/OK, um die jeweiligen Einstellungen bzw. Untermenües aufzurufen (mittlere und
rechte Spalte) und drehen Sie wiederum, um zu blättern.
Menü: Einstellungen
Mode Stellen Sie hier ein, wie die Uhrzeit im Standby-Bildschirm angezeigt wird
Manage My MediaU
Netzwerk
Datum&Uhrzeit
Alarm
Wenn aktiviert, erscheint der Punkt My mediaU im Hauptmenü. Stellen Sie hier
den Login für künftige Einwahlversuche ein.
• Automatische WLAN-Konguration: Aktivieren/deaktivieren Se hier das
WiFi. Nach dem Aktivieren, wählen Sie aus der Liste der gefundenen Access
Points Ihr WLAN/Ihren Router aus und geben Sie anschließend das Pass-
wort ein.
• Manuelle Konguration: Wählen Sie die Option DHCP (IP wird automatisch
zugewiesen) oder geben Sie die IP-Adresse manuell ein. In letzterem Fall
werden Sie aufgefordert, nacheinander die entsprechende SSID (Name des
Routers/Access Points), die IP-Adresse, Subnet Mask, den default Gateway,
sowie einen präferierten und einen alternativen DNS Server anzugeben.
Nutzen Sie diese Option, wenn Sie mit der Materie vertraut sind und falls
Sie mehrere Funktnetzwerke abwechselnd nutzen.
• Check Network When Power On: Aktivieren Sie, damit das CONNECT 100
bei jedem Neustart automatisch die (einzugebende) Verbindung wiederndet.
• Stellen Sie hier das Format der Uhrzeit- (12h oder 24std) sowie der Datums-
darstellung (YY/MM/DD oder DD/MM/YY oder MM/DD/YY) ein.
• DST: Stellen Sie die automatische Umstellung auf Sommer-/Winterzeit ein.
• GMT: Stellen Sie Ihre Zeitzone relativ zur GMT-Zeit ein.
Das CONNECT 100 stellt drei unabhängig voneinander steuerbare Alarmfunktionen zur Verfügung. Bei zweien handelt es sich um „gewöhnliche“ Wecker: Stellen
Sie Alarm1 und Alarm2 auf eine gewünschte Uhrzeit ein und wählen Sie jeweils
die Signal-Quelle aus (wenn das WLAN nicht verbunden werden kann, wird nach
einer Minute eine eingespeicherte Melodie abgespielt).
Bei Alarm NAP handelt es sich um einen Timer, der den Ablauf von (wählbar:)
5/10/20/30/60/90/120 Minuten signalisiert.
Drücken Sie SNOOZE, um den Alarm für 5 Minuten zu verschieben. Drücken Sie
eine beliebige andere Taste, um den Alarm zu beenden.
8
Page 9

Stellen Sie mit der Timer-Funktion einen Koch-Timer ein (achtung: ist im StandbyModus deaktiviert bzw. pausiert). Nutzen Sie die Pfeiltasten, um die Timer-Zeit
zwischen 00:00 und 59:59min einzustellen und drücken Sie dann OK, um den
Countdown zu starten.
Nach EIinstellen und Starten des Timers können Sie mit HOME/MODE/Pfeil links
Timer
Sprache
Dimmer
Display Wählen Sie die Darstellung in Schwarz/Weiß oder Farbe.
Power Management
Sleep Timer
Buer
Wetter
Local Radio Setup
Playback Setup
DLNA Setup Der Standard-DLNA-Name lautet CONNECT 100. Ändern Sie, falls gewünscht, hier.
zurück zur vorherigen Anzeige wechseln.
Ist der COuntdown beendet, während Musik abgespielt wird, erklingt dennoch
der Alarm und die Anzeige wechselt zum Timer-Display. Drücken Sie eine beliebi-
ge Taste, um den Alarm zu beenden.
Bitte beachten Sie: Die Alarm-Funktion sowie der Sleep-Timer sind inaktiv und
werden von der Timer-Funktion überschrieben, wenn diese aktiv ist.
Wählen Sie hier die Displaysprache aus (Englisch, Deutsch, Spanisch, Französisch, Portugiesisch, Italienisch).
Stellen Sie hier de Hintergrundbeleuchtung des Displays ein. Wählen Sie den
Menüpunkt Standby, um die Beleuchtung im Standbymodus einzustellen und
den Punkt Active, um die Beleuchtung während der Nutzung zu verändern.
Wählen Sie Dimmer Timer, um die Zeitspanne für das automatische Herunterdimmen des Displays nach einer Weile der Nichtbenutzung zu aktivieren und
einzustellen.
Aktivieren Sie das Power Management und stellen Sie es auf 5/15/30 Minuten
ein, damit das CONNECT 100 sich automatisch nach der eingestellten Zeitspanne
abschaltet, falls kein WLAN gefunden wird.
Stellen Sie den Sleep Timer ein, damit sich das Gerät nach der Zeitspanne von
15/30/60/90/120/150/180 Minuten automatisch abschaltet.
Bequeme Alternative: Drücken Sie mehrfach SLEEP auf der Fernbedienung.
Kongurieren Sie den Speicher-Buer (Zwischenspeicher) für bestmöglichen
Empfang von Streams oder Internet-Radio. Stellen Sie 2/4/8 Sekunden ein.
Aktivieren/deaktivieren Sie die Wetteranzeige für den Standby-Bildschirm. Wäh-
len Sie weiterhin die gewünschte Temperatur-Einheit (°F oder °C) aus und stellen
Sie Ihren Standort ein.
Ist die Wetteranzeige aktiviert, wechselt sich diese auf dem Standby-Bildschirm
im Zehn-Sekundentakt mit der Uhrzeitanzeige ab.
Stellen Sie hier manuell Ihre Location und damit den bevorzugten Zugri auf lo-
kale Radiosender ein. Wählen Sie Auto Detect für eine autmatische Ermittlung
Ihres Standorts.
Wählen Sie hier einen gewünschten Abspielmodus für das Media Center (O =
normales Abspielverhalten; Repeat all = alle Titel werden wiederholt; Repeat
one = der jeweils aktuelle Titel wird wiederholt; Shule = verfügbare Titel werden
in zufälliger Reihenfolge abgespielt).
9
Page 10

Aktivieren Sie die Resume When Power On Funktion, damit das CONNECT 100
Resume When PWR
Software Update
Reset
nach dem EInschalten dort weitermacht, wo es aufgehört hat: beim zuletzt gehörten Stream oder Sender. (Standard: Aktiv)
Zum Updaten der Firmware, wenn auf dem Herstellerserver eine neue Version be-
reitgestellt wurde.
Bestätigen Sie mit YES, um die Werkseinstellungen wiederherzustellen. Achtung:
Alle manuell vorgenommenen Einstellungen und Presets werden hierdurch gelöscht.
My mediaU
Anzeige und Steuerung Ihrer eigenen mediaU-Sender. Erstellen Sie zunächst einen mediaU-Account:
• Besuchen Sie www.mediayou.net
• Erönen Sie ein Konto mit Ihrem Benutzernamen und einem frei wählbaren Passwort. Loggen Sie sich
nach Erhalt der Bestätigungsmail ein.
• Registrieren Sie Ihr CONNECT 100 auf der Webseite. Sie benötigen dazu die MAC-Adresse des Geräts.
Diese nden Sie über Hauptmenü -> Information Center -> System Information -> Wireless Info.
• Über den mediaU-Account können Sie Ihre Radiosender und Stream verwalten und haben vom CONNECT 100 aus direkten Zugri auf diese (Passwort und Nutzername müssen dort nicht eingegeben
werden).
Internet Radio
Nach erfolgreicher Verbindung zu einem beliebigen Sender werden die Bitrate sowie das Sendeformat auf
dem Display angezeigt. Untermenües:
My Favorites
10
Die Liste Ihrer persönlichen Favoriten, fasst bis zu 250 Einträge.
Um einen Sender hinzuzufügen, halten Sie während der Sender läuft PRESET/BT
am Gerät oder PRESET auf der Fernbedienung gedrückt.
Ein Sender kann nicht mehrfach zur Favoritenliste hinzugefügt werden.
Drücken Sie PRESET/BT am Gerät oder PRESET auf der Fernbedienung, um die
Liste anzuzeigen. Blättern Sie mit NAV oder den Pfeiltasten durch die Liste. Drücken Sie die Pfeiltaste RECHTSm um das Untermenü für den gerade angewählten
Sender aufzurufen mit den Optionen Löschen, Verschieben, Umbenennen, Ab-
spielen und Als Alarm Verwenden.
Page 11
Unter diesem Punkt sind Sender in den Kategorien Global Top 20, Genre sowie
Country/Location abgelegt. Önen Sie die jeweiligen Unterkategorien, um die
Senderlisten zu durchsuchen. Drücken Sie NAV/OK bzw SELECT zum abspielen.
Jeder angewählte (farblich hinterlegter) Sender hat ein Untermenü, das Sie mit
der Pfeiltaste (rechts) anwählen können. Die Unterpunkte sind
Radio Station / Music
Local Radio Zugri auf lokale Radiosender.
History Die zehn zuletzt gehörten Sender werden hier aufgelistet.
Service
• Zu Favoriten hinzufügen
• Auto Scan
• Abspielen
• Als Alarm Verwenden.
Wählen Sie Auto Scan, um alle in dem jeweiligen Ordner vorhandenen Sender
für je 30 Sekunden abspielen zu lassen. Drücken Sie SELECT, um das Springen zu
stoppen und den zur Zeit aktiven Sender beizubehalten.
Suchen Sie über Sender Suchen Radiosender nach Schlüsselwörtern oder fügen
Sie Sender Ihrer Favoritenliste über die Funktion Sender Hinzufügen hinzu.
Media Center
Falls Sie an Ihrem Rechner oder Mediacenter/Medienserver Medien für UPnP
Streaming freigegeben haben, tauchen die entsprechenden Dateien hier auf.
Falls mehr als ein UPnP-Server im WLAN gefunden wurde, können Sie hier zwi-
schen den Alternativen wählen.
Spielen Sie Musik mit den gewohnten Tasten (Fernbedienung) Play/Pause, Stop
UPnP
und den Pfeiltasten ab.
Bitte beachten Sie: Das Gerät kann nur Dateien abspielen, wenn die Dateinamen
unter 40 Zeichen lang sind und in lateinischen Buchstaben geschrieben sind.
Falls Dateien dennoch nicht wiedergegeben werden, könnte es an einem inkom-
patiblen Format liegen.
Meine Playlist
Playlist löschen Löschen Sie die erstellte Playlist.
USB Playback
Legen Sie eine persönliche Playlist an: Indem Sie bei den gewünschten Titeln
Select gedrückt halten, fügen Sie diese jeweils hinzu.
Stecken Sie einen USB-Stick mit Medieninhalten an. Wählen Sie den Punkt USB
Playback, werden diese angezeigt.
Die Submenü-Struktur wird beibehalten, repräsentiert ab hier allerdings die auf
dem Speichermedium enthaltenen Dateiordner.
Dateinamen werden angezeigt (können sich vom jeweiligen Titel unterscheiden).
Bitte beachten Sie: Der USB-Port ist nicht für das Auaden externer Geräte noch
für den Datentransfer mit einem Computer ausgerichtet.
11
Page 12

BT
• Wählen Sie den BT-Modus über das Hauptmenü doer mit der BT-Taste auf der Fernbedienung, um
Audio-Inhalte von externen Geräten (Smartphone, Tablet oder Computer) via BT über das CONNECT
100 abzuspielen.
• Aktivieren Sie BT auf Ihrem externen BT-Gerät und verbinden Sie mit „CONNECT100“. Nutzen Sie die
Play/Pause-, Pfeil- und Stop-Tasten auf der Fernbedienung oder Ihr externes Gerät für die Navigation
durch Ihre Medienbibliothek.
• Trennen Sie die Verbindung von Seiten Ihres Smartphones/Tablets, um ein anderes Gerät zu pairen.
AUX IN
• Schließen Sie externe Audiogeräte per (mitgeliefertem) 3,5mm-Audiokabel am AUX-Eingang auf der
Rückseite des CONNECT 100 an.
• Wählen Sie den AUX-Modus über das Hauptmenü, oder per mehrfachen Druck auf MODE.
• Regulieren Sie die Ausgabelautstärke am CONNECT 100. Denken Sie daran, die Ausgabelautstärke des
externen Geräts (typischerweise Handy, MP3-Player o.ä.) laut genug einzustellen.
Line Out
Sie können externe Stereoanlagen, HiFi-Geräte oder Mischpulte/PA über den Line-Ausgang am CONNECT
100 anschließen. Nutzen Sie dazu ein 3,5mm-Audiokabel.
Information Center#
Grenzen Sie zunächst Ihren Standort durch Eingabe Ihres Landes und der Stadt
Wetter
Finanzen Anzeige der wichtigsten Aktienindex-Kennzahlen.
System
12
(oder der nächst größeren in der Liste aufgeführte Stadt) ein.
Blättern Sie dann mit den Pfeiltasten, um die Vorhersage für die nächsten Tage
zu sehen.
Anzeige der Systeminformationen mit Details zur Netzwerkverbindung, MAC-
Adresse etc.
Page 13

DLNA Streaming und App-Steuerung
Nutzen Sie Ihren Computer als Medien-Server und streamen Sie Audio-Inhalte via DLNA über den CONNECT 100. Sie können Dateien in der Formaten MP3, WMA, WAV und AAC streamen.
UPnP
• Stellen Sie sicher, dass Ihr Computer mit demselben Netzwerk verbunden ist, wie Ihr CONNECT 100.
• Starten Sie eine geeignete Plattform für UPnP (zum Beispiel den Windows Media Player, ab Version 11).
• Erstellen Sie eine Abspielliste und erlauben Sie die Freigabe für UPnP.
• Bitte konsultieren Sie die Hilfedatei der Software (zum Beispiel durch Druck auf F1) für weitere Informa-
tionen über die UPnP-Freigabe und zu weiteren Themen)
• Gehen Sie bei Smartphones/Tablets, von denen Sie streamen möchten, analog vor: Laden Sie sich
eine geeignete Streaming Software von Google Play herunter, verbinden Sie das Gerät mit dem Netz-
werk und fügen Sie die Musikdateien, die Sie streamen möchten, der Freigabe hinzu.
DLNA
Auch das DLNA-Protokoll wird für das Streamen von Musik unterstützt. DLNA wird von Windows ab Version
7 und dem Windows Media Player ab Version 12 unterstützt
• Önen Sie erst Systemeinstellungen > Netzwerk und Internet > Freigabeoptionen > Medien Streaming
und fügen Sie das CONNECT 100 hinzu.
• Starten Sie dann den Windows Media Player und erlauben Sie die Remote-Bedienung des CONNECT 100.
Hinweise
• Für das Streaming von Smartphones oder Tablets empfehlen sich frei verfügbare apps wie bubbleUPnP, oder Twonky Beam.
• Während des DLNA Streams können am CONNECT 100 nur die Lautstärke sowie Standby/Power bedient werden. Andere Funktionen sind inaktiv. Trennen Sie die Verbindung Rechner- bzw. Smartphone-
seitig.
13
Page 14

Hinweise zur Entsorgung
Elektroaltgeräte
Bendet sich die diese Abbildung (durchgestrichene Mülltonne auf Rädern) auf dem Produkt, gilt die Europäische Richtlinie 2002/96/EG. Diese Produkte dürfen nicht mit dem
normalen Hausmüll entsorgt werden. Informieren Sie sich über die örtlichen Regelungen
zur getrennten Sammlung elektrischer und elektronischer Gerätschaften. Richten Sie sich
nach den örtlichen Regelungen und entsorgen Sie Altgeräte nicht über den Hausmüll.
Durch die regelkonforme Entsorgung der Altgeräte werden Umwelt und die Gesundheit
ihrer Mitmenschen vor möglichen negativen Konsequenzen geschützt. Materialrecycling
hilft, den Verbrauch von Rohstoen zu verringern.
Konformitätserklärung
Hersteller: CHAL-TEC GmbH, Wallstraße 16, 10179 Berlin, Deutschland
Dieses Produkt entspricht den folgenden Europäischen Richtlinien:
2011/65/EU (RoHS)
1999/05/EG (R&TTE)
14
Page 15

Dear Customer,
Congratulations on purchasing this product. Please read and follow these instructions, in order to avoid
damaging the item. We do not cover any damages that may arise from improper use of the item or the
disregard of the safety instructions.
Important Safety Advice
• Read all instructions before using.
• To protect against a re, electric shock or personal injury, do not immerse cord, electric plugs or device
in water or other liquids.
• Do not expose the appliance to extreme temperatures. The appliance shall be used in moderate climates.
• The use of attachments that are not recommended by the appliance manufacturer may result in re,
electric shock or personal injury.
• Do not open the unit by removing any cover parts. Do not attempt to repair the unit. Any repairs or
servicing should be done by qualied personell only.
• Only qualied persons may perform technical work on the product. The product may not be opened or changed. The components cannot be serviced by the user. The manufacturer is not responsible
for any radio or TV interference caused by unauthorized modications.
• The appliance is not a toy. Do not let children play with it. Never let children insert foreign objects into
the appliance.
• Never clean the surface of the device with solvents, paint thinners, cleansers or other chemical products. Instead, use a soft, dry cloth or soft brush.
• Save these instructions.
Small objects
Keep small objects (i.e. screws, mounting material, memory cards etc.) and packaging out of the range of
children. Do not let Children play with foil. Choking hazard!
Transporting the device
Please keep the original packaging. To gain suicient protection of the device while shipment or transportation, make sure to put it back in its original packaging.
Cleaning the surface
Do not use any volatile liquids, detergents or the like. Use a clean dry cloth.
15
Page 16
Technical Data
Item #.
Power supply DC 12V (adaptor for AC 220-240V, 50-60Hz supplied)
Speakers 2 x 5W
Network 802.11b/g/n(WLAN), supporting WEP, WPA, WPA2 (PSK), WPS
Streaming UPnP, DLNA
Supported le types WMA, MP3, WAV
Connections DC, USB, 3.5mm AUX, 3.5mm Line-Out
Dimensions & weight 210 x 115 x 126mm, 1.53kg
Scope of delivery
10029864, 10029865
Device, AC/DC adaptor, 3.5mm audio cable, remote control, instruction manual
Controls
16
Page 17
Controls
17
Page 18
Display 1 6 Aux In
Operation keys:
HOME, MODE; PRESET, TUN+, TUN+
NAV / OK 3 8 USB port
VOL+/- / Power 4 9 DC In
SNOOZE 5 10 Power switch
2 7 Line Out
Remote Control:
• Remember to pull out the clear plastic tab from the battery compartment before using the remote.
• To remove the battery from the remote, use your thumb to pull out the battery tray. Replace it with a
CR2025 type 3V battery, taking care to insert it with the positive (+) side up.
Initial Use
• Use the supplied mains adaptor to connect the device to a household mains socket
• Switch the device on with the power switch on the rear. The press POWER on the front to wake the
device up from standby mode.
• When it is the rst time running the device, the system will ask you to set Language and Network Congurations. You may setup the network connection immediately, or set it later.
Use NAV (=rotate to scroll) to select the desired option. Press NAV/OK to conrm.
• Press POWER/STANDBY (4) for standby. Date and time, as well as alarms - if activated - will still be
shown on the display when in standby mode.
18
Page 19

Menu: Overview
Standby
Main Menu:
My mediaU <--> Sub menu
| |
Internet Radio <--> My Favorites
| | Radio Station / Music
| | Local Radio <--> Sub menu
| | History
| | Service
| |
Media Center <--> UPnP <--> Sub menu
| | My Playlist
| | Clear My Playlist
| |
BT
| |
AUX IN
| |
Information Center <--> Weather Information / Forecast
| | Financial Information <--> Sub menu
| | System Information
| |
Mode - Manage My MediaU - Network
Date&Time - Alarm - Timer - Language
Dimmer - Display - Power Management
Settings <-->
Sleep Timer - Buer - Weather
Local Radio Setup - Playback Setup
DLNA Setup - Equalizer
Resume When Power On
Software Update - Reset to factory settings
<--> Sub menu
19
Page 20

Menu Operation and Settings
• Switch the device on and turn the NAV wheel to scroll through the main menu (see left column on p. 19).
• Press NAV/OK to open the according submenues respectively the settings for each menu item (see
middle and right columns on p. 19). Again, rotate the knob to scroll and select.
Settings Menu
Mode
Manage My MediaU
Network
Time & Date
Set the clock mode display in Standby. Select Internet Radio to set the analog
clock Standby or Select Clock Radio to set the digital clock in Standby.
When it is enabled, My mediaU will exist on the main menu. If various mediaU
accounts exist in the CONNECT 100, Select the default login account in here.
• Wireless Network Conguration: Enable/disable WiFi network. When you
enable the WiFi network, the system will automatically select the required
AP. Enter WEP or WPA code to connect the WiFi. If it is accidentally pressed
<- to move a redundant entry, press -> to correct.
• Wireless Network (WPS PBC): If you are using a router with WPS/QSS but-
ton, you may set up the network connection simple via WPS function. Enter
it and go to press the WPS/QSS button on your router within 120 seconds.
The connection between the router and Music Link will then be congured
automatically.
• Manual Conguration: You can choose DHPC (which IP assigned automati-
cally) or manually input IP address for wireless network connection. When
you select manual setting for wired connection, the following have to be
entered: SSID (name of access point), IP Address, subnet mask, default gateway, preferred DNS server, alternate DNS server. You may choose (Manage)
specic network if you have setup more than one network connection within
an area.
• Check Network When Power On: Enable/disable WiFi network. When you
enable the WiFi network, the system will automatically search the available
AP. Select required AP. Enter WEP or WPA code to connect the WiFi. If the
wireless network connection is not existing or fails, the icon at the top left
corner will have a cross on it.
• Setup the date and time; set time format display as 12 Hour or 24 Hour; set date
format: YY/MM/DD, DD/MM/YY or MM/DD/YY.
• Turn on/o the Daylight Saving Time (DST). With a wireless network con-
nected, GMT (+00:00) time is a time reference of time setting.
• Add or deduce the hour according to your time zone when you set the time.
20
Page 21

There are three independent alarms - 2 alarms of absolute time setting (Alarm 1
and Alarm 2) and 1 alarm for relative time setting (Alarm NAP). Press Alarm on the
remote control to enter this menu directly.
The rst two alarms are similar to the normal alarm. Turn on, then set the time
and set it alarms every day, once or every specic day of week. Choose Sound to
set the sound to Beep, Melody or Internet Radio.
Note that the alarm source is from the preset Internet radio if Alarm Sound is set
to be Internet Radio. It can only set one same IR station for Alarm 1 and Alarm 2.
When the alarm time is reached, the unit connects to the Internet if the set net-
Alarm
Timer
Language
Dimmer
Display Set the display to Color display or Monochrome display.
Power Management
work is available. Therefore there may be some delay from the alarm to the radio
play. If no network is connection can be established within one minute, the alarm
will change to Melody automatically.
When Alarm NAP is set, it alarms once in 5/10/20/30/60/90/120 minutes depending on which one you have set.
Choose Alarm Volume to congure the volume of the alarms.
When the alarm(s) is/are set, there will be a clock icon at the top of the display.
The clock icon with alarm time will also clearly display on the standby mode
screen. During alarm, press SNOOZE on the device to enter to snooze mode. It
will alarm again in 5 minutes. Press any other button to stop the alarm.
Set the time count down for cooking. In standby mode, the timer function is o.
Setting the timer: use the arrow buttons to adjust the time (from 00:00 to 59:59).
Then press OK to conrm, the countdown commences. Press HOME/MODE to
return to the previous screen.
When the timer countdown is up during the playing mode, it alarms and automatically goes to TIMER screen.
Press any key to stop the alarm. You can adjust the volume in the timer screen.
Please note: Alarm and Sleep functions will be restricted during the timer countdown.
Select the desired OSD language (English, German, Spanish, French, Portuguese,
Italian).
Congure the brightness of backlight on the display. Select Standby to set the
brightness of backlight in standby mode, and select Active to set that in opera-
tion mode.
Choose Dimmer Timer to set the duration of the radio changing backlight when
you are not controlling it.
Congure to go to standby mode automatically during in the menu or/and without Wi signal. Choose the power management timer (5/15/30mins) to set the
duration of the radio to switch standby mode automatically when you are not
controlling it. Choose Turn o to ignore the power management function.
21
Page 22

Turn o or set the sleep time of 15/30/60/90/120/150/180 minutes. Once the
Sleep Timer
Buer Congure the buer time of the music playback, 2/4/8 seconds.
Waeather
Local Radio Setup
Playback Setup
DLNA Setup
Equalizer
Resume When PWR
Software Update
Reset
time is set, there will be a bed icon with remaining minutes at the top right corner
and the device will turn to standby then. Press Sleep on the remote control for
the shortcut of this function.
Activate/deactivate the weather forecast for the standby display. Choose your
preferred temperature unit (°F or °C) and then proceed entering your location.
When activated, the weather forecast is shown in turns with the clock display on
the standby screen (each 10 secs).
There is a shortcut Local Radio under Internet Radio so that you can easily go
to the station list of your location. You may Manual Setup your location, or let
the system Auto Detect your current location. The system detects the location
according to the IP address of your connected network. Press Local Station to
enter this local radio list directly.
Select the playback mode of media center – O (no repeat or shule), Repeat all,
Repeat one, or Shule.
Default device name for DLNA is CONNECT100. You may rename it for DLNA setup
on the PC or mobile.
Default equalizer is Flat, you may change to Normal, Flat, Jazz, Rock, Movie, Classical, Pop, or News. Press EQ on the remote control to swap among the EQ mode
for shortcut.
The system is default to resume internet radio playback if you were listening to
internet radio or media center before switch o the unit. If turn this setting o, the
system will remain in the main menu when switching on the unit.
Update software. If there is an updated software version on the server, the system
will notify you when you return to the main menu.
Restore the default settings. After the CONNCET100 is reset, the system will move
to language setting menu. And it will automatically turn to network setting menu
once the OSD language is elected.
My mediaU
Display and playback your own mediaU station list on the mediaU server. Set your account rst.
To activate your own station list, follow the steps below:
• Access http://www.mediayou.net/. Join my mediaU membership. Login to the website;
• Enter the wireless MAC addresses of CONNECT 100 to the mediaU website. This information can be
obtained in Information Center > System Information > Wireless Info;
• When successfully congured, you are able to save and view your own mediaU station playlist(s).
Username and password are not required to enter to the CONNECT 100.
• If there are dierent accounts stored in CONNECT 100, you can choose the one you currently use under
Conguration menu.
On the website, you may save stations to Favorite Station, set Favorite Location/Genre and My Local City,
or add stations manually. The stations can be viewed from My MediaU mode on the CONNECT 100.
22
Page 23

Internet Radio
After the connection of any station is succeeded, the bit rate and the format of the station will display on
the playing screen.
List of my favorite preset stations. It supports 250 favorite entries including sta-
tion and folder.
During the station playing screen, press and hold PRESET/BT on the device or
Preset on the remote control to save the station as my favorite. You may replace
the previous saved station to the new one.
If the Selected station have been saved, you cannot save it again.
My Favorites
The saved stations are showed under this menu. You may also press PRESET/BT
or Preset to enter the saved station list. You may enter the number key on the
remote control to recall the saved station
.
Under the preset station list, move to your station, press Select to listen. You
may also press -> to enter its submenu to Delete, Shift Up/Down along the list,
Rename, Play, or Use as Alarm Sound (if you chose internet as alarm sound in
alarm conguration).
Stations are categorized into Global Top 20, Genre and Country/Location (Aus-
tralia, Canada, United Kingdom, USA). Enter to continue the subcategories and
choose the station to listen.
Radio Station / Music
History List of the ten recently listened stations.
Service
For each station, press Select to play directly. Press -> to enter its submenu.
When you choose Auto Scan, it becomes the playback of marquee for each station in the subcategory. Each station plays 30 seconds until all have played or
you press Select to stop the marquee listening. Press Info to view the display
information of the playing station.
Search radio station - Enter your keyword to search radio station from the list.
Add new radio station - The added stations will be stored in My Favorite. Note
that the maximum character of the station name is 250.
23
Page 24

Media Center
If you have set up shared media, you should see the shared media from UPnP.
If you have more than one computer sharing media, the alternatives are listed.
Select the shared media you want to play. Use Play/Pause, Next/Prev and Stop
UPnP
My Playlist
Clear My Playlist You can remove all the saved music under My Playlist.
USB Playback
Press Info to view the display information of the playing track.
Hints: The radio can only read the track with the le name less than 40 characters. The characters should be in European language. If you encounter failure of
reading the track under UPnP mode, you may try to rename the le. However, if
the track is still unable to play, you can try converting the le to dierent formats.
You can create a playlist of favourious music from UPnP. When you playing the
music, press and hold Select to save it into My Playlist.
From this point on, menus are generated from the folders on the USB device.
Browse folders with the NAV wheel or direction keys on the remote control. The
display shows folder and le names (not necessarily track names).
Once you have found a track you want to play, press the navigate reel on the
device or press OK on the remote control.
Note: The USB port does not support charging or data transfer with a computer.
BT
• When you go to BT mode, it is under pairing (the BT icon on the bottom is ashing). You can turn on
your smart phone/tablet/other BT device for pairing.
• The BT pairing name is CONNECT100. You can control the music playback on your smartphone, tablet
or other BT device.
• There is the shortcut key “BT” the remote control to go to the BT mode.
• Note: To cancel the BT connection, you have to end the connection and stop the pairing on your smart-
phone, tablet or other BT device.
AUX IN
Aux in mode plays audio from an external source such as an MP3 player. To play audio with Aux in mode:
• Turn the volume low on both the CONNECT 100 and, if adjustable, the audio source device.
• Connect the external audio source to the Aux in 3.5mm stereo socket.
• Either press MODE until the display shows AUX IN or select AUX in under Main menu.
• Adjust the volume of the CONNECT 100 (and, if necessary, the audio source device) as required.
Line Out
It allows you to connect an audio cable from the device to your own HiFi speaker system to enhance sound
performance.
24
Page 25

Information Center
There are weather information and forecasts for 2000 cities. Select the country
and then the city for the weather details. Press <- / -> to see the weather fore-
Wetter
Finanzen View the stock index from around the world.
System
casts.
The device is able to display the weather information on the standby mode. On
the weather information page, press Select to set the city to displaying on the
standby mode. Then turn on the weather display.
Check out the version of the system, and the details of connected network. The
information includes MAC address which you are required to ll in when registration of my mediaU membership.
Streaming & App Operation
CONNECT 100 is the default device name for DLNA, and you may rename it as you like. The information
below is the introduction of how to setup up media streaming from PC or other media server. Study the own
instruction of the software or apps you use to enjoy music streaming if necessary. Make sure the music les
are in the format of MP3, WMA, WAV or AAC for music streaming to the CONNECT 100.
UPnP
To enjoy the streaming music from PC, the following steps are to be done on the PC:
• Connect the PC to the network.
• Ensure the CONNECT 100 is powered on and connected to the same network.
• Open the UPnP platform Windows Media Player (11 or later). Alternatively, other platforms or server
such as Windows Media Connection may be used.
• Allow to share your media to CONNECT 100.
• Add the audio les and folders you want to share with CONNECT 100 to the media library.
You may also enjoy the streaming music from other music server, such as smart phone (Android platform):
• Connect the mobile to the network
• Search and install media sharing apps from Google Play.
• Add the audio les from your mobile you want to share.
• After setup the shared server, choose the music and control playback on the CONNECT 100.
DLNA Function
• Besides UPnP, CONNECT 100 supports DLNA function, you share the music les from PC or Android
mobile, and you use your PC, Android mobile or iPhone / iPad to control music playback on the CONNECT 100. (It is not required to control each playback on the CONNECT 100.)
25
Page 26

• The PC system requirement for DLNA is Windows 7 and Windows Media Player 12. Setup as below:
• First, share the media on your PC to CONNECT 100.
• Control Panel > Network and Internet > Network and Sharing Center > Media streaming options
• Open Windows Media Player to enable Allow remote control of my Player.
• Right click any music in the library and choose Play to CONNECT 100.
• There will be a window for controlling music playback on CONNECT 100.
You may search and install any free or commercial DLNA apps from Google Play or Apple Store if you
are using Android mobile, tablet or iPhone / iPad. It is suggested to use bubbleUPnP, Twonky Beam on
Android mobile, tablet or Twonky Beam on iPhone/iPad.
Some apps may not support streaming music from iPhone/iPod but iPhone/iPod could still be used to
control streaming music from other servers.
Procedures for playing shared music on the app are as follows:
• Select CONNECT 100 as the player. Some apps may allow to play the music to multi players at
the same time.
• Select music server and choose the music. Some app can create a playlist if you choose several
music.
Please note: When using DLNA music streaming function on Music Link, you can only control the volume and standby via the unit. It is restricted to control the other functions. Stop DLNA on PC, mobile
or tablet before you resume Music Link’s own control.
Environment Concerns
According to the European waste regulation 2002/96/EG this symbol on the product
or on its packaging indicates that this product may not be treated as household waste.
Instead it should be taken to the appropriate collection point for the recycling of electrical
and electronic equipment. By ensuring this product is disposed of correctly, you will hep
prevent potential negative consequences for the environment and human health, which
could otherwise be caused by inappropriate waste handling of this product. For more
detailled information about recycling of this product, please contact your local council or
your household waste disposial service.
Declaration of Conformity
Manufacturer: CHAL-TEC GmbH, Wallstraße 16, 10179 Berlin, Germany.
This product is conform to the following European directives:
1999/05/EC (R&TTE)
2011/65/EU (RoHS)
26
Page 27

Chère cliente, cher client,
Toutes nos félicitations pour l’acquisition de ce nouvel appareil. Veuillez lire attentivement et respecter les
consignes suivantes de branchements et d’utilisation pour éviter d’éventuels dommages techniques.
Consignes de sécurité
• Ce mode d’emploi sert à vous familiariser aux fonctions de ce produit. Conservez-le bien an de pouvoir vous y référer à tout moment.
• L’achat de ce produit donne droit à une garantie de deux ans en cas de défectuosité de l’appareil sous
réserve d’une utilisation appropriée de celui-ci.
• Veiller à utiliser le produit conformément à l’usage pour lequel il a été conçu. Une mauvaise utilisation
est susceptible d’endommager le produit ou son environnement.
• Tout démontage ou toute modication de l’appareil porte atteinte à la sécurité du produit. Attention
aux risques de blessure !
• Ne jamais ouvrir le produit de son propre chef et ne jamais le réparer soi-même !
• Manipuler le produit avec précaution. Les chocs, les coups ou les chutes - même de faible hauteur -
peuvent endommager l’appareil.
• Ne pas exposer le produit à l’humidité ou à une chaleur extrême.
• Ne pas introduire d’objets métalliques dans cet appareil.
• Ne pas poser d’objets lourds sur l’appareil.
• Nettoyer l’appareil uniquement avec un chion sec.
• Ne pas obstruer les ouvertures d’aération.
• Utiliser uniquement les accessoires recommandés par le fabricant ou par une entreprise spécialisée
et qualiée.
• Baisser le volume sonore avant de brancher un casque à un appareil audio.
• Utiliser le bloc d’alimentation pour raccorder l’appareil au circuit électrique et le brancher à une prise
électrique domestique classique (220-240 V).
Toute ouverture non autorisée de l’appareil entraîne l’annulation de la garantie.
• Le fabricant n’est pas tenu responsable des dégâts et des dysfonctionnements causés par une mauvaise utilisation ou un mauvais montage de l’appareil.
Petits objets / éléments d’emballage (sac plastique, carton, etc.): Tenir les petits objets (par exemple
les vis et le matériel d’assemblage, les cartes mémoire) et le matériel d’emballage hors de la portée des
enfants pour éviter qu’ils ne les avalent. Empêcher les enfants de jouer avec les lms de protection. Il existe
un risque d’étouement !
Transport de l’appareil: Conserver l’emballage d’origine. Pour garantir une protection suisante de
l’appareil pendant son transport, emballer l’appareil dans son emballage d’origine.
Nettoyage en surface de l’appareil: Ne pas utiliser de liquides volatiles comme ceux contenus dans les
bombes insecticides. Une pression trop importante exercée sur la surface de l’appareil pendant le nettoyage peut l’endommager. Éviter le contact prolongé du caoutchouc ou du plastique avec l’appareil. Utiliser
un chion sec.
27
Page 28

Fiche technique
Numéro d’article
Alimentation électrique DC 12V (Netzteil für AC 220-240V, 50-60Hz im Lieferumfang enthalten)
Enceintes 2 x 5W
Réseau
Streaming UPnP, DLNA
Formats de chier compatibles WMA, MP3, WAV
Consommation énergétique 19 W (veille : < 0,5 W)
Connecteurs DC, USB, AUX 3,5 mm, Line-Out 3,5 mm
Dimensions et poids 210 x 115 x 126mm, 1,53kg
Contenu de l’emballage
10029864, 10029865
802.11b/g/n(WLAN)
Verschlüsselungsprole: WEP, WPA, WPA2 (PSK), WPS
Appareil, bloc d’alimentation, câble audio 3,5 mm, télécommande,
mode d’emploi
Éléments de commande
28
Page 29

Éléments de commande
29
Page 30

Display 1 6 Aux In
Touches de commande :
HOME, MODE; PRESET, TUN+, TUN+
NAV / OK 3 8 USB Port
VOL+/- / Power 4 9 Prise pour bloc d’alimentation
SNOOZE 5 10 Interrupteur
2 7 Line Out
Télécommande:
• Avant d’utiliser la télécommande, retirer le lm d’emballage qui se trouve dans le compartiment des
piles.
• Lors du remplacement des piles, veiller à introduire des piles de même type (CR2025, 3 V) en respectant les polarités (le pôle plus vers le haut).
Première mise en marche
• Utiliser le bloc d’alimentation fourni dans l’emballage pour brancher le CONNECT 100 à une prise de
courant.
• Mettre l’appareil en marche (mettre l’interrupteur arrière en marche et appuyer sur la touche POWER
de la façade).
• Au premier démarrage, le CONNECT 100 cherche immédiatement les réseaux sans l disponibles. Une
barre d’avancement s’aiche pendant ce temps à l’écran. Enn, tourner le bouton de réglage NAV
(3) pour sélectionner la langue d’aichage souhaitée et déterminer si le réseau doit être conguré.
Sélectionner l’option souhaitée en tournant à chaque fois NAV et en conrmant enn avec NAV/OK.
• Appuyer sur POWER/STANDBY (4) pour que l’appareil bascule en mode veille. L’écran aiche alors
l’heure, la date de même que les réveils activés.
30
Page 31

Fonctions du menu : aperçu
Standby
Menu principal
My mediaU <--> Sous-menu
| |
Radio internet <--> My Favorites
| | Station de radio / Musique
| | Radio locale <--> Sous-menus
| | Historique
| | Service
| |
Media Center <--> UPnP <--> Sous-menus
| | Ma liste de lecture
| | Eacer ma liste de lecture
| |
BT
| |
AUX IN
| |
Information Center <--> Météo
| | Finances <--> Sous-menus
| | Système
| |
Mode - Gérer My MediaU - Réseau
Date & Heure - Réveil - Minuteur
Paramètres de langue - Variateur - Aichage
Gestion de l’alimentation - Mise en veille program-
Paramètres <-->
mée - Mémoire tampon - Météo
Paramètres de radio locale - Paramètres de lecture
- paramètres DLNA
Égalisation - Reprise en cours - Mise à jour logiciel-
le - Paramètres par défaut
<--> Sous-menus
31
Page 32

Fonctions du menu : utilisation et paramètres
• Mettre l’appareil en marche et tourner le bouton NAV pour accéder au menu principal et ses sousmenus (cf. tableau)
• Appuyer sur NAV/OK pour sélectionner les options et les sous-menus (colonne du milieu et de droite
et tourner de nouveau pour passer les options en revue.
Menu : paramètres
Mode Sélectionner le format d’aichage de l’heure
Gestion de
My MediaU
Réseau
Date & heure
Réveil
Lorsqu’elle est activée, l’option My mediaU apparaît dans le menu principal. Congurer le login pour les connexions futures.
• Conguration Wi automatique : activer/désactiver la Wi. Après activation, sélectionner dans la liste les points d’accès détectés de la Wi/du routeur puis entrer le mot de passe.
• Conguration manuelle : sélectionner l’option DHCP (l’adresse IP est attribuée automatiquement) ou entrer manuellement l’adresse IP. En dernier
recours, seront exigés l’un après l’autre : le numéro SSID (nom du routeur/
point d’accès), l’adresse IP, le masque de sous-réseau, la passerelle par
défaut, de même qu’un serveur DNS préférentiel ou alternatif. Utiliser cette option en cas de bonne maîtrise de la conguration manuelle et en cas
d’utilisation de plusieurs réseaux Wi.
• Vérier le réseau au démarrage de l’appareil : activer cette fonction pour
que le CONNECT 100 se connecte automatiquement au réseau au redémarrage de l’appareil.
• Dénir le format d’aichage de l’heure (12h ou 24 heures) de même que celui
de la date (AA/MM/JJ ou JJ/MM/AA ou MM/JJ/AA).
• DST : activer le passage automatique à l’heure d’été/d’hiver.
• GMT : dénir le fuseau horaire approprié.
Le CONNECT 100 dispose de 3 réveils réglables indépendamment. Deux d’entre
eux sont des réveils « classiques » : régler Alarm1 et Alarm2 à l’heure souhaitée
et sélectionner pour chacun une source de signal (si l’appareil ne peut pas se
connecter à la Wi, une mélodie préenregistrée est émise au bout d’une minute).
Dans le cas d’Alarm NAP, il s’agit d’un minuteur, dont le décompte peut être :
5/10/20/30/60/90/120 minutes.
Appuyer sur SNOOZE pour reporter le réveil de 5 minutes. Appuyer sur n’importe
quelle touche pour arrêter le réveil.
32
Grâce à la fonction Timer (minuteur), régler un minuteur de cuisson (attention:
il est désactivé ou mis en pause en mode veille). Utiliser les touches échées
pour régler la durée du minuteur entre 00:00 et 59:59 puis appuyer sur OK pour
démarrer le compte à rebours.
Page 33

Une fois le réglage du minuteur eectué, et après son démarrage, il est possible
de revenir à l’aichage précédent avec HOME/MODE/èche.
Lorsque le décompte est terminé pendant la diusion de musique, le réveil sonne
Minuteur
Langue
Variateur
Aichage Sélectionner l’aichage en noir/blanc ou en couleurs.
Gestion de
l’alimentation
Mise en veille programmée
Mémoire tampon
Météo
Paramètres de radio
locale
Paramètres de lecture
Paramètres DLNA Le nom DLNA par défaut est CONNECT 100. Le modier ici si besoin.
Reprise en cours
tout de même et l’aichage du minuteur apparaît à l’écran. Appuyer sur n’importe
quelle touche pour arrêter le réveil.
Remarque : la fonction de réveil de même que la mise en veille programmée sont
désactivés lorsque la fonction de minuteur est activée.
Sélectionner la langue d’aichage (anglais, allemand, espagnol, français, portugais, italien).
Régler la luminosité de l’écran. Sélectionner l’option de menu Standby (veille) pour régler l’éclairage en mode veille et l’option Active (actif) pour modier
l’éclairage pendant utilisation.
Sélectionner Dimmer Timer pour activer et régler le laps de temps précédent
l’atténuation de l’éclairage de l’écran après un certain temps d’inactivité.
Activer la gestion de l’alimentation (Power Management) et dénir le réglage
5/15/30 minutes pour que le CONNECT 100 s’éteigne automatiquement après le
laps de temps déni si aucun réseau Wi n’est détecté.
Régler la mise en veille programmée pour que l’appareil bascule automatiquement en mode veille après un laps de temps de 15/30/60/90/120/150/180 mi-
nutes.
Autre possibilité simple : appuyer plusieurs fois sur la touche SLEEP de la télécommande.
Congurer la mémoire-tampon pour obtenir une meilleure réception des streams
ou de la radio internet. Choisir entre 2/4/8 secondes.
Activer/désactiver les informations météorologiques sur l’écran de veille. Sélectionner l’unité souhaitée de mesure de la température (°F ou °C) et dénir sa
localisation.
Si les informations météo sont activées, celles-ci apparaissent sur l’écran de veille en alternance avec l’aichage de l’heure, selon un intervalle de 10 secondes.
Dénir ici sa localisation manuellement pour pouvoir accéder aux stations radio
locales. Sélectionner Auto Detect pour autoriser la transmission automatique de
la localisation.
Sélectionner le mode de lecture souhaité pour le centre multimédia (O = lecture
normale ; Repeat All = répéter tous les titres ; Repeat one= répéter le titre en
cours de lecture ; Shule = lire tous les titres disponibles dans un ordre aléatoire).
Activer la fonction de reprise en cours (Resume When Power on) pour que le CONNECT 100 reprenne au démarrage exactement à l’endroit où il était resté : à la
dernière station ou au dernier stream écoutés. (Par défaut : activé).
33
Page 34

Mise à jour logiciel
Réinitialisation
Pour mettre le logiciel à jour lorsque le serveur du fabricant propose une nouvelle
version.
Conrmer avec Yes pour rétablir les paramètres par défaut. Attention : tous les
réglages et présélections manuels eectués seront supprimés
My mediaU
Aichage et commande de sa propre station mediaU. Créer à présent son compte mediaU :
• Visiter le site www.mediayou.net
• Ouvrir un compte avec un nom d’utilisateur et un mot de passe choisi par soi-même. Puis se connecter
après réception de l’email de conrmation.
• Enregistrer le CONNECT 100 sur le site web. Pour cela, l’adresse MAC de l’appareil est requise. Elle est
visible dans Menu principal -> Centre d’informations -> Système d’informations > Infos sans l.
• Il est possible d’utiliser des stations de radio et des streams depuis le CONNECT 100 via le compte
mediaU (sans avoir besoin de saisir de nouveau le mot de passe et le nom d’utilisateur).
Radio internet
Une fois la connexion à une station établie, le taux d’échantillonnage et le format de transmission sont
aichés à l’écran. Sous-menus :
La liste des favoris de l’utilisateur, pouvant atteindre un nombre de 250.
Pour ajouter une station, rester appuyer sur la touche PRESET/BT de l’appareil
pendant que la diusion de la station ou sur la touche PRESET de la télécom-
mande.
Mes favoris
34
Une station ne peut pas être ajoutée plusieurs fois dans la liste des favoris.
Appuyer sur la touche PRESET/BT de l’appareil ou PRESET de la télécommande
pour aicher la liste. Parcourir la liste avec la touche NAV ou avec les touches
échées. Appuyer sur la touche échée DROITE pour accéder au sous-menu de
la station sélectionnée comportant les options Supprimer, Déplacer, Renommer,
Lire et Utiliser comme réveil.
Page 35

Cette option trie les stations dans les catégories Global Top 20, Genre de même
que Pays/lieu. Ouvrir chaque sous-catégorie pour parcourir la liste des stations.
Appuyer sur NAV/OK ou SELECT pour les diuser.
Chaque station sélectionnée (colorée) possède un sous-menu qu’il est possible
de sélectionner avec la touche échée (droite). Voici les options :
Station radio / musique
Radio locale Accès aux stations radio locales
Historique Les dix dernières stations écoutées sont listées ici.
Service
• Ajouter aux favoris
• Auto Scan
• Diuser
• Utiliser comme réveiller
Sélectionner Auto Scan pour diuser pendant 30 secondes chaque station disponible dans le dossier. Appuyer sur SELECT pour interrompre la recherche et
mémoriser les stations actives détectées jusque-là.
Chercher des stations radio en entrant un mot-clé avec Rechercher une station
ou ajouter des stations à la liste des favoris en utilisant la fonction Ajouter une
station.
Centre multimédia
Si le streaming UPnP a été autorisé sur l’ordinateur ou sur le centre/serveur multimédia, les chiers correspondants s’aichent ici. Si via la Wi plusieurs serveurs
UPnP ont été détectés, il vous est possible de sélectionner celui souhaité.
Lire la musique avec les touches habituelles (télécommande) Lecture/Pause,
UPnP
Stop et les touches directionnelles.
Ma liste de lecture
Supprimer la liste
de lecture
Remarque : l’appareil peut uniquement lire les chiers dont le nom comporte
un nombre inférieur à 40 caractères et des lettres latines. Si malgré cela il est
impossible de lire les chiers, cela peut provenir d’un incompatibilité de format.
Créer une liste de lecture personnelle : ajouter chacun des titres souhaités en
restant appuyer sur Select.
Supprimer la liste de lecture créée.
35
Page 36

Insérer une clé USB comportant des chiers multimédias. Sélectionner l’option
Lecture USB pour les aicher.
L’arborescence des sous-menus est conservée et aiche également les dossiers
Lecture USB
contenant les chiers.
Le nom des chiers est aiché (mais peuvent diérer du titre d’origine)
Remarque : le port USB ne permet pas de recharger les périphériques ou
d’eectuer des transferts de données vers un ordinateur.
BT
• Sélectionner le mode BT via le menu principal ou la touche BT de la télécommande pour lire des
contenus audio depuis des périphériques (smartphone, tablette ou ordinateur) via la fonction BT du
CONNECT 100.
• Activer BT sur le périphérique BT et le connecter avec « CONNECT100 ». Utiliser les touches Lecture/
Pause, Stop ou les touches directionnelles de la télécommande ou de l’appareil périphérique pour
parcourir la bibliothèque multimédia.
• Interrompre la connexion depuis le smartphone/la tablette pour coupler un autre appareil.
AUX IN
• Brancher un périphérique audio à l’entrée AUX située à l’arrière du CONNECT 100 au moyen du câble
audio 3,5 mm fourni.
• Sélectionner le mode AUX via le menu principal ou en appuyant plusieurs fois sur la touche MODE.
• Ajuster le volume de lecture au niveau du CONNECT 100. Penser à régler le volume sonore du péri-
phérique (téléphone portable, lecteur MP3 etc.) à un niveau suisamment élevé.
Line Out
Il est possible de brancher une chaîne stéréo externe, une chaîne Hi ou une table de mixage au CONNECT
100 via la sortie Line. Pour ce faire, utiliser un câble audio 3,5 mm.
Centre d’informations
Dénir sa propre localisation en entrant le nom du pays et de la ville (ou bien la
Météo
Finances Aichage des principaux indices boursiers.
Système
36
grande ville la plus proche).
Utiliser ensuite les touches directionnelles pour visualiser les prévisions météo
des jours à venir.
Aichage des informations système avec des détails sur la connexion réseau,
l’adresse MAX etc.
Page 37

Streaming DLNA et commande d’application
Utiliser un ordinateur comme serveur multimédia et eectuer un streaming de contenus audio par DLNA ou
via le CONNECT 100. Il est possible de streamer des chiers au format MP3, WMA, WAV et AAC
UPnP
• S’assurer que l’ordinateur est connecté au même réseau que le CONNECT 100.
• Ouvrir une plateforme adaptée à la fonction UPnP (par exemple Windows Media Player à partir de la
version 11).
• Créer une liste de lecture et autoriser la fonction UPnP.
• Consulter le chier d’aide du logiciel (en appuyant par exemple sur F1) pour obtenir plus d’informations
sur le partage UPnP et sur d’autres thèmes.
• Procéder de la même manière avec les smartphones ou tablettes à partir desquels l’on souhaite streamer des chiers : télécharger un logiciel de streaming adapté sur Google Play, connecter l’appareil au
réseau et ajouter les chiers musicaux partagés à streamer.
DLNA
Le protocole DLNA sert également à streamer de la musique. Le protocole DLNA fonctionne sur Windows
à partir de la version 7 et sur Windows Media Player à partir de la version 12.
• Tout d’abord, ouvrir Paramètres système > Réseau et internet > Options de partage > Streaming de
chiers multimédia et ajouter le CONNECT 100.
• Ensuite, démarrer Windows Media Player et autoriser la commande à distance du CONNECT 100.
Remarque
• Pour le streaming depuis un smartphone ou une tablette, il est recommandé d’utiliser des applications
comme bubbleU-PnP ou Twonky Beam.
• Pendant le streaming DLNA, seuls le volume et la touche marche/arrêt sont utilisables sur le CONNECT 100. Toutes les autres fonctions sont inactives. Pour pouvoir les utiliser de nouveau, déconnecter
l’ordinateur ou le smartphone.
37
Page 38

Information sur le recyclage
Appareils électriques et électroniques usagés
Vous trouverez sur le produit l’image ci-contre (une poubelle sur roues, barrée d‘une
croix), ce qui indique que le produit se trouve soumis à la directive européenne 2002/96/
CE. Renseignez-vous sur les dispositions en vigueur dans votre région concernant la collecte séparée des appareils électriques et électroniques. Respectez-les et ne jetez pas les
appareils usagés avec les ordures ménagères. La mise au rebut correcte du produit usagé
permet de préserver l’environnement et la santé. Le recyclage des matériaux contribue à
la préservation des ressources naturelles.
Déclaration de conformité
Fabricant : Chal-Tec GmbH, Wallstraße 16, 10179 Berlin, Allemagne.
Ce produit est conforme aux directives européennes suivantes :
2011/65/UE (RoHS)
1999/5/CE (R&TTE)
38
Page 39

Estimado cliente:
Le felicitamos por la adquisición de este producto. Lea atentamente el siguiente manual y siga cuidadosamente las instrucciones de uso con el n de evitar posibles daños. La empresa no se responsabiliza de
los daños ocasionados por un uso indebido del producto o por haber desatendido las indicaciones de
seguridad.
Advertencia
• Este manual de instrucciones tiene como objetivo familiarizarle con el funcionamiento del producto.
Conserve este manual para que pueda realizar futuras consultas.
• Con la compra de este producto obtiene dos años de garantía en caso de defecto o avería provocados
por un uso normal del aparato.
• Utilice el producto solamente tal y como aparece indicado en este manual. Un uso alternativo puede
provocar daños en el mismo o en su entorno.
• La transformación o cambio del producto reduce la seguridad del mismo. Riesgo de lesiones. Nunca
abra el aparato ni intente repararlo usted mismo.
• Trate el producto con cuidado. Puede averiarse si recibe golpes, impactos o caídas, incluso desde poca
altura.
• Mantenga el producto alejado de la humedad y del calor extremo.
• No deje caer objetos de metal sobre el aparato.
• No coloque objetos pesados encima del aparato.
• Limpie el aparato utilizando solamente un paño seco.
• No obstruya las ranuras de ventilación.
• Utilice exclusivamente los accesorios recomendados por el fabricante o por un proveedor cualicado.
La garantía expirará si abre el aparato.
Piezas pequeñas/partes del embalaje (bolsas de plástico, cartón, etc.)
Mantenga las piezas pequeñas (p.ej. tornillos y otro material de montaje) y las partes del embalaje fuera
del alcance de los niños para evitar que se atraganten. No permita que los niños pequeños jueguen con los
plásticos, pueden provocar riesgo de asxia.
Transporte del aparato:
Conserve el embalaje original. Para proteger el aparato durante el transporte, introdúzcalo en su embalaje
original.
Limpieza exterior:
No utilice líquidos volátiles, como sprays insecticidas. El exterior del aparato podría dañarse si se frota
demasiado fuerte. Evite que el aparato esté en contacto continuado con objetos de goma o plástico. Utilice
un paño seco.
39
Page 40

Datos técnicos
Número de artículo
Suministro eléctrico DC 12V (Fuente de alimentación AC 220-240V, 50-60Hz incluida)
Altavoz 2 x 5W
Transmisión UPnP, DLNA
Tipos de archivo compatibles WMA, MP3, WAV
Conexiones DC, USB, 3,5mm AUX, 3,5mm Line-Out
Dimensiones y peso 210 x 115 x 126mm, 1,53kg
Contenido del envío
10029864, 10029865
802.11b/g/n(WLAN)
Red
Perles de codicación: WEP, WPA, WPA2 (PSK), WPS
Dispositivo, cable de alimentación, cable de audio de 3,5 mm, mando a
distancia, manual de instrucciones
Controles
40
Page 41

Controles
41
Page 42

Display 1 6 Aux In
Botones de control:
HOME, MODE; PRESET, TUN+, TUN+
NAV / OK 3 8 Puerto USB
VOL+/- / Power 4 9 Conexión de la fuente de alimentación
SNOOZE 5 10 Fuente de alimentación
2 7 Line Out
Mando a distancia:
• Antes del primer uso, retire el plástico que cubre el mando a distancia concebido para el transporte y
para la protección de descarga en el compartimento de las pilas.
• Tenga en cuenta que al sustituir las pilas, necesitará el mismo modelo de pila (CE2025, 3V) y debe
colocarlo siguiendo la polaridad correcta (polo positivo hacia arriba).
Primera puesta en marcha
• Utilice el cable de alimentación incluido para conectar el CONNECT 100 a una toma de corriente.
• Encienda el aparato (toma trasera en posición ON, pulsar POWER en la parte delantera).
• La primera vez que encienda el CONNECT 100, la radio buscará redes de ondas disponibles. Durante
el proceso se mostrará una barra de progreso en el display. Finalmente, seleccione girando la rueda
de navegación NAV (3) el idioma de display deseado y elija si desea congurar la red. Seleccione la
opción deseada girando la rueda NAV y pulsando NAV/OK.
• Pulse el botón POWER/STANDBY (4) para acceder al modo standby del aparato. La hora, la fecha y las
alarmas activas se mostrarán en el display igualmente.
42
Page 43

Funciones del menú: Descripción
Standby
Menú principal:
My mediaU <--> Submenú
| |
Internet Radio <--> My Favorites
| | Radio Station / Music
| | Local Radio <--> Submenús
| | History
| | Service
| |
Media Center <--> UPnP <--> Submenús
| | My Playlist
| | Clear My Playlist
| |
BT
| |
AUX IN
| |
Information Center <--> el tiempo
| | Bolsa <--> Submenús
| | System
| |
Mode - Manage My MediaU - Red
Fecha y hora – Alarma - Temporizador
Ajustes de idioma – Dimmer- display power
Ajustes <-->
Management - Sleep Timer - Buer - tiempo
Local Radio Setup - Playback Setup -
DLNA Setup - Equalizer -
Resume When Power On - Software
Update – Conguración por defecto
<--> Submenús
43
Page 44

Funciones del menú: Manejo y ajustes
• Encienda el aparato y gire el regulador NAV para acceder al menú principal y a sus puntos de menú
(consulte la columna izquierda de la sección Descripción).
• Pulse NAV/OK para acceder a los ajustes y submenús correspondientes (columnas central y derecha)
y vuelva a girar para navegar entre ellas.
Menú: ajustes
Mode
Manage My MediaU
Netzwerk
Fecha y hora
Alarma
Congure el modo en que quiere que aparezca la hora en el monitor durante el
modo standby.
Cuando se encuentra activo, aparece el punto My MediaU en el menú principal.
Ajuste el inicio de sesión para futuros intentos de conexión.
• Conguración WLAN automática: Activar/desactivar el WifI. Tras la acti-
vación, seleccione de la lista el Access Point encontrado para su WLAN/
Router e introduzca la contraseña correspondiente.
• Conguración manual: Seleccione la opción DHCP (el IP se generará au-
tomáticamente) o introduzca la dirección IP manualmente. En último caso,
se le requerirá tanto la SSID correspondiente (nombre del router/ access
point), la dirección IP, la máscara de subred, la puerta de acceso por defecto
y un servidor DNS preferido y alternativo. Utilice esta opción si tiene conocimientos sucientes del tema y si utiliza distintas redes de ondas.
• Comprobar red cuando la radio está encendida: Active esta función para
que el CONNECT encuentre de nuevo la conexión establecida cada vez que
se inicie de manera automática.
• Ajuste el formato de la hora (formato 12 o 24 horas) y la representación de
la fecha (AA/MM/DD o DD/MM/AAAA o MM/DD/AA).
• DST: ajuste automáticamente el cambio entre el horario de verano y el de
invierno.
• GMT: ajuste la zona horaria con relación al horario GMT.
El CONNECT 100 tiene disponibles tres funciones de alarma independientes entre sí. Las dos primeras actúan como un despertador común. Ajuste la Alarm1 y
Alarm2 para la hora deseada y seleccione la fuente de audio (si no puede establecerse una conexión WLAN, se reproducirá una melodía guardada transcurrido
un minuto).
La alarma NAP es un temporizador que señaliza el transcurso de
5/10/20/30/60/90/120 minutos (congurable).
Pulse SNOOZE para posponer la alarma durante 5 minutos. Pulse cualquier otro
botón para detener la alarma.
44
Page 45

Ajuste con la función de temporizador un minutero para la cocina (advertencia:
en modo standby estará desactivado o pausado). Utilice los botones de dirección
para congurar la hora del temporizador entre 00:00 y 59:59 y pulse a continuación OK para iniciar la cuenta atrás.
Timer
Idioma
Dimmer
Display Seleccione la visualización en blanco/negro o en color.
Power Management
Temporizador de
apagado
Buer
El tiempo
Local Radio Setup
Playback Setup
DLNA Setup
Tras ajustar e iniciar el temporizador, puede cambiar los indicadores anteriores
con HOME/MODE/echa hacia la izquierda. Si la cuenta atrás se naliza mientras se está reproduciendo la música, sonará la alarma y el monitor pasará a
mostrar el temporizador. Pulse cualquier otro botón para nalizar la alarma.
Tenga en cuenta: la función de la alarma y el temporizador quedarán inactivos
con la función del temporizador activada para evitar que se solapen
Seleccione el idioma del display (inglés, alemán, español, francés, portugués,
italiano).
Ajuste la iluminación de fondo del display. Seleccione el punto del menú standby
para congurar la iluminación en el modo standby y el punto Active para modicar la iluminación durante el uso. Seleccione Dimmer Timer para activar y
congurar el periodo de tiempo para una atenuación del display transcurrido un
tiempo sin uso de la radio.
Active el Power Management y ajústelo en 5/15/30 minutos para que el CONNECT 100 se apague automáticamente tras un periodo determinado de tiempo
en caso de no encontrar ninguna WLAN disponible.
Ajuste el temporizador de apagado para que el aparato se apague automáticamente transcurrido un periodo de tiempo de 15/30/60/90/120/150/180 minutos.
Alternativa sencilla: pulse varias veces SLEEP en el mando a distancia:
Congure el buer de almacenamiento para obtener una mejor recepción de la
transmisión o de la radio de internet. Las opciones de conguración son 2/4/8
segundos.
Active/desactive el indicador del tiempo para la pantalla en modo standby. Seleccione la unidad de temperatura deseada (°F o °C) y seleccione su localización.
Si el indicador meteorológico está activado, aparecerá en el monitor standby
alternándose con la hora cada 10 segundos.
Congure manualmente su ubicación y con ello el acceso preferente a emisoras
de radio locales. Seleccione Auto Detect para un establecimiento automático de
su ubicación.
Seleccione el modo de reproducción deseado para el Media Center (O = reproducción normal; Repeat all = repetir todas las pistas; repeat one = repetir la pista
actual; Shule = reproducir las pistas disponibles en modo aleatorio).
El nombre estándar DLNA es CONNECT 100. Modifíquelo si lo desea en este punto
del menú.
45
Page 46

Active la función Resume When Power On para que cuando encienda el CONNECT
Resume When PWR
Software Update
Reset
100, este continúe donde se había detenido: en la última transmisión o emisora
escuchadas. (Estándar: Activo)
Para actualizar el Firmware si el servidor del fabricante dispone de una nueva versión.
Conrme pulsando YES para restablecer la conguración de fábrica. Advertencia:
todos los ajustes realizados manualmente y la memoria se eliminarán.
My mediaU
Visualización y control de tu propia emisora mediaU. En primer lugar, cree una cuenta mediaU:
• Entre en www.mediayou.net
• Abra una cuenta con su nombre de usuario y una contraseña a su elección. Inicie sesión cuando haya
recibido el correo electrónico de conrmación.
• Registre su CONNECT 100 en la página web. Para ello necesitará la dirección MAC del aparato. La
encontrará en el menú principal -> Centro de información -> Información del sistema -> Información
inalámbrica.
• Con la cuenta mediaU puede administrar sus emisoras de radio y transmisiones desde el CONNECT
100 y contar con un acceso directo (no necesitará introducir la contraseña y el nombre de usuario).
Radio Internet
Cuando haya establecido la conexión correctamente con una emisora, se mostrará la tasa de bits y el formato de envío en el display. Submenús:
My Favorites
46
La lista de sus favoritos puede almacenar hasta 250 entradas.
Para añadir una emisora, mantenga pulsado PRESET/BT en el aparato o PRESET
en el mando a distancia mientras esta se reproduce.
Una emisora no puede añadirse varias veces a la lista de favoritos.
Pulse PRESET/BT en el aparato o PRESET en el mando a distancia para mostrar
la lista. Navegue con NAV o con los botones de echas. Pulse la echa derecha
para acceder al submenú de la emisora que se reproduce en ese momento, que
contará con las opciones Eliminar, Desplazar, Renombrar, Reproducir y Utilizar
como alarma.
Page 47

En este punto encontrará las emisoras de las categorías Global Top 20, Géneros
y País/Ubicación. Abra la subcategoría correspondiente para examinar una lista
de emisoras. Pulse NAV/OK o SELECT para reproducir.
Cada emisora seleccionada (marcada con color) cuenta con un submenú que
puede seleccionar pulsando la echa de dirección a la derecha. Los subpuntos son
• Añadir a favoritos
Radio Station / Music
Local Radio Acceso a las emisoras de radio locales
History Las últimas 10 emisoras escuchadas aparecen listadas.
Service
• Auto Scan
• Reproducir
• Utilizar como alarma
Seleccione Auto Scan para reproducir todas las emisoras contenidas en la carpeta correspondiente durante 30 segundos cada una. Pulse SELECT para detener el
salto y mantener la emisora actual.
Busque emisoras de radio utilizando palabras clave o añada las emisoras a su
lista de favoritos a través de la función “Añadir emisora”.
Media Center
Si ha autorizado a su ordenador o centro/servidor multimedia transmitir conte-
nidos a través de UPnP, seleccione los archivos correspondientes en esta sección.
Si se ha encontrado más de un servidor UPnP en la WLAN, puede elegir entre las
alternativas.
UPnP
Mi lista de reproducción
Eliminar lista de reproducción
USB Playback
Reproduzca la música con los botones habituales (mando a distancia) Play/Pause, Stop y los botones de dirección.
Tenga en cuenta: el aparato solo puede reproducir archivos si los nombres de
los mismos cuentan con menos de 40 caracteres y están escritos con el alfabeto
latino. Si los archivos siguen sin reproducirse, es posible que se trate de un formato incompatible.
Cree una lista de reproducción personalizada: mantenga pulsado el botón Select
mientras suena la pista deseada y añádala.
Elimine la lista de reproducción creada.
Conecte un dispositivo USB con contenido multimedia. Seleccione el punto USB
Playback para mostrar los archivos.
La estructura del submenú se mantendrá, visualizará una carpeta de archivos
contenidos en el dispositivo de almacenamiento.
Los nombres de los archivos también se muestran (pueden distinguirse cada una
de las pistas).
Tenga en cuenta: el puerto USB no es apto para cargar dispositivos externos ni
para transferir datos de un ordenador.
47
Page 48

BT
• Seleccione el modo BT a través del menú principal o con el botón BT del mando a distancia para
reproducir en la CONNECT 100 contenido de audio de dispositivos externos (Smartphone, Tablet u
ordenador) por medio de BT.
• Active el BT en su dispositivo externo y conéctelo con “CONNECT100”. Utilice los botones Play/Pause,
los botones de dirección y Stop en el mando a distancia o en su dispositivo externo para navegar por
la biblioteca multimedia.
• Interrumpa la conexión desde su Smartphone o Tablet para sincronizar la radio con otro aparato.
AUX IN
• Conecte dispositivos de audio externos con el cable de audio de 3,5 mm (incluido) en la entrada AUX
situada en la parte trasera de la CONNECT 100.
• Seleccione el modo AUX a través del menú principal o pulsando varias veces MODE.
• Regule el volumen de reproducción en la CONNECT 100. Recuerde ajustar el volumen del dispositivo
externo (normalmente móvil, reproducir MP3 o similar) a un nivel lo sucientemente alto.
Line Out
Puede conectar aparatos estéreo, HiFi o mesas de mezclas/PA con la salida Line de la CONNECT 100. Para
ello, utilice el cable de audio de 3,5 mm.
Centro de información
Limite su ubicación introduciendo su país y ciudad (o la ciudad más cercana de la
El tiempo
Bolsa Consulte los movimientos más importantes en bolsa.
System
48
lista proporcionada).
Navegue con los botones de dirección para consultar la predicción para los próximos días.
Consulte la información del sistema con detalles sobre la conexión de red, dirección MAC, etc.
Page 49

Transmisión DLNA y control por App
Utilice su ordenador como servidor multimedia y transmita los contenidos de audio a través del DLNA con
la CONNECT 100. Puede transmitir archivos en los formatos MP3, WMA, WAV y AAC.
UPnP
• Asegúrese de que su ordenador está conectado a la misma red que la CONNECT 100.
• Inicie una plataforma adecuada para UPnP, como el reproductor multimedia de Windows, a partir de
la versión 11.
• Cree una lista de reproducción y autorice su transmisión vía UPnP.
• Consulte el archivo de ayuda del software (pulsando, por ejemplo, F1) para más información sobre la
autorización UPnP y otros temas).
• Proceda del mismo modo para smartphones y tablets. Descargue un software de transmisión apropia-
do desde Google Play, conecte el aparato a la red y añada los archivos de música que desea reproducir.
DLNA
El protocolo DLNA también es compatible con la transmisión de música. DLNA es compatible con Windows
a partir de su versión 7 y con la versión 12 y posteriores del reproducir multimedia de Windows.
• Abra primero los ajustes del sistema > Redes e internet > Opciones de autorización > Transmisión de
contenidos, y añada el CONNECT 100.
• Inicie el reproductor multimedia de Windows y permita el control remoto del CONNECT 100.
Advertencias
• Para transmitir contenidos desde smartphones o tablets, le recomendamos apps gratuitas como bub-
bleUPnP o Twonky Beam.
• Durante la reproducción DLNA solo puede controlar el volumen y el apagado y encendido en la CON-
NECT 100. El resto de las funciones estarán desactivadas. Interrumpa la conexión desde el ordenador
o smartphone.
49
Page 50

Indicaciones para la retirada del aparato
Si el aparato lleva adherida la ilustración de la izquierda (el contenedor de basura tachado) entonces rige la normativa europea, directiva 2002/96/CE. Este producto no debe
arrojarse a un contenedor de basura común. Infórmese sobre las leyes territoriales que
regulan la recogida separada de aparatos eléctricos y electrónicos. Respete las leyes
territoriales y no arroje aparatos viejos al cubo de la basura doméstica. Una retirada de
aparatos conforme a las leyes contribuye a proteger el medio ambiente y a las personas a
su alrededor frente a posibles consecuencias perjudiciales para la salud. El reciclaje ayuda
a reducir el consumo de materias primas.
Declaración de conformidad
Fabricante: Chal-Tec GmbH, Wallstraße 16, 10179 Berlín (Alemania).
Este producto cumple con las siguientes directivas europeas:
2011/65/UE (refundición RoHS)
1999/05/CE (R&TTE)
50
Page 51

Gentile cliente,
La ringraziamo per aver acquistato il nostro prodotto. La preghiamo di leggere attentamente le seguenti
istruzioni e di seguirle per evitare eventuali danni. Non ci assumiamo alcuna responsabilità per danni derivati da una mancata osservazione delle avvertenze di sicurezza e da un uso improprio del dispositivo.
Avvertenze di sicurezza
• Il presente manuale ha lo scopo di illustrare il funzionamento del prodotto. Conservarlo per consultazioni future.
• Questo prodotto ha una garanzia di due anni di conformità. Non sono coperti da garanzia i danni
causati da un utilizzo improprio.
• Utilizzare il prodotto esclusivamente per lo scopo previsto. Un utilizzo improprio può danneggiare il
prodotto o l’ambiente circostante.
• Apportare modiche al prodotto compromette la sua sicurezza. Attenzione pericolo di farsi male!
• Non aprire mai il prodotto e non eseguire mai riparazioni autonomamente.
• Maneggiare il prodotto con cautela. Può danneggiarsi in caso di urti, colpi o cadute anche da altezze
minime.
• Non esporre il prodotto all’umidità e al calore eccessivo.
• Non fare cadere oggetti di metallo nel dispositivo.
• Non fare cadere oggetti pesanti sul dispositivo.
• Pulire il dispositivo solo con un panno asciutto.
• Non bloccare le fessure di aereazione.
• Utilizzare esclusivamente gli accessori consigliati dal produttore o da un rivenditore qualicato.
La garanzia decade in caso di intervento di terzi.
Parti più piccole/imballaggio
Conservare le parti più piccole (ad es. viti, materiale di montaggio e di imballaggio) lontano dalla portata dei
bambini, per evitare che le ingeriscano. Non lasciare che i bambini giochino con il materiale d’imballaggio.
Pericolo di soocamento!
Trasporto del dispositivo
Conservare la confezione originale. Per garantire una protezione adeguata del dispositivo durante il trasporto, riporlo nella confezione originale.
Pulizia delle superci esterne
Non utilizzare liquidi volatili come ad esempio spray per insetti. Le superci si possono danneggiare se si
puliscono troppo energicamente. Le parti in plastica o in gomma non devono restare a contatto con il dispositivo per lungo tempo. Utilizzare un panno asciutto.
51
Page 52

Dati tecnici
Articolo numero.
Alimentazione DC 12V (alimentatore per AC 220-240V, 50-60Hz incluso nella consegna)
Altoparlanti 2 x 5W
Streaming UPnP, DLNA
Tipo di le supportati WMA, MP3, WAV
Collegamenti DC, USB, 3,5mm AUX, 3,5mm Line-Out
Dimensioni & peso 210 x 115 x 126mm, 1,53kg
Consegna
10029864, 10029865
802.11b/g/n(WLAN)
Rete
Proli supportati: WEP, WPA, WPA2 (PSK), WPS
Dispositivo, alimentatore, cavo audio da 3,5 mm, telecomando, manuale di
istruzioni
Pannello dei comandi
52
Page 53

Pannello dei comandi
53
Page 54

Display 1 6 Aux In
Tasti funzione:
HOME, MODE; PRESET, TUN+, TUN-
NAV / OK 3 8 Porta USB
VOL+/- / Power 4 9 Attacco alimentatore
SNOOZE 5 10 Interruttore
2 7 Line Out
Telecomando
• Al primo utilizzo del telecomando, rimuovere dal vano pile la pellicola di protezione.
• Quando si cambiano le pile, inserire pile dello stesso tipo (CR2025, 3V) rispettando la corretta polarità
(polo positivo rivolto verso l’alto).
Prima messa in funzione
• Utilizzare l’alimentatore incluso nella consegna per collegare il CONNECT 100 alla presa di corrente.
• Accendere il dispositivo (posizionare su ON l’interruttore sul retro, premere POWER sulla parte fron-
tale).
• Alla prima accensione, il CONNECT 100 avvia la ricerca di reti senza li e sul display compare un diagramma. Ora selezionare la lingua desiderata ruotando la rotellina NAV (3) e scegliere se la rete deve
essere congurata. Selezionare l’opzione desiderata ruotando NAV e inne premere NAV/OK.
• Premere POWER/STANDBY (4) per mettere il dispositivo in standby. Sul display compaiono la data,
l’ora e le sveglie attivate.
54
Page 55

Funzioni del menu: descrizione
Standby
Menu principale
My mediaU <--> Sottomenu
| |
Radio internet <--> Preferiti
| | Stazione radio / Musica
| | Radio locale <--> Sottomenu
| | History
| | Service
| |
Media Center <--> UPnP Sottomenu
| | La mia playlist
| | Cancellare la playlist
| |
BT
| |
AUX IN
| |
Centro informazioni <--> Meteo
| | Finanza <--> Sottomenu
| | Sistema
| |
Modalit - Gestire My MediaU - Rete
Data & Ora - Sveglia - Timer
Parametri lingua - Dimmer – Gestione display –
Parametri <-->
impostazioni radio locale – impostazioni riproduzi-
equalizzatore – Resume when Power on – Aggior-
Sleep timer – Buer – Meteo-
one - impostazioni DLNA-
namento software – Impostazioni di fabbrica
<--> Sottomenu
55
Page 56

Funzione del menu: utilizzo & impostazioni
• Accendere il dispositivo e ruotare la manopola NAV per accedere al menu principale e al sottomenu
(vedere la colonna sinistra della descrizione a pag. 6).
• Premere NAV/OK per accedere alle impostazioni ovvero al sottomenu (colonna centrale e destra) e
ruotare di nuovo la manopola per sfogliare.
Menu: Impostazioni
Mode Impostare la visualizzazione dell’orario sul display in standby.
Manage My MediaU
Rete
Data e ora
Sveglia
Una volta attivo, la voce My mediaU appare nel menu principale. Impostare il
login per gli accesso futuri.
• Congurazione wireless automatica: attivare/disattivare il wireless. Dopo
l’attivazione, selezionare la rete wireless/il router dalla lista degli access
point trovati e inserire la password.
• Congurazione manuale: selezionare l’opzione DHCP (l’IP viene assegna-
to automaticamente) oppure inserire l’indirizzo IP. Nell’ultimo caso, viene
richiesto di inserire l’SSID corrispondente (nome del router / access point)
l’indirizzo IP, il subnet mask, il gateway di default, un server DNS alternativo
e uno preferito. Utilizzare questa opzione se si è esperti in materia e per
utilizzare diverse reti wireless alternativamente.
• Check Network When Power On: attivare ainché ad ogni riavvio il CON-
NECT 100 ritrovi automaticamente la connessione.
• Impostare il formato dell’ora (12 oppure 24 ore) e della data (AA/MM/GG
oppure GG/MM/AA oppure MM/GG/AA).
• DST: impostare il cambio automatico dell’ora legale.
• GMT: impostare il fuso orario in base alla zona GTM.
Il CONNECT 100 dispone di tre funzioni sveglia gestibili l’una indipendentemente
dall’altra. Alarm 1 e Alarm 2 funzionano come una sveglia tradizionale: impostare
Alarm 1 e la Alarm 2 ad un orario desiderato e selezionare la fonte del segnale
(se la rete wireless non viene rilevata, dopo 1 minuto viene riprodotta una melodia memorizzata).
L’Alarm NAP invece è un timer che segnala lo scorrere dei minuti (selezionabile):
5/10/20/30/60/90/120.
Premere SNOOZE per posticipare la sveglia (5). Premere un tasto qualsiasi per
spegnere la sveglia.
Impostare il timer con l’apposita funzione (attenzione: in modalità standby il timer è disattivato). Utilizzare i tasti freccia per impostare il timer (tempo compreso tra 00:00 e 59:59). Inne premere OK per avviare il conto alla rovescia.
56
Page 57

Dopo aver impostato e avviato il timer, tornare alla schermata precedente tramite HOME/MODE/freccia sinistra.
Timer
Lingua Selezionare la lingua (inglese, tedesco, spagnolo, francese, portoghese, italiano).
Dimmer
Display Scegliere tra bianco/nero oppure a colori.
Power Management
Sleep Timer
Buer
Meteo
Local Radio Setup
Playback Setup
DLNA Setup Il nome DLNA standard è CONNECT 100. Modicarlo qui se lo si desidera.
Resume When PWR
Software Update
Reset
Se il conto alla rovescia termina e nel mentre è in corso la riproduzione della
musica, la sveglia si attiva si passa al display del timer. Premere un tasto qualsiasi
per spegnere la sveglia.
Nota: la funzione sveglia e lo Sleep Timer non sono attivi se il timer è attivo.
Impostare l’illuminazione dello sfondo del display. Selezionare la voce standby
per regolare l’illuminazione in modalità standby e la voce Active per modicare
l’illuminazione durante l’utilizzo.
Selezionare Dimmer Timer per impostare lo spegnimento del display in caso di
inattività.
Attivare e impostare il Power Management (5/15/30 minuti) ainché il CONNECT
100 si spenga automaticamente allo scadere del tempo impostato, nel caso in cui
non venga trovata una rete wireless.
Impostare lo Sleep Timer ainché il dispositivo si spenga automaticamente dopo
15/30/60/90/120/150/180 minuti.
Alternativa: premere ripetutamente SLEEP sul telecomando.
Congurare il buer (memoria intermedia) per una ricezione ottimale dello stre-
aming o della internet radio. Impostare 2/4/8 secondi.
Attivare/disattivare il meteo per il display in standby. Selezionare l’unità della
temperatura desiderata (°F oppure °C) e impostare la localizzazione.
Se il meteo è attivo, questo compare sullo schermo in standby ogni 10 secondi
insieme all’ora.
Impostare manualmente la localizzazione e l’accesso ai canali radio locali. Selezionare Auto Detect per la determinazione automatica del luogo.
Selezionare una modalità di riproduzione per il Media Center (O = riproduzione
normale; Repeat all = vengono ripetuti tutti i brani; Repeat one = viene ripetuto il
brano corrente; Shule = i brani vengono riprodotti in sequenza casuale).
Attivare la funzione Resume when power On ainché il CONNECT 100 all’accensione
riprenda da dove si è arrestato: dall’ultimo streaming o canale. (Standard: attivo)
Per aggiornare la versione rmware se è disponibile una nuova versione sul server
del produttore.
Confermare con YES per ripristinare le impostazioni di fabbrica. Attenzione: tutte le
impostazioni e i preset vengono cancellati
57
Page 58

My mediaU
Visualizzare e gestire i canali del mediaU. Per prima cosa creare un account mediaU.
• Visitare il sito www.mediayou.net.
• Aprire un account con nome utente e password. Eettuare il login dopo aver ricevuto l’email di conferma.
• Registrare sul sito il CONNECT100. Per fare ciò si ha bisogno dell’indirizzo MAC del dispositivo che si
trova in Menu principale -> Centro informazioni -> Informazioni wireless.
• È possibile gestire i canali radio e lo stream tramite l’account mediaU ed avere accesso diretto a questi
ultimi dal CONNECT 100 (qui non è necessario inserire la password e il nome utente).
Internet Radio
Dopo essersi collegati ad un canale, i bit rate e il formato del canale appaiono sul display. Sottomenu:
La lista dei preferiti comprende no a 250 canali.
Per aggiungere un canale, tenere premuto PRESET/BT sul dispositivo mentre il
canale viene trasmesso oppure PRESET sul telecomando.
I miei preferiti
Radio Station / Music
Local Radio Accesso ai canali locali.
History Lista degli ultimi dieci canali ascoltati.
58
Un canale non può essere aggiunto ripetutamente alla lista dei preferiti.
Premere PRESET/BT sul dispositivo oppure PRESET sul telecomando per visualizzare la lista. Sfogliare la lista tramite NAV oppure tramite i tasti freccia. Premere il
tasto freccia DESTRO per accedere al sottomenu del canale appena selezionato
con le opzioni cancellare, spostare, rinominare, riprodurre e utilizzare come
sveglia.
I canali sono suddivisi nelle categorie Global Top 20, Genre e Country/Location. Aprire il sottomenu per sfogliare la lista dei canali. Premere NAV/OK ovvero
SELECT per la riproduzione.
Ogni canale selezionato (evidenziato) dispone di un sottmenu selezionabile con
il tasto freccia (destro). Le voci del sottomenu sono:
• Aggiungere ai preferiti
• Auto scan
• Riproduzione
• Utilizzare come sveglia
Selezionare Auto Scan per riprodurre tutti i canali presenti nella cartella per 30
secondi. Premere SELECT per arrestare la funzione e restare su un canale.
Page 59

Service
Cercare tramite ricerca canali i canali radio tramite parole chiavi oppure aggiun-
gere canali alla lista dei preferiti tramite la funzione Aggiungere canali.
Media Center
Se sul PC o sul Mediacenter / Mediaserver sono stati attivati media per lo streaming UPnP, i le corrispondenti appaiono qui. Se è stato trovato più di un server
UPnP nella rete wireless, qui è possibile selezionare le alternative.
Riprodurre la musica con i tasti usuali (telecomando) Play/Pause, Stop e con i
UPnP
Meine Playlist
Playlist löschen Cancellare la playlist creata.
USB Playback
tasti freccia.
Nota: il dispositivo può riprodurre solo le i cui nomi contengono no a 40 caratteri dell’alfabeto latino. Se i le non possono essere riprodotti, ciò potrebbe
dipendere da un formato incompatibile.
Aggiungere un brano alla playlist tenendo premuto Select durante la riproduzi-
one del brano.
Inserire un dispositivo USB con contenuti multimediali. Selezionare la voce USB
Playback.
Sul display compaiono i nomi delle cartelle e dei le (non necessariamente compaiono i titoli dei brani).
Nota: la porta USB non è adatta per ricaricare dispositivi esterni o per trasferire
dati ad un computer.
BT
• Selezionare la modalità BT dal menu principale oppure tramite il tasto BT sul telecomando per riprodurre via BT contenuti audio da dispositivi esterni (smartphone, tablet o computer) tramite il CONNECT 100.
• Attivare il BT sul dispositivo esterno BT e connettersi a “CONNECT100”. Utilizzare i tasti Play/Pause,
i tasti freccia e Stop sul telecomando oppure il dispositivo esterno per la navigazione attraverso la
biblioteca multimediale.
• Scollegare lo smartphone/tablet per eseguire il pairing con un altro dispositivo.
AUX IN
• Collegare all’ingresso AUX, posto sul retro del CONNECT 100, dispositivi audio esterni tramite il cavo
audio da 3,5 mm incluso nella consegna.
59
Page 60

• Selezionare la modalità AUX dal menu principale oppure premendo ripetutamente MODE.
• Impostare il volume sul CONNECT 100. Impostare un volume abbastanza alto del dispositivo esterno
(di solito cellulare, lettore MP3 ecc.).
Line Out
È possibile collegare impianti stereo, dispositivi HiFi tramite l’uscita Line sul CONNECT 100. Utilizzare un
cavo audio da 3,5 mm.
Centro informazioni
Meteo
Finanza Visualizzare gli indici azionari più importanti.
Sistema
Inserire la localizzazione indicando il paese e la città (oppure una città vicina).
Sfogliare utilizzando i tasti freccia per vedere le previsioni dei giorni successivi.
Visualizzare le informazioni di sistema con i dettagli sul collegamento della rete,
indirizzo MAC ecc.
60
Page 61

Streaming DLNA e gestione app
Utilizzare il computer come media server ed eseguire lo streaming di contenuti audio via DLNA tramite il
CONNECT 100. È possibile eseguire lo streaming di le in formato MP3, WMA, WAV e AAC.
UPnP
• Assicurarsi che il computer sia collegato alla stessa rete del CONNECT 100.
• Aprire la piattaforma UPnP (ad esempio del Windows Media Player a partire dalla versione 11).
• Creare una playlist e consentire l’accesso per l’UPnP.
• Consultare i le della guida del software (ad esempio premendo F1) per ulteriori informazioni).
• Procedere in maniera analoga con lo smartphone/tablet per eseguire lo streaming: scaricare un soft-
ware streaming da Google Play, collegare il dispositivo alla rete e aggiungere all’accesso i le musicali
che si intende eseguire in streaming.
DLNA
Anche il protocollo DLNA è supportato per lo streaming della musica. Il DLNA viene supportato da Windows a partire dalla versione 7 e da Windows Media Player a partire dalla versione 12.
• Aprire prima le Impostazioni di sistema > Rete e internet > Opzioni condivisione > Streaming media e
aggiungere il CONNECT 100.
• Avviare Windows Media Player e consentire il controllo remoto del CONNECT 100.
Note
• Per lo streaming di smartphone o tablet, si consigliano applicazioni gratuite come bubbleUPnP oppure
Twonky Beam.
• Durante lo streaming DNLA è possibile utilizzare sul CONNECT 100 solo il volume e lo Stanby/Power.
Le altre funzioni non sono attive. Scollegare il computer o lo smartphone.
61
Page 62

Smaltimento
Se sul prodotto è presente la gura a sinistra (il cassonetto dei riuti mobile sbarrato),
si applica la direttiva europea 2002/96/CE. Questi prodotti non possono essere smaltiti
con i riuti normali. Informarsi sulle disposizioni vigenti in merito alla raccolta separata
di dispositivi elettrici ed elettronici. Non smaltire i vecchi dispositivi con i riuti domestici.
Grazie al corretto smaltimento dei vecchi dispositivi, si proteggono il pianeta e la salute
delle persone da possibili conseguenze negative. Il riciclo di materiali aiuta a ridurre il
consumo di materie prime.
Dichiarazione di conformità
Produttore: Chal-Tec GmbH, Wallstraße 16, 10179 Berlino, Germania.
Questo prodotto è conforme alle seguenti direttive europee:
2011/65/UE (RoHS)
1999/05/CE (R&TTE)
62
 Loading...