

Page 1

Amp-2 DG
HiFi-Verstärker mit BT
HiFi Amplier with BT
Amplicateur Hi avec BT
Amplicador Hi con BT
Amplicatore HiFi con BT
10035179
www.auna-multimedia.com
Page 2

Page 3

Sehr geehrter Kunde,
wir gratulieren Ihnen zum Erwerb Ihres Gerätes.
Lesen Sie die folgenden Hinweise sorgfältig
durch und befolgen Sie diese, um möglichen
Schäden vorzubeugen. Für Schäden, die durch
Missachtung der Hinweise und unsachgemäßen
Gebrauch entstehen, übernehmen wir keine
Haftung. Scannen Sie den QR-Code, um Zugri auf
die aktuellste Bedienungsanleitung und weitere
Informationen rund um das Produkt zu erhalten.
TECHNISCHE DATEN
Artikelnummer 10035179
Stromversorgung 230 V~ 50 Hz
RMS-Leistung 2 x 50 W RMS
Speicheranschlüsse USB
Mikrofonanschlüsse 2 Stück
DE
3
Page 4
DE
SICHERHEITSHINWEISE
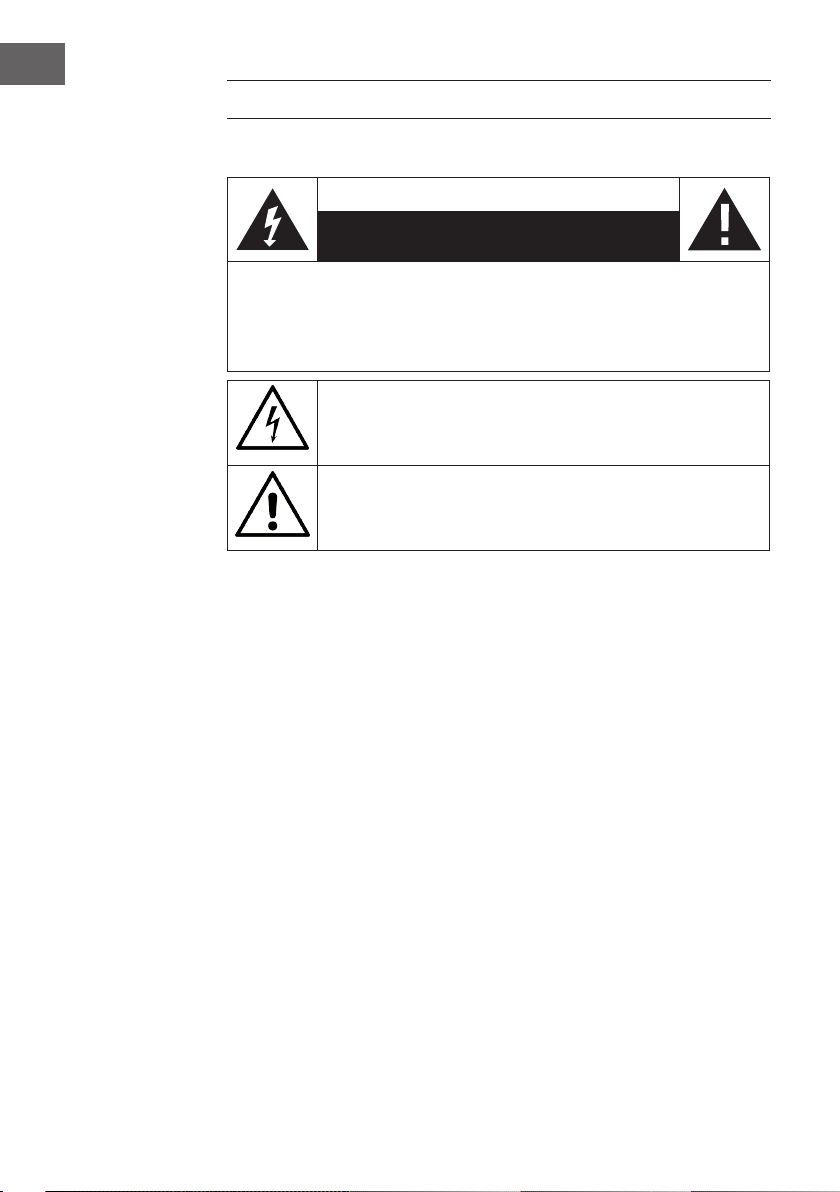
Erklärung der Symbole auf dem Gerät
CAUTION
RISK OF ELECTRIC SHOCK
DO NOT OPEN
WARNUNG: UM DIE GEFAHR EINES STROMSCHLAGS UND EINER
PERSONENVERLETZUNG ZU VERRINGERN, DAS GEHÄUSE NICHT ÖFFNEN. KEINE FÜR
DEN BENUTZER ZU WARTENDEN TEILE IM GERÄT. WENDEN SIE SICH IM FALLE EINER
REPARATUR NUR AN QUALIFIZIERTES PERSONAL.
Das Blitzsymbol mit dem Dreieck macht Sie auf gefährliche elektrische
Spannung in diesem Gerät aufmerksam, die hoch genug ist, um eine
Stromschlaggefahr darzustellen. Das Gehäuse nicht önen!
Das Ausrufezeichen mit dem Dreieck macht Sie darauf aufmerksam,
dass in der Dokumentation für das Gerät wichtige Bedienungs- und
Wartungshinweise enthalten sind.
Kinder ab 8 Jahren, psychisch, sensorisch und körperlich eingeschränkte
Menschen dürfen das Gerät nur benutzen, wenn sie vorher von einer für
sie verantwortlichen Aufsichtsperson ausführlich mit den Funktionen und
den Sicherheitsvorkehrungen vertraut gemacht wurden und die damit
verbundenen Risiken verstehen.
Pege
• Halten Sie den Verstärker trocken. Falls er nass wird, wischen Sie ihn
sofort trocken.
• Verwenden Sie den Verstärker ausschließlich in Umgebungen mit einer
guten Luftzirkulation.
• Schützen Sie den Verstärker vor Staub und Schmutz.
• Gelegentlich mit einem feuchten Tuch wischen, und das Gerät sieht aus
wie neu.
• Verwenden Sie keine scharfen chemischen Reinigungsmittel oder
Lösungsmittel.
4
Page 5

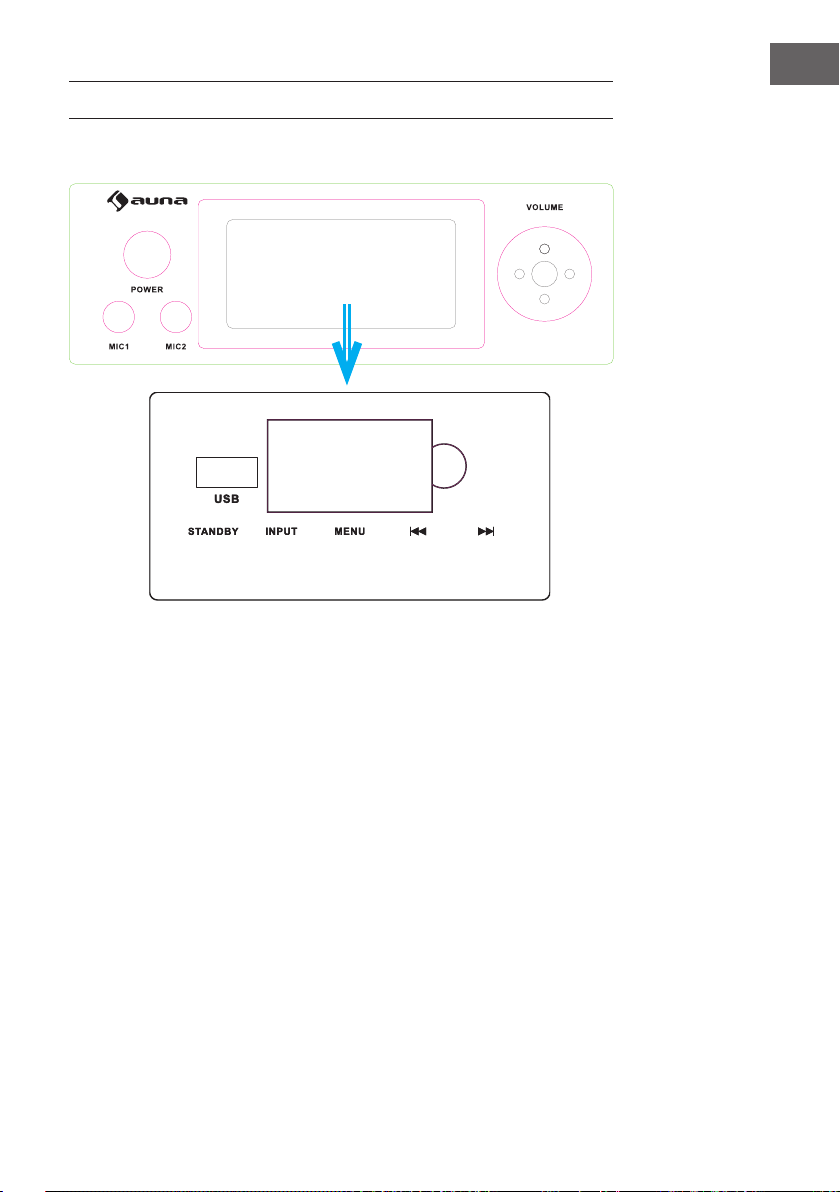
EIGENSCHAFTEN UND BEDIENELEMENTE
Vorderseite
DE
1
2 3
4
5 6 7 8 9
1 POWER: Den Verstärker ein- oder ausschalten.
2 MIC1: Mikrofonanschluss
3 MIC2: Mikrofonanschluss
4 USB-INPUT: Stecken Sie Ihren USB-Stick hier ein.
5 Standby: Berühren Sie diesen Bereich und die Anlage geht in den
Standby-Modus. Berühren Sie diesen Bereich erneut, und das Gerät
kehrt in den Standby-Modus zurück.
6 Input: Wahl der Quelle
7 Menu: Berühren diesen Button, um den Bass, die Höhen, die Balance,
die Mikrofonlautstärke das Echo und die Hauptläutstärke einstellen.
8 : Wahl des vorigen Titels
9 : Wahl des nächstens Titels
10 Volume: Einstellen der Lautstärke
10
5
Page 6

DE
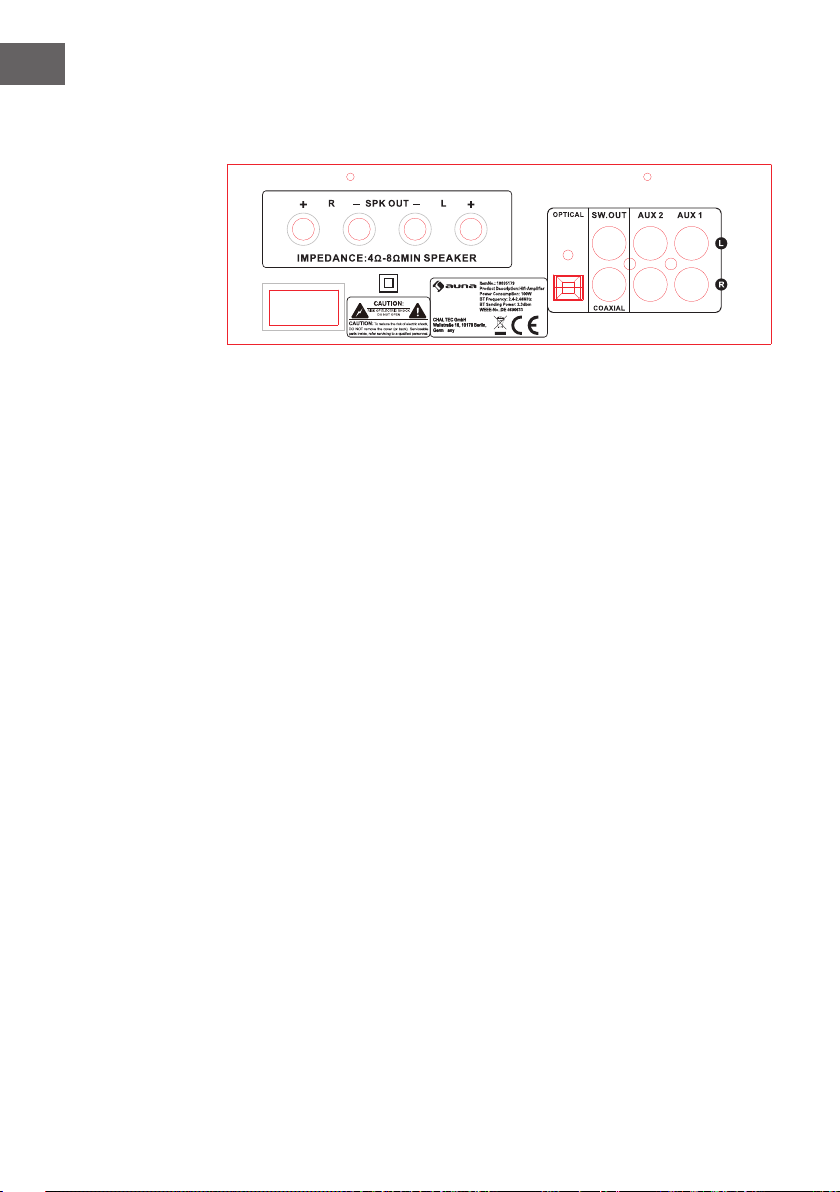
Rückseite
1
2
1 Lautsprecheranschlüsse
Hier die Lautsprecher anschließen.
2 Stromanschluss
Anschluss des Netzwerkkabels
3 Optischer Eingang
Anschluss einer optischen Signalquelle
4 Koaxialeingang
Hier ein Koaxialkabel anschließen.
5 Sub-Ausgang
Verbinden Sie diesen Ausgang mit dem passiven Ausgang eines
weiteren Verstärkers.
6 AUX2-Eingang
Hier ein externes Signal anschließen.
7 AUX1-Eingang
Hier ein externes Signal anschließen.
3
4
5
6 7
6
Page 7
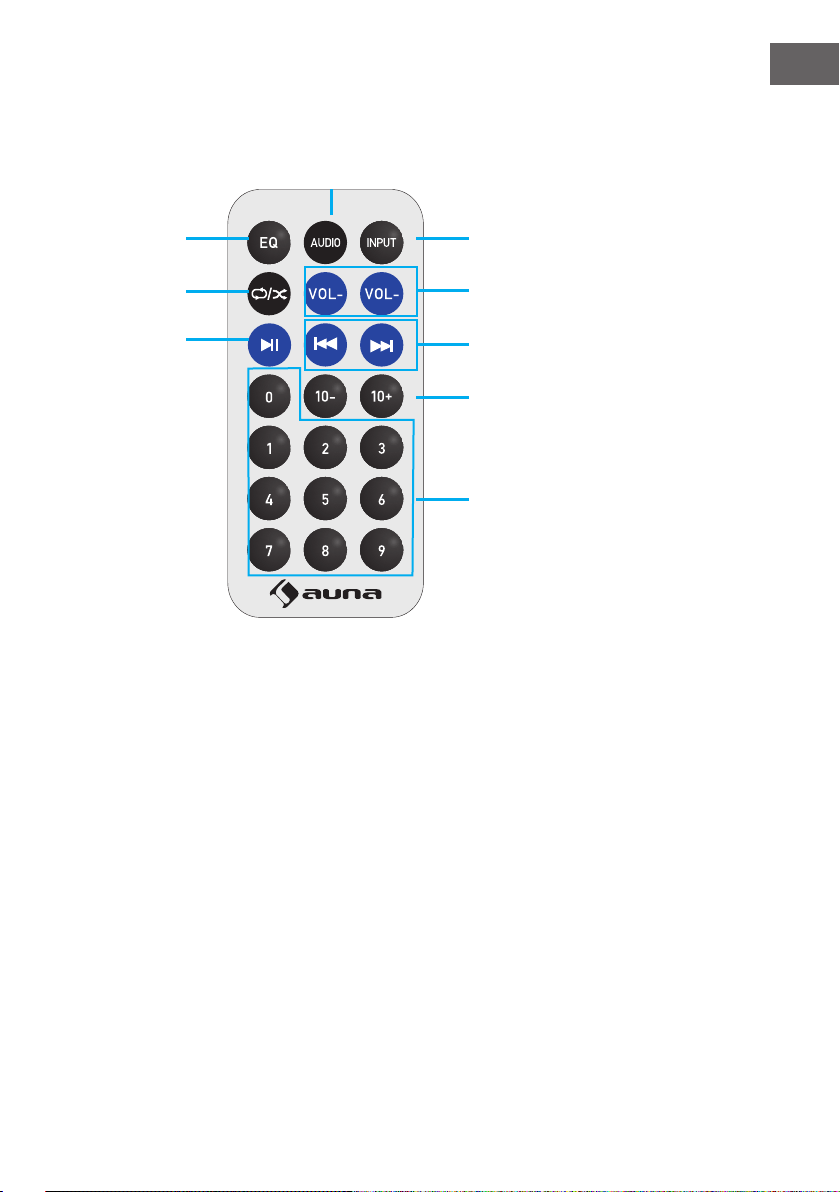
Fernbedienung
DE
4
1
2
3
1 Equalizer
2 Wiederholung/Zufallswiedergabe
3 Wiedergabe/Pause
4 AUDIO: Erst diese Taste drücken und anschließend den
Lautstärkeregler, um den Bass, die Höhen, die Balance und die
Hauptlautstärke einzustellen.
5 Input: Wahl der Eingangsquelle
6 Lautstärke - / Lautstärke +
7 Titel zurück / Titel vor
8 - 10 Titel/ +10 Titel
9 Ziernfeld zur Wahl des Titels
5
6
7
8
9
7
Page 8

DE
WIEDERGABE ÜBER BT
Sie können externe Geräte mit eingebautem BT mit dem Verstärker
drahtlos verbinden und über angeschlossene Lautsprecher wiedergeben.
Bei der Herstellung der Verbindung erklingt ein hörbarer Ton, der bei der
Herstellung der Verbindung hilft.
1. Drücken Sie INPUT so oft, bis der BT-Modus eingestellt ist.
2. Schalten Sie bei dem externen Gerät BT ein.
3. Suchen Sie nach verfügbaren BT-Geräten. Achten Sie darauf, dass Sie
innerhalb der Empfangsreichweite sind. Wählen Sie aus der Liste der
verfügbaren Geräte „Amp-2 DG“.
4. Wenn die BT-Kopplung erfolgreich durchgeführt wurde, haben eine BT-
Verbindung hergestellt.
5. Sie können nun über das externe Gerät Musik wiedergeben.
8
Page 9

FEHLERBEHEBUNG
Fehler Grund Lösung
DE
Kein Ton
Rückkopplung
Die Audioquelle oder die
Lautsprecher sind nicht
richtig angeschlossen.
Die Gesamtlautstärke ist
auf Min. eingestellt.
Die Lautsprecherkabel
haben die falsche
Impedanz.
Der Verstärker hat sich
abgeschaltet.
Das Mikrofon und die
Lautsprecher sind zu dicht
beieinander.
Überprüfen Sie die
Verkabelung.
Regeln Sie die Lautstärke
auf eine höhere
Einstellung.
Überprüfen Sie, dass die
Lautsprecherkabel die
richtige Impedanz haben.
Schalten Sie den
Verstärker aus und
lassen ihn abkühlen.
Gewährleisten Sie eine
gute Luftzirkulation und
schalten das Gerät dann
wieder ein.
Positionieren Sie das
Mikrofon und die
Lautsprecher neu.
9
Page 10

DE
HINWEISE ZUR ENTSORGUNG
Bendet sich die linke Abbildung (durchgestrichene
Mülltonne auf Rädern) auf dem Produkt, gilt die Europäische
Richtlinie 2012/19/EU. Diese Produkte dürfen nicht mit
dem normalen Hausmüll entsorgt werden. Informieren
Sie sich über die örtlichen Regelungen zur getrennten
Sammlung elektrischer und elektronischer Gerätschaften.
Richten Sie sich nach den örtlichen Regelungen und
entsorgen Sie Altgeräte nicht über den Hausmüll. Durch die
regelkonforme Entsorgung der Altgeräte werden Umwelt
und die Gesundheit Ihrer Mitmenschen vor möglichen
negativen Konsequenzen geschützt. Materialrecycling hilft,
den Verbrauch von Rohstoen zu verringern.
Das Produkt enthält Batterien, die der Europäischen
Richtlinie 2006/66/EG unterliegen und nicht mit dem
normalen Hausmüll entsorgt werden dürfen. Bitte
informieren Sie sich über die örtlichen Bestimmungen
zur gesonderten Entsorgung von Batterien. Durch
regelkonforme Entsorgung schützen Sie die Umwelt
und die Gesundheit Ihrer Mitmenschen vor negativen
Konsequenzen.
Konformitätserklärung
Hersteller:
Chal-Tec GmbH, Wallstraße 16, 10179 Berlin,
Germany.
Dieses Produkt entspricht den folgenden Europäischen
Richtlinien:
2011/65/EU (RoHS)
2015/53/EU (RED)
Die vollständige Konformitätserklärung des
Herstellers nden Sie unter folgendem Link.
Scannen Sie dazu diesen QR-Code oder geben
Sie die URL ein.
use.berlin/10035179
10
Page 11

Dear Customer,
Congratulations on purchasing this device. Please
read the following instructions carefully and follow
them to prevent possible damages. We assume
no liability for damage caused by disregard of the
instructions and improper use. Scan the QR code
to get access to the latest user manual and more
product information.
TECHNICAL DATA
EN
Item number
Power supply 230 V~ 50 Hz
RMS power 2 x 50 W RMS
Storage media USB
Microphone inputs 2
10035179
11
Page 12
EN
SAFETY INSTRUCTIONS
Explanation of the symbols on the appliance
CAUTION
RISK OF ELECTRIC SHOCK
DO NOT OPEN
WARNING: TO REDUCE THE RISK OF ELECTRIC SHOCK; DO NOT REMOVE THE COVER
OR BACK. NO USER-SERVICEABLE PARTS INSIDE: REFER SERVICING TO QUALIFIED
PERSONNEL.
The lightning symbol is intended to alert you to the presence of
uninsulated, dangerous voltage within this product‘s enclosure that
might be of suicient magnitude to constitute a risk of electric shock.
Do not open the product case.
The exclamation symbol is intended to inform you that important
operating and maintenance instructions are included in the literature
accompanying this product..
Children over the age of 8 and persons with reduced physical, sensory
or mental capabilities or those with a lack of experience and knowledge
may only use the device if they are instructed on how to do so by a person
responsible for their safety, or if they are supervised and understand the
hazards associated with the use of the device.
Care
• Keep the amplier dry. If it gets wet, wipe immediately.
• Use the amplier only in well-ventilated installations.
• Handle the amplier away from dust and dirt.
• Wipe occasionally with a damp cloth to keep it looking new.
• Do not use harsh chemical, solvents or detergents
12
Page 13
FEATURES AND CONTROLS
Front
EN
1
2 3
4
5 6 7 8 9
1 Power: Press this switch to turn on/o the unit.
2 MIC 1: Connect your microphone here.
3 MIC 2: Connect your microphone here.
4 USB Input: Connect your USB here.
5 Standby: Touch this area and the unit will go into standby. Touch again
and unit will come back.
6 Input: Touch this area to switch among all input modes.
7 Menu: Touch this area switch the control mode among BASS, TREBLE,
BALANCE, MIC VOL, ECHO and master volume.
8 Previous: Press this button to go back to previous track or station.
9 Next: Press this button to go to next track or station.
10 Volume: Use this knob to adjust the volume.
10
13
Page 14
EN
Back
1
2
1 Main Outputs:
Connect your speakers here.
2 Power:
Connect your power cord here.
3 Optical Input:
Connect your optical signal here.
4 Coaxial Input:
Connect your coaxial signal source here.
5 Sub Output:
Connect this output to the passive input of another amplifier.
6 AUX 2 Input:
Connect your AUX signal source here.
7 AUX 1 Input:
Connect your AUX signal source here.
3
4
5
6 7
14
Page 15

Remote Control
EN
4
1
2
3
5
6
7
8
9
1 EQ: Press this key to switch among all preset equalization
modes.
2 Repeat/Random: Press this key to repeat current track, all
tracks or play random tracks.
3 Play/Pause: Press this button to play. Press again to pause.
4 AUDIO: First press this button and then use the volume
control to adjust the bass, treble, balance and main volume.
5 Input: Press this key to switch among all input modes.
6 Volume Controls: Press either of these keys to decrease or
increase the volume of main output.
7 Previous: Press this button to go back to previous track.
Next: Press this button to go to next track.
8 10-/10+ titles
9 Number keys: Use this key to enter the track number and
quickly go to that track.
15
Page 16

EN
BT OPERATION
External devices which have a built-in BT feature can be connected to this
amplier wirelessly to play through the amplier‘s speakers. If your amp
is connected to speakers, you will hear audible tones which will help for
connecting.
1. Press INPUT repeatedly until the BT mode is set.
2. Turn on BT on the external device.
3. Search for available BT devices. Make sure that you are within the
reception range. Select "Amp-2 DG" from the list of available devices.
4. If BT pairing is successful, you have established a BT connection.
5. You can now play music on the external device.
16
Page 17

TROUBLESHOOTING
Problem Possible Reason Solution
No sound
Feedback
Sound source or speakers
may not be connected
properly.
Master volume control
may be set to a minimum.
The speaker's wire might
be the wrong impedance.
The amplier is shutting
down or powering o
Microphone and speakers
are to close together
Check all connections.
Adjust the volume control
to a higher setting.
Make sure that the
speakers that you have
connected to the amp are
matching in impedance.
Turn the amplier o and
let it cool, make sure that
the amplier is properly
ventilated, and then turn
it back on..
Reposition the
microphone and speakers
EN
17
Page 18

EN
DISPOSAL CONSIDERATIONS
According to the European waste regulation 2012/19/EU
this symbol on the product or on its packaging indicates
that this product may not be treated as household waste.
Instead it should be taken to the appropriate collection
point for the recycling of electrical and electronic
equipment. By ensuring this product is disposed of
correctly, you will help prevent potential negative
consequences for the environment and human health,
which could otherwise be caused by inappropriate waste
handling of this product. For more detailed information
about recycling of this product, please contact your local
council or your household waste disposal service.
Your product contains batteries covered by the European
Directive. 2006/66/EC, which cannot be disposed of with
normal household waste. Please check local rules on
separate collection of batteries. The correct disposal of
batteries helps prevent potentially negative consequences
on the environment and human health.
Declaration of Conformity
Producer:
Berlin Brands Group, Wallstraße 16, 10179 Berlin,
Germany.
This product is conform to the following European
Directives:
2011/65/EU (RoHS)
2015/53/EU (RED)
The complete declaration of conformity of the
manufacturer can be found at the following
link.
Scan this QR code or enter the URL.
use.berlin/10035179
18
Page 19

Chère cliente, cher client,
Toutes nos félicitations pour l’acquisition de ce
nouvel appareil. Veuillez lire attentivement et
respecter les instructions de ce mode d’emploi an
d’éviter d’éventuels dommages. Nous ne saurions
être tenus pour responsables des dommages dus
au non-respect des consignes et à la mauvaise
utilisation de l’appareil. Scannez le QR-Code pour
obtenir la dernière version du mode d'emploi ainsi
que d'autres informations concernant le produit.
FICHE TECHNIQUE
Numéro d'article 10035179
Alimentation 230 V~ 50 Hz
Puissance RMS 2 x 50 W RMS
Accès mémoire USB
Prise micro 2
FR
19
Page 20

FR
CONSIGNES DE SÉCURITÉ
Explication des symboles sur l'appareil
ATTENTION
RISQUE DE CHOC ÉLECTRIQUE
NE PAS OUVRIR
MISE EN GARDE : POUR RÉDUIRE LE RISQUE DE CHOC ÉLECTRIQUE ET DE BLESSURES,
N'OUVREZ PAS LE BOÎTIER. L'APPAREIL NE CONTIENT AUCUNE PIÈCE À MAINTENIR
PAR L'UTILISATEUR. ADRESSEZ-VOUS UNIQUEMENT A UN PERSONNEL QUALIFIÉ EN
CAS DE RÉPARATION.
Le symbole de la foudre avec le triangle attire votre attention sur une
tension électrique suisamment dangereuse dans cet appareil pour
présenter un risque de choc électrique. N'ouvrez pas le boîtier !
Le point d'exclamation point dans le triangle équilatéral est destiné
à alerter l'utilisateur de la présence d'importantes instructions
d'utilisation et d'entretien et de maintenance dans les documents qui
accompagnent ce produit.
Les enfants à partir de 8 ans ainsi que les personnes aux capacités
physiques, mentales ou sensorielles réduites ne doivent utiliser
l’appareil qu'après avoir été familiarisés par une personne responsable
de leur sécurité aux fonctionnalités et aux mesures de sécurité et qu'ils
comprennent les risques associés.
20
Entretien
• Gardez l'amplicateur au sec. S'il est mouillé, essuyez-le
immédiatement.
• N'utilisez l'amplicateur que dans des environnements avec une bonne
circulation d'air.
• Protégez l'amplicateur de la poussière et de la saleté.
• Essuyez l'appareil de temps en temps avec un chion humide pour qu'il
conserve son aspect neuf.
• N'utilisez pas de produits de nettoyage chimiques ou de solvants
agressifs.
Page 21

CARACTÉRISTIQUES ET ÉLÉMENTS COMMANDE
Face avant
FR
1
2 3
4
5 6 7 8 9
1 POWER: pour allumer ou éteindre l'amplificateur.
2 MIC1: prise micro
3 MIC2: prise micro
4 USB-INPUT: Insérez votre clé USB ici.
5 Standby: touchez cette zone pour mettre le système en mode veille.
Touchez à nouveau cette zone pour rallumer l'appareil.
6 Input: choix de la source
7 Menu: appuyez sur ce bouton pour régler les graves, les aigus, la
balance, le volume du micro, l'écho et le volume principal.
8 : pour aller au titre précédent
9 : pour aller au titre suivant
10 Volume: réglage du volume
10
21
Page 22

FR
Dos de l'appareil
1
2
1 Connexions des enceintes
branchez ici les enceintes.
2 Alimentation
branchement du câble secteur
3 Entrée optique
Branchement d'une source de signal optique
4 Entrée coaxiale
Branchez ici un câble coaxial
5 Sortie Sub
Connectez cette sortie à la sortie passive d'un autre amplificateur
6 Entrée AUX2
Branchez un signal externe ici
7 Entrée AUX1
Branchez un signal externe ici
3
4
6 7
5
22
Page 23

Télécommande
FR
4
1
2
3
5
6
7
8
9
1 Egaliseur
2 Répétition/ lecture aléatoire
3 Lecture / Pause
4 AUDIO : appuyez d'abord sur cette touche puis sur le contrôle du
volume pour régler les graves, les aigus, la balance et le volume
principal.
5 Input : choix de la source d'entrée
6 Volume - / Volume +
7 Titre précédent / titre suivant
8 - 10 titres / +10 titres
9 Champ numérique pour sélectionner un titre
23
Page 24

FR
LECTURE PAR BT
Vous pouvez connecter sans l des appareils externes avec BT intégré à
l'amplicateur et les lire sur les enceintes connectées. Vous entendrez une
tonalité lors de la connexion pour vous aider à l'établir.
1. Appuyez plusieurs fois sur INPUT jusqu'à ce que le mode BT soit déni.
2. Allumez l'appareil externe BT.
3. Vériez les appareils BT disponibles. Assurez-vous que vous êtes à
portée. Sélectionnez "Amp-2 DG" dans la liste des appareils disponibles.
4. Si le couplage BT a réussi, vous avez établi la connexion BT.
5. Vous pouvez maintenant lire de la musique sur l'appareil externe.
24
Page 25

RÉSOLUTION DES PROBLÈMES
Problème Cause Solution
FR
Pas de son
Retours
La source audio ou les
enceintes ne sont pas
connectés correctement.
Le volume principal est
réglé sur min.
Les câbles des enceintes
ont une mauvaise
impédance.
L'amplicateur s'est
éteint.
Le micro et les enceintes
sont trop proches.
Vériez le câblage.
Réglez un volume plus
élevé.
Vériez que les câbles
d'enceinte ont la bonne
impédance.
Éteignez l'amplicateur
et laissez-le refroidir.
Assurez une bonne
circulation de l'air, puis
rallumez l'appareil.
Repositionnez le micro et
les enceintes.
25
Page 26

FR
INFORMATIONS SUR LE RECYCLAGE
Vous trouverez sur le produit l’image ci-contre (une
poubelle sur roues, barrée d‘une croix), ce qui indique que le
produit se trouve soumis à la directive européenne 2012/19/
UE. Renseignez-vous sur les dispositions en vigueur dans
votre région concernant la collecte séparée des appareils
électriques et électroniques. Respectez-les et ne jetez pas
les appareils usagés avec les ordures ménagères. La mise
en rebut correcte du produit usagé permet de préserver
l’environnement et la santé. Le recyclage des matériaux
contribue à la préservation des ressources naturelles.
Ce produit contient des piles qui sont soumises à la
directive européenne 2006/66/CE selon laquelle elles ne
doivent pas être éliminées avec les ordures ménagères.
Renseignez-vous sur les dispositions en vigueur
concernant la mise en rebut séparée des piles. La mise
au rebut correcte du produit usagé permet de préserver
l’environnement et la santé.
Déclaration de conformité
Fabricant :
26
Chal-Tec GmbH, Wallstraße 16, 10179 Berlin,
Allemagne.
Ce produit est conforme aux directives
européennes suivantes:
2011/65/EU (RoHS)
2015/53/EU (RED)
La déclaration complète de conformité du
fabricant est accessible par le lien suivant.
Pour y accéder, scannez ce QR-code ou
saisissez l'URL.
use.berlin/10035179
Page 27

Estimado cliente:
Le felicitamos por la adquisición de este producto.
Lea atentamente el siguiente manual y siga
cuidadosamente las instrucciones de uso con el
n de evitar posibles daños. La empresa no se
responsabiliza de los daños ocasionados por un
uso indebido del producto o por haber desatendido
las indicaciones de seguridad. Escanee el siguiente
código QR para tener acceso al manual de
instrucciones más actualizado y a información
adicional sobre el producto.
DATOS TÉCNICOS
Número de artículo 10035179
Suministro eléctrico 230 V~ 50 Hz
Potencia RMS 2 x 50 W RMS
Conexiones para dispositivos de
almacenamiento
Tomas para micrófono 2
USB
ES
27
Page 28

ES
INDICACIONES DE SEGURIDAD
Explicación de los símbolos que aparecen en el aparato
ATENCIÓN
RIESGO DE DESCARGA ELÉCTRICA
NO ABRIR
ADVERTENCIA: PARA REDUCIR EL RIESGO DE UNA DESCARGA ELÉCTRICA Y DE
LESIONES PERSONALES, NO ABRA LA CARCASA. NO EXISTE NINGUNA PIEZA QUE
PUEDA REPARAR EL USUARIO. CONTACTE CON UN SERVICIO TÉCNICO AUTORIZADO
EN CASO DE AVERÍA.
El símbolo del rayo dentro del triángulo le advierte de la tensión
eléctrica peligrosa de este aparato, que es lo sucientemente alta como
para representar un riesgo de descarga eléctrica. ¡No abra la carcasa!
El símbolo de exclamación con el triángulo le advierte de que la
documentación del aparato contiene indicaciones importantes de
mantenimiento y uso.
Los niños mayores de 8 años y las personas con discapacidades físicas,
sensoriales o mentales solamente podrán utilizar el aparato si han
sido previamente instruidas sobre su uso y conocen las indicaciones de
seguridad y los riesgos que entraña su uso.
28
Cuidado
• Mantenga el amplicador seco. Si se moja, séquelo inmediatamente.
• Utilice el amplicador exclusivamente en entornos con buena
circulación de aire.
• Proteja el amplicador del polvo y la suciedad.
• Solamente utilice un paño húmedo y el aparato se verá como nuevo.
• No utilice productos químicos abrasivos ni lejías.
Page 29

CARACTERÍSTICAS Y ELEMENTOS DE CONTROL
Parte delantera
ES
1
2 3
4
5 6 7 8 9
1 POWER: Encender o apagar el amplificador.
2 MIC1: Toma para el micrófono
3 MIC2: Toma para el micrófono
4 USB-INPUT: Conecte aquí su dispositivo USB.
5 Standby: Toque este control para que el equipo pase al modo
reposo. Vuelva a tocar el control para que el aparato reanude su
funcionamiento.
6 Input: Selección de la fuente
7 Menu: Toque esta tecla para regular los graves, los agudos, el balance,
el volumen del micrófono, el eco y el volumen principal.
8 : Seleccionar la pista anterior
9 : Seleccionar la pista siguiente
10 Volume: Ajustar el volumen
10
29
Page 30

ES
Parte trasera
1
2
1 Toma para altavoces
Conecte aquí los altavoces
2 Alimentación
Conecte aquí el cable de alimentación
3 Entrada óptica
Conecte aquí una fuente de señal óptica
4 Entrada coaxial
Conecte aquí el cable coaxial
5 Salida sub
Conecte esta salida a la salida pasiva de otro amplificador.
6 Entrada AUX2
Conecte aquí una señal externa
7 Entrada AUX1
Conecte aquí una señal externa
3
4
6 7
5
30
Page 31

Mando a distancia
ES
4
1
2
3
5
6
7
8
9
1 Ecualizador
2 Repetición/reproducción aleatoria
3 Reproducción/pausa
4 AUDIO: Primero, pulse la tecla y a continuación gire el regulador de
volumen para regular los graves, los agudos, el balance y el volumen
principal.
5 Input: Selección de fuente de entrada
6 Volumen - / Volumen +
7 Pista anterior/ pista siguiente
8 - 10 pistas / + 10 pistas
9 Teclado numérico para seleccionar la pista
31
Page 32

ES
REPRODUCCIÓN A TRAVÉS DE BT
Puede conectar dispositivos externos con BT integrado al amplicador
de manera inalámbrica y reproducir música mediante los altavoces
conectados. Al establecer la conexión, suena un pitido que indica que se ha
creado la conexión.
1. Pulse INPUT hasta que se seleccione el modo BT.
2. Conecte el BT en el dispositivo externo.
3. Busque dispositivos BT disponibles. Asegúrese de situar los aparatos
dentro del rango de alcance. Seleccione "Amp-2 DG" de la lista de
dispositivos disponibles.
4. Cuando se haya realizado la sincronización BT correctamente, se habrá
establecido la conexión BT.
5. Ahora puede reproducir música a través del dispositivo externo.
32
Page 33

REPARACIÓN DE ANOMALÍAS
Error Motivo Solución
ES
No hay sonido
Retroalimentación
acústica
La fuente de audio
o los altavoces no
están conectados
correctamente.
El volumen general está
ajustado al mínimo.
Los cables de los
altavoces tienen una
impedancia errónea.
El amplicador se apaga. Apague el amplicador
El micrófono y los
altavoces están
demasiado cerca entre sí.
Compruebe el cableado.
Suba el volumen.
Compruebe que los
cables de los altavoces
tengan la impedancia
correcta.
y deje que se enfríe.
Garantice una buena
circulación del aire y
vuelva a encender el
aparato.
Reubique el micrófono y
los altavoces.
33
Page 34

ES
RETIRADA DEL APARATO
Si el aparato lleva adherida la ilustración de la izquierda (el
contenedor de basura tachado) entonces rige la normativa
europea, directiva 2012/19/UE. Estos productos no pueden
depositarse en los contenedores destinados a la basura
común. Infórmese sobre las leyes territoriales que regulan
la recogida separada de aparatos eléctricos y electrónicos.
Guíese por las regulaciones locales y no deseche el aparato
como un residuo doméstico. Una retirada de aparatos
conforme a las leyes contribuye a proteger el medio
ambiente y a las personas a su alrededor frente a posibles
consecuencias perjudiciales para la salud. El reciclaje ayuda
a reducir el consumo de materias primas.
El producto contiene pilas sujetas a la Directiva Europea
2006/66/CE, según la cual estas no pueden depositarse
en los contenedores destinados a la basura común.
Infórmese sobre la normativa vigente sobre la eliminación
de pilas. Una gestión adecuada de estos residuos previene
consecuencias potencialmente negativas para el medio
ambiente y la salud de las personas.
Declaración de conformidad
Fabricante: Chal-Tec GmbH, Wallstrafte 16, 10179
Berlín (Alemania).
34
Este producto cumple con las siguientes
directivas europeas:
2011/65/UE (refundición RoHS)
2014/53/UE (RED)
Encontrará la declaración de conformidad
completa del fabricante en el siguiente enlace.
Escanee el código QR o introduzca la URL.
use.berlin/10035179
Page 35

Gentile Cliente,
La ringraziamo per aver acquistato il dispositivo.
La preghiamo di leggere attentamente le seguenti
istruzioni per l’uso e di seguirle per evitare
possibili danni tecnici. Non ci assumiamo alcuna
responsabilità per danni scaturiti da una mancata
osservazione delle avvertenze di sicurezza e da un
uso improprio del dispositivo. Scansionare il codice
QR seguente, per accedere al manuale d’uso più
attuale e per ricevere informazioni sul prodotto.
DATI TECNICI
Numero articolo 10035179
Alimentazione 230 V~ 50 Hz
Potenza RMS 2 x 50 W RMS
Connessione di memoria USB
Connessioni microfono 2
IT
35
Page 36

IT
AVVERTENZE DI SICUREZZA
Spiegazione dei simboli sul dispositivo
ATTENZIONE
RISCHIO DI FOLGORAZIONE NON APRIRE
ATTENZIONE: NON APRIRE L’ALLOGGIAMENTO ONDE EVITARE SCOSSE ELETTRICHE
E GRAVI LESIONI PERSONALI. IL PRODOTTO NON CONTIENE COMPONENTI CHE
NECESSITANO DI ASSISTENZA DA PARTE DEL CLIENTE. RIVOLGERSI ESCLUSIVAMENTE
A TECNICI QUALIFICATI.
Il simbolo del fulmine con la punta a forma di freccia, contenuto in
un triangolo equilatero, serve per avvisare l’utente della presenza di
tensioni pericolose non isolate all’interno del prodotto, di intensità
suiciente per costituire un pericolo di scosse elettriche per le persone.
Il punto esclamativo all’interno di un triangolo equilatero avverte
l’utente della presenza di istruzioni importanti sull’uso e sulla
manutenzione nella documentazione allegata al prodotto.
Bambini a partire da 8 anni e persone con limitate capacità siche e
psichiche possono utilizzare il dispositivo solo se sono stati istruiti in
modo esaustivo da una persona responsabile del loro controllo sulle
funzioni e sulle procedure di sicurezza e comprendono i rischi connessi.
36
Manutenzione
• Tenere asciutto l’amplicatore. Se si bagna, asciugarlo immediatamente
con un panno.
• Utilizzare l’amplicatore solo in ambienti con buona circolazione d’aria.
• Proteggere l’amplicatore da polvere e sporco.
• Passare di tanto in tanto un panno umido sul dispositivo e sembrerà
come nuovo.
• Non utilizzare detergenti chimici aggressivi o solventi.
Page 37

FUNZIONI ED ELEMENTI DI CONTROLLO
Lato frontale
IT
1
2 3
4
5 6 7 8 9
1 POWER: accendere o spegnere l’amplificatore.
2 MIC1: connessione microfono.
3 MIC2: connessione microfono.
4 USB INPUT: collegare qui la chiavetta USB.
5 Standby: toccare questo tasto e il dispositivo passa in modalità
standby. Toccare di nuovo questo tasto e il dispositivo torna in modalità
standby.
6 Input: selezionare la fonte.
7 Menu: toccare questo tasto per impostare bassi, alti, balance, volume
del microfono, eco e volume principale.
8 : selezionare il titolo precedente.
9 : selezionare il titolo successivo.
10 Volume: regolare il volume principale.
10
37
Page 38

IT
Lato posteriore
1
2
1 Connessione altoparlanti
Collegare qui gli altoparlanti
2 Alimentazione
Connessione per il cavo di alimentazione.
3 Ingresso ottico
Connessione per una fonte di segnale ottico
4 Ingresso coassiale
Collegare qui un cavo coassiale
5 Uscita sub
Collegare questa uscita con l’uscita passiva di un altro amplificatore
6 Ingresso AUX2
Collegare qui un segnale esterno
7 Ingresso AUX1
Collegare qui un segnale esterno
3
4
6 7
5
38
Page 39

Telecomando
IT
4
1
2
3
5
6
7
8
9
1 Equalizzatore
2 Ripetizione/Riproduzione casuale
3 Play/Pausa
4 AUDIO: premere questo tasto e poi la regolazione del volume per
impostare bassi, alti, balance e volume principale
5 Input: selezionare la fonte di ingresso
6 Volume+/Volume-
7 Titolo precedente/Titolo successivo
8 -10 titoli/+10 titoli
9 Campo numerico per selezionare il titolo
39
Page 40

IT
RIPRODUZIONE TRAMITE BT
È possibile collegare l’amplicatore a dispositivi esterni con BT integrato
e riprodurre la musica tramite altoparlanti connessi. Quando si realizza
la connessione si sente un segnale acustico che aiuta nel processo di
accoppiamento.
1. Premere INPUT più volte, no all’impostazione della modalità BT.
2. Attivare il BT sul dispositivo esterno.
3. Cercare dispositivi BT disponibili. Assicurarsi di essere entro la portata di
ricezione. Scegliere il dispositivo “Amp-2 DG” nella lista.
4. Una volta realizzato l’accoppiamento BT, i due dispositivi sono collegati.
5. Ora è possibile riprodurre musica dal dispositivo esterno.
40
Page 41

CORREZIONE DEGLI ERRORI
Errore Causa Soluzione
IT
Nessun audio.
Eetto Larsen (feedback
acustico).
La fonte audio o gli
altoparlanti non sono
collegati correttamente.
Il volume è al minimo. Alzare il volume.
I cavi degli altoparlanti
hanno un’impedenza
errata.
L’amplicatore si è
spento.
Il microfono e gli
altoparlanti sono troppo
vicini tra loro.
Controllare i cavi di
collegamento.
Controllare che i cavi
degli altoparlanti abbiano
l’impedenza corretta.
Spegnere il dispositivo
e lasciarlo rareddare.
Garantire una buona
circolazione d’aria e
riaccendere il dispositivo.
Riposizionare microfono e
altoparlanti.
41
Page 42

IT
SMALTIMENTO
Se sul prodotto è presente la gura a sinistra (il bidone dei
riuti con le ruote), si applica la direttiva europea 2012/19/
UE. Questi prodotti non possono essere smaltiti con i
riuti normali. Informarsi sulle disposizioni vigenti per la
raccolta di dispositivi elettrici ed elettronici. Attenersi alle
disposizioni vigenti e non smaltire i vecchi dispositivi con i
riuti domestici. Grazie al corretto smaltimento dei vecchi
dispositivi si tutela il pianeta e la salute delle persone da
possibili conseguenze negative. Il riciclo di materiali aiuta a
diminuire il consumo di materie prime.
Il prodotto contiene batterie che sono soggette alla
direttiva europea 2006/66/CE e non possono essere
smaltite con i normali riuti domestici. Preghiamo di
informarvi sulle regolamentazioni vigenti sullo smaltimento
delle batterie. Grazie al corretto smaltimento dei vecchi
dispositivi si tutela l’ambiente e la salute delle persone da
conseguenze negative.
Dichiarazione di conformità
Produttore: Chal-Tec GmbH, Wallstraße 16, 10179
Berlino,
Germania.
42
Questo prodotto è conforme alle seguenti
direttive europee:
2011/65/UE (RoHS)
2014/53/UE (RED)
La dichiarazione di conformità completa del
produttore è disponibile al seguente link.
Scansionare il codice QR o inserire l’URL.
use.berlin/10035179
Page 43

Page 44

 Loading...