

Page 1

www.auna-multimedia.com
DAB CD Radio
10031949 10031950
Page 2

Page 3
3
DE
Sehr geehrter Kunde,
wir gratulieren Ihnen zum Erwerb Ihres Gerätes. Lesen Sie die folgenden
Hinweise sorgfältig durch und befolgen Sie diese, um möglichen Schäden
vorzubeugen. Für Schäden, die durch Missachtung der Hinweise und
unsachgemäßen Gebrauch entstehen, übernehmen wir keine Haftung.
INHALTSVERZEICHNIS
Sicherheitshinweise 4
Geräteübersicht 5
Vor dem ersten Betrieb 6
Funktionen und Einstellungen 7
DAB+ Betrieb 10
FM Betrieb 14
CD Betrieb 16
BT Betrieb 18
USB Betrieb 19
Weitere Funktionen 20
Pege und Instandhaltung 21
Hinweise zur Entsorgung 22
TECHNISCHE DATEN
Artikelnummer 10031949, 10031950
Stromversorgung 220-240 V ~ 50-60 Hz
DAB/DAB+ Tuner 174.928 (5A) MHz - 239.200 (13F) MHz
FM Tuner 87.5 MHz - 108.0 MHz
KONFORMITÄTSERKLÄRUNG
Hersteller:
Chal-Tec GmbH, Wallstraße 16, 10179 Berlin,
Deutschland.
Dieses Produkt entspricht den folgenden
Europäischen Richtlinien:
2014/35/EU (LVD)
2011/65/EU (RoHS)
2014/53/EU (RED)
English 24
Français 45
Italiano 66
Español 87
Page 4

4
DE
SICHERHEITSHINWEISE
Zum Schutz vor Laserbestrahlung
• Versuchen Sie nicht, das Gehäuse zu zerlegen, da der Laserstrahl in
diesem CD-Player schädlich für die Augen ist.
• Stellen Sie die Benutzung sofort ein, wenn üssige oder feste
Fremdkörper in das Gehäuse geraten.
• Berühren Sie die Linse nicht. Dies kann sie beschädigen und dazu
führen, dass der Player nicht mehr richtig funktioniert.
• Stecken Sie nichts in den Sicherheitsschlitz, da die Laser-Diode sonst
auf “ON” steht, wenn die Klappe noch oen ist.
• Stellen Sie sicher, dass das Gerät keine Stromzufuhr erhält, wenn es
lange nicht in Gebrauch ist. Ziehen Sie den Stecker aus der Steckdose.
Greifen Sie dabei stets den Stecker, nicht das Kabel.
• Dieses Gerät verwendet einen Laser. Benutzen Sie die Steuerung und
Einstellungen ausschließlich für die hier angegebenen Zwecke, da Sie
sich ansonsten gefährlicher Bestrahlung aussetzen können.
Platzierung
• Benutzen Sie dieses Gerät nicht an extrem heißen, kalten, staubigen
oder schwülen Orten.
• Stellen Sie das Gerät auf eine ache und ebene Fläche.
• Behindern Sie nicht die Luftzufuhr zum Gerät durch die Platzierung an
einem schlecht belüfteten Ort, durch das Bedecken mit einem Tuch oder
durch das Platzieren auf einem Teppich.
• Benutzen Sie das Gerät nur mit einem vom Hersteller empfohlenen
oder im Kauf enthaltenen Rollwagen, Regal, Stativ, Träger oder
Tisch. Wenn ein Rollwagen verwendet wird, bewegen Sie die Einheit
Rollwagen/Gerät vorsichtig, um Verletzung durch mögliches Umkippen
vorzubeugen.
Kondensation
• Wenn das Gerät in einem beheizten Raum stehen gelassen wird, der
warm und feucht ist, können sich im Gehäuse Wassertröpfchen oder
Kondensation bilden.
• Wenn sich im Gehäuse Kondensation bildet, ist es möglich, dass das
Gerät nicht korrekt funktioniert.
• Lassen Sie es für 1 bis 2 Stunden stehen, bevor Sie es einschalten, oder
erwärmen Sie den Raum langsam und lassen Sie das Gerät vor dem
Einschalten trocken. Sollte es ein Problem geben, trennen Sie das
Gerät von der Stromquelle und konsultieren Sie einen qualizierten
Fachmann.
Page 5
5
DE
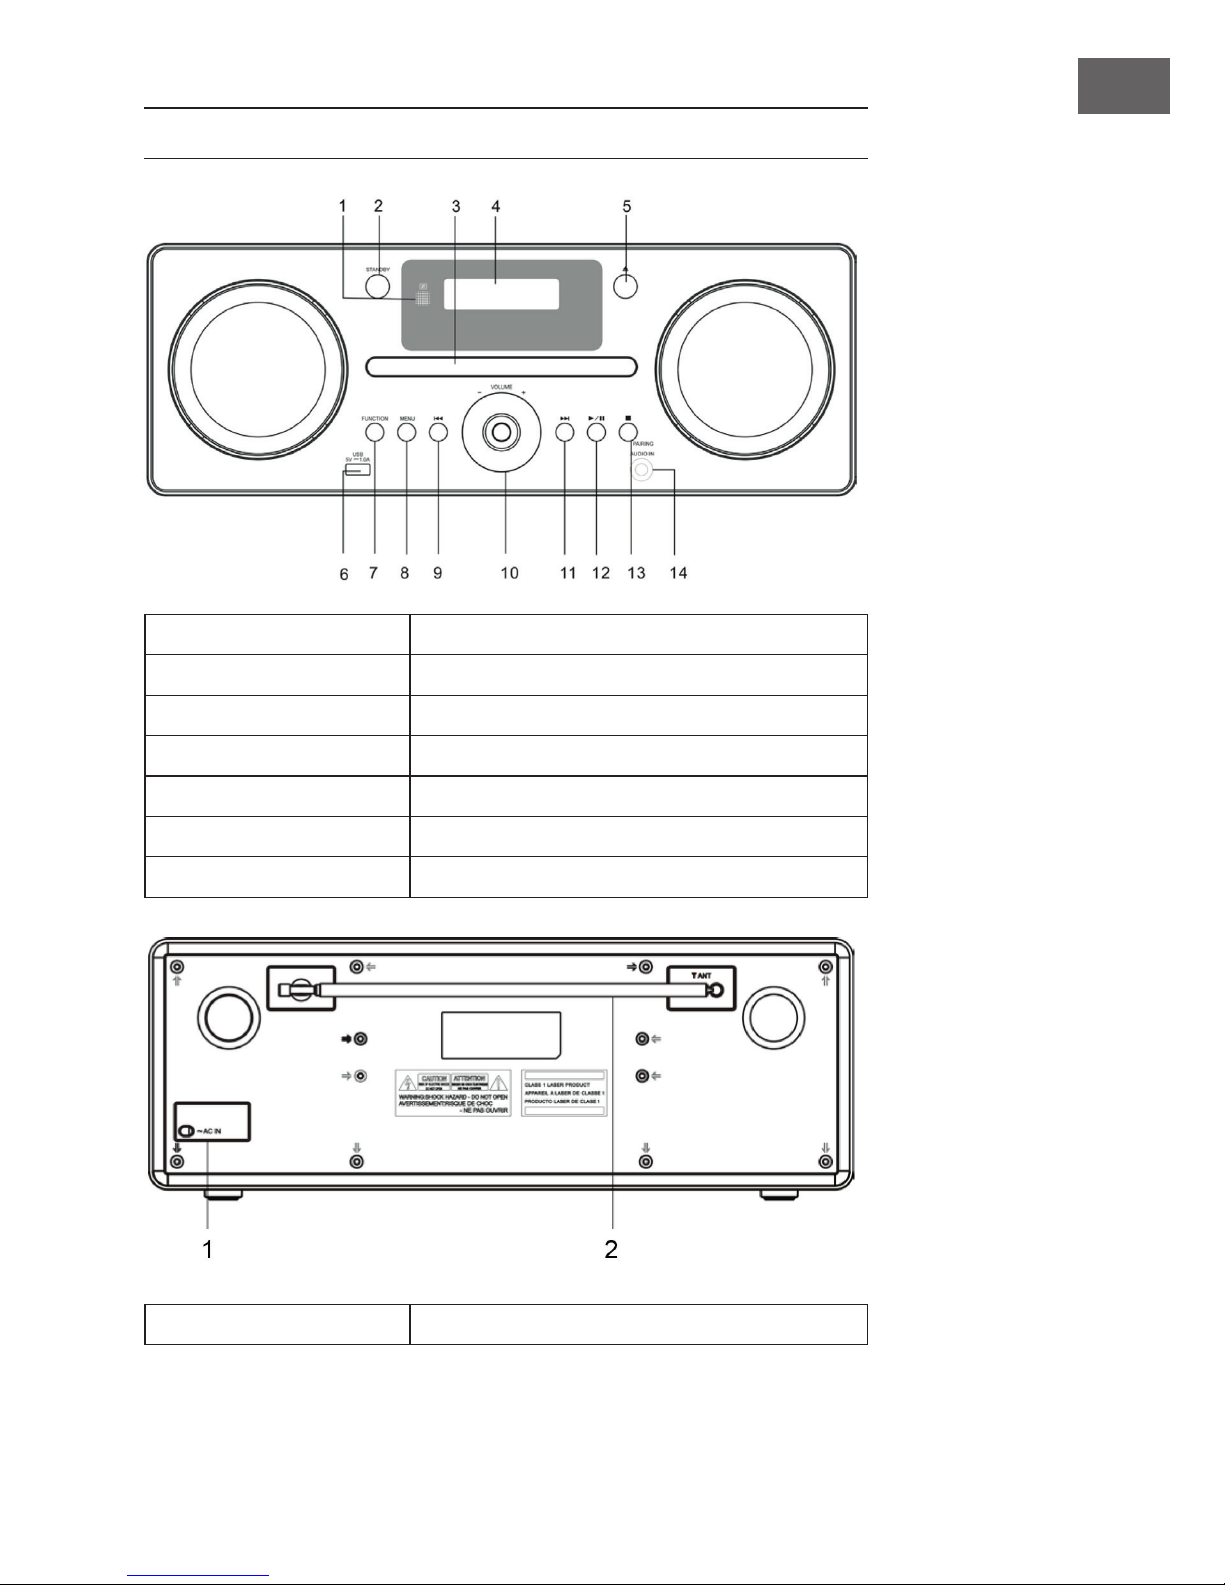
GERÄTEÜBERSICHT
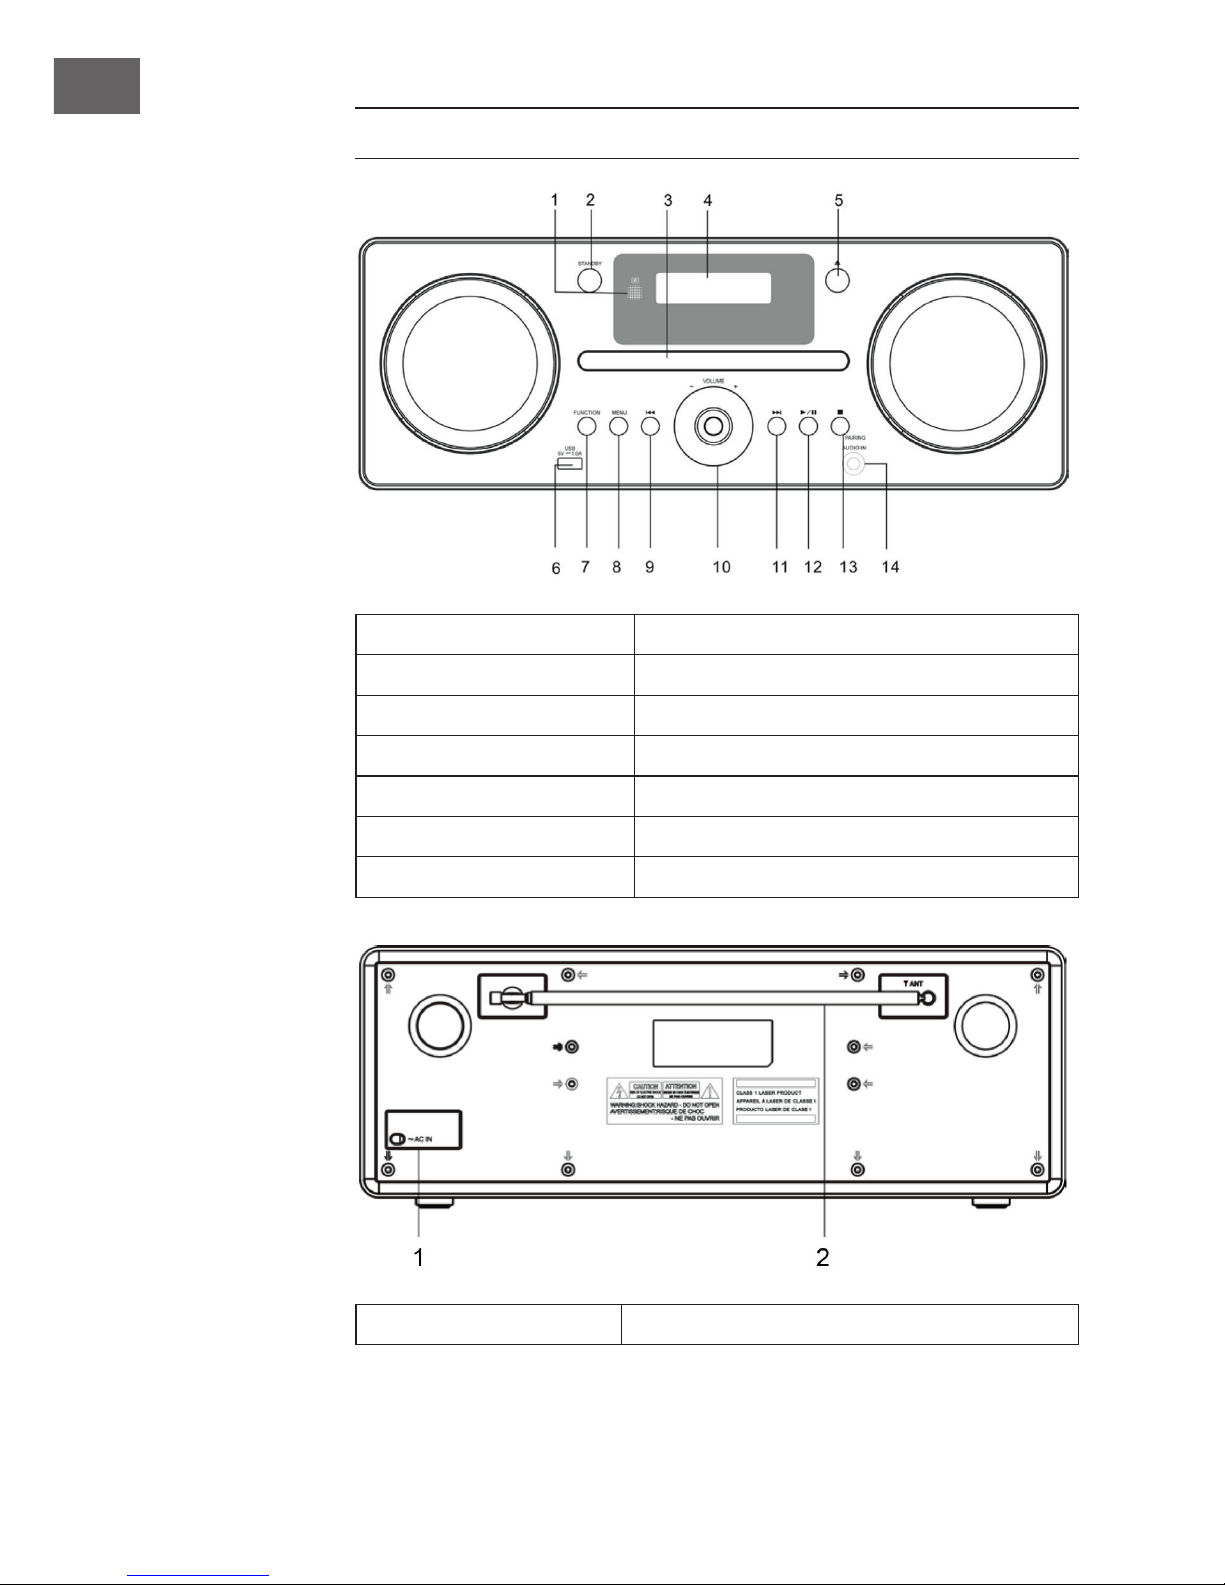
1 FERNBEDIENUNGSTASTE 8 MENU-TASTE
2 STANDBY -TASTE 9 CD/BT ÜBERSPRINGEN ZURÜCK/TUNE-TASTE
3 CD-FACH 10 LAUTSTÄRKEREGLER
4 LCD DISPLAY 11 CD/BT ÜBERSPRINGEN WEITER/ TUNE+-TASTE
5 CD-FACH AUF/ZU-TASTE 12 CD/BT PLAY/PAUSE
6 USB-BUCHSE 13 CD STOP/PAARUNGSTASTE
7 FUNKTIONSTASTE 14 AUX IN BUCHSE
1 NETZKABEL 2 DAB/FM ANT
Page 6
6
DE
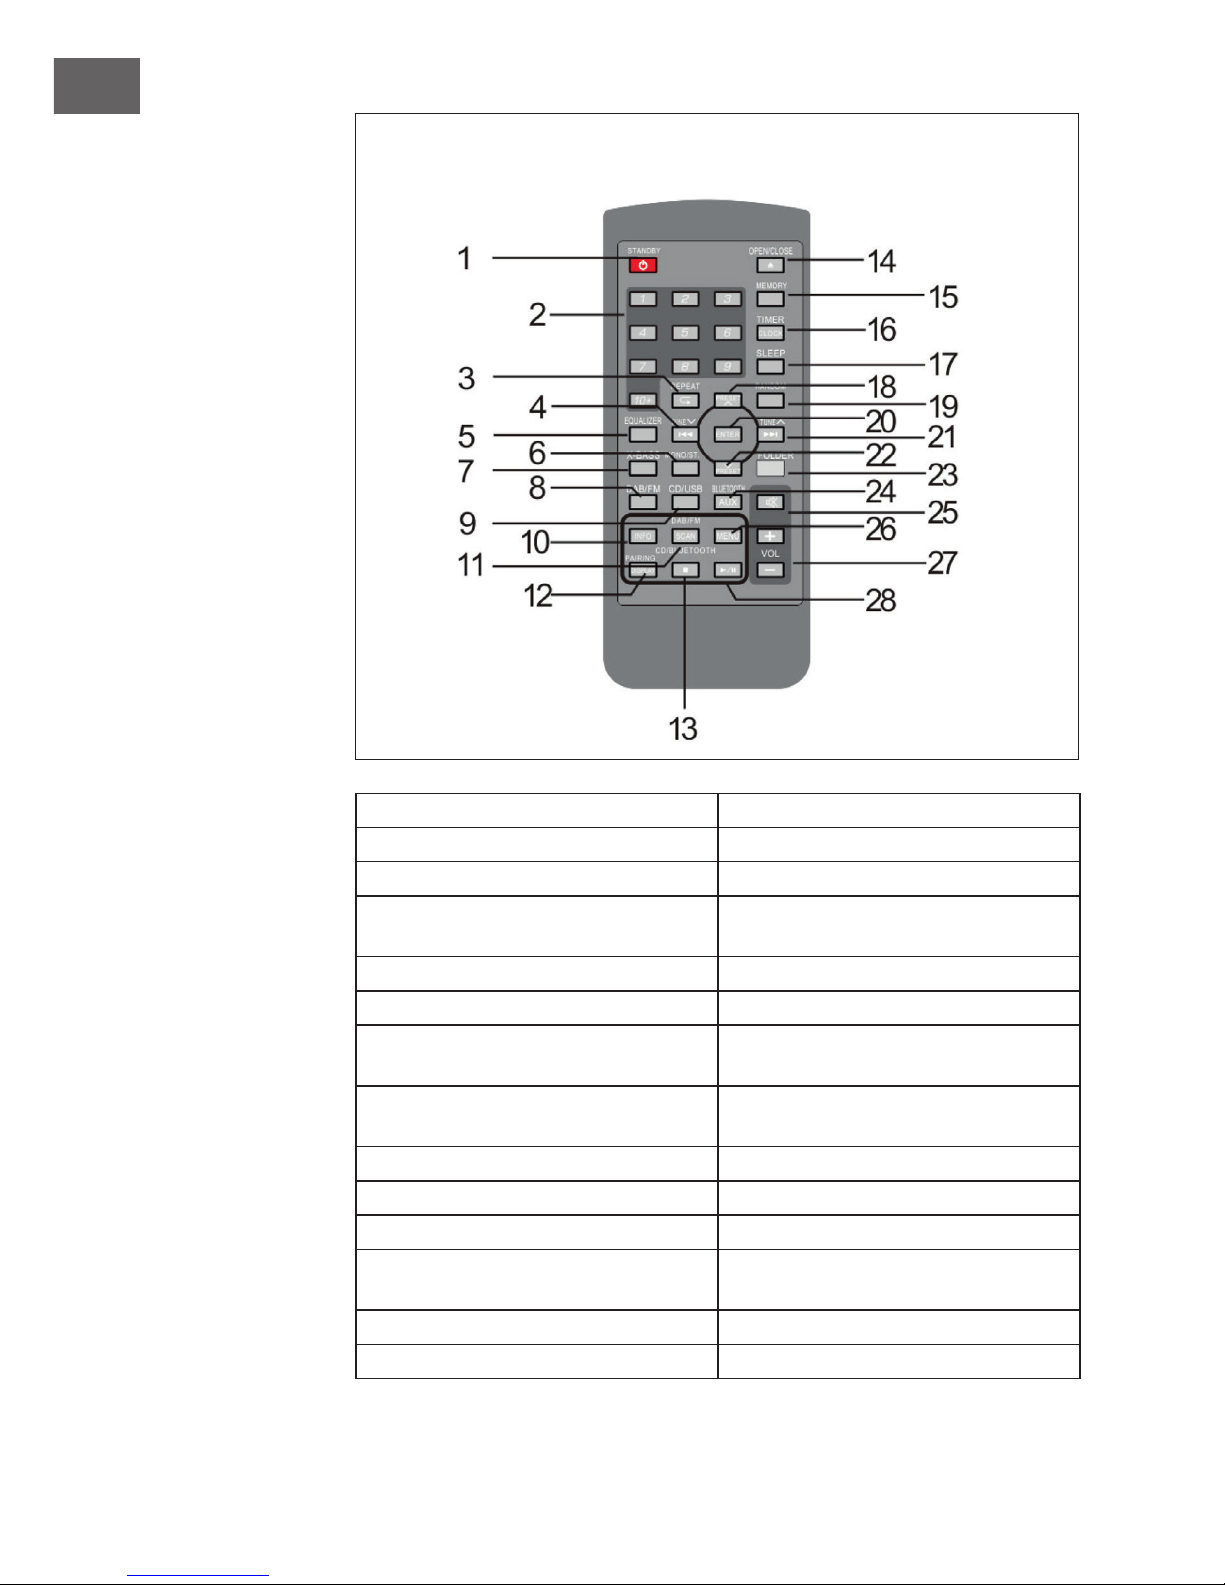
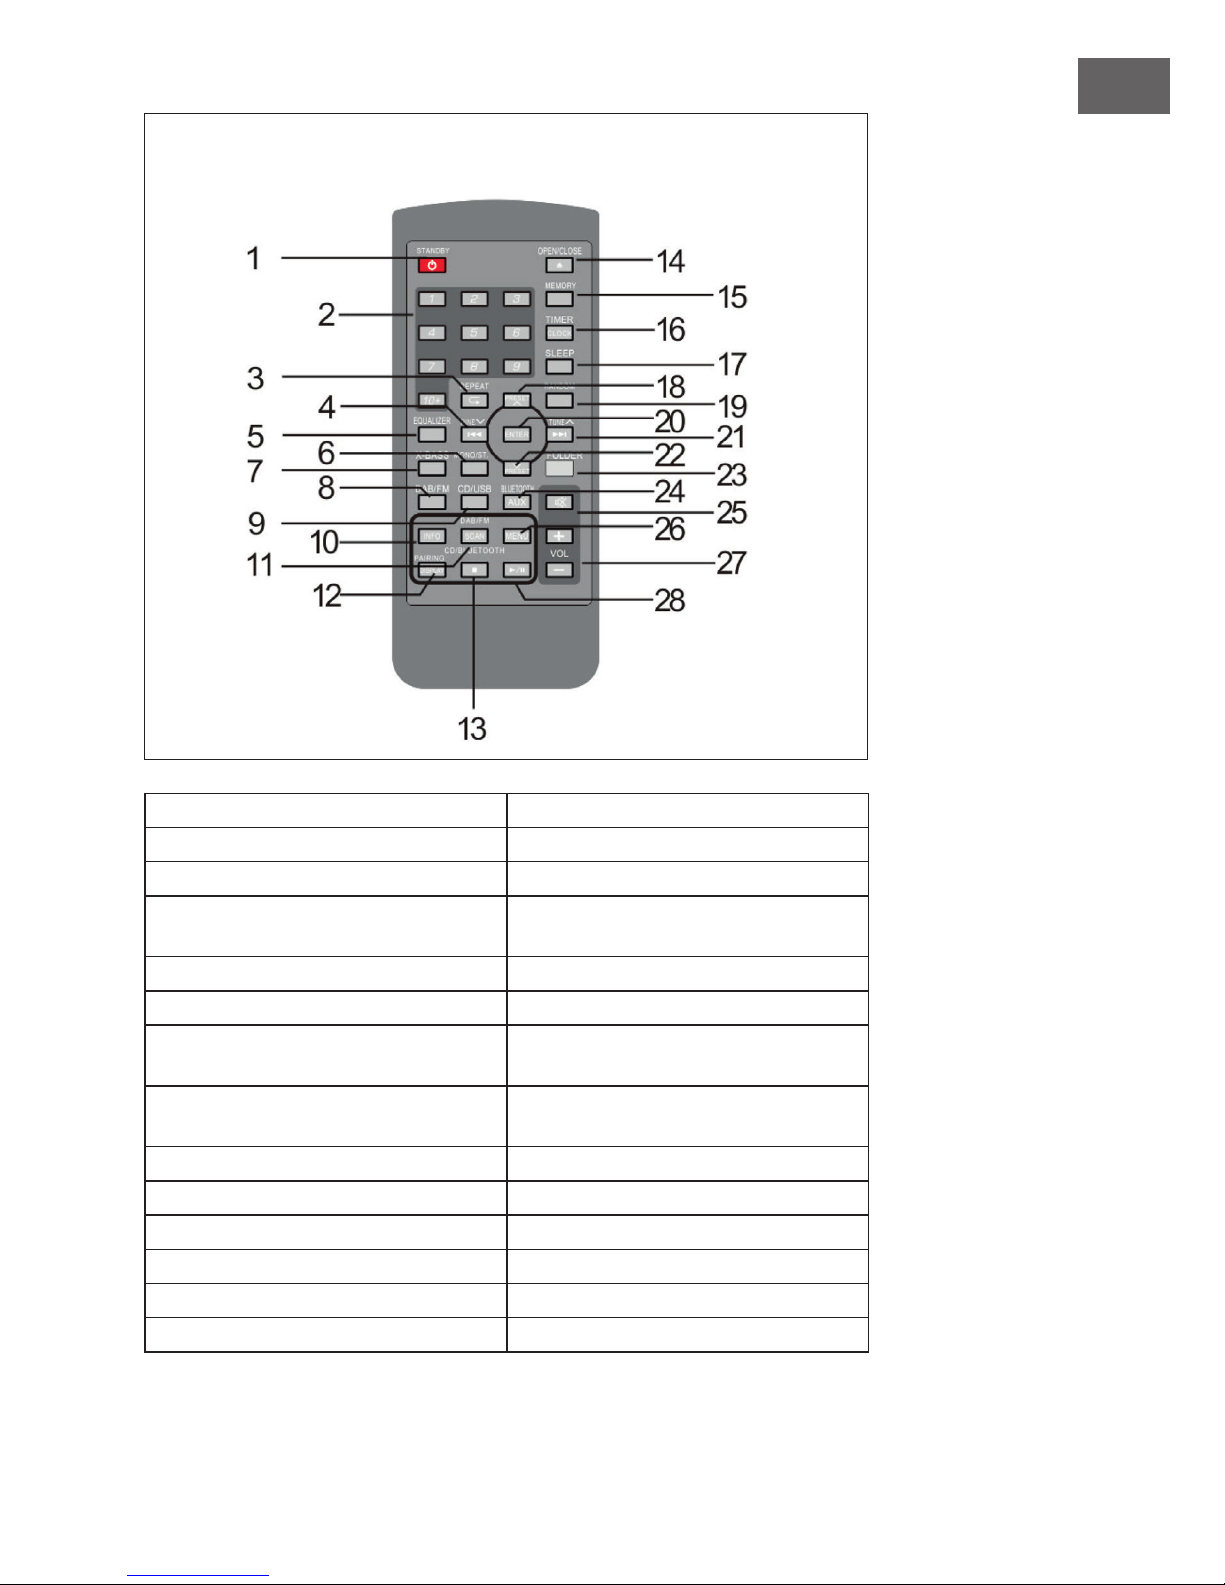
1 STANDBY-TASTE 15 MEMORY-TASTE
2 DIREKTSUCH-TASTE 16 TIME/CLOCK SET-TASTE
3 REPEAT-TASTE 17 SLEEP-TASTE
4 CD/USB TRACK DOWN ODER TIME
DOWN-TASTE / TUNER DOWN-TASTE
18 FOLDER UP-TASTE/TUNER PRESET-
TASTE
5 EQ-TASTE 19 RANDOM-TASTE
6 FM MONO/ST-TASTE 20 ENTER-TASTE
7 X-BASS-TASTE 21 CD/USB TRACK UP ODER TIME UP/
TUNER UP-TASTE
8 DAB/FM SELECT-TASTE 22 FOLDER DOWN-TASTE/TUNER
PRESET DOWN
9 CD/USB SELECT-TASTE 23 FOLDER ON/OFF-TASTE
10 DAB INFO-TASTE 24 BT/AUX SELECT-TASTE
11 DAB/FM SCAN-TASTE 25 MUTE-TASTE
12 CD/USB DISPLAY/ BT
PAARUNGSTASTE
26 DAB/FM MENUE-TASTE
13 CD/USB/BT STOP-TASTE 27 VOLUME UP AND DOWN- TASTE
14 OPEN/CLOSE-TASTE 28 CD/USB/BT PLAY/PAUSE-TASTE
Page 7

7
DE
VOR DEM ERSTEN BETRIEB
Dieses Gerät wird mit 100-240VAC ~ 50/60 Hz AC Haushaltstrom
betrieben und benötigt eine CR2025 3V Lithiumbatterie(enthalten) für
die Fernbedienung. Versuchen Sie niemals, das Gerät an eine andere
Stromquelle anzuschließen. Sie könnten damit das Gerät beschädigen und
die Gewährleistung verlieren.
Stromanschluss
Stecken Sie das Netzkabel in eine 100-240VAC ~ 50/60 Hz Steckdose.
Überprüfen Sie, dass der Stecker sicher in der Steckdose steckt.
Fernbedienung
Die Fernbedienung wird mit einer CR2025 3V Lithiumbatterie (in der
Bedienung enthalten) betrieben. Um die Fernbedienung zu aktivieren,
entfernen Sie den im Batteriefach eingefügten Isolierstreifen.
Wenn die Fernbedienung aussetzt oder nicht mehr angemessen
funktioniert, ersetzen Sie die Batterie mit einer neuen CR2025 3V
Lithiumbatterie.
1 Drücken Sie die Batteriefach-Abdeckung leicht nach unten und
entnehmen Sie die Batteriehalterung von dem Fernbedienungsgehäuse.
2 Ersetzen Sie die Batterie und vergewissern Sie sich, dass sie richtig
installiert ist. Die Fernbedienung funktioniert nicht, wenn die Batterie
mit umgekehrter Polarität eingesetzt wird.
Hinweis: Wenn die Batterie nicht korrekt ausgetauscht wird, kann
die Fernbedienung beschädigt werden. Ersetzen Sie die Batterie
ausschließlich mit einer gleichen oder gleichwertige Batterie.
Gerät anschließen
Wickeln Sie das Netzkabel vollständig ab. Schließen Sie das Netzkabel auf
der Rückseite des Geräts an die Netzanschlussbuchse an. Das Gerät ist nun
angeschlossen und betriebsbereit.
Page 8

8
DE
FUNKTIONEN UND EINSTELLUNGEN
Gerät ein-/ausschalten
Wenn Sie das Gerät zum ersten Mal an die Steckdose anschließen, zeigt
das Dispay “00:00:00” an. Wenn Sie an Ihrem Standort ein DAB+ -Signal
erhalten können, schaltet das Gerät mit der Ortszeit gleich. Nach etwa einer
Minute schaltet es auf STANDBY-Modus um.
• Drücken Sie auf STANDBY am Gerät oder an der Fernbedienung, um
das Gerät auf ON-Modus zu schalten.
• Drücken Sie auf STANDBY am Gerät oder an der Fernbedienung, um
das Gerät zurück auf STANDBY-Modus zu stellen.
• Trennen Sie das Netzkabel von der Netzanschlussbuchse, wenn Sie das
Gerät komplett ausschalten wollen.
Hinweis:
• Wenn das Gerät etwa 15 Minuten lang inaktiv ist, stellt es sich
automatisch auf Standby-Modus um.
• Bitte schalten Sie das Gerät vollständig aus, wenn Sie es nicht nutzen,
um Energie zu sparen.
Einstellen der Lautstärke
• Drehen Sie am VOLUME+/- Knopf am Gerät oder drücken Sie auf
VOLUME +/- an der Fernbedienung, um die Lautstärke zu erhöhen/
verringern.
• Wenn Sie den Ton abstellen wollen, drücken Sie auf MUTE. Drücken Sie
erneut MUTE oder die VOLUME+/- Tasten an der Fernbedienung, oder
drehen Sie den VOLUME+/- Knopf am Gerät, um normal weiterzuhören.
Uhrzeit einstellen
1 In Standby-Modus, drücken Sie die CLOCK-Taste an der Fernbedienung.
Die Stundenziern blinken auf dem Display.
2 Drücken Sie die |<< oder >>| -Taste, um die Stundenziern einzustellen,
und drücken Sie anschließend zur Bestätigung die CLOCK-Taste. Die
Minutenziern blinken auf dem Display.
3 Drücken Sie die |<< oder >>| Taste, um die Minutenziern einzustellen
und drücken Sie anschließend zur Bestätigung die CLOCK-TASTE.
4 Die Uhrzeit ist nun eingestellt.
Page 9

9
DE
Hinweis: Wenn das Gerät kein DAB+ -Signal empfangen kann, können
Sie die Uhrzeit manuell einstellen. Sobald ein DAB+ -Signal empfangen
wird, aktualisiert die Uhrzeit sich automatisch.
Timer einstellen
1 Drücken und halten Sie die TIMER-Taste an der Fernbedienung bis das
Display “ON TIMER” anzeigt und die Stundenziern auf dem Display
blinken.
2 Drücken Sie die |<< oder >>| Taste, um die Stundenziern einzustellen
und drücken Sie anschließend zur Bestätigung die TIMER-Taste. Die
Minutenziern blinken auf dem Display.
3 Drücken Sie die |<< oder >>| Taste, um die Minutenziern einzustellen,
und dann drücken Sie zur Bestätigung dieTIMER-Taste.
4 Wenn die |<< oder >>|Taste ON Timer Clock set eingestellt ist, zeigt
das Display “O Timer” an und die Stundenziern blinken.
5 Drücken Sie die |<< oder >>| Taste, um die Stundenziern einzustellen
und drücken Sie anschließend zur Bestätigung die TIMER-Taste. Die
Minutenziern blinken auf dem Display.
6 Drücken Sie die |<< oder >>| Taste an der Fernbedienung, um
die Minutenziern einzustellen und drücken Sie anschließend zur
Bestätigung die TIMER-Taste.
7 Drücken Sie die Tasten, um DAB, FM, DISC oder USB-Modus zu
selektieren, drücken Sie anschließend zur Bestätigung die TIMER-Taste.
Das Display zeigt “VOL#” an und blinkt. Drücken Sie die |<< oder >>|
Taste, um die Lautstärke einzustellen, und drücken Sie anschließend zur
Bestätigung die TIMER-Taste.
8 Drücken Sie die TIMER-Taste, um “Timer On” zu selektieren. Die
Schaltuhr ist nun eingestellt.
9 Im Standby-Modus wird das UHR-Symbol auf dem Display angezeigt,
um darauf hinzuweisen, dass die Schaltuhr aktiviert ist.
Timer deaktivieren
Drücken Sie die Timer-Taste an der Fernbedienung wiederholt, um den Time
O-Modus zu selektieren. Das UHR-Symbol verschwindet vom Bildschirm.
Page 10
10
DE
Einstellung des Einschlaf-Timers
Benutzen Sie den Einschlaf-Timer, um das Gerät nach einem gewissen
Zeitraum im Play-Modus auszuschalten. Durch das Einstellen des EinschlafTimers können Sie bei laufender Musik einschlafen in der Gewissheit, dass
Ihr Gerät sich von selbst ausschaltet anstatt die ganze Nacht zu laufen.
1 Um den Einschlaf-Timer einzustellen drücken Sie wiederholt die SLEEP-
Taste an der Fernbedienung, um den gewünschten Einschlaf-Timer wie
folgt auszuwählen: 90> 80 > 70 > 60 > 50 > 40 > 30 > 20 > 10 > OFF
2 Der Einschlaf-Timer ist nun aktiviert.
3 Drücken Sie die SLEEP-Taste, um die verbleibende Zeit bevor das Gerät
sich automatisch ausschaltet, anzuzeigen.
4 Um den Einschlaf-Timer zu deaktivieren, drücken Sie wiederholt die
SLEEP-Taste, um “SLEEP OFF” zu selektieren.
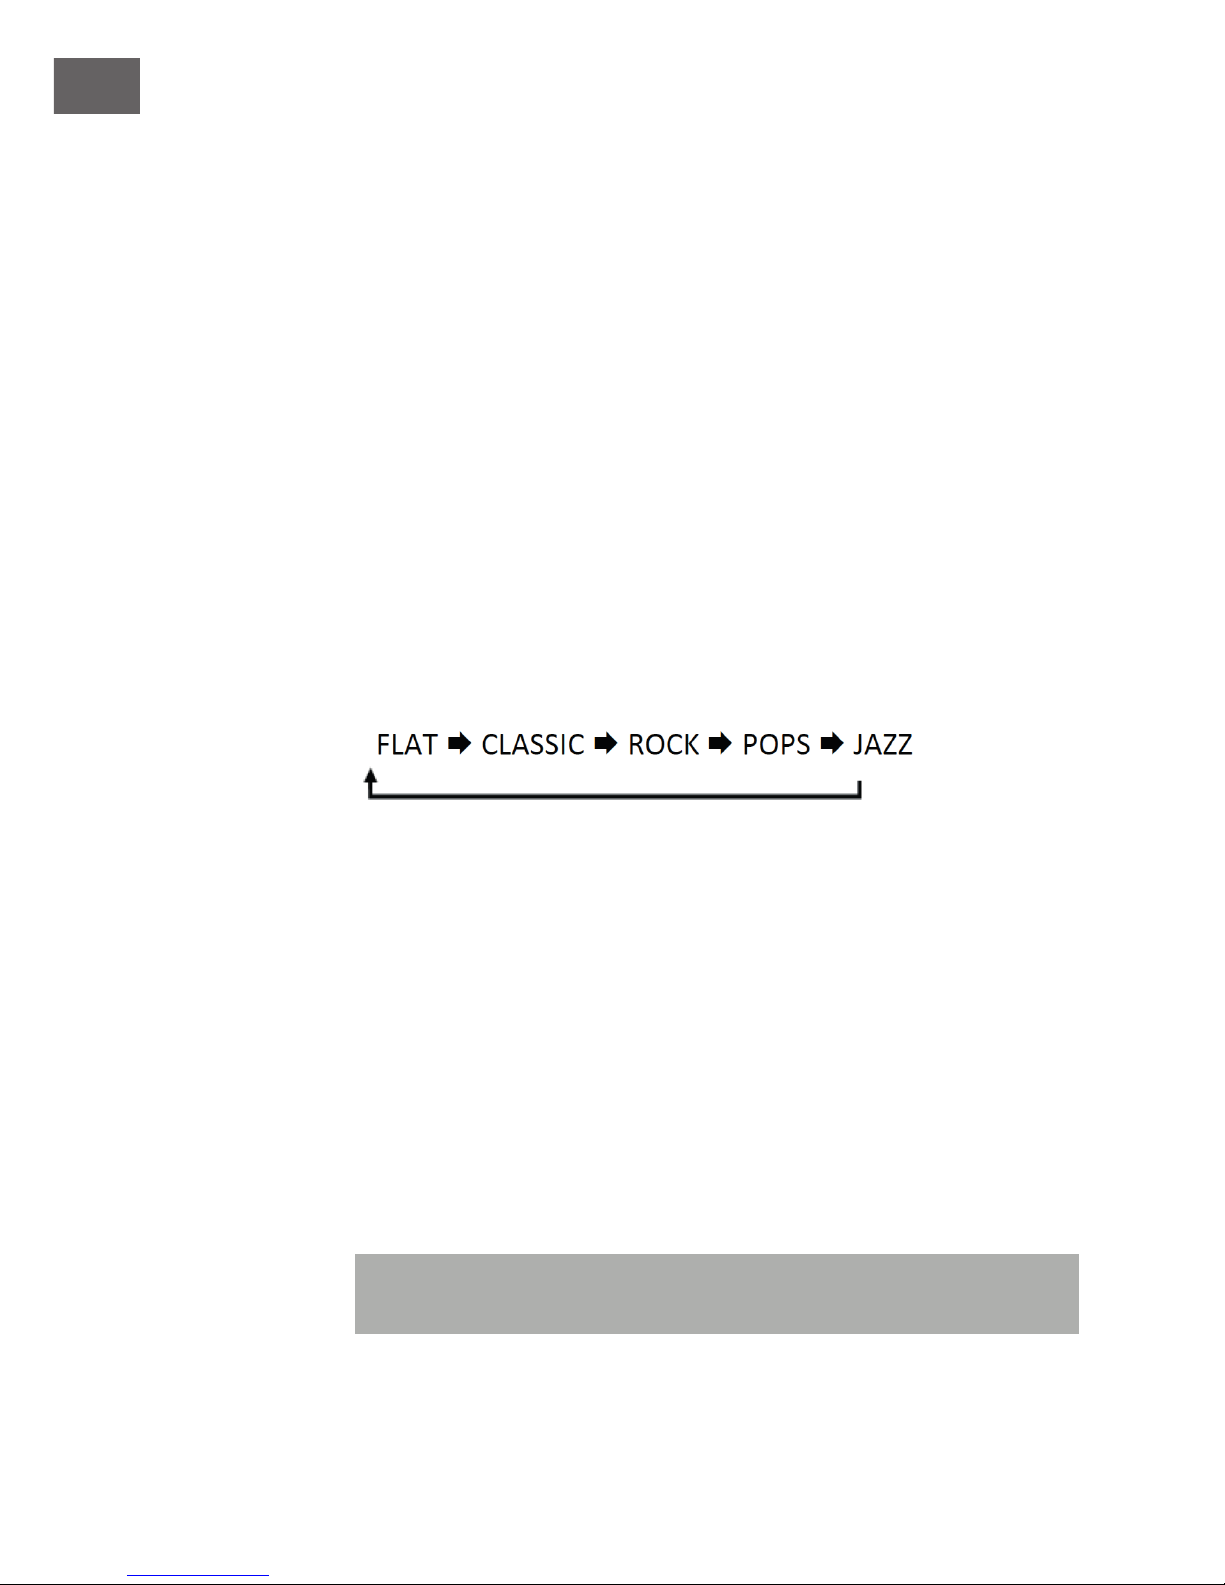
EQ -Regler
Dieses System unterstützt eine Vielzahl an Equalizern und Sound Eekten.
Drücken Sie während der Widergabe die EQ-Taste an der Fernbedienung,
um einen gewünschten Musik-Modus auszuwählen. Bei jedem Drücken der
EQ-Taste wechselt der Musik-Modus zum nächsten wie folgt:
Systemrücksetzung
Es kann vorkommen, dass Sie Ihr Gerät auf die Werkseinstellungen
zurücksetzen müssen, vor allem wenn Sie umgezogen sind. Wenn Sie mit
dem Empfang Probleme haben, ist es sinnvoll, das System zurückzusetzen
und es noch einmal zu probieren. Wenn Sie in eine andere Region des
Landes ziehen und die lokalen und nationalen DAB+ -Signale dieser
Region empfangen, sind Ihre zuvor eingestellten Sender eventuell nicht
mehr verfügbar.
1 Önen Sie im DAB-Modus das CD-Fach und drücken und halten Sie
anschließend die STOP-Taste am Gerät bis im Display “Restarting...
FACTORY RESET” angezeigt wird.
2 Nachdem das Gerät zurückgesetzt wurde, kehrt es in den DAB-Modus
zurück.
Hinweis: Bei der Systemzurücksetzung werden alle eingestellten Sender
und gespeicherten FM/DAB+ Sender gelöscht.
Page 11

11
DE
DAB+ BETRIEB
Wenn Sie das Gerät an den Netzstrom angeschlossen haben und es
dann zum ersten Mal vom Standby-Modus einschalten, stellt sich das
Gerät automatisch auf DAB-Modus ein und führt die Auto-Scan-Funktion
aus. Während des Scans wird auf dem Display neben “Scanning...” ein
Anzeigebalken abgebildet, der den Verlauf des Scans und die Anzahl der
bisher gefundenen Sender anzeigt. Wenn der Scan beendet ist, wählt
das Gerät den ersten alphanumerisch gefundenen Sender aus. Um die
gefundenen Sender zu erkunden, drücken Sie die |<< oder >>| Taste.
Full Scan
Der Full Scan sucht nach allen DAB+ Band II-Kanälen. Nachdem der Scan
beendet ist, wird automatisch der alphanumerisch erste Sender ausgewält.
1 Um Auto-Scan zu aktivieren, drücken Sie die SCAN-Taste und das
Display zeigt “Scanning...” und einen Anzeigebalken an.
2 Alle gefundenen Sender werden automatisch gespeichert. Um die
gefundenen Sender zu erkunden und zu hören, drücken Sie zum
Auswählen die |<< oder >>| Taste. Um Sender als Pre-Set zu speichern,
drücken Sie die “ENTER”-Taste.
Manuelles Tuning
Sie können neben der Auto-Tune Funktion den Receiver auch manuell
einstellen. Dies ist hilfreich, wenn Sie Ihre Antenne ausrichten oder wenn
Sie Sender hinzufügen, die beim Auto-Tuning verpasst wurden.
1 Drücken Sie die MENU-Taste an der Fernbedienung, um das Menü
anzuzeigen.
2 Drücken Sie die ENTER-Taste, um Manual tune zu selektieren.
3 Drücken Sie die |<< oder >>| -Taste, um durch die DAB+ Kanäle, die von
5A bis 13F numeriert sind, zu surfen.
4 Nachdem Sie Ihren gewünschten Kanal ausgewählt haben, drücken Sie
zur Bestätigung die Enter-Taste. Das Display zeigt das Multiplex an.
5 Drücken Sie erneut die ENTER-Taste, um die gewählten Kanäle als Pre-
Set Sender zu bestätigen.
Page 12

12
DE
Drc (Dynamic Range Compression)
Wenn Sie Musik mit einem hohen Dynamikbereich in einem lauten
Umfeld hören, möchten Sie vielleicht gerne den Audio-Dynamikbereich
einschränken.
1 Drücken Sie die MENU-Taste an der Fernbedienung , um das Menü
anzuzeigen.
2 Drücken Sie die |<< oder >>| Taste, um “DRC” zu selektieren und
drücken Sie anschließend zur Bestätigung die ENTER-Taste an der
Fernbedienung.
3 Drücken Sie die |<< oder >>| Taste, um o/ high/ low auszuwählen.
4 Drücken Sie zur Bestätigung die ENTER-Taste an der Fernbedienung.
Prune
Sie können alle unverfügbaren Sender von der Liste entfernen.
1 Drücken Sie im DAB-Modus die MENU-Taste an der Fernbedienung, um
das Menü anzuzeigen.
2 Drücken Sie die |<< oder >>| Taste, um “Prune” zu selektieren und
drücken Sie anschließend zur Bestätigung die ENTER-Taste.
3 Drücken Sie die |<< oder >>| Taste, um zu selektieren und drücken Sie
anschließend die ENTER-Taste an der Fernbedienung, um unverfügbare
Sender zu löschen.
4 Sie können die |<< oder >>| Taste drücken, um zu selektieren und
anschließend die ENTER-Taste an der Fernbedienung drücken, um zu
löschen.
Software Information
1 Drücken Sie in DAB-Modus die MENU-Taste an der Fernbedienung, um
das Menü anzuzeigen.
2 Drücken Sie die |<< oder >>| Taste, um “SW version” zu selektieren.
3 Drücken Sie die ENTER-Taste an der Fernbedienung, um die Software
Version anzuzeigen.
Page 13

13
DE
Untermenüs und Funktionen
Sie sehen möglicherweise ein “ > “ Symbol nach dem Namen des Senders.
Dies weist darauf hin, dass es zu diesem Sender Nebenleistungen gibt. Die
Nebenleistungen beinhalten extra Leistungen, die mit dem Primärsender
zu tun haben. So möchte beispielsweise ein Sportsender zusätzliche
Reportagen hinzufügen.. Die Nebenleistungen werden auf der Senderliste
direkt nach dem Primärsender eingefügt. Um den Sekundärsender
auszuwählen,, drücken Sie auf die MENU-Taste wenn das “ > “ vor dem
Sender-Namen auf dem Display angezeigt wird. Wenn die Nebenleistung
endet, wechselt das Gerät automatisch wieder auf den Primärsender um.
Voreingestellte Sender
(Nur mit Fernbedienung)
1 Drücken und halten Sie die MEMORY-Taste. Das Display zeigt an
“<Save to P # >“.
2 Drücken Sie die PRESET < oder >-Taste, um die Nummer Ihres
gewünschten voreingestellten Senders zu selektieren.. Dann drücken
Sie zur Bestätigung die ENTER-Taste.
3 Der Sender wird in ein paar Sekunden gespeichert und das Display
zeigt dann “Preset #Stored” an.
Einen gespeicherten Sender aufrufen
(Nur mit Fernbedienung)
1 Wenn Sie einen Sender auf eine er Preset-Tasten gespeichert haben,
können Sie Ihn aufrufen, indem Sie die MEMORY-Taste drücken.
2 Drücken und halten Sie die die PRESET-Taste bis Ihr gewünschter
Sender auf dem Display angezeigt wird; dann drücken Sie zur
Bestätigung die ENTER-Taste, um ihn zu spielen.
Dab Display-Modi
Drücken Sie die DISPLAY-Taste an der Fernbedienung. Das Display zeigt im
Wechsel folgende Display-Modi an. Die Information jedes Display-Modus
wird auf dem unteren Teil des Displays angezeigt.
Signal Strength (Signalstärke)
Das Display zeigt einen Anzeigebalken, um die Signalstärke anzuzeigen; je
stärker das Signal, desto länger der Balken von links nach rechts.
Page 14

14
DE
Programme Type (Programmtyp)
Dies beschreibt den Stil oder das Genre des ausgestrahlten Programms.
Ensemble
Dies zeigt den Namen des Multiplex an, in dem sich der Sender, den Sie
anhören bendet. Ein Multiplex ist eine Kollektion von Radiosendern, die
auf einer Frequenz gebündelt und ausgestrahlt werden. Es gibt nationale
und lokale Multiplexe. Die Lokalen beherbergen Sender, die einem
spezischen Gebiet angehören.
Hinweis: DAB, anders als normales Radio, gruppiert mehrere
Radiosender zusammen und strahlt sie auf einer Frequenz aus.
Frequency (Frequenz)
Dies zeigt die Frequenz des voreingestellten Senders an, so wie “11C
220.352MHz”.
Signal Error (Signalfehler)
Dies zeigt eine Zahl an, welche die Fehlerrate abbildet. Wenn die Zahl
0 ist, bedeutet das, dass das empfangene Signal fehlerfrei ist und die
Signalstärke sehr gut ist. Wenn die Fehlerrate hoch ist, ist es ratsam, die
Antenne neu auszurichten oder das Gerät umzustellen.
Audio Bit Rate
Das Display zeigt die digitale Audio-Bitrate an, die empfangen wird.
Time/ Date
Dies zeigt die aktuelle Uhrzeit und Datum an, die vom E10
Rundfunkunternehmen automatisch bereitgestellt wird.
DLS (Dynamic Label Segment)
Dynamic Label Segment ist ein Lauftext, den das Rundfunkunternehmen
seinen Übertragungen beifügt. Der Text beinhaltet normalerweise
Informationen, so wie z.B. Programmdetails.
Page 15

15
DE
FM BETRIEB
Wechseln von DAB zu FM-Modus
Um das Gerät auf FM-Modus umzustellen, drücken Sie wiederholt
die FUNCTION-Taste oder drücken Sie die DAB/FM-Taste an der
Fernbedienung. Das Display zeigt nun die Frequenz an.
Auto Scan (Automatischer Suchlauf)
Drücken Sie die SCAN-Taste bis der Tuner anfängt, nach Sendern zu suchen.
Um den Frequenzbereich zu durchsuchen, drücken und halten Sie die SCANTaste. Wenn ein Sender gefunden wurde, stellt sich die Suche automatisch
ein.
Manual Scan (Manuelle Suche)
Um manuell nach FM-Sendern zu suchen, drücken Sie wiederholt die |<<
oder >>| -Taste bis Sie die gewünschte Frequenz erreicht haben.
Scan Setting (Scan-Einstellung)
Dies ist eine Suchoption, mit der man alle Sender oder nur Sender mit sehr
gutem Signal durchsuchen kann.
1 Drücken Sie die MENU-Taste, dann drücken Sie anschließend die |<<
oder >>|-Taste, um “Scan Setting” zu selektieren. Drücken Sie zur
Bestätigung die ENTER-Taste.
2 Drücken Sie die |<< oder >>|-Taste, um “All stations” (alle Sender)oder
“Strong stations only” (nur Sender mit gutem Signal) zu selektieren.
Drücken Sie zur Bestätigung die ENTER-Taste.
Audio Setting (Höreinstellung)
Dieses Gerät wechselt automatisch zwischen Stereo und Mono-Modus, aber
Sie können dies aufheben und diese Funktion manuell schalten. Dies kann
bei schwachem Signalempfang hilfreich sein.
1 Drücken Sie die MENU-Taste, dann drücken Sie die |<< oder >>|-Taste,
um “Audio Settings” zu selektieren. Drücken Sie zur Bestätigung die
ENTER-Taste.
2 Drücken Sie die |<< oder >>|-Taste, um “Stereo allowed” (Stereo
erlaubt) oder “Forced mono” (Zwangsmono) zu selektieren und drücken
Sie anschließend zur Bestätigung die ENTER-Taste.
Page 16

16
DE
Audio-Modus
Drücken Sie die MONO/STEREO-Taste an der Fernbedienung, um zwischen
Stereo- und Mono-Modus hin- und her zu schalten.
Voreingestellte Sender
Sie können bis zu 20 Ihrer bevorzugten Sender im Memory-Speicher
speichern. So können Sie schnell und problemlos auf Ihre Lieblingssender
zugreifen.
1 Um eine Voreinstellung zu speichern, müssen sie bereits den Sender,
den Sie speichern wollen, hören. Drücken und halten Sie die MEMORY-
Taste. Das Display zeigt nun “Save to P#” an.
2 Drücken Sie die PRESET UP oder PRESET DOWN-Taste, um Ihre
gewünschte Voreinstellungs- oder Preset-Nummer zu selektieren.
Drücken Sie anschließend zur Bestätigung die ENTER-Taste.
3 Der Sender wird in wenigen Sekunden gespeichert und das Display
zeigt dann “Preset # Stored” (Voreinstellung # gespeichert) an.
Einen gespeicherten Sender aufrufen
1 Nachdem Sie einen Sender auf einen der Preset-(Voreinstellungs)tasten
gespeichert haben, können Sie ihn aufrufen, indem Sie die MEMORY-
Taste drücken.
2 Drücken Sie die PRESET-hoch oder PRESET-runter -Taste solange, bis Ihr
Wunschsender auf dem Display angezeigt wird.
FM Display-Modi
Drücken Sie die INFO-Taste an der Fernbedienung. Das Display zeigt nun
im Wechsel folgende Display-Modi an. Die Information zu jedem DisplayModus wird im unteren Bereich des Displays angezeigt.
Radio Text
So wie bei DAB kann das Rundfunkunternehmen einen Lauftext, der
Information zum laufenden Programm anzeigt, hinzufügen.
Page 17

17
DE
Programm-Typ
Dies beschreibt den Stil oder das Genre des ausgestrahlten Programms.
Frequenz
Dies zeigt die Frequenz des laufenden Senders an, wie z.B. “87.50MHz”.
Audio-Typ
Dies zeigt an, ob der empfangene Sender Mono oder Stereo ist..
Time / Date (Zeit / Datum)
Das Rundfunkunternehmen (Sender) stellt Zeit und Datum automatisch
bereit, so dass Sie diese Information nicht manuell einstellen müssen.
CD BETRIEB
Drücken Sie wiederholt die FUNCTION-Taste am Gerät oder drücken Sie CD
an der Fernbedienung, um CD-Modus zu selektieren.
Playback (Wiedergabe)
1 Drücken Sie die OPEN/CLOSE-Taste, um das CD-Fach zu önen.
2 Legen Sie die CD mit der Label-Seite nach oben in das CD-Fach und
drücken Sie dann die OPEN/CLOSE-Taste, um das CD-Fach zu schließen.
3 Wenn keine CD eingelegt ist oder die CD nicht gelesen werden kann,
wird “NO DISC” oder “UNKNOWN DISC” im Display angezeigt.
4 Die Gesamtzahl aller Titel wird im Display angezeigt. Drücken Sie nun
die SCAN/ > II -Taste, um den ersten Titel der CD/MP3 automatisch
abzuspielen.
Hinweis: Dieses Gerät can CD, CD-R, CD-RW disc, 8cm abspielen.
Wiedergabe unterbrechen
1 Drücken Sie die SCAN/ > II -Taste, um die Wiedergabe zu unterbrechen.
2 Um die Wiedergabe fortzusetzen, drücken Sie erneut die SCAN/ > II-
Taste.
Page 18

18
DE
Wiedergabe stoppen
Drücken Sie die STOP-Taste, um die Wiedergabe zu stoppen.
Zu einem anderen Titel springen
• Drücken Sie die |<< oder >>| -Taste, um zurück zum Liedanfang oder
vorherigen Titel oder vorwärts zum nächsten Titel zu springen.
• Drücken und halten Sie die |<< oder >>| -Taste, um vor- oder
zurückzuspulen.
Wiederholte Wiedergabe
1 Drücke Sie im Stop- oder Playback-Modus einmal die REPEAT-Taste an
der Fernbedienung. “REP_ONE” wird auf dem Display angezeigt. Die CD
spielt wiederholt den aktuellen Titel.
2 Drücken Sie die REPEAT-Taste zweimal. “REP_ALL” wird im Display
angezeigt. Die CD wird alle Titel wiederholt abspielen
3 Drücken Sie die REPEAT-Taste noch einmal, um die Wiederholungs-
Funktion aufzuheben.
Zufallswiedergabe
Alle Titel der CD können in zufälliger Reihenfolge gespielt werden.
1 Drücken Sie im Playback-Modus die RANDOM-Taste an der
Fernbedienung. Die “RANDOM”-Anzeige wird im Display angezeigt. Alle
Titel werden wahllos abgespielt.
2 Drücken Sie die |<< oder >>| -Taste, um den nächsten zufällig
gewählten Titel zu spielen.
3 Nachdem alle Titel einmal abgespielt wurden, endet die Wiedergabe
automatisch.
4 Um die Zufallswiedergabe aufzuheben, drücken Sie die RANDOM-Taste
während der zufälligen Wiedergabe (RANDOM Playback). Die normale
Wiedergabe wird fortgesetzt.
Page 19

19
DE
Programm-Einstellung (Nur Über Fernbedienung)
Sie können in beliebiger Reihenfolge bis zu 32 Titel im CD-Modus oder 64
Titel im MP3-Modus programmieren. Der Programmier-Modus kann vom
Stop-Modus aus aktiviert werden.
1 Drücken Sie die MEMORY-Taste, um in den Programmier-Modus zu
gelangen.
2 Drücken Sie die |<< oder >>| -Taste, um den Titel, den Sie
programmieren möchten, auszusuchen.
3 Drücken Sie die MEMORY-Taste, um den den Titel zu bestätigen.
4 Wiederholen Sie Schritte 2 und 3, um weitere Titel zu programmieren.
Wenn Sie die Programmierung abgeschlossen haben, drücken Sie die
SCAN/ > II-Taste., um die Wiedergabe der programmierten Titel zu starten.
Programm beenden
Um das Abspielprogramm aufzuheben önen und schließen Sie das CD-
Fach.
BT- BETRIEB
Das Gerät verfügt über eine BT-Funktion, die ein Signal innerhalb eines 8
Meter-Radius empfangen kann. Das Gerät mit einem BT-Gerät koppeln, um
Musik zu hören:
1 Drücken Sie vom STANDBY-Modus aus wiederholt die FUNCTION-Taste
am Gerät oder drücken Sie die BT-Taste an der Fernbedienung, um den
BT-Modus zu selektieren.
2 Falls das Gerät nicht bereits mit einem BT-Gerät gekoppelt ist, blinkt auf
dem Display nun “BT CONNECTED”.
3 Aktivieren Sie Ihr BT-Gerät und selektieren Sie SEARCH MODE
(Suchmodus).
4 “Harvard” erscheint nun auf Ihrer BT-Gerät-Liste.
5 Selektieren Sie “Harvard” und geben Sie ggf. “0000” als Passwort ein.
6 Um die BT-Funktion aufzuheben, drücken Sie die FUNCTION-Taste, um
auf einen anderen Modus zu schalten oder trennen Sie die Funktion von
Ihrem BT-Gerät.
Page 20

20
DE
Hinweis:
• Wenn das Signal schwach ist, kann es vorkommen, dass Ihr BTEmpfänger den Empfang unterbricht, den Paarungs-Modus aber von
selbst wieder aktiviert.
• Um einen besseren Signalempfang zu gewährleisten, entfernen Sie
Störfaktoren zwischen dem Gerät und dem BT-Gerät.
• Dieses Gerät unterstützt A2DP (Advanced Audio Distribution Prole)
und AVRCP (Audio Video Remote Control Prole) -Funktionen. Diese
können jeweils ausschließlich mit einem einzelnen BT-Gerät gekoppelt
werden.
• Die Kompabilität mit allen Geräten und Medienarten wird nicht
garantiert.
• Es ist möglich, dass manche Mobiltelefone mit BT-Funktion die
Verbindung trennen und wieder herstellen, wenn Sie Anrufe tätigen und
beenden. Dies weist nicht auf ein Problem mit Ihrem Gerät hin.
USB BETRIEB
1 Auf der Vorderseite des Geräts bendet sich ein USB-Anschluss. Wenn
ein USB-Gerät an das Gerät angeschlossen ist, drücken Sie wiederholt
die FUNCTION-Taste am Gerät oder drücken Sie die USB/CD-Taste an
der Fernbedienung, um den USB-Modus einzustellen.
2 Das Gerät zeigt automatisch die Gesamtzahl aller Titel an.
3 Alle Wiedergabe-Funktionen sind die gleichen wie beim Abspielen einer
MP3-CD.
REP_ONE : Drücken Sie die REPEAT-Taste einmal. “REP_ONE” wird auf dem
Display angezeigt. Der aktuelle Titel wird wiederholt gespielt..
REP_ALBUM: Drücken Sie die REPEAT-Taste zweimal. “REP_ALBUM” wird
auf dem Display angezeigt. Der aktuelle Folder (Ordner) wird wiederholt
gespielt.
REP_ALL: Drücken Sie die REPEAT-Taste dreimal. “REP_ALL” wird auf dem
Display angezeigt. Alle Datein werden wiederholt gespielt.
REP_OFF: Drücken Sie die REPEAT-Taste noch einmal. Die
Wiederholfunktion ist aufgehoben.
Page 21

21
DE
Hinweis:
• Das Gerät kann in USB-Modus nur MP3 Dateiformat spielen.
• Wenn Ihr USB-Gerät mit MP3‘s geladen ist, das Display aber “NO”
anzeigt, ist das Format Ihres USB-Geräts möglicherweise nicht mit dem
Gerät kompatibel.
• Dieses Gerät unterstützt USB Versionen 1.1 und 2.0.
• Das Gerät kann USB-Geräte mit bis zu 32GB Memory unterstützen.
• Das Gerät ist möglicherweise nicht mit allen USB-Geräten und
Speicherkarten kompatibel. Dies weist nicht auf ein Problem mit dem
Gerät hin.
WEITERE FUNKTIONEN
Auaden des Geräts
Sie können Ihr Gerät über den integrierten USB-Anschluss mit einem USB-
Ladekabel(nicht enthalten) auaden.
Hinweis: Die maximale Strombelastbarkeit für USB-Auadung ist 1A.
Es besteht keine Garantie, dass alle USB-Ladekabel mit dem Gerät
kompatibel sind.
AUDIO-IN Betrieb
1. Auf der Vorderseite des Geräts bendet sich ein AUDIO IN-Anschluss.
Analoge Audio- Tonsignale von anderen Audioquellen können über den
AUDIO-IN-Anschluss auf dieses Gerät übertragen werden.
2. Schließen Sie ein anderes Audiogerät mit einem AUX-Kabel(nicht
enthalten) über den AUDIO-IN-Anschluss an das Gerät an.
3. Drücken Sie wiederholt die FUNCTION-Taste am Gerät oder drücken
Sie die AUDIO-IN-Taste an der Fernbedienung, um den AUX-Modus zu
selektieren.
4. Drehen Sie den VOLUME+/- -Knopf am Gerät oder drücken Sie die
VOLUME+/- -Taste an der Fernbedienung, um die Lautstärkeregelung
für Ihren bevorzugten Lautstärke-Ausgangspegel festzulegen.
5. Bedienen Sie die Wiedergabefunktionen ihres angeschlossenes
Audiogeräts direkt über den AUX-Modus.
• Folgen Sie beim Anschluss des Externgeräts den Anweisungen in
dessen Bedienungsanleitung.
• Beispiele von externen Audiogeräten, die an dieses Gerät
angeschlossen werden können, sind: Tragbare MP3 Player,
Kassettenrekorder, Mini Disc Player, DVD Player, etc.
Page 22

22
DE
Automatiosche Abschaltung
• Wenn das Gerät mehr als 4 Stunden auf AUX-Modus gestellt ist,
schaltet es automatisch auf STANDBY-Modus um.
• 10 Minuten vor dem Ausschalten blinkt “AUTO-OFF” auf dem Display.
• Drücken Sie die RANDOM-Taste, um die AUTO-OFF- Funktion
aufzuheben.
PFLEGE UND INSTANDHALTUNG
• Säubern Sie Ihr Gerät mit einem feuchten(niemals nassen) Lappen.
Benutzen Sie niemals Lösungsmittel oder Seife.
• Vermeiden Sie es, das Gerät an heißen, schwülen oder staubigen Orten
stehen zu lassen.
• Halten Sie das Gerät von Heizkörpern und elektrischen Störquellen, wie
z. B. Leuchtstolampen oder Motoren fern.
Umgang mit CDs
• Wenn während der CD-Wiedergabe Aussetzer oder Unterbrechungen
in der Musik vorkommen, oder wenn die CD gar nicht spielt, ist
es möglich, dass die Oberäche der unteren Seite gesäubert
werden muss. Vor dem Spielen sollten Sie mit einem weichen Tuch
Fingerbdrücke und Staub vorsichtig abwischen.
• Benutzen Sie niemals Chemikalien, wie z.B.
Schallplattenreinigungssprays, antistatische Sprays oder Flüssigkeiten,
Benzol oder Verdünner, um CDs zu säubern. Solche Chemikalien
beschädigen die Plastikoberäche der Diskette unwiderruich.
• Legen Sie die CD immer sicher mit der Labelseite nach oben in die CDHalterung ein. CDs können nur auf einer Seite abgespielt werden.
• Um eine CD aus ihrem Gehäuse zu entfernen, drücken Sie auf die Mitte
des Gehäuses und nehmen Sie die Diskette heraus, indem Sie sie
vorsichtig an den Rändern greifen.
• Disks sollten nach Gebrauch wieder in Ihre Hülle gegeben werden, um
sie vor Staub und Kratzern zu schützen.
• Um das Wölben der Disk zu vermeiden, setzen Sie sie nicht für
längere Zeit direktem Sonnenlicht, hoher Luftfeuchtigkeit oder hohen
Temperaturen aus.
• Befestigen Sie keine Klebeetiketten und beschriften Sie die Diskette auf
keiner Seite. Die Tinte in manchen Markern könnte die Öberäche der
Disk beschädigen.
Page 23
23
DE
HINWEISE ZUR ENTSORGUNG
Bendet sich die linke Abbildung (durchgestrichene
Mülltonne auf Rädern) auf dem Produkt, gilt die
Europäische Richtlinie 2012/19/EU. Diese Produkte
dürfen nicht mit dem normalen Hausmüll entsorgt
werden. Informieren Sie sich über die örtlichen
Regelungen zur getrennten Sammlung elektrischer
und elektronischer Gerätschaften. Richten Sie sich
nach den örtlichen Regelungen und entsorgen
Sie Altgeräte nicht über den Hausmüll. Durch die
regelkonforme Entsorgung der Altgeräte werden
Umwelt und die Gesundheit ihrer Mitmenschen
vor möglichen negativen Konsequenzen geschützt.
Materialrecycling hilft, den Verbrauch von Rohstoen
zu verringern.
Das Produkt enthält Batterien, die der Europäischen
Richtlinie 2006/66/EG unterliegen und nicht mit dem
normalen Hausmüll entsorgt werden dürfen. Bitte
informieren Sie sich über die örtlichen Bestimmungen
zu gesonderten Entsorgung von Batterien. Durch
regelkonforme Entsorgung schützen Sie die Umwelt
und die Gesundheit ihrer Mitmenschen vor negativen
Konsequenzen.
Page 24
24
EN
Dear Customer,
Congratulations on purchasing this equipment. Please read this manual
carefully and take care of the following hints to avoid damages. Any failure
caused by ignoring the mentioned items and cautions mentioned in the
instruction manual are not covered by our warranty and any liability.
CONTENT
Safety Instructions 25
Product Description 26
Before rst Use 28
Functins and Settings 29
DAB+ Operation 32
FM Operation 36
CD Operation 38
BT Operation 40
USB Operation 41
Other Functions 42
Care and Maintenance 43
Hints on Disposal 44
TECHNICAL DATA
Item number 10031949, 10031950
Power supply 220-240 V ~ 50-60 Hz
DAB/DAB+ Tuner 174.928 (5A) MHz - 239.200 (13F) MHz
FM Tuner 87.5 MHz-108.0 MHz
DECLARATION OF CONFORMITY
Producer:
Chal-Tec GmbH, Wallstraße 16, 10179 Berlin, Germany.
This product is conform to the following European
Directives:
2014/35/EU (LVD)
2011/65/EU (RoHS)
2014/53/EU (RED)
Page 25

25
EN
SAFETY INSTRUCTIONS
On Protection Against Laser Energy Exposure
• As the laser beam used in this compact disc player is harmful to the
eyes, do not attempt to disassemble the casing.
• Stop operation immediately if any liquid or solid object should fall into
the cabinet.
• Do not touch the lens or poke at it. If you do, you may damage the lens
and the player may not operate properly.
• Do not put anything in the safety slot. If you do, the laser diode will be
“ON” when the CD door is still open.
• If the unit is not to be used for a long period of time, make sure that the
power source is disconnected from the unit. Unplug the AC cord from
the wall outlet. Make it a practice to remove the AC cord by grasping
the main body and not by pulling the cord.
• This unit employs a laser. The use of controls or adjustment or
performance of procedures other than those specied here may result
in exposure to hazardous radiation.
On Placement
• Do not use the unit in places which are extremely hot, cold, dusty or
humid.
• Place the unit on a at and even surface.
• Do not restrict the air ow of the unit by placing it in a place with poor
ventilation, by covering it with a cloth or by placing it on a carpet.
• Use only with the cart, stand, tripod, bracket, or table specied by the
manufacturer, or sold with the apparatus. When a cart is used, use
caution when moving the cart/apparatus combination to avoid injury
from tipover.
On Condensation
• When left in a heated room where it is warm and damp, water droplets
or condensation may form inside the unit.
• When there is condensation inside the unit, the unit may not function
normally.
• Let it stand for 1 to 2 hours before turning the power on, or gradually
heat the room up and dry the unit before use.
Page 26
26
EN
PRODUCT DESCRIPTION
1 REMOTE CONTROL SENSOR 8 MENU
2 STANDBY 9 CD/BLUETOOTH SKIP PREVIOUS |<</TUNE-
3 CD DOOR 10 VOLUME CONTROL KNOB
4 LCD DISPLAY 11 CD/BLUETOOTH SKIP NEXT >>|/TUNE+
5 CD DOOR OPEN/CLOSE 12 CD/BLUETOOTH PLAY/PAUSE
6 USB JACK 13 CD STOP/PAIRING
7 FUNCTION BUTTON 14. AUX IN JACK
1 MAINS CABLE 2 DAB/FM ANT
Page 27
27
EN
1 STANDBY BUTTON 15 MEMORY BUTTON
2 DISC DIRECT SEARCH BUTTON 16 TIME/CLK.SET BUTTON
3 REPEAT BUTTON 17 SLEEP BUTTON
4 CD/USB TRACK DOWN OR TIME
DOWN BUTTON / TUNER DOWN
18 FOLDER UP BUTTON/
TUNER PRESET UP
5 EQ BUTTON 19 RANDOM BUTTON
6 FM MONO/ST BUTTON 20 ENTER BUTTON
7 X-BASS BUTTON 21 CD/USB TRACK UP OR TIME UP
TUNER UP BUTTON
8 DAB/FM SELECT BUTTON 22 FOLDER DOWN BUTTON/ TUNER
PRESET DOWN
9 CD/USB SELECT BUTTON 23 FOLDER ON/OFF BUTTON
10. DAB INFO BUTTON 24 BLUETOOTH /AUX SELECT BUTTON
11. DAB/FM SCAN BUTTON 25 MUTE BUTTON
12. CD/USB DISPLAY/ BT PAIRING 26 DAB/FM MENU BUTTON
13. CD/USB/BT STOP BUTTON 27 VOLUME UP AND DOWN BUTTON
14. OPEN/CLOSE BUTTON 28 CD/USB/BT PLAY/PAUSE BUTTON
Page 28

28
EN
BEFORE FIRST USE
This unit operates on 100-240VAC ~ 50/60 Hz AC household current and
requires one CR2025 3V lithium battery (included) for the remote control.
Do not attempt to operate the unit from any other power source. You could
cause damage to the unit and void your warranty.
AC Power Connection
Plug the AC power cord into an available 100-240VAC ~ 50/60 Hz AC Outlet.
Make sure the plug is securely inserted into the AC outlet.
Remote Control
The remote control operates on one CR2025 3V lithium battery (included
in the remote). To activate the remote control, remove the insulator tab
inserted in the battery compartment.
If the remote operation becomes intermittent or unsatisfactory, replace the
original battery with a new CR2025 3V lithium battery.
1 Press down on the compartment cover, slide out the battery holder
from the remote control case.
2 Replace the battery making sure the battery is installed correctly. The
remote will not work if the battery is installed with the wrong polarity.
Note: If the battery is not replaced properly, the remote control may be
damaged. Replace only with the same or equivalent type battery.
Connecting to the Mains Socket
Unwind the mains cable to its full length. Connect the mains cable at the
rear of the main unit to the mains socket. The unit is now connected and
ready to use.
Page 29

29
EN
FUNCTINS AND SETTINGS
Powering ON/OFF
When you rst connect the unit to the mains socket, display will show the
“00:00:00”. If you can receive a DAB+ signal in your location, the unit will
synchronize to the current local time. After approximate one minute, it will
switch to STAND BY mode.
• Press the STANDBY on the unit or on the remote control to switch the
unit to ON mode.
• Press the STANDBY on the unit or on the remote control to switch the
unit back to STANDBY mode.
• Disconnect the mains plug from the mains socket if you want to switch
the unit o completely.
Note:
• When the unit is idle for approximately 15 minutes, it will automatically
switch to standby.
• Please turn the unit o completely to save energy when not in use.
Adjusting the Volume
• Turn the VOLUME +/– control on the unit or press the VOLUME +/–
buttons on the remote control to increase/decrease the volume.
• If you wish to turn the sound o, press the MUTE button on the remote
control. Press the MUTE button again or press the VOLUME +/– buttons
on the remote control or turn the VOLUME +/– control on the unit to
resume normal listening.
Manual Clock Setting
1 In Standby mode, press the CLOCK button on the remote control. The
hour digits ash on the display.
2 Press the |<< or >>| buttons to adjust the hour digits, and then press the
CLOCK button to conrm. The minute digits will ash on the display.
3 Press the |<< or >>| buttons to adjust the minute digits, and then press
the CLOCK button to conrm.
4 The time is now set.
Page 30

30
EN
Note: If the unit cannot receive any DAB+ signal, you can set the
clock manually. Once the DAB+ signal is received, the time will be
automatically updated.
Setting the Daily Timer
1 Press and hold the TIMER button on the remote control until the display
shows “On Timer”, and the hour digits ash.
2 Press the |<< or >>| buttons to adjust the hour digits, and then press the
TIMER button to conrm. The minute digits will ash on the display.
3 Press the |<< or >>| buttons to adjust the minute digits, and then press
the TIMER button to conrm.
4 When the |<< or >>| On Timer Clock set is set, the display will show
“O Timer” and the hour digits will ash.
5 Press the |<< or >>| buttons to adjust the hour digits, and then press the
TIMER button to conrm. The minute digits will ash on the display.
6 Press the |<< or >>| buttons on the remote control to adjust the minute
digits, and then press the TIMER button to conrm.
7 Press the buttons to select DAB, FM, DISC or USB mode, then press the
TIMER button to conrm. The display will show “VOL#” and ash. Press
the |<< or >>| buttons to adjust the volume, and then press the TIMER
button to conrm.
8 Press the TIMER button to select „Timer On“, and the Timer is now set.
9 In standby mode, the CLOCK icon will show on the display to indicate
the Timer is On.
To cancel the Daily Timer
Press the TIMER button on the remote control repeatedly to select Time O
mode. The CLOCK icon will disappear from the display.
Page 31

31
EN
Setting the Sleep Timer
Use the sleep timer to turn the unit o after a certain time in play mode. By
setting the sleep timer, you can fall asleep with music by knowing that your
unit will turn o by itself rather than playing all night.
1 To set the sleep timer press the SLEEP button on the remote control
repeatedly to select the desired sleep timer as below: 90>80>70>60>
50>40>30>20>10>OFF
2 The sleep timer is now set.
3 Press the SLEEP button to show the reminding time before the unit turn
o automatically.
4 To cancel the sleep timer, press the SLEEP button repeatedly to select
“Sleep OFF”.
EQ Control
This system supports a variety of equalizers and sound eects. During
playback, press the EQ button on the remote control to select a desired
music mode. Each time the EQ button is pressed, the music mode will
change to the next one as follows:
System Reset
There may be times when you need to reset your unit back to the factory
settings especially when you have moved house. If you experience
reception problems you may want to reset and try again. If you move to
another part of the country and pick up the local and national DAB+ signals
in that area, your previously tuned channels may no longer be available.
1 During DAB mode, open the CD Disk tray then press and hold the
STOP button on the unit until the display shows “Restarting…FACTORY
RESET”.
2 After the unit is reset, it will return to DAB mode.
NOTE: After the system reset, all the tuned stations, FM/DAB+ preset
stations will be erased.
Page 32

32
EN
DAB+ OPERATION
If the unit is connected to the mains power and then switched on from
standby for the rst time, the unit will automatically enter into the DAB
mode and perform auto scan function. During the scan the display will show
“Scanning…” together with a slide bar that indicates the progress of the
scan and the amount of stations that have been found so far.
Once the scan has nished, the unit will select the rst alphanumerically
found station. To explore the found stations, press the |<< or >>| buttons.
Full Scan
The full scan will search for the entire DAB+ Band III channels. After the scan
has nished, the rst alphanumerically found station will be automatically
selected.
1 To activate auto scan, press the SCAN button and the display will show
“Scanning …” and a progressing slide bar.
2 All the stations that have been found will be stored automatically. To
explore and listen to the found stations, press the |<< or >>| buttons to
select. Then press the ENTER button conrm into stations.
Manual Tuning
As well as the auto tune function, you can manually tune the receiver. This
can help you when aligning your aerial or when adding stations that were
missed while auto tuning.
1 Press the MENU button on the remote control to display the menu.
2 Press the ENTER button to select Manual tune.
3 Press thebuttons to cycle through the DAB+ channels, which are
numbered from 5A to 13F.
4 After your desired channel number is selected, press the ENTER button
to conrm. The display will show the multiplex.
5 Press the MENU button again to add selected channel to station list.
Page 33

33
EN
DRC (Dynamic Range Compression)
If you are listening to music with high dynamic range in a noisy
environment, you may wish to compress the audio dynamic range.
1 Press the MENU button on the remote control to display the menu.
2 Press the |<< or >>| buttons to select “DRC” and then press the ENTER
button on the remote control to conrm.
3 Press the |<< or >>| buttons to select o / high / low.
4 Press the ENTER button on the remote control to conrm.
Prune
You may remove all unavailable stations from the list.
1 During DAB mode, press the MENU button on the remote control to
display the menu.
2 Press the |<< or >>| buttons to select “Prune” and then press the ENTER
button on the remote control to conrm.
3 Press the |<< or >>| to select <YES>, and then press the ENTER button
on the remote control to delete the unavailable stations.
4 You can press the |<< or >>| to select <NO>, and then press the ENTER
button on the remote control to cancel.
Software Information
1 In DAB mode, press the MENU button on the remote control to display
the menu.
2 Press the |<< or >>| buttons to select “SW version”.
3 Press the ENTER button on the remote control to display the software
version.
4 Press the MENU button to exit.
Page 34

34
EN
Secondary Services
You may see a “ > ” symbol after the name of the station, this indicates that
there are secondary services available to that station. These secondary
services contain extra services that are related to the primary station. e.g. a
sports station may want to add extra commentaries. The secondary services
are inserted directly after theprimary station in the station list.
To select the secondary station, press the MENU button when the “>”
appears in the display before the station name. When the secondary service
ends, the unit will automatically switch back to the primary station.
Preset Stations
(Remote Control Only)
1 Press and hold the MEMORY button. The display will show “<Save to
P#>”.
2 Press the PRESET UP or DOWN buttons to select your desired preset
station number. Then press the ENTER button conrm.
3 The station will be stored in few seconds and the display will then show
“Preset #Stored”.
Recalling a Stored Station
(Remote Control Only)
1 Once you have saved a station to one of the preset buttons, you can
recall it by pressing the MEMORY button.
2 Press the PRESET UP or DOWN buttons until your desired station show
on the display.
DAB Display Modes
Press the INFO button on the remote control, the display will switch through
the following display modes. The information of each display mode is
displayed on the lower segment of the display.
Signal Strength
The display will show a slide bar to indicate the signal strength, the stronger
the signal, the longer the bar will be from left to right.
Page 35

35
EN
Programme Type
This describes the “style” or “genre” of the programme that is being
broadcast.
Ensemble
This displays the name of the multiplex that contains the station you are
listening to. A multiplex is a collection of radio stations that are bundled
and transmitted on one frequency. There are national and local multiplexes.
Local ones contain stations that are specic to that area.
Note: DAB – unlike normal radio, groups together several radio stations
and transmits them on one frequency.
Frequency
This displays the frequency of the present station, such as “11C
220.352MHz”.
Signal Error
This displays a number showing the error rate. If the number is 0, it means
the signal received is error free and the signal strength is strong. If the error
rate is high, it is recommended to re-orient the aerial or re-position the unit.
Audio Bit Rate
The display will show the digital audio bit rate being received.
Time / Date
This displays the current time and date provided automatically by the
broadcaster.
DLS (Dynamic Label Segment)
Dynamic label segment is a scrolling message that the broadcaster may
include with their transmissions. The message usually includes information,
such as program me details etc.
Page 36

36
EN
FM OPERATION
SWITCHING FROM DAB TO FM MODE
To switch the unit to FM mode, press the FUNCTION button repeatedly
to select FM mode or press the DAB/FM button on the remote control to
switch to FM mode. The display will show the frequency.
Auto Scan
Press the SCAN button until the tuner starts searching for a station. To scan
down the frequency band, press and hold the SCAN button. Once a station
has been found, the scanning will stop automatically.
Manual Scan
To search for FM stations manually, press the |<< or >>| buttons repeatedly
until your desired frequency is reached.
Scan Setting
This is a scanning option to scan all stations, or just scan stations with a
strong signal.
1 Press the MENU button, then press the |<< or >>| buttons to select
“Scan setting”. Press the ENTER button to conrm.
2 Press the |<< or >>| buttons to select ”All stations” or “Strong stations
only”. Press the ENTER button to conrm.
Audio Setting
This unit will automatically switch between stereo and mono mode, but
you can override this and switch this function manually. This can be helpful
when receiving poor signal reception.
1 Press the MENU button, then press thebuttons to select “Audio setting”.
Press the ENTER button to conrm.
2 Press thebuttons to select “Stereo allowed” or “Forced mono” and then
press the ENTER button to conrm.
Page 37

37
EN
Audio Mode
Press the MONO/STEREO button on the remote control to toggle between
the Stereo or Mono modes.
Preset Stations
You can store up to 20 of your favourite stations to the memory. This will
enable you to access your favourite stations quickly and easily.
1 To store a preset, you must rst be listening to the station that you
would like to save, press and hold the MEMORY button. The display will
show “Save to P#”.
2 Press the PRESET buttons to select your desired preset station number.
Then press the ENTER button conrm.
3 The station will be stored in few seconds and the display will then show
“Preset #Stored”.
Recalling a Stored Station
1 Once you have saved a station to one of the preset buttons, you can
recall it by pressing the MEMORY button.
2 Press the PRESET buttons until your desired station show on the
display; Then press the ENTER button conrm.
FM Display Modes
Press the DISPLAY button on the remote control, the display will switch
through the following display modes.The information of each display mode
is displayed on the lower segment of the display.
Radio Text
As with DAB, the broadcaster can include a scrolling text that displays
information about the current program.
Page 38

38
EN
Programme Type
This describes the “style” or “genre” of the programme that is being
broadcast.
Frequency
This displays the frequency of the present station, such as „87.50 MHz“.
Audio Type
This displays if the station being received is in mono or stereo.
Time / Date
The broadcaster (Radio station) provides clock and date information
automatically so there’s no need to manually set this information.
CD OPERATION
Press the FUNCTION button repeatedly on the unit or press CD on the
remote control to select CD mode.
Playback
1 Press the open/close button to open the disc tray.
2 Place the CD with the label side up into the CD compartment, and then
press the open/close button to close the disc tray.
3 If there is no disc or the disc can’t be read, “NO DISC” or “Unknown
Disc” will show on the display.
4 The total number of tracks will display on the display, then press the
SCAN button to play the rst track of the CD/MP3 disc automatically
This unit can play CD, CD-R, CD-RW disc, 8cm.
To Pause Playback
1 Press the SCAN button to pause the playback.
2 To resume playback, press the SCAN button again.
Page 39

39
EN
To Stop Playback
Press the STOP button to stop playback.
Skipping to another Track
• Press the|<< or >>|buttons to skip backwards to the beginning of the
track or previous track or skip forwards to the next track.
• Press and hold the |<< or >>| buttons to perform fast forward/reverse
playback.
Repeat Playback
1 During stop or playback mode,press the REPEAT button once on the
remote control, “REP_ONE” will show on the display. The CD will play
the current track repeatedly.
2 Press the REPEAT button twice, “REP_ALL” will show on the display. The
CD will play all tracks repeatedly.
3 Press the REPEAT button once more again, the REPEAT function will turn
o.
Random Playback
All tracks on the disc can be played in a random order.
1 During playback mode, press the RANDOM button on the remote
control. The“RANDOM” indicator will show on the display. All tracks will
be played randomly.
2 Press the |<< or >>| buttons to playback the next random track.
3 After all the tracks have played once, the playback will stop
automatically.
4 To cancel random playback, press the RANDOM button during
RANDOM playback. Normal playback will resume.
Page 40

40
EN
Programme Setting
(Remote Control Only)
User can program up to 32 tracks in CD mode or 64 tracks in MP3 in any
desired order. Programme mode is activated while in STOP mode.
1 Press the MEMORY button to enter programme mode.
2 Press the |<< or >>| buttons to select the track that you want to preset.
3 Press the MEMORY button to conrm the track.
4 Repeat steps 2-3 to programme more tracks. Once it is completed,
press the SCAN/ button to start playback of the programmed tracks.
Programme Cancel
To cancel the programme, press thebutton twice, or open the disk tray and
then close it again.
BT OPERATION
The unit has a BT function that can receive a signal within 8 metres.
Pairing the unit with a BT device to listen to music:
1 While in the STANDBY mode, press the FUNCTION button repeatedly
on the unit or press the BT button on the remote control to select BT
mode.
2 If the unit is not paired with any BT device, the display will ash “BT
CONNECTED”.
3 Activate your BT device and select the search mode.
4 “Harvard” will appear on your BT device list.
5 Select “Harvard” and enter “0000” for the password if necessary.
6 To disconnect the BT function, press the FUNCTION button to switch to
another mode or disconnect the function from your BT device.
Page 41

41
EN
Note:
• If the signal strength is weak, your Bluetooth receiver may disconnect,
but it will re-enter pairing mode automatically.
• For a better signal reception, remove the obstacles between the unit
and the Bluetooth device.
• This unit supports A2DP (Advanced Audio Distribution Prole) and
AVRCP (Audio Video Remote Control Prole) functions. This can only be
paired with one Bluetooth device at one time.
• Compatibility with all devices and media types is not guaranteed.
• Some mobile phones with the Bluetooth function may connect and
disconnect as you make and end calls. This is not an indication of a
problem with your unit.
USB OPERATION
1 There is an USB socket located at the front of the unit. When a USB
device is connected to the unit, press the FUNCTION button repeatedly
on the unit or press the USB/CD button on the remote control to select
USB mode.
2 The unit will automatically display the total number of tracks.
3 All playback features are the same as if you were playing an MP3 CD.
REP_ONE : Press the REPEAT button once, “REP_ONE” will show on the
display. It will play the current track repeatedly.
REP_ALBUM : Press the REPEAT button twice, “REP_ALBUM” will show on
the display. It will play the current folder repeatedly.
REP_ALL : Press the REPEAT button three times, “REP_ALL” will show on the
display. It will play all les repeatedly.
REPEAT OFF: Press the REPEAT button once more again, the repeat function
will turn o.
Page 42

42
EN
Note:
• The unit can only play MP3 le format in USB operation.
• If your USB device is loaded with MP3’s but the display keeps showing
“NO” on the display, the format of your USB device might not be
compatible with the unit.
• This unit supports USB versions 1.1 and 2.0.
• The unit can support USB devices with up to 32GB of memory.
• The unit may not be compatible with all USB devices and memory
cards, this is not an indication of a problem with the unit.
OTHER FUNCTIONS
Charge Your Device
You can charge your device through the USB socket on this unit with a USB
cable (not supplied).
Note: The maximum current for USB charging is 1A. All devices for USB
charging are not guaranteed.
AUDIO IN Operation
1 There is an AUDIO IN socket located at the front of the unit. Analogue
audio sound signals from other audio sources can be input to the unit
through this socket.
2 Connect the input to another audio device via an AUX cable (not
included) with AUDIO IN socket.
3 Press the FUNCTION button repeatedly on the unit or press the AUDIO
IN button on the remote control to select AUX mode.
4 Turn the VOLUME+/- control on the unit or press the VOLUME +/–
buttons on the remote control to adjust the volume control for your
desired sound output level.
5 In AUX mode, operate your connected audio device directly for
playback features.
• When connecting the external audio device, refer to the owner’s manual
of the external device.
• Examples of External Audio Device that can be connected to the unit
are: Portable MP3 Players, Cassette Players, Mini Disc Players, DVD
Players, etc.
Page 43

43
EN
4-Hour Playback
1 If the unit is in AUX mode more than 4 hours, it will automatically switch
to standby mode.
2 10 minutes before entering standby, “AUTO-OFF” will ash on the
display.
3 Press the RANDOM button to continue cancel auto o function.
Note: The maximum current for USB charging is 1A. All devices for USB
charging are not guaranteed.
CARE AND MAINTENANCE
1 Clean your unit with a damp (never wet) cloth. Solvent or detergent
should never be used.
2 Avoid leaving your unit in hot, humid or dusty places.
3 Keep your unit away from heating appliances and sources of electrical
noise such as uorescent lamps or motors.
Handling CD Discs
• If drop-outs or interruptions occur in the music during CD play, or if the
CD fails to play at all, its bottom surface may require cleaning. Before
playing, ngerprints and dust should be carefully wiped o with a
soft cloth. Wipe in a straight motion from the center of the disc to the
outside edge with a good soft cleaning cloth.
• Never use chemicals, such as record cleaning sprays, antistatic sprays or
uids, benzene or thinner to clean compact discs. These chemicals will
permanently damage the plastic surface of the disc.
• Always install the compact disc securely on the disc clampers with the
label side facing up. Compact discs can be played on only one side.
• To remove a disc from its storage case, press down on the center of the
case and lift the disc out, holding it carefully by the edges.
• Discs should be returned to their cases after use to protect them from
dust and scratches.
• To prevent warping the disc, do not expose it to direct sunlight, high
humidity or high temperature for extended periods of time.
• Do not apply adhesive labels or write anything on either side of the
disc. The inks used in some felt-tips pens may damage the surfaces of
the disc.
Page 44

44
EN
HINTS ON DISPOSAL
According to the European waste regulation
2012/19/EU this symbol on the product or on its
packaging indicates that this product may not be
treated as household waste. Instead it should be
taken to the appropriate collection point for the
recycling of electrical and electronic equipment. By
ensuring this product is disposed of correctly, you
will help prevent potential negative consequences
for the environment and human health, which could
otherwise be caused by inappropriate waste handling
of this product. For more detailed information about
recycling of this product, please contact your local
council or your household waste disposal service.
Your product contains batteries covered by the
European Directive. 2006/66/EC, which cannot
be disposed of with normal household waste.
Please check local rules on separate collection of
batteries. The correct disposal of batteries helps
prevent potentially negative consequences on the
environment and human health.
Page 45

45
FR
Cher client,
Toutes nos félicitations pour l’acquisition de ce nouvel appareil. Veuillez
lire attentivement les instructions suivantes de branchement et d’utilisation
an d’éviter d’éventuels dommages. Le fabricant ne saurait être tenu pour
responsable des dommages dus au non-respect des consignes de sécurité et
à la mauvaise utilisation de l’appareil.
SOMMAIRE
Consignes de sécurité 46
Aperçu de l’appareil 47
Avant la première utilisation 49
Fonctions et réglages 50
Fontionnement DAB+ 53
Fonctionnement de la FM 57
Utilisation des CD 59
Fonctionnemnt BT 61
Fonctionnement USB 62
Autres fonctions 63
Entretien et maintenance 64
Conseils pour le recyclage 65
FICHE TECHNIQUE
Numéro d’article 10031949, 10031950
Alimentation 220-240 V ~ 50-60 Hz
Tuner DAB/DAB+ 174.928 (5A) MHz - 239.200 (13F) MHz
Tuner FM 87.5 MHz-108.0 MHz
DÉCLARATION DE CONFORMITÉ
Fabricant :
Chal-Tec GmbH, Wallstraße 16, 10179 Berlin,
Allemagne.
Ce produit est conforme aux directives
européennes suivantes :
2014/35/UE (LVD)
2011/65/UE (RoHS)
2014/53/UE (RED)
Page 46

46
FR
CONSIGNES DE SÉCURITÉ
Protection contre les rayons laser
• N’essayez pas de démonter le boîtier car le rayon laser de ce lecteur de
CD est dangereux pour les yeux.
• Cessez immédiatement d’utiliser l’appareil si des liquides ou des corps
étrangers pénètrent dans le boîtier.
• Ne touchez pas à la lentille. Cela peut l’endommager et empêcher le
lecteur de fonctionner correctement à l’avenir.
• N’insérez rien dans la fente de sécurité car la diode laser est sur “ON” si
le clapet est resté ouvert.
• Assurez-vous que l’appareil ne reçoit plus de courant lorsque vous ne
vous en servez plus. Débranchez la che de la prise. Pour cela prenez
tirez toujours sur la che et non sur le câble.
• Cet appareil utilise un laser. Utilisez les commandes et les réglages
uniquement aux ns prévues et décrites ici, pour ne pas vous exposer à
des rayonnements dangereux.
Emplacement
• N’utilisez pas cet appareil dans des lieux extrêmement chauds, froids,
poussiéreux ou mal aérés.
• Installez l’appareil sur une surface lisse et horizontale.
• Ne gênez pas la ventilation de l’appareil en l’installant dans un endroit
mal ventilé, en le couvrant avec un chion ou en l’installant sur un tapis.
• Utilisez l’appareil uniquement avec un chariot, une étagère, un trépied,
support ou table recommandés par le fabricant ou acheté en même
temps. Si vous utilisez un chariot, déplacez l’ensemble chariot /appareil
avec précaution, pour éviter de vous blesser en renversant l’appareil.
Condensation
• Si vous laissez l’appareil dans une pièce chaude et humide, des gouttes
d’eau ou de la condensation peuvent se former dans le boîtier.
• Si de la condensation se forme dans le boîtier, il se peut que l’appareil
ne fonctionne pas correctement.
• Laissez-le reposer 1 à 2 heures avant de le rallumer, ou bien réchauez
doucement la pièce et laissez l’appareil sécher avant de l’allumer. Si
un problème apparaît, débranchez l’appareil de son alimentation et
consultez un spécialiste qualié.
Page 47

47
FR
APERÇU DE L’APPAREIL
1 TOUCHE TÉLÉCOMMANDE 8 TOUCHE MENU
2 TOUCHE VEILLE 9 TOUCHE CD/BT SAUT DE TITRE ARRIÈRE /TUNE-
3 LECTEUR CD 10 RÉGLAGE DU VOLUME
4 ÉCRAN LCD 11 TOUCHE CD/BT SAUT DE TITRE AVANT / TUNE+
5 TOUCHE POUR OUVRIR/
FERMER LE LECTEUR CD
12 CD/BT PLAY/PAUSE
6 PORT USB 13 TOUCHE CD STOP/APPARIEMENT
7 TOUCHE DE FONCTION 14 PRISE AUX IN
1 CÂBLE SECTEUR 2 ANTENNE DAB/FM
Page 48

48
FR
1 TOUCHE VEILLE 15 TOUCHE MEMORY
2 TOUCHE RECHERCHE DIRECTE 16 TOUCHE TIME/CLOCK SET
3 TOUCHE REPEAT 17 TOUCHE SLEEP
4 TOUCHE CD/USB TRACK DOWN OU
TOUCHE TIME DOWN / TOUCHE TUNER
DOWN
18 TOUCHE FOLDER UP / TOUCHE
TUNER PRESET
5 TOUCHE EQ 19 TOUCHE RANDOM
6 TOUCHE FM MONO/ST 20 TOUCHE ENTER
7 TOUCHE X-BASS 21 TOUCHE CD/USB TRACK UP OU TIME
UP/ TUNER UP
8 TOUCHE DAB/FM SELECT 22 TOUCHE FOLDER DOWN /TUNER
PRESET DOWN
9 TOUCHE CD/USB SELECT 23 TOUCHE FOLDER ON/OFF
10 TOUCHE DAB INFO 24 TOUCHE BT/AUX SELECT
11 TOUCHE DAB/FM SCAN 25 TOUCHE MUTE
12 TOUCHE CD/USB DISPLAY/
APPARIEMENT BT
26 TOUCHE DAB/ MENU FM
13 TOUCHE CD/USB/BT STOP 27 MENU VOLUME UP AND DOWN
14 TOUCHE OPEN/CLOSE 28 TOUCHE CD/USB/BT PLAY/PAUSE
Page 49

49
FR
AVANT LA PREMIÈRE UTILISATION
Cet appareil fonctionne sur le courant domestique 100-240VAC ~ 50/60 Hz
AC et utilise une pile au lithium CR2025 3 V (fournie) pour la télécommande.
N’essayez jamais de brancher l’appareil sur une autre alimentation
électrique. Vous pourriez endommager l’appareil et vous perdriez la
garantie.
Branchement sur le secteur
Branchez le câble secteur dans une prise 100-240VAC ~ 50/60 Hz. Vériez
que la che est bien insérée dans la prise.
Télécommande
La télécommande utilise une pile au lithium CR2025 3 V (fournie). Pour
activer la télécommande, retirez la bande isolante dans le compartiment
à piles. Si la télécommande s’éteint ou ne fonctionne plus correctement,
remplacez la pile par une nouvelle pile CR2025 3 V.
1 Appuyez doucement vers le bas sur le cache du compartiment à pile et
retirez le support des piles du boîtier de la télécommande.
2 Remplacez la pile et assurez-vous qu’elle est installée correctement en
respectant la polarité. La télécommande ne fonctionne pas si la pile est
installée à l’envers.
Brancher l’appareil
Déroulez entièrement le câble secteur. Branchez le câble secteur à l’arrière
e l’appareil sur la prise d’alimentation. L’appareil est maintenant branché et
prêt à l’utilisation.
Page 50

50
FR
FONCTIONS ET RÉGLAGES
Allumer/ éteindre l’appareil
Lorsque vous branchez l’appareil pour la première fois dans une prise,
l’écran aiche “00:00:00”. Si vous captez un signal DAB+ -, l’appareil
se met tout seul à l’heure locale. Au bout d’une minute environ, il passe
automatiquement en mode STANDBY.
• Appuyez la touche STANDBY de l’appareil ou de la télécommande pour
mettre l’appareil en mode ON.
• Appuyez sur STANDBY sur l’appareil ou la télécommande, pour
remettre l’appareil en mode STANDBY.
• Débranchez le câble secteur de la prise d’alimentation si vous voulez
éteindre complètement l’appareil.
Remarque :
• Si l’appareil est resté inactif pendant environ15 minutes, il passe
automatiquement mode Standby.
• Veuillez éteindre complètement l’appareil lorsque vous ne l’utilisez pas,
pour économiser de l’énergie.
Réglage du volume
• Tournez le bouton VOLUME+/- de l’appareil ou appuyez sur l VOLUME
+/- sur la télécommande pour augmenter ou réduire le volume.
• Si vous voulez couper le son, appuyez sur MUTE. Appuyez de nouveau
sur MUTE ou les touches VOLUME+/- de la télécommande, ou bien
tournez le bouton VOLUME+/- de l’appareil pour rétablir le son.
Réglage de l’heure
1 En mode Standby, appuyez sur la touche CLOCK de la télécommande.
Les chires de l’heure clignotent à l’écran.
2 Appuyez sur la touche |<< ou >>| pour régler les heures, et appuyez sur
la touche CLOCK pour conrmer. Les chires des minutes clignotent à
l’écran.
3 Appuyez sur la touche |<< ou >>| pour régler les minutes, puis appuyez
sur la touche CLOCK pour conrmer.
4 L’heure est maintenant réglée.
Page 51

51
FR
Remarque : si l’appareil ne capte aucun signal DAB+, vous pouvez
régler l’heure manuellement. Dès qu’un signal DAB+ sera reçu, l’heure
s’actualisera automatiquement.
Réglage de la minuterie
1 Appuyez et maintenez la touche TIMER de la télécommande jusqu’à ce
que l’écran aiche “ON TIMER” et que les chires des heures clignotent.
2 Appuyez sur la touche |<< ou >>| pour régler les heures et appuyez sur
la touche TIMER pour conrmer. Les chires des minutes clignotent à
l’écran.
3 Appuyez sur la touche |<< ou >>| pour régler les chires des minutes,
puis appuyez sur la touche TIMER pour conrmer.
4 Si la touche |<< ou >>| est réglée sur ON Timer Clock set, l’écran aiche
“O Timer” et les chires des heures clignotent.
5 Appuyez sur la touche |<< ou >>| pour régler les heures puis appuyez
sur la touche TIMER pour conrmer. Les chires des minutes clignotent
à l’écran.
6 Appuyez sur la touche |<< ou >>| de la télécommande pour régler les
chires des minutes, puis appuyez sur la touche TIMER pour conrmer.
7 Appuyez sur les touches pour choisir les modes DAB, FM, DISC ou USB,
puis appuyez sur la touche TIMER pour conrmer. L’écran aiche “VOL#”
et clignote. Appuyez sur la touche |<< ou >>| pour régler le volume, puis
appuyez sur la touche TIMER pour conrmer.
8 Appuyez sur la touche TIMER pour sélectionner “Timer On”. La
minuterie est maintenant réglée.
9 En mode Standby, le symbole HEURE est aiché à l’écran pour signaler
que la minuterie est activée.
Désactiver la minuterie
Appuyez plusieurs fois sur la touche Timer de la télécommande pour choisir
le mode Time O. Le symbole HEURE disparaît de l’écran.
Page 52

52
FR
Programmation de l’arrêt automatique
Utilisez la minuterie d’arrêt automatique pour éteindre l’appareil après une
durée de fonctionnement déterminée en mode lecture. Le réglage de la
minuterie d’arrêt automatique vous permet de vous endormir en écoutant
de la musique tout en sachant que votre appareil s’éteindra tout seul plutôt
que de rester allumé toute la nuit.
1 Pour programmer l’arrêt automatique, appuyez plusieurs fois sur la
touche SLEEP de la télécommande et choisissez l’une des durées
proposées avant l’arrêt de l’appareil, dans l’ordre suivant : 90> 80 > 70
> 60 > 50 > 40 > 30 > 20 > 10 > OFF
2 L’arrêt automatique est maintenant activé.
3 Appuyez sur la touche SLEEP pour aicher la durée restante avant
l’arrêt automatique.
4 Pour désactiver l’arrêt automatique, appuyez plusieurs fois sur la touche
SLEEP pour sélectionner “SLEEP OFF”.
Réglage de l’égaliseur
Ce système comporte un grand nombre de choix d’égaliseurs et d’eet
sonores. Pendant la lecture, appuyez sur la touche EQ de la télécommande
pour choisir un mode de musique. A chaque appui sur la touche EQ le mode
de musique change dans l’ordre suivant :
Réinitialisation du système
Il peut arriver que vous ayez besoin de réinitialiser votre appareil aux
paramètres d’usine, surtout en cas de déménagement. Si vous avez des
diicultés de réception, il peut être utile de réinitialiser le système et
d’essayer à nouveau. Si vous déménagez dans une nouvelle région et que
vous recevez les signaux DAB+ locaux et nationaux de cette région, il se
peut que vos réglages précédents et stations enregistrées ne soient plus
disponibles.
1 En mode DAB, ouvrez le lecteur CD et appuyez et maintenez la touche
STOP de l’appareil, jusqu’à ce que l’écran aiche “Restarting... FACTORY
RESET”.
2 Après avoir réinitialisé l’appareil, il retourne en mode DAB.
Remarque : lors d’une réinitialisation du système, toutes les stations
réglées et les stations FM/DAB+ sont eacées.
Page 53

53
FR
FONTIONNEMENT DAB+
Lorsque vous branchez l’appareil sur le secteur et que vous l’allumez pour la
première fois à partir du mode Standby, l’appareil se met automatiquement
en mode DAB et eectue un Auto-Scan. Pendant le scan, l’écran aiche à
côté de “Scanning...” une barre de progression qui représente l’avancement
du scan et le nombre de stations trouvées jusqu’ici. A la n du scan,
l’appareil choisir la première station dans l’ordre alphanumérique. Pour
découvrir les stations trouvées, appuyez sur la touche |<< ou >>|.
Full Scan
Le Full Scan parcourt tous les canaux DAB+ Band II. A la n du scan, la
première station de l’ordre alphanumérique est choisie automatiquement.
1 Pour activer l’auto-scan, appuyez sur la touche SCAN, l’écran aiche
alors “Scanning...” ainsi qu’une barre de progression.
2 Toutes les stations trouvées sont automatiquement enregistrées. Pour
connaître les stations trouvées et les écouter, appuyez sur la touche
|<< ou >>| pour les sélectionner. Pour mémoriser des stations en accès
direct, appuyez sur la touche “ENTER”.
Tuner manuel
Outre la fonction Auto-Tune vous pouvez aussi régler manuellement le
récepteur. Cela est utile lorsque vous orientez votre antenne ou lorsque
vous ajoutez des stations qui n’ont pas été trouvées par la recherche
automatique Auto-Tuning.
1 Appuyez sur la touche MENU de la télécommande pour aicher le
menu.
2 Appuyez sur la touche ENTER pour choisir Manual tune.
3 Appuyez sur la touche |<< ou >>| pour parcourir les canaux DAB+
numérotés de 5A à 13F.
4 Une fois que vous avez choisi votre canal, appuyez sur la touche Enter
pour conrmer. L’écran aiche le Multiplex.
5 Appuyez de nouveau sur la touche ENTER pour conrmer le choix du
canal comme station Pre- Set.
Page 54

54
FR
Drc (Dynamic Range Compression)
Lorsque vous écoutez de la musique avec beaucoup d’amplitude sonore
dans un environnement bruyant, vous souhaiterez peut-être réduire cette
amplitude audio dynamique.
1 Appuyez sur la touche MENU de la télécommande pour aicher le
menu.
2 Appuyez sur la touche |<< ou >>| pour choisir “DRC” puis conrmez en
appuyant sur la touche ENTER de la télécommande.
3 Appuyez sur la touche |<< ou >>| pour choisir parmi o/ high/ low.
4 Conrmez en appuyant sur la touche ENTER de la télécommande.
Prune
Vous pouvez supprimer de la liste toutes les stations indisponibles.
1 En mode DAB, appuyez sur la touche MENU de la télécommande pour
aicher le menu.
2 Appuyez sur la touche |<< ou >>| pour choisir “Prune” et conrmez en
appuyant sur la touche ENTER.
3 Appuyez sur la touche |<< ou >>| pour faire votre sélection, puis
appuyez sur la touche ENTER de la télécommande pour supprimer les
stations indisponibles.
4 Vous pouvez appuyer sur la touche |<< ou >>| pour faire votre sélection
et terminer en appuyant sur la touche ENTER de la télécommande pour
supprimer.
Information sur le logiciel
1 En mode DAB, appuyez sur la touche MENU de la télécommande pour
aicher le menu.
2 Appuyez sur la touche |<< ou >>| pour choisir “SW version”.
3 Appuyez sur la touche ENTER de la télécommande pour aicher la
version de Software.
Page 55

55
FR
Sous-menus et fonctions
Vous voyez probablement un symbole “ > “ qui suit le nom de la station.
Cela signie que des services complémentaires sont disponibles sur
cette station. Les services complémentaires comprennent des extras qui
sont en lien avec les stations primaires. Ainsi par exemple, une station
sportive qui veut ajouter des reportages complémentaires. Les services
complémentaires sont ajoutés dans la liste des stations directement
derrière l’émetteur primaire. Pour choisir l‘émetteur secondaire, appuyez
sur la touche MENU lorsque le signe “ > “ est aiché sur l‘écran devant le
nom de la station. A la n du service complémentaire, l‘appareil retourne
automatiquement à l‘émetteur primaire.
Station préréglée (Télécommande uniquement)
1 Appuyez et maintenez la touche die MEMORY-Taste. L‘écran aiche
“<Save to P # >“.
2 Appuyez sur la touche PRESET < ou > pour sélectionner le numéro de
la station préréglée souhaitée. Conrmez ensuite en appuyant sur la
touche ENTER.
3 La station est mémorisée au bout de quelques secondes et l‘écran
aiche ensuite „Preset #Stored“.
Lecture d’une station mémorisée
(Télécommande uniquement)
1 Lorsque vous avez associé une station à une touche d‘accès rapide, vous
pouvez la sélectionner en appuyant sur la touche MEMORY.
2 Appuyez et maintenez la touche PRESET jusqu‘à ce que la station voulue
apparaisse à l‘écran ; conrmez ensuite en appuyant sur la touche
ENTER pour écouter la station.
Modes d’aichage Dab
Appuyez sur la touche DISPLAY de la télécommande. L‘écran aiche les uns
après les autres les modes d‘aichage. Les informations de chaque mode
d‘aichage sont indiquées dans la partie asse de l‘écran.
Signal Strength (Force du signal)
L‘écran aiche une barre de progression pour traduire la force du signal ;
plus le signal est fort, plus la barre est longue de gauche à droite.
Page 56

56
FR
Programme Type (Genre de programme)
Indique le genre ou le style de programme diusé.
Ensemble
Indique le nom du multiplex dans lequel se trouve la station que vous
écoutez. Un multiplex est un ensemble de stations émettrices regroupées
et diusées sur une fréquence. Il existe des multiplexes nationaux et locaux.
Les locaux hébergent les stations qui appartiennent à une région spécique.
Frequency (Fréquence)
Indique la fréquence de la station préréglée, par exemple “11C 220.352MHz”.
Signal Error (Erreur de signal)
Indique un nombre qui correspond au taux d‘erreur. Un chire de 0 signie
que le signal reçu est sans erreur et que la force du signal est bonne. Si le
taux d‘erreurs est élevé, il est recommandé de réorienter l‘antenne ou de
déplacer l‘appareil.
Audio Bit Rate
L‘écran indique le taux d‘échantillonnage de la radio numérique reçue.
Time/ Date
Indique l‘heure et la date actuelles mises à disposition automatiquement
par les entreprises de radiodiusion E10.
DLS (Dynamic Label Segment)
Dynamic Label Segment est un texte déroulant qui accompagne les
émissions de la société de radiodiusion. Le texte contient en principe des
informations telles que le détail des programmes.
Page 57

57
FR
FONCTIONNEMENT DE LA FM
Passer du mode DAB à FM
Pour mettre l‘appareil en mode FM, appuyez plusieurs fois sur la touche
FUNCTION ou appuyez sur la touche DAB/FM de la télécommande. L‘écran
aiche alors la fréquence.
Auto Scan (recherche automatique)
Appuyez sur la touche SCAN jusqu‘à ce que le Tuner commence la recherche
des stations. Pour parcourir toute la gamme de fréquences, appuyez et
maintenez la touche SCAN. Lorsqu‘une station est découverte, la recherche
s‘arrête automatiquement.
Manual Scan (recherche manuelle)
Pour eectuer une recherche manuelle de stations FM, appuyez plusieurs
fois sur la touche |<< ou >>| jusqu‘à atteindre la fréquence souhaitée.
Scan Setting (réglage du scan)
Il s‘agit d‘une option de recherche qui permet de rechercher soit toutes les
stations, soit celles qui ont un bon signal uniquement.
1 Appuyez sur la touche MENU, puis appuyez sur la touche |<< ou >>|
pour choisir “Scan Setting”. Conrmez en appuyant sur la touche
ENTER.
2 Appuyez sur la touche |<< ou >>| pour choisir “All stations” (toutes les
stations) ou bien “Strong stations only” (uniquement les stations avec
un bon signal). Conrmez en appuyant sur la touche ENTER.
Audio Setting (réglages audio)
Cet appareil passe automatiquement du mode stéréo au mode mono, mais
vous pouvez désactiver cette fonction et basculer manuellement entre les
modes. Cela peut être utile en cas de signal de mauvaise qualité.
1 Appuyez sur la touche MENU, puis appuyez sur la touche |<< ou >>|
pour choisir “Audio Settings”. Conrmez en appuyant sur la touche
ENTER-Taste.
2 Appuyez sur la touche |<< ou >>| pour choisir “Stereo allowed” (Stéréo
autorisé) ou “Forced mono” (mono uniquement), puis conrmez en
appuyant sur la touche ENTER.
Page 58

58
FR
Mode audio
Appuyez sur la touche MONO/STEREO-Taste de la télécommande, pour
changer de mode entre stéréo et mono.
Preset Stations (stations préréglées)
Vous pouvez mémoriser jusqu‘à 20 stations parmi vos préférées dans
l‘emplacement mémoire. Vous pouvez ainsi accéder rapidement et
facilement à vos stations préférées.
1 Pur enregistrer une présélection, vous devez être en train d‘écouter la
station que vous voulez mémoriser. Appuyez ret maintenez la touche
MEMORY. L‘écran indique maintenant “Save to P#” an.
2 Appuyez sur la touche PRESET pour sélectionner votre présélection ou
numéro d‘accès direct. Conrmez en appuyant sur la touche ENTER.
3 La station est mémorisée en quelques secondes, puis l‘écran aiche
“Preset # Stored” (préréglage # mémorisé).
Lecture d’une station mémorisée
1 Une fois que vous avez enregistré un accès direct associé à une touche,
vous pouvez le rappeler en appuyant sur la touche MEMORY.
2 Appuyez sur la touche PRESET jusqu‘à ce que la station choisie soit
aichée à l‘écran ; puis conrmez en appuyant sur la touche ENTER-
Taste.
Modes d’aichage FM
Appuyez sur la touche DISPLAY de la télécommande. L‘écran aiche
maintenant les uns après les autres les modes d‘aichage. Les informations
de chaque mode d‘aichage sont indiquées en bas de l‘écran.
Texte Radio
Comme pour la DAB, la société de radiodiusion peut ajouter un texte
déroulant qui aiche des informations concernant le programme en cours.
Page 59

59
FR
Type de programme
Indique le style ou le genre du programme diusé.
Fréquence
Indique la fréquence de la station en cours, par exemple “87.50MHz”.
Qualité audio
Indique si le signal reçu est en stéréo ou en mono.
Time / Date (heure / date)
La société de diusion (station) met automatiquement à disposition l‘heure
et la date, de sorte que vous n‘avez pas besoin de régler manuellement ces
données.
UTILISATION DES CD
Appuyez plusieurs fois sur la touche FUNCTION de l‘appareil, ou bien
appuyez sur CD sur la télécommande pour choisir le mode CD.
Playback (lecture)
1 Appuyez sur la touche OPEN/CLOSE pour ouvrir le lecteur CD.
2 Insérez le CD avec la face imprimée vers le haut dans le lecteur CD puis
appuyez sur la touche OPEN/CLOSE pour refermer le lecteur CD.
3 Si aucun CD n‘a été inséré, ou si le CD ne peut être lu, l‘écran aiche
“NO DISC” ou “UNKNOWN DISC”.
4 L‘écran aiche le nombre total de titres. Appuyez maintenant sur la
touche SCAN/ > II pour lire automatiquement le premier titre du CD/
MP3.
Interrompre la lecture
1 Appuyez sur la touche SCAN/ > II pour interrompre la lecture.
2 Pour poursuivre la lecture, appuyez de nouveau sur la touche SCAN/ > II.
Page 60

60
FR
Arrêter la lecture
Appuyez sur la touche STOP pour stopper la lecture.
Passer à un autre titre
• Appuyez sur la touche |<< ou >>| pour retourner au début du titre ou au
titre précédent, ou passer au titre suivant.
• Appuyez et maintenez la touche |<< ou >>| pour parcourir vers l‘avant
ou l‘arrière.
Lecture répétée
1 En mode Stop ou Playback, appuyez une fois sur la touche REPEAT de
la télécommande. L‘écran aiche “REP_ONE“. Le CD répète le titre en
cours.
2 Appuyez deux fois sur la touche REPEAT. L‘écran aiche “REP_ALL”. Le
CD répètera tous les titres.
3 Appuyez une fois encore sur la touche REPEAT pour quitter la lecture
répétée.
Lecture aléatoire
Vous pouvez lire tous les titres du CD dans un ordre aléatoire.
1 En mode Playback, appuyez sur la touche RANDOM de la
télécommande. L‘écran aiche le témoin “RANDOM”. Tous les titres
sont lus dans le désordre.
2 Appuyez sur la touche |<< ou >>| pour le titre aléatoire suivant.
3 Lorsque tous les titres ont été lus une fois, la lecture s‘arrête
automatiquement.
4 Pour quitter la lecture aléatoire, appuyez sur la touche RANDOM
pendant la lecture aléatoire (RANDOM Playback). La lecture normale se
poursuit.
Page 61

61
FR
Réglage d’un programme (télécommande uniquement)
Vous pouvez programmer dans l‘ordre de votre choix jusqu‘à 32 titres en
mode CD ou 64 titres en mode MP3. Vous pouvez aussi activer le mode
Programme à partir du mode Stop.
1 Appuyez sur la touche MEMORY pour accéder au mode Programme.
2 Appuyez sur la touche |<< ou >>| pour rechercher et sélectionner le titre
que vous voulez programmer.
3 Appuyez sur la touche MEMORY pour conrmer le titre.
4 Répétez les étapes 2 et 3 pour programmer d‘autres titres. Lorsque vous
avez terminé la programmation, appuyez sur la touche SCAN/ > II pour
démarrer la lecture des titres programmés.
Arrêter le programme
Pour arrêter le programme de lecture, ouvrez et refermez le lecteur CD.
FONCTIONNEMNT BT
L‘appareil dispose d‘une fonction BT capable de capter un signal dans un
rayon de 8 mètres. Appariez l‘appareil avec un lecteur BT pour écouter de la
musique :
1 En mode STANDBY, appuyez plusieurs fois sur la touche FUNCTION de
l‘appareil, ou bien appuyez sur la touche BT de la télécommande pour
choisir le mode BT.
2 Si l‘appareil n‘est pas encore apparié avec un appareil BT, le message
“BT CONNECTED” clignote à l‘écran.
3 Activez votre appareil BT et choisissez SEARCH MODE (mode
recherche).
4 “Harvard” apparaît maintenant dans votre liste d‘appareils BT.
5 Sélectionnez “Harvard” et saisissez si besoin “0000” comme mot de
passe.
6 Pour quitter la fonction BT, appuyez sur la touche FUNCTION pour
passer dans un autre mode ou bien quittez la fonction depuis votre
appareil BT.
Page 62

62
FR
Remarque :
• Lorsque le signal est faible, il se peut que votre récepteur BT interrompe
le signal, et réactive automatiquement le mode appariement.
• Pour garantir le meilleur signal de retransmission, éloignez tous les
facteurs d‘interférence entre l‘appareil et l‘appareil BT.
• Cet appareil est compatible A2DP (Advanced Audio Distribution
Prole) et AVRCP (Audio Video Remote Control Prole). Ces fonctions
ne peuvent à chaque fois être utilisées qu‘avec un seul appareil BT
connecté.
• La compatibilité entre tous les appareils et les types de médias n‘est
pas garantie.
• Il se peut que certains téléphones mobiles BT interrompent la
connexion et la recherchent à nouveau, lorsque vous émettez un appel
ou raccrochez. Cela n‘est aucunement un signe de problème de votre
appareil.
FONCTIONNEMENT USB
1 Sur la face avant de l‘appareil se trouve un port USB. Lorsqu‘un appareil
USB est branché sur l‘appareil, appuyez plusieurs fois sur la touche
FUNCTION de l‘appareil ou bien appuyez sur la touche USB/AUX de la
télécommande pour régler le mode USB.
2 L‘appareil aiche automatiquement le nombre total de titres.
3 Toutes les fonctions de lecture sont les mêmes que pour la lecture d‘un
CD MP3.
REP_ONE : appuyez une fois sur la touche REPEAT. L‘écran aiche “REP_
ONE”. Le titre en cours sera répété.
REP_ALBUM : appuyez deux fois sur la touche REPEAT. L‘écran aiche “REP_
ALBUM”. Le dossier en cours sera relu.
REP_ALL : Appuyez trois fois sur la touche REPEAT. L‘écran aiche “REP_
ALL”. Tous les chiers seront relus.
REP_OFF : Appuyez encore une fois sur la touche REPEAT. Vous quittez la
fonction lecture à répétition.
Page 63

63
FR
Remarque :
• En mode USB, l‘appareil ne peut lire que les chiers MP3.
• Si votre appareil USB contient des chiers MP3 ais que l‘écran aiche
“NO”, alors le format de votre appareil USB est probablement
incompatible avec celui de l‘appareil.
• Cet appareil est compatible avec les versions USB 1.1 et 2.0.
• L‘appareil est compatible avec les appareils USB jusqu‘à 32 GB de
mémoire.
• L‘appareil n‘est probablement pas compatible avec tous les appareils
USB et cartes mémoires. Ce n‘est pas un signe de dysfonctionnement
de votre appareil.
AUTRES FONCTIONS
Recharge de l’appareil
Vous pouvez recharger votre appareil via le port USB intégré avec un câble
de recharge USB (non fourni).
Fonctionnement de l’AUDIO-IN
1. Sur la face avant de l‘appareil se trouve une prise AUDIO IN. Les
signaux audio analogiques des autres sources audio peuvent être
retransmis par la prise AUDIO-IN de cet appareil.
2. Branchez un autre appareil audio avec un câble AUX (non fourni) dans la
prise AUDIO-IN de l‘appareil.
3. Appuyez plusieurs fois sur la touche FUNCTION de l‘appareil, ou bien
appuyez sur la touche AUDIO-IN de la télécommande pour choisir le
mode AUX.
4. Tournez le bouton VOLUME+/- de l‘appareil ou appuyez sur la touche
VOLUME+/- de la télécommande pour régler le volume selon vos
préférences.
5. Utilisez les fonctions de lecture de votre appareil audio branché
directement depuis le mode AUX.
• Lors du branchement de votre appareil externe, suivez les indications
de son mode d‘emploi.
• Voici des exemples d‘appareils audio externes que vous pouvez
brancher sur cet appareil : lecteur portable MP3, enregistreur de
cassettes, lecteur mini Disc, lecteur DVD, etc.
Page 64

64
FR
Arrêt automatique
• Lorsque l‘appareil est resté plus de 4 heures en mode AUX, il passe
automatiquement en mode STANDBY.
• 10 minutes avant de s‘arrêter, l‘écran fait clignoter le message “AUTO-
OFF”.
• Appuyez sur la touche RANDOM pour quitter la fonction AUTO-OFF.
ENTRETIEN ET MAINTENANCE
• Nettoyez votre appareil avec un chion humide (jamais mouillé).
N‘utilisez jamais de solvant ni de savon.
• Evitez de laisser l‘appareil dans les endroits chauds, mal ventilés ou
poussiéreux.
• Tenez l‘appareil à distance des radiateurs et des interférences
électriques, telles que les lampes uorescentes ou les moteurs.
Manipulation des CD
• Pendant la lecture de CD, si sauts ou des interruptions de la musique
se produisent, ou si le CD ne peut être lu, il se peut que la surface
inférieure du CD ait besoin d‘être nettoyée. Avant de lire un CD, vous
pouvez nettoyer délicatement le CD avec un chion humide pour en
retirer les empreintes de doigts et la poussière.
• N‘utilisez jamais de produit chimique come par exemple des sprays
nettoyants pour disques vinyles, sprays antistatiques ou liquides,
benzène ou diluants pour nettoyer les CD. Ces produits endommagent
irrémédiablement la surface en plastique du CD.
• Posez toujours les CD sur le support avec la face imprimée vers le haut.
Les CD ne peuvent être lus que d‘un côté.
• Pour retirer un CD de son boîtier, appuyez sur le centre du boîtier et
sortez le disque en le prenant avec précaution sur les bords.
• Les disques doivent toujours être remis dans leur pochette après
utilisation pour les protéger contre la poussière et les rayures.
• Pour éviter la déformation des disques, ne les exposez pas longtemps à
l‘ensoleillement direct, à une forte humidité ou à de fortes températures
élevées.
• Ne xe aucune étiquette autocollante et n‘écrivez pas sur le CD. L‘encre
de certains marqueurs pourrait endommager la surface du disque.
Page 65

65
FR
CONSEILS POUR LE RECYCLAGE
Le pictogramme ci-contre apposé sur le produit
signie que la directive européenne 2012/19/UE
s‘applique (poubelle à roues barrée d’une croix). Ces
produits ne peuvent être jetés dans les poubelles
domestiques courantes. Renseignez-vous concernant
les règles appliquées pour la collecte d’appareils
électriques et électroniques. Conformez-vous aux
réglementations locales et ne jetez pas vos anciens
produits avec les ordures ménagères. Le respect
des règles de recyclage des vieux produits aide à
la protection de l’environnement et de la santé de
votre entourage contre les conséquences négatives
possibles. Le recyclage des matériaux aide à réduire
l’utilisation des matières premières.
Le produit contient des piles qui sont soumises à la
directive européenne 2006/66/CE et ne doivent pas
être jetées dans les poubelles à ordures ménagères.
Veuillez-vous informer sur les réglementations
locales en vigueur pour le recyclage des piles. En
respectant les règles de recyclage vous participez
activement à la protection de l’environnement et à la
préservation de la santé de vos proches.
Page 66

66
IT
Gentile cliente,
La ringraziamo per aver acquistato il nostro prodotto. La preghiamo
di leggere attentamente le seguenti istruzioni e di seguirle per evitare
eventuali danni. Si declina ogni responsabilità per danni derivati da una
mancata osservazione delle avvertenze di sicurezza e da un uso improprio
del dispositivo.
INDICE
Avvertenze di sicurezza 67
Descrizione del prodotto 68
Avvertenze per il primo utilizzo 70
Funzioni e impostazioni 71
Funzione DAB+ 74
Modalità FM 78
Funzione CD 80
Funzione BT 82
Funzione USB 83
Altre funzioni 84
Pulizia e manutenzione 85
Smaltimento 86
DATI TECNICI
Articolo numero 10031949, 10031950
Alimentazione 220-240 V ~ 50-60 Hz
Sintonizzatore DAB/DAB+ 174.928 (5A) MHz - 239.200 (13F) MHz
Sintonizzatore FM 87.5 MHz - 108.0 MHz
DICHIARAZIONE DI CONFORMITÀ
Produttore:
Chal-Tec GmbH, Wallstraße 16, 10179 Berlino,
Germania.
Questo prodotto è conforme alle seguenti
direttive europee:
2014/35/UE (LVD)
2011/65/UE (RoHS)
2014/53/UE (RED)
Page 67

67
IT
AVVERTENZE DI SICUREZZA
Protezione dai raggi laser
• Non tentare di smontare l‘alloggiamento poiché il fascio laser presente
in questo lettore CD è dannoso per gli occhi.
• Non utilizzare il dispositivo se corpi estranei liquidi o solidi penetrano
nell‘alloggiamento.
• Non toccare la lente. Ciò può danneggiarla e causare il
malfunzionamento del lettore.
• Non inserire oggetti nella fessura di sicurezza, altrimenti il diodo laser è
impostato su „ON“ quando lo sportello è ancora aperto.
• Assicurarsi che il dispositivo non sia collegato alla corrente in caso di
inutilizzo. Staccare la spina dalla presa. Aerrare sempre la spina alla
base, non il cavo di alimentazione.
• Questo dispositivo utilizza un laser. Utilizzare i comandi e le
impostazioni solo per gli scopi indicati in questo manuale per evitare di
esporsi a radiazioni pericolose.
Collocamento
• Non utilizzare questo dispositivo in un luoghi caldi, freddi, polverosi o
umidi.
• Posizionare il dispositivo su una supercie piana e stabile.
• Non ostruire il usso di aria collocando il dispositivo in un luogo poco
ventilato, coprendolo con un panno o collocandolo su un tappeto.
• Utilizzare il dispositivo solo con un carrello, un treppiede, un supporto
o un tavolo raccomandato dal produttore. Se si utilizza un carrello,
spostare attentamente il dispositivo / carrello per evitare infortuni
causati da eventuali ribaltamenti.
Condensa
• Se il dispositivo è collocato in una stanza riscaldata, nell´alloggiamento
possono formarsi gocce d‘acqua o condensa.
• Se sull´alloggiamento si forma la condensa, il dispositivo potrebbe non
funzionare correttamente.
• Attendere 1 o 2 ore prima di accendere il dispositivo oppure riscaldare
gradualmente la stanza e lasciare asciugare il dispositivo prima
di accenderlo. In caso di problemi, staccare la spina dalla presa e
consultare un tecnico qualicato.
Page 68

68
IT
DESCRIZIONE DEL PRODOTTO
1 TASTO TELECOMANDO 8 TASTO MENU
2 TASTO STANDBY 9 SALTARE CD/BT / TASTO TUNE
3 SCOMPARTO CD 10 MANOPOLA VOLUME
4 DISPLAY LCD 11 SALTARE CD/BT / TASTO TUNE +-
5 TASTO APERTURA/
CHIUSURA SCOMPARTO CD
12 CD/BT PLAY/PAUSE
6 ATTACCO USB 13 CD STOP/PAIRING
7 TASTO FUNZIONE 14 ATTACCO AUX IN
1 CAVO DI ALIMENTAZIONE 2 DAB/FM ANT
Page 69

69
IT
1 TASTO STANDBY 15 TASTO MEMORY
2 TASTO RICERCA DIRETTA 16 TASTO TIME/CLOCK SET
3 TASTO REPEAT 17 TASTO SLEEP
4 CD/USB TRACK DOWN OPPURE
TASTO TIME DOWN / TUNER DOWN
TASTE
18 TASTO FOLDER UP / TASTO TUNER
PRESET
5 TASTO EQ 19 TASTO RANDOM
6 FM MONO/ TASTO ST 20 TASTO ENTER
7 TASTO X-BASS 21 CD/USB TRACK UP OPPURE TASTO
TIME UP/ TUNER UP
8 TASTO DAB/FM SELECT 22 TASTO FOLDER DOWN/TUNER
PRESET DOWN
9 TASTO CD/USB SELECT 23 FOLDER ON/ TASTO OFF
10 TASTO DAB INFO 24 TASTO BT/AUX SELECT
11 TASTO DAB/FM SCAN 25 TASTO MUTE
12 CD/USB DISPLAY / BT PAIRING 26 TASTO DAB/FM MENU
13 TASTO CD/USB/BT STOP 27 TASTO VOLUME UP / DOWN
14 TASTO OPEN/CLOSE 28 TASTO CD/USB/BT PLAY/PAUSE
Page 70

70
IT
AVVERTENZE PER IL PRIMO UTILIZZO
Questo dispositivo è alimentato da una potenza di 100-240VAC ~ 50 / 60Hz
e richiede una batteria al litio CR2025 3V (inclusa) per il telecomando. Non
tentare mai di collegare il dispositivo ad un‘altra fonte di corrente. Ciò
potrebbe danneggiare il dispositivo e comportare la perdita della garanzia.
Collegamento alla corrente
Inserire il cavo di alimentazione in una presa 100-240VAC ~ 50/60 Hz.
Controllare che la spina sia correttamente inserita nella presa.
Telecomando
Il telecomando necessita di una batteria al litio CR2025 3V (inclusa). Per
attivare il telecomando, rimuovere la striscia isolante inserita nel vano. Se il
telecomando non funziona più correttamente, sostituire la batteria con una
nuova batteria al litio CR2025 3V.
1 Premere il coperchio del vano batteria leggermente verso il basso e
rimuovere il vano dall‘alloggiamento del telecomando.
2 Sostituire la batteria e assicurarsi che sia inserita correttamente. Il
telecomando non funziona se la batteria viene inserita con la polarità
opposta.
Nota: se la batteria non viene sostituita correttamente, il telecomando
potrebbe danneggiarsi. Sostituire la batteria solo con la stessa batteria o
con una equivalente.
Collegare il dispositivo alla corrente
Srotolare completamente il cavo di alimentazione. Collegare il cavo di
alimentazione sul retro del dispositivo all´apposito attacco. Il dispositivo è
ora collegato e pronto per l´uso.
Page 71

71
IT
FUNZIONI E IMPOSTAZIONI
Accendere / spegnere il dispositivo
Quando si collega il dispositivo alla presa per la prima volta, sul display
appare „00:00:00“. Se si riceve un segnale DAB+, il dispositivo passa all‘ora
locale. Dopo circa un minuto, si passa alla modalità STANDBY.
• Premere STANDBY sul dispositivo o sul telecomando per attivare il
dispositivo in modalità ON.
• Premere STANDBY sul dispositivo o sul telecomando per riportare il
dispositivo in modalità STANDBY.
• Scollegare il cavo di alimentazione dalla presa per spegnere
completamente il dispositivo.
Nota:
• In caso di inattività superiore a 15 minuti, passa automaticamente in
modalità standby.
• Spegnere completamente il dispositivo in caso di inutilizzo per
risparmiare energia.
Regolare il volume
• Ruotare la manopola VOLUME +/- sul dispositivo oppure premere
VOLUME +/- sul telecomando per aumentare / diminuire il volume.
• Per disattivare l´audio, premere MUTE. Premere di nuovo MUTE o i tasti
VOLUME +/- sul telecomando oppure ruotare la manopola VOLUME +/sul dispositivo per continuare la riproduzione normale.
Impostare l´ora
1 In modalità standby, premere il tasto CLOCK sul telecomando. L‘ora
lampeggia sul display.
2 Premere il tasto | << o >> | per impostare l´ora e premere il tasto
CLOCK per confermare. I minuti lampeggiano sul display.
3 Premere il tasto | << o >> | per impostare i minuti e premere il tasto
CLOCK per confermare.
4 Il tempo ora è impostato.
Page 72

72
IT
Nota: se il dispositivo non è in grado di ricevere un segnale DAB+, è
possibile impostare l‘ora manualmente. Non appena viene ricevuto un
segnale DAB+, l‘ora viene aggiornata automaticamente.
Impostare il timer
1 Tenere premuto il tasto TIMER sul telecomando no a quando sul
display non appare „ON TIMER“ e l‘ora lampeggia sul display.
2 Premere il tasto | << o >> | per impostare l‘ora e premere il tasto TIMER
per confermare. I minuti lampeggiano sul display.
3 Premere il tasto | << o >> | per impostare i minuti e premere il tasto
TIMER per confermare.
4 Quando il tasto | << o >> | è impostato su ON, il display visualizza „O
Timer“ e l´ora lampeggia.
5 Premere il tasto | << o >> | per impostare l‘ora e premere il tasto TIMER
per confermare. I minuti lampeggiano sul display.
6 Premere il tasto | << o >> | sul telecomando per impostare i minuti e
premere il tasto TIMER per confermare.
7 Premere i tasti per selezionare la modalità DAB, FM, DISC o USB e
premere il tasto TIMER per confermare. Il display visualizza „VOL #“ e
lampeggia. Premere il tasto | << o >> | per regolare il volume e premere
il tasto TIMER per confermare.
8 Premere il tasto TIMER per selezionare „Timer On“. Il timer ora è
impostato.
9 In modalità standby, sul display appare il simbolo CLOCK ed indica che
il timer è attivo.
Disattivare il timer
Premere ripetutamente il tasto timer del telecomando per selezionare la
modalità di spegnimento. Il simbolo CLOCK scompare dal display.
Page 73

73
IT
Impostare il timer di spegnimento
Utilizzare il timer di spegnimento per spegnere il dispositivo dopo un
determinato tempo. Impostando il timer di spegnimento è possibile
addormentarsi mentre la musica è in esecuzione, sapendo che il dispositivo
si spegnerà automaticamente.
1 Per impostare il timer di spegnimento, premere ripetutamente il tasto
SLEEP sul telecomando per selezionare il timer desiderato: 90> 80> 70>
60> 50> 40> 30> 20> 10> OFF.
2 Il timer di spegnimento ora è attivato.
3 Premere il tasto SLEEP per visualizzare il tempo rimanente prima che il
dispositivo si spenga automaticamente.
4 Per disattivare il timer di spegnimento, premere più volte il tasto SLEEP
per selezionare „SLEEP OFF“.
Manopola EQ
Questo sistema supporta una serie di equalizzatori ed eetti sonori.
Durante la riproduzione, premere il tasto EQ sul telecomando per
selezionare la modalità musicale desiderata. Ogni volta che si preme il tasto
EQ, la modalità musicale cambia nel modo seguente come segue:
Resettare il sistema
Potrebbe essere necessario riportare il dispositivo alle impostazioni di
fabbrica, soprattutto in caso di trasloco. Se si vericano problemi con
la ricezione, è utile reimpostare il sistema e riprovare. Se ci si sposta in
un‘altra regione del paese e si ricevono i segnali DAB + locali e nazionali di
quella regione, le stazioni impostate in precedenza potrebbero non essere
più disponibili.
1 In modalità DAB, aprire lo scomparto CD, tenere premuto il tasto STOP
sul dispositivo no a quando sul display non appare „Restarting ...
FACTORY RESET“.
2 Dopo che il dispositivo è stato resettato, ritorna in modalità DAB.
Nota: quando il sistema viene resettato, tutte le stazioni impostate e le
stazioni FM/DAB+ memorizzate vengono eliminate.
Page 74

74
IT
FUNZIONE DAB+
Dopo aver collegato il dispositivo alla corrente e averlo acceso per
la prima volta, il dispositivo passa automaticamente in modalità DAB
ed esegue la funzione di scansione automatica. Durante la scansione,
appare un diagramma accanto a „Scanning...“ che mostra l‘avanzamento
della scansione ed il numero di stazioni trovate. Quando la scansione è
terminata, il dispositivo seleziona la prima stazione alfanumerica trovata.
Per visualizzare le stazioni rilevate, premere il tasto | << o >> |.
Scansione completa
La scansione completa cerca tutti i canali DAB + Band II. Dopo la scansione,
il primo canale alfanumerico viene selezionato automaticamente.
1 Per attivare la scansione automatica, premere il tasto SCAN e sul
display compare „Scanning ...“ e un diagramma.
2 Tutte le stazioni trovate vengono salvate automaticamente. Per trovare
e ascoltare le stazioni trovate, premere il tasto | << oppure >> |. Per
memorizzare le stazioni come predenite, premere il tasto „ENTER“.
Sintonizzazione manuale
Oltre alla funzione Auto-Tuning, è possibile impostare manualmente il
ricevitore. Ciò è utile se si orienta l‘antenna o se si aggiungono stazioni non
trovate durante la sintonizzazione automatica.
1 Premere il tasto MENU sul telecomando per visualizzare il menu.
2 Premere il tasto ENTER per selezionare la sintonizzazione manuale.
3 Premere il tasto | << oppure >> | per navigare attraverso i canali DAB +
numerati da 5A a 13F.
4 Dopo aver selezionato il canale desiderato, premere il tasto Invio per
confermare. Il display mostra il multiplex.
5 Premere nuovamente il tasto ENTER per confermare i canali selezionati
come stazioni predenite.
Page 75

75
IT
Drc (Dynamic Range Compression)
Se si ascolta la musica con un‘elevata gamma dinamica in un ambiente
rumoroso, è possibile limitare la gamma dinamica audio.
1 Premere il tasto MENU sul telecomando per visualizzare il menu.
2 Premere il tasto | << o >> | per selezionare „DRC“ e premere il tasto
ENTER sul telecomando per confermare.
3 Premere il tasto | << o >> | per selezionare o / high / low.
4 Premere il tasto ENTER sul telecomando per confermare.
Prune
È possibile rimuovere tutte le stazioni non disponibili dall‘elenco.
1 In modalità DAB, premere il tasto MENU del telecomando per
visualizzare il menu.
2 Premere il tasto | << o >> | per selezionare „Prune“ e premere il tasto
ENTER per confermare.
3 Premere il tasto | << o >> | per selezionare e premere inne il tasto
ENTER sul telecomando per eliminare le stazioni non disponibili.
4 È possibile utilizzare il tasto | << o >> | per selezionare e poi premere il
tasto ENTER sul telecomando per cancellare.
Informazioni sul software
1 In modalità DAB, premere il tasto MENU del telecomando per
visualizzare il menu.
2 Premere il tasto | << o >> | per selezionare „versione SW“.
3 Premere il tasto ENTER sul telecomando per visualizzare la versione del
software.
Page 76

76
IT
Sottomenu e funzioni
È possibile visualizzare il simbolo „>“ dopo il nome della stazione. Ciò indica
che sono disponibili servizi ulteriori per questa stazione. I servizi ulteriori
includono servizi aggiuntivi che hanno a che fare con la stazione principale.
Ad esempio, una stazione sportiva desidera aggiungere ulteriori report.
I servizi ulteriori vengono inseriti direttamente nell‘elenco delle stazioni
direttamente dopo la stazione principale. Per selezionare la stazione
secondaria, premere il tasto MENU quando appare „>“ di fronte al nome
della stazione sul display. Al termine del servizio ulteriore, il dispositivo
passa automaticamente alla stazione principale.
Stazioni preimpostate (solo con telecomando)
1 Tenere premuto il tasto MEMORY. Il display visualizza „<Save to P #>“.
2 Premere il tasto PRESET <oppure il tasto >- per selezionare il numero
della stazione predenita desiderata e premere il tasto ENTER per
confermare.
3 La stazione verrà memorizzata in pochi secondi e sul display compare
„Preset#Stored“.
Richiamare una stazione memorizzata (solo con telecomando)
1 Se è stata memorizzata una stazione su un tasto Preset, è possibile
accedervi premendo il tasto MEMORY.
2 Tenere premuto il tasto PRESET no a visualizzare la stazione
desiderata sul display; quindi premere ENTER per confermare.
Modalità di visualizzazione Dab
Premere il tasto DISPLAY sul telecomando. Il display mostra le modalità
di visualizzazione. Le informazioni di ciascuna modalità di visualizzazione
appaiono nella parte inferiore del display.
Signal strength (forza segnale)
Il display visualizza un diagramma per indicare la potenza del segnale; più
forte è il segnale, più lungo sarà il diagramma da sinistra a destra.
Page 77

77
IT
Tipo di programma
Descrive lo stile o il genere del programma.
Ensemble
Viene visualizzato il nome del multiplex in cui si trova la stazione che si sta
ascoltando. Un multiplex è una raccolta di stazioni radio trasmesse su una
frequenza. Ci sono multiplex nazionali e locali.
Nota: il segnale DAB, diversamente dalla normale radio, raggruppa
diverse stazioni radio e le trasmette su una frequenza.
Frequenza
Indica la frequenza della stazione preselezionata, ad esempio „11C
220.352MHz“.
Signal errore (Errore del segnale)
Indica un numero che elabora il tasso di errore. Se il numero è 0, signica
che il segnale ricevuto è privo di errori e la potenza del segnale è molto
buona. Se il tasso di errore è alto, è consigliabile riorientare o riposizionare
l‘antenna.
Audio Bit Rate
Il display indica il bitrate audio digitale che viene ricevuto.
Ora/data
Indica l‘ora e la data correnti forniti automaticamente dalla stazione.
DLS (Dynamic Label Segment)
Il Dynamic Label Segment è un testo scorrevole che la stazione aggiunge
alle sue trasmissioni. Il testo contiene normalmente informazioni, ad
esempio i dettagli del programma.
Page 78

78
IT
MODALITÀ FM
Passare dalla modalità DAB a FM
Per passare in modalità FM, premere ripetutamente il tasto FUNCTION o
premere il tasto DAB/FM sul telecomando. Il display visualizza la frequenza.
Auto scan (scansione automatica)
Premere il tasto SCAN no a quando il sintonizzatore inizia a cercare
le stazioni. Per cercare nell‘intervallo di frequenza, tenere premuto il
tasto SCAN. Se è stata trovata una stazione, la ricerca si interrompe
automaticamente.
Manual Scan (scansione manuale)
Per cercare manualmente le stazioni FM, premere il tasto | << o >> | no a
raggiungere la frequenza desiderata.
Scan setting (impostazione scansione)
Questa è un‘opzione di ricerca con la quale è possibile cercare tutte le
stazioni o solo le stazioni con un segnale molto buono.
1 Premere il tasto MENU, premere il tasto | << o >> | per selezionare
„Scan Setting „. Premere il tasto ENTER per confermare.
2 Premere il tasto | << o >> | per selezionare „All stations“ o „Strong
stations only“. Premere il tasto ENTER per confermare.
Impostazione audio
Questo dispositivo passa automaticamente dalla modalità Stereo a Mono,
ma è possibile annullare e passare manualmente a questa funzione. Ciò può
essere utile in caso di bassa ricezione del segnale.
1 Premere il tasto MENU, poi premere il tasto |<< oppure >>| per
selezionare „Audio Settings“. Premere il tasto ENTER per confermare.
2 Premere il tasto |<< oppure >>| per selezionare „Stereo allowed“ o
„Forced mono“, quindi premere il tasto ENTER per confermare.
Page 79

79
IT
Modalità audio
Premere il tasto MONO / STEREO sul telecomando per passare dalla
modalità stereo alla modalità mono.
Stazioni memorizzate
È possibile memorizzare no a 20 stazioni preferite. Ciò consente di
accedere rapidamente e facilmente ai programmi preferiti.
1 Per salvare una stazione, sintonizzarsi sulla stazione che si desidera
memorizzare. Tenere premuto il tasto MEMORY. Sul display appare
„Save to P #“.
2 Premere il tasto PRESET UP o PRESET DOWN per selezionare il numero
desiderato. Quindi premere il tasto ENTER per confermare.
3 La stazione verrà memorizzata in pochi secondi e sul display compare
„Preset # Stored“ (Preset # memorizzato).
Accedere ad una stazione memorizzata
1 Dopo aver salvato una stazione in uno dei tasti Preset (Preset), è
possibile accedervi premendo il tasto MEMORY.
2 Premere il tasto PRESET-up o PRESET-down no a visualizzare la
stazione desiderata sul display.
Modalità display FM
Premere il tasto INFO sul telecomando. Il display visualizza
alternativamente le modalità di visualizzazione. Le informazioni relative
a ciascuna modalità di visualizzazione vengono visualizzate nella parte
inferiore del display.
Radio text
Come per la funzione DAB, la stazione può aggiungere un testo scorrevole
che visualizza informazioni sul programma.
Page 80

80
IT
Tipo di programma
Descrive lo stile o il genere del programma.
Frequenza
Indica la frequenza della stazione, ad esempio „87.50MHz“.
Tipo audio
Indica se la stazione ricevuta è mono o stereo.
Ora / data
La stazione fornisce automaticamente l´ora e la data, quindi non è
necessario impostare manualmente queste informazioni.
FUNZIONE CD
Premere ripetutamente il tasto FUNCTION sul dispositivo o premere CD sul
telecomando per selezionare la modalità CD.
Playback (riproduzione)
1 Premere il tasto OPEN/CLOSE per aprire il vano CD.
2 Posizionare il disco con il lato stampato rivolto verso l‘alto nel vano CD
e premere il tasto OPEN/CLOSE per chiudere il vano CD.
3 Se non è stato inserito alcun CD oppure non è possibile leggere il CD,
viene visualizzato „NO DISC“ o „UNKNOWN DISC“.
4 Sul display viene visualizzato il numero totale di tracce. Premere il tasto
SCAN /> II per riprodurre automaticamente la prima traccia del CD/
MP3.
Nota: questo dispositivo può riprodurre CD, CD-R, CD-RW, 8 cm.
Interrompere la riproduzione
1 Premere il tasto SCAN /> II per mettere in pausa la riproduzione.
2 Per riprendere la riproduzione, premere di nuovo il tasto SCAN /> II.
Page 81

81
IT
Interrompere la riproduzione
Premere il tasto STOP per fermare la riproduzione.
Passare ad un altro brano
• Premere il tasto | << oppure >> | per tornare all´inizio del brano o al
brano precedente oppure per passare al brano successivo.
• Tenere premuto il tasto | << o >> | per andare avanti o tornare indietro.
Ripetizione
1 In modalità Stop o Playback, premere una volta il tasto REPEAT
sul telecomando. Sul display appare „REP_ONE“. Il CD riproduce
ripetutamente il brano corrente.
2 Premere il tasto REPEAT due volte. Sul display appare „REP_ALL“. Il CD
ripete il brano attuale.
3 Premere il tasto REPEAT ancora una volta per annullare la funzione di
ripetizione.
Riproduzione casuale
Tutti i brani del CD possono essere riprodotti in ordine casuale.
1 In modalità Playback, premere, il tasto RANDOM sul telecomando. La
spia „RANDOM“ appare sul display. Tutti i brani vengono riprodotti in
modo casuale.
2 Premere il tasto | << o >> | per riprodurre il brano successivo
selezionato in modo casuale.
3 Una volta che tutti i brani sono stati riprodotti, la riproduzione termina
automaticamente.
4 Per annullare la riproduzione casuale, premere il tasto RANDOM
durante la riproduzione casuale (RANDOM Playback). La riproduzione
normale continua.
Page 82

82
IT
Impostazione del programma
(solo tramite telecomando)
È possibile programmare no a 32 tracce in modalità CD o 64 tracce in
modalità MP3 in qualsiasi ordine. La modalità di programmazione può
essere attivata dalla modalità Stop.
1 Premere il tasto MEMORY per accedere alla modalità di
programmazione.
2 Premere il tasto | << oppure >> | per cercare il brano da programmare.
3 Premere il tasto MEMORY per confermare il brano.
4 Ripetere i passaggi 2 e 3 per programmare più brani. Una volta
terminata la programmazione, premere il tasto SCAN /> II per avviare la
riproduzione dei brani programmati.
Uscire dal programma
Per terminare la riproduzione, aprire e chiudere il vano CD.
FUNZIONE BT
Il dispositivo ha una funzione BT che può ricevere un segnale entro un
raggio di 8 metri. Collegare il dispositivo a un dispositivo BT per ascoltare
la musica:
1 Dalla modalità STANDBY, premere ripetutamente il tasto FUNCTION
sul dispositivo o premere il tasto BT sul telecomando per selezionare la
modalità BT.
2 Se il dispositivo non è già collegato con un dispositivo BT, sul display
viene visualizzato „BT CONNECTED“.
3 Attivare il proprio dispositivo BT e selezionare SEARCH MODE
(modalità di ricerca).
4 „Harvard“ apparirà nell‘elenco dei dispositivi BT.
5 Selezionare „Harvard“ e inserire „0000“ se richiesto.
6 Per annullare la funzione BT, premere il tasto FUNCTION per passare a
un‘altra modalità o disconnettere la funzione dal proprio dispositivo BT.
Page 83

83
IT
Nota:
• Se il segnale è debole, il ricevitore BT interrompa la ricezione, ma la
modalità Pairing si riattiva.
• Per garantire una migliore ricezione del segnale, rimuovere le
interferenze tra il dispositivo e il dispositivo BT.
• Questo dispositivo supporta le funzioni A2DP (Advanced Audio
Distribution Prole) e AVRCP (Audio Video Remote Control Prole).
Queste possono essere collegate esclusivamente ad un singolo
dispositivo BT.
• Non è garantita la compatibilità con tutti i dispositivi e con tutti i tipi di
supporti.
• È possibile che alcuni telefoni cellulari con funzione BT possano
disconnettersi e ricollegarsi quando eettuano e terminano le chiamate.
Ciò non indica un problema con il dispositivo.
FUNZIONE USB
1 Sulla parte anteriore del dispositivo c‘è una porta USB. Quando un
dispositivo USB è collegato al dispositivo, premere ripetutamente
il tasto FUNCTION sul dispositivo o premere il tasto USB/CD del
telecomando per impostare la modalità USB.
2 Il dispositivo mostra automaticamente il numero totale di tutti i brani.
3 Tutte le funzioni di riproduzione sono le stesse di quando si riproduce
un CD MP3.
REP_ONE: premere una volta il tasto REPEAT. „REP_ONE“ appare sul
display. Il brano corrente viene riprodotto ripetutamente.
REP_ALBUM: premere due volte il tasto REPEAT. Sul display viene
visualizzato „REP_ALBUM“. La cartella corrente (cartella) viene riprodotta
ripetutamente.
REP_ALL: premere tre volte il tasto REPEAT. Sul display appare „REP_ALL“.
Tutti i le vengono riprodotti ripetutamente.
REP_OFF: premere di nuovo il tasto REPEAT. La funzione di ripetizione viene
annullata.
Page 84

84
IT
Nota:
• In modalità USB il dispositivo può riprodurre solo le MP3.
• Se il dispositivo USB è caricato con MP3, ma sul display appare „NO“,
il formato del dispositivo USB potrebbe non essere compatibile con il
dispositivo.
• Questo dispositivo supporta le versioni USB 1.1 e 2.0.
• Il dispositivo può supportare dispositivi USB con massimo 32 GB di
memoria.
• Il dispositivo potrebbe non essere compatibile con tutti i dispositivi
USB e con le schede di memoria. Questo non indica un problema con il
dispositivo.
ALTRE FUNZIONI
Caricare il dispositivo
È possibile caricare il dispositivo con un cavo di ricarica USB (non incluso)
tramite la porta USB integrata.
Nota: la corrente massima per la carica USB è 1A. Non vi è alcuna
garanzia che tutti i cavi di ricarica USB siano compatibili con il
dispositivo.
Funzionamento AUDIO-IN
1. Sulla parte anteriore del dispositivo vi è un attacco AUDIO IN. I segnali
audio analogici provenienti da altre sorgenti audio possono essere
trasferiti a questo dispositivo tramite l´attacco AUDIO IN.
2. Collegare un altro dispositivo audio al dispositivo con un cavo AUX (non
incluso) tramite l´attacco AUDIO IN.
3. Premere ripetutamente il tasto FUNCTION sul dispositivo oppure
premere il tasto AUDIO-IN sul telecomando per selezionare la modalità
AUX.
4. Ruotare la manopola VOLUME +/- sul dispositivo oppure premere
il tasto VOLUME +/- sul telecomando per impostare il controllo del
volume per il livello di uscita desiderato.
5. Utilizzare le funzioni di riproduzione del dispositivo audio collegato
direttamente tramite la modalità AUX.
• Seguire le istruzioni contenute nel manuale quando si collega il
dispositivo esterno.
• Esempi di dispositivi audio esterni collegabili a questo dispositivo sono:
lettori MP3 portatili, registratori, lettori DVD, lettori DVD, ecc.
Page 85

85
IT
Spegnimento automatico
• Quando il dispositivo è impostato sulla modalità AUX per più di 4 ore, si
passa automaticamente in modalità STANDBY.
• „AUTO-OFF“ lampeggia sul display 10 minuti prima dello spegnimento.
• Premere il tasto RANDOM per annullare la funzione AUTO-OFF.
PULIZIA E MANUTENZIONE
• Pulire il dispositivo con un panno umido (non bagnato). Non usare mai
solventi o saponi.
• Evitare di posizionare il dispositivo in luoghi caldi, umidi o polverosi.
• Tenere il dispositivo lontano da termosifoni e da fonti di interferenze
elettriche come lampade uorescenti o motori.
Gestione dei CD
• Se durante la riproduzione del CD si vericano interruzioni della musica
o se il CD non viene riprodotto, è necessario pulire la supercie del lato
inferiore. Prima della riproduzione del CD, utilizzare un panno morbido
per pulire delicatamente le impronte digitali e la polvere.
• Non utilizzare mai prodotti chimici per la pulizia del CD come spray
o diluenti. Tali sostanze chimiche danneggiano irreversibilmente la
supercie plastica del disco.
• Inserire sempre il CD nel vano con il lato stampato rivolto verso l‘alto. I
CD possono essere riprodotti solo su un lato.
• Per rimuovere un disco dal vano, premere il centro del vano e rimuovere
il disco aerrandolo delicatamente ai bordi.
• I dischi devono essere posizionati di nuovo nella custodia dopo l‘uso
per proteggerli da polvere e grai.
• Per evitare che il disco si danneggi, non esporlo alla luce diretta del
sole, all’umidità elevata o ad alte temperature per lunghi periodi di
tempo.
• Non apporre etichette adesive sul disco e non scrivere sul disco.
L‘inchiostro potrebbe danneggiare la supercie del disco.
Page 86

86
IT
SMALTIMENTO
Se sul prodotto è presente la gura a sinistra (il
cassonetto dei riuti mobile sbarrato), si applica
la direttiva europea 2012/19/UE. Questi prodotti
non possono essere smaltiti con i riuti normali.
Informarsi sulle disposizioni vigenti in merito alla
raccolta separata di dispositivi elettrici ed elettronici.
Non smaltire i vecchi dispositivi con i riuti domestici.
Grazie al corretto smaltimento dei vecchi dispositivi,
si proteggono il pianeta e la salute delle persone da
possibili conseguenze negative. Il riciclo di materiali
aiuta a ridurre il consumo di materie prime.
Il prodotto contiene batterie che sono soggette alla
direttiva europea 2006/66/EG e non possono essere
smaltite con i normali riuti domestici. Preghiamo
di informarvi sulle regolamentazioni vigenti sullo
smaltimento delle batterie. Grazie al corretto
smaltimento dei vecchi dispositivi si tutela l’ambiente
e la salute delle persone da conseguenze negative.
Page 87

87
ES
Estimado cliente:
Le felicitamos por la adquisición de este producto. Lea atentamente el
siguiente manual y siga cuidadosamente las instrucciones de uso con el
n de evitar posibles daños. La empresa no se responsabiliza de los daños
ocasionados por un uso indebido del producto o por haber desatendido las
indicaciones de seguridad.
ÍNDICE DE CONTENIDOS
Descripción del aparato 89
Antes del primer uso 91
Funciones y ajustes 92
Funcionamiento DAB+ 95
Funcionamiento FM 99
Funcionamiento CD 101
Funcionamiento BT 103
Funcionamiento USB 104
Otras funciones 105
Cuidado y mantenimiento 106
Indicaciones para la retirada del aparato 107
DATOS TÉCNICOS
Número de artículo 10031949, 10031950
Suministro eléctrico 220-240 V - 50-60 Hz
Sintonizador DAB/DAB+ 174.928 (5A) MHz - 239.200 (13F) MHz
Sintonizador FM 87,5 MHz - 108.0 MHz
DECLARACIÓN DE CONFORMIDAD
Fabricante:
Chal-Tec GmbH, Wallstraße 16, 10179 Berlín
(Alemania).
Este producto cumple con las siguientes directivas
europeas:
2014/35/UE (baja tensión)
2011/65/UE (refundición RoHS)
2014/53/UE (RED)
Page 88

88
ES
INDICACIONES DE SEGURIDAD
Protección contra la radiación láser
• No intente abrir la carcasa, pues la radiación láser de este reproductor
de CD es dañina para los ojos.
• Detenga el uso inmediatamente si caen líquidos u objetos sobre la
carcasa.
• No toque la lente. Esta podría dañarse y provocar que el reproductor no
funcione correctamente.
• No introduzca nada en la ranura de seguridad, pues el diodo láser
continuará activado incluso con la tapa abierta.
• Asegúrese de que el aparato no reciba suministro eléctrico si no lo usa
durante un periodo de tiempo prolongado. Desconecte el enchufe de la
toma de corriente. Para ello, agarre el enchufe, no el cable.
• Este aparato utiliza un láser. Utilice el control y ajustes exclusivamente
para el n concebido, pues de lo contrario puede exponerse de un
modo peligroso a radiaciones.
Colocación
• No utilice el aparato en lugares extremadamente calientes, fríos, con
polvo o humedad.
• Coloque el aparato en una supercie seca y plana.
• No impida la circulación de aire en el aparato colocándolo en un lugar
con ventilación deciente, cubriéndolo con un paño ni colocándolo
sobre una alfombra.
• Utilice el aparato solamente con las ruedas, estanterías, soportes o
mesas recomendadas por el fabricante o incluidas en el envío. Si se
utiliza un carrito con ruedas, mueva la unidad/aparato con cuidado para
evitar lesiones provocadas de un posible vuelco.
Condensación
• Si el aparato se deja en una sala con calefacción que sea húmeda y
cálida, pueden formarse gotas de agua o condensación en la carcasa.
• Si se forma condensación en la carcasa, es posible que el aparato no
funcione correctamente.
• Déjelo reposar durante 1 o 2 horas antes de encenderlo o caliente la
estancia poco a poco y deje que el aparato se seque. Si se produce un
problema, desconecte el aparato del suministro eléctrico y consulte con
un técnico cualicado.
Page 89

89
ES
DESCRIPCIÓN DEL APARATO
1 BOTÓN DEL MANDO A
DISTANCIA
8 BOTÓN MENÚ
2 BOTÓN STANDBY 9 BOTÓN ATRÁS CD/BT / SINTONIZAR-
3 COMPARTIMENTO PARA CD 10 REGULADOR DE VOLUMEN
4 DISPLAY LCD 11 BOTÓN AVANZAR CD/BT / SINTONIZAR +
5 BOTÓN PARA ABRIR/
CERRAR EL COMPARTIMENTO
PARA CD
12 PLAY/PAUSE CD/BT
6 TOMA USB 13 BOTÓN SINCRONIZACIÓN/DETENCIÓN CD
1 CABLE DE ALIMENTACIÓN 2 ANTENA DAB/FM
Page 90

90
ES
1 BOTÓN STANDBY 15 BOTÓN MEMORIA
2 BOTÓN BÚSQUEDA DIRECTA 16 BOTÓN FIJAR HORA/RELOJ
3 BOTÓN REPETIR 17 BOTÓN SLEEP
4 BOTÓN PISTA ANTERIOR CD/USB O
REDUCIR TIEMPO / RETROCEDER EN
SINTONIZADOR
18 BOTÓN CARPETA SUPERIOR/ PRESET
SIGUIENTE
5 BOTÓN ECUALIZADOR 19 BOTÓN ORDEN ALEATORIO
6 BOTÓN MONO/ST FM 20 BOTÓN ENTER
7 BOTÓN X-BASS 21 BOTÓN PISTA SIGUIENTE CD/USB
O AUMENTAR TIEMPO / AVANZAR EN
SINTONIZADOR
8 BOTÓN SELECCIONAR DAB/FM 22 BOTÓN CARPETA INFERIOR/ PRESET
ANTERIOR
9 BOTÓN SELECCIONAR CD/USB 23 BOTÓN ACTIVAR/DESACTIVAR CARPETA
10 BOTÓN INFO DAB 24 BOTÓN SELECCIONAR BT/AUX
11 BOTÓN BÚSQUEDA DAB/FM 25 BOTÓN SILENCIO
12 BOTÓN VISUALIZACIÓN CD/USB /
SINCRONIZACIÓN BT
26 BOTÓN MENÚ DAB/FM
13 BOTÓN STOP CD/USB/BT 27 BOTÓN AUMENTAR Y REDUCIR
VOLUMEN
14 BOTÓN ABRIR/CERRAR 28 BOTÓN STOP CD/USB/BT PLAY/PAUSE
Page 91

91
ES
ANTES DEL PRIMER USO
Este aparato funciona con corriente doméstica de 100-240VAC ~ 50/60 Hz AC y
necesita una pila de litio CR2025 3V (incluida) para el mando a distancia.
Nunca intente conectar el aparato a otras fuentes de electricidad. Podría
dañar el aparato y cancelar la garantía.
Toma para suministro eléctrico
Conecte el cable de alimentación a una toma de corriente de 100-240VAC ~
50/60 Hz. Asegúrese de que el enchufe está conectado correctamente a la
toma.
Mando a distancia
El mando a distancia funciona con una pila de litio tipo CR2025 de 3V
(incluida en el envío). Para activar este mando a distancia, retire del
compartimento de las pilas la cinta aislante incluida. Si el mando a
distancia no funciona correctamente, sustituya la pila por una de litio de
CR2025 de 3V.
1 Presione la tapa del compartimento de las pilas hacia abajo y retire el
soporte de la pila de la carcasa del mando a distancia.
2 Sustituya la pila y asegúrese de que esté correctamente instalada. El
mando a distancia no funciona si la pila se ha colocado con la polaridad
errónea.
Advertencia: Si la pila no se ha cambiado correctamente, el mando a
distancia puede dañarse. Sustituya la pila exclusivamente por otra del
mismo tipo.
Conectar el aparato
Desenrolle el cable completamente. Conecte la fuente de alimentación
a la toma de red situada en la parte trasera del aparato. El aparato está
conectado y listo para su uso.
Page 92

92
ES
FUNCIONES Y AJUSTES
Apagar/encender aparato
Si conecta el aparato a la toma de corriente por primera vez, el display
muestra „00:00:00“. Si recibe una señal DAB+ en su ubicación, el aparato
captará la zona horaria. Tras un minuto, cambiará al modo standby.
• Pulse el botón STANDBY en el aparato o en el mando a distancia para
cambiar al modo ON.
• Pulse STANDBY en el aparato o en el mando a distancia para cambiar
de nuevo al modo STANDBY.
• Desconecte el cable de alimentación del conector de la toma de red si
desea apagar por completo el aparato.
Advertencia:
• Si el aparato está inactivo durante 15 minutos, se cambia
automáticamente al modo standby.
• Apague el aparato completamente si no lo utiliza para ahorrar energía.
Ajuste del volumen
• Gire la rueda de VOLUME+/- del aparato o pulse VOLUME+/- en el
mando a distancia para aumentar o reducir el volumen.
• Si desea silenciar el aparato, pulse MUTE. Pulse de nuevo MUTE o los
botones VOLUME +/- del mando a distancia o gire la rueda VOLUME
+/- del aparato para aumentar de nuevo el volumen.
Ajustar la hora
1 En el modo standby, pulse el botón CLOCK del mando a distancia. En el
display parpadean los dígitos de las horas.
2 Pulse el botón |<< o >>| para ajustar las horas y, a continuación, el
botón CLOCK para conrmar. En el display parpadean los dígitos de los
minutos.
3 Pulse el botón |<< o >>| para ajustar los minutos y a continuación pulse
el botón CLOCK para conrmar.
4 Ya se ha congurado la hora correctamente.
Page 93

93
ES
Advertencia: Si no recibe ninguna señal DAB+, puede ajustar la hora
manualmente. En cuando reciba una señal DAB+, la hora se actualiza
automáticamente.
Ajustar el temporizador
1 Mantenga pulsado el botón TIMER del mando a distancia hasta que el
display muestre „ON TIMER“ y los dígitos de las horas parpadeen en el
mismo.
2 Pulse el botón |<< o >>| para ajustar las horas y a continuación pulse el
botón TIMER para conrmar. En el display parpadean los dígitos de los
minutos.
3 Pulse el botón |<< o >>| para ajustar los minutos y a continuación pulse
el botón TIMER para conrmar.
4 Si pulsa el botón |<< o >>| y el temporizador de encendido está
congurado, el display muestra „o timer“ y los dígitos de las horas
parpadean.
5 Pulse el botón |<< o >>| para ajustar las horas y a continuación pulse el
botón TIMER para conrmar. En el display parpadean los dígitos de los
minutos.
6 Pulse el botón |<< o >>| del mando a distancia para ajustar los minutos
y a continuación pulse el botón TIMER para conrmar.
7 Pulse los botones para seleccionar el modo DAB, FM, DISC o USB y a
continuación pulse el botón TIMER para conrmar. El display muestra
„VOL#“ y parpadea. Pulse el botón |<< o >>| para ajustar el volumen y, a
continuación, el botón TIMER para conrmar.
8 Pulse el botón TIMER para seleccionar „TImer On“. El temporizador está
congurado.
9 En el modo standby, el símbolo del reloj aparece en el display para
indicar que el temporizador está activado.
Desactivar el temporizador
Pulse el botón del temporizador varias veces en el mando a distancia para
seleccionar el modo de temporizador de apagado. El símbolo de la hora
desaparece del monitor.
Page 94

94
ES
Ajustar el temporizador de apagado
Utilice el temporizador de apagado para desconectar el aparato en modo
reproducción transcurrido un tiempo determinado. Congurando el
temporizador de apagado, puede silenciar la música que suena sabiendo
que el aparato se apagará automáticamente y no estará en funcionamiento
durante toda la noche.
1 Para regular el temporizador de apagado, pulse varias veces el botón
SLEEP del mando a distancia para seleccionar el tiempo de apagado
deseado como sigue: 90> 80 > 70 > 60 > 50 > 40 > 30 > 20 > 10 > OFF
2 El temporizador de apagado está activado.
3 Pulse el botón SLEEP para visualizar el tiempo que resta para que se
apague el aparato automáticamente.
4 Para desactivar el temporizador de apagado, pulse varias veces el
botón SLEEP para seleccionar „SLEEP OFF“.
Regulador del ecualizador
Este sistema es compatible con una variedad de ecualizadores y efectos de
sonidos. Pulse el botón EQ del mando a distancia durante la reproducción
para seleccionar el modo de música deseado. Cada vez que pulse el botón
EQ, el modo música cambia como sigue:
Restablecimiento del sistema
Puede ocurrir que deba restablecer su aparato a los valores de fábrica,
sobre todo si se ha mudado. Si tiene problemas en la recepción, sería
razonable reiniciar el sistema y probar una vez más. Si se traslada a otra
región de su país y recibe las señales locales y nacionales DAB+- de esta
región, las emisoras que ha congurado anteriormente ya no estarán
disponibles.
1 Abra el compartimento de CD en modo DAB y mantenga pulsado el
botón STOP del aparato hasta que el aparato muestre „Restarting...
FACTORY RESET“.
2 Después de haber restablecido el aparato, el aparato regresa al modo
DAB.
Advertencia: En el restablecimiento del sistema se eliminan todas
las emisoras conguradas y guardadas en FM/DAB+.
Page 95

95
ES
FUNCIONAMIENTO DAB+
Si conecta el aparato a una toma de electricidad y lo enciende por primera
vez a partir del modo standby, este pasa automáticamente al modo DAB
y realiza la función de búsqueda automática. Durante la búsqueda, en
el display aparece una barra de progreso junto a „Scanning...“, lo cual
indica el transcurso de la búsqueda y el número de emisoras que se hayan
encontrado hasta el momento. Una vez haya concluido la búsqueda, el
aparato selecciona primera emisora encontrada por orden alfanumérico.
Para visualizar las emisoras encontradas, pulse el botón |<< o >>|.
Full Scan
El Full Scan busca todos los canales DAB+ en la banda II. Cuando haya
concluido la búsqueda, se selecciona automáticamente la primera emisora
encontrada por orden alfanumérico.
1 Para activar la búsqueda automática, pulse el botón SCAN y el display
muestra „Scanning...“ y una barra de progreso.
2 Se guardan automáticamente todas las emisoras encontradas. Para
visualizar y escuchar las emisoras encontradas, pulse el botón |<< o
>>|. Para guardar las emisoras como preseleccionadas, pulse el botón
„ENTER“.
Sintonización manual
Puede ajustar de modo manjual la función auto-tune junto con el receptor.
Esto es útil si mueve la antena o si añade emisoras que no ha detectado la
sintonización automática.
1 Pulse el botón MENU del mando a distancia para visualizar el menú.
2 Pulse el botón ENTER para una sintonización manual.
3 Pulse el botón |<< o >>| para navegar por los canales DAB+, los cuales
están numerados desde 5A hasta 13F.
4 Después de haber seleccionado su canal deseado, presione el botón
enter para conrmar. El display muestra el multiplex.
5 Pulse el botón ENTER para conrmar los canales establecidos como
emisoras preseleccionadas.
Page 96

96
ES
Rango de compresión dinámica (DRC)
Si escucha música con un rango dinámico elevado en un entorno con
mucho ruido, quizás quiera limitar el rango de compresión dinámica de
audio.
1 Pulse el botón MENU del mando a distancia para mostrar el menú.
2 Pulse el botón |<< o >>| para seleccionar „DRC“ y a continuación pulse
el botón ENTER del mando a distancia para conrmar.
3 Pulse el botón |<< o >>| para seleccionar o/high/low.
4 Pulse el botón ENTER del mando a distancia para conrmar.
Prune
Puede eliminar todas las emisoras no disponibles de la lista.
1 Pulse el botón MENU del mando a distancia en modo DAB para mostrar
el menú.
2 Pulse el botón |<< o >>| para seleccionar „Prune“ y a continuación
pulse el botón ENTER para conrmar.
3 Pulse el botón |<< o >>| para seleccionar y a continuación pulse el
botón ENTER del mando a distancia para eliminar las emisoras no
disponibles.
4 Puede pulsar el el botón |<< o >>| para seleccionar y, a continuación,
el botón ENTER del mando a distancia para eliminar las emisoras no
disponibles.
Información de software
1 Pulse el botón MENU del mando a distancia en modo DAB para mostrar
el menú.
2 Pulse el botón |<< o >>| para seleccionar „SW version“.
3 Pulse el botón ENTER del mando a distancia para visualizar la versión
de software.
Page 97

97
ES
Submenús y funciones
Es posible que vea un símbolo „>“ tras el nombre de la emisora. Esto
indica que para dicha emisora existen servicios adicionales. Los servicios
adicionales contienen información extra relacionada con la emisora
primaria. Por ejemplo, una emisora deportiva puede añadir reportajes
adicionales. Los servicios adicionales se añaden a la lista de emisoras
directamente tras la emisora primaria. Para seleccionar las emisoras
secundarias, pulse el botón MENU si el símbolo „>“ aparece en el display
antes del nombre de la emisora. Si naliza el servicio adicional, el aparato
pasa automáticamente a la emisora primaria.
Emisoras predeterminadas
(Solo con mando a distancia)
1 Mantenga pulsado MEMORY. El display muestra „<Save to P # >“.
2 Pulse el botón PRESET < o > para seleccionar el número de la emisora
preseleccionada que desea. A continuación, pulse el botón ENTER para
conrmar.
3 La emisora se guarda en un par de segundos y el display muestra a
continuación „Preset#Stored“.
Acceder a una emisora guardada
(Solo con mando a distancia)
1 Si ha guardado una emisora en uno de los espacios preseleccionados,
puede acceder a la misma pulsando el botón MEMORY.
2 Mantenga pulsado el botón PRESET hasta que se muestre la emisora
deseada en el display; a continuación, pulse el botón ENTER para
conrmar y reproducirla.
Modos de visualización DAB
Pulse el botón DISPLAY del mando a distancia. El display muestra de
manera alterna los siguientes modos de visualización. La información de
cada modo de visualización aparece en la parte inferior del display.
Signal Strength (potencia de señal)
El display muestra una barra de visualización para observar la potencia
de señal; cuanto más potente sea la señal, más largas serán las barras de
izquierda a derecha.
Page 98

98
ES
Programme Type (Tipo de programa)
Describe el estilo o el género del programa que se emite.
Ensemble
Muestra el nombre del mutiplex donde se encuentra la emisora que está
escuchando. Un multiplex es una agrupación de emisoras que emiten desde
una misma frecuencia. Existen multiplex locales y nacionales. Los locales
contienen emisoras que pertenecen a una zona en concreto.
Advertencia: DAB, al contrario que la radio normal, agrupa varias
emisoras de radio y emite sobre una frecuencia.
Frequency (frecuencia)
Esta opción muestra la frecuencia de la emisora predeterminada, como „11C
220.352MHz“.
Signal Error (Error de señal)
Esta opción muestra un número que indica la tasa de errores. Si el número
es 0, signica que la señal recibida no tiene errores y que la potencia de
señal es muy buena. Si la tasa de errores es elevada, se aconseja reorientar
la antena o reubicar el aparato.
Tasa de bits de audio
El display muestra la tasa de bits digital de audio que se recibe.
Fecha/hora
Esta opción muestra la hora y fecha actuales que las compañías
radiofónicas E10 ofrecen de un modo automático.
DLS (Dynamic Label Segment)
Dynamic Label Segment es un texto corrido que incluye la compañía
radiofónica en las transmisiones. El texto contiene normalmente
información y detalles del programa.
Page 99

99
ES
FUNCIONAMIENTO FM
Cambiar de modo DAB a FM
Para cambiar el aparato al modo FM, pulse varias veces el botón FUNCTION
o presione el botón DAB/FM del mando a distancia. El display muestra la
frecuencia.
Auto Scan (búsqueda automática)
Pulse el botón SCAN hasta que el sintonizador comience a buscar emisoras.
Para buscar el rango de frecuencia, mantenga pulsado el botón SCAN.
Cuando se haya encontrado una emisora, la búsqueda se congura
automáticamente.
Manual Scan (búsqueda manual)
Para buscar manualmente emisoras FM, pulse varias veces el botón |<< o
>>| hasta haber alcanzado la frecuencia deseada.
Scan Setting (Ajustes de búsqueda)
Se trata de una opción de búsqueda con la que se pueden buscar todas las
emisoras o solo aquellas con muy buena señal.
1 Pulse el botón MENU, a continuación pulse |<< o >>| para seleccionar
„Scan Setting“. Pulse el botón ENTER para conrmar.
2 Pulse el botón |<< o >>| para seleccionar „All station“ (todas las
emisoras) o „Strong stations only“ (solo emisoras con buena señal).
Pulse el botón ENTER para conrmar.
Audio Setting (Ajustes de audio)
Este aparato pasa automáticamente del modo estéreo a mono, pero puede
cancelar dicho cambio para activar manualmente esta función. Esto puede
ser útil para señales débiles.
1 Pulse el botón MENU, a continuación pulse |<< o >>| para seleccionar
„Audio Settings“. Pulse el botón ENTER para conrmar.
2 Pulse el botón |<< o >>| para seleccionar „Stereo allowed“ (estéreo
permitido) o „Forced mono“ (mono obligatorio) y a continuación pulse
el botón ENTER para conrmar.
Page 100

100
ES
Modo audio
Pulse el botón MONO/STEREO del mando a distancia para pasar el modo
estéreo al modo mono.
Emisoras predeterminadas
Puede guardar hasta 20 emisoras preferidas en la memoria. Así puede
acceder rápidamente y sin problemas a sus emisoras favoritas.
1 Para guardar una emisora predeterminada, debe escuchar la emisora
que desea guardar. Pulse el botón MEMORY. El display muestra „Save
to P#“.
2 Pulse el botón PRESET UP o PRESET DOWN para seleccionar su número
preset o predeterminado deseado. A continuación, pulse el botón
ENTER para conrmar.
3 La emisora se guarda en pocos segundos y el display muestra a
continuación „Preset # Stored“ (Predeterminado # guardado).
Acceder a una emisora guardada
1 Tras haber guardado una emisora en uno de los botones Preset, puede
acceder a la misma pulsando el botón MEMORY.
2 Pulse el botón PRESET UP o PRESET DOWN hasta que se visualice la
emisora deseada en el display.
Modos de visualización FM
Pulse el botón INFO del mando a distancia. El display muestra de manera
alterna los siguientes modos de visualización. La información de cada modo
de visualización aparece en la parte inferior del mismo.
Radio texto
Al igual que en el modo DAB, la emisora de radio puede añadir un texto
corrido donde se incluye información sobre el programa actual.
 Loading...