

Page 1
Karaoke-Tower
www.auna-multimedia.com10027096 10027097 10030804
Page 2

Sehr geehrter Kunde,
wir gratulieren Ihnen zum Erwerb Ihres Gerätes. Lesen Sie die folgenden Anschluss- und Anwendungshinweise sorgfältig durch und befolgen Sie diese, um möglichen technischen Schäden vorzubeugen.
Für Schäden, die durch Missachtung der Sicherheitshinweise und unsachgemäßen Gebrauch entstehen,
übernehmen wir keine Haftung.
Inhalt
Technische Daten . . . . . . . . . . . . . . . . . . . . . . . . . . . . . . . . . . . . . 2
Sicherheitshinweise . . . . . . . . . . . . . . . . . . . . . . . . . . . . . . . . . . . . 2
Bedienelemente . . . . . . . . . . . . . . . . . . . . . . . . . . . . . . . . . . . . . . 4
Bedienung . . . . . . . . . . . . . . . . . . . . . . . . . . . . . . . . . . . . . . . . .5
Entsorgung . . . . . . . . . . . . . . . . . . . . . . . . . . . . . . . . . . . . . . . . . 6
Technische Daten
Artikelnummer . . . . . . . . . . . . . . . . . . . . .10027096 10027097 10030804
Stromversorgung . . . . . . . . . . . . . . . . . . . . . . . .220-240 V~ 50/60 Hz
Sicherheitshinweise
• Diese Bedienungsanleitung dient dazu, Sie mit der Funktionsweise dieses Produktes vertraut zu machen. Bewahren Sie diese Anleitung daher stets gut auf, damit Sie jederzeit darauf zugreifen können.
• Sie erhalten bei Kauf dieses Produktes zwei Jahre Gewährleistung auf Defekt bei sachgemäßem Gebrauch.
• Bitte verwenden Sie das Produkt nur in seiner bestimmungsgemäßen Art und Weise. Eine anderweitige Verwendung führt eventuell zu Beschädigungen am Produkt oder in der Umgebung des Produktes.
• Ein Umbauen oder Verändern des Produktes beeinträchtigt die Produktsicherheit. Achtung Verletzungsgefahr!
• Önen Sie das Produkt niemals eigenmächtig und führen Sie Reparaturen nie selber aus!
• Behandeln Sie das Produkt sorgfältig. Es kann durch Stöße, Schläge oder den Fall aus bereits geringer Höhe beschädigt werden.
• Halten Sie das Produkt fern von Feuchtigkeit und extremer Hitze.
Zur Reduzierung der Gefahr von Brand, elektrischem Schlag und Beschädigung:
• Setzen Sie dieses Gerät nicht dem Regen aus.
2
Page 3

• Stellen Sie keine mit Flüssigkeiten gefüllten Gefäße, wie Vasen, auf dieses Gerät.
• Ausschließlich das empfohlene Zubehör verwenden.
• Reparieren Sie dieses Gerät nicht selbst. Wenden Sie sich zur Wartung an qualiziertes Kunden-
dienstpersonal.
• Stellen Sie keine schweren Gegenstände auf dieses Gerät.
• Reinigen Sie das Gerät nur mit einem trockenen Tuch.
• Blockieren Sie nicht die Belüftungsönungen.
• Installieren Sie die Geräte nicht in unmittelbarer Nähe von Hitzequellen wie Heizungen, Herden,
Öfen oder anderen heiß werdenden Geräten (wie z. B. Verstärkern o. a.)
Netzkabel/Netzteil
Zur Reduzierung der Gefahr von Brand, elektrischem Schlag und Beschädigung:
• Gewährleisten Sie, dass die Spannung der Stromversorgung dem auf diesem Gerät angegebenen
Wert entspricht.
• Stecken Sie das Netzteil vollständig in die Steckdose ein.
• Ziehen Sie nicht am Kabel, knicken Sie es nicht und stellen Sie keine schweren Gegenstände darauf.
• Fassen Sie den Stecker nicht mit nassen Händen an.
• Fassen Sie den Stecker beim Herausziehen an seinem Korpus an.
• Verwenden Sie keinen beschädigten Netzstecker oder eine beschädigte Steckdose.
• Installieren Sie dieses Gerät so, dass das Netzkabel sofort aus der Steckdose gezogen werden kann,
wenn Störungen auftreten
Kleine Objekte/Verpackungsteile (Plastikbeutel, Karton, etc.)
• Bewahren Sie kleine Objekte (z. B. Schrauben und anderes Montagematerial, Speicherkarten) und
Verpackungsteile außerhalb der Reichweite von Kindern auf, damit sie nicht von diesen verschluckt
werden können. Lassen Sie kleine Kinder nicht mit Folie spielen. Es besteht Erstickungsgefahr!
Aufstellung
• Stellen Sie das Gerät auf eine trockene, ebene, wasserfeste und hitzebeständige Oberäche.
• Suchen Sie einen Aufstellort, an dem Kinder nicht an das Gerät gelangen können.
• Die Steckdose muss leicht zugänglich sein, um im Notfall das Gerät schnell vom Stromkreis trennen
zu können.
• Installieren oder positionieren Sie dieses Gerät nicht in einem Bücherregal, Einbauschrank oder ei-
nem sonstigen engen Raum. Stellen Sie eine gute Belüftung des Gerätes sicher.
• Stellen Sie das Gerät nicht auf Verstärker oder andere Geräte, die heiß werden können. Diese Hitze
könnte das Gerät beschädigen.
• Setzen Sie dieses Gerät keinem direkten Sonnenlicht, hohen Temperaturen, starker Feuchtigkeit und
übermäßigen Erschütterungen aus.
Transport des Gerätes
• Bitte bewahren Sie die Originalverpackung auf. Um einen ausreichender Schutz beim Transport des
Gerätes zu erreichen, verpacken Sie das Gerät in der Originalverpackung.
3
Page 4
Reinigung der äußeren Oberfl äche
• Verwenden Sie keine üchtigen Flüssigkeiten wie Insektensprays. Durch zu starken Druck beim Abwischen können die Ober ächen beschädigt werden. Gummi- oder Plastikteile sollten nicht über
einen längeren Zeitraum mit dem Gerät in Kontakt sein. Nutzen Sie ein trockenes Tuch.
Bedienelemente
m u l t i m e d i a
1 2
3
4
5
7
8
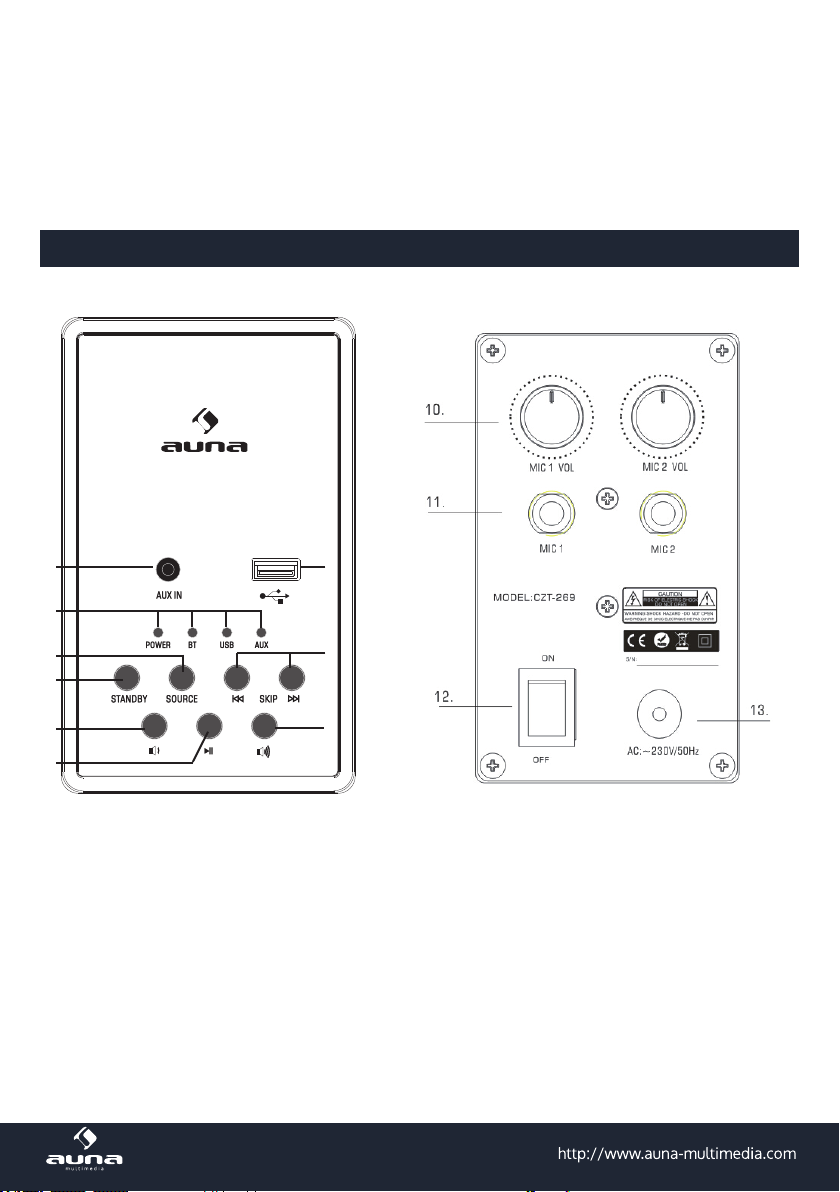
1 Line In
2 USB-Eingang
3 Power- / Modus-LEDs
4 Source (Quelle)
5 Power/Standby
6 Überspringen (vor/zurück)
7 Lautstärke 8 Play/Pause
9 Lautstärke +
4
6
9
10 Mikrofon Lautstärke
11 Mikrofon-Anschlüsse
12 Netzschalter
13 Netzkabel
Page 5

Bedienung
Aufbau
• Packen Sie das Gerät vorsichtig aus, um die Ober äche nicht zu beschädigen
• Bringen Sie den Fuß mithilfe der beiliegenden Schrauben und Unterlegscheiben am Karaoke Tower
an.
• Bringen Sie die Schutzpads an der Unterseite des Fußes an.
Inbetriebnahme
• Drücken Sie
• Drücken Sie SOURCE (4) mehrfach, um die Tonquelle auszuwählen. Die Modus-LED (3) zeigt die
aktuell gewählte Quelle an.
• Stellen Sie die gewünschte Lautstärke mit (7) und (8) ein.
Line In
• Schließen Sie hier ein externes Audio-Gerät mit einem 3,5mm-Klinke-AUX- / Line-Kabel an (MP3-
Player, CD-Player, Smartphone, Tablet o.ä.).
• Wählen Sie mit dem Source-Knopf (4) AUX als Eingangsquelle an.
• Nutzen Sie ihr externes Audiogerät wie gewohnt.
USB
• Stecken Sie einen USB-Stick (oder USB-Festplatte o. ä.) in den USB-Slot ein.
• Wählen Sie USB mit dem Source-Button (4) aus. Auto-Play wird unterstützt.
Beachten Sie: Der USB-Port auf der Oberseite des Geräts unterstützt MP3-Dateien von 32-320 kbps. Eine Anzahl von 999 MP3-Dateien auf dem Datenträger
sollte nicht überschritten werden. Um Dateien von einem USB-Datenträger abzuspielen, sollten Sie diesen einstecken, wenn der Tower im Standby-Modus ist
und diesen dann erst einschalten.
, um das Gerät einzuschalten.
Karaoke
• Stecken Sie die beiliegenden Mikrofone in die rückseitigen Anschlüsse (11) ein.
• Regulieren Sie die Lautstärke mit den darüber liegenden Lautstärke-Reglern (10).
• Wählen Sie die gewünschte Playback-Quelle mit dem Source-Knopf (4).
• Singen!
5
Page 6

BT
• Wählen Sie BT mit dem Source-Button (4) aus. Die LED wird blau.
• Aktivieren Sie BT auf Ihrem BT-Gerät (Smartphone, Tablet, Computer). Schlagen Sie dazu in der Be-
dienungsanleitung Ihres BT-Gerätes nach.
• Lassen Sie Ihr Gerät für andere BT-Gertäte sichtbar werden.
• Pairen Sie Ihr BT-Gerät mit „Karaboom“. Falls ein Passwort verlangt wird, tippen Sie „0000“ ein
(viermal ‚null‘).
• Überprüfen Sie, ob das Pairing zwischen den Geräten funktioniert hat.
• Nach dem erfolgten Pairing hören Sie einen Signalton.
• Sie können Ihr BT-Gerät nun mit den Pfeiltasten sowie PLAY/PAUSE auf dem Tower bedienen und
auf die Musikbibliothek zugreifen.
Entsorgung
Be ndet sich die linke Abbildung (durchgestrichene Mülltonne auf Rädern) auf dem Produkt,
gilt die Europäische Richtlinie 2002/96/EG. Diese Produkte dürfen nicht mit dem normalen
Hausmüll entsorgt werden. Informieren Sie sich über die örtlichen Regelungen zur getrennten Sammlung elektrischer und elektronischer Gerätschaften. Richten Sie sich nach den örtlichen Regelungen und entsorgen Sie Altgeräte nicht über den Hausmüll. Durch die regelkon-
forme Entsorgung der Altgeräte werden Umwelt und die Gesundheit ihrer Mitmenschen vor
möglichen negativen Konsequenzen geschützt. Materialrecycling hilft, den Verbrauch von
Rohsto en zu verringern.
Hersteller: Chal-Tec GmbH, Wallstraße 16, 10179 Berlin.
Dieses Produkt entspricht den folgenden Europäischen Richtlinien:
2004/108/EG (EMV)
1999/05/CE (R&TTE)
2006/95/EG (LVD)
2011/65/EU (RoHS)
6
Page 7

Dear Customer,
Congratulations on purchasing this equipment. Please read this manual carefully and take care of the
following hints on installation and use to avoid technical damages. Any failure caused by ignoring the
mentioned items and cautions mentioned in the operation and installation instructions are not covered
by our warranty and any liability.
.
Contents
Technical Data . . . . . . . . . . . . . . . . . . . . . . . . . . . . . . . . . . . . . . . 7
Security Instructions. . . . . . . . . . . . . . . . . . . . . . . . . . . . . . . . . . . . 7
Controls . . . . . . . . . . . . . . . . . . . . . . . . . . . . . . . . . . . . . . . . . . . 9
How to use . . . . . . . . . . . . . . . . . . . . . . . . . . . . . . . . . . . . . . . . 10
Disposal Considerations . . . . . . . . . . . . . . . . . . . . . . . . . . . . . . . . . 11
Technical Data
Item number . . . . . . . . . . . . . . . . . . . . . .10027096 10027097 10030804
Power supply . . . . . . . . . . . . . . . . . . . . . . . . . . . 220-240 V~ 50/60 Hz
Security Instructions
• This instruction manual intends to make you familiar with the functioning of this product. Keep this
manual safe, so you can refer to the instructions any time.
• With the purchase of this product you receive two years of warranty when using the product in the
intended manner.
• Please use the product in the intended manner. Another use my lead to damage to the product or
its surroundings.
• Any modications or changes to the product compromise the product safety. Warning: Danger of
injuries!
• Never open the device by yourself. Never carry out repairs by yourself!
• Handle the product with care. It can be damaged by shocks, knocks or falling from even a short
height.
• Keep the product away from humidity and extreme heat.
In order to reduce the risk of re, electrical shock or damage:
• Never expose the device to rain.
• Do not place vessels lled with liquids such as vases on the unit.
7
Page 8

• Use of recommended accessories only.
• Do not repair the device by yourself. Turn to qualied service personnel.
• Do not place heavy objects in this device.
• Clean the device only with a dry cloth.
• Do not block the ventilation openings.
• Do not install near any heat sources such as radiators, heat registers, stoves, or other apparatus
(including ampliers) that produce heat.
Power cord/power adaptor
In order to reduce the risk of re, electrical shock or damage:
• This product should be operated from the type of power source indicated on the rating plate.
• Plug the power adaptor rmly into the wall outlet.
• Do not pull on the power cord, do not bend it and do not place heavy objects on the power cord.
• Do not touch the plug with wet hands.
• When unplugging, hold the plug on its body.
• Install the device in a way that the power plug can be pulled immediately in case of malfunctions.
Small parts / packaging (plastic parts, cardboard boxes, etc.)
Keep small objects (e.g. screws and other installation parts, memory cards) and packaging material
out of the reach of children, lest they be swallowed. Do not let children play with plastic bags. Risk of
suocation!
Locating
• Locate the device on the a dry, level, water and heat-resistant surface.
• Choose an installation location, where children cannot reach the device.
• The wall outlet must be easily accessible, in order to be able to unplug the device in a case of an
emergency.
• Do not install this device in a book shelf, built-in cupboard or any other narrow space. Ensure the
ventilation of this device.
• Do not place this device on an amplier or any other device that can become hot. The heat could
damage the device.
• Do not expose this device to direct sunlight, high temperatures, high humidity or excessive vibrations.
Transport of the device
Please retain the original packaging. In order to ensure suicient protection when transporting the
device, pack the device in the original packaging.
Cleaning of the outer surface
• Do not use volatile uids such as insect sprays. By pressing to hard when wiping, the surface can
be damaged. Rubber or plastic parts should not be in contact with the device over a longer period.
Use a dry cloth.
8
Page 9

m u l t i m e d i a
1 2
3
Controls
4
5
7
8
1 Line In
2 USB port
3 Power- / Mode-LEDs
4 Source button
5 Power/Standby
6 Skip (forward/backward)
7 Volume 8 Play/Pause
9 Volume +
6
9
10 Microphone volume
11 Microphone jacks
12 Power On/O
13 AC cable
9
Page 10

How to use
Setup
• Carefully take the tower body and base out of the packaging.
• Take the screws and washers out.
• Attach the base to the body aligning the two holes in the base with the two holes in the tower.
• Screw the base into the body.
• Attach the four pads to the base bottom to protect the ground (1 piece for spare parts).
• Stand the tower upright on the oor. The appliance is now ready for use.
General operation
• Press
• Press the SOURCE button repeatedly to select the playback source. The LED indicator will light
• Press the VOL(Volume)+/- Buttons to adjust volume level.
• Press the " “button control to choose the tracks.
• If the unit is not used for a long period of time, pull out the plug to turn o the unit completely.
Line In (requires an 3.5mm audio cable)
• Connect your auxiliary device (e.g. smart phone/ MP3 player) to the 3.5mm LINE jack.
• Press the
• Press ‘ Play/Pause ‘on your auxiliary source.
• Adjust the volume to desired level.
• To stop playback, disconnect your auxiliary source from the LINE jack.
USB
• You can connect a USB ash device (not included) to the USB port on the unit to play MP3 les.
• Press
• Press SOURCE into the USB mode. The USB indicator will turns green.
• USB device can auto play
• Press PREVIOUS/NEXT to select track.
Note:
Supported format: MP3 (32kbps-320kbps) The total number of MP3 fi les on the memory
device should not exceed 999. If you cannot easily insert the memory card, you may
have inserted it incorrectly. Try to turn over the card and then insert again. For play-
ing fi les on USB fl ash drive, you should plug in the USB fl ash drive when the unit is in
standby mode. Turn ON the unit and use MODE button to select USB mode.
button to turn on or turn o the unit.
blue according to BT mode.
button to turn on the unit. Press the SOURCE button repeatedly unit the LINE indica-
tor turn green.
button to turn on the unit.
Karaoke
• You can plug the microphone (included)in the back MIC JACK.
• Adjust the mic volume with the knobs on the back.
• Chose your preferred device mode and start play.
• Sing.
10
Page 11

BT function
• Press MODE button to select BT mode. The LED indicator turns blue.
• Turn on BT functionality on your BT device. Typically, BT controls are found on the device’s tools or
settings menu (see your user manual).
• Turn on BT connectivity and make your device ‘discoverable”.
• Choose ‘add a new BT device’ or ‘setup BT device’ on your device. It will start to search. Once “kara-
boom” shows on your device, select it. If your device prompts you for a pass code, please enter
0000. If the pairing attempt fails or times out, please start pairing procedure again (see steps above).
• After your device and the “T” have connected each other, a sound can be heard.
• Make sure the BT connection between the unit and the device is active.
• Press the Play/Pause button to pause playback, press again to resume playback and press button
to skip forward to next track and to skip backward to previous track.
Disposal Considerations
According to the European waste regulation 2002/96/EC this symbol on the product
or on its packaging indicates that this product may not be treated as household waste.
Instead it should be taken to the appropriate collection point for the recycling of electrical and electronic equipment. By ensuring this product is disposed of correctly, you will
help prevent potential negative consequences for the environment and human health,
which could otherwise be caused by inappropriate waste handling of this product. For
more detailed information about recycling of this product, please contact your local
council or your household waste disposal service.
Producer: Chal-Tec GmbH, Wallstraße 16, 10179 Berlin. Germany
This product is conform to the following European Directives
1999/05/CE (R&TTE)
2006/95/EG (LVD)t
2011/65/EU (RoHS)
11
 Loading...