

Page 1
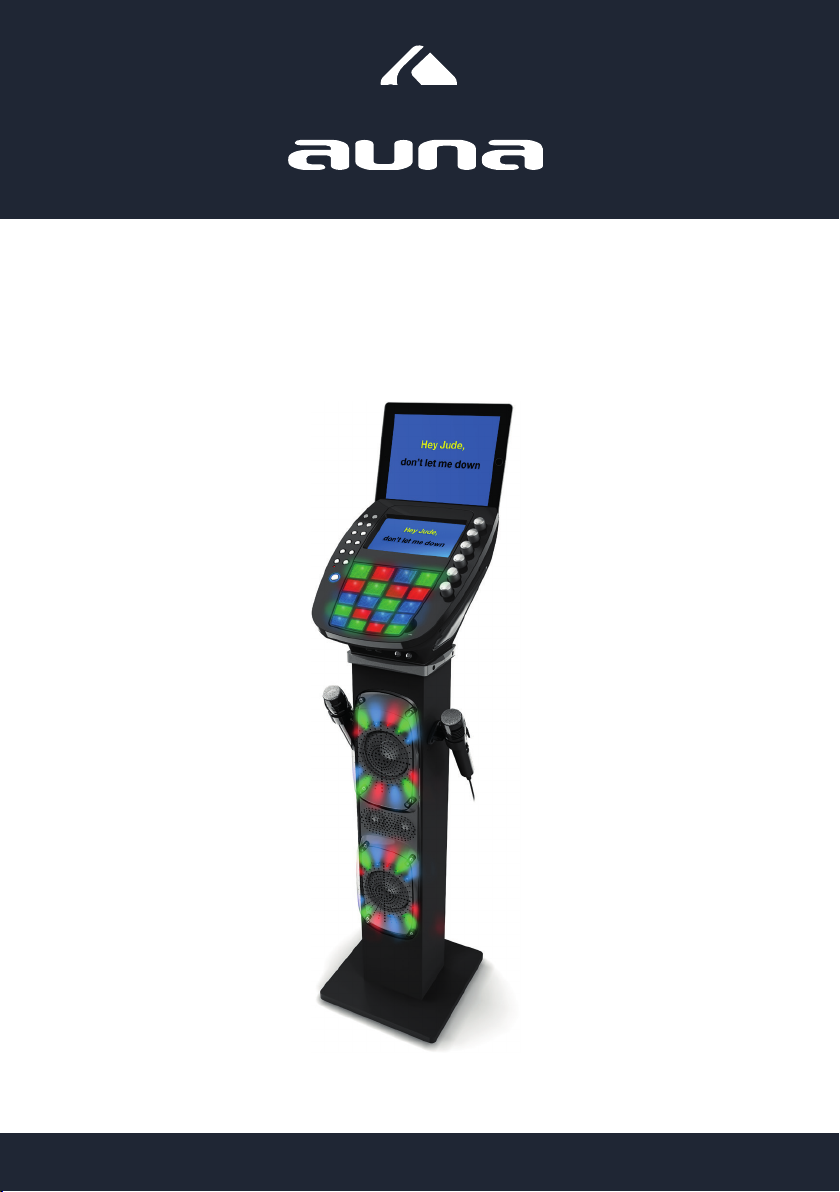
KaraBig
BT-Karaokeanlage
10030796
www.auna.de
Page 2

Sehr geehrter Kunde,
zunächst möchten wir Ihnen zum Erwerb Ihres Gerätes gratulieren.
Bitte lesen Sie die folgenden Anschluss- und Anwendungshinweise sorgfältig durch und befolgen Sie diese
um möglichen technischen Schäden vorzubeugen.
Sicherheitshinweise
• Diese Bedienungsanleitung dient dazu, Sie mit der Funktionsweise dieses Produktes vertraut zu machen. Bewahren Sie diese Anleitung daher stets gut auf, damit Sie jederzeit darauf zugreifen können.
• Sie erhalten bei Kauf dieses Produktes zwei Jahre Gewährleistung auf Defekt bei sachgemäßem
Gebrauch.
• Bitte verwenden Sie das Produkt nur in seiner bestimmungsgemäßen Art und Weise. Eine anderweitige Verwendung führt eventuell zu Beschädigungen am Produkt oder in der Umgebung des Produktes.
• Önen Sie das Produkt niemals eigenmächtig und führen Sie Reparaturen nie selber aus!
• Behandeln Sie das Produkt sorgfältig. Es kann durch Stöße, Schläge oder den Fall aus bereits geringer
Höhe beschädigt werden.
• Halten Sie das Produkt fern von Feuchtigkeit und extremer Hitze.
• Lassen Sie keine Gegenstände aus Metall in dieses Gerät fallen.
• Stellen Sie keine schweren Gegenstände auf dieses Gerät.
• Reinigen Sie das Gerät nur mit einem trockenen Tuch.
Kleine Objekte/Verpackungsteile (Plastikbeutel, Karton, etc.):
Bewahren Sie kleine Objekte (z.B. Schrauben und anderes Montagematerial, Speicherkarten) und Verpackungsteile außerhalb der Reichweite von Kindern auf, damit sie nicht von diesen verschluckt werden können. Lassen Sie kleine Kinder nicht mit Folie spielen. Es besteht Erstickungsgefahr!
Transport des Gerätes:
Bitte bewahren Sie die Originalverpackung auf. Um ausreichenden Schutz beim Transport des Gerätes zu
erreichen, verpacken Sie das Gerät in der Originalverpackung.
Reinigung der äußeren Oberäche:
Verwenden Sie keine üchtigen Flüssigkeiten, wie Insektensprays. Durch zu starken Druck beim Abwischen
können die Oberächen beschädigt werden. Gummi- oder Plastikteile sollten nicht über einen längeren
Zeitraum mit dem Gerät in Kontakt sein. Nutzen Sie ein trockenes Tuch.
2
www.auna.de
Page 3

Technische Daten
Artikelnummer 10030796
Stromversorgung Netzteil für Haushaltssteckdose (230V @50Hz)
Audio Ausgang 40W RMS
CD-Player CD/CD+G
Frequenzgang 100Hz - 20kHz, SNR 50dB
Mikrofon Dynamisch, -73 dB 600 Ohm, Anschluss: Ø 6.3mm
Maße
Lieferumfang:
MIC 1 MIC 2
USB 1 USB 2
LINE IN
Gerät Tablet-Halterung AV Kabel Karaoke-CD+G
2 dynamische Mikro-
fone
Netzteil Bedienungsanleitung
3
www.auna.de
Page 4
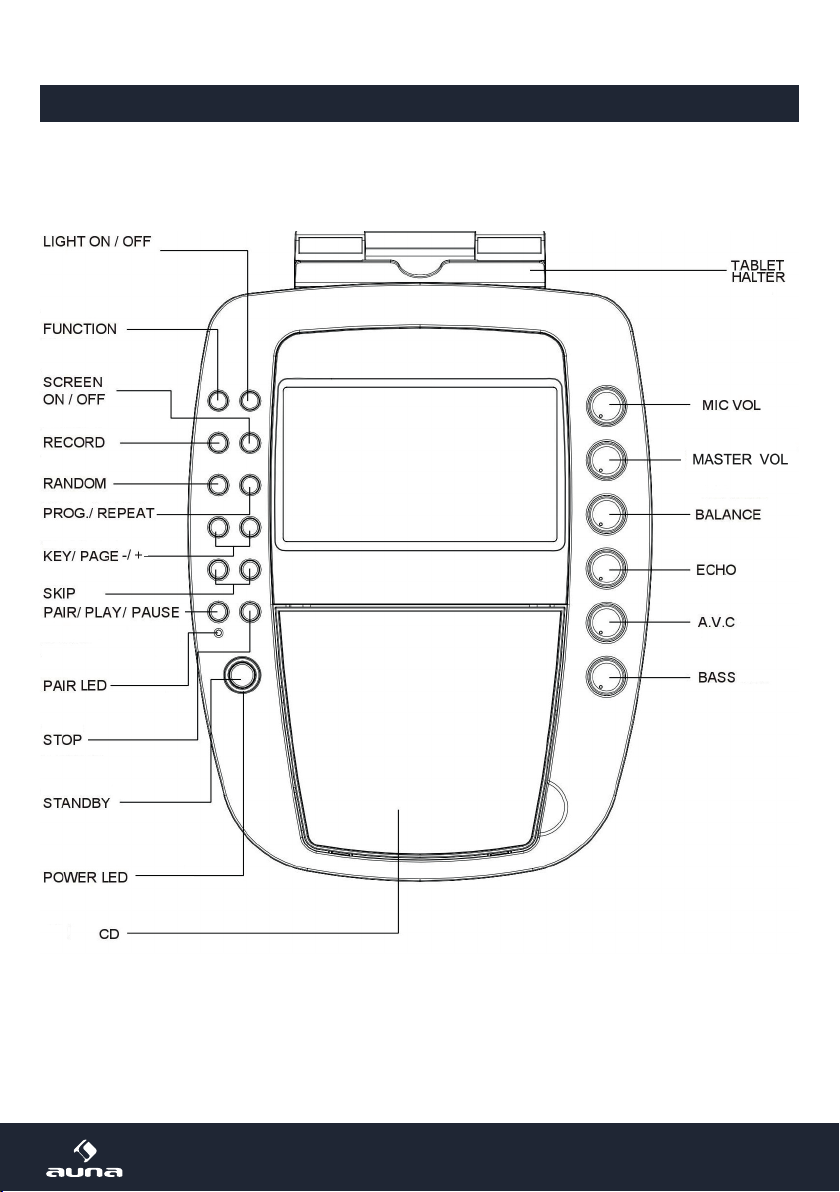
Übersicht: Bedienelemente und Anschlüsse
Bedienfeld
4
www.auna.de
Page 5
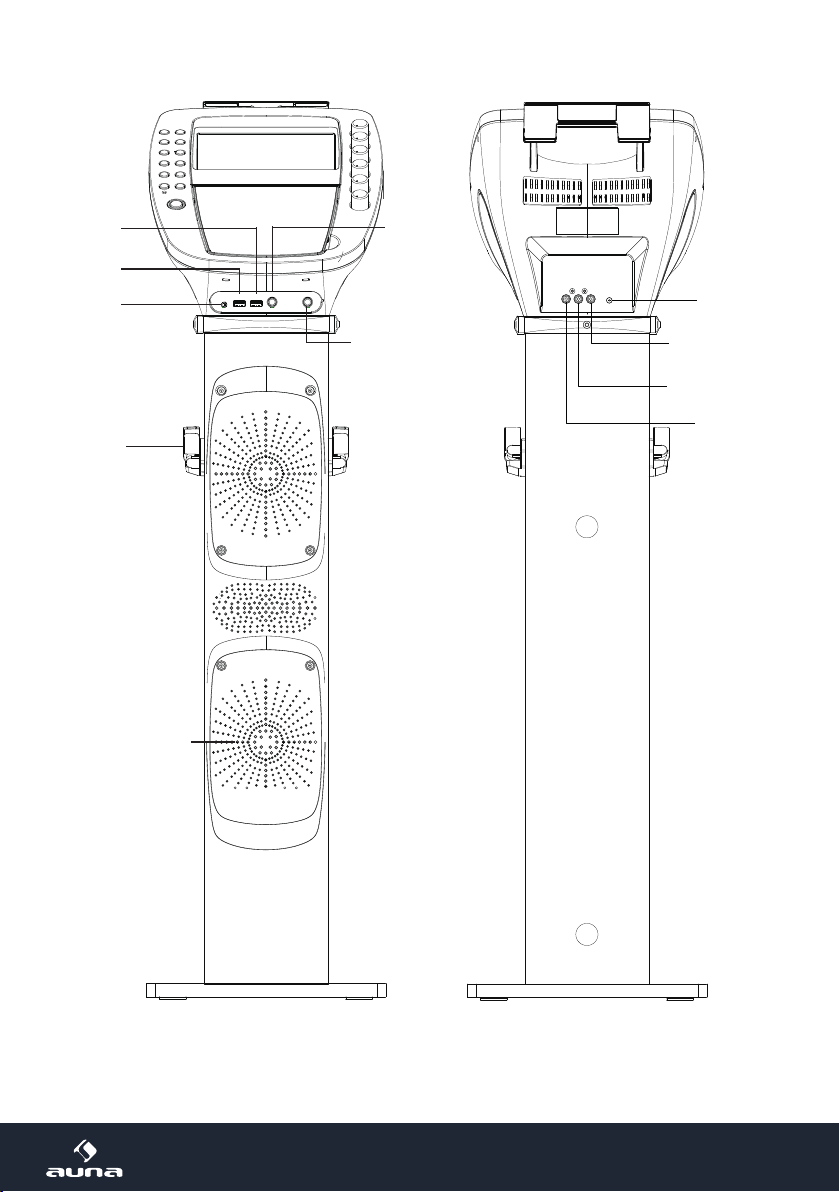
USB 2
USB 1
LINE IN
MIC 1 IN
MIC 1 MIC 2
USB 1 USB 2
LINE IN
DC IN
MIC
HALTER
LAUTSPRECHER
MIC 2 IN
AUDIO OUT (L)
AUDIO OUT (R)
VIDEO OUT
Vorderseite Rückseite
5
www.auna.de
Page 6

Display
PROGRAMM MODUS
AKTUELLER TRACK / TRACKS GESAMT
AKTUELLES MEDIUM
SPIELZEIT
REPEAT MODUS
Inbetriebnahme und Anschlussvarianten
• POWER: Verbinden Sie das Gerät per mitgeliefertem Netzteil mit einer Haushaltssteckdose:
6
www.auna.de
Page 7
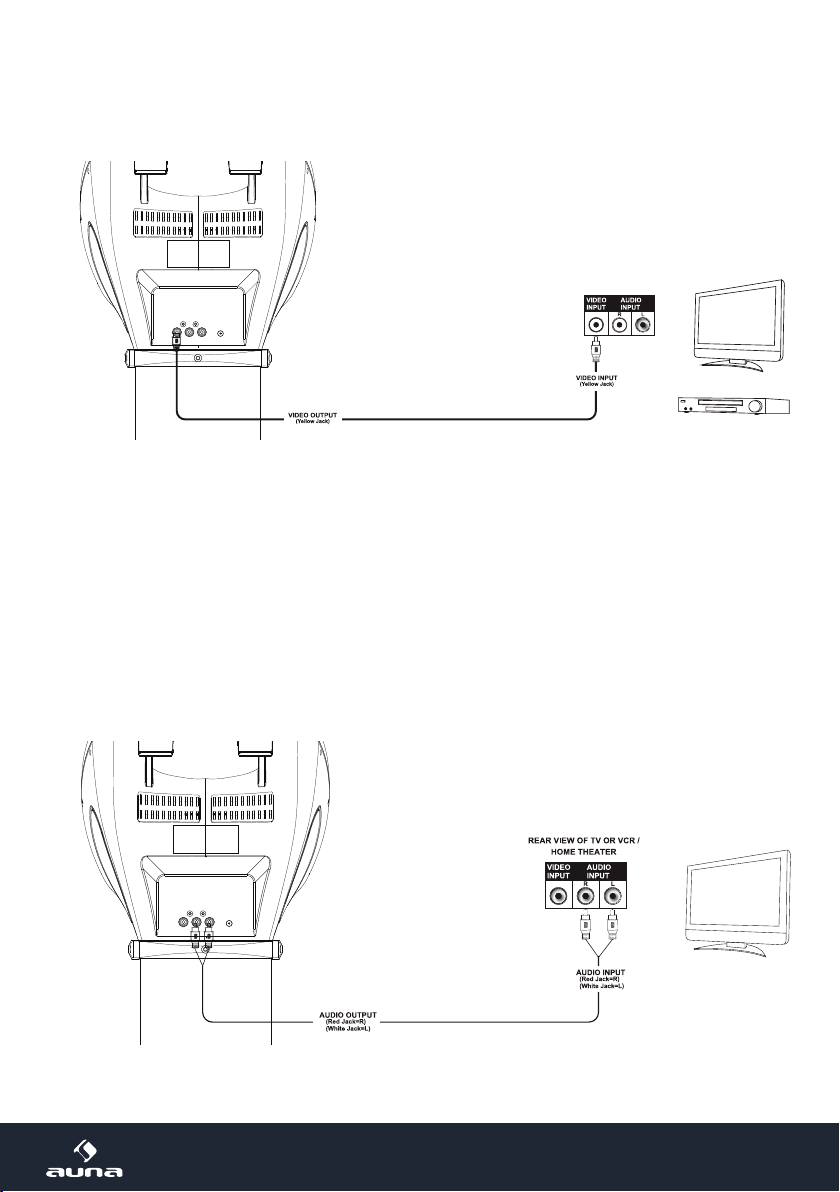
• VIDEO: Nutzen Sie das mitgelieferte Video-Kabel (gelb), um den Video-Ausgang (Video Out) der Kara-
oke-Anlage mit dem Video-Eingang (Video In) Ihres TV-Geräts/Beamers/etc. zu verbinden.
In den meisten Fällen müssen Sie am TV-Gerät/Beamer die Eingangsquelle entsprechend auswählen.
Während einige Geräte entsprechende Menüs haben, kann es bei anderen Input-Kanäle geben, die
hiter oder vor den regulären Empfangskanälen oder auf der „0“ liegen.
Bitte konsultieren Sie dahingehend die Bedienungsanleitung/Hilfedateien Ihrer TV-Geräte.
• AUDIO
LINE OUT: Nutzen Sie das mitgelieferte Cinchkabel (rot-weiß), um den Audio-Ausgang (Audio Out)
Ihrer Karaoke-Anlage mit dem Audio-Eingang Ihrer Stereoanlage, Ihres TV-Geräts o.ä. zu verbinden.
7
www.auna.de
Page 8

LINE IN:
LINE IN
USB 1 USB 2
MIC 1 MIC 2
Verbinden Sie externe Klangquellen mit dem
Line-In der Karaoke-Anlage. Stellen Sie sicher,
dass das genutzte externe Mediengerät Klang
abspielt.
Stellen Sie die Ausgabelautstärke (Master Volu-
me) dann an der Karaoke-Anlage ein.
MIKROFONE:
Schließen Sie die Mikrofone and den MIC1 und
MIC2 genannten Anschlüssen an der Front an.
Schalten Sie die Mikrofone mit den Schaltern
an diesen selbst ein. Die Mikrofon-Signale
werden mit dem Musikplayback von CD/CD+G
gemischt.
Um Feedbackschleifen zu verhindern, richten
Sie die Mikrofonkapseln nicht in Richtung der
Lautsprecher und halten Sie die Kapseln nicht
mit den Händen zu.
Bedienung
MIC 1 MIC 2
USB 1 USB 2
LINE IN
POWER: Schalten Sie den KaraBig mit POWER ein und aus.
MASTER VOLUME: Stellen Sie hier die Lauststärke ein.
SELECTING THE AUDIO SOURCE: Drücken Sie FUNCTION, um CDG, USB oder BT auszuwählen.
LIGHT EFFECT: Schalten Sie hier den integrierten Lichteekt ein oder aus.
CD/USB
Önen Sie das CD-Fach und legen Sie eine CD (mit der bedruckten Seite nach unten) ein. Schließen Sie
das CD-Fach dann wieder. Oder: Schließen Sie einen USB-Datenträger mit MP3-Dateien am USB-Port an.
Nach einem kurzen Moment, in dem das Gerät das eingelegte Medium einliest, erscheint ein entsprechender Hinweis auf dem Display. Nutzen Sie die Tasten PLAY/PAUSE, NEXT/PREVIOUS sowie PAGE+/- (letztere
im Stop-Modus), um die Wiedergabe zu steuern.
8
www.auna.de
Page 9

REPEAT-FUNKTION
Drücken Sie während des Abspielens mehrfach PROGRAM/REPEAT, um die Abspielmodi REPEAT 1 (aktuellen Titel wiederholen) - REP FOLDER (bei MP3-CDs/USB: aktuellen Ordner wiederholen) - REP ALL (alles
wiederholen) - bzw. NO REP (Wiederholfunktion aus) zu wählen.
PLAYLISTEN PROGRAMMIEREN
Stoppen Sie die Wiedergabe. Im Stop-Modus können Sie Abspiellisten mit bis zu 20 Einträgen programmieren:
• Drücken Sie PROGRAM/REPEAT. “PRG SET 01:XX” wird auf dem Display angezeigt.
• Nutzen Sie die VOR/ZURÜCK-Tasten, um den gewünschten Titel auszuwählen. Drücken Sie dann PRO-
GRAM, um den gewählten Titel zu Ihrer Playlist hinzuzufügen.
• Wiederholen Sie diesen Vorgang bis zu 20x.
• Drücken Sie PLAY/PAUSE zum Abspielen.
• Drücken Sie zwemal STOP, um das Abspielen zu beenden und die Playliste zu löschen.
Karaoke Funktionen
• PAGE+ / PAGE: Überspringen von 10 Titeln oder Blättern bei der Textanzeige.
• KEY+ / KEY-: Passen Sie die Karaokespur bei CD+Gs an Ihre Stimmlage an (maximal 6 Halbtöne +/-).
• ECHO: Stellen Sie hiermit den integrierten Hall-Eekt ein.
• BALANCE: Stellen Sie hier die Lautstärke-Balance der Stimmspur der Disc und der Musicspur ein (bei
Karaoke-Discs (CD+G)).
• AUTO VOICE CONTROL: Stellen Sie den Grenzwert ein, bei dem die (aufgenommene) Gesangsspur
ausgeblendet wird und Ihre Gesangs-Leistung diese ersetzt.
• MIC VOLUME: Stellen Sie mit dem MIC VOL-Regler den Anteil der Mikrofonlautstärke am Gesamtvo-
lumen ein.
• SCREEN ON/OFF: TFT-Bildschirm ein/ausschalten.
Recording
Sie können Ihre Performance auf einen an USB1 angeschlossenen USB-Stick aufnehmen:
• Schließen Sie einen (leeren) USB-Stick an USB1 an.
• Drücken Sie FUNCTION mehrfach, um die Aufnahme- bzw. Karaoke-Quelle zu wählen. Sie können zu
Tracks von USB2 / BT / LINE IN oder natürlich CD singen und das Ergebnis als MP3-Datei festhalten.
• Nutzen Sie die Tasten PLAY/PAUSE, NEXT/PREVIOUS sowie PAGE+/- (letztere im Stop-Modus), um die
Wiedergabe zu steuern.
• Drücken Sie RECORD, um die Aufnahme zu starten. Drücken Sie RECORD erneut, um die Aufnahme
zu beenden.
9
www.auna.de
Page 10

BT
Schalten Sie mit FUNCTION in den BT-Modus. Falls die Karaoke-Anlage nicht automatisch im Pairing-Modus
ist, halten Sie PAIR gedrückt, bis die blaue LED schnell blinkt.
Aktivieren Sie BT auf Ihrem Smartphone/Tablet und verbinden Sie mit KARABIG in der Liste der gefundenen
Geräte in Reichweite.
Sie können nun die Klanginhalte Ihrer mobilen Medienbibliothek über den DiscoFever streamen.
10
www.auna.de
Page 11

Problembehebung
Gerät lässt sich nicht
einschalten
TV gibt keinen Ton
über den DiscoFever
aus.
CD Player funktioniert
nicht korrekt.
TV gibt keinen Ton
aus.
Songtexte erscheinen
nicht auf dem TV-Bildschirm.
Kein Mikrofon-Signal.
Keine Video-Darstellung auf dem TFT.
Kein Ton im BT-Modus
TV-VOL ist auf Minimum?
TV ausgeschaltet?
Cinchkabel lose?
TV: Audio-Eingang nicht gewählt?
Disc verkehrt herum eingelegt?
Disc verschmutzt oder beschädigt?
Disc nicht kompatibel?
Feuchtigkeit im CD-Fach?
Überprüfen Sie, ob bei Ihrem TV-Gerät
der korrekte Audio-Eingang eingestellt
wurde und die Cinchkabel an den korrekten Anschlüssen verbunden wurden.
Cinchkabel lose?
Überprüfen Sie Anschluss und Sitz des
Videokabels.
Überprüfen Sie, ob bei Ihrem TV-Gerät
der korrekte Video-Eingang gewählt
wurde.
MIC VOL auf Minimum gedreht?
Mikrofon ausgeschaltet?
TFT ausgeschaltet?
Keine Karaoke-CD (CD+G) eingelegt?
War der Pairing-Vorgang erfolgreich?
BT-Gerät stummgeschaltet?
Überprüfen Sie den Sitz des Netzteils
und die Funktion der Steckdose (Siche-
rungen?).
Nur Audio-CDs, CD+G und MP3-CDs
können gelesen werden.
Lassen Sie eventuell aufgetretene Kon-
densfeuchtigkeit 20-30min. trocknen.
Schalten Sie das Gerät aus und nach
einer Weile wieder ein.
11
www.auna.de
Page 12

Hinweise zur Entsorgung
Be ndet sich die diese Abbildung (durchgestrichene Mülltonne auf Rädern) auf dem Produkt, gilt die Europäische Richtlinie 2012/19/EU. Diese Produkte dürfen nicht mit dem
normalen Hausmüll entsorgt werden. Informieren Sie sich über die örtlichen Regelungen
zur getrennten Sammlung elektrischer und elektronischer Gerätschaften. Richten Sie sich
nach den örtlichen Regelungen und entsorgen Sie Altgeräte nicht über den Hausmüll.
Durch die regelkonforme Entsorgung der Altgeräte werden Umwelt und die Gesundheit
ihrer Mitmenschen vor möglichen negativen Konsequenzen geschützt. Materialrecycling
hilft, den Verbrauch von Rohsto en zu verringern.
Konformitätserklärung
Hersteller: CHAL-TEC GmbH, Wallstraße 16, 10179 Berlin, Deutschland.
Dieses Produkt entspricht den folgenden Europäischen Richtlinien:
2011/65/EU (RoHS)
2014/35/EU (LVD)
2014/53/EU (RED)
12
www.auna.de
Page 13

Dear Customer,
Congratulations on purchasing this product. Please read and follow these instructions, in order to avoid
damaging the item. We do not cover any damages that may arise from improper use of the item or the
disregard of the safety instructions.
Important Safety Advice
• Read all instructions before using.
• To protect against a re, electric shock or personal injury, do not immerse cord, electric plugs or device
in water or other liquids.
• Do not expose the appliance to extreme temperatures. The appliance shall be used in moderate climates.
• The use of attachments that are not recommended by the appliance manufacturer may result in re,
electric shock or personal injury.
• Do not open the unit by removing any cover parts. Do not attempt to repair the unit. Any repairs or
servicing should be done by qualied personell only.
• Only qualied persons may perform technical work on the product. The product may not be
opened or changed. The components cannot be serviced by the user. The manufacturer is not responsible for any radio or TV interference caused by unauthorized modications.
• The appliance is not a toy. Do not let children play with it. Never let children insert foreign objects into
the appliance.
• Never clean the surface of the device with solvents, paint thinners, cleansers or other chemical products. Instead, use a soft, dry cloth or soft brush.
• Save these instructions.
Small objects: Keep small objects (i.e. screws, mounting material, memory cards etc.) and packaging out of
the range of children. Do not let Children play with foil. Choking hazard!
Transporting the device: Please keep the original packaging. To gain suicient protection of the device
while shipment or transportation, make sure to put it back in its original packaging.
Cleaning the surface: Do not use any volatile liquids, detergents or the like. Use a clean dry cloth.
13
www.auna.de
Page 14

Specications
Item# 10030796
Power supply Power adaptor (230V @50Hz)
Audio output 40 W RMS
CD player CD/CD+G
Frequency response 100Hz - 20kHz, SNR 50dB
Microphones Dynamic, -73 dB 600 ohms, jack: Ø 6.3 mm
Dimensions
In the box:
Device Tablet cradle AV cable Karaoke CD+G
2 dynamic microphones AC/DC adapter Instruction manual
14
www.auna.de
Page 15

Overview: Controls and Connections
Control Panel
15
www.auna.de
Page 16

USB
SOCKET 2
USB
SOCKET 1
LINE IN JACK
MIC
HOLDER
SPEAKERS
MIC
JACK 1
MIC 1 MIC 2
USB 1 USB 2
LINE IN
MIC JACK 2
DC JACK
AUDIO OUT (L)
JACK
AUDIO OUT (R)
JACK
VIDEO JACK
Front Rear
16
www.auna.de
Page 17

Display
Initial Use and Connections
• POWER: Insert the supplied power adaptor‘s plug into the DC jack located on the rear panel. Plug the
adaptor into a household AC wall socket.
17
www.auna.de
Page 18

• VIDEO CONNECTION: Use the yellow video cable to connect the Video Out of the karaoke machine
with the video input on your TV/VCR:
In the most cases, you will have to select the respective input source of your TV/VCR to display the
signal from the karaoke machine on your TV screen.
Most TVs/VCRs have options like „Input Select“, where you choose between cable, video1, video2 etc..
Sometimes, there are unoccupied channels before the lowest/highest channel on your TV.
Please consult your TV‘s/your VCR‘s user manual on how to select the correct video input source and
how to switch to it.
• AUDIO
LINE OUT: Use RCA cables (red/white, supplied) to connect the Audio Out of your karaoke machine
with the Audio In or AUX In of your home stereo, a PA unit, or your TV/VCR:
18
www.auna.de
Page 19

LINE IN:
LINE IN
USB 1 USB 2
MIC 1 MIC 2
Connect external audio devices to the Line in of
your karaoke machine, using Line-in cable. Make
sure the volume of the used external player is
turned up. Adjust the master volume with your
karaoke machine.
MICROPHONES:
Plug a microphone into the MIC1 or MIC2 jack at
the rear of your Karaoke Machine. Microphone
signals are mixed with playback from CD/CD+G.
Located on the microphone, there is an ON/OFF
switch. Ensure you set the ON/OFF switch on
the microphone to ON when required for use.
Please note: Please do not point the microphone
head directly to the front of the speaker(s) on
the unit when you are singing, it would cause
unwanted feedback sound that may aect the
performance of your unit.
MIC 1 MIC 2
USB 1 USB 2
LINE IN
Operation
POWER ON/OFF: To turn on the Karaoke Machine, press the POWER button once, the POWER indicator
will light up to full brightness and TFT. To turn o the system, press the POWER button again. The power
indicator and TFT screen will turn o.
MASTER VOLUME: Rotate to the MASTER VOLUME control to obtain the desired sound level.
SELECTING THE AUDIO SOURCE: Press FUNCTION button to toggle between CDG, USB, BT, Line in modes.
LIGHT EFFECT: Press LIGHT ON/OFF button once to switch on LED light eect. Press the button again to
switch o.
CD/USB Operation
Open the CD door and place a disc in the CD compartment with the printed side facing up. Gently close the
CD Door. Insert USB drives with MP3 les into the USB port.
19
www.auna.de
Page 20

The karaoke machine begins to read the disc/the USB drive. After that, the operation icon will appear on the
top of the TFT screen (if no disc is loaded, or the loaded disc is not readable, the display will say “NO DISC”).
Press PLAY/PAUSE to play the inserted media. Use the NEXT/PREV and PAGE+/- buttons (when in stop
mode), to operate the playback.
REPEAT PLAY
During playback, press PROGRAM/REPEAT repeatedly to cycle through the play modes REPEAT 1 (repeat
current track) - REP FOLDER (for MP3 discs/drives with folders) - REP ALL - NO REP (repeat function o).
PROGRAMMING PLAYLISTS
This unit can be programmed to play up to 20 tracks/les. Stay in stop mode and
• Press PROGRAM/REPEAT button once. “PRG SET 01:XX” will be shown on the screen.
• Use the SKIP buttons to select the desired track to be programmed. Press PROGRAM/REPEAT button
again to add the selected track/les to your playlist.
• Repeat this procedure to program up to 20 tracks/les.
• Press PLAY/PAUSE to play the programmed tracks. The “PROG” indicator will appear on screen during
the programmed playback.
• To clear program and resume normal playback, press the STOP button twice during playback.
Karaoke Functions
• PAGE+ / PAGE: Press PAGE+/PAGE- to skip 10 tracks or to go to the next page of song list.
• KEY+ / KEY-: Your system includes a digital key controller to adjust the audio tone (pitch) of the music.
Key control should be done in the PLAY MODE only. Press the KEY+ button to raise the key of the music,
and press the KEY- button to lower the key. (max. 6 times)
• ECHO: Adjust the ECHO control to enhance your voice for a concert hall eect.
• BALANCE: Adjust the BALANCE control between the pre-recorded singer’s voice and the music when
using a multiplex karaoke disc.
• AUTO VOICE CONTROL: This function can be activated and adjusted by the AVC control knob. The vocals on the Multiplex recording will be muted when the singer starts to sing through the microphone.
When the singer stops singing, the recorded vocal track will resume on normal level again.
• MIC VOLUME: Adjust the MIC VOLUME control to a desired level and obtain the best performance.
• SCREEN ON/OFF: Press the SCREEN ON/OFF button to turn the TFT screen ON/OFF.
20
www.auna.de
Page 21

Recording
You can record your performance to any (empty) USB drives inserted in the USB1 socket.
• Insert a USB drive to USB 1.
• Press FUNCTION repeatedly to select the recording and audio source (USB2 / BT / LINE IN / CD)
• Use the buttons PLAY/PAUSE, NEXT/PREVIOUS and PAGE+/- to operate the music playback.
• Press RECORD to start recording to USB1. Press again to stop recording.
BT Operation
Use the FUNCTION button to activate BT mode. If the karaoke machine does not automatically begin to
pair, press and hold pair, to send it to pairing mode. Activate BT on your smartphone/tablet as well and pair
with the KARABIG.
A sound signal (and the blue LED) will indicate successful pairing. You can now stream your audio from your
smartphone/tablet over the karaoke machine‘s speakers.
21
www.auna.de
Page 22

Troubleshooting
No power but POWER
is on.
No power when
plugged in.
No sound from TV.
CD Player does not
work normally
No sound - If audio is
going
through TV or VCR.
No song lyrics appear
on
the TV screen
AC adaptor is not plugged into a wall
outlet or the connector is not plugged
into the power supply jack on the back
of the unit.
The AC outlet may not have power.
TV system is set to minimum Turn up the volume on the TV system
TV system is powered O Power the TV system on.
RCA cords are not connected securely.
Disc is inserted upside down Insert the disc correctly
Disc is dirty Wipe clean with a soft cloth
Disc is scratched / warped Use a new disc
A non standard disc is inserted
Moisture inside the CD deck Wait about 20 - 30 mins to let it dry.
Karaoke system needs to be reset
Source Selection on TV or VCR is not
correct.
RCA cords are not connected securely
Video cable is not connected properly
to the TV
Source selector on TV is not set to
VIDEO
TV does not have video line input
A CDG is loaded but the CD+G icon is
not lit
Plug the AC adaptor into a wall outlet
and plug the connector into the DC
jack on the unit.
Check the outlet with a working lamp
or other electrical appliance.
Ensure white and red RCA cords are
securely inserted into into the karaoke
system and the TV system.
Only use discs bearing correct identication logo
Disconnect the machine from the pow-
er source for 30 seconds then reconnect.
Follow directions in “connections”
Ensure white and red RCA cords are
securely inserted into both the karaoke
system and the home stereo system.
Connect the video cable to the kara-
oke system’s VIDEO OUT and to the TV
VIDEO IN.
Using your TV remote to select VIDEO
input or select the proper VIDEO input
on the TV itself.
Connect from VIDEO OUT of the system to the VIDEO IN on your VCR/
Home theater. Refer to “Making the
Connections. Check the disc to be sure
it is a CD+G
Check the disc to be sure it is clean.
22
www.auna.de
Page 23

No sound from mic
No Video is displayed
on
the TFT Screen.
No sound when play-
ing audio via BT.
According to the European waste regulation 2012/19/EU this symbol on the product or on
its packaging indicates that this product may not be treated as household waste. Instead
it should be taken to the appropriate collection point for the recycling of electrical and
electronic equipment. By ensuring this product is disposed of correctly, you will help
prevent potential negative consequences for the environment and human health, which
could otherwise be caused by inappropriate waste handling of this product. For more
detailed information about recycling of this product, please contact your local council or
your household waste disposal service.
Mic volume control is set to minimum
Mic is o
The TFT Screen is turned OFF. Set Screen button to turn ON.
The disc being played is a regular mu-
sic CD,in which case no image will be
displayed.
Your BT device hasn’t been paired
properly.
The volume control of your BT device
is set too low.
The volume control of your BT device
is set too low.
Adjust mic volume to max, and then readjust to a comfortable level
Turn on mic with the ON/OFF switch
located on the microphone
Ensure you are playing a CD+Graphics
or CD+G Karaoke disc.
Pairing your BT device according to the
“BT setup” section.
Increase the volume of your BT device.
Increase the volume of the unit by VOL-
UME control.
Environmental Concerns
Declaration of Conformity
Declaration of Conformity
Producer: CHAL-TEC GmbH, Wallstraße 16, 10179 Berlin, Germany
This product is conform to the following European directives:
2011/65/EU (RoHS)
2014/35/EU (LVD)
2014/53/EU (RED)
23
www.auna.de
Page 24

Chal-Tec GmbH | Wallstr.16 | 10179 Berlin | Deutschland
www.chal-tec.com
www.electronic-star.de
Chal-Tec GmbH ∙ Wallstraße 16 ∙ 10179 Berlin
Fon: +49 (0) 30 3001385-500
Fax: +49 (0) 30 3001385-999
E-Mail: frontdesk@chal-tec.com
Geschäftsführer: Peter Chaljawski
Handelsregister: HRB 98898
Amtsgericht: Berlin - Charlottenburg
USt-ID-Nr.: DE 814529349
WEEE-Nr.: DE 46906833
Bankverbindung: Hypo Vereinsbank
Konto Nummer: 355 986 675
BLZ: 100 208 90
IBAN: DE91100208900355986675
BIC|SWIFT-Code: HYVEDEMM488
EU-Konformitätserklärung
Wir, die
CHAL -TEC GmbH
Wallstraße 16
10179 Berlin
erklären hiermit, dass der nachfolgend bezeichneten Funkanlagentyp:
Auna KaraBig Karaoke Anlage Artikelnr. 10030796
allen folgenden einschlägigen Bestimmungen entspricht:
RED-Richtlinie 2014/53/EU
LVD 2014/35/EU
RoHS-Richtlinie 2011/65/EG.
ErP-Richtlinie 2009/125/EG
Angewandte harmonisierte Normen:
EN 60065:2014
EN 55032:2015
EN 55032:2012+AC2013
EN 55020:2007+A11:2011
EN 55024:2010+A1:2015
EN 61000-3-2:2014
EN 61000-3-3:2013
EN 62301
EN 301 489-1 V2-1-1 (2017-02)
EN 301 489-17 V3.1.1 (2017-02)
EN 300 328 V2.1.1 (2016-11)
EN 62479:2010
Berlin, 05. Juli 2018 ___________________________
Sebastian Jäger
Produkt Manager
 Loading...