

Page 1

Areal Bar 150
10030155 10030156
www.auna-multimedia.com
Page 2

Page 3
Sehr geehrter Kunde,
wir gratulieren Ihnen zum Erwerb Ihres Gerätes. Lesen Sie die folgenden
Hinweise sorgfältig durch und befolgen Sie diese, um möglichen Schäden
vorzubeugen. Für Schäden, die durch Missachtung der Hinweise und
unsachgemäßen Gebrauch entstehen, übernehmen wir keine Haftung.
INHALTSVERZEICHNIS
DE
Technische Daten 4
Sicherheitshinweise 4
Übersicht und Funktionen 5
BT-Funktionen 7
AUX 1 8
Koaxial 8
USB und SD 8
Hinweise zur Entsorgung 9
KONFORMITÄTSERKLÄRUNG
Hersteller:
Chal-Tec GmbH, Wallstraße 16, 10179 Berlin,
Deutschland.
Dieses Produkt entspricht den folgenden
Europäischen Richtlinien:
2014/53/EU (RED)
2011/65/EU (RoHS)
English 11
Français 19
Español
Italiano
3
Page 4
DE
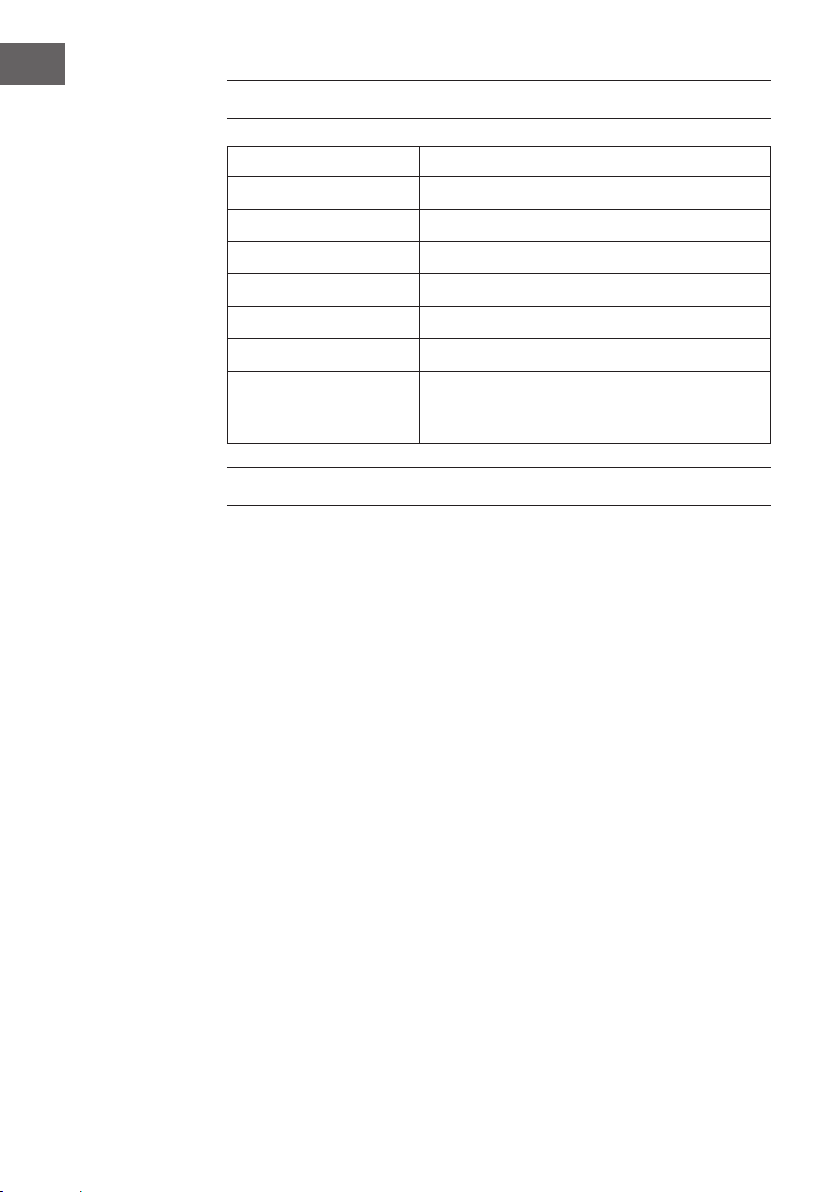
TECHNISCHE DATEN
Artikelnummer 10030155, 10030156
Stromversorgung Netzteil 18V/1A (220V ~50/60Hz)
Lautsprecher 4 x 2" / 8Ω / 10W
Leistung 40W
Frequenzgang 60Hz - 20kHz
S/N Ratio ≥90dB
BT 2.1+EDR
Gerät, Netzteil, 3,5mm Aux-Kabel, 3,5mm
Lieferumfang
Aux -> Cinch Kabel, Fernbedienung,
Bedienungsanleitung
SICHERHEITSHINWEISE
• Diese Bedienungsanleitung dient dazu, Sie mit der Funktionsweise
dieses Produktes vertraut zu machen. Bewahren Sie diese Anleitung
daher stets gut auf, damit Sie jederzeit darauf zugreifen können.
• Sie erhalten bei Kauf dieses Produktes zwei Jahre Gewährleistung auf
Defekt bei sachgemäßem Gebrauch.
• Bitte verwenden Sie das Produkt nur in seiner bestimmungsgemäßen
Art und Weise. Eine anderweitige Verwendung führt eventuell zu
Beschädigungen am Produkt oder in der Umgebung des Produktes.
• Ein Umbauen oder Verändern des Produktes beeinträchtigt die
Produktsicherheit.
• Önen Sie das Produkt niemals eigenmächtig und führen Sie
Reparaturen nie selber aus!
• Behandeln Sie das Produkt sorgfältig. Es kann durch Stöße, Schläge
oder den Fall aus bereits geringer Höhe beschädigt werden.
• Halten Sie das Produkt fern von Feuchtigkeit und extremer Hitze.
• Lassen Sie keine Gegenstände aus Metall in dieses Gerät fallen.
• Stellen Sie keine schweren Gegenstände auf dieses Gerät.
• Reinigen Sie das Gerät nur mit einem trockenen Tuch.
• Verwenden Sie ausschließlich vom Hersteller oder vom qualizierten
Fachhandel empfohlenes Zubehör.
• Der Netzadapter kann mit Wechselstrom von 220 - 240 V betrieben
werden.
• Verwenden Sie einen geeigneten Steckeradapter, wenn der Stecker
nicht in die Netzsteckdose passt.
4
Page 5
Die Gewährleistung verfällt bei Fremdeingrien in das Gerät.
Kleine Objekte/Verpackungsteile (Plastikbeutel, Karton, etc.)
Bewahren Sie kleine Objekte (z.B. Schrauben und anderes Montagematerial,
Speicherkarten) und Verpackungsteile außerhalb der Reichweite von Kindern
auf, damit sie nicht von diesen verschluckt werden können. Lassen Sie kleine
Kinder nicht mit Folie spielen. Es besteht Erstickungsgefahr!
Transport des Gerätes
Bitte bewahren Sie die Originalverpackung auf. Um ausreichenden Schutz
beim Transport des Gerätes zu erreichen, verpacken Sie das Gerät in der Originalverpackung.
Reinigung der äußeren Oberäche
Verwenden Sie keine üchtigen Flüssigkeiten, wie Insektensprays. Durch zu
starken Druck beim Abwischen können die Oberächen beschädigt werden.
Gummi- oder Plastikteile sollten nicht über einen längeren Zeitraum mit dem
Gerät in Kontakt sein. Nutzen Sie ein trockenes Tuch.
ÜBERSICHT UND FUNKTIONEN
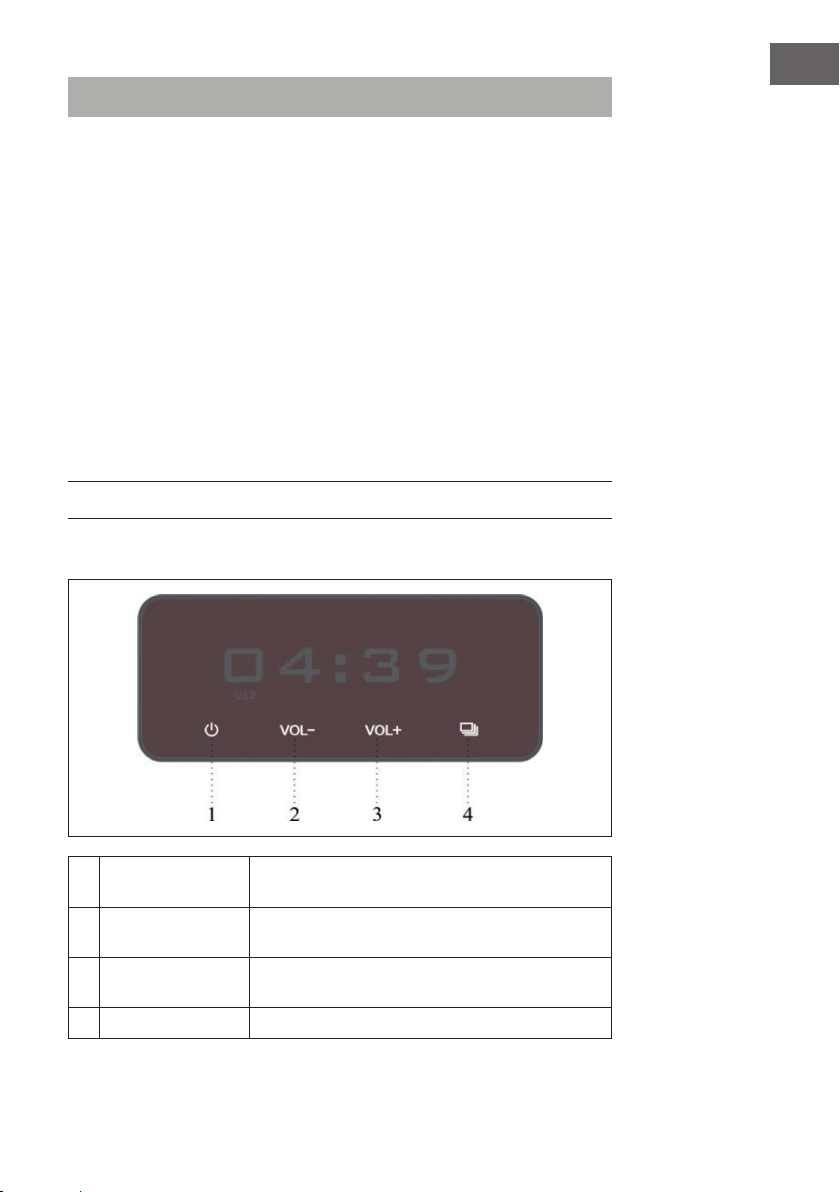
Bedienfeld
DE
1 Power/
Play/Pause
2 VOL- Gedrückt halten: Lautstärke verringern; kurz drücken:
3 VOL+ Gedrückt halten: Lautstärke erhöhen; kurz drücken:
4 Source Mehrfach drücken für Wahl der Audio-Quelle
Gedrückt halten: Ein-/Ausschalten; kurz drücken:
Play/Pause
voriger Titel
nächster Titel
5
Page 6
DE
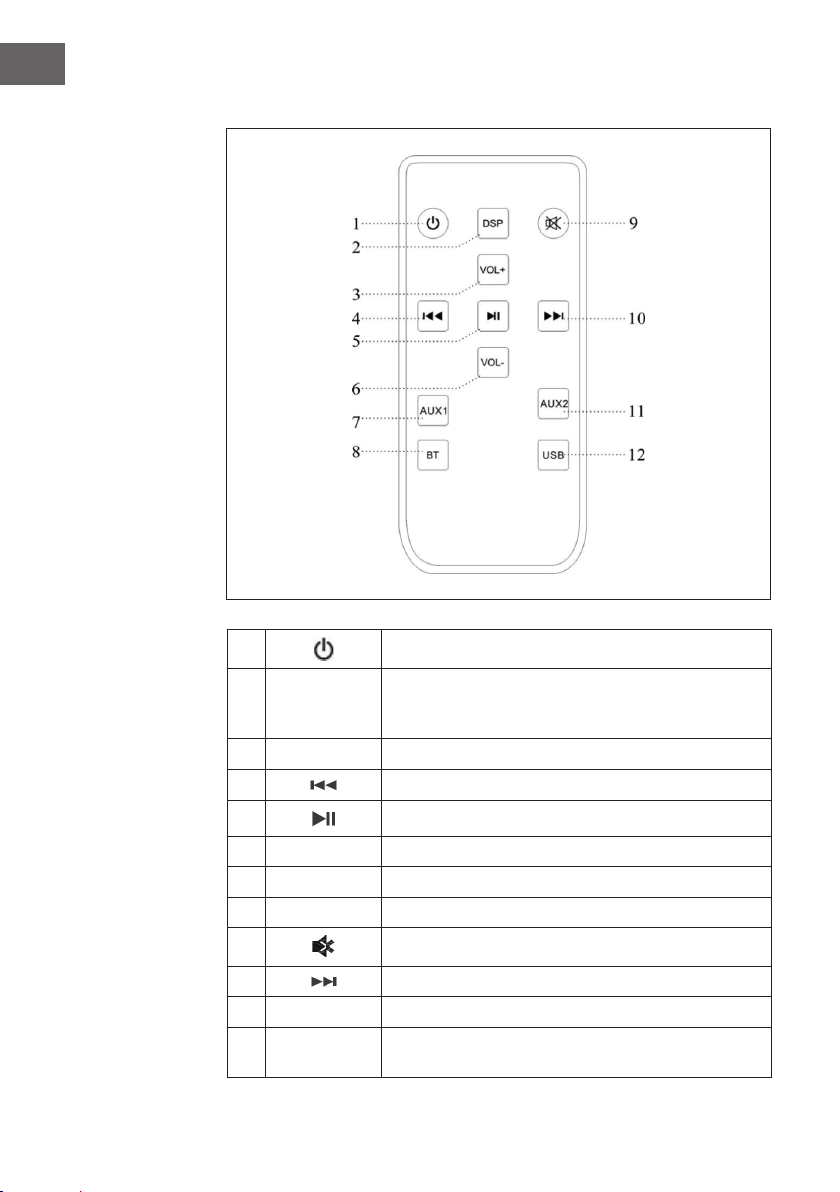
Fernbedienung
1 Ein/Ausschalten
Mehrfach drücken für Auswahl des gewünschten DSP-
2 DSP
3 VOL+
4
5
6 VOL-
7 Moduswahl: AUX 1
8 Moduswahl: BT
9
10
11 Moduswahl: Coaxial
12 Moduswahl:
Soundeekts (Rock - Jazz - Classical - Cinema - Pop);
gedrückt halten zum Abschalten des DSP-Soundeekts
Voriger Titel
Play/Pause
Stummschaltung ein/aus
Nächster Titel
USB (mehrfach drücken zum Wechsel zwischen USB und
SD)
6
Page 7
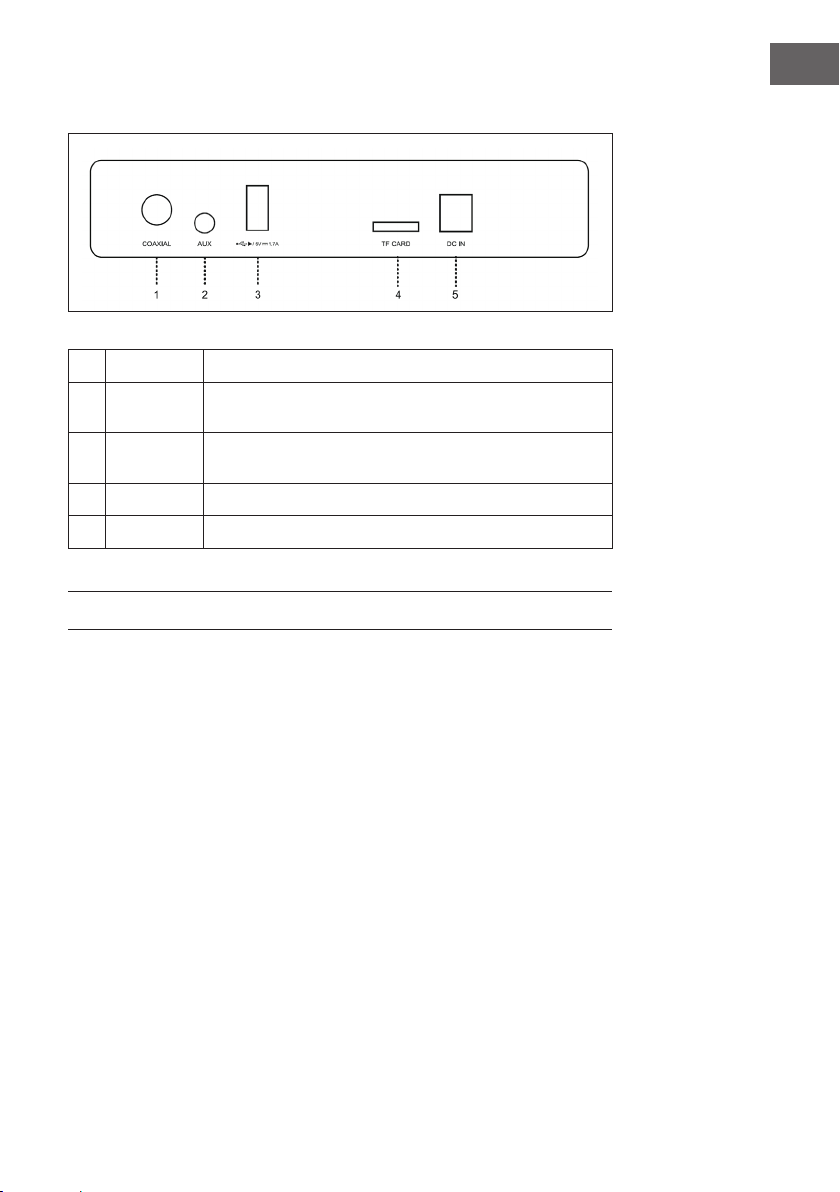
Anschluss-Terminal
DE
1 Coaxial
2 AUX
3 USB
4 TF CARD
5 DC IN
Koaxial-Eingang
Schließen Sie hier externe Mediengeräte (MP3-Player,
Smartphone, o.ä) per 3,5mm-AUX-Kabel an.
Anschluss für USB-Sticks oder zum Auaden von
Mobiltelefonen.
Slot für SD-Karte
Netzteilanschluss
BT-FUNKTIONEN
• Schalten Sie die Soundbar ein und wechseln Sie mit BT auf der
Fernbedienung oder mit der SOURCE-Taste am Gerät in den BT-Modus.
Das BT-Symbol auf dem Display beginnt zu blinken.
• Ihr BT-Gerät sollte sich im Umkreis von etwa 10m benden. Aktivieren
Sie BT auf dem Gerät und verbinden Sie mit AREAL BAR 150.
• Falls Sie zur Eingabe eines Passworts aufgefordert werden, tippen Sie
„0000“ (viermal Null).
• Nach erfolgter Verbindung („pairing“) hört das BT-Symbol auf zu blinken
und Sie können Audiodaten von Ihrem externen BT-Gerät abspielen.
7
Page 8

DE
AUX 1
AUX 1
Verbinden Sie externe Mediengeräte wie Smartphones, Laptops, MP3-
Player o.ä. per AUX-Kabel mit dem AUX1-Eingang der Soundbar und
schalten Sie per AUX1-Taste auf der Fernbedienung oder mit der SOURCETaste am Gerät in den AUX1-Modus. Die erfolgreiche Verbindung wird
durch ein entsprechendes Icon auf dem Display angezeigt. Nutzen Sie Ihr
Mediengerät zum Abspielen von Audiodaten.
KOAXIAL
• Wenn die Quelle Ihrer Geräte über digitale Anschlüsse verfügt,
verbessert die Verwendung dieses Anschlusses die Audioqualität.
• Das Koaxialkabel wird mitgeliefert
• Verbinden Sie die Koaxialbuchse auf der Rückseite des Geräts mit der
Koaxialbuchse Ihres Fernsehers (oder digitalen Geräts usw.) über das
mitgeliefertes Kabel.
• Schalten Sie das Gerät ein und schalten Sie in den Koaxialmodus.
USB UND SD
Schließen Sie USB-Datenträger mit Audioinhalten (im MP3-Format) am
USB-Port an und schalten Sie mit der USB-Taste auf der Fernbedienung
oder mit der SOURCE-Taste am Gerät in den UST/SD-Modus. Das
Abspielen beginnt automatisch, wenn kompatible Inhalte erkannt werden.
Stecken Sie Micro-SD-Karten mit Audioinhalten (im MP3-Format) in den
SD-Slot ein (mit den Kontakt-Flächen nach unten) und schalten Sie mit der
USB-Taste auf der Fernbedienung oder mit der SOURCE-Taste am Gerät in
den UST/SD-Modus. Das Abspielen beginnt automatisch, wenn kompatible
Inhalte erkannt werden.
Wechseln Sie mit der USB-Taste auf der Fernbedienung zwischen USB und
SD, falls beide Datenträger verbunden sind. Sonst wird automatisch der
jeweils verbundene Datenträger ausgelesen.
8
Page 9

HINWEISE ZUR ENTSORGUNG
Bendet sich die linke Abbildung (durchgestrichene
Mülltonne auf Rädern) auf dem Produkt, gilt die
Europäische Richtlinie 2012/19/EU. Diese Produkte
dürfen nicht mit dem normalen Hausmüll entsorgt
werden. Informieren Sie sich über die örtlichen
Regelungen zur getrennten Sammlung elektrischer
und elektronischer Gerätschaften. Richten Sie sich
nach den örtlichen Regelungen und entsorgen
Sie Altgeräte nicht über den Hausmüll. Durch die
regelkonforme Entsorgung der Altgeräte werden
Umwelt und die Gesundheit ihrer Mitmenschen
vor möglichen negativen Konsequenzen geschützt.
Materialrecycling hilft, den Verbrauch von Rohstoen
zu verringern.
Das Produkt enthält Batterien, die der Europäischen
Richtlinie 2006/66/EG unterliegen und nicht mit dem
normalen Hausmüll entsorgt werden dürfen. Bitte
informieren Sie sich über die örtlichen Bestimmungen
zu gesonderten Entsorgung von Batterien. Durch
regelkonforme Entsorgung schützen Sie die Umwelt
und die Gesundheit ihrer Mitmenschen vor negativen
Konsequenzen.
DE
9
Page 10

Page 11

Dear Customer,
Congratulations on purchasing this equipment. Please read this manual
carefully and take care of the following hints to avoid damages. Any failure
caused by ignoring the mentioned items and cautions mentioned in the
instruction manual are not covered by our warranty and any liability.
CONTENT
Technical Data 12
Safety Instructions 12
Overview and Functions 13
BT Functions 15
AUX 1 16
Coaxial 16
USB and SD 16
Hints on Disposal 17
DECLARATION OF CONFORMITY
Producer:
Chal-Tec GmbH, Wallstraße 16, 10179 Berlin, Germany.
This product is conform to the following European
Directives:
EN
2014/53/EU (RED)
2011/65/EU (RoHS)
11
Page 12

EN
TECHNICAL DATA
Item number 10030155, 10030156
Power supply Netzteil 18V/1A (220V ~50/60Hz)
Speaker 4 x 2" / 8Ω / 10W
Rated Power 40W
Frequency range 60Hz - 20kHz
S/N Ratio ≥90dB
BT 2.1+EDR
Gerät, Netzteil, 3,5mm Aux-Kabel, 3,5mm
Packing content
Aux -> Cinch Kabel, Fernbedienung,
Bedienungsanleitung
SAFETY INSTRUCTIONS
• Read all instructions before using.
• To protect against a re, electric shock or personal injury, do not immer-
se cord, electric plugs or device in water or other liquids.
• Do not expose the appliance to extreme temperatures. The appliance
shall be used in moderate climates.
• The use of attachments that are not recommended by the appliance
manufacturer may result in re, electric shock or personal injury.
• Do not open the unit by removing any cover parts. Do not attempt to
repair the unit. Any repairs or servicing should be done by qualied personell only.
• Only qualied persons may perform technical work on the product.
The product may not be opened or changed. The components cannot
be serviced by the user. The manufacturer is not responsible for any
radio or TV interference caused by unauthorized modications.
• The appliance is not a toy. Do not let children play with it. Never let
children insert foreign objects into the appliance.
• Never clean the surface of the device with solvents, paint thinners,
cleansers or other chemical products. Instead, use a soft, dry cloth or
soft brush.
• This appliance is to be used with 12V car power supply.
• Save these instructions.
12
Page 13

The warranty expires in case of foreign intervention in the device.
Small objects:
Keep small objects (i.e. screws, mounting material, memory cards etc.) and
packaging out of the range of children. Do not let Children play with foil.
Choking hazard!
Transporting the device:
Please keep the original packaging. To gain suicient protection of the device while shipment or transportation, make sure to put it back in its original
packaging.
Cleaning the surface:
Do not use any volatile liquids, detergents or the like. Use a clean dry cloth.
OVERVIEW AND FUNCTIONS
Control Panel
EN
1 Power / Play/Pause
2 VOL-
3 VOL+
4 Source
Hold: Power on/o; press: Play/Pause
Hold: decrease volume; press: previous track
Hold: increase volume; press: skip track
Press repeatedly to select input source
13
Page 14

EN
Remote Control
1 Power on/o
2 DSP
3 VOL+
4
5
6 VOL-
7 Mode selection: AUX 1
Mode
8
selection:
9
10
11 Mode selection: Coaxial
12 Mode selection: USB (press repeatedly to switch USB / SD back and forth)
Press repeatedly to select the desired DSP powered sound
eect (Rock - Jazz - Classical - Cinema - Pop); hold to dismiss.
Previous track
Play/Pause
BT
Mute/un-mute
Skip track
14
Page 15

Connection Terminal
1 Coaxial Coaxial IN
2 AUX
3 USB
4 TF CARD SD slot
5 DC IN
Use the supplied audio cable to connect external media
players here.
Connect USB drives containing MP3 les here; use to
charge mobile phones (5V)
Power supply connection
BT FUNCTIONS
EN
• Turn on the sound bar and then switch to Bluetooth Mode, the
Bluetooth icon on the LED display will keep ashing;
• Keep the sound bar and Bluetooth enabled device within 20~30 feet or
less of each other during paring process. Dierent environments may
aect the transmission distance;
• Set your mobile phone or the Bluetooth enabled device to search for
Bluetooth devices;
• When the Bluetooth enabled nds the sound bar, select “Areal Bar 150”
from the list of found devices;
• If required, enter the password “0000”. Select OK or YES to pair the two
units;
• After a successful pairing, the Bluetooth Indicator light will stop
blinking.
15
Page 16

EN
AUX 1
AUX 1
Keep the unit powered on. Plug one end of the 3.5 mm AUX cord to the
headphone jack on your device. Plug the other end of the 3.5 mm AUX cord
into the AUX1 jack on the sound bar. It successfully joins into the AUX Mode
along with AUX1 icon lights up. Use the connected device‘s audio controls
for music playback.
COAXIAL
• If the source of your devices has digital connectors, using them will
improve the audio quality.
• Coaxial cable is supplied
• Connect the coaxial jack on the back of the unit to coaxial out jack of
your TV (or digital device etc.) by a supplied cable.
• Turn on the unit and switch to coaxial mode.
USB AND SD
Turn on the unit. Push USB disk with Mp3 music(s) into USB port, it will
switch to USB Playback Mode and then start to play music automatically.
Push the Micro SD card with Mp3 music(s) into the Micro SD card slot with
the metal contacts facing down. The card will stick out of the slot about
halfway. Waiting for a while, it will play music automatically.
Use the USB button on the remote control to switch between USB and SD if
both discs are connected. Otherwise, the respective connected data carrier
is automatically read out.
16
Page 17

HINTS ON DISPOSAL
According to the European waste regulation 2012/19/
EU this symbol on the product or on its packaging
indicates that this product may not be treated as
household waste. Instead it should be taken to the
appropriate collection point for the recycling of
electrical and electronic equipment. By ensuring this
product is disposed of correctly, you will help prevent
potential negative consequences for the environment
and human health, which could otherwise be caused by
inappropriate waste handling of this product. For more
detailled information about recycling of this product,
please contact your local council or your household
waste disposal service.
Your product contains batteries covered by the
European Directive. 2006/66/EC, which cannot be
disposed of with normal household waste. Please check
local rules on separate collection of batteries. The
correct disposal of batteries helps prevent potentially
negative consequences on the environment and human
health.
EN
17
Page 18

EN
18
Page 19

Cher client,
Toutes nos félicitations pour l’acquisition de ce nouvel appareil. Veuillez
lire attentivement les instructions suivantes de branchement et d’utilisation
an d’éviter d’éventuels dommages. Le fabricant ne saurait être tenu pour
responsable des dommages dus au non-respect des consignes de sécurité et
à la mauvaise utilisation de l’appareil.
SOMMAIRE
Fiche technique 20
Consignes de sécurité 20
Aperçu et fonctions 21
Fonctions BT 23
AUX 1 24
Coaxial 124
USB et SD 24
Conseils pour le recyclage 25
DÉCLARATION DE CONFORMITÉ
Fabricant :
Chal-Tec GmbH, Wallstraße 16, 10179 Berlin,
Allemagne.
FR
Ce produit est conforme aux directives
européennes suivantes :
2014/53/UE (RED)
2011/65/UE (RoHS)
19
Page 20

FR
FICHE TECHNIQUE
Numéro d’article 10030155, 10030156
Alimentation électrique Bloc d’alimentation 18V/1A (220 V ~ 50-60 Hz
Enceintes 4 x 2" / 8Ω / 10W
Puissance 40 W
Réponse en fréquence 60 Hz - 20 kHz
Rapport signal/bruit ≥ 90dB
BT 2.1 + EDR
Appareil, bloc d’alimentation, câble Aux 3,5
Contenu de l’emballage
mm, câble Aux -> RCA 3,5 mm, télécommande,
mode d’emploi
CONSIGNES DE SÉCURITÉ
• Ce mode d’emploi sert à vous familiariser aux fonctions de ce produit.
Conservez-le bien an de pouvoir vous y référer à tout moment.
• L’achat de ce produit donne droit à une garantie de deux ans en cas de
défectuosité de l’appareil sous réserve d’une utilisation appropriée de
celui-ci.
• Veiller à utiliser le produit conformément à l’usage pour lequel il a
été conçu. Une mauvaise utilisation est susceptible d’endommager le
produit ou son environnement.
• Tout démontage ou toute modication de l’appareil porte atteinte à la
sécurité du produit. Attention aux risques de blessure !
• Ne jamais ouvrir le produit de son propre chef et ne jamais le réparer
soi-même !
• Manipuler le produit avec précaution. Les chocs, les coups ou les chutes
- même de faible hauteur - peuvent endommager l’appareil.
• Ne pas exposer le produit à l’humidité ou à une chaleur extrême.
• Ne pas introduire d’objets métalliques dans cet appareil.
• Ne pas poser d’objets lourds sur l’appareil.
• Nettoyer l’appareil uniquement avec un chion sec.
• Ne pas obstruer les ouvertures d’aération.
• Utiliser uniquement les accessoires recommandés par le fabricant ou
par une entreprise spécialisée et qualiée.
• Baisser le volume sonore avant de brancher un casque à un appareil
audio.
• Utiliser le bloc d’alimentation pour raccorder l’appareil au circuit
électrique et le brancher à une prise électrique domestique classique
(220-240 V).
20
Page 21

Toute ouverture non autorisée de l’appareil entraîne l’annulation de la
garantie.
Petits objets / éléments d’emballage (sac plastique, carton, etc.)
Tenir les petits objets (par exemple les vis et le matériel d’assemblage, les
cartes mémoire) et le matériel d’emballage hors de la portée des enfants
pour éviter qu’ils ne les avalent. Empêcher les enfants de jouer avec les lms
de protection. Il existe un risque d’étouement !
Transport de l’appareil
Conserver l’emballage d’origine. Pour garantir une protection suisante de l’appareil
pendant son transport, emballer l’appareil dans son emballage d’origine.
Nettoyage en surface de l’appareil
Ne pas utiliser de liquides volatiles comme ceux contenus dans les bombes insecticides. Une pression trop importante exercée sur la surface de
l’appareil pendant le nettoyage peut l’endommager. Éviter le contact prolongé du caoutchouc ou du plastique avec l’appareil. Utiliser un chion sec.
APERÇU ET FONCTIONS
Panneau de commande
FR
1 Marche/
lecture/pause
2 VOL- Rester appuyer : baisser le volume ; appuyer
3 VOL+ Rester appuyer : monter le volume ; appuyer
4 Source Appuyer plusieurs fois pour sélectionner la source
Rester appuyer : marche/arrêt ; appuyer brièvement :
lecture/pause
brièvement : titre précédent
brièvement : titre suivant
audio
21
Page 22

FR
Télécommande
22
1 Marche
Appuyer plusieurs fois pour sélectionner les eets
2 DSP
3 VOL+ rester appuyer pour désactiver les eets sonores DSP.
4
5 Titre précédent
6 VOL- Lecture/pause
7 Sélection du mode : AUX 1
8 Sélection du mode : BT
9
10
11 Sélection du mode : Coaxial
12 Sélection du mode :
sonores DSP souhaités (Rock - Jazz - Classique Cinema - Pop) ;
Mode silencieux activé/désactivé
Titre suivant
USB (appuyer plusieurs fois pour basculer entre
USB et SD)
Page 23

Terminal des branchements
FR
1 Coaxial
2 AUX
3 USB
4 TF CARD
5 DC IN
Entrée coaxiale
Brancher ici des périphériques multimédia (lecteur MP3,
smartphone par ex.) par câble 3,5 mm - AUX
Connecteur pour clé USB ou pour recharger un téléphone
portable.
Fente pour carte SD
Prise pour bloc d’alimentation
FONCTIONS BT
• Allumer la barre de son et basculer en mode BT en appuyant sur la
touche BT de la télécommande ou sur la touche SOURCE de l’appareil.
Le symbole BT commence à clignoter sur l’écran d’aichage.
• L’appareil BT doit se trouver dans un rayon de 10 m. Activer BT sur
l’appareil et le connecter à l’AREAL BAR 150.
• Si un mot de passe est exigé, entrer « 0000 » (quatre fois zéro).
• Une fois la connexion établie (« pairing »), le symbole BT s’arrête de
clignoter et il est possible de lire les chiers audio depuis l’appareil
périphérique BT.
23
Page 24

FR
AUX 1
AUX 1
Connecter les périphériques multimédia tels que smartphones, ordinateur
portable lecteur MP3 à l’entrée AUX1 de la barre de son et basculer en
mode AUX1 en appuyant sur la touche AUX1 de la télécommande ou sur
la touche SOURCE de l’appareil. En cas de connexion fructueuse l’icône
correspondante s’aiche à l’écran. Utiliser l’appareil périphérique pour lire
les chiers audio.
COAXIAL
• Si la source de votre appareil possède des connecteurs numériques,
l‘utilisation de ce connecteur améliore la qualité audio.
• Le câble coaxial est inclus dans la livraison.
• Connectez la prise coaxiale à l‘arrière de l‘appareil à la prise coaxiale de
votre téléviseur (ou appareil numérique, etc.) à l‘aide du câble fourni.
• Allumez l‘appareil et passez en mode coaxial.
USB ET SD
Brancher le support de stockage contenant des chiers audio (au format
MP3) au port USB et basculer en mode USB/SD en appuyant sur la touche
USB de la télécommande ou sur la touche SOURCE de l’appareil. La lecture
démarre automatiquement si des contenus compatibles sont reconnus.
24
Introduire les cartes Micro-SD contenant des chiers audio (au format MP3)
dans la fente SD (avec la surface de contact vers le bas) et basculer en
mode USB/SD en appuyant sur la touche USB de la télécommande ou sur la
touche SOURCE de l’appareil. La lecture démarre automatiquement si des
contenus compatibles sont reconnus.
Basculer entre USB et SD en appuyant sur la touche USB de la
télécommande, si les deux supports de donnée sont connectés. Sinon, le
support de stockage connecté est lu automatiquement.
Page 25

CONSEILS POUR LE RECYCLAGE
Le pictogramme ci-contre apposé sur le produit
signie que la directive européenne 2012/19/UE
s‘applique (poubelle à roues barrée d’une croix). Ces
produits ne peuvent être jetés dans les poubelles
domestiques courantes. Renseignez-vous concernant
les règles appliquées pour la collecte d’appareils
électriques et électroniques. Conformez-vous aux
réglementations locales et ne jetez pas vos anciens
produits avec les ordures ménagères. Le respect
des règles de recyclage des vieux produits aide à
la protection de l’environnement et de la santé de
votre entourage contre les conséquences négatives
possibles. Le recyclage des matériaux aide à réduire
l’utilisation des matières premières.
Ce produit contient des piles qui sont soumises à
la directive européenne 2006/66/CE selon laquelle
elles ne doivent pas être éliminées avec les ordures
ménagères. Renseignez-vous sur les dispositions
en vigueur concernant la mise en rebut séparée des
piles. La mise en rebut correcte du produit usagé
permet de préserver l’environnement et la santé.
FR
25
Page 26

FR
26
Page 27

Page 28

 Loading...