

Page 1
Karaoke-Tower
www.auna-multimedia.com10029400 10029401
Page 2

Sehr geehrter Kunde,
wir gratulieren Ihnen zum Erwerb Ihres Gerätes. Lesen Sie die folgenden Anschluss- und Anwendungshinweise sorgfältig durch und befolgen Sie diese, um möglichen technischen Schäden vorzubeugen.
Für Schäden, die durch Missachtung der Sicherheitshinweise und unsachgemäßen Gebrauch entstehen,
übernehmen wir keine Haftung.
Inhalt
Sicherheitshinweise ......................................................................2
Lieferumfang ............................................................................3
Bedienelemente .........................................................................4
Fernbedienung ...........................................................................5
Einrichtung ..............................................................................6
Bedienung ...............................................................................8
Problembehebung ........................................................................11
Technische Daten .......................................................................12
Entsorgung .............................................................................12
Sicherheitshinweise
• Lesen Sie diese Bedienungsanleitung sorgfältig. Bewahren Sie die Bedienungsanleitung auf.
• Beachten Sie alle Hinweise.
• Verwenden Sie das Gerät nicht in der Nähe von Wasser.
• Reinigen Sie das Gerät nur mit einem trockenen Tuch.
• Verdecken Sie nicht die Lüftungsönungen. Stellen Sie das Gerät in Übereinstimmung mit den Hinweisen des Herstellers auf.
• Stellen Sie in der Nähe des Gerätes keine Wärmequellen auf wie Heizgeräte, Öfen oder andere Geräte (einschließlich Verstärker).
• Schützen Sie das Netzkabel davor, dass darauf getreten wird oder es gequetscht wird, besonders am
Netzstecker, Mehrfachsteckdosen und dort, wo es aus dem Gerät tritt.
• Verwenden Sie nur das vom Hersteller angegebene Zubehör.
• Ziehen Sie den Netzstecker bei Gewitter und wenn Sie das Gerät für längere Zeit nicht verwenden.
• Lassen Sie das Gerät ausschließlich von qualiziertem Personal warten. wenn Netzkabel oder Netzstecker beschädigt sind, Flüssigkeit oder Fremdkörper in das Gerät gelangt sind, das Gerät Regen
oder Feuchtigkeit ausgesetzt war und wenn es nicht normal funktioniert oder heruntergefallen ist.
• Dieses Gerät sollte keinen Wassertropfen und -spritzern ausgesetzt werden. Gegenstände, die mit
Flüssigkeiten gefüllt sind, sollten nicht auf das Gerät gestellt werden.
• Batterien dürfen keiner extremen Hitze wie Sonneneinstrahlung, Feuer und dergleichen ausgesetzt
werden.
• Auf der Rückseite des Gerätes nden sich die Warnsymbole.
2
Page 3

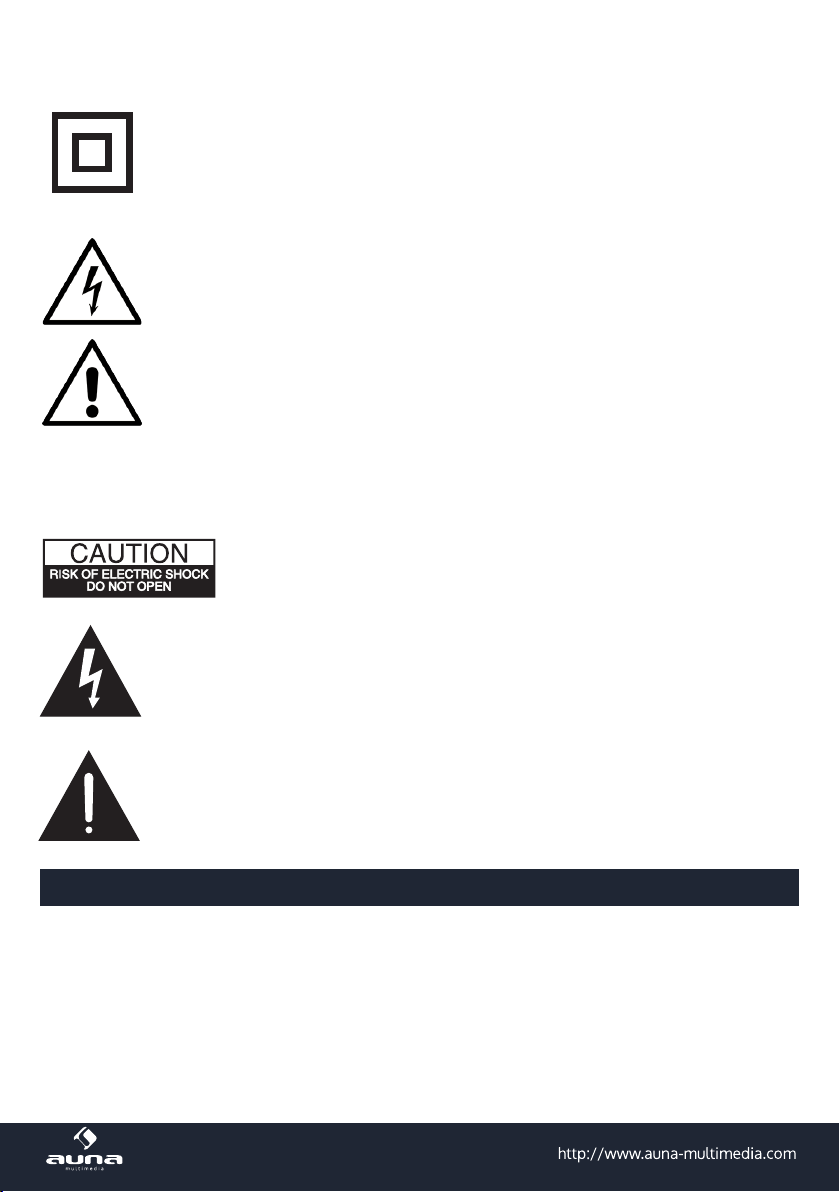
Dieses Symbol zeigt an, dass das Gerät über eine doppelte Isolierung zwischen
der gefährlichen Eingangsspannung und den vom Benutzer zugänglichen Teilen
verfügt.
Warnung: Gefahr eines Stromschlags
Setzen Sie das Gerät nicht Regen oder Feuchtigkeit aus.
Warnung: Explosionsgefahr (Batterien)
Legen Sie die Batterien richtig herum ein. Verwenden Sie den richtigen Battietyp.
Erklärung der Symbole auf dem Gerät
Warnung: Gefahr eines Stromsschlags: Entfernen Sie nicht die Gehäuseabdeckung. Das Gerät enthält keine durch den Benutzer einzustellenden oder zu wartenden Teile.
Das Blitzsymbol mit Pfeilspitze in einem gleichseitigen Dreieck weist den Benutzer auf
das Vorhandensein einer nicht isolierten gefährlichen elektrischen Spannung innerhalb
des Systemgehäuses hin, so dass die Gefahr von Stromschlägen besteht.
Das Ausrufezeichen in einem gleichschenkligen Dreieck weist den Anwender auf wichtige Anweisungen zum Betrieb und zur Instandhaltung (Wartung) in der Dokumentation
hin.
• BT-Sound-Tower
• Netzstecker
• Audiokabel
• Fernbedienung
(CR2025-Batterie erforderlich)
Lieferumfang
• LINE-IN-Kabel
• Sockel
• 2 Karaoke-Mikrofone
• Bedienungsanleitung
3
Page 4

LOCATION OF CONTROLS
Source Tun+ Tun- Vol+ Vol-Power
1 2 34 5 6
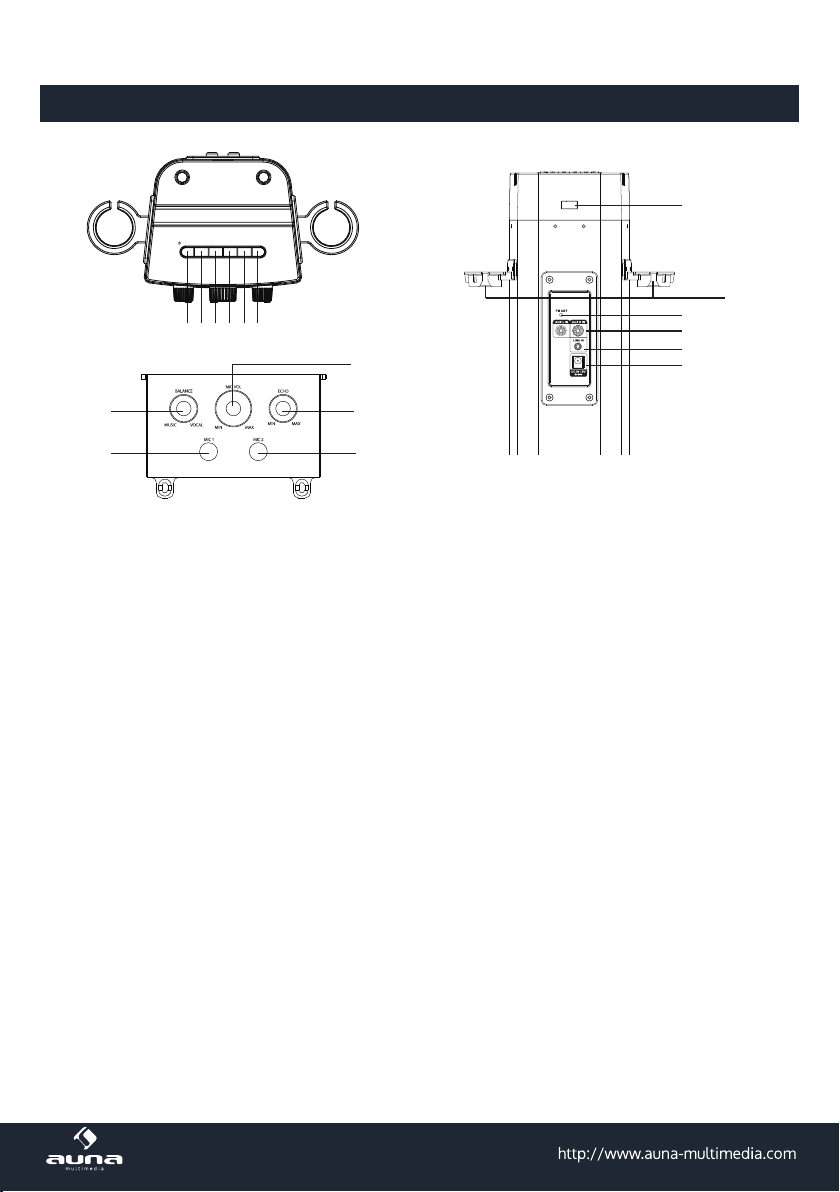
Bedienelemente
9
CHARGING PORT
DC 5V
12
13
14
15
16
17
7
8
1 POWER: Ein-und Ausschalten der Lautsprecher
2 SOURCE: Wiederholt drücken, um zwischen den Audioeingängen BT, AUX; LINE IN; und FM zu
wechseln.
3 TUN +: Im FM-Modus einmal drücken, um die Senderfrequenz voranlaufen zu lassen. Ein zweites
Mal drücken, um den automatischen Sendersuchlauf voranlaufen zu lassen.
4 TUN -: Im FM-Modus einmal drücken, um die Senderfrequenz zurücklaufen zu lassen. Ein zweites
Mal drücken, um den automatischen Sendersuchlauf zurücklaufen zu lassen.
5 VOLUME +: Drücken, um die Lautstärke zu erhöhen.
6 VOLUME -:Drücken, um die Lautstärke zu verringern.
7 BALANCE: Drehen Sie den Balance-Drehregler, um die Lautstärke links und rechts anzupassen.
8 MIC 1: Mikrofoneingang
9 MIC VOL: Drehen, um die Mikrofonlautstärke einzustellen.
10 ECHO: Drehregler betätigen, um die Stärke des Echos einzustellen.
11 MIC 2: Mikrofoneingang
12 DC 5 V: 5-Volt-USB-Ladeanschluss
13 Mikrofonhalterung
14 FM-Ant: UKW-Antenne
15 AUX L/R IN: Aux-Anschlüsse links und rechts
16 LINE IN: 3,5-mm-Klinkanschluss
17 DC IN 18V: Anschlussbuchse für Gleichstrom
10
11
4
Page 5
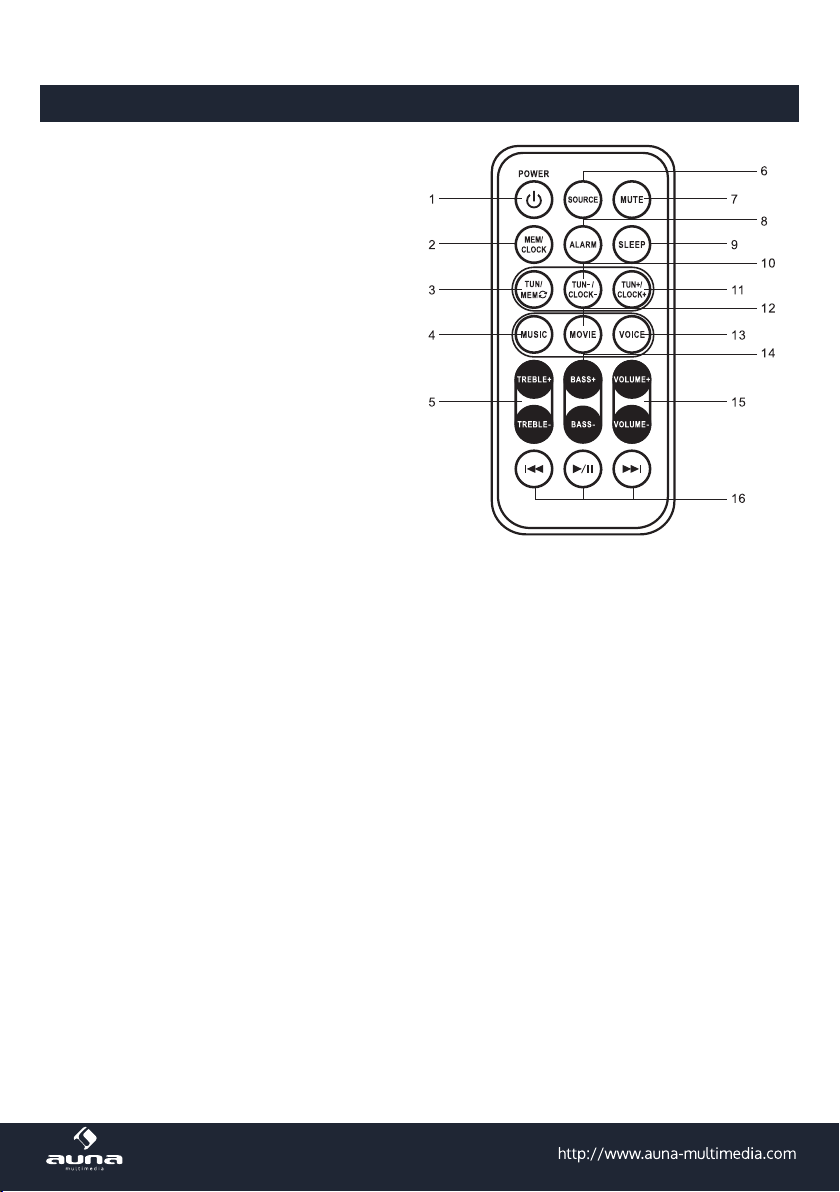
Fernbedienung
1 POWER: EIN/AUS
2 MEM CLOCK:
• Wiederholt drücken, um zwischen gespeicherten Radio-Stationen zu wechseln.
• Drücken, um die Uhrzeit einzustellen.
3 TUNE/MEM:
• 3 Sekunden gedrückt halten, um automatisch nach UKW-Sendern zu suchen.
• Drücken, um die gespeicherten Sender
durchzugehen.
4 MUSIC: Zwischen den Equalizern wechseln,
die für das Musikgenre optimiert sind.
5 TREBLE: Die Höhen im Music-Modus hoch
oder runter stellen.
6 SOURCE: Zwischen BT, FM, AUX in LINE,
und USB wechseln.
7 MUTE: Drücken, um stumm zu schalten.
Erneut drücken, um die Stummschaltung
aufzuheben.
8 ALARM: Den Alarm einstellen.
9 SLEEP: Wiederholt drücken, um die Schlaftimer einzustellen.
10 TUN -/CLOCK -:
• Senderfrequenz zurücklaufen lassen.
• Uhrzeit einstellen (zurück).
• Gespeicherten Stationen wählen (zurück).
11 TUN +/CLOCK +:
• Senderfrequenz vorlaufen lassen.
• Uhrzeit einstellen (vorwärts).
• Gespeicherten Stationen wählen (vorwärts).
12. MOVIE: Für Filme geeigneten Equalizer einstellen.
13. VOICE: Für Dialoge geeigneten Equalizer einstellen.
14. BASS: Den Bass im Music-Modus regeln.
15. VOLUME: Die Lautstärke einstellen.
16. : Im BT-Modus einen Titel zurück- oder vorspringen.
/: Im BT-Modus einen Titel abspielen oder pausieren.
5
Page 6
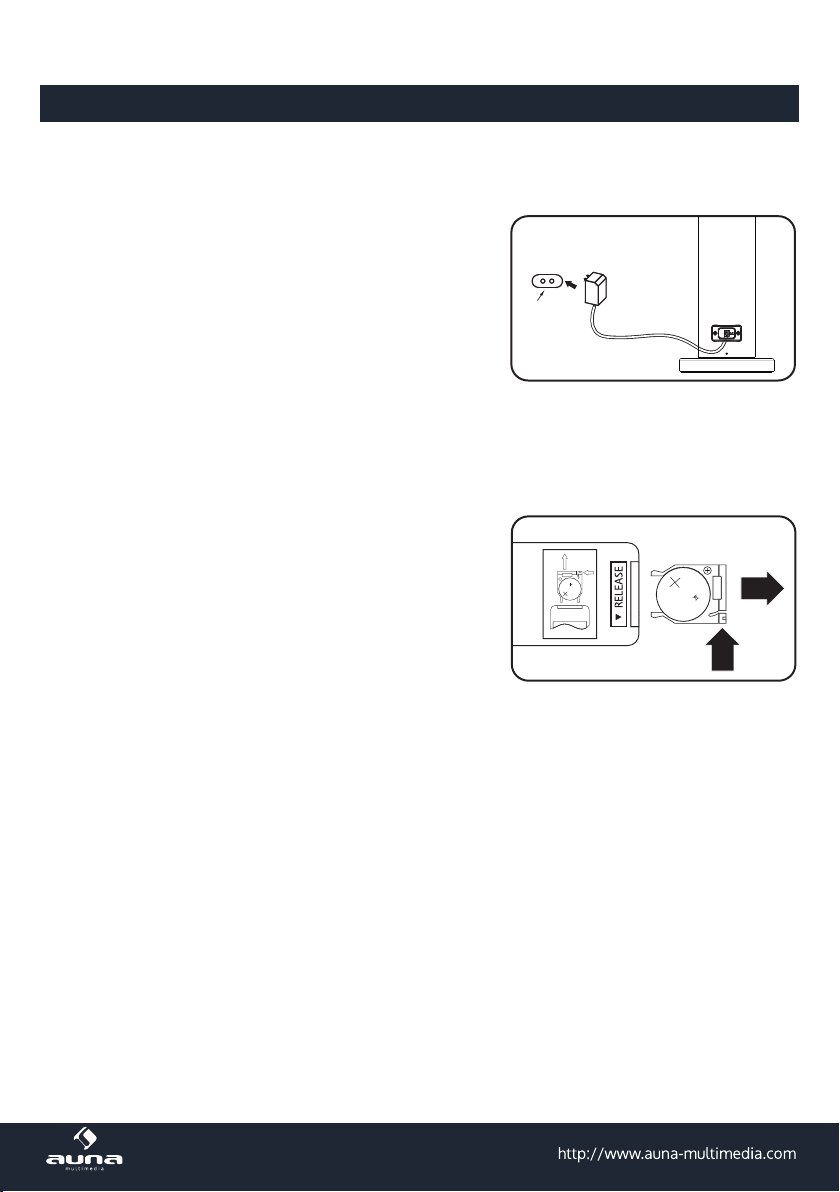
Einrichtung
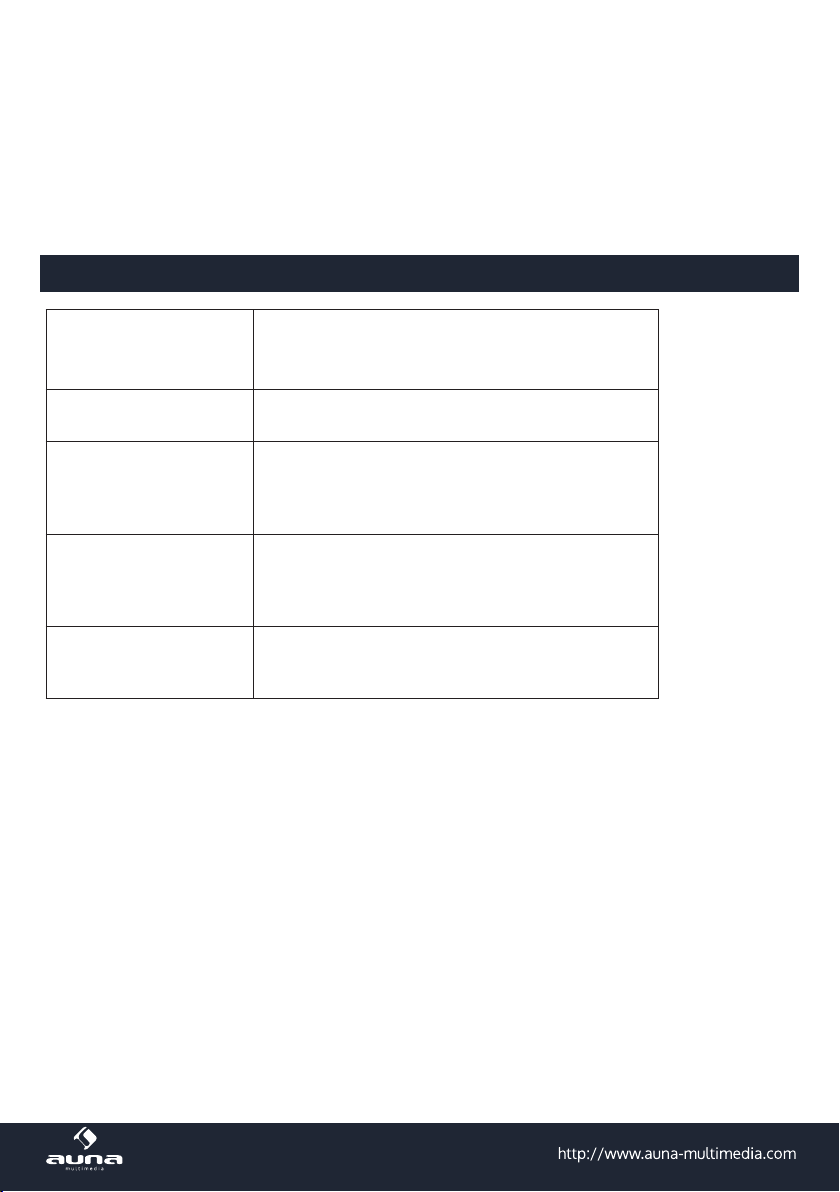
Stromversorgung
Stecken Sie den kleinen Stecker des Netzgerätes in den
Gleichstromanschluss des Gerätes. Schließen Sie den
Netzstecker an eine Steckdose an.
Einsetzen der Batterien in die Fernbedienung
1. Drücken Sie auf die Zunge und schieben Sie das
Batteriefach nach rechts.
2. Ersetzen Sie die alte Knopfzelle durch eine neue
bzw. legen Sie eine neue Knopfzelle des Typs
CR 2025 ein. Richten Sie die Knopfzelle nach der
Polarität aus, die auf der Fernbedienung angezeigt
wird.
3. Schließen Sie das Batteriefach wieder.
Steckdose
CR2025
Netzgerät
OPEN
SC UL
3V
CR2025
Lithium Cell
PUSH
Lithium Cell
CR2025
3V
SC UL
OPEN
PUSH
Vorsichtsmaßnahmen bezüglich Batterien
1. Verwenden Sie nur die angegebenen Größen und Typen von Batterien.
2. Achten Sie beim Einsetzen der Batterie auf die korrekte Polarität, wie sie auf dem Batteriefach
angezeigt wird. Eine falsch herum eingesetzte Batterie kann die Fernbedienung beschädigen.
3. Wenn die Batterie in dem Gerät leer ist oder für lange Zeit nicht verwendet wird, entfernen Sie die
Batterie, um Schäden durch ein mögliches Auslaufen der Batterie zu verhindern.
4. Versuchen Sie nicht Batterien wieder aufzuladen, die dazu nicht bestimmt sind. Sie können überhit-
zen und zerbersten.
5. Batterien dürfen nicht übermäßiger Hitze wie Sonneneinstrahlung, Feuer und dergleichen ausge-
setzt werden.
6. Reinigen Sie die Batteriekontakte und die des Gerätes, bevor Sie die Batterien einsetzen.
7. Mischen Sie nicht verschiedenen Arten von Batterien miteinander (z. B. Alkali- und Zink-Kohlebat-
terien.).
6
Page 7
Auaden eines externen Gerätes durch den eingebauten USB-Anschluss
L DEVICE BY
holding bracket
4/. Plug in charging cable (not supplied)
to both external device's DC jack
and tower speaker USB port.
L DEVICE BY
Note :
- When it has been connected, it will
automatically charge any of the device.
holding bracket
4/. Plug in charging cable (not supplied)
to both external device's DC jack
and tower speaker USB port.
charging cable
L DEVICE BY
Note :
- When it has been connected, it will
automatically charge any of the device.
- There is no control key to select either
"charge" or "not charge". Please
disconnect charging if you don't need
it or leave it for long time.
Insert the microphone
plug into mic jack
1 or 2.
holding bracket
4/. Plug in charging cable (not supplied)
to both external device's DC jack
and tower speaker USB port.
charging cable
charging cable
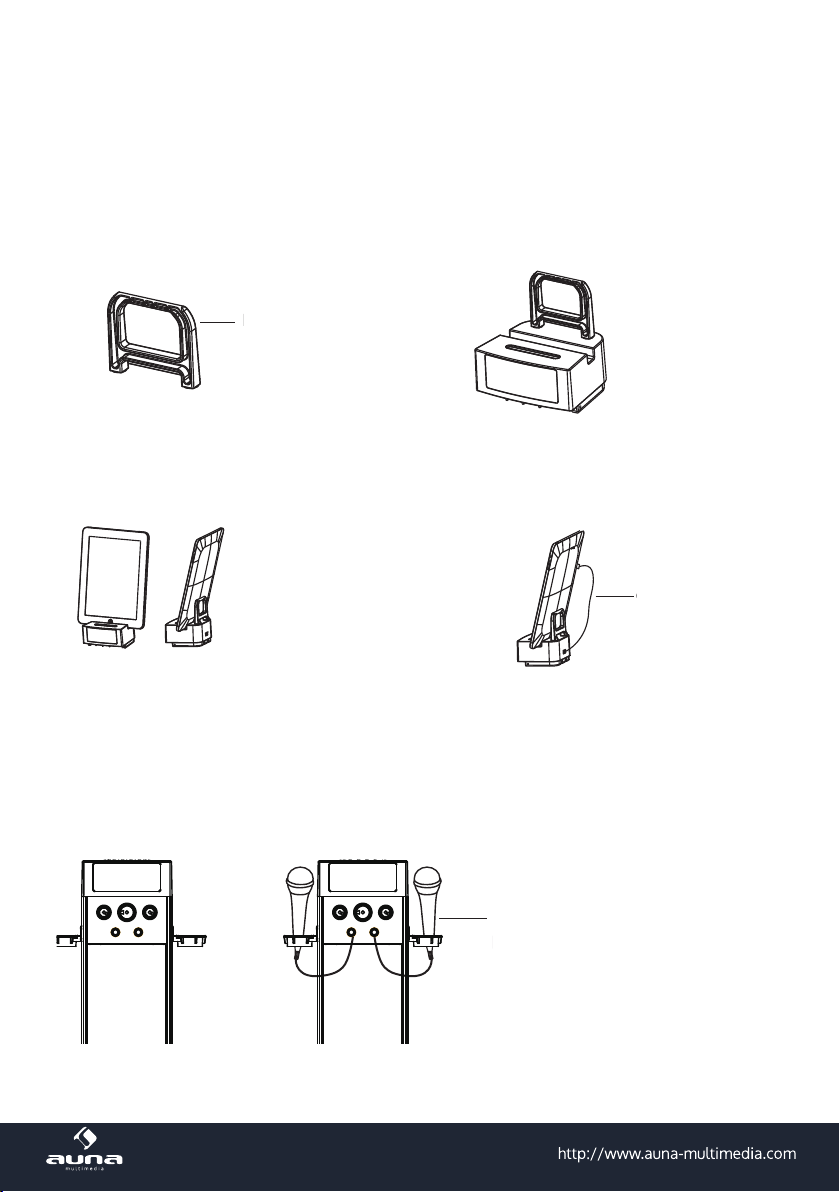
Der USB-Anschluss kann verschiedene Geräte auaden, z. B. iPods, iPhones, iPads, Smartphones, Tablets usw.
1. Nehmen Sie die
Halterung aus dem
Karton.
Halterung
2. Setzen Sie die Halterung auf das Gerät
3. Setzen Sie das
Gerät, das Sie laden
möchten in die Lade-
station.
Hinweise
• Wenn der Anschluss erfolgt ist, wird automatisch jedes der Geräte geladen.
• Es gibt keinen Schalter, der das Auaden ein- oder ausschaltet. Trennen Sie das USB-Kabel, wenn
Sie nicht weiter laden wollen.
4. Schließen Sie das USB-Ladekabel
(nicht im Lieferumfang enthalten) an
das externe Gerät und an die
Karaokemaschine an.
Ladestation
Anschluss des Mikrofons
Schließen Sie den Stecker des Mikrophons am
Eingang MIC 1 oder MIC 2 an.
7
Page 8
CHARGING PORT
DC 5V
1. Connect the Aux out jack from the external audio
player (such like DVD player, TV, VCR …etc.) to the
AUX IN jacks on the rear of tower speaker by the
supplied RCA connection cable as the figure below:
2. Connect the tower speaker to the power as previous
procedures. The Standby indicator will turn on.
3. Press the POWER button on the tower speaker or
Remote Control to power on the tower speaker.
4. Press the SOURCE button on the unit repeatedly or
the Remote Control to turn to AUX mode.
5. Power on the connected external player and st
playback as usual.
CHARGING PORT
DC 5V
3. Press the POWER button on the tower speaker or
Remote Control to power on the tower speaker.
4. Press the SOURCE button on the unit repeatedly or
the Remote Control to turn to AUX mode.
5. Power on the connected external player and st
playback as usual.
6. Press the volume buttons to adjust volume level.
7. Press the TREBLE buttons on the Remote Control to
adjust treble as desired.
1. Connect the Headphone/Earphone; Line out jack
from the external audio player such like MP3 player;
Discman … etc) to the LINE IN jacks on the rear of
tower speaker by the supplied Line In connection
cable as the figure below:
2. Connect the tower speaker to the power as previous
procedures. The Standby indicator will turn on.
3. Press the POWER button on the tower speaker or
Remote Control to power on the tower speaker.
4. Press the SOURCE button on the unit repeatedly
to turn to LINE mode.
5. Power on the connected external player and start
Bedienung
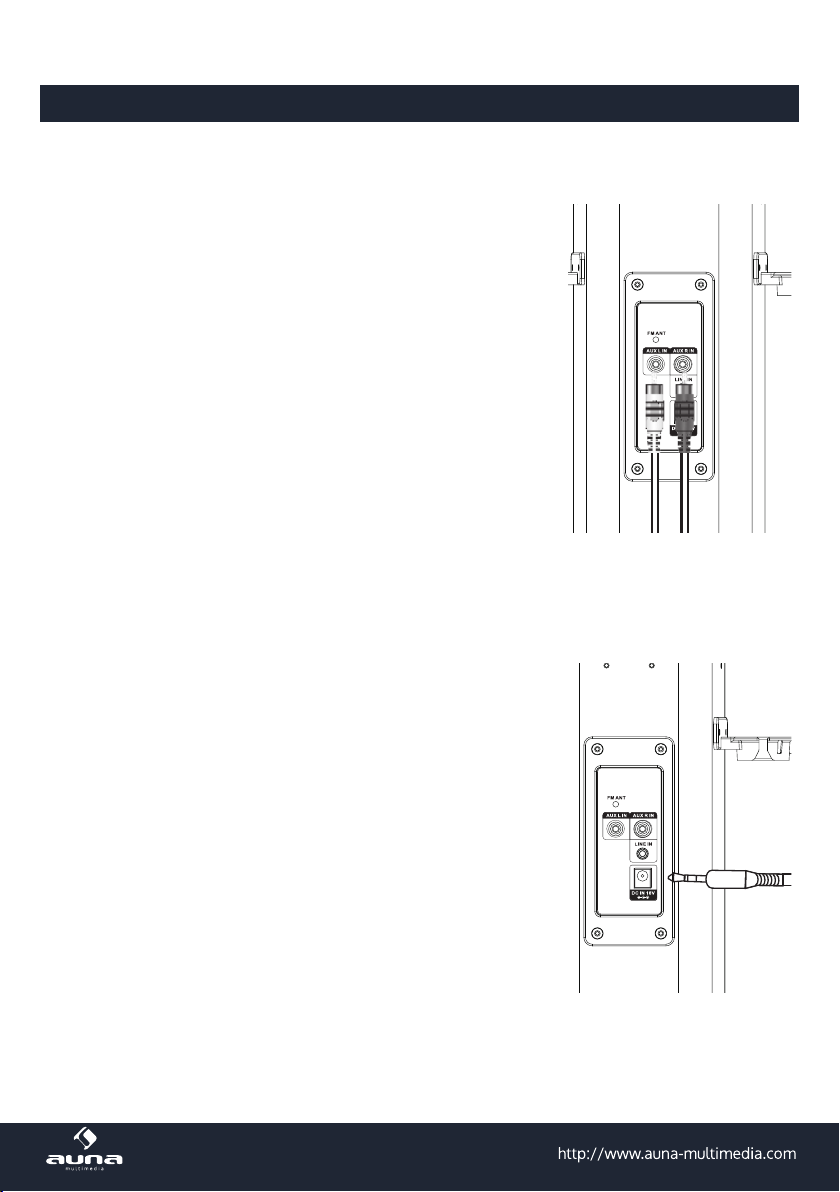
Wiedergabe von einem AUX-IN-Anschluss
1. Verbinden Sie den Aux-Out-Ausgang einer externen Audioquelle
(wie DVD-Player, Fernseher, Videorekorder usw.) mit den AUX-IN-
Anschlüssen auf der Rückseite des Turms mit Hilfe der mitgelieferten Cinchkabel (siehe Bild).
2. Verbinden Sie die den Turm mit der Stromversorgung wie vorher
beschrieben. Die Standby-Lampe leuchtet.
3. Drücken Sie POWER am Turm oder auf der Fernbedienung, um
den Turm einzuschalten.
4. Drücken Sie am Turm oder auf der Fernbedienung wiederholt
SOURCE, um in den AUX-Modus zu gehen.
5. Schalten Sie das externe Gerät ein und starten Sie wie gewöhnlich die Wiedergabe.
6. Drücken Sie die Lautstärketasten, um die Lautstärke einzustellen.
7. Drücken Sie TEBLE auf der Fernbedienung, um die Höhen einzustellen.
8. Drücken Sie BASS auf der Fernbedienung, um den Bass nach Wunsch einzustellen.
9. Drücken Sie den gewünschten Equalizer-Modus (MUSIC, MOVIE oder VOICE).
10. Drücken Sie MUTE, um den Ton stummzuschalten und drücken Sie ihn erneut, um den Ton wieder
einzuschalten.
Wiedergabe vom 3,5-mm-Anschluss
1. Verbinden Sie den Kopfhörer/Ohrhörer, den Klinkenanschluss des
externen Gerätes (MP3-Player usw.) an den 3,5-mm-Anschluss.
2. Verbinden Sie den Turm mit der Stromversorgung wie vorher
beschrieben. Die Standby-Anzeige leuchtet.
3. Drücken Sie POWER am Turm oder auf der Fernbedienung, um
den Turm einzuschalten.
4. Drücken Sie am Turm oder auf der Fernbedienung wiederholt
SOURCE, um in den LINE-Modus zu gehen.
5. Schalten Sie das externe Gerät ein und starten Sie wie gewöhnlich die Wiedergabe.
6. Die weitere Bedienung ist wie im AUX-IN-Modus.
8
Page 9

BT verbinden
Das erste Mal verbinden
1. Schalten Sie den Turm ein. Drücken Sie SOURCE und wählen Sie BT.
2. Die BT-LED blinkt ununterbrochen, während das Gerät gesucht wird.
3. Wenn der Tower gefunden wurde, erscheint der Name „HiTower“. Falls ein Passwort verlangt wird,
geben Sie „0000“ ein, um eine Verbindung mit dem Tower herzustellen.
Erneute Verbindung
1. Schalten Sie den Turm ein. Drücken Sie SOURCE und wählen Sie den BT-Modus.
2. Die BT-LED blinkt 3 Sekunden lang. Es wird automatisch das letzte Gerät gefunden, mit dem eine
Verbindung hergestellt wurde. Wenn das Gerät gefunden wurde, startet die Wiedergabe direkt.
3. Falls kein Gerät gefunden wurde, blinkt die BT-LED ununterbrochen. Geben Sie erst einmal das
Passwort ein oder drücken Sie SOURCE, um FM, AUX oder LINE IN zu wählen.
Hinweise zur Einrichtung von BT
1. Die BT-Lautsprecher verbinden sich nur einem Gerät gleichzeitig. Schalten Sie die BT-Lautsprecher
aus, um das Gerät mit einem anderen BT-Gerät zu verbinden.
2. Die maximale Reichweite zwischen dem BT-Lautsprecher und einem Gerät beträgt 10 Meter.
3. Während der Wiedergabe mit BT neben anderen drahtlosen Geräten können Interferenzen auftreten. Falls bei der Wiedergabe mit BT Probleme auftreten, stellen Sie den Turm an einem anderen
Ort auf oder verwenden Sie den 3,5-mm-Klinkenanschluss anstelle der BT-Funktion.
Radio hören und einstellen
UKW-Antenne
Richten Sie die UKW-Antenne (im Lieferumfang enthalten) aus, um das beste Empfangssignal zu bekommen.
Einstellung des Radios
1. Drücken Sie POWER, um den Turm einzuschalten.
2. Drücken Sie SOURCE, um in den Radio-Modus zu schalten.
3. Drücken Sie TUN+/CLOCK+ oder TUN-/CLOCK- auf der Fernbedienung, um das Radio einzustellen.
4. Drücken und halten Sie Sekunden lang TUN/MEN auf der Fernbedienung, um die gespeicherten
Radiosender durchzugehen.
Einen gespeicherten Radiosender hören
1. Drücken Sie POWER, um das Gerät einzuschalten.
2. Drücken Sie SOURCE, um in den Radiomodus zu gelangen.
3. Drücken Sie TUN/MEN auf der Fernbedienung, um die gespeicherten Sender durchzugehen.
9
Page 10

Speichern eines Senders
1. Befolgen Sie die Anweisungen zum Einstellen eines Senders.
2. Nachdem Sie den gewünschten Sender eingestellt haben, drücken Sie MEM/CLOCK.
3. Drücken Sie TUN+/CLOCK+ oder TUN-/CLOCK- auf der Fernbedienung, um die gewünschte Senderfrequenz einzustellen.
4. Drücken Sie MEM/CLOCK, um den aktuellen Sender zu den gespeicherten Programmplätzen hinzuzufügen. Sie können 30 Stationen speichern.
Einstellen der Uhr
1. Drücken Sie POWER, um das Gerät auszuschalten.
2. Drücken und halten Sie POWER 3 Sekunden lang (auf der Fernbedienung oder dem Gerät), um die
12- oder 24-Stunden-Anzeige zu wählen.
3. Drücken und halten Sie MEM/CLOCK 3 Sekunden lang (auf der Fernbedienung oder dem Gerät),
um die Uhrzeit einzustellen.
4. Drücken Sie TUN+/CLOCK+ oder TUN-/CLOCK- auf der Fernbedienung, um die Stunde einzustellen.
5. Drücken Sie MEM/CLOCK noch einmal, um die Einstellung zu bestätigen. Es geht automatisch mit
der Einstellung der Minute weiter.
6. Drücken Sie TUN+/CLOCK+ oder TUN-/CLOCK- auf der Fernbedienung, um die Minute einzustellen.
7. Drücken Sie MEM/CLOCK auf der Fernbedienung noch einmal , um die Einstellung zu bestätigen.
Einstellen des Schlaf-Timers
1. Drücken Sie POWER, um das Gerät einzuschalten.
2. Drücken Sie wiederholt SLEEP, um die voreinstellbaren Zeiten zu wählen. Diese sind 5, 10, 15, 30,
60, 90 Minuten.
3. Nachdem die eingestellte Zeit abgelaufen ist, schaltet der Turm sich automatisch aus.
Einstellen des Alarms
1. Drücken Sie POWER, um den Lautsprecher einzuschalten.
2. Wählen Sie auf der Fernbedienung den FM-Modus. Drücken Sie TUN+/CLOCK+ oder TUN-/CLOCKauf der Fernbedienung, um den gewünschten Sender einzustellen.
3. Drücken Sie POWER auf der Fernbedienung, um das Gerät auszuschalten.
4. Drücken Sie ALARM und halten Sie die Taste 3 Sekunden, um den Alarm einzustellen.
5. Die Zeit auf der Anzeige beginnt zu blinken.
6. Drücken Sie TUN+/CLOCK+ oder TUN-/CLOCK- auf der Fernbedienung, um die Stunde einzustellen.
7. Drücken Sie MEM/CLOCK noch einmal, um die Einstellung zu bestätigen. Es geht automatisch mit
der Einstellung der Minute weiter.
10
Page 11
8. Drücken Sie TUN+/CLOCK+ oder TUN-/CLOCK- auf der Fernbedienung, um die Minute einzustellen.
9. Drücken Sie ALARM auf der Fernbedienung, um die Einstellung zu bestätigen.
10. Wenn der Alarm ausgelöst wird, wird der voreinstellte Sender eingeschaltet.
11. Drücken Sie ALARM auf der Fernbedienung, um den Wecker ein- und auszuschalten.
Problembehebung
Fehler Lösungen
Kein Strom
Kein Ton
Die Fernbedienung
funktioniert nicht.
Kein Ton im BT-Modus
Überprüfen Sie die Verbindung des Netzgerätes zwischen der Steckdose und dem Gerät.
Sehen Sie nach, ob die Lautstärke etwa auf Minimum
gestellt ist.
Sehen Sie nach, ob die Lautsprecher etwa auf Stumm
gestellt sind.
Überprüfen Sie die Batterie und tauschen Sie die Batterie ggf. aus.
Überprüfen Sie, ob zwischen der Fernbedienung und
dem Gerät sich keine Hindernisse benden.
Überprüfen Sie, ob die Geräte miteinander verbunden
sind. Der Turm und das BT-Gerät müssen beim ersten
Pairing mit dem Passwort „0000“ verbunden werden.
11
Page 12

Technische Daten
Artikelnummer 10029400 10029401
Stromversorgung 18 V 1,6 A
Stromversorgung der Fernbedienung CD 3 V, 1x CR 2025 Batterie (inklusive)
Stromverbrauch 30 W
Radio Bandbreite 87,5 MHz - 108 MHz
Impedanz der Lautsprecher
linker Kanal 8 Ohm
rechter Kanal 8 Ohm
Entsorgung
Bendet sich die linke Abbildung (durchgestrichene Mülltonne auf Rädern) auf dem Produkt,
gilt die Europäische Richtlinie 2002/96/EG. Diese Produkte dürfen nicht mit dem normalen
Hausmüll entsorgt werden. Informieren Sie sich über die örtlichen Regelungen zur getrennten Sammlung elektrischer und elektronischer Gerätschaften. Richten Sie sich nach den örtlichen Regelungen und entsorgen Sie Altgeräte nicht über den Hausmüll. Durch die regelkonforme Entsorgung der Altgeräte werden Umwelt und die Gesundheit ihrer Mitmenschen vor
möglichen negativen Konsequenzen geschützt. Materialrecycling hilft, den Verbrauch von
Rohstoen zu verringern.
Das Produkt enthält Batterien, die der Europäischen Richtlinie 2006/66/EG unterliegen und
nicht mit dem normalen Hausmüll entsorgt werden dürfen. Bitte informieren Sie sich über
die örtlichen Bestimmungen zur gesonderten Entsorgung von Batterien. Durch regelkonforme Entsorgung schützen Sie die Umwelt und die Gesundheit Ihrer Mitmenschen vor negativen Konsequenzen.
Hersteller: Chal-Tec GmbH, Wallstraße 16, 10179 Berlin.
Dieses Produkt entspricht den folgenden Europäischen Richtlinien:
2011/65/EU (RoHS)
2014/35/EU (LVD)
99/005//EG R&TTE
12
Page 13

Dear Customer,
Congratulations on purchasing this equipment. Please read this manual carefully and take care of the
following hints on installation and use to avoid technical damages. Any failure caused by ignoring the
items and cautions mentioned in the operation and installation instructions are not covered by our
warranty and any liability.
Contents
Safety Instructions ......................................................................13
Scope of Supply .........................................................................14
Location of Controls .....................................................................15
Remote Control .........................................................................16
Installation .............................................................................17
Basic Operation .........................................................................19
Troubleshooting ........................................................................22
Technical Data ..........................................................................23
Disposal Considerations .................................................................23
Safety Instructions
• Read these Instructions. Keep these Instructions. Heed all Warnings. Follow all instructions.
• Do not use this apparatus near water.
• Clean only with a dry cloth.
• Do not block any ventilation openings. Install in accordance with the manufacturer’s instructions.
• Do not install near any heat sources such as radiators, heat registers, stoves, or other apparatus
(including ampliers) that produce heat.
• Protect the power cord from being walked on or pinched particularly at plugs, convenience receptacles, and the point where they exit from the apparatus.
• Only use attachments/accessories specied by the manufacturer.
• When a cart is used, use caution when moving the cart/apparatus combination to avoid injury from
tip-over.
• Unplug this apparatus during lightning storms or when unused for long periods of time.
• Refer all servicing to qualied service personnel. Servicing is required when the apparatus has been
damaged in any way, such as the power-supply cord or the plug, liquid has been spilled or objects
have fallen into the apparatus, the apparatus has been exposed to rain or moisture, does not operate
normally,or has been dropped.
• The battery shall not be exposed to excessive heat such as sunshine, re or the like.
13
Page 14
This symbol indicates that this product incorporates double insulation between
hazardous mains voltage and user accessible parts. Use only with a cart, stand,
tripod, bracket, or table specied by the manufacturer, or sold with the apparatus.
When a cart is used, use caution when moving the cart/apparatus.
Warning: Danger of electric shock
Do not expose this device to rain or humidity.
Warning: Danger of explosion (batteries)
Insert the batteries with the correct polarity. Use the correct battery type.
Explanation of the symbols on the device
WARNING: TO REDUCE THE RISK OF ELECTRIC SHOCK, DO NOT REMOVE COVER (OR BACK). NO USER-SERVICEABLE PARTS INSIDE.
REFER SERVICING TO QUALIFIED SERVICE PERSONNEL.
The lightning ash with arrowhead symbol, within an equilateral triangle, is intended to
alert the user to the presence of uninsulated "dangerous voltage" within the product‘s
enclosure that may be of suicient magnitude to constitute a risk of electric shock to
persons.
The exclamation point within an equilateral triangle is intended to alert the user to the
presence of important operating and maintenance (servicing) instructions in the litera-
ture accompanying the appliance.
• BT Sound Tower
• Power adaptor
• RCA Audio Cable
• Remote Control: Requires a
• CR2025 Battery (pre-installed)
14
Scope of Supply
• Line-in Cable
• Standing Bracket
• 2 KARAOKE microphones
• Instruction manual
Page 15
LOCATION OF CONTROLS
Source Tun+ Tun- Vol+ Vol-Power
1 2 34 5 6
Location of Controls
9
CHARGING PORT
DC 5V
12
13
14
15
16
17
7
8
1 POWER button: Press to turn the tower speaker o or on.
2 SOURCE button: Press repeatedly to select the audio inputs to BT (Bluetooth receiver), AUX, LINE
in or FM.
3 TUN+: In FM mode, one touch press to navigate up radio frequency. Press and hold a second to
switch to auto-search radio station.
4 TUN-: In FM model, one touch press to navigate down radio frequency. Press and hold a second to
switch to auto-search radio station.
5 VOLUME -: Press to decrease the volume.
6 VOLUME +: Press to increase the volume.
7 BALANCE : Rotate the BALANCE knob to adjust L/R track volume.
8 MIC 1 jack
9 MIC VOL: Rotate the MIC knob to adjust the mic volume.
10 ECHO: Rotate the ECHO knob to adjust the echo level.
11 MIC 2 jack
12 DC 5V USB charging port.
13 Karaoke microphone holder
14 FM antenna
15 AUX L/R IN jacks
16 3.5mm LINE IN jack
17 DC jack in
10
11
15
Page 16

Remote Control
1 POWER button: Press to turn the unit on
or o.
2 MEM CLOCK button:
• Press to cycle through saved radio stations.
• Press to set the time.
3 TUNE/MEM button:
• Press 3 seconds to search automatically
FM stations.
• One touch to re-cycle through saved radio
stations.
4 MUSIC button: Press to switch to the EQ
optimised for music.
5 TREBLE buttons: Press to adjust the treble
up or down at MUSIC mode.
6 SOURCE button: Press to switch to Blue-
tooth, FM, AUX in LINE in or USB.
7 MUTE button: Press to mute the sound,
press again to resume.
8 ALARM button: Press to set the alarm.
9 SLEEP button: Press repeatedly to set the sleep time.
10 TUN -/CLOCK - button:
• Press to navigate up radio frequency.
• Press backward to adjust the time.
• Press backward to select those saved stations.
11 TUN +/CLOCK +:
• Press to navigate up radio frequency.
• Press to navigate down the time.
• Press forward to select those saved stations.
12. MOVIE button: Press to switch to the EQ optimized for movie sound.
13. VOICE button: Press to switch to the EQ optimized for dialogue.
14. BASS buttons: Press to adjust the bass up or down at MUSIC mode.
15. VOLUME buttons: Press to adjust the volume.
16. : In BT mode, press to skip forward or back one track.
/: In BT mode, press to play or pause a track.
16
Page 17

Installation
Power Source
Insert the small plug from the supplied AC/DC adapter
to the DC in jack on the unit. Insert the AC/DC adapter
to DC in jack on the unit.
Batteries Installation (Remote Control)
1. Push the tab, then slide out the battery tray as the
gure on the right.
2. Replace the old button cell by a new CR 2025 button
cell as the polarity markings on the remote control.
3. Close the battery tray.
CR2025
OPEN
PUSH
SC UL
3V
CR2025
Lithium Cell
Lithium Cell
CR2025
3V
SC UL
OPEN
PUSH
Battery Precautions
1. Use only the size and type of battery specied.
2. Be sure the follow the correct polarity when installing the battery as indicated in the battery com-
partment. A reversed battery may cause damage to the device.
3. If the battery in the device is consumed or the device is not to be used for a long period of time,
remove the batteries to prevent damage or injury from possible battery leakage.
4. Do not try to recharge the battery not intended to be recharged; it can overheat and rupture.
5. The batteries shall not be exposed to excessive heat such as sunshine, re or the like.
6. Clean the battery contacts and also those of the device prior the battery installation.
7. Do not mix dierent types of batteries together (e.g. Alkaline and Carbonzine) or old batteries with
fresh ones.
17
Page 18

Charging external device by built-in 5V USB port
L DEVICE BY
holding bracket
4/. Plug in charging cable (not supplied)
to both external device's DC jack
and tower speaker USB port.
L DEVICE BY
Note :
- When it has been connected, it will
automatically charge any of the device.
holding bracket
4/. Plug in charging cable (not supplied)
to both external device's DC jack
and tower speaker USB port.
charging cable
L DEVICE BY
Note :
- When it has been connected, it will
automatically charge any of the device.
- There is no control key to select either
"charge" or "not charge". Please
disconnect charging if you don't need
it or leave it for long time.
Insert the microphone
plug into mic jack
1 or 2.
holding bracket
4/. Plug in charging cable (not supplied)
to both external device's DC jack
and tower speaker USB port.
charging cable
charging cable
It can charge various external devices, e.g. ipod, iphone, ipad, smart phone or tablet etc.
1. Take out the holding
bracket from the
package.
holding bracket
2. Insert it into the position as shown.
3. Place any device that
you need to charge
over the slot.
Note
• When it has been connected, it will automatically charge any of the device.
• There is no control key to select either „charge“ or „not charge“. Please disconnect charging if you
don‘t need it or leave it for long time.
4. Plug in charging cable (not supplied)
to both external device’s DC jack and
tower speaker USB port.
charging cable
Connecting the microphone
18
Insert the microphone plug into mic jack 1 or 2.
Page 19

CHARGING PORT
DC 5V
1. Connect the Aux out jack from the external audio
player (such like DVD player, TV, VCR …etc.) to the
AUX IN jacks on the rear of tower speaker by the
supplied RCA connection cable as the figure below:
2. Connect the tower speaker to the power as previous
procedures. The Standby indicator will turn on.
3. Press the POWER button on the tower speaker or
Remote Control to power on the tower speaker.
4. Press the SOURCE button on the unit repeatedly or
the Remote Control to turn to AUX mode.
5. Power on the connected external player and st
playback as usual.
CHARGING PORT
DC 5V
3. Press the POWER button on the tower speaker or
Remote Control to power on the tower speaker.
4. Press the SOURCE button on the unit repeatedly or
the Remote Control to turn to AUX mode.
5. Power on the connected external player and st
playback as usual.
6. Press the volume buttons to adjust volume level.
7. Press the TREBLE buttons on the Remote Control to
adjust treble as desired.
1. Connect the Headphone/Earphone; Line out jack
from the external audio player such like MP3 player;
Discman … etc) to the LINE IN jacks on the rear of
tower speaker by the supplied Line In connection
cable as the figure below:
2. Connect the tower speaker to the power as previous
procedures. The Standby indicator will turn on.
3. Press the POWER button on the tower speaker or
Remote Control to power on the tower speaker.
4. Press the SOURCE button on the unit repeatedly
to turn to LINE mode.
5. Power on the connected external player and start
Basic Operation
Listening from AUX IN jack
1. Connect the Aux out jack from the external audio player (such as
DVD player, TV, VCR …etc.) to the AUX IN jacks on the rear of tower
speaker by the supplied RCA connection cable as the gure below:
2. Connect the tower speaker to the power as previous procedures.
The Standby indicator will turn on.
3. Press the POWER button on the tower speaker or remote control
to power on the tower speaker.
4. Press the SOURCE button on the unit repeatedly or the remote
control to turn to AUX mode.
5. Power on the connected external player and start playback as
usual.
6. Press the volume buttons to adjust volume level.
7. Press the TREBLE buttons on the Remote Control to adjust treble
as desired.
8. Press the BASS buttons on the Remote Control to adjust BASS as
desired.
9. Press the EQ preset mode buttons MUSIC; MOVIE or VOICE to turn on the preset EQ eect as
desired.
10. Press the MUTE button to turn o the sound, press again to resume.
11. When nished listening, press POWER button on the tower speaker or remote control to power O
(standby mode) the speaker.
Listening from 3.5mm LINE in jack
1. Connect the headphone/earphone; LINE OUT jack from the
external audio player such like MP3 player; Discman … etc) to the
LINE IN jacks on the rear of tower speaker by the supplied Line In
connection cable as the gure below:
2. Connect the tower speaker to the power as previous procedures.
The Standby indicator will turn on.
3. Press the POWER button on the tower speaker or remote control
to power on the tower speaker.
4. Press the SOURCE button on the unit repeatedly to turn to LINE
mode.
5. Power on the connected external player and start playback as
usual.
6. Other operations are same as AUX IN mode.
19
Page 20

Setting up BT pairing
Initial pairing
1. Switch on the tower speaker. Press the SOURCE button and select BT.
2. The BT LED will blink non-stop in searching for device.
3. When a device is found, it will show the name “HiTower” If the device require a password, enter
„0000“ to pair with the tower speaker.
Re-pairing
1. Switch on the tower speaker. Press the SOURCE button and selectBluetooth mode.
2. The BT LED will blink 3 seconds and it is automatically nding the last device it was paired with.
When the device is found, it can play back directly.
3. If there is no device found, the bluetooth LED will continue to blink non-stop. Enter password to
start with or press SOURCE button to select FM, AUX in or LINE in.
BT setup note
1. The BT speaker only connects to device at a time. Turn o the BT speaker in order to pair the
device with another Bluetooth device.
2. The maximum transmission between the Bluetooth speaker and a device is 10 meters or 32 feet.
3. Interference may occur during playback when using the BT function near other wireless devices. If
playback through Bluetooth is problematic, move the Bluetooth speaker and the playback device to
a dierent location, or use the 3.5mm audio cable jack instead of the BT function.
Listening and setting up FM radio
FM Antenna
Adjust the FM Wire Antenna (included) to get the best reception signal.
Tuning the FM radio
1. Press the POWER button to turn the tower speaker on.
2. Press the SOURCE button to switch to FM radio mode.
3. Press the TUN+/CLOCK+ or TUN-/CLOCK- buttons on the remote to tune the FM radio.
4. Press and hold TUN/MEM button 3 seconds on the remote control to switch auto-seraching radio
stations. After nish searching, it will automatically save those stations.
Listening to a saved radio station
1. Press the POWER button to turn the tower speaker on.
2. Press the SOURCE button to switch to FM radio mode.
3. Press the TUN/MEN button on the remote control to cycle through saved radio stations.
20
Page 21

Saving a Radio Station
1. Follow the instructions for tuning the FM radio.
2. After tuning to the desired station, press the MEM/CLOCK button.
3. Press the MEM/CLOCK button to save the current radio station to the selected preset. Here are 30
stations can be saved to the tower speaker’s memory.
Setting the clock
1. Press the POWER button to switch o the unit.
2. Press and hold 3 seconds the POWER button on the remote control or unit to select 12 or 24 hour.
3. Press and hold 3 seconds MEM/CLOCK button on the remote control to set the time.
4. Press the TUN+/CLOCK + or TUN-/CLOCK- button on the remote control to adjust up or down the
hour.
5. Press MEM/CLOCK button again on the remote control to conrm the setting and it will automati-
cally go to minute setting.
6. Press the TUN+/CLOCK + or TUN-/CLOCK- button on the remote control to adjust up or down the
minute.
7. Press MEM/CLOCK button again on the remote control to conrm the setting.
Setting SLEEP timer
1. Press the POWER button to switch on the unit.
2. Press the SLEEP button repeatedly to select the preset set timer. Time presets available are 5, 10,
15, 30, 60, 90 minutes.
3. After the set sleep time has expired, the tower bar will automatically power o.
Setting the alarm
1. Press the POWER button to turn the tower speaker on.
2. Press the POWER button and select the FM mode on the remote control. Press the TUN+/CLOCK +
or TUN-/CLOCK- button to select the desired radio frequency.
3. Press the POWER button on the remote control to switch o the power.
4. Press and hold 3 seconds the ALARM button on the remote control to set the alarm.
5. The time on the LCD display will begin blinking.
6. Press the TUN+/CLOCK + or TUN-/CLOCK- button on the remote control to adjust up or down the
hour.
7. Press MEM/CLOCK button again on the remote control to conrm the setting and it will automati-
cally go to minute setting.
8. Press the TUN+/CLOCK + or TUN-/CLOCK- button on the remote control to adjust up or down the
minute.
9. Press the ALARM button again on the remote control to conrm the setting.
10. After the set sleep time has expired, the ALARM will ring the preset radio.
11. Press the ALARM button on the remote control to switch on or o the alarm setting.
21
Page 22

Troubleshooting
Problem What to do
No power
No sound
The remote control
won‘ t work
No sound from
in BT mode
Check the connection of the AC/DC adapter
between the tower speaker and wall outlet.
Check that the volume control is NOT at minimum.
Check that it is NOT set to mute.
Inspect or replace the battery.
The remote control will not work Make sure there are
no obstacles obscuring.
Check if you have pairing or not. It needs to pair
the external BT player and the tower speaker with
password „0000“ before 1st time listening.
22
Page 23

Technical Data
Item number 10029400 10029401
Power source 18 V 1.6 A
Power source of remote control CD 3 V, 1x CR 2025 battery (included)
Power consumption 30 W
Radio Coverage 87,5 MHz - 108 MHz
Impedance of Speakers
Left Channel 8 Ohm
Right Channel 8 Ohm
Disposal Considerations
According to the European waste regulation 2002/96/EC this symbol on the product or on
its packaging indicates that this product may not be treated as household waste. Instead it
should be taken to the appropriate collection point for the recycling of electrical and electronic equipment. By ensuring this product is disposed of correctly, you will help prevent
potential negative consequences for the environment and human health, which could oth-
erwise be caused by inappropriate waste handling of this product. For more detailed information about recycling of this product, please contact your local council or your household
waste disposal service.
Your product contains batteries covered by the European Directive. 2006/66/EC, which
cannot be disposed of with normal household waste. Please check local rules on separate
collection of batteries. The correct disposal of batteries helps prevent potentially negative
consequences on the environment and human health.
Producer : Chal-Tec GmbH, Wallstraße 16, 10179 Berlin. Germany
This product is conform to the following European Directives:
2011/65/EU (RoHS)
2014/35/EU (LVD)
99/005//EC R&TTE
23
Page 24

Chère cliente, cher client,
Toutes nos félicitations pour l’acquisition de ce nouvel appareil. Veuillez lire attentivement et respecter
les consignes suivantes de branchements et d’utilisation pour éviter d’éventuels dommages techniques.
Nous ne saurions être tenus pour responsables des dommages dus au non-respect des consignes et à
la mauvaise utilisation de l’appareil.
Sommaire
Consignes de sécurité ..................................................................24
Contenu de la livraison ................................................................. 25
Éléments de commande ................................................................ 26
Télécommande .........................................................................27
Installation ............................................................................ 28
Utilisation ............................................................................. 30
Résolution des problèmes ................................................................33
Fiche technique ........................................................................ 34
Information sur le recyclage ............................................................. 34
Consignes de sécurité
• Lire attentivement ce mode d’emploi. Conserver ce mode d’emploi.
• Respecter toutes les consignes.
• Ne pas utiliser l’appareil à proximité d’eau.
• Nettoyer l’appareil uniquement à l’aide d’un chion sec.
• Ne pas obstruer les ouvertures d’aération. Installer l’appareil conformément aux instructions du fabricant.
• Ne pas placer de sources de chaleur à proximité de l’appareil, comme par exemple un radiateur, un
four ou d’autres appareils (y compris un amplicateur).
• Protéger le cordon d’alimentation pour éviter que quiconque ne marche dessus ou ne l’écrase, surtout au niveau de la che d’alimentation, d’une multiprise ou de la sortie de l’appareil.
• Utiliser uniquement les accessoires recommandés par le fabricant.
• Débrancher l’appareil en cas d’orage et en cas d’inutilisation prolongée de l’appareil.
• Faire réparer l’appareil uniquement par un personnel qualié si le cordon ou la che d’alimentation
sont endommagés, si un liquide ou un corps étranger a pénétré dans l’appareil, si l’appareil a été
exposé à la pluie ou à l’humidité, s’il présente des dysfonctionnements ou s’il est tombé.
• Cet appareil ne doit pas être exposé à des gouttes ou des éclaboussures d’eau. Ne pas poser d’objet
rempli d’eau sur l’appareil.
• Ne pas exposer les piles à de fortes chaleurs comme ceux des rayons du soleil, du feu ou équivalent.
• Des symboles de danger sont aichés à l’arrière de l’appareil.
24
Page 25

Ce symbole indique que l’appareil est équipé d’une double isolation entre la tension dangereuse d’entrée et les parties accessibles à l’utilisateur.
Attention : risques d’électrocution
Ne pas exposer l’appareil à la pluie ou à l’humidité.
Attention : risques d’explosion (piles)
Introduire les piles en respectant les polarités. Utiliser le type correct de piles.
Explications des symboles sur l’appareil
Attention : risques d’électrocution : ne pas ouvrir le boîtier de l’appareil. L’appareil
ne contient pas de pièces à régler ou à maintenir par l’utilisateur.
Le symbole représentant un éclair avec une èche à l‘intérieur d‘un triangle équilatéral
est utilisé pour prévenir l‘utilisateur de la présence d‘une tension électrique dangereuse
non isolée à l‘intérieur de l‘appareil susceptible de provoquer une électrocution.
Le triangle dans lequel gure un point d‘exclamation alerte l‘utilisateur de la présence
d‘instructions de fonctionnement et de maintenance importantes dans la documentation accompagnant le produit.
• Tour de son BT
• Fiche d’alimentation
• Câble audio
• Télécommande
• (pile CR2025 impérative)
Contenu de la livraison
• Câble LINE IN
• Socle
• 2 microphones karaoké
• Mode d’emploi
25
Page 26

LOCATION OF CONTROLS
Source Tun+ Tun- Vol+ Vol-Power
1 2 34 5 6
Éléments de commande
CHARGING PORT
DC 5V
9
12
13
14
15
16
17
7
8
1 POWER : allumer et éteindre les enceintes
2 SOURCE : appuyer plusieurs fois sur cette touche pour basculer entre les entrées audio BT, AUX, LINE IN
et FM.
3 TUN + : appuyer une fois sur cette touche en mode FM pour eectuer une recherche avant de station.
Appuyer une deuxième fois sur cette touche pour eectuer une recherche automatique avant de station.
4 TUN - : appuyer une fois sur cette touche en mode FM pour eectuer une recherche arrière de station.
Appuyer une deuxième fois sur cette touche pour eectuer une recherche automatique arrière de station.
5 VOLUME + : appuyer sur cette touche pour augmenter le volume.
6 VOLUME - : appuyer sur cette touche pour diminuer le volume.
7 BALANCE : tourner le bouton de réglage de la balance pour ajuster le volume de gauche et de droite.
8 MIC 1 : entrée microphone
9 MIC VOL : tourner pour régler le volume micro
10 ECHO : actionner le bouton de réglage pour régler l’intensité de l’eet d’écho.
11 MIC 2 : entrée microphone
12 DC 5 V : prise de recharge USB 5 Volts
13 Support de microphone
14 FM-Ant : antenne UKW
15 AUX L/R IN : prises Aux gauche et droite
16 LINE IN : prise jack 3,5 mm
17 DC IN 18 V : prise secteur pour courant continu
10
11
26
Page 27

Télécommande
1. POWER : éteint/allumé
2. MEM CLOCK :
• Appuyer plusieurs fois pour parcourir
les stations de radio sauvegardées.
• Appuyer pour régler l’heure.
3. TUNE/MEM
• Rester appuyer pendant 3 secondes
pour eectuer une recherche automatique de stations UKW.
• Appuyer pour parcourir les stations
sauvegardées.
4. MUSIC : sélectionner une des égalisations
en fonction du genre musical
5. TREBLE : monter ou baisser les aigus en
mode Music.
6. SOURCE : sélectionner une option parmi
BT, FM, AUX in LINE et USB.
7. MUTE : appuyer pour passer en mode silen-
cieux. Appuyer de nouveau pour désactiver
le mode silencieux.
8. ALARM : régler le réveil.
9. SLEEP : appuyer plusieurs fois pour régler le minuteur d’endormissement
10. TUN -/CLOCK - :
• Chercher une fréquence inférieure.
• Régler l’heure (reculer)
• Sélectionner une station sauvegardée (précédente)
11. TUN +/CLOCK + :
• Chercher une fréquence supérieure.
• Régler l’heure (avancer)
• Sélectionner une station sauvegardée (suivante)
12. MOVIE : sélectionner une égalisation adaptée à un lm.
13. VOICE : sélectionner une égalisation adaptée à un dialogue.
14. BASS : régler la basse en mode Music.
15. VOLUME : régler le volume.
16. passer au titre suivant ou précédent en mode BT.
/ : lire un titre ou le mettre en pause en mode BT.
27
Page 28

Installation
Alimentation électrique
Brancher la petite che du bloc d’alimentation dans la
prise de courant continu de l’appareil. Puis brancher la
che d’alimentation à une prise électrique.
Insertion de la pile dans la télécommande
1. Appuyer sur la languette et tirer le compartiment de
la pile sur la droite.
2. Remplacer l’ancienne pile bouton par une nouvelle
ou insérer une nouvelle pile bouton de type CR 2025.
L’introduire en respectant la polarité indiquée sur la
télécommande.
3. Refermer le compartiment de la pile.
prise électrique
CR2025
bloc d’alimentation
OPEN
PUSH
SC UL
3V
CR2025
Lithium Cell
Lithium Cell
CR2025
3V
SC UL
OPEN
PUSH
Mesures de précaution relatives aux piles
1. Utiliser uniquement la même taille et le même type de pile.
2. Respecter la polarité correcte au moment d’introduire la pile, comme indiqué sur le compartiment
de la pile. Si la pile est insérée à l’envers, cela peut endommager la télécommande.
3. Si la pile de l’appareil est vide ou ne sera pas utilisée pendant un moment, sortir la pile pour empêcher des dégâts liés à la fuite de la pile.
4. Ne pas essayer de recharger les piles, car elles ne sont pas conçues pour cela. Elles peuvent sur-
chauer et exploser.
5. Ne pas exposer les piles à des chaleurs démesurées comme celle des rayons de soleil, du feu ou
équivalent.
6. Nettoyer les pôles de la pile et ceux de l’appareil avant d’introduire les piles.
7. Ne pas mélanger diérents types de piles (par exemple les piles alcalines et salines)
28
Page 29

Rechargement d’un périphérique via la prise USB intégrée
L DEVICE BY
holding bracket
4/. Plug in charging cable (not supplied)
to both external device's DC jack
and tower speaker USB port.
L DEVICE BY
Note :
- When it has been connected, it will
automatically charge any of the device.
holding bracket
4/. Plug in charging cable (not supplied)
to both external device's DC jack
and tower speaker USB port.
charging cable
L DEVICE BY
Note :
- When it has been connected, it will
automatically charge any of the device.
- There is no control key to select either
"charge" or "not charge". Please
disconnect charging if you don't need
it or leave it for long time.
Insert the microphone
plug into mic jack
1 or 2.
holding bracket
4/. Plug in charging cable (not supplied)
to both external device's DC jack
and tower speaker USB port.
charging cable
charging cable
La prise USB permet de recharger diérents appareils, par exemple un iPod, un iPhone, un iPad, un
smartphone, une tablette).
1. Sortir le support du
carton.
Support
2. Poser le support sur l’appareil
3. Placer l’appareil à recharger sur la station
de charge.
Remarques
• Lorsque le branchement est eectué, l’appareil connecté est automatiquement rechargé.
• Il n’y a aucun interrupteur permettant d’activer ou de désactiver la recharge. Débrancher le câble
USB pour arrêter la recharge.
4. Brancher le câble de recharge USB
(non fourni à la livraison) à l’appareil
périphérique et à l’appareil karaoké.
Station de charge
Branchement d’un microphone
Brancher la che du microphone dans l’entrée
MIC1 ou MIC2
29
Page 30

CHARGING PORT
DC 5V
1. Connect the Aux out jack from the external audio
player (such like DVD player, TV, VCR …etc.) to the
AUX IN jacks on the rear of tower speaker by the
supplied RCA connection cable as the figure below:
2. Connect the tower speaker to the power as previous
procedures. The Standby indicator will turn on.
3. Press the POWER button on the tower speaker or
Remote Control to power on the tower speaker.
4. Press the SOURCE button on the unit repeatedly or
the Remote Control to turn to AUX mode.
5. Power on the connected external player and st
playback as usual.
CHARGING PORT
DC 5V
3. Press the POWER button on the tower speaker or
Remote Control to power on the tower speaker.
4. Press the SOURCE button on the unit repeatedly or
the Remote Control to turn to AUX mode.
5. Power on the connected external player and st
playback as usual.
6. Press the volume buttons to adjust volume level.
7. Press the TREBLE buttons on the Remote Control to
adjust treble as desired.
1. Connect the Headphone/Earphone; Line out jack
from the external audio player such like MP3 player;
Discman … etc) to the LINE IN jacks on the rear of
tower speaker by the supplied Line In connection
cable as the figure below:
2. Connect the tower speaker to the power as previous
procedures. The Standby indicator will turn on.
3. Press the POWER button on the tower speaker or
Remote Control to power on the tower speaker.
4. Press the SOURCE button on the unit repeatedly
to turn to LINE mode.
5. Power on the connected external player and start
Utilisation
Diusion par prise AUX IN
1. Relier la sortie Aux-Out à une source audio externe (comme un
lecteur de DVD, un téléviseur, un caméscope etc.) aux prises AUX-
IN situées à l’arrière de l’appareil à l’aide du câble RCA fourni (cf.
illustration)
2. Brancher la tour à l’alimentation électrique comme décrit plus
haut. Le voyant lumineux de marche s’allume.
3. Appuyer sur la touche POWER de la tour ou de la télécommande
pour allumer la tour.
4. Appuyer plusieurs fois sur la touche SOURCE de la tour ou de la
télécommande pour accéder au mode AUX.
5. Allumer l’appareil périphérique et démarrer la lecture comme
d’habitude.
6. Appuyer sur les touches de volume pour régler le volume.
7. Appuyer sur la touche TREBLE de la télécommande pour ajuster
les aigus.
8. Appuyer sur la touche BASS de la télécommande pour ajuster les basses à sa convenance.
9. Appuyer sur le mode d’égalisation souhaité (MUSIC, MOVIE ou VOICE).
10. Appuyer sur MUTE pour couper le son et appuyer de nouveau sur cette touche pour désactiver le
mode silencieux.
Diusion par prise 3,5 mm
1. Brancher le casque d’écoute/les écouteurs, la prise jack d’un périphérique (lecteur MP3 etc.) à une prise 3,5 mm.
2. Brancher la tour à l’alimentation électrique comme décrit plus
haut. Le voyant lumineux de marche s’allume.
3. Appuyer sur la touche POWER de la tour ou de la télécommande
pour allumer la tour.
4. Appuyer plusieurs fois sur la touche SOURCE de la tour ou de la
télécommande pour accéder au mode LINE.
5. Allumer l’appareil périphérique et démarrer la lecture comme
d’habitude.
6. Les consignes suivantes d’utilisation sont identiques à celles du
mode AUX-IN.
30
Page 31

Connexion BT
Première connexion
1. Mettre la tour en marche. Appuyer sur SOURCE et sélectionner BT
2. La LED BT clignote en permanence pendant la détection de l’appareil.
3. Lorsque la tour a été détectée, le nom « HiTower » s’aiche. Si un mot de passe est exigé, entrer «
0000 » pour établir une connexion avec la tour.
Nouvelle connexion
1. Allumer la tour. Appuyer sur SOURCE et sélectionner le mode BT.
2. La LED BT clignote pendant 3 secondes. Le dernier appareil avec lequel la tour a été connectée est
détecté automatiquement. La lecture démarre immédiatement une fois l’appareil détecté.
3. Si aucun appareil n’a été détecté, la LED BT clignote en permanence. Entrer tout d’abord le mot de
passe ou appuyer sur SOURCE pour sélectionner FM, AUX ou LINE IN.
Remarques sur la connexion BT
1. Les enceintes BT ne peuvent se connecter qu’à un seul appareil à la fois. Éteindre les enceintes BT
pour permettre à l’appareil de se connecter à un autre appareil BT.
2. La distance maximale de portée entre les enceintes BT et l’autre appareil est de 10 mètres.
3. Pendant la lecture en BT, d’autres appareils sans l peuvent provoquer des interférences. Si des
problèmes surviennent pendant la lecture en BT, placer la tour à un autre endroit ou utiliser un
câble jack 3,5 mm en remplacement de la fonction BT.
Écouter et régler la radio
Antenne UKW
Déployer et orienter l’antenne UKW (fournie) de sorte à capter le meilleur signal de réception possible.
Réglage de la radio
1. Appuyer sur POWER pour allumer la tour.
2. Appuyer sur SOURCE pour passer en mode radio.
3. Appuyer sur TUN+/CLOCK+ ou TUN-/CLOCK- sur la télécommande pour régler la radio.
4. Rester appuyer pendant plusieurs secondes sur la touche TUN/MEM de la télécommande pour
passer en revue les stations de radio sauvegardées.
Écouter une station radio sauvegardée
1. Appuyer sur POWER pour allumer l’appareil.
2. Appuyer sur SOURCE pour accéder au mode radio.
3. Appuyer sur la touche TUN/MEM de la télécommande pour parcourir les stations sauvegardées.
31
Page 32

Sauvegarde d’une station
1. Suivre les instructions de réglage d’une station.
2. Une fois la station souhaitée détectée, appuyer sur MEM/CLOCK.
3. Appuyer sur TUN+/CLOCK+ ou TUN-/CLOCK- de la télécommande pour régler la fréquence de la
station souhaitée.
4. Appuyer sur MEM/CLOCK pour ajouter la station sélectionnée à un emplacement de sauvegarde. Il
est possible de sauvegarder 30 stations.
Réglage de l’heure
1. Appuyer sur POWER pour éteindre l’appareil.
2. Rester appuyer sur la touche POWER pendant 3 secondes (sur la télécommande ou sur l’appareil)
pour sélectionner le format d’aichage 12 ou 24 heures.
3. Rester appuyer sur la touche MEM/CLOCK pendant 3 secondes (sur la télécommande ou sur l’appareil) pour régler l’heure.
4. Appuyer sur les touches TUN+/CLOCK+ ou TUN-/CLOCK- de la télécommande pour régler les
heures.
5. Appuyer de nouveau sur la touche MEM/CLOCK pour conrmer les réglages. Le réglage des minutes suit automatiquement.
6. Appuyer sur les touches TUN+/CLOCK+ ou TUN-/CLOCK- de la télécommande pour régler les
minutes.
7. Appuyer de nouveau sur la touche MEM/CLOCK de la télécommande pour conrmer le réglage.
Réglage du minuteur d’endormissement
1. Appuyer sur POWER pour allumer l’appareil.
2. Appuyer plusieurs fois sur SLEEP pour sélectionner le préréglage de la durée. Celle-ci est de 5, 10,
15, 30, 60, 90 minutes.
3. Une fois que la durée préréglée est écoulée, la tour s’éteint automatiquement.
Réglage du réveil
1. Appuyer sur POWER pour allumer les enceintes.
2. Sélectionner le mode FM sur la télécommande. Appuyer sur TUN+/CLOCK+ ou TUN-/CLOCK- de la
télécommande pour sélectionner la station souhaitée.
3. Appuyer sur la touche POWER de la télécommande pour éteindre l’appareil.
4. Appuyer sur la touche ALARM et rester appuyer sur la touche pendant 3 secondes pour régler le
réveil.
5. L’heure se met à clignoter sur l’écran d’aichage.
6. Appuyer sur TUN+/CLOCK+ ou TUN-/CLOCK- de la télécommande pour régler les heures.
7. Appuyer de nouveau sur la touche MEM/CLOCK pour conrmer les réglages. Le réglage des minutes suit automatiquement.
8. Appuyer sur les touches TUN+/CLOCK+ ou TUN-/CLOCK- de la télécommande pour régler les
32
Page 33

minutes.
9. Appuyer de nouveau sur la touche ALARM de la télécommande pour conrmer le réglage.
10. Lorsque le réveil se déclenche, la station sélectionnée est diusée.
11. Appuyer sur la touche ALARM de la télécommande pour activer et désactiver le réveil.
Résolution des problèmes
Problème Solution
Pas de courant
Pas de son
La télécommande ne
fonctionne pas
Pas de son en mode
BT
Vérier la connexion du bloc d’alimentation entre la
prise de courant et l’appareil.
Vérier que le volume n’est pas réglé au minimum. Vérier que les enceintes n’ont pas été réglées en mode
silencieux.
Vérier l’état de la pile et la remplacer par une autre.
Vérier qu’aucun obstacle ne se trouve entre la télécommande et l’appareil.
Vérier que les appareils sont correctement connectés.
La tour et l’appareil BT doivent être connectés avec le
mot de passe « 0000 » à la première connexion.
33
Page 34

Fiche technique
Numéro d’article 10029400 10029401
Alimentation électrique 18 V 1,6 A
Alimentation électrique de la télé-
commande
Consommation électrique 30 W
Largeur de bande radio 87,5 MHz - 108 MHz
Impédance des enceintes
Canal de gauche 8 Ohm
Canal de droite 8 Ohm
CD 3 V, 1x CR 2025 pile (inclue)
Information sur le recyclage
Vous trouverez sur le produit l’image ci-contre (une poubelle sur roues, barrée d‘une croix),
ce qui indique que le produit se trouve soumis à la directive européenne 2002/96/CE. Renseignez-vous sur les dispositions en vigueur dans votre région concernant la collecte séparée des appareils électriques et électroniques. Respectez-les et ne jetez pas les appareils
usagés avec les ordures ménagères. La mise au rebut correcte du produit usagé permet de
préserver l’environnement et la santé. Le recyclage des matériaux contribue à la préservation des ressources naturelles.
34
Ce produit contient des piles qui sont soumises à la directive européenne 2006/66/CE selon
laquelle elles ne doivent pas être éliminées avec les ordures ménagères. Renseignez-vous
sur les dispositions en vigueur concernant la mise en rebut séparée des piles. La mise en
rebut correcte du produit usagé permet de préserver l’environnement et la santé.
Fabricant : Chal-Tec GmbH, Wallstraße 16, 10179 Berlin, Allemagne.
Ce produit est conforme aux directives européennes suivantes :
2011/65/UE (RoHS)
2014/35/UE (LVD)
1999/5/CE (R&TTE)
Page 35

Gentile cliente,
La ringraziamo per aver acquistato il nostro prodotto. La preghiamo di leggere attentamente le seguenti istruzioni e di seguirle per evitare eventuali danni. Non ci assumiamo alcuna responsabilità per
danni derivati da una mancata osservazione delle avvertenze di sicurezza e da un uso improprio del
dispositivo.
Indice
Avvertenze di sicurezza ..................................................................35
Consegna ............................................................................. 36
Comandi ...............................................................................37
Telecomando .......................................................................... 38
Installazione ............................................................................39
Utilizzo .................................................................................41
Risoluzione dei problemi ................................................................ 44
Dati tecnici ............................................................................45
Smaltimento ...........................................................................45
Avvertenze di sicurezza
• Leggere attentamente le istruzioni e conservare il manuale per consultazioni future.
• Seguire tutte le istruzioni.
• Non utilizzare il dispositivo vicino all’acqua.
• Pulire il dispositivo utilizzando un panno asciutto.
• Non ostruire le prese d‘aria. Installare il dispositivo seguendo le indicazioni del produttore.
• Tenere lontano il dispositivo da fonti di calore come ad esempio termosifoni, stufe e da altri dispo-
sitivi (inclusi amplicatori).
• Proteggere il cavo di alimentazione, non calpestarlo e non schiacciarlo, soprattutto in corrispondenza della spina, della presa e nel punto in cui fuoriesce dal dispositivo.
• Utilizzare solo accessori indicati dal produttore.
• Disinserire il cavo di alimentazione durante i temporali o in caso di inutilizzo prolungato del dispositivo.
• La manutenzione deve essere eseguita da personale qualicato. Far controllare il dispositivo se il
cavo di alimentazione o la spina sono danneggiati, se è penetrato del liquido all’interno del dispositivo, se il dispositivo è stato esposto all’umidità o alla pioggia, se non funziona correttamente
oppure è caduto.
• Non esporre il dispositivo a spruzzi d‘acqua. Non collocare sul dispositivo recipienti contenenti liquidi.
• Tenere le pile lontano da fonti di calore, dalla luce diretta del sole e da amme vive.
• Sulla parte posteriore del dispositivo sono indicati i simboli di avvertimento.
35
Page 36

Questo simbolo indica che il dispositivo è dotato di doppio isolamento tra la ten-
sione di ingresso pericolosa e le parti accessibili all’utente.
Attenzione: pericolo di scosse elettriche
Non esporre il dispositivo alla pioggia o all'umidità.
Attenzione: rischio di esplosione (pile)
Inserire le pile correttamente. Utilizzare il tipo corretto di pile.
Spiegazione dei simboli sul dispositivo
Attenzione: pericolo di scosse elettriche: non aprire il dispositivo.
Il dispositivo non contiene parti riparabili dall’utente.
Il simbolo del lampo con una freccia all‘interno di un triangolo avverte l’utente della
presenza di tensione elettrica pericolosa non isolata all‘interno dell’alloggiamento del
prodotto: pericolo di scosse elettriche.
Il punto esclamativo all’interno di un triangolo segnala all’utente la presenza di istruzioni
importanti all’interno del manuale relative al funzionamento e alla manutenzione del
prodotto.
• Sound Tower BT
• Adattatore di alimentazione
• Cavo audio
• Telecomando (necessarie pile CR2015)
• Cavo LINE IN
36
Consegna
• Base
• 2 microfoni per Karaoke
• Manuale di istruzioni
Page 37

LOCATION OF CONTROLS
Source Tun+ Tun- Vol+ Vol-Power
1 2 34 5 6
Comandi
9
CHARGING PORT
DC 5V
12
13
14
15
16
17
7
8
1 POWER: premere per accendere e spegnere gli altoparlanti.
2 SOURCE: premere ripetutamente per passare dall’ingresso audio BT a AUX, LINE IN o FM.
3 TUN +: in modalità FM, premere una volta per eettuare la ricerca dei canali in avanti. Premere una
seconda volta per avviare la ricerca automatica dei canali.
4 TUN -: in modalità FM, premere una volta per eettuare la ricerca dei canali all’indietro. Premere
una seconda volta per avviare la ricerca automatica dei canali all’indietro.
5 VOLUME +: premere per aumentare il volume.
6 VOLUME -: premere per abbassare il volume.
7 BALANCE: ruotare la manopola di bilanciamento per regolare il volume a sinistra e destra.
8 MIC 1: ingresso microfono
9 MIC VOL: ruotare per regolare il volume del microfono.
10 ECHO: manopola per regolare l‘eco.
11 MIC 2: ingresso microfono
12 DC 5V: attacco ricarica 5V USB
13 Supporto microfono
14 Antenna FM
15 AUX L/R IN: imgresso Aux destro e sinistro
16 LINE IN: ingresso connettore jack da 3,5 mm
17 DC IN 18V: presa DC IN (corrente continua)
10
11
37
Page 38

Telecomando
1 POWER: ON / OFF
2 MEM CLOCK:
• Premere ripetutamente per cambiare i canali radio salvati.
• Premere per impostare l’ora.
3 TUNE/MEM:
• Tenere premuto per 3 secondi per cercare
automaticamente i canali FM.
• Premere per scorrere i canali salvati.
4 MUSIC: scorrere gli equalizzatori ottimizzati
per la musica.
5 TREBLE: aumentare o abbassare gli alti in
modalità Musica.
6 SOURCE: passare da BT a FM, AUX, LINE IN
e a USB.
7 MUTE: premere per disattivare l’audio. Pre-
mere di nuovo per attivare di nuovo l’audio.
8 ALARM: impostare la sveglia.
9 SLEEP: premere ripetutamente per imposta-
re il timer di spegnimento.
10 TUN -/CLOCK -:
• Premere per cercare i canali all’indietro
• Premere per impostare l’ora (indietro)
• Premere per selezionare le stazioni salvate (indietro)
11 TUN +/CLOCK +:
• Premere per cercare i canali in avanti
• Premere per impostare l’ora (in avanti).
• Premere per selezionare le stazioni salvate (in avanti)
12. MOVIE: premere per passare all’equalizzatore per lm.
13. VOICE: premere per passare all’equalizzatore per dialoghi.
14. BASS: premere per regolare i bassi in modalità Musica.
15. VOLUME: regolare il volume.
16. : in modalità BT mandare avanti o indietro un brano.
/: in modalità BT riprodurre o mettere in pausa un brano.
38
Page 39

Installazione
Alimentazione
Inserire il connettore dell’alimentatore alla presa DC
IN posta sul dispositivo. Ora collegare la spina ad una
presa.
Inserire le pile nel telecomando
1. Premere la linguetta e spingere il vano pile verso
destra.
2. Sostituire le pile vecchie con pile a bottone del tipo
CR 2025. Rispettare la corretta polarità indicata sul
telecomando.
3. Richiudere il vano pile
Presa
CR2025
Alimentatore
OPEN
PUSH
SC UL
3V
CR2025
Lithium Cell
Lithium Cell
CR2025
3V
SC UL
OPEN
PUSH
Misure di sicurezza per le pile
1. Utilizzare solo pile del tipo indicato.
2. Rispettare la corretta polarità indicata nel vano. Una pila inserita nel modo errato può danneggiare
il dispositivo.
3. Rimuovere le pile in caso di inutilizzo del dispositivo o quando sono scariche per evitare danni
causati da possibili perdite di liquido.
4. Non tentare mai di caricare le pile non caricabili: possono surriscaldarsi ed esplodere.
5. Non esporre le pile a calore eccessivo come ai raggi del sole, a amme vive e simili.
6. Prima di inserire le pile, pulire i contatti delle pile e del dispositivo.
7. Non mischiare mai diversi tipi di pile (ad esempio pile alcaline e pile zinco-carbone).
39
Page 40

Caricare un dispositivo esterno tramite la porta USB integrata
L DEVICE BY
holding bracket
4/. Plug in charging cable (not supplied)
to both external device's DC jack
and tower speaker USB port.
L DEVICE BY
Note :
- When it has been connected, it will
automatically charge any of the device.
holding bracket
4/. Plug in charging cable (not supplied)
to both external device's DC jack
and tower speaker USB port.
charging cable
L DEVICE BY
Note :
- When it has been connected, it will
automatically charge any of the device.
- There is no control key to select either
"charge" or "not charge". Please
disconnect charging if you don't need
it or leave it for long time.
Insert the microphone
plug into mic jack
1 or 2.
holding bracket
4/. Plug in charging cable (not supplied)
to both external device's DC jack
and tower speaker USB port.
charging cable
charging cable
La porta USB può caricare diversi dispositivi ad esempio iPod, IPhone, smartphone, tablet ecc.
1. Rimuovere il suppor-
to dalla confezione.
supporto
2. Mettere il supporto sul dispositivo.
3. Mettere il dispositivo
da ricaricare sulla
base di ricarica.
Avvertenze
• Una volta connesso, il processo di ricarica si avvia automaticamente.
• Non c’è un interruttore che attiva e o disattiva il processo di ricarica. Staccare il cavo USB per termi-
nare il processo di ricarica.
4. Collegare il cavo di ricarica USB (non
incluso nella consegna) al dispositivo
esterno e al Karaoke Tower.
base di ricarica
Collegare il microfono
40
Collegare il connettore del microfono all’ingresso MIC1 oppure MIC2.
Page 41

CHARGING PORT
DC 5V
1. Connect the Aux out jack from the external audio
player (such like DVD player, TV, VCR …etc.) to the
AUX IN jacks on the rear of tower speaker by the
supplied RCA connection cable as the figure below:
2. Connect the tower speaker to the power as previous
procedures. The Standby indicator will turn on.
3. Press the POWER button on the tower speaker or
Remote Control to power on the tower speaker.
4. Press the SOURCE button on the unit repeatedly or
the Remote Control to turn to AUX mode.
5. Power on the connected external player and st
playback as usual.
CHARGING PORT
DC 5V
3. Press the POWER button on the tower speaker or
Remote Control to power on the tower speaker.
4. Press the SOURCE button on the unit repeatedly or
the Remote Control to turn to AUX mode.
5. Power on the connected external player and st
playback as usual.
6. Press the volume buttons to adjust volume level.
7. Press the TREBLE buttons on the Remote Control to
adjust treble as desired.
1. Connect the Headphone/Earphone; Line out jack
from the external audio player such like MP3 player;
Discman … etc) to the LINE IN jacks on the rear of
tower speaker by the supplied Line In connection
cable as the figure below:
2. Connect the tower speaker to the power as previous
procedures. The Standby indicator will turn on.
3. Press the POWER button on the tower speaker or
Remote Control to power on the tower speaker.
4. Press the SOURCE button on the unit repeatedly
to turn to LINE mode.
5. Power on the connected external player and start
Riproduzione da ingresso AUX-IN
Utilizzo
1. Collegare l’uscita Aux-Out di una fonte audio esterna (come lettore DVD, televisore, video registratore ecc.) agli attacchi AUX-IN
posti sul retro del dispositivo tramite il cavo RCA incluso nella
consegna (vedere la gura).
2. Collegare il dispositivo alla corrente come descritto in precedenza.
La spia standby lampeggia.
3. Premere POWER sul dispositivo oppure sul telecomando per
accendere il dispositivo.
4. Premere ripetutamente SOURCE sul dispositivo oppure sul telecomando per passare in modalità AUX.
5. Accendere il dispositivo esterno e avviare la riproduzione come di
consueto.
6. Premere i tasti del volume per regolare il volume.
7. Premere TREBLE sul telecomando per regolare gli alti.
8. Premere BASS sul telecomando per regolare i bassi.
9. Selezionare la modalità Equalizzatore desiderata (MUSIC, MOVIE oppure VOICE).
10. Premere MUTE per disattivare l’audio. Premere di nuovo MUTE per riattivare l’audio.
Riproduzione da ingresso 3,5 mm
1. Collegare le cuie; collegare l’uscita LINE OUT del dispositivo
esterno (lettore MP3 ecc..) all’ingresso LINE IN da 3,5 mm posto
sul retro del dispositivo.
2. Collegare il dispositivo alla corrente come descritto in precedenza.
La spia standby si accende.
3. Premere POWER sul dispositivo oppure sul telecomando per
accendere il dispositivo.
4. Premere ripetutamente SOURCE sul dispositivo oppure sul telecomando per passare in modalità LINE.
5. Accendere il dispositivo esterno e avviare la riproduzione come di
consueto.
6. L’utilizzo è lo stesso di quello in modalità AUX-IN.
41
Page 42

Collegamento BT
Collegamento iniziale
1. Accendere il dispositivo. Premere SOURCE e selezionare BT.
2. La spia a LED lampeggia ininterrottamente durante la ricerca del dispositivo.
3. Quando il dispositivo viene trovato, appare il nome “HiTower”. Se viene richiesta una password,
inserire “0000” per creare il collegamento.
Collegamento successivo
1. Accendere il dispositivo. Premere SOURCE e selezionare la modalità BT.
2. La spia a LED lampeggia per 3 secondi e viene trovato automaticamente l’ultimo dispositivo con il
quale è stato creato un collegamento. Quando il dispositivo è stato trovato, la riproduzione si avvia
direttamente.
3. Se non viene trovato nessun dispositivo, la spia a LED BT lampeggia ininterrottamente. Inserire la
password oppure premere SOURCE per selezionare FM, AUX oppure LINE.
Indicazioni per l’installazione BT
4. Gli altoparlanti BT si collegano solo ad un dispositivo alla volta. Spegnere gli altoparlanti BT per
collegare il dispositivo ad un altro dispositivo BT.
5. Il raggio d’azione massimo tra gli altoparlanti BT e un dispositivo è di 10 metri.
6. Durante l’utilizzo della funzione BT, altri dispositivi senza li nelle vicinanze possono causare inter-
ferenze. In questo caso collocare il dispositivo in un altro luogo oppure utilizzare il cavo audio da
3,5 mm al posto della funzione BT.
Ascoltare e impostare la radio
Antenna FM
Regolare l’antenna FM (inclusa nella consegna) per una ricezione migliore.
Sintonizzare la radio
1. Premere POWER per accendere il dispositivo.
2. Premere SOURCE per passare alla modalità radio.
3. Premere TUN+/CLOCK oppure TUN-/CLOCK sul telecomando per sintonizzare la radio.
4. Tenere premuto per 3 secondi TUN/MEN sul telecomando per scorrere i canali radio salvati.
Ascoltare i canali radio salvati
1. Premere POWER per accendere il dispositivo.
2. Premere SOURCE per passare in modalità radio.
3. Premere TUN/MEM sul telecomando, per scorrere i canali salvati.
42
Page 43

Salvare un canale radio
1. Seguire le indicazioni per sintonizzare la radio.
2. Dopo aver impostato un canale, premere MEM/CLOCK.
3. Premere TUN+/CLOCK oppure TUN-/CLOCK sul telecomando per regolare la frequenza radio
desiderata.
4. Premere MEM/CLOCK per aggiungere il canale attuale in una postazione di memoria. È possibile
salvare 30 canali.
Impostare l’ora
1. Premere POWER per spegnere il dispositivo.
2. Tenere premuto per 3 secondi POWER (sul telecomando oppure sul dispositivo) per selezionare il
formato 12 ore o 24 ore.
3. Tenere premuto per 3 secondi MEM/CLOCK (sul telecomando oppure sul dispositivo) per imposta-
re l’orario.
4. Premere TUN+/CLOCK+ oppure TUN-/CLOCK- sul telecomando per impostare le ore.
5. Premere MEM/CLOCK ancora una volta per confermare l’impostazione e procedere all’impostazione dei minuti.
6. Premere TUN+/CLOCK+ oppure TUN-/CLOCK- sul telecomando per regolare i minuti.
7. Premere MEM/CLOCK sul telecomando ancora una volta per confermare l’impostazione.
Impostare il timer
1. Premere POWER per accendere il dispositivo.
2. Premere ripetutamente SLEEP per selezionare i tempi predeniti: 5, 10, 15, 30, 60, 90.
3. Allo scadere del tempo, il dispositivo si spegne automaticamente.
Impostare la sveglia
1. Premere POWER per accendere gli altoparlanti.
2. Selezionare sul telecomando la modalità FM. Premere TUN+/CLOCK+ oppure TUN-/CLOCK- sul
telecomando per selezionare la frequenza radio desiderata.
3. Premere POWER sul telecomando per spegnere il dispositivo.
4. Tenere premuto per 3 secondi ALARM sul telecomando per impostare la sveglia.
5. Il tempo sul display inizia a lampeggiare.
6. Premere TUN+/CLOCK+ oppure TUN-/CLOCK- sul telecomando per impostare le ore.
7. Premere MEM/CLOCK ancora una volta per confermare l’impostazione e procedere con l’impostazione dei minuti.
8. Premere TUN+/CLOCK+ oppure TUN-/CLOCK- sul telecomando per impostare i minuti.
9. Premere ALARM sul telecomando per confermare l’impostazione.
10. Allo scadere del tempo impostato, la sveglia si attiva.
11. Premere ALARM sul telecomando per attivare/disattivare la sveglia.
43
Page 44

Risoluzione dei problemi
Problema Soluzioni
Il dispositivo non si
accende
Assenza di suono
Il telecomando non
funziona
Assenza di suono in
modalità BT
Controllare il collegamento dell’alimentatore tra il dispositivo e la presa.
Vericare che il volume non sia impostato al minimo.
Vericare se gli altoparlanti sono stati disattivati.
Controllare le pile ed eventualmente sostituirle.
Assicurarsi che non ci siano ostacoli tra il telecomando
e il dispositivo.
Vericare che i dispositivi siano collegati l’un l’altro.
Collegare i due dispositivi alla prima connessione inserendo la password “0000”.
44
Page 45

Dati tecnici
Articolo numero 10029400 10029401
Alimentazione 18 V 1,6 A
Alimentazione del telecomando CD 3 V, 1x CR 2025 pile (incluse)
Consumo energetico 30 W
Larghezza banda radio 87,5 MHz - 108 MHz
Impedenza degli altoparlanti
Canale sinistro 8 Ohm
Canale destro 8 Ohm
Smaltimento
Se sul prodotto è presente la gura a sinistra (il cassonetto dei riuti mobile sbarrato), si
applica la direttiva europea 2002/96/CE. Questi prodotti non possono essere smaltiti con i
riuti normali. Informarsi sulle disposizioni vigenti in merito alla raccolta separata di dispositivi elettrici ed elettronici. Non smaltire i vecchi dispositivi con i riuti domestici. Grazie al
corretto smaltimento dei vecchi dispositivi, si proteggono il pianeta e la salute delle persone
da possibili conseguenze negative. Il riciclo di materiali aiuta a ridurre il consumo di materie
prime.
Il prodotto contiene batterie che in base alla direttiva europea 2006/66/CE non possono es-
sere smaltite con i normali riuti domestici. Informarsi sulle disposizioni vigenti relative alla
raccolta dierenziata delle batterie. Grazie al corretto smaltimento dei vecchi dispositivi, si
proteggono il pianeta e la salute delle persone da possibili conseguenze negative.
Produttore: Chal-Tec GmbH, Wallstraße 16, 10179 Berlino, Germania.
Questo prodotto è conforme alle seguenti direttive europee:
2011/65/UE (RoHS)
2014/35/UE (LVD)
99/005//CE R&TTE
45
Page 46

Estimado cliente,
Le felicitamos por la adquisición de este producto. Lea atentamente el siguiente manual y siga cuidadosamente las instrucciones de uso con el n de evitar posibles daños. La empresa no se responsabiliza
de los daños ocasionados por un uso indebido del producto o por haber desatendido las indicaciones
de seguridad.
Índice
Indicaciones de seguridad ............................................................... 46
Contenido del envío .....................................................................47
Controles ..............................................................................48
Mando a distancia ...................................................................... 49
Instalación ............................................................................50
Utilización ............................................................................. 52
Resolución de problemas ...............................................................55
Datos técnicos ......................................................................... 56
Indicaciones para la retirada del aparato .................................................. 56
Indicaciones de seguridad
• Lea atentamente este manual de instrucciones. Conserve este manual para consultas posteriores.
• Tenga en cuenta todas las indicaciones.
• No utilice el aparato cerca del agua.
• Limpie el aparato utilizando solamente un paño seco.
• No obstruya las ranuras de ventilación. Instale el aparato siguiendo las indicaciones del fabricante.
• No coloque cerca del aparato fuentes de calor, como radiadores, hornos y otros dispositivos (inclui-
dos amplicadores).
• Proteja el cable de alimentación para que nadie lo pise ni tropiece con él, especialmente el enchufe,
las bases múltiples y el lugar en donde instale el aparato.
• Utilice exclusivamente los accesorios recomendados por el fabricante.
• Cuando no utilice el aparato durante un periodo prolongado de tiempo y cuando haya tormenta,
desconecte el enchufe de la toma de corriente.
• El mantenimiento del aparato deberá ser realizado exclusivamente por personal cualicado, tam-
bién en caso de que el cable de alimentación o el enchufe estén dañados, se haya ltrado líquido o
se hayan introducido cuerpos extraños en el interior del aparato, el aparato se haya visto expuesto a
la lluvia y en caso de que el aparato no funcione correctamente o se haya dejado caer.
• Este aparato no debe exponerse a salpicaduras de agua. No coloque encima del aparato objetos que
contengan líquidos.
• Las pilas deberán protegerse del calor extremo, como la exposición directa al sol, fuego y similares.
• En la parte trasera del aparato encontrará símbolos de advertencia.
46
Page 47

Este símbolo le muestra que el aparato dispone de un aislamiento doble entre la
tensión de entrada de riesgo y las partes accesibles al usuario.
Advertencia: riesgo de descarga eléctrica
No exponga el aparato a la humedad ni a la lluvia.
Advertencia: riesgo de explosión (pilas)
Asegúrese de colocar correctamente las pilas. Utilice el tipo adecuado de pilas.
Explicación de los símbolos que aparecen en el aparato
Advertencia: riesgo de descarga eléctrica. No retire la carcasa del aparato. El aparato no contiene ninguna pieza que pueda ser reparada por el usuario.
El símbolo del rayo con la echa dentro de un triángulo equilátero advierte al usuario de
la existencia de una tensión eléctrica peligrosa sin aislar dentro de la carcasa del sistema, por lo que existe el riesgo de que se produzca una descarga eléctrica.
El símbolo de exclamación dentro de un triángulo equilátero advierte al usuario de las
instrucciones importantes de funcionamiento y del mantenimiento en este manual de
instrucciones.
Contenido del envío
• Torre de sonido BT
• Cable de alimentación
• Cable de audio
• Mando a distancia (necesia pila CR2025)
• Cable LINE IN
• Zócalo
• 2 micrófonos para karaoke
• Manual de instrucciones
47
Page 48

LOCATION OF CONTROLS
Source Tun+ Tun- Vol+ Vol-Power
1 2 34 5 6
Controles
9
CHARGING PORT
DC 5V
12
13
14
15
16
17
7
8
1 POWER: Encender y apagar los altavoces
2 SOURCE: Pulse varias veces para elegir entre las entradas de audio BT, AUX, LINE IN y FM.
3 TUN +: Pulse una vez en modo FM para comenzar la búsqueda de emisoras en la banda de frecuen-
cia. Pulse dos veces para realizar una búsqueda automática de emisoras por la banda de frecuencia.
4 TUN -: Pulse una vez en modo FM para comenzar la búsqueda hacia atrás de emisoras en la banda
de frecuencia. Pulse dos veces para realizar una búsqueda automática hacia atrás de emisoras por
la banda de frecuencia.
5 VOLUME +: Pulse el botón para aumentar el volumen.
6 VOLUMEN-: Pulse el botón para reducir el volumen.
7 BALANCE: Gire el regulador de balance para ajustar el volumen a la izquierda y a la derecha.
8 MIC 1: Entrada del micrófono
9 MIC VOL: Gire el regulador para ajustar el volumen del micrófono.
10 ECHO: Toque el regulador para ajustar la potencia del eco.
11 MIC 2: Entrada del micrófono
12 DC 5 V: Conexión de carga USB de 5V
13 Soporte del micrófono
14 Antena FM: Antena FM
15 AUX L/R IN: Conexiones aux derecha e izquierda
16 LINE IN: Conexión por clavija de 3,5 mm
17 DC IN 18V: Conector para corriente continua
10
11
48
Page 49

Mando a distancia
1 POWER: EIN/AUS
2 MEM CLOCK:
• Pulse varias veces para elegir entre las distintas estaciones de radio memorizadas.
• Pulse una vez para ajustar la hora.
3 TUNE/MEM:
• Mantenga pulsado el botón tres segundos
para buscar automáticamente emisoras
FM.
• Pulse una vez para navegar entre las emisoras guardadas.
4 MUSIC: Elija las distintas opciones del ecua-
lizador que optimicen el género musical
actual.
5 TREBLE: Congure los agudos a un nivel
inferior o superior en el modo música.
6 SOURCE: : Elija entre BT, FM, AUX in LINE
y USB.
7 MUTE: Pulse el botón para silenciar la
reproducción. Pulse de nuevo para nalizar
la función silencio.
8 ALARM : Congure la alarma.
9 SLEEP: Pulse varias veces para congurar el temporizador de apagado.
10 TUN -/CLOCK -:
• Búsqueda hacia atrás de una frecuencia de emisoras.
• Ajustar la hora (hacia atrás).
• Elegir las emisoras memorizadas (hacia atrás).
11 TUN +/CLOCK +:
• Buscar la frecuencia de una emisora hacia adelante en la banda de frecuencia.
• Ajustar la hora (hacia adelante).
• Elegir las emisoras memorizadas (hacia adelante).
12. MOVIE: Ajustar el ecualizador para que se adapte a las películas.
13. VOICE: Ajustar el ecualizador para que se adapte a los diálogos.
14. BASS: Regular los graves en el modo música.
15. VOLUME: Regular volumen.
16. : Saltar una pista hacia adelante o hacia atrás en modo BT.
/: Reproducir o pausar una pista en modo BT.
49
Page 50

Instalación
Suministro eléctrico
Encaje el enchufe pequeño del cable de alimentación
en el conector para corriente continua del aparato. Conecte el enchufe a una toma de corriente.
Colocación de las pilas en el mando a distancia
1. Presione la lengüeta y retire el compartimento de la
pila hacia la derecha.
2. Sustituya la pila tipo botón e introduzca una nueva
del tipo CR 2025. Oriente la pila tipo botón siguien-
do la polaridad correspondiente que se indica en el
mando a distancia.
3. Vuelva a cerrar el compartimento de las pilas.
Toma de
corriente
Cable de alimentación
CR2025
OPEN
PUSH
SC UL
3V
CR2025
Lithium Cell
Lithium Cell
CR2025
3V
SC UL
OPEN
PUSH
Medidas de seguridad relacionadas con las pilas
1. Utilice solamente el tipo y tamaño de pilas indicados.
2. A la hora de sustituir las pilas, tenga en cuenta la polaridad correcta que se indica en el comparti-
mento. Una colocación incorrecta de las pilas podría averiar el mando a distancia.
3. Si la pila se agota o el aparato no se utiliza durante un periodo prolongado de tiempo, retire la pila
para evitar una posible fuga del líquido.
4. No intente recargar las pilas que no son adecuadas para tal acción. Pueden sobrecalentarse y
explotar.
5. Las pilas deberán protegerse del calor extremo, como la exposición directa al sol, fuego y simila-
res.
6. Limpie los contactos de la pila y los del aparato antes de introducir una pila.
7. No mezcle distintos tipos de pilas simultáneamente (p. ej. pilas alcalinas con pilas de zinc y carbo-
no).
50
Page 51

Carga de un dispositivo externo a través de una conexión USB
L DEVICE BY
holding bracket
4/. Plug in charging cable (not supplied)
to both external device's DC jack
and tower speaker USB port.
L DEVICE BY
Note :
- When it has been connected, it will
automatically charge any of the device.
holding bracket
4/. Plug in charging cable (not supplied)
to both external device's DC jack
and tower speaker USB port.
charging cable
L DEVICE BY
Note :
- When it has been connected, it will
automatically charge any of the device.
- There is no control key to select either
"charge" or "not charge". Please
disconnect charging if you don't need
it or leave it for long time.
Insert the microphone
plug into mic jack
1 or 2.
holding bracket
4/. Plug in charging cable (not supplied)
to both external device's DC jack
and tower speaker USB port.
charging cable
charging cable
La conexión USB puede cargar distintos dispositivos, como por ejemplo iPods, iPhones, iPads, smartphones, tablets, etc.
1. Retire el soporte de
la caja de cartón.
Soporte
2. Coloque el soporte sobre el aparato.
3. Coloque el aparato
que desee cargar en
el compartimento de
carga.
Advertencias
• Si la conexión se ha realizado con éxito, el dispositivo en cuestión comenzará a cargarse.
• No existe ningún interruptor para iniciar o nalizar la carga. Desconecte el cable USB cuando desee
interrumpir el proceso de carga
4. Conecte el cable de carga USB (no
incluido en el envío) en el dispositivo
externo y en la máquina de karaoke.
Compartimento de carga
Conexión del micrófono
Conecte la clavija del micrófono en la entrada
MIC 1 o MIC 2.
51
Page 52

CHARGING PORT
DC 5V
1. Connect the Aux out jack from the external audio
player (such like DVD player, TV, VCR …etc.) to the
AUX IN jacks on the rear of tower speaker by the
supplied RCA connection cable as the figure below:
2. Connect the tower speaker to the power as previous
procedures. The Standby indicator will turn on.
3. Press the POWER button on the tower speaker or
Remote Control to power on the tower speaker.
4. Press the SOURCE button on the unit repeatedly or
the Remote Control to turn to AUX mode.
5. Power on the connected external player and st
playback as usual.
CHARGING PORT
DC 5V
3. Press the POWER button on the tower speaker or
Remote Control to power on the tower speaker.
4. Press the SOURCE button on the unit repeatedly or
the Remote Control to turn to AUX mode.
5. Power on the connected external player and st
playback as usual.
6. Press the volume buttons to adjust volume level.
7. Press the TREBLE buttons on the Remote Control to
adjust treble as desired.
1. Connect the Headphone/Earphone; Line out jack
from the external audio player such like MP3 player;
Discman … etc) to the LINE IN jacks on the rear of
tower speaker by the supplied Line In connection
cable as the figure below:
2. Connect the tower speaker to the power as previous
procedures. The Standby indicator will turn on.
3. Press the POWER button on the tower speaker or
Remote Control to power on the tower speaker.
4. Press the SOURCE button on the unit repeatedly
to turn to LINE mode.
5. Power on the connected external player and start
Reproducción desde una conexión AUX-IN
Utilización
1. Conecte la salida Aux Out de una fuente externa de audio (como
reproductores DVD, televisores, grabadoras de vídeo, etc.) a la
conexión AUX-IN situada en la parte trasera de la torre con ayuda
de un cable RCA (consulte la imagen).
2. Conecte la torre al suministro eléctrico como se ha descrito ante-
riormente. La luz de standby se ilumina.
3. Pulse POWER en la torre o en el mando a distancia para encenderla.
4. Pulse SOURCE en la torre o en el mando a distancia para acceder
al modo AUX.
5. Encienda el dispositivo externo e inicie la reproducción como
acostumbra.
6. Pulse los botones de volumen para regular el volumen.
7. Pulse TREBLE en el mando a distancia para regular la proporción
de agudos.
8. Pulse BASS en el mando a distancia para regular la proporción de graves.
9. Pulse el modo del ecualizador que desee (MUSIC, MOVIE o VOICE).
10. Pulse MUTE para silenciar la reproducción y pulse de nuevo para activar el sonido.
Reproducción desde una conexión de 3,5 mm
1. Conecte los auriculares al conector del dispositivo externo (reproductor MP3 o similar) al conector de 3,5 mm.
2. Conecte la torre al suministro eléctrico como se ha descrito ante-
riormente. La luz de standby se ilumina.
3. Pulse POWER en la torre o en el mando a distancia para encenderla.
4. Pulse SOURCE en la torre o en el mando a distancia para acceder
al modo LINE.
5. Encienda el dispositivo externo e inicie la reproducción como
acostumbra.
6. El resto del manejo es idéntico al descrito en el modo AUX.
52
Page 53

Conexión a través de BT
Primera conexión
1. Encienda la torre. Pulse el botón SOURCE y seleccione BT.
2. El LED BT se ilumina de manera intermitente mientras el dispositivo realiza la búsqueda.
3. Cuando se haya detectado la torre, aparecerá el nombre «HiTower». En caso de que se le requiera
introducir una contraseña, teclee «0000» para establecer la conexión con la torre.
Conexiones posteriores
1. Encienda la torre. Pulse el botón SOURCE y seleccione el modo BT.
2. El LED BT parpadea durante 3 segundos. Se realizará la búsqueda del último dispositivo con el que
se ha establecido la conexión. Cuando se haya detectado el dispositivo, la reproducción comenzará directamente.
3. Si no se detecta ningún aparato, el LED BT parpadea de manera intermitente. Introduzca la contra-
seña o pulse SOURCE para elegir entre FM, AUX o LINE IN.
Indicaciones para la conguración del BT
1. El altavoz BT solamente se conecta simultáneamente a un solo dispositivo. Apague el altavoz BT
para conectar el dispositivo a otro aparato con BT.
2. El alcance máximo entre el altavoz BT y otro dispositivo es de 10 metros.
3. Durante la reproducción BT, pueden producirse interferencias en caso de que el aparato esté situado junto a dispositivos inalámbricos. Si detecta problemas durante la reproducción BT, reubique la
torre o utilice una conexión con clavija de 3,5 mm en lugar de la función BT.
Escuchar y congurar la radio
Antena FM
Oriente la antena FM (incluida en el envío) para obtener la mejor recepción de señal.
Ajuste de de la radio
1. Pulse POWER para encender la torre.
2. Pulse SOURCE para activar el modo radio.
3. Pulse TUN+/CLOCK o TUN-/CLOCK- en el mando a distancia para congurar la radio.
4. Mantenga pulsado TUN/MEN en el mando a distancia unos segundos para navegar entre las
emisoras de radio guardadas.
Escuchar una emisora de radio guardada
1. Pulse POWER para encender el aparato.
2. Pulse SOURCE para activar el modo radio.
3. Pulse TUN/MEN en el mando a distancia para navegar por las emisoras memorizadas.
53
Page 54

Memorizar emisoras
1. Siga las instrucciones de conguración de una emisora.
2. Cuando haya congurado la emisora deseada, pulse MEM/CLOCK.
3. Pulse TUN+/CLOCK+ o TUN-/CLOCK- en el mando a distancia para congurar la frecuencia de
radio.
4. Pulse MEM/CLOCK para añadir la emisora actual a la lista de emisoras guardadas. Puede memorizar hasta 30 emisoras.
Ajuste de la hora
1. Pulse POWER para apagar el aparato.
2. Mantenga pulsado POWER durante tres segundos (en el mando a distancia o en el aparato) para
elegir entre el formato de 12 o 24 horas.
3. Mantenga pulsado MEM/CLOCK durante tres segundos (en el mando a distancia o en el aparato)
para ajustar la hora.
4. Pulse TUN+/CLOCK+ o TUN-/CLOCK- en el mando a distancia para congurar las horas.
5. Pulse MEM/CLOCK para conrmar los ajustes. Se continuará automáticamente con la conguración de los minutos.
6. Pulse TUN+/CLOCK+ o TUN-/CLOCK- en el mando a distancia para congurar los minutos.
7. Pulse MEM/CLOCK en el mando a distancia una vez más para conrmar los ajustes.
Ajuste del temporizador de apagado
1. Pulse POWER para encender el aparato.
2. Pulse varias veces SLEEP para seleccionar el tiempo de apagado que desee. Puede elegir entre 5,
10, 15, 30, 60 o 90 minutos.
3. Cuando haya transcurrido el tiempo seleccionado, la torre se apaga automáticamente.
Ajuste de la alarma
1. Pulse POWER para encender el altavoz.
2. Seleccione el modo FM con el mando a distancia. Pulse TUN+/CLOCK o TUN-/CLOCK- en el man-
do a distancia para congurar la alarma deseada.
3. Pulse POWER en el mando a distancia para apagar el aparato.
4. Mantenga pulsado el botón ALARM durante 3 segundos para congurar la alarma.
5. La hora comienza a parpadear en el indicador.
6. Pulse TUN+/CLOCK+ o TUN-/CLOCK- en el mando a distancia para congurar las horas.
7. Pulse MEM/CLOCK para conrmar los ajustes. Se continuará automáticamente con la conguración de los minutos.
54
Page 55

8. Pulse TUN+/CLOCK+ o TUN-/CLOCK- en el mando a distancia para congurar los minutos.
9. Pulse MEM/CLOCK en el mando a distancia para conrmar los ajustes.
10. Cuando la alarma comience a sonar, se activará la emisora deseada.
11. Pulse ALARM en el mando a distancia para activar o desactivar la alarma.
Resolución de problemas
Problema Solución
No hay electricidad
No hay sonido
El mando a distancia
no funciona.
No hay sonido en
modo BT
Compruebe la conexión de la fuente de alimentación
entre la toma de corriente y el aparato.
Compruebe si el volumen está regulado al mínimo.
Compruebe si el volumen se ha silenciado.
Compruebe las pilas y sustitúyalas si fuera el caso.
Compruebe si entre el mando a distancia y el aparato
existe algún tipo de obstáculo.
Compruebe si los dispositivos se han conectado entre
sí. La torre y el dispositivo BT deben conectarse con la
contraseña «0000» la primera vez que realice la sin-
cronización.
55
Page 56

Datos técnicos
Número de artículo 10029400 10029401
Suministro eléctrico 18 V 1,6 A
Suministro eléctrico del mando a
distancia
Consumo de energía 30 W
Ancho de banda de radio 87,5 MHz - 108 MHz
Impedancia del altavoz
canal izquierdo 8 Ohmios
canal derecho 8 Ohmios
CD 3 V, 1 pila CR 2025 (incluida)
Indicaciones para la retirada del aparato
Si el aparato lleva adherida la ilustración de la izquierda (el contenedor de basura tachado)
entonces rige la normativa europea, directiva 2002/96/CE. Este producto no debe arrojarse
a un contenedor de basura común. Infórmese sobre las leyes territoriales que regulan la
recogida separada de aparatos eléctricos y electrónicos. Respete las leyes territoriales y no
arroje aparatos viejos al cubo de la basura doméstica. Una retirada de aparatos conforme a
las leyes contribuye a proteger el medio ambiente y a las personas a su alrededor frente a
posibles consecuencias perjudiciales para la salud. El reciclaje ayuda a reducir el consumo
de materias primas.
El producto contiene pilas sujetas a la Directiva Europea 2006/66/CE, según la cual estas
no pueden depositarse en los contenedores destinados a la basura común. Compruebe la
normativa de su país con respecto al reciclaje de las pilas usadas. Una gestión adecuada de
estos residuos previene consecuencias potencialmente negativas para el medio ambiente y
la salud de las personas.
56
Fabricante: Chal-Tec GmbH, Wallstraße 16, 10179 Berlín (Alemania).
Este producto cumple con las siguientes directivas europeas:
2011/65/UE (refundición RoHS)
2014/35/UE (baja tensión)
1999/05/CE (R&TTE)
 Loading...