

Page 1
DAB+ Retro-Radio
DAB+ & FM Radio, BT, AUX-IN & USB, RDS, Wecker
www.auna-multimedia.com10027920 10027921 10027922
Page 2

Bedienungsanleitung 3
Instruction manual 12
Mode d‘emploi 21
Manual de instrucciones 29
Instruzioni 38
2
Page 3

Sehr geehrter Kunde,
zunächst möchten wir Ihnen zum Erwerb Ihres Gerätes gratulieren.
Bitte lesen Sie die folgenden Anschluss- und Anwendungshinweise sorgfältig durch und befolgen Sie diese
um möglichen technischen Schäden vorzubeugen.
Warnung
• Diese Bedienungsanleitung dient dazu, Sie mit der Funktionsweise dieses Produktes vertraut zu machen. Bewahren Sie diese Anleitung daher stets gut auf, damit Sie jederzeit darauf zugreifen können.
• Sie erhalten bei Kauf dieses Produktes zwei Jahre Gewährleistung auf Defekt bei sachgemäßem Gebrauch.
• Bitte verwenden Sie das Produkt nur in seiner bestimmungsgemäßen Art und Weise. Eine anderweitige Verwendung führt eventuell zu Beschädigungen am Produkt oder in der Umgebung des Produktes.
• Ein Umbauen oder Verändern des Produktes beeinträchtigt die Produktsicherheit. Achtung Verlet-
zungsgefahr! Önen Sie das Produkt niemals eigenmächtig und führen Sie Reparaturen nie selber aus!
• Behandeln Sie das Produkt sorgfältig. Es kann durch Stöße, Schläge oder den Fall aus bereits geringer
Höhe beschädigt werden.
• Halten Sie das Produkt fern von Feuchtigkeit und extremer Hitze.
• Lassen Sie keine Gegenstände aus Metall in dieses Gerät fallen.
• Stellen Sie keine schweren Gegenstände auf dieses Gerät.
• Reinigen Sie das Gerät nur mit einem trockenen Tuch.
• Blockieren Sie nicht die Belüftungsönungen.
• Verwenden Sie ausschließlich vom Hersteller oder vom qualizierten Fachhandel empfohlenes Zubehör.
Die Gewährleistung verfällt bei Fremdeingrien in das Gerät.
Kleine Objekte/Verpackungsteile (Plastikbeutel, Karton, etc.):
Bewahren Sie kleine Objekte (z.B. Schrauben und anderes Montagematerial, Speicherkarten) und Verpackungsteile außerhalb der Reichweite von Kindern auf, damit sie nicht von diesen verschluckt werden kön-
nen. Lassen Sie kleine Kinder nicht mit Folie spielen. Es besteht Erstickungsgefahr!
Transport des Gerätes:
Bitte bewahren Sie die Originalverpackung auf. Um ausreichenden Schutz beim Transport des Gerätes zu
erreichen, verpacken Sie das Gerät in der Originalverpackung.
Reinigung der äußeren Oberäche:
Verwenden Sie keine üchtigen Flüssigkeiten, wie Insektensprays. Durch zu starken Druck beim Abwischen
können die Oberächen beschädigt werden. Gummi- oder Plastikteile sollten nicht über einen längeren
Zeitraum mit dem Gerät in Kontakt sein. Nutzen Sie ein trockenes Tuch.
3
Page 4
Technische Daten
Artikelnummer
Netzadapter
Leistung 2 x 2.5W + 5W RMS
USB-Anschluss 5V, 1A
Gewicht 1,65kg
Lieferumfang Gerät, Netzteil, Fernbedienung,Bedienungsanleitung
10027920 (schwarz)
10027921 (weiß)
10027922 (rot)
Input: AC 100-240V ~50/60Hz
Output: DC 5V 2000mA
Radio FM: 87.5 – 108MHz
DAB: 174.928 – 239.200MHz
Erste Inbetriebnahme
• Entfernen Sie das Verpackungsmaterial vom Gerät.
• Stellen Sie das Gerät auf eine ebene, trockene Fläche ohne direkte Sonnenstrahlung und fern von
anderen Wärmequellen (z.B. Ofen, Herd oder Heizung). Lassen Sie an allen Seiten mindestens 10cm
Abstand zwischen Gerät und Wänden oder anderen Gegenständen.
• Stellen Sie sicher, dass der Stromstecker jederzeit zu erreichen ist und im Notfall sofort vom Stromnetz
abgetrennt werden kann.
• Verbinden Sie das Gerät mit einer Steckdose und legen Sie die Batterie in die Fernbediunung ein.
4
Page 5

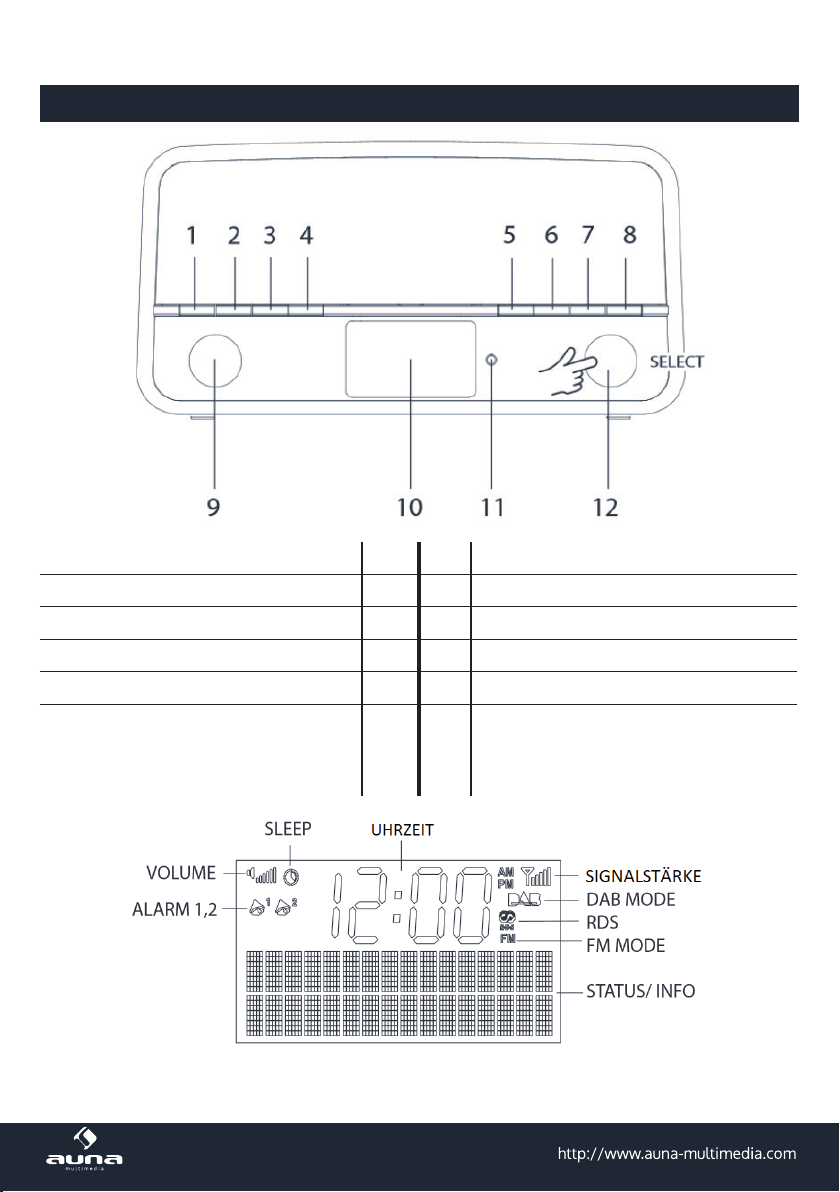
Front:
Bedienelemente
Ein-/Ausschalten / Standby 1 7 INFO / MENU
Funktions-Wahlschalter 2 8 Alarm
Pairing (Play) / Scan 3 9 Lautstärke
EQ / ST / MO 4 10 Display
Sleep / Dim / Snooze 5 11 IR-Sensor
Multiknopf:
Prog / Pre 6 12
Drehen = Sender suchen / Scrollen
Drücken = Select/Enter
Display
5
Page 6

Fernbedienung:
FUNC (Wählen Sie zwischen FM-, AUX-IN und
DAB-Modus)
Ein/Standby 2 10
INFO / MENU (Drücken, um Senderinfor-
mationen anzuzeigen; Gedrückt halten, um
ins Menü zu wechseln.)
Alarm 1/2 (Aktivieren oder bearbeiten Sie die
Weckzeit)
SELECT 5 13
/ Pairing / Scan
(Drücken für Play/Pause; gedrückt halten (2 Sek.)
für BT Pairing; im Radio-Modus: Drücken, um
Sendersuchlauf zu starten).
ST / MONO 8 16 VOL-
6
PRESET (Drücken, um gespeicherten Sender auf-
1 9
zurufen; gedrückt halten, um den aktuellen Sen-
der zu speichern.)
SNOOZE (
9 Minuten.)
Verschiebt den laufenden Wecker um
3 11 EQ (Klangeinstellungen aufrufen und editieren)
4 12 DIM (Displaybeleuchtung)
6 14 VOL+
SLEEP (Mehrfach drücken für die Einstellung des
7 15
Sleep-Timers. Jeder Druck verringert die SleepZeit um 10min.)
Page 7

Bedienung
Einstellen der Uhrzeit
Wenn Sie das Gerät zum ersten Mal einschalten, zeigt die Uhr auf dem Display „0:00“ an. Die Uhr stellt sich
automatisch, sobald ein DAB-Sender empfangen wird. Wird Kein DAB-Sender empfangen, können Sie die
Uhrzeit auch manuell einstellen:
• Schalten Sie das Gerät ein und halten Sie INFO/MENU für 2 Sekunden gedrückt, um das Menü aufzurufen.
• Navigieren Sie mit dem Multiknopf bis zum „Set Time/Date“-Untermenü:
• Hauptmenü -> System Setup -> Time Setup -> Set Time/Date.
• Bestätigen Sie jeden Schritt mit Druck auf SELECT (Multiknopf).
• Drehen Sie den Multiknopf, um die Stunde einzustellen und drücken Sie zum Bestätigen.
• Drehen Sie den Multiknopf, um die Minute einzustellen und drücken Sie erneut.
• Verfahren Sie bei der Einstellung des Datums in der selben Weise.
• Sie können des Weiteren in der Sektion „Set Time/Date“ auswählen, ob die Uhrzeit im 12- oder im
24-h-Format angezeigt werden soll.
FM-Radio
Für optimalen Empfang ziehen Sie die Antenne vollständig heraus und suchen Sie nach der besten Position.
Sie können 10 FM-Sender auf dem Gerät abspeichern.
• Drücken Sie FUNCTION am Gerät oder FUNC auf der Fernbedienung, um den FM-Modus auszuwählen.
• Drücken Sie PAIR/SCAN, um automatisch nach Radiosendern suchen zu lassen. Sobald ein Sender
gefunden wird, wird dieser abgespielt.
• Falls eine Empfangsfrequenz manuell fein abgestimmt werden muss, drehen Sie am Multiknopf. Jeder
„Zacken“ ändert die Frequenz um 0.05MHz.
Das Radio zeigt die durchsuchten Frequenzen während des Sendersuchlaufs an. Wird ein brauchbares Sig-
nal empfangen, spielt das Radio den gefundenen Sender ab. Falls RDS-Daten empfangen werden, werden
Sendername sowie Radio-Text angezeigt. Bei Nichtempfang von RDS-Daten zeigt das Display [No Radio-
Text] an.
Stereo/Mono
Drücken Sie ST/MONO, um zwischen FM-Empfang in Mono oder Stereo zu wählen. Halten Sie ST/MO
gedrückt, um die Option „Auto“ zu wählen (spielt Stereo, wenn vorhanden; sonst mono).
Speichern von Sendern
• Wählen Sie den Sender, den Sie gern speichern möchten und halten Sie PROG/PRE gedrückt.
• Es wird [Preset Stored] angezeigt. Drehen Sie den Multiknopf, um den Speicher-Platz auszuwäh-
len (1 – 10), auf dem Sie den Sender speichern möchten. [Empty] wird für leere Speicherplätze
7
Page 8

angezeigt.
• Drücken Sie SELECT, um das Speichern auf dem ausgesuchten Speicherplatz zu bestätigen.
Drücken Sie PROG/PRE um die gespeicherten Sender anzuzeigen und wählen Sie Ihre Auswahl wiederum mit SELECT.
FM-Einstellungen
Einige Geräteeinstellungen sind speziell für den FM-Radioempfang zuständig. Önen Sie für diese Einstellungen das Menü, indem Sie im FM-Modus die Taste MENU für 2 Sekunden gedrückt halten. Sie
erhalten daraufhin Zugri auf die Menüpunkte „Scan setting“, „Audio setting“, „Set time/date“, „Factory
reset“ sowie „Sw version“.
• Scan setting: Stellen Sie die Sensitivität des Sendesuchlaufs ein. Bei der Wahl von „Strong sta-
tions only“ werden nur Sender mit starkem Signal abgerufen, bei „All Stations“ werden auch Sen-
der gefunden, die ein schwaches Signal haben.
• Audio setting: Stellen Sie hier ein, ob Sender automatisch im Stereo-Modus abgespielt werden,
falls ein Stereo-Signal zur Verfügung steht. „Mono only“ spielt alle Sender im Mono-Modus ab,
was bei Sendern mit schwächerem Signal von Vorteil sein kann, da weniger Rauschen auftritt.
• Set time/date: Stellen Sie hier Uhrzeit und Datum ein (Vorgehensweise wie oben beschrieben).
• Factory Reset: Setzt das Gerät zurück in den Werkszustand. Alle gespeicherten Sender, Datum
und Uhrzeit sowie alle Einstellungen werden gelöscht.
• Sw Version: Zeigt die Versionsnummer der aufgespielten Firmware an.
DAB-Radio
Erster Sendersuchlauf
Wenn Sie zum ersten Mal in den DAB-Modus schalten, führt das Gerät einen ersten Sendersuchlauf
automatisch durch. Das Display zeigt etwa folgendes an (Statusleiste sowie die Anzahl der gefundenen
Sender):
Das Gerät scannt automatisch alle empfangenen Sender und speichert sie in alphanumerischer Reihen-
folge ab. Der automatische Suchlauf kann einige Minuten dauern. Sobald er abgeschlossen ist, stellt
sich automatisch die Uhr und das Gerät spielt den in der Reihenfolge ersten Sender ab.
Manuelle Sendersuche
• Drehen Sie am Multiknopf. <Station List> wird angezeigt.
• Drehen Sie weiter, um die Senderliste zu durchblättern.
• Drücken Sie, um den aktuell angezeigten Sender zu spielen.
8
Page 9

Automatische Sendersuche
Sie können jeder Zeit nach neu hinzugekommenen Sendern suchen: Drücken Sie im DAB-Modus einfach
auf PAIR/SCAN. Der Suchlauf kann einige Minuten dauern.
Speichern von Sendern
• Wählen Sie den Sender, den Sie gern speichern möchten und halten Sie PROG/PRE gedrückt.
• Es wird [Preset Stored] angezeigt. Drehen Sie den Multiknopf, um den Speicher-Platz auszuwählen
(1 – 10), auf dem Sie den Sender speichern möchten. [Empty] wird für leere Speicherplätze angezeigt.
• Drücken Sie SELECT, um das Speichern auf dem ausgesuchten Speicherplatz zu bestätigen.
• Drücken Sie PROG/PRE um die gespeicherten Sender anzuzeigen und wählen Sie Ihre Auswahl
wiederum mit SELECT.
Display Modi
Die untere Displayzeile kann verschiedene Inhalte anzeigen, die von DAB-Sendern übermittelt werden.
Drücken Sie INFO/MENU kurz, damit das Gerät sie anzeigt. Die Inhalte können, je nach Sender die
folgenden sein: DLS (Information über den laufenden Titel/die laufende Sendung) – Sender-Genre –
Signalstärke – Zeit – Multiplex Name / Nummer / Frequenz – Audio Bitrate und Encoding Info.
Einstellungen
Schalten Sie mit FUNCTION bzw. FUNC in den DAB-Modus und halten Sie INFO/MENU für 2 Sekunden
gedrückt. Um durch die verfügbaren Optionen zu blättern, drehen Sie am Multiknopf. Zum Auswählen
und Bestätigen drücken Sie diesen.
Sie erhalten Zugri auf die Einstellungen „Full Scan“ (Vollständiger Sendersuchlauf) , „Manual Tune“
(Manuelle Sendersuche) und „Prune“ (Sender löschen, die nicht mehr empfangbar sind).
BT
• Schalten Sie mit FUNCTION bzw. FUNC in den BT-Modus. Das [BT]-Symbol auf dem Display blinkt.
• Suchen Sie in Ihrem BT-Gerät (Smartphone, Tablet o.ä.) nach „Auna_Nizza“ und verbinden Sie es damit.
Falls Sie aufgefordert werden, ein Passwort einzugeben, tippen Sie „0000“ (4 x Null).
• Wenn das Gerät das zuletzt verbundene BT-Gerät in seiner Nähe ndet, verbindet es sich automatisch
damit.
Die BT-Reichweite beträgt etwa 10m (ohne Wände und andere Hindernisse).
AUX-IN
Verbinden Sie einen externen Player (Smartphone, MP3-Player, CD-Player o.ä.) mit einem gewöhnlichen
Audiokabel (3,5mm Klinke) mit dem Gerät. Schalten Sie das Gerät mit FUNCTION bzw. FUNC in den AUXModus. Steuern Sie die Musik über ihren externen Player.
9
Page 10

EQ-Einstellung
Drücken Sie EQ am Gerät oder der Fernbedienung. „L:00“ wird angezeigt. Drehen Sie am Multiknopf um
den Bassanteil zu erhöhen/verringern. Drücken Sie nochmals EQ, um nach der selben Vorgehensweise die
Höhenanteile im Gesamtklang zu verändern.
Wecker und Sleep-Timer stellen
Das Gerät stellt zwei Weckzeiten zur Verfügung und Sie haben die Wahl, sich von einem Piep-Ton oder dem
Radio wecken zu lassen.
• Drücken Sie ALARM, um zu den Einstellungen von Alarm1 (Wecker1) zu gelangen.
• Drehen Sie am Multiknopf, um Alarm1 oder Alarm2 auszuwählen, drücken Sie dann (Select), um den
ausgewählten Alarm zu bearbeiten.
• Stellen Sie die Dauer des Alarms ein (15, 30, 45, 60 oder 90 Minuten).
• Stellen Sie die Quelle des Wecktons ein (DAB, FM, Buzzer).
• Stellen Sie die Alarm-Periode ein (Täglich / An Wochentagen / An Wochenenden / Nur ein Mal).
• Stellen Sie die Alarm-Lautstärke ein.
• Das Alarm-Symbol (Glocke) wird auf dem Display angezeigt, wenn der Alarm aktiv ist.
• Um Alarm2 zu stellen, verfahren Sie genau so.
• Um den Wecker/Alarm zu beenden, drücken Sie SNOOZE (verschat Ihnen 9 Minuten Ruhe, bevor der
Wecker wieder unerbittlich seines Amtes waltet) oder Standby (schaltet den Alarm ab).
• Um den Sleep-Timer zu stellen, drücken Sie mehrfach auf SLEEP, um den Timer erst zu aktivieren und
dann die Zeit einzustellen (90, 60, 45, 30 oder 15 Minuten). Ein weiterer Druck auf Sleep schaltet den
Timer wieder ab.
10
Page 11
Hinweise zur Entsorgung
Elektroaltgeräte
Bendet sich die diese Abbildung (durchgestrichene Mülltonne auf Rädern) auf dem Produkt, gilt die Europäische Richtlinie 2002/96/EG. Diese Produkte dürfen nicht mit dem
normalen Hausmüll entsorgt werden. Informieren Sie sich über die örtlichen Regelungen
zur getrennten Sammlung elektrischer und elektronischer Gerätschaften. Richten Sie sich
nach den örtlichen Regelungen und entsorgen Sie Altgeräte nicht über den Hausmüll.
Durch die regelkonforme Entsorgung der Altgeräte werden Umwelt und die Gesundheit
ihrer Mitmenschen vor möglichen negativen Konsequenzen geschützt. Materialrecycling
hilft, den Verbrauch von Rohstoen zu verringern.
Konformitätserklärung
Hersteller: CHAL-TEC GmbH, Wallstraße 16, 10179 Berlin, Deutschland
Dieses Produkt entspricht den folgenden Europäischen Richtlinien:
2011/65/EU (RoHS)
1999/05/EG (R&TTE)
11
Page 12

Dear Customer,
Congratulations on purchasing this product. Please read and follow these instructions, in order to avoid
damaging the item. We do not cover any damages that may arise from improper use of the item or the
disregard of the safety instructions.
Important Safety Advice
• Read all instructions before using.
• To protect against a re, electric shock or personal injury, do not immerse cord, electric plugs or device
in water or other liquids.
• Do not expose the appliance to extreme temperatures. The appliance shall be used in moderate climates.
• The use of attachments that are not recommended by the appliance manufacturer may result in re,
electric shock or personal injury.
• Do not open the unit by removing any cover parts. Do not attempt to repair the unit. Any repairs or
servicing should be done by qualied personell only.
• Only qualied persons may perform technical work on the product. The product may not be opened or changed. The components cannot be serviced by the user. The manufacturer is not responsible
for any radio or TV interference caused by unauthorized modications.
• The appliance is not a toy. Do not let children play with it. Never let children insert foreign objects into
the appliance.
• Never clean the surface of the device with solvents, paint thinners, cleansers or other chemical products. Instead, use a soft, dry cloth or soft brush.
• Save these instructions.
Small objects
Keep small objects (i.e. screws, mounting material, memory cards etc.) and packaging out of the range of
children. Do not let Children play with foil. Choking hazard!
Transporting the device
Please keep the original packaging. To gain suicient protection of the device while shipment or transportation, make sure to put it back in its original packaging.
Cleaning the surface
Do not use any volatile liquids, detergents or the like. Use a clean dry cloth.
12
Page 13

Technical Data
Item #
AC/DC adaptor
Output power 2 x 2.5W + 5W RMS
Radio band FM: 87.5 – 108MHz
DAB band 174.928 – 239.200MHz
USB port 5V, 1A
Weight 1,65kg
Scope of delivery Device, mains adaptor, RC, instruction manual
10027920 (schwarz)
10027921 (weiß)
10027922 (rot)
Input: AC 100-240V ~50/60Hz
Output: DC 5V 2000mA
Initial Setup
Connect the mains adapter (included) to the 5V DC Socket on the back of the unit and then plug into the
mains socket and switch on.
Insert the battery (CR2025) as shown below. Make sure the ‘+’ sign is facing up.
13
Page 14
Front:
Controls
ON/standby 1 7 INFO / MENU
Function 2 8 Alarm
Pairing (Play) / Scan 3 9 Volume
EQ / ST / MO 4 10 Display
Sleep / Dim / Snooze 5 11 IR Sensor
Tune / Select
Prog / Pre 6 12
Turn = Scroll
Press = Select/Enter
Display
14
Page 15

Remote control:
FUNC (Press to select FM, DAB, AUX or BT) 1 9
Power/Standby 2 10
INFO / MENU (Show station information.
Hold to enter menu.)
3 11 EQ (Enter the bass and treble sound settings.)
PRESET (Press to recall a preseted station; press
and hold to store recently chosen station.)
SNOOZE
9 minutes.)
(Press to snooze your alarm clock for
Alarm 1/2 (Activate and edit the alarms.) 4 12 DIM (Dim the display.)
SELECT 5 13
6 14 VOL+
/ Pairing / Scan
(Press to set the sleep timer. Each press
(BT mode: Short press to playback; hold 2 secs
to activate pairing. DAB/FM modes: Scan for
radio stations.).
7 15
SLEEP
increases the sleep time by 10 minutes..)
ST / MONO 8 16 VOL-
15
Page 16

Operation
Setting Time and Date
The rst time you plug your unit in, the clock on the display will show “0:00”. The clock will automatically set
when you rst tune in any DAB station. Nevertheless, if there is no DAB station available, the clock may be
set manually via the MENU system. To set the time and date manually:
• Switch on the unit, press and hold INFO/ MENU for 2 secs to enter MENU mode.
• Turn the TUNE knob then enter “Set Time/Date” by following path: Main menu > System setup > Time
setup > Set Time/Date
• Each step need to press Select, you will enter to below interface on display.
• Turn the TUNE knob to set the hour, then press to con¬rm.
• Turn the TUNE knob to set the minute, then press to conrm.
• Follow the same routine to set the date.
FM Radio
For optimal reception, fully extend the antenna and adjust its position. You can store a maximum of 10 FM
radio stations.
• Press the FUNCTION button on the device or FUNC on the RC to select FM mode.
• Press PAIR/ SCAN. The unit will automatically start searching radio station. When a station is found it
will stop searching and you will hear the station.
• If the station needs to be ¬ne tuned to ¬ensure the best reception turn the TUNE knob. Each turn will
change the radio frequency by 0.05MHz
The radio will search and the tuning frequency will be displayed whilst searching. When a useable station is
detected the radio will stop tuning and play the station. If RDS data is present, the station name and scrolling radio text will be displayed. If RDS data is not present, display will show [ No Radio Text ].
Stereo/Mono reception
You can set your unit to switch between Auto and mono FM reception. Press and hold ST / MO to select
audio mode “Auto” (turns to Stereo signal automatically upon receipt) or Mono.
Storing radio stations (FM) (store up to 10 preset stations)
• Search for a station you want to store and then press and hold PROG / PRE button.
• Display will show „Preset Stored“ , turn the TUNE knob to ¬nd the preset number (1-10) which you
want to store
• The display will show (Empty) if no station is stored on the particular slot.
• Press SELECT to con¬rm if you want to store the station in the displayed preset number.
• To listen to stored stations, press PROG/PRE to recall 1-10. Press SELECT to play the preset selection.
16
Page 17

FM Settings menu
There are some menu settings specically t for FM radio operation. These may be changed through the
settings menu. Set to FM mode. Press and hold the MENU button for 2 seconds ( front panel). You will
gain access to the settings: Scan setting – Audio setting – Set time/date – Factory reset – Sw version
SCAN SETTING: With this menu option you can set the Scanning sensitivity of the FM radio
to two dierent levels- “Strong stations only” or “All stations. ”Setting to “Strong stations only” will
exclude weaker stations resulting in a quicker scan. If you set to “All stations” the scan will stop at every
station detect, even if the signal is weak.
AUDIO SETTINGS: This option enables you to set the radio to receive FM in Auto mode (Mono/
Stereo) or in Mono only. This may be useful if the signal is weak and the broadcast is noisy.
SET TIME/DATE: This main option enables the clock to be set manually if there is no available
DAB transmission.
FACTORY RESET: This option will restore all settings to “factory original”. All clock, station lists
and any stored preset stations will be cleared. After factory reset the radio will automatically re-scan
the DAB.
SW VERSION: This option will display the version number of the control software currently
installed in your radio. This might be helpful to a technician who is servicing the radio.
DAB Radio
Initial scan
When your radio is switched on for the rst time the scanning display will be shown while the scanning
process takes place: The radio scans all usable stations (full scan) and stores them in alphanumerical
order. The initial scan will take a few minutes. After the scan, the clock will be set and the radio will play
the rst station in the sequence. To browse for another station, refer to the next section
Re-scanning for DAB stations
When used rst, your radio scanned the DAB band for available stations. The station services found
were then stored in your system‘s memory. You can re-scan the band at any time if you move to a
dierent area or just to refresh the stored list of available stations. To scan for DAB stations manually:
• Select the DAB band.
• Press the PAIR/ SCAN button on the front panel. The scanning process will take a few minutes. The
number of services found during the scan will be shown at the right side of the display.
• After the scan, the radio will re-tune to the station in the station list to play if it is available.
Browsing for a station
Turn the TUNE knob. <Station list> will be displayed. Turn the TUNE knob to browse the station list.
Press the SELECT knob to select the station displayed. After short delay, the radio will tune to the station
17
Page 18

DAB settings
Your radio has some additional features and options that may be reached through the Settings menu.
To enter the DAB settings Menu from the top panel controls:
• Set to DAB mode.
• Press and hold the INFO/MENU button for 2 seconds.
• To scroll through available options, turn the TUNE knob to choose an option from the menu.
• Press SELECT to conrm.
Further details on the DAB settings menu
FULL SCAN: Select full scan to re-scan the entire DAB band and refresh the station list.
MANUAL TUNE: Manual tuning enables you to search the band manually, stepping through the
multiplex numbers to check if any have usable signal strength. Manual tuning is not necessary in normal operation where scanning will have automatically established a station list of all useable stations.
PRUNE: If your station list includes stations that you can no longer receive (you may have
moved to a dierent area), you can select the ‘Prune’ option to remove any stations that can no longer
be received from the Station List.
DAB display mode options
The bottom line of the display can be switched to show dierent items of information that may be
transmitted with a DAB station. For choosing the information display:
Press INFO/MENU on the front panel repeatedly to change the information displayed while playing a
DAB radio station. The full range of display options are shown below. Some stations may not broadcast
all of these options.
DLS (Dynamic Label Segment): This is a scrolling message giving real-time information-song titles,
news headlines, etc.
PROGRAMME TYPE: This describes the style of the program being broadcast.
MULTIPLEX NAME: DAB Digital radio stations are broadcast in multiplexes. Each multiplex is a bundle
of radio stations transmitted in a signal frequency. There are national and local multiplexes; local ones
contain stations specic to your area. This option displays the name of the multiplex name that contains
the station you are listening to.
SIGNAL STRENGTH: This setting will display a signal strength bar graph. The longer the bargraph, the
stronger the signal. Setting the display to show signal strength is useful when setting up the aerial for
the strongest signal.
TIME: Time and date are updated by broadcasted information.
MULTIPLEX NUMBER/FREQ: This option will display the multiplex number and frequency that contains
the station you are listening to.
18
Page 19

BIT RATE: DAB allows broadcasters to vary the BIT RATE (or the amount by which an audio signal can be
compressed) depending on the type of broadcast. This enables the amount of stations on a multiplex
to be maximized. Speech and News are often broadcast at a lower Bit Rate; music needs a higher Bit
Rate for good delity.
Storing radio stations (DAB)
You can store up to 10 stations as presets.
• Search for a station you want to store and then press and hold PROG / PRE button.
• Display will show „Preset Stored“ , turn the TUNE knob to ¬nd the preset number (1-10) which you
want to store
• The display will show (Empty) if no station is stored on the particular slot.
• Press SELECT to con¬rm if you want to store the station in the displayed preset number.
BT
You can listen to tracks from a media device if it is connected to the unit via BT. To connect your device to
the unit via BT follow the steps below:
• While the unit is on, press FUNCTION repeatedly on the unit or FUNC on remote control.
• This unit will automatically activate BT. When sucessfully paired, the [BT] icon will show steadily.
• Search for the system with your BT device and you should see „Auna_Nizza“ Enter password
„0000“ if required. When connected, the [BT] icon will keep showing steadily.
Note: When the unit has found the last paired BT device, it will connect automatically. For manual Pairing,
press and hold PAIR/SCAN for 3 seconds - now you are able to see the device „Auna_Nizza“ on your BT
device. The operating range of the BT for this unit is 10 meters without obstruction. Walls, structures and
other objects can have a negative eect the BT range
AUX-IN
Connect your auxiliary device to the 3.5mm AUX IN socket on the back of the unit. An auxiliary device could
be a MP3 player, a CD walkman or a personal computer etc. Press the FUNCTION button to select AUX
mode. Set the auxiliary device to play. You may need to adjust the volume levels on both devices
EQ
Bass setting: Press EQ button on main unit or remote control, display shown „L: 00“. Turn the TUNE knob
to adjust the Bass level.
Treble setting: Press EQ button on main unit or remote control, display shown „H: 00“. Turn the TUNE knob
to adjust the Treble level.
19
Page 20

Alarm and Sleep Timer
Your unit has 2 alarms that you can set to wake you up with a buzzer or music from the radio. The volume
level can also be set.
Setting alarm
• Press the ALARM button, display show Alarm 1 Setup. Turn the TUNE knob to select Alarm 1 or Alarm
2, then press to conrm.
• Set the Alarm on time, then press SELECT to enter the Alarm Wizard.
• Set the Duration: 15, 30, 45, 60, 90.
• Set the wake up source: DAB, FM, Buzzer.
• Set the alarm period: Daily, week days, weekends, once.
• Set the alarm sound level .
• The alarm bell symbol will also be displayed with number 1 next to it.
Setting alarm 2: Press the ALARM button, then repeat the instructions above.
Cancelling and deactivate the alarm
• Press Alarm button then select Alarm 1 or 2, choose Alarm on then press SELECT to con¬rm.
• Press the SNOOZE button to stop the alarm temporarily, the alarm will stop and ring up again after 9
minutes.
• Press STANDBY button to deactivate the alarm sound.
Environment Concerns
According to the European waste regulation 2002/96/EG this symbol on the product
or on its packaging indicates that this product may not be treated as household waste.
Instead it should be taken to the appropriate collection point for the recycling of electrical
and electronic equipment. By ensuring this product is disposed of correctly, you will hep
prevent potential negative consequences for the environment and human health, which
could otherwise be caused by inappropriate waste handling of this product. For more
detailled information about recycling of this product, please contact your local council or
your household waste disposial service.
Declaration of Conformity
Manufacturer: CHAL-TEC GmbH, Wallstraße 16, 10179 Berlin, Germany.
This product is conform to the following European directives:
1999/05/EC (R&TTE)
2011/65/EU (RoHS)
20
Page 21

Chère cliente, cher client,
Toutes nos félicitations pour l’acquisition de ce nouvel appareil. Veuillez lire attentivement et respecter les
consignes suivantes de branchements et d’utilisation pour éviter d’éventuels dommages techniques.
Consignes de sécurité
• Ce mode d’emploi sert à vous familiariser aux fonctions de ce produit. Conservez-le bien an de pouvoir vous y référer à tout moment.
• L’achat de ce produit donne droit à une garantie de deux ans en cas de défectuosité de l’appareil sous
réserve d’une utilisation appropriée de celui-ci.
• Veiller à utiliser le produit conformément à l’usage pour lequel il a été conçu. Une mauvaise utilisation
est susceptible d’endommager le produit ou son environnement.
• Tout démontage ou toute modication de l’appareil porte atteinte à la sécurité du produit. Attention
aux risques de blessure ! Ne jamais ouvrir le produit de son propre chef et ne jamais le réparer soi-
même !
• Manipuler le produit avec précaution. Les chocs, les coups ou les chutes - même de faible hauteur -
peuvent endommager l’appareil.
• Ne pas exposer le produit à l’humidité ou à une chaleur extrême.
• Ne pas introduire d’objets métalliques dans cet appareil. Ne pas poser d’objets lourds sur l’appareil.
• Nettoyer l’appareil uniquement avec un chion sec. Ne pas obstruer les ouvertures d’aération.
• Utiliser uniquement les accessoires recommandés par le fabricant ou par une entreprise spécialisée
et qualiée.
Toute ouverture non autorisée de l’appareil entraîne l’annulation de la garantie.
Petits objets / éléments d’emballage (sac plastique, carton, etc.) : tenir les petits objets (par exemple
les vis et le matériel d’assemblage, les cartes mémoire) et le matériel d’emballage hors de la portée des
enfants pour éviter qu’ils ne les avalent. Empêcher les enfants de jouer avec les lms de protection. Il existe
un risque d’étouement !
Transport de l’appareil : conserver l’emballage d’origine. Pour garantir une protection suisante de
l’appareil pendant son transport, emballer l’appareil dans son emballage d’origine.
Nettoyage en surface de l’appareil : ne pas utiliser de liquides volatiles comme ceux contenus dans les
bombes insecticides. Une pression trop importante exercée sur la surface de l’appareil pendant le nettoyage peut l’endommager. Éviter le contact prolongé du caoutchouc ou du plastique avec l’appareil. Utiliser
un chion sec.
21
Page 22

Fiche technique
Numéro d’article
Bloc d’alimentation
Puissance 2 x 2.5W + 5W RMS
Prise USB 5V, 1A
Contenu de l’emballage
10027920 (noir)
10027921 (blanc)
10027922 (rouge)
Entrée : AC 100-240 V ~ 50-60 Hz
Sortie : DC 5 V, 2 000 mA
Radio FM: 87.5 – 108MHz
DAB : 174.928 – 239.200MHz
Poids 1,65kg
Appareil, bloc d‘alimentation, télécommande, mode
d’emploi
Première utilisation
• Retirer les éléments d’emballage de l’appareil.
• Placer l’appareil sur une surface plane, sèche, non exposée à la directe du soleil et loin de sources de
chaleur (par exemple un four, une cuisinière ou un radiateur). Dégager l’espace entre l’appareil et les
murs ou les objets environnants en ménageant un écart d’au moins 10 cm.
• S’assurer que la che d’alimentation est accessible à tout moment et qu’elle peut rapidement être
débranchée.
• Brancher l’appareil à une prise et introduire la pile dans la télécommande
22
Page 23

Avant:
Éléments de commande
Marche/ arrêt / veille 1 7 INFO / MENU
Commutateur de fonctions 2 8 Réveil
Couplage (lecture) / scan 3 9 Volume
EQ / ST / MONO 4 10 Aichage
Sleep / Dim / Snooze 5 11 Capteur IR
Bouton multifonctions
Prog / Pre 6 12
Tourner = recherche de stations, faire dé-
ler
Aichage
23
Page 24

Télécommande:
FUNC (Sélectionner le mode FM, AUX-IN ou
DAB.)
Marche/veille 2 10
INFO / MENU (Appuyer sur cette touche
pour aicher les informations sur la station;
rester appuyer accéder au menu.)
1 9
3 11
PRESET (Appuyer pour sélectionner une station
sauvegardée ; rester appuyer pour sauvegarder la
station en cours de diusion.)
SNOOZE
minutes.)
(Repousse la sonnerie du réveil de 9
EQ (Accéder à l’égalisation des sons (basses/
aiguës)
Alarm 1/2 (Activer ou désactiver le réveil.) 4 12 DIM (Atténue la luminosité de l’écran LCD.)
SELECT 5 13
6 14 VOL+
/ Pairing / Scan
(Appuyer sur cette touche pour la lecture / pause
; rester appuyer (2 sec) pour le couplage BT.
En mode radio : appuyer pour démarrer la
recherche de stations.)
7 15
SLEEP (Appuyer plusieurs fois pour régler la mise
en veille programmée. Chaque pression de la touche diminue le décompte de 10 minutes.)
ST / MONO 8 16 VOL-
24
Page 25

Utilisation
Réglage de l’heure
Lors du premier démarrage de l’appareil, l’heure apparaît sur l’aichage sous la forme « 0:00 ». L’heure se
règle automatiquement à partir du moment où une station DAB est captée. Si aucune radio DAB n’est captée, il est possible de régler l’heure manuellement :
• Allumer l’appareil et rester appuyer sur la touche INFO/MENU pendant 2 secondes pour accéder au
men.
• Utiliser le bouton multifonctions pour passer en revue les options et sélectionner « Set Time/Date » :
menu principal -> System Setup -> Time Setup -> Set Time/Date.
• Conrmer chaque étape en appuyant sur SELECT (bouton multifonctions).
• Tourner le bouton multifonctions pour régler les heures et appuyer sur conrmer.
• Tourner le bouton multifonctions pour régler les minutes et appuyer de nouveau sur conrmer.
• Procéder de même pour le réglage de la date.
• Il est en outre possible, dans la section « Set Time/Date », de choisir un aichage de l’heure au format
12 ou 24 heures.
Radio FM
Pour une réception optimale, déplier complètement l’antenne et rechercher une meilleure position.
Il est possible de sauvegarder 10 stations FM sur l’appareil.
• Appuyer sur la touche FUNCTION de l’appareil ou FUNC de la télécommande pour sélectionner le
mode FM.
• Appuyer sur PAIR/SCAN pour eectuer une recherche automatique de stations. Une fois qu’une station
est détectée, celle-ci est diusée.
• Pour ajuster manuellement la fréquence de réception, tourner le bouton multifonctions. Chaque ajustement modie la fréquence de 0.05 MHz.
La radio aiche les fréquences passées en revue pendant la recherche de stations. Si un signal correct est
détecté, la radio diuse la station en question. Si des données RDS sont reçues, le nom de la station de
même que le texte radio s’aichent. En cas de non réception de données RDS, l’indication [No Radio Text]
s’aiche.
Stéréo / Mono
Appuyer sur ST/MONO pour sélectionner, au choix, la réception FM en mono ou en stéréo. Rester appuyer sur ST/MO pour sélectionner l’option « Auto » (diuse en stéréo si possible ; sinon uniquement
en mono).
Sauvegarde de stations
• Sélectionner la station à sauvegarder et rester appuyer sur PROG/PRE.
• [Preset Stored] s’aiche. Tourner le bouton multifonctions pour sélectionner un emplacement de
25
Page 26

sauvegarde (1-10) sur lequel sauvegarder la station. [Empty] s’aiche si l’emplacement est vide.
• Appuyer sur SELECT pour conrmer la sauvegarde sur l’emplacement sélectionné.
Appuyer sur PROG/PRE pour aicher les stations sauvegardées et faire sa sélection en appuyant sur
SELECT.
Réglages FM
Quelques réglages sont spéciques à la réception radio FM. Pour eectuer ces réglages, ouvrir le menu
en restant appuyer pendant 2 secondes sur la touche MENU en mode FM. Cela permet d’accéder aux
options du menu « Scan setting », « Audio setting », « Set time/date », « Factory reset » de même que
« Sw version ».
• Scan setting: Dénir la sensibilité de la recherche de stations. En sélectionnant « Strong sta-
tions only », seules les stations au signal fort seront détectées, tandis qu’avec « All stations », les
stations au signal faible seront aussi détectées.
• Audio setting: Sélectionner la diusion automatique de stations en mode stéréo si un signal
stéréo est disponible. « Mono only » permet de diuser toutes les stations en mono, ce qui est
avantageux en cas de signal faible, car les sons parasites sont moins nombreux.
• Set time/date: Régler l’heure et la date (procéder comme décrit plus haut)
• Factory Reset: Rétablit les réglages par défaut de l’appareil. Toutes les stations sauvegardées, la
date et l’heure de même que tous les réglages seront supprimés.
• Sw Version: Aiche le numéro de version du micrologiciel utilisé.
Radio DAB
Première recherche de stations
Lorsque l’appareil bascule pour la première fois en mode DAB, l’appareil eectue une première recherche automatique de stations. L’aichage se présente comme suit (barre d’état tout comme le nombre
de stations détectées).
L’appareil eectue une recherche automatique de toutes les stations captées et les sauvegarde automatiquement par ordre alphanumérique. La recherche automatique peut durer plusieurs minutes. Une fois
celle-ci terminée, l’horloge se règle automatiquement et l’appareil diuse la première station de la liste.
Recherche manuelle de stations
• Tourner le bouton multifonctions. <Station List> s’aiche.
• Continuer de tourner pour faire déler la liste des stations.
• Appuyer sur le bouton pour diuser la station en cours d’aichage.
26
Page 27

Recherche automatique de stations
Il est à tout moment possible d’eectuer une recherche de nouvelles stations : appuyer simplement sur
PAIR/SCAN en mode DAB.
Sauvegarde de stations
• Sélectionner la station à sauvegarder et rester appuyer sur PROG/PRE.
• [Preset Stored] s’aiche. Tourner le bouton multifonctions pour sélectionner un emplacement de
sauvegarde (1-10) sur lequel sauvegarder la station souhaitée. [Empty] s’aiche si l’emplacement
est vide.
• Appuyer sur SELECT pour conrmer la sauvegarde sur l’emplacement sélectionné.
• Appuyer sur PROG/PRE pour aicher les stations sauvegardées et faire sa sélection en appuyant
sur SELECT.
Modes d’aichage
La barre d’aichage du bas aiche diérents contenus pouvant être transmis par les stations DAB.
Appuyer brièvement sur INFO/MENU pour que l’appareil les aiche. Les contenus peuvent être les
suivants, en fonction de la radio : DLS (informations sur les titres/la station en cours) - Type de station
- Force du signal - Heure - Nom/numéro/fréquence de multiplexage - taux d’échantillonnage audio et
information sur l’encodage.
Paramètres
Sélectionner le mode DAB en appuyant sur la touche FUNCTION ou FUNC et rester appuyer sur INFO/
MENU pendant 2 secondes. Pour passer en revue les options disponibles, tourner le bouton multifonctions. Appuyer sur cette touche pour sélectionner et conrmer.
L’utilisateur accède aux réglages « Full Scan » (recherche complète de stations), « Manual Tune » (recherche manuelle de stations) et « Prune » (suppression d’une station qui n’est plus captée).
BT
• Sélectionner le mode BT en appuyant sur FUNCTION ou FUNC. Le symbole [BT] clignote sur l’aichage.
• Chercher l’appareil BT (smartphone, tablette etc.) nommé « Auna_Nizza » et s’y connecter. Si un mot
de passe est exigé, taper « 0000 » ( 4 x zéro).
• Si l’appareil détecte l’appareil BT auquel il s’est dernièrement connecté, il s’y connecte de nouveau
automatiquement.
La portée BT est de 10 m environ (sans murs et sans obstacles).
AUX-IN
Connecter un périphérique de lecture (smartphone, lecteur MP3, lecteur CD ou équivalent) à l’appareil avec
un câble audio classique (jack 3,5 mm). Sélectionner le mode AUX en appuyant sur la touche FUNCTION ou
FUNC. Commander la lecture de la musique depuis le périphérique de lecture.
27
Page 28

EQ
Appuyer sur la touche EQ de l’appareil ou de la télécommande. « L:00 » s’aiche. Tourner le bouton multifonctions pour augmenter ou diminuer les basses. Appuyer de nouveau sur EQ pour modier, selon le même
procédé la part des aiguës dans l’égalisation sonore.
Réglage du réveil et de la mise en veille programmée
L’appareil dispose de deux réveils indépendants, permettant de réveiller l’utilisateur par bip sonore ou par
la radio.
• Appuyer sur ALARM pour accéder aux réglages de Alarm1 (réveil 1).
• Tourner le bouton multifonctions pour sélectionner Alarm1 ou Alarm2, puis appuyer sur (Select) pour
modier les réglages du réveil sélectionné.
• Régler la durée du réveil (15, 30, 45, 60 ou 90 minutes).
• Régler la source du réveil (DAB, FM, Buzzer).
• Régler la fréquence du réveil (quotidien / jours en semaine / weekend / une seule fois).
• Régler le volume du réveil.
• Le symbole de réveil (une cloche) apparaît sur l’aichage lorsque le réveil est activé.
• Pour régler Alarm2, procéder de la même manière.
• Pour arrêter le réveil, appuyer sur SNOOZE (laisse à l’utilisateur 9 minutes de repos, avant que le réveil
ne sonne de nouveau) ou Standby (éteint le réveil).
• Pour régler le minuteur Sleep (mise en veille programmée), appuyer plusieurs fois sur SLEEP pour
activer le minuteur puis régler la durée (90, 60, 45, 30 ou 15 minutes). Appuyer de nouveau sur Sleep
pour désactiver le minuteur.
Information sur le recyclage
Appareils électriques et électroniques usagés
Vous trouverez sur le produit l’image ci-contre (une poubelle sur roues, barrée d‘une
croix), ce qui indique que le produit se trouve soumis à la directive européenne 2002/96/
CE. Renseignez-vous sur les dispositions en vigueur dans votre région concernant la collecte séparée des appareils électriques et électroniques. Respectez-les et ne jetez pas les
appareils usagés avec les ordures ménagères. La mise au rebut correcte du produit usagé
permet de préserver l’environnement et la santé. Le recyclage des matériaux contribue à
la préservation des ressources naturelles.
Déclaration de conformité
Fabricant : Chal-Tec GmbH, Wallstraße 16, 10179 Berlin, Allemagne.
Ce produit est conforme aux directives européennes suivantes :
1999/5/CE (R&TTE)
2011/65/UE (RoHS)
28
Page 29

Estimado cliente,
Le felicitamos por la adquisición de este producto. Lea atentamente el siguiente manual y siga cuidadosamente las instrucciones de uso con el n de evitar posibles daños. La empresa no se responsabiliza de
los daños ocasionados por un uso indebido del producto o por haber desatendido las indicaciones de
seguridad.
Advertencia
• Este manual de instrucciones tiene como objetivo familiarizarle con el funcionamiento del producto.
Conserve este manual para que pueda realizar futuras consultas.
• Con la compra de este producto obtiene dos años de garantía en caso de defecto o avería provocados
por un uso normal del aparato.
• Utilice el producto solamente tal y como aparece indicado en este manual. Un uso alternativo puede
provocar daños en el mismo o en su entorno.
• La transformación o cambio del producto reduce la seguridad del mismo. Riesgo de lesiones.
• Nunca abra el aparato ni intente repararlo usted mismo.
• Trate el producto con cuidado. Puede averiarse si recibe golpes, impactos o caídas, incluso desde poca
altura.
• Mantenga el producto alejado de la humedad y del calor extremo.
• No deje caer objetos de metal sobre el aparato.
• No coloque objetos pesados encima del aparato.
• Limpie el aparato utilizando solamente un paño seco.
• No obstruya las ranuras de ventilación.
• Utilice exclusivamente los accesorios recomendados por el fabricante o por un proveedor cualicado.
La garantía expirará si abre el aparato.
Piezas pequeñas/partes del embalaje (bolsas de plástico, cartón, etc.)
Mantenga las piezas pequeñas (p.ej. tornillos y otro material de montaje) y las partes del embalaje fuera
del alcance de los niños para evitar que se atraganten. No permita que los niños pequeños jueguen con los
plásticos, pueden provocar riesgo de asxia.
Transporte del aparato
Conserve el embalaje original. Para proteger el aparato durante el transporte, introdúzcalo en su embalaje
original.
Limpieza exterior
No utilice líquidos volátiles, como sprays insecticidas. El exterior del aparato podría dañarse si se frota
demasiado fuerte. Evite que el aparato esté en contacto continuado con objetos de goma o plástico. Utilice
un paño seco.
29
Page 30

Datos técnicos
Número de artículo
Fuente de alimentación
Potencia 2 x 2.5W + 5W RMS
Conexión USB 5V, 1A
Contenido del envío
10027920 (negro)
10027921 (blanco)
10027922 (rojo)
Entrada: AC 100-240V ~50/60Hz
Salida: DC 5V 2000mA
Radio FM: 87.5 - 108 MHz
DAB: 174.928 – 239.200 MHz
Peso 1,65 kg
Dispositivo, mando a distancia, manual de instruc-
ciones
Primera puesta en marcha
• Retire todo el material de embalaje del aparato.
• Coloque el aparato en una supercie plana, seca, fuera de la exposición directa del sol y lejos de otras
fuentes de calor (p. ej. hornos, hornillos o radiadores). Deje una distancia a los lados de al menos 10
cm entre el aparato y las paredes u otros objetos.
• Asegúrese de que la toma de corriente y el enchufe están accesibles en todo momento y este puede
desconectarse de la red eléctrica de inmediato.
• Conecte el aparato a una toma de corriente e introduzca las pilas en el mando a distancia.
30
Page 31

Controles
Parte delantera:
Encender/apagar / Standby: 1 7 INFO / MENÚ
Interruptor de selección de funciones 2 8 Alarma
Sincronización (Play) / Scan 3 9 Volumen
EQ / ST / MO 4 10 Display
SLEEP / Atenuación / SNOOZE 5 11 Sensor IR
Prog / Pre 6 12
Botón multifunción:
Girar = Buscar emisora / navegar
Pulsar = Select/Enter
Display
Hora
FORTALEZA DE LA SEÑAL
MODO DAB
RDS
MODO FM
STATUS/INFO
31
Page 32

Mando a distancia:
FUNC (escoja entre los modos FM, AUX-IN y DAB) 1 9
On/Standby 2 10
INFO / MENU
formación de la emisora; mantenga pulsado
Alarma 1/2 (activar o editar la hora de la
(pulse para mostrar la in-
para cambiar al menú)
alarma)
3 11 EQ (acceder y editar la conguración del tono)
4 12 DIM (Iluminación de display)
SELECT 5 13
6 14 VOL+
PRESET (Pulse para acceder a las emisoras me-
morizadas; mantenga pulsado para memorizar la
emisora actual)
SNOOZE (posponer la alarma activa 9 minutos)
/ / Sincronización / Scan
(Pulse para Play/Pause; mantenga pulsado
(2 seg) para sincronización BT; en modo
Radio: pulse para iniciar una búsqueda de
emisoras)
ST / MONO 8 16 VOL-
32
7 15
SLEEP
(pulse varias veces para congurar el
temporizador de apagado. Cada vez que pulse el
tiempo de apagado se retrasa 10 minutos
Page 33

Utilización
Ajuste de la hora
Si enciende el aparato por primera vez, en el display aparecerá la hora «0:00». La hora se congura automáticamente en cuanto se reciba la señal de una emisora DAB. Si no se localiza ninguna emisora DAB,
también puede congurar la hora manualmente:
• Encienda el aparato y mantenga pulsado INFO/MENÚ durante dos segundos para acceder al menú.
• Navegue con el botón multifunción hasta el submenú «Set Time/Date»:
• Menú principal -> System Setup -> TIME Setup -> Set Time/Date.
• Conrme cada paso pulsando SELECT (botón multifunción).
• Gire el botón multifunción para congurar la hora y pulse para conrmar.
• Gire el botón multifunción para congurar los minutos y pulse para conrmar.
• Proceda del mismo modo para congurar la fecha.
• Además, puede elegir en la sección «Set Time/Date» si desea que la hora se muestre en formato de
12 o de 24 horas.
Radio FM
Para una señal óptima, desenrolle la antena completamente y localice la mejor posición.
Puede guardar hasta 10 emisoras FM en el aparato.
• Pulse FUNCTION en el aparato o FUNC en el mando a distancia para seleccionar el modo FM.
• Pulse PAIR/SCAN para buscar automáticamente las emisoras de radio. La búsqueda se detiene cuando
se haya encontrado una emisora.
• Si debe localizar una frecuencia de manera manual, gire el botón multifunción. Cada movimiento del
botón modica la frecuencia 0.05 Mhz.
La radio muestra la frecuencia en la que se encuentra durante la búsqueda de emisoras. Si se recibe una
señal que se puede transmitir, la radio reproducirá la emisora encontrada. Si recibe información RDS, también se mostrará el nombre de la emisora y texto sobre la radio. Si no se recibe información RDS, el display
muestra [No Radio-Text].
Estéreo/Mono
Pulse ST/MONO para elegir entre una recepción FM en mono o estéreo. Mantenga pulsado ST/MO
para elegir la opción «auto» (reproduce estéreo cuando esté disponible; en caso contrario, selecciona
mono).
Memorizar emisoras
• Elija la emisora que desea guardar y mantenga pulsado PROG/PRE.
• Se mostrará [Preset Stored]. Gire el botón multifunción para seleccionar el espacio de memoria (1 -
10) en el que desea guardar la emisora. Se mostrará [empty] para los espacios de memoria vacíos.
• Pulse SELECT para conrmar que desea guardar la emisora en el espacio de memoria seleccionado.
33
Page 34

Pulse PROG/PRE para visualizar las emisoras guardadas y seleccione la que desee pulsando SELECT.
Ajustes FM
Algunos ajustes del aparato son exclusivos para la recepción de radio FM. Para acceder a estos ajustes,
abra el menú pulsando el botón MENÚ durante dos segundos con la radio en modo FM. Tendrá acceso
a los puntos de menú «Scan setting», «Audio setting», «Set time/date», «Factory reset» y «Sw version».
• Ajustes de búsqueda (Scan Setting): congure la sensibilidad de la búsqueda de emisoras. Si se-
lecciona «Strong stations only» solamente se accederá a emisoras con señal potente; si selecciona
«All Stations» encontrará también las emisoras con una señal débil.
• Ajustes de audio (Audio Settings): En este punto puede elegir si las emisoras se reproducen
automáticamente en modo estéreo en caso de que esa opción esté disponible. «Mono only» reproducirá todas las emisoras en modo mono, lo que puede ser una ventaja para las emisoras con
señal débil, pues provocará menos interferencias.
• Congurar fecha/hora (Set time/date): Ajuste la hora y la fecha (siga el procedimiento descrito
anteriormente).
• Restablecer valores de fábrica (Factory Reset): Restablece el aparato con los valores de fábrica.
Se eliminarán todas las emisoras memorizadas, la fecha, la hora y todos los ajustes.
• Versión Sw: Muestra el número de versión del rmware actual.
Radio DAB
Búsqueda inicial de emisoras
Si enciende el aparato por primera vez en modo DAB, el aparato realizará una primera búsqueda automática de emisoras. El display mostrará lo siguiente (barra de estado y número de emisoras encontradas):
El aparato busca automáticamente todas las emisoras recibidas y las guarda en orden alfanumérico.
La primera búsqueda automática puede durar unos minutos. Cuando se haya completado, la hora se
congurará automáticamente y el aparato reproduce la primera emisora por orden.
Búsqueda manual de emisoras:
• Gire el botón multifunción. <Station List> aparece en el display.
• Vuelva a girar el botón para navegar por la lista de emisoras.
• Pulse el botón para reproducir la emisora correspondiente.
Búsqueda automática de emisoras
Puede buscar en cualquier momento nuevas emisoras: Pulse el botón PAIR/SCAN en modo DAB. La
búsqueda puede durar unos minutos.
34
Page 35

Memorizar emisoras
• Elija la emisora que desea guardar y mantenga pulsado PROG/PRE.
• Se mostrará [Preset Stored]. Gire el botón multifunción para seleccionar el espacio de memoria (1 -
10) en el que desea guardar la emisora. Se mostrará [empty] para los espacios de memoria vacíos.
• Pulse SELECT para conrmar que desea guardar la emisora en el espacio de memoria seleccionado.
• Pulse PROG/PRE para visualizar las emisoras guardadas y seleccione la que desee pulsando SELECT.
Modo Display
La línea inferior del display puede mostrar distinta información que se transmite de las emisoras DAB.
Pulse INFO/MENU para que dicha información aparezca en el display. La información, dependiendo
de cada emisora, puede ser: DLS (información sobre la pista/emisora que se reproduce actualmente) Género de la emisora - Fortaleza de la señal - Hora - Nombre / número / frecuencia multiplex - Tasa de
bits del audio e información de decodicación.
Ajustes
Pulse el botón FUNCTION o FUNC en el modo DAB y mantenga pulsado INFO/MENÚ durante dos
segundos. Para navegar entre las distintas opciones, gire el botón multifunción. Para seleccionar y
conrmar, pulse este botón.
Accederá a los ajustes «Full Scan» (búsqueda completa de emisoras) , «Manual Tune» (búsqueda manual de emisoras) y «Prune» (eliminar emisoras cuya señal ya no puede detectarse).
BT
• Pulse el botón FUNCTION o FUNC en el modo BT. El símbolo [BT] parpadea en el display.
• Busque en su dispositivo BT (smartphone, tablet o similares) el «Auna_Nizza» y establezca la conexión.
En caso de que necesite introducir una contraseña, teclee “0” (4 veces cero).
• Si el último aparato BT al que ha conectado la radio, la conexión se establecerá automáticamente.
• El alcance BT es de 10 m (sin paredes ni otros obstáculos).
AUX-IN
Conecte un reproductor externo (smartphone, reproducir MP3, reproductor CD o similares) al aparato con
un cable de audio común (clavija de 3,5 mm). Encienda el aparato pulsando el botón FUNCTION o FUNC en
el modo AUX. Controle la reproducción musical con su reproductor externo.
Conguración del EQ
Pulse EQ en el aparato o en el mando a distancia. Se mostrará «L:00». Gire el botón multifunción para aumentar o reducir la proporción de graves. Pulse de nuevo EQ para modicar del mismo modo la proporción
de agudos y el tono general.
35
Page 36

Congurar la alarma y el temporizador de apagado
El aparato cuenta con dos alarmas disponibles y tiene la opción de elegir como sonido de alarma un pitido
o una emisora de radio.
• Pulse ALARM para acceder a la conguración de Alarma1 (alarma 1).
• Gire el botón multifunción para elegir entre la alarma1 y la alarma2, pulse a continuación (Select) para
editar la alarma seleccionada.
• Ajuste la duración de la alarma (15, 30, 45, 60, 60 o 90 minutos).
• Ajuste la fuente de sonido (DAB, FM, zumbido).
• Ajuste el periodo de la alarma (diario / laborables / nes de semana / solo una vez).
• Ajuste el volumen de la alarma.
• El símbolo de la alarma (reloj) aparecerá en el display cuando esta se encuentre activa.
• Para ajustar la alarma2, proceda del mismo modo.
• Para nalizar el despertador/alarma, pulse SNOOZE (se pospone durante 9 minutos antes de volver a
sonar) o Standby (apagar la alarma).
• Para ajustar el temporizador de apagado, pulse varias veces SLEEP para activar primero el temporizador y posteriormente ajustar la hora (90, 60, 45, 30 o 15 minutos). Si pulsa de nuevo Sleep el temporizador se apagará de nuevo.
36
Page 37

Indicaciones para la retirada del aparato
Si el aparato lleva adherida la ilustración de la izquierda (el contenedor de basura tachado) entonces rige la normativa europea, directiva 2002/96/CE. Este producto no debe
arrojarse a un contenedor de basura común. Infórmese sobre las leyes territoriales que
regulan la recogida separada de aparatos eléctricos y electrónicos. Respete las leyes territoriales y no arroje aparatos viejos al cubo de la basura doméstica. Una retirada de aparatos conforme a las leyes contribuye a proteger el medio ambiente y a las personas a su
alrededor frente a posibles consecuencias perjudiciales para la salud. El reciclaje ayuda a
reducir el consumo de materias primas.
Declaración de conformidad
Fabricante: Chal-Tec GmbH, Wallstraße 16, 10179 Berlín (Alemania).
Este producto cumple con las siguientes directivas europeas:
2011/65/UE (refundición RoHS)
1999/05/CE (R&TTE)
37
Page 38

Gentile cliente,
La ringraziamo per aver acquistato il nostro prodotto. La preghiamo di leggere attentamente le seguenti
istruzioni e di seguirle per evitare eventuali danni. Non ci assumiamo alcuna responsabilità per danni derivati da una mancata osservazione delle avvertenze di sicurezza e da un uso improprio del dispositivo.
Avvertenze di sicurezza
• Il presente manuale ha lo scopo di illustrare il funzionamento del prodotto. Conservarlo per consultazioni future.
• Questo prodotto ha una garanzia di due anni di conformità. Non sono coperti da garanzia i danni
causati da un utilizzo improprio.
• Utilizzare il prodotto esclusivamente per lo scopo previsto. Un utilizzo improprio può danneggiare il
prodotto o l’ambiente circostante.
• Apportare modiche al prodotto compromette la sua sicurezza. Attenzione pericolo di farsi male!
• Non aprire mai il prodotto e non eseguire mai riparazioni autonomamente.
• Maneggiare il prodotto con cautela. Può danneggiarsi in caso di urti, colpi o cadute anche da altezze
minime.
• Non esporre il prodotto all’umidità e al calore eccessivo.
• Non fare cadere oggetti di metallo nel dispositivo.
• Non fare cadere oggetti pesanti sul dispositivo.
• Pulire il dispositivo solo con un panno asciutto.
• Non bloccare le fessure di aereazione.
• Utilizzare esclusivamente gli accessori consigliati dal produttore o da un rivenditore qualicato.
La garanzia decade in caso di intervento di terzi.
Parti più piccole/imballaggio
Conservare le parti più piccole (ad es. viti, materiale di montaggio e di imballaggio) lontano dalla portata dei
bambini, per evitare che le ingeriscano. Non lasciare che i bambini giochino con il materiale d’imballaggio.
Pericolo di soocamento!
Trasporto del dispositivo
Conservare la confezione originale. Per garantire una protezione adeguata del dispositivo durante il trasporto, riporlo nella confezione originale.
Pulizia delle superci esterne
Non utilizzare liquidi volatili come ad esempio spray per insetti. Le superci si possono danneggiare se si
puliscono troppo energicamente. Le parti in plastica o in gomma non devono restare a contatto con il dispositivo per lungo tempo. Utilizzare un panno asciutto.
38
Page 39

Dati tecnici
Numero articolo
Alimentatore
Potenza 2 x 2.5W + 5W RMS
Attacco USB 5V, 1A
Consegna
10027920 (nero)
10027921 (bianco)
10027922 (rosso)
Input: AC 100-240V ~50/60Hz
Output: DC 5V 2000mA
Radio FM: 87.5 – 108MHz
DAB 174.928 – 239.200MHz
Peso 1,65 kg
Dispositivo, alimentatore, telecomando, manuale di
istruzioni
Prima messa in funzione
• Rimuovere completamente il materiale di imballaggio.
• Collocare il dispositivo su una supercie stabile, asciutta e lontano dalla luce diretta del sole e da altre
fonti di calore (ad esempio forni, fornelli o termosifoni). Lasciare almeno 10 cm di spazio libero su ciascun lato tra il dispositivo e le pareti o altri oggetti.
• Il cavo si alimentazione deve essere facilmente raggiungibile in modo da poter essere disinserito pron-
tamente in caso di emergenza.
• Collegare il dispositivo ad una presa di corrente e inserire le pile nel telecomando.
39
Page 40

Parte frontale:
Pannello dei comandi
On /O / standby 1 7 INFO / MENU
Selettore di funzione 2 8 Sveglia
Pairing (Play) / Scan 3 9 Volume
EQ / ST / MO 4 10 Display
Sleep / Dim / Snooze 5 11 Sensore IR
Manopola multifunzione:
Prog / Pre 6 12
Ruotare = ricerca canale / sfogliare
Premere = Select / Enter
Display
40
Page 41

Telecomando:
FUNC (selezionare FM-, AUX-IN e modalità
DAB)
On/Standby 2 10 SNOOZE (posticipare la sveglia di 9 minuti)
INFO / MENU (premere per vedere le
informazioni sui canali; tenere premuto per
scorrere il menu)
Alarm 1 / 2 (attivare o modicare l’ora della
sveglia)
SELECT 5 13
/ Pairing / Scan
(premere per Play/Pause; tenere premuto (2 sec)
per il Pairing BT; in modalità radio: premere per
avviare la ricerca dei canali.
ST / MONO 8 16 VOL-
PRESET (premere per accedere ai canali memo-
1 9
rizzati; tenere premuto per memorizzare i canali
attuali).
3 11 EQ (accedere alle impostazioni audio)
4 12 DIM (illuminazione display)
6 14 VOL+
SLEEP (premere ripetutamente per
7 15
l’impostazione dello Sleep Timer. Ad ogni pressione di tasto, lo Sleep Timer diminuisce di 10 minuti.)
41
Page 42

Utilizzo
Impostare l’ora
Quando si accende il dispositivo per la prima volta, sul display compare „0:00“. L’ora si imposta automaticamente quando si riceve una stazione DAB. Se non si riceve nessuna stazione DAB, è possibile anche
impostare l‘ora manualmente:
• Accendere il dispositivo e tenere premuto INFO / MENU per 2 secondi per accedere al menu.
• Accedere con la manopola multifunzione al sottomenu „Imposta ora / Data“:
• Menu principale -> Congurazione del sistema -> Congurazione ora -> imposta ora / data.
• Confermare ogni passo premendo SELECT (manopola multifunzione).
• Ruotare manopola multifunzione per impostare le ore e premere per confermare.
• Ruotare manopola multifunzione per impostare i minuti e premere di nuovo.
• Procedere nello stesso modo per l‘impostazione della data.
• Nella sezione „Set Time / Date“ è possibile impostare il formato dell’ora (12 o 24 ore).
FM Radio
Per una ricezione ottimale, srotolare completamente l‘antenna e cercare la migliore posizione.
È possibile memorizzare no a 10 stazioni FM.
• Premere FUNCTION sul dispositivo oppure FUNC sul telecomando per selezionare la modalità FM.
• Premere PAIR / SCAN per avviare la ricerca automatica dei canali radio. Appena viene trovata un cana-
le radio, questo viene riprodotto.
• Per sintonizzare manualmente una frequenza a intervalli di 0,05 MHz, ruotare la manopola multifunzione.
La radio mostra le frequenze cercate durante la scansione dei canali. Se viene trovato un segnale buono,
la radio riproduce il canale trovato. Se vengono trovati RDS, compare il nome della radio. Se non vengono
trovati dati RDS, sul display compare [No Radio Testo].
Stereo/Mono
Premere ST/MONO per scegliere tra la ricezione FM mono o stereo. Tenere premuto ST/MO per selezionare l‘opzione „Auto“ (riproduzione stereo se disponibile, altrimenti mono).
Memorizzare i canali
• Selezionare il canale che si desidera salvare e tenere premuto PROG / PRE.
• Ora appare [Preset Stored]. Ruotare la manopola multifunzione per selezionare la postazione
(1 - 10), in cui si desidera memorizzare il canale. Le postazioni non ancora occupate vengono
segnalate con [Empty].
• Premere SELECT per confermare la postazione selezionata. Premere PROG / PRE per visualizzare
i canali memorizzati e selezionare la scelta di nuovo con SELECT.
42
Page 43

Impostazioni FM
Alcune impostazioni sono esclusivamente per la ricezione radio FM. Per accedere a queste impostazioni, aprire in modalità FM il menu tenendo premuto per 2 secondi il tasto MENU. Ora si ha accesso alle
voci del menu „Scan setting“, „Audio setting“, „Set time / date“, „Factory reset“ e „Sw version“.
• Scan setting: impostare la sensibilità della ricerca dei canali. Se si seleziona „Strong stations
only“, vengono trasmessi solo canali con un segnale forte. Se si seleziona „all stations“ vengono
trasmessi anche i canali con segnale debole.
• Audio setting: impostare qui se i canali televisivi devono essere riprodotti automaticamente in
modalità stereo, se è disponibile un segnale stereo. „Mono only“ riproduce i canali in modalità
mono, che può essere vantaggioso per i canali con segnale più debole perché insorgono meno
rumori.
• Set time / date: impostare l’ora e la data (stessa procedura descritta sopra).
• Factory Reset: tornare alle impostazioni di fabbrica. Vengono cancellati tuttt i canali memorizzati,
la data, l’ora e le impostazioni.
• Sw Version: indica il numero di versione del rmware.
Radio DAB
Prima sintonizzazione
Se si passa per la prima volta in modalità DAB, il dispositivo esegue una prima sintonizzazione automatica. Sul display compaiono i seguenti dati (barra di stato e il numero dei canali trovati). Il dispositivo
esegue automaticamente la scansione di tutte i canali ricevuti e li memorizza in ordine alfanumerico.
La ricerca automatica può richiedere diversi minuti. Al termine, l‘ora si imposta automaticamente e il
dispositivo riproduce il primo canale trovato
Sintonizzazione manuale
• Ruotare la manopola multifunzione. Compare <Station List>.
• Continuare a ruotare per scorrere l‘elenco dei canali.
• Premere per riprodurre i canali visualizzati.
Sintonizzazione automatica
È possibile cercare in qualsiasi momento canali nuovi: in modalità DAB, è suiciente premere PAIR /
SCAN. La ricerca può richiedere diversi minuti.
Memorizzare i canali
• Selezionare il canale da memorizzare e tenere premuto PROG / PRE.
• Ora compare [Preset Stored]. Ruotare la manopola multifunzione per selezionare la postazione
(1 - 10). Le postazioni libere sono indicate con [Empty]
• Premere SELECT per confermare la memorizzazione del canale nella postazione selezionata.
• Premere PROG/PRE per visualizzare i canali memorizzati e selezionare la scelta di nuovo con SELECT.
43
Page 44

Modalità display
La riga inferiore del display mostra diversi contenuti trasmessi dai canali DAB. Per visualizzarli, premere
brevemente INFO / MENU. I contenuti possono variare a seconda del canale: DLS (informazioni sul
brano attuale / canale attuale) – canale - genere- potenza del segnale - ora - nome multiplex / numero
/ frequenza – bit rate audio e informazioni codica.
Impostazioni
Passare in modalità DAB tramite FUNCTION o FUNC e tenere premuto per 2 secondi INFO/MENU. Per
scorrere le opzioni disponibili, ruotare la manopola multifunzione. Premere quest’ultima per seleziona-
re e confermare.
Ora si accede alle impostazioni „Full Scan“ (scansione completa), „Manual Tune“ (sintonizzazione manuale) e „Prune“ (eliminare i canali non sono ricevibili).
BT
• Passare in modalità BT tramite FUNCTION o FUNC. Sul display lampeggia l‘icona [BT].
• Cercare nel dispositivo BT (telefono, tablet, ecc) „Auna_Nizza“ e collegarsi. Se viene richiesto di inseri-
re una password, inserire „0000“ (4 x zero).
• Quando il dispositivo trova gli ultimi dispositivi BT collegati nelle sue vicinanze, si connette automaticamente.
Il raggio di azione BT è di circa 10 m (in assenza di pareti e di altri ostacoli).
AUX-IN
Collegare un lettore esterno (smartphone, lettore MP3, lettore CD, ecc.) tramite un normale cavo audio
(3,5 mm) al dispositivo. Passare in modalità AUX tramite FUNCTION o FUNC. Gestire la musica dal proprio
lettore esterno.
Impostazione EQ
Premere EQ sul dispositivo o sul telecomando. Viene visualizzato: „L:00“. Ruotare la manopola multifunzione per aumentare / diminuire i bassi. Premere nuovamente EQ per modicare gli alti seguendo la stessa
procedura modicare la.
Impostare la sveglia e lo Sleep Timer
Il dispositivo è dotato di due allarmi e si può scegliere tra segnale acustico o radio.
• Premere ALARM per accedere alle impostazioni per Alarm 1 (sveglia 1).
• Ruotare la manopola multifunzione per selezionare Alarm1 o Alarm 2 quindi premere Select per modi-
care la sveglia selezionata.
44
Page 45

• Impostare la durata della sveglia (15, 30, 45, 60 o 90 minuti).
• Impostare la fonte (DAB, FM, Buzzer).
• Impostare la ripetizione (giornaliera / giorni della settimana / durante il ne settimana / solo una
volta).
• Impostare il volume della sveglia.
• Il simbolo della sveglia (campana) appare sul display quando la sveglia è attiva.
• Per impostare l’Alarm2, procedere allo stesso modo.
• Per arrestare la sveglia, premere SNOOZE (posticipare la sveglia di 9 minuti) o Standby (spegne la
sveglia).
• Per impostare lo Sleep Timer, premere ripetutamente SLEEP per attivare il timer e impostare il tempo
(90, 60, 45, 30 o 15 minuti). Premendo di nuvo Sleep, il timer si spegne.
Smaltimento
Se sul prodotto è presente la gura a sinistra (il cassonetto dei riuti mobile sbarrato),
si applica la direttiva europea 2002/96/CE. Questi prodotti non possono essere smaltiti
con i riuti normali. Informarsi sulle disposizioni vigenti in merito alla raccolta separata
di dispositivi elettrici ed elettronici. Non smaltire i vecchi dispositivi con i riuti domestici.
Grazie al corretto smaltimento dei vecchi dispositivi, si proteggono il pianeta e la salute
delle persone da possibili conseguenze negative. Il riciclo di materiali aiuta a ridurre il
consumo di materie prime.
Dichiarazione di conformità
Produttore: Chal-Tec GmbH, Wallstraße 16, 10179 Berlino, Germania.
Questo prodotto è conforme alle seguenti direttive europee:
2011/65/UE (RoHS)
1999/05/CE (R&TTE)
45
Page 46

46
 Loading...