

Page 1
Kassettenrekorder
10021826 10021827 10021828
http://www.auna-multimedia.com
Page 2

Warnung
• Gerät
Zur Reduzierung der Gefahr von Brand, elektrischem Schlag und Beschädigung:
• Setzen Sie dieses Gerät nicht dem Regen aus.
• Stellen Sie keine mit Flüssigkeiten gefüllten Gefäße, wie Vasen, auf dieses Gerät.
• Ausschließlich das empfohlene Zubehör verwenden.
• Reparieren Sie dieses Gerät nicht selbst. Wenden Sie sich zur Wartung an qualiziertes
Kundendienstpersonal.
• Lassen Sie keine Gegenstände aus Metall in dieses Gerät fallen.
• Stellen Sie keine schweren Gegenstände auf dieses Gerät.
Netzkabel/Netzteil
Zur Reduzierung der Gefahr von Brand, elektrischem Schlag und Beschädigung:
• Gewährleisten Sie, dass die Spannung der Stromversorgung dem auf diesem Gerät angegebenen
Wert entspricht.
• Stecken Sie den Netzstecker vollständig in die Steckdose ein.
• Ziehen Sie nicht am Kabel, knicken Sie es nicht und stellen Sie keine schweren Gegenstände darauf.
• Fassen Sie den Stecker nicht mit nassen Händen an.
• Fassen Sie den Stecker beim Herausziehen an seinem Korpus an.
• Verwenden Sie keinen beschädigten Netzstecker oder eine beschädigte Steckdose.
• Installieren Sie dieses Gerät so, dass das Netzkabel sofort aus der Steckdose gezogen werden
kann, wenn Störungen auftreten.
Kleine Objekte/Verpackungsteile
(Plastikbeutel, Karton, etc.)
• Bewahren Sie die kleine Objekte (z.B. Schrauben und anderes Montagematerial, Speicherkarten)
und Verpackungsteile außerhalb der Reichweite von Kindern auf, damit sie nicht von diesen
verschluckt werden kann. Lassen Sie kleine Kinder nicht mit Folie spielen. Es besteht
Erstickungsgefahr!
Achtung:
• Gerät
StellenSiekeineQuellenoenerFlammen,z.B.brennendeKerzen,aufdasGerät.
Aufstellung
• StellenSiedasGerätaufeinetrockene,ebene,wasserfesteundhitzebeständigeOberäche.
• Die Steckdose muss leicht zugänglich sein, um im Notfall das Gerät schnell vom Stromkreis trennen
zu können.
• Installieren oder positionieren Sie dieses Gerät nicht in einem Bücherregal, Einbauschrank oder
einem sonstigen engen Raum. Stellen Sie eine gute Belüftung des Gerätes sicher.
• Stellen Sie das Gerät nicht auf Verstärker oder andere Geräte, die heiß werden können. Diese
Hitze könnte das Gerät beschädigen.
• Setzen Sie dieses Gerät keinem direkten Sonnenlicht, hohen Temperaturen, starker Feuchtigkeit
und übermäßigen Erschütterungen aus.
2
Page 3
Netzadapter
• Der Netzadapter kann mit Wechselstrom von 220 - 240 V betrieben werden.
• Verwenden Sie aber einen geeigneten Steckeradapter, wenn der Stecker nicht in die Netzsteckdose
passt.
Bestimmungsgemäßer Gebrauch
Dieses Gerät dient der
• musikalischen Unterhaltung
Es ist ausschließlich für diesen Zweck bestimmt und darf nur zu diesem Zweck verwendet werden. Es darf
nur in der Art und Weise benutzt werden, wie es in dieser Gebrauchsanleitung beschrieben ist.
Dieses Gerät ist nicht dafür bestimmt, durch Personen (einschließlich Kinder) mit eingeschränkten
physischen, sensorischen oder geistigen Fähigkeiten oder mangels Erfahrung und/oder mangels Wissen
benutzt zu werden, es sei denn,sie werden durch eine für ihre Sicherheit zuständige Person beaufsichtigt
oder erhielten von ihr Anweisungen, wie das Gerät zu benutzen ist. Kinder sollten beaufsichtigt werden,
um sicherzustellen, dass sie nicht mit dem Gerät spielen.
Reinigung der äußeren Oberfl äche
Verwenden Sie keine üchtigen Flüssigkeiten, wie Insektensprays. Durch zu starken Druck beim
AbwischenkönnendieOberächenbeschädigtwerden.Gummi-oderPlastikteilesolltennichtübereinen
längeren Zeitraum mit dem Gerät in Kontakt sein.
Bedienelemente
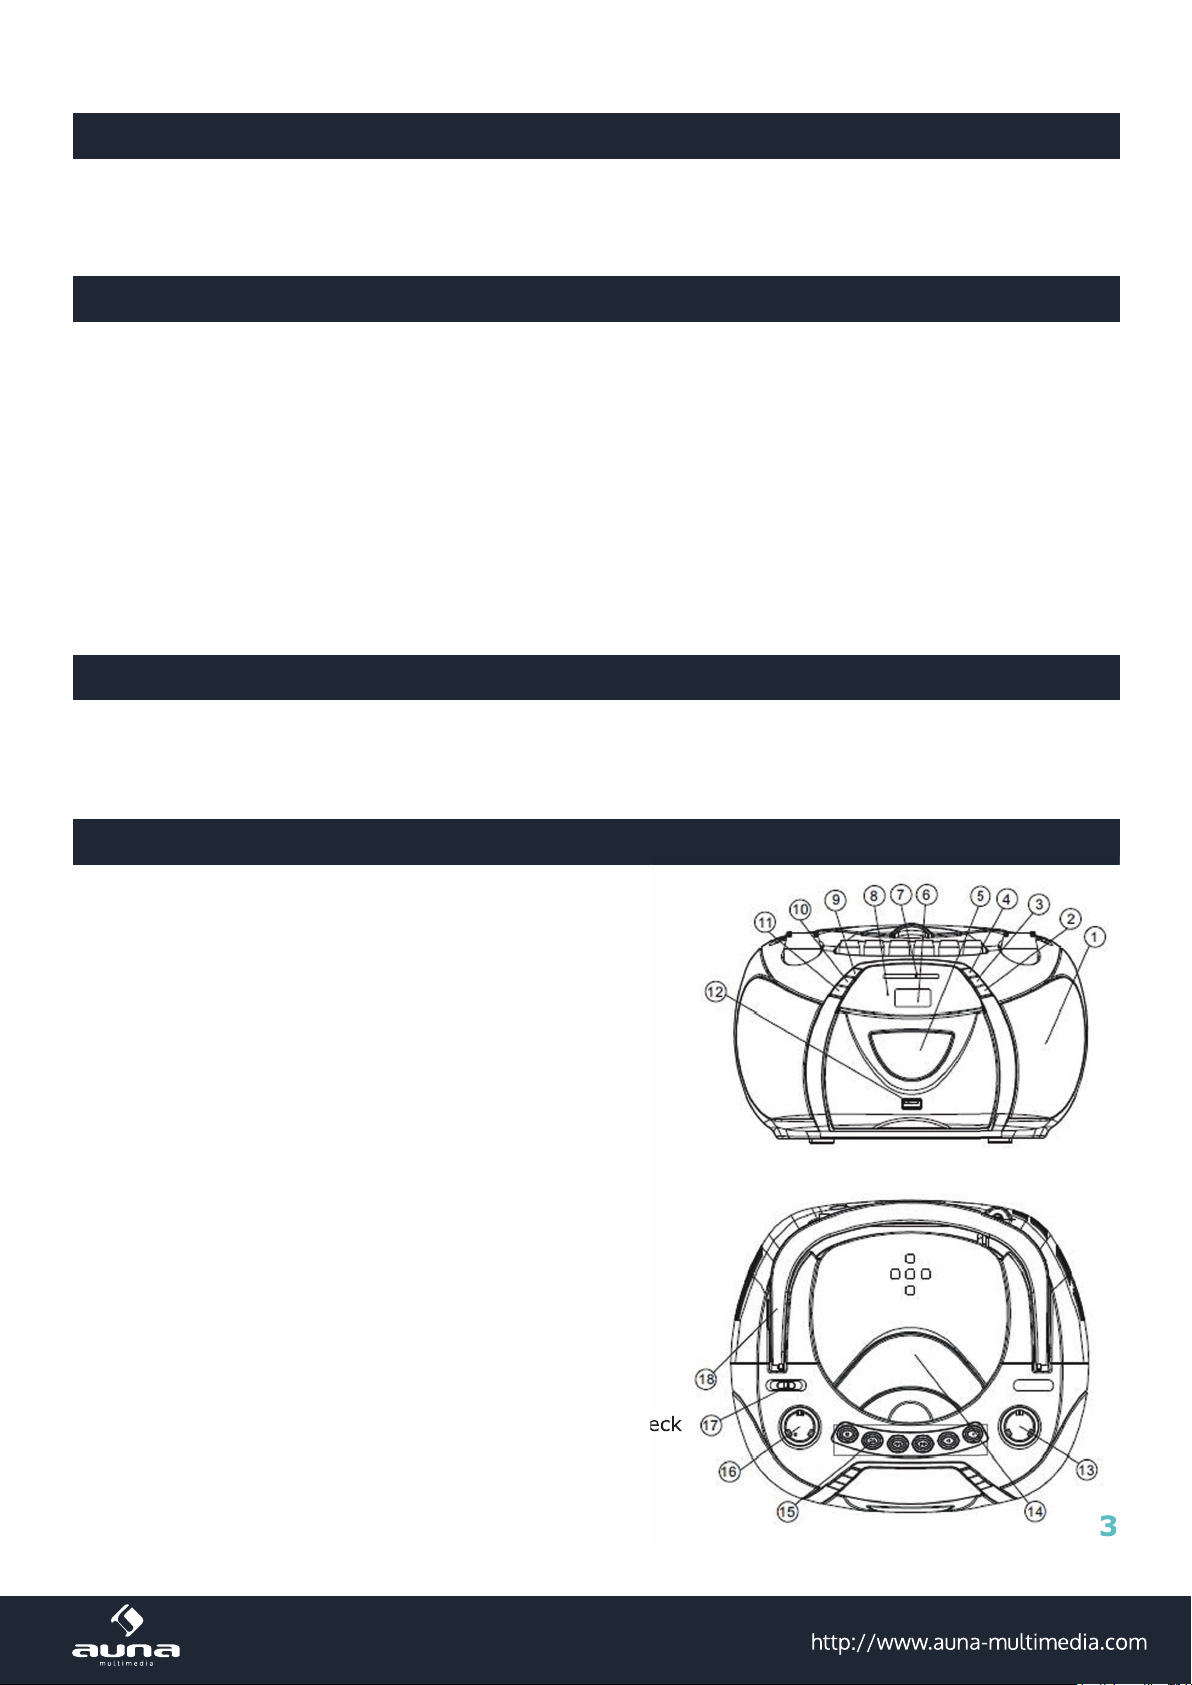
1. Lautsprecher
2. Programmieren
3. Vor
CD wechselt zum nächsten Titel
4. Stop
Hält die CD-Wiedergabe an/löscht
die CD-Programmierung
5. Kassetten-Deck
6. LCD-Display
7. Sendersuch-Nadel
8. UKW-Stereo Anzeige
9. Play/Pause
startet oder pausiert CD-Wiedergabe
10. Zurück
CD wechselt zum vorherigen Titel
11. Wiederholung
12. USB-Port
13. UWK-Frequenz-Regler
zum Einstellen des Radio-Senders
14. CD-Klappe
15. Kassetten-Steuerung
Pause: pausiert Wiedergabe
Stop/Eject:stopptdasBand;önetdasKassetten-Deck
FWD/REW: Band vor- und zurückspulen
Play: spielt die Kassette ab
3
Page 4
16. Lautstärkeregler
17. Funktions-Auswahl
wählen Sie zwischen FM (UKW),
TAPE (Kassette) und CD, MP3, USB
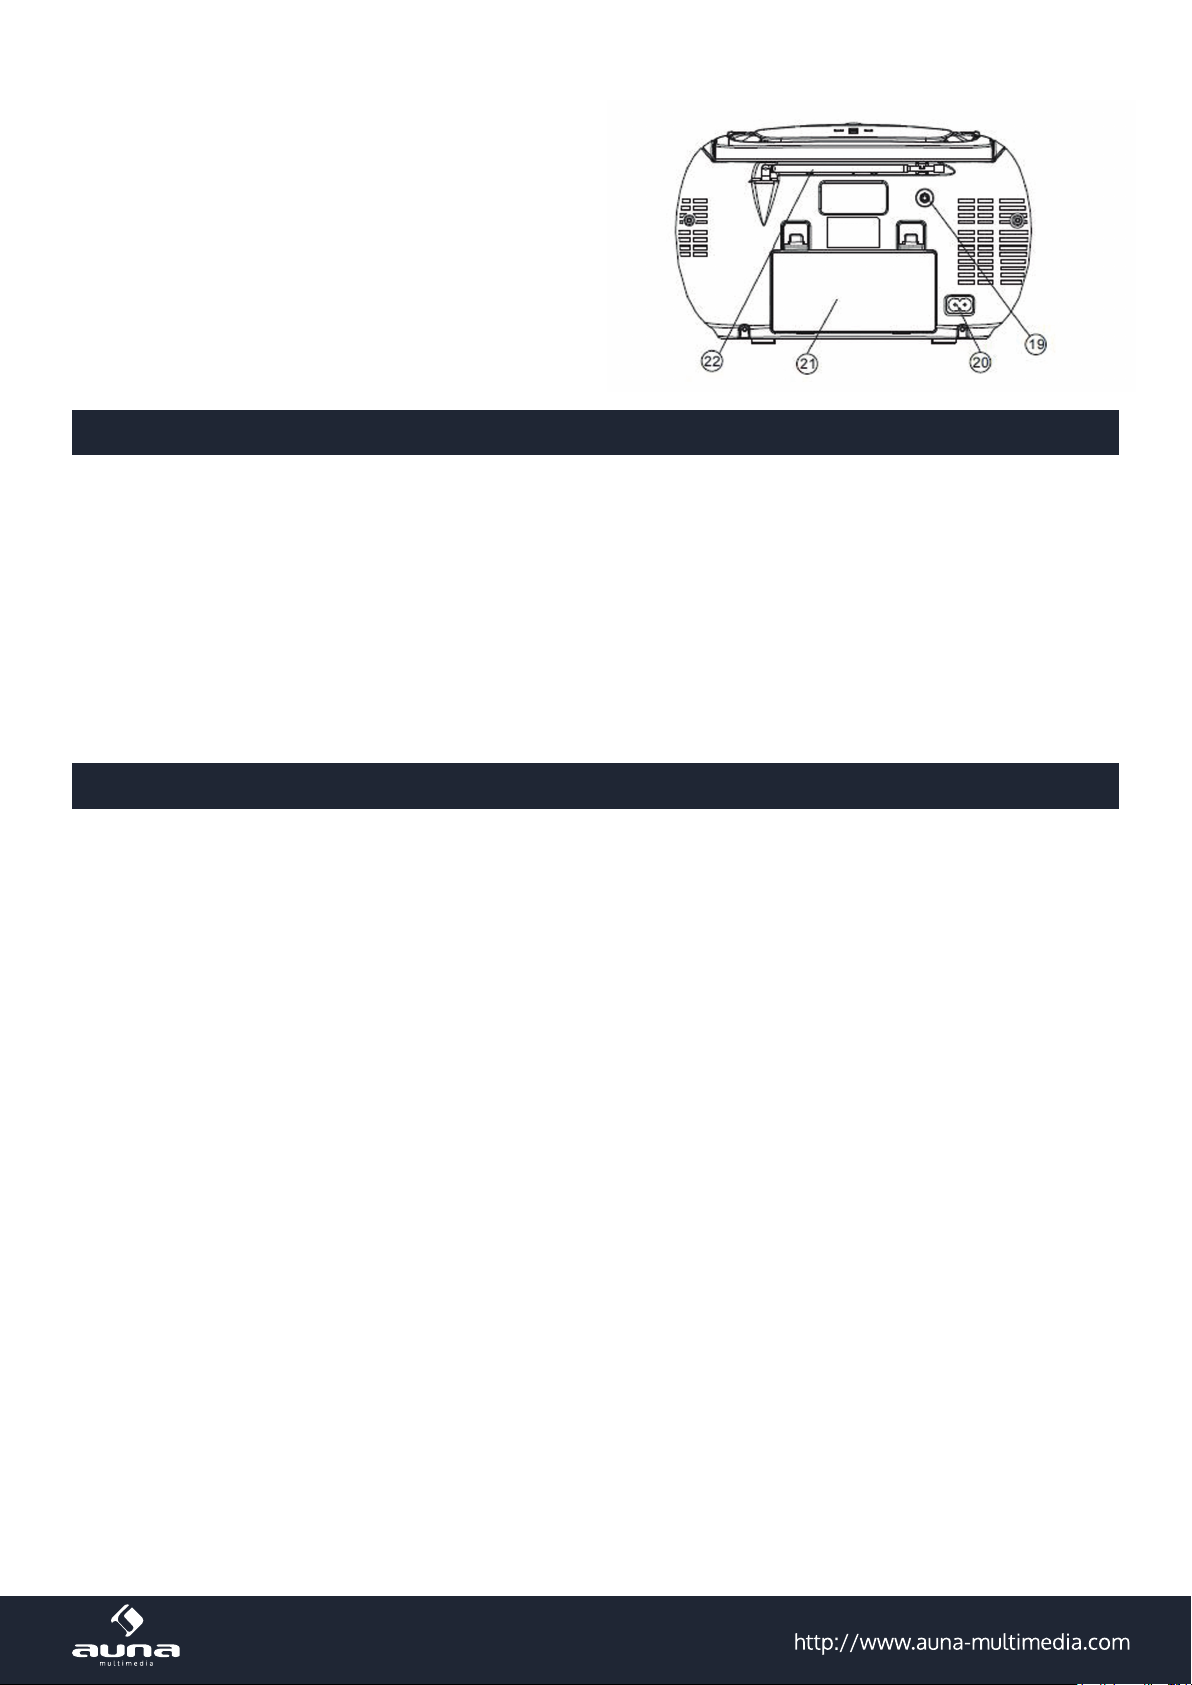
18. Tragegriff
19. Kopfhörer-Ausgang
20. Netzanschluss
21. Batteriefach
22. Teleskopantenne
Reparaturen
• Reparaturen am Gerät sollten nur von einer autorisierten Fachwerkstatt durchgeführt werden.
• Ein Umbauen oder Verändern des Produktes beeinträchtigt die Produktsicherheit.
Achtung Verletzungsgefahr!
• ÖnenSiedasProduktniemalseigenmächtigundführenSieReparaturennieselberaus!
• Falscher Zusammenbau führt möglicherweise zu Fehlfunktionen oder dem Totalausfall.
• ÖnenSieinkeinemFalldasGerät.
Achtung:
Es wird keine Haftung für Folgeschäden übernommen. Technische Änderungen und Irrtümer vorbehalten!
Beachten Sie:
DieGewährleistungverfälltbeiFremdeingrienindasGerät.
Gerätenutzung
Stromversorgung:
• Verbinden Sie das Gerät über das Netzkabel mit der Steckdose. Schalten Sie das Gerät nach der
Benutzung auf OFF.
• Önen Sie das Batteriefach, legen Sie 6 UM-2-Batterien. Achten Sie dabei auf die Polarität.
Schließen Sie danach wieder das Batteriefach.
Hinweise zum Umgang mit Batterien
• Unsachgemäße Handhabung der Batterien kann zu Korrosion und zu Austreten von
Batterieüssigkeitführen.DieswiederumkannzuVerletzungen,SachschadenoderBrändenführen.
• Wenn die Batterien zu schwach sind, funktioniert das Gerät nicht. Ersetzen Sie sie in diesem Fall
mit solchen des gleichen Typs.
• Mischen Sie keine gebrauchten Batterien mit neuen. Mischen Sie nicht die Batterietypen.
• Entsorgen Sie Batterien nicht im Hausmüll, sondern in dafür vorgesehenen Abgabestellen.
• Entfernen Sie Batterien aus dem Gerät, wenn Sie beabsichtigen, das Gerät für längere Zeit nicht
zu benutzen. Die Batterien könnten ansonsten auslaufen.
Grundlegende Bedienung
1. Benutzen Sie zum Einschalten und zum Auswählen der Audio-Quelle die Funktionsschalter.
2. Regeln Sie die Lautstärke mit dem Lautstärke-Regler.
3. Wählen Sie für Radio FM ST.. Verwenden Sie den Frequenz-Regler zum Einstellen des Senders.
4. Wählen Sie zum Abspielen von CD und MP3 die Funktion CD/MP3/USB. Steuern Sie die
Wiedergabe über die Tasten PLAY/PAUSE, NEXT, BACK.
5. Verwenden Sie die REPEAT-Taste um eine wiederholte Wiedergabe einzustellen. Zur Verfügung
stehen die Modi „Einzeln“, „Alle“, „Album“, „Zufall“.
6. Stellen Sie den Schalter zum Ausschalten des Gerätes oder zum Auswählen der Kassetten-
Funktion auf TAPE (OFF).
7. Steuern Sie die Kassetten-Wiedergabe mit den Tasten STOP/EJECT, PLAY, PAUSE, REW und FWD.
4
Page 5
Abspiel-Programmierung:
1. Sie können Abspielreihenfolge von 20 Titeln (CD-Modus) bzw. 99 Titeln (MP3-Modus)
einprogrammieren. Drücken Sie vor dem Beginn die STOPP-Taste.
2. Drücken Sie zum Aktivieren der Programmierung PROGRAM. PROG. und P.01 wird auf dem
Display angezeigt. Drücken Sie bei MP3-Dateien zum Navigieren die REPEAT-Taste zum Auswählen
des Albums. Drücken Sie dann FOLDER UP, FOLDER DN um den gewünschten Ordner auszuwählen.
3. Drücken Sie BACK oder NEXT um die gewünschte Track-Nummer auszuwählen.
4. Drücken Sie PROGRAMM um die Auswahl abzuspeichern.
5. Wiederholen Sie Schritt 2-3 um weitere Titel zur Auswahl hinzuzufügen. Das Display zeigt FUL an,
wenn alle Speicherplätze belegt sind.
6. DrückenSiezumAbspielendiePLAY/PAUSE-Taste.DasDisplayzeigtPROGan.
7. DrückenSie dieSTOPP-Tastezwei Mal oder Önen Sie dieCD-KlappeumdieProgrammierung
aufzuheben. Die Anzeige PROG erlischt.
Entsorgung und Konformitätserklärung
BendetsichdielinkeAbbildung(durchgestricheneMülltonneaufRädern)aufdem
Produkt, gilt die Europäische Richtlinie 2012/19/EU. Diese Produkte dürfen nicht mit
dem normalen Hausmüll entsorgt werden. Informieren Sie sich über die örtlichen
Regelungen zur getrennten Sammlung elektrischer und elektronischer Gerätschaften. Richten Sie sich nach den örtlichen Regelungen und entsorgen Sie Altgeräte
nicht über den Hausmüll. Durch die regelkonforme Entsorgung der Altgeräte werden
Umwelt und die Gesundheit ihrer Mitmenschen vor möglichen negativen Konsequen-
zengeschützt.Materialrecyclinghilft,denVerbrauchvonRohstoenzuverringern.
Hersteller:Chal-TecGmbH,Wallstraße16,10179Berlin,Deutschland.
Dieses Produkt entspricht den folgenden Europäischen Richtlinien:
2014/30/EU (EMV)
2014/35/EU (LVD)
2011/65/EU(RoHS)
5
Page 6

Safety Precautions
·
Read all instructions ca refully before using the un it and keep th em for further re ference.
·
·
D
·
·
L
·
·
·
T
·
·
N
·
M
·
·
Ve
·
·
S
·
·
M
·
·
I
·
B
·
·
·
Retain the manual. If you pa ss the unit onto a third party ma ke sure to inc lude this manua l.
Check that the voltage mar ked on the rating label match es your mains voltage.
amage
Please inspe ct the unit fo r damage after unpacking.
Do not continued to operat e the unit if yo u are in any doubt ab out it worki ng normally, or if it is d amaged in
any way - switch off , withdraw t he mains plug and c onsult you r dealer.
ocation o f Unit
The unit must be placed on the f lat stable s urface and shou ld not be subj ected to vibrat ions.
Do not place the unit on slope d or unstable surfaces as the u nit may fall o ff ir tip over.
The mains socket must be loc ated near th e unit and should b e easily access ible.
emperature
Avoi d extreme de grees of temperature, eit her hot or cold. Place the unit w ell away fro m heat sources
such as radiators or gas/e lectric fires.
Avoi d exposure t o direct sunlig ht and other s ources of heat.
aked Flames
Never place any type of cand le or naked flame on the top of or ne ar the unit.
oisture
To reduce the risk of fire, elec tric shock or product damag e, do not expose this unit to rai n, moistur e,
dripping or splashing. N o objects fille d with liqui ds, such as vases , should be pl aced on the unit.
If you spil l any liquid into t he unit, it ca n cause serious d amage. Swi tch it off at the mains i mmediate ly.
Withdraw the mains plug an d consult your dealer.
ntilati on
To prevent the risk of electri c shock or fire hazard due to ove rheating, ensure that cur tains and other
materials do not obstruc t the ventil ation vents.
Do not install or place this u nit in a bookcase, built-in c abinet or in another confin ed space. En sure the
unit is well ventilated.
afety
Always disco nnect the un it from the mains s upply befo re connecting /disconn ecting other de vices or
moving the unit.
Unplug the unit from the mai ns socket during a lightnin g storm.
ains Cabl e
Make sure the unit or unit stand is not rest ing on top of the mains cable, as t he weight of t he unit may
damage the mains cable and c reate a safety hazard.
If the main s cable is damage d it must be rep laced by the manu facturer, i ts service agen t, or simila rly
qualified persons in ord er to avoid a hazar d.
nterference
Do not place the unit on or near a ppliances which may cause e lectromagne tic interf erence. If you do it, it
may adversely affect the operating perfor mance of the unit, and cause a di storted picture or sound.
atteries
Batteries used in the unit a re easily swallowed by youn g children and th is is danger ous.
Keep loose batteries awa y from young children and mak e sure that the bat tery holde r tray is secure in the
unit. Seek medical advic e if you believe a ce ll has been sw allowed.
Please dispo se of batter ies correctly by followin g the guidance in t his manual .
6
Page 7

Safety Precautions
Earphones
Product Overview
Front view
Top view
Rear view
·
Listening to loud sounds for prolonged periods of time may permanently damage your hearing.
·
Before putting on earphones, turn the volume down then put the earphones on and slowly increase the
volume until you reach a comfortable listening level.
Supervision
·
Children should supervised to ensure that they do not play with the unit and the remote control.
·
Never let anymore especially children push anything into the holes, slots or any other openings in the
case - this could result in a fatal electric shock.
Service
·
To reduce the risk of electric shock, do not remove screws, The unit does not contain any userserviceable parts. Please leave all maintenance work to qualified personnel.
Maintenance
·
Ensure to unplug the unit from the mains socket before cleaning.
·
Do not use any type of abrasive pad or abrasive cleaning solutions as these may damage the unit’s
surface.
·
Do not use liquids to clean the unit.
Class 1 Laser Product
·
This unit utilises a laser. Use of controls, adjustments or performance of
procedures other than those specified herein may result in hazardous
radiation exposure.
·
Before removing the unit, ensure the disc tray is empty.
·
Always remove the disc when the unit is not in use.
·
Failure to do so will risk severely damaging the disc and the unit.
·
Do not stack devices, heat from other devices may affect the performance of
the unit.
CAUTION
CAUTION
RISK OF ELECTRIC SHOCK
RISK OF ELECTRIC SHOCK
DO NOT OPEN
DO NOT OPEN
The lightning flash with arrowhead symbol, within an equilateral triangle, is intended to
alert the user to the presence of uninsulated “dangerous voltage” within the unit’s
enclosure that may be of sufficient magnitude to constitute a risk of electric shock.
The exclamation point within an equilateral triangle is intended to alert the user to the
presence of important operating and maintenance (servicing) instructions in the manual
accompanying the unit.
CLASS 1
LASER PRODUCT
Owner’s record
For your convenience, record the model number and serial number for future reference.
Model no.:________________________________ Serial no.:_________________________________
7
Page 8

Product Overview
Front view
9
10
11
12
Top view
18
17
16
15
1. Speakers
7
6
8
5
4
3
2
1
2. Program
3. Next
CD: skips tracks forward.
4. Stop
CD: stops CD playback or delete a program.
5. Cassette Door
6. LCD Display
7. Dial Pointer
8. FM Stereo Indicator
9. Play/Pause
CD: start or pauses CD playback.
10. Back
CD: skips tracks backward.
11. Repeat
12. USB Jack
13. Tuning Knob
- adjust FM radio station.
14. CD Door
15. Cassette Control Buttons
Pause - interrupts playback.
Stop/Eject - stops the tape; opens the cassette door.
FWD/REW - forwards/rewinds the tape.
Play - starts playback.
16. Volume Control
17. Function Selector
- select FM ST., TAPE (OFF)and CD/MP3/USB.
18. Handle
19. Earphones Jack
13
14
20. AC IN Jack
- connect AC power cord to the mains socket.
21. Battery Compartment
22. Telescopic Antenna
Rear view
22
21
19
20
8
Page 9

Power Supply
General Operation
1. To switch on and sele ct your operati on source, adju st the FUNCTION Selector to C D/MP3/USB or FM
2. Adjust the sou nd with the VOLUME Control.
3. To switch off the unit, adju st the FUNCTION Selector to TAPE (OFF).
Note: To av oid unnecessa ry energy consu mption, always adjust the F UNCTION Selec tor to TAPE(OFF).
Radio Reception
1. Adjust the FUN CTION Sele ctor to FM ST..
2. Turn the TUNING Knob to tune t o a station.
Note: The FM stereo indica tor comes on if the b and selector is set on FM stere o and you have tuned the
Helpf
·
Using Earphones
Turn dow n the volume befo re connecting the earphon es. Slowly rais e the volume with the earphones on
until you reac h your desir ed volume. When e arphones are co nnected, the speaker is automatically
disabled.
Note: Avoid list ening to sound at e xcessive leve ls which could be h armful to yo ur ears. At full power, the
Connect AC power
N
Caution:
·
Risk of produc t damage! En sure that the pow er supply voltage corresp onds to the volta ge printed on the
rating label l ocated on back or bottom of the u nit.
Warnin g:
·
Risk of electric shock! Wh en you disconne ct the AC power, alwa ys pull the plug from the wall outlet.
Note: Install the unit nea r the wall outlet a nd where the AC power plug can b e easily reached.
1. Connect the p ower cord to t he AC IN jack on the unit and to the w all outlet.
2. To save e nergy: After use, set the swit ch to OFF.
Install/Replace the Un it Batteri es (not included)
Note: You can use bot h batt
eries and AC power as power s upply of this uni t.
1. Open the battery compar tment.
2. Insert 6xUM -2 batteri es with correct p olarity (+/-) as indicate d.
3. Close the battery compa rtment.
Handling the b atteries
·
Improper or in correct use of batteries ma y cause corrosi on or battery leakage, whic h could cause fir e,
personal inj ury or damage to property.
·
When the batteries are exh austed, the app liance will not f unction. Replace both batteries at the sam e
time with new on es.
·
Use only the typ es of batter ies indicated i n this manual.
·
Do not install n ew batteri es with used ones and do not mix di ffere nt types of ba tteries.
·
Do not dispose o f used batte ries as domesti c waste. Dispose of them in acc ordance with lo cal
regulation s.
·
Remove batte ries from th e unit if you do not pl an to use it for a long period of tim e, otherwise th e batteries
may leak.
ote: When replacing the ba tteries, make s ure you dispose o f the old batteries in accord ance with
applicable r egulations. T hey should b e disposed of in a lo cation specif ically design ated for tha t
purpose so the y can be recycled safely and wi thout posing an y risk for the envi ronment. Do not burn
or bury them.
9
Page 10

General Operation
1. To switch on and sele ct your operati on source, adju st the FUNCTION Selector to C D/MP3/USB or FM
ST..
2. Adjust the sou nd with the VOLUME Control.
3. To switch off the unit, adju st the FUNCTION Selector to TAPE (OFF).
Note: To av oid unnecessa ry energy consu mption, always adjust the F UNCTION Selec tor to TAPE(OFF).
Radio Reception
1. Adjust the FUN CTION Sele ctor to FM ST..
2. Turn the TUNING Knob to tune t o a station.
Note: The FM stereo indica tor comes on if the b and selector is set on FM stere o and you have tuned the
radio to an FM stereo statio n.
Helpf
ul hints:
·
To improve FM rece ption, you c an extend, incl ine or turn the tel escopic antenna for best re ception.
Using Earphones
Turn dow n the volume befo re connecting the earphon es. Slowly rais e the volume with the earphones on
until you reac h your desir ed volume. When e arphones are co nnected, the speaker is automatically
disabled.
Note: Avoid list ening to sound at e xcessive leve ls which could be h armful to yo ur ears. At full power, the
prolonged li stening can damage the ears o f the user.
10
Page 11

CD/MP3/USB Operation
You can play commercially available audio CDs including CD-R, CD-RW, MP3 files and USB files.
CD/MP3/USB Operation
Play options
Adjust volume level
1. During play, turn VOLUME Control to increase/decrease the volume level.
Select play modes
1. Press the REPEAT button repeatedly to select a play mode:
·
repeat: repeat the single track.
·
repeat all: repeat the whole disc.
·
album: repeat the selected folder.
·
random: play tracks randomly.
2. To return to normal play, press the button repeatedly until play mode icons are no longer
displayed.
Program play sequence
You may store up to 20 tracks (in CD mode) or 99 tracks (in MP3 or USB mode) can be programmed for disc
play in any order. Be sure to press the STOP button before use.
1. Press the PROGRAM/RESTART button to activate
·
“PROG.” and “P01” indicators will flash on the display.
·
For MP3/USB tracks, press the button repeatedly to select an album, then press the FOLDER
UP or FOLDER DN. buttons to select a folder you want.
2. Press the BACK or NEXT buttons to select your desired track number.
3. Press the PROGRAM/RESTART button to store the desired track number.
4. Repeat steps 2-3 to select additional tracks into program memory.
·
When the memory is full, "FUL” will show on the display.
5. To play your program, press the PLAY/PAUSE button in stop mode.
·
The “PROG.” indicator will show on the display.
6. To delete program, press the STOP button twice in stop mode or by
·
The “PROG.” indicator will disappear.
CD MODE
MP3 MODE
USB MODE
Note:
·
Even if this portable radio-CD player is able to read CD-R and CD-RW discs, in addition to conventional
compact discs, it is not possible to offer a 100% guarantee that all CD-R/RW discs can be read; playback
depends on the quality and condition of the blank discs that you use, among other things. A playback
failure does not necessarily indicate that the unit is malfunctioning.
·
You cannot play CDs encoded with copyright protection technologies.
Play a CD or MP3
1. Adjust the FUNCTION Selector to CD/MP3/USB.
2. Open the CD door by pressing the right corner.
3. Insert a CD with the printed side facing up.
·
The display will show the total number of tracks.
·
If CD door is not closed, the display will show "OP".
·
If disc is loading, the display will show "- - -".
·
If no disc, the display will show “USB”.
4. To start playback automatically or press the PLAY/PAUSE button to
start playback. Press again to stop playing track temporarily. Press
again to resume playback.
5. Press the NEXT or BACK buttons to go to next track or back to the
previous track.
·
press and hold while playing until you find the place on the track you
want.
·
For MP3 discs, press the FOLDER UP or FOLDER DN. buttons
repeatedly to select a folder, then press the NEXT or BACK buttons
to select a file you want to play.
6. Press the STOP button to stop playback.
Total track
Total track
MP3
USB
MP3
USB Connection
The USB jack is located on the front of the unit. Use a USB device to insert into the slot.
·
the display will show the total number of folders then the total number of tracks after insert USB device
into USB jack.
Note: To quit the USB mode, press and hold the PLAY/PAUSE button for 2 seconds to switch to CD/MP3
mode.
Caution :
·
Use only USB flash memory device on this system.
·
Do not connect other USB device to this system.
·
The USB port is not intended as power source for other device.
11
Page 12

CD/MP3/USB Operation
Play options
Select play modes
1. Press the
2. To return to normal play, press the
Program play sequence
You may store up to 20 tracks (in CD mode) or 99 tracks (in MP3 or USB mode) can be programmed for disc
play in any order. Be sure to press the
1. Press the
2. Press the
3. Press the
4. Repeat steps 2-3 to select additional tracks into program memory.
5. To play your program, press the
6. To delete program, press the
Adjust volume level
1. During play, turn VOLUME Control to increase/decrease the volume level.
·
repeat: repeat the single track.
·
repeat all: repeat the whole disc.
·
album: repeat the selected folder.
·
random: play tracks randomly.
displayed.
CD MODE
MP3 MODE
USB MODE
REPEAT button repeatedly to select a play mode:
RE P.
REPEAT 1 à REPEAT ALL à RANDOM à NORMAL PLAYBACK
MP3
REP.
REPEAT 1 à ALBUM REPEAT ALL à à RANDOM à NORMAL PLAYBACK
USB MP3
RE P.
REPEAT 1 à ALBUM REPEAT ALL à à RANDOM à NORMAL PLAYBACK
RE P.
ALBUM
RE P.
ALBUM
REP.
REPEAT
MP3
USB MP3
button repeatedly until play mode icons are no longer
RANDOM
MP3
REP.
USB MP3
RE P.
RANDOM
RANDOM
MP3
USB MP3
MP3
USB MP3
STOP button before use.
PROGRAM/RESTART button to activate programming.
·
“PROG.” and “P01” indicators will flash on the display.
·
For MP3/USB tracks, press the button repeatedly to select an album, then press the FOLDER
UP or FOLDER DN. buttons to select a folder you want.
BACK or NEXT buttons to select your desired track number.
PROGRAM/RESTART button to store the desired track number.
·
When the memory is full, "FUL” will show on the display.
REPEAT
PLAY/PAUSE button in stop mode.
·
The “PROG.” indicator will show on the display.
·
The “PROG.” indicator will disappear.
STOP button twice in stop mode or by opening the CD door.
12
Page 13

Maintenance
Cassette Recorder
Play a tape
Cleaning the Unit
·
To clean the unit, wipe the case with slightly moist, lint-free cloth.
·
Do not use any cleaning fluids containing alcohol, ammonia or abrasives.
·
Do not spray any aerosol at or near the unit.
Note: Ensure the unit is fully unplugged from the mains socket before cleaning.
Handling Discs
·
Do not touch the playback side of the disc.
·
Do not attach paper or tape to the disc.
Cleaning Discs
·
Fingerprints and dust on the disc cause picture and sound deterioration. Wipe the disc from the center
·
If you cannot wipe off the dust with a soft cloth, wipe the disc lightly with a slightly moistened cloth and
·
Do not use any type of solvent such as thinner, benzine, commercially available cleaners or antistatic
Cleaning Disc Lens
·
Clean the lens with a camera lens brush, or similar. Follow the instructions supplied with the cleaner.
Storing Discs
·
Do not store discs in places subjected to direct sunlight or near heat sources.
·
Do not store discs in places subjected to moisture and dust such as a bathroom or near a humidifier.
·
Storing discs vertically in a case, stacking discs or placing objects on discs outside of their cases may
Clean the Tape Deck
Use a cotton bud slightly moistened with alcohol or a special head cleaning fluid to clean the deck.
1. Open cassette compartment door by pressing Stop/Eject.
2. Press the Play button and clean the rubber pressure rollers C.
3. Press the Pause button and clean the magnetic heads A and also the Capstan B.
4. After cleaning, press the Stop/Eject button.
Note: Cleaning of the heads can also be done by playing a cleaning cassette through once.
1. Adjust the FUNCTION Selector to TAPE(OFF).
2. Press the STOP/EJECT button to open the cassette door and insert a cassette then close it.
3. Press the PLAY button to start playback.
4. To pause playback, press the PAUSE button. To resume, press the button again.
5. To rewind or fast forward, press the REW or FWD buttons until you reach your desired passage.
·
Press the STOP/EJECT button to stop fast forward or rewinding.
6. To stop the tape, press the STOP/EJECT button.
Note:
·
The keys are automatically released at the end of a tape and the set is switched off (unless PAUSE mode
has been activated.)
·
During fast forwarding/rewinding, the key will not be released at the end of a tape. To switch off the set,
make sure the cassette keys are also released.
13
Page 14

Maintenance
Cleaning the Unit
·
To clean the unit, wipe the case with slightly moist, lint-free cloth.
·
Do not use any cleaning fluids containing alcohol, ammonia or abrasives.
·
Do not spray any aerosol at or near the unit.
Note: Ensure the unit is fully unplugged from the mains socket before cleaning.
Handling Discs
·
Do not touch the playback side of the disc.
·
Do not attach paper or tape to the disc.
Cleaning Discs
·
Fingerprints and dust on the disc cause picture and sound deterioration. Wipe the disc from the center
outwards with a soft cloth. Always keep the disc clean.
·
If you cannot wipe off the dust with a soft cloth, wipe the disc lightly with a slightly moistened cloth and
finish with a dry cloth.
·
Do not use any type of solvent such as thinner, benzine, commercially available cleaners or antistatic
spray. They may damage the disc.
Playback side
Cleaning Disc Lens
·
Clean the lens with a camera lens brush, or similar. Follow the instructions supplied with the cleaner.
Storing Discs
·
Do not store discs in places subjected to direct sunlight or near heat sources.
·
Do not store discs in places subjected to moisture and dust such as a bathroom or near a humidifier.
·
Storing discs vertically in a case, stacking discs or placing objects on discs outside of their cases may
cause warping.
Clean the Tape Deck
Use a cotton bud slightly moistened with alcohol or a special head cleaning fluid to clean the deck.
1. Open cassette compartment door by pressing Stop/Eject.
2. Press the Play button and clean the rubber pressure rollers C.
3. Press the Pause button and clean the magnetic heads A and also the Capstan B.
4. After cleaning, press the Stop/Eject button.
Note: Cleaning of the heads can also be done by playing a cleaning cassette through once.
C
BA A
14
Page 15

Specifications
(The technical characteristics are liable to change without notice)
Power Supply
Power Consumption
Dimensions
Weight
Frequency Range
Output Power (RMS)
Earphones Jack
Notes for battery disposal
The batteries used with this product contain chemicals that are harmful to the environment. To
prevent our environment, dispose of used batteries according to your local laws or regulations.
Do not dispose of batteries with normal household waste.
For more information, please contact the local authority or your retailer where you purchased the
product.
Troubleshooting
If a fault occurs, first check the points listed below before taking the set for repair.
If you are unable to remedy a problem by following hints, consult your dealer or service center.
Note: Do not open the unit as there is a risk of electric shock. Under no circumstances should you try to
repair the set yourself; as this will invalidate the guarantee.
No power
·
E
nsure that the power cord is connect securely.
·
E
nsure that there is power at the AC Mains.
·
E
nsure that the batteries are inserted correctly.
No sound or poor sound
·
A
djust the volume.
No response from the unit
·
D
isconnect and reconnect the AC power cord, then turn on the unit again.
·
lectrostatic discharge, re-connect the AC power cord after a few seconds.
E
CD does not play
·
T
he disc is dirty. Clean the CD.
·
he disc is placed upside down. Remove and place the CD right side up.
T
·
U
se a finalized CD or correct format disc.
The CD skips tracks
·
nsure that the CD is not damaged or dirty.
E
·
E
nsure that program mode is deactivated.
Poor radio reception
·
E
lectrical interference in your home can cause poor reception. Move the unit away from them (especially
those with motors and transformers).
·
F
ully extend the telescopic antenna.
Poor cassette sound quality
·
ust and dirty on the heads, etc. Clean deck parts, see Maintenance.
D
·
U
se of incompatible cassette types (METAL or CHROME). Only use NORMAL (IECI) for recording.
The unit does not function properly while using batteries
·
B
atteries are dead. Replace the new batteries.
·
he polarities of the batteries are incorrectly positioned.
T
·
R
einsert the batteries ensuring the polarities (+/-) match the unit's indicated polarities (+/-).
File from USB device does not play
·
C
heck the file format. This product only support MP3 format.
Remarks:
·
I
f the unit is not used for 30 minutes or more, it will automatically enter STANDBY mode. Press the
PROGRAM/RESTART button to resume use.
·
I
f any anomaly occurs, switch the FUNCTION Selector to the TAPE(OFF) position, and then switch it
back to CD/MP3/USB or FM ST. position again.
Environmental information
All unnecessary packaging materials has been omitted. The packaging can be easily separated into three
materials: cardboard, polystyrene and plastic.
Your set consists of materials which can be recycled if disassembled by a specialized company. Please
observe the local regulations regarding the disposal of packaging, dead batteries and old equipment.
ENG-11
15
Page 16

Specifications
Power Supply
Mains: AC 230V~50Hz
Battery: DC 9V (6xUM-2, batteries not included)
Power Consumption
Dimensions
Weight
Frequency Range
Output Power (RMS)
Earphones Jack
(The technical characteristics are liable to change without notice)
: 10W
: 260(L) x 205(W) x 155(H) mm
: 1.73 kg
: FM 88-108MHz
: 1.2W x 2
: 3.5mm
Hints on Disposal
According to the European waste regulation 2012/19/EU this symbol on the product
or on its packaging indicates that this product may not be treated as household waste. Instead it should be taken to the appropriate collection point for the recycling of
electrical and electronic equipment. By ensuring this product is disposed of correctly, you will help prevent potential negative consequences for the environment and
human health, which could otherwise be caused by inappropriate waste handling of
this product. For more detailled information about recycling of this product, please
contact your local council or your household waste disposial service.
Declaration of Conformity
Producer:Chal-TecGmbH,Wallstraße16,10179Berlin,Germany.
This product is conform to the following European Directives:
2014/30/EU (EMC)
2014/35/EU (LVD)
2011/65/EU(RoHS)
16
 Loading...