

Page 1
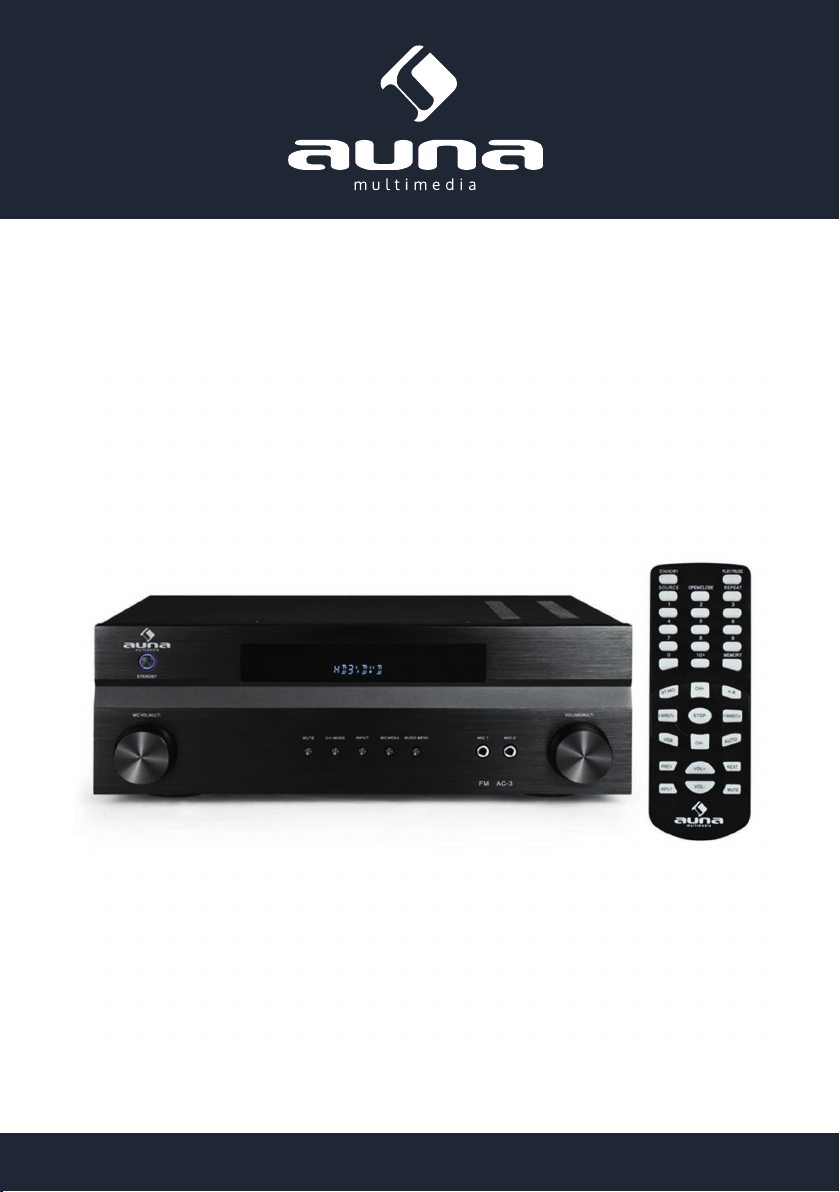
AV2-H338
5.1 Surround Receiver
www.auna-multimedia.com10004932
Page 2

Sehr geehrter Kunde,
zunächst möchten wir Ihnen zum Erwerb Ihres Gerätes gratulieren.
Bitte lesen Sie die folgenden Anschluss- und Anwendungshinweise sorgfältig durch und befolgen Sie diese
um möglichen technischen Schäden vorzubeugen.
Warnung
• Diese Bedienungsanleitung dient dazu, Sie mit der Funktionsweise dieses Produktes vertraut zu machen. Bewahren Sie diese Anleitung daher stets gut auf, damit Sie jederzeit darauf zugreifen können.
• Sie erhalten bei Kauf dieses Produktes zwei Jahre Gewährleistung auf Defekt bei sachgemäßem Gebrauch.
• Bitte verwenden Sie das Produkt nur in seiner bestimmungsgemäßen Art und Weise. Eine anderweitige Verwendung führt eventuell zu Beschädigungen am Produkt oder in der Umgebung des Produktes.
• Ein Umbauen oder Verändern des Produktes beeinträchtigt die Produktsicherheit. Achtung Verlet-
zungsgefahr! Önen Sie das Produkt niemals eigenmächtig und führen Sie Reparaturen nie selber aus!
• Behandeln Sie das Produkt sorgfältig. Es kann durch Stöße, Schläge oder den Fall aus bereits geringer
Höhe beschädigt werden.
• Halten Sie das Produkt fern von Feuchtigkeit und extremer Hitze.
• Lassen Sie keine Gegenstände aus Metall in dieses Gerät fallen.
• Stellen Sie keine schweren Gegenstände auf dieses Gerät.
• Reinigen Sie das Gerät nur mit einem trockenen Tuch.
• Blockieren Sie nicht die Belüftungsönungen.
• Verwenden Sie ausschließlich vom Hersteller oder vom qualizierten Fachhandel empfohlenes Zubehör.
Die Gewährleistung verfällt bei Fremdeingrien in das Gerät.
Kleine Objekte/Verpackungsteile (Plastikbeutel, Karton, etc.):
Bewahren Sie kleine Objekte (z.B. Schrauben und anderes Montagematerial, Speicherkarten) und Verpackungsteile außerhalb der Reichweite von Kindern auf, damit sie nicht von diesen verschluckt werden kön-
nen. Lassen Sie kleine Kinder nicht mit Folie spielen. Es besteht Erstickungsgefahr!
Transport des Gerätes:
Bitte bewahren Sie die Originalverpackung auf. Um ausreichenden Schutz beim Transport des Gerätes zu
erreichen, verpacken Sie das Gerät in der Originalverpackung.
Reinigung der äußeren Oberäche:
Verwenden Sie keine üchtigen Flüssigkeiten, wie Insektensprays. Durch zu starken Druck beim Abwischen
können die Oberächen beschädigt werden. Gummi- oder Plastikteile sollten nicht über einen längeren
Zeitraum mit dem Gerät in Kontakt sein. Nutzen Sie ein trockenes Tuch.
2
Page 3
Technische Daten
Artikelnummer 10004932
• 2 x 6,3mm-Klinke-Mikrofon-Eingang,
• 3 x HDMI-Eingang,
• 1 x HDMI-Ausgang,
Anschlüsse
Betriebsmodi 2.1, 3.1, 5.1
RMS-Leistung 2x 140W & 3x 40W
Frequenzgang 20 Hz ~ 20 KHz
Verzerrungsgrad <0,1%
Stromversorgung 230V ~50Hz
Maße / Gewicht 511 x 397 x 220 mm / 3kg
Lieferumfang
• 2 x Cinch-Line-Eingang,
• 1 x 5.1-Cinch-Eingangssatz,
• 1 x Cinch-Subwoofer-Ausgang,
• 1 x UKW-Antennen-Eingang,
• 5 x Satz Lautsprecherklemmen
• Gerät,
• Fernbedienung,
• UKW-Radioantenne,
• Bedienungsanleitung
3
Page 4
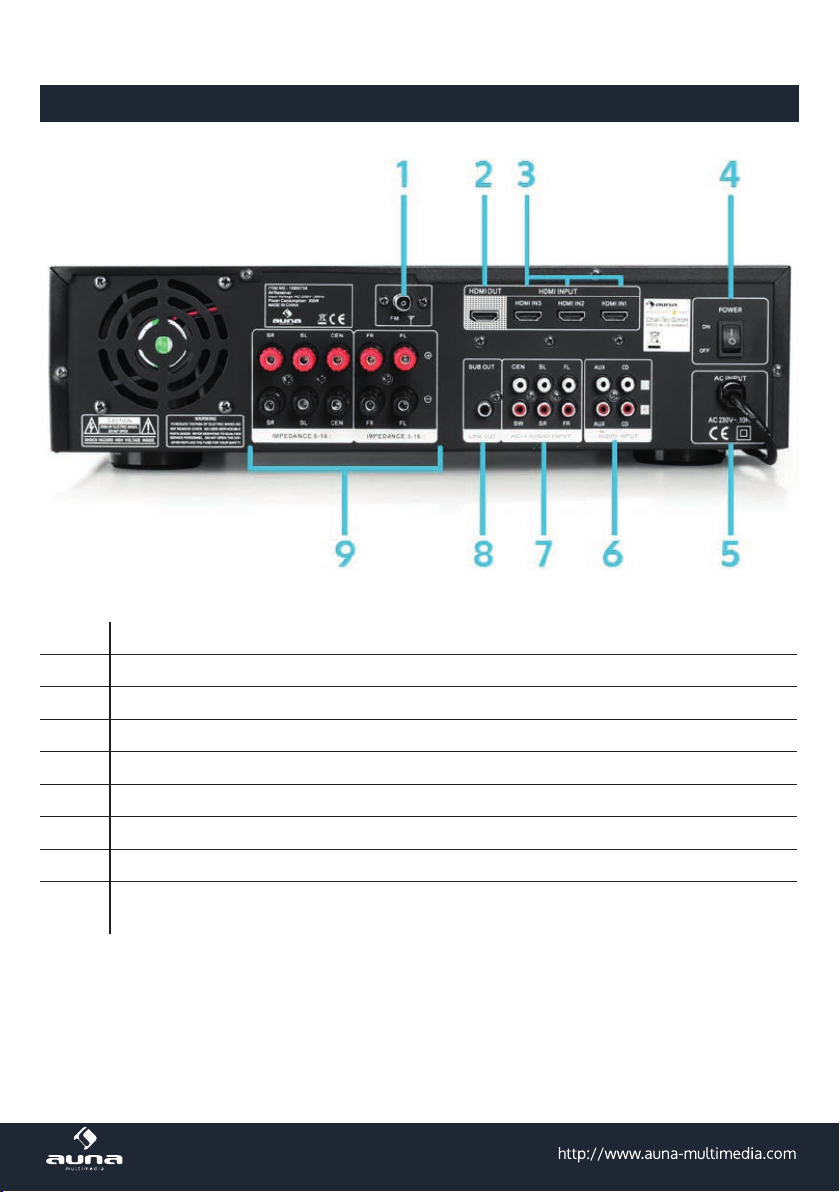
Übersicht
Rückseite (Abb. ähnlich):
1 FM - Antennenanschluss
2 HDMI-Ausgang: Anschluss für Monitor oder Beamer
3 3 x HDMI-Eingang: Anschlüsse für Blu-ray, DVD, Spielekonsole etc.
4 Netzschalter
5 Netzkabel
6 Audio-Eingänge AUX und CD
7 AC-3-Audioeingang
8 Line-Out-Anschluss für (aktive) Subwoofer
Lautsprecherklemmen
9
FR = Front Rechts; FL = Front Links; SR = Surround Rechts; SL = Surround Links; CEN = Center
4
Page 5
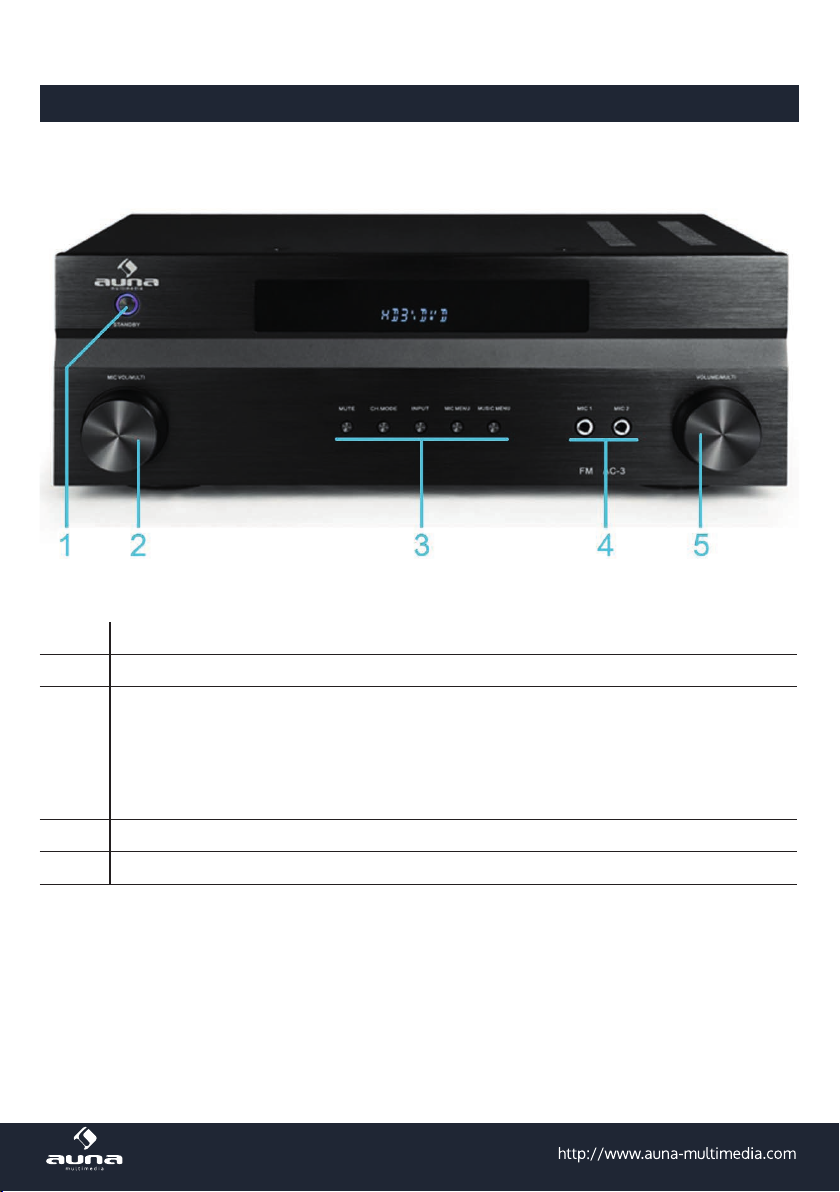
Front:
1 Power/Standby
2 MIC VOL / MULTI
Funktionstasten:
- MUTE: Stummschaltung
- CH.MODE: Kanalmodus wählen
3
- INPUT: Eingangsquelle wählen
- MIC MENU: Karaokemenü
- MUSIC MENU: Musikmenü
4 MIC 1 & MIC 2: Mikrofon-Anschlüsse
5 VOLUME / MULTI;
Übersicht
5
Page 6

Hinweise zur Bedienung
Generelles
• Wählen Sie die Audio-Quelle durch mehrfaches Drücken von INPUT. Der jeweilige Eingangskanal wird
auf dem Display angezeigt. Wenn Sie eine AC-3-Quelle wählen, kann das Gerät ein 5.1-Signal ausgeben.
• Regeln Sie die Lautstärke mit VOL+/- bzw. dem Volumen-Knopf am Gerät. Stellen Sie Höhen/Tiefen mit
den entsprechenden Tasten auf der Fernbedienung ein oder önen Sie das MUSIC MENU am Gerät:
Drücken Sie mehrfach, um durch die verfügbaren Optionen zu „blättern“ und ändern Sie die Werte
jeweils durch Drehen von VOL/MULTI.
Mit MUTE stellen Sie die Ausgabe Stumm. Drücken Sie nocheinmal für die Aufhebung der Stummschaltung.
• Wechseln Sie mit mit CH.MODE den Kanalmodus (AC-3 / Stereo).
• Stellen Sie die Lautstärke der einzelnen Surround-Lautsprecher mit den entsprechenden Lautstärke-
Tasten auf der Fernbedienung ein (oder über das MUSIC MENU).
Karaoke
• Das Gerät „erkennt“ automatisch, welches Mikrofon gerade angeschlossen ist. Bitte regeln Sie die
Mikrofon-Lautstärke auf ein Minimum, bevor Sie eines anschließen.
• Nutzen Sie die Tasten zur Einstellung des Mikrofon-Klangs auf der Fernbedienung oder rufen Sie das
MIC.MENU am Gerät auf, um die Klangoptionen M TRE (Höhen), M BASS (Tiefen), ECHO (Hall-Eekt)
und MIC VOL (Mikrofon-Lautstärke) anzupassen.
Hinweis: Halten Sie die Mikrofonkapsel nicht mit den Händen zu und vermeiden Sie es, das Mikrofon
auf Lautsprecher zu richten - beides führt insbesondere bei höheren Lautstärken zu Pfeifen durch so
genanntes Feedback.
HDMI
• Das Gerät verfügt über 3 HDMI-Eingänge und 1 HDMI-Ausgang. HDMI1, HDMI2 & HDMI3 sind die
Eingänge und HDMI OUT ist der Ausgang. An die Eingänge können Sie verschiedene Quellen anschließen, an den Ausgang Wiedergabegeräte wie TV oder Beamer.
• Das HDMI-Videosignal der gewählten Quelle wird über den HDMI-Ausgang an das angeschlossenen
Wiedergabegerät ausgegeben.
ACHTUNG: Der Receiver arbeitet als HDMI-Verteiler. Um ein eingehendes HDMI-Audiosignal zu hören,
muss ein anderes HDMI-fähiges Gerät - typischerweise ein Fernseher - an den HDMI-Ausgang angeschlossen sein. Es ist nicht möglich, ein HDMI-Soundsignal direkt über den Verstärker wiederzugeben.
6
Page 7

Radio
• Bevor Sie die Radio-Funktion nutzen können, müssen Sie die mitgelieferte Antenne anschließen.
Drücken Sie INPUT um TUNER für die Radiowiedergabe zu wählen.
• Mit CH+/CH- können Sie zwischen den gespeicherten Sender wechseln. Mit TU+/TU- können Sie die
Frequenz ändern.
• Wenn Sie AUTO drücken, werden auf dem gesamten Frequenzbereich Sender gesucht und automa-
tisch gespeichert.
• Um den aktuellen Sender zu speichern drücken Sie MEMO; es können bis zu 40 Sender gespeichert
werden.
• Stereo/Mono-Betrieb können Sie mit der entsprechenden Taste auf der Fernbedienung wählen.
Hinweise zur Entsorgung
Bendet sich die diese Abbildung (durchgestrichene Mülltonne auf Rädern) auf dem Produkt, gilt die Europäische Richtlinie 2012/19/EU. Diese Produkte dürfen nicht mit dem
normalen Hausmüll entsorgt werden. Informieren Sie sich über die örtlichen Regelungen
zur getrennten Sammlung elektrischer und elektronischer Gerätschaften. Richten Sie sich
nach den örtlichen Regelungen und entsorgen Sie Altgeräte nicht über den Hausmüll.
Durch die regelkonforme Entsorgung der Altgeräte werden Umwelt und die Gesundheit
ihrer Mitmenschen vor möglichen negativen Konsequenzen geschützt. Materialrecycling
hilft, den Verbrauch von Rohstoen zu verringern.
Konformitätserklärung
Hersteller: Chal-Tec GmbH, Wallstraße 16, 10179 Berlin, Deutschland
Dieses Produkt entspricht den folgenden Europäischen Richtlinien:
2014/53/EU (RED)
2014/35/EU (LVD)
2011/65/EU (RoHS)
7
Page 8

Dear Customer,
Congratulations on purchasing this product. Please read and follow these instructions, in order to avoid
damaging the item. We do not cover any damages that may arise from improper use of the item or the
disregard of the safety instructions.
Important Safety Advice
• Read all instructions before using.
• To protect against a re, electric shock or personal injury, do not immerse cord, electric plugs or device
in water or other liquids.
• Do not expose the appliance to extreme temperatures. The appliance shall be used in moderate climates.
• The use of attachments that are not recommended by the appliance manufacturer may result in re,
electric shock or personal injury.
• Do not open the unit by removing any cover parts. Do not attempt to repair the unit. Any repairs or
servicing should be done by qualied personell only.
• Only qualied persons may perform technical work on the product. The product may not be
opened or changed. The components cannot be serviced by the user. The manufacturer is not respon-
sible for any radio or TV interference caused by unauthorized modications.
• The appliance is not a toy. Do not let children play with it. Never let children insert foreign objects into
the appliance.
• Never clean the surface of the device with solvents, paint thinners, cleansers or other chemical products. Instead, use a soft, dry cloth or soft brush.
• Save these instructions.
Small objects
Keep small objects (i.e. screws, mounting material, memory cards etc.) and packaging out of the range of
children. Do not let Children play with foil. Choking hazard!
Transporting the device
Please keep the original packaging. To gain suicient protection of the device while shipment or transportation, make sure to put it back in its original packaging.
Cleaning the surface
Do not use any volatile liquids, detergents or the like. Use a clean dry cloth.
8
Page 9

Technical Data
Item # 10004932
• 2 x 6.3mm Mic In
• 3 x HDMI In
• 1 x HDMI Out
Connections
Possible channel modes 2.1, 3.1, 5.1
RMS output 2x 140W & 3x 40W
Frequency response 20 Hz ~ 20 KHz
Harmonic distortion <0,1%
Power supply 230V ~50Hz
Dimensions / weight 511 x 397 x 220 mm / 3kg
Scope of delivery
• 2 x RCA Line In
• 1 x 5.1 RCA In
• 1 x RCA Subwoofer Out
• 1 x FM antenna jack
• 5 x Speaker terminals
• Device
• Remote control
• Antenna
• Instruction manual
9
Page 10

Overview
Rear (similar):
1 FM antenna jack
2 HDMI Out: connect monitor, TV or projector here.
3 3 x HDMI In: connect Blu-Ray player, DVD player, gaming console etc. here.
4 Power switch
5 Mains cable
6 Audio Inputs: AUX and CD
7 AC-3 Audio In
8 Line Out: connect (active) subwoofer here
Speaker terminals
9
FR = Front Right; FL = Front Left; SR = Surround Right; SL = Surround Left; CEN = Center
10
Page 11

Front:
1 Power/Standby
2 MIC VOL / MULTI
Operation buttons:
- MUTE: toggle mute/unmute
- CH.MODE: select channel mode
3
- INPUT: select input source
- MIC MENU: karaoke options menu
- MUSIC MENU: music options menu
4 MIC 1 & MIC 2: microphone input jacks
5 VOLUME / MULTI;
Overview
11
Page 12

How To Use
Basics
• Select audio source by pressing the INPUT key on the front panel or on the remote control. When
selecting AC-3 input, the machine can link decoder to 5.1 channel output.
• Adjust the volume with VOL+/- or with VOL/MULTI on the device front. Adjust treble/bass with the
corresponding buttons on the RC or launch the MUSIC MENU on the device. In this case, press MUSIC
MENU repeatedly to scroll through the options. Use the MULTI knob to adjust the respective value.
Press MUTE to mute or un-mute the sound output.
• Press DSP to change the display mode. Press CH.MODE to change the channel mode (AC-3 / Stereo).
• Use the surround speaker buttons on the RC to adjust the volume levels of each speaker separately.
Karaoke
• The device automatically „notices“ which microphone is connected at the time. Please always turn the
microphone volume down before connecting a microphone.
• Use the microphone sound setting buittons on the RC or use the MIC.MENU to adjust sound options
for the microphone inputs, such as M TRE (treble), M BASS (bass), ECHO (reverb eect) und MIC VOL
(microphone volume).
Please note: Do not cover the microphone capsule with your hands and try to avoid pointing the
microphone towards a speaker cone - both will lead to a hooting feedback, particularly when the output volume level is rather high.
HDMI
• This unit has three HDMI input jacks and one HDMI output jack for digital audio and video signal input/
output. Connect the HDMl1,HDMl2,HDMl3 jack of this unit to the HDMI output jack of other HDMI
components (such as a DVD player).Connect the HDMI OUT jack of this unit to the HDMI input jack of
other HDMI components (such as a TV and a projector).
• The video or audio signals input at the HDMI IN jacks of the selected input source are output at the
HDMI OUT jack of this unit.
ATTENTION:
This receiver works as an HDMI-hub. In order to listen to an ingoing HDMI audio signal another HDMI-
ready device - typically a TV - has to be connected to the HDMI output of this receiver. It is not possible
to listen to a HDMI audiosignal directly via this receiver.
12
Page 13

Tuner
• Before using radio functions, please attach the supplied antenna. Adjust the antenna to obtain best
reception. Press INPUT on the front panel (amplier) or on the remote control, to select TUNER mode.
• Press CH+/CH- on the remote control, to nd the radio stations that you have listened to before. Use
the TU+/TU- buttons on the remote control, to adjust the radio frequency manually.
• Press AUTO on the remote control - the machine can scan radio channels from low-frequency to highfrequency by itself and memorize the channels one by one.
• Press MEMO on the remote control and it will memorize the current radio frequency on the band. The
machine can memorize at most 40 FM radio bands.
• In FM mode. Press the ST.MO key on the remote control, to select stereo or mono reception
Environmental Concerns
According to the European waste regulation 2012/19/EU this symbol on the product or
on its packaging indicates that this product may not be treated as household waste. Instead it should be taken to the appropriate collection point for the recycling of electrical
and electronic equipment. By ensuring this product is disposed of correctly, you will help
prevent potential negative consequences for the environment and human health, which
could otherwise be caused by inappropriate waste handling of this product. For more
detailed information about recycling of this product, please contact your local council or
your household waste disposal service.
Declaration of Conformity
Manufacturer: Chal-Tec GmbH, Wallstraße 16, 10179 Berlin, Germany.
This product is conform to the following European directives:
2014/53/EU (RED)
2014/35/EU (LVD)
2011/65/EU (RoHS)
13
Page 14

Cher client,
Toutes nos félicitations pour l’acquisition de ce nouvel appareil. Veuillez lire attentivement les instructions suivantes an d’éviter d’éventuels dommages. Le fabricant ne saurait être tenu pour responsable
des dommages dus au non-respect des consignes de sécurité et à la mauvaise utilisation de l’appareil.
Avertissement
• Ce mode d’emploi a pour but de vous familiariser avec les fonctionnalités du produit. Conservez-le
soigneusement an de pouvoir vous y référer ultérieurement.
• L’achat de ce produit vous donne droit à deux ans de garantie sur les pannes et défauts en conditions d’utilisation normale.
• Utilisez le produit exclusivement aux ns prévues. Une utilisation diérente pourrait causer des
dommages au produit ou dans son environnement.
• Tout démontage remet en cause la sécurité de l’appareil. Attention, danger de blessure ! N’ouvrez
jamais le produit de votre propre chef et n’eectuez jamais les réparations vous-même!
• Manipulez le produit avec précaution. Les coups et chocs ainsi que les chutes, même d’une faible
hauteur, peuvent l‘endommager.
• Tenez le produit éloigné des sources d’humidité et de forte chaleur.
• Ne laissez aucun objet métallique pénétrer dans cet appareil.
• Ne posez aucun objet lourd sur cet appareil.
• Nettoyez l’appareil uniquement avec un chion sec.
• N’obstruez pas les ouvertures d’aération.
• Utilisez exclusivement des accessoires recommandés par le fabricant ou un professionnel qualié.
La garantie expire en cas d’intervention étrangère sur l’appareil.
Petits éléments / éléments d’emballage (sacs en plastique, cartons, etc.) :
S’assurer que les petits éléments (par exemple vis, matériel de montage) et éléments d’emballage
soient conservés hors de la portée des enfants pour éviter les risques d‘étouement. Ne pas laisser les
enfants jouer avec les emballages plastiques, ils peuvent s’asphyxier !
Transport de l’appareil :
Veuillez conserver l’emballage d‘origine. Pour garantir la meilleure protection de l’appareil lors de son
transport, veuillez le remettre dans son emballage d’origine.
Nettoyage des surfaces externes :
Ne pas utiliser de liquides volatils tels que le spray insecticide. Une pression trop forte lors de l’essuyage peut endommager les surfaces. Les matières en plastique ou en caoutchouc ne doivent pas
rester en contact avec l’appareil pendant une période prolongée. Utiliser un chion sec.
14
Page 15

Fiche technique
Numéro d’article 10004932
• 2 x Entrées micro jack 6,3mm,
• 3 x Entrées HDMI,
• 1 x Sortie HDMI,
Connectivité
Modes d’utilisation 2.1, 3.1, 5.1
Puissance RMS 2x 140W & 3x 40W
Gamme de fréquences 20 Hz ~ 20 KHz
Distorsion <0,1%
Alimentation 230V ~50Hz
Dimensions / Poids 511 x 397 x 220 mm / 3kg
Livraison
• 2 x Entrée de ligne RCA,
• 1 x Kit Entrée RCA 5.1,
• 1 x Sortie RCA Subwoofer,
• 1 x Entrée d’antenne FM,
• 5 x kit de pinces de haut-parleurs
• Appareil,
• Télécommande,
• Antenne radio FM,
• Mode d’emploi
15
Page 16

Aperçu
Dos de l’appareil (illustration proche):
1 Prise d’antenne FM
2 Sortie HDMI : prise pour moniteur ou projecteur
3 3 x Entrée HDMI : prises pour Blu-ray, DVD, console de jeux, etc.
4 Interrupteur secteur
5 Câble secteur
6 Entrées Audio AUX et CD
7 Entrée audio AC-3
8 Prise de sortie de ligne pour Subwoofer (dynamique)
Pinces de haut-parleurs
9
FR = avant droit ; FL = avant gauche ; SR = Surround droit ; SL = Surround gauche ;
CEN = Centre
16
Page 17

Façade :
1 Power/Veille
2 MIC VOL / MULTI
Touches de fonctions :
- MUTE: Muet
- CH.MODE: choix du mode canal
3
- INPUT: sélection des sources d’entrée
- MIC MENU: menu du karaoké
- MUSIC MENU: menu pour la musique
4 MIC 1 & MIC 2: prises micros
5 VOLUME / MULTI
Aperçu
17
Page 18

Conseils d’utilisation
Conseils Généraux
• Choisissez la source audio en appuyant plusieurs fois sur INPUT. Chacun des canaux d’entrée sera
aiché sur l’écran. Si vous choisissez une source AC-3, l’appareil peut produire un signal 5.1.
• Réglez le volume avec VOL+/- ou avec le bouton de volume sur l’appareil. Réglez aigus/basses
avec les touches correspondantes sur la télécommande ou bien ouvrez le menu MUSIC MENU sur
l’appareil : Appuyez plusieurs fois pour parcourir les options disponibles, et modiez les valeurs
en tournant le bouton VOL/MULTI. Avec MUTE mettez le son à zéro. Appuyez encore une fois pour
quitte le mode muet.
• Changez le mode de canal avec CH.MODE (AC-3 / Stéréo).
• Réglez le volume de chacun des haut-parleurs Surround avec les touches correspondantes sur la
télécommande (ou dans le menu MUSIC MENU).
Karaoké
• L’appareil „reconnaît“ automatiquement quel micro vient d’être branché. Veuillez régler le volume
du micro au minimum avant de le brancher.
• Utilisez les touches de réglage du son du micro sur la télécommande, ou accédez au menu MIC.
MENU sur l’appareil, pour ajuster les options de son M TRE (aigus), M BASS (basses), ECHO (eet
Hall) et MIC VOL (volume du micro).
Remarque : Ne tenez pas la capsule du micro avec les mains et évitez de pointer le micro vers les hautparleurs – les deux actions produisent surtout des silements puissants par eet de retour.
HDMI
• L’appareil dispose de 3 HDMI entrées et d’une sortie HDMI. HDMI1, HDMI2 & HDMI3 sont les entrées et HDMI OUT est la sortie. Vous pouvez brancher diérents sources sur les entrées, sur la
sortie des appareils d’aichage tels que TV ou projecteur.
• Le signal vidéo HDMI de la source sélectionnée sera aiché par la sortie HDMI sur l’appareil d’ai-
chage connecté.
ATTENTION : le récepteur fonctionne comme un répartiteur HDMI. Pour entendre un signal HDMI entrant, un autre appareil compatible HDMI – typiquement un téléviseur – doit être relié à la sortie HDMI.
Il n’est pas possible de diuser un signal HDMI directement par l’amplicateur.
18
Page 19

Radio
• Avant de pouvoir utiliser les fonctions radio, vous devez brancher l’antenne fournie. Appuyez sur
INPUT pour choisir TUNER et lire des stations de radio.
• Avec CH+/CH- vous pouvez passer de l’une à l’autre des stations mémorisées. Avec TU+/TU- vous
pouvez changer de fréquence.
• Si vous appuyez sur AUTO, toute la gamme de fréquences sera parcourue et les stations trouvées
automatiquement mémorisées.
• Pour mémoriser la station en cours, appuyez sur MEMO ; vous pouvez mémoriser jusqu’à 40 stations.
• Vous pouvez choisir entre les fonctionnements Stéréo/Mono avec la touche correspondante sur la
télécommande.
Conseils pour le recyclage
Vous trouverez sur le produit l’image ci-contre (une poubelle sur roues, barrée d‘une croix),
ce qui indique que le produit se trouve soumis à la directive européenne 2012/19/UE. Renseignez-vous sur les dispositions en vigueur dans votre région concernant la collecte
séparée des appareils électriques et électroniques. Respectez-les et ne jetez pas les appareils usagés avec les ordures ménagères. La mise en rebut correcte du produit usagé
permet de préserver l’environnement et la santé. Le recyclage des matériaux contribue à
la préservation des ressources naturelles.
Déclaration de conformité
Fabricant : Chal-Tec GmbH, Wallstraße 16, 10179 Berlin, Deutschland
Ce produit est conforme aux directives européennes suivantes:
2014/53/UE (RED)
2014/35/UE (LVD)
2011/65/UE (RoHS)
19
Page 20

Chal-Tec GmbH | Wallstr.16 | 10179 Berlin | Deutschland
Chal-Tec GmbH ∙ Wallstraße 16 ∙ 10179 Berlin
Geschäftsführer: Peter Chaljawski
Handelsregister: HRB 98898
Bankverbindung: Hypo Vereinsbank
BIC|SWIFT-Code: HYVEDEMM488
EU-Konformitätserklärung
Wir, die
CHAL -TEC GmbH
Wallstraße 16
10179 Berlin
erklären hiermit, dass der nachfolgend bezeichnete Funk anlagentyp:
Auna AV2-H338 Hifi Receiver Artikelnr. 10004932
allen folgenden einschlägigen Bestimmungen entspricht:
RED-Richtlinie 2014/53/EU
LVD-Richtlinie 2014/35/EU
RoHS-Richtlinie 2011/65/EU
Angewandte harmonisierte Normen:
EN 303 345 V1.1.7: 2017
EN 55032:2015
EN 55020: 2007+A11:2011
EN 61000-3-2:2014
EN 610003-3:2013
Berlin, 10. August 2018 ___________________________
Sebastian Jäger
Produktmanager
www.chal-tec.com
www.electronic-star.de
Fon: +49 (0) 30 3001385-500
Fax: +49 (0) 30 3001385-999
E-Mail: frontdesk@chal-tec.com
20
Amtsgericht: Berlin - Charlottenburg
USt-ID-Nr.: DE 814529349
WEEE-Nr.: DE 46906833
Konto Nummer: 355 986 675
BLZ: 100 208 90
IBAN: DE91100208900355986675
 Loading...