

Page 1
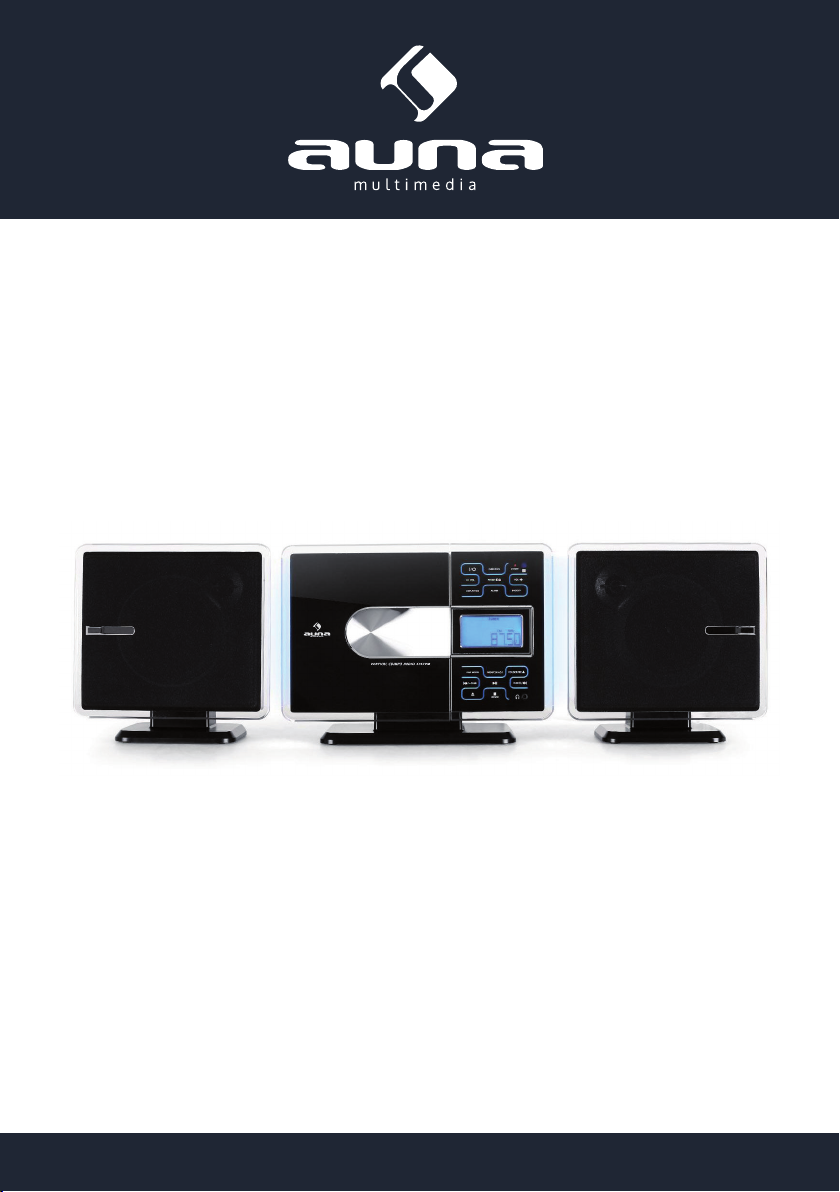
Stereoanlage
USB / MP3 / CD / SD / AUX
www.auna-multimedia.com10004778 10004798 10006706
Page 2
Sehr geehrter Kunde,
Wir gratulieren Ihnen zum Erwerb Ihres Gerätes. Lesen Sie die folgenden Anschluss- und Anwendungshinweise sorgfältig durch und befolgen Sie diese, um möglichen technischen Schäden vorzubeugen.
Für Schäden, die durch Missachtung der Sicherheitshinweise und unsachgemäßen Gebrauch entstehen,
übernehmen wir keine Haftung.
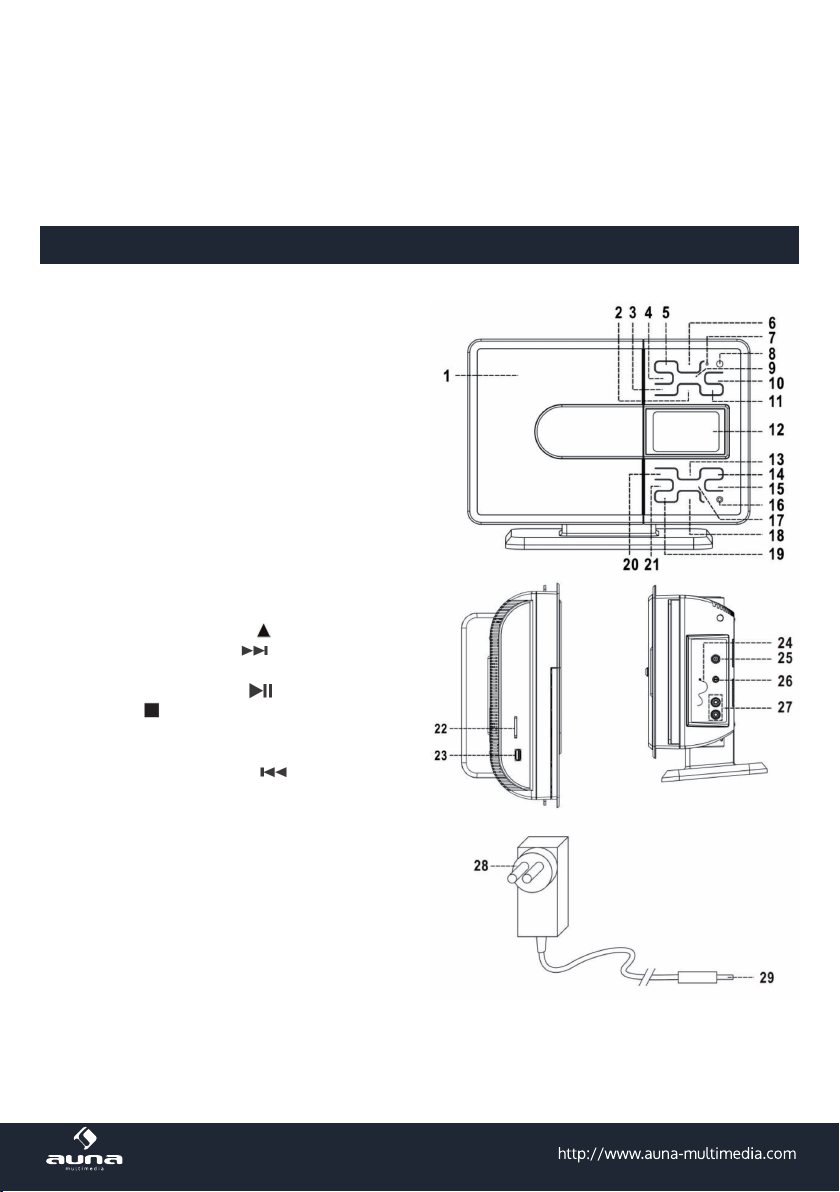
Geräteübersicht
1 CD-Fach
2 Alarm-Taste
3 Display/ID3
4 Lautstärke runter
5 Ein-/Standby-Taste
6 Funktionswahl-Taste
7 Standby Kontrollleuchte
8 IR Sensor für die Fernbedienung
9 Voreingestellte Equalizer
10 Lautstärke hoch
11 Snooze-Funktion
12 LCD-Anzeige
13 Speicher / Uhrzeit einstellen
14 Ordner / Speicher vor
15 Frequenz / Titel vor
16 3.5mm Kopfhöreranschluss
17 Wiedergabe / Pause
18 Stopp / Stereo-Mono-Taste
19 CD-Fach önen/schließen
20 Wiedergabemodus
21 Frequenz/ Titel zurück
22 SD-Kartenslot
23 USB-Anschluss
24 FM-Wurfantenne
25 DC-Stromanschluss
26 3.5 mm AUX-IN Anschluss
27 Lautsprecheranschluss (L/R)
28 Netzgerät
29 DC-Stromstecker
2
Page 3
ACHTUNG: Benutzen Sie das Gerät nur für den vorgesehenen Zweck. Eine andere Verwendung könnte
gefährlich sein. Das Gerät darf nur von Fachpersonal eingestellt oder repariert werden.
WICHTIG: Das CD-Laufwerk kann den Radioempfang anderer Geräte stören, schalten Sie das Gerät ab
falls Sie ein anderes Gerät verwendet möchten.
Fernbedienung
Die Fernbedienung benötigt für den Betrieb 2 “AAA“-Batterien (nicht im Lieferumfang enthalten).
Taste Funktion
ON/STANDBY Ein / in den Standby-Modus schalten.
FUNCTION Wählen Sie eine Funktion (CD/USB/RADIO/AUX)
MEM / CLK-ADJ STANDBY: Drücken & Halten um Uhr/Alarm einzustellen.
CD / RADIO: Sender speichern.
SKIP UP
TUNE+/- RADIO: Frequenz einstellen.
STOP
FOLDER / PRE UP / DOWN CD / MP3: Ordner vor/zurück
-10 / +10 CD / MP3 / USB / SD: Titel abbrechen vor / zurück. 10 Titel vor / zurück.
Open / Close CD-Fach önen/Schließen
VOLUME -/+ Lautstärke regeln.
PLAY-mode CD / USB: Zufallswiedergabe / Wiederholung aktivieren.
Display / ID3 ID3-Funktion aktiviert
PRESET EQ Equalizer-Modus wählen.
SLEEP Einschlaunktion einstellen.
MUTE Stummschaltung
ALARM Drücken um den Alarm einzustellen.
SNOOZE ALARM: Schlummerfunktion einstellen.
Play/pause CD / USB: Wiedergabe starten/pausieren
/ DOWN CD / USB / SD: vorheriger / nächster Titel
/ ST-MONO
RADIO: Stereo/Mono aktivieren
CD/USB: Wiedergabe stoppen
RADIO: Gespeicherte Sender vor/zurück
3
Page 4
Aufbau und Anschluss
Vor dem ersten Betrieb
• Packen Sie alle Teile aus und entfernen Sie die Verpackung.
• Schließen Sie das Gerät nicht an, bevor die Spannungsversorgung geprüft und sämtliche Kabel angeschlossen haben.
• Decken Sie keine Belüftungsönungen ab und vergewissern Sie sich, dass rund um das Gerät mehre-
re Zentimeter Platz zur Belüftung sind.
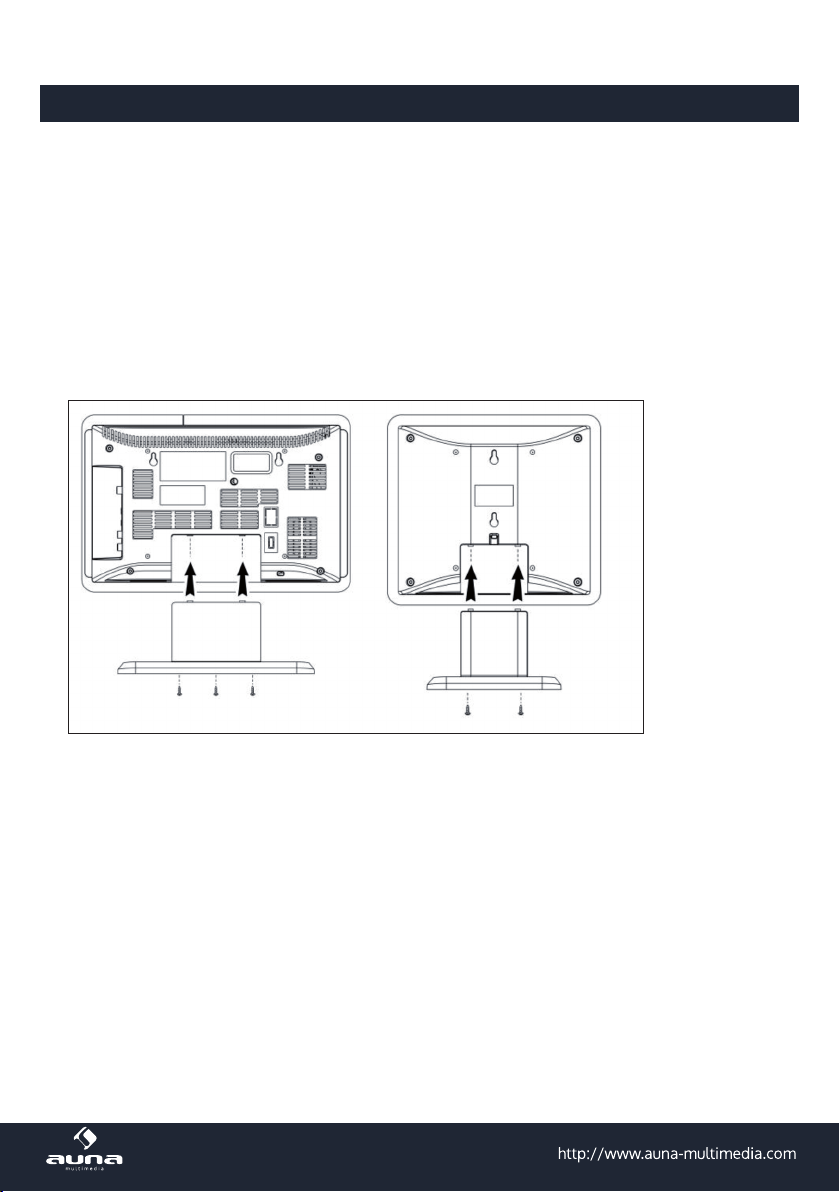
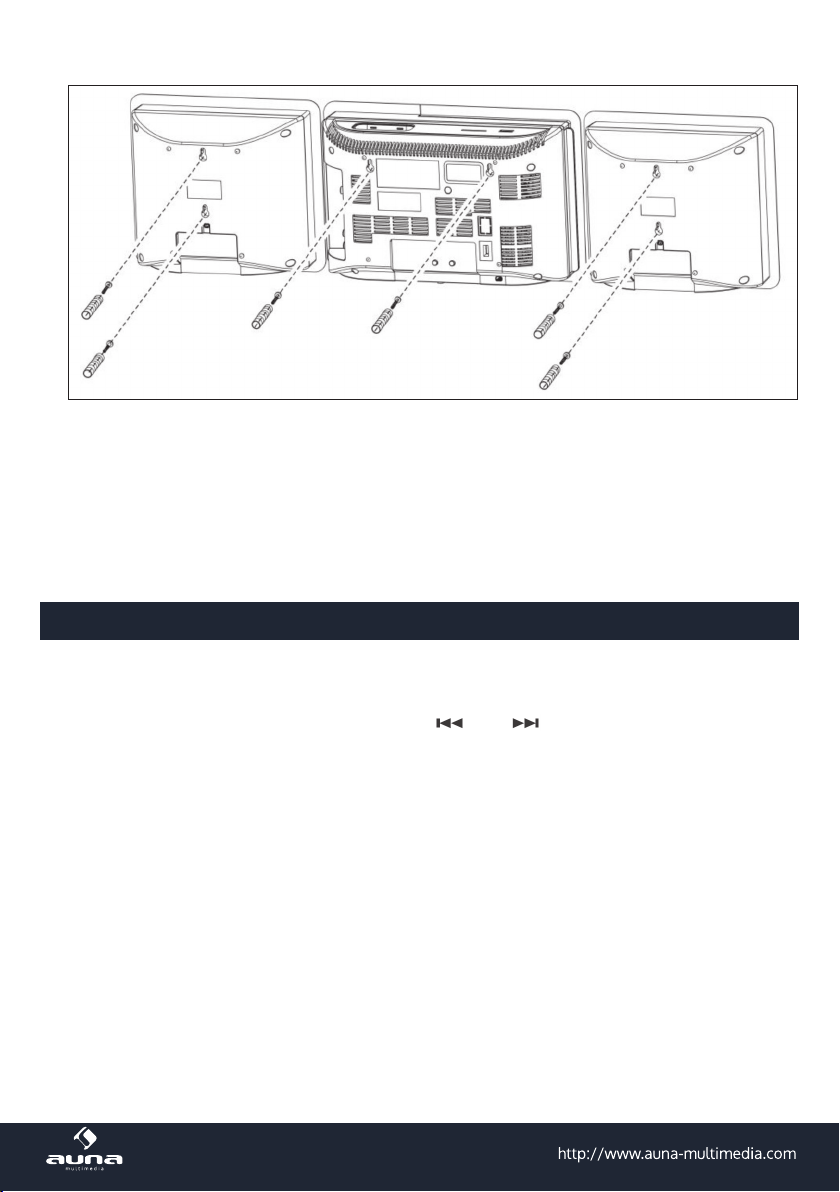
Montage für den Tischgebrauch
Stecken Sie das Gerät und die beiden Lautsprecher auf die dazugehörigen Standfüße auf und schrauben
Sie die Befestigungsschrauben ein. Siehe Bild:
Wandmontage
1 Entfernen Sie die Lautsprecher und den die Standfuß falls montiert.
2 Richten Sie die Bohrschablone waagerecht aus und markieren Sie die für die Wandmontage not-
wendigen Bohrungen.
3 Bohren Sie die Befestigungslöcher (Durchmesser 6 mm).
4 Stecken Sie die Plastikdübel in die Bohrungen.
5 Schrauben Sie die Befestigungsschrauben so weit ein, dass sie ca. 4 mm aus der Wand hervorstehen.
6 Hängen Sie das Gerät und die beiden Lautsprecher in die Schrauben ein.
4
Page 5
Anschluss
• Stecken Sie den DC-Stromstecker (29) in den DC-Stromanschluss (26) und stecken Sie anschließend
das Netzgerät in eine geeignete Steckdose.
• Beim ersten Einschalten wechselt das Gerät in den Standby-Modus und die LED-Anzeige leuchtet auf.
• Schließen Sie die Lautsprecher an der Seite des Gerätes an.
• Schalten Sie das Gerät ein. Nun sollte die Hintergrundbeleuchtung der Anzeige eingeschaltet sein
und das Gerät ist Betriebsbereit.
Uhrzeit einstellen
1 Wechseln Sie in den Standby-Modus.
2 Drücken Sie die MEM/CLK-ADJ Tasten. Im Display erscheint die Anzeige „00“. Drücken Sie die
3 oder Tasten um die Stunden einzustellen. Drücken Sie die MEM/CLK-ADJ Taste zum Bestätigen.
4 Um die Minuten einzustellen, drücken Sie die oder Tasten. Drücken Sie erneut auf die
MEM/CLK-ADJ Taste um die Uhrzeit abzuspeichern.
Sollten Sie 5 Sekunden keine Taste drücken, wird der Modus automatisch verlassen. Die Uhrzeit wird
gelöscht, sobald das Gerät vom Stromnetz getrennt wird. Schalten Sie das Gerät bei Nichtbenutzung
in den Standby-Modus.
5
Page 6
Radio hören
Manuell
1 Drücken Sie die FUNCTION Taste, um den „Tuner“-Modus aufzurufen.
2 Stimmen Sie mit dem TUNING Regler oder den gewünschten Sender ab.
3 Regeln Sie die Laustärke nach Ihren Wünschen.
Automatisch
1 Drücken Sie die FUNCTION Taste, um den „Tuner“-Modus aufzurufen.
2 Drücken und halten Sie oder für 1-2 Sekunden.
3 Das Gerät sucht nun automatisch den nächsten Sender.
4 Wiederholen Sie die Schritte 2 & 3 bis Sie den gewünschten Sender gefunden haben.
5 Regeln Sie die Laustärke nach Ihren Wünschen.
Senderspeicher
Sie können bis zu 20 Sender speichern. Wechseln Sie in den Radiomodus.
1 Suchen Sie entweder manuell oder automatisch einen Sender.
2 Drücken Sie „Speicher/ Uhrzeit einstellen“ bis „MEM“ und die Nummer des Speicherplatzes blin-
kend angezeigt wird.
3 Drücken Sie „Ordner/Speicher vor um den Speicherplatz zu wählen.
4 Drücken Sie zum Bestätigen erneut „Speicher/ Uhrzeit einstellen“.
5 Wiederholen Sie die Schritte 1 bis 4 für weitere Sender.
6 Sie können nun die gespeicherten Sender mit „Ordner/Speicher vor aufrufen.
• Wenn Sie das Gerät vom Stromnetz trennen werden die gespeicherten Sender gelöscht. Sollen diese
gespeichert bleiben, wechseln Sie in den Standby-Modus.
• Sollten Sie 5 Sekunden keine Taste drücken, wird der Modus automatisch verlassen.
• Sie können die Speicherplätze jederzeit mit einem anderen Sender überschreiben.
FM-Stereo-Empfang
• Drücken Sie die Stereo-Mono-Taste wiederholt, um zwischen Mono und Stereo-Empfang zu wech-
seln. Bei schwachen Sendersignalen ist der Mono-Modus empfohlen.
• Wird ein Sender als Stereosignal empfangen, wird in der Anzeige eingeblendet.
Hinweise für einen besseren Empfang:
Zum Empfang von AM Sendern ist eine Antenne im Gerät integriert. Das Gerät kann durch Verdrehen
und Änderung auf den Sender ausgerichtet werden. In diesem Frequenzband werden Sendungen nur
in Mono ausgestrahlt.
6
Page 7
CD-Wiedergabe
Vorbereitung
1 Stellen Sie die Funktionswahltaste auf „CD“.
2 Drücken Sie „Open/close“ zum Önen des CD-Fachs.
3 Legen Sie eine CD mit der bedruckten Seite nach oben ein und schließen die Tür.
4 Die CD wird durchsucht und auf der Anzeige erscheinen die Anzahl der Titel und die Spieldauer.
Wiedergabe/Pause
Um die Wiedergabe zu unterbrechen, drücken Sie „Play/pause“. Die Abspieldauer hält an. Drücken Sie
zum Fortsetzen der Wiedergabe erneut „Play/pause“.
Wiedergabe stoppen
Drücken Sie während der Wiedergabe oder Pause zum Stoppen.
Überspringen / Suchmodus (Überspringen / Suche vor / Überspringen/ Suche zurück )
• Drücken Sie während der Wiedergabe wechselt das Gerät zum nächsten Titel.
• Drücken Sie während der Wiedergabe „skip down“ wechselt das Gerät zum vorherigen Titel.
Für MP3-CD
1 Es wird die Anzahl aller Titel angezeigt und die Wiedergabe startet automatisch.
2 Drücken Sie „Ordner / Speicher „vor “ oder „herunter “ um die Ordnernummer zu ändern.
3 Drücken Sie oder um die Titelnummer zu ändern.
ID3 (Titel/Album) Funktion (über Fernbedienung)
Drücken Sie „ID3“ während der MP3-Wiedergabe und die Titelinformation wird angezeigt. Drücken Sie
zum Deaktivieren erneut „ID3“.
Hinweis:
• Ist für den Titel kein Name festgelegt, wird nichts auf der LCD-Anzeige angezeigt.
• Es wird auch nichts auf der Anzeige angezeigt, falls das Dateiformat nicht unterstützt wird.
• Die LCD-Anzeige unterstützt nur englische Schriftzeichen.
Anforderungen an MP3-Titel:
• MP3-Bitrate: 32kbps ~ 256kbps. Sampling-Rate: 32kHz, 44.1kHz und 48 Hz dekodierbar
• Die Wiedergabeleistung variiert je nach Aufnahmequalität. Das Einlesen der CDs ist durch die längere
Spieldauer auch länger.
7
Page 8
Wiederholung/Intro/Zufallswiedergabe
Drücken Sie „repeat/intro/random“ vor oder während der Wiedergabe, um einen Titel, einen Ordner
oder alle Titel in verschiedenen Modi wiederzugeben.
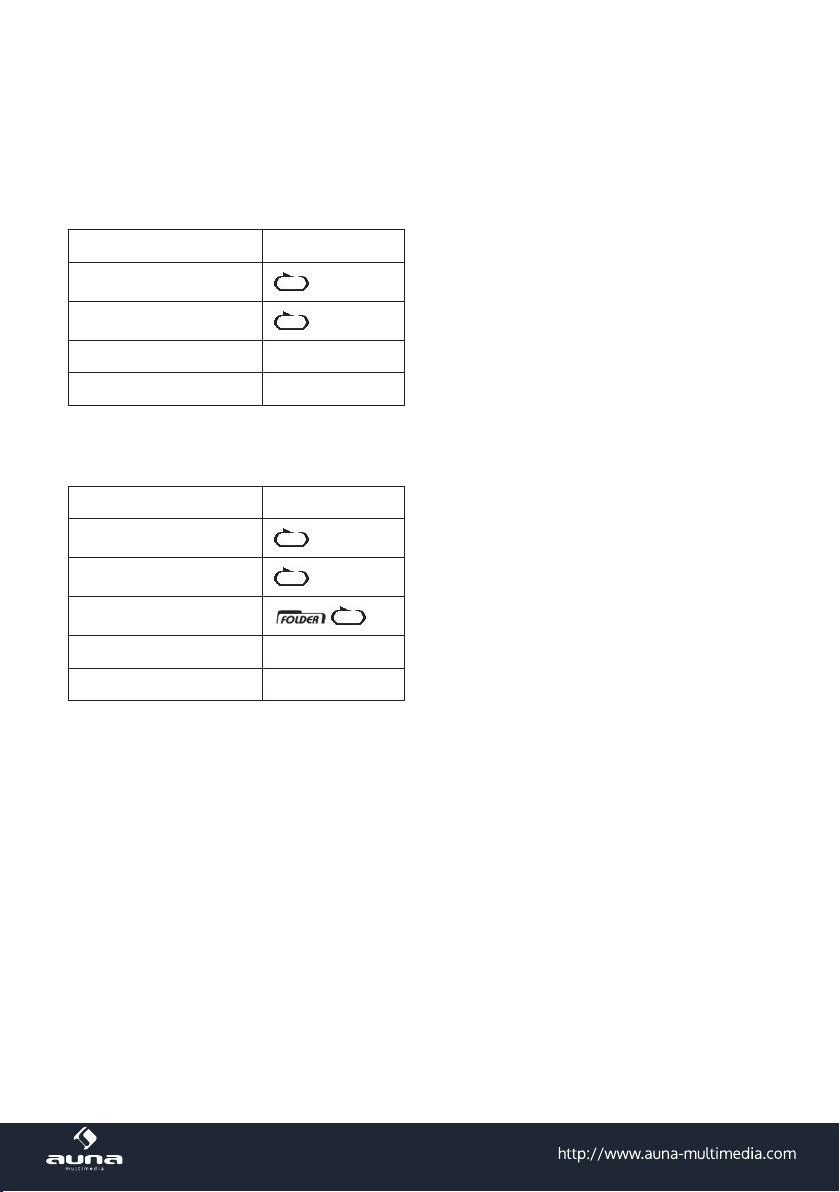
Für CD: (1) Wiederholung 1 ->(2) Wiederholung alle Titel -> (3) Zufallswiedergabe -> (4) aus
Wiedergabemodus LCD-Anzeige
Wiederholung Titel
Wiederholung alle
Zufallswiedergabe RAN
Aus -------
Für MP3-CD: (1) Wiederholung 1 -> (2) Wiederholung alle Titel -> (3) Wiederholung 1 Ordner ->
(4) Zufallswiedergabe -> (5) aus.
Wiedergabemodus LCD-Anzeige
Wiederholung Titel
Wiederholung alle
Wiederholung Ordner
Zufallswiedergabe RAN
Aus -------
blinkend
blinkend
Wiederholung
Sie können ununterbrochen einen Titel oder Ordner hören.
Zufallswiedergabe
Sie können sich alle Titel in zufälliger Reihenfolge anhören.
8
Page 9
Programmierte CD-Wiedergabe (über Fernbedienung)
Sie können bis zu 32 CD/MP3-Titel in beliebiger Reihenfolge wiedergeben. Das Gerät muss sich dafür
im Stopp-Modus benden:
1 Wechseln Sie in den CD-Modus und stoppen Sie die Wiedergabe.
2 Drücken Sie „Speicher/ Uhrzeit einstellen“ bis „MEM“ angezeigt wird.
3 Wählen Sie den gewünschten Titel mit
4 Drücken Sie „Program“ um den Titel der Programmierung hinzuzufügen.
5 Wiederholen Sie die Schritte 3 und 4 für alle weiteren Titel.
6 Haben Sie alle Titel der Wiedergabeliste hinzugefügt drücken Sie zum Starten der Wiedergabe
7 Zum Beenden der Wiedergabe drücken Sie .
Sollten Sie 5 Sekunden keine Taste drücken, wird der Modus automatisch verlassen.
Wiedergabe von MP3-Dateien von USB / Speicherkarte
Das Gerät kann MP3-Dateien von SD/MMC-Speicherkarte oder USB abspielen.
1 Schalten Sie das Gerät in den Standby-Modus bevor Sie USB oder Speicherarte nutzen.
2 Schließen einen USB-Speicher an bzw. Stecken eine Speicherkarte ein. Siehe Bild. Falls Sie versu-
chen das Speichermedium falsch herum einzulegen, kann es zu Schäden am Gerät kommen. Prüfen
Sie die richtige Ausrichtung vor dem Einsetzen.
3 Schalten Sie das Gerät durch Drücken der FUNCTION Taste in den SD/MMC bzw. USB-
Modus.
4 Das Gerät beginnt automatisch mit dem Laden und zeigt die Anzahl den MP3-Dateien an.
5 Die Bedienung erfolgt wie bei der CD/MP3-Wiedergabe.
Wichtige Hinweise
/ .
• Das Gerät kann nur MP3-Dateien lesen.
• Sollten Sie einen MP3-Player mittels USB an das Gerät anschließen, wird er unter Umständen nicht
als USB-Speicher erkannt. Dies ist keine Fehlfunktion.
• Der USB-Anschluss ist nicht für USB-Verlängerungen oder den direkten Anschluss an einen PC aus-
gelegt.
Entfernen von USB / Speicherkarte
Vor dem Entfernen müssen Sie da Gerät abschalten bzw. den Modus zu CD, AUX oder Radio wechseln.
Nun können Sie das Speichermedium entnehmen.
9
Page 10
Weitere Funktionen
Einschlaf-Funktion
1 Drücken Sie „Sleep“ und „slp-90“ wird angezeigt.
2 Drücken Sie wiederholt „Sleep“ bis die gewünschten Minuten 90>80>70>…>10 und angezeigt
werden.
3 Nach Anlauf dieser Zeit schaltet sich das Gerät automatisch ab.
4 Um die Funktion zu deaktivieren, drücken Sie wiederholt „Sleep“ bis verschwindet.
Wecker
Sie können mittels dieser Funktion von CD, Radio, USB oder SD wecken lassen. Drücken und halten Sie
„Alarm“, es wird angezeigt und Sie können mit / die Stunden einstellen. Bestätigen Sie
dieses mit „Alarm“ und stellen Sie anschließend mit / die Minuten ein. Diese bestätigen Sie
wieder mit „Alarm“. Regeln Sie abschließend mit hoch/runter die Wecklautstärke.
Hinweis:
• Sollte keine Musik über CD oder USB erkannt werden, weckt Sie das Gerät mittels Radio.
• Beim Wecken mittels Radio wird der zuletzt gehörte Sender verwendet.
• Sollten Sie 4 Sekunden keine Taste drücken, wird der Modus automatisch verlassen.
• Drücken Sie während des Alarms „Ein/Standby“, um den Alarm auszuschalten.
Alarm de-/aktivieren
1 Drücken Sie zum Aktivieren wiederholt „Alarm“ bis angezeigt wird.
2 Drücken Sie zum Deaktivieren wiederholt „Alarm“ bis nicht mehr angezeigt wird.
Stummschaltung
Mittels dieser Funktion können Sie die Tonausgabe kurzzeitig unterbrechen.
Voreingestellte Equalizer
Es gibt 4 voreingestellte Equalizer, die Sie durch wiederholtes Drücken von „Voreingestellte Equalizer“
wählen können: Flach -> Klassik -> Rock -> Pop -> Jazz
Anzeigefunktionen
Drücken Sie „Anzeige/ID3“ in irgendeinem Wiedergabemodus und es wird die aktuelle Zeit angezeigt.
10
Page 11

Snooze-Funktion
Drücken Sie während des Alarms „Snooze“, der Alarm wird pausiert und nach Ablauf von 9 Minuten
fortgesetzt. Um den Alarm auszuschalten drücken Sie „Ein/Standby“.
AUX-IN Buchse
Zum Anschluss von analogen Wiedergabegeräten. Über diese Buchse können Sie auch den Ton anderer
Wiedergabegeräte wie MP3-Player, CD-Player usw. über die Lautsprecher hören.
Hinweis: Stellen Sie die Lautstärke des externen Gerätes auf eine hörgerechte Lautstärke.
Hinweise zur Entsorgung
Be ndet sich die linke Abbildung (durchgestrichene Mülltonne auf Rädern) auf dem
Produkt, gilt die Europäische Richtlinie 2002/96/EG. Diese Produkte dürfen nicht mit
dem normalen Hausmüll entsorgt werden. Informieren Sie sich über die örtlichen Regelungen zur getrennten Sammlung elektrischer und elektronischer Gerätschaften.
Richten Sie sich nach den örtlichen Regelungen und entsorgen Sie Altgeräte nicht
über den Hausmüll. Durch die regelkonforme Entsorgung der Altgeräte werden Umwelt und die Gesundheit ihrer Mitmenschen vor möglichen negativen Konsequenzen
geschützt. Materialrecycling hilft, den Verbrauch von Rohsto en zu verringern.
Das Produkt enthält Batterien, die der Europäischen Richtlinie 2006/66/EG unterliegen und nicht mit
dem normalen Hausmüll entsorgt werden dürfen. Bitte informieren Sie sich über die örtlichen Bestimmungen zu gesonderten Entsorgung von Batterien. Durch regelkonforme Entsorgung schützen Sie die
Umwelt und die Gesundheit ihrer Mitmenschen vor negativen Konsequenzen.
Konformitätserklärung
Hersteller: Chal-Tec GmbH, Wallstraße 16, 10179 Berlin, Deutschland.
Dieses Produkt entspricht den folgenden Europäischen Richtlinien:
2014/30/EU (EMV)
2014/35/EU (LVD)
2011/65/EU (RoHS)
11
Page 12

Dear Customer,
Congratulations on purchasing this equipment. Please read this manual carefully and take care of the
following hints to avoid damages. Any failure caused by ignoring the mentioned items and cautions
mentioned in the instruction manual are not covered by our warranty and any liability.
Product Description
1 CD door
2 Alarm button
3 Display/ID3 button
4 Volume down button
5 On / standby button
6 Function button
7 Standby LED indicator
8 Remote sensor
9 Preset EQ button
10 Volume up button
11 Snooze button
12 LCD display
13 Memory / Clock-adjust button
14 Folder/ Pre-up button
15 Skip / tuning up button
16 3.5mm headphone jack
17 Play/pause button
18 Stop /St-mono button
19 CD door open/close button
20 Play mode button
21 Skip / tuning down button
22 SD slot
23 USB socket
24 FM wire antenna
25 DC jack
26 3.5 mm Aux-in jack
27 Speaker jack (l/r)
28 AC/DC adaptor
29 DC plug
12
Page 13

Caution: Usage of controls or adjustments or performance of procedures other than those specied he-
rein may result in hazardous radiation exposure. This unit should not be adjusted or repaired by anyone
except qualied service personnel.
Important: Since movement of the cd mechanism and the sensitive circuity may cause interference to
the radio tuner nearby, switch this unit o while operating other radio devices.
Remote Control
The Infra-Red Transmitter require 2 pcs “AAA“ size battery for operation (not included).
Button Function
ON/STANDBY Press to switch on / standby the system.
FUNCTION Press to select the functions (CD/Tuner/USB/Aux).
MEM / CLK-ADJ In standby mode: press and hold to adjust clock.
In CD/Tuner mode mode: press and hold preset to adjust memory.
SKIP UP
TUNE+/- Press to step up/down of radio frequency at tuner mode.
STOP
FOLDER / PRE UP / DOWN In Tuner mode: press to select preset memory upwards.
-10 / +10 In CD/MP3 disc/USB/SD mode: press to skip up/down 10 tracks.
Open / Close Press to open or close the CD door.
VOLUME -/+ Press to adjust volume level up/ down.
PLAY-mode In CD/USB mode: press to active random/repeat function.
Display / ID3 Press to active the ID3 function.
PRESET EQ Press to select dierence EQ mode for enjoyment.
SLEEP Press to active sleep function.
MUTE Press to active mute function .
ALARM Press to adjust alarm clock or active/de-active alarm function.
SNOOZE Press terminale the alarm mode temporarily.
Play/pause In CD/USB mode: press to start playback/pause mode.
/ DOWN Press to select previous/next radio tracks at CD/USB tuner mode.
/ ST-MONO In DC/USB mode: press to stop the playback.
In radio mode: select stereo/mono mode.
In MP3 mode: press to select folder downwards.
13
Page 14

Installation and Connection
Before rst Use
• Unpack all parts and remove protective material.
• Do not connect the unit to the mains before checking the main voltage and before all other connec-
tions have been made.
• Do not cover any vents and make sure that there is a space of several centimeters around the unit
for ventilation.
For Table Top Use
Inset the stand to the main unit and speaker box refer to the picture
For Wall Mounting
1 Uninstall speaker box and the stand in the revise way from above.
2 Use the wall-mounting template supplied with the unit to make anchor hole marks on the wall.
Make sure the marks are level.
3 Drill 1/4” holes on the marks.
4 Insert the plastic anchor supplied with unit it is ush with the wall.
5 Insert the screw and tighten the screw 4mm away from the wall. (Approximately the width of 2
pennies) hang the main unit and speakers to the screw.
14
Page 15

Connection
• Connect the power cord (22) to ac outlet
• When you rst plug the unit into the mains, the unit will go into standby mode and the standby led
indicator (3) will light up.
• Connect the speaker wire to the speaker jck (21) located on the side of unit.
• Turn on the power (5), if the lcd display (4) is on with backlighting, it means the power supply is nor-
mal. Now your system is ready to play the music.
Setting the Clock
1 Set unit in standby mode.
2 Press & hold the “ Mem/clk-adj ” button (13) the rst & second digit of “ 00 ” is ashing on the LCD
display(12). Press skip up or skip down button (15,21) to set the correct hour. Press “ Mem/Clk-adj ”
button (13) to store the correct hour.
3 The third & fourth digit of “ 00 ” is ashing, press the skip up or skip down button (15, 21) to set the
correct minutes. Then press “ Mem/Clk-adj ” button (13) to store the correct minute.
The clock setting mode will automatically quit if no button is being pressed in a period of about 5
seconds after pressing the “ Mem/Clk-adj ” button. The pre-set time will be re-set completely if disconnecting the main power supply. You are recommended to switch the system into standby mode for
convenience usage.
15
Page 16

Listening to Radio
Manual tuning
1 Press Function button (6) to select “ Tuner ” mode.
2 Tune to the required station by pressing the tune “ + ” or “ − ” button (15,21).
3 Adjust volume up/down button (10,4) to the desired volume level.
Auto tuning
1 Press Function button (6) to select “ tuner ” mode.
2 Press and hold the tune “ + ” or “ − ” button (15,21) for 1-2 seconds and then release.
3 The unit will start seeking automatically and stop until a radio station is reached.
4 Repeat step 2 & 3 until the desired radio station is being reached.
5 Adjust volume up/down button (10,4) to the desired volume level.
Preset stations
You can store up to 20 radio stations in the memory Set to tuner mode.
1 Turn to the desired radio station by “ manual” or “ auto ” tuning method.
2 Press the Mem/Clk-adj ” button (13) until the “ MEM ” indicator and preset station number are ash
on LCD display (12)
3 Press “ Folder / Pre-up button (14) to select the desired station memory for storage.
4 Press “ Mem/Clk-adj ” button (13) again to conrm the setting.
5 Repeat step 1 to 4 to store other stations.
6 Now you can select the presets stations in order by pressing the “Folder/Pre–up ” button (14)
• The pre-set memories will be cancelled completely if dis-connecting the main power supply. You are
recommended to switch the system into standby mode for convenience usage.
• There are 5 seconds for program state, after 5 sec. This state would resume to normal tuner mode
automatically.
• You can overwrite a present station by storing another frequency in its place.
FM-stereo reception
• Press the “ St/Mono ” button (18) repeatedly, the FM programs are receiving in mono and stereo
mode repeatedly. In particular when stereo signals are weak.
• It is preferable to receive the program in mono.If stereo signal is being received, the stereo indicator
“ ” will appear on LCD display (12) to show FM stereo program is now receiving.
Hints for best reception:
FM : The receiver has a build-in FM wire antenna (24).
16
Page 17

Playing CD/MP3
Getting Started
1 Press Function button (6) to select “CD” mode. Press “ CD door open/close ” button (19) to
open the CD door. Place a CD with the printed side facing up & close the door by pressing the
“CD door open/close” button (19) again.
2 Focus search is performing, the LCD display (12) will show the total number of tracks & total playing
time. Then, the unit will start to automatically. Adjust volume with up/down button.
Play / pause mode
To interrupt, press the “Play/Pause” button (17) once, and the playing time will be freeze on the LCD
display (12). Press again to resume normal playback.
Stop mode
1. If “stop” button (13) is pressed during play or pause mode, system will go to stop mode.
Skip mode (skip up / skip down )
• During play or pause mode, if “ skip up ” button (15) is pressed. It will go to next track.
• During play or pause mode, if “ skip down “ button (21) is pressed. It will go to the previous track.
For MP3 disc
1 After focus search is performing, the total number of track and album will be shown on the LCD
display (12). The unit will start to plat directly.
2 Press “ Folder/ Pre-up (14) or Pre-dn ” at remote control to select the folder number.
3 Press “ skip up or skip down ” button (15, 21) to select the track number.
ID3 function
Press the “ID3“ button (3) repeatedly, the LCD display (12) show “ le - … ”during playback of MP3 le,
the song le / album / song / artist name is being displayed in sequence.
Remark: in that case of no name or not supportive languages had been assigned for the track, LCD
display will blank (12) when press the id3 button. No title/album name can be recognized if the input
format on the disc/mass media is not supporting by the system. The system support only English and
Arabic number for ID3 function
MP3 track format requirement
• Bit rate : 32 kbps~320 kbps, sampling rate : 32 kHz, 44.1 kHz and 48 kHz decodable
• The performance of playing mp3 disc is various from the quality of recording disc and the method
of recording. Furthermore, the searching lead-time for mp3-cd is longer than normal cd due to dierence format.
17
Page 18

Repeat/random mode
Press the “ Play mode ” button (20) during playback to select repeat and random function, a single track,
all the tracks repeat or folder repeat(MP3 only) and random can be played in dierence mode as follow:
For CD: (1) repeat 1 > (2) repeat all tracks > (3) random > (4) o mode
Play mode Indicator on LCD
Repeat track
Repeat all
Random RAN
O mode -------
For MP3 disc/le: (1) repeat 1 > (2) repeat all tracks > (3) repeat 1 folder > (4) random > (5) o mode
Play mode Indicator on LCD
Repeat track
Repeat all
Repeat folder
Random RAN
O mode -------
ashing
ashing
Repeat play
You can listen the desired track or whole disc repeat by this function.
Random play
You can listen all the tracks in a random order by this function.
18
Page 19

CD programming
Up to 20 tracks can be programmed for disc play in any order. Before use, be sure to press the
“stop
” button (18).
1 Set in CD mode & stop the cd playback.
2 Press the “ Mem/Clk-adj ” button (13) and “ MEM ” will appear on LCD display (12).
3 Select a desired track by pressing skip up or down button (15, 21).
4 Press the “ Mem/Clk-adj ” button (13) to store the track into memory.
5 Repeat steps 3 and 4 to enter additional tracks into the memory if necessary.
6 When all the desired tracks have been programmed, press “ Play/Pause ” button (17) to play the
disc in assigned order.
7 Press “ Stop ” button (18) to clear all stored memory.
The programming mode will automatically stop if no button is being pressed in a period of about 10
seconds after pressing the “mem/clk-adj ” button.
Playback of MP3 Songs via USB Storage Media or Memory Card
The system is able to decode and playback all MP3 le which stored in the memory media with USB
connecting port or SD/MMC memory card.
1 Set the system at standby mode rst or other function except SD or USB mode.
2 Plug-in the USB pen-drive with the face up & make sure it going into completely or insert the me-
mory card in the direction of the arrow as shown in the label on the underside of the memory card
slot cover. Insert straight without bending.
3 Connecting the USB upside down or backwards could damage the audio system or the storage me-
dia (USB thumb drive / SD / MMC card). Check to be sure the direction is correct before connection.
4 Set function button (6) to “ ” SD/MMC card or “ ” Usb mode.
5 The system will start reading the storage media automatically after connecting, and LCD display (12)
will show the total number of MP3 les being detected.
6 Repeat the same playback procedure as playing CD/MP3 disc as above.
Remark
• The system can detect and read the le under MP3 format only at usb/sd mode but not other music
le format.
• If connect the system to MP3 player via the USB socket, due to variances in MP3 encoding format,
some MP3 player may not be able to play via the USB socket. This is not a malfunction of the system.
• USB port does not support connection with USB extension cable and is not designed for communi-
cation with computer directly
Removing of USB / Memory Card
To remove the USB / memory card, turn o the power or switch the function mode to either cd, aux or
tuner rst. For USB port – un-plug it by pulling out the usb socket directly, for memory card – press the
memory card inward & then release, now the card being partially eject and you can remove it by hand.
19
Page 20

Additional Features
Sleep function
1 Press “ Sleep ” button (11) “slp-90 “ will shown on the LCD display (12).
2 Keep pressing the button to adjust the sleep timer in the order of 90 > 80 > 70 >….10 minutes res-
pectively and sleep icon “ ” will indicate on LCD.
3 System will stop and go to standby mode automatically after running the selected time.
4 To cancel the sleep mode, press “ sleep ” button until “SLP-o’ displayed and the “ “ indicator
disappear on LCD display.
Alarm clock setting
This function allows the system to turn on automatically and wake you up by CD , Tuner, USB, SD mode.
Press and hold the “ Alarm ” button (2) to enter the alarm setting mode, the rst two digits of clock will
ashing with alarm icon . Press “ Skip up / down ” button (15,21) to set the hour & then
press “ Alarm ” button(2) again to conrm. Then press “ Skip up / down ” button (15,21) to set
the minutes & press “ Alarm “ button (2) to conrm the alarm time, press “ Skip up / down ”
button (15,21) to select wake up mode & press “ Alarm “ button (2) to conrm. Then press up/down but-
ton (10,4) to adjust the wake up volume level. Press the alarm to complete the alarm setting.
Remark
• If there is no music source being detected (such as USB or cd) when the preset time is reached, system
will default to “ Tuner ” function for wake up mode automatically. The system will preset at the latest
radio frequency being listened before switching o
• For tuner wake up, the system will preset at the latest radio frequency being listened before switching o.
• There are about 4 seconds for alarm setting mode, this system will return to normal mode automati-
cally if no keys being pressed in this time frame.
• During the alarm on mode, press the “ On/standby “ button (5) will switch o the system.
Active/de-active timer function
• To active the alarm function, press the “ Alarm ” button(2) repeatedly until the alarm indicator “ ”
is shown on LCD display (12).
• To cancel alarm function by press again “ Alarm” button(2) until the timer indicator “ ” disappear.
Mute function: Press to terminate the sound output from speaker temporarily and press again to resume
normal playback.
Pre-set EQ function: This unit provides 4 dierences sound mode to enhance your listening experience. You can select the desired eect by pressing the “ preset EQ ” button (9) repeatedly at following
sequence: Flat > classic > rock > pop > jazz
20
Page 21

Display function
For convenience usage, press “ Display/ID3 “ button (3) when system is on at any mode, the LCD display
(12) will show the current time.
Snooze function
During the alarm on mode, press “ Snooze “ button(11) once to terminate the alarm mode temporarily,
and system will re-start again after 9 minutes on each press. To cancel the alarm, press the “ Alarm “ (2)
button or On/standby button (5) while system is on.
Aux-in Connection
Connect another audio device, e.G. (Portable) cd player, mp3 player, (portable) cassette player, ipod,
etc. To this system via a cord with 3.5Mm dia jack plugs (not supplied). Connect one end of this cord
to the 3.5Mm dia. Headphone jack on the external device and the other end to the aux-in jack (26) on
the side of the unit. When connected in this way it is possible to play back the music already on the
connected device.
Hints on Disposal
According to the European waste regulation 2002/96/EG this symbol on the product
or on its packaging indicates that this product may not be treated as household waste. Instead it should be taken to the appropriate collection point for the recycling of
electrical and electronic equipment. By ensuring this product is disposed of correctly, you will help prevent potential negative consequences for the environment and
human health, which could otherwise be caused by inappropriate waste handling of
this product. For more detailled information about recycling of this product, please
contact your local council or your household waste disposial service.
Your product contains batteries covered by the European Directive. 2006/66/EG, which cannot be disposed of with normal household waste. Please check local rules on separate collection of batteries. The
correct disposal of batteries helps prevent potentially negative consequences on the environment and
human health.
Declaration of Conformity
Producer: Chal-Tec GmbH, Wallstraße 16, 10179 Berlin, Germany.
This product is conform to the following European Directives:
2014/30/EU (EMC)
2014/35/EU (LVD)
2011/65/EU (RoHS)
21
Page 22

Chère cliente, cher client,
Toutes nos félicitations pour l’acquisition de ce nouvel appareil. Veuillez lire attentivement et respecter
les instructions de ce mode d’emploi an d’éviter d’éventuels dommages. Nous ne saurions être tenus
pour responsables des dommages dus au non-respect des consignes et à la mauvaise utilisation de
l’appareil.
Aperçu de l’appareil
1 Compartiment à CD
2 Touche Alarm
3 Écran/ID3
4 Baisser le volume
5 Touche marche/veille
6 Touche de sélection des fonctions
7 Voyant lumineux de veille
8 Capteur IR de la télécommande
9 Égaliseur préréglé
10 Augmenter le volume
11 Fonction Snooze
12 Écran LCD
13 Mémoire/réglage de l’heure
14 Dossier/mémoire précédent(e)
15 Fréquence/titre précédent(e)
16 Prise casque 3,5 mm
17 Lecture/pause
18 Stop / Touche stéréo-mono
19 Ouvrir/fermer le compartiment à CD
20 Mode de lecture
21 Fréquence/titre suivant(e)
22 Fente pour carte SD
23 Prise USB
24 Antenne laire FM
25 Prise secteur DC
26 Prise AUX-IN 3,5 mm
27 Prises pour enceintes (L/R)
28 Bloc d’alimentation
29 Fiche d’alimentation DC
22
Page 23

ATTENTION : utiliser l’appareil uniquement aux ns prévues. Toute autre utilisation peut être dangereu-
se. L’appareil doit être révisé ou réparé uniquement par un technicien spécialisé.
IMPORTANT : le lecteur CD peut perturber la réception radio d’autres appareils, éteindre l’appareil au
besoin pour pouvoir utiliser d’autres appareils.
Télécommande
La télécommande requiert 2 piles « AAA » pour fonctionner (non fournies à la livraison).
Touche Fonction
ON/STANDBY Mettre en marche / en mode veille
FUNCTION Sélectionner une fonction (CD/USB/RADIO/AUX)
MEM/CLK-ADJ STANDBY : rester appuyer pour régler l’heure et le réveil.
CD/RADIO : mémoriser une station.
SKIP UP
TUNE +/- RADIO : régler la fréquence.
STOP
FOLDER / PRE UP / DOWN CD/MP3 : dossier suivant/précédent
-10/+10 CD/MP3/USB/SD : saut avant/arrière de 10 titres.
Ouvrir/Fermer Ouvrir/fermer le compartiment à CD.
VOLUME -/+ Régler le volume.
Mode de lecture CD/USB : activer la lecture aléatoire / répétition
Écran /ID3 Activation de la fonction ID3.
PRESET EQ Sélectionner le mode d’égalisation.
SLEEP Régler la fonction d’endormissement
MUTE Silencieux.
ALARM Appuyer pour régler le réveil.
SNOOZE ALARM : régler la fonction d’endormissement.
Lecture/pause CD/USB : démarrer/mettre en pause la lecture
/ DOWN CD/USB/SD : titre précédent/suivant
/ ST-MONO
RADIO : activer la stéréo/mono
CD/USB : arrêter la lecture
RADIO : station mémorisée suivante/précédente
23
Page 24

Montage et branchements
Avant la première mise en marche
• Déballer toutes les pièces et retirer tout l’emballage.
• Ne pas brancher l’appareil avant d’avoir vérié et brancher tous les câbles.
• Ne pas couvrir les ouvertures d’aération et s’assurer qu’un espace de plusieurs centimètres est ména-
gé tout autour de l’appareil pour la ventilation.
Montage pour utilisation sur table
Glisser l’appareil et les deux enceintes sur les socles appropriés et les visser avec des vis de serrage. Se
référer aux illustrations suivantes :
Montage mural
1 Retirer les enceintes et l’appareil de leur socle s’ils sont déjà montés.
2 Mettre le gabarit de perçage
3 Percer les trous de xation (diamètre 6 mm).
4 Introduire les chevilles dans les trous de xation.
5 Visser les vis de xation de sorte à ce qu’elles dépassent du mur de 4 cm.
6 Accrocher l’appareil et les enceintes aux vis.
24
Page 25

Branchements
• Brancher la che d’alimentation DC (29) dans la prise secteur (26) et brancher enn le bloc
d’alimentation à une prise de terre adaptée.
• À la première mise en marche, l’appareil se met en mode veille et le voyant LED s’allume.
• Brancher les enceintes aux côtés de l’appareil.
• Allumer l’appareil. À présent le rétroéclairage doit normalement s’allumer et l’appareil être prêt à
l’emploi.
Réglage de l’heure
1 Passer en mode veille.
2 Appuyer sur la touche MEM/CLK-ADJ. L’indication « 00 » s’aiche à l’écran.
3 Appuyer sur les touches échées pour régler les heures. Appuyer sur la touche MEM/CLK-ADJ pour
conrmer.
4 Pour régler les minutes, appuyer sur les touches ou . Appuyer de nouveau sur la touche
MEM/CLK-ADJ pour sauvegarder l’heure.
Après 5 secondes sans appuyer sur aucune touche, ce mode est quitté automatiquement. L’heure est
eacée dès que l’appareil est débranché. Lorsque l’appareil n’est pas utilisé, le mettre en mode veille.
25
Page 26

Écouter la radio
Manuellement
1 Appuyer sur la touche FUNCTION pour sélectionner le mode « TUNER ».
2 Sélectionner la station souhaitée avec le bouton de réglage TUNING ou .
3 Régler le volume à sa convenance.
Automatiquement
1 Appuyer sur la touche FUNCTION pour sélectionner le mode « TUNER ».
2 Rester appuyer sur ou pendant 1-2 secondes.
3 L’appareil cherche automatiquement la prochaine station.
4 Répéter les étapes 2 & 3 jusqu’à ce que la station souhaitée soit trouvée.
5 Régler le volume à sa convenance.
Mémorisation de station
Il est possible de mémoriser jusqu’à 20 stations. Basculer en mode radio.
1 Rechercher une station en mode manuel ou automatique.
2 Appuyer sur « Mémoire/réglage de l’heure » jusqu’à ce que « MEM » et le numéro de l’emplacement
mémorisé s’aiche en clignotant.
3 Appuyer sur « Dossier/mémoire précédent(e) » pour sélectionner l’emplacement de mémorisa-
tion.
4 Appuyer de nouveau sur « Mémoire/réglage de l’heure » pour conrmer.
5 Répéter les étapes 1 à 4 pour les autres stations.
6 Il est à présent possible de faire appel aux stations mémorisées en appuyant sur « Dossier/Mé-
moire précédent(e) »
• Lorsque l’appareil est débranché du réseau d’alimentation électrique, les stations mémorisées sont
eacées. Pour les préserver, basculer en mode veille.
• Après 5 secondes sans appuyer sur aucune touche, le mode est automatiquement quitté.
• Il est à tout moment possible d’attribuer l’emplacement mémorisé à une autre station.
Réception stéréo FM
• Appuyer plusieurs fois sur la touche stéréo-mono pour basculer entre la réception mono et stéréo.
• Si une station est captée en signal stéréo, cela est spécié sur l’aichage.
Remarque pour une meilleure réception
Une antenne est intégrée à l’appareil pour la réception des stations AM. Il est possible de changer de
position à l’appareil pour mieux capter les stations. Sur cette bande de fréquences, les stations sont
diusées uniquement en mono.
26
Page 27

Lecture de CD
Préparation
1 Mettre le commutateur de fonction sur « CD ».
2 Appuyer sur « Open/close » pour ouvrir le compartiment à CD.
3 Introduire un CD face imprimée vers le haut et refermer le tiroir.
4 Le CD est analysé et le nombre de titres et la durée de lecture s’aichent à l’écran.
Lecture/pause
Pour interrompre la lecture, appuyer sur « Play/pause ». La barre temporelle se ge. Appuyer de nouveau sur « Play/pause » pour reprendre la lecture.
Arrêt la lecture
Appuyer sur cette touche pendant la lecture ou la pause pour arrêter la lecture.
Saut / mode recherche (saut/recherche avant / saut/recherche arrière )
• Appuyer sur pendant la lecture pour passer au titre suivant.
• Appuyer sur « skip down » pendant la lecture pour passer au titre précédent
Pour les CD MP3
1 Le nombre de titres s’aiche et la lecture démarre automatiquement.
2 Appuyer sur « Dossier/mémoire précédent(e) » ou pour modier l’ordre des numéros.
3 Appuyer sur ou pour modier le numéro du titre.
Fonction ID3 (Titre/album) (via la télécommande)
Appuyer sur « ID3 » pendant la lecture MP3 pour aicher les informations sur le titre. Appuyer de nouveau sur « ID3 » pour désactiver.
Remarque
• Si aucun nom n’est attribué au titre, rien ne s’aiche sur l’écran LCD.
• Rien ne s’aiche à l’écran non plus si le format de chier n’est pas compatible.
• L’écran LCD est uniquement compatible avec les caractères anglais.
Caractéristiques des titres MP3
• Taux de compression MP3 : 32 kbps ~ 256 kbps. Taux d’échantillonnage : 32kHz, 44.1kHz und 48 Hz
décodables.
• La qualité de lecture varie en fonction de la qualité de l’enregistrement. L’analyse du CD est égale-
ment plus longue en raison de la plus longue durée totale de lecture.
27
Page 28

Répétition/Intro/Lecture aléatoire
Appuyer sur « repeat/intro/random » avant ou pendant la lecture pour lire un titre, un dossier ou tous
les titres dans le mode souhaité parmi les diérents modes proposés.
Pour les CD : (1) Répétition 1 -> (2) Répétition de tous les titres -> (3) Lecture aléatoire -> (4) désactivé
Mode de lecture Écran LCD
Répétition d’un titre
Répétition de tous les titres
Lecture aléatoire RAN
Désactivé -------
Pour les CD MP3 : (1) Répétition 1 -> (2) Répétition de tous les titres -> (3) Répétition d’un dossier -> (4)
Lecture aléatoire -> (5) désactivé
Mode de lecture Écran LCD
Répétition d’un titre
Répétition de tous les titres
Répétition d‘un dossier
Lecture aléatoire RAN
Désactivé -------
clignotant
clignotant
Répétition
Il est possible d’écouter un titre ou un dossier en boucle.
Lecture aléatoire
Il est possible d’écouter tous les titres en mode aléatoire.
28
Page 29

Lecture programmée de CD (via la télécommande)
Il est possible de lire jusqu’à 32 titres CD ou MP3 dans l’ordre souhaité. L’appareil doit se trouver pour
cela en mode stop :
1 Basculer en mode CD et arrêter la lecture.
2 Appuyer sur « Mémoire/réglage de l’heure » jusqu’à ce que « MEM » s’aiche.
3 Sélectionner le titre souhaité avec
4 Appuyer sur « Programm » pour ajouter des titres de la programmation.
5 Répéter les étapes 3 et 4 pour tous les autres titres.
6 Une fois tous les titres souhaités ajoutés à la liste de lecture, appuyer sur la touche de lecture pour
démarrer la lecture.
7 Pour arrêter la lecture, appuyer sur .
Après 5 secondes sans appuyer sur aucune touche, le mode est automatiquement quitté.
Lecture de chiers MP3 depuis un support USB / une carte mémoire.
L’appareil peut lire des chiers MP3 d’un support SD/MMC ou USB.
1 Mettre l’appareil en mode veille avant d’utiliser le support USB ou la carte mémoire.
2 Connecter un périphérique de stockage USB ou introduire une carte mémoire. Se référer à
l’illustration. Ne pas insérer le médium dans le mauvais sens an de ne pas endommager l’appareil.
Vérier le sens d’insertion avant d’introduire le périphérique.
3 Mettre l’appareil en mode SD/MMC ou USB en appuyant sur la touche FUNCTION.
4 L’appareil commence automatiquement à charger le périphérique et aiche le nombre de chiers
MP3 qu’il contient.
5 L’utilisation est identique à celle de la lecture CD/MP3.
/ .
Remarques importantes
• L’appareil peut lire uniquement des chiers MP3.
• Si un lecteur MP3 est branché à l’appareil via le port USB, il arrive que le support de stockage USB ne
soit pas reconnu. Ceci n’est pas un dysfonctionnement.
• La prise USB n’est pas adaptée au branchement d’une rallonge USB ou à un branchement direct à un
PC.
Retrait du support USB / la carte mémoire
Avant de retirer le périphérique, il est nécessaire d’éteindre l’appareil ou de basculer en mode CD, AUX
ou Radio. Il est alors possible de retirer le support de stockage.
29
Page 30

Autres fonctions
Fonction d’endormissement
1 Appuyer sur « Sleep » ; « slp-90 » s’aiche.
2 Appuyer plusieurs fois sur « Sleep » jusqu’à ce que les minutes souhaitées 90>80>70>…>10 et
s’aichent.
3 Une fois ce temps écoulé, l’appareil s’éteint automatiquement.
4 Pour désactiver cette fonction, appuyer plusieurs fois sur « Sleep » jusqu’à ce que disparaisse.
Réveil
Cette fonction permet d’être réveillé par un CD, la radio, le support USB ou SD. Rester appuyer sur «
Alarm », s’aiche et régler les heures avec / . Conrmer le réglage avec « Alarm » et enn
régler les minutes avec / . Conrmer avec « Alarm ». Enn, régler le volume avec les touches
haut/bas.
Remarque :
• Si la musique du CD ou du support USB n’est pas reconnue, le réveil de l’appareil s’eectue avec la
radio.
• Le réveil par radio utiliser la dernière station écoutée.
• Si aucune touche n’est activée pendant 4 secondes, le mode est automatiquement quitté.
• Appuyer sur « marche/veille » pendant le réveil pour éteindre le réveil.
(Dés)activer le réveil
1 Pour activer le réveil, appuyer plusieurs fois sur « Alarm » jusqu’à ce que s’aiche.
2 Pour désactiver le réveil, appuyer plusieurs fois sur « Alarm » jusqu’à ce que disparaisse.
Silencieux
Cette fonction permet de couper le son immédiatement.
Égaliseur prédéni
Il y a 4 égalisations prédénies qu’il est possible de sélectionner en appuyant plusieurs fois sur « égaliseur prédéni » : Flat -> Classic -> Rock -> Pop -> Jazz
Fonctions d’aichage
Appuyer sur « Aichage/ID3 » dans n’importe quel mode pour aicher l’heure actuelle.
30
Page 31

Fonction Snooze
Appuyer sur « Snooze » pendant le réveil pour mettre le réveil en pause et le redéclencher 9 minutes
après. Pour éteindre le réveil, appuyer sur « marche/veille ».
Prise AUX-IN
Cette prise sert à brancher des lecteurs analogiques. Cette prise permet également d’écouter le son
d’un autre appareil de lecture comme un lecteur MP3, un lecteur CD etc. via les enceintes.
Remarque : régler le volume de l’appareil périphérique à un niveau audible.
Information sur le recyclage
Vous trouverez sur le produit l’image ci-contre (une poubelle sur roues, barrée d‘une
croix), ce qui indique que le produit se trouve soumis à la directive européenne
2002/96/CE. Renseignez-vous sur les dispositions en vigueur dans votre région concernant la collecte séparée des appareils électriques et électroniques. Respectez-les
et ne jetez pas les appareils usagés avec les ordures ménagères. La mise au rebut cor-
recte du produit usagé permet de préserver l’environnement et la santé. Le recyclage
des matériaux contribue à la préservation des ressources naturelles.
Ce produit contient des piles qui sont soumises à la directive européenne 2006/66/CE selon laquelle
elles ne doivent pas être éliminées avec les ordures ménagères. Renseignez-vous sur les dispositions
en vigueur concernant la mise en rebut séparée des piles. La mise en rebut correcte du produit usagé
permet de préserver l’environnement et la santé.
Déclaration de conformité
Fabricant : Chal-Tec GmbH, Wallstraße 16, 10179 Berlin, Allemagne.
Ce produit est conforme aux directives européennes suivantes :
2014/30/UE (CEM)
2014/35/UE (LVD)
2011/65/UE (RoHS)
31
 Loading...