

Page 1
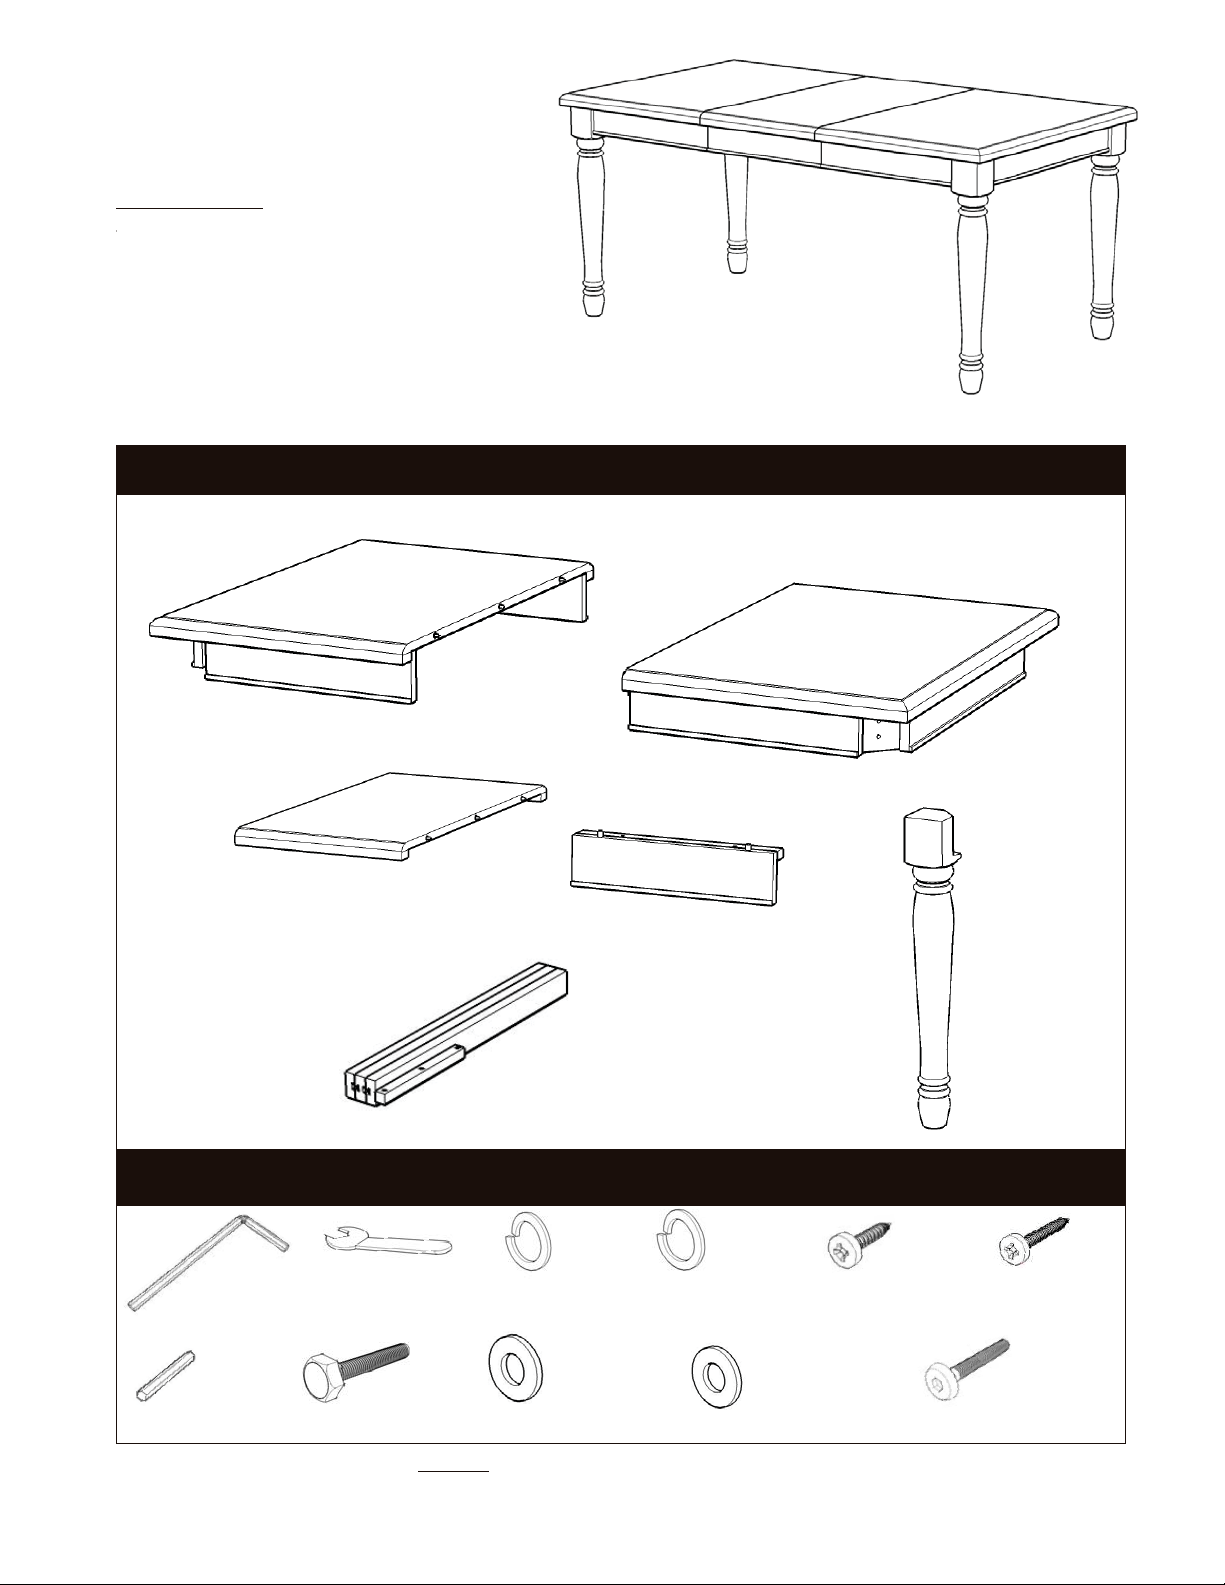
Dining Table
IMPORTANT NOTE
Carefully remove all the parts from the carton and put
them individually on a soft cloth to prevent scratches
or other damages occuring to the parts.
We have taken great care in the design of this
product and request that you carefully and strictly
follow our assembly instructions to ensure a
completed product as it was designed.
Part List
A.
Top
1 pc.
C.
Leaf
1 pc.
F.
Table Slide
2 pcs.
Hardware List
Hex Wrench
1 pc.
Key Wrench
1 pc.
Spring Washer
8 pcs. (+1 extra )
D.
Apron
2 pcs.
Spring Washer (Small)
12 pcs. (+1 extra )
M3.5x32
Wood Screw (short)
6 pcs. (+1 extra )
B.
Top
1 pc.
E.
Leg
4 pcs.
M3.5x40
Wood Screw
16 pcs. (+1 extra )
Small
Hex Wrench
1 pc.
Tools required for assembly : screwdriver Tools recommended for assemblyPhillips : Level
M8x50
Bolt
8 pcs. (+1 extra )
Flat Washer
8 pcs. (+1 extra )
Flat Washer (Small)
12 pcs. (+1 extra )
M6x40
Head Cap Bolt
12 pcs. (+1 extra)
Page 2
Assembly Instructions 2/3
IMPORTANT
* Do not tighten up all the screws until each part is properly assembled.
* You should keep Hex Wrench in a safe place as you may need to tighten up the Head Cap Bolts in the future.
* After assembly, item must be level to work properly. Use the included adjustable levelers to level.
* Use a soft cloth between these parts and the floor.
E
F
F
A
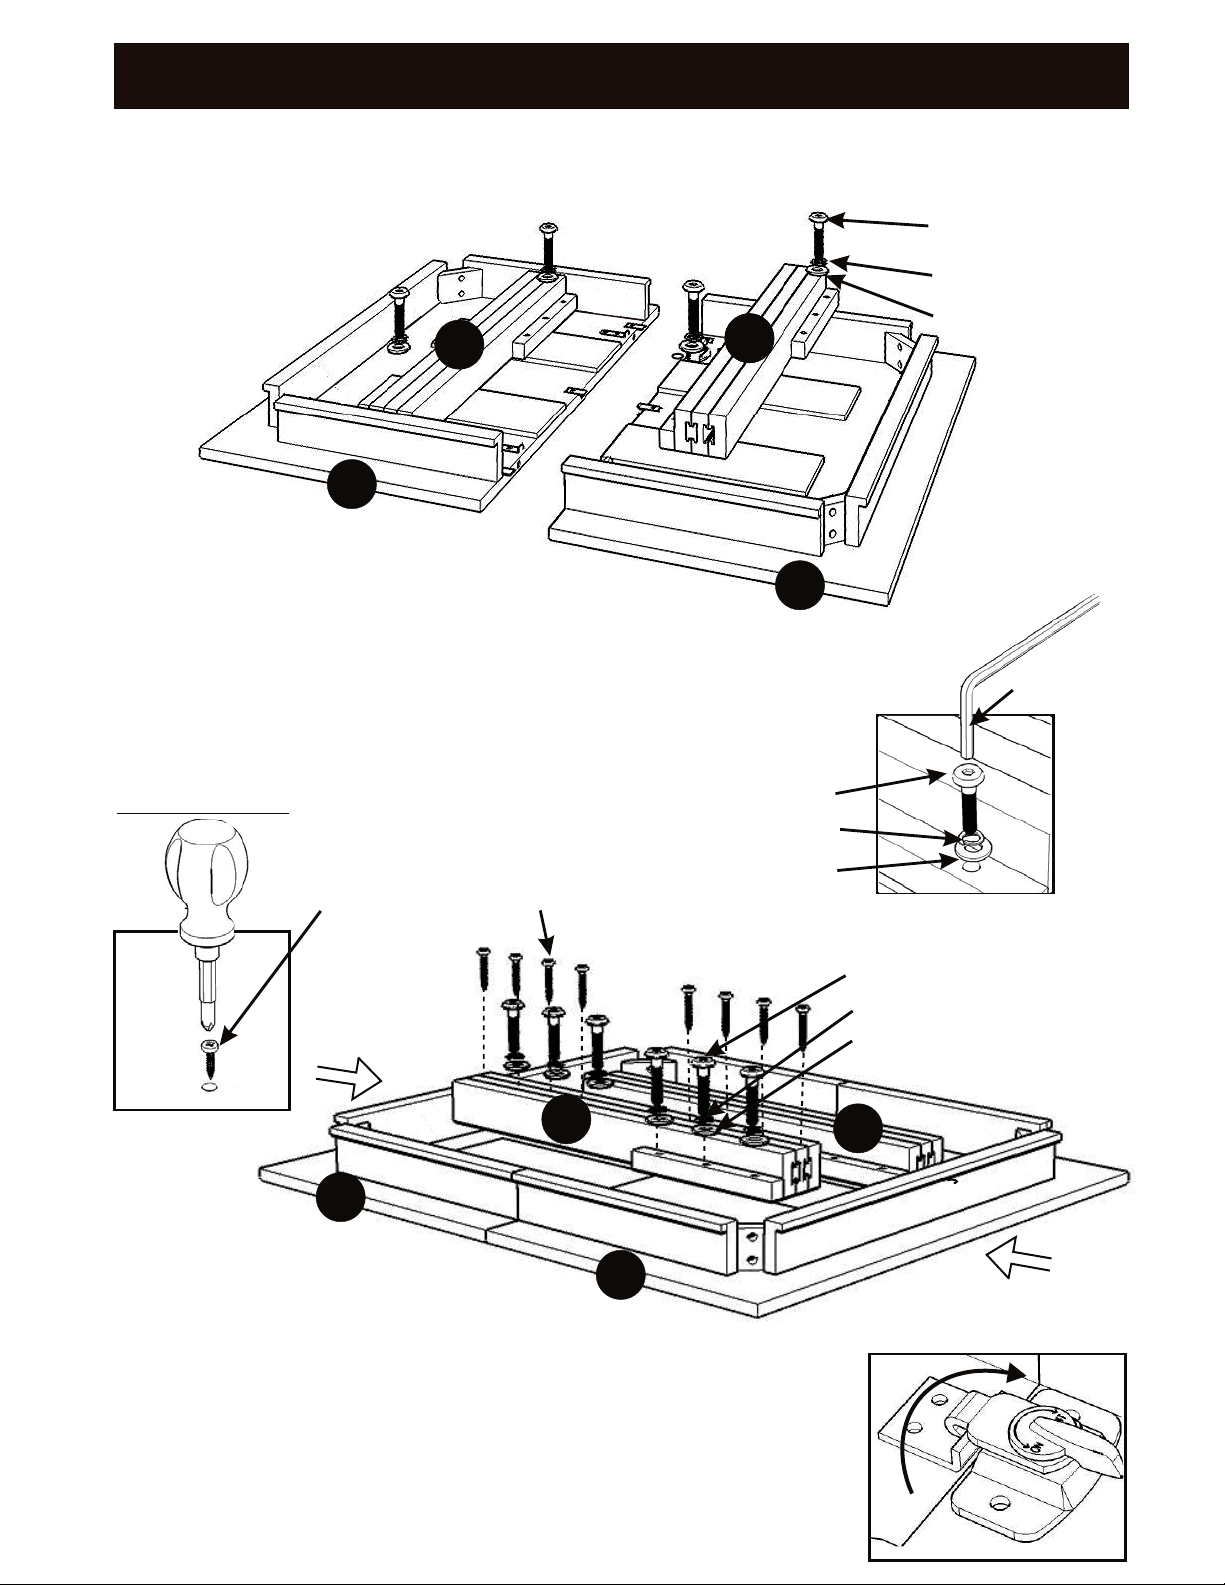
STEP 1
Place Top (A) and (B) face side down
on a soft cloth.
Remove Table Slides (F) from their packing position by loosening
and removing Head Cap Bolts, Spring Washers(Small) and
Flat Washers(Small) using Hex Wrench.(see Figure 1)
B
Head Cap Bolt
Spring Washer(Small)
Flat Washer(Small)
Hex Wrench
Note: These 4 Head Cap Bolts, Spring Washers(Small) and Flat Washers(Small)
will be used in Step 2.
DO NOT DISCARD
Wood Screw
Figure 3
Wood Screw
F
Head Cap Bolt
Spring Washer(Small)
Flat Washer(Small)
A
B
STEP 2
Figure 1
Head Cap Bolt
Spring Washer(Small)
Flat Washer(Small)
F
Attach Top (A) with (B), by aligning dowels with the holes and firmly
pushing together.
Engage the locks by turning their handles clockwise ¼ turn
(see Figure 2).
Attach Table Slides (F) to the unit using Head Cap Bolts,
Spring Washers(Small) and Flat Washers(Small).
ghten Wood Screws (see Figure 3).
Ti
Page 3
Assembly Instructions 3/3
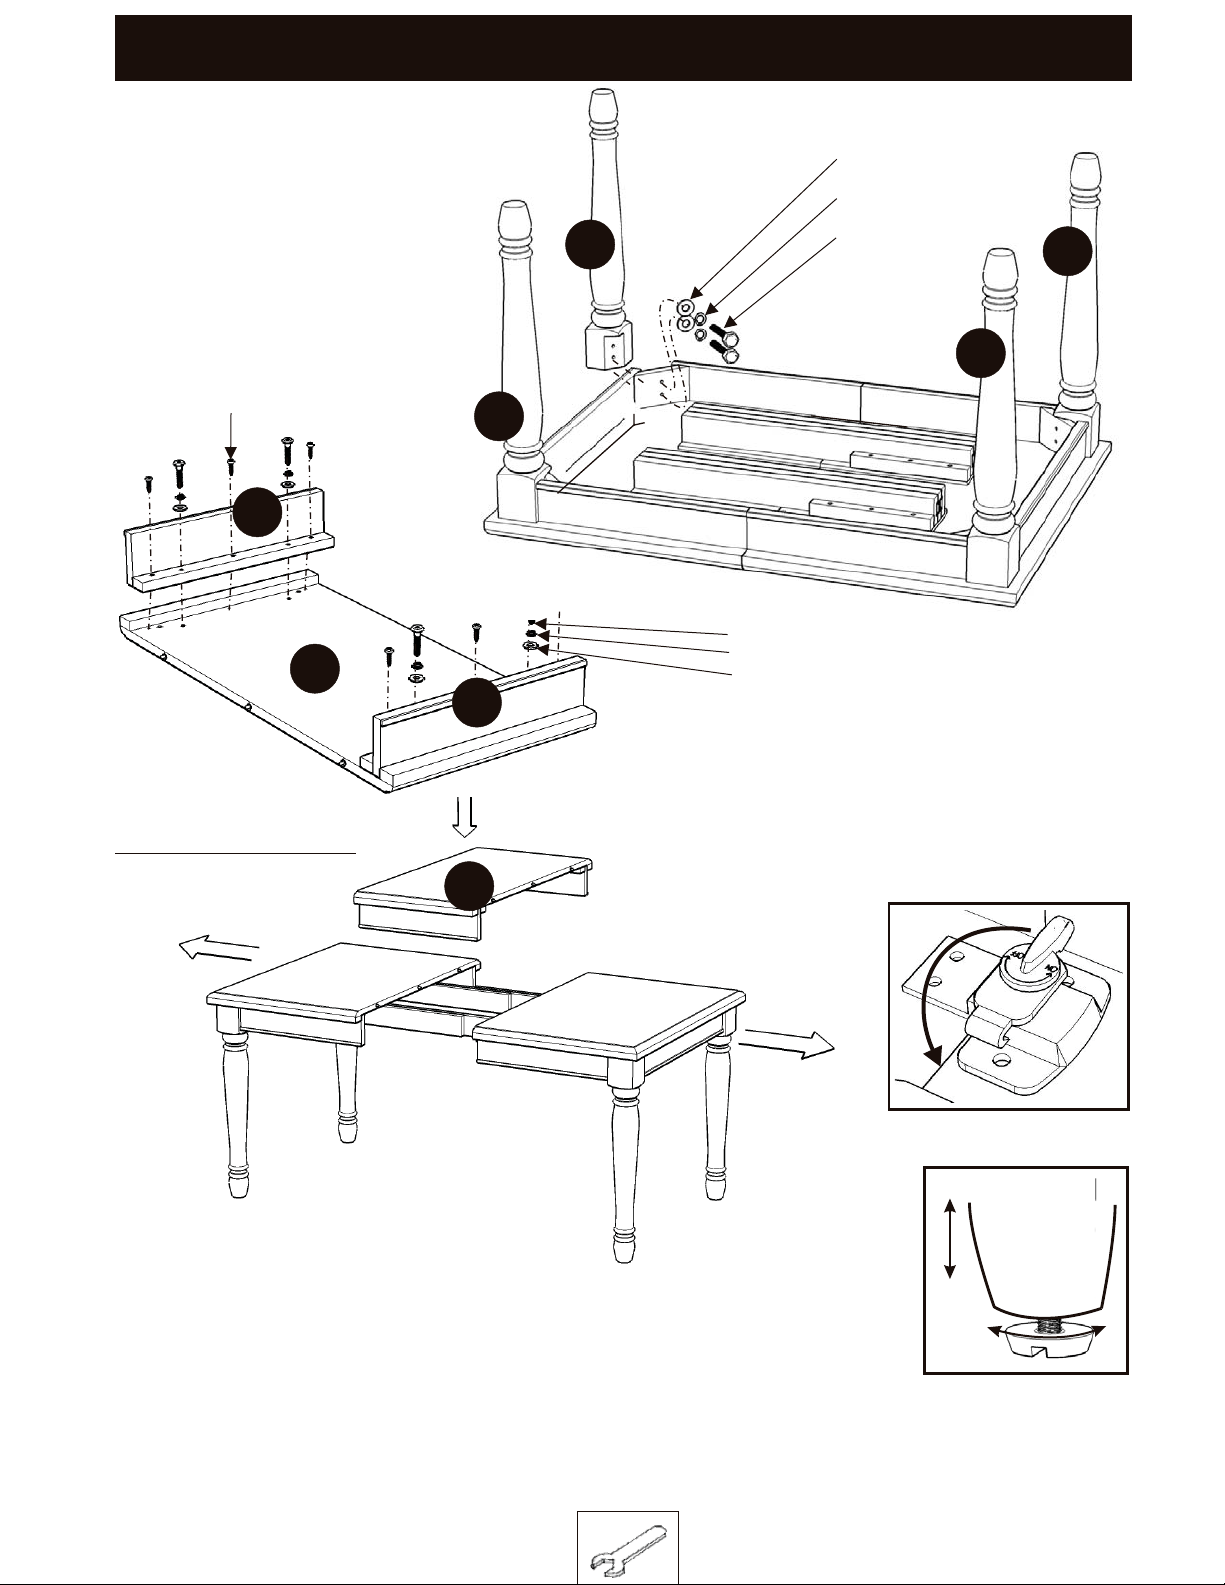
STEP 3
Attach Legs (E) to the unit
with Flat Washers,
Spring Washers and Bolts.
Wood Screw (short)
D
C
Adding the Leaf
D
E
E
Flat Washer
Spring Washer
Bolt
Head Cap Bolt
Spring Washer (Small)
Flat Washer (Small)
Attach Aprons (D) to Leaf (C)
with Head Cap Bolts,
Spring Washers (Small)
Flat Washers (Small)
and Wood Screws (short).
E
E
STEP 4
C
(Figure 3)
STEP 5
Disengage the locks by turning their handles counter-clockwise ¼
turn (see Figure 3).
Pull out both sides of the table, then place Leaf (C) in the unit as shown,
aligning the dowels with the holes.
Push the table together firmly, then engage the locks by turning their handles clockwise ¼ turn
(see Figure 2).
(Figure )4
To level the unit, adjust the adjustable
levelers on the bottom of unit.
Please keep the Key Wrench as you may
 Loading...