

Page 1
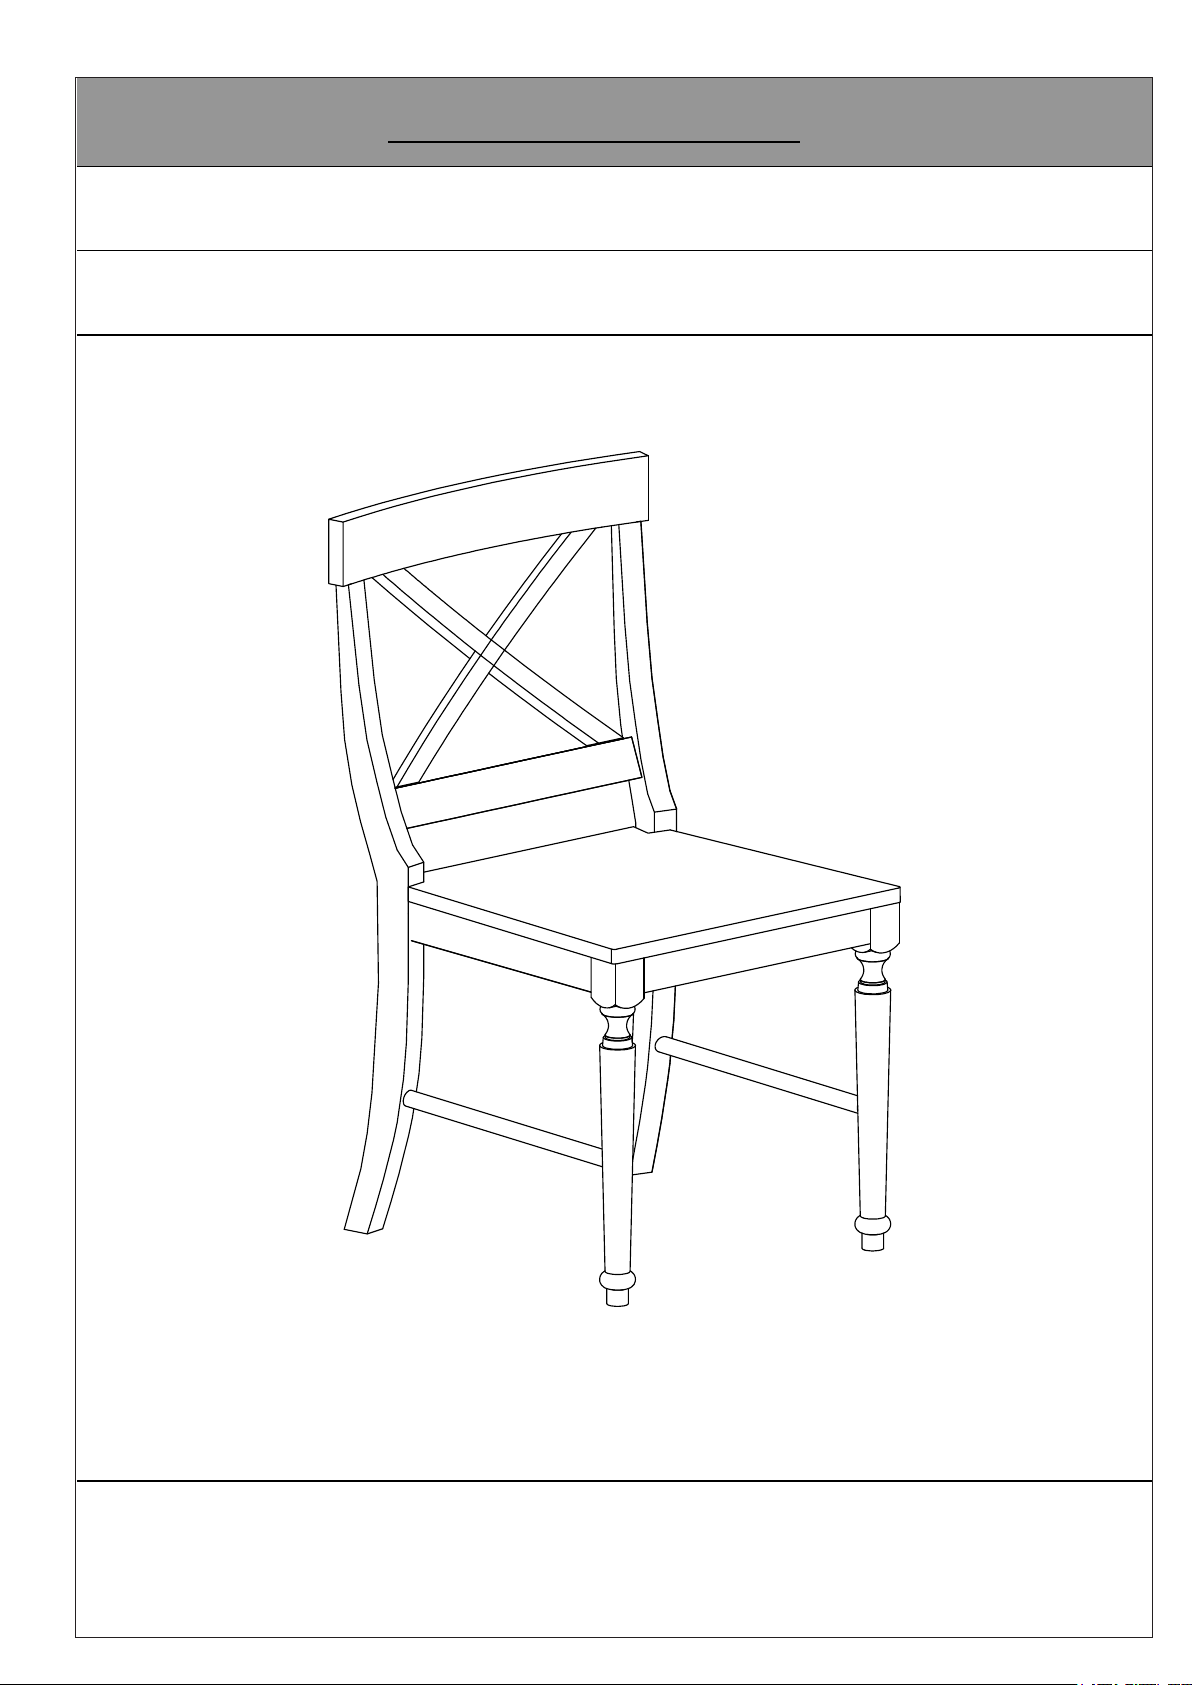
Assembly Instructions
Caution : You must read this before you proceed.
CHAIR
CAUTION
Keep your child / children at bay in the process of assembly.
For turning / ipping the Chair and to prevent damage to the Chair, 02 persons may be needed to
execute this action.
: This Chair is NOT a TOY.
Page 2
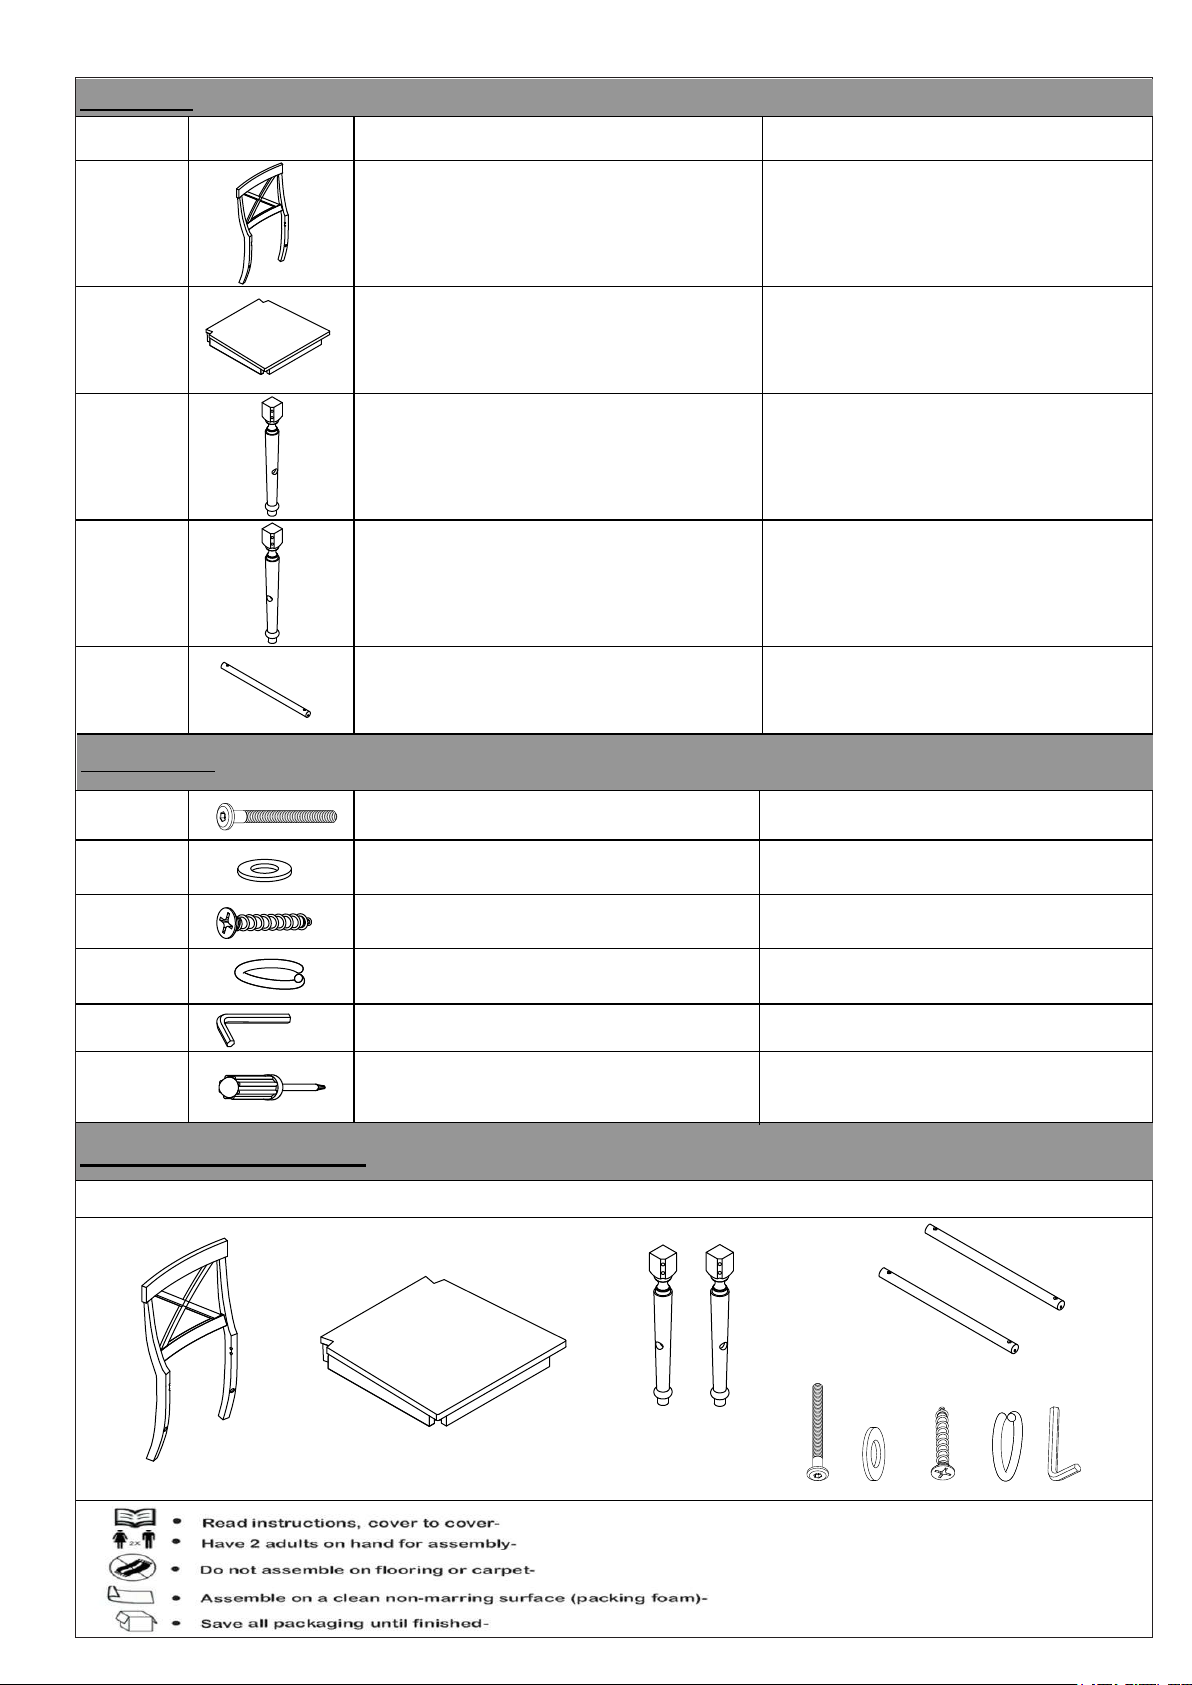
Parts List
NO. Picture QTY
A
B 1
C1
C2
D
Chair Back /Hind Legs
Chair Seat
Left Front Legs (Lablelled C1)
Right Front Legs (Lablelled C2)
Side Rails
(the side with holes as bottom side
to face the oor after assembled)
Description
1
1
1
2
Hardware
1 9
2 9
3 5
4 9
5 1
6 Not provided
Bolts (M6x60mm)
Flat Washers
Screws (M4x40mm)
Spring Washers
Allen Key
Screwdriver
Assembly Preparation
Before Beginning Assembly:
Page 3
Assembly Steps
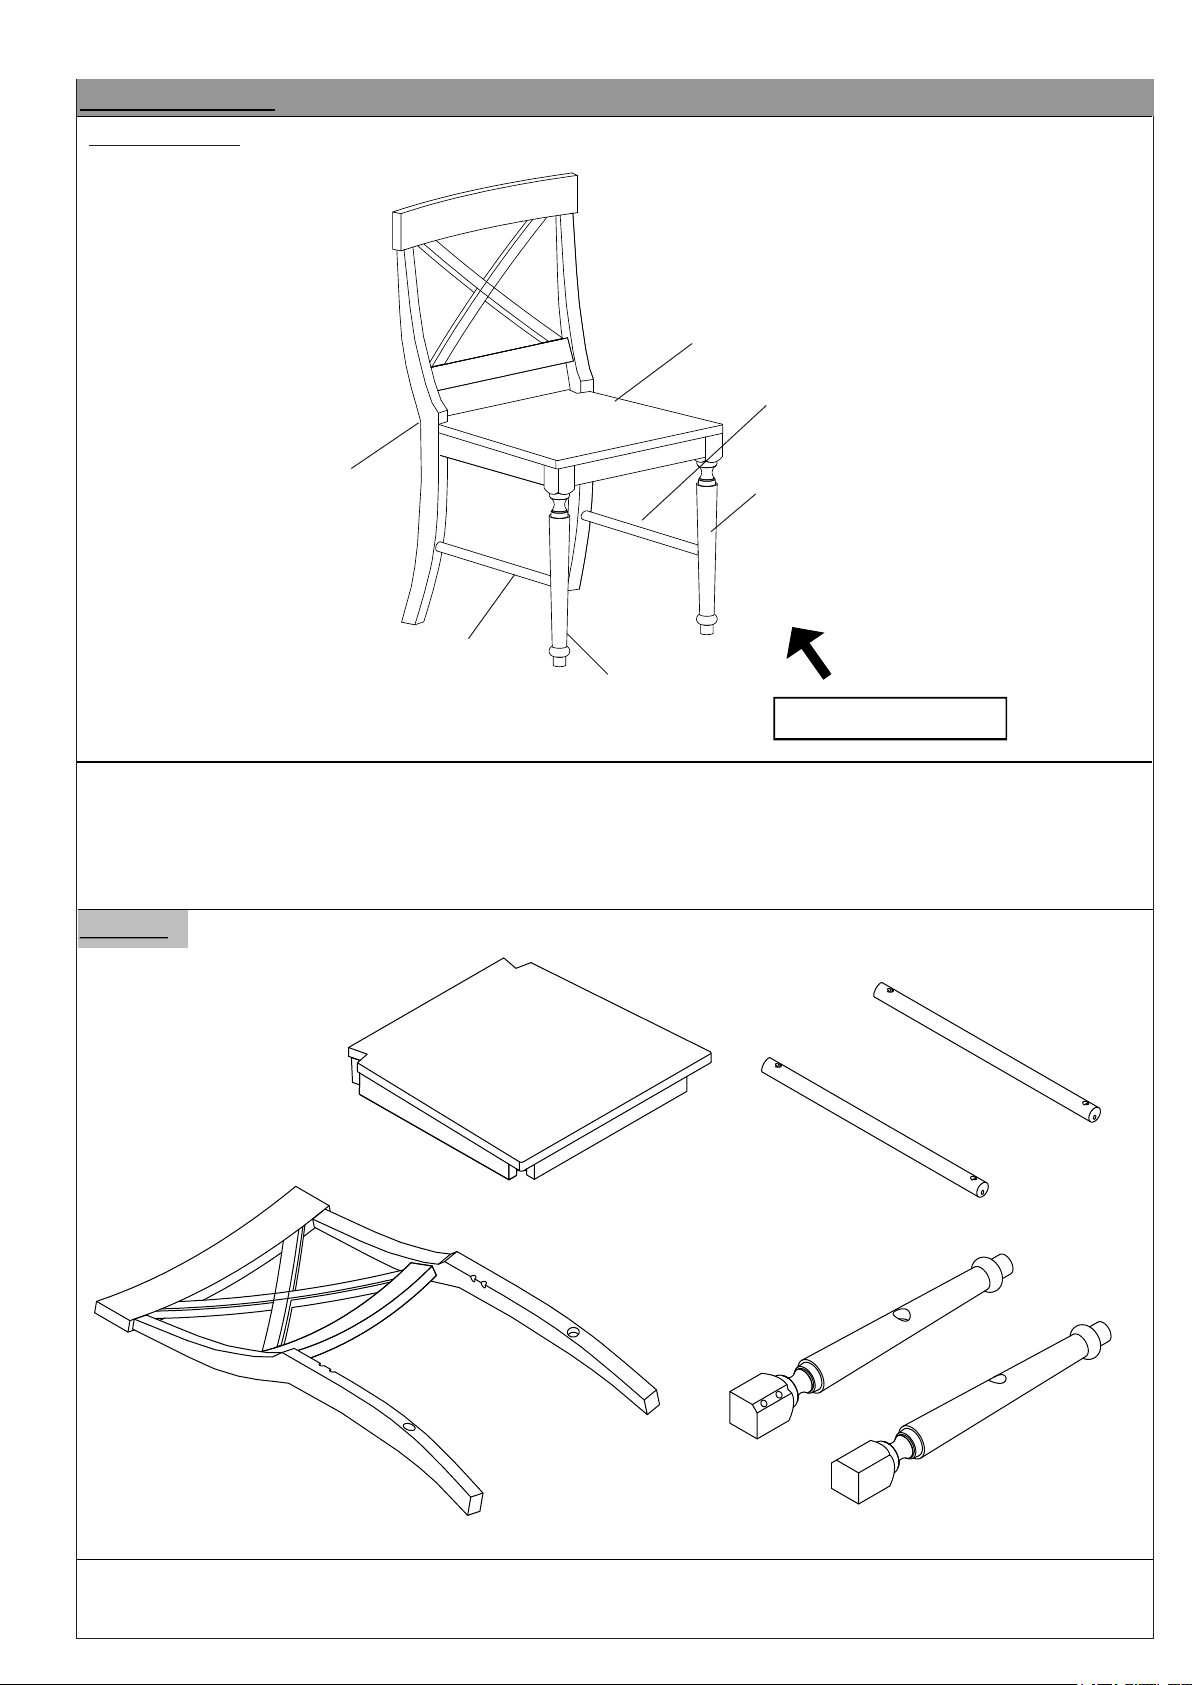
OVERVIEW
Chair Seat (B)
Side Rail (D)
Chair Back (A)
Side Rail (D)
Left Front Leg(C1)
Right Front Leg(C2)
FRONT FACING
This Chair has multiple parts and may require up to some 30 minutes to assemble.
To give you an overview of the Chair, the above picture is to help you put the various parts
into perspective.
Please read through the instruction
before assembly.
below to familiarise yourself with the parts and steps
Step 1
Unpack and place all parts on a clean soft surface.
Page 4
Step 2
B
A
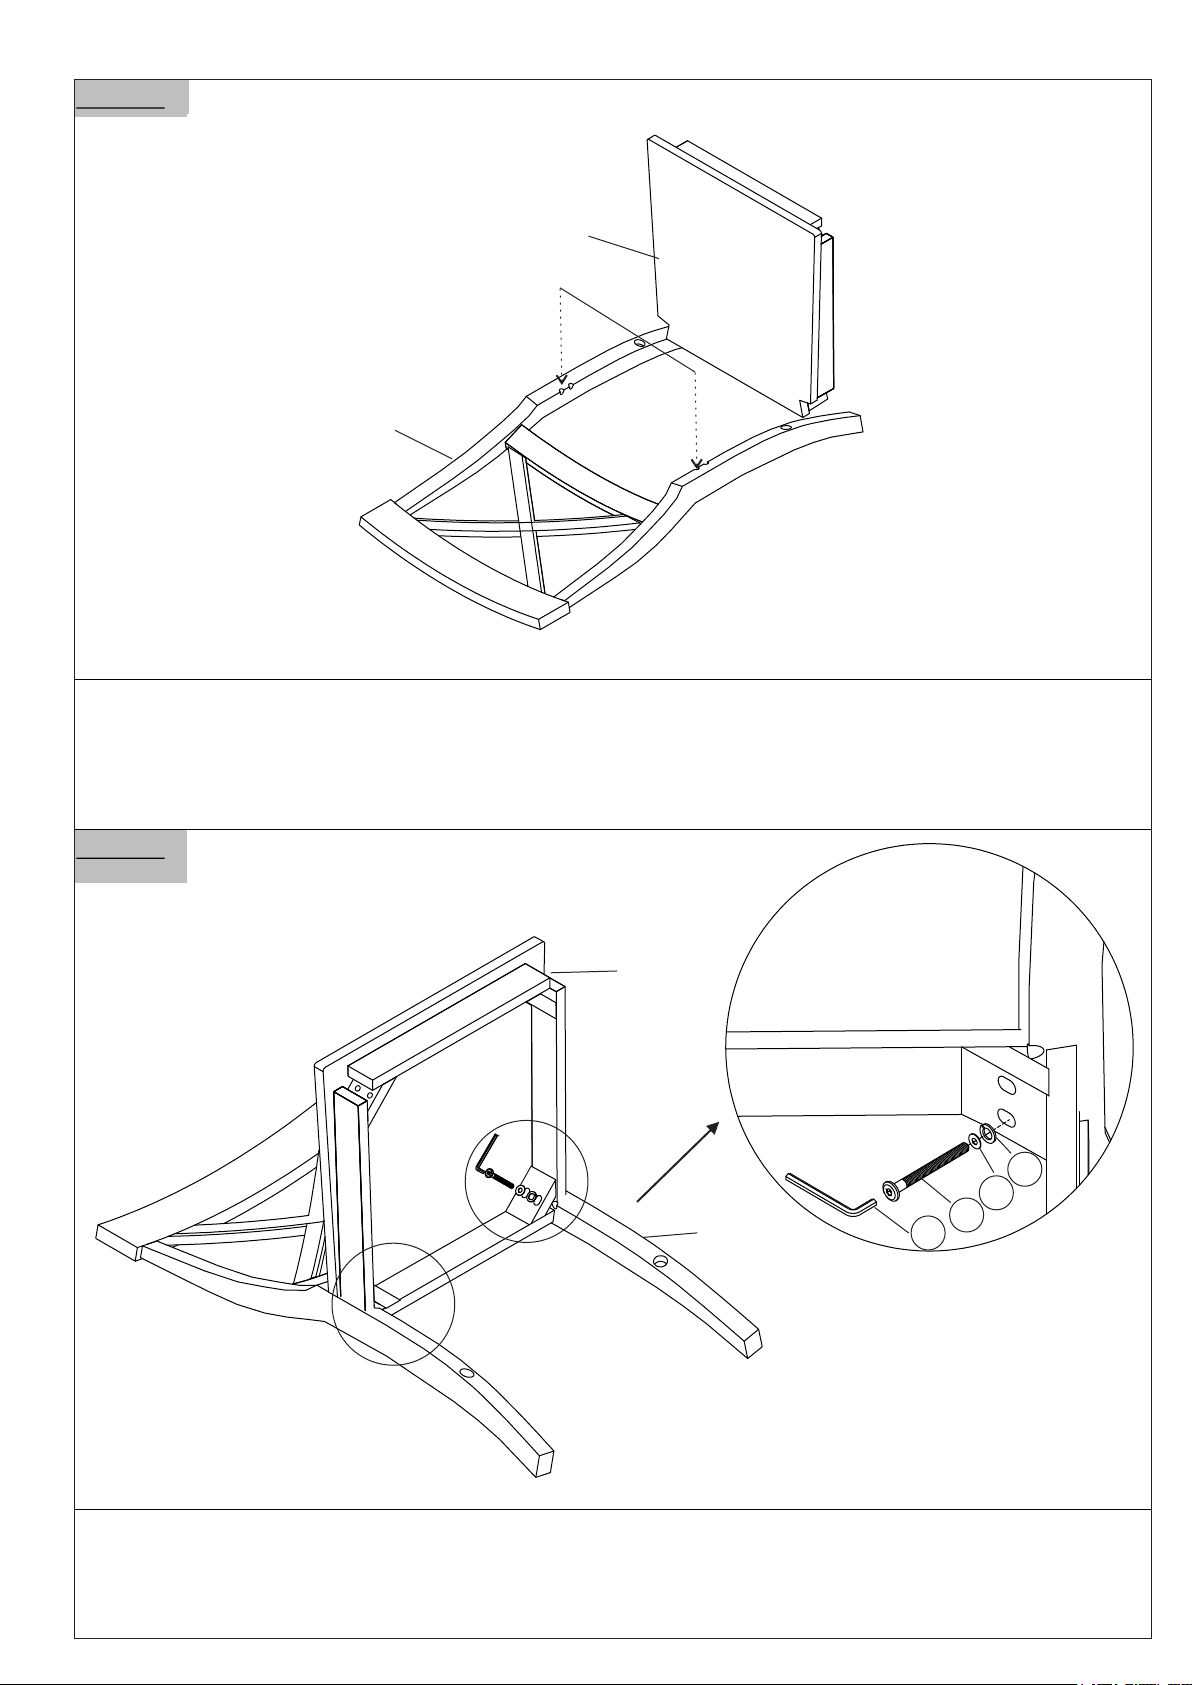
Place the Chair Back (A) onto a at clean soft surface, as pictured above.
Push the Chair Seat
Use your left hand to push the seat frame oorwards.
This action helps to ensure the Chair Seat (B) is pressed towards to the Chair Back (A) with
no gap
between them.
(B) in to the mounting position of the Chair Back (A)
Step 3
B
2
4
1
A
5
Secure the Chair Back ( A) to the Chair Seat (B), using Bolt (1), Spring Washer (4) and
Flat Washer (2) with AllenKey (5).
Loosely tighten the Bolts up to 80%.
Page 5
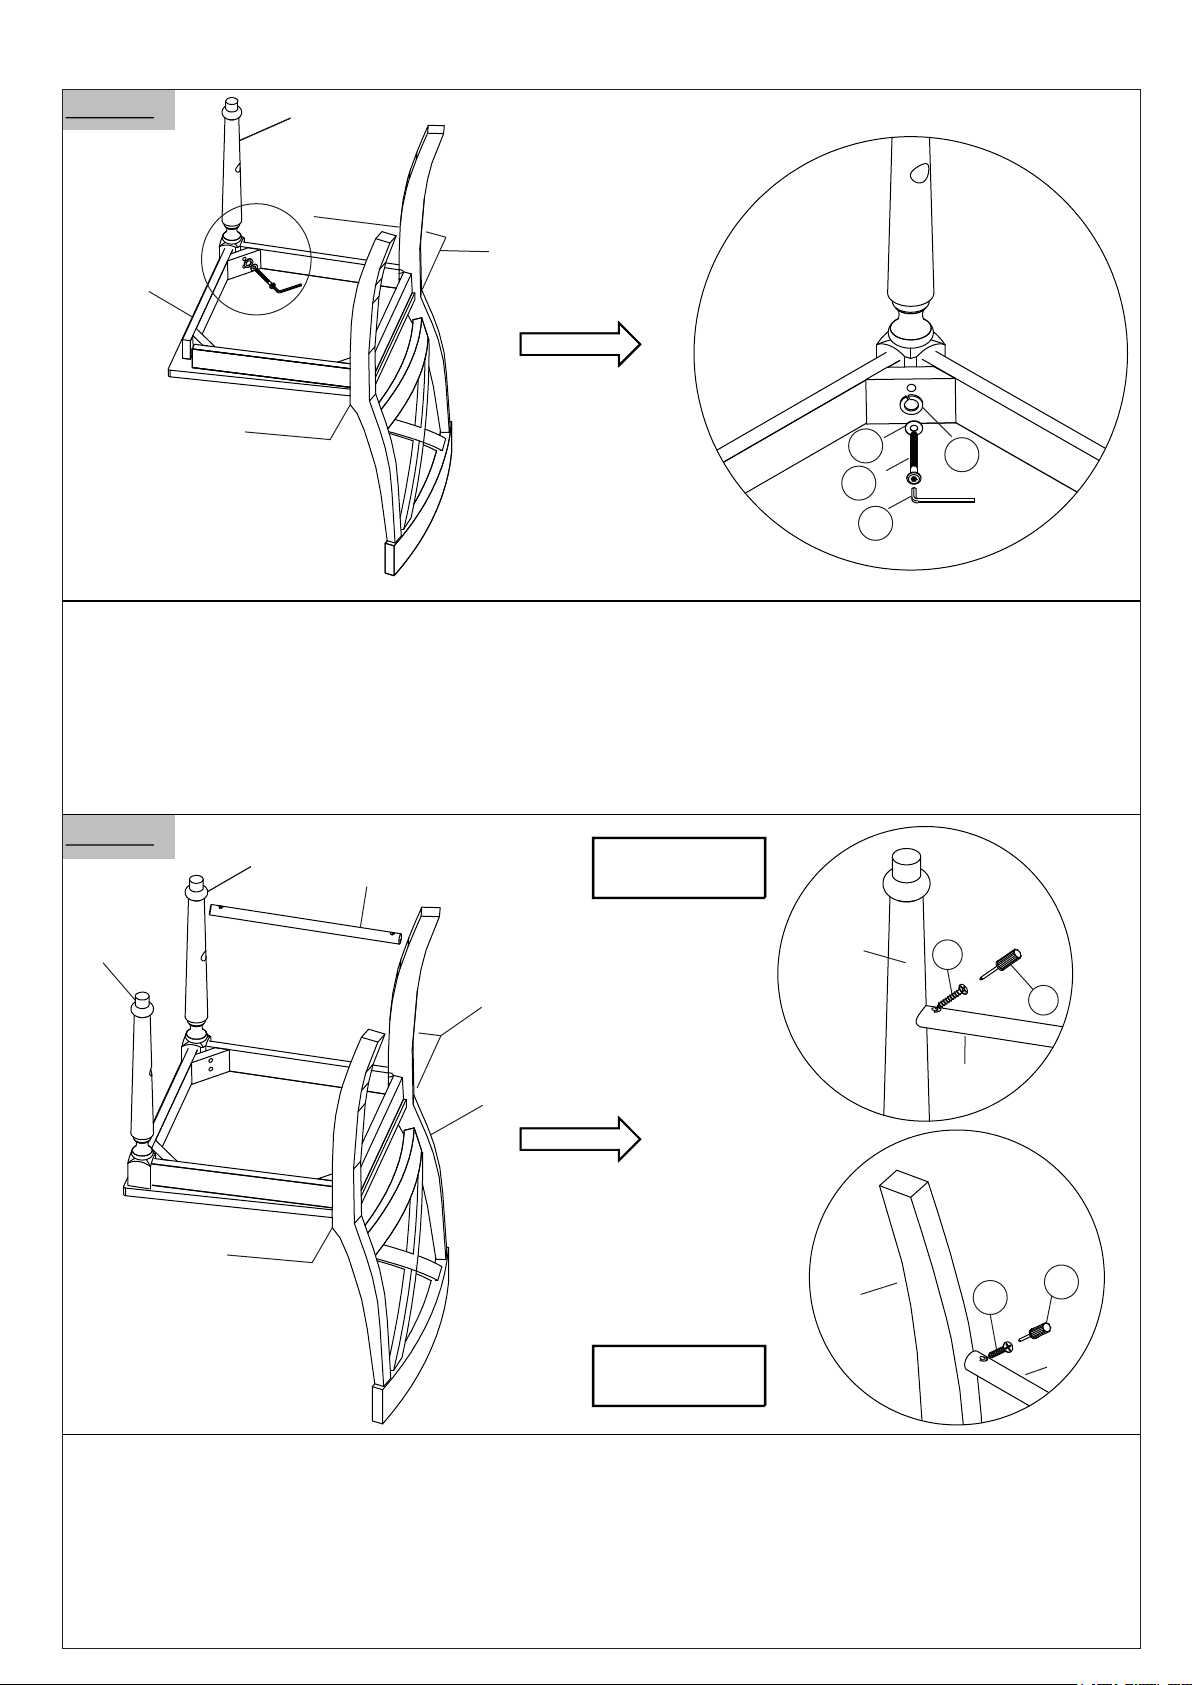
Step 4
B
C2
C2C2
Table
2
1
5
Next, place the Chair onto the side of a table as shown in picture.
You
will have the chair bottom and legs facing skywards.
Place Right Front Leg (C2) into the Chair Seat (B)
Secure Right Front Leg (C2) to the Chair Seat (B) by using Bolt (1), Spring Washer (4) and
Flat Washer (2)
Loosely tighten the Bolts up to 50%.
Repeat the same process for the other Left Front Leg (C1)
with Allen Key (5).
4
Step 5
C2
C1
C2
D
Step 4.1
C2
3
Table
6
D
A
A
3
6
D
Step 4.2
Then, place Side Rail (D) into the housing of the Hind Leg of the Chair Back (A) and Right Front Leg (C2).
You may need to apply a little pressure to the Legs - pushing outwards, so as to enable the
the Side Rail (D) to slotted into possition.
In step 4.1) Secure the Side Rail (D) to Right Front Leg (C2) by using Screw (3) and Screwdriver (6).
In step 4.2) Secure the Side Rail (D) to the Chair Back (A) by using Screw (3) and Screwdriver (6).
Loosely tighten the Bolts up to 80%.
Repeat the same process for the other Side Rail (D) to the Left Front Leg (C1)
Page 6
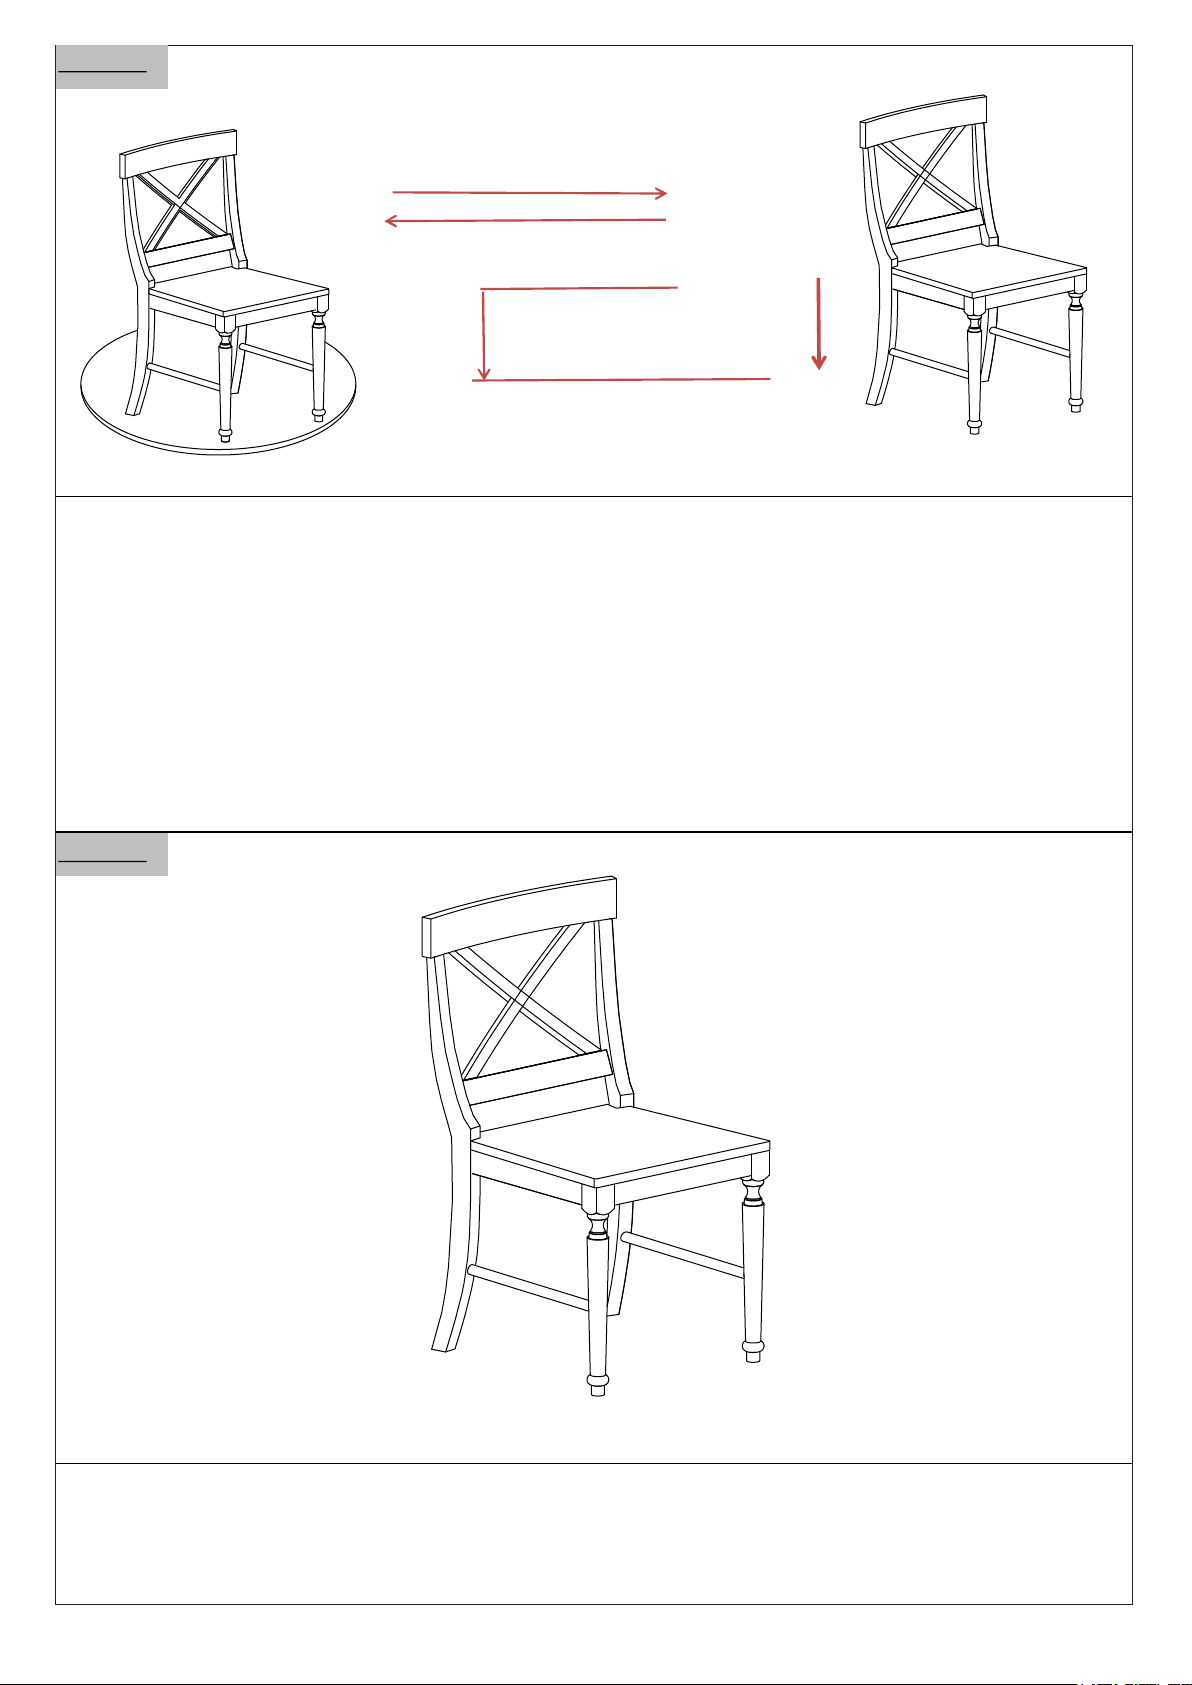
Step 6
If wobble
Test again
30CM~50CM
Place the Chair on a LEVEL SURFACE to see if it wobbles.
If it wobbles, lift the Chair to some 30cm to 50cm height from the ground.
Keep your feet and toes well away from the drop zone.
Drop the Chair freely and vertically with the four legs, hitting the ground, at the same time.
This Drop Test will help to ensure that all the screws and gaps to all reach full alignment status.
Test again for evenness on a LEVEL SURFACE.
If no wobbles found, proceed to tighten all the screws.
CAUTION: When tightening these screws, tighten sequentially.
DO NOT tighten any screw fully and then towards the next one.
This would cause the frame to warp.
If there is still wobbles, loosen the screws and execute this same drop tests.
WARNING!! IF CHAIR IS NOT STABLE , IT COULD LEAD TO DAMAGING THE PRODUCT.
Step 7
Inspect the Chair and make sure all parts are connected.
Your Chair is ready for use
Caution: This Chair can only be used on a at, level surface.
Page 7
 Loading...