

Page 1
W
00
/ 3
WS
50
1
S
August Internationa l Lt d
United Kingdo m
Tel: + 44 ( 0) 84 5 25 0 05 86
www.a ug us ti nt .c om
EN
Multiroom Wi-Fi Speaker
FR
Enceinte Wi-Fi Multiroom
DE
Multiroom Wi-Fi Lautsprecher
IT
Altoparlante Wi-Fi Multiroom
ES
Altavoz Multiroom Wi-Fi
Page 2

User Manual
Than k you f or pu rch asi ng th e Augu st WS 150 / W S30 0.
This u ser m anu al is d esi gne d to fa mil iar ize y ou wi th al l
the fe atu res o f thi s dev ice . Ple ase t ake t he ti me to r ead
this u ser m anu al ca ref ull y, even if you ar e alr ead y
fami lia r wit h a sim ila r pro duc t.
Safe ty
To ensur e the s afe ty of y ou an d oth ers , ple ase r ead t he
Safe ty In str uct ion s bef ore u sin g thi s dev ice . Ple ase d o
not di sas sem ble t his p rod uct , it ca n be un saf e and w ill
inva lid ate t he ma nuf act ure r's w arr ant y.
Disp osa l
Plea se en sur e the p rod uct a nd ac ces sor ies a re
disp ose d of in c omp lia nce w ith t he WE EE (Was te
Elec tri cal a nd El ect ron ic Eq uip men t) Di rec tiv e and a ny
othe r reg ula tio ns ap pli cab le to y our c oun try. Alwa ys
chec k wit h the e nvi ron men t age ncy a nd an y oth er
rele van t aut hor iti es fo r cur ren t dis pos al re gul ati ons .
Cust ome r Ser vic e
You ca n con tac t us by p hon e on: + 44 (0 )84 5 250 0 586
or by em ail a t: se rvi ce@ aug ust int .co m sho uld y ou
requ ire f urt her t ech nic al su ppo rt or c ust ome r ser vic e.
English
Page 3
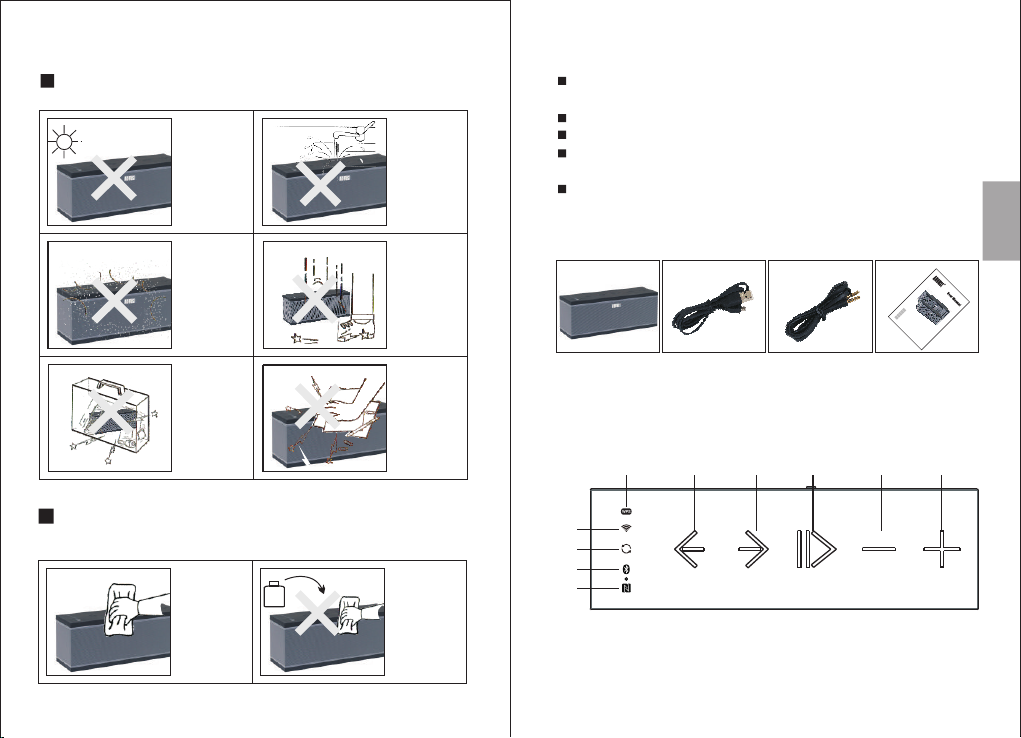
1. Safety Instructions
Stora ge and U se
Do not store or
use this device
in extreme
temperatures.
Do not store or
use this device
in wet or damp
environments.
2. Main Features
Mult iro om Spea ker
Devi ces
Blue too th NF C Con nec tiv ity f or No n Wi- Fi De vic es
Audi o-I n Soc ket f or No n Blu eto oth D evi ces
Inte gra ted M icr o SD Ca rd Re ade r (WS 150 ) / USB
Port ( WS3 00)
Long L ife B uil t-i n Rec har gea ble B att eri es
Wi-F i for And roi d and Ap ple
English
Do not expose
this device to
dust, oil or
smoke.
When transporting
this device store
securely to avoid
impact damage.
Maint enan ce
Please unpl ug all leads before cle aning this device .
Wipe the
devic e and
butto ns with
a soft cloth.
Alcoho l
-1-
Do not drop
or strike this
device.
Do not scratch
this device with
sharp objects.
Never wipe this
device with an
abrasive cloth
or apply
detergent,
alcohol or
chemical based
cleaning
products.
3. Box Contents
Mul tiroo m Wi-Fi
Spe aker
USB P ower Ca ble 3.5 mm Audio C able
4. Part Names and Functions
4.1 Top
10
1.WPS Button
2.Previous
3.Next
4.Play / Pause
5.Volume Down
1 2 3 4 5 6
7
8
9
6.Volume Up
7.Wi-Fi Status LED
8.Mode Switch
9.Bluetooth Status LED
10.NFC Tag
-2-
EN
FR
M
DE
u
E
l
t
n
IT
i
r
ce
M
o
ES
o
ultiroo
i
m W
A
nt
ltoparlante Wi -Fi Mul
e W
A
ltav
i
-F
m W
i
i Sp
F
o
i M
z Mu
i
e
Fi La
u
a
l
k
t
l
i
ti
e
r
o
r
r
u
o
o
t
o
m
s
m Wi
p
r
ec
tiroom
he
Fi
r
Use r Manua l
WS15
0/
3
00WS
Page 4
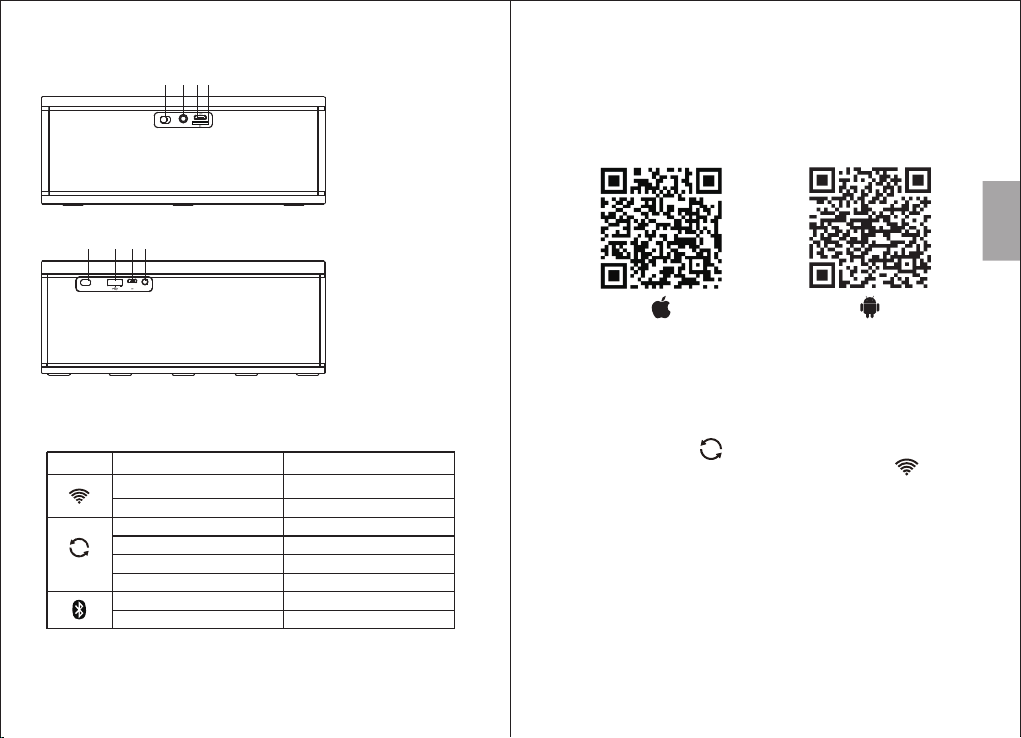
4.2 Ba ck
WS150
WS300
1 2 3
OFF ON
1 2 3
OFF ON AUX IN
4
AUX IN
DC 5V
4.3 St at us LED Me an ing
Indication Status LED
Wi-Fi Mode Green
Entering Wi-Fi Mode Flashing Green
Line-in Mode Blue
Low Power Flashing Red
Charging Red
Fully Charged Off
Pairing Flashing Blue
Connected Blue
Quick Start Guide
4
DC 5V
1.Power Switch
2.3.5mm Audio - In Socket
3.Micro USB Power Port
4.Micro SD Card Reader
1. Power Switch
2. USB Reader
3. Micro USB Power Port
4. 3.5mm Audio - In Socket
-3-
1. Scan the QR code below with your device or search
for 'August Alink' to download and install the app from
the Google Play or the Apple Store.
English
Note: For Blackberry phones, go to www.augustint.com
do download the application .apk file and install it.
2. Enable Wi-Fi on your device and connect to your
network.
3. Switch on the speaker, after 20 seconds it will enter
the Wi-Fi mode. will flash for 15 seconds when
entering Wi-Fi mode. Once in Wi-Fi mode, will
light green.
4. Run the App and follow the on screen guide to setup.
Please fully charge the WS150/WS300 before first use.
To charge the device, use the provided USB power cable
to connect the speaker to a powered USB port.
Tip: Once in Wi-Fi mode, you can connect the speakers
to your Wi-Fi directly from your router, without passing
through the application. Press WPS on the speaker then
press the WPS button on your router. They will establish
the connexion on their own.
-4-
Page 5

Table of Contents
1. Saf ety I nst ruc tio ns -- --- --- --- --- --- --- --- --- --- --- -1
2. Mai n Fea tur es --- --- --- --- ----------------- --- --- --- --2
3. Box C ont ent s --- --- --- --- --- --- --- ----------------- --- 2
4. Par t Nam es an d Fun cti ons -------- --- --- --- --- --- -2
4.1. Top --- --- --- --- --- --- --- --- --- --- --- --- --- ------------2
4.2. B ac k ------- --- --- --- --- --- --- --- --- --- --- --- --- --- --- -3
4.3. S ta tus LED M ea nin g --- --- --- --- ----------------- -- 3
5. Ope rat ion ----- --- --- --- --- --- --- ----------------- --- -- 6
5.1. I ns talla ti on -- --- --- --- --- --- --- --- --- --- --- --- --- ---- 6
5.2. C on necti on - --- --- --- --- --- --- --- --- --- --- --- --- --- --6
5.2. 1. W i-Fi Co nn ect io n -------------- --- --- --- --- --- --6
5.2. 2. B lueto ot h Con ne ct ion --------- --- --- --- --- --- -10
5.2. 3. N FC Conn ec tio n --- ----------------- --- --- --- --11
5.3. M ul ti and So lo M ode ( Wi -F i Con ne ction O nl y) ---- --1 2
5.3. 1. So lo Mo de ----------------- --- --- --- --- --- --- --1 2
5.3. 2. Multi Mode - --- --- --- --- --- --- --- --- --- --- --- --1 2
5.4. S pe aker' s Op tio ns ( Wi -Fi C on necti on O nly ) -- ----13
5.5. M us ic Play er ( Wi- Fi C on nec ti on Only ) --- --- --- --- 14
5.5. 1. L ocal Mu si c --------------- --- --- --- --- --- --- --1 4
5.5. 2. E xtern al S tor ag e De vic e Mu sic ----- --- --- ---15
5.5. 3. T hi rd Part y Mu sic Pro vi der s -- --- --------------15
5.6 Ha nd s-fre e Ca lli ng( Bluet oo th Con necti on Onl y) --17
5.7. Au di o-In - --- --- --- --- --- --- --- --- ----------------- --1 7
6. Cha rgi ng ---- --- --- --- --- --- --- ----------------- --- --- 17
7. Trou ble sho oti ng --- --- --- ----------------- --- --- --- 18
8. Spe cif ica tio ns ---- --- ----------------- --- --- --- --- --1 9
9. Wa rra nty ---- --- --- --- --- --- --- --- --- --- --- --- --- --- --20
-5-
5. Operation
5.1. Installation
1. Scan the QR code below with your device or search for
‘August Alink’ to download and install the app from the
Google Play or the Apple Store.
English
Note: For Blackberry phones, go to www.augustint.com
to download the application .apk file and install it.
2. Enable Wi-Fi on your device and connect to your
network.
3. Switch on the speaker, after 20 seconds it will enter
Wi-Fi mode. will flash for 15 seconds when
entering Wi-Fi mode. Once in Wi-Fi mode, will
light green.
Tip: Once in Wi-Fi mode, you can connect the speakers
to your Wi-Fi directly from your router, without passing
through the application. Press WPS on the speaker then
press the WPS button on your router. They will establish
the connexion on their own.
5.2. Connection
5.2.1. Wi-Fi Connection
5.2.1.1. Network Connection
-6-
Page 6

1. Run the application and p ress ‘Wi- Fi Setup Wi zard/Add Device’
3. Pre ss W PS on the W S1 50 / WS 30 0, t hen p re ss 'Nex t'
English
2. Con fi rm you Wi -F i net wo rk’s n ame a nd e nter th e pa ssw or d,
then p re ss ‘Nex t’
-7-
4. Th e app li catio n wi ll fi nd t he d evi ce a nd setu p th e Wi- Fi
conn ec tion. P re ss 'C an cel/B ac k' to go ba ck
-8-
Page 7

5. Onc e co nnect ed p res s 'N ext/F in ish' to f in ish
5.2. 1.2 .Di rec t Con nec tio n
You ca n als o con nec t you r pho ne / ta ble t dir ect ly to t he
spea ker ’s Wi- Fi ne two rk.
1. Swi tch o n the W i-F i spe ake r
2. Ent er th e Wi- Fi se tti ng of y our d evi ce an d con nec t to
the sp eak er’s W i-F i net wor k. The Wi -Fi n etw ork ’s
name i s ‘Wi -Fi S pea ker _xx xx’ .
3. Onc e con nec ted y our s pea ker h as be com e a rou ter
and yo u can p lay y our m usi c or ad d ano the r spe ake r.
4. To add an oth er sp eaker, use the same procedure
show n in 5. 2.1 .1.
Note : To rest ore t he fa cto ry se tti ngs f or Wi -Fi n etw ork
pres s and h old W PS.
English
6. To add a not he r devic e, p res s '+ ' on t he 'D ev ice Lis t' p age a nd
repe at s teps 2- 4
-9-
5.2. 2. Bl uet oot h Con nec tio n
1. Pre ss to c han ge be twe en Wi -Fi a nd Bl uet oot h
mode .
2. The s pea ker w ill enter reconnection mod e and w ill
conn ect a uto mat ica lly t o any p rev iou sly k now n
devi ce. I f no kn own d evi ce is a vai lab le, t he sp eak er
will a uto mat ica lly e nte r pai rin g mod e aft er 4 se con ds
and th e sta tus L ED wi ll fl ash b lue .
3. Ena ble B lue too th on t he so urc e dev ice .
4. Sca n for B lue too th de vic es on y our s our ce de vic e.
Sele ct WS 150 / W S30 0 to co nne ct to i t. On ce
succ ess ful ly pa ire d, th e sta tus L ED wi ll li ght b lue .
-10-
Page 8

5. To pair t o a new d evi ce, press and hold the mode
swit ch bu tto n for 3 s eco nds t o swi tch t he sp eak er
into p ari ng mo de ag ain . This can be done eithe r
when a d evi ce is a lre ady c onn ect ed to t he sp eak er or
when t he sp eak er is i n rec onn ect ion m ode . In pa iri ng
mode , the s tat us LE D wil l fla sh bl ue.
Note : Whe n the s our ce de vic e is sw itc hed o ff , the
spea ker w ill e nte r rec onn ect ion m ode . Th e LED w ill
flas h blu e and y ou wi ll be a ble t o rec onn ect t o any
prev iou s pai red d evi ce.
For PC c onn ect ion s, Wi ndo ws XP and Wind ows V ist a
requ ire t hir d par ty so ftw are t o con nec t to Bl uet oot h
spea ker s. If y ou ar e usi ng a la ter v ers ion o f Win dow s
and th e WS1 50/ WS3 00 is n ot ou tpu tti ng au dio , ple ase
chec k tha t the d riv ers f or yo ur PC s Blu eto oth m odu le
are up t o dat e and t hat t he Aud io Ou tpu t sou rce i s set t o
the sp eak er.
5.2. 3. NF C Con nec tio n
1. Ena ble B lue too th an d NFC o n you r sou rce d evi ce.
2. Swi tch o n the s pea ker a nd en ter B lue too th mo de.
3. Touch t he NF C are a of your source device aga ins t
the NF C are a on th e spe ake r. They will autom ati cal ly
pair w ith e ach o the r.
4. Con fir m Blu eto oth p air ing i f pro mpt ed. “ WS1 50 /
WS30 0” wi ll no w be li ste d in yo ur so urc e dev ice ’s
Blue too th de vic e lis t.
5. To disc onn ect y our device, touch the NFC a rea o f
your d evi ce ag ain st th e NFC a rea o n the s pea ker.
-11-
5.3. M ult i and S olo M ode ( Wi- Fi Co nnection Only)
Two Spe ake r pla yba ck se tti ngs c an be s ele cte d in th e
‘DEV ICE L IST ’
English
Tip: The ‘ DEV ICE L IST ’ can be accessed fro m any
scre en of t he ap p by sl idi ng th e scr een t owa rds t he le ft.
5.3. 1. So lo Mo de:
Solo m ode e nab les m ult ipl e spe ake rs co nne cte d to th e
same n etw ork t o pla y different music in div idu all y.
Spea ker s are b y def aul t in so lo mo de.
5.3. 2. Mu lti M ode :
Mult i mod e ena ble s to gr oup s ome o r all s pea ker s
conn ect ed to t he sa me ne two rk to p lay t he sa me mu sic ,
this c an be u sed t o sep ara te le ft an d rig ht ch ann els
betw een s pea ker s(s ee 5. 4 Spe ake rs Op tio ns) .
To group s pea ker s, pr ess a nd ho ld a se con dar y
devi ce’ s ico n and drag it towards the main dev ice ’s
icon .
-12-
Page 9

To ungro up th e spe ake rs, p res s and h old a s eco nda ry
devi ce’ s ico n and drag it down past the dotted l ine o n
the sc ree n.
Tip: P res s <L>, <R> or <LR> to change th e sou nd’ s
chan nel b etw een l eft , rig ht or s ter eo fo r sel ect ed
spea ker.
5.4 Sp eak er ’s Opt ion s (Wi -Fi C onn ection Only)
You ca n cha nge y our s pea ker ’s settings under the
‘DEV ICE L IST ’.
1. Pre ss to s ee th e ava ila ble o pti ons .
2. Pre ss 'R ena me' t o cha nge t he na me of t he sp eak er.
Sele ct on e ava ila ble n ame t hen p res s 'Fi nis h' to
conf irm o r pre ss '< ' to ca nce l. You ca n als o
cust omi ze th e spe ake r's n ame b y sel ect ing
'Cus tom …'.
3. Pre ss 'S pea ker I nfo ' to se e the d eta ile d inf orm ati on.
Sele ct 'R est ore F act ory S ett ing s' to r ese t the
spea ker 's Wi -Fi s ett ing .
-13-
5.5. M usi c Pla yer ( Wi- Fi Co nne cti on Only)
In sol o mod e, mu lti ple s pea ker s can p lay d iffer ent
trac ks. I n mul ti- mod e all t he sp eak ers w ith in th e sam e
netw ork w ill p lay t he sa me tr ack w ith t he ma in sp eak er.
To selec t a mus ic so urc e:
Tip: t he di ff ere nt mu sic s our ces c an be a cce ssed from
any sc ree n of th e app b y sli din g the s cre en to war ds th e
righ t
5.5. 1. Lo cal M usi c
• Pres s the m usi c ico n und er th e ‘DE VIC E LIS T’.
• Pres s ‘My M usi c’ to sea rch f or lo cal m usi c.
• Pres s the d evi ce ic on to v iew a ll th e mus ic on t he
devi ce an d sel ect o ne to p lay.
• Unde r ‘So ng’ pre ss to s ee mo re op tio ns.
-14-
English
Page 10

5.5. 2. Ex ter nal S tor age D evi ce Mu sic
5.5.2.1. USB Stick
The WS300 can play music from a USB stick.
• Press to browse and play.
5.5.2.2. Micro SD Card
The WS150 can play music from a micro SD card. When
a micro SD card is inserted, the WS150 will scan and
start playing music from the micro SD card automatically.
5.5.3. Third Party Music Providers
Tip: F or al bums, select one album and pre ss to
save t his a lbu m for e asy a cce ss. You c an ac ces s
albu ms fr om th e spe ake r ’s se tti ng.
English
Note: Some third party applications need Air Play and
can only be used with IOS.
• Press ‘Settings’ to change the list of music providers.
• Pres s a thi rd pa rty ’s icon to see its optio ns or o pen
the ap pli cat ion .
• Pres s ‘Se arc h’ to sea rch t he on lin e mus ic pr ovider
for so ngs , art ist s and a lbu ms.
-15-
1
3
5
6 6
2
1. Current mu sic so urce
2. Current sp eake r
4
3. Pres s to add t o the fa vour ites /
remov e from t he fav ouri tes
4. Pres s to see t he cur rent p layl ist
5. Repeat and S huff le opt ion
7
6. Track co ntro ls
7. Volume contr ol
-16-
Page 11

5.6 Ha nds -fr ee Ca lli ng (B lue too th Co nne cti on On ly)
When c onn ect ed th rou gh Bl uet oot h to a mo bil e pho ne,
the WS 150 / 3 00 wi ll ac t as a ha nds -fr ee sy ste m for a ny
call s. Th e mus ic will be stopped for any in com ing c all s,
and wi ll re sum e onc e the c all f ini she d.
- Pres s to an swe r an in com ing c all o r to
end an o ngo ing c all .
- Pres s and h old t o rej ect a n inc omi ng ca ll.
- When p lay ing m usi c, pr ess a nd ho ld to d ial t he
last n umb er fr om yo ur ca ll di rec tor y.
- Use + or - t o adj ust t he ca ll vo lum e.
5.7. Aud io- In
Use th e pro vid ed au dio c abl e to co nne ct yo ur so urc e
devi ce to t he sp eak er.
Once t he au dio c abl e is pl ugg ed in , the s pea ker w ill
ente r the a udi o-I n mod e aut oma tic all y.
6. Charging
Conn ect t he sp eak er to a p owe red U SB po rt us ing t he
prov ide d USB p owe r cab le.
Whil e cha rgi ng, w ill l igh t red a nd go o ff o nce t he
batt ery i s ful ly ch arg ed.
A full ch arg e tak es ap pro xim ati vel y 7 hou rs de pen din g
on pow er in put .
7. Troubleshooting
Problems Solutions
Unable to switch on • Fully charge the Speaker
Unable to connect
to the speaker via
Wi-Fi
Unable to pair my
Bluetooth source
device
Can't install the
Bluetooth driver
for the speaker
on a computer
There is no sound
from my Bluetooth
audio device
No sound or
intermittent sound
in Wi-Fi mode.
• Switch speaker on
• Ensure the Wi-Fi environment is 2.4 GHz
• Ensure the speaker is in Wi-Fi mode
• Ensure that both your device and the
speaker are in the same network.
• To add a new speaker, please refer to
section 5.1.
• Press and Hold WPS on the speaker to
reset to factory setting, then try again.
• Confirm that the speaker is in pairing mode.
• Confirm that the speaker is within 10m of
the source device
• Delete existing connection to speaker
from source device and repair.
• Press and hold the multi-function button
for 2 seconds
• For Windows 7 and 8, update the
Bluetooth driver from the Bluetooth
module manufacturer's website. For
further information on you PCs Bluetooth
module, please consult your PC supplier.
•
Bluetooth speaker are not supported by
Windows XP and Vista, a third party
Bluetooth driver can be used to solve
this issue.
• Make sure the Bluetooth audio device is
connecting to the speaker via Bluetooth.
• Check the volume on both source device
and your audio device.
• Ensure the Wi-Fi strength is good
• Reduce the audio quality in the app
• Reduce the usage of the router
English
-17-
-18-
Page 12

8. Specifications
WS150
Output Power
Frequency Response
SNR
Wi-Fi Band
Bluetooth Version
Bluetooth Profiles
External Storage Device
Charging Voltage
Charging Current
Working Time (Wi-Fi)
Working Time (AUX / BT)
Charging Time
Internal Battery
Dimensions
Net Weight 1.49kg
10W
60Hz-20KHz
≥75dB
2.4GHz 2.4GHz
V2.1+EDR V2.1+EDR
A2DP, AVRCP,
HSP, HFP
Micro SD up to 32G
DC5V
1A
about 12H
about 22H
about 8H
2x2000mAh, 3.7V
180x56x69mm
0.43kg
15W
80Hz-20KHz
≥85dB
A2DP, AVRCP,
HSP, HFP
USB up to 16GB
DC5V
1A
about 9H
about 14H
about 8H
2x2000mAh, 3.7V
256x80x103.5mm
-19-
WS300
9.Warranty
This p rod uct i s guara nte ed fo r twelv e mon ths f rom the
date o f the o rig inal pu rch ase . In the un lik ely e vent of a ny
defe ct ar isi ng due to f aul ty ma teria ls or w ork mansh ip,
the un it wi ll be e ither r epl ace d or repa ire d fre e of char ge
(whe re po ssi ble) du rin g thi s perio d. An al ter nativ e
prod uct w ill b e offer ed i n cas e the p rod uct is no l ong er
avai lab le or r epair abl e.
This w arr ant y is subj ect t o the f ol low ing c ondit ion s:
The wa rra nty i s only va lid w ith in the co unt ry wh ere the
prod uct i s pur chase d.
The pr odu ct mu st be cor rec tly i nstal led a nd op erate d
in acc ord anc e to the in str uct ions gi ven i n thi s user
manu al.
The pr odu ct mu st be use d sol ely f or dome sti c
purp ose s.
The wa rra nty o nly cov ers t he ma in unit s, an d doe s not
cove r the a cce ssori es.
The wa rra nty d oes not c ove r the d amage c aus ed by
misu se, n egl igenc e, ac cid ent and n atu ral d isast er.
The wa rra nty w ill be re nde red i nvali d if th e pro duct is
reso ld or h as be en dama ged b y ine xpert r epa irs . Th e
manu fac tur es disc lai m any l iabil ity f or in ciden tal o r
cons equ ent ial dam age s.
Plea se co nsu lt our cu sto mer a dvise r bef ore r eturn ing
any pr odu ct; w e are not r esp ons ible fo r any
unex pec ted p roduc t ret urn s.
Any fa ult y pro duct mu st be k ept a nd retu rne d in th e
orig ina l pac kagin g wit h all t he acce sso rie s and the
orig ina l cop y of the pu rch ase r eceip t.
The wa rra nty i s in addi tio n to, a nd does n ot di min ish,
your s tat uto ry or leg al ri ght s.
Cust ome r Ser vice:
Teleph one : +44 ( 0) 845 25 0 058 6
Emai l: se rvi ce@au gus tin t.com
-20-
English
Page 13

This product is in compliance with the essential
requirements and other relevant provisions of Directive
1999/5/EC. The declaration of conformity may be consulted
at August International Ltd, Rawmec Business Park,
Plumpton Road, Hoddesdon, EN11 0EE, United Kingdom.
Industry Canada Statement
This device complies with Industry Canada license-exempt
RSS standard(s). Operation is subject to the following two
conditions: (1) this device may not cause interference, and
(2) this device must accept interference, including
interference that may cause undesired operation of the
device.
Note: This equipment has been tested and found to comply
with the limits for a Class B digital device, pursuant to part
15 of the FCC Rules. These limits are designed to provide
reasonable protection against harmful interference in a
residential installation. This equipment generates uses and
can radiate radio frequency energy and, if not installed and
used in accordance with the instructions, may cause
harmful interference to radio communications. However,
there is no guarantee that interference will not occur in a
particular installation. If this equipment does cause harmful
interference to radio or television reception, which can be
determined by turning the equipment off and on, the user is
encouraged to try to correct the interference by one or
more of the following measures:
Reorient or relocate the receiving antenna.
Increase the separation between the equipment and
receiver.
Connect the equipment into an outlet on a circuit
different from that to which the receiver is connected.
Consult the dealer or an experienced radio/TV technician
for help.
No Unauthorized Modifications: Do not make any changes
or modifications to this product without the prior express
written approval of August International Ltd. Any changes
or modifications made without express written approval
could void the user’s authority to operate this product.
For details of further relevant technical standards, please
contact us at the address above.
English
-21-
-22-
 Loading...