

Page 1
August International Ltd
United Kingdom
Tel: +44 (0)845 250 0586
www.a ug us ti nt .c om
WR3
20
Wi-Fi Wireless Multiroom Receiver
EN
Récepteur Wi-Fi Multiroom Sans-Fil
Schnurloser Wi-Fi Multiroom Empfänger
Ricevitore Wi-Fi Multiroom Senza Fili
Receptor WiFi Multiroom Inalámbrico
FR
DE
IT
ES
Page 2

English
User Manual
Thank you for purchasing the August WR320. This user
manual is designed to familiarize you with all the
features of this device. Please take the time to rea d thi s
user manual carefully, even if you are already familiar
with a similar product.
Safety
To ensure the safety of yourself and others, please
read the Safety Instructions before using this devi ce.
Please do not disassemble this product as it can be
unsafe and will invalidate the manufacturer's warran ty.
Disposal
Please ensure the product and accessories are
disposed of in compliance with the WEEE (Was te
Electrical and Electronic Equipment) Directiv e and a ny
other regulations applicable to your country. Always
check with the environment agency and any other
relevant authorities for current disposal regul ati ons .
Customer Service
You can contact us by phone on: + 44 (0 )84 5 250 0 586
or by email at: service@augustint.com should you
require further technical support or customer ser vic e.
Page 3
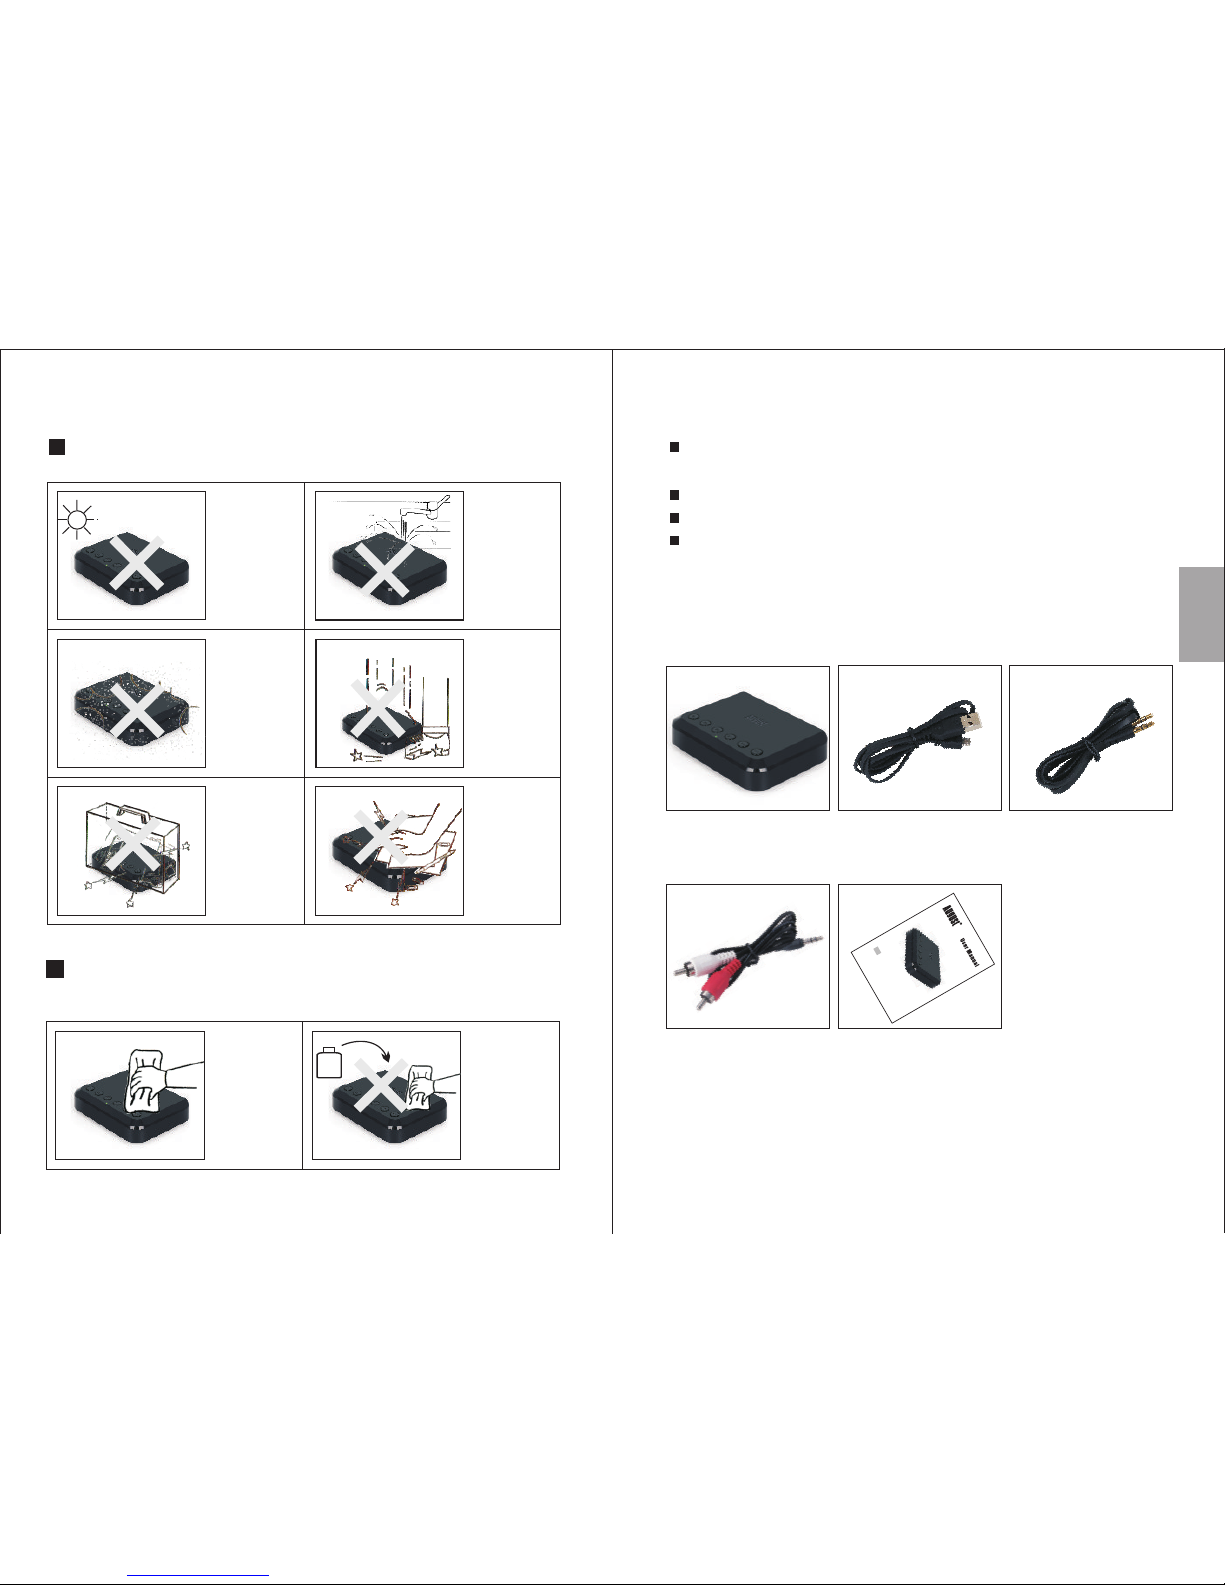
Storage and Use
Do not expose
this device to
dust, oil or
smoke.
When
transporting this
device, store
securely to avoid
impact damage.
Do not scratch
this device with
sharp objects.
Do not store or
use this device
in extreme
temperatures.
Do not store or
use this device
in wet or damp
environments.
Do not drop
or strike this
device.
Maintenance
Please unplug all leads before cleaning this device.
Alcoh ol
1. Safety Instructions
Wipe the
device and
buttons with
a soft cloth.
Never wipe this
device with an
abrasive cloth
or apply
detergent,
alcohol or
chemical based
cleaning
products.
3. Box Contents
2. Main Features
Wi-Fi Audio Receiver to add Multiroom Capability to
any Home Audio System
Bluetooth Audio Mode for Bluetooth Source Devices
Ethernet and Wireless Internet Connection
Optical and 3.5mm Audio Out for Digital and
Analogue Connection
Wi-Fi
Wireless Receiver
USB Power Cable 3.5mm Audio Cable
English
-1-
3.5mm to
2xRCA Audio Cable
-2-
WR
3
2
0
Wi
-F
i W
ire
le
s
s R
e
ceiver
E
N
User Manual
Page 4
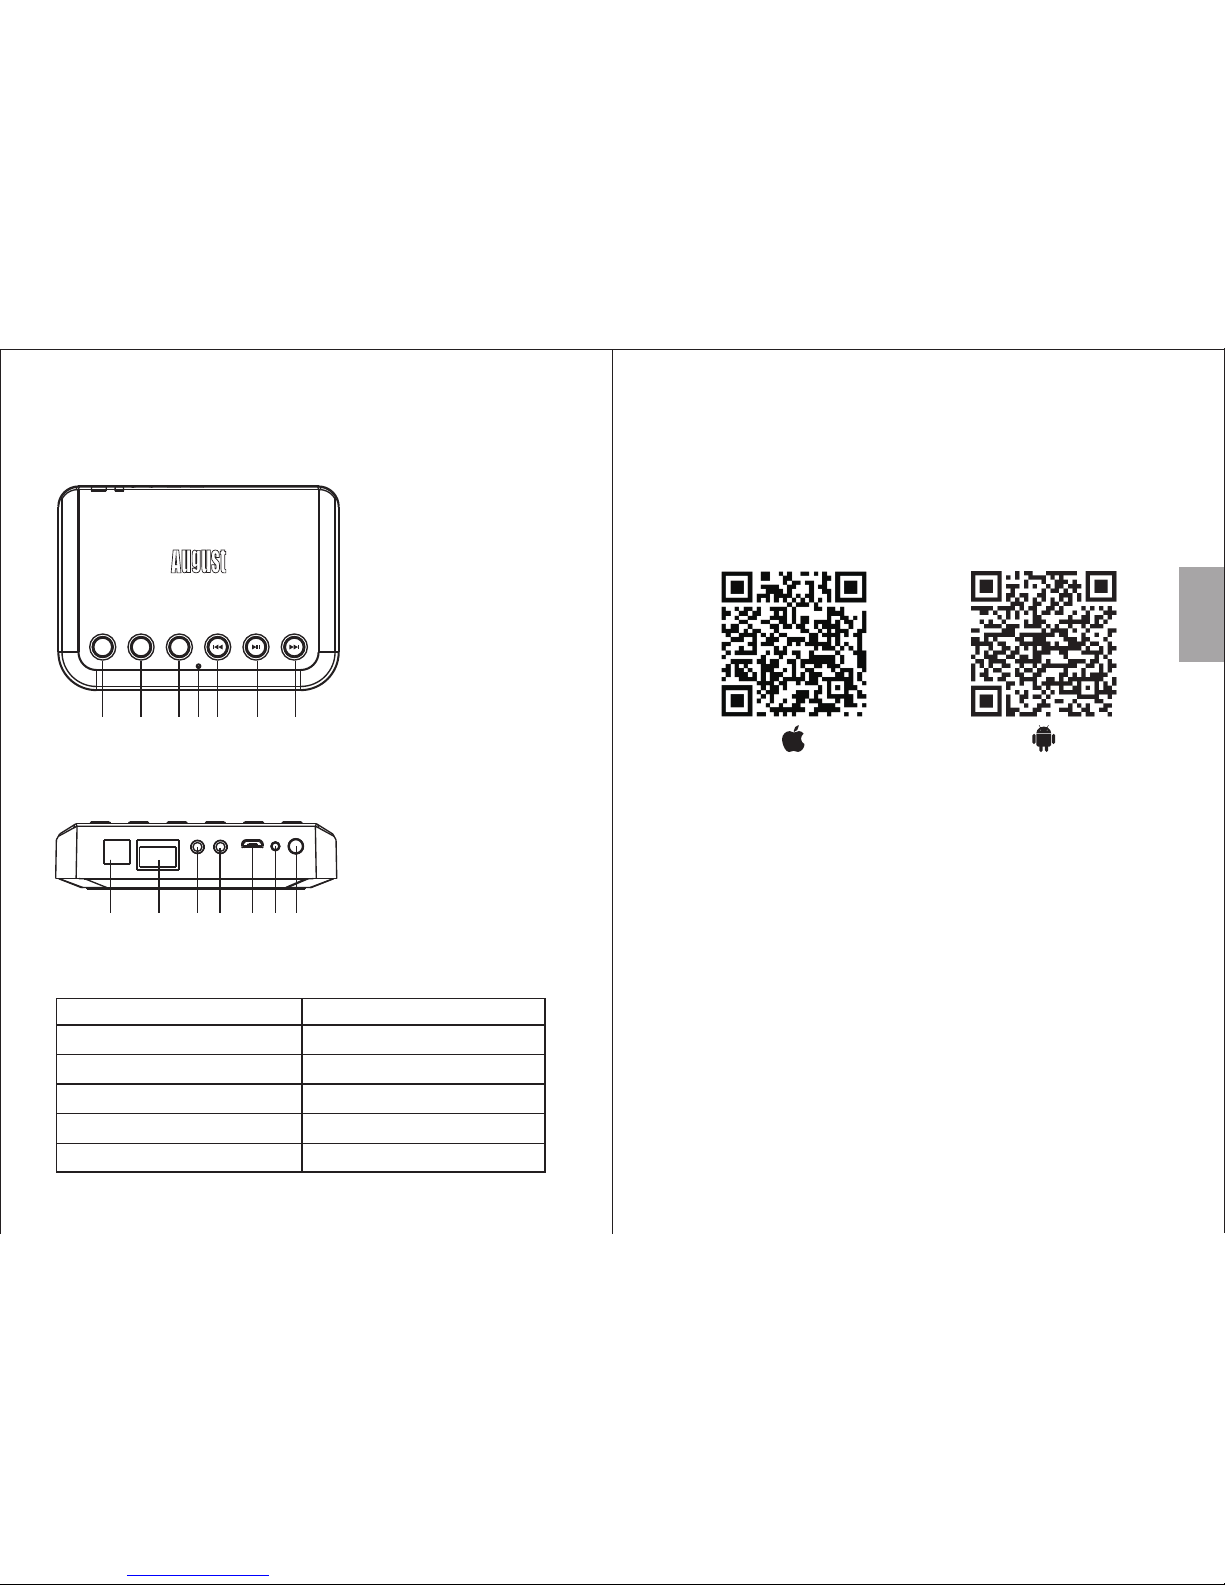
4.2 Ba ck
4.3 St atus LED Me aning
Indication Status LED
Entering Wi-Fi Mode Flashing Green
Wi-Fi Mode Green
Line – In Mode Red
Bluetooth Pairing Mode Flashing Blue
Bluetooth Connected Blue
-3-
AUX INLANOPTICAL AUX OUT WPSDC 5V
Reset
1 2 3 5 6 74
1.Optical-Out
2.LAN
3.AUX-Out
4.AUX-In
5.Micro USB Power Port
6.Reset
7.WPS Button
1. Scan the QR code below with your device or search for
'August Alink' to download and install the app from
Google Play or the Apple Store.
Note: For Blackberry phones, go to www.augustint.com to
download the application as an .apk file and install it.
2. Enable Wi-Fi on your device and connect to your
network.
3. Connect the WR320 to a powered USB port using the
provided cable. The WR320 will switch on automatically
and enter Wi-Fi mode. Once in Wi-Fi mode, the status
LED will light green.
4. Run the App and follow the on-screen guide to set up.
Tip: Once in Wi-Fi mode, you can connect the WR320 to
your Wi-Fi directly from your router, without using the
application. Press WPS on the WR320, then press the
WPS button on your router. They will connect
automatically.
English
-4-
1.Mode Switch
2.Preset 1
3.Preset 2
4.Previous
5.Play / Pause
6.Next
7.Status LED
M P1 P2
1 2 3 4 5 67
4. Part Names and Functions
4.1 Top
Quick Start Guide
Page 5

Table of Contents
1. Safety Instructions -------------------------------1
2. Main Features --- -----------------------------------2
3. Box Contents --- --- --- --- ---------------------------2
4. Part Names and Functions ----------------------3
4.1. Top ---------------------------------------- --- --- --- 3
4.2. B ack - --- --------------------------------------------3
4.3. S tatus LED M eanin g ------------ --- --- --- --- ----- 3
5. Operation ---------------------------- --- --- --- --- --- 6
5.1. I nstalla tion - --- ------------------------------------ 6
5.2. C onnecti on ------------------- --- --- --- --- --- ------7
5.3. W i-Fi Conn ectio n --- --- --- --- --- -------------------7
5.3. 1. Ne twork Conn ection --------------------------7
5.3. 2. D irect Co nnectio n -------------------------- -11
5.4. Blue to oth Conne ct ion -- --- --- ---------------------11
5. 5. Mult i and Sol o Mode (W i-Fi Co nnect ion Only) ----13
5.5. 1. So lo Mo de ------------------------------- --- -13
5.5. 2. Mu lti M od e --------------- --- --- --- --- --- ----13
5.6. R eceiver 's Opti ons (Wi-F i Connect ion Onl y) ----13
5.7. M usic Play er (Wi- Fi C onnec tion Only ) --- --- --- -14
5.7. 1. Local Mu sic -- --- --- --- ----------------------15
5.7. 2. Third Part y Music Pro vider s ---- --- --- --- --- -15
5.8. Line -In M ode -------------------------------------17
6. Troubleshooting ---------------------------------18
7. Specifications ------------------------------------19
8. Warranty --- --- --- --- -------------------------------20
5. Operation
5.1. Installation
1. Scan the QR code below with your device or search for
'August Alink' to download and install the app from
Google Play or the Apple Store.
Note: For Blackberry phones, go to www.augustint.com
to download the application as an .apk file and install it.
2. Enable Wi-Fi on your device and connect to your
network.
3. Connect the WR320 to a powered USB port using the
provided cable. The WR320 will switch on
automatically and enter Wi-Fi mode. Once in Wi-Fi
mode, the status LED will light green.
Tip: Once in Wi-Fi mode, you can connect the WR320 to
your Wi-Fi directly from your router, without using the
application. Press WPS on the WR320, then press the
WPS button on your router.. They will connect
automatically.
English
-6-
-5-
Page 6

5.2 Connection
5.3 Wi-Fi Connection
5.3.1 Network Connection
English
-8-
-7-
Optical connection
3.5mm Audio Cable
Aux connection
AUX INLANOPTICAL AUX OUT WPSDC 5V
Reset
Power Cable
Optical Audio Cab le
AUX INLANOPTICAL AUX OUT WPSDC 5V
Reset
Power Cable
1. Connect the power cable to the micro USB Power Port.
2. Connect the WR320 to the AUX-In socket of your playback
device using either a 3.5mm or optical cable.
2. Con firm you Wi -Fi net work’s name a nd enter th e passw or d,
then p ress ‘Nex t’
1. Run the application and press ‘Wi-Fi Setup Wizard/Add Device’
Aux Out
3.5mm Audio Cable
AUX INLANOPTICAL AUX OUT WPSDC 5V
Reset
Power Cable
Aux In
3.5mm Audio Cable
Page 7

English
-10-
-9-
3. Pre ss WPS on the W R320, t hen press ' Next'
4. The app licatio n will fi nd t he devi ce and set up t he Wi-F i
conn ection. P ress 'C ancel/B ack' to go ba ck
6. To add anot her devic e, pres s '+ ' on the 'D evice Lis t' page a nd
repe at steps 2- 4
5. Onc e connect ed, pre ss 'Next/ Finish' t o finis h
Page 8

5.3.2.Direct Connection
You can also connect your pho ne or t abl et di rec tly t o
the receiver's Wi-Fi network.
1. Turn on the Wi-Fi receiver.
2. Enter the Wi-Fi setting of your device and connect to
the receiver’s Wi- Fi ne two rk. The Wi-Fi network’s
name is ‘WR320_xxxx’.
3. Once connected, your WR320 has become a router
and you can play music or add another Wi-Fi device.
4. To add an oth er Wi -Fi device, use the same
procedure shown in 5.3.1.
Note: To restore the factory settings for the Wi-Fi
network, press and hold the Reset button for 10
seconds.
5.4. Bluetooth Connection
1. Press 'mode' to change between the Wi-Fi,
Bluetooth and Line-in modes.
2. The W R32 0 wil l enter reconnection mode and will
connect automatically to any previously known
device. If no known device is available, the WR320
will automatically enter pairing mode after 4 secon ds
and the status LED will flash blue.
3. Enable Bluetooth on the source device.
4. Scan for Bluetooth devices on your source device.
Select WR320 to connect to it. Once successfu lly
paired, the status LED will light blue.
5. To pair t o a new d evi ce, press and hold the Play /
Pause button for 3 seconds to switch WR320 into
paring mode again. This can be done either when a
device is already connected to the receiver or when
English
-11-
-12-
the WR320 is in reconnection mode. In pairing mode,
the status LED will flash blue.
Note: When the source device is switched off, the
WR320 will enter reconnection mode. The LED will
flash blue and you will be able to reconnect to any
previously paired device.
Windows XP and W indows Vis ta re qui re th ird p art y
software to connect to WR320. If you are using a later
version of Windows and the WR320 is not outputting
audio, please check that the drivers for your PC's
Bluetooth module are up to date and that the Audio
Output source is set to the receiver.
5.5 Multi and Solo Mode (Wi-Fi Connection Onl y)
Two Speaker playback settings can be selected in the
‘DEVICE LIST’
Tip: T he ‘D EVICE LIST’ can be accessed from any
screen of the app by sliding the screen towards the left.
Page 9

5.5.1 Solo Mode
Solo mode enables multiple speakers that are
connected to the same network to play different music
individually. Speakers are by default in solo mode.
5.5.2 Multi Mode
Multi mode enables you to group some or all of the
speakers connected to a network and have them play
the same music. This can be used to separate left and
right channels between speakers (see 5.6 Receiver
Options). To group speakers, press and hold the icon of
a secondary device and drag it towards the main
device's icon. To ungroup the speakers, press and hold
a secondary device’s icon and drag it down past the
dotted line on the screen.
5.6 Receiver ’s Options (Wi-Fi Connection Only)
You can change your device’s settings under the
‘DEVICE LIST’.
English
-14-
-13-
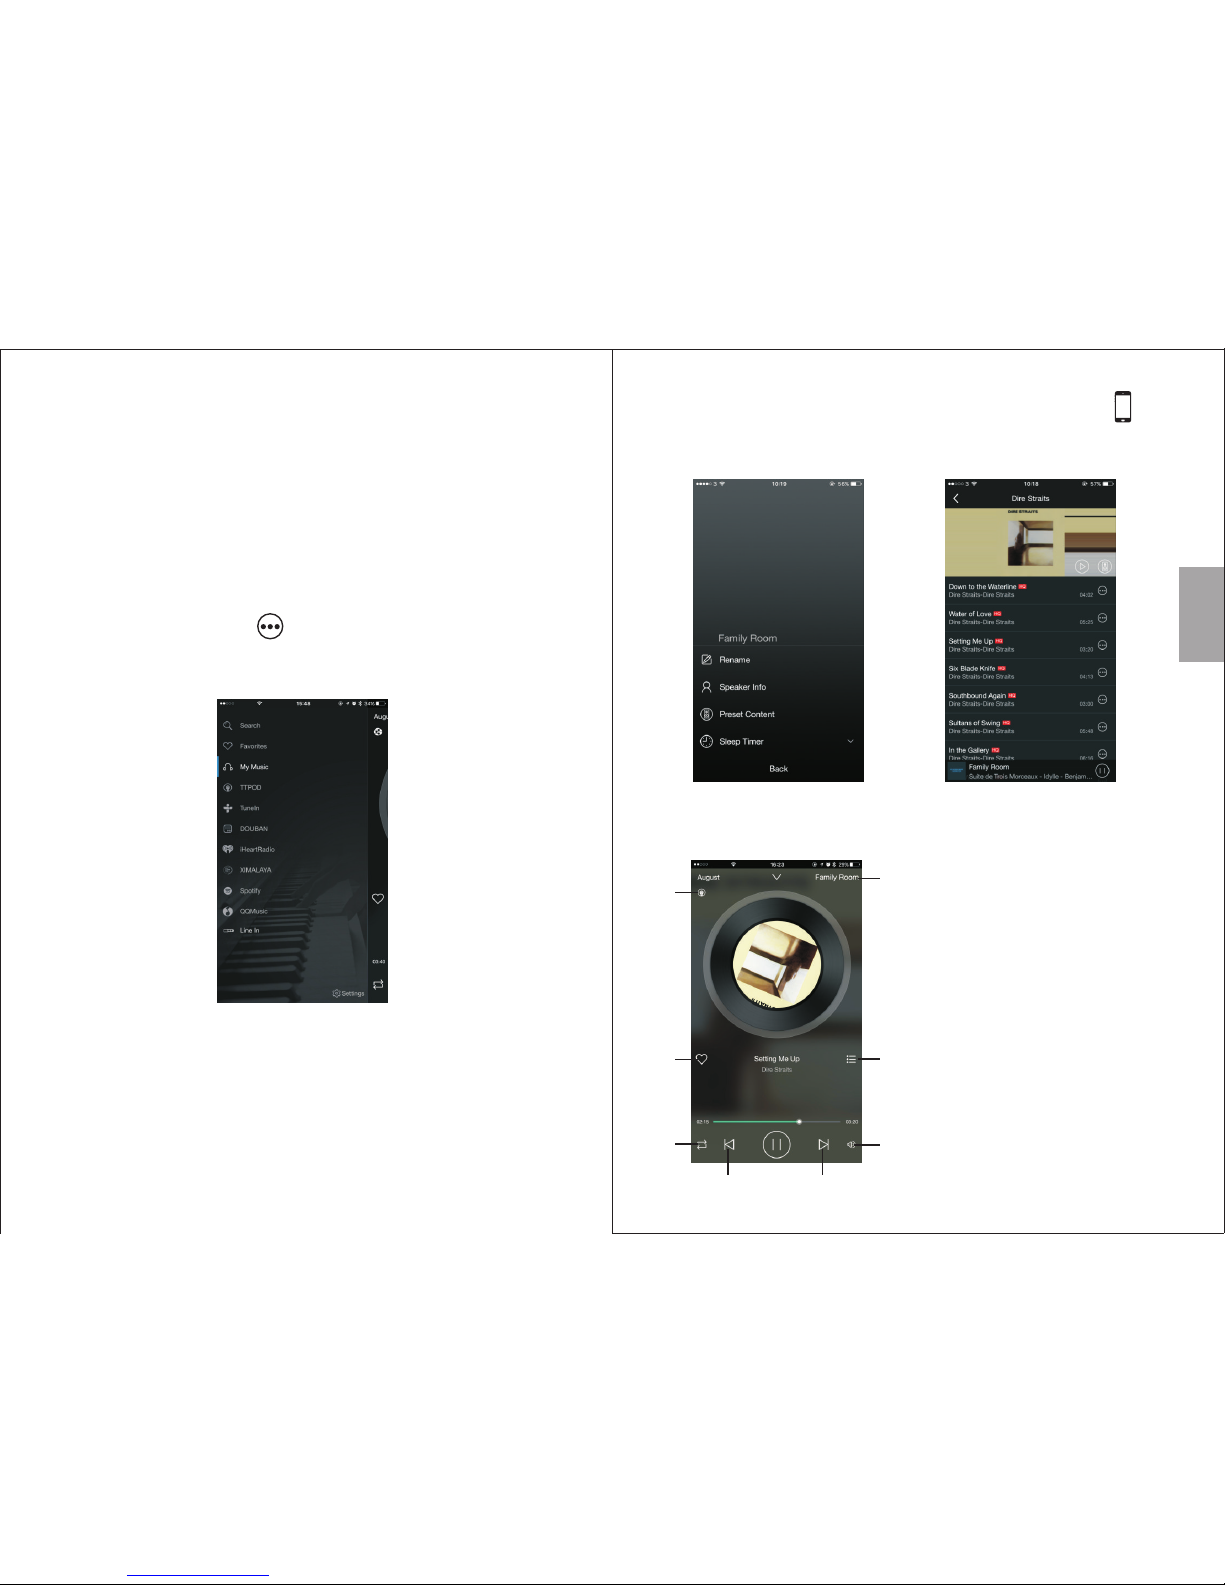
1. Press to see the available options.
2. Press 'Rename' to change the name of the speaker.
Select one available name, then press 'Finish' to
confirm or press '<' to cancel. You can also
customize the speaker's name by selecting
'Custom…'.
3. Press ‘Receiver Info' to see the detailed informat ion .
Select 'Restore Factory Settings' to rese t the
receiver's Wi-Fi setting.
Tip: P res s <L>, <R> or <LR> to change the channel
between left, right and stereo for the selected speak er.
5.7 Music player (Wi-Fi Connection Only)
In solo mode, multiple speakers can play different
tracks. In multi-mode, all the speakers within the
network will play the same track as the main speaker.
To select a music source:
Page 10
Tip: t he di fferent mu sic s our ces c an be a cce ssed from
any screen of the app by sliding the screen towards the
right
5.7.1. Local Music
• Press the music icon under the ‘DEVICE LIST’.
• Press ‘My Music’ to sea rch f or lo cal m usi c.
• Press the device icon to view all the tracks on the
device and select one to play.
• Under 'Song', press to see more options.
5.7.2 Third Par ty Mu sic P rov ide rs
• Press ‘Settings’ to c han ge th e lis t of mu sic p roviders.
• Press the icon of a third party to see its options or
open the application.
• Press ‘Search’ to sea rch t he on lin e mus ic pr ovi der
for songs, artists and albums.
English
-16-
-15-
Tip: F or al bums / stations, select one and press to
save this album for easy access. You can access
albums / stations from the speaker's settings.
Note: Some third party applications need Air Play and
can only be used with IOS.
1. Current music source
2. Current speaker
3. Press to add to the favourites /
remove from the favourites
4. Press to see the current playlist
5. Repeat and Shuff le opt ion
6. Track controls
7. Volume control
2
1
3
4
5
7
6 6
Page 11

English
5.8 Line-In Mode
Use the provided audio cable to connect your source
device to the WR320.
Once the audio cable is plugged in, the receiver will
enter line-in mode automatically and the status LED
will light red.
In Line in mode, you will be able to play music from your
source device on some or all of the Wi-Fi receivers in
your multiroom system.
-18-
-17-
Problems Solutions
Unable to switch on • Check the power cable
• Ensure the USB port has power
6. Troubleshooting
Unable to connect
to the receiver via
Wi-Fi
• Ensure the Wi-Fi environment is 2.4 GHz
• Ensure the receiver is in Wi-Fi mode
• Ensure that both your device and the
are in the same network.
• To add a new speaker, please refer to
section 5.1.
• Press and Hold Reset on the speaker to
reset to factory setting, then try again.
receiver
Unable to pair my
Bluetooth source
device
• Confirm that the is in pairing mode.
• Confirm that the receiver is within 10m of
the source device
• Delete existing connection to speaker from
source device and pair again.
• Press and hold the multi-function button
for 2 seconds
receiver
Can't install the
Bluetooth driver
for the receiver
on a computer
• For Windows 7 and 8, update the
Bluetooth driver from the Bluetooth
module manufacturer's website. For further
information on you PC's Bluetooth module,
please consult your PC supplier.
• Bluetooth receivers are not supported by
Windows XP or Vista. A third party
Bluetooth driver can be used to solve
this issue.
There is no sound
from my Bluetooth
audio device
• Make sure the Bluetooth audio device is
connected to the speaker via Bluetooth.
• Check the volume on both source device
and your audio device.
No sound or
intermittent sound
in Wi-Fi mode.
• Ensure the Wi-Fi strength is good
• Reduce the audio quality in the app
• Reduce the usage of the router
Page 12

English
7. Specifications
Wi-Fi Profile
Bluetooth Version
Bluetooth Profiles
Bluetooth Operating Range
Power Input
Dimensions
Up to 10m (Class 2 )
DC 5V/500mA
Net Weight
140 x 86.5 x 25mm
165g
This prod uct i s guaranteed fo r twelve months f rom the
date of the o rig inal purchase . In the unlikely e vent of any
defect ar isi ng due to faulty ma terials or work manship,
the unit wi ll be e ither replace d or repaired fre e of charge
(where po ssi ble) during thi s period. An alter native
product w ill b e offer ed in case the p rod uct is no long er
available or r epairable.
This warr ant y is subject t o the f ollowing c onditions:
The warra nty i s only valid with in the country wh ere the
product w as pu rchased.
The produ ct mu st be correc tly i nstalled and op erated
in accord anc e with the instru ctions given in t his user
manual.
The produ ct mu st be used solely f or domestic
purpose s.
The warra nty c overs only the ma in units and does n ot
cover the a cce ssories.
The warra nty d oes not cove r the d amage caused by
misuse, n egl igence, accid ent or natural di saster.
The warra nty w ill be rendered i nvalid if the pro duct is
resold or h as be en damaged by ine xpert repairs . Th e
manufac tur ers discla im an y liability for i ncidental or
consequ ent ial damages.
Please co nsu lt one of our custo mer service adv isers
before re tur ning any pro duc t; we are not respo nsible
for any une xpe cted produ ct re turns.
Any fault y pro duct must be k ept a nd returned in th e
origina l pac kaging with all t he accessorie s and the
origina l cop y of the purch ase r eceipt.
The warra nty i s in addition to, a nd does not dimin ish,
your stat uto ry or legal ri ght s.
Custome r Ser vice:
Telephone: +44 ( 0) 845 250 0586
Email: se rvi ce@augustin t.com
8. Warranty
-19-
802.11 a/b/g/n
V4.0
A2DP, AVRCP, PBAP
SNR
Wi-Fi Operation Range
≥80dB
Up to 100m
-20-
Wi-Fi Band
Frequency Response
Distortion
2.4GHz
20Hz-20KHz
≤1.0% at 1KHz
Page 13

English
This product is in compliance with the essential
requirements and other relevant provisions of Directive
1999/5/EC. The declaration of conformity may be consulted
at August International Ltd, Rawmec Business Park,
Plumpton Road, Hoddesdon, EN11 0EE, United Kingdom.
-22-
-21-
 Loading...