

Page 1
Mod
el
N
5
1
5
MS
.:
o
August International Ltd
United Kingdom
Telephone: +44 (0)845 250 0586
www.a ug us ti nt .c om
EN
Bluetooth Stereo Speakers
FR
Enceintes Stéréo Bluetooth
DE
Bluetooth Stereo Lautsprecher
IT
Altoparlanti Stereo Bluetooth
ES
Altavoces Bluetooth Estéreo
Page 2
User Manual
Quick Start Guide
MS515
Thank you for purchasing this August product. This user
manual is designed to familiarize you with a ll t he f ea tu re s of
this device. Please take the time to read this u se r ma nu al
carefully, even if you are already familiar with a similar
product.
Safety
To ensure the safety of you and others, please read the Safety
Instructions before using this dev ic e. P le as e do n ot
disassemble this product, it can be unsa fe a nd w il l in va li da te
the manufacturer's warranty.
Disposal
Please ensure the product and accessor ie s ar e di sp os ed o f in
compliance with the WEEE (Waste Electric al a nd E le ct ro ni c
Equipment) Directive and any other regul at io ns a pp li ca bl e to
your country. Always check with the environment agency and
any other relevant authorities for cur re nt d is po sa l
regulations.
Customer Service
You can contact us by phone on: +44 (0)845 250 058 6 or b y
email at: [email protected] shou ld y ou r eq ui re f ur th er
technical support or customer servic e.
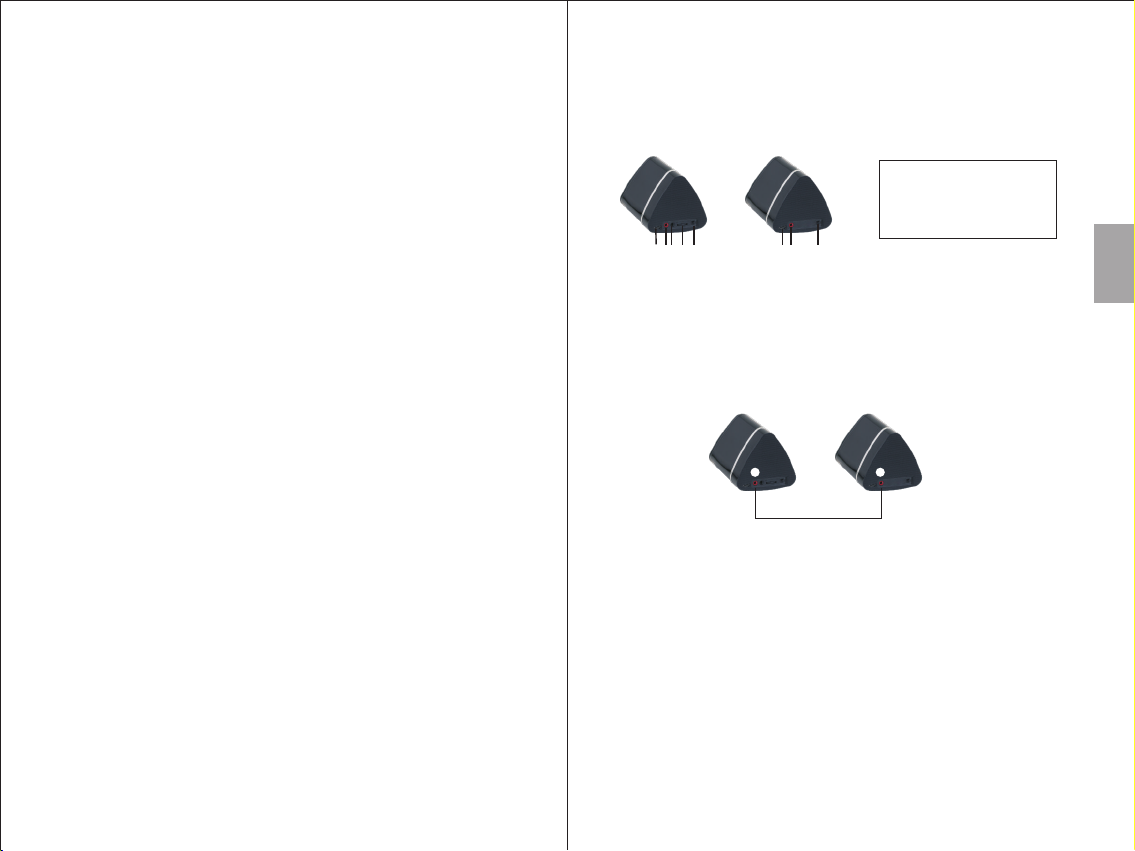
Mai n (Left )
1
3
4
5
Sec ondar y (Righ t)
1 52
2
1. USB Charging Socket
2. 3.5mm Connecting Socket
3. 3.5mm Audio-In Socket
4. Multifunction Switch
5. Power Switch
Please fully charge both speakers before first use. To cha rge,
use the USB charging cable to connect both speakers to a
powered USB port.Whilst charging, the LED lights red and
turns off once fully charge d.
1.Use the connecting cable to connect the ma in a nd s ec on da ry
speaker.
2
2
2. Switch both speakers on.
Note: The main speaker will automaticall y en te r pa ir in g
mode, indicated a alternative blue and red s tr ob in g LE D,
if the last used source device is not availabl e.
3. Pair your source device to “MS515”
Note: If you are unfamiliar with the Bluet oo th f ea tu re o f
your source device, please refer to its us er m an ua l fo r
detailed instructions.
English Français Español
-1-
4. Once successfully paired and connec te d, t he b lu e LE D
starts to flash once per 2 seconds.
-2-
Page 3
Contents
1. Safety Instructions......... .. .. .. .. .. .. .. ................................4
2. Main Features............... .. .. .. .. .. .. .. .................................5
3. Accessories....................... .. .. .. .. .. .. .. ............................5
4. Part Names and Functions........ .. .. .. .. .. .. .. .......................5
1. Safety Instructions
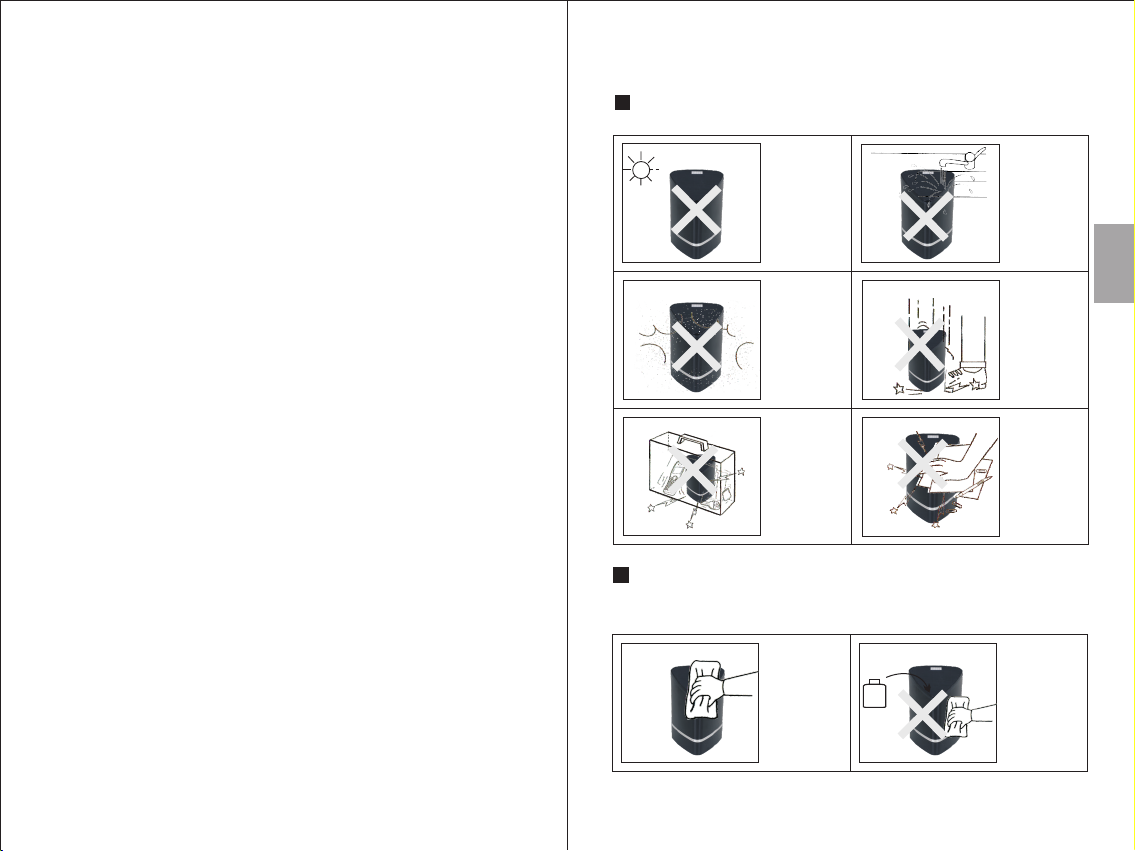
Storage and Use
Do not store or
use this device
in extreme
temperatures.
Do not store or
use this device
in wet or damp
environments.
English Français Deutsch Español
5. Operation................. .. .. .. .. .. .. .. .....................................6
6. Charging.............................................. .. .. .. .. .. .. .. .........9
7. Specification............. .. .. .. .. .. .. .. ....................................9
8. Troubleshooting.................. .. .. .. .. .. .. .. .........................10
9. Warranty................ .. .. .. .. .. .. .. ......................................11
10..
FCC statement.
........................ .. .. .. .. .. .. .. .....................12
-3-
Do not expose
this device to
dust, oil or
smoke.
When transporting
this device store
securely to avoid
impact damage.
Do not drop
or strike this
device.
Do not scratch
this device with
sharp objects.
Maintenance
Please unplug all leads before cleaning this device.
Wipe the
device and
butto ns with
a soft cloth.
Alcoh ol
-4-
Never wipe this
device with an
abrasive cloth
or apply
detergent,
alcohol or
chemical based
cleaning
products.
Page 4
2. Main Features
Wireless Audio from any Blueto ot h De vi ce
Speakers for Stereo Sound on Your H ome TV
Audio-In Socket for Non Bluetooth De vi ce s
Long Life Built-in Rechargeable Batteries
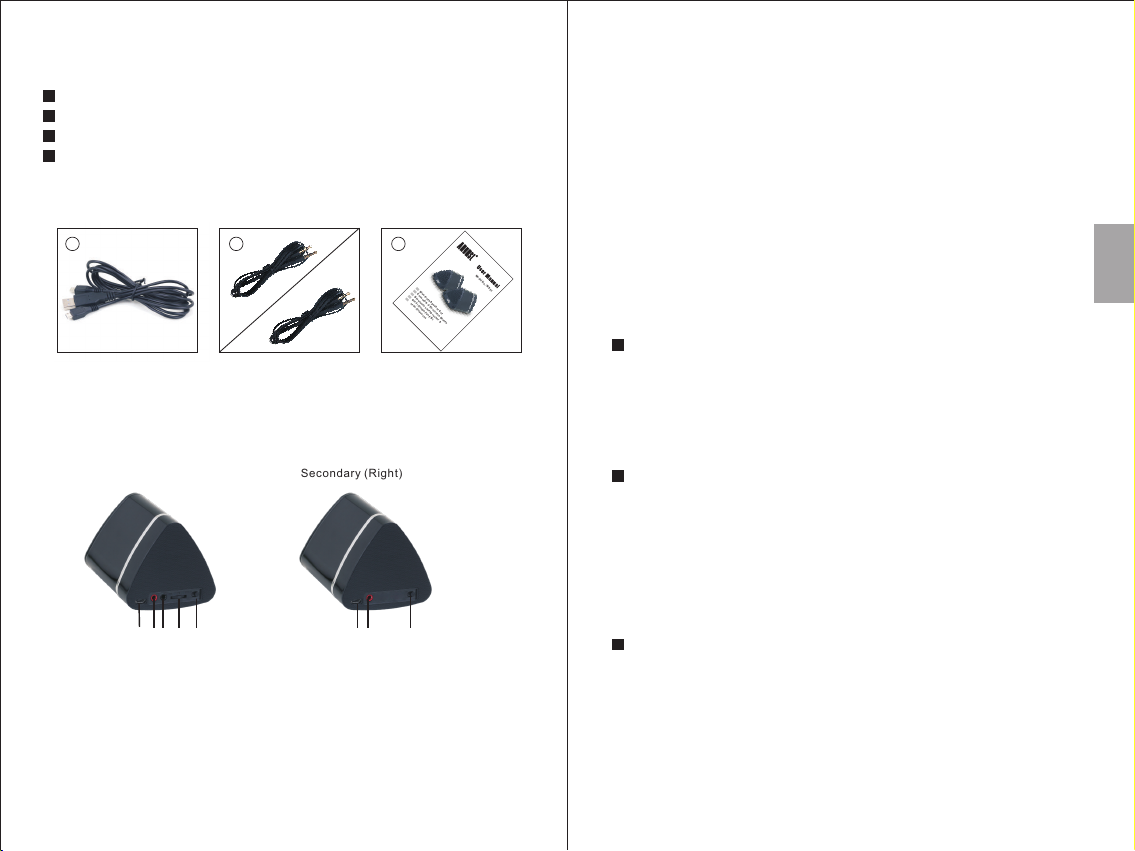
3. Accessories
1 2 3
USB c hargi ng ca ble
3.5mm Connecting Cable
[Red Band]/3.5 mm Audio Cable
4. Part Names and Functions
Mai n (Left ) Sec ondar y (Righ t)
4
1
5
3
1. USB Charging Socket
2. 3.5mm Connecting Socket
3. 3.5mm Audio-In Socket
4. Multifunction Switch
5. Power Switch
-5-
2 52 1
EN
FR
B
DE
l
u
Ens
e
IT
t
Bl
o
e
o
ES
uetooth La
m
S
t
h S
e
b
t di
Se
l
e d
p
t de A
e
A
a
’
E
l
k
t
n
e
o
c
r S
p
u
l
e
ta
a
t
i
s
r
e
n
v
p
l
t
t
a
o
re
e
n
c
s B
t
c
e
i B
h
s B
lu
e
l
r Set
u
e
l
u
e
t
o
t
e
o
t
o
oo
o
t
h
t
h
t
h
Use r manua l
5. Operations
5.1 Switch Speakers On/Off
The power switch for both the main and secondary speaker is a
slider switch located on the rear of each unit. Before switching the
speakers on, please ensure that the main and secondary speaker
are connected with the provided connecting cable.
5.2 Bluetooth Connection
5.2.1 Connection to the Main Speaker
Mod
e
l No.
: M
S
51
5
Switch the main speaker on, then press and hold the multifunction
switch button until a two tone notification sounds to indicate
pairing mode. In pairing mode, the LED will quickly flash blue
and red alternatively.
For mobile phones
1) Scan for available Bluetooth devices on your mobile phone
(see your mobile phone user manual for instructions if needed).
2) Select “MS515” from the available devices.
3) Once successfully paired and connected, the blue LED starts to
flash once per 2 seconds.
For computers
1) Enable the Bluetooth function on your computer.
2) Select “Devices and Printers” from the Control Panel and click
“Add a Device”.
3) Select “MS515” from the available devices, the system will
install the driver automatically.
4) Once successfully paired and connected, the blue LED starts to
flash once per 2 seconds.
For a TV or Set-Top Box with Integrated Bluetooth
Connection
1) Scan for available Bluetooth devices on your TV or Set-Top
Box (see your TV or Set-Top Box user manual for instructions
if needed).
2) Select “MS515” from available devices.
3) Once successfully paired and connected, the blue LED starts to
flash once per 2 second.
-6-
English
Page 5

For TV with No Bluetooth Connection
To connect to a TV or Set-Top box without a Bluetooth
connection, you will require a Bluetooth Transmitter such as the
August MR250.
1) Plug the transmitter into the headphone socket of your TV.
2) Switch the transmitter on and enter pairing mode (for more
information, please refer to the transmitter user manual). Please
ensure that no other Bluetooth device is available for pairing
nearby.
3) The transmitter will automatically pair with the MS515. Once
successfully paired and connected, the blue LED starts to flash
once per 2 seconds.
5.3 Remote Control
The MS515 is able to control the music playing on either a mobile
phone or a computer with a Bluetooth connection.
Press the multifunction switch to pause or resume playing music.
Briefly move the multifunction switch to the Previous or Next
position to select the previous or next track.
Move and hold the multifunction switch to adjust the volume on
the source device from the speaker.
Note: The remote control is only compatible with devices that
support A2DP, please refer to your devices user manual for its
A2DP compatibility. For devices such as TVs, Set-top Boxes or
Bluetooth transmitters the Volume control on the main Speaker
will work independently.
5.4 Audio-In
To use the MS515 as a wired speaker, use the provided 3.5mm
audio cable to connect the main MS515 speaker with your source
device. Once the audio cable is connected, the device
automatically switches to Audio-in mode and the status LEDs will
light red.
6. Charging
To charge the MS515, connect the micro USB lead to the device's
power socket, and the other end of the USB cable to a powered USB
port. The LED lights red whilst charging and turns off once the
battery is fully charged.
English
-7-
-8-
Page 6
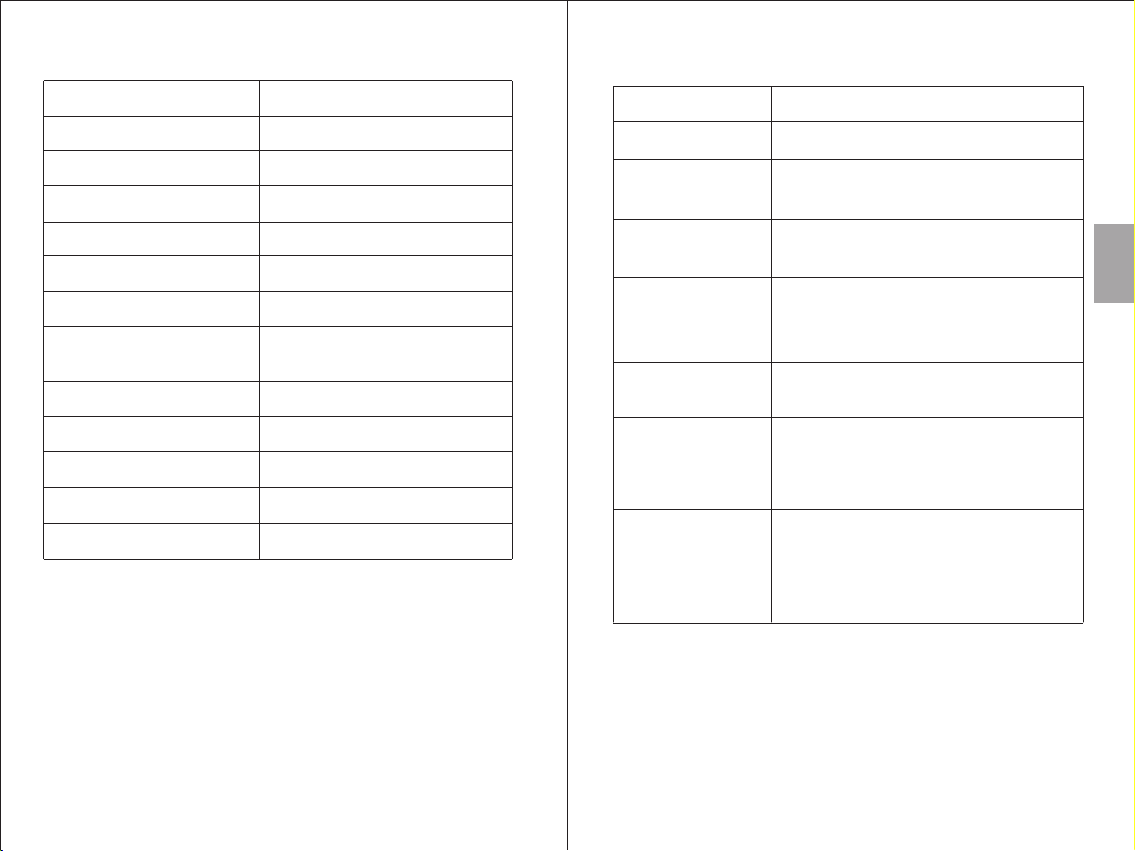
7. Specification
8. Troubleshooting
Bluetooth Specification
Bluetooth Profile
Operating Range
Frequency Response
Speaker Output
SNR
Distortion
Battery
Work in g Tim e
Charging Time
Standby Time
Weig ht o f ea ch s peaker
Dimensions
Bluetooth V4.0+EDR
A2DP, AVR CP
Up to 10m (Class 2)
90Hz – 20KHz
5W x 2
≥80dB
≤1.0% at 1kHz
3.7V/1600mAh Built-in
Lithium Battery
About 15 hours
About 5 Hours
30 Days
Approximately 260g
106.5 x 74 x 69.4mm
Problem
Won’t turn on
Can’t find the
MS515
Can’t install the
driver for MS515
The sound quality
is intermittent in
Bluetooth mode
No Sound
Can’t connect to
Bluetooth on
Windows XP
or Vista
Can’t connect to
Bluetooth in
Windows 7+
Solution
Please charge the MS515
Confirm MS515 is in pairing status
and within 10 meters from the device.
Update the driver of the Bluetooth
module on your computer
Disable the Wi-Fi on your source
device
Check the volume on both source
device and MS515
Third party software may be required,
please contact the manufacturer of
your Bluetooth chip for more
information
Download all updates for Windows
and your Bluetooth driver, these may
need to be manually downloaded from
the Bluetooth chips manufacturers
website
English
-9-
-10-
Page 7
9.Warranty
This product is guaranteed for twelve months from the date of the
original purchase. In the unlikely event of any defect arising due to
faulty materials or workmanship, the unit will be either replaced or
repaired free of charge (where possible) during this period. An
alternative product will be offered in case the product is no longer
available or repairable.
This warranty is subject to the following conditions:
The warranty is only valid within the country where the
product is purchased.
The product must be correctly installed and operated in
accordance to the instructions given in this user manual.
The product must be used solely for domestic purposes.
The warranty only covers the main units, and does not cover
the accessories.
The warranty does not cover the damage caused by misuse,
negligence, accident and natural disaster.
The warranty will be rendered invalid if the product is resold or
has been damaged by inexpert repairs. The manufactures
disclaim any liability for incidental or consequential damages.
Please consult our customer adviser before returning any
product; we are not responsible for any unexpected product
returns.
Any faulty product must be kept and returned in the original
packaging with all the accessories and the original copy of the
purchase receipt.
The warranty is in addition to, and does not diminish, your statutory
or legal rights.
Customer Service:
Telephone: +44 (0) 845 250 0586
Email: [email protected]
This product is in compliance with the essential requirements and
other relevant provisions of Directive 1999/5/EC. The declaration
of conformity may be consulted at August International Ltd, Unit
5 Swains Mill, Crane Mead, Ware SG12 9PY, England.
-11-
10.10.
FCC Statement
This device complies with Part 15 of the FCC rules. Operation is
subject to the following twoconditions: 1) this device may not
cause harmful interference, and 2) this device must acceptany
interference received, including interference that may cause
undesired operation.
Note: This equipment has been tested and found to comply
with the limits for a Class B digital device, pursuant to part 15
of the FCC Rules. These limits are designed to provide reasonable
protection against harmful interference in a residential installation.
This equipment generates uses and can radiate radio frequency
energy and, if not installed and used in accordance with the
instructions, may cause harmful interference to radio communications. However, there is no guarantee that interference will not
occur in particular installation. If this equipment does cause
harmful interference to radio or television reception, which can
be determined by turning the equipment off and on, the user is
encouraged to try to correct the interference by one or more of
the following measures:
--Reorient or relocate the receiving antenna.
--Increase the separation between the equipment and receiver.
--Connect the equipment into an outlet on a circuit different from
that to which the receiver isconnected.
--Consult the dealer or an experienced radio/TV technician for help.
Changes or modifications not expressly approved by the party
responsible for compliance could void the user's authority to
operate the equipment.
-12-
English
 Loading...