

Page 1
User Manual
DVB600
August International Ltd
United Kingdom
Tel:+44 (0) 845 250 0586
www.augustint.com
EN
FR
DE
IT
ES
Android and Satellite TV Box
Décodeur Satellite Android
Android Box und Satelliten Receiver
Decoder Satellitare Android
Sintonizador Satélite y Android
Page 2

Table of Contents
1. Safety Instruction s.... ..... ..... ..... ..... ..... ..... ..... ..... ..... . 01
2. Main Features..... ..... ..... ..... ..... ..... ..... ..... ..... ..... ..... ...02
3. Box Contents........... ..... ..... ..... ..... ..... ..... ..... ..... ..... ...02
4. Part Names and Functio ns... ..... ..... ..... ..... ..... ..... ..... . 03
4.1 Front Panel........... ..... ..... ..... ..... ..... ..... ..... ..... ..... ..03
4.2 Left Side............. ..... ..... ..... ..... ..... ..... ..... ..... ..... ....0 3
4.3 Back Panel............ ..... ..... ..... ..... ..... ..... ..... ..... ..... . 03
4.4 Remote Control (ref er to the Q SG we hav e)... ..... .... 04
4.4.1 I R remote control for DTV mo de... ..... ..... .. .... . 04
4.4.2 2 .4G wireless remote con trol. ..... ..... ..... ..... .... 05
5. Battery Replacemen t.... ..... ..... ..... ..... ..... ..... ..... ..... .. 07
6. Connection and Set Up...... ..... ..... ..... ..... ..... ..... ..... ... 07
6.1 Connecting the powe r adapt or.... ..... ..... ..... ..... ..... .. 07
6.2 Connecting the Audio O ptica l Outpu t.... ..... ..... ..... ...08
6.3 Connecting the HDMI O utput ..... ..... ..... ..... ..... ..... ...08
6.4 Connecting to the Eth ernet ..... ..... ..... ..... ..... ..... ..... .09
6.5 RF Cable Connection D escri ption ..... ..... ..... ..... ..... . 09
6.6 Connecting to the Wi- Fi... ..... ..... ..... ..... ..... ..... ..... .. 10
7. Operation............ ..... ..... ..... ..... ..... ..... ..... ..... ..... ..... .. 11
7.1 Initial Installat ion.. ..... ..... ..... ..... ..... ..... ..... ..... ..... .. 11
7.2 DTV.. ..... ..... ..... ..... ..... ..... ..... ..... ..... ..................... 13
7.2.1 C hannel Scan........ ..... ..... ..... ..... ..... ..... ..... ... 14
7.2.2 D TV Mode................. ..... ..... ..... ..... ..... ..... .... 19
7.2.3 R ecordings Sett ings. ..... ..... ..... ..... ..... ..... ..... . 33
7.2.4 DTV se tting s.... ..... ..... ..... ..... ..... ..... ..... ..... ....34
7.3 FAV APP....... ..... ..... ..... ..... ..... ..... ..... ..... ..... ..... ..... 39
7.4 ALL APPS.. ..... ..... ..... ..... ........................... ..... ..... .40
7.4.1 P lay Store.......... ..... ..... ..... ..... ..... ..... ..... ..... ..40
7.4.2 Movi e Playe r.... ..... ..... ..... ..... ..... ..... ..... ..... ....41
7.4.3 File Brows er... ..... ..... ..... ..... ..... ..... ..... ..... ......42
7.4.4 Mira cast. ..... ..... ..... ..... ..... ..... ..... ..... ..... ..... ....42
7.5 System Settings.. ..... ..... ..... ..... ..... ..... ..... ..... ..... ....4 4
7.5.1 Quic k Switc h Betwe en Ap ps... ..... ..... ..... ..... ....4 4
7.5.2 Sett ings. ..... ..... ..... ..... ..... ..... ..... ..... ..... ..... .... 44
8. Troubleshooting....... ..... ..... ..... ..... ..... ..... ..... ..... ..... ..50
9. Specifications.. ..... ..... ..... ..... ..... ..... ..... ..... ..... ..... ..... 51
10. Warran ty... ..... ..... ........................... ..... ..... ..... ..... ....5 2
Page 3
User Manual
Thank you for purchasin g the August DVB600 And roid an d Satel lite
TV Box. This use r manua l is desi gned to f amili arise y ou with all the
features of this device . Pleas e take th e time to r ead thi s user ma nual
carefully, ev en if you a re alre ady fam iliar w ith a sim ilar product.
Safety
To ensure the safety of you and o thers , pleas e read th e Safet y
Instructions before u sing th is devi ce. Ple ase do no t disas sembl e the
product, it can be unsafe a nd will i nvali date th e manuf actur er's
warranty.
Disposal
Please ensure the produ ct and ac cesso ries ar e dispo sed of in
compliance with the WEE E (Waste Electrical and El ectro nic
Equipment) Directiv e and any o ther re gulat ions ap plica ble to yo ur
country.
Always check with the env ironm ental a gency a nd any ot her rel evant
authorities for curre nt disp osal re gulat ions.
Customer Service
You ca n conta ct us by ph one on: + 44 (0)845 250 0586 o r by emai l at:
service@augustint .com sh ould yo u requi re furt her tec hnica l suppo rt
or customer service.
1. Safety Instructions
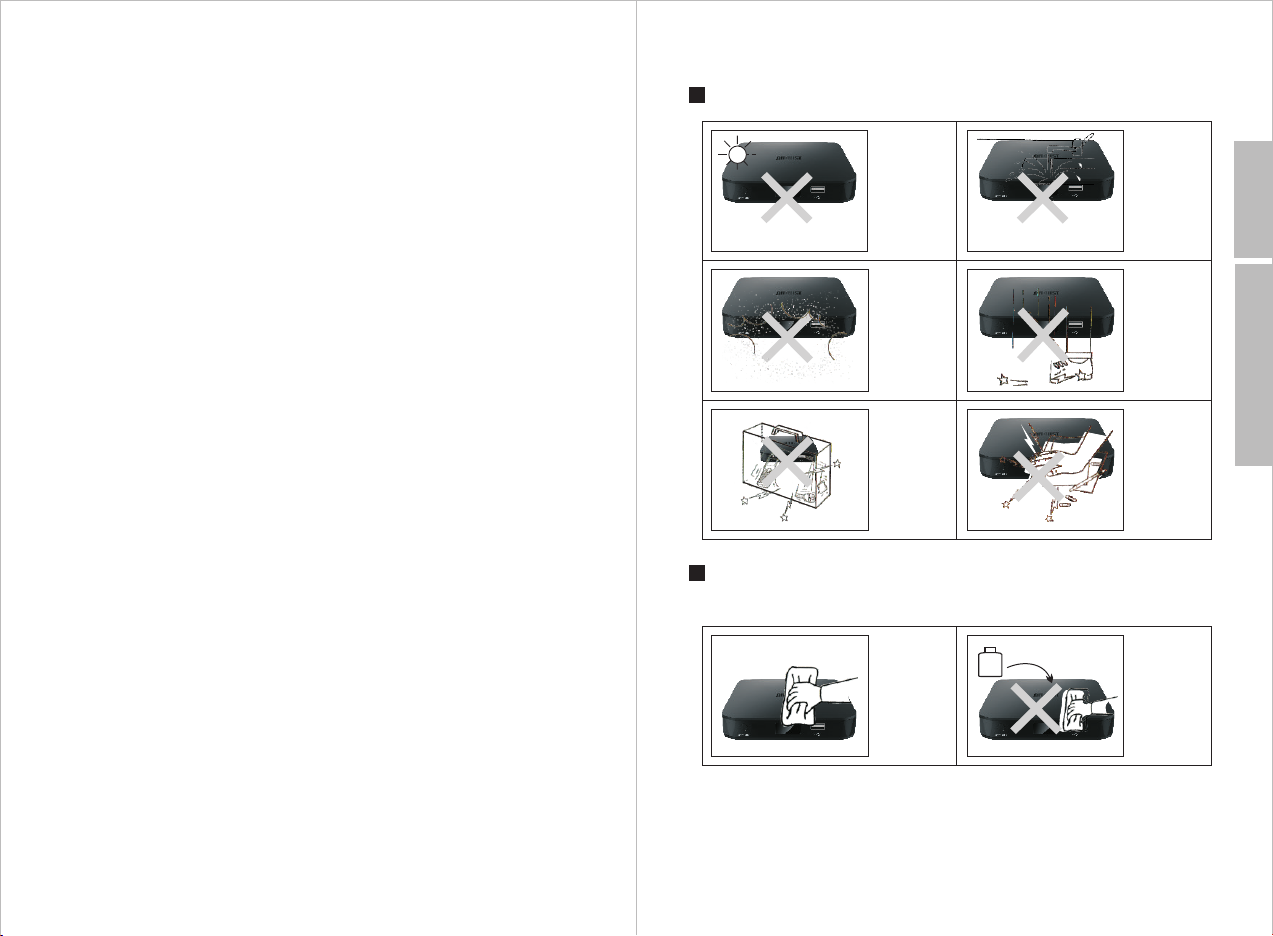
Storage and Use
Keep this
machine away
from hot or
cold places.
Working
temperature of
this device is
0゚C ~ 50゚C,
storage
temperature is
-10゚C ~ 60゚C.
Never expose
the receiver to
moisture,dust
oil or smoke.
Never put this
machine in
containers that
are unstable as
this may cause
damage.
Maintenance
Please unplug all connection wires before start cleaning this machine.
Please wipe this
machine
and buttons with
a softcloth. Only
clean the screen
with professional
LCD TV screen
cleanser.
Alcohol
Keep the
Receiver
away
from water or
damp
environment.
Avoid
dropping or
exposing to
impacts.
Never extrude
or chafe this
machine with
sharp objects.
Never wipe this
machine with an
abrasive cloth,
detergent
powder, alcohol
and benzene etc.
various
propellants or
chemical
cleaning products.
English
Back to Content
Never try to repair or modi fy this d evice y ourse lf, thi s will in valid ate
the warranty, may caus e furth er dama ge to the d evice a nd could cause
personal injury. In th e case of a ny faul t, plea se turn o ff the de vice
immediately and conta ct Augus t Inter natio nal cus tomer s ervic es or
your retailer to arrang e a profe ssion al repa ir.
-1-
Page 4
D
VB600
Quick Start Guide
Android and Satellite Bo
x
Decoder Sa
tellitare Android
Sintonizador Sa
télite y
Android
Décodeur Satellite Android
Android Bo
x und Sa
telliten R
eceiv
er
EN
FR
DE
IT
ES
2. Main Features
Receives DVB-S & DVB-S2 F reesa t TV
Smart Box with Andro id 4.4 KitKat
Tim e-Shi ft with L ive Rec ording
Supports Vid eo/Mu sic/P hoto Pl aybac k
HDMI Output up to 1080p
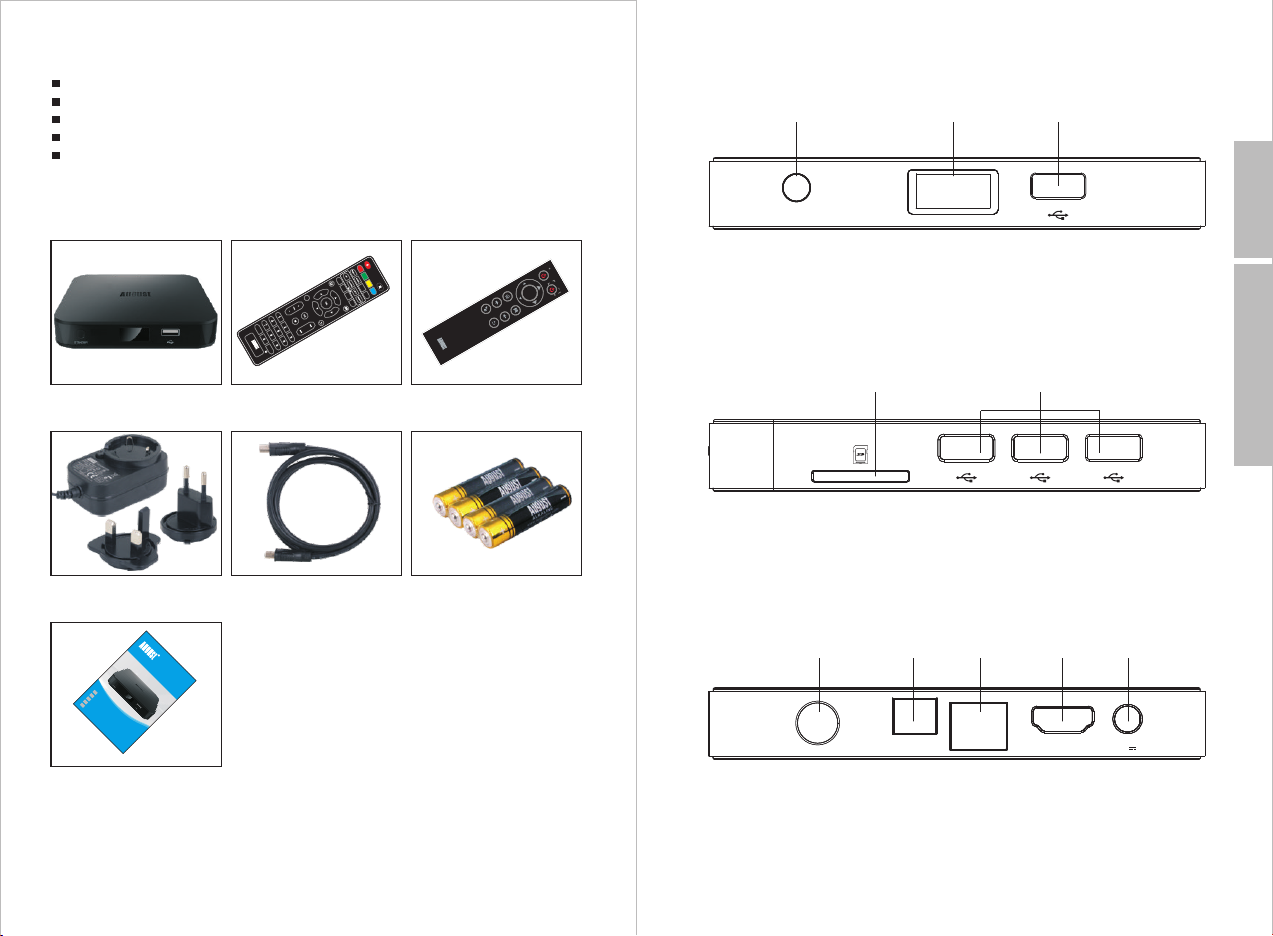
4. Part Names and Functions
4.1 Front Panel
1
2 3
English
3. Box Contents
ASPECT
F1
EPG
FIND
F
T
2
T
X
SAT
I
F
NF
3
SE
O
T
F4
R
E
C
FAV
R
T
A
V/
D
IO
R/L
DV
B
REC
6
0
0
ALL
Smart Satellite Box Remote Control Air Mouse Remote Control
Power Adaptor
HDMI 4 x AAA Batteries
DVB600
STAND BY
1.Standby Button
TV
O
K
2. Status LED
3. USB Port
Back to Content
4.2 Left Side
1 2
1. SD Card Rader
2. USB ports
4.3 Back Panel
1 2 3 4 5
RF IN
OPT ICAL
LAN
HDM I
DC1 2V 1.5A
QSG
1. LNB In
2. Audio Optical Output
-2-
3. Network Interface
4. HDMI Out
5. Power DC In
-3-
Page 5
4.4 Remote Control
4.4.1.DTV Remote Control
1 18
ASPECT
2 19
3 20
4
5
6
F1
7
EPG
8
9
10
11 27
SET
12 30
13
14
15
16
TV/
17 34
RADI O
F2
TTX
FAV
DVB 600
FIND SAT
F3
INFO
R/L
RECA LL
REC
21
22
23
F4
24
25
26
28
29
31
32
33
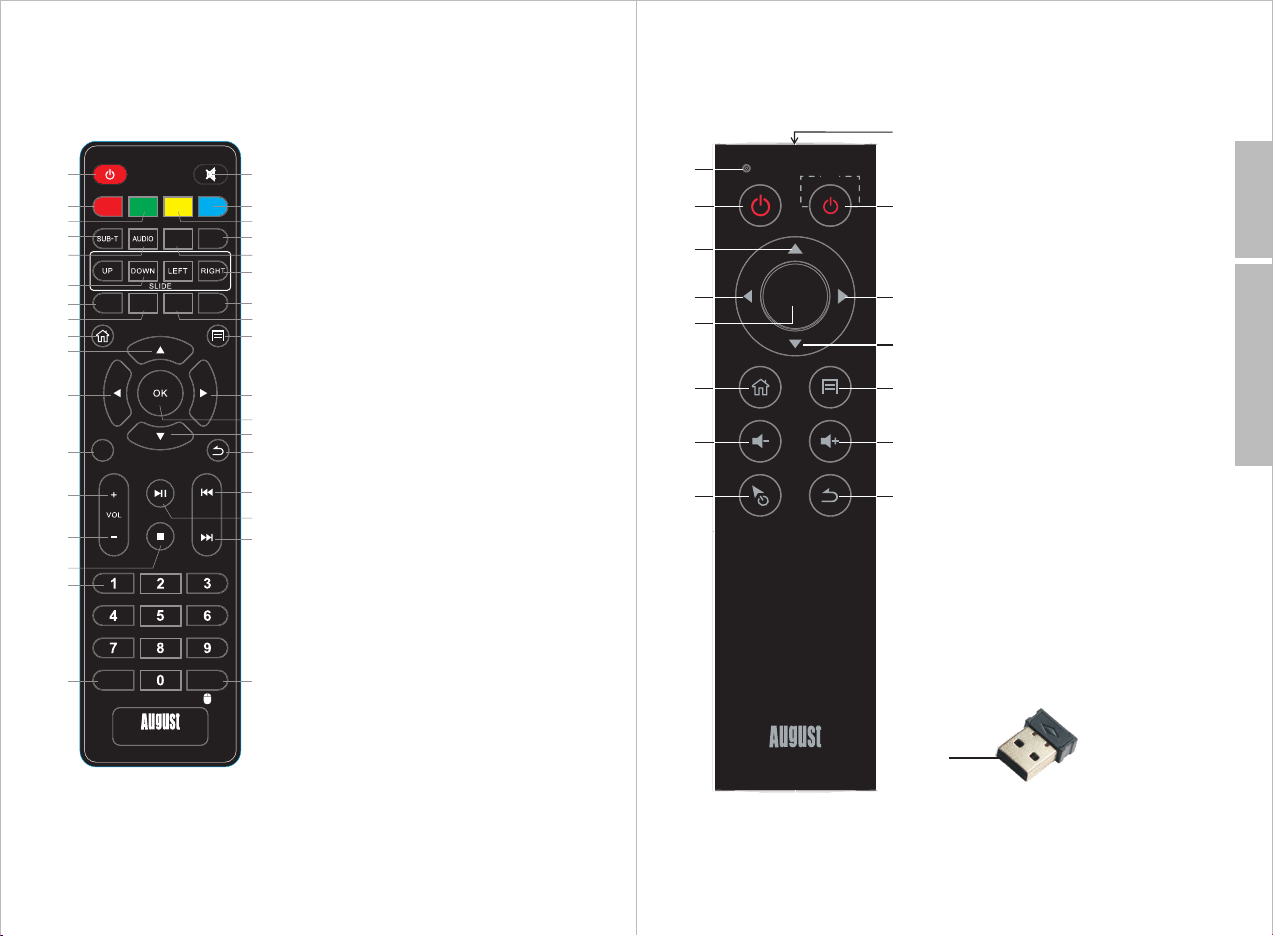
1. Po wer O N/O FF
2. Red But ton / As pect Rati o
3. Gr een B utt on / Screen S ize
4. Su bti tle O ptions
5. Audio La ngu age O ptio ns
6. Sc rol l Up an d Down for Me nu an d Cha nnel L ist
7. F1 F unc tio n or 7 Days Ele ctr oni c Prog ram G uid e
8. F2 F unc tio n or Open and C los e Tel etext
9. Home
10. Up / Cha nne l Up in D TV Mod e
11. Le ft
12. Syst em Se ttings
13. Volum e Up
14. Volum e Dow n
15. Stop / S top R ecordin g
16. Numb ers
17. TV and R adio Chan nel S wit ch Con fir m Set ting s
18. Mute / U nmu te
19. Blue B utt on Exit all S ett ing s
20. Yel low Bu tto n
21. Sele ct Sa tellite P rog ram o r Grou p Opt ion s
22. Quic kly F ind Chann el fr om Ch anne l Lis t
23. Scro ll Le ft and Righ t
24. F4 Fun cti on / Start re cor din g
25. F3 Fun cti on or Chann el In for mati on
26. Main M enu a nd Li st all S hor t Key F unct ion s in
DTV m ode
27. Righ t
28. Conf irm i n General m ode a nd Ch anne l lis t in
DTV m ode
29. Down a nd Ch ann el Dow n in DT V mod e
30. Pres s to Go B ack one lev el.
Pre ss an d hol d to return t o hom e pag e
31. Prev iou s track
32. Play /Pa use in Play er mo de.
Pre ss to s tar t time shif t in DT V mod e.
Pre ss an d hol d to active f avo uri te Cha nne l lis t in
DTV m ode
33. Next t rac k or switch AU DIO t rac k in DTV m ode
34. Pres s to di splay rec ent ly wa tche d cha nne l list
Pre ss an d hol d to active / d eac tiv ate ai r mou se
fun cti on
4.4.2 Smart Remote Control
1
TV
TV
2
3
4
OK
5
6
7
8
DVB600
15
9
10
11
12
13
14
1. Status LED
2. Power Button
3. Up
4. Left
5. OK
6. Home
7. Volume Down
8. Air Mouse
9. Learning Button
10. Right
11. Do wn
12. Menu
13. Volume Up
14. Return
15. IR LED
16.USB Receiver
16
English
Back to Content
-4-
-5-
Page 6
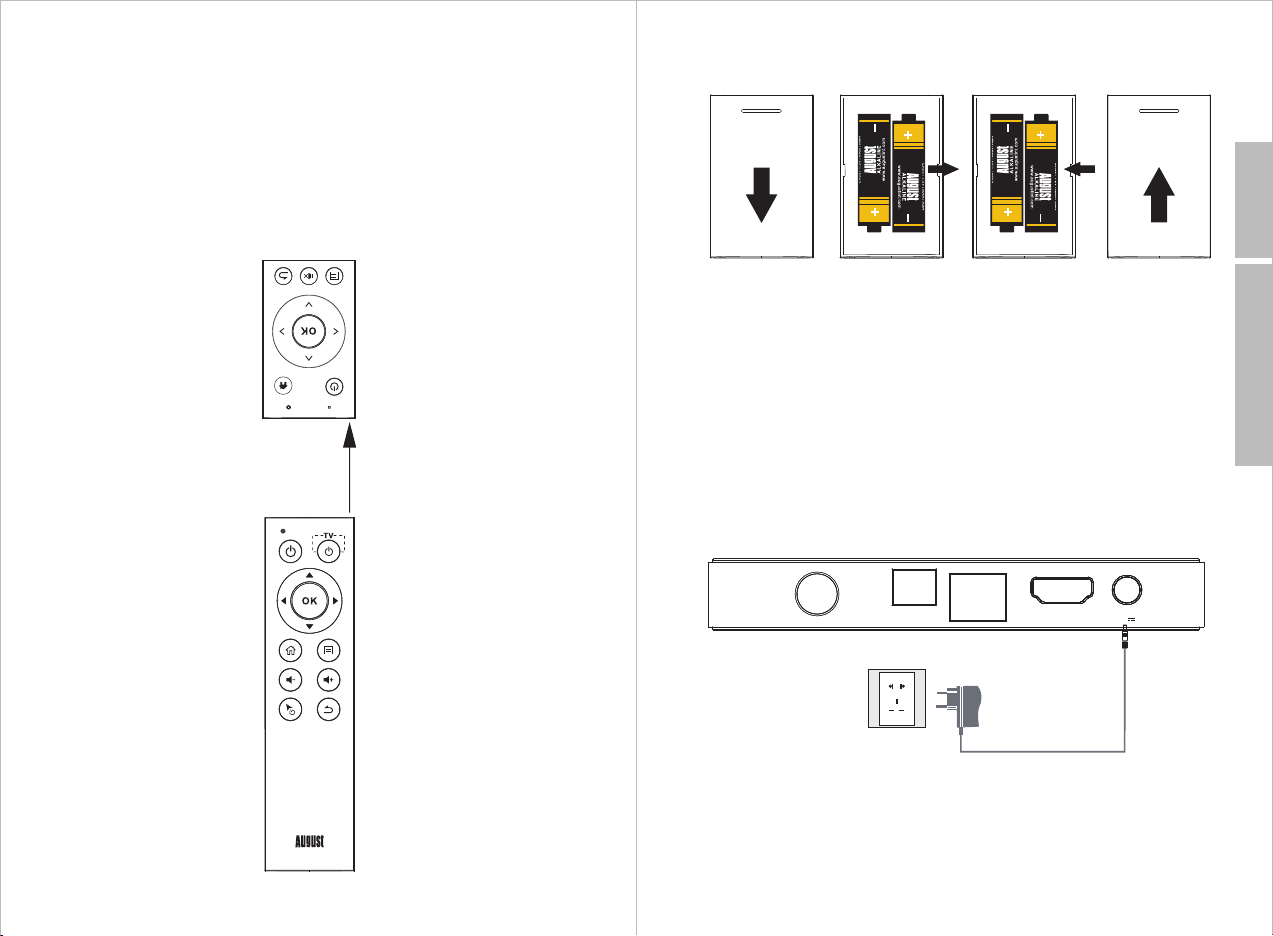
Learning Button Function
There is one learning but ton on th e remot e contr ol. It ca n recor d any
button's function on th e other I R remot e contr ol.
5. Battery Replacement
1. Press and hold the learn ing but ton for 6 s econd s to acti ve the
learning function. On ce acti vated , the sta tus LED w ill lig ht blue .
2. While activated, aim t he desi red IR re mote co ntrol t o the IR LE D on
the DVB600's smart remo te cont rol. As sh own in th e pictu re belo w.
3. Press the button to be rec orded .
4. Once the recording has f inish ed, the s tatus L ED will f lashe s 2 times
0.5-5cm
1. Press and slide the battery cover in direction shown.
2. Remove old AAA batteries if required.
3. Insert new AAA batteries following the positive and negative markings.
4. Replace battery cover and slide to lock.
6. Connection and Set Up
6.1 Power Adaptor Connection
1. Connect the power adaptor to the DC IN 12V socket.
2. Plug the power adaptor into the mains power socket.
RF IN
OPT ICAL
LAN
HDM I
DC1 2V 1.5A
English
Back to Content
-6-
-7-
Page 7
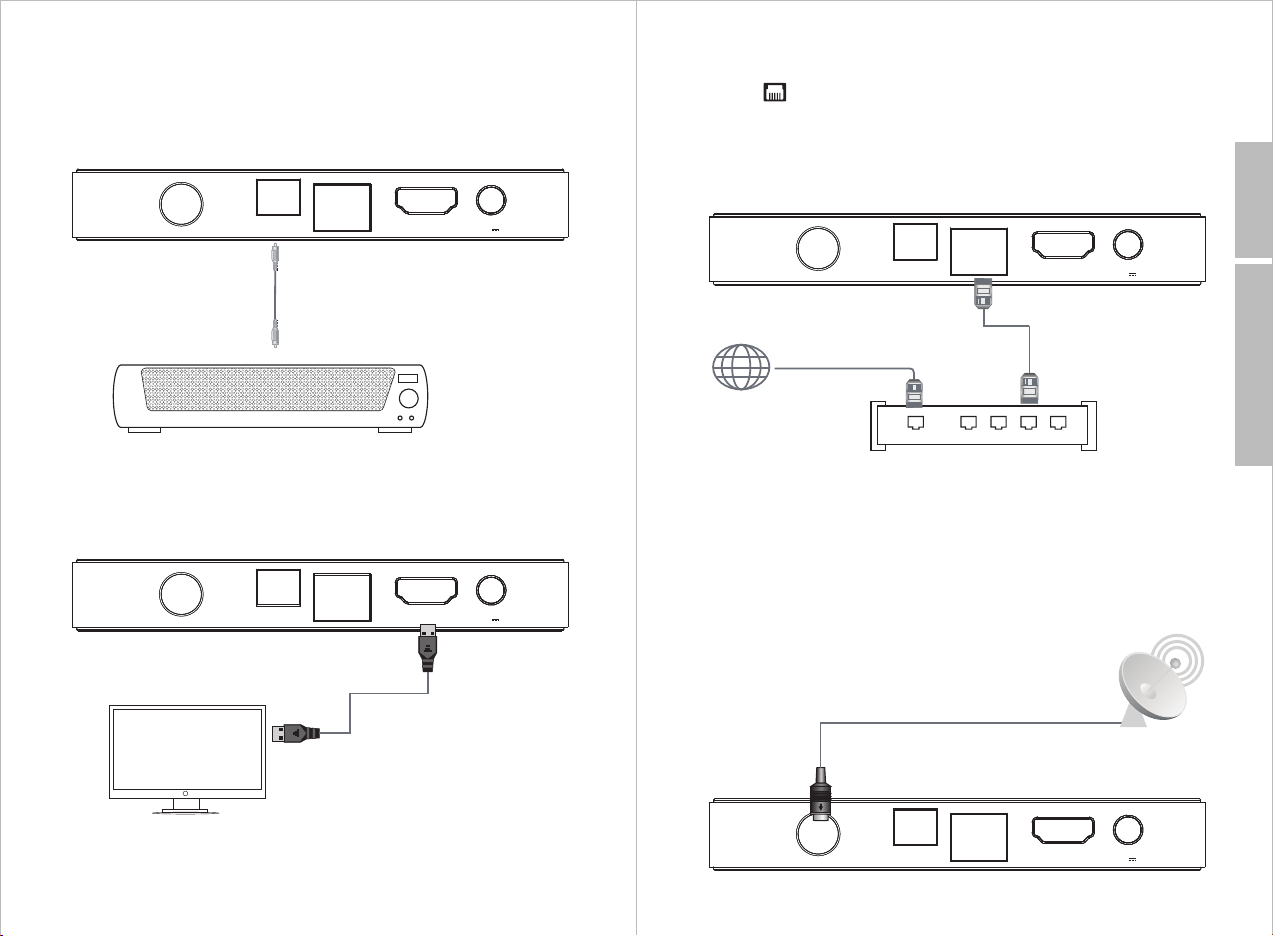
6.2 Audio Optical Output Connection
1. Insert the audio optic al cabl e to the au dio opt ical ou tput on t he
DVB600.
2. Insert the audio optic al cabl e to the au dio opt ical in put on th e
receiver device.
RF IN
OPT ICAL
Optical connection ca ble to
compatible speaker sy stem
LAN
HDM I
DC1 2V 1.5A
6.4 Ethernet Connect io n
1. Connect the DVB600 to yo ur rout er usin g an Ethe rnet ca ble.
2. Select from the home screen.
3. Select ‘Advanced opt ion’.
4. Select ‘Proxy settin gs’ and press <OK> to change t he prox y
hostname.
5. Select ‘IP se tting s’ an d press < OK> to ch ange th e IP se tting
between DHCP and Stat ic.
RF IN
OPT ICAL
Broadband Internet connection
Internet
Broadband Router/Modem
LAN
HDM I
Wired Network
DC1 2V 1.5A
English
Back to Content
6.3 HDMI Output Connecti on
RF IN
OPT ICAL
HDMI connection cable to TV
Once connected, selec t the inp ut sour ce on you TV to co rrect HDMI
port.
LAN
HDM I
DC1 2V 1.5A
-8-
Note: If DHCP is e nable d on your r outer, t he DVB6 00 will
automatically conne ct to the r outer o nce the E thern et cabl e is
inserted; If DHCP is no t enabl ed on you r route r, you wil l need to
manually input an IP ad dress .
6.5 RF Cable Connectio n
RF IN
OPT ICAL
LAN
HDM I
DC1 2V 1.5A
-9-
Page 8
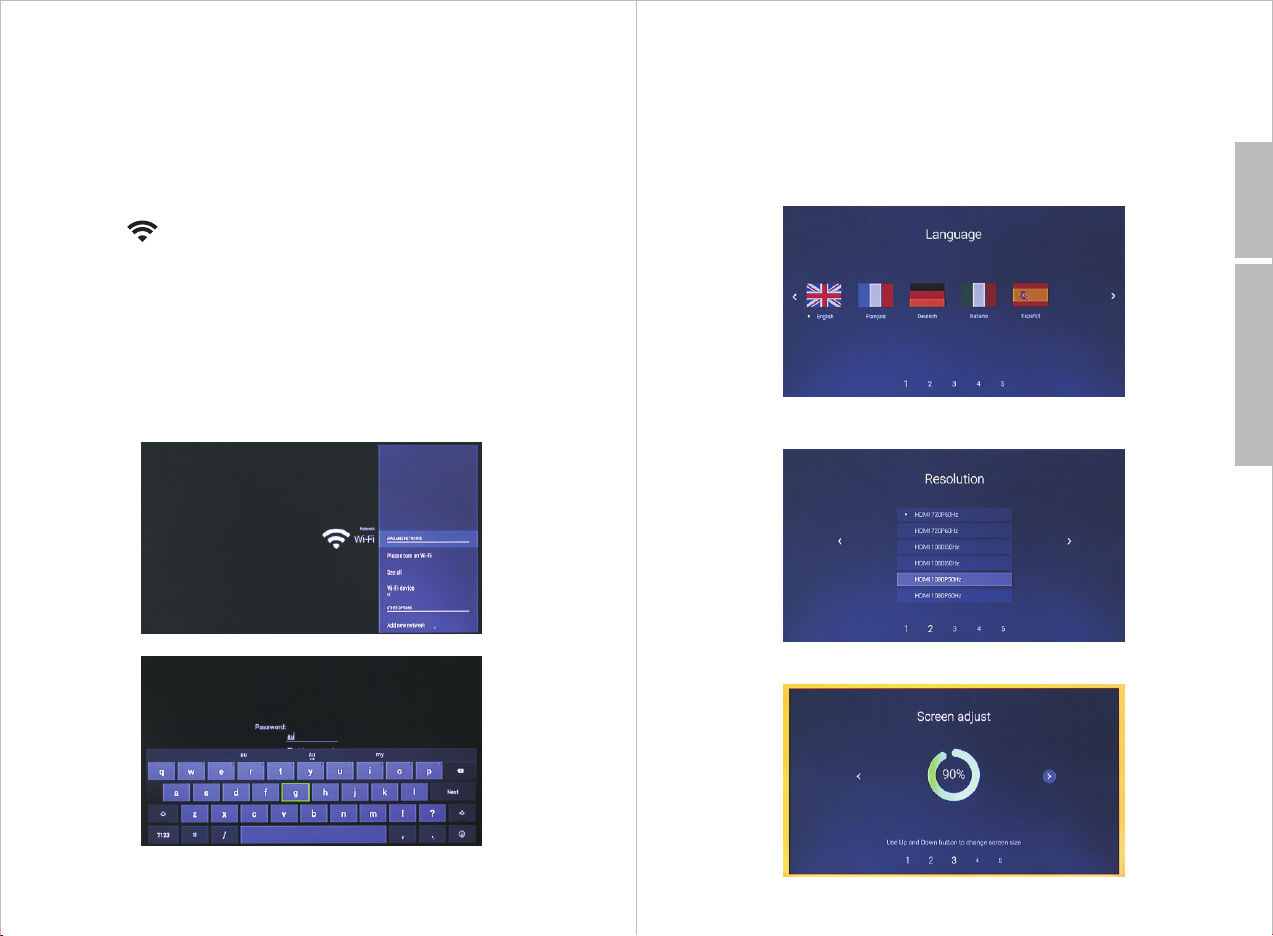
6.6 Wi-Fi Connection
The DVB600 is able to conne ct wire lessl y to your r outer. P lease n ote
that, for video streami ng, an in terne t bandw idth of a t least 2 Mbps is
recommended. To strea m HD movi es from a n inter nal net work an
Ethernet cable connec tion is r ecomm ended .
Note: The DVB600 will dis able th e Wi-Fi f uncti on when t he Ethe rnet
cable is inserted.
1. Select from the home screen.
2. Under availab le netw orks, i t will li st thre e best si gnal ne twork .
Select 'See all' to see all t he avai lable n etwor ks.
3. Use <▲> or <▼> to select the netwo rk and pr ess <OK > to conf irm.
4. Enter the network pass word if r eques ted.
5. Select 'Next' from the o n scree n keybo ard to sa ve and co nnect t o
the network.
7. Operation
7.1 Initial Installati on
Important: Ensure the s atell ite dis h and the c ables a re prop erly
installed to get the best s ignal .
A setup wizard will be run on th e first t ime use o f the DVB 600. All t he
settings can be changed l ater.
1. Use <◀> and <▶> to select your lan guage a nd pres s <OK> to
confirm.
2. Use <▲> and <▼> to select the reso lutio n and pre ss <OK> t o
confirm.
English
Back to Content
-10-
3. Use <▲> and <▼> to adjust the scre en size a nd pres s <OK> to
confirm.
-11-
Page 9
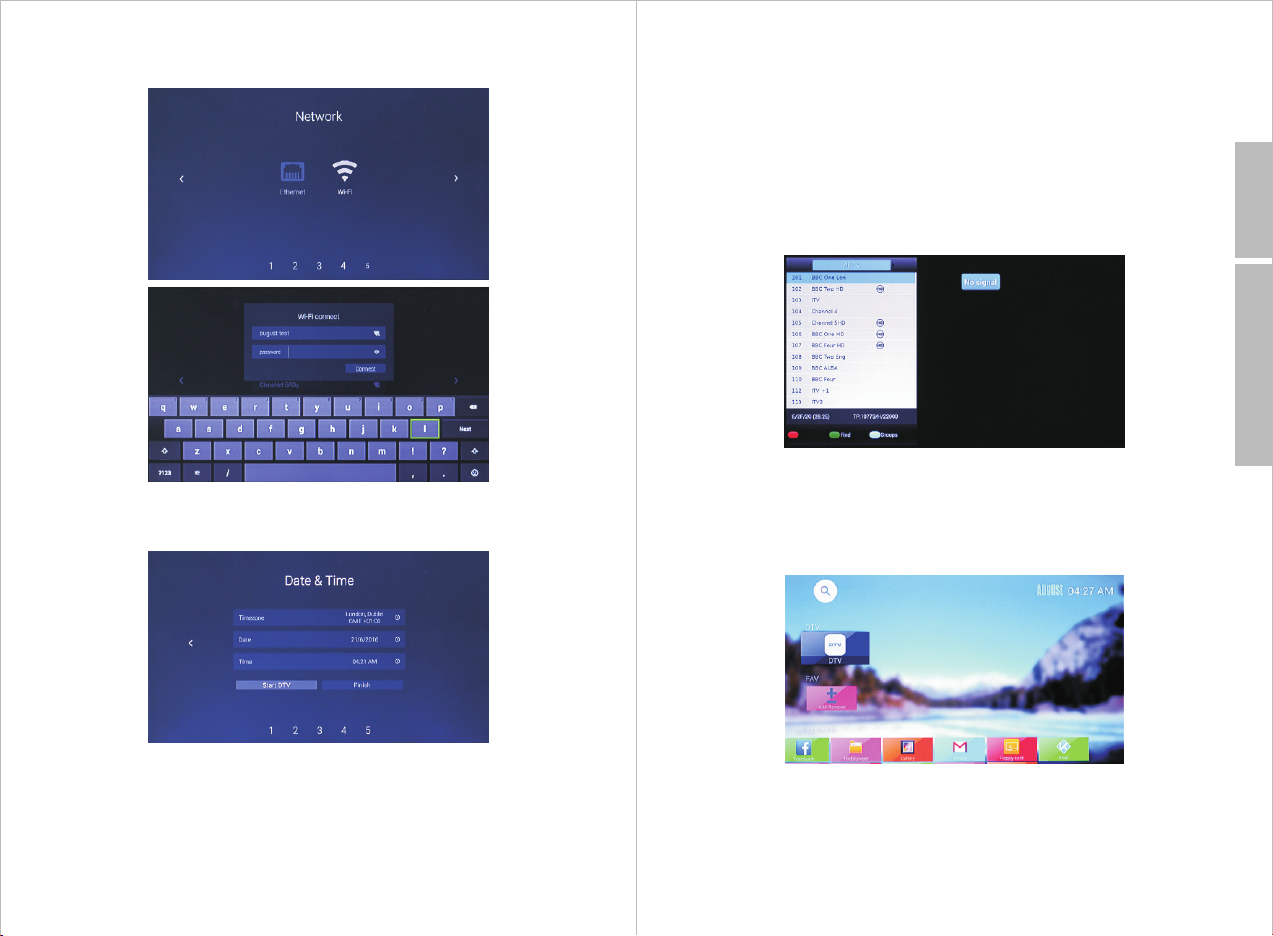
4. Select the type of netwo rk conn ectio n. Pres s <OK> to c onfir m or
change the settings for W i-Fi ne twork .
5.3. Use <▲> and <▼> to change the ti me; Use <◀> a nd <▶> to
change between hour, min ute and AM / P M. Use <▶> to h ighli ght
‘Set’ th en pres s <OK> to c onfir m.
6. Select ‘DTV’ to fi nish th e settings and start DTV; select ‘ Finis h’ to
go to the home page. Press <O K> to con firm.
English
Note: Freesat Channel s are pre -stor ed on the d evice a nd only
require the satellite d ish to be c orrec tly ins talle d. If you r dish is
oriented towards the Ast ra Sate llite , you can s elect f inish a nd go to
the DTV A pp to start watching TV w ithou t havin g to perf orm a sca n.
Back to Content
5. Use <▲> and <▼> to select betwee n ‘Timezone’, ‘Date’ an d ‘Tim e’,
press <OK> to enter.
5.1. Use <▲> and <▼> to change the ti mezon e and pre ss <OK> t o
confirm.
5.2. Use <▲> and <▼> to change the da te; Use <◀> a nd <▶> to
change between year, mon th and da y. Use <▶> t o highl ight ‘Set’ then
press <OK> to confirm.
-12-
7.2 DTV
The DVB600 can be used to wat ch, rec ord and p layba ck sate llite TV.
To switch to DTV mode select ‘D TV’ from the home screen.
-13-
Page 10
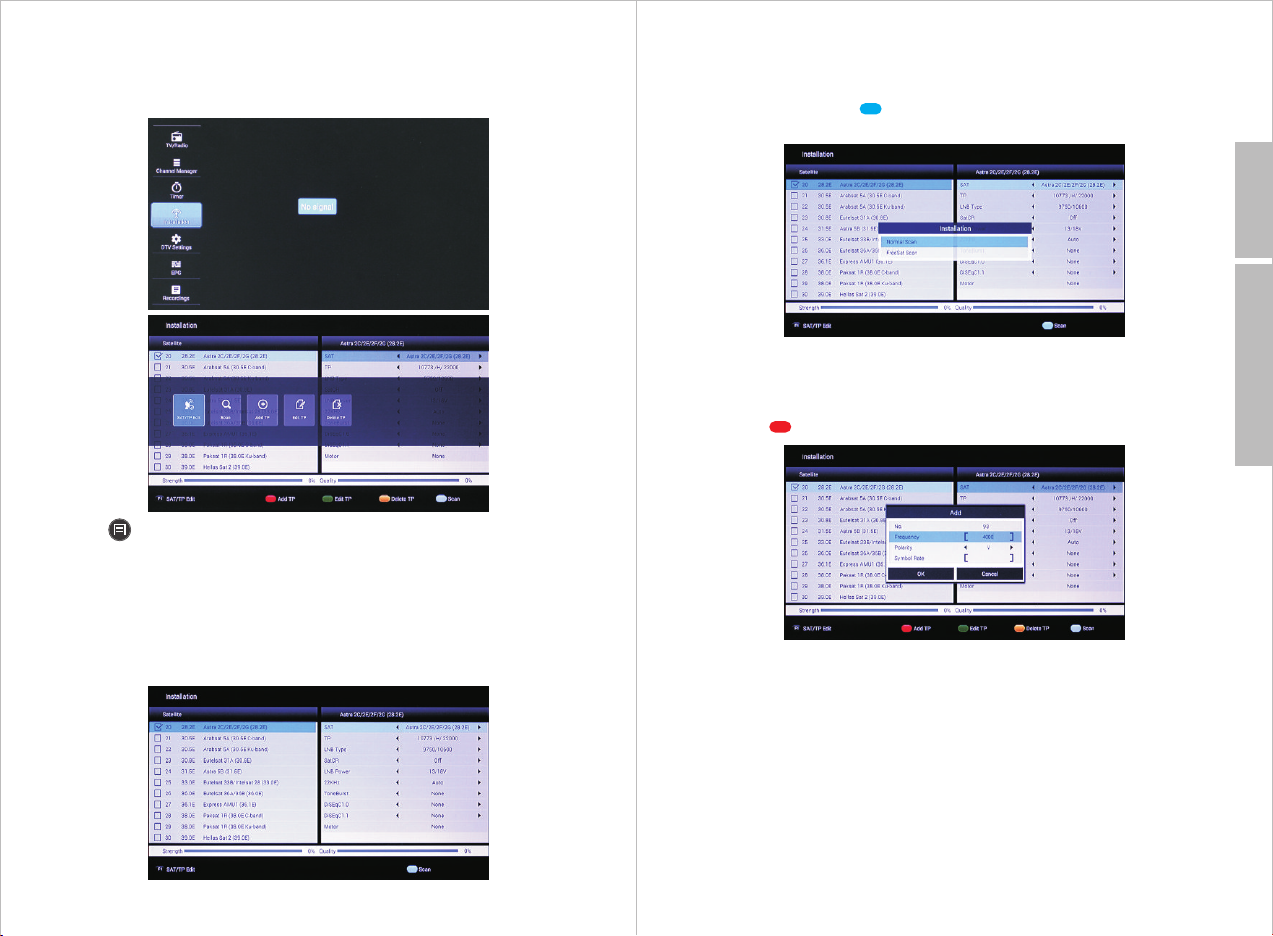
7.2.1 Ch annel S can
If there are no channels sa ved on th e DVB60 0, a chan nel sca n will
have to be performed. Sel ect ‘In stall ation ’ in th e ‘DTV’ page and
press <OK> to enter the cha nnel in stall ation p age.
Press< > to list all operat ion
7.2.1.1 Satellite Sel ectio n
1. Use <▲> and <▼> to highlight the d esire d satel lite fr om the le ft
hand side of the screen. De taile d infor matio n will be d ispla yed on th e
right hand side.
2. Press <OK> to select the d esire d satel lite. The si gnal strength and
quality status will be di splay ed at the b ottom o f the scr een.
7.2.1.2 Quick Channel S can
If you wish to use the defaul t setti ngs to pe rform a n autom atic
channel scan, press < > to en ter the ‘ Scan’ options. Us e <▲> and
<▼> to highlight ‘Press OK to s can’ then press <OK>.
English
Back to Content
7.2.1.3 Ad ding a Transpo nder (T P)
Press <F1> to see the defau lt freq uency l ist and e nter th e ‘SAT / TP
Edit’.
1. Press < > to add a TP.
2. Use <▲> and <▼> to select the Freq uency, Pola rity an d Symbo l
Rate.
3. Use the number pad to inpu t the val ues for f reque ncy and s ymbol
rate.
4. Use <◀> and <▶> to change the pola rity be tween V ( Vertic al) and
H (Horizontal).
5. Once finished, selec t ‘OK’ or ‘Cancel’ and p ress <O K> to confirm.
-14-
Note: TP is in sho rt for tr anspo nder. A tr anspo nder is a s eries o f
interconnected unit s that fo rm a comm unica tions c hanne l betwe en
the receiving and the tra nsmit ting an tenna s.
-15-
Page 11
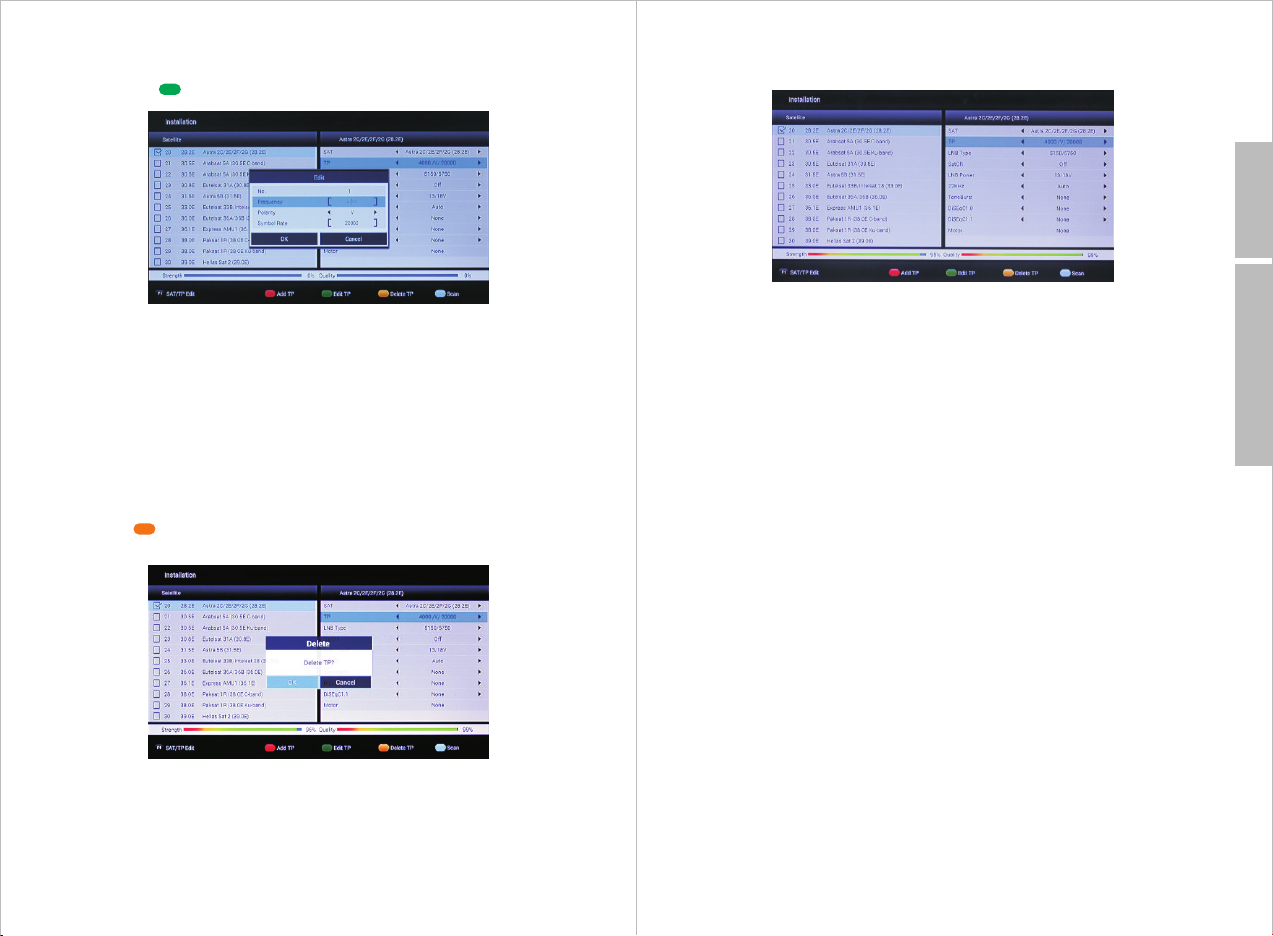
7.2.1.4 Editing a Tra nspon der
1. Use <▲> and <▼> to select a TP in the lis t.
2. Press the < > to edit the TP.
3. Use <▲> and <▼> to select the Freq uency, Pola rity an d Symbo l
Rate.
4. Use the number pad to inpu t the val ues for f reque ncy and s ymbol
rate.
5. Use <◀> and <▶> to change the pola rity be tween V ( Vertic al) and
H (Horizontal).
6. Once finished, selec t ‘OK’ or ‘Cancel’ and p ress <O K> to confirm.
7.2.1.5 Deleting a Tr anspo nder
1. Use <▲> and <▼> to select a TP in the lis t.
2. Press < > to delete the TP.
3. Select ‘OK’ or ‘ Cance l’ an d press < OK> to co nfirm .
7.2.1.6 Options
To manually change the foll owing o ption s, use:
English
Back to Content
1. <▲> and <▼> to select one
2. Then <◀> a nd <▶> keys t o chang e the set tings
- LNB Type
Low Noise Block Downcon verte r. Chang e this se tting t o match t he
range of the converter.
- SatCR
Enable this to set the LNB to u nique c hanne l, if mut able re ceive rs are
using the same coax cable .
- LNB Power
Enable this to give power t o the LNB t o recei ve vert ical ch annel s only
(13V), horizontal cha nnels o nly (18 V) or swi tch bet ween ve rtica l and
horizontal.
- 22KHz
By turning the 22KHz opti on on and o ff, t he rece iver wi ll automatical ly
switch between the two po rts all owing r eliab le oper ation t hat
sometimes fails when us ing a 2X1 D iSEqC s witch .
Note: You can al so use <◀> and <▶> keys to change TPs in the
detailed page.
- ToneBu rst
Adjust To neBur st betw een non e, A and B.
- DiSEqC1.0
This setting allows you t o switc h betwe en up to 4 sa telli te sour ces.
- DiSEqC1.1
This setting allows you t o switc h betwe en up to 4 sa telli te sour c
-17--16-
Page 12
- Motor
If your satellite dish do esn’t h ave a mot or, this f uncti on will n ot be
available.
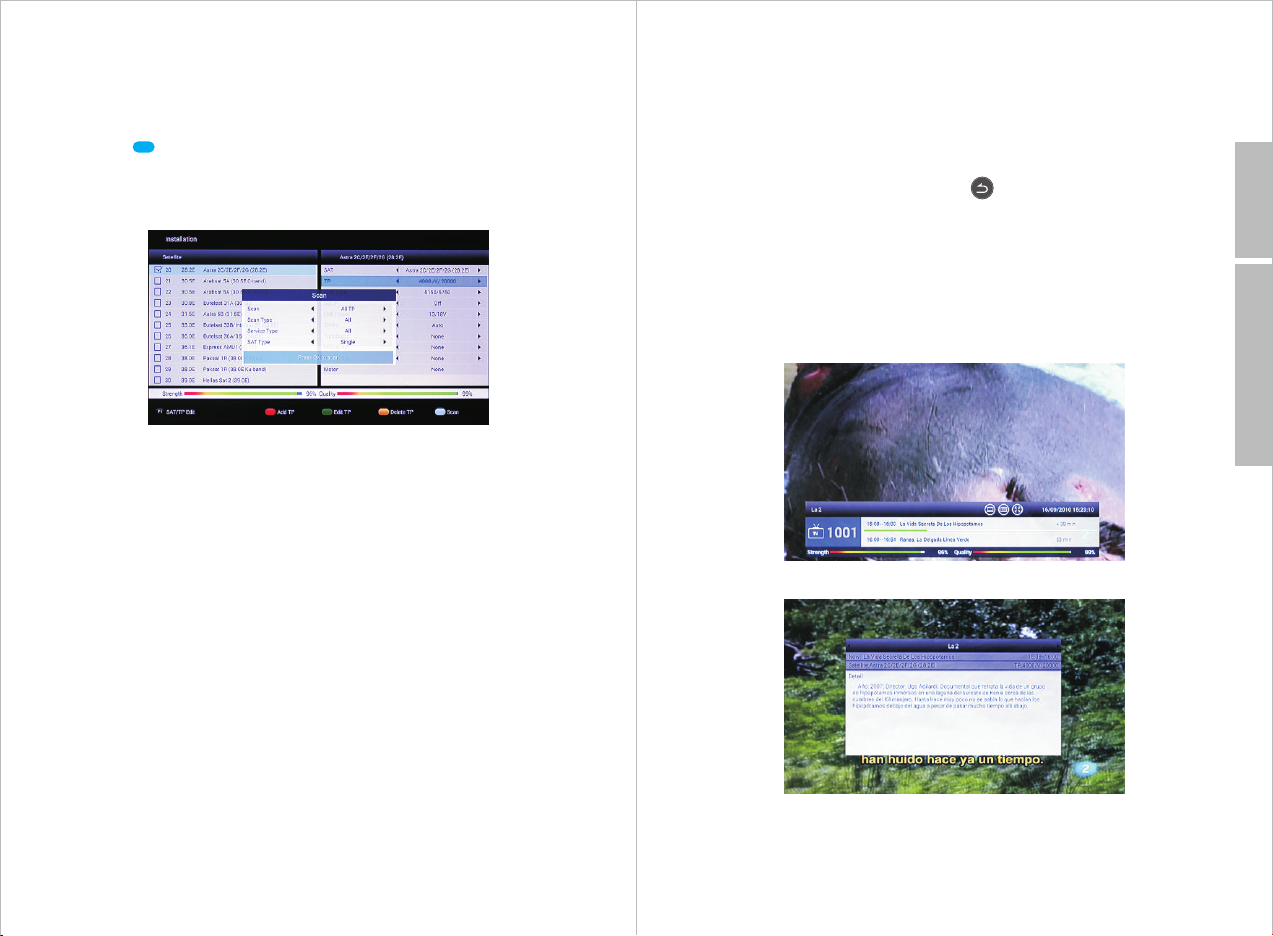
7.2.1.7 Manual Channe l Scan
1. Press < > to perform a manua l scan.
2. Some settings can be cha nged be fore pe rform ing the s can.
3. Use <▲> and <▼> to select and use <◀> an d <▶> keys to c hange
the settings.
- SAT Typ e:
Select between:
• Single to search a single s atell ite
• Multi to search all selec ted sat ellit e. Not av ailab le if onl y one
satellite is selected o n the lef t hand si de of the s creen .
4. Use <▲> and <▼> to select ‘Press < OK> to Sc an’ then press <OK>
to confirm. If you wish to ex it pres s < > and sel ect ‘OK ’, ‘Exi t’ or
‘Cancel’.
English
- Scan
Select between:
• All TP to scan transponde rs whic h are in th e recei ver’s dat abase
(Recommended)
• Blind to scan every possi ble fre quenc y
• One TP to s can only the curre ntly se lecte d trans ponde r
• One TP + NIT to sc an the cu rrent ly sele cted transponder and th e
Network Information Table by t he sate llite s ervic e provider.
- Scan Typ e:
Select between:
• All to save all scanned cha nnels
• FTA to save o nly the f ree to ai r chann els (Re comme nded)
- Service Type
Select between:
• All to save TV and R adio ch annel s (Reco mmend ed)
• TV to save only TV c hanne ls
• Radio to save only radio ch annel s
-18-
7.2.2 DT V Mode
7.2.2.1Channel Info rmati on
Press <F3/INFO> in TV /Radi o mode to s how the “ now and n ext
program information ” for the c urren t chann el/st ation i nclud ing sig nal
strength and quality. The d isplay also show s wheth er subt itles a nd
Teletext information ar e avail able.
Press <F3/INFO> a secon d time to s how det ailed i nform ation .
Press <F3/INFO> a third t ime to sh ow the sa telli te info rmati on for th e
current channel.
To close the channel inform ation , press < F3/IN FO> a las t time.
Alternately.
-19-
Back to Content
Page 13
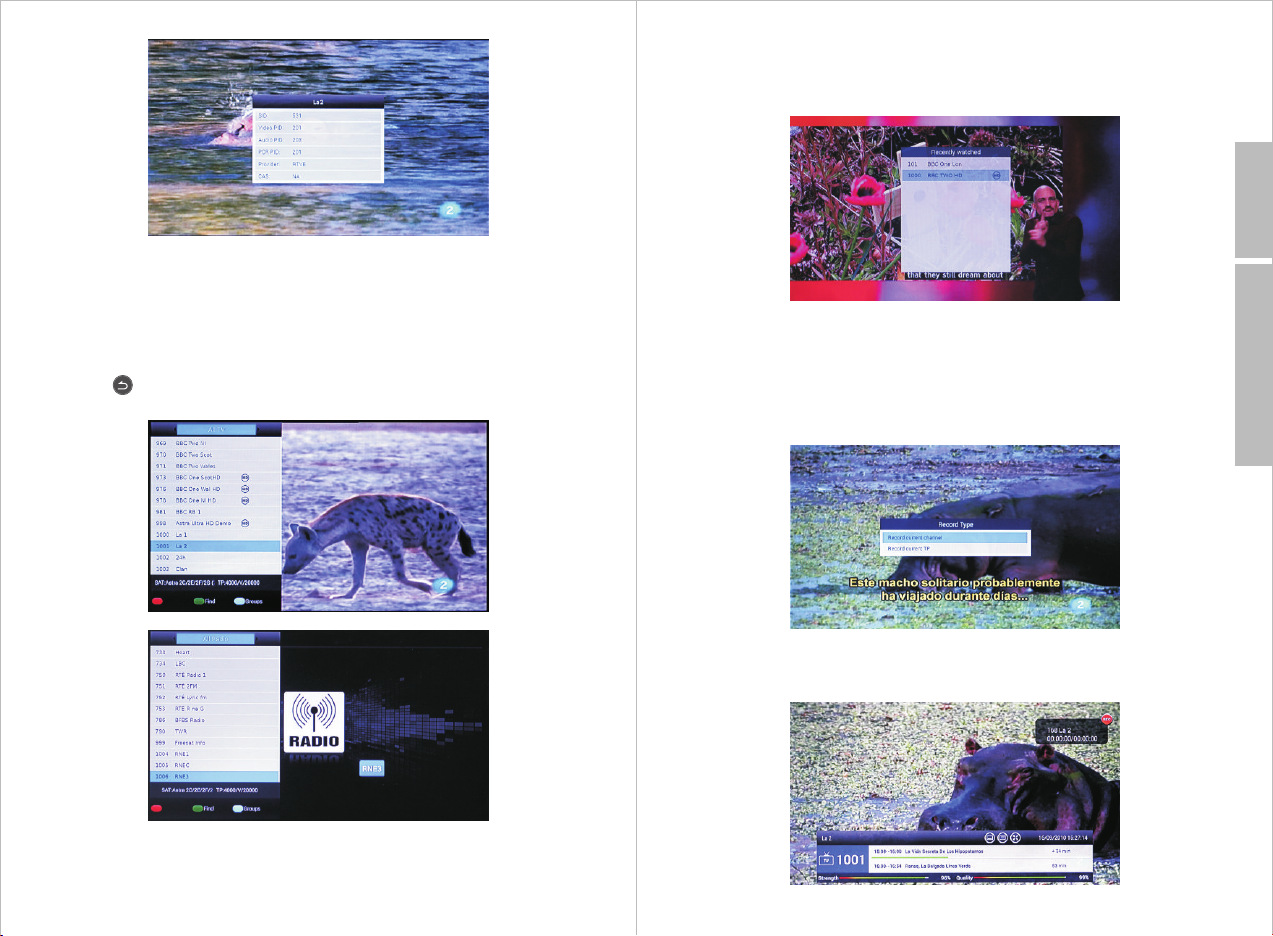
7.2.2.3 Recall
Press <RECALL> in TV or R adio mo de to dis play re centl y watched
channel list. Use <▲> or <▼> to sel ect the c hanne l then pr ess <OK >
to switch between them.
English
7.2.2.2 Channel List
Press <OK> in the TV or Rad io mode t o show th e chann el list . Press
<TV/Radio> to switch be tween t he TV a nd Radi o chann el list.
Press <▲> or <▼> to select the desi red cha nnel, t hen pre ss <OK> t o
confirm.
Press < > to close the list.
Back to Content
7.2.2.4 Record
To record a program, a USB remo vable s torag e - such as U SB stic k or
hard drive - with suffi cient r emain ing spa ce is req uired.
Plug your USB removable s torag e into on e of the US B socke ts.
Press <F4/REC> to start a n insta nt reco rding o f the pro gram be ing
watched using the pre-s et PVR se tting s.
Press <F4/REC> again to s how the r ecord ing det ails. This will also
enable you to set the recor ding du ratio n using t he numb er keys a nd
pressing <OK> to confir m.
-20-
-21-
Page 14
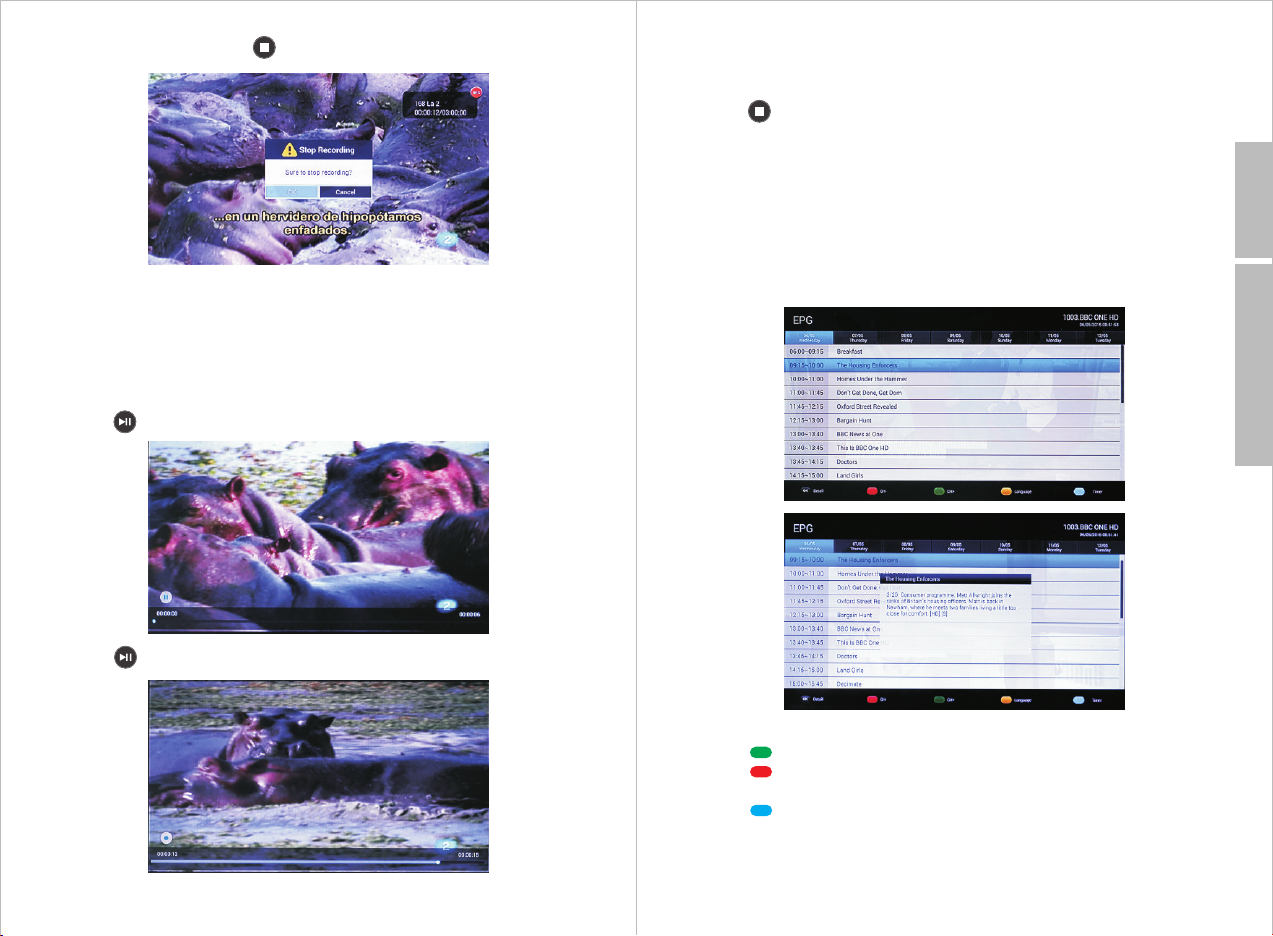
To stop recording, press < >.
Note: The reco rding s ettin gs can be c hange d in the DT V settings.
Please refer to section 7 .2.4. 6.
7.2.2.5 Time S hift
To use Time a USB removable stor age - suc h as USB st ick or ha rd
drive - with sufficie nt rema ining s pace is r equired.
Press < > to start Time Shift.
Use <◀> or <▶> to jump the recordin g backw ards or f orwar ds by 30
seconds.
Press and hold the <◀> or <▶> for fas t backw ards or f orwar ds.
Press < > to end Time Shift.
Note: Time Shift setting s can be ch anged i n DTV Set tings . Pleas e
refer to section 7.2.4
7.2.2.6 EPG
Press <F1/EPG> in TV mo de or sel ect EPG f rom the D TV home
screen to view the Electr onic Pr ogram G uide. This f unction only
supports the program gu ide for t he curr ent and n ext pro gram,
scheduled view ing or sc hedul ed reco rding o f progr ams.
English
Back to Content
Press < > to pause and resume t he prog ram.
-22-
Press < > to move to the next channel.
Press < > to move to the previo us chan nel.
Press < OK > to show the progra m infor matio n.
Press < > to set the schedule o ption s.
-23-
Page 15
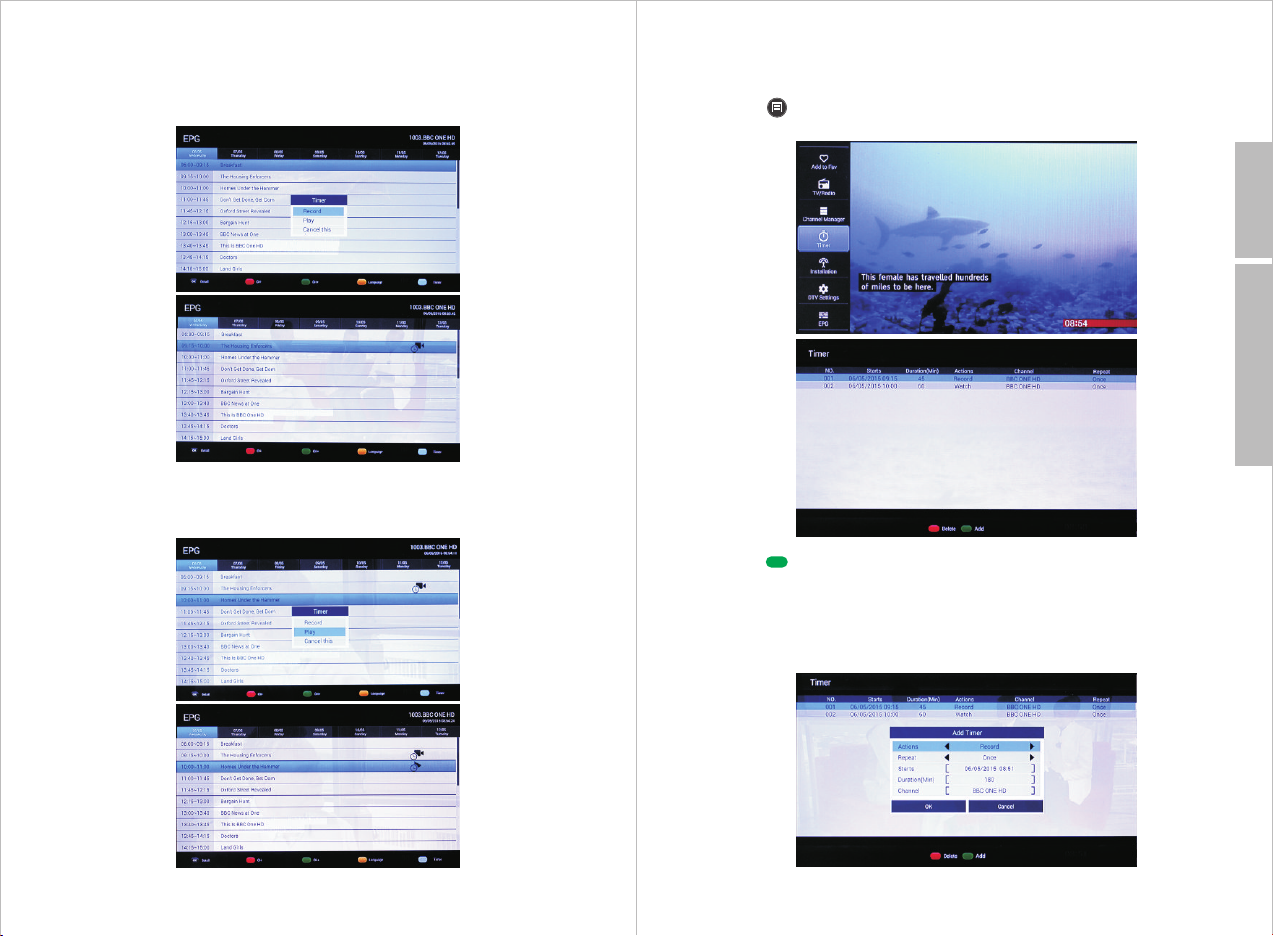
Note : Schedule options o nly app ly on fut ure pro grams .
- Select ‘Record’ to set a sch eduled recording
- Select ‘Cancel this’ to ca ncel
- Press <OK> to confirm.
- Select ‘Play’ to se t a remin der for viewing a future pr ogram
- Select ‘Cancel this’ to ca ncel
- Press <OK> to confirm.
7.2.2.7 Time r
Tim er func tion al lows sc heduling recor dings o r remin ders fo r viewi ng
a future program.
1. Press < > to show the menu lis t then us e <▲> or <▼> to sel ect
‘Ti mer’. Press OK to ente r.
English
Back to Content
2. Press < > to add an event (act ion)
3. Use <▲> and <▼> to change betwee n optio ns:
- Actions: use <◀> or <▶> to change b etwee n ‘Reco rd’ and ‘Watc h’.
- Repeat: use <◀> or <▶> to change be tween ‘ Once’ , ‘Dail y’ an d
‘Week ly’.
-25--24-
Page 16
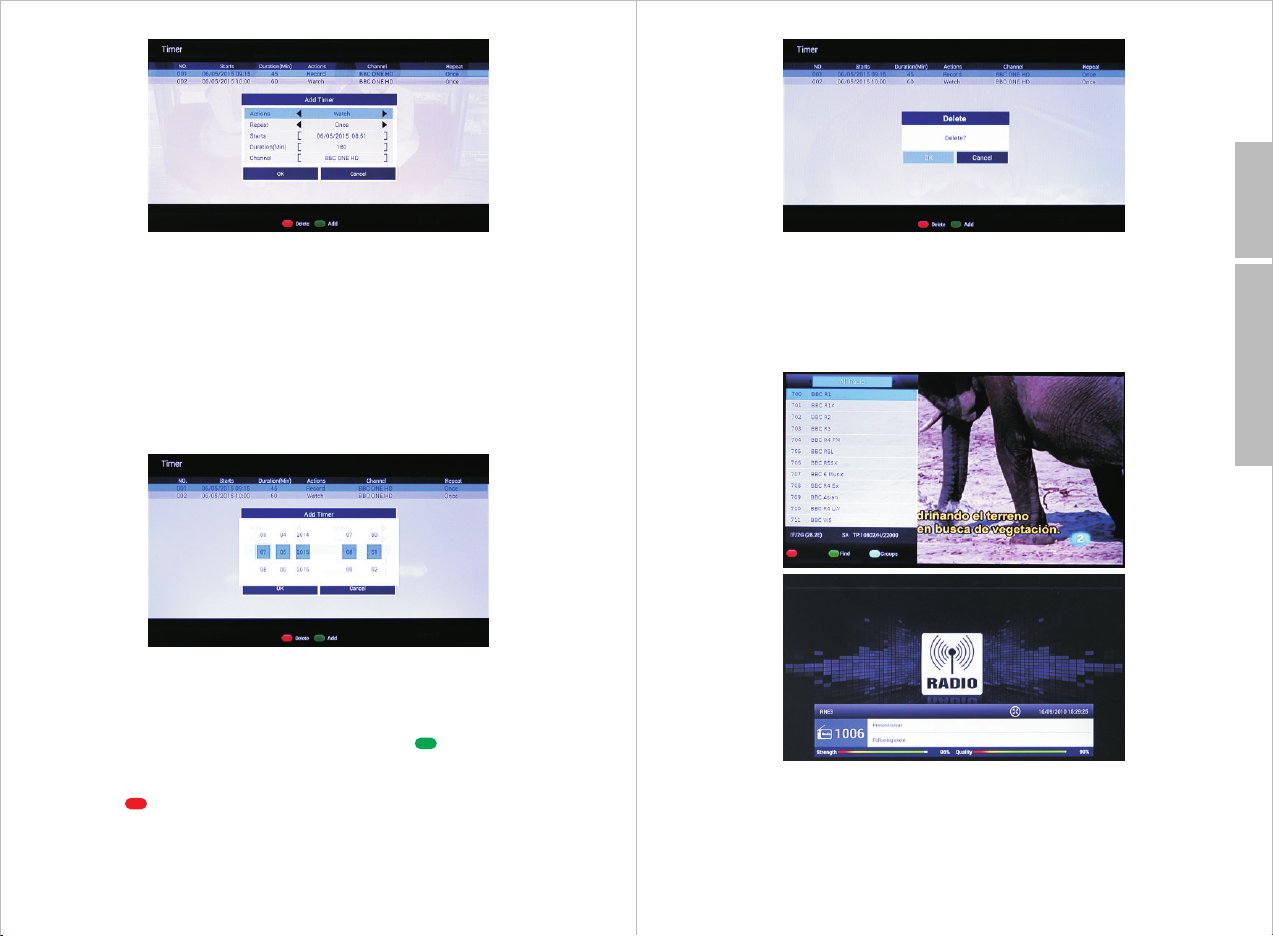
English
Note: When weekly repea t is chos en, sel ect the d ay for wh ich the
reminder or recording s hould r epeat . Use the a rrow ke ys to sel ect the
day then press <OK> to conf irm. Se lect ‘C ancel ’ to re turn wi thout
saving or select ‘OK’ to s ave. The ‘Repeat’ wi ll high light t he selected
date.
4. Select ‘Starts’ then pr ess <OK> to enter the start time. Us e <◀> or
<▶> to change between time an d date, U se <▲> and <▼> to c hange
the time and date. Select ‘ Cance l’ to return or selec t ‘OK’ to save.
5. Select ‘Duration (Mi n)’ and use the number keys to c hange t he
duration.
6. Select ‘Channel’ an d press < OK> to en ter the c hannel list. Use
<▲> and <▼> to change the channel o r press < > t o find a ch annel
(search). Press <OK> to s ave.
7. Select ‘Cancel’ to retu rn or select ‘OK’ to sa ve the ti mer.
8.Press< > to delete the cu rrent c hosen t imer
7.2.2.8 Channel List
To show the channel list, pre ss <OK> i n DTV mod e or sele ct ‘TV
Channel’ in DTV hom e scree n.
Press <TV / Radio> to switch betwe en TV c hanne ls and Ra dio
stations.
Use <▲> or <▼> to select a channel. The sa telli te and TP info rmati on
will be displaye d at the bo ttom of t he list .
Press <OK> to change the ch annel .
Use <▲> or <▲> to select one then pre ss <OK> t o save.
Back to Content
-26-
-27-
Page 17
English
Press < > to search a channel b y enter ing its n ame usi ng the on
screen keyboard.
Press < > to display channe ls on differ ent sat ellit e.
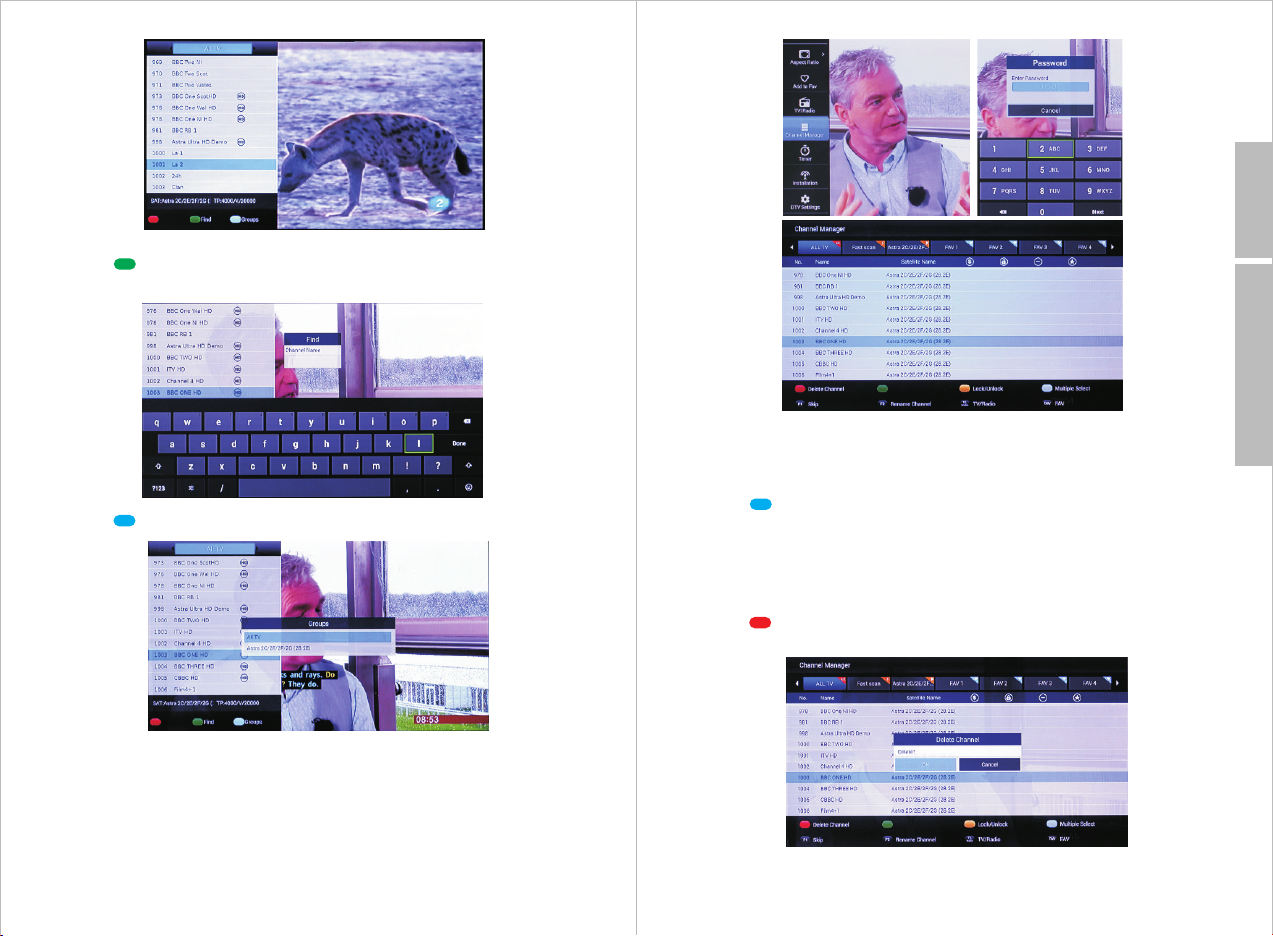
7.2.2.9 Channel Manag er
Select ‘Channel manag er ’ in th e DTV hom e scree n to ente r the
channel manage r.
The default password is ‘ 0000’ .
Press <TV/Radio> to cha nge bet ween TV and ra dio cha nnel list.
Back to Content
Use <◀> and <▶> to change between g roups , use <▲> and <▼> t o
select channel.
- Selecting Channels
Press < > to switch between ‘ Singl e Selec t’ and ‘Mult iple Se lect’ .
Note: For multiple sele ct: pre ss <OK> t o selec t indiv idual c hanne ls
to add to the multiple sele ction o r press < F2> to se lect al l.
- Deleting Channels
Press < > to delete the selec ted cha nnel( s). Sel ect ‘OK ’ to co nfirm
or ‘Cancel’ to retu rn.
-28-
-29-
Page 18
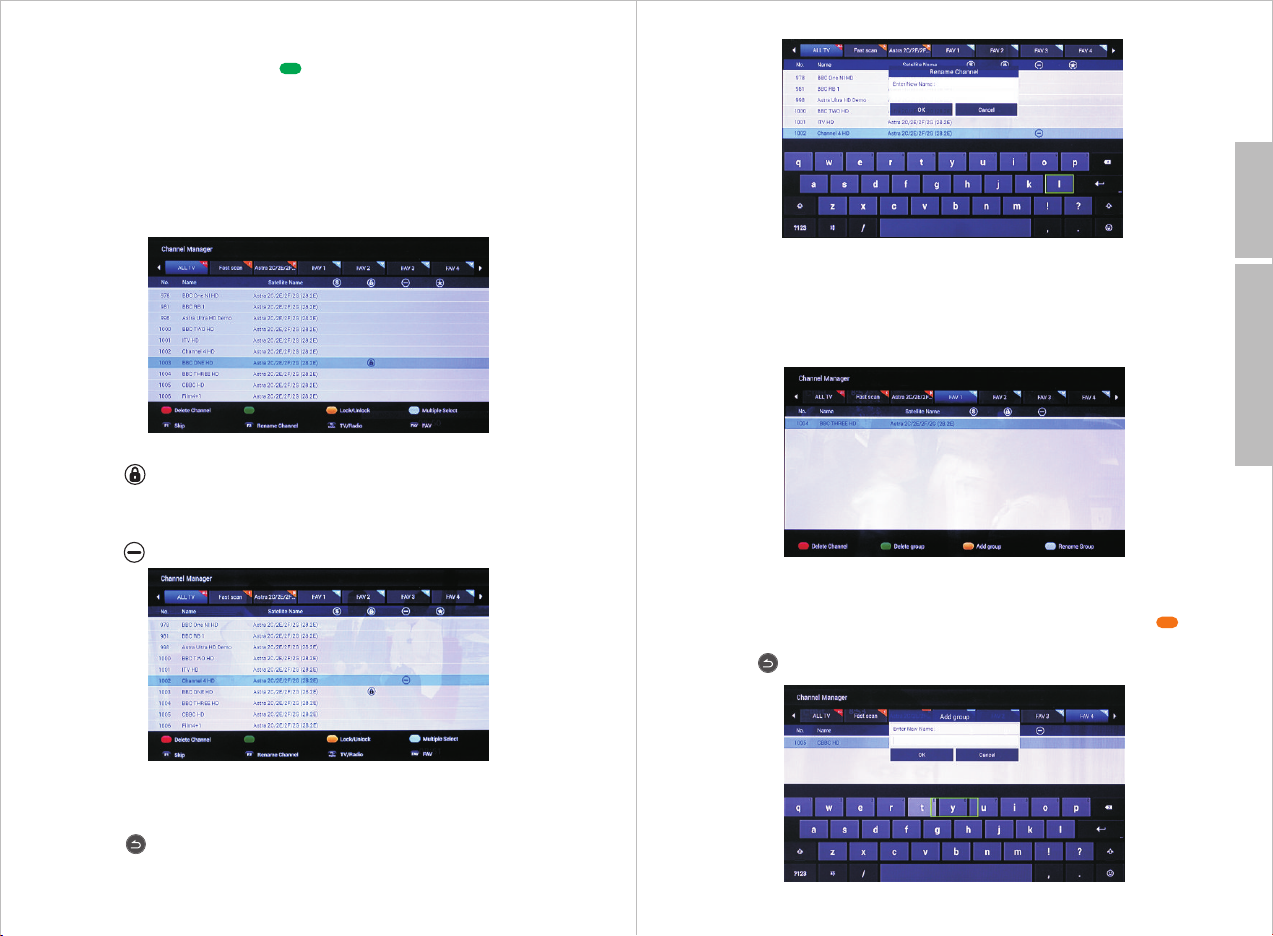
- Moving Channels
In single select mode pre ss < > to mov e a selec ted cha nnel up . In
multiple select mode, m ove the s elect ed chan nel(s ) to a high light ed
point.
NOTE:It is recommende d not to mo dify th e Chann el List i n the UK as
it may affect Fr eesat C hanne l N° and th e worki ng cond ition of the
box.
- Locking a Channel
English
Press the yellow button t o lock / un lock th e selec ted cha nnel( s).
The icon will show for the lo cked ch annel (s).
- Skipping a Channel
Press <F1> button to skip / u n-ski p the sel ected c hanne l(s).
The icon will show for the sk ipped c hanne l(s).
- Rename a channel
1. Press <F2> to rename a sel ect cha nnel.
2. Enter the new name by usin g on scre en key bo ard
3. Press< > and select ‘OK’ to s ave.
- Channel Groups
Use <◀> and <▶> to change between g roups .
Personal groups (labe lled in b lue) ca n be adde d, dele ted and
renamed.
Default groups (label led in or ange) c annot b e delet ed or ren amed.
• Adding a New Group
1. Use <◀> and <▶> to select a person al grou p then pr ess < >.
2. Enter the group name by us ing on sc reen ke yboar d.
3. Press and select ‘OK’ to sa ve.
Back to Content
-30-
-31-
Page 19
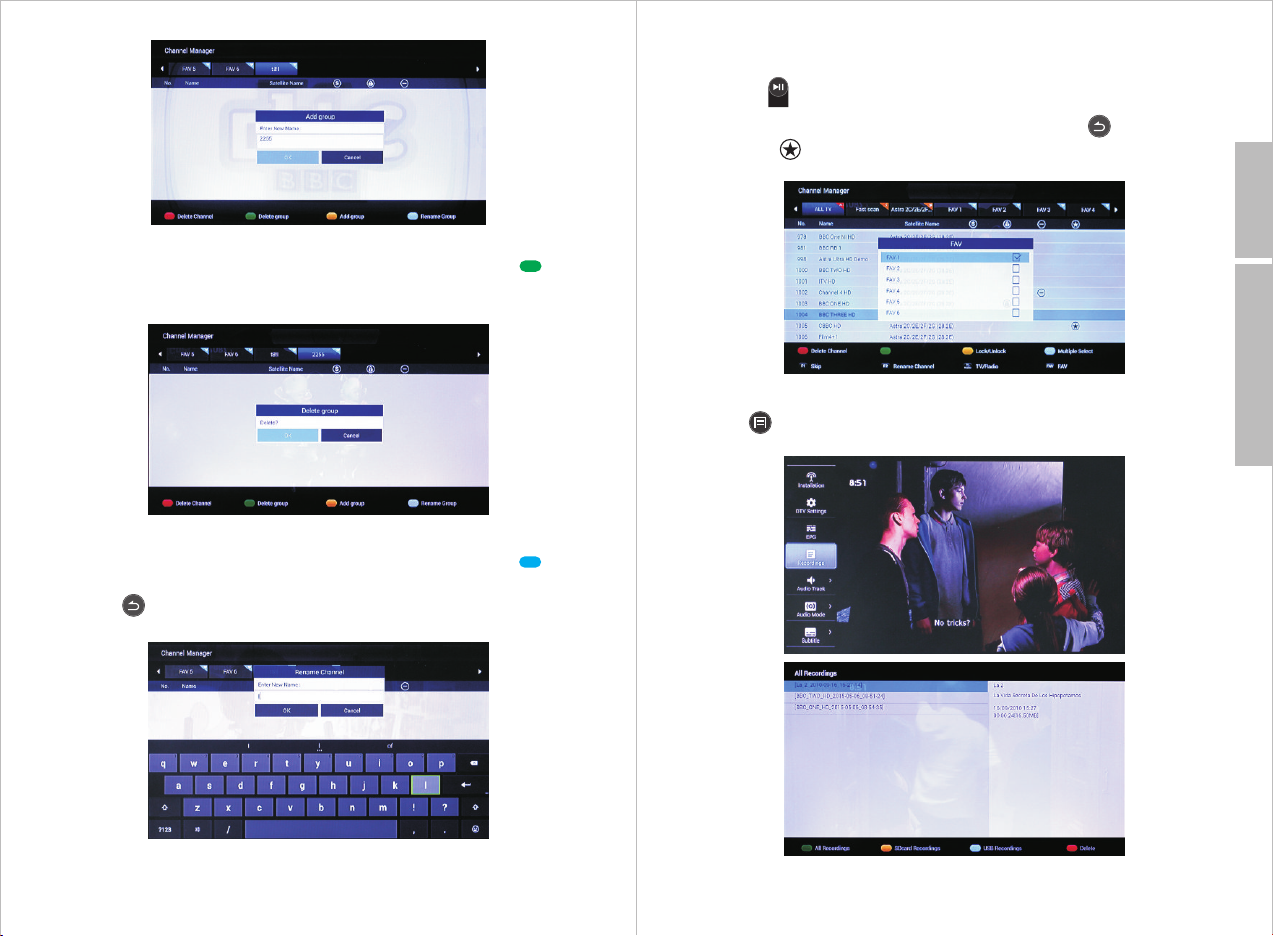
• Deleting a Group
1. Use <◀> and <▶> to select a person al grou p then pr ess < >.
2. Select ‘cancel’ to exis t without deleting or sel ect ‘OK ’ to delete the
group.
• Renaming a Group
1. Use <◀> and <▶> to select a person al grou p then pr ess < >.
2. Enter the group name by us ing on sc reen ke yboar d.
3. Press and select ‘OK’ to sa ve.
• Adding Channel s to Pers onal Gr oup
1. Select channel(s) (s ee Sele cting C hanne ls)
2. Press < > to add selected ch annel (s) to a pe rsona l group a s
favourite.
3. Select a personal grou p press < OK> the n press < > t o go back .
4. The icon will show for the c hanne ls that a re in fav ourit e.
7.2.3 Re cordi ngs Set tings
Press < > in DTV mode or select ‘ Recor dings ’ in the DTV hom e
screen to enter the PVR fun ction .
FAV
English
Back to Content
-32- -33-
Page 20
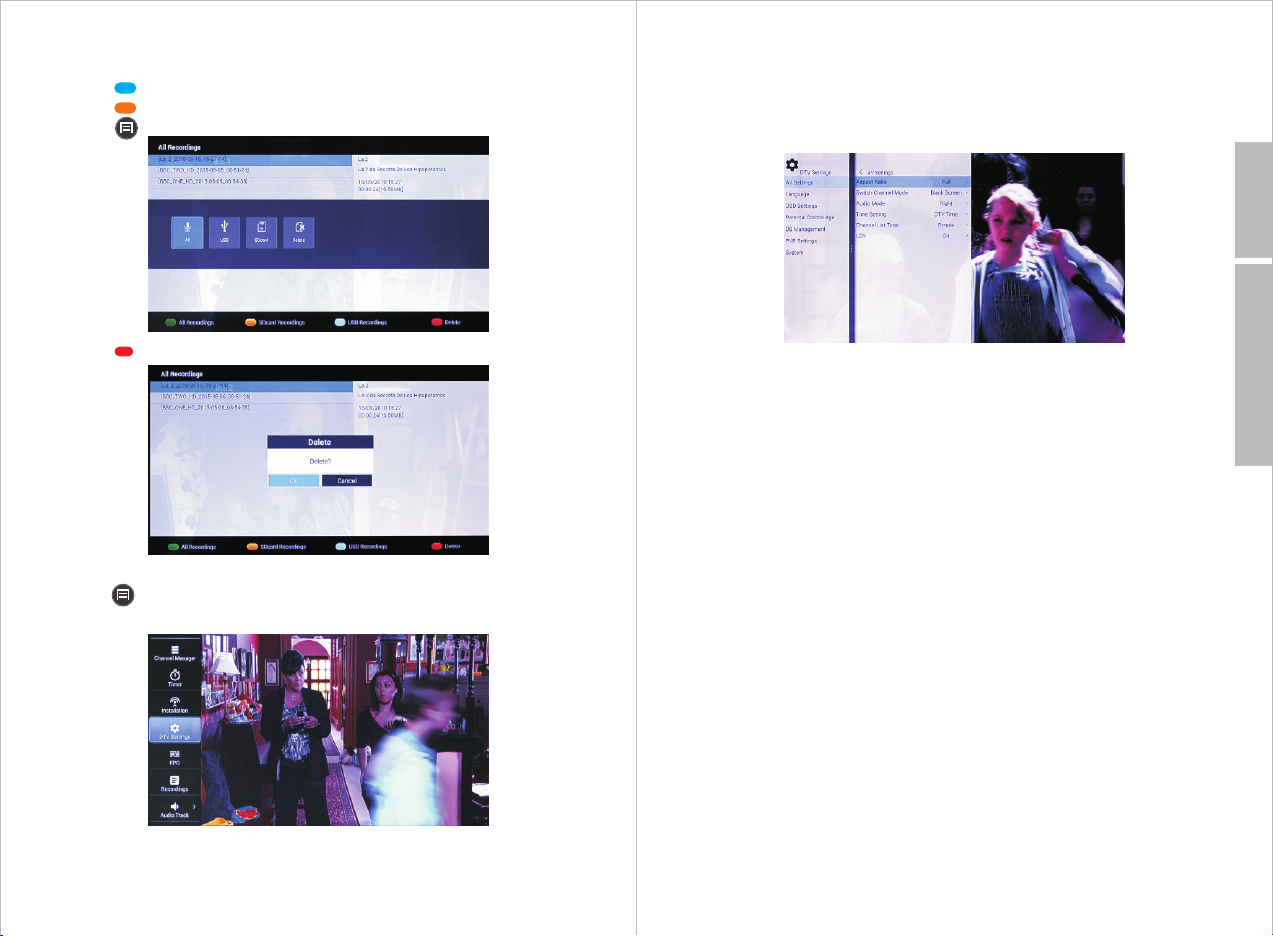
Use <▲> and <▼> to select a recorde d file.
Press <OK> to start playb ack.
Press < > to browse USB recor dings f iles.
Press < > to browse SD card rec ordin gs file s.
Press < > to list all operati on
Press < > to delete selecte d file th e file.
In a sub-menu, use <▶> to displ ay the se tting s.
Press <OK> to change the se tting s.
Use <◀> to back one level.
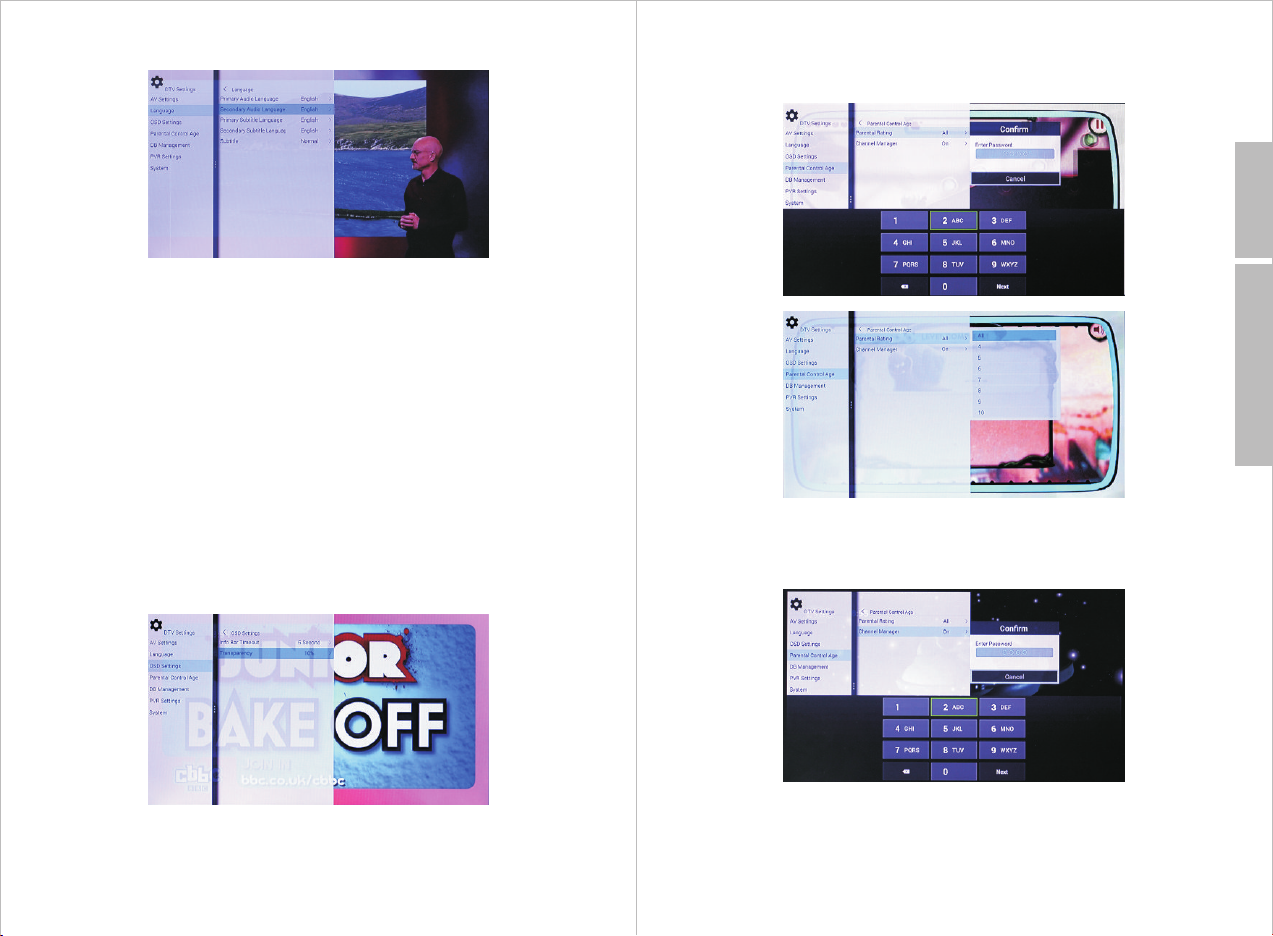
- 7.2.4.1 AV Sett ings
English
Back to Content
- Asp ect Rat io
Select between:
• Auto to adjust the aspect r atio au tomat icall y.
• Full to f it the aspect ratio to full s creen .
- Switch Channel Mode
Select between:
• Freeze to freeze the pict ure whe n switc hing ch annel s
• Black to display a black sc reen wh en swit ching c hanne ls
7.2.4 DT V setti ngs
Press < > in DTV mode or select ‘ DTV Set tings ’ in DTV home
screen to enter the DTV set tings .
Use <▲> or <▼> to change between op tions .
Use <▶> to enter a sub-menu for e ach opt ion.
-34-
- Audio Mode
Select between:
• Stereo to have right and le ft chan nel acc ordin gly
• Left to have the left Chann el only o n both sp eaker s
• Right to have the right cha nnel on ly on bot h speak ers.
- Time Se tting
Select between:
• DTV Tim e which c an differ de pending of your time zone a nd the
satellite used
• Internet time which wil l be the ti me for yo ur actu al time z one
- Channel List Type
Select between:
• Simple to display the cha nnel li st only
• EPG to display the channe l with cu rrent p rogra m infor matio n
-35-
Page 21
7.2.4.2 Language
7.2.4.4 Parental Cont rol
- Parental Rating to choo se the pa renta l contr ol age be tween Al l
(no parental control) o r from ag e 4 to 18
English
- Primary Au dio Lan guage t o choos e the primary audio langu age
- Secondary Audio L angua ge to cho ose the secondary audio
language (if availabl e)
- Primary Subtitle Lang uage to c hoose t he prim ary sub title
language
- Secondary Subtitle La nguag e to choo se the se conda ry audi o
language (if availabl e)
- Subtitle to enable or dis able th e subti tles, a nd sele ct the su btitl e
option.
Select between:
• Normal
• Hard of Hearing
• Off
7.2.4.3 OSD Settings
- Info Bar Timeo ut to cha nge the d ispla y time of t he info rmati on bar
from 2s to 20s
- Transparency to change t he tran spare ncy of th e infor matio n bar
Back to Content
- Channel Manager to turn p asswo rd prot ectio n of the Ca nnel Li st
between On / Off
-37--36-
Page 22
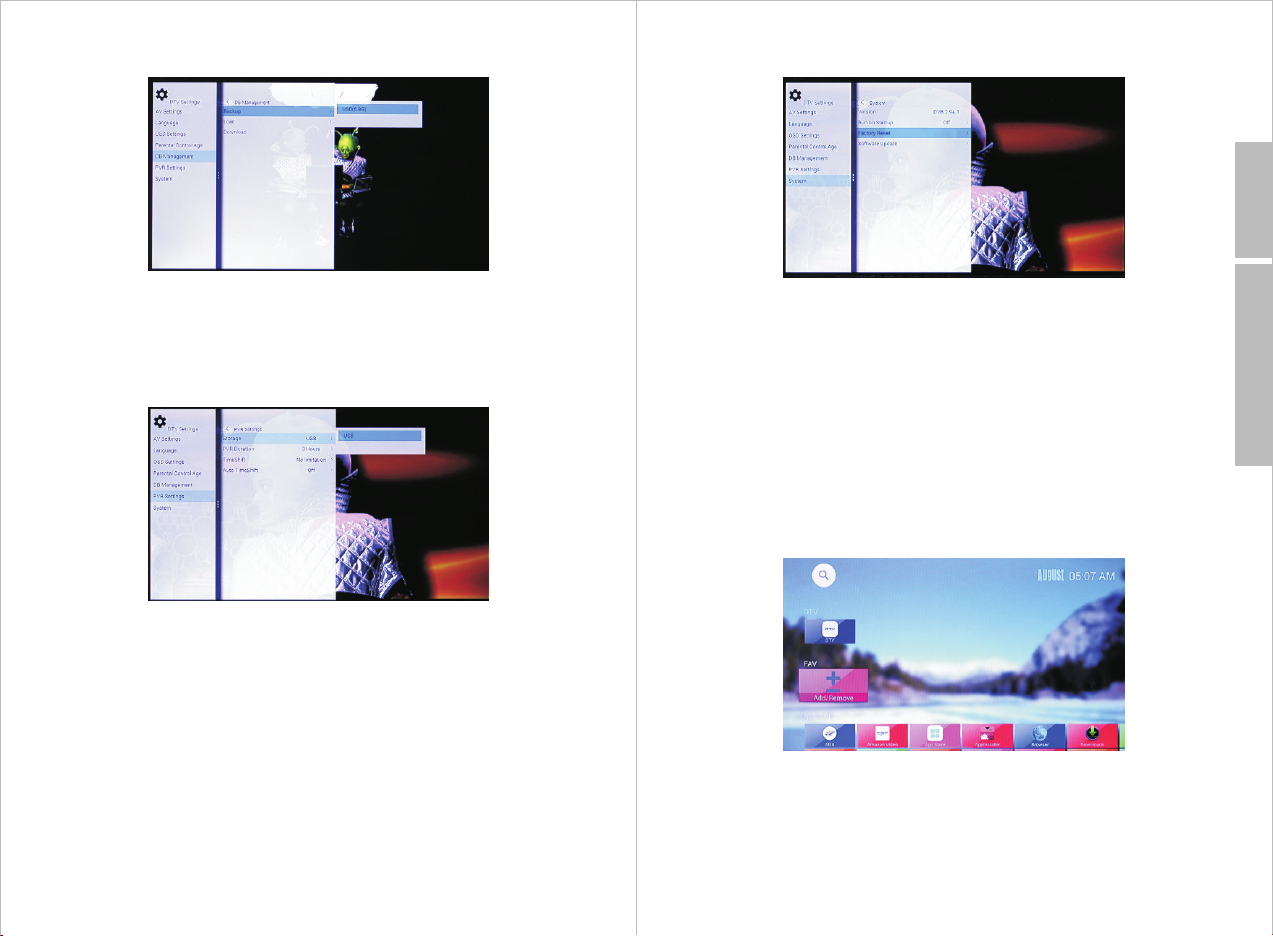
7.2.4.5 DB Management
7.2.4.7 System
English
Back to Content
- Backup to save the satell ite’s chan nel dat a to a USB
- Load to l oad the saved sate llite ’s ch annel d ata fro m a USB
- Download to download th e satel lite’s cha nnel da ta from internet
7.2.4.6 PVR Settings
- Storage to change the des ired st orage d evice
- PVR Duration to change th e defau lt reco rding d urati on
- Time Sh ift to ch ange th e defau lt time s hift du ratio n
- Auto Ti me Shif t to enab le / disa ble aut o time sh ift
- Version to view to the curre nt syst em vers ion
- Run on Startup will give yo u the pos sibil ity to en able / di sable
auto run for DTV mode on star t up
- Factory Reset will proc eed to re set the D VB600 ’s DT V mode to
default settings
- System Update to update t he soft ware fo r DVB60 0, plea se refe r
to section 7.5.2.7
7.3 FAV APP
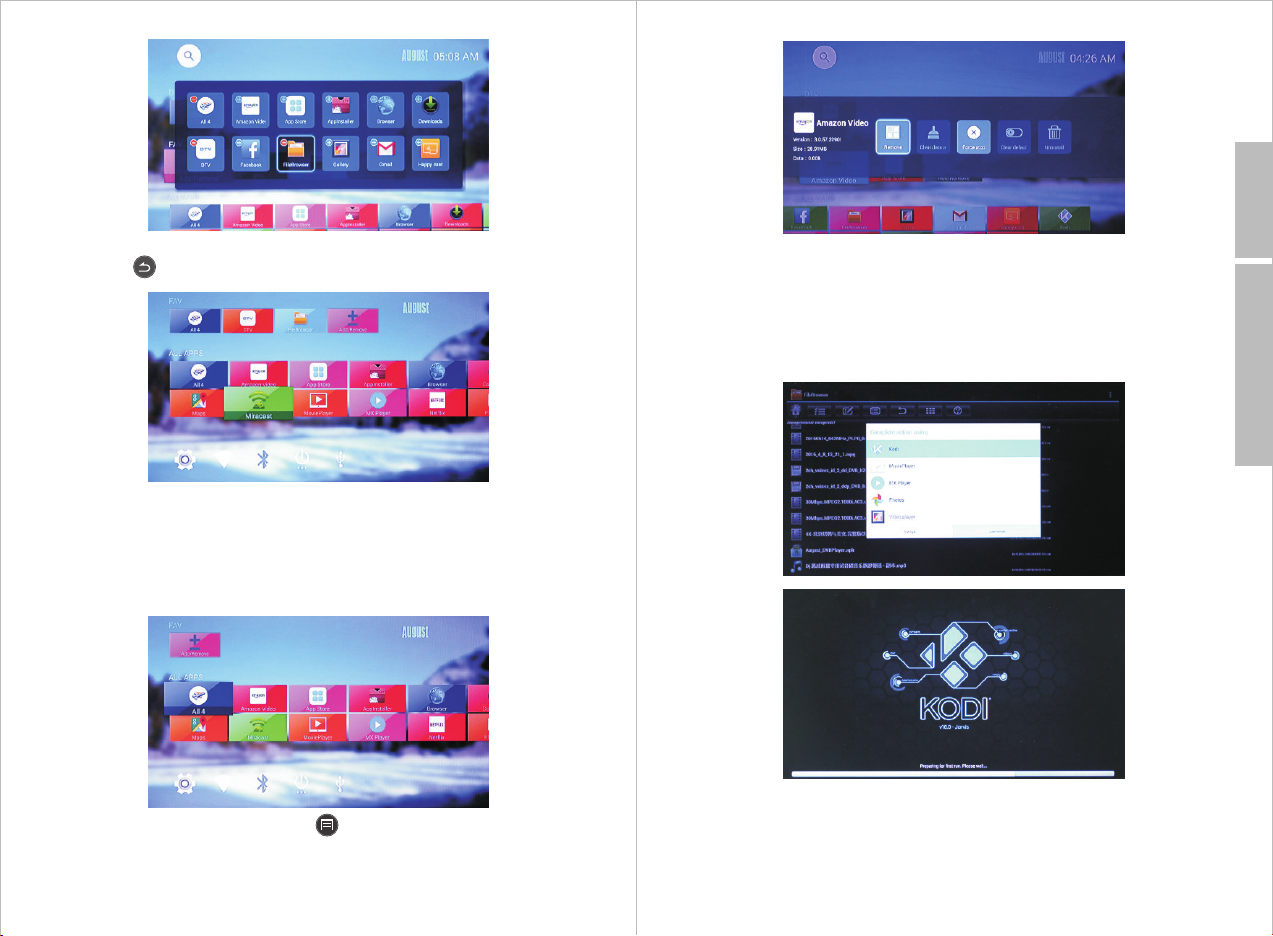
You ca n add / rem ove on th e DVB60 0 your favourite a pplic ation s to
‘FAV’ to create a shortcut to ac cess yo ur appl icati ons.
1. Select ‘FAV’ from the home sc reen.
2. Use the arrow keys to sele ct an app licat ion the n press O K to add /
remove.
-39--38-
Page 23
English
3. Press < > to finish editin g.
7.4 ALL A PP S
7.4.1 Pl ay Stor e
Select Play Store to acce ss the Pl ay Stor e and ins tall ne w Apps. A
google account is requi red to ac cess th e Play St ore.
When select one app icon, press < > t o list APP oper ation .example
Remove,Force stop.
7.4.2 Mo vie Pla yer
Select Movie Player to pl ay the vi deo fil e on the DV B600 or a p lugge d
external USB storage de vice.
For compatible file for mat (au dio, vi deo and i mages ) pleas e refer t o
table in section 9. Speci ficat ions
Back to Content
-41--40-
Page 24
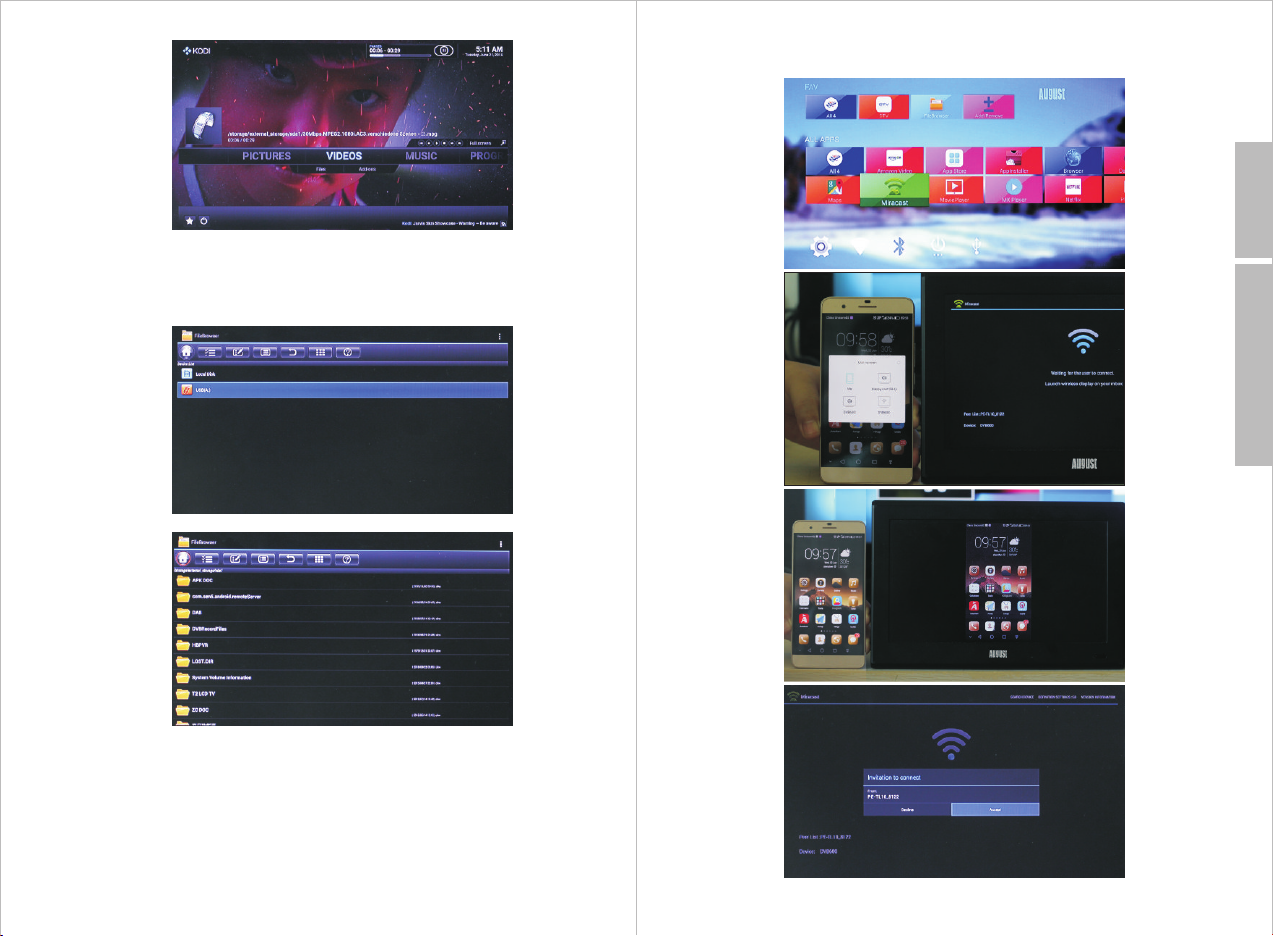
Note: Not all smartphon es and ta blets s uppor t mirac ast, pl ease
consult your devices us er manu al for de tails .
English
7.4.3 Fi le Brow ser
Select File Browser to br owse th e files c ontai ned on th e DVB60 0 or a
plugged external USB st orage d evice .
7.4.4 Mi racas t
Select the Miracast to se nd your s martp hone’s or ta blet’s scree n to
the DVB600 using Miraca st. Fol low the o n scree n instr uctio ns in
order to connect your sma rtpho ne or tab lets to t he DVB6 00 thro ugh
the Miracast app.
Back to Content
-42-
-43-
Page 25
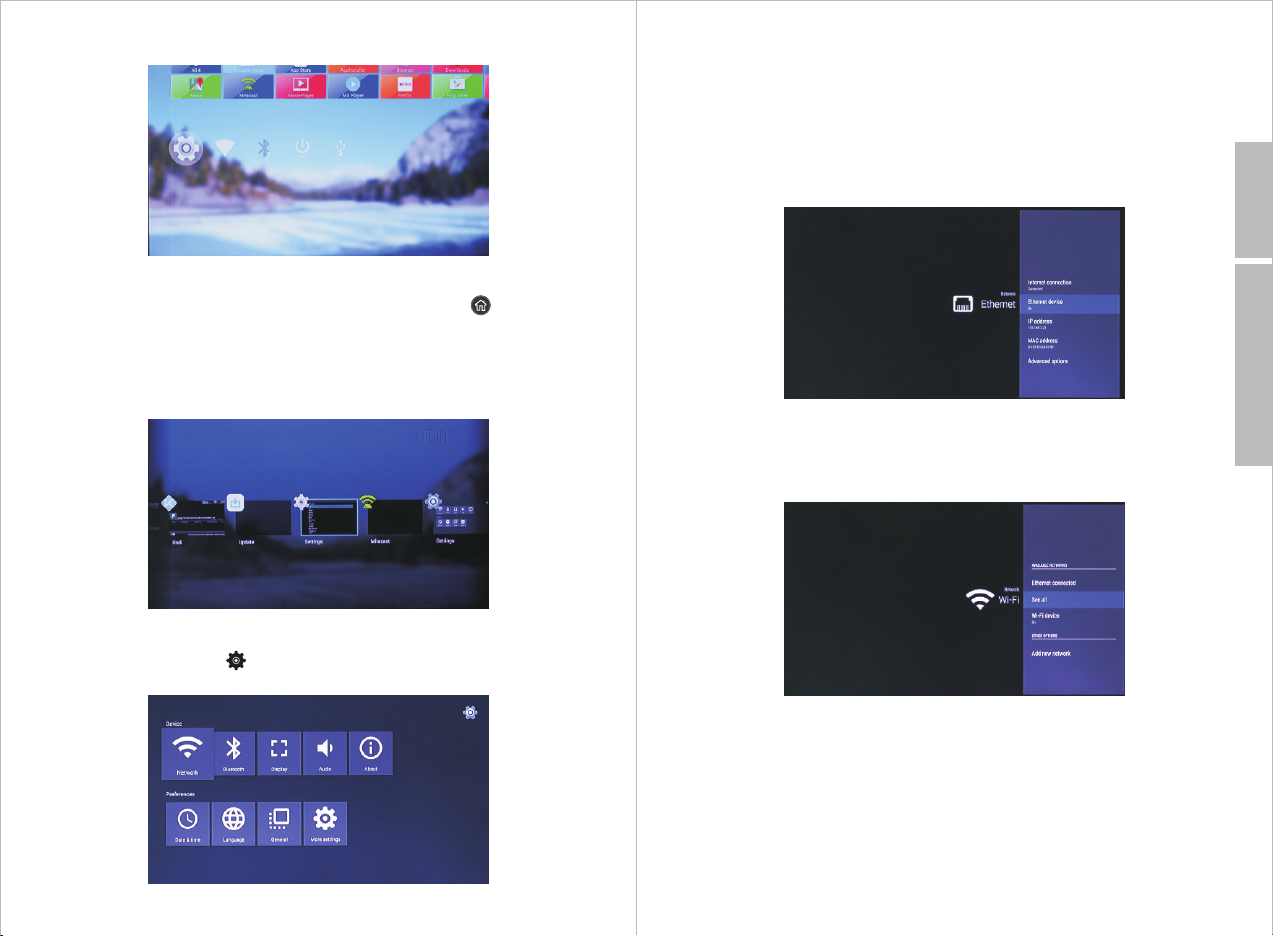
7.5 System Settings
Use the arrow keys to select between the options and press <OK> to
enter.
For each option, use <▲> and <▼> to select one setting then use the
arrow keys to change the setting or press <OK> to select.
7.5.1 Qu ick Swi tch Bet ween Apps
To quickly access running applications, press and hold < > from any
mode to see the list of the currently running applications.
Use <◀> or <▶> to select an application and press <OK> to switch;
Press and hold <OK> to see more options (remove from list or App info).
Press and hold then pull the application icon up to close the application
(please use air mouse RC for this action).
7.5.2 Settings
Press <SET> or Select to see the box settings and preferences.
This menu lists the main options.
7.5.2.1 Network
When the Ethernet function is enabled and the cable is plug in, the
‘Network’ will show the options for Ethernet.
Disable the Ethernet in the ‘More Settings’ menu or unplug the Ethernet
cable. The ‘Network’ will thus show the options for Wi-Fi.
Select the type of network connection and press <OK>to confirm or
change the settings for Wi-Fi network.
English
Back to Content
-44-
-45-
Page 26
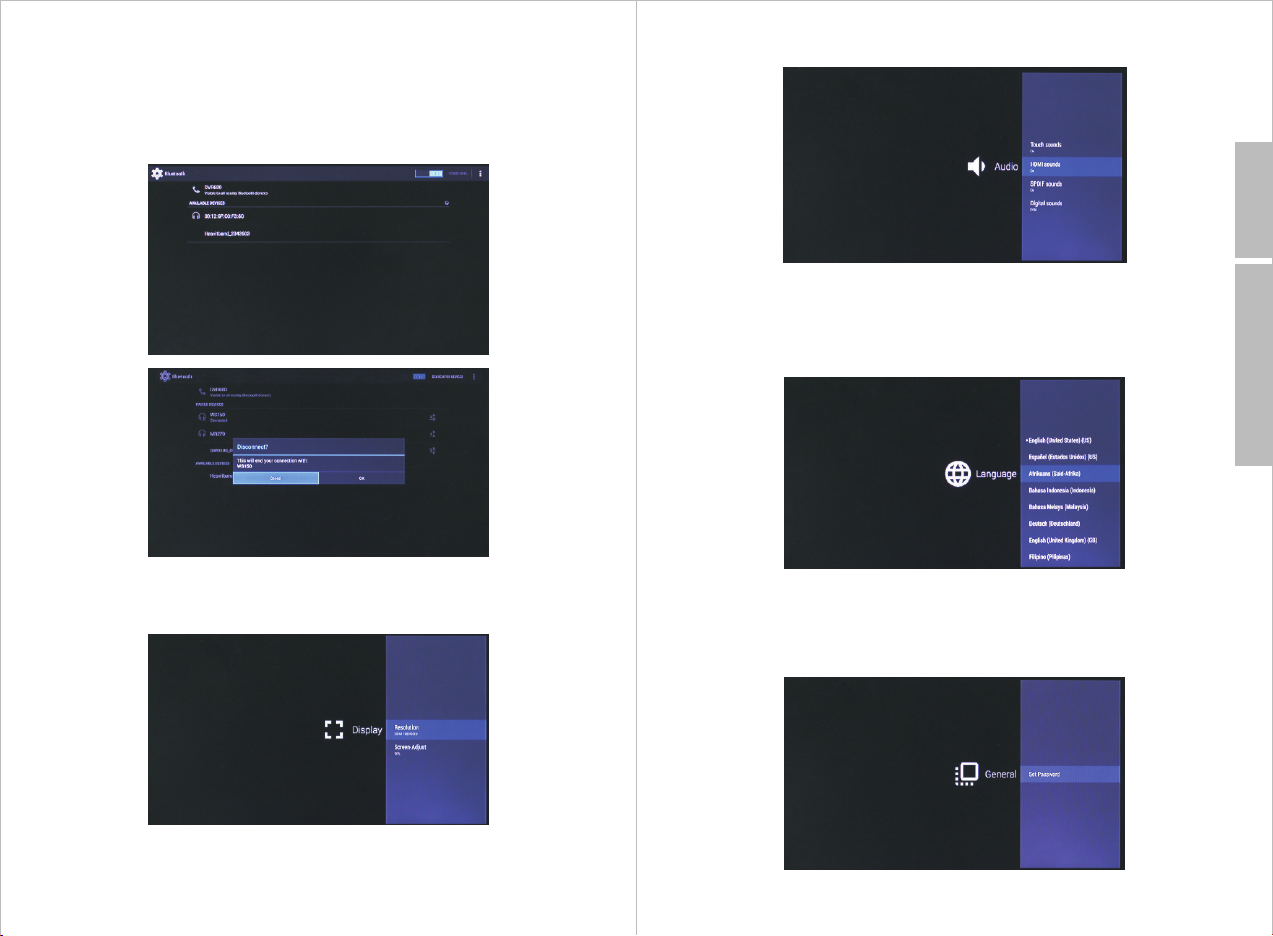
7.5.2.2 Bluetooth
Enables you to turn on/off the Bluetooth function of the DVB600 and to
search and pair to Bluetooth devices.
The DVB600 can be paired to Bluetooth Audio Devices such as
speakers and Headphones or Bluetooth external devices such as
keyboard or mouse.
7.5.2.4 Au dio
English
7.5.2.3 Display
Tur n on/off the touch soun ds, HDM I audio a nd SPDI F audio . Chang e
Back to Content
the type of the digital aud io.
7.5.2.5 Language
Change the system’s l angua ge
7.5.2.6 General
Change the system passw ord. (T he defa ult pas sword i s ‘0000 ’)
Change the output resol ution a nd adju st the sc reen si ze.
-46-
-47-
Page 27
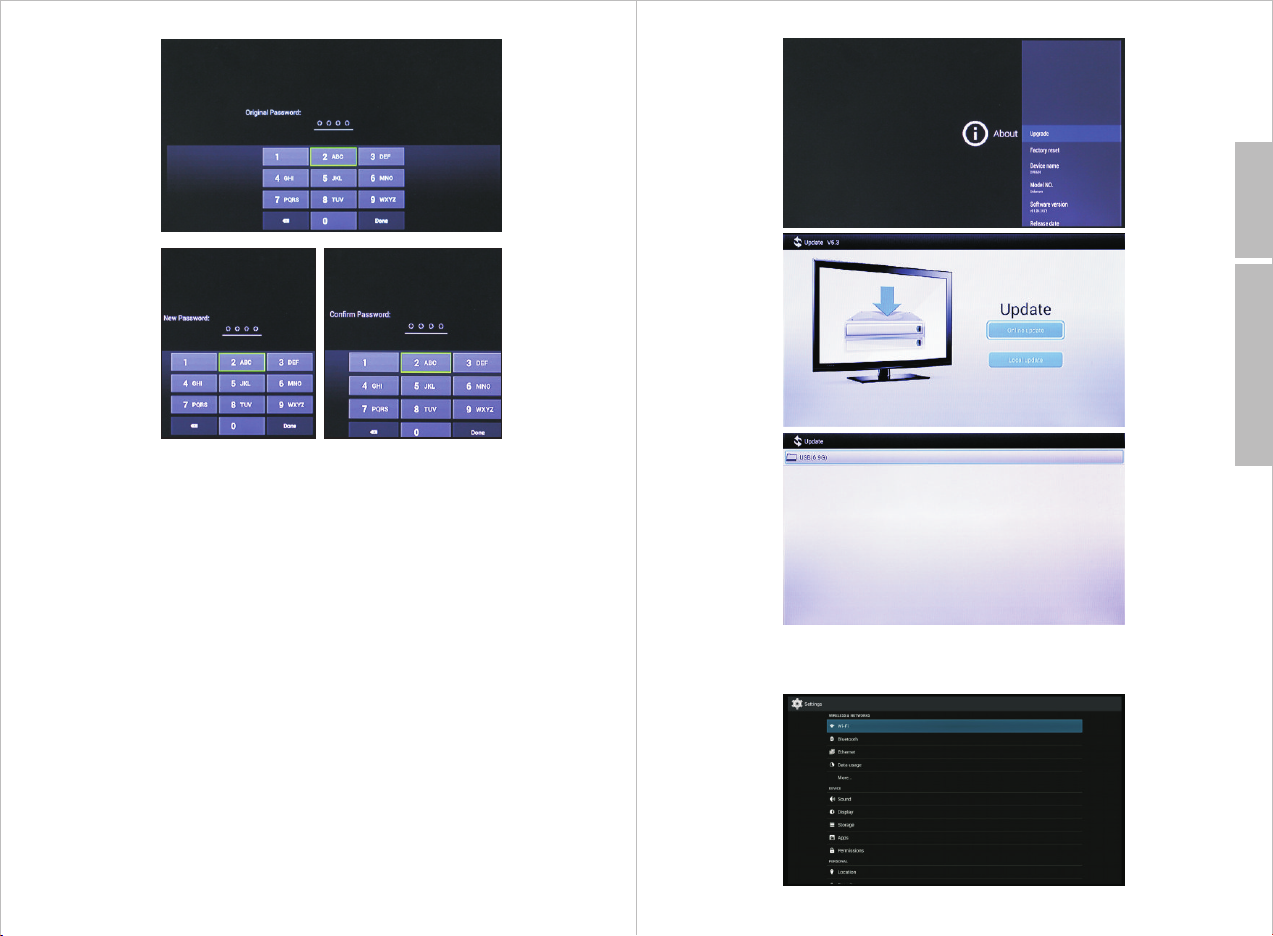
7.5.2.7 Ab out
The About menu enables you t o see the d evice ’s in formation as well
as options for software u pdate a nd fact ory res et.
- Online update Select ‘Online u pdate ’ to check if there is a ne w
update available on the s erver. I f a new sof tware v ersio n is avai lable ,
follow the on screen step s to proc eed on up datin g the sof tware o f
your DVB600.
English
Back to Content
- Local update Local upda te enab le you to u pdate t he soft ware
version from a local sour ce such a s SD card o r USB sti ck:
1. Download the update fi le from o ur webs ite
2. Transfer it to an externa l memor y of your c hoice (SD car d or USB)
3. Plug the external memo ry onto t he DVB6 00.
4. Select ‘Local update ’ then select your externa l memor y.
5. Select the update file t hen pre ss <OK> t o confi rm.
-48-
7.5.2.8 More Settings
This option will show all An droid b ased sy stem se tting s.
-49-
Page 28
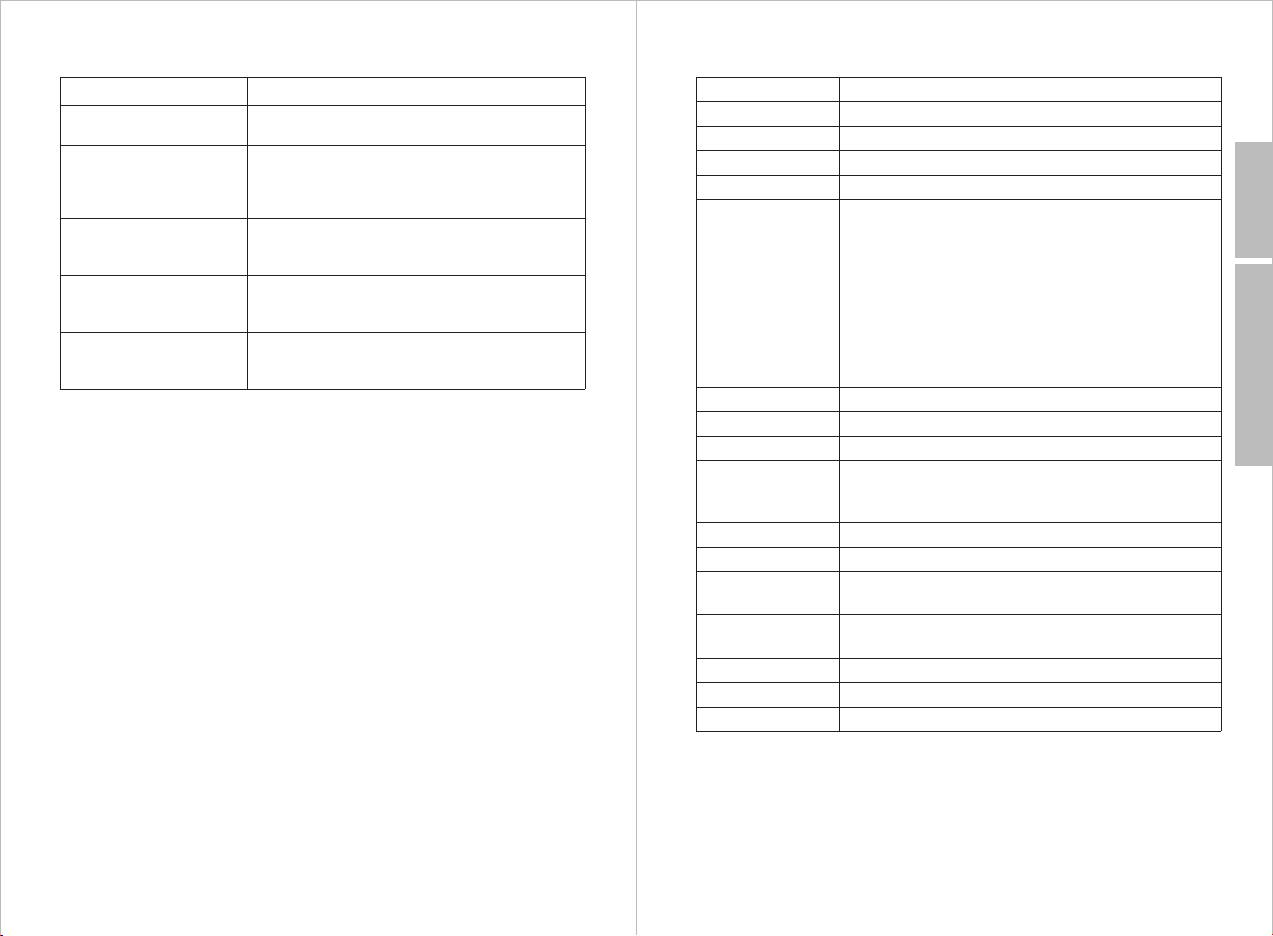
8. Troubleshooting
Contents
9. Specifications
Problems
I have updated an app
and it now won't load.
I cannot update the DVB600.
I cannot find any channels.
I cannot start recording or
timeshift.
There are no sound on
DVB600.
Solutions
Uninstall the app through the Play Store then
reinstall it.
For online update, check the internet connection.
For local update, refer to section 7.5.2.7.
If the update failed, power off the DVB600 and start
it again.
Ensure the satellite dish and the cables are properly
installed and select the correct satellite. For detailed
settings, refer to section 7.2.
Ensure insert a USB storage device with sufficient
remaining space. Check the PVR settings on the
DTV mode. See section 7.2.4.6
Ensure neither DVB600 nor audio output device is
mute. Check the general audio settings. See section
7.5.2.
Android Version
Chipset
RAM
Flash
Demodulator Mode
Video Decoding
Video File Format
Aspect Ratio
Video resolution
Audio Decoding
File System
USB Ports
Power Adaptor
Connections
Bluetooth Version
Dimensions
Net Weight
Android 4.4 OS
Amlogic S805
DDR3 1GB
eMMC 8GB
QPSK, 8PSK (DVB-S / S2)
H.265 HEVC [email protected] up to 1080P@60fps
H.264 AVC [email protected] up to 1080P@60fps
H.264 MVC up to 1080P@60fps
MPEG-4 ASP@L5 up to 1080P@60fps
AVS Jizhun Profile up to 1080P@60fps
MPEG-2 MP@HL up to 1080P@60fps
MPEG-1 MP@HL up to 1080P@60fps
RealVideo 8/9/10 up to 1080P@60fps
WebM up to VGA
*.mkv, *.wmv, *.mpg, *.mpeg, *.dat, *avi, *.mov, *.mp4, *.rm
AUTO, 4:3, 16:9, FULL SCREEN
1080p 1080i 720p 576i 480p
WMA, WMA Pro, WMV, MEPG, AAC, HE-AAC, OGG,
OGA, FLAC, ALAC, Ape, M4A, RM, MPEG-1layer1/2,
MPEG-2 Layer II, Dolby Digital/Digital Plus
NTFS, FAT32, EXT3, EXT4
4 x USB2.0
AC 100 – 240V 50 – 60Hz
DC 12V 1.5A
Tuner In, Ethernet RJ45 Port, HDMI Out, DC IN,
OPTICAL Out
v4.0
128 (140 with F type connector) x 128 x 12mm
194g
English
Back to Content
-51--50-
Page 29
10. Warranty
This product is guaranteed for twelve months from the date of the original
purchase. In the unlikely event of any defect arising due to faulty materials
or workmanship, the unit will be either replaced or repaired free of charge
(where possible) during this period. An alternative product will be offered in
case the product is no longer available or repairable.
This warranty is subject to the following conditions:
The warranty is only valid within the country where the product is
purchased.
The product must be correctly installed and operated in accordance to
the instructions given in this user manual.
The product must be used solely for domestic purposes.
The warranty only covers the main units, and does not cover the
accessories.
The warranty does not cover the damage caused by misuse,
negligence, accident and natural disaster.
The warranty will be rendered invalid if the product is resold or has been
damaged by inexpert repairs. The manufactures disclaim any liability for
incidental or consequential damages.
Please consult our customer adviser before returning any product; we
are not responsible for any unexpected product returns.
Any faulty product must be kept and returned in the original packaging
with all the accessories and the original copy of the purchase receipt.
The warranty is in addition to, and does not diminish, your statutory or legal
rights.
Customer Service:
Telephone: +44 (0) 845 250 0586
Email: [email protected]
English
Back to Content
This product is in compliance with the essential requirements and other
relevant provisions of Directive 1999/5/EC. The declaration of conformity
may be consulted at August International Ltd, Unit 5 Swains Mill, Crane
Mead, Ware SG12 9PY, England.
Manufactured under license from Dolby Laboratories.
Dolby and the double-D symbol are trademarks of Dolby Laboratories.
-52-
-53-
 Loading...