

Page 1
August International Ltd
United Kingdom
Telephone:+44 (0) 845 250 0586
www.augustint.com
DVB500
EN
FR
DE
IT
ES
Android and DVB-T2 Box
Empfängt DVB-T und DVB-T2 (H.265)
Decoder DVB-T2 Android
Sintonizador DVB-T2 y Android
Décodeur DVB-T2 Android
Page 2
-1-
English
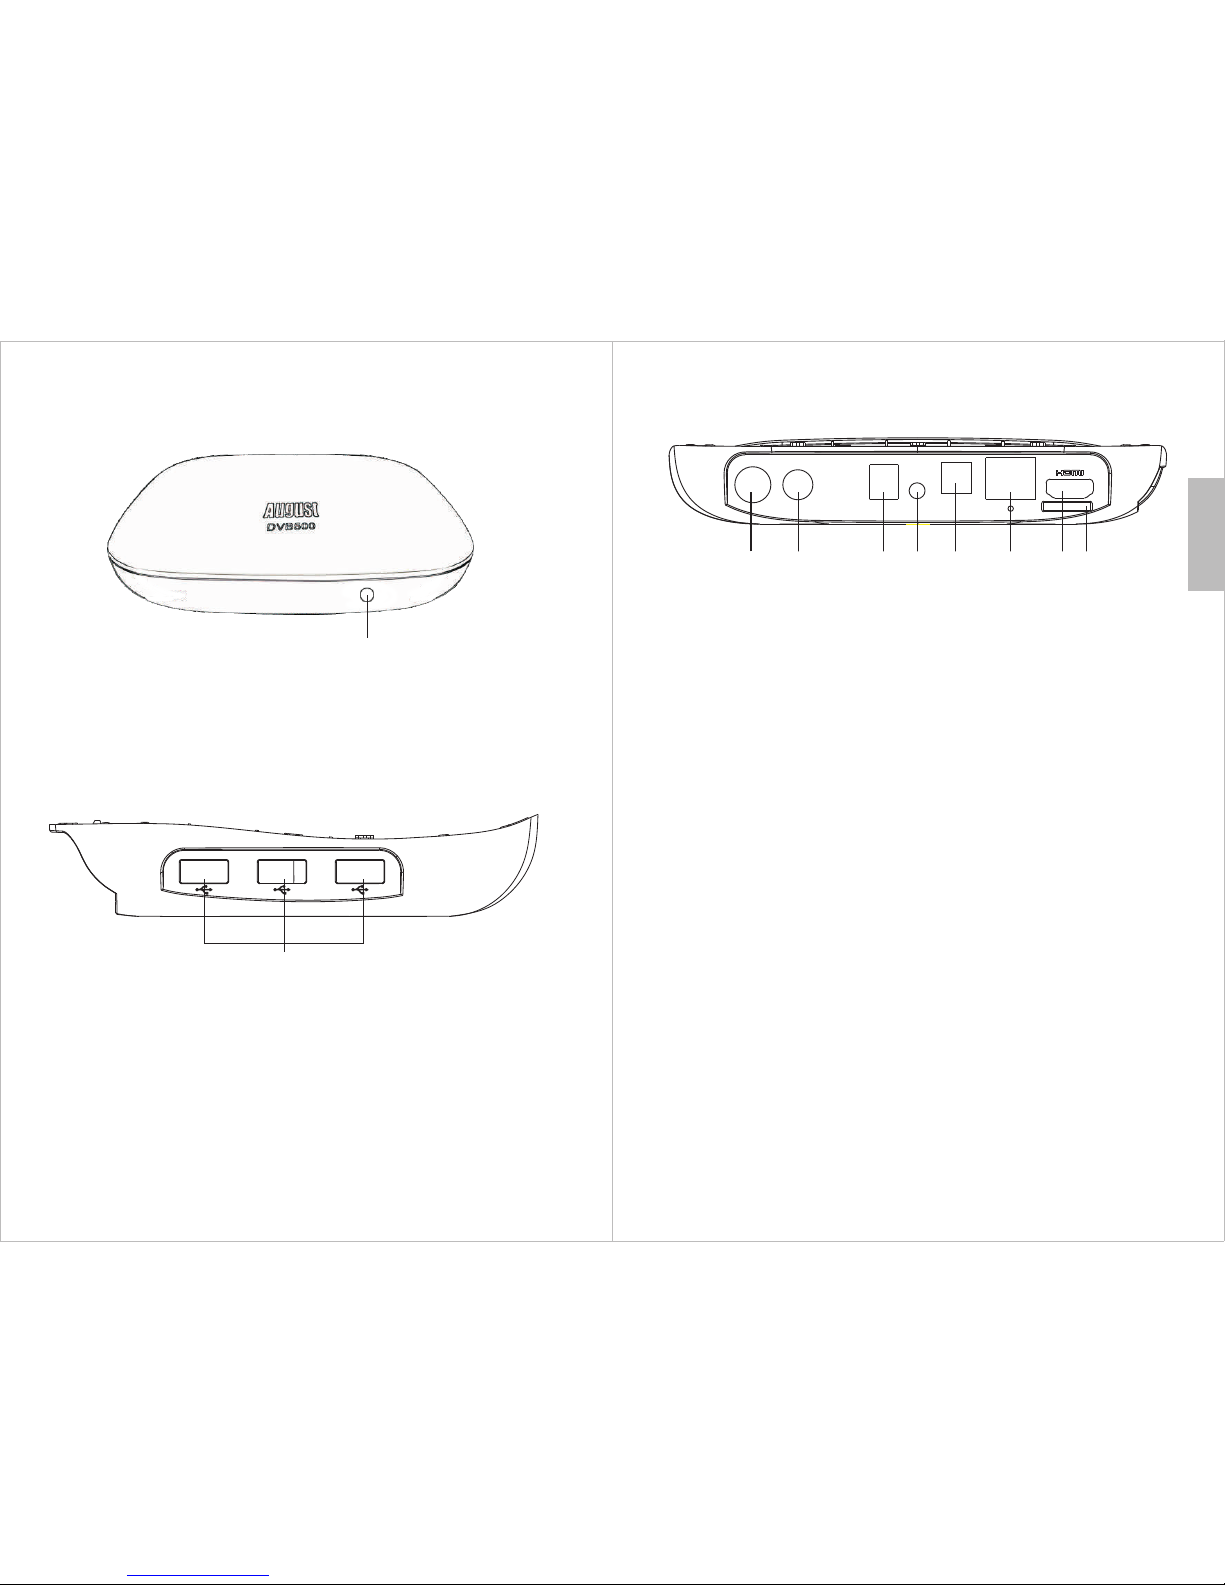
1.1 Front Panel
2
2. USB ports
1.3 Back Panel
3. RF in (antenna input)
4. RF Loop through Port
5. Power DC in
6. A/V out
1. Part Names and Functions
RF IN
RF OUT
DC IN
AV OUT OPTICAL
LAN
RESET
TF
3 4 5 6 7 8 109
7. Audio Optical out
8. Network interface
9. HDMI out
10. TF card reader
1
1. Status LED
1.2 Left Side
-2-
Page 3
-3-
English
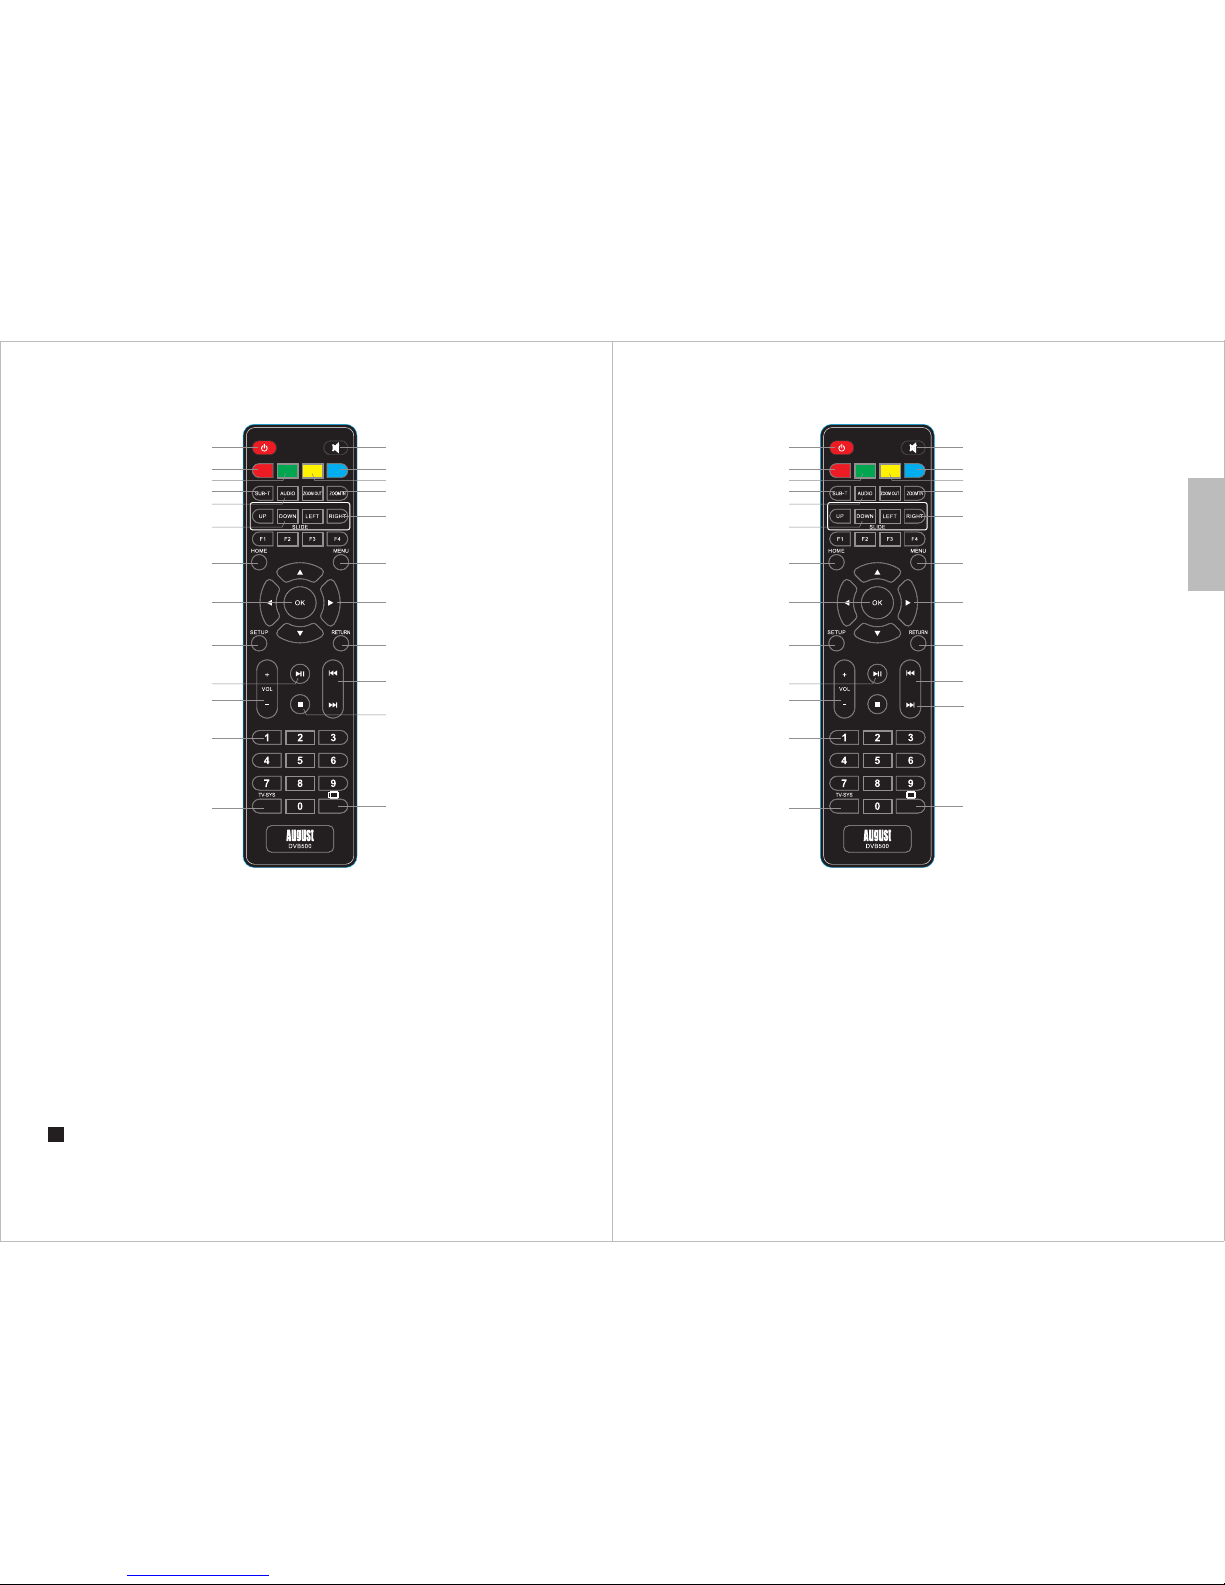
1 P owe r
2 - Red but ton
3 - Green b utt on
4 - Subti tle
5 - Audio
6 - Scrol l up an d dow n
7 - Home
8 - Confi rm
9 - Setup
10 - Play /Pa use
11 - Volu me up/down
12 - Numb ers
-
Functionality depends on the application
-4-
1.4 Remote Control
1 14
2 15
4
17
18
7 19
3 16
6
8 20
9 21
11
22
10
23
12
13
24
5
1.4.1 General
13 TV/Sy s
14 - Mute
15 - Blue b utt on
16 - Yellow b utt on
17 - Zoom i n and Z oom o ut
18 - Slid e lef t and S lid e right
19 - Menu
20 - Dire cti ona l But tons
21 - Back O ne Le vel
22 - Next a nd Pr evi ous
23 - Stop
24 - Aspec t Rat io / Lo ng pr ess to
activ ate M ous e fun ction
-
1.4.2 TV Mode (Live TV)
1 P owe r
2 - Image R ati o
3 - Chann el In for mat ion
4 - Subti tle M enu
5 - Audio La ngu age S ele ction
6 - Chann el Li st
7 - Home
8 - Chann el Li st
9 - Syste m set tin gs
10 - Set or r emo ve Fa vou rite
chann el Pl ay/ Pau se when
using Ti meS hif t
11 - Volu me up/down
12 - Numb ers
13 - Chan ge HD MI Re sol ution
14 - Mute /un mut e the s ound
15 - Blue B utt on
-
16 - Yellow B utt on
17 - TV S ettings
18 - Chan nel L ist
19 - TV S etting
20 - Up - Cha nne l Up
Down - Ch ann el Do wn
Left, R igh t - Cha nne l informat ion
21 - Retu rn / Ho me pa ge
22 - Not av ail abl e in TV m ode
23 - Audio S ter eo/ Lef t/Right
24 - Reca ll La st Ch ann el
F1: EPG
F2: TTX
F3: Pro gra m Inf orm ation
F4: Time d Rec ord
1 14
2 15
4
17
18
7 19
3 16
6
8 20
9 21
11
22
10
23
12
13
24
5
Page 4
-5-
English
-6-
2. Connection
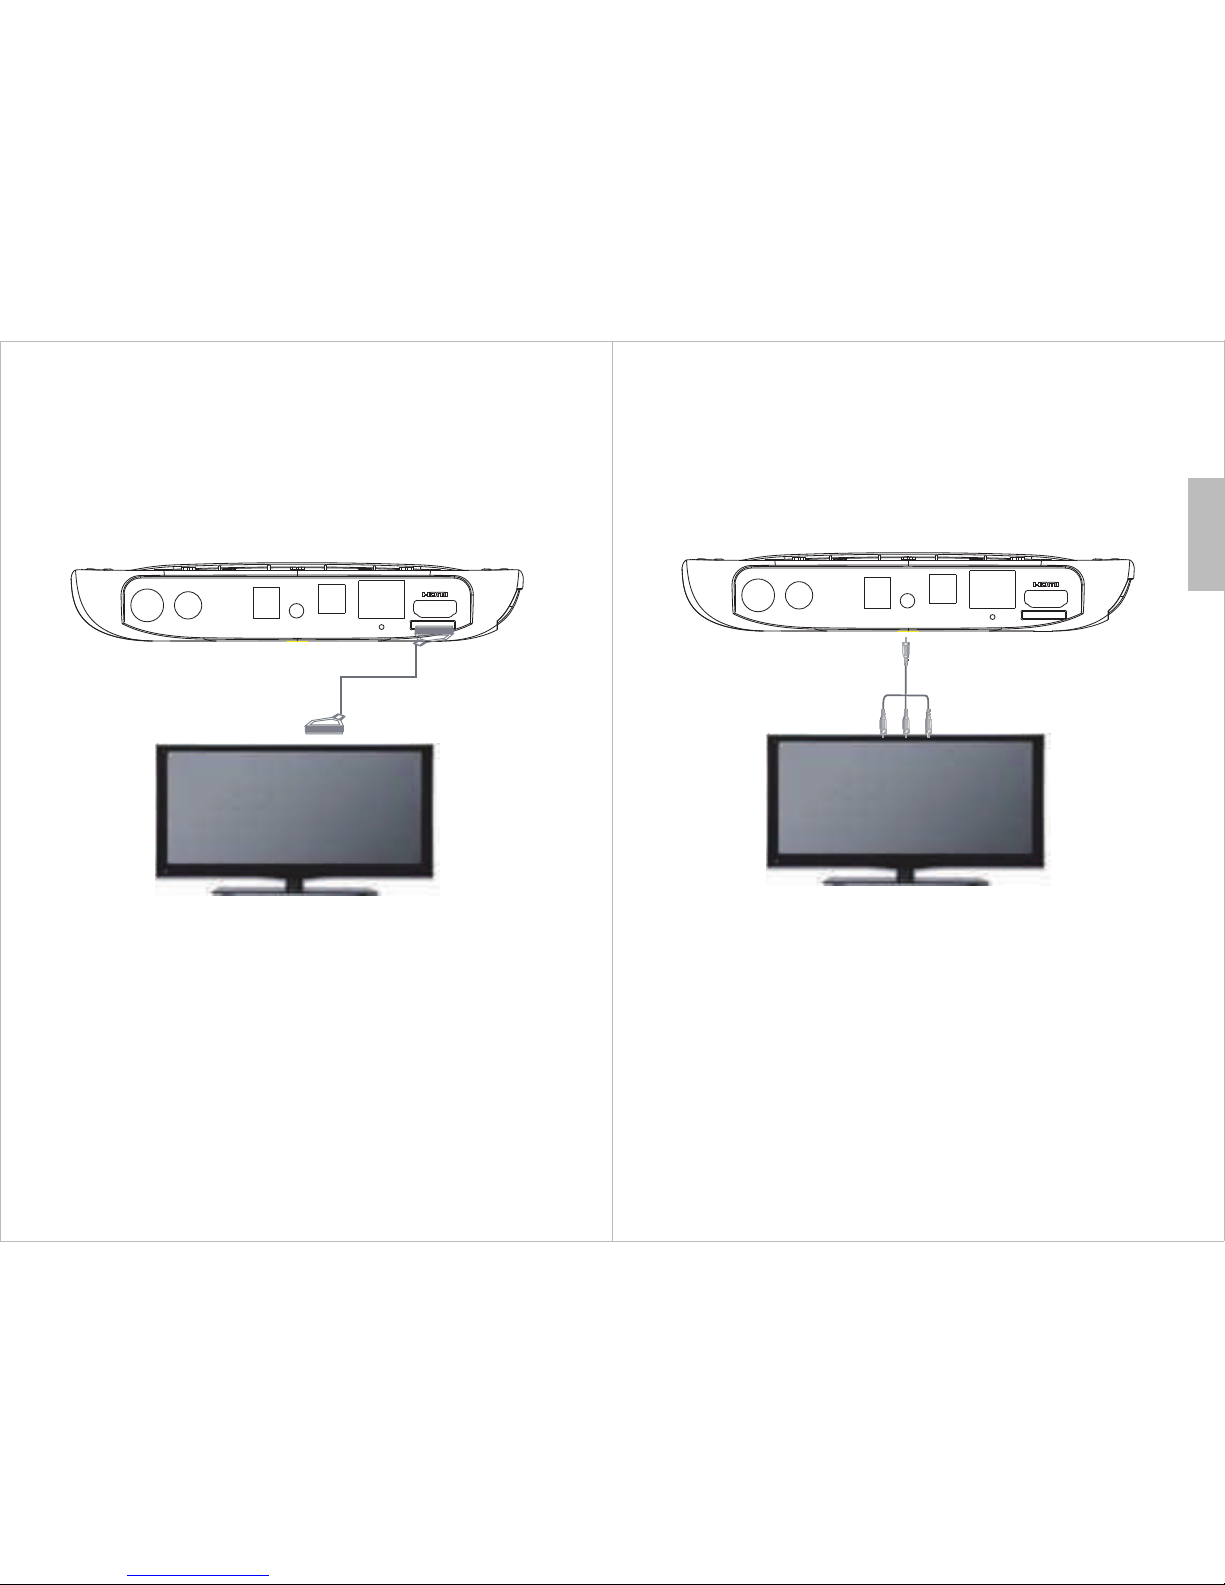
2.1 HDMI Connection
1) Switch off both the DVB500 and your TV.
2) Connect the DVB500 to your TV using the provided HDMI cable.
3) Turn your TV and the DVB500 on.
4) Set your TV input to the correct HDMI port.
RF IN
RF OUT
DC IN
AV OUT OPTICAL
LAN
RESET
TF
HDMI connection cable
2.2 AV Connection
1) Switch off both the DVB500 and your TV.
2) Connect the DVB500 to your TV using the provided AV cable.
3) Turn your TV and the DVB500 on.
4) Set your TV input to the correct AV port.
RF IN
RF OUT
DC IN
AV OUT OPTICAL
LAN
RESET
TF
A/V connection cable
Page 5
-7-
English
-8-
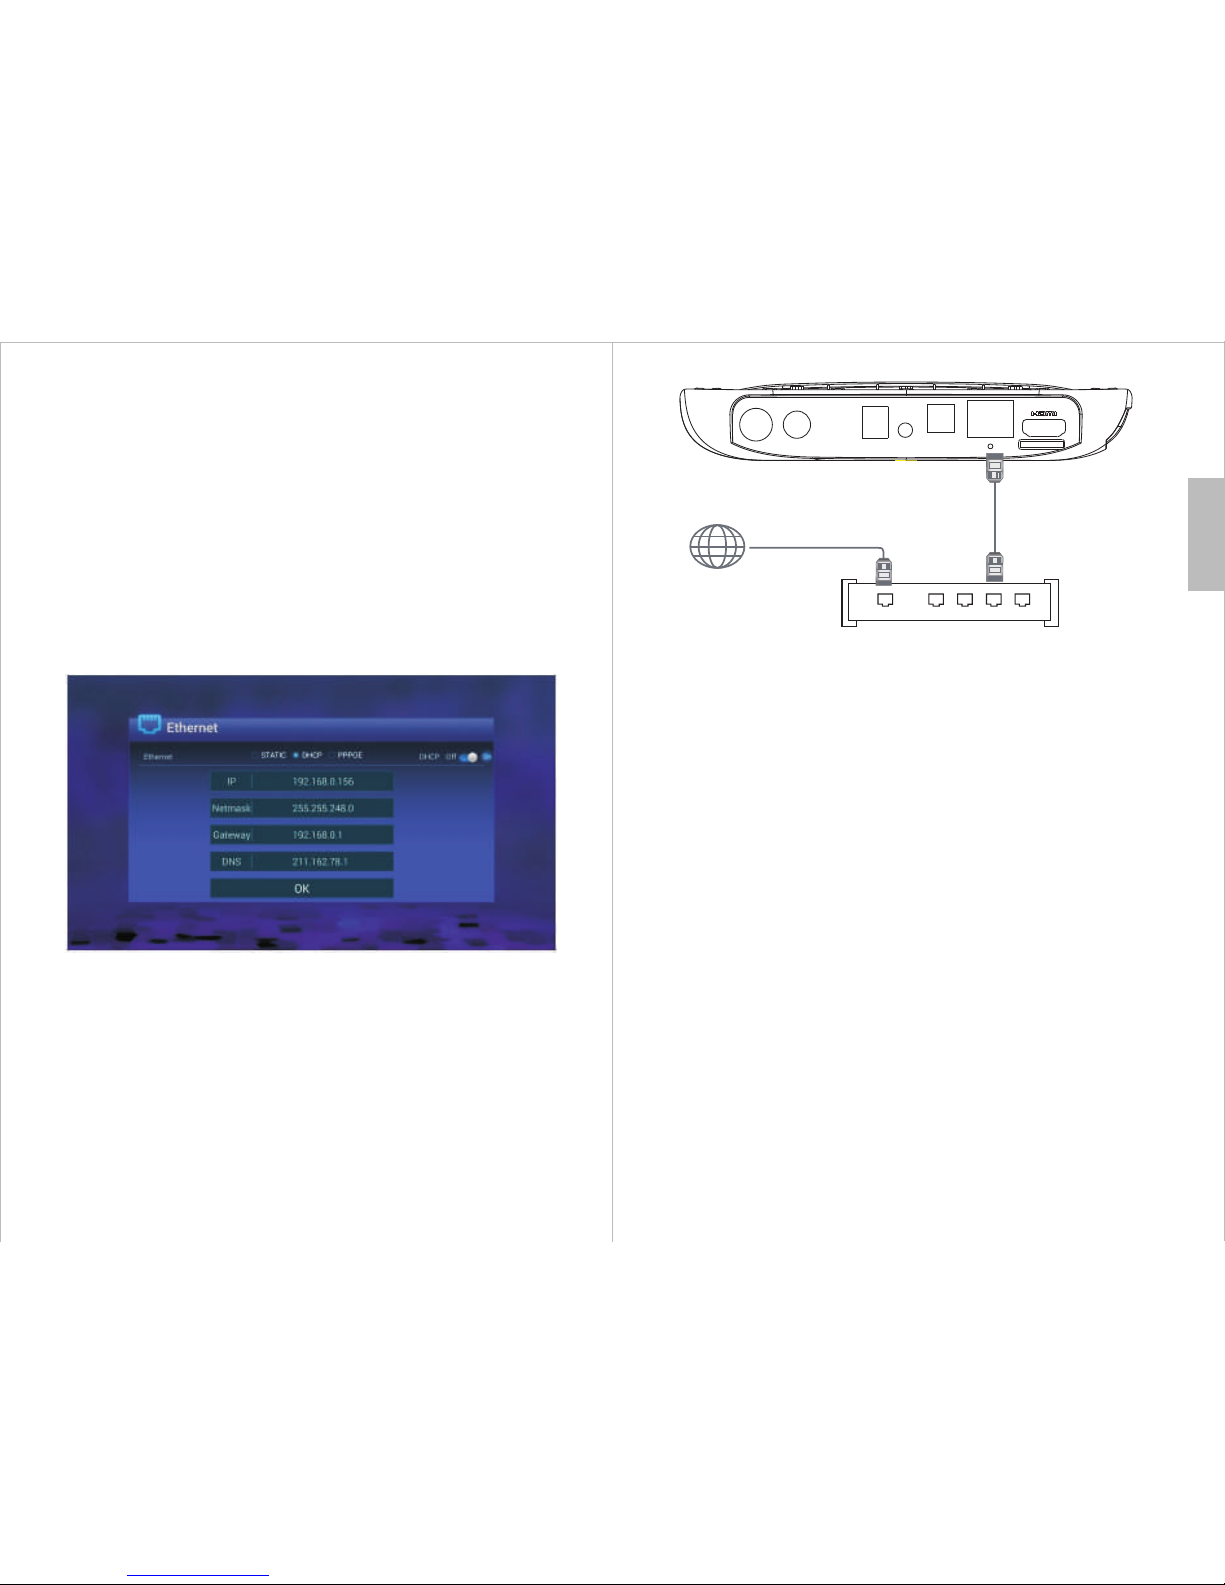
2.3 Ethernet Connection
1) Connect the DVB500 to your router using an ethernet cable.
2) Select settings from the home screen.
3) Select Ethernet from the settings menu.
4) Enable DHCP.
Note: If DHCP is not enabled on your router, you will need to manually input
your IP address.
2.4 Wi-Fi Connection
If you are unable to connect to the internet using a wired connection, the
DVB500 is able to connect wirelessly to your router. Please note that, for
video streaming, an internet bandwidth of at least 2Mbps is recommended.
To stream HD movies from an internal network an Ethernet cable connection
is recommended.
1) Select settings from the home screen.
2) Select Wi-Fi from the settings menu.
3) Select your Network from the Network list.
4) Use the on screen keyboard to insert password.
5) Press RETURN.
6) Select OK to finish.
RF IN
RF OUT
DC IN
AV OUT OPTICAL
LAN
RESET
TF
Broadband Internet connection
Internet
Broadband Router/Modem
Wired Network
Page 6
-9-
English
-10-
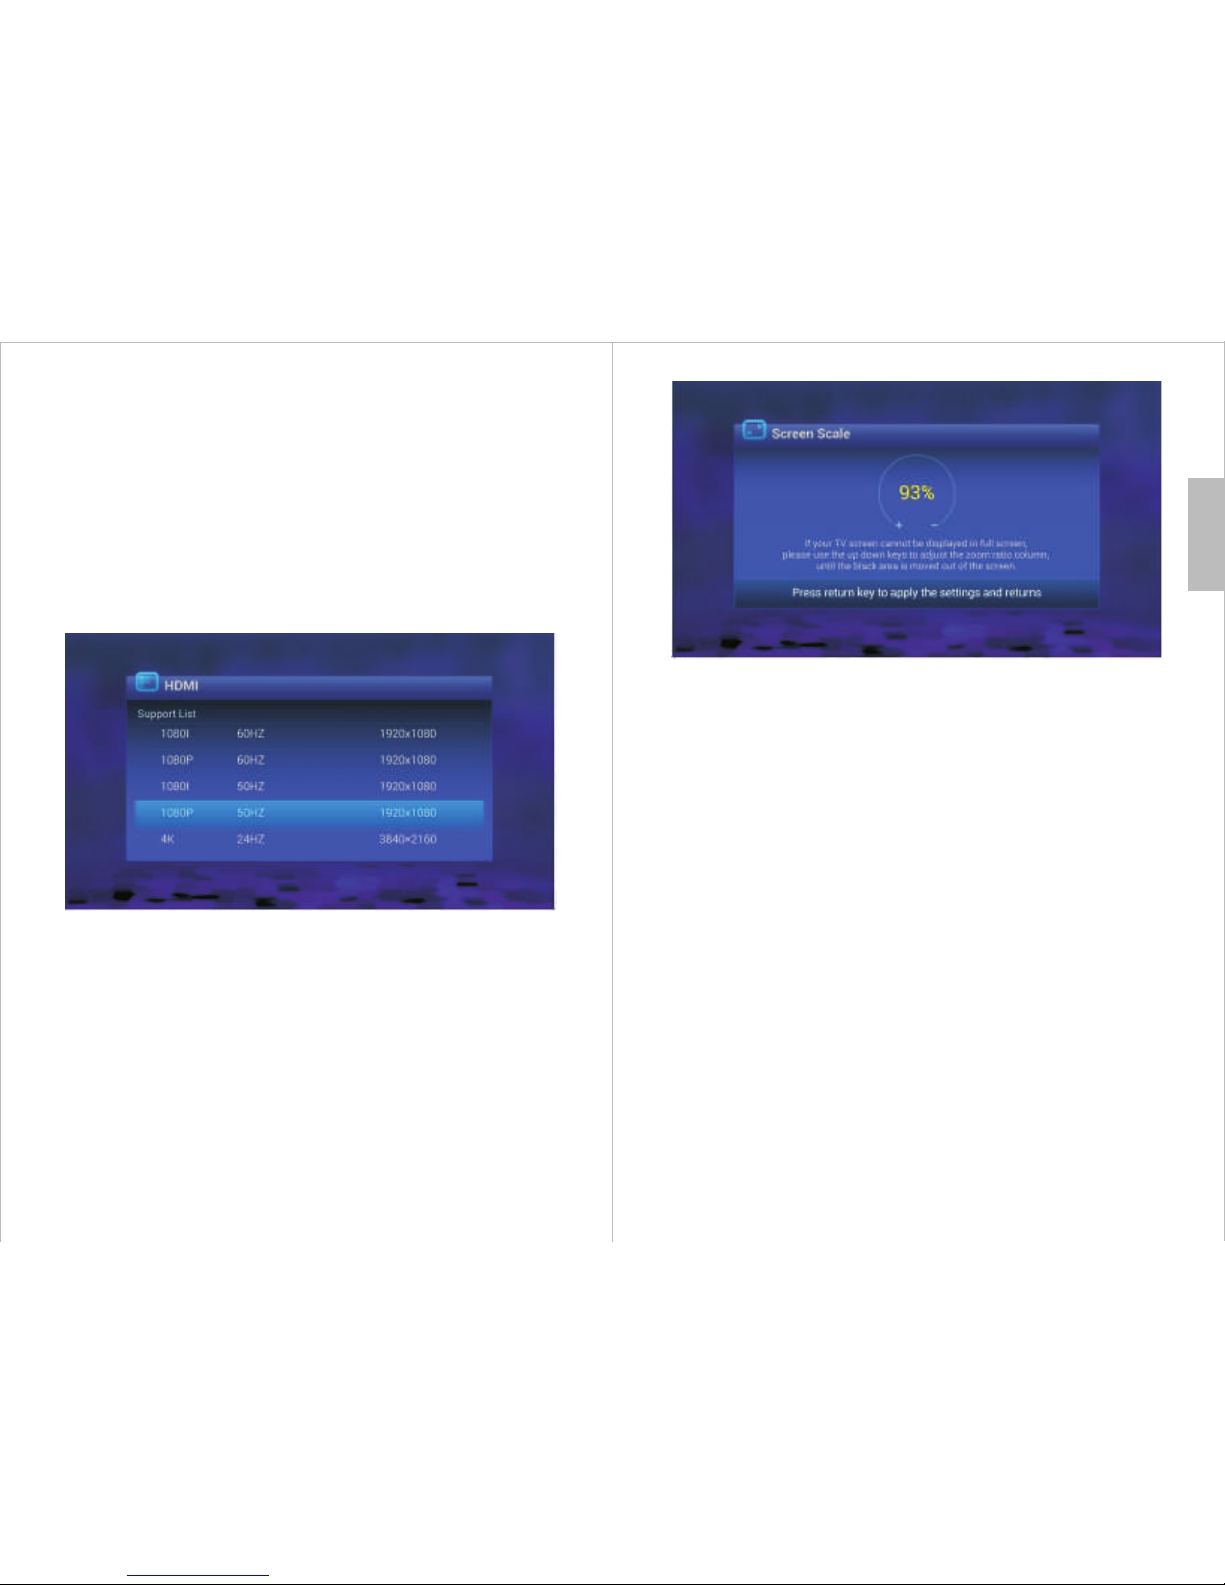
3. Unit Operation
To set the HDMI resolution:
1) Select settings from the home screen.
2) Select HDMI from the settings menu.
3) Select the correct resolution for your TV.
4) Select OK to confirm.
Note: The setting changes are automatically cancelled after 15 seconds
unless confirmed.
3.1 HDMI Settings
3.2 Screen Scale Settings
If the edges of your screen are clipped or there are black borders around the
image, you can adjust the screen size by:
1) Select settings from the home screen.
2) Select Scale from the settings menu.
3) Use <▲> and <▼>to set the screen scale.
4) Press Return to confirm.
3.3 Time and Date Settings
If you are connected to the internet, the time and date will be set
automatically. To set the time and date manually:
1) Press Setup.
2) Select “date & time” from the setup menu.
3) Uncheck Automatic “date & time”.
4) Select “Set date” and set the correct date.
5) Select “Set time” and set the correct time.
6) Select “Select time zone” and set the correct time zone.
7) Select "Done" or press "Return" on the remote to confirm.
8) Press RETURN to exit the setup menu.
Page 7
-11-
English
-12-
4. Digital TV
The DVB500 can be used to watch, record and playback Live TV. To launch
the Live TV app, select it from the homescreen.
Please note that the TV signal strength in some areas may not be
sufficient to support TV reception using a portable antenna. The distance
from the closest transmitter and other factors such as surrounding
buildings, the walls of your house, weather and electromagnetic
interference caused by power and telecommunication infrastructure may
affect signal strength. Changing location may improve signal reception
and a rooftop antenna designed for digital TV can be used to achieve the
best possible reception.
4.1 TV Setup
If there are no channels saved to the DVB500, it will ask you to scan.
Selecting yes will launch the search menu. To access the search menu to
scan once channels have been saved, press menu and select SEARCH.
After channels have been saved to the DVB500, when the Live TV app is
opened it will resume playing the last watched channel.
Before performing a scan, select Area from the search menu and select
the country that you are currently in.
4.1.1 Automatic Scan
1) Select Auto Scan.
2) Wait whilst the DVB500 searches for available channels.
3) Once the progress bar reaches 100% press return to exit.
4.1.2 Manual Scan
Manual scan is used to search a specific channel or frequency (VHF or UHF
band). It also allows the user to edit the frequency, change the channel
bandwidth and perform a signal check on a channel or frequency.
4.1.2.1 Scan By Channel
1) Select Manual Scan.
2) Select Scan Band and choose the band to scan.
3) Select Channel and choose the channel to scan.
4) Select Search to begin the scan.
5) Once the progress bar reaches 100% press return to exit.
4.1.2.2 Scan by Frequency
1) Select Manual Scan.
2) Select Scan Mode and choose By Frequency.
3) Select Frequency and choose the frequency to scan.
4) Select Bandwidth and choose the bandwidth to scan.
5) Select Search to begin the scan.
6) Once the progress bar reaches 100% press RETURN to exit.
4.1.3 Signal Check
Signal check shows information regarding the strength and quality of signal for
the currently playing channel. To perform a signal check.
1) Select Manual Scan.
2) Select Signal Check.
Page 8

-13-
English
-14-
5. Program Menu
The Pro gram Menu gives ac cess to t he sett ings fo r saved c hanne ls,
the PVR , EPG and recordin gs.
5.1 Channel Manager
To enter ch annel manager, se lect Ch annel M anage r from th e progr am
menu an d insert the passw ord. The def ault pa sswor d is ‘000 0’ .
Doubl e pressing OK on a sel ected c hanne l opens a c hanne l edit me nu.
5.1.1 R ename a Channel
To change t he name of a channel :
1) Sele ct the channel in th e chann el mana ger win dow.
2) Pres s F3 and use the onscr een key board t o renam e.
3) Pres s OK to con firm the ne w name or R ETURN t o cance l.
5.1.2 L ock a Channel
1) Sele ct the channel in th e chann el mana ger win dow.
2) Pres s the blue button to l ock or un lock.
5.1.3 D elete a Channel
1) Sele ct the channel in th e chann el mana ger win dow.
2) Pres s the red button.
3) Sele ct OK to co nfirm or RE TURN to c ancel .
5.1.4 F avourite chann el
1) Sele ct the channel in th e chann el mana ger win dow.
2) Pres s the play/pause b utton t o add or re move fa vouri te.
5.2 EPG (Electronic Pr og ra m Gu id e)
In the EP G, you ca n view the pr ogram g uide an d sched ule rec ordin gs.
To access t he EPG, select EPG f rom the p rogra m menu or p ress F1 o n
the rem ote.
5.2.1 V iew Pro gram Gu ide
To view the p rogram guide of cu rrent ly play ing and u pcomi ng prog rams
for a cha nnel:
1) Sele ct the channel in th e left EP G windo w
2) The gu ide for the channe l will ap pear in t he righ t EPG win dow
5.2.2 S chedule a Record ing or Re minde r
To schedu le a recording or re minde r from th e EPG:
1) Sele ct the channel tha t the pro gram is o n in the le ft EPG wi ndow
2) Pres s the right arrow to m ove to th e right E PG wind ow.
3) High light the progra m to reco rd and pr ess OK.
4) Set th e repeat setting f rom Onc e/Dai ly/Weekl y.
5) Set mo de to Record to reco rd or View to re mind.
5.3 PVR Settings
The PVR s ettings menu all ows you t o choos e the sto rage de vice yo ur
PVR rec ords to and the size o f the Time shift b uff er.
5.4 Recordings
The Rec ordings menu all ows you t o view an d delet e your pr eviou s
recor dings. To access t he reco rding s menu, s elect R ecord ings from
the pro gram menu and inpu t your pa sswor d. Th e defau lt pass word is
0000.
To play a rec ording, highli ght it an d press t he yell ow butt on.
To previe w a recording, hig hligh t it and pr ess the r ed butt on.
To delete a r ecording, high light i t and pre ss the bl ue butt on.
To access s orting and searc h optio ns, pre ss OK.
5.5 Time Shift
Tim e Shift a llows y ou to pau se and re wind live TV, it tempo raril y saves
the cur rently playing c hanne l to your s torag e devic e. To act ivate the
Tim e Shift f uncti on, sel ect Time S hift fr om the prog ram men u and
follo w the on screen inst ructi ons.
Note: A n external stora ge devi ce (USB o r Micro S D card) i s requi red to
use thi s function.
Page 9

-15-
English
-16-
6. System Menu
The Sys tem Menu allows yo u to mana ge the re call se tting s, subt itles ,
passw ords, parental c ontro l, Tele text an d anten na powe r options .
6.1 Recall Settings
Recal l settings are use d to cont rol the a mount o f previ ously p layed
chann els the recall but ton scr olls th rough . Selec t 1 to swit ch betw een
the las t 2 channels playe d. 3 to swi tch bet ween th e last 3 ch annel s
playe d and 5 to switch betw een the l ast 5 cha nnels p layed .
6.2 Subtitles
Selec t Subtitles from t he Syst em menu t o toggl e betwe en subt itles o n
and off .
6.3 Factory Reset
Facto ry Reset, remove s all sav ed chan nel and r ecord ing inf ormat ion
from th e Live TV a pp. To perfo rm a fact ory res et:
1) Sele ct Factory Reset f rom the S ystem M enu.
2) Inpu t your password. D efaul t passw ord is 00 00.
3) Sele ct Yes to confirm or No to c ancel .
6.4 Set Password
A passwo rd is used to protec t your re cordi ngs, se t up pare ntal co ntrol s
and to lo ck the factory res et opti on. To set you r passw ord:
1) Sele ct Set Password fr om the Sy stem Me nu.
2) Ente r the current pass word. D efaul t passw ord is 00 00.
3) Ente r your new passwor d in both b oxes.
4) Sele ct OK to co nfirm.
6.5 Parental Control Age
To set the pa rental control a ge:
1) Sele ct Parental Cont rol Age fro m the Sys tem Men u.
2) Ente r the current pass word. D efaul t passw ord is 00 00.
3) Sele ct the age restric tion ag e.
4) Sele ct Yes to confirm or No to c ancel .
6.6 TTX Region
To set the TT X regio n:
1) Sele ct TTX Re gion fr om the Sy stem Me nu.
2) Sele ct the TT X Regio n.
3) Sele ct Yes to confi rm or No to c ancel .
6.7 Antenna Power
The DVB 500 can supply pow er to an an tenna a mplif ier thr ough th e
coaxi al socket. If your a ntenn a suppo rts thi s featu re, you s hould s witch
anten na power on. To switc h antenna power on a nd off selec t Antenn a
Power i n the System Menu an d press O K.
7 OSD Display Time
The amo unt of time an on scre en disp lay app ears fo r can be ad juste d.
To change t he on screen displ ay time :
1) Sele ct OSD Display Time
2) Sele ct the display tim e.
3) Sele ct Yes to confi rm or No to c ancel .
NOTE: T he Aspec t Ratio a nd Audio L angua ge opti ons in th e AV menu
are not u sed by the DVB500.
8. Live Recording
The DVB 500 can be set to reco rd what y ou are wa tchin g for a set
lengt h of time. To record :
1) Pres s F4 to open the Timer se tting .
2) Inpu t the amount of time t o recor d for.
3) Sele ct Yes to confi rm or No to c ancel .
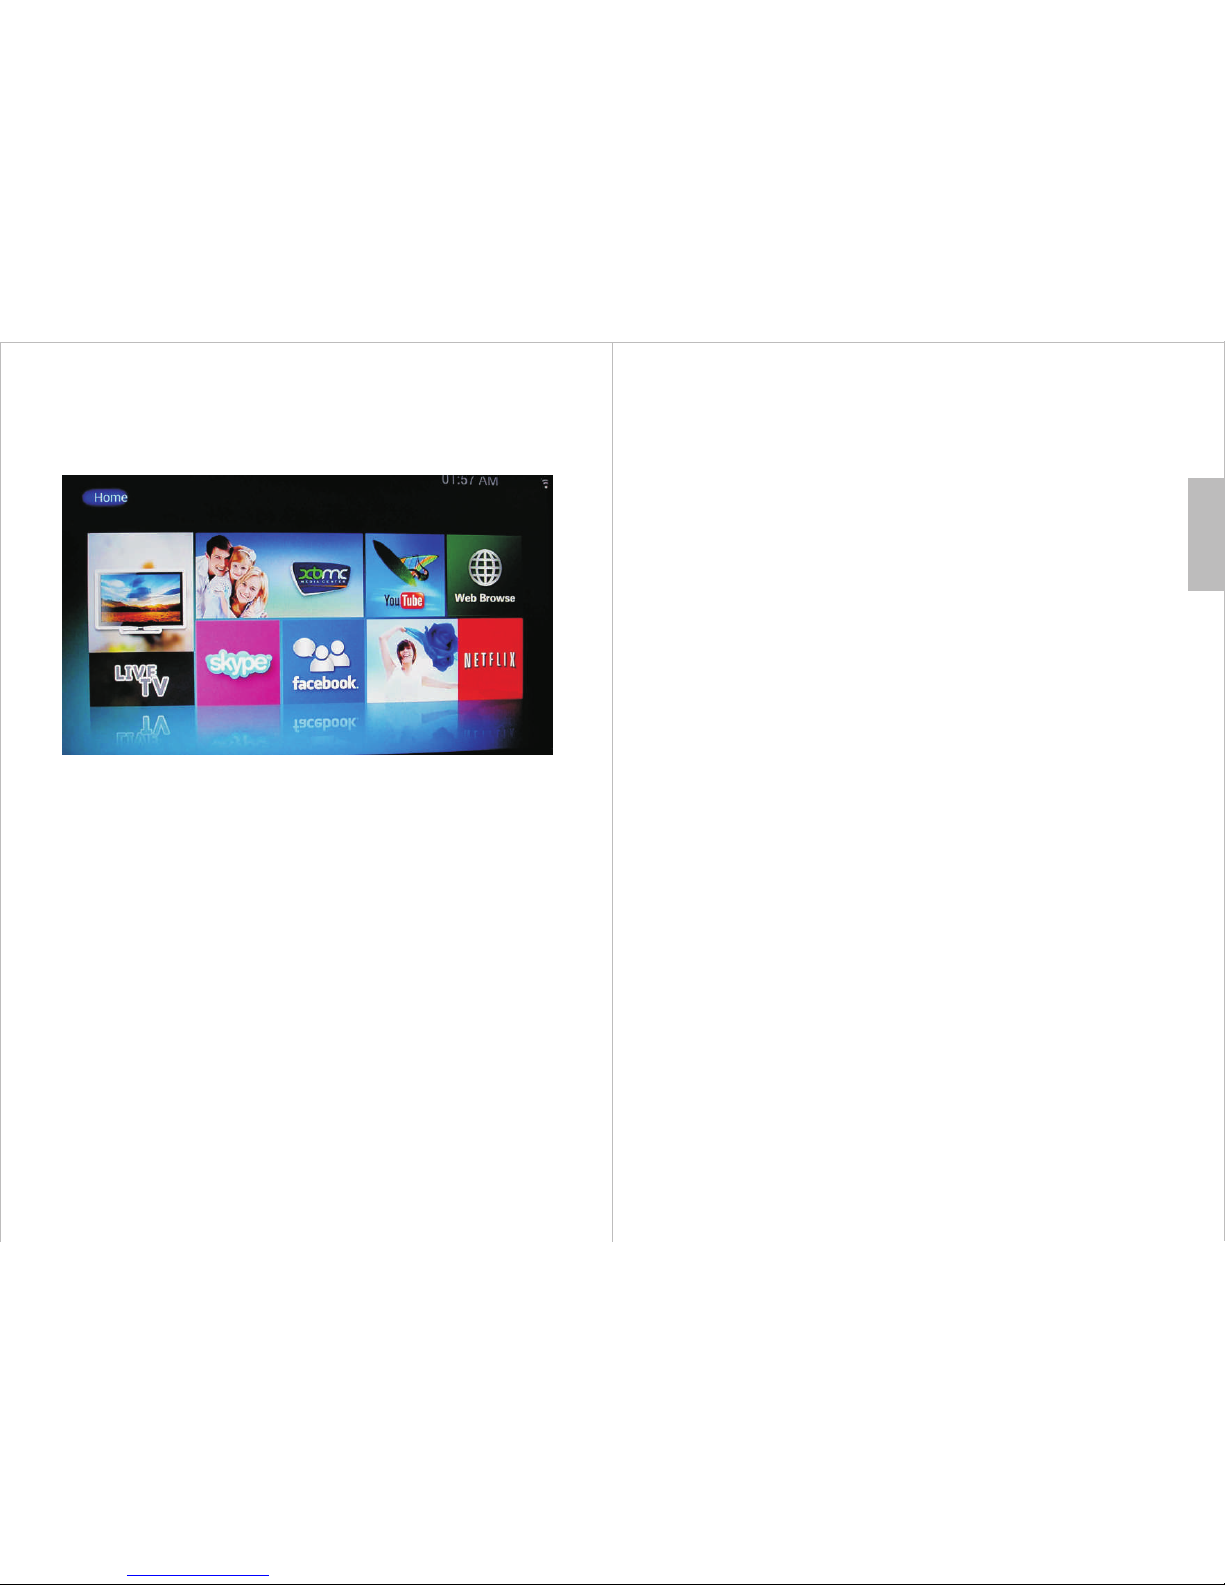
9. Home
The hom e screen gives acc ess to th e prein stall ed Apps, p ress HO ME
to acce ss it and use the arro w keys an d OK to lau nch an ap p.
.
Page 10

-17-
English
-18-
10. Apps Center
10.1 Play Store
To access t he Play Store and in stall n ew APPs, s elect P lay Sto re from
the Apps C enter menu.
10.2 My APPs
All you r installed APPs ca n be foun d in My APPs, t o launc h an APP
highl ight it in the My Apps sc reen an d press O K.
10.3 Media Player
The Med ia Player allows y ou to bro wse and o pen vid eo, pic ture an d
audio f iles from your sto rage me dia. To open the M edia Pl ayer, se lect it
from th e APPs Center menu.
10.4 Quick Launch
Selec t the Quick Launch i con to ad d APPs to th e Apps Cen ter men u. To
add app s:
1) Sele ct the Quick Launc h icon fr om the App s Cente r menu.
2) High light an App a nd pres s OK to add o r remov e it.
3) Pres s RETURN to confir m and exi t.
11 Smart Apps
Smart Ap ps are pre install ed apps t hat dis play th e news an d weath er,
speed u p the DVB500 and giv e acces s to Mira cast an d Media C enter.
11.1 Speed UP
Click t he Speed Up button o n the Sma rt Apps sc reen to k ill bac kgrou nd
proce sses and speed up th e DVB50 0.
11.2 Miracast
To send you r smartphone or ta blet sc reen to t he DVB5 00 usin g
mirac ast, select the mi racas t icon an d conne ct to DVB 500 thr ough
your sm artphone or tabl ets mir acast a pp.
NOTE: N ot all smartphon es and ta blets s uppor t mirac ast, pl ease
consu lt your devices us er manu al for de tails .
.
12 Settings
12.1 System Upgrad e
Syste m Upgrade allows y ou to ins tall up dated F irmwa re to you r
DVB50 0 when released.
12.2 Language
Langu age allow s you to ch ange th e langu age of th e on scre en menu s,
to chan ge the on screen lan guage :
1) Sele ct Language from t he Sett ings me nu.
2) High light the correc t langu age and p ress OK .
3) Pres s RETURN to confir m and exi t.
12.3 Bluetooth
Bluet ooth allows you to c onnec t Bluet ooth he adset s, keyb oards a nd
mice to t he DVB500. To conne ct a Bluetooth acc essor y:
1) Sele ct Bluetooth fro m the Set tings M enu.
2) Pres s OK to swi tch Bluet ooth on .
3) Sele ct Search to searc h for Blu etoot h acces sorie s.
4) High light the access ory and p ress OK t o pair.
5) High light the access ory and p ress OK t o Conne ct
6) Pres s RETURN to confir m and exi t.
12.4 Device Info
Selec ting Device Info f rom the S ettin gs Menu d ispla ys info rmati on on
the Andr oid version, Int ernet c onnec tion an d Firmw are cur rentl y
insta lled on the DVB500 .
12.5 Advanced
Selec ting Advan ced fro m the Set tings m enu acc esses t he Andro id
menu to g ive you control ov er Andro id spec ific se tting s.
.
Page 11

-19-
English
-20-
This pr odu ct is in co mpl iance w ith t he esse nti al requ ire ments a nd ot her
relev ant p rovis ion s of Dire cti ve 1999 /5/ EC. The decl ara tion of c onf ormit y
may be co nsu lted at Au gus t Inter nat ional L td, U nit 5 Swa ins M ill, Cr ane
Mead, Wa re SG12 9 PY, Eng lan d.
This pr oduct is guarant eed for t welve m onths f rom the d ate of th e
origi nal purchase. In t he unli kely ev ent of an y defec t arisi ng due to
fault y materials or wor kmans hip, th e unit wi ll be eit her rep laced o r
repai red free of charge ( where p ossib le) dur ing thi s perio d. An
alter native product w ill be offer ed in cas e the pro duct is n o longer
avail able or rep airab le.
This wa rranty is subjec t to the fo llowi ng cond ition s:
The war ranty i s only va lid wit hin the c ountr y where t he prod uct is
purch ased.
The pro duct mu st be cor rectl y insta lled an d opera ted in ac cordance
to the in struc tions giv en in thi s user ma nual.
The pro duct mu st be use d solel y for dom estic p urpos es.
The war ranty o nly cov ers the m ain uni ts, and d oes not c over th e
acces sories.
The war ranty d oes not c over th e damag e cause d by misu se,
negli gence, acciden t and nat ural di saste r.
The war ranty w ill be re ndere d inval id if the p roduc t is reso ld or has
been da maged by inexper t repai rs. The manu factu res dis claim any
liabi lity for inciden tal or co nsequ entia l damag es.
Pleas e consult our cust omer ad viser b efore r eturn ing any p roduc t;
we are no t responsible fo r any une xpect ed prod uct ret urns.
Any faul ty product must be k ept and r eturn ed in the o rigin al
packa ging with all the ac cesso ries an d the ori ginal c opy of th e
purch ase receipt.
The war ranty is in additi on to, an d does no t dimin ish, yo ur stat utory o r
legal r ights.
Custo mer Service:
Telepho ne: +44 (0) 845 250 05 86
Email : service@augu stint .com
13.Warranty
 Loading...