

Page 1
August International Ltd
United Kingdom
Tel:+44 (0) 845 250 0586
www.augustint.com
DV B-T2 HEVC TV Receiver a nd Multim edia Player
Ri cevitore TV D VB-T2 HEV C e Lettor e Multimediale
Si ntonizador T DT HD DVB- T2 HEVC y R eproductor Multimedi a
Ré cepteur TNT H D DVB-T2 H EVC avec M ultimédia Player
DV B-T2 HEVC TV Receiver u nd Multim edia Player
DVB425
EN
FR
DE
IT
ES
Page 2

User Manual
Thank you for purchasing the August DVB425 TV Receiver. You may
already be familiar with using similar products but please take the time to
read these instructions carefully. They are designed to familiarise you with
the product’s features and to ensure that you get the very best from your
purchase.
Please read the safety instructions before using this product to ensure
your safety and the safety of others.
Please ensure the product and its accessories are disposed in
compliance with WEEE (Waste Electrical and Electronic Equipment)
Directive and any other applicable regulations. Please check with your
local authority for current disposal regulations.
If you need help, please contact our customer service:
Telephone: +44 (0) 845 250 0586
Email: [email protected]
Safety
Disposal
Declaration of Conformity
The Declaration of Conformity can be found on our website at
http://www.augustint.com/en/declaration/
Customer Service
English
Page 3

Contents
English
Quick Start Guide
DVB4 25
1. It is recommended that you use a rooftop aerial when searching for TV channels
for the first time.
2. Connect the DVB425 to a TV or monitor using the provided HDMI cable or a
SCART cable
3. Optionally, connect the DVB425 to a wired internet connection using an Ethernet
cable.
4. Connect the DVB425 to the mains power and press the power button on the
remote control or the box to switch on the device.
5. When you turn on the device for the first time, the Installation Guide will appear.
Select the desired Country, OSD Language, Resolution and Aspect Ratio, then
press to start the automatic channel scan. Once the search has finished, press
or to select channels. Press TV/RADIO to switch between Freeview TV and
Radio channels.
6.If you have performed the installation process before and would like to search for
channels again, press and go to Channel Search, select Auto Search,
then press to start a new search. Once the search has finished, press or
to select channels. Press TV/RADIO to switch between Freeview TV and Radio
channels.
7. To play music, photos, movies or PVR recordings from a USB storage device,
insert the storage device into the USB port, press and go to Media
Player. Choose between Music, Photo, Movie or PVR and press to view the file
list. Then, select a file and press to Play.
8. Please note that the signal strength in some areas may not be sufficient to
support TV reception using a portable aerial. The distance from the closest
transmitter and other factors such as surrounding buildings, the walls of your house,
weather and electromagnetic interference caused by power and telecommunication
infrastructure may affect signal strength. Changing location may improve signal
reception and a rooftop aerial designed for digital TV can be used to achieve the
best possible reception.
9. For any further queries, please telephone the August International Ltd helpline on
+44 (0) 845 250 0586 or email [email protected]
OK
▲ ▼
MENU
OK ▲ ▼
MENU
OK
OK
1. Sa fety Ins truct ions - ----- ------------ ----- ----- ----- ----- ----- ---1
2. Main Featu res -- ----- ------------ ----- ----- ----- ----- ----- ----- ---2
3. Box Co ntent s ----- ------------ ----- ----- ----- ----- ----- ----- ----- -2
4. Pa rt Na mes and Funct ions - ----- ----- ------------ ----- ----- ---3
4.1 Front ----- ----- ------- ----- ----- ----- ----- ----- ----- ----- ----- ----- -3
4.2 Back --- ----- ----- ----- ------- ----- ----- ----- ----- ----- ----- ----- ---3
4.3 Rem ote C ontro l --- ----- ------- ----- ----- ----- ----- ----- ----- ----- 4
4.3 .1 Rem ote B utt on Fu nct ion s----- ----- ----- ----- ------------ ----- ----- ----4
4.3 .2 Use of the Rem ote Cont rol --- ----- ----- ----- ----- ----- ------------ ----- 5
5. Conn ectio n ------ ----- ------------ ----- ----- ----- ----- ----- ----- --6
6. Oper ation - ----- ----- ------------ ----- ----- ----- ----- ----- ----- ----7
6.1 Initia l Instal latio n ---- ----- ----- ------------ ----- ----- ----- ----- -7
6.2 TV Mo de (Quic k access to funct ions) --- ----- ----- ----- ---7
6. 2.1 Su bti tle ----- -- --------- -- ------- -- --------- -- ------- -- --------- -- ----7
6.2 .2 Cha nnel Inf orm ati on---- ------- ----- ----- -- ----- ----- ------- ----- ----- 7
6.2 .3 Chan nel Li st---- ----- ----- ----- ----- ----- ----- ----- ----- ------------ --8
6. 2.4 Te let ext --- -- ------- -- ------- -- ------- -- ------- -- ------- -- ------- -- ---8
6.2 .5 L ast Cha nne l Wa tched ---- ----- ----- ------------ ----- ----- ----- ----- --8
6. 2.6 EP G-- ------- -- ------- -- -- ------- -- ------- -- ------- -- ------- -- -- -----8
6. 2.7 T ime r-- -- ------- -- --------- -- ------- -- ------- -- --------- -- ------- -- --9
6.2 .8 Live Recor din g-- ----- ----- ----- ----- ----- ----- ----- ----- ----- ------- 10
6.2 .9 Ti me Shif t------------ ----- ----- ----- ----- ----- ----- ----- ----- ----- --10
6. 2.10 A udio --- -- ----- ------- ------- ------- ------- ----- -- ----- -- ----- -- ---11
6.2 .11 Col our b utto ns- ----- ----- ----- ----- ----- ----- ----- ----- ------------ -11
6.2 .12 Med ia Play er f rom USB Stor age- ----- ----- ----- ----- ------------ ----- 11
6.2 .13 Re corded P rogr ams --- ----- ------------ ----- ----- ----- ----- ----- ----11
6.3 Rad io Mode - ----- ----- ----- ----- ------------ ----- ----- ----- ----- 12
6.4 Med ia pl ayer ----- ----- ------- ----- ----- ----- ----- ----- ----- ----- 12
6.4.1 M usi c-- ------- ----- ------- ----- ------- ----- ------- ----- -- ----- ----- -1 3
6.4 .2 Ph oto Viewe r-- ----- ----- ----- ----- ----- ----- ----- ------------ ----- --13
6. 4.3 V ide o-- ------- ----- -- ----- ------- ------- ----- -- ----- ------- ------- --14
6. 4.4 P VR-- ------- ------- ------- ------- ------- ------- ------- ------- ------1 4
Page 4
7 Main Menu ( detai led ac cess to fu nctio ns) -- ----- ----- ----- 14
7.1 Chan nel-- ----- ----- ------- ----- ----- ----- ----- ----- ----- ----- ----- 15
7.1 .1 T V Cha nnel Ma nage r-- ----- ----- ----- ------------ ----- ----- ----- ----- 15
7.1 .2 Radi o C hann el Manager ----- ----- ----- ----- ----- ----- ----- ----- ----- -15
7.1 .3 Del ete All- ----- ----- ------------ ----- ----- ----- ----- ----- ----- ----- --16
7.1 .4 Cha nne l Pla y Type --- ----- ----- ------- ----- ----- ----- ----- ----- ----- -16
7. 2 Ch annel Sear ch ----- ----- ------------ ----- ----- ----- ----- ----- 16
7.2 .1 Aut o Se arch ----- ----- ----- ----- ----- ----- ----- ----- ----- ------------ 16
7.2 .2 M anu al Sear ch---- ------- ----- ----- ----- ----- ----- ----- ----- ----- ---16
7.2 .3 Aeri al Powe r----- ----- ----- ------------ ----- ----- ----- ----- ----- ----- 17
7.2 .4 Sta ndby Lo opt hrough- ----- ----- ----- ----- ----- ----- ----- ----- ----- ---17
7.2 .5 LCN ----- ----- ----- ----- ----- ----- ----- ----- ------------ ----- ----- ---17
7. 3 Sys tem Setup ---- ----- ----- ------- ----- ----- ----- ----- ----- ----1 7
7.3 .1 La ngua ge-- ----- ----- ------- ----- ------- ----- ----- -- ----- ----- ------1 8
7.3 .2 T V S yst em---- ----- ----- ------- ----- ----- ----- ----- ----- ----- ----- --18
7.3 .3 Date/ Time Set tings---- ----- ----- ----- ----- ----- ----- ----- ----- ----- -19
7.3 .4 Time r Set tin gs---- ----- ----- ------------ ----- ----- ----- ----- ----- ----1 9
7.3 .5 Par ent al Lock ----- ----- ----- ----- ----- ----- ----- ----- ----- ------- ----1 9
7.3 .6 OSD Se tti ngs --- ----- ----- ----- ----- ----- ----- ----- ----- ----- ------- -20
7.3 .7 Fa vourite --- ----- ----- ----- ----- ----- ------------ ----- ----- ----- ----2 0
7.3 .8 M ultiv iew Settings ----- ----- ----- ----- ----- ----- ----- ----- ----- ----- --20
7.3 .9 Auto Stan dby --- ----- ----- ----- ----- ----- ----- ----- ------- ----- ----- -21
7. 4 Tools --- ----- ------------ ----- ----- ----- ----- ----- ----- ----- ----- -21
7.4 .1 Info rmati on----- ----- ------- ----- ----- ----- ----- ----- ----- ----- ----- -21
7.4 .2 F act ory Res et---- ----- ----- ----- ----- ----- ----- ----- ----- ------------ 21
7.4 .3 Soft war e Upd ate- ----- ----- ----- ----- ------- ----- ----- ----- ----- ----- 21
7.4 .4 R emo ve USB Devi ce S afe ly ----- ----- ----- ----- ----- ----- ----- ----- --22
7. 5 Ne twork -- ----- ------- ----- ----- ----- ----- ----- ----- ----- ----- ---22
7. 6 Med ia Player ---- ----- ------------ ----- ----- ----- ----- ----- ----- 23
7.6 .1 USB Devi ce Infor matio n--- ----- ----- ----- ----- ----- ----- ----- ------- -23
7.6 .2 PVR Sett ing s----- ------------ ----- ----- ----- ----- ----- ----- ----- ----2 3
8. Sp ecifi catio ns--- ----- ----- ------- ----- ----- ----- ----- ----- ----- --24
9. Trou blesh ootin g --- ----- ----- ------------ ----- ----- ----- ----- --25
10. Warran ty -- ----- ------------ ----- ----- ----- ----- ----- ----- ----- --27
-1-
1. Safety Instructio ns
Stora ge and Use
DVB425 DVB425
DVB425
DVB425
DVB425 DVB425
DVB425DVB425
Maint enance
Please unplug all external wires before cleaning the machine.
Alcohol
Do not ex pose the
devic e to hot or
cold co nditions.
The wor king
tempe rature of
the dev ice is 0゚C~
50゚C. The
stora ge
tempe rature is10゚C ~ 60゚C.
Keep th e receiver
away fr om water
and dam p
envir onments.
Do not ex pose the
recei ver to
moist ure, dust, o il
or smok e.
Be care ful to
avoid d ropping or
strik ing the
devic e.
When
trans porting th e
devic e, store
secur ely to avoid
impac t damage.
Do not to uch the
machi ne with
sharp o bjects.
Wipe the
machi ne with a
soft cloth. Only
clean the scr een
with professi onal
LCD TV screen
clean ser.
Do not wi pe the
machi ne with an
abras ive cloth,
deter gent,
powde r, alco hol,
benze ne or any
prope llants or
chemi cal cleani ng
produ cts.
English
Page 5
English
-2-
For safety reasons, please switch off the receiver when not in use by pressing the
power button.
Please ensure that the DVB425 is located so that it has adequate ventilation.
Special Notice
In the case of a fault with the DVB425, do not attempt to repair the device yourself.
Turn off the receiver immediately and notify August or the seller from which you
purchased the item. Any disassembly or modification may lead to further damage
and will invalidate the warranty.
Precautions
2. Main Features
HD Freeview Se t Top Box - Watch Free to Air Digital TV in HD qua lity
PVR Style USB Re corder - Record TV p rogrammes straight on to USB Media
Coaxial Digi tal Output - Highest soun d purity and quality
Enjoy Digita l Features - Record Funct ion, Time Shift, EPG
(Electroni c Programme Guide)
Max Resoluti on: 1080p - Video Ou tput: HDMI / SCART - Audio Output: HDMI /
SCART / Coaxial
3.Box Contents
DVB425
Remote Control
HDMI Cable
2 x AAA Batteries
User Manual
SUB-T
AUDIO
D
V
B4
25
USB TIMER
MP
DV
B
-T
2
H
E
VC T
V Re
ce
ive
r
a
n
d Mu
lt
i
med
ia
P
l
ay
er
Ri
c
e
v
it
or
e
TV
DV
B-
T2 HE
V
C
e
L
ettor
e
M
ul
tim
e
d
ia
le
S
in
t
onizad
o
r
TD
T
H
D DV
B
T
2 H
EV
C y
R
e
pr
oduct
o
r
Mu
lt
im
edia
Récep
te
u
r
T
NT
HD
DV
BT2
HEV
C a
v
ec Mu
lt
im
édia
P
la
y
e
r
DV
B
T2
H
E
V
C T
V
Rece
ive
r
u
n
d M
ul
timedi
a
P
l
ay
er
D
VB
425
EN
FR
DE
IT
ES
-3-
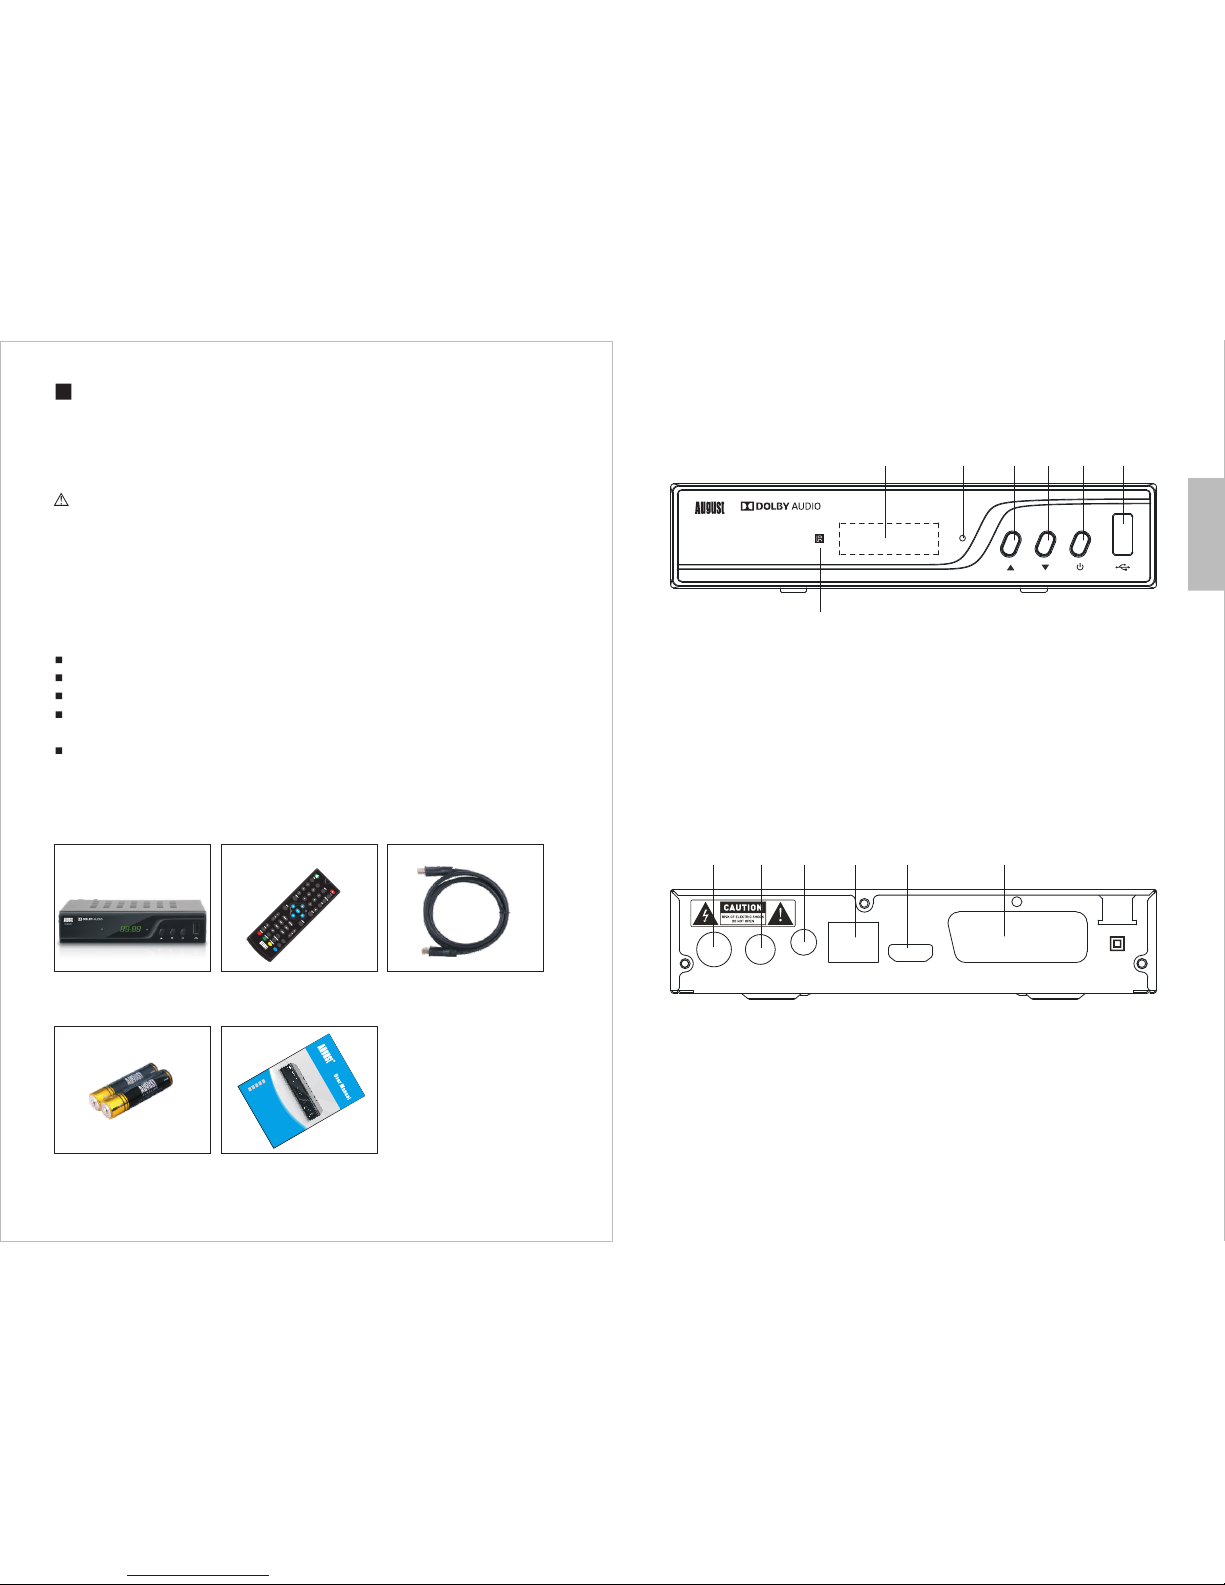
4.1 Front
1.Display
2.Status LED
3.Up
4.Down
5.Power Button
6.USB Port
7. Remote Control Sensor
4.2 Back
1.Antenna In
2.Antenna Out (Loop Through)
3.Coaxial Audio Out
4.LAN Port
5.HDMI Output
6.SCART Output
4. Part Names and Functi on s
1
DVB4 25
RF IN
LOOP
THRO UGH
COAX IAL
LAN
TV SCA RT
HDMI
220- 240V~
50/6 0Hz
2 3 4 5
1 2 3 4 5 6
6
7
Page 6
4.3 Remote Control
4.3.1 Remote Button Functions
English
SUB-T
AUDIO
DVB 425
USB TIMER
MP
9
6
7
8
10
11
12
13
14
15
16
17
18
20
19
21
22
23
24
28
27
29
30
31
32
33
36
34 35
37
40
3
25
26
1
2
5
4
38
39
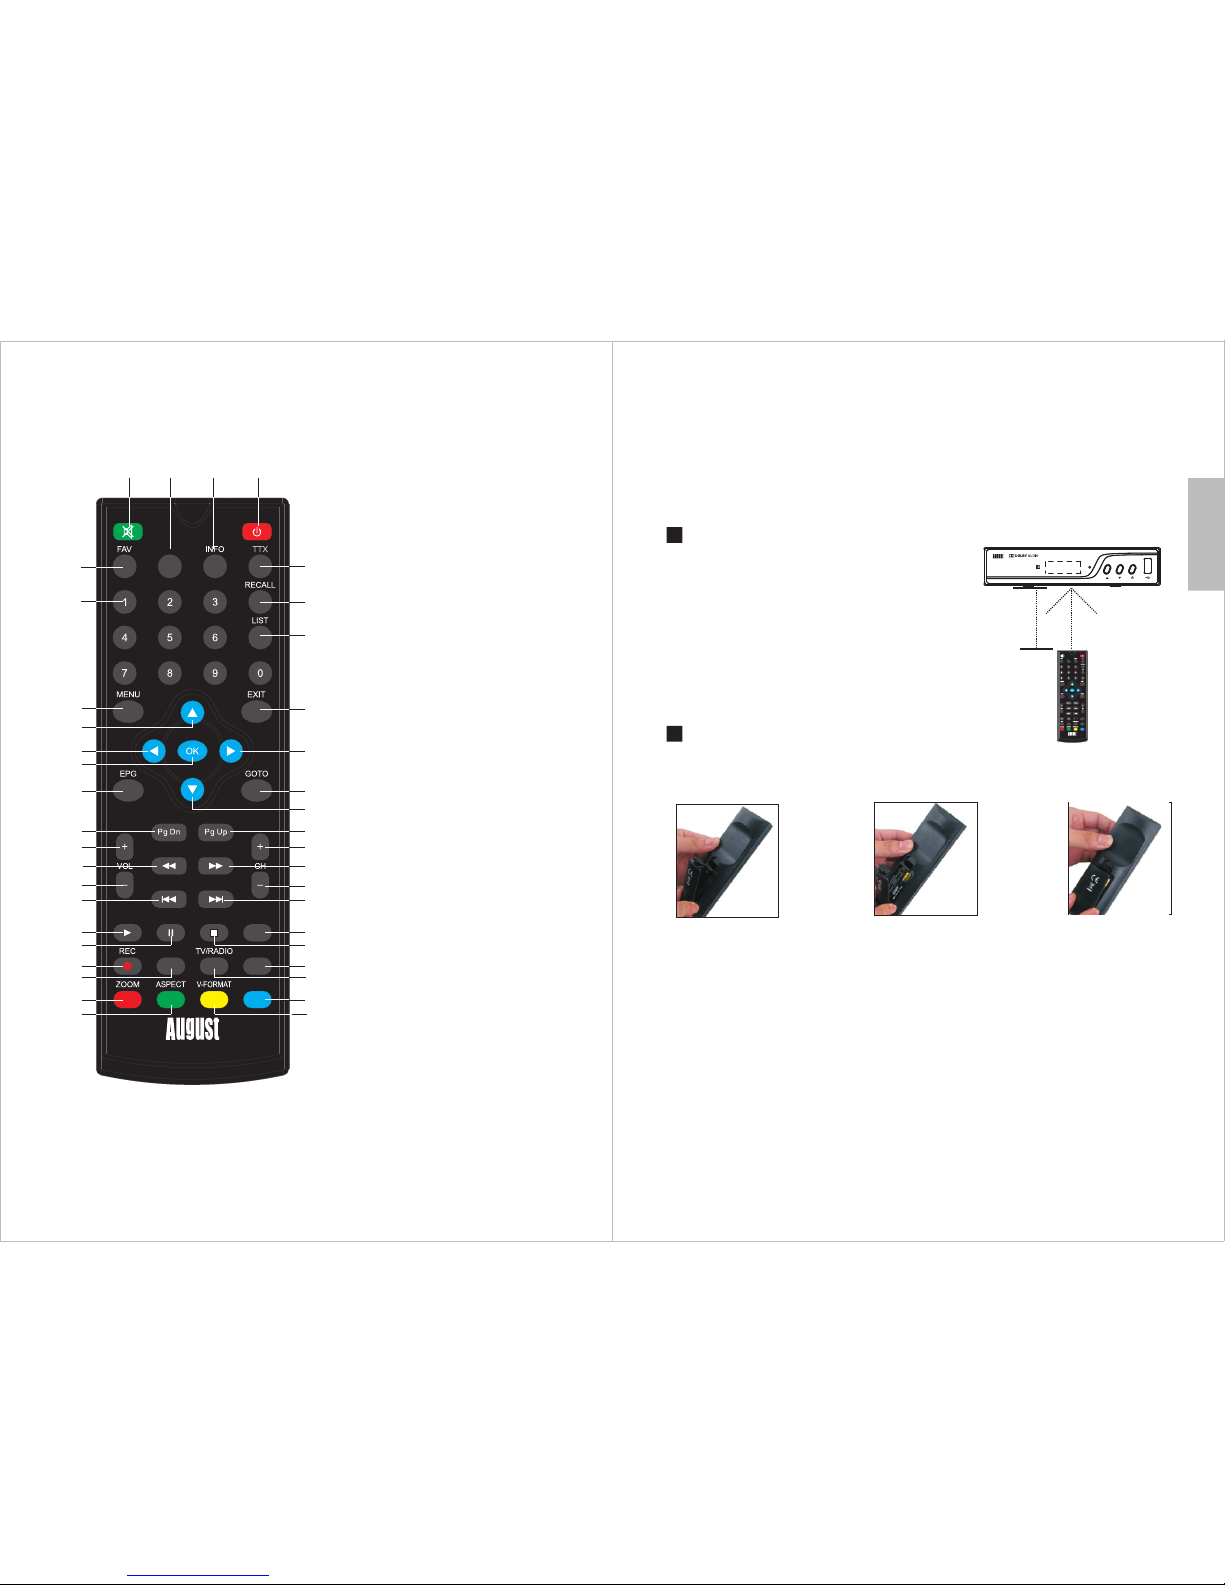
1. Mu te / Unmu te
2. Po wer
3. Fa vouri te Chan nel Lis t
4. Su btitl e
5. In forma tion
6. Tele tex t (not a vaila ble in UK)
7. Nu mbers
8. Re callL ast Cha nnel Vi ewe d
9. Re corde d files
10. M ain Men u
11. Ex it
12. U p
13. D own
14. L eft
15. R ight
16. C onfir m
17. E lectr onic Pr ogram G uide
18. G o To Fun cti on
19. P age Dow n
20. P age Up
21. C hanne l Up
22. C hanne l Down
23. Vo lume Up
24. Vo lume Do wn
25. R ewind
26. F orwar d
27. P revio us Track
28. N ext Trac k
29. P lay
30. P ause
31. S top
32. Au dio Lan guage
33. R ecord
34. U SB Mult imedi a Playe r
35. T V / Rad io
36. Ti mer
37. Z oom in
38. As pect ra tio
39. R esolu tion
40. M P
-4-
Operating range
1. The IR sensor on the remote control should be
aimed directly at the sensor on the front of the
DVB425. It may not be possible to operate the
device if there are obstacles between it and the
sensor on the remote control.
2. Use the remote control no further than 8 meters
away from the sensor.
3. The receiving angle range should be ±30°.
Replacing the Batteries
If the remote control does not function or if the operating range becomes reduced,
replace the old battery with a new one.
Pull out the battery holder
and remove the old battery.
Replace the battery holder.Insert the new battery into the battery
holder with the + side facing upwards.
30°
<8m
30°
-5-
*Note:
1. Please ensure the proper disposal of used batteries.
2. To prevent leakage of fluid from the lithium battery, remove the battery when the
remote control will not be in use for a long period of time. If the battery leaks fluid,
carefully wipe it out of the battery case, then change to a new lithium battery.
SUB-T
AUDIO
DVB425
USB TIMER
MP
DVB425
4.3.2 Use of the Remote Control
Please remove the PVC packaging before using the remote control for the first time.
1. Do not expose the remote control to direct sunlight or any other source of strong
or bright light.
2. Be careful not to drop the remote control, step on it or subject it to shocks.
3. Do not expose the remote control to hot or humid conditions.
4. Keep the remote control away from water.
Page 7
-6-
English
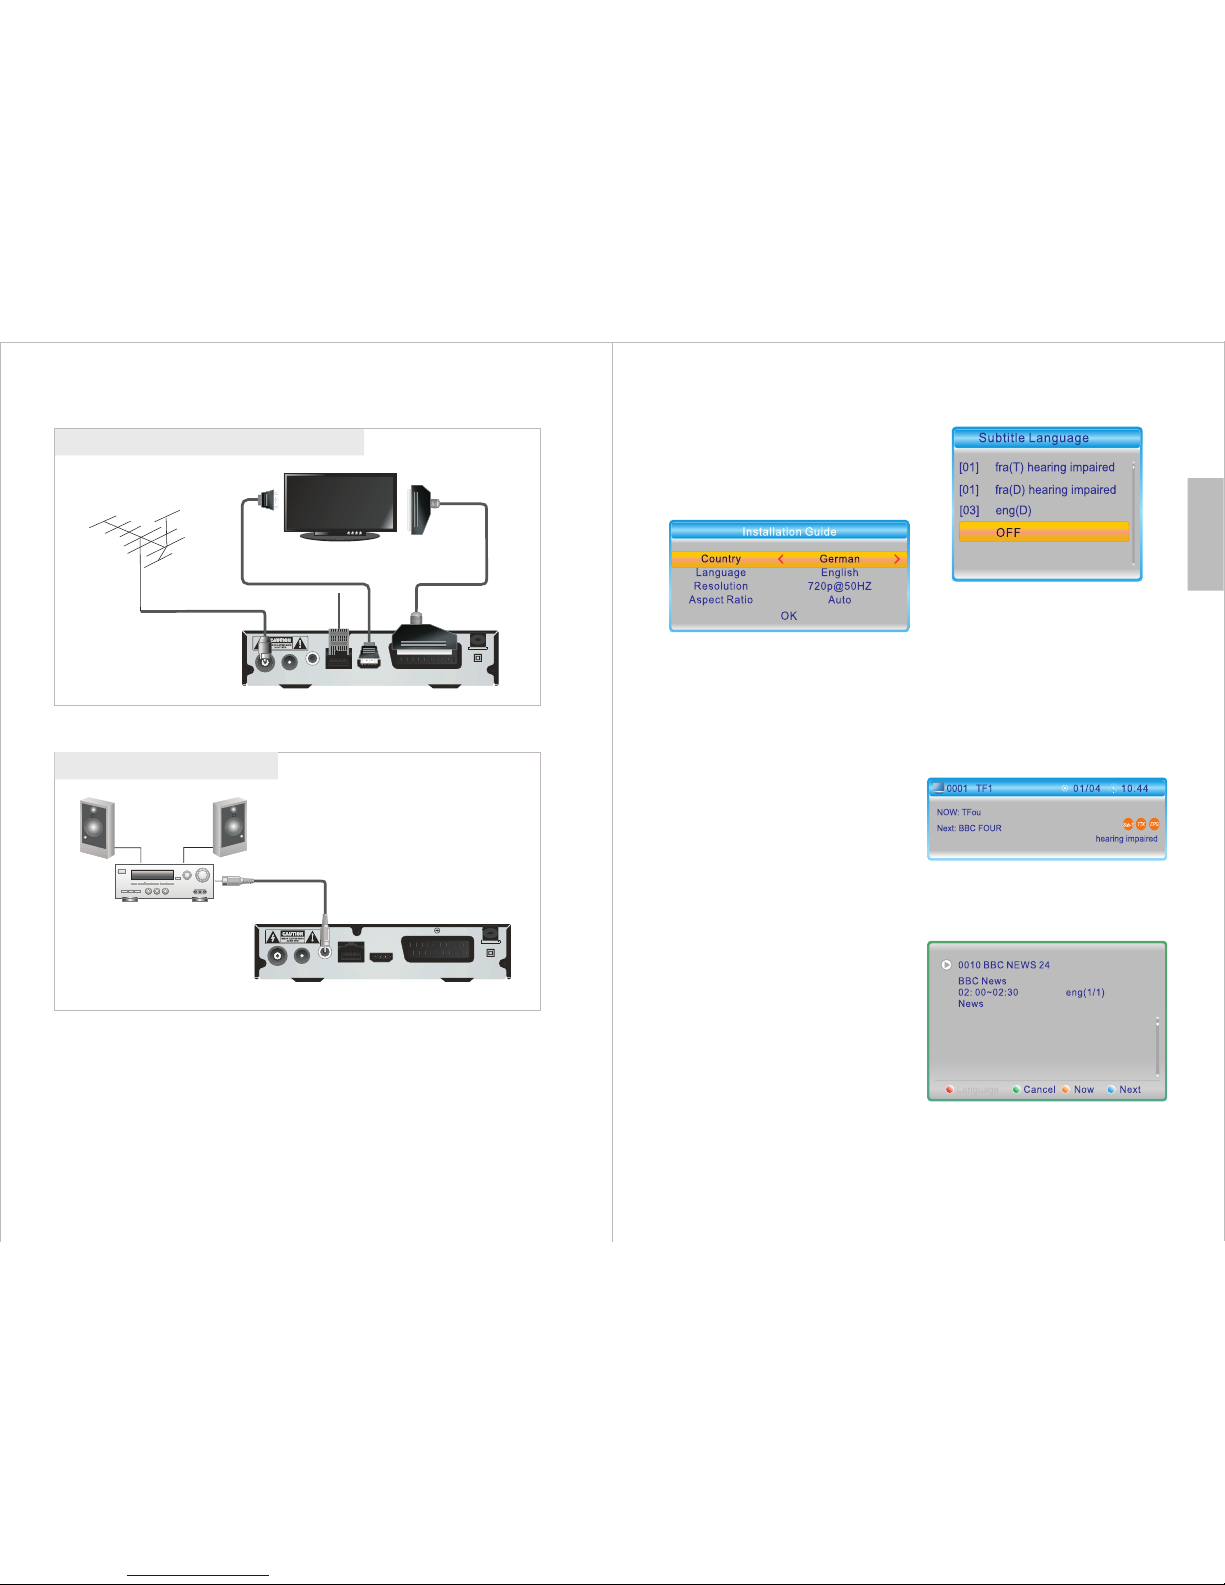
5. Connection
Co nne cting t o a TV
Co nne cti ng a HiFi s yst em
Coa xial cab le
Hi-F i
HDM I cable
RF ca ble
TV
Sca rt cable
Aer ial
LAN
RF IN
LOOP
THROUGH
COAXIAL
LAN
TV SCART
HDMI
220-240 V~
50/60Hz
RF IN
LOOP
THROUGH
COAXIAL
LAN
TV SCART
HDMI
220-240 V~
50/60Hz
-7-
6. Operation
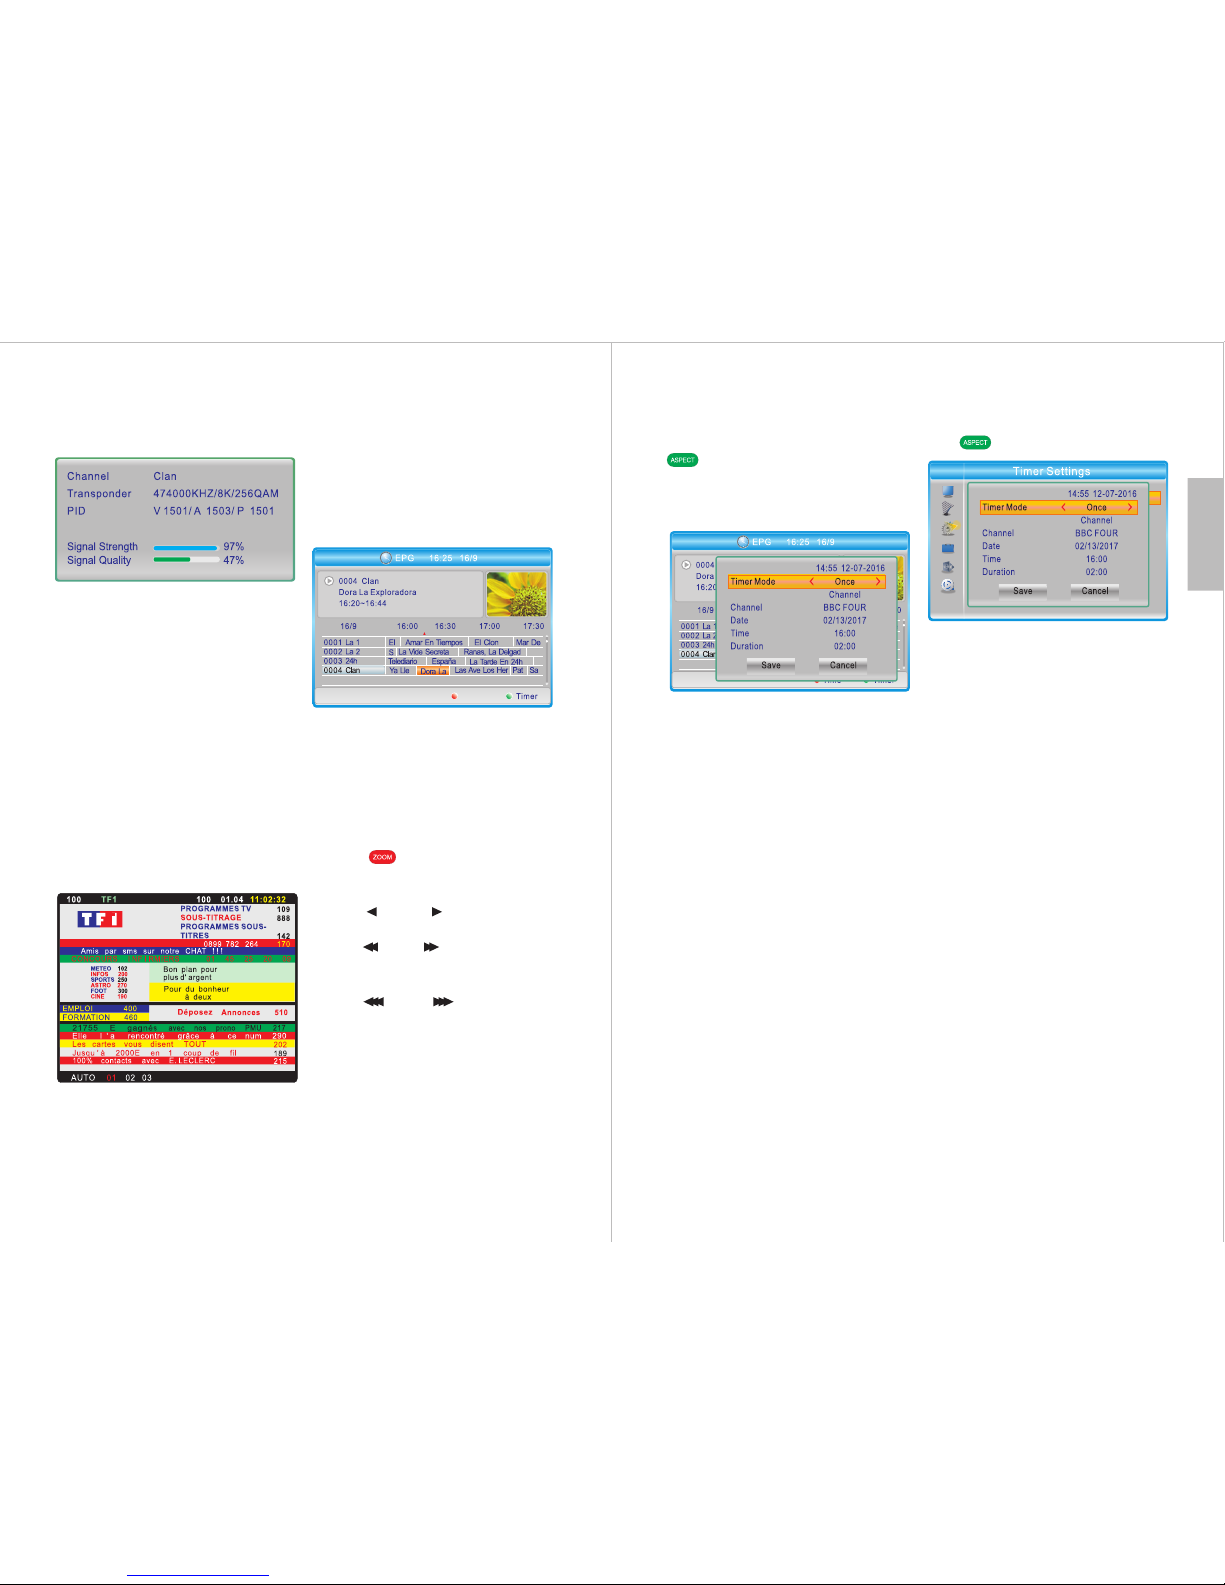
6.1 Ini tial In stallat ion
When yo u fir st sw itc h on the devic e,
you wil l see a n ins tal lation gui de th at
allow s you t o set y our p referenc es
and sea rch f or ch ann els.
Use ▲ or ▼ to n avi gat e bet ween
setti ngs a nd us e ◄ or ► to a djust the
selec ted s ett ing .
1. Sele ct th e des ire d Country.
2. Sele ct th e des ire d Language .
3. Navi gat e to Re sol ution and pr ess
OK to ent er th e res olu tion setti ngs
menu. S ele ct th e des ired resol uti on,
then pr ess O K to co nfi rm.
4. Sele ct Yes f rom t he po p-up windo w
to save t he se tti ngs o r No to cancel .
5. Sele ct th e des ire d Aspect Rat io.
6. Sele ct OK , the n pre ss OK to start
the Au to Chan nel S ear ch.
After t he se arc h has f inished, y ou ca n
start w atc hin g any c hannels wh ich
have be en fo und .
Press T V/R ADI O to sw itch betwe en
Freev iew TV and R adi o cha nne ls. If
no chan nel s are f oun d, the devic e wil l
retur n to th e ins tal lation gui de.
6.2 TV Mo de (Qui ck access t o
funct ions)
This se cti on wi ll ex plain how to
acces s fun cti ons q uickly usi ng th e
remot e con tro l whe n watching TV.
6.2.1 S ubt itl e
1. Pres s the S UB- T but ton.
2. Use ▲ an d ▼ to se lec t the s ubtitle
langu age o r sel ect O FF to disabl e
subti tle s.
3.Pre ss OK t o con fir m or press EXI T
to canc el.
6.2.2 C han nel I nfo rmation
1. Pres s INF O to sh ow in formatio n
about t he cu rre nt an d next progr ams .
2. Pres s INF O aga in to s how more
detai led i nfo rma tion.
Page 8
-8-
English
3. Pres s INF O onc e mor e to display
chann el in for mat ion such as
frequ enc y, sig nal s tre ngt h and signal
quali ty.
4. Pres s EXI T at an y tim e to close the
infor mat ion w ind ow.
6.2.3 C han nel L ist
1.Pre ss OK t o vie w the c hannel lis t.
2. Use ▲ or ▼ t o nav iga te be tween
chann els a nd pr ess O K to begin
watch ing t he se lec ted channe l. Pr ess
Pg Up or Pg D n to mo ve to t he
previ ous o r nex t pag e respecti vel y.
3.Pre ss EX IT to c los e the channe l
list.
6.2.4 Teletext
Press T TX to a cce ss th e teletext
servi ce.
Note: N ot al l cha nne ls support
telet ext .
6.2.5 L ast C han nel Watc hed
Press R ECA LL to r etu rn to the last
chann el th at wa s bei ng watched .
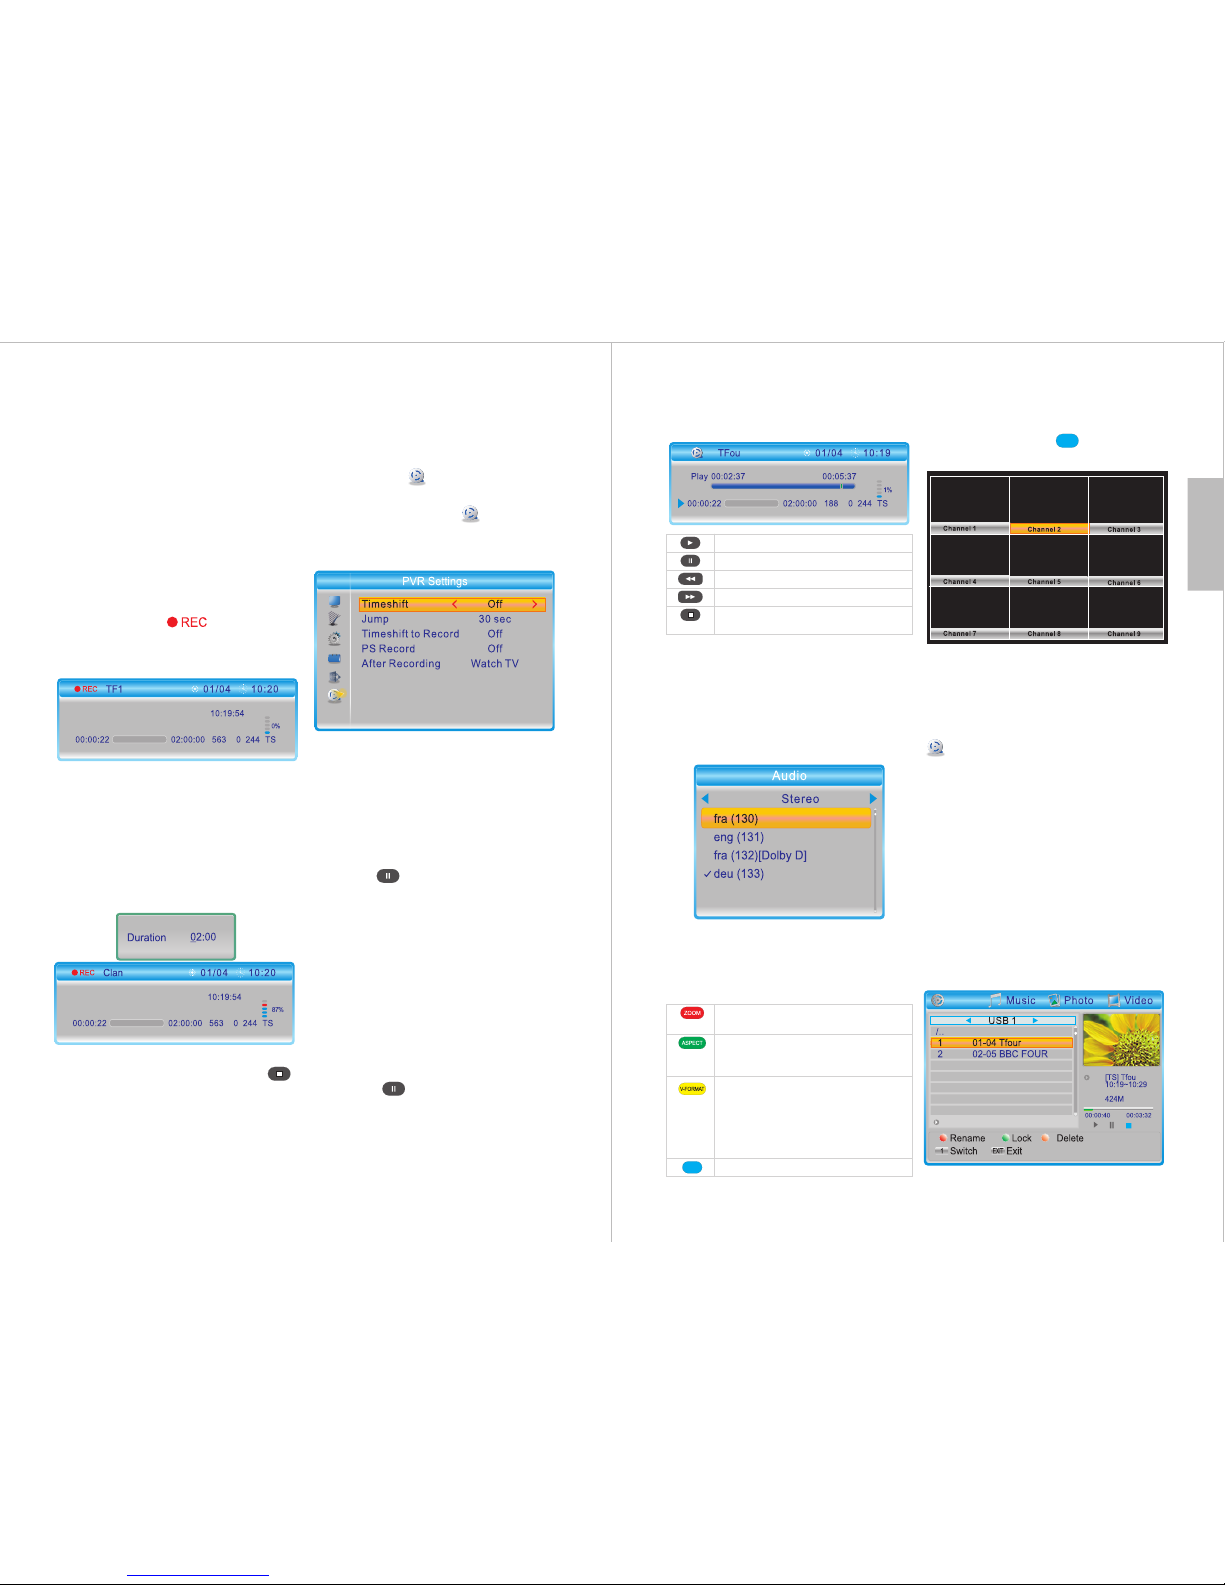
6.2.6 E PG
The EPG ( Ele ctr oni c Program Gu ide )
is the sc hed ule o f pro grams due to b e
broad cas ted i n the n ext 7 days.
1.Pre ss EP G to op en th e EPG page.
2.Use ▲ a nd ▼ to n avi gat e between
chann els a nd us e ◄ and ► t o
navig ate t hro ugh t he schedul ed
progr ams .
3.Pre ss OK t o vie w mor e detailed
infor mat ion a bou t the select ed
progr am.
4.Pre ss to e nab le th e followin g
enhan ced n avi gat ion option s. Pr ess
<EXIT > to re tur n.
Selec t ‘ ’ and ‘ ’ to navi gat e
throu gh pr ogr ams o ne by one.
Selec t ‘ ’ and ‘ ’ to navi gat e
throu gh pr ogr ams b y steps of 2
hours .
Selec t ‘ ’ and ‘ ’ to navi gat e
throu gh pr ogr ams b y steps of 24
hours .
Note: N ot al l cha nne ls support E PG.
Navigation
-9-
- Sched ule R eco rdi ng
To add a time r for a s che dul ed
recor din g, pr ess T IMER or EPG,
then wh en wa tch ing T V.
Use ▲ or ▼ to n avi gat e bet ween
setti ngs a nd us e ◄ or ► to a djust the
selec ted s ett ing .
1.Sel ect t he de sir ed Timer Mode : Off ,
Once, D ail y, Weekly or Mon thl y.
2.For Ac tio n, se lec t Record.
Note: W hen s ele cti ng Record, e nsu re
that a US B sto rag e dev ice with
sufficient fr ee sp ace i s ins erted in the
USB por t.
Tip s: When crea tin g a tim er fr om the
EPG, th e pro gra m tim e, date and
durat ion w ill b e set a utomatic all y
accor din g to in for mation tra nsm itt ed
by the br oad cas ter.
Shoul d you w ish t o cha nge these
setti ngs :
1.Sel ect t he de sir ed Channel .
2.Inp ut th e Dat e by us ing the keyp ad
numbe rs.
3.Inp ut th e Tim e by us ing t he keypad
numbe rs (t ime f orm at: hh/mm) .
4.Inp ut th e Dur ati on by using th e
keypa d num ber s (ti me format:
hh/mm ). Du rat ion i s the period f or
which t he se lec ted c hannel wil l be
recor ded .
5.Sel ect S ave a nd pr ess OK to
confi rm or s ele ct Ca ncel and pre ss
OK to can cel .
6.2.7 Timer
- Sched ule View ing
To add a time r for a s che dul ed
viewi ng, p res s TIM ER or EPG, the n
when wa tch ing T V.
Use ▲ or ▼ to n avi gat e bet ween
setti ngs a nd us e ◄ or ► to a djust the
selec ted s ett ing .
1.Sel ect t he de sir ed Timer Mode : Off ,
Once, D ail y, Weekly or Mon thl y.
2. For Act ion , sel ect V iew.
Tip s: When crea tin g a tim er fr om the
EPG, th e pro gra m tim e, date and
durat ion w ill b e set a utomatic all y
accor din g to in for mation tra nsm itt ed
by the br oad cas ter.
Shoul d you w ish t o cha nge these
setti ngs :
1.Sel ect t he de sir ed Channel .
2.Inp ut th e Dat e by us ing the keyp ad
numbe rs.
3.Inp ut th e Tim e by us ing t he keypad
numbe rs (t ime f orm at: hh/mm)
4.Inp ut th e Dur ati on by using th e
keypa d num ber s (ti me format:
hh/mm ). Du rat ion i s the period f or
which t he se lec ted c hannel wil l be
recor ded .
5.Sel ect S ave a nd pr ess OK to
confi rm or s ele ct Ca ncel and pre ss
OK to can cel .
Action
Action
Page 9
-10-
English
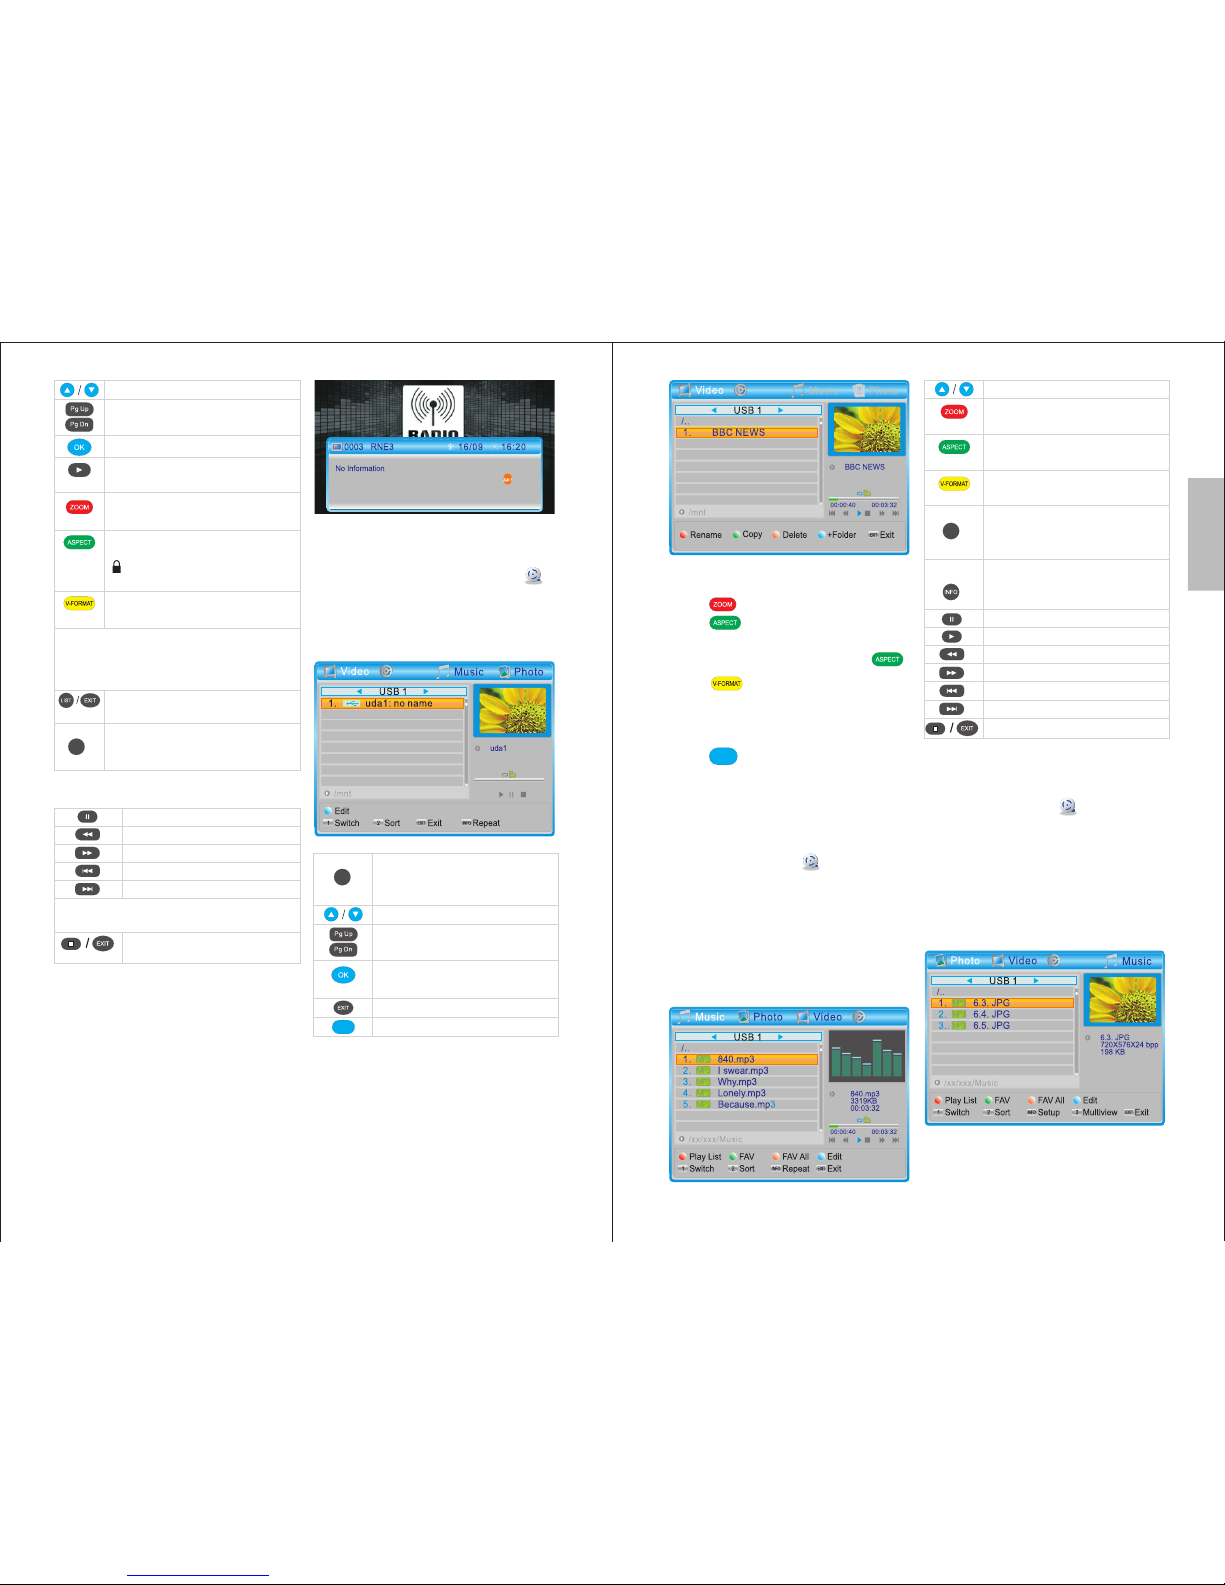
6.2.9 Timeshi ft
Tim esh ift a llows you to c ont rol a l ive
TV prog ram b y pau sin g it and
resum ing i t lat er.
To enable o r dis abl e Time shift:
Path: M ENU > M edi a Pla yer >
PVR Set tin gs >Timeshi ft
1.Pre ss ME NU, s ele ct Media
Playe r and p res s OK.
2.Sel ect a nd en ter P VR Setting s.
3.Sel ect Ti mes hif t, then use
◄ and ► to ch ang e bet wee n Off,
Auto an d Pau se.
Off dis abl es th e Time shift func tio n.
Auto en abl es th e Time shift func tio n
all the t ime .
Pause a llo ws yo u to us e Timeshift b y
press ing w hil e wat ching live TV.
Selec t Tim esh ift t o Rec ord, then us e
◄ and ► to ch ang e bet wee n On and
Off.
Note: I f Time shi ft to R ecord is set t o
On, the p rog ram w ill b e recorded
while t ime s hif tin g.
When Tim esh ift i s set t o Auto, the
Tim esh ift f unction is e nab led a ll th e
time.
When Tim esh ift i s set t o Pause, you
can pre ss wh ile w atc hing live
TV to beg in us ing t he Tim eshift
funct ion .
Note: W hen p rog ram ming a
recor din g, we r eco mmend that y ou
check t he Aft er Re cor ding optio n in
the PVR S ett ing s men u to determi ne
what wi ll ha ppe n aft er the recor din g
concl ude s. Pl eas e refer to sec tio n
7.6.2 .
6.2.8 L ive R eco rdi ng
Inser t a USB s tor age d evice with
sufficient fr ee sp ace i nto t he USB
port.
1.Pre ss RE C to st art a l ive record ing .
Whils t rec ord ing w ill flash on
the top r igh t han d cor ner of the
scree n.
2.Whi le re cor din g, press REC t o
show de tai led r eco rding info rma tio n.
3.Whi lst t he de tai led record ing
infor mat ion i s dis played, pr ess R EC
to set th e dur ati on. U se
◄ or ► to nav iga te an d use t he
keypa d num ber s to in put the time .
4.To st op a live r eco rdi ng, p ress ,
then se lec t Yes to f ini sh or No to
retur n.
-11-
Multi -vi ew mo de al lows you to vi ew
multi ple c han nel s at once. Use t he
arrow k eys t o sel ect a nd preview a
chann el. P res s OK, or EXIT t o
retur n to th e liv e bro adcast.
6.2.1 2 Med ia Pl aye r from USB
Stora ge
In TV o r Radio mode , pre ss US B to
enter t he me dia p lay er or select
Media P lay er fr om th e menu
windo w.
Note: A US B sto rag e dev ice such as
a USB sti ck or h ard d riv e must be
inser ted i n the U SB po rt.
For det ail ed in for mation abo ut me dia
playe r opt ion s, pl ease refer t o sec tio n
6.4.
6.2.1 3 Rec ord ed Pr ograms
To watch re cor ded p rog rams, pres s
LIST to e nte r the r eco rded progr am
list (P VR) .
Recor d
When Tim esh ift i s act ive, use the
follo win g but ton s to control t he li ve
broad cas tin g:
6.2.1 0 Audi o
1.Pre ss th e AUD IO bu tton.
2.Use ▲ a nd ▼ to s ele ct an a vailable
audio l ang uag e.
3.Pre ss OK t o con fir m or press EXI T
to canc el.
6.2.11 Colour b utt ons
In TV m ode, the col our ed bu tto ns
perfo rm th e fol low ing functi ons :
MP
Res ume
Pau se
Rew ind
Fas t forwa rd
Exi t time sh ift and r eturn
to th e live br oadca st
MP
Zoo m in. Onc e zoome d in, use ▲
/▼/◄/ ► to sele ct the di splay a rea
Cyc le thro ugh the f ollow ing
Asp ect Rat io sett ings: A uto,
4:3 PS, 4:3 LB and 16 :9
Cyc le thro ugh the f ollow ing
Res oluti on sett ings: 4 80i, 48 0p,
576 i, 576p , 720p (5 0Hz), 7 20p
(60 Hz), 10 80i (50 Hz), 10 80i
(60 Hz), 10 80p (50 Hz) and 1 080p
(60 Hz)
Mul ti-vi ew wind ow
Page 10
English
6.4 Med ia pl aye r
In TV o r Radio mode , pre ss US B to
enter t he me dia p lay er or select
Media P lay er fr om th e main menu. A
USB sto rag e dev ice m ust be inser ted
into th e USB p ort .
Recor d
-12-
6.3 Rad io Mo de
Press T V/R ADI O to sw itch betwe en
TV mode a nd Ra dio m ode .
Pau se
Rew ind
Fas t forwa rd
Jum p Backw ards
Jum p Forwa rd
Not e: The Ju mp pe riod c an be set i n
sec tion 7. 6.2
Ret urn to th e list of r ecord ed
fil es.
Sel ect a rec orded f ile
Go to p revio us/ne xt page
Pla y selec ted fil e in full s creen
Pla y selec ted fil e in the pr eview
win dow
Ren ame a fil e using t he onsc reen
key board
Loc k/unl ock a fil e. The de fau lt
pas sword i s 0000. Once lo cked,
wil l appea r next to t he lock ed
fil e
Mar k file fo r delet ion.
Mul tiple f iles ca n be mark ed
War ning : E xitin g the lis t of reco rded
pro grams o r chang ing to an other
med ia type w ill aut omati cally d elete t he
mar ked fil es.
Exi t and ret urn to li ve
bro adcas ting
Swi tch to ot her med ia file t ypes
(Ph oto, Vi deo , Musi c or PVR
Rec ordin g)
- Full Sc ree n mod e Opt ions
1
MP
Swi tch bet ween me dia fil e types
(Ph oto, Vi deo , Musi c and
Rec ordin gs)
Sel ect a fol der or vi deo fil e
Go to p revio us/ne xt page
Ent er fold er or pla y the
sel ected f ile
Go Ba ck
Ent er Edit m ode
1
-13-
- In edit m ode :
Press t o ren ame a f old er or file.
Press t o cop y the s ele cted
folde r or fi le, t hen c hoose the
direc tor y to co py it t o and press .
Press t o mar k one o r mor e files
or fold ers f or de let ion. When yo u exi t
Edit mo de, t he ma rke d files will b e
delet ed.
Press to add a n ew fo lde r.
Press E XIT t o go ba ck to t he previou s
folde r.
Press M ENU t o exi t Edi t mode.
6.4.1 M usi c
Press M ENU , sel ect M edia Playe r
and pre ss OK . The n, se lec t Mus ic
and pre ss OK . Alte rna tively, if you are
alrea dy in M edi a Pla yer mode, pr ess
<1> to sw itc h bet wee n media type s
until y ou re ach M usi c.
- File Op tio ns
6.4.2 P hot o Vie wer
Press M ENU , sel ect M edia Playe r
and pre ss OK . The n, se lec t Pho to
and pre ss OK . Alte rna tively, if you are
alrea dy in M edi a Pla yer mode, pr ess
<1> to sw itc h bet wee n media type s
until y ou re ach P hot o.
- File Op tio ns
MP
Recor d
Recor d
Sel ect a fol der or mu sic fil e
Sho w or edit t he list o f
fav ourit es
Add o r remov e a file fr om the
lis t of favo urite s
Add o r remov e all fil es from
the l ist of fa vouri tes
Sor t the fil es in the c urren t
dir ector y by Name , Tim e, Size
or Fa vouri te
Cha nge the r epeat m ode
bet ween re peat on e,
rep eat fol der and r andom
Pau se
Res ume
Rew ind
Fas t forwa rd
Pre vious v ideo
Nex t video
Ret urn to th e video l ist
2
Recor d
Page 11
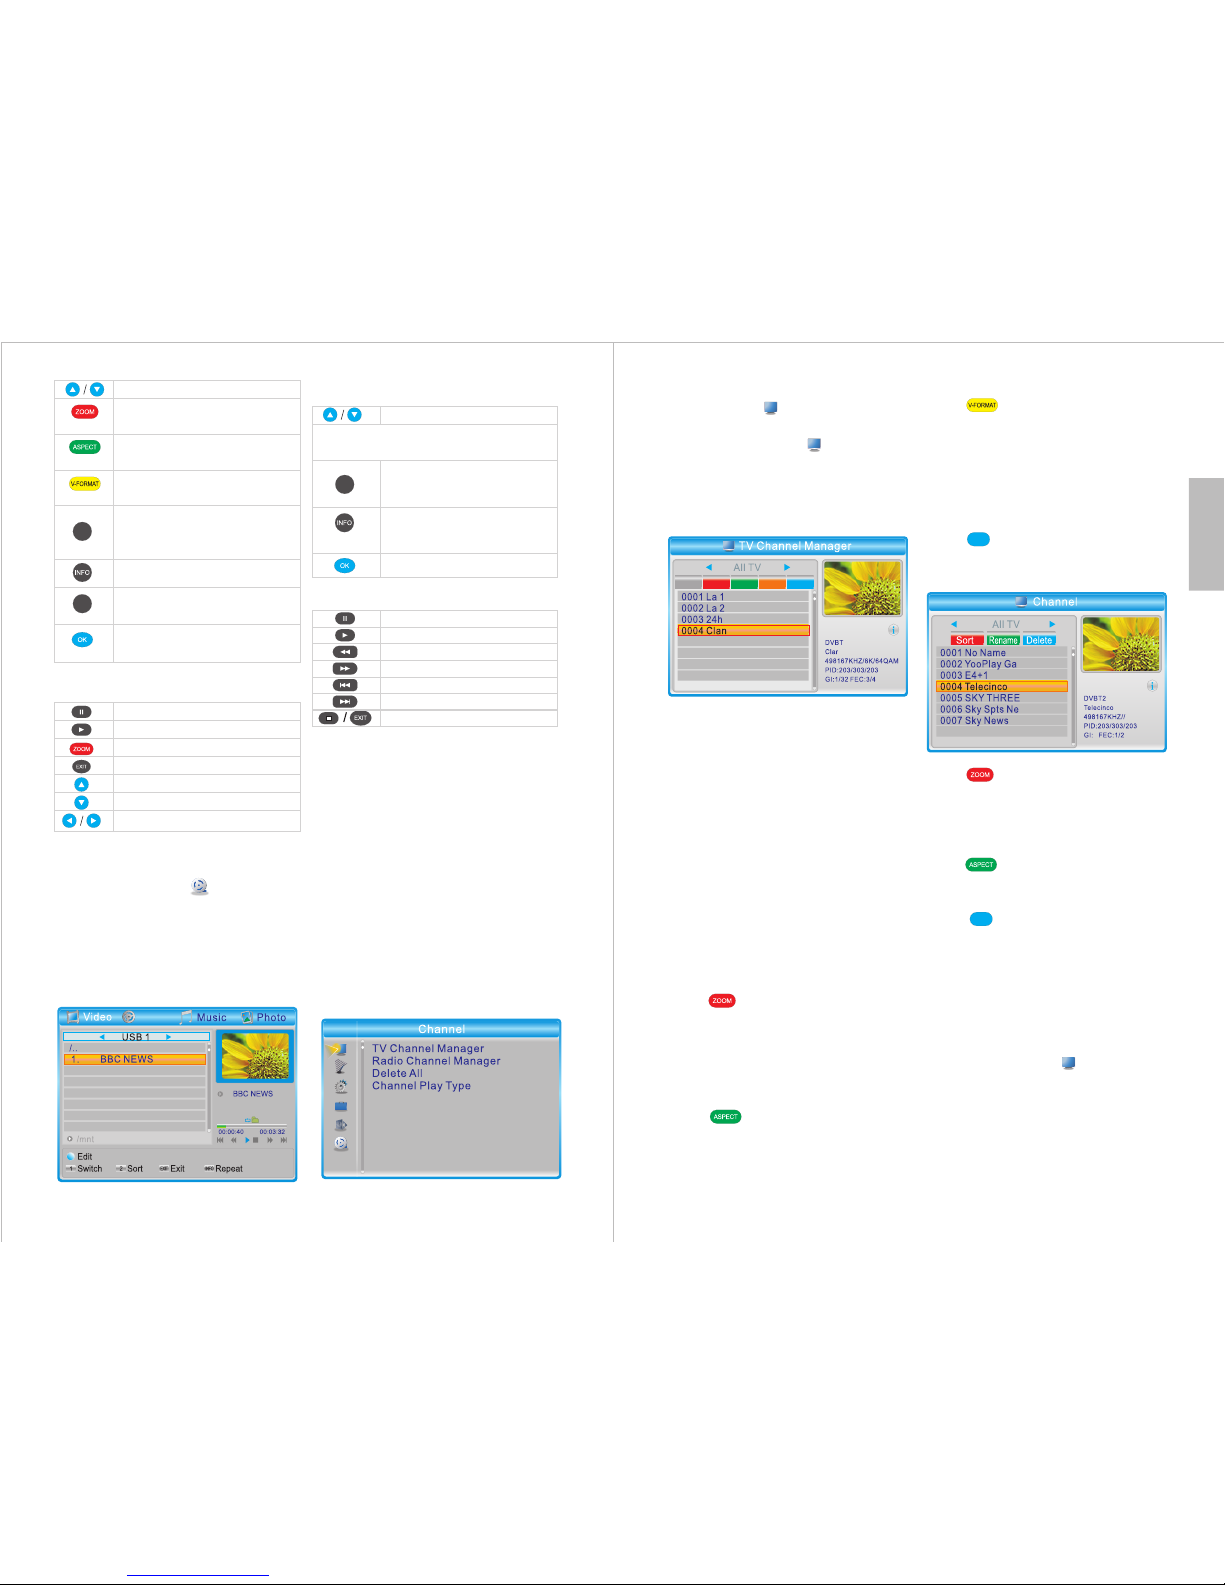
English
-14-
6.4.4 P VR
Pleas e ref er to section 6 .2.13
Recor ded P rog ram s.
7 Main Me nu ( det ail ed ac ces to
funct ion s)
In TV o r Radio mode p res s MEN U to
enter t he ma in me nu. P ress EXIT or
MENU to c los e the m enu .
In the ma in me nu, u se ▲ an d ▼ to
navig ate b etw een t he Channel ,
Chann el Se arc h, Sy stem Setup ,
Tool s, Ne two rk and Media P lay er
menus .
Press O K or ► to e nte r a men u or
EXIT to g o bac k to th e mai n menu.
6.4.3 Video
Press M ENU , sel ect M edia Playe r
and pre ss OK . The n, se lec t Vid eo an d
press O K. Alt ern ati vely, if yo u are
alrea dy in M edi a Pla yer mode, pr ess
<1> to sw itc h bet wee n media type s
until y ou re ach V ide o.
Recor d
Sel ect a fol der or vi deo fil e
Sor t files i n the cur rent
dir ector y by Name , Tim e or
Siz e
Cha nge the r epeat m ode
bet ween re peat on e and
rep eat fol der
Pla y file in f ull scr een
Pau se
Res ume
Rew ind
Fas t forwa rd
Pre vious v ideo
Nex t video
Ret urn to th e video l ist
- Full Sc ree n mod e Opt ions
- File Op tio ns
Not e: The se lec ted fi le will b e played in
the p revie w windo w.
2
- Full Sc ree n mod e Opt ions
Sel ect a fol der or ph oto
Sho w or edit t he list o f
fav ourit es
Add o r remov e a file fr om the
lis t of favo urite s
Add o r remov e all fil es from
the l ist of fa vouri tes
Sor t files i n the cur rent
dir ector y by Name , Tim e, Size
or Fa vouri te
Edi t slide s how opt ions
Pau se slid eshow
Res ume sli desho w
Zoo m in
Res tore to o rigin al size
Go to n ext pho to
Go pr eviou s photo
Rot ate the p hoto
Vie w pho tos in mult i-v iew
mod e
Vie w pho tos in full s cre en
mod e or star t a slide show
2
3
-15-
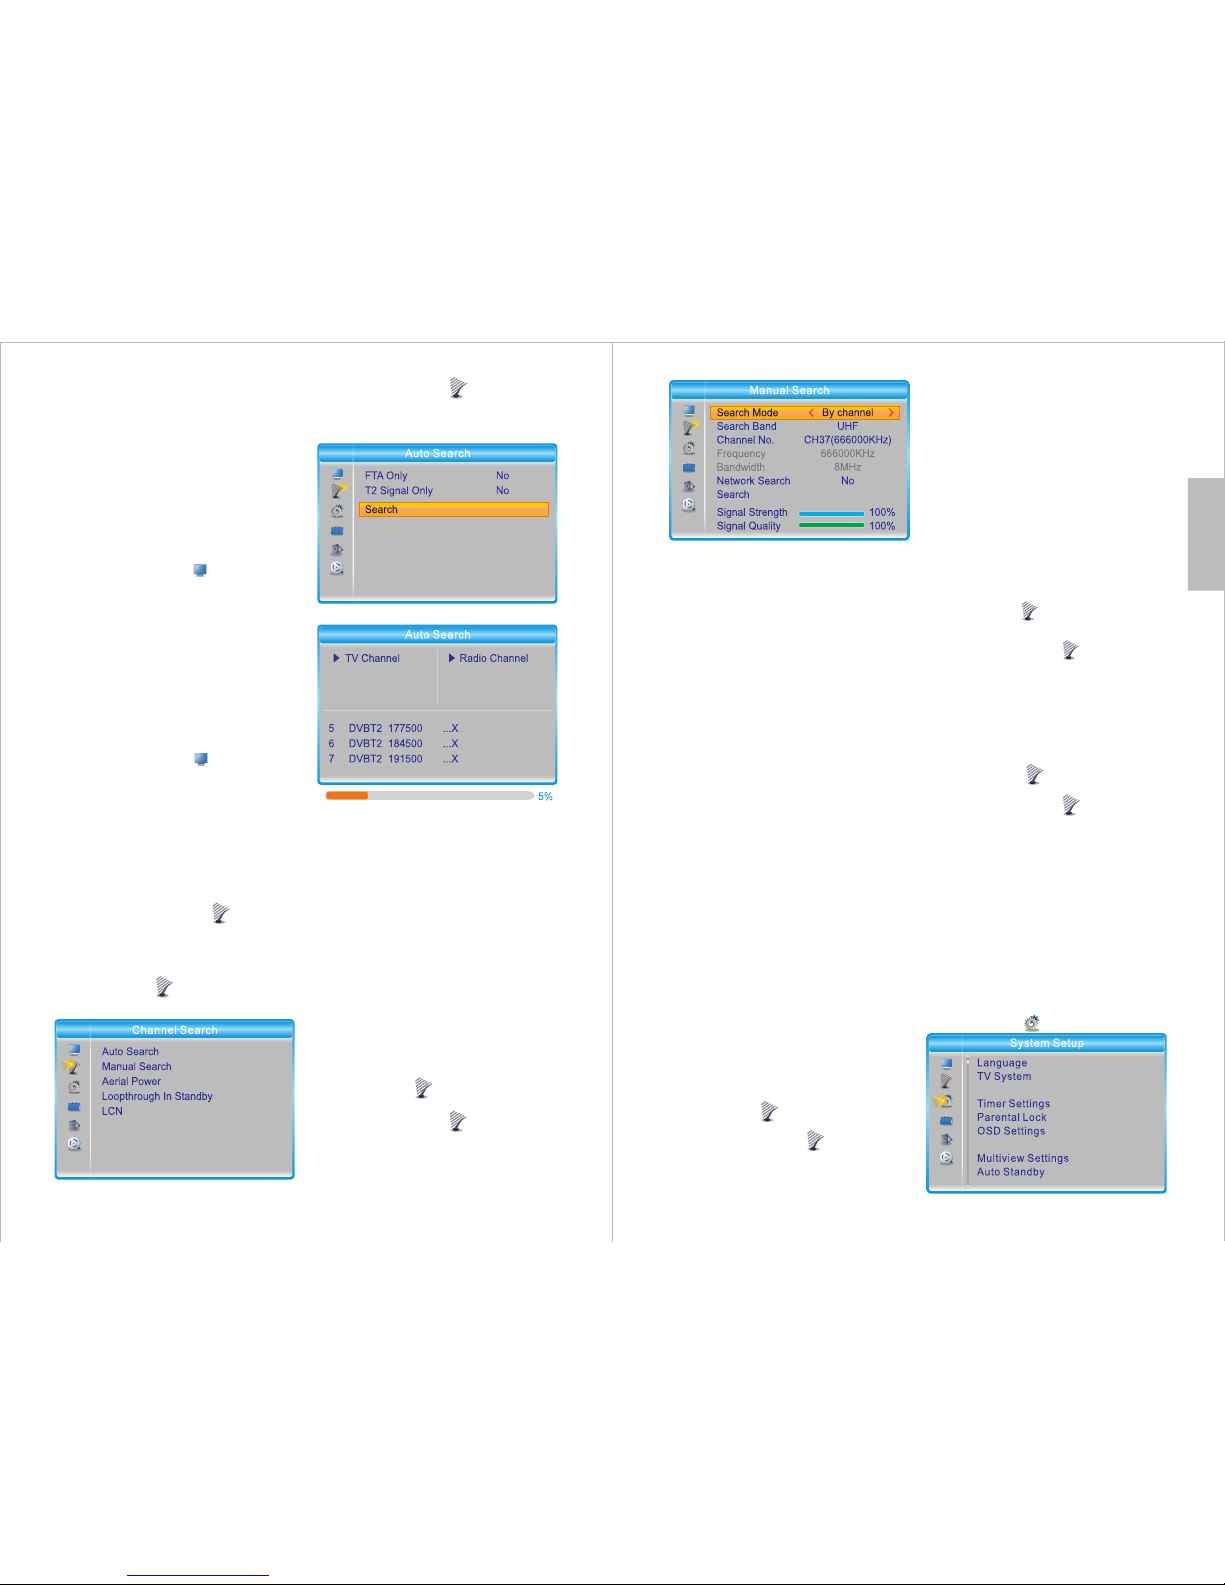
7.1 Cha nnel
Path: M ENU > C han nel >
Chann el Ma nag er
Press M ENU , sel ect C hannel and
press O K. Then, s ele ct TV C han nel
Manag er an d pre ss OK .
7.1.1 T V Cha nne l Man ager
▲ / ▼ : Selec t a cha nne l.
EXIT: R etu rn to t he Ch annel
subme nu.
When yo u pre ss EX IT, i f any change s
have be en ma de, s ele ct Yes to
confi rm or s ele ct No t o cancel.
- Favou rit es
Press FAV to enable / d isa ble t he
favou rit es fu nct ion.
Selec t a cha nne l, th en press OK to
see the f avo uri tes l ists.
Selec t a lis t, th en pr ess OK to add /
remov e.
Press E XIT t o go ba ck.
- Lock
Press to en abl e / disable th e
lock fu nct ion .
Selec t a cha nne l and p ress OK to loc k
/ unloc k tha t cha nne l.
The def aul t pas swo rd is 0000.
- Skip
Press to e nab le / di sable the
skip fu nct ion .
Selec t a cha nne l the n press OK to
skip / un ski p.
- Move
Press t o ena ble / d isa ble the
move fu nct ion .
Selec t a cha nne l and p ress OK to
move it .
Use ▲ or ▼ to m ove t he ch ann el.
Press O K to fi nis h mov ing.
- Edit
Press to en ter t he Edit Chan nel
subme nu, f rom w hic h you can sort ,
renam e and d ele te ch annels.
Press to sor t the c han nels in a
different ord er. Se lec t bet ween Name
(A-Z) , Nam e (Z- A), F ree/Scra mbl e or
Lock, t hen p res s OK to c onfirm or
press E XIT t o can cel .
Press to enab le th e ren ame
funct ion . Sel ect a c hannel, th en pr ess
OK to ren ame .
Press to ena ble / d isa ble the
delet e fun cti on. S elect a chan nel , the n
press O K to de let e. Th e def aul t
passw ord i s 000 0.
Press E XIT t o exi t the E dit Channe l
subme nu.
7.1.2 R adi o Cha nne l Manager
Press M enu , sel ect C hannel and
press O K. Then, s ele ct Ra dio C hannel
Manag er. Al ter nat ively, if y ou are in TV
Chann el Ma nag er mo de, press
TV/Ra dio t o swi tch t o the Radio
Chann el Ma nag er.
MP
MP
FAV
Loc k
Ski p
Mov e
Edi t
Page 12
-16-
English
The Rad io Ch ann el Ma nager
opera tes i n the s ame w ay as the TV
Chann el Ma nag er. Pl ease refer t o
secti on 7. 1.1 f or fu rther inst ruc tio ns.
Press T V/R ADI O to sw itch betwe en
the TV Channel Ma nag er an d the
Radio C han nel M ana ger.
Press E XIT t o go ba ck to t he previou s
subme nu.
7.1.3 D ele te All
Press M ENU , sel ect C hannel and
press O K. Se lec t Del ete All an d pre ss
OK.
This op tio n wil l res et the TV an d
Radio c han nel l ist s.
Press O K, th en in put t he passwor d to
delet e all c han nel s.
The def aul t pas swo rd is 0000.
Selec t Yes to c onf irm o r No to cancel .
7.1.4 C han nel P lay Ty pe
Press M ENU , sel ect C hannel and
press O K. Then, s ele ct Ch ann el Play
Type , press OK and u se ◄ an d ► to
chang e the t ype o f cha nnel displ aye d
betwe en Al l, Fr ee an d Scramble d.
Press E XIT t o ret urn t o the Channe l
subme nu.
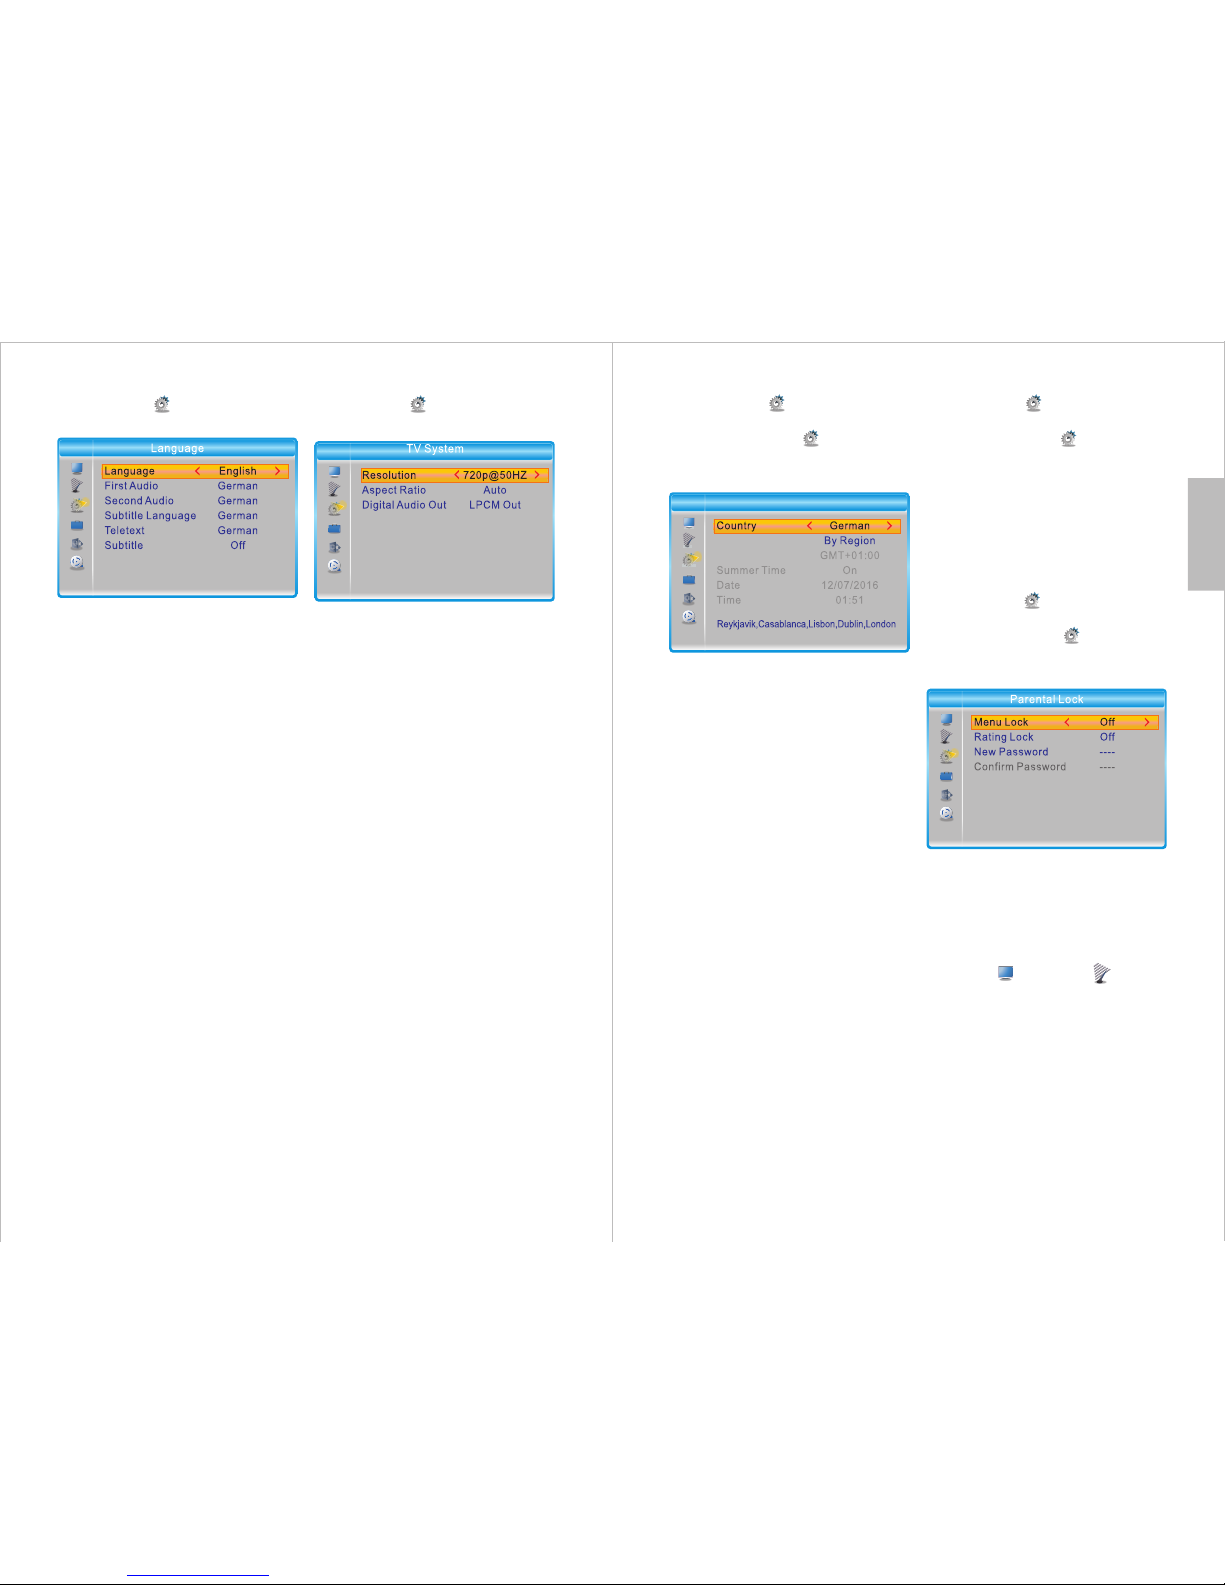
7.2 Cha nnel Se arch
Press M ENU, select Chan nel
Searc h and press OK.
7.2.1 Au to Se arch
Path: M ENU > C han nel S earch >
Auto Se arc h
Press M ENU , sel ect C hannel
Searc h and p res s OK. T hen , sel ect
Auto Se arc h and p res s OK.
Use ◄ or ► to a lte r the s ele cted
setti ng.
FTA Only: E nab le th is op tion to
searc h for f ree t o air c hannels on ly.
T2 Sign al On ly: E nab le this opti on to
searc h for H D cha nne ls only.
Selec t Sea rch a nd se lect Yes to sta rt
searc hin g or se lec t No to cancel .
Note: W hen p erf orm ing a new scan ,
the cha nne l lis t wil l not be updat ed
but wil l be re pla ced b y the channe ls
that ar e fou nd.
7.2.2 M anu al Se arc h
Path: M ENU > C han nel S earch >
Manua l Sea rch
Press M ENU , sel ect C hannel
Searc h and p res s OK. T hen , sel ect
Manua l Sea rch a nd pr ess OK.
-17-
Use ◄ or ► to a lte r the s ele cted
setti ng.
Searc h Mod e: Ch oos e either By
Chann el or B y Fre que ncy.
Selec tin g By Ch ann el allows yo u to
selec t a cha nne l num ber and sear ch
for it us ing t he de fau lt frequen cy of
that ch ann el.
Navig ate t o Cha nne l No. and use ◄
and ► to ch ang e the c han nel.
Selec tin g By Fr equ ency allow s you t o
enter a s pec ifi c fre quency to se arc h.
Navig ate t o Fre que ncy and use th e
numbe r key s to en ter t he desired
frequ enc y.
Netwo rk Se arc h: En able the
Netwo rk Se arc h opt ion to allow t he
DVB42 5 to se arc h all c hannels wi th
ONID (O rig ina l Net work ID) on th e
selec ted f req uen cy.
Note: P rio r to sc ann ing, a previ ew of
the sig nal s tre ngt h and qualit y for t he
selec ted c han nel o r frequenc y wil l be
displ aye d on th e scr een.
Selec t Sea rch a nd pr ess OK to star t
scann ing .
7.2.3 Ae ria l Power
The DVB 425 c an ou tpu t 5V power
from th e coa xia l aer ial socket . This
allow s you t o pow er co mpatible
indoo r amp lif ied a erials.
Path: M enu > C han nel S earch >
Aeria l Pow er
Press M ENU , sel ect C hannel
Searc h and p res s OK. T hen , sel ect
Aeria l Pow er an d pre ss OK.
Note: DO N OT activate this fu nct ion i f
using a ro oft op ae ria l or if your indoor
aerial i s pow ere d by a po wer adaptor
as it will n ega tiv ely a ffec t the s ign al
qualit y.
7.2.4 St and by Lo opt hrough
While in s tan dby m ode , the DVB425
can prov ide a n ant enn a point for a
second r ece ive r or TV. Follow the
instru cti ons b elo w to ensure that the
Loopth rou gh fu nct ion is enabled, the n
connec t the s eco nd de vice to the
Antenn a Out ( Ple ase s ee section 4.2).
Path: Me nu > Ch ann el Se arch >
Loopth rou gh in S tan dby
Press ME NU, s ele ct Ch annel
Search a nd pr ess O K. Then, se lec t
Loop Thr oug h in St and by and press
OK. Fina lly, select On to e nab le th e
loopth rou gh fu nct ion or Off to disable
it.
7.2.5 LC N
Path: ME NU > Ch ann el Se arch >
LCN
Press ME NU, s ele ct Ch annel
Search a nd pr ess O K. Then, se lec t
LCN and pr ess O K.
LCN (Log ica l Cha nne l Number)
provid es ch ann el so rting as intended
by the bro adc ast er 1 = BB C1, 2 =
BBC2 etc .
Enable /di sab le th is function using
◄ / ► to so rt ch ann els b y LCN .
Tip : We strong ly re com men d lea ving
this fun cti on en abl ed.
7.3 Syst em Se tup
Path: ME NU > Sy ste m Set up
Favou rite
Date/ Time Setti ngs
Page 13
-18-
English
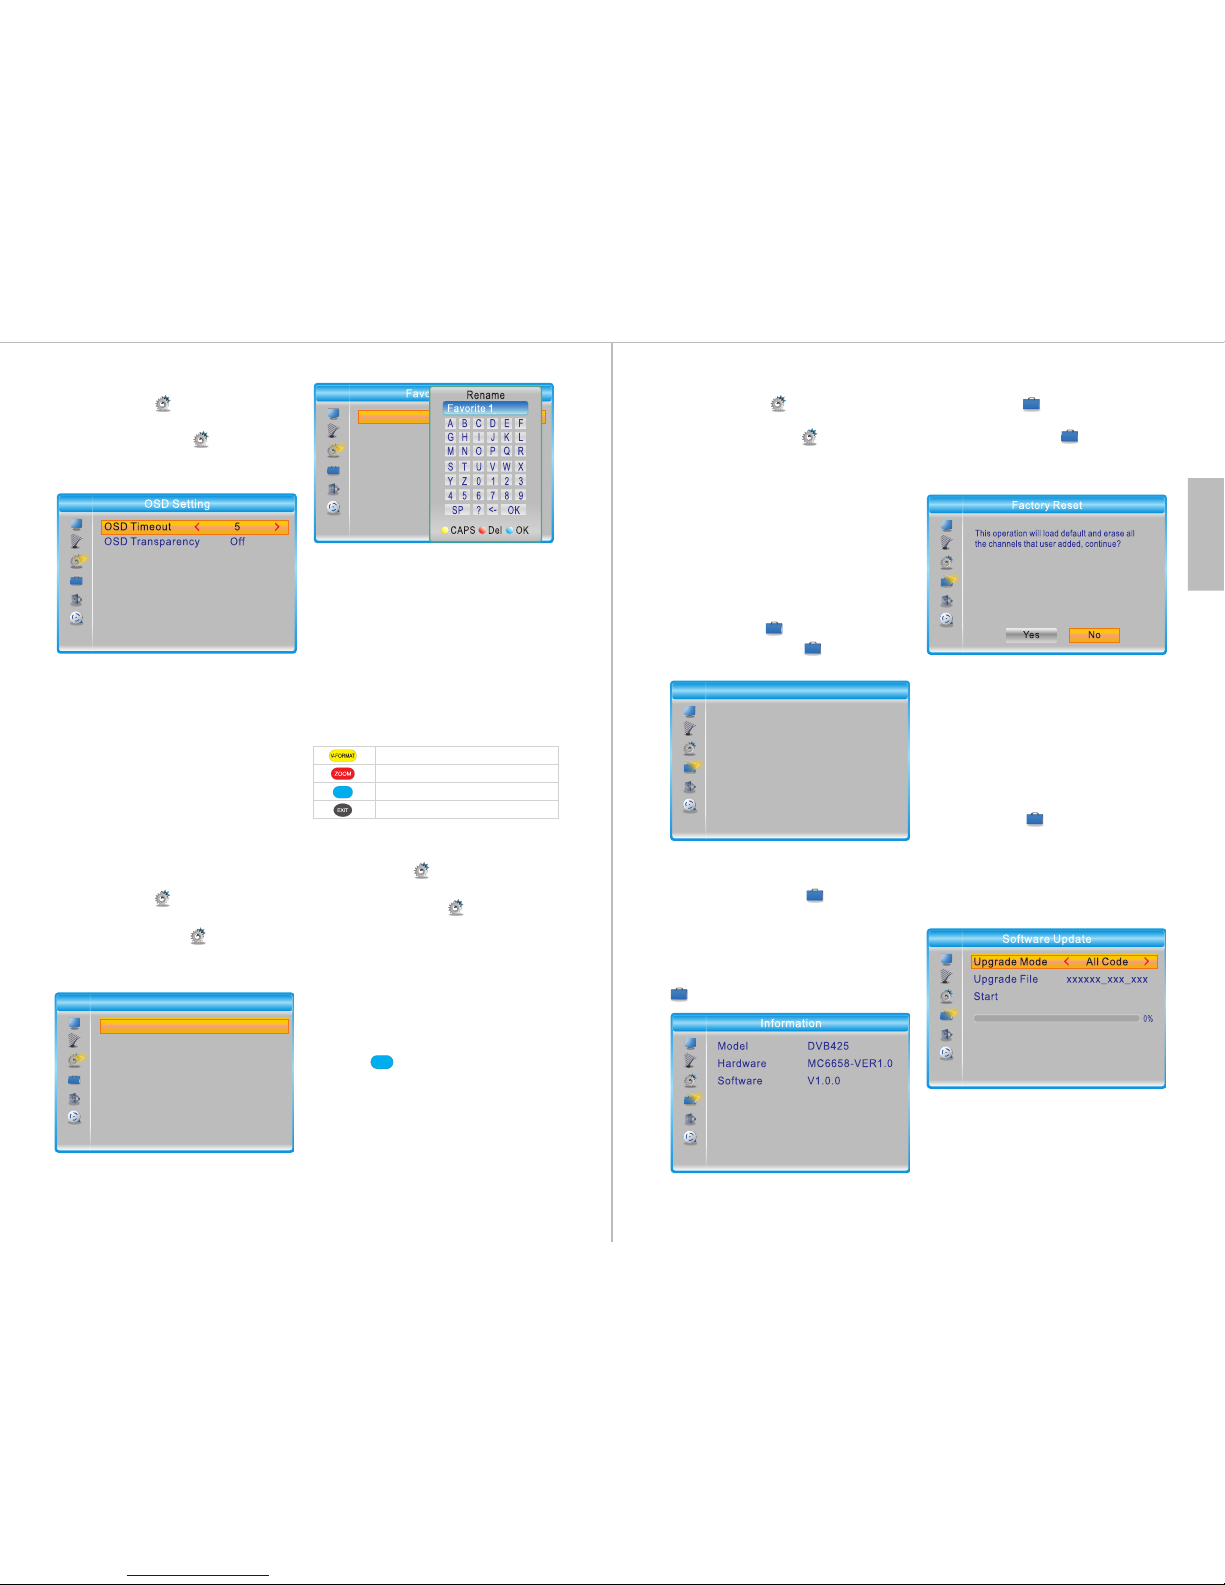
7.3.1 L ang uag e
Path: M ENU > S yst em Se tup >
Langu age
▲ / ▼: Nav igat e thr oug h the submenu.
◄ / ►: Chan ge th e sel ect ed setting .
- Langu age
Selec t you r pre fer red system
langu age f rom a mon g English,
Frenc h, Ge rma n, It alian and Sp ani sh.
- First Au dio
Selec t the d efa ult a udio langu age f or
TV from a mon g Eng lis h, French,
Germa n, It ali an an d Spanish.
- Secon d Audi o
Selec t the s eco nd au dio langua ge fo r
TV from a mon g Eng lis h, French,
Germa n, It ali an an d Spanish.
- Subti tle L ang uag e
Selec t the s ubt itl e language f rom
among E ngl ish , Fre nch, Germa n,
Itali an an d Spa nis h.
- Tele text
Selec t the t ele tex t language f rom
among E ngl ish , Fre nch, Germa n,
Itali an an d Spa nis h.
- Subti tle
Set Sub tit le to N orm al or Hard of
Heari ng to e nab le su btitles. S et it t o
Off to di sab le su bti tles.
Note: S ubt itl es ar e not provid ed by a ll
progr ams .
7.3.2 T V Sys tem
Path: M ENU > S yst em Se tup > TV
Syste m
▲ / ▼: Navig ate t hro ugh t he list of
optio ns an d sub men us.
OK: Ent er a su bme nu or c onfirm
chang es.
- Resol uti on
Selec t the d esi red r esolutio n fro m
among t he fo llo win g options:
By Sour ce, B y Nat ive T V, 480 i, 48 0p,
576i, 5 76p , 720 p@5 0Hz,
720p@ 60H z, 10 80i @50Hz,
1080i @60 Hz, 1 080 p@50Hz or
1080p @60 Hz.
In the po p-u p win dow, s elect Yes to
confi rm th e new r eso lution or No t o
rever t to th e pre vio us setting .
- Asp ect R ati o
Selec t the d esi red a spect rati o fro m
among A uto , 4:3 PS, 4 :3LB or 16:9
and con fir m.
- Digit al Aud io Out
Choos e eit her L PCM O ut or BS Out
and con fir m.
Note: B S sta nds f or Bi tstream. L PCM
stand s for L ine ar Pu lse-code
modul ati on.
Tip : We st ron gly recomm end u sin g
LPCM Ou t.
-19-
7.3.3 D ate /Ti me Se tti ngs
Path: M ENU > S yst em Se tup >
Date/ Time S ettings
Press M ENU , sel ect S ystem Setu p
and pre ss OK . The n, se lec t
Date/ Tim e Set tin gs an d press OK.
- Count ry
Selec t Cou ntr y, pr ess OK then
choos e one o f Uni ted K ingdom,
Franc e, Sp ain , Ger many or Ital y.
Press O K to co nfi rm.
- Tim e Zone
Selec t Tim e Zon e, pr ess O K and
choos e one o f By Re gio n, User
Defin ed or O ff. P res s OK to confir m.
By Coun try : Whe n Time Z one is set
to By Cou ntr y, al l clo ck setting s wil l
be set au tom ati cal ly accordi ng to t he
count ry se lec ted .
Tip : We st ron gly recomm end s ett ing
Tim e Zon e to By C ountry.
User De fin ed: S ett ing Time Zone t o
User De fin ed al low s you to set the
Time Offse t and S umm er Ti me
optio ns ma nua lly.
Off : Setting Tim e Zon e to Of f all ows
you to se t the D ate a nd Ti me
manua lly.
To input th e tim e and d ate m anually,
selec t Off , go to D ate o r Tim e, then
use ◄ and ► t o sel ect t he nu mber to
chang e and u se th e num ber keys to
enter t he ne w num ber.
7.3.4 Timer Set tin gs
Path: M ENU > S yst em Se tup >
Tim er Se tti ngs
Press M ENU , sel ect S ystem
Setup a nd pr ess O K. Th en, s ele ct
Timer Sett ing s and p res s OK.
Selec t a tim er, th en pre ss OK to enter.
Pleas e ref er to s ect ion 6.2.7 fo r mor e
detai led i nfo rma tion.
Up to 8 tim ers c an be a dde d.
7.3.5 P are nta l Loc k
Path: M ENU > S yst em Se tup >
Paren tal L ock
Press M ENU , sel ect S ystem
Setup a nd pr ess O K. Th en, s ele ct
Paren tal L ock a nd pr ess OK.
Input t he pa ssw ord t o enter the
Paren tal L ock m enu . The d efa ult
passw ord i s 000 0.
- Menu Lo ck:
If the Me nu Lo ck is O n, yo u will be
requi red t o ent er th e password t o
acces s the C han nel o r Channel
Searc h men us.
- Ratin g Loc k:
Press O K to ad jus t the R ating Lock .
Selec t Off o r an ag e rat ing betwee n
AGE 4 and AG E 18.
- New pas swo rd
To set a new pa ssw ord , use t he
keypa d num ber s to en ter the new
passw ord , the n ent er the new
passw ord a gai n to co nfirm. Sel ect
Yes to ret urn .
Time Zon e
Time Offs et
Date/ Time Setti ngs
Page 14
English
-20-
The Fav our ite s ubm enu allows y ou to
creat e up to 8 l ist s of fa vourite
chann els . You can t hen a dd channel s
to a list t hro ugh t he TV C han nel
Manag er (p lea se re fer to secti on
7.1.1 ) .
To rename a F avo uri te li st, select t he
list, p res s OK, t hen e nter the new
name us ing t he on scr een keyboa rd.
Press O K to co nfi rm.
7.3.8 M ult ivi ew Se ttings
Path: M ENU > S yst em Se tup >
Multi vie w Set tin gs
Press M ENU , sel ect S ystem Setu p
and pre ss OK . The n, se lec t Mul tiview
Setti ngs a nd pr ess O K.
Choos e bet wee n 3x3 P ictures an d
4+1 Pic tur es to c han ge the pictu re
layou t of th e mul ti- view windo w.
You ca n acc ess t he multi-v iew
windo w whi le wa tch ing TV by
press ing .
7.3.6 O SD Se tti ngs
Path: M ENU > S yst em Se tup >
OSD Set tin gs
Press M ENU , sel ect S ystem
Setup a nd pr ess O K. Th en, s ele ct
OSD Set tin gs an d pre ss OK.
- OSD Timeout
OSD Timeou t ref ers t o the t ime that
infor mat ion r ema ins on scree n bef ore
disap pea rin g. Se lect the des ire d
onscr een d isp lay t ime from 1 sec ond
to 10 sec ond s in st eps o f 1 second.
- OSD Tran spa ren cy
Set the t ran spa ren cy of the onsc ree n
displ ay by c hoo sin g from among O ff,
10%, 20 %, 30 % and 4 0%.
7.3.7 F avo uri te
Path: M ENU > S yst em Se tup >
Favou rit e
Press M ENU , sel ect S ystem Setu p
and pre ss OK . The n, se lec t Fav ourite
and pre ss OK .
MP
1 Favou rite 1
2 Favou rite 2
3 Favou rite 3
4 Favou rite 4
5 Favou rite 5
6 Favou rite 6
7 Favou rite 7
8 Favou rite 8
MP
Ena ble / dis able ca ps lock
Del ete
Con firm
Can cel
-21-
7.3.9 Au to St andby
Path: M ENU > S yst em Se tup >
Auto St and by
Press M ENU , sel ect S ystem Setu p
and pre ss OK . The n, se lec t Aut o
Stand by an d pre ss OK .
The Aut o Sta ndb y fun ction caus es
the DVB 425 t o go in to st andby mode
autom ati cal ly if n o action is ta ken
withi n the s ele cte d time.
Choos e bet wee n Off , 30 Min, 1 Hour,
2 Hours a nd 3 Ho urs .
7.4 Tool s
Path: M ENU > Tools
Press M ENU , sel ect Tools a nd
press O K.
7.4.1 I nfo rma tio n
Path: M ENU > Tools > In for mat ion
Press M ENU , sel ect Tools a nd
press O K. Then, s ele ct In for mation
and pre ss OK .
From he re, y ou ca n see t he Model,
Hardw are v ers ion a nd Softwar e
versi on. P res s EXI T to return to t he
Tool s men u.
7.4.2 F act ory R ese t
Path: M ENU > Tools > Fa cto ry
Reset
Press M ENU , sel ect Tools a nd
press O K. Ne xt, s ele ct Factory R ese t
and pre ss OK . The n, en ter t he
passw ord .
Selec t Yes to r ese t the d evice to the
defau lt fa cto ry se ttings or se lec t No
to canc el an d exi t.
Once th e def aul t fac tory setti ngs
have be en re sto red , the Instal lat ion
Guide w ill a ppe ar. Pl ease refer t o
secti on 6. 1 for f urt her instru cti ons .
7.4.3 S oft war e Upd ate
Path: M ENU > Tools > So ftw are
Updat e
This fu nct ion a llo ws you to upda te th e
softw are o f the D VB4 25.
To find the m ost r ece nt so ftware,
pleas e go to o ur we bsi te:
www.au gus tin t.c om
1.Dow nlo ad th e sof tware to a USB
stora ge de vic e and i nsert it int o the
DVB42 5's U SB po rt.
2.Sel ect S oft war e Update and p res s
OK.
3.For U pgr ade M ode , select All C ode .
Tools
Inf ormat ion
Fac tory Re set
Sof tware U pdate
Rem ove USB d evice s afely
1 Favou rite 1
2 Favou rite 2
3 Favou rite 3
4 Favou rite 4
5 Favou rite 5
6 Favou rite 6
7 Favou rite 7
8 Favou rite 8
Favou rite
Page 15
English
-22-
4.Go to U pgr ade F ile , then use ◄ and
► to sele ct th e fil e.
5.Sel ect S tar t, th en press OK .
6.Sel ect Ye s to up dat e or select No t o
retur n.
Once up dat ed, t he In stallati on Gu ide
will ap pea r. Ple ase r efer to sect ion
6.1 for f urt her i nst ructions .
7.4.4 R emo ve US B Dev ice Safely
Path: M ENU > Tools > Re mov e
USB Dev ice S afe ly
Press M ENU , sel ect S ystem Setu p
and pre ss OK . The n, se lec t Rem ove
USB dev ice s afe ly an d press OK.
Next, p res s ▼, the n pre ss OK and
remov e the U SB de vic e.
7.5 Net wor k
Path: M ENU > N etw ork
Press M ENU , sel ect N etwork and
press O K.
From he re, y ou ca n set t he network
optio ns, l ist en to o nline radi o or
check t he we ath er fo recast. In o rde r
to use th ese f unc tio ns, please e nsu re
that th e DVB 425 i s con nected to th e
inter net v ia an E the rnet cable .
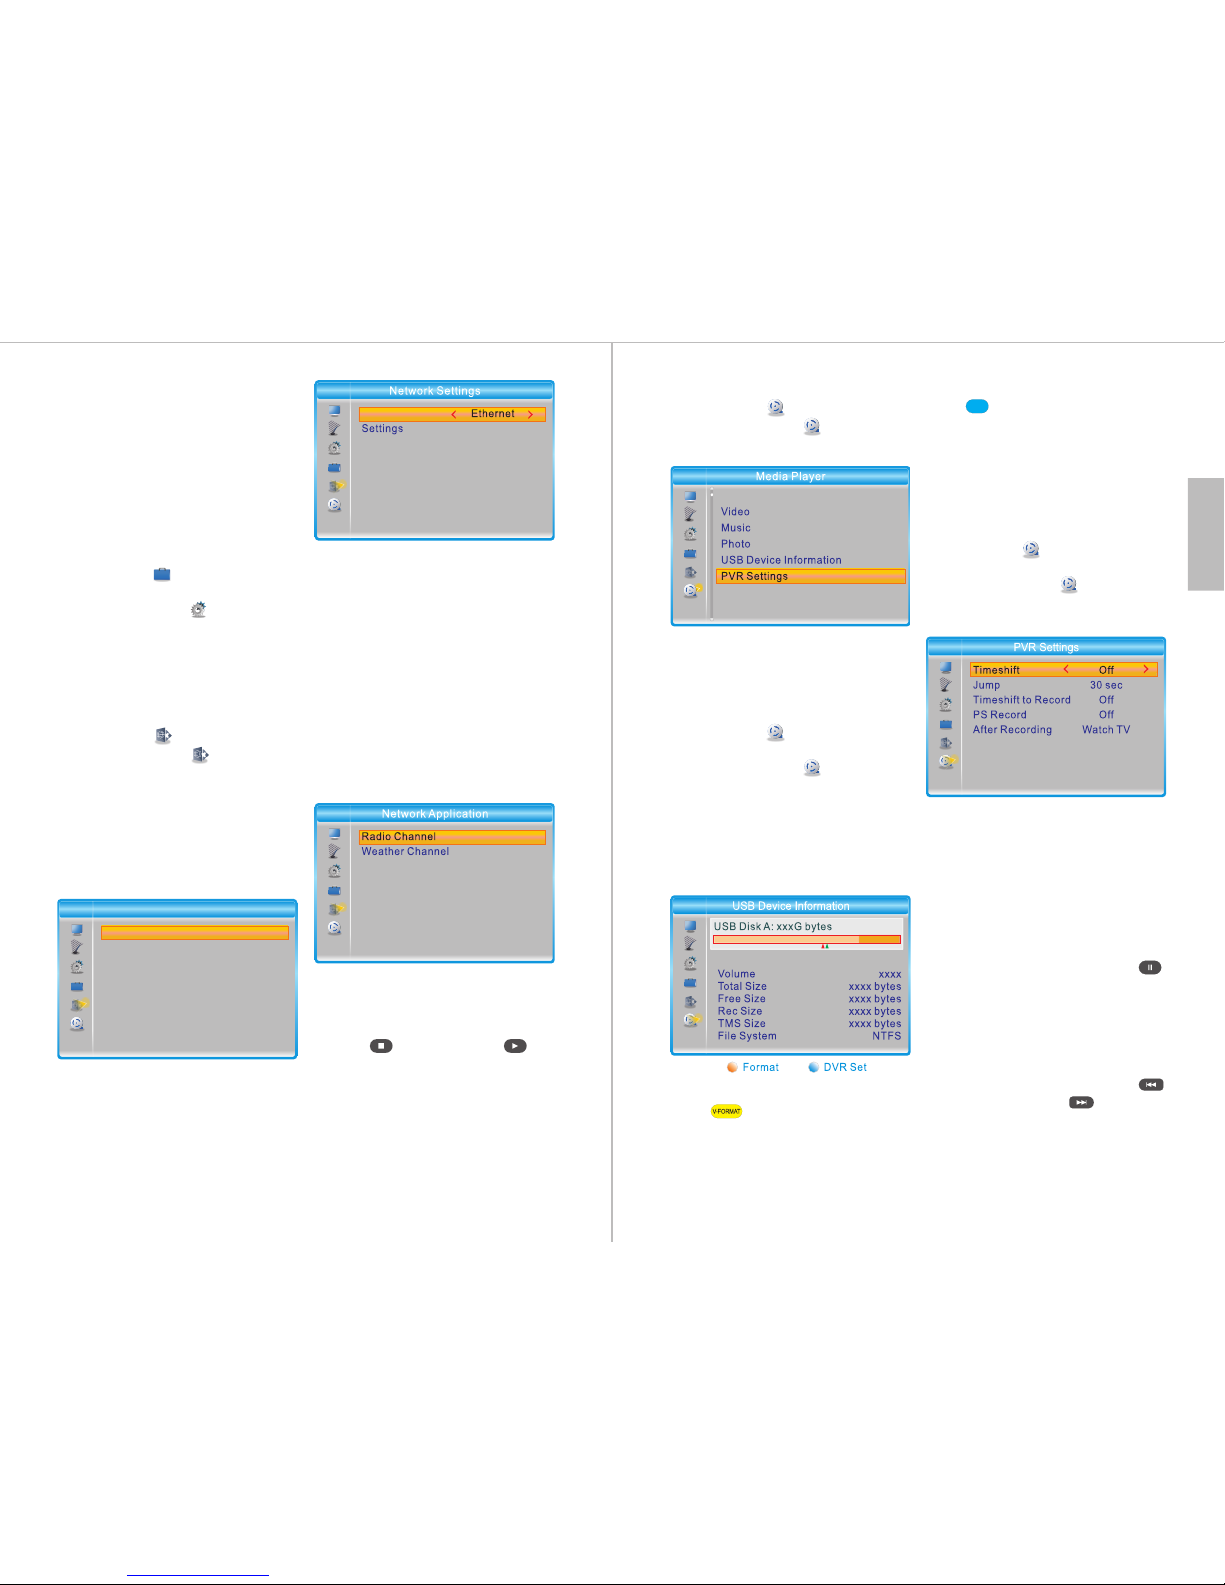
- Netwo rk Se tti ngs :
Netwo rk: S ele ct be tween Ethe rne t
and Non e to en abl e or di sable the
netwo rk fu nct ion .
Setti ngs : Sel ect b etween On an d Off
for DHC P.
Selec tin g On al low s the DVB425 t o
set DHC P inform ati on au tom atically.
Selec tin g Off a llo ws you to set DH CP
infor mat ion s uch a s IP Add res s or
DNS man ual ly.
To input th e set tin gs ma nually, use
◄ and ► to se lec t the d igi t to change
and use t he ke ypa d to en ter the new
numbe r.
Selec t App ly an d pre ss OK to save
the set tin gs or p res s EXIT to retu rn.
- Netwo rk App lication s:
Radio C han nel :
1. Pres s OK to e nte r.
2. Sele ct a co unt ry.
3. Sele ct a ra dio s tat ion.
4. Pres s to st op or p res s
to play.
Wea ther Chann el:
1. Pres s OK to e nte r.
2. Sele ct a co unt ry.
3. Sele ct a ci ty to s ee it s weather.
Press P g Dn an d Pg Up f or fa ster
navig ati on.
Net work Se tting
Net work App licat ion
Net work
Net work
-23-
7.6 Med ia Player
Path: M ENU > M edi a Pla yer
Press M ENU , sel ect M edia Playe r
and pre ss OK .
For ins tru cti ons c oncernin g the P VR,
Vid eo, Music an d Pho to fu nct ions,
pleas e ref er to s ect ion 6.4.
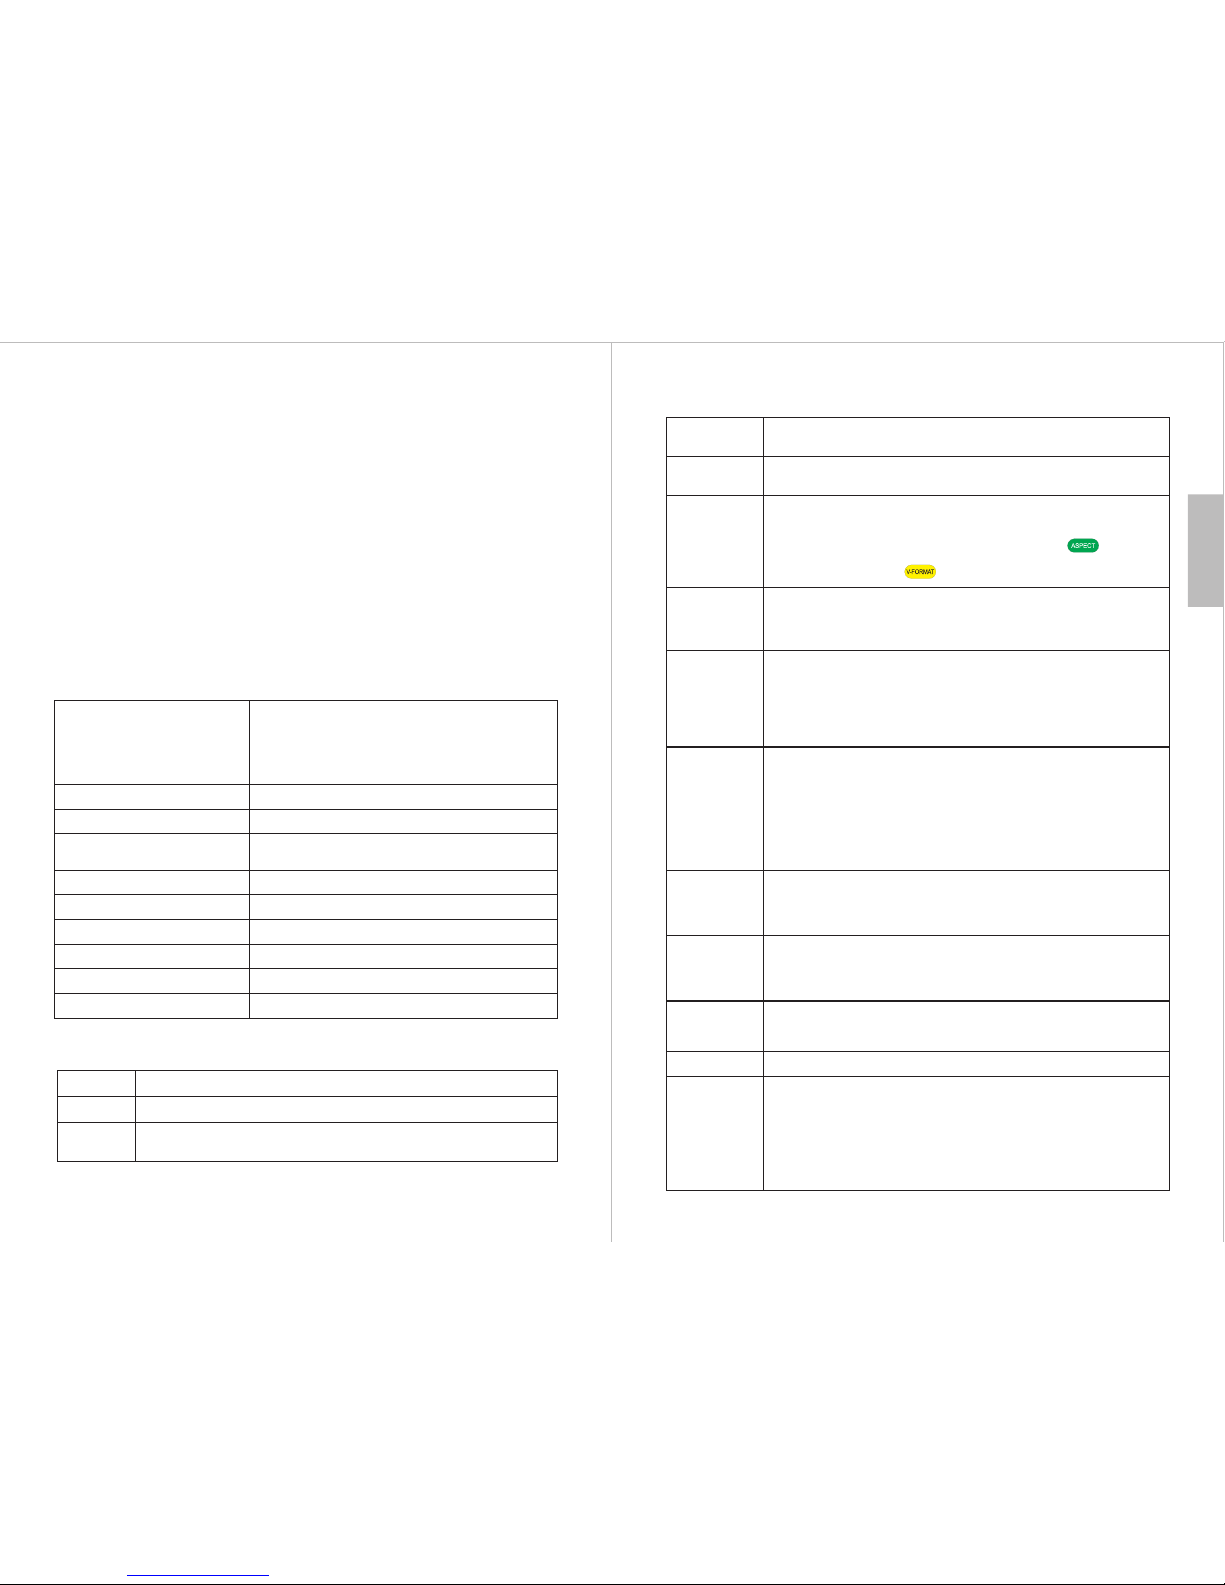
7.6.1 U SB De vic e Inf ormation
Path: M ENU > M edi a Pla yer >
USB Dev ice I nfo rma tion
Press M ENU , sel ect M edia Playe r
and pre ss OK . Sel ect U SB Device
Infor mat ion a nd pr ess OK.
From he re, y ou ca n see i nformati on
about t he US B sto rag e device, fo rma t
the dev ice o r cha nge i ts DVR
setti ngs .
-Form att ing y our U SB Device
Press t o for mat t he US B
devic e.
Choos e eit her FAT or NTFS for mat ,
then se lec t OK to c onf irm or Cance l to
retur n.
- USB Usa ge
Press to ad jus t whether th e USB
devic e wil l be us ed fo r recordin g onl y,
times hif tin g onl y or both reco rdi ng
and tim esh ift ing .
Selec t OK to c onf irm o r select Can cel
to retu rn.
7.6.2 P VR Se tti ngs :
Path: M ENU > M edi a Pla yer >
PVR Set tin gs
Press M ENU , sel ect M edia Playe r
and pre ss OK . The n, se lec t PVR
Setti ngs a nd pr ess O K.
- Tim eshift:
◄ / ► : Choos e bet wee n Off , Aut o
and Pau se.
Selec t Off t o dis abl e the Timeshi ft
funct ion .
Selec t Aut o to en abl e the Timeshi ft
funct ion a ll th e tim e.
Selec t Pau se so t hat t he Timeshif t
funct ion c an be u sed b y pressing
while w atc hin g liv e TV.
- Jump:
◄ / ► : Chang e dur ati on be tween 30
secon ds, 1 m inu te, 5 m in, 10min,
15min , 20m in an d 30 mi nutes.
While watchi ng a recording, pres s
to jump b ack war ds or t o jump
forwa rds b y the s ele cted amoun t.
Recor d
MP
Page 16
English
-24-
8. Specifications
DVB-T/T2 Band
6, 7, 8MHz
DVB-T/T2 Frequency
VHF: 177.5~226.5MH
UHF: 474~858MHz
z
Video Output
HDMI, SCART
USB Port
USB 2.0 host (5V)
Power Input
AC 220~240V 50/60Hz
Power consumption
< 12.0 W
Dimensions
168 x 118 x 37 mm
Net Weight
338g
DVB-T/T2 Video Decoder
MPEG-2 MP@HL
HEVC/H.265 up to 1920 x 1080 50/60Hz
AVC/H.264,
[email protected]
MPEG4 A SP
DVB-T/T2 Audio Decoder
MP3 WAV AAC AC3 WMA
Media Formats
mp3, ac 3, m4 a, aa c, wa v, wma , ogg , flag
jpg jp eg, b mp, p ng,
mpg, mp eg, d at, t s, tr p, tp, m2ts, v ob, m p4, m ov,
mkv, divx(opti ona l), a vi, f lv, 3g p
Music
Photo
Movie
- Tim eshift to Re cor d:
Use ◄ and ► t o cha nge b etw een On and Off .
Note: i f Time shi ft to R ecord is set t o On, t he pr ogr am will be rec ord ed wh ile
time sh ift ing .
- PS Reco rd:
The PS Re cor d (Pr ogr am Stream Re cor d) fu nct ion allows y ou to r eco rd on ly
the cur ren t pro gra m. Enablin g thi s fun cti on will redu ce th e siz e of th e
recor din g fil e.
◄ / ► : Chang e bet wee n On an d Off.
- Aft er Re cor ding:
Use ◄ and ► t o cha nge b etw een Watc h TV and Go to Sta nd- by Mo de.
-25-
Problems
9. Troubleshooting
No Power • Plug t he powe r cord int o the wal l socket t ightl y and turn o n the dev ice.
• The sta tus LED l ights gr een whi le switched on an d red in standby mo de.
• Che ck the co nnect ion to th e TV o r mon itor.
• Ens ure the c orrec t sourc e is sele cted.
• Che ck the vi deo inp ut on you r TV o r mon ito r.
• Cha nge the a spect r atio of t he DVB4 25 by pre ssing .
• Cha nge the V ide o Format of t he DV B42 5 to red uce t he re solu tion of
the i mage by p ressi ng .
Possible Causes and Solutions
No Signal
• The s ign al provid ed by t he ae rial m ay be t oo we ak or th e aeria l may be
imp roper ly conn ected .
• If yo u are usi ng a roof top aer ial, en sure th at the DV B425' s Ant enna
Pow er opti on is set t o Off. Pl eas e refe r to sect ion 7.2 .3.
• If yo u are usi ng an ind oor aer ial, tr y movin g it arou nd or cha nging
its p ositi on.
• Try us ing ano ther co nnect ion cab le.
Picture Freezing,
Sound Distorting
• If th e signa l is too we ak, ple ase try u sing a ro oftop a erial o r an
amp lifie d aeria l.
• You are u sing a ro oftop a erial , ensur e that th e Ant enna Po wer opt ion
is Of f. Plea se refe r to sect ion 7.2 .3 for fu rther i nstru ction s.
• If yo u are usi ng an ind oor aer ial, tr y movin g it arou nd or cha nging
its p ositi on.
• Cha nge the b atter ies.
• Ens ure tha t you are w ithin t he remo te cont rol's o perat ing ran ge
(ma x 8 meter s, 30°)
• Mov e the DVB 425 awa y from di rect su nligh t.
.
Remote control
does not work
• Ens ure tha t a USB sto rage de vice is c onnec ted to th e USB por t.
• Ens ure tha t there i s suffi cie nt fre e space o n the USB s torag e devic e.
• Try us ing ano ther US B stora ge devi ce with s uffic ien t space.
• Ple ase ref er to sec tion 6. 2.8.
No Recording
No Timeshift • The Time shift f uncti on is not e nable d by defa ult. Pl ease re fer to
sec tion 6. 2.9 for i nstru ction s on how to e nable i t.
• Ens ure tha t there i s suffi cie nt fre e space o n the USB s torag e devic e.
No sound
No image
• Pre ss <MUT E> to unm ute.
• Pre ss <VOL +> to inc rease t he volu me.
• Che ck the vo lume on t he TV or mo nit or.
• Che ck cabl e conne ction s.
Password
• The d efa ult pa ssword is 00 00.
Factory reset •
• Go to Too ls an d press OK to e nte r.
• Sel ect Fac tory Re set.
• Pre ss OK, th en ente r the pas sword . Th e def ault
pas sword i s 0000.
• Sel ect Yes to re set the d evice t o the def ault fa ctory s ettin gs or
sel ect No to e xit. On ce the de fault s ettin gs have b een res tored , the
Ins talla tion Gu ide wil l appea r.
Pre ss MENU t o acces s the mai n menu.
Page 17
-26-
English
Warning
Warning
This operati on instruction manual i s intended only for refer ence. No further
notice is requ ired for any modificati on to the information con tained therein. Due
to continuin g improvements, the fea tures and design are subj ect to change
without noti ce.
No user servic eable components are fi tted inside this Receiv er. Do not attempt
any repairs, a s this will invalidate th e warranty. Any repairs must be ca rried out
by either the ma nufacturer or their nom inated service centre . Parts inside this
set are subjec t to high voltage.
Manufactured under license from Dolby Laboratories.
Dolby and the double-D symbol are trademarks of Dolby Laboratories.
-27-
This product is guaranteed for twelve months from the date of the original purchase.
In the unlikely event of any defect arising due to faulty materials or workmanship,
the unit will be either replaced or repaired free of charge (where possible) during this
period. An alternative product will be offered in case the product is no longer
available or repairable.
This warranty is subject to the following conditions:
The warranty is only valid within the country where the product was purchased.
The product must be correctly installed and operated in accordance with the
instructions given in this user manual.
The product must be used solely for domestic purposes.
The warranty only covers the main units and does not cover the accessories.
The warranty does not cover damage caused by misuse, negligence,
accident or natural disaster.
The warranty will be rendered invalid if the product is resold or has been
damaged by inexpert repairs. The manufacturers disclaim any liability for
incidental or consequential damages.
Please consult one of our customer service advisers before returning any
product. We are not responsible for any unexpected product returns.
Any faulty product must be kept and returned in the original packaging with all
the accessories and the original copy of the purchase receipt.
The warranty is in addition to, and does not diminish, your statutory or legal rights.
Customer Service:
Telephone: +44 (0) 845 250 0586
Email: [email protected]
10. Warranty
This product is in compliance with the essential requirements and other relevant
provisions of Directive 2014/30/EU. The Declaration of conformity may be consulted
online at http://www.augustint.com/en/declaration.
 Loading...