

Page 1
August International Ltd
United Kingdom
Telephone:+44 (0) 845 250 0586
www.augustint.com
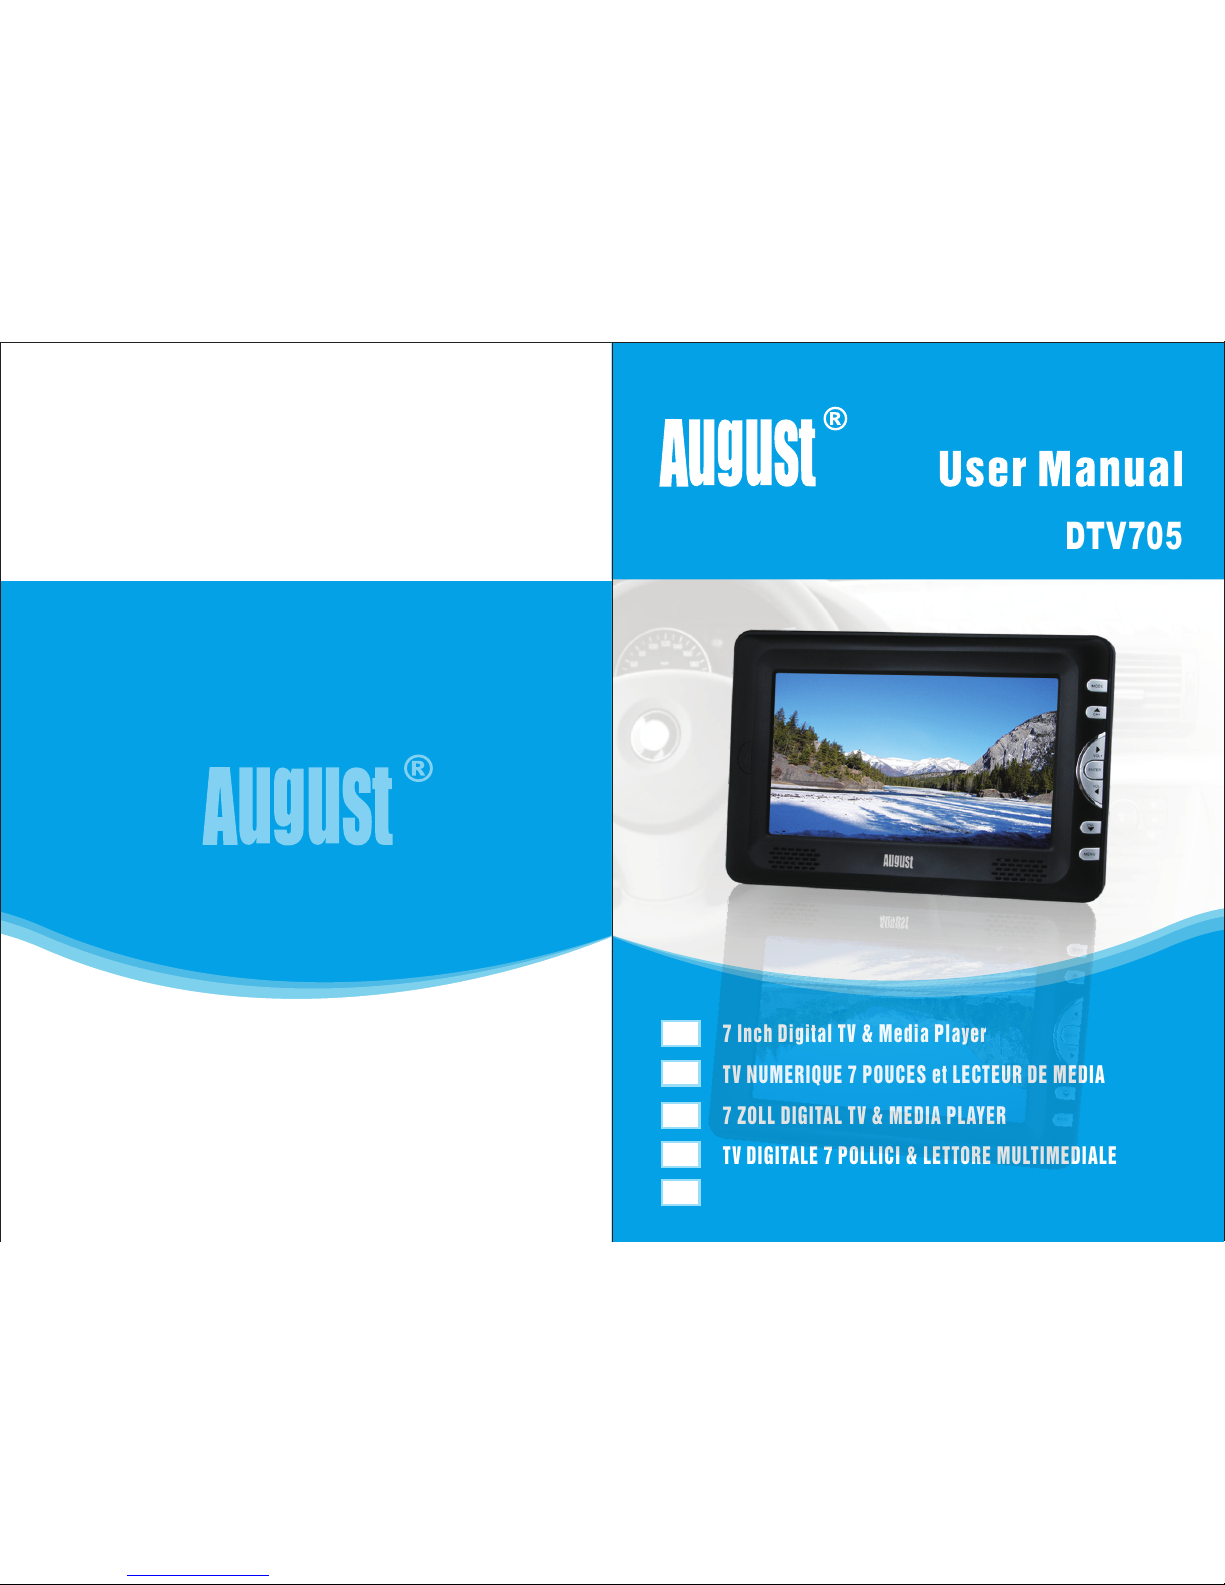
7 Inch D igit al TV & Med ia Player
7 ZOLL D IGITAL T V & MEDIA PLAYER
TV DIGITAL E 7 PO LLICI & L ETTORE MULTIMEDIALE
TV DIGITAL 7 PULGADA y LECTOR DE MEDIA
TV NUMER IQUE 7 PO UCES et LECTEUR D E MEDIA
DTV705
EN
FR
DE
IT
ES
Page 2

English
User Manual
Thank you for purchasing this August TV. You may already be familiar with using
similar products but please take the time to read these instructions carefully. They
are designed to familiarise you with the product’s many features and to ensure that
you get the very best from your purchase.
Safety
Please read the Safety Instructions before using this product to ensure your safety
and the safety of others.
Disposal
Please ensure the product and its accessories are disposed in compliance with
WEEE (Waste Electrical and Electronic Equipment) Directive and any other
applicable regulations. Please check with your local authority for current disposal
regulations.
Customer Service
If you need help, please contact our Customer Service:
Telephone: +44 (0) 845 250 0586
Email: [email protected]
Page 3

English
1. Safety Instru ction s
2. Acces sories
3. Part Names and Fu nctio ns
4. Connection
5. Unit Operatio n
6. Recharge the Ba ttery
7.
8. Troubl eshoo ting
9. Warranty
Specificatio ns
1
2
3
8
9
18
19
20
21
Contents
Quick Start Guide
DTV705
It is suggested that you use a roof top aerial when searching for TV channels for the first
time. If any signal is detected, the channel information will be saved onto the TV, you
may then switch back to the portable antenna supplied and change your location to find
the best place to receive the signal.
Connect the device to the mains power or use the built-in battery, switch on the Power
Switch to turn it on.
When turning on the device for the first time, “Installation Guide” will show, follow the
instructions to select desired OSD Language and Country, then press <ENTER>, the auto
search will then start. Once the search has finished, press <▲> or <▼> to select channels.
Press <TV/RADIO> to switch between Freeview TV and Radio channels.
If you have done the first time installation before, and would like to search for Digital
Freeview channels again, or if you have moved to a different region and need to search
channels again, press <MENU>, move to “Channel Search” menu, select Auto Search
and press <ENTER> to start the search. Once the search has finished, press <▲> or <▼>
to select channels. Press <TV/RADIO> to switch between Freeview TV and Radio
channels.
To play music, photos, movies or PVR from a USB memory stick, insert the memory
stick into the USB port, press <MENU>, move to Media Player menu, select “Music”,
“Photo”, “Movie” or “PVR”, press <ENTER> to view the file list. Select a file and press
<ENTER> to Play.
Please note that the signal strength in some areas may not be sufficient to support TV
reception using a portable aerial. The distance from the closest transmitter and other
factors such as surrounding buildings, the walls of your house, weather and electro-
magnetic interference caused by power and telecommunication infrastructure may affect
signal strength. Changing location may improve signal reception and a rooftop aerial
designed for digital TV can be used to achieve the best possible reception.
Reception can also be affected by various factors such as how close you are to
transmitters, tall buildings, thick walls, ceilings, weather etc.
For any further queries, please telephone August International Ltd helpline
+44 (0) 845 250 0586 or email [email protected]
1.
2.
3.
4.
5.
7.
6.
Page 4
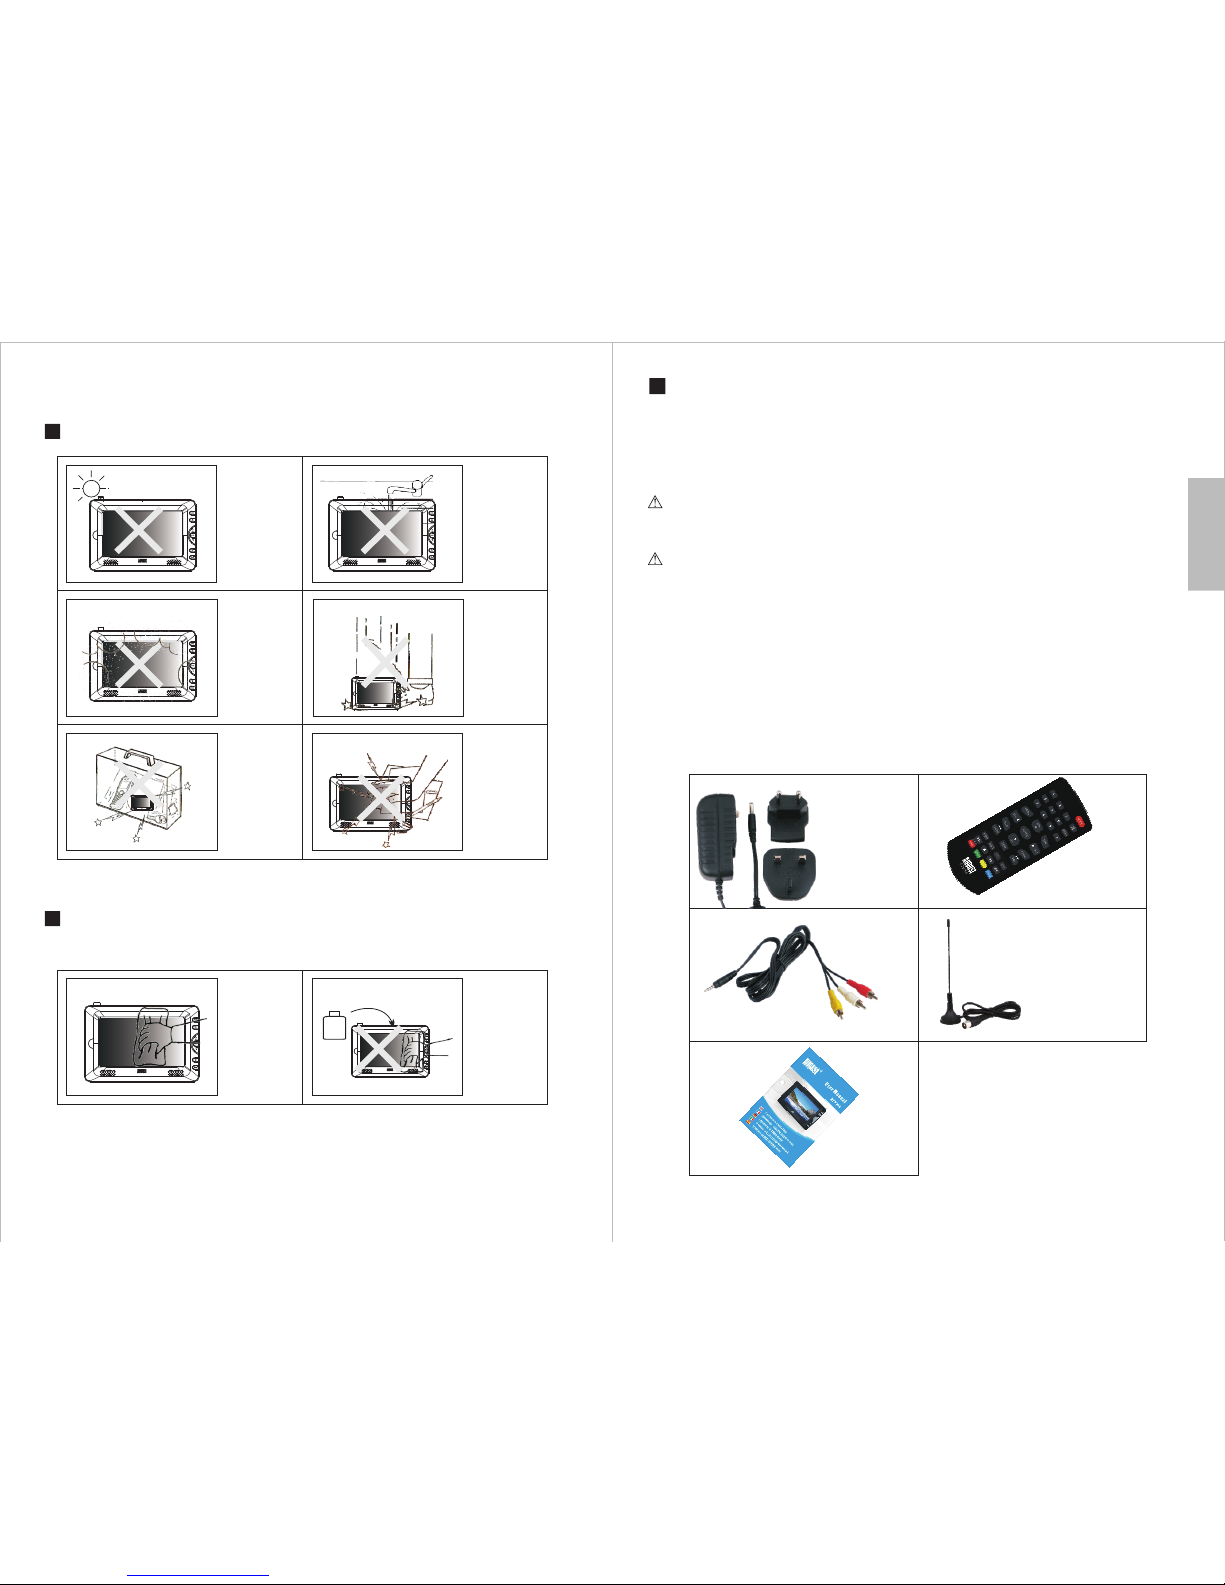
1. Safety Instructions
Maint ena nce
Please unplug all connection wires before start cle aning this machine.
Stora ge an d Use
Never expose
the TV set to
moisture,dust
oil or smoke.
Never put this
machine in
containers that
are unstable as
this may cause
damage.
Never extrude
or chafe this
machine with
sharp objects.
Keep this
machine away
from hot or
cold places.
Working
temperature of
this device is
0゚C ~ 50゚C,
storage
temperature is
Keep the TV
set away from
water or damp
environment.
Avoid
dropping or
exposing to
impacts.
Please wipe the
display screen
and buttons with
a softcloth. Only
clean the screen
with professional
LCD TV screen
cleanser.
Never wipe this
machine with an
abrasive cloth,
detergent
powder, alcohol
and benzene etc.
various
propellants or
chemical
cleaning products.
Alcohol
-1-
English
-2-
2. Accessories
AV cable
Digital TV antenna
AC/DC adaptor
Remote control
User manual
1. Use only the supplied power adaptor with this device. Failure to do so can cause damage to
the device and risk personal injury.
2. For the sake of safety, when you do not intend to use the display, please switch off the AC
adaptor or car adaptor.
Warning
For the sake of safety for yourself and others, please do not watch the TV while driving.
Special Notice
A few highlights or dark spots may appear on the LCD screen. It is a very common
phenomenon of active matrix display technology, and does not mean any defects or fault.
Never try to repair this machine by yourself. In case of any fault or failure, please turn off
the display at once, and notify our company or the corresponding dealer. The display is
made up of many precision electronic components. Any disassembly or modification may
lead to further damage.
Operation Precautions
-10゚C ~ 60゚C.
Page 5
-3-
English
-4-
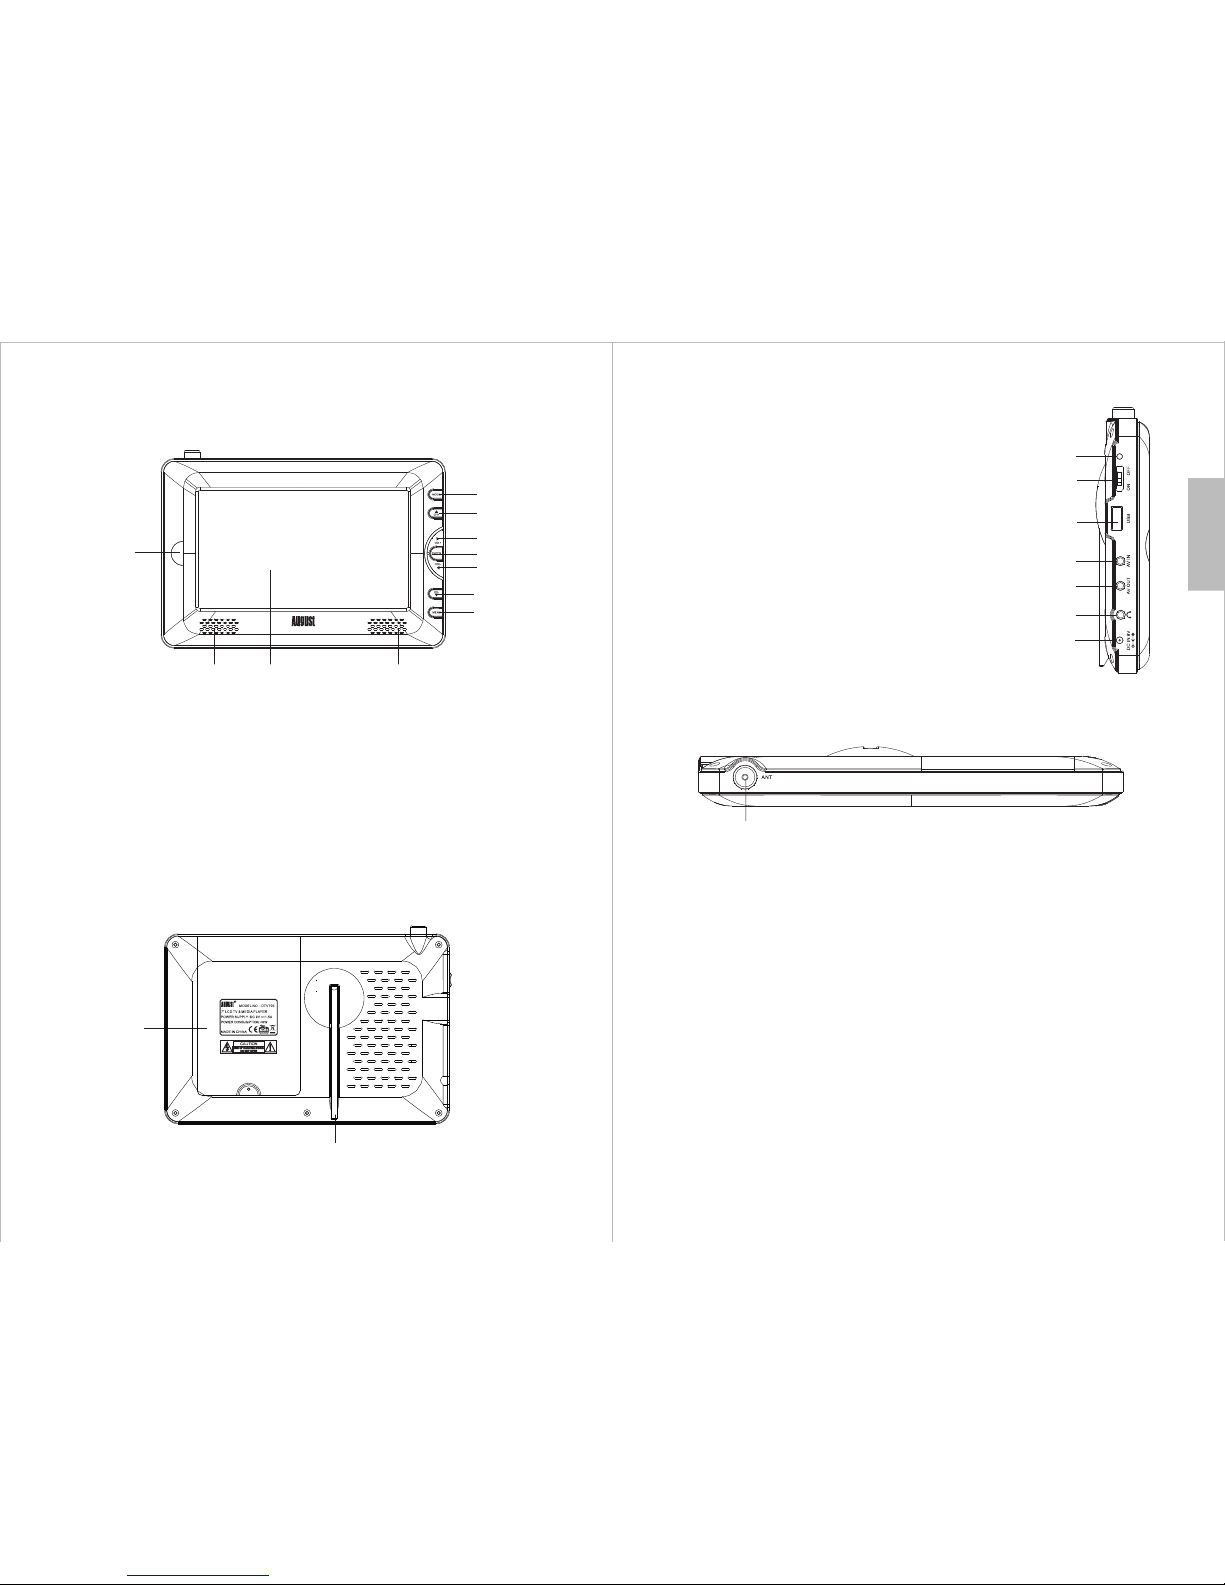
3. Part Names and Functions
3.1 Front
1.TV/AV mode button
2.CH+/CH- button: menu / channel selection
3.Volume+/- button: increase / reduce volume
4.Enter button: enter / confirm
5.Menu button: main menu / exit the menu
Enter / exit the LCD setup
6.Speakers
7.LCD display
8.IR receiver window
1.Battery compartment
2.Stand
3.2 Back
3.3 Left
3.4 Top
1. Power Indicator:
Orange and red indicate that the device is charging
depending on whether the TV is On or Off.
Green indicates that the device is working on the internal
battery or fully charged.
2. ON/OFF
3. USB Port
4. AV IN
5. AV OUT
6. Earphone Socket
7. 9V DC IN Socket
1
1. Antenna In
1
2
3
4
2
6 7 6
8
5
3
2
1
3
4
5
6
7
2
1
Page 6
English
-6-
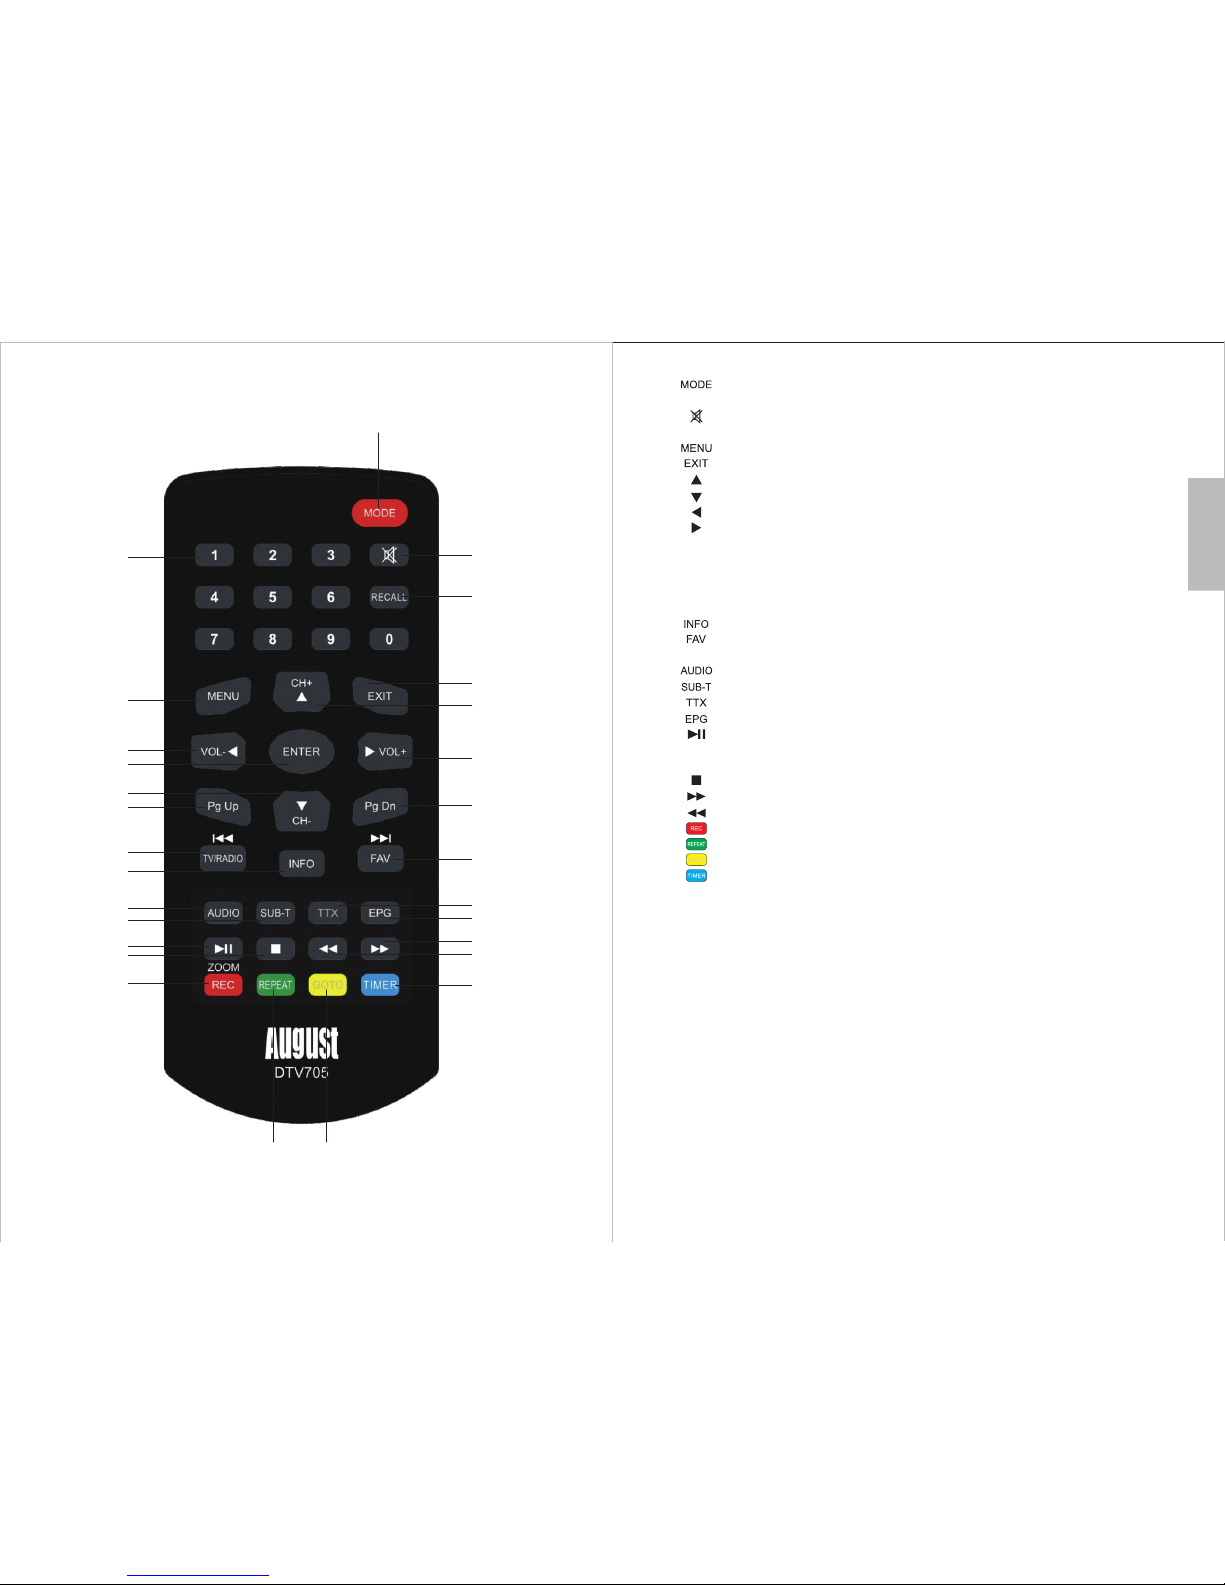
3.5 Remote Control
3.5.1 Remote Button Functions
1. TV an d AV mode switch
2. Numbers
3. Mute/unmute the sound
4. Change back to the previous channel
5. Enter the main menu
6. Exit
7. Up / Channel up
8. Down / Channel down
9. Left / Volume down
10. Right / Volume up
11. Conf irm
12. Page up
13. Page down
14. TV and R adi o swi tch ( TV mode)
15. Information
16. Favourite channel list (TV mod e)
17. Audio language
18. Subtitle
19. Teletext ( not a vai lab le in U K)
20. Electronic Program Guide
21. Timeshift (TV mode )
22. Stop
23. Fast Forward (media player mode)
24. Rewind (media player mode)
25. Record / Zoom in
26. Repeat (media player mode)
27. Go To fun cti on (m edi a pla yer m ode )
28. Schedule
Previous Track (media player mode)
Next track (media player mode)
Play / Pause (media player mode)
LCD setup (AV mode)
0-9
Pg Up
RECALL
ENTER
Pg Dn
TV/RADIO
2
5
9
8
12
11
14
15
17
18
21
22
25
3
4
6
7
13
10
16
19
20
23
24
28
-5-
2726
1
Page 7
English
-8-
-7-
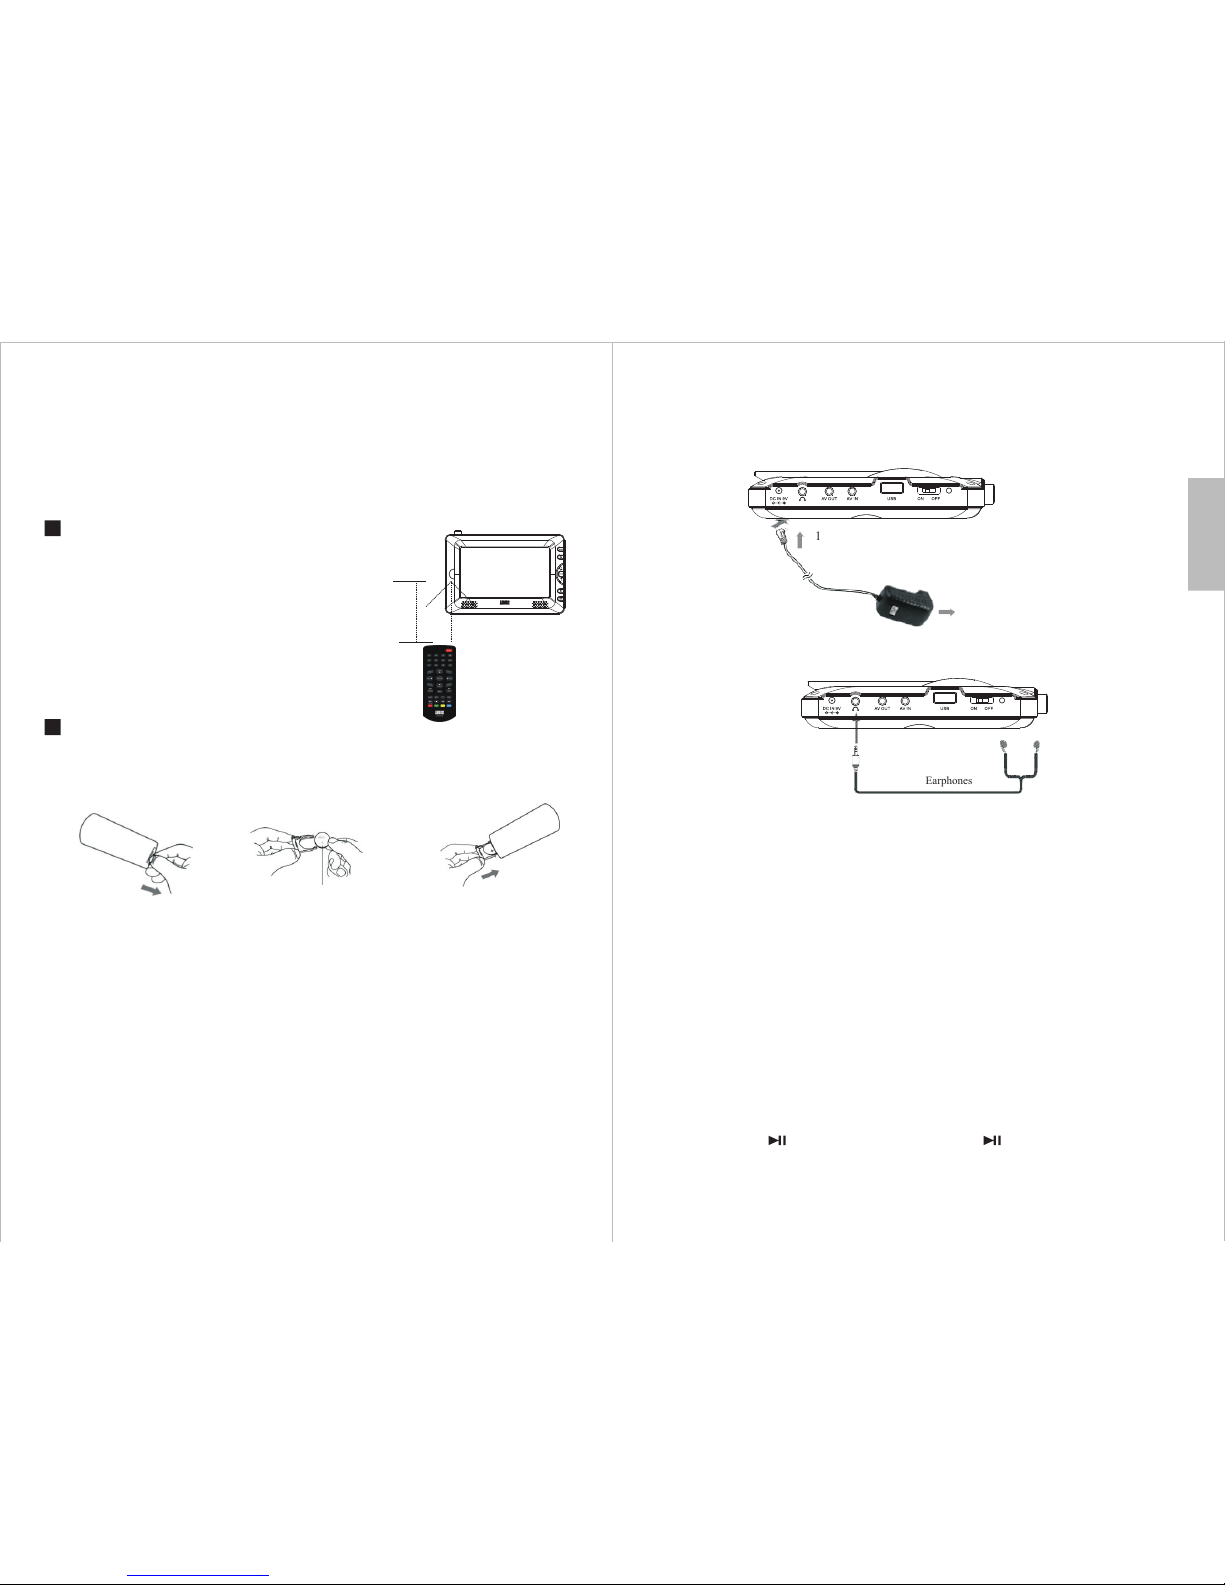
3.5.2 Use of the Remote Control
Please remove the PVC packaging before using the remote control for the first time.
1. Do not expose the remote control to direct sunlight or very strong/bright light.
2. Do not drop or step on the remote control or subject it to shocks.
3. Keep the remote control away from extreme hot or humid environment.
4. Keep the remote control away from water.
Operating range
1. The IR sensor on the remote control should aim
directly to the sensor on the front of the device.
It may not be possible to operate the device if
there are obstacles between it and the remote sensor.
2. Use the remote control no further than 5 meters away
from the sensor.
3. The receiving angle range should be ±30°.
4. Connection
4.1 Connecting the power supply
1. Connect the DC output of the AC/DC adaptor to the TV’s DC IN 9V socket.
2. Plug the power adaptor into an AC power socket.
4.2 Connecting the earphones
Plug the earphone’s 3.5mm connector into the TV’s earphone socket.
Whilst earphones are connected, no sound will be played through the TV’s speakers.
*Note:
1. Please ensure proper disposal of used batteries.
2. To prevent leakage of fluid from the lithium battery, remove the battery when not using the
remote control for a long period of time. If the battery leaks fluid, carefully wipe it out of the
battery case, then change to a new lithium battery.
Replacing the battery
If the remote control does not function or if the operating range becomes reduced, replace the
old battery with a new one.
Pull out the battery holder
and remove the old battery.
Push back the holder.
+
Lithium battery(CR2025)
30°
<5m
30°
1
2
Earphones
4.3 Connecting the AV cable
4.3.1 AV IN
Connect the yellow wire of the AV cable to the source’s video out socket, the white wire and
red wire to the source’s left audio socket and right audio socket. Then insert the 3.5mm AV
cable connector into the TV’s AV IN socket.
4.3.2 AV OUT
Connect the yellow wire of the AV cable to the target’s video out socket, the white wire and
red wire to the target’s left audio socket and right audio socket. Then insert the 3.5mm AV
cable head into the TV’s AV OUT socket.
4.4 LCD Setup
In TV mode, to enter or exit the LCD setup, press and hold the <MENU> button on the TV
for 3 seconds and then release .
In AV mode, press < > to enter the LCD setup. Press < > again to exit.
In LCD setup, press <▲> or <▼> to select a item, then press <◄> or <►> to adjust the value.
Insert the new battery into the battery
holder with the + side facing upwards.
Page 8
English
-10-
-9-
5. Unit Operation
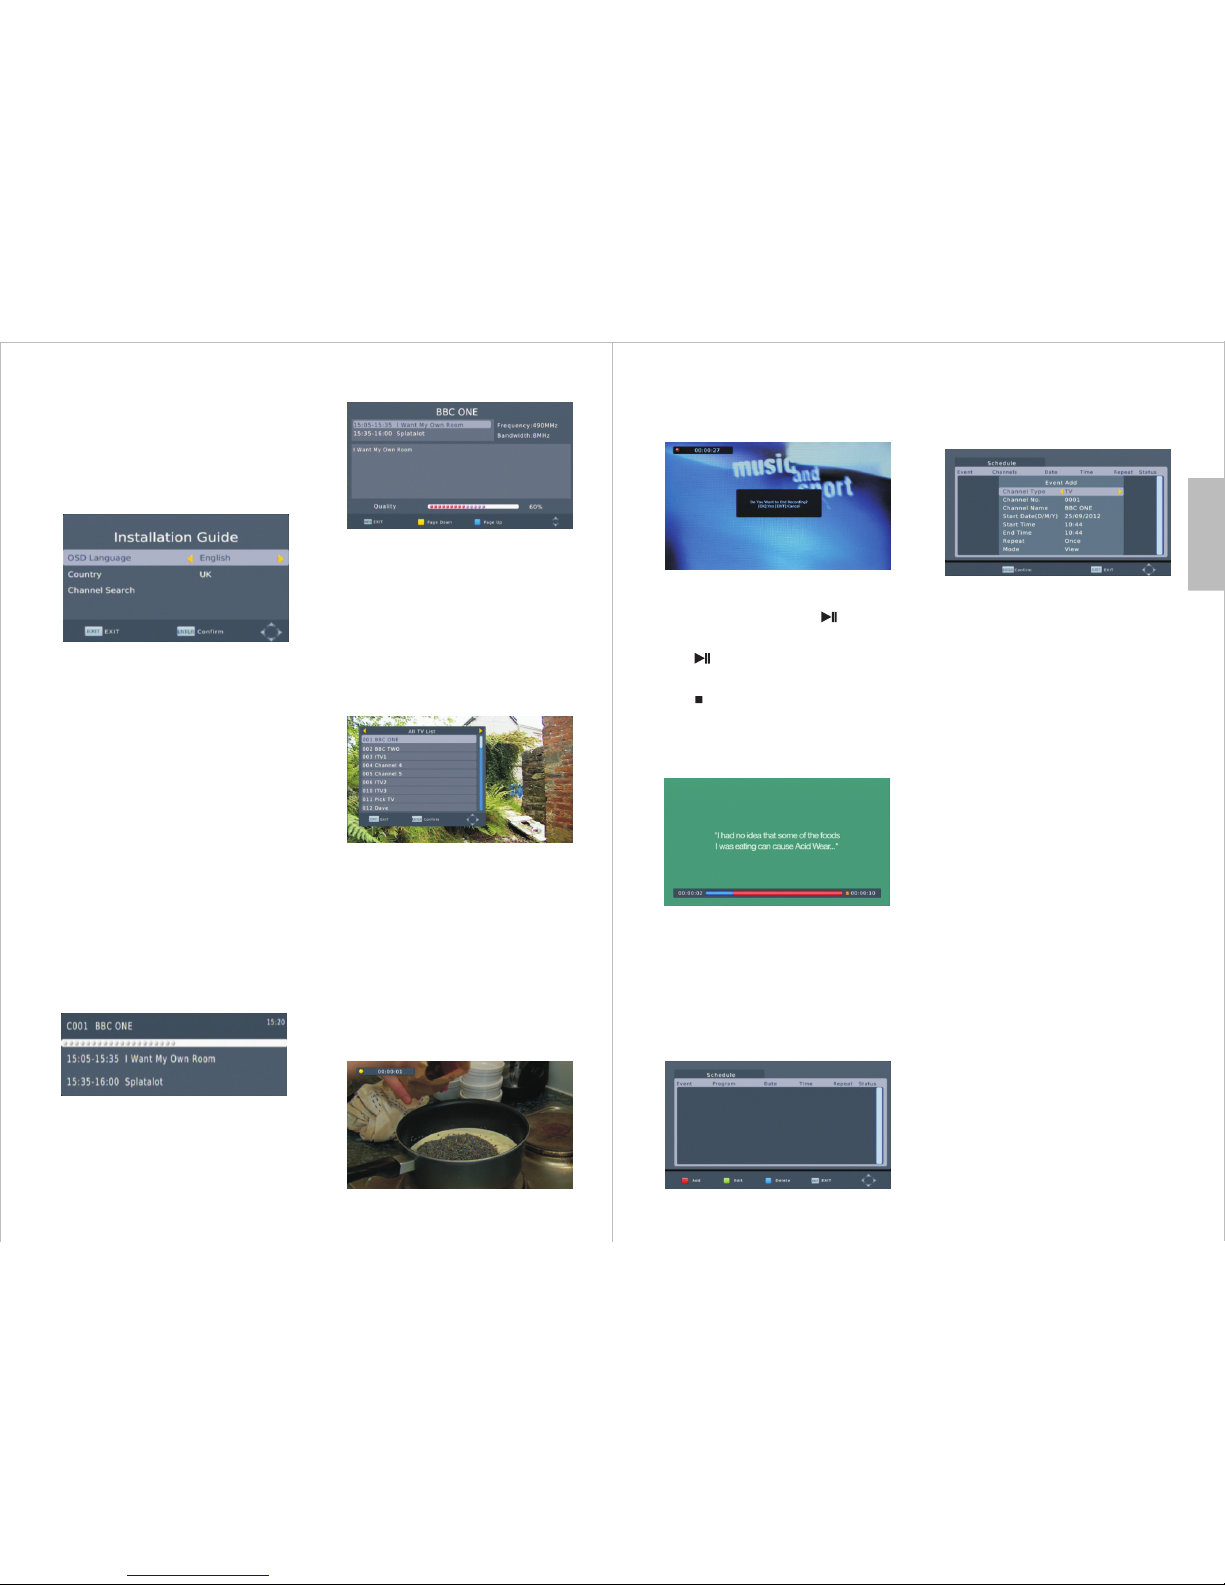
5.1 Initial Installation
After you first switch-on your device, an
Installation Guide is displayed that allows
you to set your location preferences and
search for channels.
Press to navigate up or down.
Press <◄> or <►> to change the options.
After setting the OSD Language and Country,
then press <ENTER> to start the search.
Press <EXIT> to enter the main menu.
After the search has finished, you can start
watching any channels which have been found.
Press <TV/RADIO> to switch between
Freeview TV and Radio channels. If no
channels are found, it will return to the
Installation Guide. You can try a different
location or use a rooftop aerial.
<▲> or <▼>
5.2 Channel Information
Press <INFO> in TV display mode to show
Now and Next for the current station.
Press <INFO> again to show detailed
information.
5.3 Channel List
Press <ENTER> in TV display mode to show
the channel list. Press <◄> or <►> to switch
between the TV and Radio channel list.
Press to select the desired
channel and press <ENTER> to confirm.
Press <EXIT> to close the list.
<▲> or <▼>
5.4 Recall
Press <RECALL> in TV display mode to
change back to the last channel you watched.
5.5 Record
Plug a USB memory stick into the USB
socket, then press < > to record the
channel you are watching. Whilst recording
a timer will show in the top left corner of
the screen.
REC
5.6 Time Shift
To enable Time Shift, press whilst
watching TV, the program will pause.
Press again to resume, <◄◄> to
rewind and <►►> to fast forward.
Press to exit Time Shift and return to
the live broadcast.
< >
< >
< >
To stop recording, press again.
press <ENTER> to confirm or
keep recording.
<REC>
Then
<EXIT> to
5.7 Schedule
Press in TV display mode to
Schedule. This function supports
viewing or scheduled recording
You can choose to record at
daily, weekly or schedule a
one off recording.
<TIMER>
enter the
scheduled
of Programs.
the same time
5.7.1 Event Add
To add an event, press he
window will pop up.
<REC> , t
Event Add
Press to select an item,
press <◄> or <►> to change the settings.
Then press <ENTER> to confirm or
press <EXIT> to exit.
<▲> or <▼>
5.7.2 Event Edit
To edit an existing event, press<▲> or <▼>
to select the event and press <REPEAT>.
5.7.3 Event Delete
To delete an existing event, press <▲> or
<▼> to select the event and press <TIMER>.
Then press <ENTER> to confirm or press
<EXIT> to cancel.
Press <EXIT> to exit Schedule.
5.8 AV IN/AV OUT
The DTV705 supports both AV IN and AV
OUT.
To use AV IN, press <MODE> to enter AV
mode then connect your source device using
the provided AV cable.
To use AV OUT, connect the TV to your
target device using the provided AV cable.
Note: Time Shift requires a USB memory
stick with sufficient free space to be inserted.
Page 9
English
-12-
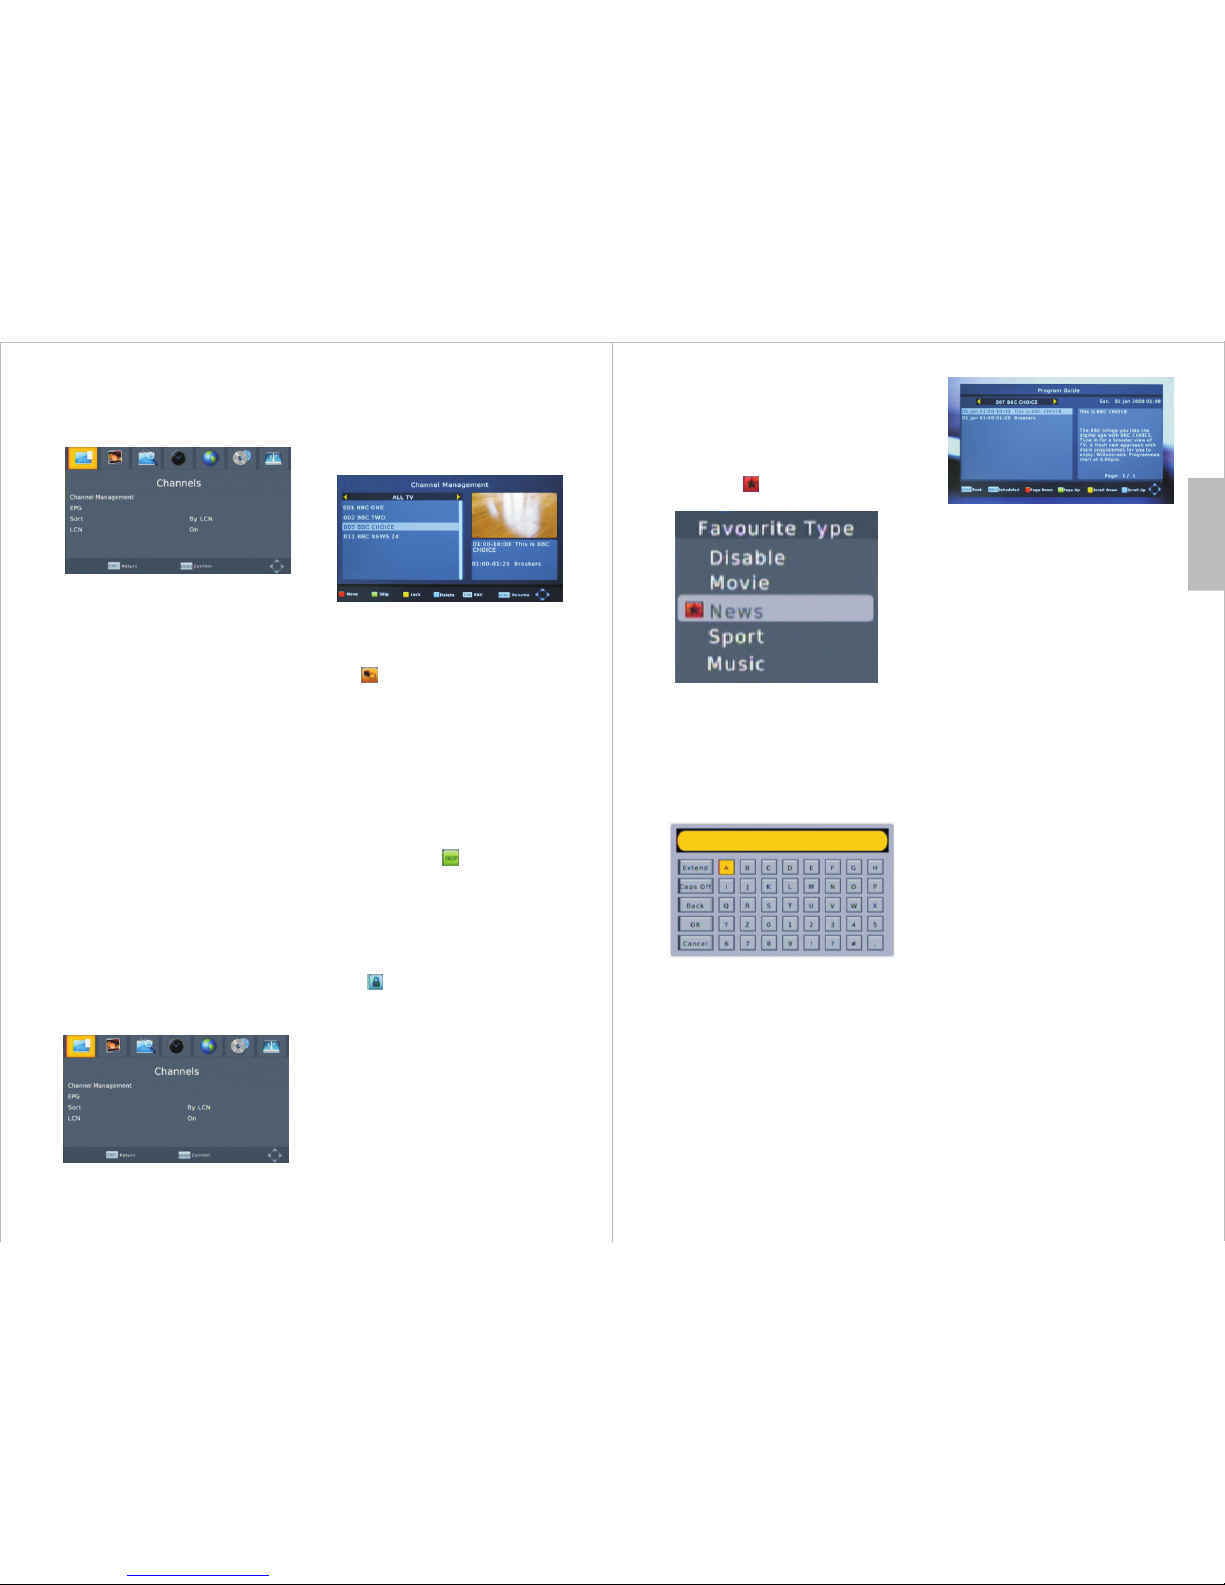
5.9.1.2 EPG
The EPG (electronic program guide) is a
schedule of programs due to be broadcast in
the next 7 days. Please note that not all
channels offer listing information.
<▲> or <▼>
<◄> or <►>
Channel Select
Program Select
To schedule recording or viewing, select the
program you would like to watch or record
and press <ENTER>. This opens the Event
Add window. (Please refer to 5.7.1)
Pressing <INFO> whilst in the EPG opens
the Schedule window where you can view a
list of scheduled events.
5.9.1.3 Sort
Sort can be used to automatically reorder
your channels by LCN (logical channel
number), ONID (Original Network ID),
Service Name and Service ID. Press <◄> or
<►> to select an option.
5.9.1.4 LCN
Press <◄> or <►> to enable or disable
Logical Channel Number.
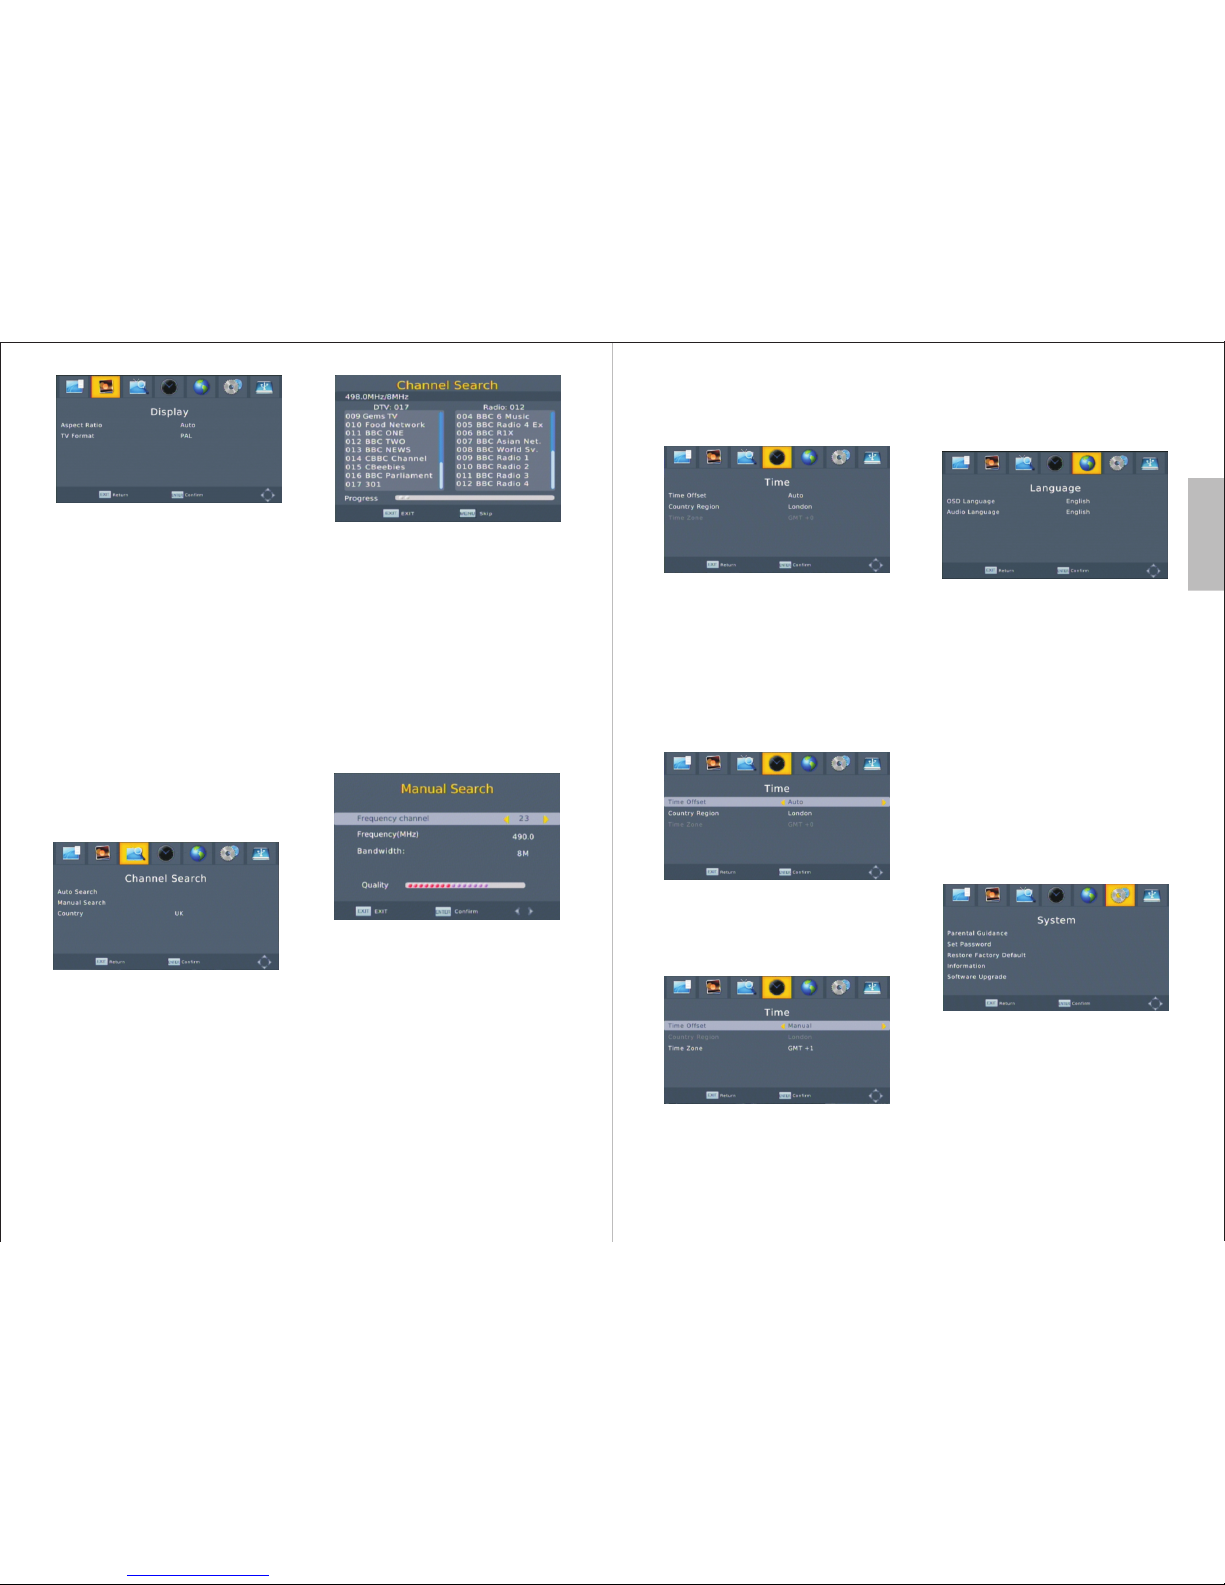
5.9.2 Display
The Display menu allows you to change
aspect ratio and TV format.
To rename a channel, press <▲> or <▼> to
highlight the channel then press <RECALL>.
To use the onscreen keyboard, press <▲>,
<▼>, <◄> or <►> to select a character then
press <ENTER> to confirm.
To add a channel to your favourites list, press
<▲> or <▼> to highlight the channel then
press <FAV>. Select a category from the list
and press <ENTER> to confirm. Press <EXIT>
to close the window. Favourite channels are
indicated by the icon.
-11-
5.9 Main Menu
Press <MENU> to enter the main menu,
press <EXIT> to exit the menu.
In the main menu, press <◄> or <►> to
select between the Channels, Display,
Channel Search, Time, Language, System or
Media Player submenus. Press <ENTER> to
enter a submenu or press <EXIT> to exit the
main menu.
In a submenu, press <▲> or <▼> to select
an item, then press <ENTER> or press
<◄> or <►> to change the settings.
Press <EXIT> to save the settings and go
back to the previous menu.
5.9.1 Channels
The Channels menu allows you to manage
channels, access the Electronic Program Guide
(EPG), sort channels in different orders and
enable or disable Local Channel Numbers
(LCN).here are four items in the Channels
submenu, Channel Management, EPG, Sort
and LCN.
5.9.1.1 Channel Management
After selecting Channel Management press
<ENTER> then type in the password to
continue. The default password is 000000.
To move a channel, press to
highlight the channel and to select
the icon will display next to the channel
<▲> or <▼>
<REC>
it,
name. Then press <▲> or <▼> to move the
channel to the desired position and press
<ENTER> to confirm.
To skip or unskip a channel, press <▲> or
<▼> to highlight the channel then press
<REPEAT>. Skipped channels are not found
whilst browsing up and down channels and
are indicated by the icon.
To lock or unlock a channel, press <▲> or
<▼> to highlight the channel then press
<GOTO>, you will be prompted to input
your password. Locked channels are indicated
by the icon.
To delete a channel, press <▲> or <▼> to
highlight the channel then press <TIMER>.
Press <ENTER> to confirm or press <EXIT>
to cancel.
Page Down or Up
Scroll through program
description
<REC> or
<REPEAT>
<GOTO> or
<TIMER>
Page 10
English
-14-
-13-
5.9.2.1 Aspect Ratio
Press <◄> or <►> to select between Auto,
16:9 Wide Screen, 16:9 Pillar Box, 16:9 Pan
& Scan, 4:3 Full, 4:3 Letter Box and 4:3 Pan
& Scan aspect ratios.
5.9.2.2 TV Format
Press <◄> or <►> to select a between PAL
and NTSC TV formats.
5.9.3 Channel Search
The Channel Search menu allows you to
search for channels and change channel
search settings.
5.9.3.1 Auto Search
Select Auto Search and press <ENTER> to
start searching for channels, the selected
countries settings will be used.
If no channels are found, the Installation
Guide window will be displayed (Please refer
5.1)
Press <EXIT> during the search to stop
searching.
Press <MENU> during the search to skip the
current frequency.
5.9.3.2 Manual Search
Manual Search is used to search for channels
on a specific frequency.
Press <◄> or <►> to select the desired
Frequency and press <ENTER> to start
searching. The selected countries settings
will be used.
5.9.3.3 Country
Press <◄> or <►> to select the countries
broadcast settings to use in auto search or
manual search.
5.9.4.1 Time Offset
Press <◄> or <►> to select between manual
and automatic Time Offset.
5.9.4.2 Country Region
Press <◄> or <►> to select which regions
time to use for automatic time offsetting.
5.9.4.3 Time Zone
Press <◄> or <►> to select a time zone to
use for manual time offsetting.
5.9.5 Language
The Language menu allows you to change
language settings for the OSD and audio.
Press <▲> or <▼> to select an item and
press <◄> or <►> to change the language.
Whilst watching TV you can press <AUDIO>
to access language settings for the audio.
5.9.6 System
The System menu allows you to change
parental guidance and password settings,
restore the device to factory default, view
system information and upgrade the software.
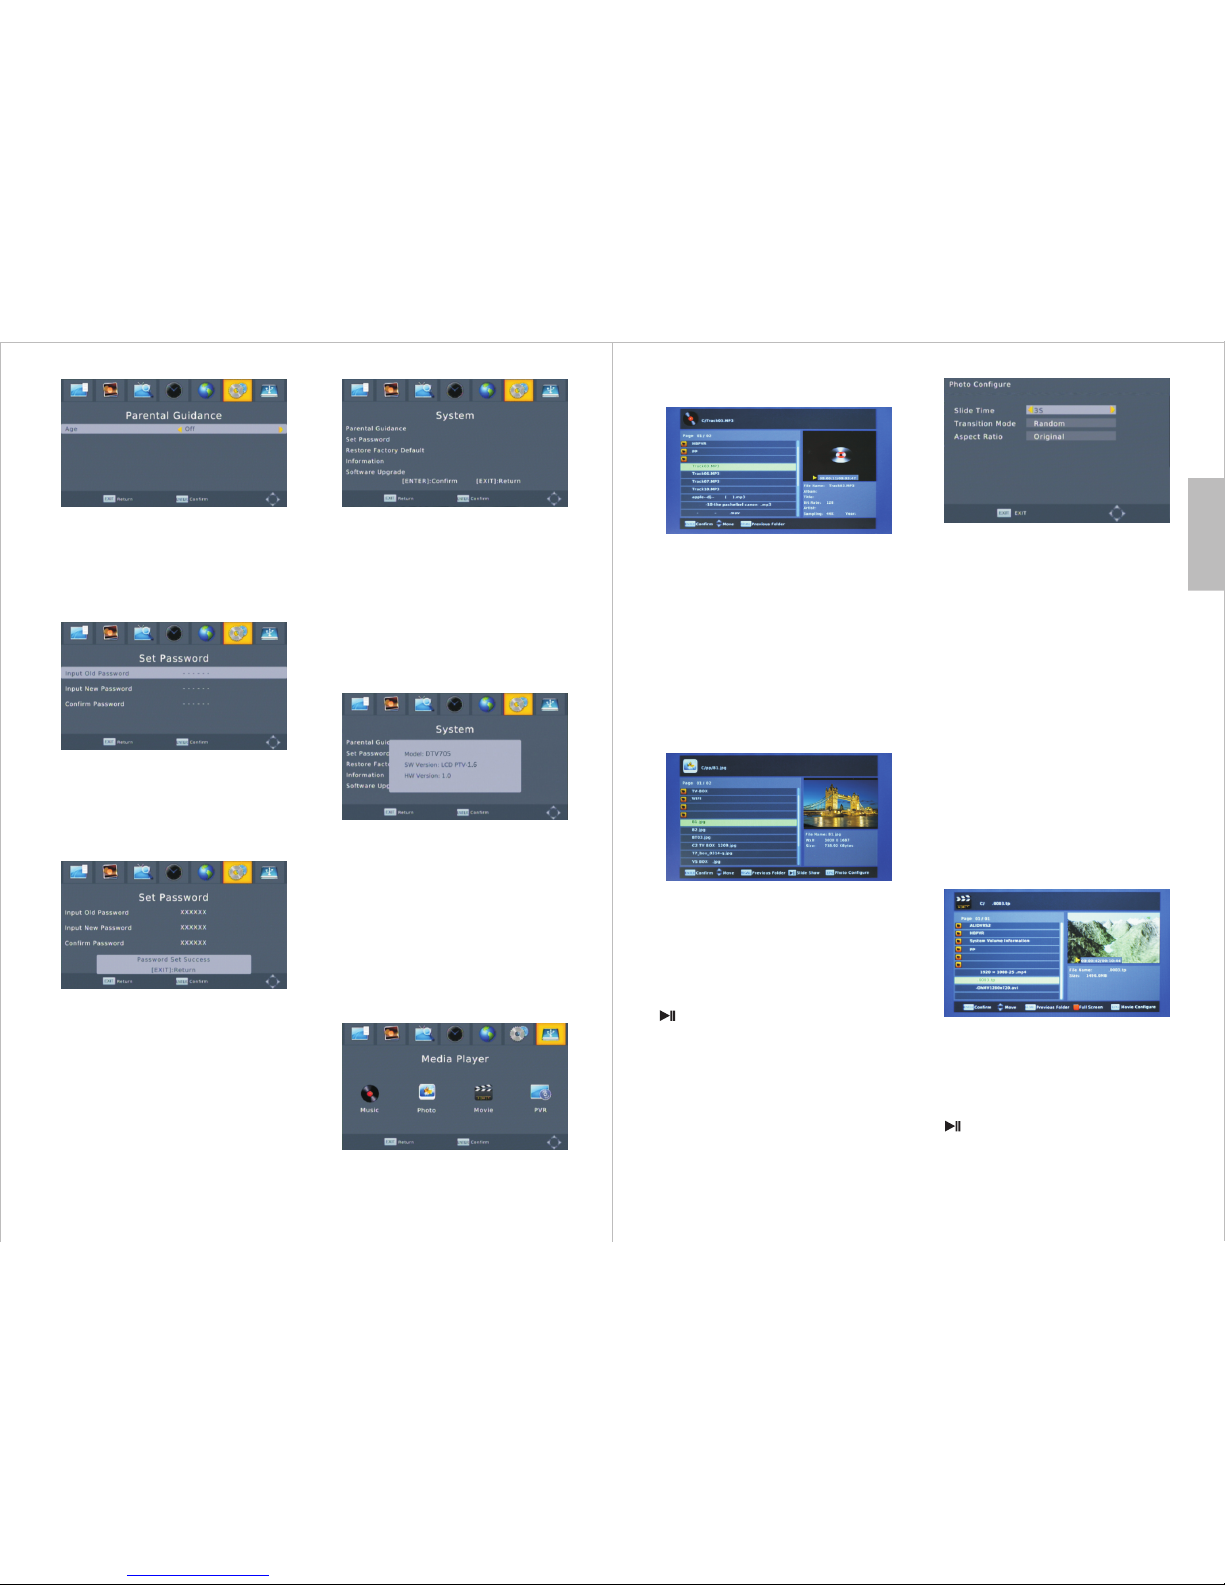
5.9.6.1 Parental Guidance
Enter your password to access the parental
guidance settings then use <◄> or <►> to
select between off, or to specify an age group
between 04 and 18. The default password
is 000000.
5.9.4 Time
The Time menu allows you to change the
system time.
Page 11
English
-16-
-15-
5.9.6.2 Set Password
Enter your current password using the number
buttons on the remote control then enter your
new password twice.
After entering your new password a pop up
message will appear. Press <EXIT> to close
the pop up message and return to the
password menu.
5.9.6.3 Restore Factory Default
Press <ENTER> then enter your password
and press <ENTER> to reset the device to
factory default settings or press <EXIT> to
return to the system menu.
Once the default settings have been restored,
the Installation Guide will appear. (Please
refer 5.1)
5.9.6.4 Information
Press <ENTER> to display information on
the device model, current software and
hardware version.
5.9.6.5 Software Upgrade
This function is for manufacturers use only.
5.9.7 Media Player
Media Player allows you to play music,
photos, movies and PVR files from a USB
memory device. The supported formats can
be found in chapter 7, Specifications.
5.9.7.1 Music Player
<▲> or <▼>
<ENTER>
<RECALL>
<REPEAT>
<GOTO>
<EXIT>
Select a folder or file
Open folder or play a file
Go back to previous folder
Set repeat mode
Jump to a specific track
position
Exit music player mode
5.9.7.2 Photo Player
<▲> or <▼>
<ENTER>
<RECALL>
< >
<REPEAT>
<EXIT>
Select a folder or preview
a file
Open folder or display a
file in full screen
Go back to previous folder
Start the slide show
Set repeat mode
Exit the slide show or
photo player mode
Press <EPG> to enter Photo Configure.
Slide Time:
The duration each picture is displayed for in
a slide show. It can be set to between 1 and
8 seconds.
Transition Mode:
There are 60 different transition modes to
select. It controls how the pictures transition
in a slide show.
Aspect Ratio:
This is used to control the aspect ratio of
pictures in a slide show. There are two
options, Original and Screen Fit.
5.9.7.3 Movie Player
<▲> or <▼>
<ENTER>
<RECALL>
< >
<◄◄>
<►►>
Select a folder or file
Open folder or preview
a file
Go back to previous folder
Pause/Resume
Rewind
Fast forward
Page 12
English
-18-
-17-
< >
< >
<REC>
<REPEAT>
<GOTO>
<EXIT>
Next
Previous
Enter or exit full screen
Set repeat mode
Jump to a specific track
position
Exit the movie player mode
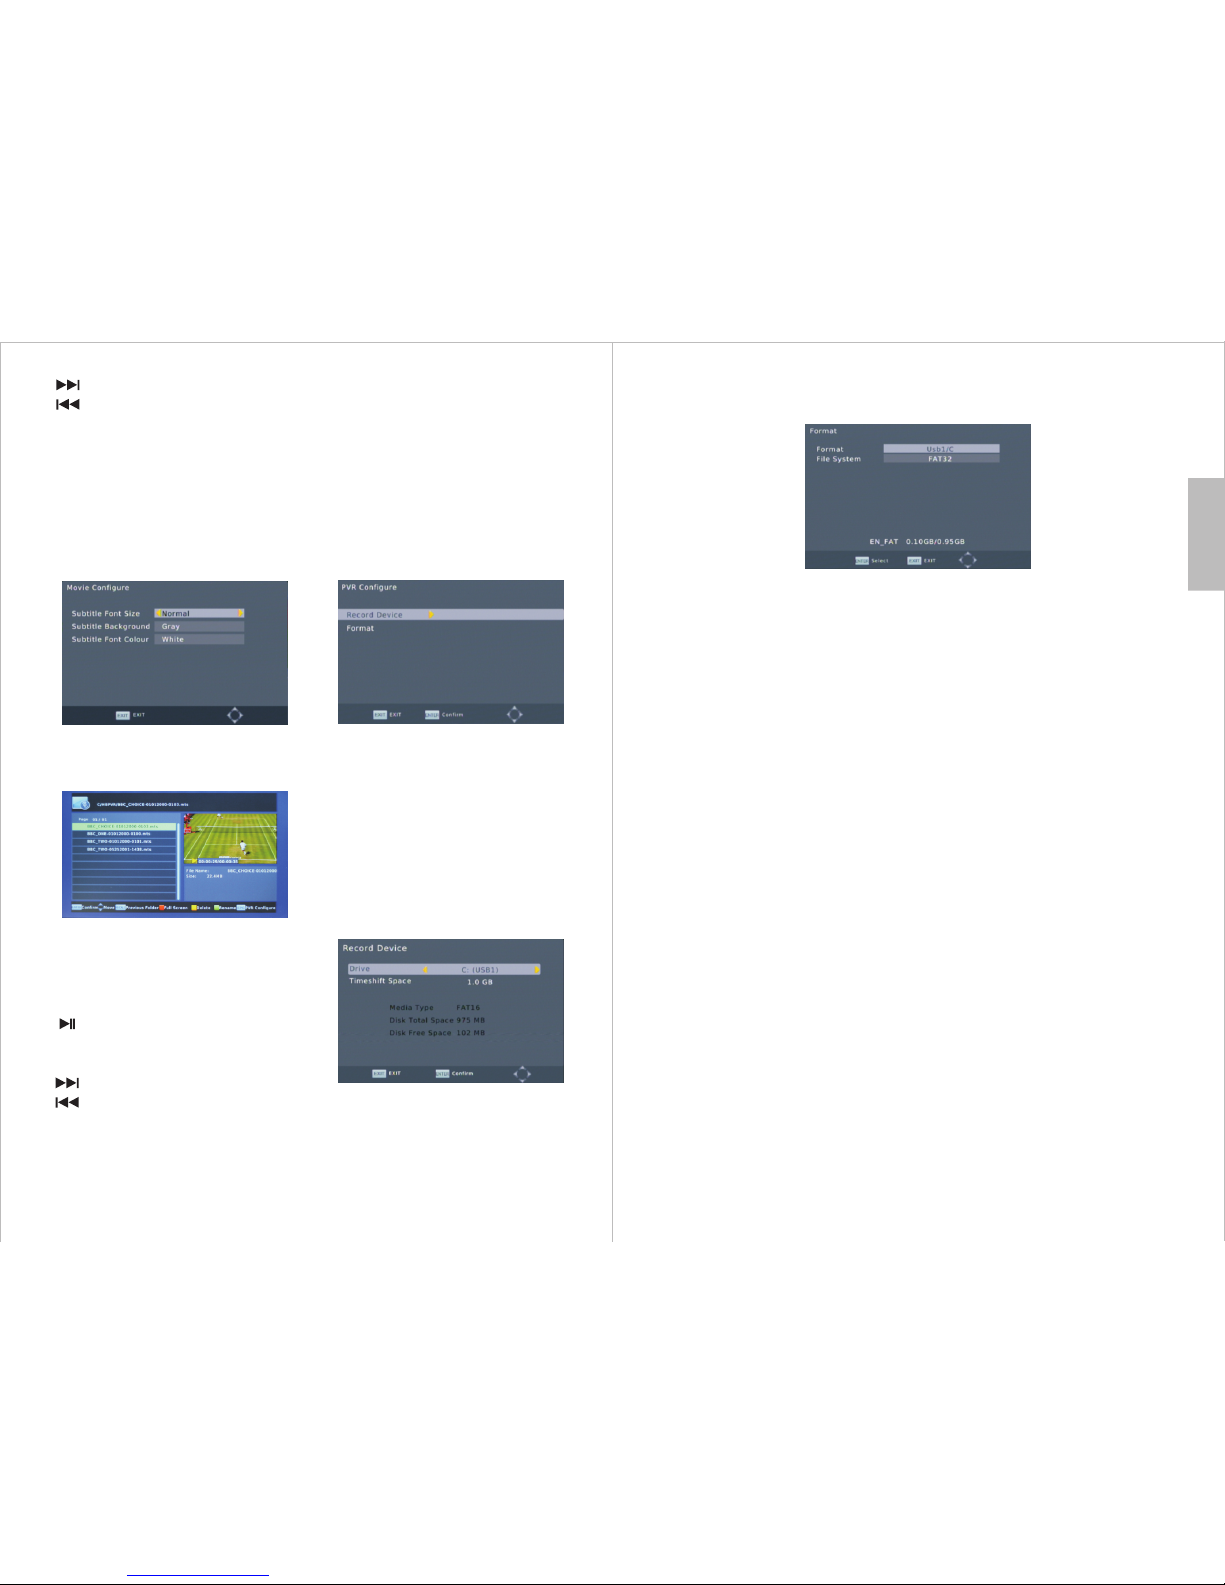
Press <EPG> to enter Movie Configure and
set the movie’s subtitle options.
5.9.7.4 PVR Player
<▲> or <▼>
<ENTER>
<RECALL>
< >
<◄◄>
<►►>
< >
< >
<REC>
<EXIT>
Select a folder or file
Open folder or preview
a file
Go back to previous folder
Pause/Resume
Rewind
Fast forward
Next
Previous
Enter or exit full screen
Exit the PVR player mode
During playback:
<REPEAT>
<GOTO>
Set repeat mode
Jump to a specific track
position
After stopping playing:
<REPEAT>
<GOTO>
Rename a file
Delete a file
Press <EPG> to enter PVR Configure.
Users can select the record device and format
the USB memory stick in PVR Configure.
Record Device:
Users can select which disk is used for record
and time shift and set the Timeshift Space in
Record Device. Press <▲> or <▼> to select
an item and press <◄> or <►> to change the
settings.
Format:
Format allows you to format a USB memory device in either FAT32 or NTFS.
Press to highlight File System then press <◄> or <►> to select between
FAT32 and NTFS. Press < ▲> or <▼> to highlight Format and press <ENTER>. Then press
<ENTER> to begin formatting or press <EXIT> to return to the Format menu.
6. Recharge the battery
Connect the mains adaptor to the DC IN 9V socket on the TV.
When the TV is on, the power indicator lights orange when charging and green when the
device is fully charged.
When the TV is off, the power indicator lights red when charging and turns off when the
device is fully charged.
A red battery icon will be flashing in the right top corner of the screen when the battery is
low and the TV will automatically switch off.
It normally takes about 3 hours for the battery to fully charge, the TV will play up to 2 hours.
<▲> or <▼>
Page 13
English
-20-
-19-
DVB-T Band
6, 7, 8 MHz
DVB-T Frequency
VHF: 177.5~227.5 MHz
UHF: 474~858 MHz
AV In
CVBS, L/R
AV Out
CVBS ,L/R
USB Port
USB 2.0 host (5V/500mA)
Built-in Speaker
2 x 1.5W, 8 ohm
Power Adaptor
AC 100~240V 50~60Hz
DC 9V/1.5A
Power consumption
< 9 W
Dimensions
210 x 140 x 30 mm
Net Weight
500g
Built-in Battery
7.4V 1800mAh
rechargeable battery
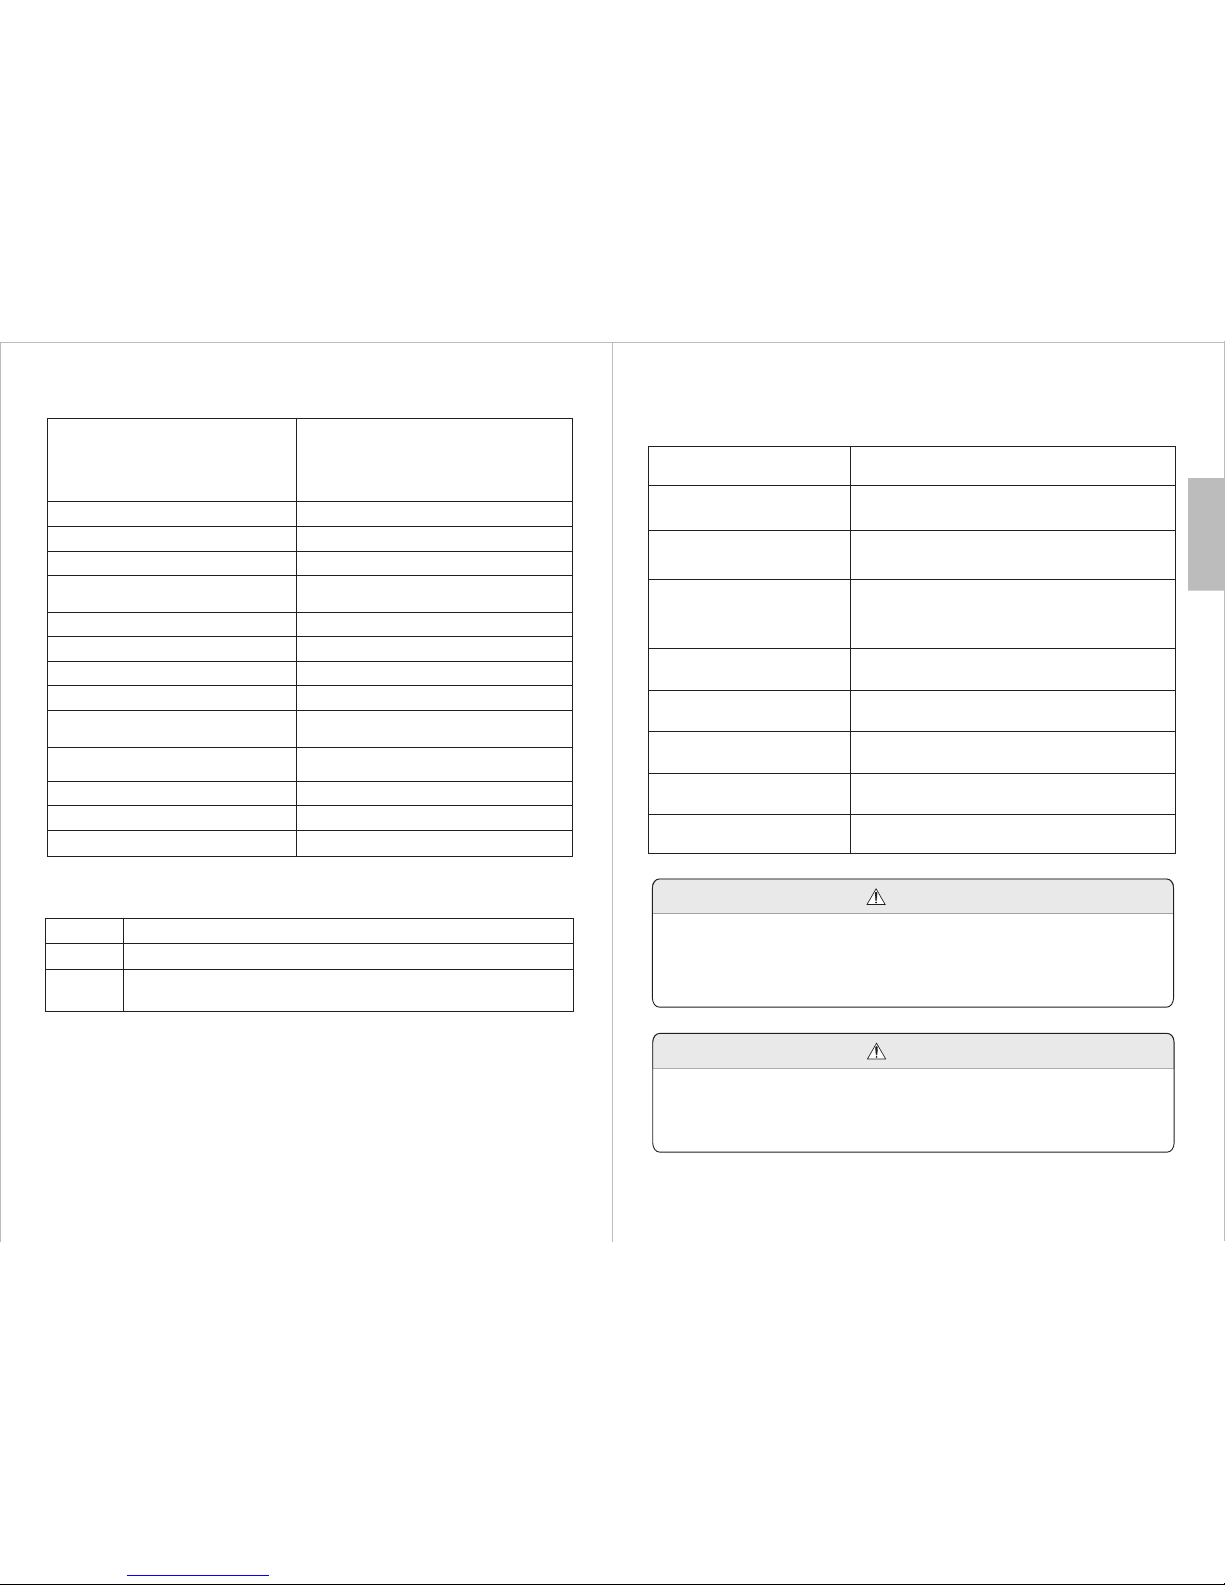
7. Specifications
LCD Display
Screen size: 7 Inch
Resolution: 800 x 480 pixels
Aspect Ratio: 16:9
Brightness: Max 200 cd/m
Contrast: 500:1
2
DVB-T Video Decoder
MPEG1/2/4 H.264
DVB-T Audio Decoder
Mp3 WMA AAC
Media Formats
Problems listed below do not necessarily signify a fault with the unit. Please check this list
before requesting repairs.
Problems
8. Troubleshooting
No picture and no sound
Check the connection with the AC adaptor or car adaptor.
Use of an unauthorized power supply.
Check the channel selection. Scan for channels again.
Always rescan for channels in new locations.
Check the sound volume. If you are using earphones, test them
on another item. Check the earphone cable is plugged into the
earphone socket on the device.
Set the device to factory default, then try again.
Possible Causes and Solutions
Picture freezing, and/or
sound distorting
Signal too weak, please check the aerial. Try to use a
proper roof top aerial or an amplified aerial.
No signal
Signal too weak, please check the aerial. Try to use a
proper roof top aerial or an amplified aerial.
Please adjust Brightness and/or Contrast settings.
Dark Picture
Motors/Trains/High Voltage Lines and Neon Lights may
affect the signal.
Snowstorm
Achromatic/Flashing/No Colour
Please adjust the Colour Setting.
No sound
No image
This user manual and instructions are intended for reference purposes only. No further
notice will be given regarding modification of any information contained therein. Due to
continuing improvements, the features and design are subject to change without notice.
Warning
No user serviceable components are fitted inside this TV. Do not attempt any repairs, as
this will invalidate the warranty. Any repairs must be carried out by either the
manufacturer or their nominated service centre. Parts inside this set are subject to high
voltage.
Warning
mp3, ac3, m4a, aac, wma, asf, ogg
jpg, jpeg, jpe, bmp, png
mpg, mpeg, dat, ts, trp, tp, m2ts, vob, mp4, mov, mkv, di vx, a vi,
asf, wmv, flv, 3g p
Mus ic
Pho to
Mov ie
Page 14

-21-
This warranty is subject to the following conditions:
The warranty is only valid within the country where the product is purchased
The product must be correctly installed and operated in accordance with the instructions
given in the user's manual.
The product must be used solely for domestic purposes.
The warranty only covers the main unit, and does not cover the accessories.
The warranty does not cover the damage caused by misuse, negligence, accident and
natural disaster.
The warranty will be rendered invalid if the product is resold or has been damaged by
inexpert repairs. The manufacturer disclaims any liability for incidental or consequential
damages.
Please consult our customer service before returning any product; we are not responsible
for any unexpected product returns.
Any faulty products must be kept and returned in the original packaging with all the
accessories and the original copy of the purchase receipt.
The warranty is in addition to, and does not diminish, your statutory or legal rights.
Please note:
1. A LCD display panel comprises a very large number of pixels and each pixel contains three
sub-pixels - red, green and blue. Due to the complex manufacturing process, occasional pixel
anomalies may occur. Pixel anomalies cannot be fixed or repaired and can happen at any stage
in the LCD's life. August products should not be deemed as faulty if there are no more than
three bright and dark pixels respectively.
2. Portable TV antennas included in the box are for people to watch Freeview TV in areas where
the signal is very strong and there may be difficulties in receiving signal with the included
portable antennas in some regions where the signal is not strong. August TVs should not be
deemed as faulty if it can receive Freeview by connecting to a proper digital rooftop aerial.
Customer Service:
Telephone: +44 (0) 845 250 0586
Email: [email protected]
9. Warranty
This product is guaranteed for twelve months from the date of the original purchase. In the
unlikely event of any defect arising due to faulty materials or workmanship, the unit will be
either replaced or repaired free of charge (where possible) during this period. An alternative
product will be offered in case the product is no longer available or repairable.
 Loading...