

Page 1

®
User Manual
August International Ltd
United Kingdom
Telephone:0870 850 3525
www.augustint.com
10.4 Inch Digital & Analogue LCD TV
With built-in card reader and USB port
DA104PF
Page 2

User Manual
Quick Start Guide
DA104PF
1. It is suggested that you use a roof top aerial when scanning for TV channels
for the first time, if any signal is detected, the channel information will be
saved on the TV, you may then switch back to the portable antenna supplied
and change your location to find the best place to receive the signal.
Thank you for buying our August TV. You may already be familiar with using
a similar product but please take time to read these instructions carefully. It is
designed to familiarise you with the product’s many features and to ensure
that you get the very best from your purchase.
Safety
To ensure your safety and the safety of others, please ensure you read the
Safety Instructions you use this product.
Disposal
Please ensure the product and its accessories are disposed in compliance with
WEEE (Waste Electrical and Electronic Equipment) Directive and other
regulations. Please check with your local authority for disposal regulations.
Customer Service:
If you need help, please contact our Customer Service:
Telephone: +44 (0) 870 850 3525
Email: service@augustint.com
before
2. When turning on the device for the first time, it will ask you to do the
“First Time Installation”, if it doesn't, press DVD/DVB to switch to DVB
(Freeview TV) mode. Follow the instructions to select “Country” and start
the “Auto Scan”. Once the scan has finished, press CH+, CH- or EPG to
select channels.
3. To search for Analogue TV, press TV on the remote and you should see
either “AUTO”, “PAL” or “SECAM” at the top right corner of the screen.
Press MENU once to enter the first menu to change “Bright”, “Contrast”,
“Colour” and “Language”. Press MENU again to enter the second menu to
search for channels, change the video system (S-COLOR) between AUTO,
PAL and SECAM, and change the sound system (S-SYS) between I (UK),
L (France), BG (other European countries) and DK (Russia and Asia
countries). Press DOWN on the second menu to select “AUTO-SEARCH”,
then press RIGHT to start searching for channels.
4. If you have done the first time installation before, and would like to search
for Digital Freeview channels again, or if you have moved to a different
region and need to scan channels again, press DVD/DVB to switch to DVB
(Freeview TV) mode, then press SETUP, press DOWN to select
“Installation”, press RIGHT to move to “Auto Scan”, press ENTER, press
LEFT or RIGHT to select the correct “Country”, press DOWN to select
“Start Scan”, then press ENTER to start. Once the scan has finished, press
CH+, CH- or EPG to select channels.
Page 3
5. To play music, photos or video files on a SD card or memory stick, insert
the SD card or memory stick to the card slot or USB port, press DVD/DVB
to switch to DVD mode, press LEFT or RIGHT to switch between the
“Audio”, “Photo”, “Video” folders and Subtrack, press UP or DOWN to
select the file you want to play, press ENTER or PLAY to start playing.
1.Safety Instructions
2.Product Features
3.Accessories
4.Part Names and Functions
1
2
3
4
6. Please note the included portable antenna may only be used in areas where
signal is very strong. There may be difficulties in receiving signal with the
portable antenna in some regions at present, this is due to the fact that
Freeview (www.freeview.co.uk) is yet to operate in full power in the UK.
The government aims to achieve a full switchover by 2012, which will
occur in stages, region by region between 2008 and 2012, at present the
quality of Freeview reception varies in different regions across the UK.
As mentioned on the Freeview website, only 73% of the UK population is
able to receive Freeview at present and only a small number of households
might be able to use a set top aerial at present. This only applies if you live
in an area with coverage close to a transmitter, but reception would still be
unreliable and they strongly recommend that you use a roof top aerial for
good reception.
The reception will be improving along with the progress of the Digital
Switchover Program. Reception may also be affected by various factors
such as how close you are to transmitters, tall buildings, thick walls,
ceilings and weather etc.
5.Remote Control
6.Connections
6.1.Installing the base support
6.2.Connecting the power supply
6.3.Connecting the earphones
6.4.Connection of AV input
6.5.Connection of AV output
6.6.System connection
7.Digital Freeview TV (DVB-T)
8.DPFMode(USB&CardReader)
9.Analogue TV
10.AV Input
11.Troubleshooting
12.Technical Parameters
13.Warranty
6
8
8
8
8
8
8
9
10
13
14
15
15
16
18
7. For any further queries, please telephone August International Ltd
helpline 0870 850 3525 or email service@augustint.com
Page 4

1. Safety Instructions
Storage and Use
The storage
temperature ofthis
machine is-20 to
60
The application
temperature ofthis
machine is0-40.℃℃.
Never expose the
TV set tomoisture,
dust, oil or smoke.
Never put this
machine in
containers that
are unstable as
this may cause
damage.
Keep theTV set
away fromwater
or damp
environment.
Avoiddropping
or exposing to
impacts.
Avoidexposing
the TV setto sharp
objects.
1.Only use the attached AC adapter or car adapter.
2.For the sake of safety, when you do not intend to use the display, please
switch off the AC adapter or car adapter.
Earphone Precautions
1. Keep the volume down, as it may inconvenience others and damage your ears.
2. If you have tinnitus, please turn down the volume or stop using this machine.
3. It is recommended not to use earphones for a long period of time.
Do not watch or turn on the TV set whilst driving.
A few highlights or dark spots may appear on the LCD screen. It is a very
common phenomenon for active matrix displays, and never necessarily
signifies defects or faults. Never try to repair this machine by yourself. In
case of any faults or failure, please turn off the display at once, and notify
the manufacturer or the corresponding dealer. The display is made up of
many precision electronic components. Any disassembly or modification
may lead to further damage.
Please unplug all connection wires before start cleaning this machine.
Please wipe the
display screen and
buttons with asoft
cloth. Only clean
the screen with
professional LCD
TV screen cleanser.
Never cleanthe
TV set withan
abrasive cloth,
detergent powder,
alcohol, benzene
or inflammables.
2. Product Features
1. 10.4” Digital and Analogue LCD TV with card reader and USB port.
2. Plays MPEG4, JPEG, MP3, WMA.
3. SD/MMC/MS card reader and USB port.
4. Auto Program Search, Electronic Program Guide.
5. Subtitle, Multi-language, Stereo sound.
6. Composite Video / Stereo Audio input / output.
7. 10-bit Video D/A Converter, high-definition multi-media interface of up to
500 lines.
8. 24-bit/192 KHz Audio D/A Converter, high quality, professional Hi-Fi standard.
Page 5

3. Accessories
DA104PF
Remote control
AV in/out cord
4. Part Names and Functions
10
11
12
3
4
5
6
7
8
9
.-
1 TFT LCD screen
.
2 Remote receiver
1
2
./ +
3 NEXT Channel
./ -
4 PRE Channel
.
5Menu
.
6 Volume+ / Right
.
7 Volume-/Left
./
8 PLAY PAUSE
.
9 Mode
.
10 AV IN jack
.
11 AV OUT jack
./ /
12 SD MS MMC port
.
13 USB port
.
14 Earphone jack
./
15 Power ON OFF
.
16 +12V DC Power In jack
Base support
Double-sided adhesive
pad for base support
-4-
.
17 Antenna input jack
.
18 Stereo speakers
Page 6

Panel Button Functions
This table explains the functions of the buttons on the panel in each mode:
1
2
3
4
5
6
8
Panel Button
Mode
II
▲
/-VOL
▲
/+VOL
▲
/Menu
▲
/-/CH
▲
/+/CH
▲
Power Power
I
▲
▲
I
▲
(USB & Card)
Mode DVB T */-
DPF
II
▲
VOL-
VOL+
I
▲
▲
▲
▲
I
DVB T-
Mode DPF */
VOL-
VOL+
CH-
Power
CH+
ATV
Mode
/-VOL
▲
/+VOL
▲
Menu
▲
/-CH
▲
/+CH
Power
Mode
/-VOL
▲
/+VOL
▲
Menu
Power
AV
▲
▲
In DVB-T mode, press and hold Mode to change to DPF mode for USB
and card functions.
In DPF mode, press and hold Mode to change to DVB-T mode for
watching digital Freeview TV.
5. Remote Control Operation
DPF
TITLE PBC/
110 DPF DVB TV-//
DA104PF
1.POWER
2.DPF/DVB
3.SUBTITLE
4.LANGUAGE
5.SLOW
6.SETUP
7.UP/DOWN/LEFT/RIGHT
8.ENTER
9.TITLE/PBC
10.REV
11.FWD
12.STOP
13.PLAY/PAUSE
14.MUTE
15.A-B
16.RADIO
17.EPG
18.TV
19.AV
20.NUMBER
21.SEARCH/GOTO
22.REPEAT
23.MENU
24.DISPLAY
25.L/R
26.FAV/ZOOM
34
27.NEXT
28.PREV
29.TTX (not available)
30.STEP
31.VOLUME+
32.VOLUME-
33.PRLIST
34.RETURN
-5-
-6-
Page 7

Remote Control Functions
This table explains the functions of the buttons on the remote control in each mode:
Remote Button
1
2
3
4
5
6
7
8
POWER
DPF/DVB
SUBTITLE Subtitle Subtitle
LANGUAGE Language Language
SLOW Slow(video only)
SETUP Setup Setup
/CH+ /CH+ /CH+
/-CH /-CH /-CH
DPF
()USB & card
Switch toDVB-T Switch toDPF Switch toDPF/DVB
DVB -T
Power On/Off
Mode
ATV
OSD Language OSD Language
AV
Switch toDPF/DVB
8
8
8
9
ENTER ENTER ENTER
TITLE/PBC TITLE/PBC
10
11
12
13
14
15
16
17
18
19
20
20
21
22
23
24
25
26
(STOP) (STOP)
(PLAY/PAUSE)
MUTE MUTE MUTE MUTE
A-B A-B repeat
RADIO TV/Radio shift
EPG
TV Switch to Analogue TV
AV
0~9 0~9 0~9
10+ 10+
SEARCH/GOTO
REPEAT Repeat
MENU Menu Menu Menu
DISPLAY File info Channel info
L/R L/R speakers L/R speakers
FAV/ZOOM
(PLAY/PAUSE)
Electronic Program Guide
Go to Auto search
Zoom
Favourite Channels
Switch to AV Input
MUTE
Auto search
Previous channel
Menu
27
28
29
30
31
32
33
34
TTX
STEP
VOLUME+ VOLUME+ VOLUME+ VOLUME+
- VOLUME- VOLUME- VOLUME-
VOLUME
PRLIST Channel list
RETURN Previous channel
Playback in step
(video only)
VOLUME+
VOLUME
-
-7-
6. Connections
6.1. Installing the base support
Unscrew the oval handle on the
ball-joint, it will split into halves,
embrace them on the top of the base
support, then tighten the oval handle.
Slide the metal surface of the ball-joint
into the slot on the back of the TV,
then tighten the wheel screw.
6.2. Connecting the power supply
Insert the power supply plug on the
AC adapter to the jack on the TV
marked DC 12V.
6.3. Connecting the earphones
Insert the earphone plug to the jack on
the TV marked earphones.
If earphones are used, sound is only transmitted through the earphones,
and no sound is available from the speakers of the TV set.
6.4. Connection of AV Input
Connect the yellow port of the AV
cable to video jack, the white port to
the left audio jack and the red port to
the right audio jack, then insert the AV
head into the AV input jack on the TV.
6.5. Connection of AV Output
Connect the yellow port of the AV
cable to video jack, the white port to
the left audio jack and the red port to
the right audio jack, then insert the AV
head into the AV output jack on the TV.
-8-
Page 8

7. Digital Freeview TV (DVB-T)
6.6. System Connection
1. Always turn off the power of all devices before you connect or disconnect
any cables.
2. Audio/Video cables should be connected correctly according to the colour.
Yellow plug - Video jack
White plug - Left Audio jack
Red plug - Right Audio jack
3. Connection illustration:
7.1. Turn on the machine
Press POWER to turn on the machine.
It will enter the mode that it was when
last turned off.
If it enters DPF mode, press
DPF/DVB to switch to DVB mode.
For DVB mode, it will select the last
channel watched. If there was no last
channel watched, or it is the first time
it is powered on, a message will
appear, asking if the user wants to run
the first time installation wizard.
7.2. First Time Installation
A message will appear, asking if the
user wants to run the first time
installation wizard. Upon selecting
[YES], a new message will appear,
asking for country and OSD language.
Use the arrow keys to select the
appropriate. Select [NEXT] and press
ENTER to proceed to the next screen.
On this screen, the user will be asked
whether they want to perform an auto
scan of the channels, select [YES] and
press ENTER to start the scan.
7.3. The Main Menu
Pressing SETUP will enter the main
menu, which includes the following
sub-menus: Channel Guide, System
Config, Installation, and Game. From
here, pressing SETUP again, or
RETURN will exit the menu. Use UP
or DOWN to highlight different items.
Pressing ENTER will enter a new
menu corresponding to the highlighted
item.
7.3.1. Channel Guide
-9-
7.3.1.1. TV Channels
The channels are listed on the left
hand side of the menu, and a preview
window is on the right side. From
Page 9
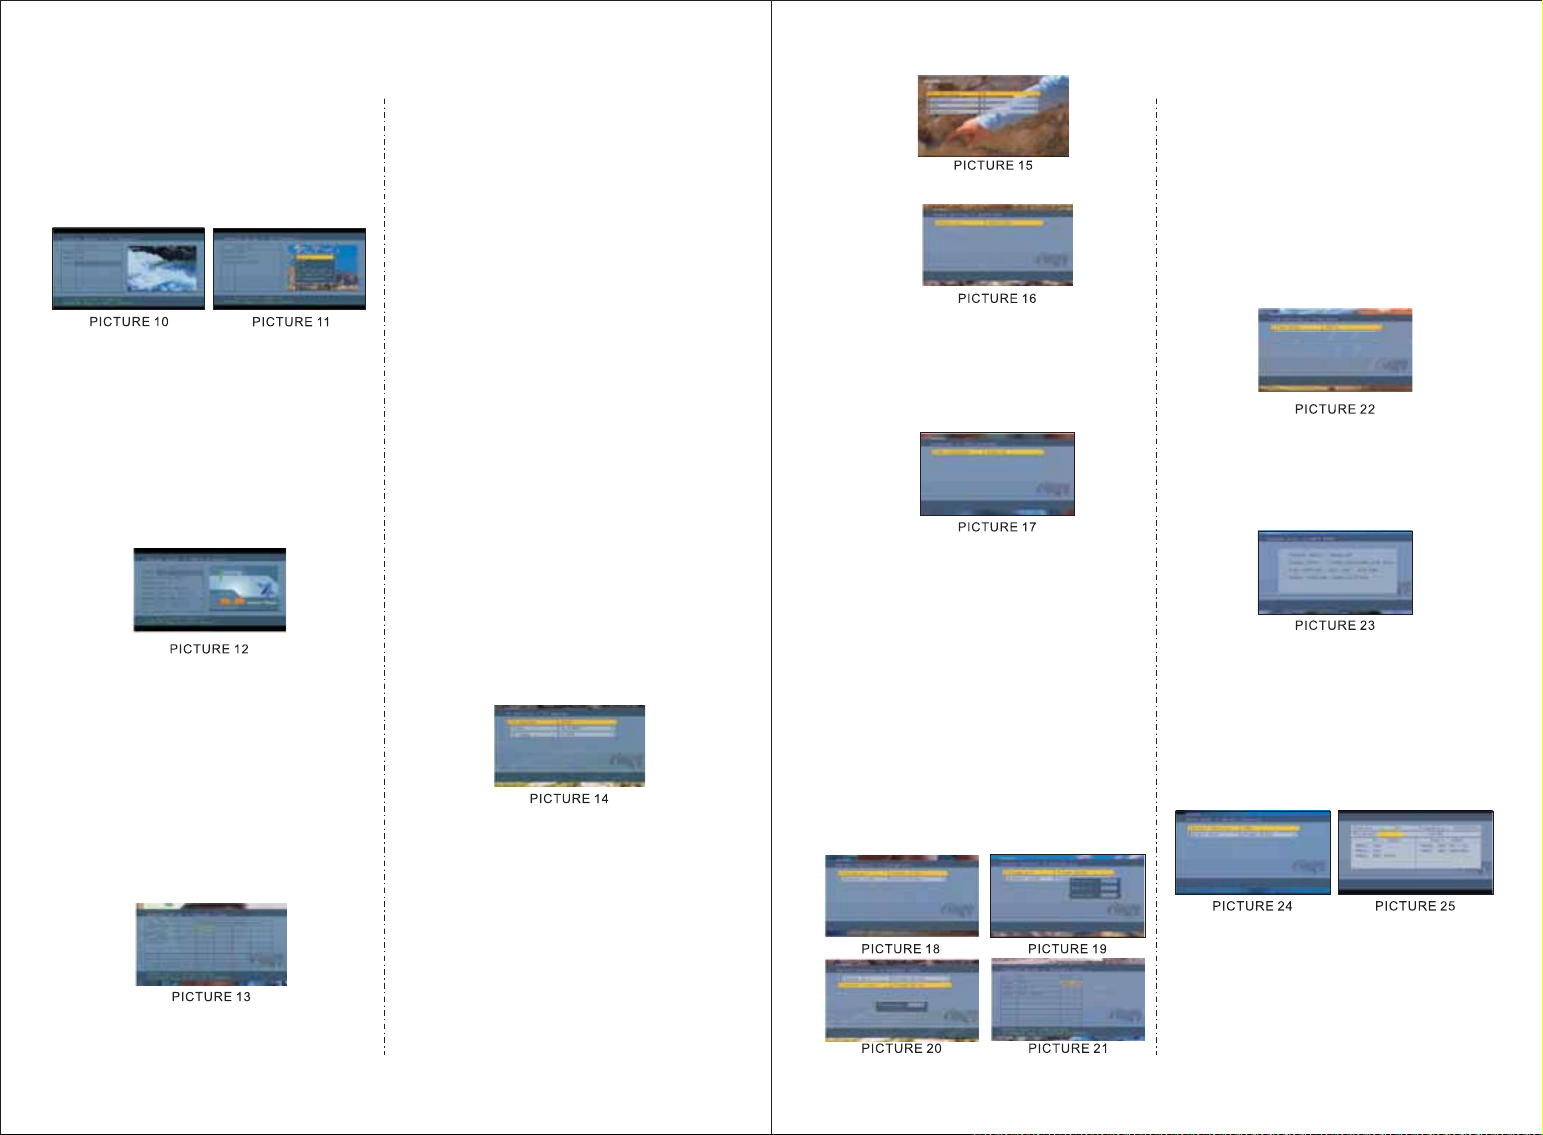
here, the channel can be changed
using the UP or DOWN keys, press
ENTER to start viewing in full
screen. Press LEFT or RIGHT to
change channel groups. Press
DISPLAY to sort the channels.
7.3.1.2. Radio Channels
The Radio Channels menu is similar
to the TV channels menu. Channels
can be changed using UP and
DOWN, groups can be changed
using LEFT or RIGHT. Press
DISPLAY to sort the channels.
7.3.1.3 Channel Class
From the Channel Class menu, each
channel can be classified into a group.
Pressing ENTER will add the channel
to the category column. Press ENTER
again to cancel the selection. Use
RADIO to switch between TV and
radio channels.
7.3.1.4 Channel Edit
Enter the Channel Edit menu. To
change a channel's name, select a
channel and press ENTER. Use
LEFT or RIGHT to select a character,
and UP or DOWN to change the
character. Press ENTER to confirm
the change. To move a channel, select
the MOVE column and press ENTER.
Use UP or DOWN to change the
order of channels and ENTER to
confirm. Select DELETE column and
press ENTER to delete the channel.
Use RADIO to switch between TV
and radio channels.
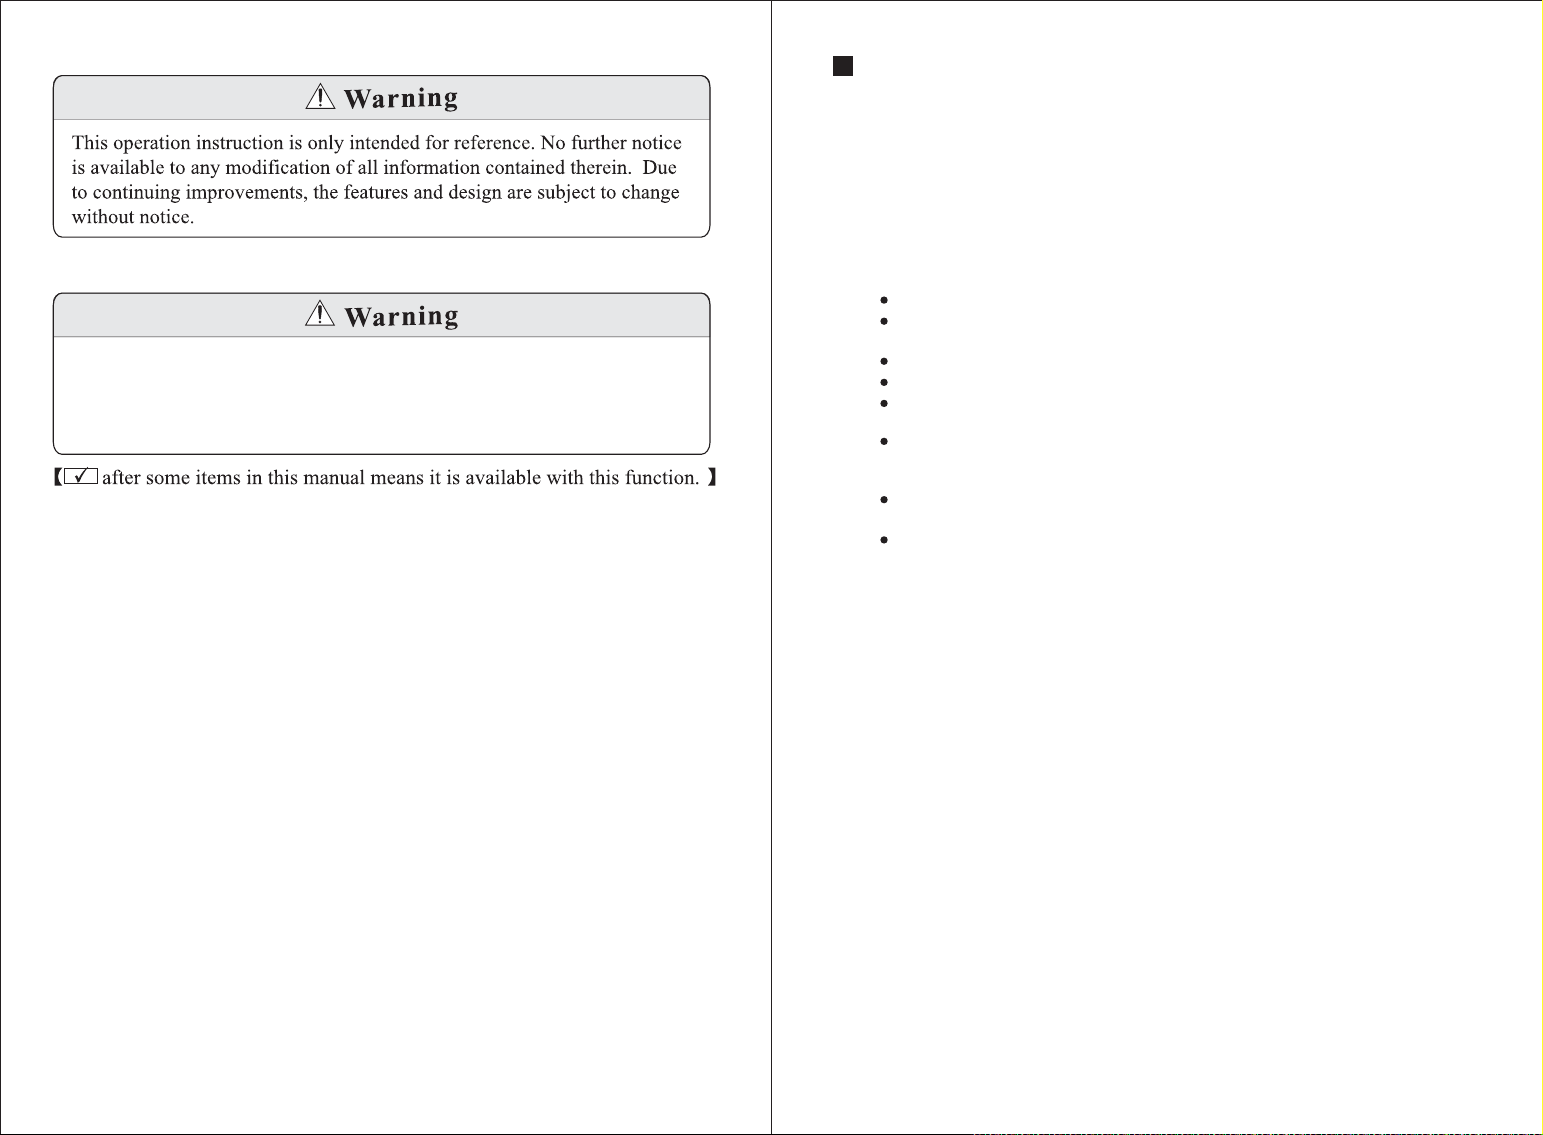
7.3.2. System Configuration
7.3.2.1. TV Settings
The TV System, Video Output and TV
aspect ratio can be changed. Press UP
or DOWN to select one of the items.
To change the setting press LEFT or
RIGHT or press ENTER and then UP
or DOWN to select from a list of
settings.
7.3.2.2. Video Settings
Brightness, Contrast, Hue and
Saturation can be changed. Press UP
or DOWN to select one of the items.
To change the setting press LEFT or
RIGHT or press ENTER and then
UP or DOWN to select from a list
of settings.
7.3.2.3. Audio Settings
7.3.2.4 Language
Use LEFT or RIGHT to select a
language, or ENTER to select from
a list with all the possible languages.
7.3.2.5. Parental Control
Pin and Channel Lock can be changed.
When changing the pin, the user will
be asked to enter the old pin, the new
pin and confirm the new pin. In order
to change the Channel Lock, the user
must first enter the pin, the system
default pin is 0000. Use UP or DOWN
to select a channel, ENTER to
lock/unlock a channel and RADIO to
switch between TV and radio channels.
7.3.2.6. Time Settings
TIME ZONE: If you fixed the country
whilst searching for channels, you
cannot adjust the time zone. Restore
to factory settings, restart the TV set
and don't search for channels. Then
access the TIME ZONE menu and
use UP or DOWN to select one and
press ENTER to confirm.
7.3.2.7. System Information
This displays the firmware version and
date, along with tuner and model
information.
7.3.3. Installation
7.3.3.1. Auto Scan
Select a country using LEFT or
RIGHT, then press DOWN to Start
Scan and press ENTER.
7.3.3.2. Manual Scan
A scan can be performed by choosing
the following settings: Country, Scan
Type, Start Channel, Starting
-11-
-12-
Page 10

Frequency, End Frequency and
Bandwidth. If the Scan Type is single
channel, only the Country and Start
Channel can be set. If the Scan Type
is Channel Range, then the Country,
Start Channel and End Channel can
be set. Use UP or DOWN to select
an item and the LEFT or RIGHT
keys to change the settings, once
done, go to Start Scan and press
ENTER.
7
7.3.3.3. Default Setup
A message box will appear asking if
the user wants to restore the TV set to
factory settings. After the settings are
reset, the first time installation
message will appear.
7.3.4. Games
There are three games. These are
played using UP, DOWN, LEFT,
RIGHT and ENTER. Press RETURN
or SETUP to return to the game menu.
8. DPF Mode
(USB and Card Reader Functions)
8.1. USB Function
1. The USB port is compatible with
flash memory, it is not guaranteed
that it can be used with all types of
MP3 players.
2. Insert the flash drive into the USB
port on the side of the TV.
3. The device will search for data on
the flash drive.
4. Press to select (Audio),
(JPEG photo), or (Video)
at the bottom of the screen and press
ENTER to confirm.
5. Press number buttons or
to select the files you want to play.
8.2. Card Reader Function
1. Insert the SD/MS/MMC card into
the card slot on the side of the TV.
2. The device will search for data on
the SD/MS/MMC card.
3. For selecting files please refer to
USB Function.
Notice:
SCREEN SAVER: On DPF mode,
when the unit is stopped, it will start
the screen saver after 3 minutes. 5
minutes later, it will turn off
automatically. To turn off Screen
Saver, press SETUP, and set the
Screen Saver to OFF.
9. Analogue TV
Press TV on the remote control to switch to the Analogue TV mode.
Press MENU, use and to select and adjust.
Press MENU
once
Press MENU
twice
Press MENU to exit.
1. Auto Search Start from Program NO .0.
2. When the signal is received under Manual Search, the indication
frequency will stop, which is the optimum position for signal storage.
If the signal is too weak, the system will automatically identify it as no
signal.
3. In the case of a picture without sound, please check the Sound System
for correct setup first.
4. If the input signal is not strong enough, please adjust “Fine” option, it
may improve the picture and sound quality.
If the signal is too weak, the image will remain poor whatever you do,
and may output loud noises, shaking images and inferior sound etc.
which is not the TV's fault. If the image remains poor when using the
telescopic antenna, please try to use a roof top aerial or an amplified
external antenna.
/
BRIGHT
CONTRAST
COLOR
ENGLISH
AUTO-SEARCH
SEARCH
FINE
BAND
POSITION
SKIP
S-COLOR
S-SYS
SWAP
/
0~100
0~100
0~100
Other language options
48MHz ~ 860MHz
UHF / VHFL / VHFH
0 ~ 254
ON / OFF
AUTO / PAL /SECAM
DK/I/L/BG
0
-13-
14
Page 11

10. AV Input
12. Technical Parameters
Press MENU on the remote control.
Use / and / to select and adjust.
Press MENU
once
Other language options
Press MENU to exit Menu.
11. Troubleshooting
Problems listed below do not necessarily signify a fault with the unit.
Please check this list before requesting repairs.
Problems
No picture, no sound
No image
No sound
Picture freezing, and
/or sound distorting
No signal
Dark picture
Snowstorm
Achromatic/Flashing/No
Colour
Possible Causes and Solutions
Check the connection with the AC adapter/Car Adapter.
Use of an unauthorized power supply.
Power switch on the side of the TV is off.
TV is on standby as it was switched off by pressing the
POWER on remote.
Check the channel selection. Scan for channels again.
Always re-scan for channels in new locations. Ensure
the video cable is not damaged. Ensure video settings
are correct.
Check the sound volume. If you are using earphones,
test them on another item. Check that the cable is
plugged in. Sound System is not correctly set in
Analogue TV mode.
Signal too weak, please check the aerial. Try to use a
proper roof top aerial or an amplified aerial.
Signal too weak, please check the aerial. Try to use a
proper roof top aerial or an amplified aerial.
Please adjust Brightness and/or Contrast settings.
Motors/Trains/High Voltage Lines and Neon Lights
may affect the signal.
Please adjust the Colour Setting.
S-Color is not correctly set in Analogue TV mode.
Product Name:
10.4 inch digital and analogue LCD TV
with built-in card reader and USB port
MPEG4:
AC/DC adapter:
Picture Resolution:
Video S/N Ratio:
Frequency response:
Audio S/N Ratio:
Dynamic Range:
Harmonic Distortion:
D/A Converter:
Video Output Level:
Audio Output Level:
4 and 5 versions without QPEL and GMC
AC 100/240V-50/60 Hz-DC adaptor +12V(car cigarette lighter)
≥
500 Line
≥
60dB
fs 96KHZ: 4Hz-44KHz: +/-1dB
≥
90dB
≥
90dB
<
96KHz/24bit
1Vp-p(75ohm)
1.0V 0.1V
DVB Decode standard:
DVB Band Wide:
DVB VHF:
UHF:
678
177.5MHz ~ 226.5MHz
474MHz ~ 858MHz
ATV Receiving Channel:
ATV Sound System:
Screen Size:
10.4 Inches
Audio Output:
Loudspeaker:
Outer Dimension:
Weight:
Dot Matrix:
Resolution:
About 1200g
0.1000(H) x 0.3000 (V)
600 x RGB x480
Response Speed (ms):
Visible Angle:
Brightness:
Contrast:
300cd/
150:1
DK I BG L M N
0.3W (Max)
two 40mm round loudspeaker
290 x 213.5 x 46mm
R:30 / F:50
U:50 D:60, R/L: 60
㎡
0.01%
MPEG2 ISO/IEC13818 MPEG2 MP ML
@
DK/I 49.75MHz~855.25MHz
BG 48.25MHz~855.25MHz
-15-
-16-
Page 12
Warranty
This product is guaranteed for 2 years from the date of the original purchase. This warranty
covers costs of parts and labour for the first 12 months and covers manufacture defects of
major components which include LCD screens, DVD disc loaders and software on main
circuit board for the second 12 months. In the unlikely event of any defect arising due to
faulty materials or workmanship, the unit will be either replaced or repaired (where
possible) during this period. An alternative product will be offered in case the product is no
longer available or repairable.
No user serviceable components are fitted inside this TV. Do not attempt
any repairs, as this will invalidate the warranty. Any repairs must be carried
out by either the manufacturer or their nominated service centre. Parts
inside this set are subject to high voltage.
This warranty is subject to the following conditions:
The warranty is only valid within the country where the product is purchased
The product must be correctly installed and operated in accordance with the
instructions given in the user's manual.
The product must be used solely for domestic purposes.
The warranty only covers the main unit, and does not cover the accessories.
The warranty does not cover the damage caused by misuse, negligence, accident
and natural disaster.
The warranty will be rendered invalid if the product is resold or has been
damaged by inexpert repairs. The manufacture disclaims any liability for
incidental or consequential damages.
Please consult our customer service before returning any product; we are not
responsible for any unexpected product returns.
Any faulty products must be kept and returned in the original packaging with all
the accessories and the original copy of the purchase receipt.
The warranty is in addition to, and does not diminish, your statutory or legal rights.
Please note:
1.A LCD display panel comprises a very large number of pixels and each pixel contains
three sub-pixels - red, green and blue. Due to the complex manufacturing process,
occasional pixel anomalies may occur. Pixel anomalies cannot be fixed or repaired and
can happen at any stage in the LCD's life. August products should not be deemed as
faulty if there are no more than three bright and dark pixels respectively.
2.Portable TV antennas included in the box are for people to watch Freeview TV in areas
where the signal is very strong and there may be difficulties in receiving signal with the
included portable antennas in some regions at present. This is due to the fact that
Freeview is yet to operate in full power in the UK. August TVs should not be deemed
as faulty if it can receive Freeview by connecting to a proper digital rooftop aerial.
-17-
Customer Service:
Telephone: +44 (0) 870 850 3525
Email: service@augustint.com
-18-
 Loading...