

Page 1

Table of Contents
Safety Information and Usage Guidelines ................ I
Getting Started ........................................................... 1
Part Names & Main Functions ............................................1
Turning Your Phone ON and OFF .................................... 1 0
Roaming with your Tri-mode Telephone ..........................11
Roaming Settings ..............................................................11
Displaying Your Phone Number .......................................12
Display ..............................................................................13
Battery ...............................................................................15
Tips on Using Your Battery and Battery Charger
Effectively ......................................................................... 17
Precautions for Handling the Battery and Charger ...........18
Phone Mode .............................................................. 19
Standby Mode ...................................................................19
Talk Mode ..................... ............................ ...... ..................19
Power Save Mode ... ............................. ..... ........................19
Voice Call .................................................................. 20
Making a Voice Call .........................................................20
Emergency Calls (911) ......................................................21
One-Touch Dialing (Speed Dialing) .................................2 1
Dialing in Lock Mode .......................................................21
Dialing Emergency #/Special Numbers in Lock Mode ....22
Redialing a Call .................................................................22
Using the Scratch Pad .......................................................23
Answering a Call ...............................................................24
Adjusting Ringer Volume .................................................25
Muting the Microphone during a Call ...............................25
Roaming ............................................................................26
Setting the Roaming Feature .............................................26
Voice Calling Experience .................................................28
Caller ID ............................................................................29
Call Waiting ......................................................................30
Page 2

Three-way Calling (Conference Call) ...............................31
Call Forwarding ................................................................32
Missed Calls ......................................................................32
Dropped Calls (Fade Calls) .............................. ...... ...........33
Failed Calls .......................................................................33
Dialing Your Home Network Operator Services ..............33
Prepend Dialing ................................................................34
Four-digit Dialing .............................................................35
Pause Dialing ....................................................................36
Data/Fax Trans m is si on .......... ............... ... .... ... .........39
Sending Fax/Data ..............................................................39
Transmission Specifications .............................................39
Menus ......................................................................40
Selecting Menus ................................................................40
1. Phone Book Menu ................. ............................ ..... ......41
2. Calls Menu ............ ..... ............................. ..... ...... ...........43
3. Sounds Menu .................................... ...... ......................44
4. Display menu .................................... ...... ......................55
5. Security Menu ................................... ...... ......................61
Information on the Phone Book Utility ............................66
6. Setup/Tool Menu .................................................... ......67
7. System Menu ................................................................75
8. Custom Files .................... ...... ............................ ..... ......77
Phone Book Dialing ..................................................79
Entering Characters ...........................................................81
Overwriting an Existing Location .....................................84
Searching for and Dialing Phone Numbers .....................86
Modifying Your Phone Book Entries ...............................88
Erasing a Single Phone Book Entry ..................................88
Erasing All Phone Book Entries .......................................88
Storing Your Phone Book Entries in Secret Mode ...........89
Viewing Your Call Logs ...................................................89
Calling by Using Call Logs ..............................................89
Storing the Phone Number by Using the Call Logs ..........90
Erasing a Single Call Log (Outgoing, Incoming or
Page 3

Missed Call) ......................................................................91
Viewing Your Call Info .................................................... 9 1
Voicemail .................................................................. 93
Setting Up Your Voicemail Feature ..................................93
Viewing Voicemail Messages ...........................................93
Accessing with the One-Touch Access Feature ................93
Messaging ................................................................ 94
Notification .......................................................................94
Standby Mode ...................................................................94
Talk Mode ..................... ............................ ...... ..................94
Viewing a Text Message in Standby Mode ......................95
Viewing a Browser Message in Standby Mode ................95
Message Menu ..................................................................96
Erasing a Single Message .................................................97
Erasing All Messages ........................................................ 9 7
Message Ringing ...............................................................98
Message Memory Capacity ...............................................98
Messages and Lock Mode .................................................9 8
Internet Acce ss ....... .... ... ............... ... ... .... ... .............. 99
Setting the Charging Reminder of Your Browser .............99
Starting the MiniBrowser ................................ ................100
Advanced Menus .............................................................101
Exiting the MiniBrowser .................................................101
Navigating the Web Sites ................................................102
Entering Characters .........................................................104
Link .................................................................................105
Bookmarks ......................................................................106
Your Phone’s Menus ............................................. 107
Specifications ......................................................... 110
Telephone ........................................................................ 110
Accessori es .......... ................ ............ ................ ...... 111
Standard ..........................................................................111
Options ............................................................................111
Page 4

Troubleshooting .....................................................112
Drivers Safety Tip s . ................ ... ... ... ... ................ ... .114
FDA Consumer Update ..........................................114
Exposure to Rad io Wav e s ............ ... ................ ... ... .118
Patent Information ..................................................120
Page 5

Safety Information and
Usage Guidelin es
Exposure to Radio Frequency Signals
Your wireless handheld portable telephone is a low power radio
transmitter and receiver. When it is ON, it receives and also sends
out radio frequency (RF) signals.
In August, 1996, the Federal Communications Commissions
(FCC) adopted RF exposure guidelines with safety levels for
hand-held wireless phones. Those guidelines are consistent with
the safety standards previously set by both U.S. and international
standards bodies:
ANSI C95.1 (1992)
NCRP Report 86 (1986)
ICNIRP (1996)
Those standards were based on comprehensive and periodic
evaluations of the relevant scientific literature. For exam ple, over
120 scientists, engineers, and physicians from unive rsities,
government health agencies, and industry reviewed the available
body of research to develop the ANSI Standard (C95.1).
The design of your phone compl ies with the FCC guideli nes (and
those standards).
* American Nation al Stan dards Institu te; Nation al Counc il on Radiatio n
Protection and Measurements; International Commission on NonIonizing Radiation Protection
• To maintain compliance with FCC RF exposure guideline, if
you wear a handset on your body use the Sharp-supplied or
*
approved holster. If you do not use a body-worn accessory,
ensure the antenna is at least one inch (2.54 centimeters) away
from your body when transmitting. Use of non-Sharp
accessories may violate FCC RF exposure guidelines.
Antenna Care
Unauthorized antennas, modifications, or attachments could
damage the phone and may violate FCC regulations.
I
Page 6

Phone Operation
NORMAL POSITION: Hold the phone as you would any other
telephone.
TIPS ON EFFICIENT OPERATION: For your phone to
operate most efficiently:
• Do not touch the antenna unnecessarily when the phone is in
use. Contact with the antenna affects call quality and may cause
the phone to operate at a higher power level than otherwise
needed.
Driving
Check the laws and regul ati on s on t he use of w irel es s tel eph ones
in the areas where you drive. Always obey them. Also, if using
your phone while driving, please:
• Give full attention to driving — driving safely is your first
responsibility;
• Use hands-free operation, if available;
• Pull off the road and park before making or answering a call if
driving conditions so require.
Electronic Devices
Most modern electronic equipment is shielded from RF signals.
However, certain electronic equipment may not be shielded
against the RF signals from your wireless phone.
Pacemakers
The Health Industry Manufacturers Association recommends that
a minimum separation of six (6″ ) inches (15.24 centimeters) be
maintained between a handheld wireless phone and a pacemaker
to avoid potential interference with the pacemaker. These
recommendations are consistent with the inde pendent research by
and recommendations of Wireless Technology Research.
II
Page 7

Persons with pacemakers:
• Should ALWAYS keep the phone more than six inches from
their pacemaker when the phone is turned ON;
• Should not carry the phone in a breast pocket;
• Should use the ear opposite the pacemaker to minimize the
potential for interference.
• If you have any reason to suspect that interference is taking
place, turn your phone OFF immediately.
Hearing Aids
Some digital wireless phones may int erfer e with some hearing
aids. In the event of such interference, you may want to consult
your hearing aid manufacturer.
Other Medical Devices
If you use any other personal medical device, consult the
manufacturer of your device to determine if they are adequately
shielded from external RF energy. Your ph ysician may be ab le to
assist you in obtaining this information.
Turn your phone OFF in health care facilities when any
regulations posted in these areas instruct you to do so. Hospitals
or health care facilities may be using equipment that could be
sensitive to external RF energy.
Vehicles
RF signals may affect improperly installed or inadequately
shielded electronic systems in motor vehicles. Check with the
manufacturer or its representative regarding your vehicle. You
should also consult the manufacturer of any equipment that has
been added to your vehicle.
Posted Facilities
Turn your phone OFF in any facility where posted notices so
require.
III
Page 8

Aircraft
FCC regulations prohibit using your phone while in the air.
Switch OFF your phone before boarding an aircraft.
Blasting Areas
To avoid interfering with blasting operations, turn your phone
OFF when in a “blasting area” or in areas posted: “Turn off twoway radio”. Obey all signs and instructions.
Potentially explosive atmospheres
Turn your phone OFF when in any area with a potentially
explosive atmosphere and obey all s i gns an d in stru ct io ns. S par ks
in such areas could cause an explosion or fire resulting in bodily
injury or even death.
Areas with a potentially explosive atmosphere are often but not
always clearly marked. They include fueling areas such as
gasoline stations; below deck on boats; fuel or chemical transfer
or storage facil iti es ; veh i cl es us i ng li quef ied p et rol eum g as (such
as propane or butane); areas where the air contains chemicals or
particles, such as grai n, dust, or metal powders; and any other area
where you would normally be advised to turn off your vehicle
engine.
For Vehicles Equipped with an Air Bag
An air bag inflates with great force. DO NOT place objects,
including both installed or portable wireless equipment, in the
area over the air bag or in the air bag deployment area. If invehicle wireless equipment is improperly installed and the air b ag
inflates, serious injury could result.
FCC Notice
The phone may cause TV or radio interference if used in close
proximity to receiving equipment. The FCC can require you to
stop using the phone if such interference cannot be eliminated.
IV
Page 9

FCC Compliance
This device complies with part 15 of the FCC Rules. Operation is
subject to the following two conditions: (1) This device may not
cause harmful interference, and (2) this device must accept any
interference received, including interference that may cause
undesired operation.
Information To User
This equipment has been tested and found to comply with the
limits of a Class B digital device, pursua nt to Part 15 of the FCC
Rules. These limits are des igned to pr ovide reasonabl e protection
against harmful interference in a residential installation . This
equipment generates, uses an d can radiate radio fr equency energy
and, if not installed and used in accordance with the instructions,
may cause harmful interference to radio communications.
However, there is no guarantee that interference will not occur in
a particular installation; if this equipment does cause harmful
interference to radio or television reception, which can be
determined by turning the equipment off and on, the user is
encouraged to try to correct the interferen ce by one or more of the
following measures:
1. Reorient/Relocate the receiving antenna.
2. Increase the separation between the equipment and
receiver.
Connect the equip ment into an outlet on a circuit dif ferent
3.
from that to which the receiver is connected.
Consult the dealer or an experienced ra di o/TV t echni cian
4.
for help.
CAUTION: Changes or modif ications not expr essly approv ed by
the manufacturer responsible fo r compliance could void the user’s
authority to operate the equipment
V
Page 10

Batteries
Caution: All batteries can cause property damage, injury or
burns if a conductive material, such as jewelry, keys or beaded
chains, touches exposed terminals. The material may complete an
electrical circuit and become quite hot. To protect against such
unwanted current drain, exercise care in handling any charged
battery, particularly when placing it inside your pocket, purse or
other container with metal objects. When the battery is detached
from the phone, use a cover made of non-cond uctive poly bag, for
storing your battery, when it is not in use.
Flying
You should turn off your phone before boarding any aircraft.
To prevent possible interference with aircraft systems, U.S.
Federal Aviation Administration (FAA) regu lations requi re you to
have permission from a crew member to use your phone while the
plane is on the ground. To prevent any risk of interference, FCC
regulations prohibit using your phone while the plane is in the air.
Limiting Children’s Access to Your Phone
Your phone should not be played with by children. They could
hurt themselves and others, damage the phone or make calls that
increase your bill.
Changes or Modifications
Any changes or modifications to your phone not expressly
approved in this document could void your warranty for this
equipment and void your authority to operate this equipment.
Only use approved batteries, antennas and chargers. The use of
unauthorized accessories may be dangerous and will invalidate
the phone warranty if said accessories cause damage to o r a defect
to develop in the phone.
Although your phone is quite sturdy, it is a complex piece of
hardware and can be broken. Use common-sense guidelines to
avoid dropping, hitting, bending or sitting on it.
VI
Page 11

Liquefied Petroleum Gas
Vehicles using liquefied petroleum gas (such as propane or
butane) must comply with the National Fire Protection Standard
(NFPA-58). For a copy of this standard, contact the National Fire
Protection Association, One Batterymarch Park, Quincy, MA
02269, Attn.: Publication Sales Division.
Phone Care
Your phone is designed for excellent durability under normal use
conditions. Protect your phone from water damage that could
result from spills or excessive exposure to rain.
Never submerge your wireless phone.
Cleaning the Phone
Cleaning of this product should only be done with a damp cloth.
The use of chemical cleaners may harm the finish and integrity of
the radio housing and is not recommended.
NOTE
Some of the ne twork services explained in this operation m anual may not
be availabl e on your network. Please contact your network operat or or
network service provider.
VII
Page 12
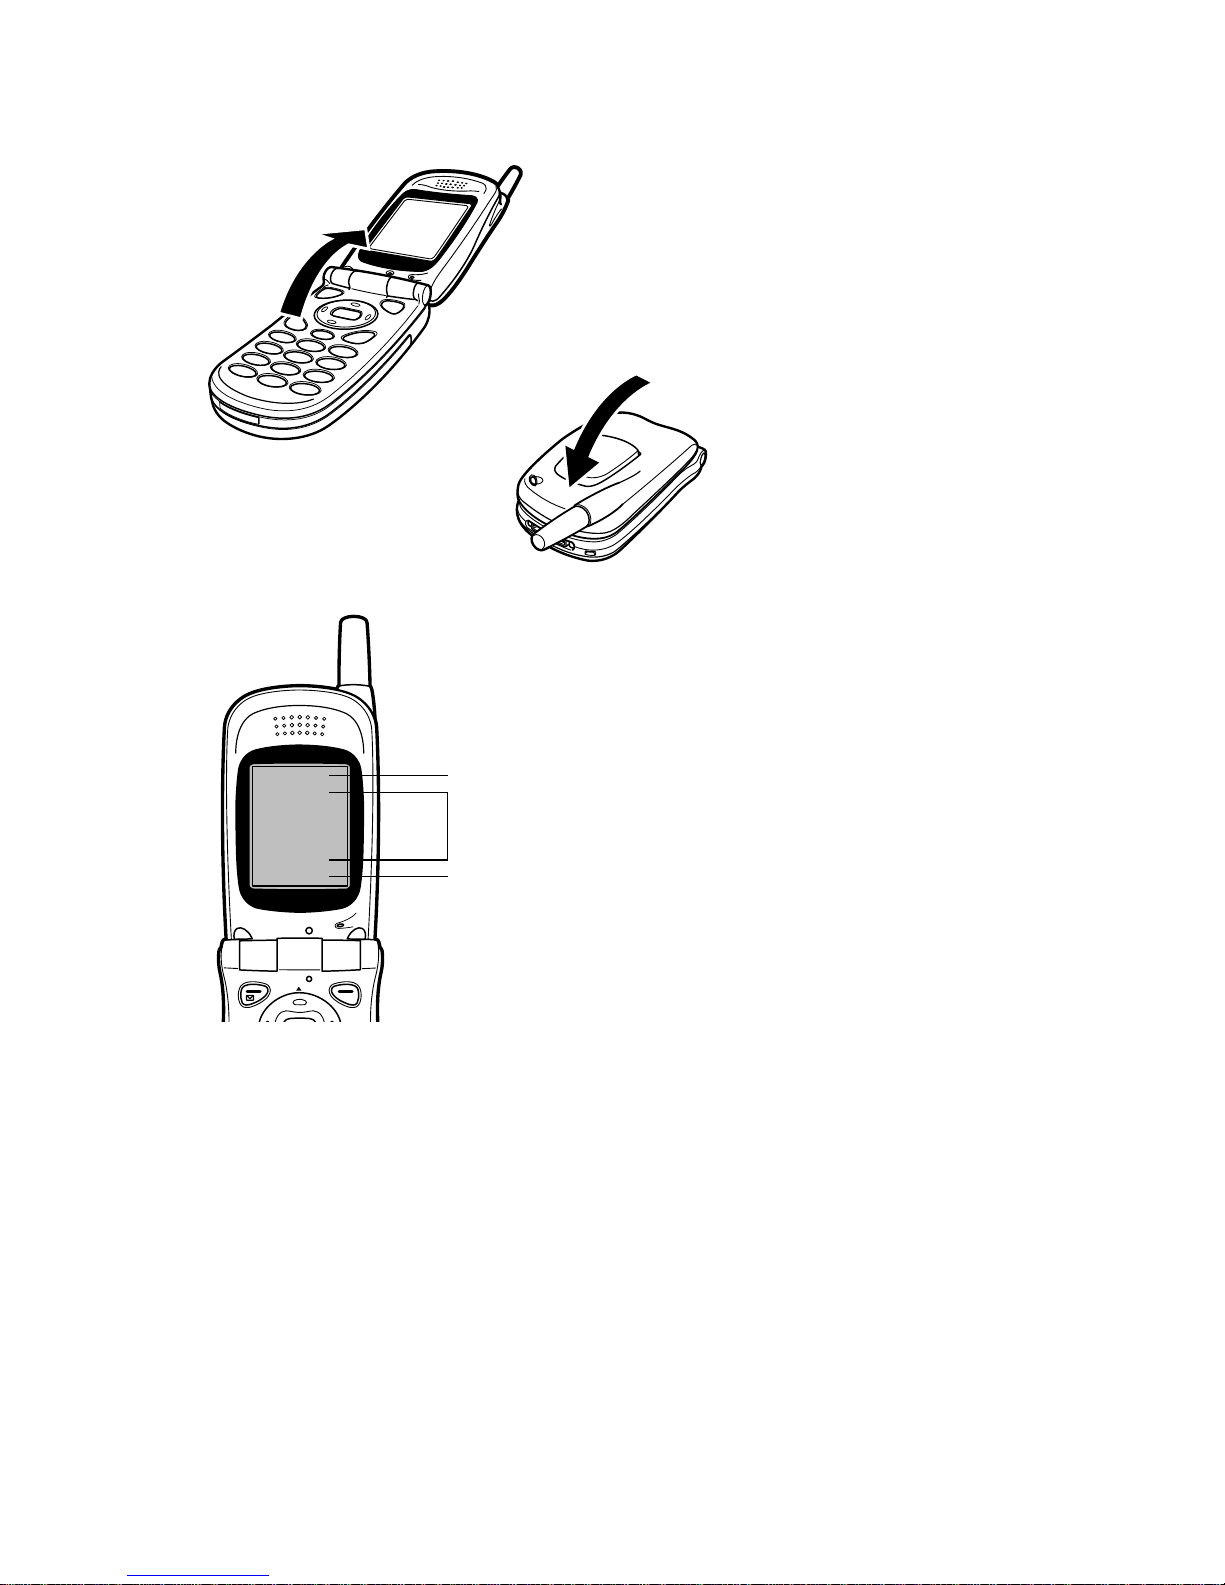
Getting Started
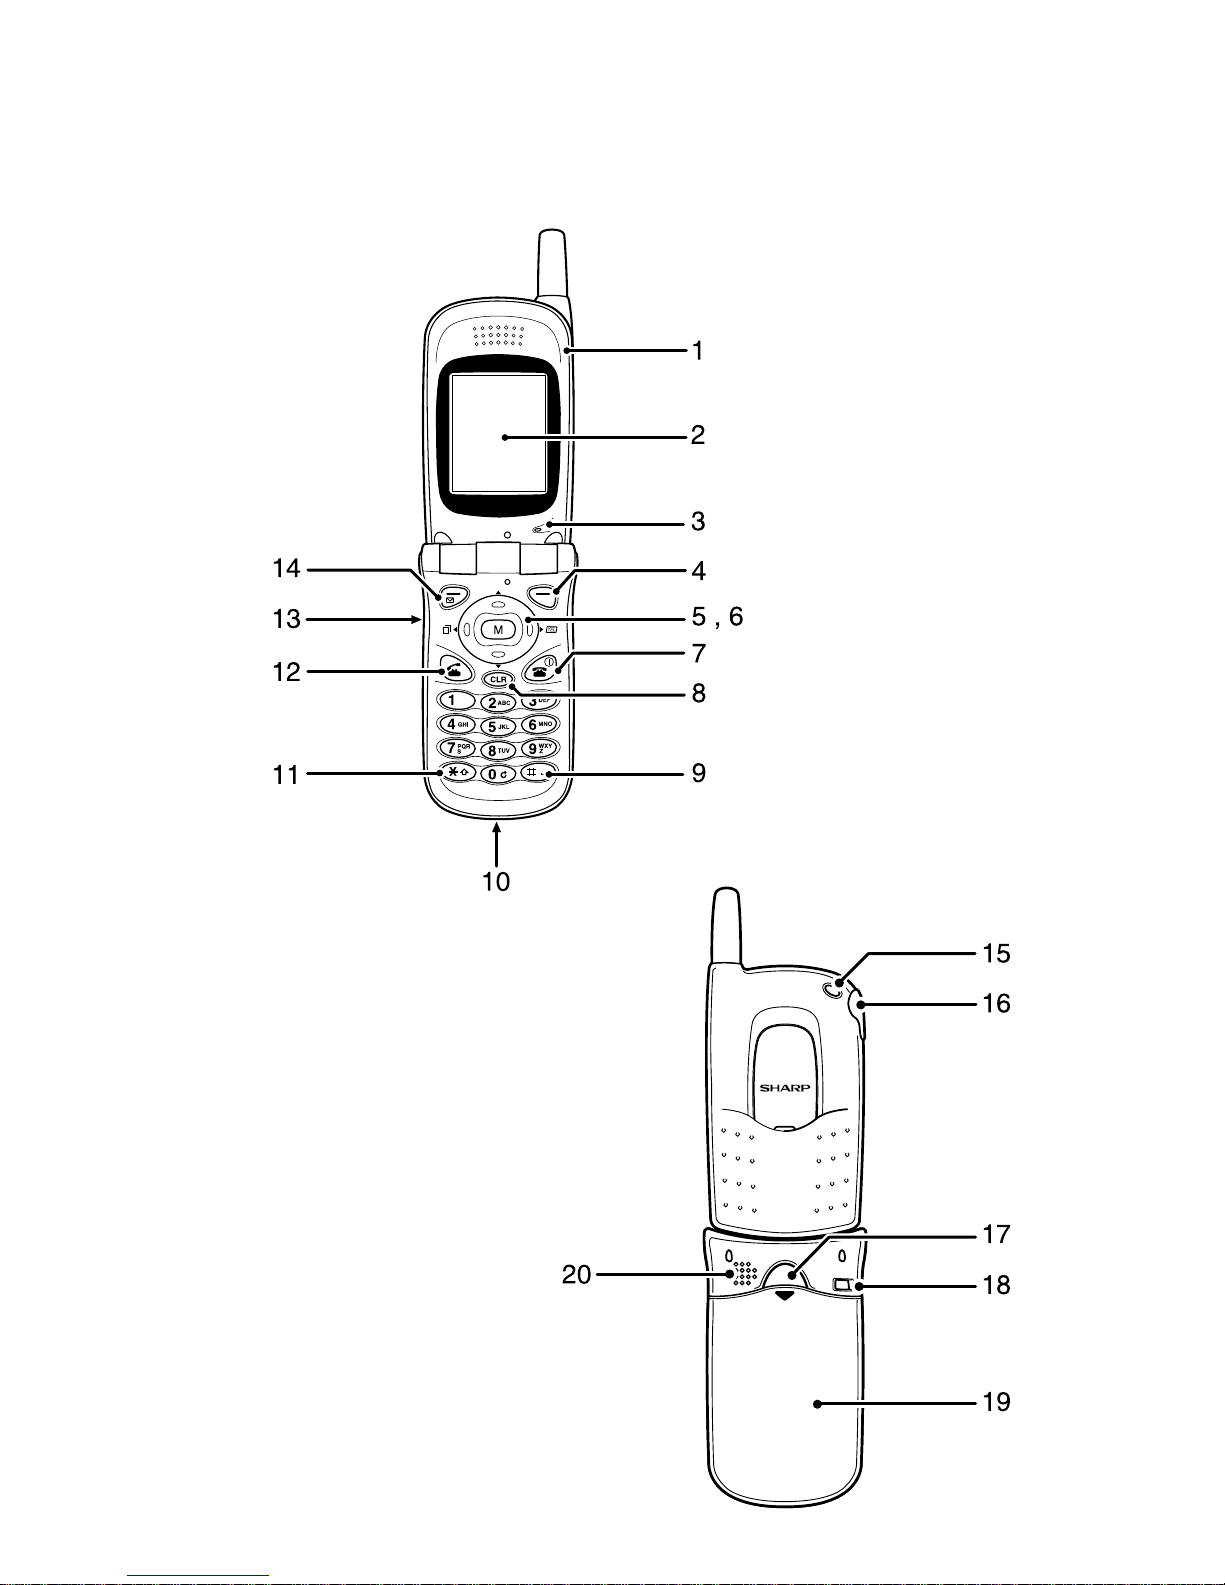
Part Names & Main Functions
1
Page 13
Getting Started (continued) wake-up tone
1.Ph
O
one:
pen the phone to
start.
You can end a ca ll by closing
the phone. The backligh t will
turn off automatically.
2.
Display (Color LCD) : The
display is used to check the
status of the phone when it is
turned on.
(1)
(2)
(3)
(1) Top area: Displays the status of
the battery, signal strength, etc.
(2) Mid dle area: Dis plays the in-
use information (call time,
name and number of other party
(if available)) and the currently
set month, date, day and time.
(3) Bottom area: Displays the name
of the functio ns to be performed
by pressing the right and left
soft keys and Center key. The
name of the funct ions displayed
varies depending on the menu
you select.
2
Page 14
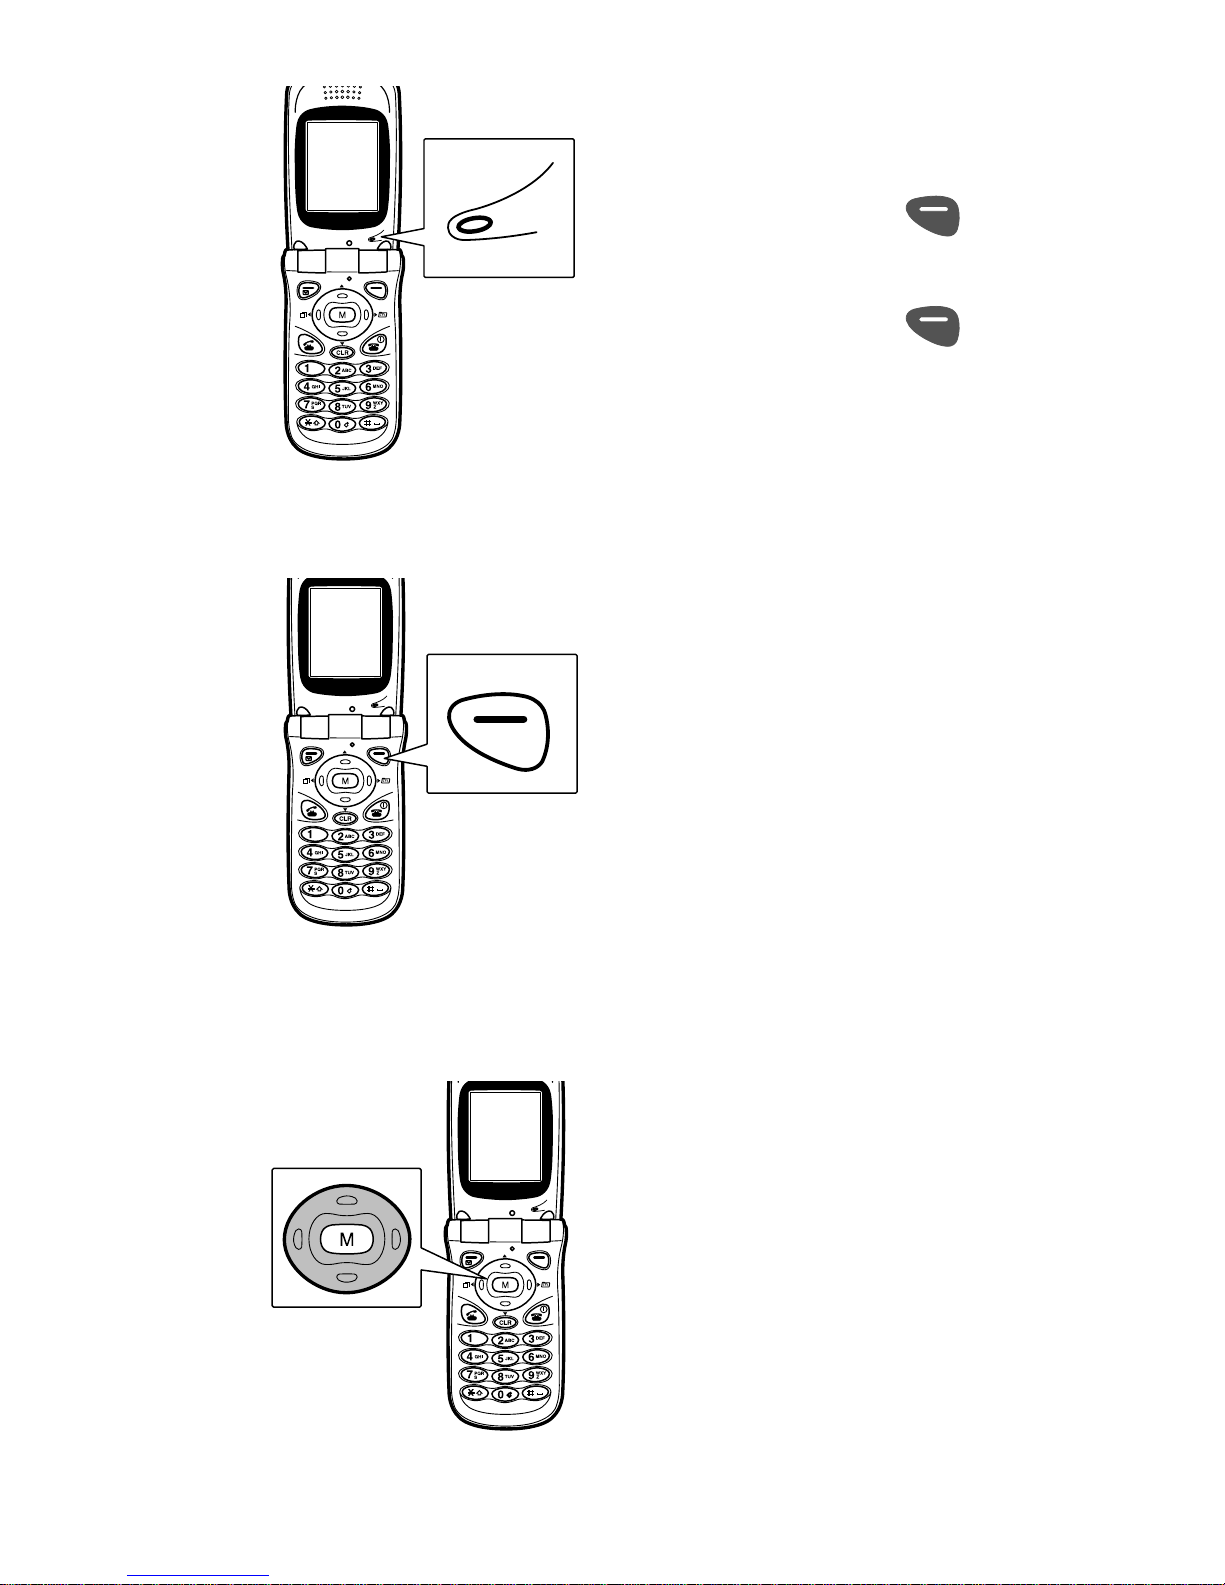
3.
Microphone: Use the
microphone to speak to the
other party during a call.
• Press the right soft key
[Mute] during a call to mute the
sound from the microphone.
Press the right soft key
[Unmute] again to cancel the
mute setting.
4.
Right Soft Key:
• Press this key to execute the
function displayed on the right
corner of the bottom line on the
display. [Brows er] is displayed in
Standby mode.
5.
Navigation Keys (Arrow
Keys):
• Press these keys to scro ll through
menu items, adjust sound volume,
etc.
Note
This operation manual uses the
following notations for the arrow
keys.
3
Page 15
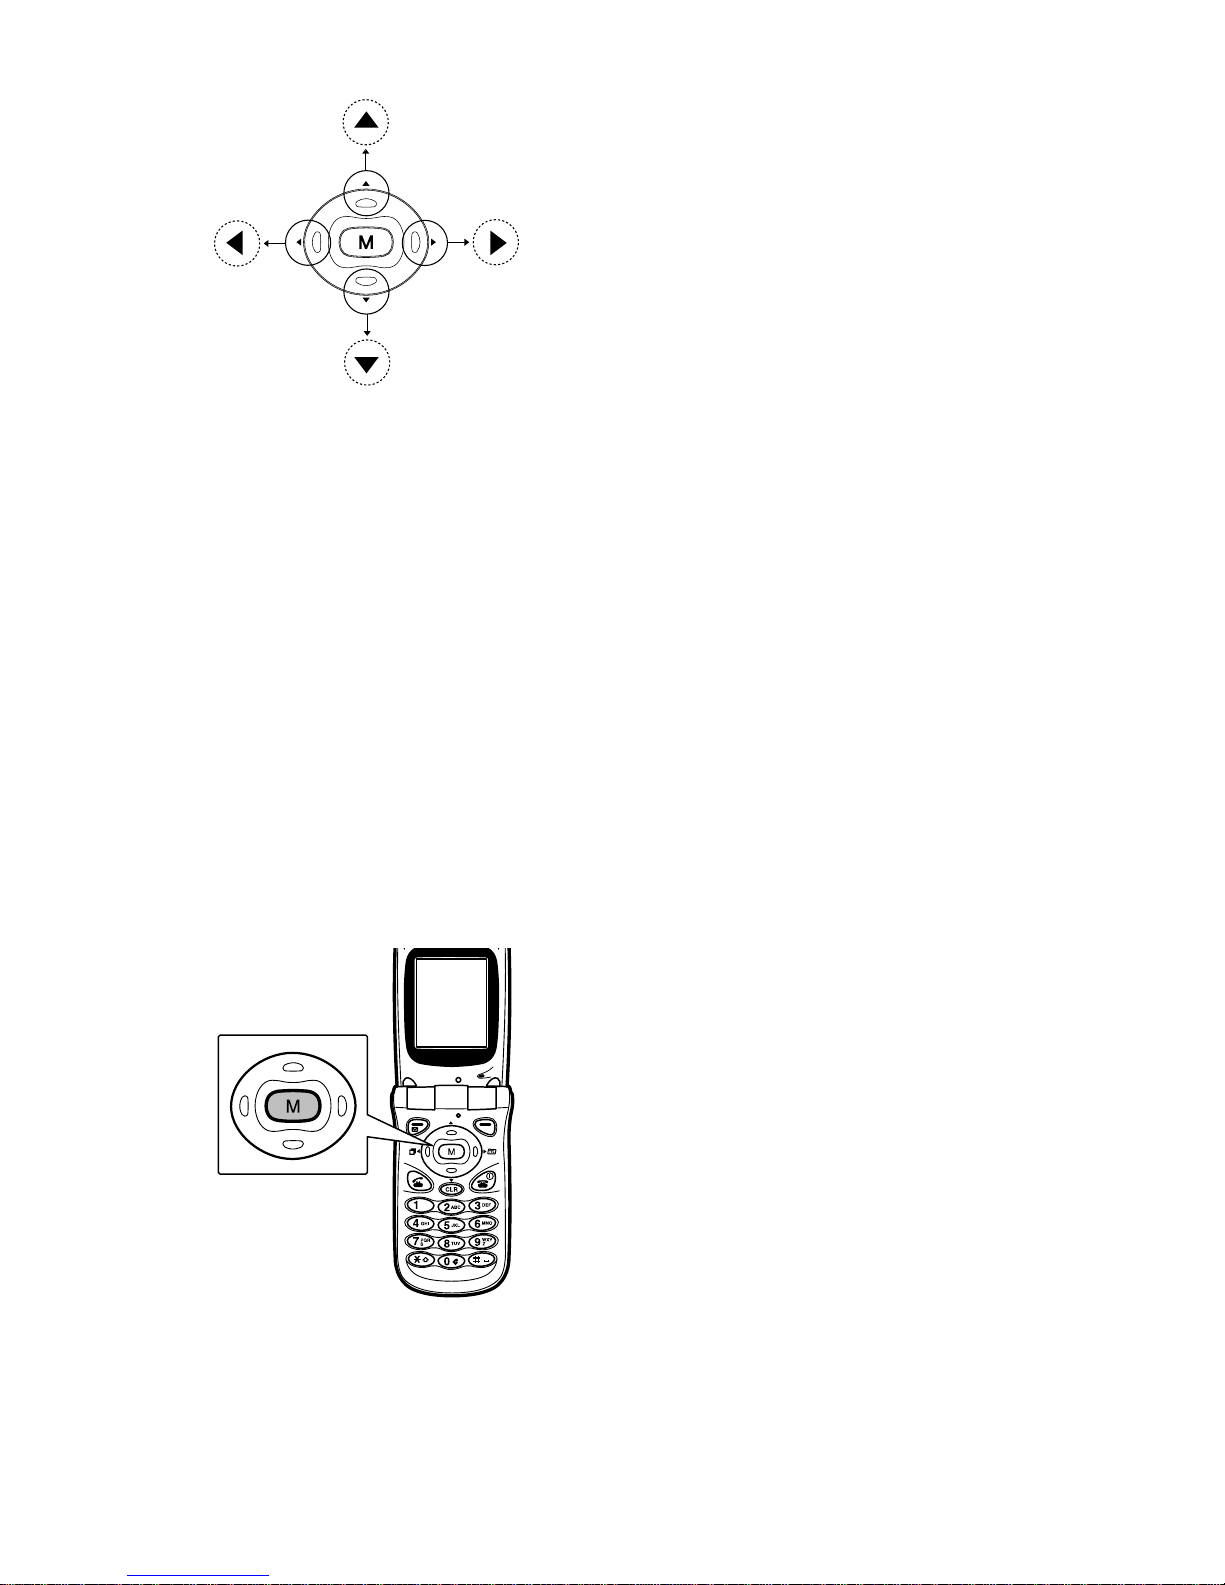
(1)
(3)
(2)
(1) Lef t arrow key: Press this key in
Standby mode and Talk mode to
view Call logs (Outgoing,
Incoming, or Missed call logs).
(2) Right arrow key: Press this key
in Standby mode or Talk mode
to display the phone book
(4)
menu.
(3) (4) Up and Down arrow keys:
• Press these keys to set the ringer
volume.
• Press Down key to mute the
ringer during an incoming call.
(The phone will automatically
reject the incoming call one
minute after pressing the Down
Key.)
• Press and hold Up or D own arrow
keys to scroll through items
quickly, if necessary.
6.
Center Key (M key):
• Press this key to display the menu
and execute the funct ion shown in
the center of the bottom line on
the display.
[M MENU] is shown in the
center of the bottom line in
Standby and Talk mode.
4
Page 16

7.
END/Power Key:
• Press this key to turn the power on
and press and hold to turn it off.
• Press this key to end a call or to
return to Standby mode, while
any menu screen is displayed.
8.
CLR Key:
• Press this key to backspace and
delete a single space or character.
Press and hold this key to delete
all characters entered.
• Press this key to return to a
previous screen.
• Press and hold this key to return
to Standby mode while any men u
screen is displayed.
5
Page 17
9.
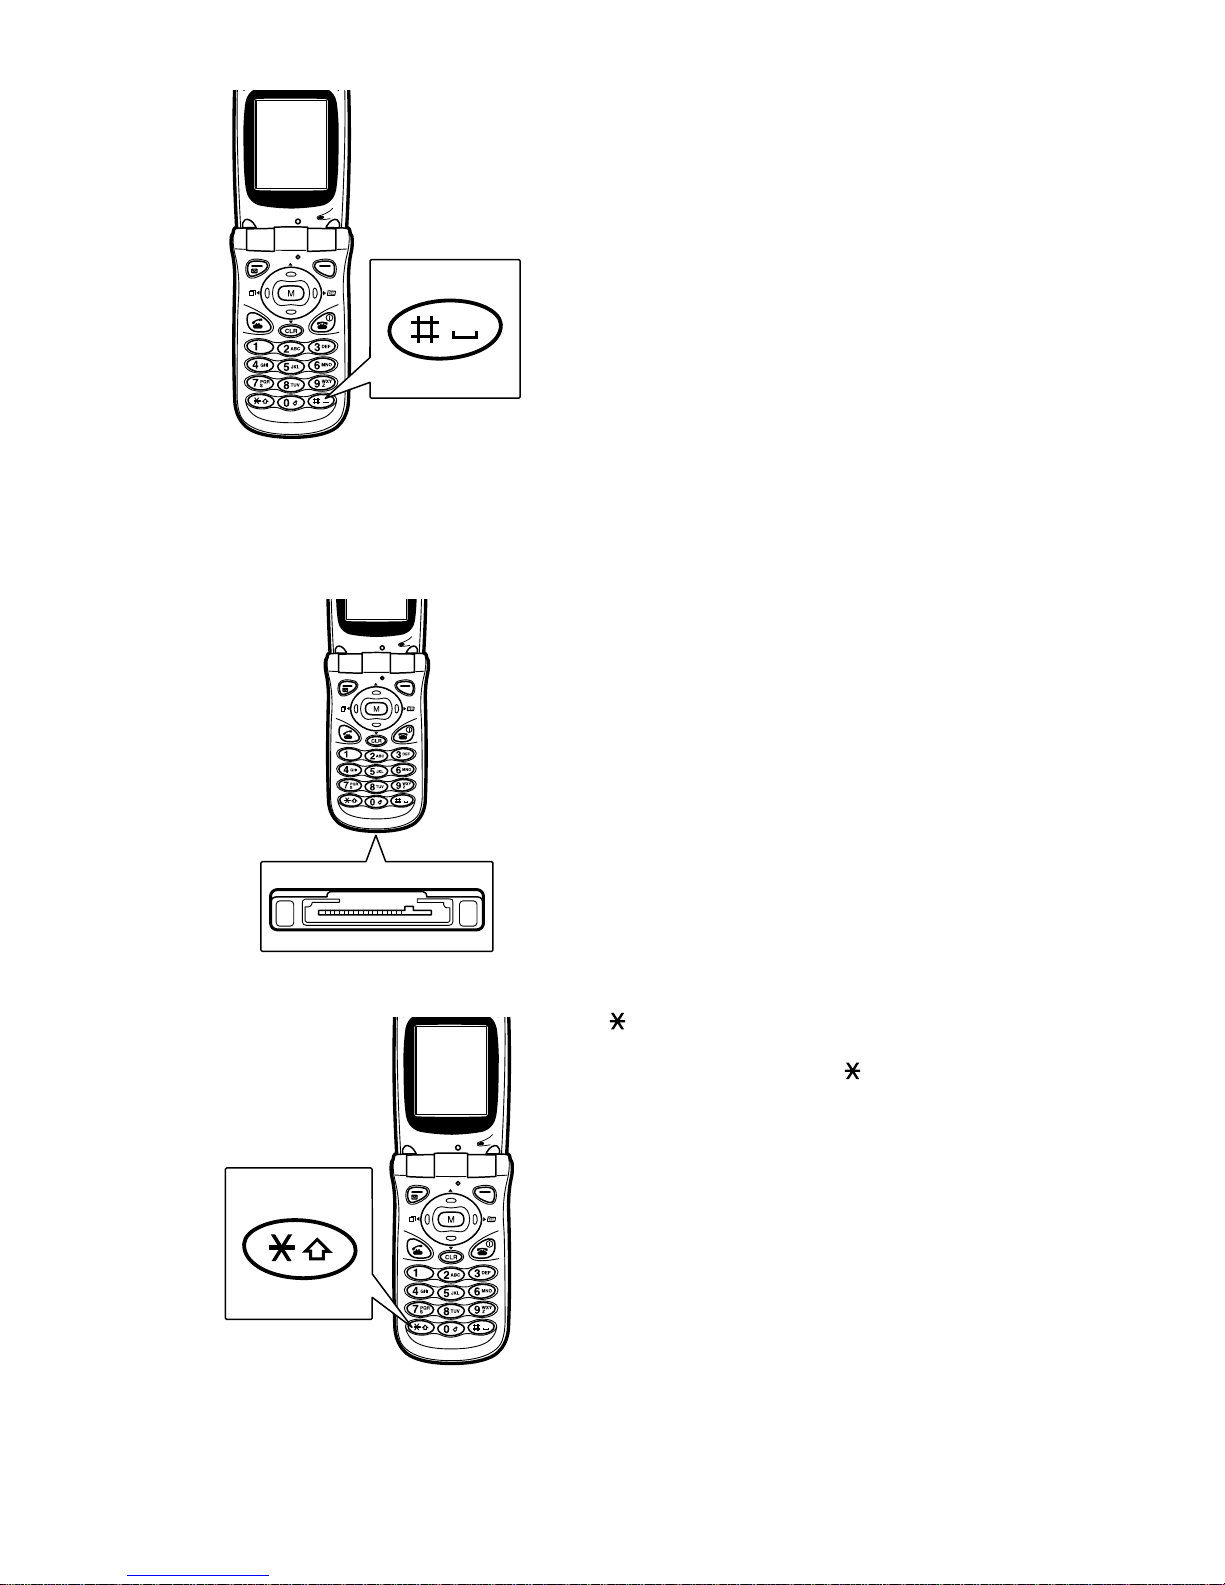
#/Space Key:
• Press this key to enter either a
space or #.
10.
Accessories C onnector :
This connector is used to
connect the charging device
(Travel charger) or PC
interface cable.
11.
• Press this key to enter .
• Press this key to shift between
upper and lower case.
/Shift Key:
6
Page 18
12.
SEND Key:
• Press this key to answer a call.
• Press this key after entering a
telephone number to place a call.
• Press this key to make a Three-
way call or answer a Call Waiting
call during a call in progress.
• Press this key twice in Standby
mode to redial the last outgoing
number.
13.
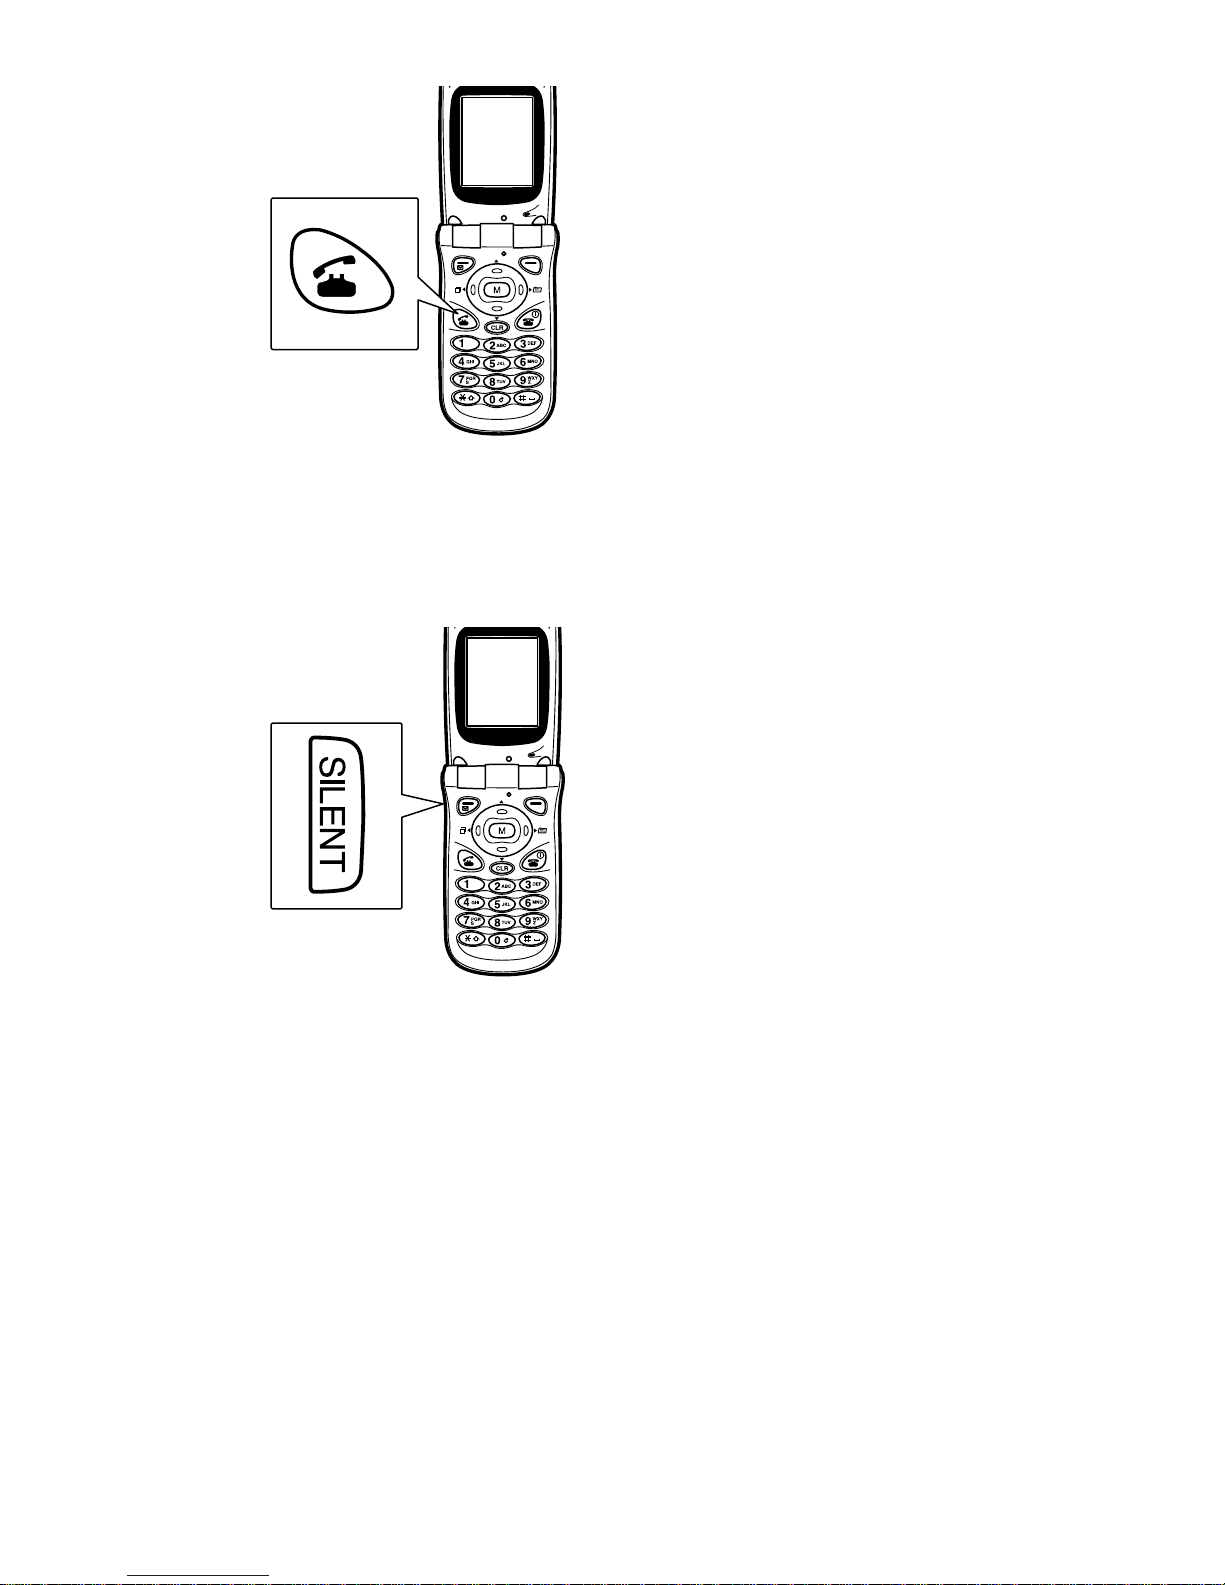
Silent Mode Key:
• Press and ho ld this key in Standby
mode to mute all sounds, such as
the wake-up tone, key beep,
ringer tone, alert, etc.
• Press this key to answer a call
(including incoming call s during
a call in progress) when a
commercially available handsfree headset is attached to the
phone.
• Press and hold this key to end a
call.
7
Page 19
14.
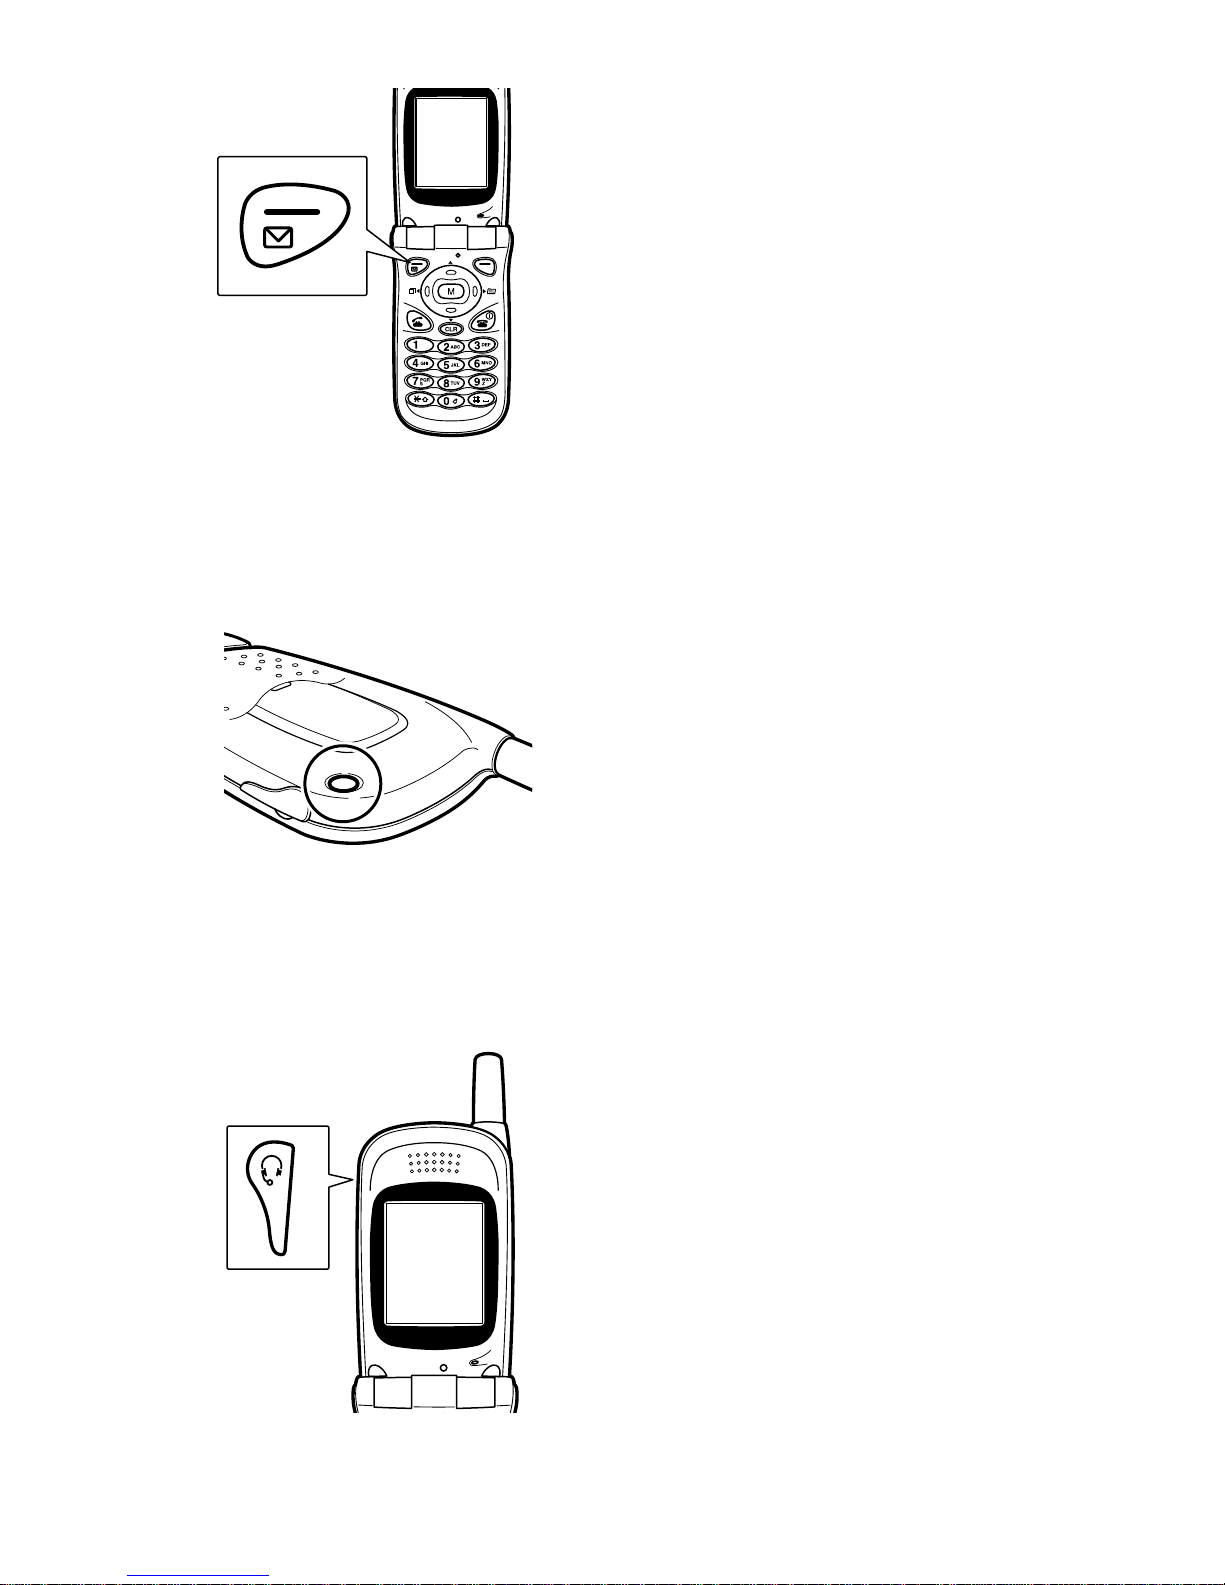
Left Soft Key/Message
Key:
• Press the left soft key to execute
the function displayed on the left
of the bottom lin e on t h e di sp la y.
• The Message key is effective
when [Message] is displayed on
the left of the bottom line.
• Press and hold the Message key to
connect to the Voicemail Center.
15.
LED Indicator: This
indicator flashes green to
indicate an incoming call or
message, while the phone is
closed with the ringer tone set
to off,
• The indicator stays illuminated
red while charging, and goes off
when charging is complete.
16.
Headset Connector: By
connecting the headset to this
connector, you can talk
hands-free. Keep the
connector covered with the
rubber plug when not using
the headset.
8
Page 20

17.
Battery Cover Release
Button:
• Press this button to remove th e
battery cover.
Details of attaching an d removing
the battery using this button are
given on pages 15 and 16.
18.
Wrist Strap Hole
19.
Battery Cover
20.
Speaker
9
Page 21
Turning Your Phone ON and OFF
Turning ON
1. Open the phone and press .
The phone will beep and the wake-up screen will be
displayed.
The phone will begin searching for a network signal.
When a signal is found, the icon will be displayed and the
phone will enter Standby mode.
Check that the following elements are displayed on the Standby
screen:
• Antenna and signal strength
icon:
• Battery icon:
• Time and date
• Banner: Welcome (default)
Now you are ready to make and receive calls.
Note
• The date and ti me are not set at the time of purchase. See page 76 for
instructions on setting them.
• While the phone is searching for the network signal, the message
“Searching for Service...” is displayed.
10
Page 22

Turning OFF
1. Press and hold .
The power-off screen will be di splayed and the Good-bye
(power-off) tone will be heard.
Note
The phone w il l not be turned off unless yo u press and hold .
This feat ure prevents your phone from bei ng turned off accidentally.
Roaming with your Tri-mode Telephone
Your phone is Tri-mode, which means you can use it to make and
receive calls in many places.
• In any city where your home network provides service.
• On other CDMA networks and conventional analog cellular
networks where your home network has implemented roaming
agreements.
When you use y our phon e outside y our home network, i t is called
roaming. If you are roaming in areas where your home network
has agreements with digital CDMA or conventional analog
cellular providers, you will pay the roaming rate plus longdistance charges, where they apply.
Note
In areas where your home network does not have roaming agreements,
you will still be able to mak e (but not receive) calls using a credit card.
This is called manual roaming. Consult your home network operator for
more information.
Roaming Settings
For more information on roaming settings, see the corresponding
pages shown below.
1. Phone’s mode (P.19)
2.
Roaming call guard (P.27)
3.
Voice calling experience (P.28)
11
Page 23
Displaying Your Phone Number
There are two ways to display your phone number in Standby
mode:
Using the Menu
1. Press to display the Main menu.
2.
Press to select Phone Book.
3.
Press to select My Phone #.
4.
Press to return to the Standby screen.
Using the Right Arrow Key
1. Press to display the phone book menu.
2.
Press to select My Phone #.
3.
Press to return to the Standby screen.
12
Page 24

Display
Top Line of Display
or
or
Depending on th e phon e’s oper atin g mode, the disp lay in dicators
will inform you of in-use statu s.
Signal Strength: Indicates the sign al strength when your
phone is turned on. The more lines the greater the signal
strength. The strength changes depending on where you
are.
Service: Indicates that an analog call is in progress.
No Service: Indicates that your phone is outside the
service area meaning that you can not make or receive a
call. Move to an area where your phone indicates more
signal strength lines.
Note
The no service indicator will always appear when you turn on your phone.
As soon as service is found, the indicator disappears.
Indicates that a digital call is in progress.
Roaming: Indicates that you are outside the area of your
home network.
Indicator status Meaning
(No display) You are in your home network service area.
Steadi ly ON Y o u are in an anal og or digi tal roaming service
area (where your home network has a roaming
agreement in place.)
Flashes once every
second
Digital Call: Indicates that the phone is set to Digital
mode.
You are in an analog or digital coverage area
not covered by your home network roaming
agreement.
13
Page 25

Analog Call: Indicates that the phone is set to Analog
mode.
Voice privacy: Indicates that the call is being made in
Voice Privacy mode.
Indicates that the ringer volume is set to “0”. is
displayed instead when it is set to Escalate.
Vibrate: Indicates that your phone will notify you of
incoming calls, data, etc. by vibrating.
Silent mode: Indicates that the phone is in Silent mode.
Press and hold th e Sil ent mo de key t o turn t he mo de on or
off.
Message: Indicates that you have received an incoming
message (voicemail notification, text, or browser
message). (P.94)
Press to display the Message menu, or p ress and hold
to call the Voicemail center.
Alarm/Reminder: Indicates that the Alarm Clock or Call
Reminder option is set. (P.72, P.73)
Battery Level: Indicates the phone
’
s current battery
level. The icon will blink during changing.(P.16)
Battery level ( : Full, : Medium, : Low, :
Empty)
14
Page 26
Battery
When you use your phone for the first time after installing the battery,
please chec k the battery leve l on the display. I f the phone detects a l ow
battery level, your call may drop quickly.
Installing the Battery
1.
1
Push the battery cover release
button and then slide the
battery cover in the direction
Guides
2
2
of the arrow .
2.
Hold the battery so that the
metal contacts of the battery
are facing down and th e guides
1
on the base of the battery slide
into the slots on the base of the
phone , and then insert it
.
3.
Place the battery cover so that
the marks are aligned and
slide it as shown until it clicks
1
2
into place .
Marks
15
Page 27
Remo v in g th e Battery
1
1
2
2
1. Turn off the phone.
2.
Push the battery cover release
button
battery cover to remove it .
3.
Pull out the ba ttery from the
and then slide the
1
2
phone.
Note
Do not remove the battery while the phone is turned on.
Chargin g th e B a tte ry
Check the status of the battery indicator on the display.
When the empty icon of the battery ( ) is displayed, your
phone detects a low battery level
*
and alerts you that the battery
is almost exhausted. When the warning message is displayed,
charge the battery immediately to its full capacity.
If you want t o continue us ing the ph one, connect i t to the charger.
If you leave the phone without charging it, it will automatically
turn off.
* There is approximately 2 to 5-minutes talk time remaining
depending on the signal strength.
Note
Be sure to charge the battery immediately to its full capacity before you
use the optional Mobile Phone Manager Sof tware or the Data /Fax
communication feature.
16
Page 28
Using the Travel Charger
Use only the chargers and adapters
approved by the manufacturer. Use
of any unauthorized accessories may
be dangerous and will invalidate the
phone warranty if the accessories
cause damage or a defect to the
phone.
* Charge time: approximately 2 to 3 hours.
1. Insert th e t ra vel charger’s conn ect o r in to the connector
at the bottom of the phone.
2.
Plug the charger into a wall outlet.
3.
The LED indicato r shows the battery level a s follows:
Indicator Status
Light is red: Charging is in progress.
Turns off: Charging is completed (fully charged).
Note
• Making a call while charging the battery with the travel charger may
increase the charging time.
• The first time you charge a battery which has bee n left unused for a long
period of time, the LCD may not turn on for a couple of minutes. This
is not a malfunction.
Tips on Using Your Battery and Battery Charger
Effectively
To use the battery and battery charger effectively, keep the
following in mind:
• Only use Sharp-approved batteries and chargers.
17
Page 29

• Charge the battery in a temperature range of 32° F to 104° F
(0°C to 40°C).
• Charge the battery if it has been left unus ed for a long perio d of
time.
• Keep the metal contacts of the battery clean.
• Replace the battery if it does not seem to offer enough
performance. The battery is a consumable. When the battery
operates for an extremely short period of time even when the
battery is fully charged, replace it with a new battery.
• Store the battery in the following temperatures, depend ing on
the storage time:
• For less than one month:
–4° F to 140° F (–20°C to 60°C)
• For more than one month:
– 4°F to 113°F (–20°C to 45°C)
Precautions for Handling the Battery and Charger
• Never dispose of the battery by burning it.
• Dispose of the battery properly: Contact your local agency for
information on recycling and disposal regulations.
• Do not use the battery charger in direct sunlight or in high
humidity areas (such as in a bathroom).
• Do not attempt to disassemble, alter or short-circuit the battery,
as burns or other accidents may occur.
• Do not allow metal objects or liquids to contact or short-circuit
the battery terminals, as burns or other accidents may occur.
• Do not expose the battery to fire.
• Do not allow the battery to get wet.
If your phone gets wet, turn the power o ff immediat ely, remove
the battery and consult the shop where you purchased your
phone.
18
Page 30

Phone Mode
Standby Mode
When you turn your phone on, it will start searching for the home
network signal. If your phone is inside the home network area, it
will enter Standby mode immediately. Press the digit keys to start
dialing.
Talk Mode
Your phone enters Talk mode at the time the telephone circuit is
established. While the phone is in Talk mode, you can access the
in-use functions (P. 40 “In-Use menu”) by pressing mode.
Power Save Mode
Your phone will enter Power Save mode automatically if your
phone can not receive a signal of adequate quality for fifteen
minutes. (The message will inform you that the phone is in Power
Save mode.) While the phone is in Power Save mode, the battery
power will be conserved.
Your phone will restart searching fo r the sig nal periodically.
Or move to a different location and press any key. Your phone
will return to Standby mode and restart searching for the signal.
19
Page 31

Voice Call
Making a Voice Call
1. Open the phone and press .
The phone beeps and the wake-up screen is displayed.
Then, (antenna) and the sig nal strength level ( ) will
be displayed to indicate you are in a service area where it
is possible to make a phone call.
Finally, the message “Searching for Service...” will be
displayed to indicate which service network the phone is
searching for.
2.
Enter the phone number by pressing the digit keys.
Up to 32 digits can be entered.
3.
Press to dial.
Note
• During a call, the current talk time will be displayed.
Tip
There are other ways to make a phone call.
1) Using the phone book (P.86)
2) Using the call logs (P.89)
3) Using one-to uch dialing (speed dialing) (P.21)
4) Using a phone number embedded in a received mess age
Redialing a Call”)
5) Redialing the last number (P.22
• During a call you can adjust the voice volume.
• You can adjust the sp eech volume during a call using
(P.45)
• When you have made a mistake, press to delete the last digit.
“
and .
Holding down will delet e the entire number.
• Turning the Min ute Alert option on reminds you of the length of the
current call. (P.52)
• The Scratch Pad feature makes it easier to enter a phone number. (P.23)
20
Page 32

• If you dial the last four digits of a p hone number stored in the phone
book and press , the matched entry will be recalled. (P.35)
• If the phone number you dialed is not stored in the phone boo k, the
number will be kept displa yed for 10 seconds. Within that time, yo u can
store the number by pressing [Store].
Emergency Calls (911)
1. Dial
2.
Press to dial
Note
• To dial an emergency number in Lock mode, see below.
•To
return to Standby mode, turn the phone off and on again.
Tip
• Emergency number (911) can be dialed even if your phone is locked
(P.61 “Lock Mode”) or your account is restricted.
• Your phone supports 911, #911 and *911 as an emergency number.
• “9 + ” is a shortcut for making an emergency call.
.
One-Touch Dialing (Speed Dialing)
1. Press and hold any of the digit keys (0 - 8).
Note
• Details of setting one-touch dialing are given on page 41.
• When the hands-free headset is attached to the phone, the telephone
number stored in the memory number 0 can be dialed up by pressing
and holdi ng the sile nt mo de key.
Dialing in Lock Mode
When making a call in Lock Mode, you must en ter the lock code
(four-digit) first and then start dialing.
• Details of storing special numbers are given on page 63.
21
Page 33

Dialing Emergency #/Special Numbers in Lock
Mode
1. Enter the emergency number.
2.
Press to dial.
Note
• Details of unlocking the phone are given on page 62.
• Details of storing special numbers are given on page 63.
Redialing a Call
You can place a call using the last outgoing call log without
entering the phone number.
1. Press in Standby mode.
The last outgoing call log will be displayed.
2.
Press again to dial.
You can also dial using the incoming, outgoi ng or miss ed call
logs. Details are given later. (P.89 “Calling by Using Call Logs”).
22
Page 34

Using the Scratch Pad
During a call, you can take numerical notes by saving them in the
phone’s memory. They can be reused as phone numbers, etc.
To save a memo (numerical note)
1. During a call press the digit keys to enter a numerical
note.
2.
Press [Memo].
The memo will be tempor arily saved to the Scratch Pad of
the phone’s memory.
To paste the memo
Here is an example of how to use the Scratch Pad feature when
storing a new phone book entry.
1. When the phone book entry prompt is displayed while
you are adding a new phone number or editing an
existing phone number, press [Func].
2.
Press to select Paste Scratch Pad.
The saved memo will be pasted.
Note
The Scratch Pad memory will be erased from the phone's memory when
you turn off the phone.
23
Page 35

Answering a Call
When you receive a call:
When your phone receive s a call, it will ring, or vibr ate depending
on your ringer setting.
The LED indicator should flash green, then the backlight will light
up when you open the phone.
There are two ways to answer a call:
1. Open the phone and press
(except the navigation keys and
2.
Press when the p
hone
is open, or press any key*
or press any key*
).
(except the navigation keys and ).
• When Any Key Answer option is enabled. (P.68)
* ( ~ , , , , ,
Note
• During a call, the current talk time will be displayed.
• When the hands-free headset is attached to the phone, press
to answer a call. When Auto Answe r is set to on (P.68), this o ption will
take priori ty over the Any Key Answer option.
Tip
• You can adjust the ringer volume in Standby mode using
(P.44)
,
)
and .
• You can mute t he ringer sound by pr essing the Silent Mode key. (P.7)
• You can adjust the sp eech volume during a call using
(P.45)
• You can know from whom you receive a call by assig ni ng a unique
wallpaper to the phone book entry. (P.58)
• To reject an incoming call, press
• You can automatic al ly answer a call, when a commercially available
hands-free headset is connected and Auto Answer is set to ON. (P.67)
24
and .
.
Page 36

Ending a Call
1. Close the phone, or press .
The approximate dura tion of the last cal l will be displayed.
Note
The name and number of the caller will be displayed (approximately 10
seconds) if you have stored it i n the phone book. (P.79)
When the Other Party Ends the Call
The Talk time, phone number and name of the called party (if
found in the phone book data) will be kept displayed for
approximately 10 seconds before the display returns to Standby
mode.
Adjusting Ringer Volume
In Standby mode you can quickl y adjust the volume of the ringer.
1. Press and .
2.
When finished selecting, press
setting.
Note
• You do not need to press
during a call in progress.
• You can also change the settings for your phone’s ringer volume in the
Main menu. (P.44)
[OK] to complete volume setting
[OK] to save the
Muting the Microphone during a Call
You can mute the microphone during a call.
1. Press [Mute].
The display will change to
Your voice will be muted whi le the voice of the other party
reaches you.
Ending the call will reset the mute setting to off.
To unmute the microphone during a call, press .
[Unmute]
.
25
Page 37

Roaming
Check your pho ne’s net wo rk status on the display when y ou turn
it on.
Display Status
(No display) Home network
Other CDMA network
and Analog cellular network
Setting the Roaming Feature
1. Press to display the Main menu.
2.
Press to select System
3.
Press to select Set Service
4.
Press to select Automatic or to select No
Roaming.
The setting will be saved and the display will return to the
System menu screen.
Automatic:
Your phone will search for your home network service first.
When your home network service is not availab le, it will search
for an alternate system automatically.
No Roaming:
This setting allows you to select only your home network to
prevent roaming.
5.
When the desired service mode is displayed, press
[OK] to save the setting.
• Press to exit without saving the setting.
26
Page 38

Roaming Call Guard
This feature allows you to display a confirmation message asking
if you really want to use the roaming service or not.
If you set the roaming call guard to on, you can avoid being
charged for roaming service.
1. Press [MENU] to display the Main menu.
2.
Press to select System.
3.
Press to select Call Guard.
4.
Press to select ON or to select OFF.
When you are receiving roaming service, check the
roaming status on the display.
The indicator and the message “Roaming Call” will be
displayed.
Note
• Alw ays dial 11 digits (1+ area cod e + number) when calling from
outside your home network servi ce area.
• When No Roaming is set in the Main menu (P.26), this feature is not
effective.
• When the Auto Answer option is set to on, this feature is not effective.
Making Roaming C a lls with the C a ll G u a r d O n
1. Enter the phone number and then press
The following message will be displayed: “Roaming rate
applies. Press SEND to proceed.”
2.
Press to call the party on the other end.
.
Answe rin g In c o ming Calls with the C a ll Guard On
1. During an inco ming call, t he followi ng message wil l be
displayed: “Roaming rate applies. Press SEND to
accept.”
2.
Press to answer the call.
27
Page 39

Voice Calling Experience
When you use your phone on other CDMA networks, your calling
experience and call quality will be similar to what you experience
when making calls from within your home network.
Although certain voice calling features may not be available, your
phone calls are still private and secure.
When you use your phone on analog cell ular networks, your
experience will be different. Cellular roaming will be similar to
the quality provided by conventional analog cellular carriers
today. Although you will still have the convenience of being able
to make and receive voice calls, here are some diff erences you can
expect:
• You are more likely to experience static, cross-talk, fade-o ut and
dropped calls.
• Some voice calling features (such as Caller ID) that are standar d
within your home network may not be available.
• Web service, Messaging service and Data/Fax calls cannot be
connected.
• Security and privacy risks (eavesdropping and phone number
cloning) are the same as those of the conventional analog
cellular services today.
• Battery life will be shorter when you use your phone for cellul ar
roaming than when you use it on a CDMA network.
If you are in the middle of a call and leave your home network
service area, your call will be dropped. When reentering your
home network service area while on a roaming call, end the call,
and then turn your phone off and on again to acquire your home
network service.
Contact your service provider if you need assistance while using
your phone outside of your home network.
28
Page 40

Caller ID
When you receive a call from a numb er that you have stored in the
phone book, your phone will display the caller’s number and
name.
Your number and name can also be displaye d on the other caller’s
phone as well.
Note
• Details of Caller ID service vary depending on your home network and
its services. Caller ID may not be available in all areas.
• To pr event your phon e number from being displayed for a par ticular
outgoing call and other functions, follow the instructions provided by
your service provider.
29
Page 41

Call W a itin g
Your phone supports Call Waiting service. Using this feature, you
can receive a second call while holding the current call.
When you receive a second call during a call in progress, the
incoming call alert is heard.
Accepting or Rejecting a Second Call
1. To accept the call, press .
The current call will be placed on hold, while the second
call will be answered.
• Press again to switch be tween the current and held
call.
2.
To reject the call, press
Note
The call log of a second ca ll will be saved as a missed call log (P.89) if
you do not answer the call.
.
Temporarily Disabling the Call Waiting Feature
Follow the instructions provided by your service provider.
Permanently Turning Off Call Waiting Feature
Follow the instructions provided by your service provider.
30
Page 42

Three-way Calling (Conference Call)
With the Three-way Calling feature, you can have a conference
with two other parties.
Note
• You must subscribe to the Three-way Calling service to use this feature.
• Details of the Three-w ay Calling fea ture vary depe nding on you r home
network and its services.
• The Three-way Calling feature may not be available in all areas.
Beginnin g a Three-way Callin g
1. During a call press .
The current call will be placed on hold.
2.
Enter another phone number and press .
You will be connected to the third party.
3.
Press again.
Three-way calling will be started.
Note
In step 2 you can recall phone book entries.
Ending a Three-way Calling
1. Press during Three-way calling.
When one of the other parties ends the call, you will be connected
with the remaining party (Two-way calling).
Note
• Your phone will record two outgoing call logs .
• You will be charged for two calls.
31
Page 43

Call Forwarding
Using the Call Forwarding feature, you can forward an inco ming
call to another phone.
When this feature is in use, you can still make a call from your
phone.
Note
Call Forwarding service to use this feature.
• You must subscribe to
• Details of the C a ll Forwardin g feature vary depending on your home
network and its services.
• The Call Forwarding feature may not be available in all areas.
the
Setting the Call Forwarding Number
Follow the instructions provided by your service provider.
Disablin g Call Forward in g
Follow the instructions provided by your service provider.
Missed Calls
Your phone can record calls you were unable to answer and
display a list of missed calls.
When the other party has ended a call before you can answer the
incoming call, your phon e will put an alert message on the display
to indicate that you have missed a call.
Displaying a List of Missed Calls
1. Press and [Missed].
Missed call log s list will be displayed.
2.
Select a missed call log and press [OK] to display
the contents.
3.
Press to dial or press to return to Standby
mode.
32
Page 44

Note
• Up to 20 missed calls can be stor ed in the phone memory. I f more th an
20 missed calls are receiv ed, the earliest call log will be automatically
replaced with the new one.
• Unanswered calls in the Call Waiting se rvice can be recorded in the list
of missed calls.
• To display a list of yo ur call logs, see “Viewing Your Call Logs
” on
page 89.
Dropped Calls (Fade Calls)
When your phone leaves your network service area or a signal
fade occurs, an alert message appears on the display.
When a dropped call occurs, it will automatically end and the
phone will return to Standby mode .
Failed Ca lls
When your phone is outside the calling range or your service
network is temporarily busy, it displays the alert message on the
display.
1. Press , or to clear the alert message.
Tip
If you turn the Aut o Retry option on, your p hone will redial autom atically
under specified conditions (P.68).
Note
If the dropped call is your outgoing call, the call log will be recorded in
the outgoing call log li s t, so that you can redial the number by pressing
twice.
Dialing Your Home Network Operator Services
Follow the instructions provided by your ser vice provider.
33
Page 45

Prepend Dialing
This feature allows you to add additional number(s) (e.g. area
code, pauses) be fore the phone number s tored in your phone book.
1. Press [MENU] to display the Main menu.
2.
Press to select Phone Book.
3.
Search for the desired number to be prepended.
See page 86 for details on searching methods.
4.
Press .
5.
Press
.
The number will be prepended.
6.
Enter the prepend digits (area code or feature activation
code) by pressing the digit keys. For feature calls,
press before dialing the feature code.
7.
Press to call the prepended number.
Note
In step 5 you can select Prepend by pressing
To prepend a phone number from your call logs:
[Func] and
1. Press [MENU] to display the Main menu.
2.
Press to select Calls.
3.
Press to select Call Logs (outgoing call logs).
.
•Press [Misse d] to dis play the missed call logs.
•Press [Income] to display the incoming call logs.
4.
Select the desired number to be prepended and press
.
5.
Perform steps 5 through 7 above.
Note
In step 5 you can select Prepend by pressing
34
[Func] and
.
Page 46

Four-digit Dialing
By pressing only the last four digits of a phone number, you can
quickly recall matched entries and then dial.
1. Dial any four continuous digits.
2.
Press .
The matched phone number will be recalled.
3.
Press to dial.
Note
If more than one phone number containing the same four digits are found
in the phone book, all candidates will be listed by name. When they do
not have name s, th e ph on e nu m bers will be displayed instead. Select the
desired num ber and then press to dial.
35
Page 47

Pause Dialing
When you call automated systems (like banking services), you are
often required to enter a password or account number. Instead of
manually entering the numbers each time, you can store the
numbers in your phone book, separated by special characters
called pauses.
There are two kinds of pau ses th at can be entered on your p hon e:
• “Hard pause” stops the dialing sequence until you pres s .
• Timed pause (two-second p ause) sto ps the dial ing sequ ence for
two seconds and then automatically sends the rem a ining digits.
Your phone has two pause dialing methods:
• Pause dialing from the phone book (P.37)
• Manual pause dialing (P.38).
Note
Multiple two second pauses can be entered to extend the leng th of a
pause. For example, two consecutive two second pauses give a total pause
time of four seconds.
However, keep in mi nd that pauses are counted as digits towards the 32
digit dialing maximum.
Tip
See page 80 fo r storing pauses in the phone book entry.
36
Page 48

Dialing a Phone Number Stored with a Timed Pause
Dial the phone number with a Timed pause by recalling
the phone book entry.
Two seconds after the connection is established, the
Timed pause will be transmitted.
Dialing a Phone Number Stored with a Hard Pause
1. Dial the phone number with a Hard pause by recalling
the phone book entry.
The entry prompt for your credit card number, bank
account number, etc. will be displayed.
2.
Press to transmit the number (DTMF tone).
Note
The DTMF tone will not be hea rd when the Key Beep op tion (P.45) is set
to "Silent."
37
Page 49

Dialing the Phone Number by Entering the Pause
Manu a lly
1. Enter the pho ne n umber of the service you want to call
(example: bank’s teleservice phone number (an 800
number)).
2.
Press [Func] to display the Function menu.
3.
Press the digit keys to select the option (Hard pause or
Timed pause):
To enter a Hard pause,
1 Press .
The initial “H” will be displayed.
2 Enter the remaining number.
3 Press .
4 After the connection is established, press again.
The number will be sent.
To enter a Timed pause,
1 Press .
The letter “T” will be displayed at the end of the phone
number.
2 Enter the remaining number following the pause (such as
your account number).
3 Press .
Two seconds after the connection is established, the
number will be sent.
Note
We recommen d you to store frequently used phone numbers includin g
the pause in yo ur phone book.
38
Page 50

Data/Fax Transmission
Using this feature, you can send and receive faxes and data by
connecting your phone with a PC.
Your phone comes equipped with a Phone Book utility ("Mobile
Phone Manager Software") which is used to transmit data between
your phone and a PC. For quick us age, refer to the sep arate sheet,
Quick Start Guide for Mobile Phone Manager Soft ware.
Note
• You must first activate the Fax /Data ser vice settin g de pending on y our
home network and your Internet Service Provider (ISP).
• We recommend that you charge the battery to its full capacity before
you use this featu re.
Requirements
1. Fax/Data service
Software for Data/Fax transmission
2.
Sending Fax/Data
Note
You can not receive voicemails while your phone is in Fax/Da ta
communication mode.
1. Start the communication application program.
Enter Fax/Data communication mode.
2.
To return to a normal voice call mode, see page 75 (7-3. Data/
Fax).
Transmission Specifications
Modem: 9600 bps/14,400 bps
Facsimile: Group 3 9600 bps/14,400 bps
39
Page 51

Menus
Menus allow you to check your phone’s settings.
Your phone provides a Main menu (P.107) and an In-Use menu.
1. Main men u
The Main menu has seven categories you can access in
Standby mode. Each category has its own submenus:
1 Phone Book 5 Security
2 Calls 6 Setup/Tool
3 Sounds 7 System
4 Display
In-Use menu
2.
The In-Use menu has five options you can access in Talk
mode:
1 Phone Book
2 Calls
3 Sounds
4 Display
6 Setup/Tool
Selecting Menus
Method 1:
To select the Main menu options, press and then press the
navigation keys to scroll through menu options until the desired
option is displayed.
Method 2: Submenu’s number
To select the desired submenu directly, press or press the
digit key for the submenu’s corresponding number.
Note
When you close the phone or when none of the keys has been pressed for
60 seconds, the phone will automatically return to Standby mode.
40
Page 52

1. Phone Book Menu
1-1. Find Name 1-4. One-touch Dial
1-2. Find by Group 1-5. My Phone #
1-3. Find Entry # 1-6. Scra t ch Pad
1-1. Find Name
See page 86 for details.
1-2. Find by Group
See page 87 for details.
1-3. Find Entry #
See page 87 for details.
1-4. Setting One-touch Dial
This option a llows you to dial quickly by press ing and holding any
of the digit keys (0 - 8).
To use the one-touch dial feature, choose the candidate to be set
as a one-touch dial from the stored phone book entries.
1. Press [MENU] to display the Main menu.
Press to select Phone Book.
2.
Press to select One-touch Dial.
3.
The names stor ed in the One-touch Dial list will be
displayed.
Select the desired blank number and press [Func].
4.
The Func tion menu will be displ ayed.
Press to select Set.
5.
The phone book menu will be displayed.
• To cancel setting, press .
41
Page 53

Search for the desired phone number to be set.
6.
Details of searching for phone numbers are gi ven on page
86.
Press [Set].
7.
The message ‘One-touch Dial x stored!’ (x: numbers 0
through 8) will be displayed and the selected phone
number will be saved.
1-5. Displaying My Phone Number
1. Press [MENU] to display the Main menu.
2. Press to select Phone Book.
Press to select My Phone #.
3.
Press to return to Standby mode.
4.
Note
During a call, yo u ca n als o display your phon e nu m be r in the same
manner.
1. Press [MENU] to display the In-Use menu.
Press to select Phone Book.
2.
Press to select My Phone #.
3.
Press
4.
twice to retu r n to the Ca lling screen.
1-6. Scratch Pad
This feature allows you to display the currently saved memo
(numerical note). Details of saving and pasting the memo are
given on page 23.
• The memo saved in the scratch pad memory will be cleared
when the phone is turned off.
42
Page 54

2. Calls M e n u
2-1. Call Logs
1. Press [MENU] to display the Main menu.
Press to select Calls.
2.
Press to select Call Logs.
3.
The outgoing call logs will be displayed.
To display the missed call logs, press [Missed].
4.
Then, to display the incoming call logs, press
5.
[Income].
To display the outgoing call logs again, press
6.
[Outgo].
The display will switch in this order.
Details of displaying call logs are given on page 89.
2-2. Call Info
Details of displaying call info (Last Call, Recent Call and All
Calls ) are given on page 91.
43
Page 55

3. Sounds Menu
3-1 Volume
Note
• When the headset is connected, "Headset " will be displayed on y our
*
phone's screen.
• The volume will automatically adjust itself to the headset setting.
• We recommend you not to select Level 5 especially when you are
driving with the headset on, because it will get in the way of driving.
Normal Ringer
This option allows y ou to set th e Normal ring er volume for voice
and fax calls.
There are two ways to set the Normal ringer volume: either set in
Standby mode or set from the Main menu.
In Standby Mode
1. Press or until the desired volume is selected.
Silent, Level 1 through 5, and Escalate.
When finished selecting, press [OK] to save the
2.
setting.
In the Main Menu
1. Press [MENU] to display the Main menu.
Press to select Sounds.
2.
Press to select Volume.
3.
Press to select Normal Ringer.
4.
Select one of the following:
5.
Silent, Level 1 through 5 and Escalate
To hear a demo for each level, switch the selection and
press [Listen].
44
Page 56

When finished selecting, press [OK] to save the
6.
setting.
Key Beep
This option allows you to adjust the volume of the beep tone (key
tone) you hear when you press a key.
1. Press [MENU] to display the Main menu.
Press to select Sounds.
2.
Press to select Volume.
3.
Press to select Key Beep.
4.
Select one of the following:
5.
Silent, level 1, level 2, level 3, and level 4.
To hear a demo for each level, switch the selection and
press [Listen].
When finished selecting, press [OK] to save the
6.
setting.
Note
This setting also adjusts the Fade Alert and Service Alert volu me.
Speech
This option allows you to adjust the earpiece speech volume.
1. Press [MENU] to display the Main menu.
Press to select Sounds.
2.
Press to select Volume.
3.
Press to select Speech.
4.
Select one of the following:
5.
Level 1, level 2, level 3, level 4 and level 5.
To hear a demo for each level, switch the selection and
press [Listen].
45
Page 57

When finished selecting, press [OK] to save the
6.
setting.
Setting the Ringer Volume for Message Ringer
You can select a unique ringer volume for incoming message
calls.
This volume setting applies to incoming voicemai l notif ications,
text messages and pagers.
1. Press [MENU] to display the Main menu.
2. Press to select Sounds.
Press to select Volume.
3.
Press to select Message Ringer.
4.
Select one of the following:
5.
Silent, level 1 through 5 and Escalate
To hear a demo for each level, switch the selection and
press [Listen].
When finished selecting, press [OK] to save the
6.
setting.
Setting the Ringer Volume for Alarm/Reminder
This option enables you to select a unique ringer vo lume for your
alarm and reminder.
1. Press [MENU] to display the Main menu.
Press to select Sounds.
2.
Press to select Volume.
3.
Press to select Alarm/Reminder.
4.
Select one of the following:
5.
Silent, level 1 through 5 and Escalate.
To hear a demo for each level, switch the selection and
press [Listen].
46
Page 58

When finished selecting, press [OK] to save the
6.
setting.
3-2. Silent Mode
This option allows you to mute all sou nds, includ ing the wake-up
tone, key beep, ringer sound, alert etc. Your phone will notify you
of incoming calls by vibrating.
1. Press [MENU] to display the Main menu.
Press to select Sounds.
2.
Press to select Silent Mode.
3.
Press to select ON or to select OFF.
4.
When finished selecting, press [OK] to save the
5.
setting.
When you select ON, the icon will be displayed.
Note
• When Silent mode is set to ON, attaching or removing the hea dset
switches the Silent mode setting between ON and OFF.
• By pressing and holding the Silent Mode key in Standby mode, you can
also turn the Silent mode ON and OFF.
3-3. Ringer Type
Using the ringer type option, you can customize up to 5 phone
book entries and 3 kinds of ringers (Normal ringer, Message
ringer and Alarm/Remin der) by setti ng a diffe rent ringer type for
each phone book entry or ringer.
When the caller has subscribed to Caller ID service, a unique
ringer tone can be specified.
Setting Ringer Type for Normal Ringer
1. Press [MENU] to display the Main menu.
Press to select Sounds.
2.
Press to select Ringer Type.
3.
47
Page 59

Press to select Normal Ringer.
4.
The selectable types will be displayed.
If you want to hear a demo for each type, use or
5.
to select the desired type and press [Listen].
To cancel selecting, press [Stop].
When finished selecting, press [OK] to save the
6.
setting.
Setting the Ringer Type for Message Calls
This option allows you to specify a unique ringer type for
incoming message calls. The ringer type setting applies to
incoming voicemail notifications, text messages, pagers and Web
messages.
1. Press [MENU] to display the Main menu.
2. Press to select Sounds.
Press to select Ringer Type.
3.
Press to select Message Ringer.
4.
The selectable tones will be displayed.
If you want to hear a demo, use or to select the
5.
desired tone and press [Listen].
To cancel selecting, press [Stop].
When finished selecting, press [OK] to save the
6.
setting.
Setting the Ringer Type for the Alarm/Reminder
This option enables you to set a unique ringer type for your Alarm
and Reminder.
1. Press [MENU] to display the Main menu.
Press to select Sounds.
2.
Press to select Ringer Type.
3.
48
Page 60

Press to select Alarm/Reminder.
4.
The selectable types will be displayed.
If you want to hear a demo, use or to select the
5.
desired tone and press [Listen].
To cancel selecting, press [Stop].
When finished selecting, press [OK] to save the
6.
setting.
Setting the Name Ringer
This option allows you to set unique ringer types for five phone
book entries (‘Name ringer’).
1. Press [MENU] to display the Main menu.
2. Press to select Sounds.
Press to select Ringer Type.
3.
Press to select Set.
4.
Choose one of the five options ([4 ] to [8]) and press
5.
[OK].
The phone number search prompt will be displayed.
Choose an entry and press [Set].
6.
The selectable melodies will be displayed.
If you want to hear a demo, use or to select the
7.
desired tone and press [Listen].
To cancel selecting, press [Stop].
When finished selecting, press [OK] to save the
8.
setting.
No. File name Melody Composer
01 TurkishMarch Turkish March Wolfgang Amadeus
02 Trepak Russian Dance
03 PetitChien Petit Chien Frederic Francois
Trepak
Mozart
Pyotr Ilych
Tchaikovsky
Chopin
49
Page 61

No. File name Melody Composer
04 Brindisi La Traviata-Brindisi Guiseppe Verdi
05 GrandeValse "Grande Valse
Brillante OP.18 Eb"
06 Canon Canon Johann Pachelbel
07 TheBear The Bear Amerikan Folksong
08 LondonBridge London Bridge English Folksong
09 SwaneeRiver Swanee River Stephen Collins
10 BeautyDreamer BeautyDreamer Stephen Collins
Removing the Name Ringer Setting
Frederic Francois
Chopin
Foste
Foste
1. Perform steps 1 through 3 for setting the Name Ringer.
2. Select one of the five names ([4] through [8]).
Press [Remove].
3.
The confirmation message will be displayed.
Press to select YES.
4.
The name will be removed from the list.
3-4. Vibrator
This option enable s you to s et the vi br ator option for three ring er
types: Normal ringer, Message ringer, Alarm/Reminder.
1. Press [MENU] to display the Main menu.
Press to select Sounds.
2.
Press to select Vibrator.
3.
Press to set the Normal Ringer,
4.
Press to select Message Ringer or
Press to select Alarm/Reminder.
Press to select ON or to select OFF.
5.
50
Page 62

When finished setting, press [OK] to save the
6.
setting.
When you select ON for the Normal ringer, the icon
will be displayed in Standby mode.
3-5. Ringer Time
This option enables you to set a ringer time (between 2 and 99
seconds) for the Message ringer and Alarm/Reminder.
1. Press [MENU] to display the Main menu.
Press to select Sounds.
2.
Press to select Ringer Time.
3.
Press to select Message Ringer, or
4.
Press to select Alarm/Reminder.
Press the digi t keys to enter th e desired time between 2 and
5.
99 seconds.
When finished setting, press [OK] to save the
6.
setting.
3-6. Alerts
Fade Alert
This option enables your phone to inform you with an alert tone
(Fade Alert) when you hav e lo st a call because your phone is out
of calling range or the network is temporarily busy.
1. Press [MENU] to display the Main menu.
Press to select Sounds.
2.
Press to select Alerts.
3.
Press to select Fade Alert.
4.
Press to select ON or to select OFF.
5.
51
Page 63

Minute Alert
This option causes you r phone to sound an aler t 10 seconds before
each elapsed minute to remind you of the length of the current
call.
Turning the Minute Alert On or Off
1. Press [MENU] to display the Main menu in
Standby mode before placing the call.
2.
Press to select Sounds.
Press to select Alerts.
3.
Press to select Minute Alert.
4.
Press to select ON or to select OFF.
5.
Service Alert
This option causes your phone to beep in the following situations:
• when a dropped call or a failed call is found, or
when your phone enters or leaves your home network area.
Turning the Service Alert On or Off
1. Press [MENU] to display the Main menu.
2. Press to select Sounds.
Press to select Alerts.
3.
Press to select Service Alert.
4.
Press to select ON or to select OFF.
5.
52
Page 64

Privacy Alert
This option sets your phone to make a unique sound when you
change the Voice Privacy setting during a call in progress.
Turning the Privacy Alert ON or OFF
1. Press [MENU] to display the Main menu.
2. Press to select Sounds.
Press to select Alerts.
3.
Press to select Privacy Alert
4.
Press to select ON or to select OFF.
5.
Wake-up/Good-bye Tone
When this option is set to on, your phone will make a sound
(wake-up and good-bye tone), when the wake-up and good-bye
screen are displayed.
Turning the Wake-up/Good-bye Tone On or Off
1. Press [MENU] to display the Main menu.
2. Press to select Sounds.
Press to select Alerts.
3.
Press to select Wake - up/Good-bye Tone.
4.
Press to select ON or to select OFF.
5.
Message Reminder
This option reminds you every two minutes in Standby mode of
unread messages when your phone finds them in the inbox.
Turning the Message Reminder On or Off
1. Press [MENU] to display the Main menu.
Press to select Sounds.
2.
53
Page 65

Press to select Alerts.
3.
Press to select MSG Reminder.
4.
Press to select ON or to select OFF.
5.
Note
This option does not apply to the voicemai l or browser mes s ages.
3-7. Tone Length
The tone length setting is used to change the length (short or long)
of the DTMF (dual-tone multi-frequency) tones.
The tone length depends on the tele-service system used by the
bank or other service (such as a bank account or voicemail
system).
Consult the tele-service center for details of the tone length.
1. Press [MENU] to display the Main menu.
Press to select Sounds.
2.
Press to select Tone Length.
3.
Press to select Normal or to select Long.
4.
54
Page 66

4. Display menu
4-1. LCD Contrast
You can adjust the brightness (or contrast) of the backlight.
1. Press [MENU] to display the Main menu.
2. Press to select Display.
Press to select LCD Contrast.
3.
Press (Dark) or (Light).
4.
• Up to nine levels are available.
When the desired contrast is displayed, press [OK]
5.
to save the settin g.
4-2. Backlight
You can turn the backlight on or off, or adjust the length of the
backlighting.
You can save battery power if you turn the backlight setting off.
When you select the length of the backlighting, the backlight will
be turned off after the selected time elapses.
1. Press [MENU] to display the Main menu.
Press to select Display.
2.
Press to select Backlight.
3.
Press one of the following:
4.
Always OFF
7 Seconds
15 Seconds
30 Seconds
Always ON
55
Page 67

4-3. Automatic Hyphenation
This option allows you to set automatic hyphenation ON/OFF .
Automatic hyphenation follows the North American Numbering
Plan, which hyphenates numbers as follows:
800-555-1234
Digits following a pause will not be hyphenated. (P.36 “Pause
Dialing”)
1. Press [MENU] to display the Main menu.
Press to select Display.
2.
Press to select Auto Hyphen.
3.
Press to select ON or to select OFF.
4.
4-4. Banner
Your phone can display a banner of up to 100 characters in
Standby mode while the phone is on.
The default setting (“Welcome”) can be customized within the
specified 100 characters, and a phone number an d e-mail address
stored in the phone book can also be used.
You can either choose to display a fixed message or have your
most frequently received mail messag e fro m certain pers ons (s ee
below) as the banner.
1. Press [MENU] to display the Main menu.
Press to select Display.
2.
Press to select Banner.
3.
Press to select Enter your Message or to
4.
select From Inbox Message.
[1] Enter your Message
The default setting (“Welcome”) will be displayed.
Edit the current message as you desire. Up to 100 characters can
be entered.
Press [OK] to save the setting.
56
Page 68

[2] From Inbox Message
Five candidates will be displayed.
Use or to select one of the five candidates.
When you want to add a new entry, select a blank entry and
press [Add New].
The message source list will be displayed: Phone Number and
E-mail Address.
Phone Number
Press . The number entry prompt will be displayed.
Then enter the desired number.
E-mail Address
Press . The address entry prompt will be dis played.
Then enter the desired address.
Up to five addresses of the e-mails you have most recently
received can be specified as a banner.
Press [OK] to save the setting.
5.
Press to return to Standby mode.
6.
The message will be displayed in Standby mode.
57
Page 69

4-5. Graphics
This feature enables you to select your de sired grap hic image fo r
the following situations:
1. Wallpaper (Screen image displayed when the phone enters
sleep mode if no keys are pressed for 5 seconds.)
2. Standby (Screen image displayed when the phone is in
Standby mode.)
3. Incoming Call (Screen image displayed when incoming
calls are received.)
4. Custom (Screen image displayed when incoming calls are
received from any of twenty pho ne book entries you selected
and assigned the screen image to.)
5. Alarm/Reminder (Screen image displayed when an a larm or
reminder sounds.)
1. Press [MENU] to display the Main menu.
Press to select Display.
2.
Press to select Graphics.
3.
Press each key to select the desired graphic image.
4.
• Press to select Wallpaper.
The following selections will be displayed.
01 OFF
02 Mosaic
03 Building Block
04 Soarer
05 Savannah
06 Dolphin
12 ---------13 SHARP Logo
14 Whirlpool
15 Sunset
16 Yacht
17 Desert
07 Flower
08 Honeycomb
09 Tiger
10 Parrots
11 ----------
58
18 Hill
19 Mountains
20 Verizon Logo
21 - 40 ----------
Page 70

• Press to select Standby.
The same selections listed above will be displayed.
• Press to select Incoming.
The same selections listed above will be displayed.
• Press to select Custom.
The following selections will be displayed.
01 Whirlpool
02 Sunset
03 Yacht
04 Desert
05 Hill
06 Mountains
07 Verizon Logo
08 ----------
• Press to select Alarm/Reminder.
The following selections will be displayed.
01 Alarm
02 Sunset
03 Whirlpool
04 Yacht
06 Hill
07 Mountains
08 Verizon Logo
09 - 28 ----------
05 Desert
• Press to select Wake-up.
The following selections will be displayed.
01 Opening
02 Dolphin
03 Flower
04 Honeycomb
05 Tiger
06 Parrots
07 ---------08 ---------09 SHARP Logo
Use or to select the desired wallpaper.
5.
10 Whirlpool
11 Sunset
12 Yacht
13 Desert
14 Hill
15 Mountains
16 Verizon Logo
17 - 86 ----------
59
Page 71

Press [OK].
6.
The selected wallpaper will be displayed.
Press [OK] to save the setting.
7.
Note
• The names of the files downloaded from the PC will be listed in the
blank numbers "----------."
• The factory default settings for the following are:
Wallpaper:OFF
Wake-up:Opening
Standby:Whirlpool
Incoming:Sunset
Custom:---------Alarm/Reminder:Alarm
4-6. Version
You can display you r phone’s software version, hardw are version,
*
ESN
call your home network Customer Care.
* ESN: Electronic Serial Number
* PRL: Preferred Roaming List
* NAM: Number Assignment Module
1. Press [MENU] to display the Main menu.
2.
3.
and PRL*. These items of information are needed when you
Press to select Display.
Press to select Version.
The hardware, software version, ESN and PRL will be
displayed.
Press to return to the
4.
60
Information menu
screen.
Page 72

5. Security Menu
To protect your phone from unauthorized use, you can lock it
easily from the Main menu, and unlock it as well.
To lock your phone, a four digit lock code must be entered. The
factory default setting of the lock code is 0000.
Once you have entered the lock number, you must enter it when
you want to change the Security menu settings.
Note
Regardless of whether the phone is locked or not, you can dial emergency
numbers (911, 911 and #911) and three specified numbers (P.63
“Special Numbers ”), an d answer incoming calls as well .
5-1. Lock Mode
1. Lock ON Power Up
This option allows you to lock the ph one every time you turn it on.
1. Press [MENU] to display the Main menu.
Press to select Security and enter your current lock
2.
code.
Press to select Lock Mode.
3.
Press to select Lock ON Power Up.
4.
The phone will be automatically locked when you turn it
on. To enable thi s setting, tur n the power off and on again.
2. Lock Now
1. Perform steps 1 through 3 above.
Press to select Lock Now.
2.
The phone locks immediately and stays locked until the
lock code is ente re d.
61
Page 73

3. Unlock
1. Perform steps 1 through 3 for Lock ON Power Up on
page 61.
2.
Press to select Unlock.
The phone will be unlocked immediately and the display
will return to the Se c urity menu screen.
5-2. New Code
The default lock code for your ph one is set to 000 0. You can set a
unique lock code and change the lock code if necessary.
Note
• Be sure to write down the new lock code.
• If you forget y our lock code, contact your service provider.
Entering a New Lock Code:
1. Press [MENU] to display the Main menu.
Press to select Security and enter your current lock
2.
code.
Press to select New Code.
3.
Enter a new, four-digit lock code by pressing the digit
4.
keys.
The lock code will be repl aced with the
your phone against unauthorized use.
• To cancel entering a new code, press or .
Press [OK] to save the new lock code.
5.
mark, protectin g
*
62
Page 74

5-3. Emergency #/Special Numbers
You can store three p hone numbers (Special Numbers ) that can be
dialed even when the phone is in Lock mode.
Once you store these numbers in the phone book, they can be
dialed manually.
Storing Special Numbers
1. Press [MENU] to display the Main menu.
Press to select Security and enter your current lock
2.
code.
Press to select Emergency #.
3.
To select a location to store the special number:
4.
• Press to select Undefined 1,
• Press to select Undefined 2, or
• Press to select Undefined 3.
Press to select Enter Number or to select
5.
Search Phone Book.
[1] Enter Number
1. Enter the special number by using the digit keys.
2. Press [OK] to save the number in the selected location.
[2] Search Phone Book
1. Perform the search procedure explained on page 86.
2. Choose the desired name and press [OK].
The contact of the selected name will be displayed.
3. Press [OK] to save the number in the selected location.
63
Page 75

Removing the Setting
1. Repeat the storing procedure (steps 1 through 3).
Choose the desired setting.
2.
Press [Remove].
3.
The stored nam e will return to the original naming
(Emergency 1, 2, or 3).
5-4. Erase All
You can erase all data stored in your phone book, messages and
call logs.
1. Press [MENU] to display the Main menu.
Press to select Security and enter your current lock
2.
code.
Press to select Erase All
3.
Press to select Phone Book.
4.
A confirmation message will be displayed to ask if you are
sure you want to erase the entire phone book data.
• Press to select C all Logs.
• Press to select Me ssages.
• Press to select C ustom Fil es.
Press to select YES.
5.
The final confirmation message will be displayed.
6.
Press
to select YES.
When finished erasing, “Erased!” will be displayed and
the phone will ret urn t o the Era se all menu scre en (s tep 4).
Note
It is a good ide a to sa ve or do wnload impo rtant info rmation (pho ne bo ok
data) to a PC using the Phone Book utility software provided as a
precaution. (P66)
64
Page 76

5-5. Secret Memory
1. Press [MENU] to display the Main menu.
Press to select Security and enter your current lock
2.
code.
Press to select Secret Memory.
3.
Press to select ON or to select OFF.
4.
Selecting ON allows you to protect phone book entries
stored as a secret entry from unauthorized use.
Selecting OFF allows you to display all phone book
entries including secret entries.
Press [OK] to save the setting.
5.
5-6. Reset
If for some reason there is a faulty operation or f ailure, you will
need to reset all settings of your phone to the factory defaults.
1. Press [MENU] to display the Main menu
Press to select Security and enter your current lock
2.
code.
Press to select Reset.
3.
Press to select OK.
4.
A confirmation message will be displayed to ask if you are
sure you want to reset the phone.
Press to select YES.
5.
Press [OK] to e xecute resetting.
6.
After resetting is completed, the phon e will be restarted
and enter Standby mode. During resetting, “Now
Resetting...” will be displayed.
• To cancel resetting, press to select Cancel in step 4, or
press to select NO in step 5.
65
Page 77

Information on the Phone Bo ok U tility
Your phone comes equipped with a Phone Book Utility (‘Mobile
Phone Manager Software’) which is used to transmit data between
your phone and a PC.
This software is comprised of three kinds of utilities: Phone Book
Manager, Melody Manager and Wallpaper Manager.
[Phone Book Manager]
This software makes a backup file of the Phone Book entries
registered on your p hone and transfers new entries created on a PC
to your phone.
[Melody Manager]
This software downloads melody files used for ringer types from
the Internet and transfers them to your phone. Twenty initial
samples are provided.
[Wallpaper Manager]
This software downloads image files (graphics or photos) for
wallpaper files, etc. from the Internet and transfers them to your
phone. Twenty initial samples (photos) are provided.
• For quick usage refer to th e separate sheet, Quick Start Guide for
Mobile Phone Manager Software.
66
Page 78

6. Setup/Tool Menu
6-1. Memory Status
This option helps you to view the memory status of the following
records.
1. Press [MENU] to display the Main menu.
2. Press to select Setup/Tool.
Press to select Memory Status.
3.
The following records will be displayed:
Phone Book 098/300
Messages 100 %
Custom Files
Graphics 18/22
Music 7/10
6-2. Calling
Turning the Auto Answer Option On or Off
This option sets you r p hon e to auto matic ally a nswer a ca ll a fter o n e ring
when a commerciall y available hands-free headset is attached to your
phone.
1. Press [MENU] to display the Main menu.
Press to select Setup/Tool.
2.
Press to select Callin g.
3.
Press to select Auto Answer.
4.
Press to select ON or to select OFF.
5.
67
Page 79

Turning the Any Key Answer Option On or Off
1. Press [MENU] to display the Main menu.
Press to select Setup/Tool.
2.
Press to select Calling.
3.
Press to select Any Key Answer.
4.
Press to select ON or to select OFF.
5.
Note
Other ways of answ ering a call are explained on page 24.
Turning the Auto Retry Option On or Off
This option allows you to set your phone to redial automatically
up to five times after the specified length of time, until your call
is picked up.
1. Press [MENU] to display the Main menu.
Press to select Setup/Tool.
2.
Press to select Calling.
3.
Press to select Auto Re try.
4.
The options will be displayed.
Press to select Every 60 sec.
5.
• Press to select Every 30 sec.
• Press to select OFF.
The Auto retry option will be turned off.
68
Page 80

Setting the Voice Privacy
This option allows you to change your voice on the phone to
encrypted mode.
1. Press [MENU] to display the Main menu.
Press to select Setup/Tool.
2.
Press to select Callin g.
3.
Press to select Voice Privacy.
4.
Press to select Automa tic .
5.
• Press to select Enhanced.
Note
Contact your home network operator to see if this option is available.
6-3. Voicemail
This option allows y ou t o set a phone number for your voi cemai l
service.
Note
Detail s of voicemail serv ice vary depending on your home network
system and its services.
1. Press [MENU] to display the Main menu.
Press to select Setup/Tool.
2.
Press to select Voicemail.
3.
Enter the specified phone number.
4.
Press [OK] to save the setting.
5.
69
Page 81

6-4. Message
1. Callback #
If for some reason you can not answer a call, you can inform the
caller of the phone number which you want to be called back at.
1. Press [MENU] to display the Main menu.
2. Press to select Setup/Tool.
Press to select Message.
3.
Press to select Callback #.
4.
Enter the desired phone number.
5.
Press [OK] to save the setting.
6.
2. Delivery ACK
You can send an acknowledgemen t to the sending party when you
successfully receive incoming data.
1. Press [MENU] to display the Main menu.
Press to select Setup/Tool.
2.
Press to select Message.
3.
Press to select Delivery ACK.
4.
Press to select ON with notification.
5.
You can check the n otification message on the display that
the
acknowledgement has been sent.
• Press to select ON.
You can send the
acknowledgement without a
notification
message
.
• Press to select OFF.
Press [OK] to save the setting.
6.
70
Page 82

3. Canned Messages
You can edit or add to the fixed forms used when sending
messages.
1. Press [MENU] to display the Main menu.
Press to select Setup/Tool.
2.
Press to select Message.
3.
Press to select Canned Message.
4.
The following selections will be displayed:
[1] Yes
[2] No
[3] Call me
[4] Need Directions
[5] Where are you ?
[6] Will call later
[7] Busy
[8] On my way
[9] Will arrive 15 minutes
[10] Thank you
Press the number you want to edit ([1] through [14]), or
5.
[11] Meeting canceled
[12] Meet me at
[13] Call me at
[14] Please Help!
[15] -------------[16] -------------[17] -------------[18] -------------[19] -------------[20] --------------
add a new message to ([15] through [20]).
Edit the current message or add a new message.
6.
Press [OK] to save the setting.
7.
71
Page 83

6-5. Browser
Details of setting the call time display are given on page 99.
6-6. Alarm
Note
• Alarm settings are not effective while your phone is turned off.
• Do not use the Alarm function in prohibited areas.
Alarm Clock
Setting the Daily Alarm
1. Press [MENU] to display the Main menu.
Press to select Setup/Tool.
2.
Select to select Alarm.
3.
Select to select Daily Alarm.
4.
Press to select ON.
5.
Press the digit keys to enter the desired alarm time.
6.
Use the digit keys and press or to set AM or PM.
Press [OK] to save the setting.
7.
Deleting the Daily Alarm Setting
1. Press [MENU] to display the Main menu.
Press to select Setup/Tool.
2.
Select to select Alarm.
3.
Press to select Daily Alarm.
4.
Press to select OFF.
5.
72
Page 84

Call Reminder
You can set yo ur pho ne to remind you to call a sp ecified person at a
preset day and time. When the alarm occurs, you will be notified by
the alarm tone and the p ho ne n um ber to call will be displayed.
Setting the Call Reminder
1. Press [MENU] to display the Main menu.
2. Press to select Setup/Tool.
Press to select Alarm.
3.
Press to select Call Reminder.
4.
Press to select ON or to select OFF.
5.
Select the search method from one of the following:
• [1] to select Search Phone Book
• [2] to select Search Call Logs
• [3] to select Enter Name
Press [OK].
6.
Enter the date and time for the alarm by using the digits keys.
7.
Press or key to select AM or PM.
8.
Press [OK] to sa ve the Call Reminder settin g.
9.
Disabling the Call Reminder Setting
1. Press [MENU] to display the Main menu.
Press to select Setup/Tool.
2.
Select to select Alarm.
3.
Press to select Call Reminder.
4.
Press to select ON.
5.
Press [Remove].
6.
Press to select YES.
7.
• To cancel removing the setting, press to select NO.
73
Page 85

6-7. Set Clock
This option allows you to set the current date and time.
The factory default setting is “January 1, 2001.”
Note
• Automatic settings provided by the CDMA network take priority over
manual settings.
• Display items vary dependi ng on your home network service area.
• Manual settings are effectiv e when the phone is turned ON in nondigital e nvironme nts. Depend ing on yo ur servic e area, "Factory default
setting" may be displayed initially.
1. Press [MENU] to display the Main menu.
2.
Press to select Setup/Tool.
Select to select Set Clock.
3.
The following clock format will be displayed:
Date (M/D/Y)
0 1 / 0 1 / 2 0 0 1
Time (H:M)
12:00 AM (PM)
Press the digit keys to set the current date and t i me.
4.
Press [OK] to save the setting.
5.
6-8. Input Mode
This option allows you to switch the input mode between
Standard and T9.
This mode applies to entering mail messages, Banner messages,
and Canned messages.
1. Press [MENU] to display the Main menu.
2.
Press to select Setup/Tool.
Select to select Input Mode.
3.
Press [OK].
4.
Press [YES] to select Standard or press [NO]
5.
to select T9.
74
Page 86

7. System Menu
7-1. Set Service
Details of set ting the option for roaming fea ture are given on page
26.
7-2. Force Mode
This feature switches your phone’s receiving mode between
analog or automatic (CDMA PCS, CDMA cell ular, or analog).
1. Press [MENU] to display the Main menu.
Press to select System.
2.
Press to select Force mode.
3.
Press to select Automa tic ,
4.
Depending on the receiving signal, your phone will be
automatically swi tched to CDMA PCS, CDMA c e llular,
or analog mode.
• Press to select Analog Call,
Your phone will be locked to analog mode.
Analog mode will be kept effective for 10 minutes after
this option is selected, or until you turn the phone off
within 10 minutes.
Press [OK] to save the setting.
5.
7-3. Data/Fax
This option allows you to change receiving modes for Data and
Fax communication when your phone is connected to a PC as a
wireless modem.
1. Press [MENU] to display the Main menu.
Press to select System.
2.
Press to select Data/Fa x.
3.
Press to select Voice only.
4.
Received data will be recognized as voice data.
75
Page 87

• Press to select Data until Power Off.
Only data other than fax data will be received. This
setting is effective until your phone will be turned off.
• Pre ss to select Fax until Po wer Off.
Only fax data will be received. This setting is effective
until your phone is turned off.
Press [OK] to save the setting.
5.
7-4. Roaming Call Guard
Details of setting the roaming call guard are gi ven on page 27.
76
Page 88

8. Custom Files
8-1. Graphics
This option allows you t o view and delete the images down loaded
from a PC.
Viewing Downloaded Graphic Files
1. Press
Press to select Custom Files.
2.
Press to select Graphics.
3.
Use or to select the file name and press
4.
[MENU] to display the Main menu.
[OK].
The image will be displayed.
Press [OK] to return to step 4 above.
Erasing a Graphic File
1. Press
Press to select Custom Files.
2.
Press to select Graphics.
3.
[MENU] to display the Main menu.
Use or to select the file name and press
4.
[Remove].
Press to select YES.
5.
The following message will be displayed: Graphics #XX
Erased! Default graphics set. (XX: entry number)
Note
When you delete the screen image currently use d for t he wallpaper, the
default wallpaper will be set.
77
Page 89

8-2. Music
This option allows you to play the melody files stored in the
phone's memory or downloaded from a PC, and easily reset the
music file used for the ringer type to the default ringer type.
Listening to Music
1. Press
Press to select Custom Files.
2.
Press to select Music.
3.
Use or to select the file name and press
4.
[MENU] to display the Main menu.
[OK].
The selected file w ill be played.
5.
Press [OK] to re turn to step 4 above.
6.
Erasing a Single Melody
1. Press
Press to select Custom Files.
2.
Press to select Music.
3.
[MENU] to display the Main menu.
Use or to select the file name and press
4.
[OK].
The selected file w ill be played.
5.
Press [Remove].
6.
Press to select YES.
7.
The follow ing message will be d isplayed: Music #XX
Erased! Default music set. (XX: entry number)
Note
• The melody files, registered in the phone's memory, which can
be overwritten are marked with (#).
• In the case that you erase a custom music file (Entry number:
XX) which has been set as a ringer pattern, the ringer pattern
will be set to Entry number: XX's original factory default music.
78
Page 90

Phone Book Dialing
Your phone can store up to 300 phone numbers.
Phone number: 32 digits including hard pauses and timed
pauses
Name: Up to 16 characters
E-mail address: Up to 48 characters
Group: 10 groups (9 groups + default)
Categories: (None), Home, Work, Mobile, Pager, Fax
* Group names can not be changed.
Tip
• You can store a phone number as a secret en try to protect it from
unauthorized use. (P.85)
• Up to nine phone numbers can be registered for one-touch dialing.
(P.41)
*
Storing a Phone Number and Name
1. Press [MENU] to display the Main menu.
Press to select Phone Book.
2.
Press [Add New].
3.
The name entry prompt will be displayed.
Enter a name and press [OK].
4.
See page 81 for details on entering characters.
Select a desired category for a new entry and press
5.
[OK].
• [1] None, [2] Home, [3] Work, [4] Mobile, [5] Pager and
[6] Fax
Press [OK] to enter the phone number.
6.
The phone number entry prompt will be displayed.
79
Page 91

Press the digit keys to enter the phone number.
7.
If necessary, press [Func] to enter a hard pause ([1]
8.
key) or a timed pause ([2] key).
Press [OK].
9.
The next item (E-mail address) will be highlighted.
Press [OK].
10.
The e-mail address entry prompt will be displayed.
Enter the e-mail address.
11.
• Up to 48 characters can be entered.
Press [OK].
12.
The next item (Entry #) will be highlighted.
Press [OK].
13.
Enter the desired number (3-digit) and press [OK] to
14.
save the setting.
• The entry number range is from 001 to 300.
• When inputting a one or two-digit entr y number (ranging
from 001 to 099), you can complete st orage by pressi ng
the co rresponding one or two digits keys.
Example: Press
for entry number
002.
Note
• A phone number or a mai l addre ss must be enter ed to compl ete st oring .
• This procedure can be completed only with the e-mail address. The
name and telephone number are not always needed.
• If a warning message is displayed to indica te that you are going to
overwrite a location, enter ano t her number and press [OK].
• If you press [OK] without entering a memory number, the lowest
blank memory number will be assigned.
Storing Phone Numbers with Pauses
1. Enter the phone number you want to store (such as the
bank’s teleservice phone number).
80
Page 92

Press [Func] to display Function menu.
2.
• Press or to enter the desired pause:
– To enter a Hard Pause, press .
The letter “H” will be displayed at the end of the number.
Then enter the digits following the pause (such as your
account number), or
– To enter a Timed pause, press .
The letter “T” will be displayed at the end of the phone
number. Then enter the number following the pause (such as
your account number).
Store the phone number by pressing [Store].
3.
Follow the screen prompt.
4.
Entering Characters
When entering characters (letters, numbers or punctua tion marks)
to create phone book entries, press the corresponding key.
Pressing each key scrolls characters in the following order when
the input method is set to “Standard” (
Available characters in Standard mode
.(period) @ / 1 ? ,(comma) -(hyphen) ’(apostrophe) ( ) : ;
a b c A B C 2
d e f D E F 3
g h i G H I 4
j k l J K L 5
m n o M N O 6
p q r s 7 P Q R S
t u v 8 T U V
normal input method
).
w x y z 9 W X Y Z
0
(Inserts a space)
Performs the same function as .
•
Displays the Symbols input mode screen when the key
•
is pressed and he ld.
81
Page 93

• To enter uppercase letters, press the left soft key until is
displayed.
• To enter the first letter of the name, etc. in uppercase, press
until is displayed.
• To correct the last character, press briefly.
Press and hold it to clear all characters.
Changing the Input Modes
By choosing the desired input mode and selecting edit options in
the entry prompt screen, you can reduce input time. Press
[Mode] on the entry prompt screen.
Input mode and edit options will be displayed:
[1] T9 (Standard), [2] Numerals (Standard), [3] Symbols,
[4] Canned Messages (P.73), [5] Copy, [6] Cut, [7] Paste
T9 Text Input
T9 text input is a shortcut method used to enter text quickly and
easily. When you type using this method, you need to press the
corresponding key only once for each letter of the word. T9 will
determine the word by comparing your key strokes with its
internal database and display the most commonly used matching
word.
How to Enter Text in T9 Mode
In any text entry screen (while in T9 mode), type a word bu t press
each key only once per letter. For example, to enter the word
PHONE, press the following keys , , , ,
. Note that as you type, different selections may be matched
to your key strokes. To scroll through alternate word choices press
. As you type, you can add a space by pressing the
key.
Adding Words to your T9 Database
Your T9 database can be easily cus tomized as well. To add a new
word to the T9 database, type the word using the Standard input
method and press OK. The word will be automatically saved to the
82
Page 94

T9 database and will be displayed as a choice the next time you
use T9.
Symbol
To enter symbols, press [Func] and select [3] (Symbols).
Select the desired symbol and press [OK].
Canned Message
To enter fixed text, press [Func] and select [4] (Canned
Messages).
Select the desired text and press [OK].
• Canned messages can be edited in the Main menu. (P.71
“Canned Messages”)
Copy, Cut and Paste
In the entry prompt screen, you can use thes e options to complete
editing smoothly.
Copy and Cut
1. Press [Func] to display the Function menu.
Select Copy or Cut and press [OK].
2.
Move the cursor to the first letter to be cop ied or to be cut
3.
and press [OPEN].
Move the cursor to the last letter to highlight the area and
4.
press [END].
The highlighted area will be saved temporarily in the
memory.
Paste
Press [Func] to display the Function menu.
5.
Select Paste.
6.
Move the cursor to the point where you want to paste the
7.
letters.
83
Page 95

Press [OPEN].
8.
Saved letters will be pasted.
For example, this method helps you complete mail messages
quickly.
• To return to the normal input mode (Standard), press
[Func] and select [1] (Standard).
Overwriting an Existing Location
You can replace existing data with a new phone number or change
a part of the stored data.
1. Press [MENU] to display the Main menu.
Press to select Phone Book.
2.
Perform the search function and select the desired entry.
3.
Press [OK].
4.
The personal contact will be displayed.
Press [Func] to display the Function menu.
5.
Press to select EDIT.
6.
If necessary, change the desired entry.
7.
Press [Save] to save the setting.
8.
Enter the memory number and press [OK].
9.
Note
If the desired memory location already contains an entry, the phone
displays a message asking if you want to replace the current entry . T o
replace the entry, press [OK].
To return to th e previous screen a nd select anot her location, press .
Phone Number Storage (Shortcut Method)
1. Enter the phone number in Standby mode.
Press [Store].
2.
84
Page 96

Repeat the steps 4 through 14 for “Storing a Phone
3.
Number and Name” on page 79.
Tip
You can quickly store phone numbers using the incoming or outgoing call
logs. (P.90)
Storing a Phone Number with a Group Setting
(Property1)
1. Repeat steps (1 throu gh 14) of sto ring a phone number
and name on pages 79 and 80.
2.
Press [Func].
The Func tion menu will be displ ayed.
Press to select [Property1].
3.
Press to select [Gr: (current setting)].
4.
Press the desired number.
5.
Storing a Phone Number as a Secret Entry
(Property1)
Note
To use this menu, first set the secret memory to OFF using the Main
menu. (P.65)
1. Repeat steps (1 throu gh 14) of sto ring a phone number
and name on pages 79 and 80.
Press [Func].
2.
The Func tion menu will be displ ayed.
Press to select [Property1].
3.
Press to select [Secret].
4.
Press to select ON or [2] to select OFF and press
5.
[OK].
The setting will be saved.
85
Page 97

Confirming the Custom Settings (Property 2)
You can confirm cust om settings fo r each phon e book entry: On etouch dial setting, ringer tone, and wallpaper graphics.
1. Display the name you want to confirm.
Press [Func] to display the Function menu.
2.
Press to select Property2.
3.
Custom settings for one-touch dial (P.42), ringer type
(P.47), and graphics (P.58) will be displayed.
Searching for and Dialing Phone Numbers
There are three methods of searching for and dialing phone
numbers that you have stored.
Finding by Name
1. Press [MENU] to display the Main menu.
Press to select Phone Book.
2.
Press to select Find Name.
3.
Enter up to 16 characters to be found and press
4.
[OK].
Matched results will be displa yed alphabet ically.
Scroll through the list using and , if necessary.
5.
When the desired entry is found, press [OK].
6.
Press twice to dial.
7.
Finding by Group
1. Press [MENU] to display the Main menu.
Press to select Phone Book.
2.
Press to select Find by Group.
3.
The group names will be displayed:
86
Page 98

• [0] Unfiled, [1] Personal 1, [2] Personal 2, [3] Personal 3, [4]
Business 1, [5] Business 2, [6] Business 3, [7] Others 1, [8]
Others 2, [9] Service
Press the desired digit key s or use or to locate the
4.
entry.
When the desired entry is found, press [OK].
5.
Press twice to dial.
6.
Finding by Entry #
1. Press [MENU] to display the Main menu.
Press to select Phone Book.
2.
Press to select Find Entry #.
3.
The number entry prompt will be displayed.
Enter the desired entry number and press [OK].
4.
A matched entry will be high lighted and th e remaining
entries will be displayed.
When the desired entry is found, press [OK].
5.
Press twice to dial.
6.
Note
When you press [OK] without entering the number in step 4, the
lowest entry will be highlighted and the remaining entries will also be
displayed.
87
Page 99

Modifying Your Phone Book Entries
You can recall a desired phone book entry and modify it.
1. Search for the desired phone book entry in Standby
mode.
Details of searching for phone book entries are given on
page 86.
Press [Func] to display the Function menu.
2.
Press to select Edit.
3.
Select an entry you want to change and press [OK].
4.
Edit it as you wish.
5.
Press [Save] to save the change.
6.
(Selecting the “Entry #” and then pressing [OK]
allows you to save the change.)
Erasing a Single Phone Book Entry
1. Search for the desired phone book entries in Standby
mode.
Details of searching for phone book entries are given on page 86.
Press [Func] to display the Function menu.
2.
Press
3.
The erase confirmation message will be displayed.
Press to select YES.
4.
When erasing is complete, the message “Memory #xxx
Erased!” (xxx: entry number) will be displayed and the
display will return to the name list.
select Erase.
to
Erasing All Phone Book Entries
Details of erasing all phone book entries are given on page 64.
88
Page 100

Storing Your Phone Book Entries in Secret Mode
Your phone will protect specified numbers from unauthorized use
by assigning the phone book entries to secret memory. (P.85)
Viewing Your Call Logs
You can view your stored call logs (incoming calls, outgoing calls
and missed calls).
Incoming call logs:Last 20 calls
Outgoing calls: Last 20 calls
Missed calls: Last 20 calls
When recalling these call logs, the following data will be
displayed:
1) Time and Date
2) Name (if stored in the phone book) or phone number (if
available by the Caller’s ID service)
Details of viewing these call logs are given below.
Note
If no name has been stored, the telephone number will be displayed
instead; and if you have stored the number as an emergency number ,
“Emergency” will be displayed instead of the other party’s name.
Calling by Using Call Logs
You can quickly dial in Standby mode using the call logs
(incoming call, outgoing call or missed call logs).
1. Press [MENU] to display the Main menu.
Press to select Calls
2.
Press to select Call Logs.
3.
The outgoing call logs will be displayed.
To display the missed call logs, press [Missed].
4.
Then, to display the incoming call logs, press
5.
[Income].
89
 Loading...