

Page 1

Page 2

XV6600WOC User Manual2
XV6600WOC User Manual
3
Page 3

Welcome
XV6600WOC User Manual
3
Congratulations on the purchase of a new Windows Mobile
The integrated wireless voice and data capabilities mean that as well as keeping your
important PIM information up-to-date and close at hand, you can make calls, send and
receive e-mail, and look up valuable information from the Internet or your company’s
network anytime, anywhere. Also, with Microsoft ActiveSync the power of your
device is increased by allowing you to synchronize the information on your PC with your
device.
TM
-based XV6600WOC.
Page 4
XV6600WOC User Manual 4
Welcome &
Safeguards
XV6600WOC User Manual
5
Regulatory
Notices
Notices
Regulatory
Before getting started
Before using and exploring your new WV6600WOC, some warning notes and regulatory
information are very important for you to go through.
THE DEVICE IS NOT CHARGED WHEN YOU TAKE IT OUT OF THE
BOX. (For information, see Chapter 1: Getting Started)
DO NOT REMOVE THE BATTERY PACK WHEN THE DEVICE IS
CHARGING.
IN MANY COUNTRIES YOU ARE REQUIRED BY LAW TO TURN OFF
YOUR PHONE WHEN YOU FLY. TURNING OFF YOUR XV6600WOC
DOESN’T TURN OFF YOUR PHONE; YOU MUST TURN OFF YOUR
WIRELESS CONNECTION TO YOUR OPERATOR’S NETWORK.
YOUR WARRANTY IS INVALIDATED IF YOU OPEN OR TAMPER
WITH THE DEVICE’S OUTER CASING. (For more information, see
the enclosed warranty information)
Page 5

XV6600WOC User Manual
5
Important Safety Precautions
When using this product, the safety precautions below must be taken against possible
legal issues and damages.
n ELECTRICAL SAFETY
This product is intended for use when supplied with power from the battery pack BTR6600
Other usage will invalidate any approval given to this product and may be dangerous.
n SAFETY IN AIRCRAFT
This product may cause interference to an aircraft's navigation system and its network.
In most countries, using this product on board an airplane is against the law.
n SAFETY FOR ENVIRONMENTS
Do not use this product in gas stations. Also the use of this product is prohibited in fuel
storehouse, chemicals, plants, and locations containing explosives.
n SAFETY ON THE ROAD
Vehicle drivers in motion are not permitted to use telephony services with the handheld
device, except in the case of emergency. In some countries, using hand-free devices as
an alternative is allowed.
n SAFETY FOR MEDICAL EQUIPMENT
This product may cause malfunctions of medical equipment. In most hospital or medical
centers, use of this product is forbidden.
n NON-IONISING RADIATION
This product should be operated in the suggested normal condition only to ensure the
radiative performance and safety of the interference. As with other mobile radio transmitting
equipment, users are advised that for satisfactory operation of the equipment and for the
safety of personnel, it is recommended that no part of the human body be allowed to
come too close to the antenna during operation of the equipment.
Welcome &
Safeguards
Regulatory
Notices
Page 6

WV6600WOC User Manual6
XV6600WOC User Manual
7
Contents
Contents
Important Health and Safety Information............5
Chapter 1 Getting Started
Contents
1.1 Knowing Your Device ............................10
1.2 Battery ..................................................12
1.3 Accessories............................................14
Chapter 2 Knowing Your XV6600WOC
2.1 Starting Up............................................18
2.2 Entering Information ............................24
2.3 Writing on the Screen ...........................28
2.4 Drawing on the Screen .........................30
2.5 Recording a Message ............................31
2.6 Finding Information..............................32
Chapter 3 Using Your Phone
3.1 About Your Phone .................................34
3.2 Making a Call.........................................38
3.3 Receiving a Call.....................................41
3.4 In-Call Options......................................42
3.5 Contacts Information............................44
3.6 Additional Dialing Information ............. 46
3.7 Securing Your Phone.............................46
Page 7

XV6600WOC User Manual
Chapter 4 Synchronizing Information
4.1 Using ActiveSync ------------------------ 50
4.2 Synchronizing Information ------------- 52
4.3 Synchronizing Using an Infrared
Connection ------------------------------- 54
4.4 ActiveSync Errors------------------------ 55
Chapter 5 Personalizing Your WV6600WOC
5.1 Device Settings -------------------------- 58
5.2 Phone Settings -------------------------- 66
Chapter 6 Scheduling and Communicating -
Microsoft Pocket Outlook
6.1 Calendar --------------------------------- 70
6.2 Contacts ---------------------------------- 72
6.3 Tasks ------------------------------------- 75
6.4 Notes ------------------------------------- 77
7
Contents
Chapter 7 Getting Connected
7.1 About Connections ---------------------- 80
7.2 Connecting to the Internet ------------- 80
7.3 Terminal Services Client ---------------- 83
7.4 Bluetooth--------------------------------- 85
Page 8

WV6600WOC User Manual8
Chapter 8 Messaging Features
8.1 E-mail Messages ................................ 100
8.2 Messaging ........................................... 104
8.3 MSN Messenger................................... 105
8.4 Managing Messages and Folders ........107
Contents
Chapter 9 Companion Programs
9.1 Album .................................................110
9.2 Pocket Word........................................ 119
9.3 Pocket Excel........................................ 122
9.4 Windows Media Player for Pocket PC . 124
9.5 Pictures ............................................... 125
Appendix : A Maintaining Your
XV6600WOC..............................129
Appendix : B Troubleshooting ........................ 152
Appendic : C Index ....................................... 157
Page 9

Chapter 1
Getting Started
1.1 Knowing Your Device
1.2 Battery
1.3 Accessories
Page 10
XV6600WOC User Manual10
Getting
Started
XV6600WOC User Manual 11
16
1.1 Knowing Your Device
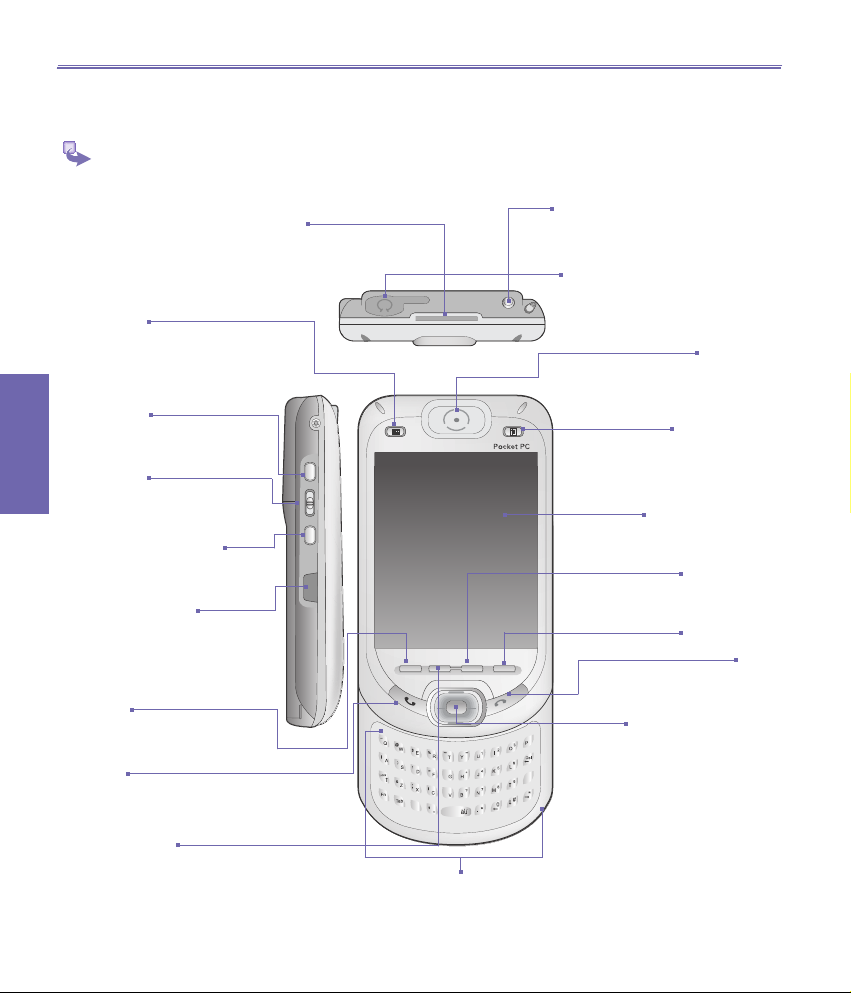
Front , Top and Left Side Panel Components
Started
Getting
MMC/SD cards or SDIO
accessories slot
Insert either MMC/SD cards or SDIO
accessories in this slot.
Contact
Press for quick access to your
Contacts.
Record
Press to record a voice note.
Volume
Press up/down to adjust the
volume of your device.
Windows Media
Press to launch Win dows
Media.
Infrared Port
Enables you to exch ange
fi le (s) o r da ta wit h ot her
de vices with ou t cab les/
wires.
Start
Press to display program
menu.
Send
Press to answer an incoming
call or to dial a number.
Messaging
Pre ss for quick access to
email/MSN messages.
QWERTY Keyboard
Press to enter letter/
symbol.
Power Button/Backlight
Press to turn on/off your
XV6600WOC or Backlight.
Earphone Microphone
Allows you to listen to audio
media or use the phone's
hands-free kit.
Speaker
Listen to audio media or a
phone call from here.
Calendar
Press for quick access
to your calendar.
Touch Screen
Pocket IE
Press for quick access
to WEB and WAP sites.
OK/Close
End
Press to end a call.
Navigation Pad
Press to move up/down and
left/right through any of the
drop down menus or program
instructions; select by pressing
in the center. When in the
dialer screen:
Left - Press once to access
the Speed Dial feature.
Right- Press once to access
the Call History feature.
Page 11
XV6600WOC User Manual 11
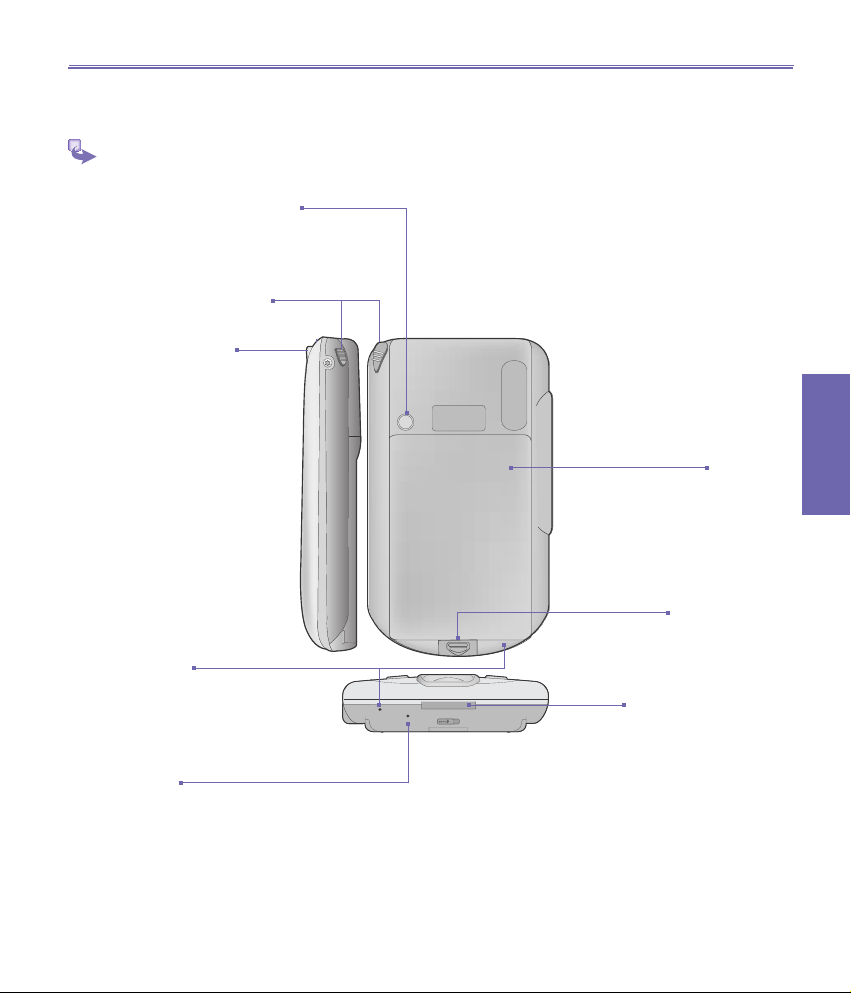
Back, Bottom and Right Side Panel Components
Car Antenna Connector
If available, you can attach your
phone to its antenna and utilize
its superior reception quality.
Stylus and Stylus Slot
Notication LED
Bi-color LED on the right :
For CDMA standby, message,
and network status, PDA
notication, PDA charging
status.
Blue LED on the left :
For Bluetooth system notication
of powe red-on and read y to
transmit RF signal.
Battery
Getting
Started
Microphone
Speak here when receiving or
making a phone call or voice
recording.
Soft Reset
Press here with stylus to reset
your device.
Press to release the back
Fixing Lock
battery.
Sync Connector
Us e t his co nnect or when
synchronizing / transmitti ng
data or recharging.
Page 12
XV6600WOC User Manual12
Getting
Started
XV6600WOC User Manual 13
1.2 Battery
Your XV6600WOC contains a rechargeable Li-ion polymer
battery under the back cover. Battery power depends on
whether you are talking on the phone, using the PDA functions or if the device is on standby.
Battery life estimates :
n Talk-time : 3 ~ 4 hrs,
n PDA : 15 hrs (approx.),
n Standby : 168 hrs (approx.),
Started
Getting
n Data retention time : 72 hrs.
The above times are based on using one function at a time.
Interchanging between functions will vary the battery life.
Data Retention
It is vital to keep your battery charged. Because your
XV6600WOC does not have a hard drive, all data and any
new programs you install are stored in RAM. If the battery
completely drains, any data or new programs you installed
will be erased. Only the default programs on the device when
you bought it will remain.
To prevent this kind of data loss, a portion of the main battery
will keep your data safe for 72 hours if your device runs out of
power. An additional battery, the backup battery, is designed
to keep your data safe when you remove the main battery. It
will keep this data safe for 20 minutes.
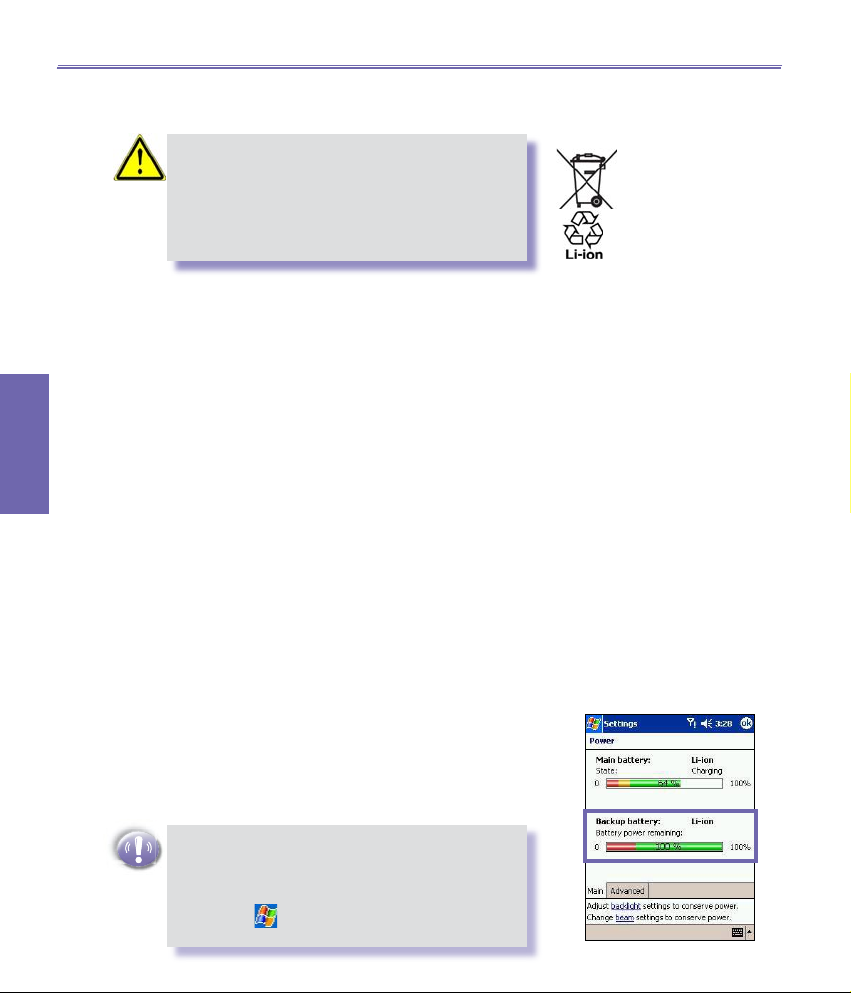
Warning : To reduce risk of re or burns, do
not disassemble, crush, puncture, short external
contacts, heat above 60℃ (140℉), or dispose of
in re or water. Replace only with manufacturer
specied batteries. Recycle or dispose of used
batteries according to the local regulations.
F
WAR NI NG : V ER IF Y THAT THE BACKUP
BATTERY POWER REMAINS AT LEAST AT
50% OR ABOVE BEFORE YOU REMOVE THE
MAIN BATTERY. THIS CAN BE CHECKED BY
TAPPING → Settings → System tab →
Power.
Page 13
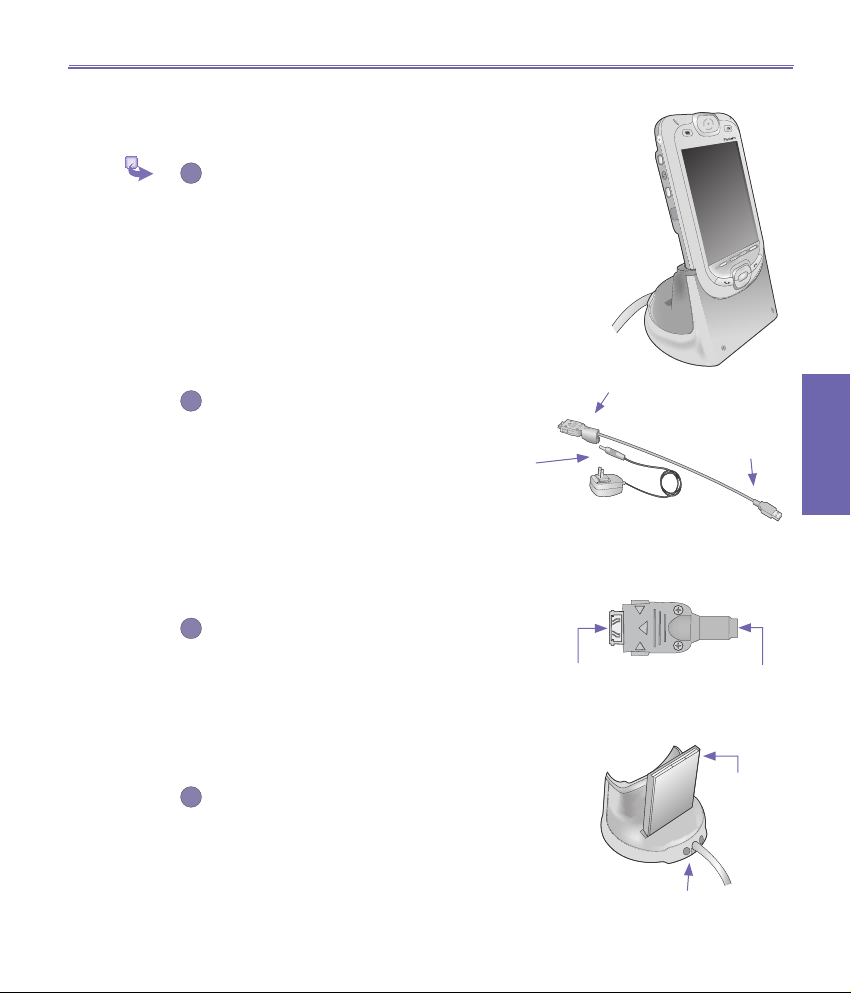
To recharge your device
1
2
3
4
You can recharge your device in the following ways :
Place your XV6600WOC in the cradle and
co nn ec t th e crad le to an e xt er na l po we r
source with the AC Adapter. Before using your
XV6600WOC, charge the battery for at least
hours for the rst time. Then, place it in the cradle
for a short time each day to recharge it to its full
capacity.
Plug the AC Adapter into the optional USB
cable head and then connect your XV6600WOC
directly to an external power source.
Plug the AC
adapter into a
Plug the AC Adapter into the op tional AC
Adapter Converter and then connect to the
sync connector of your XV6600WOC directly
to an external power source without using the
cradle.
XV6600WOC User Manual 13
8
To your
XV6600WOC.
USB
synchronization
cable, connect to
your PC
To the sync
connector of your
XV6600WOC
To AC Adapter
Getting
Started
Put a spare
If you have a spare battery for your XV6600WOC,
you can also put the battery into the slot in the
cradle for recharging.
AC Adapter plugs
into the back of the
cradle
unit into
the slot for
recharging
Page 14
XV6600WOC User Manual14
Getting
Started
XV6600WOC User Manual 15
When Your Battery is Low
When the low battery-warning message appears, immediately save any data you are
working on, perform a synchronization with your PC, then turn off your XV6600WOC. If
your device does shut down, the backup portion of your main battery will protect the data
for about 72 hours.
To view the battery status:
Tap → Settings → System tab → Power.
ALWAYS ENSURE THAT THE BACKUP BATTERY REMAINS AT LEAST 50%
CHARGED.
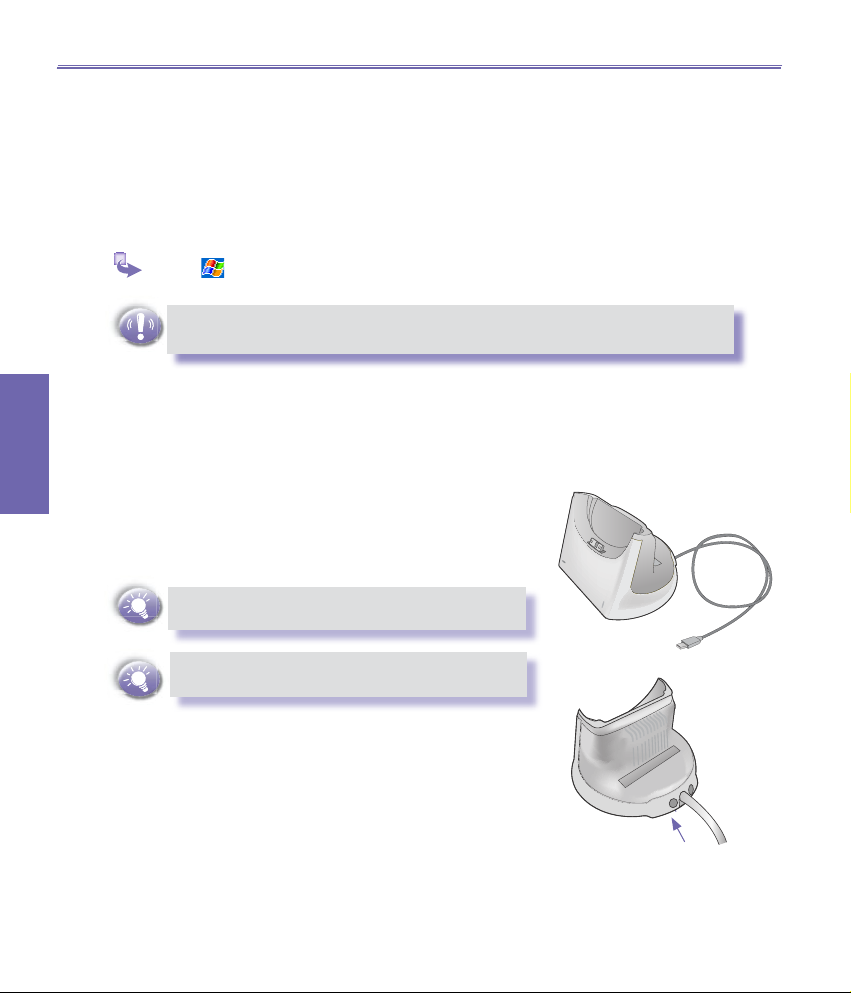
1.3 Accessories
Started
Getting
USB Cradle
Your XV6600WOC comes with a USB cradle. This allows you
to recharge your XV6600WOC with the AC Adapter, as well
as synchronize information between your XV6600WOC and
a PC using ActiveSync.
To synchronize, the USB Cradle must be plugged
into an available USB port on your PC.
For battery recharging, you must plug the AC
Adapter into the back of the cradle.
AC Adapter plugs into
the back of the cradle for
battery recharging
Page 15

XV6600WOC User Manual 15
AC Adapter Converter
AC Adapter converter in combination with the AC Adapter allows you to recharge your
device without the cradle.
USB Sync Cable
The USB cable (user's optional item) allows you to synchronize with your desktop without
the cradle. The AC converter in the head also allows you, in combination with an AC
Adapter, to recharge your device.
Stereo Headset
The stereo headset has a volume control jog dial
and a button to press to pick up a phone call.
Getting
Started
Page 16

XV6600WOC User Manual16
Started
Getting
Page 17

Chapter 2
Knowing Your XV6600WOC
2.1 Starting Up
2.2 Entering Information
2.3 Writing on the Screen
2.4 Drawing on the Screen
2.5 Recording a Message
2.6 Finding Information
Page 18
XV6600WOC User Manual 18
XV6600WOC User Manual 19
Knowing your
XV6600WOC
1
2
2.1 Starting Up
Screen Tapping, Calibration and
Re-calibration
When you rst start up your XV6600WOC, you will be asked to
calibrate the screen by tapping the center of a cross with your
stylus as it moves around the screen. This process ensures
that when you tap the screen with your stylus the item tapped
is activated.
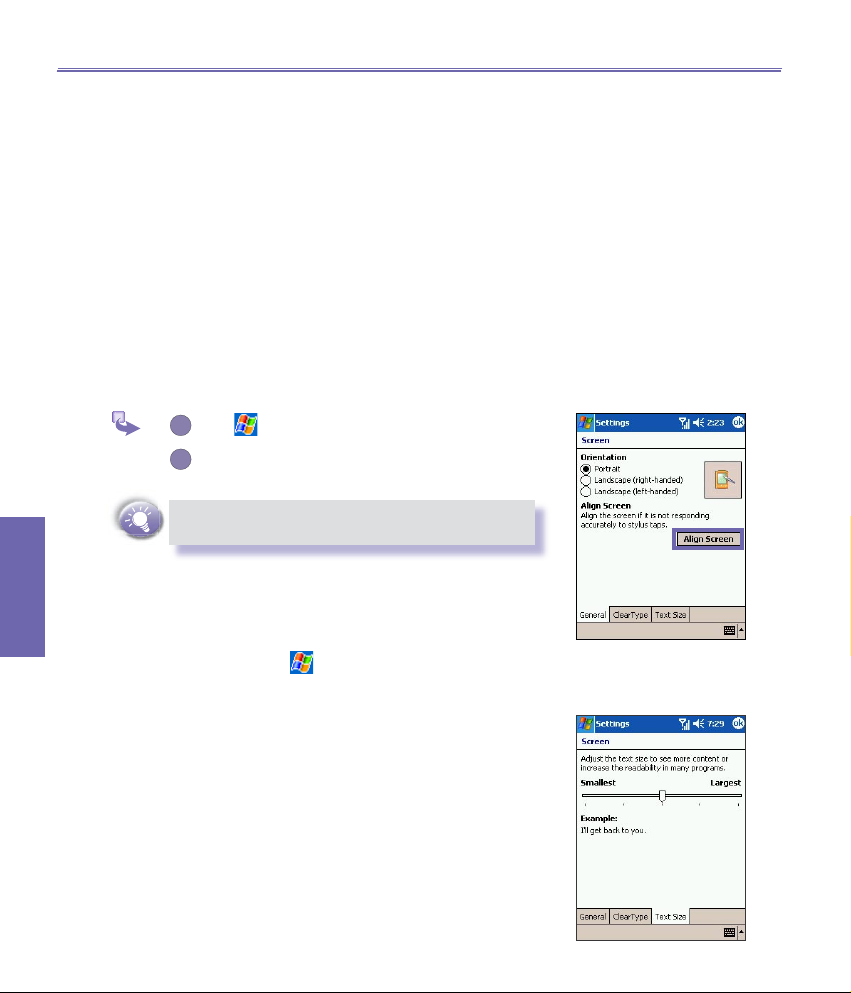
To re-calibrate the screen :
If your device does not accurately respond to screen taps, you
will need to re-calibrate it.
Tap → Settings → System tab → Screen.
Tap the Align Screen button on the General tab
to re-calibrate the screen as described above.
When aligning the touch screen, tap the target
rmly and accurately.
XV6600WOC
Knowing your
Screen Orientation
To switch the orientation of your LCD screen between Portrait
and Landscape mode if needed, you can select the Orienta-
tion options by tapping → Settings → System tab →
Screen. This helps to get a better view or a better operation
interface when running certain programs on your XV6600WOC.
Long blocks of text may be easier to read using Landscape
orientation.
For easier reading of text in programs that support ClearType,
tap the ClearType tab, and then select Enable ClearType.
To increase readability or see more content by adjusting the
size of text in programs that support it, tap the Text Size tab,
and then use the slider to make text larger or smaller.
F
Page 19
XV6600WOC User Manual 19
1
2
3
4
5
6
7
8
9
10
6
7
81234
5
9
10
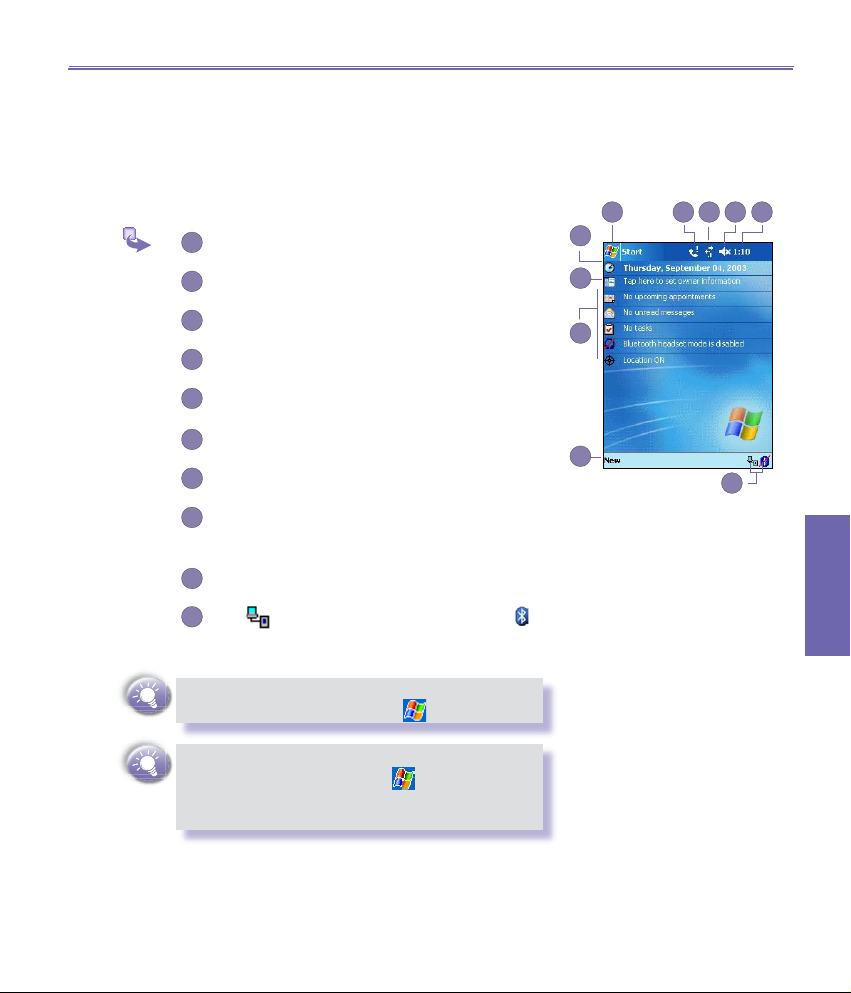
Today Screen
The Today screen displays important information, such as
today’s appointments and status icons for your device. Tap
the information listed on the Today screen to open the associated program.
Tap to go to a program.
Tap to view notication information.
Tap to view network status and options.
Tap to change volume or mute all sounds.
Tap and hold to change time format.
Tap to change date and time.
Tap to change owner information.
Your day at a glance. Tap to open the associated
program.
Tap to create a new item.
Tap to disconnect ActiveSync or tap to
turn on/off Bluetooth.
To go back to the Today screen when you are
using other programs, just tap → Today.
To customize the Today screen display, including
the background image, tap → Settings →
Personal tab → Today
please see Chapter 5).
(For more information,
Knowing your
XV6600WOC
Page 20
XV6600WOC User Manual 20
XV6600WOC User Manual 21
Knowing your
XV6600WOC
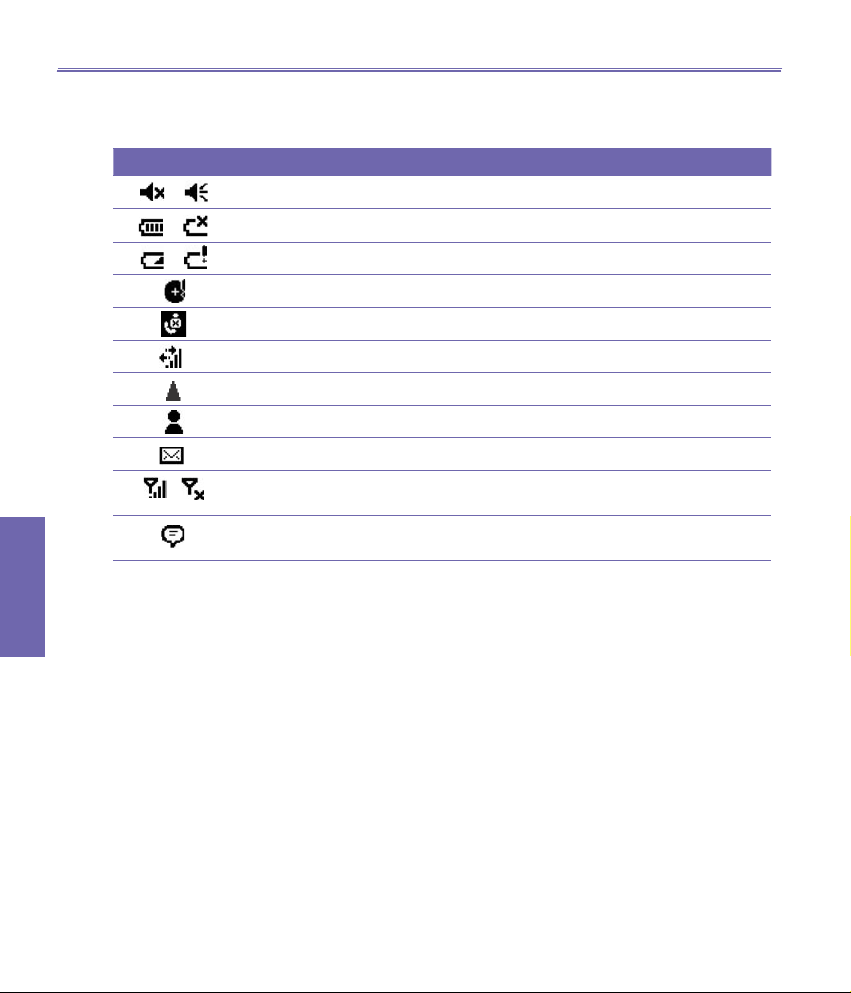
Indicators
Following are some of the status icons you may see.
Indicators Meaning
/
/
/
/
Turns sounds on / off.
Main battery with full strength / No battery.
Main battery low / very low.
Backup battery is very low.
Indicates that the Caller ID monitor program is not yet ready to receive calls.
Connection is active.
Indicates that you are roaming in a different network area.
Notication that one or more instant messages were received.
Notication that one or more mobile e-mail / SMS messages were received.
Indicates the connection to your mobile phone service provider is on / off, and
the strength of the signal.
If more notication icons need to be displayed and there is no room to display
them, this indicator will display. Tap the icon to view all notication icons.
Notications
XV6600WOC
Knowing your
Your device reminds you in a variety of ways when you have something to do or receive
a SMS. For example, if you’ve set up an appointment in Calendar, a task with a due date
in Tasks, or an alarm in Clock, you will be notied in any of the following ways:
n A message box appears on the screen.
n A sound, which you can specify, is played.
n A light ashes on your device.
n The device vibrates.
Page 21

XV6600WOC User Manual 21
1
2
3
4
1
2
3
4
5
1
2
3
4
5
1
2
3
4
1
2
3
4
5
To choose reminder types and sounds for your
device, tap → Settings → Personal → Sounds
& Notications. The options you choose here apply
throughout the device.
Title Bar
In Portrait mode :
The Title bar, located at the top of
the screen, displays the current time,
and certain status icons. Tap the leftmost icon to open the Start Menu.
Tap to switch to a
program.
Tap to switch to a
program that you
recently used.
Tap to see more
programs.
Tap to change device
settings.
Tap to see a Help topic
for the current screen.
Command Bar
Use the command bar at the bottom of the screen to perform
tasks in programs. The command bar includes menu names,
buttons, and the Input Panel button.
To create a new item in the current program, tap
New.
Tap to select menu commands.
Tap to select button commands.
Tap to display the input panel.
To see the name of a button, tap and hold the
stylus on the button.
Drag the stylus off the button so that the command
is not carried out.
In Landscape mode :
F
Knowing your
XV6600WOC
Page 22
XV6600WOC User Manual 22
XV6600WOC User Manual 23
Knowing your
XV6600WOC
1
2
3
Pop-Up Menus
Use pop-up menus to quickly perform an action on an item. To access a pop-up menu,
tap and hold the item that you want to perform the action on. When the menu appears,
tap the action you want to perform, or tap anywhere outside the menu to close it without
performing an action.
Tap and hold to display the pop-up menu.
Lift the stylus and tap the action you want.
Tap outside the menu to close it without performing an action.
Programs
You can switch from one program to another by selecting it from the menu.
To access some programs, tap → Programs, then the program name.
You can also switch to some programs by pressing a program button on your device. For
more information about the Button settings, please see Chapter 5.
XV6600WOC
Knowing your
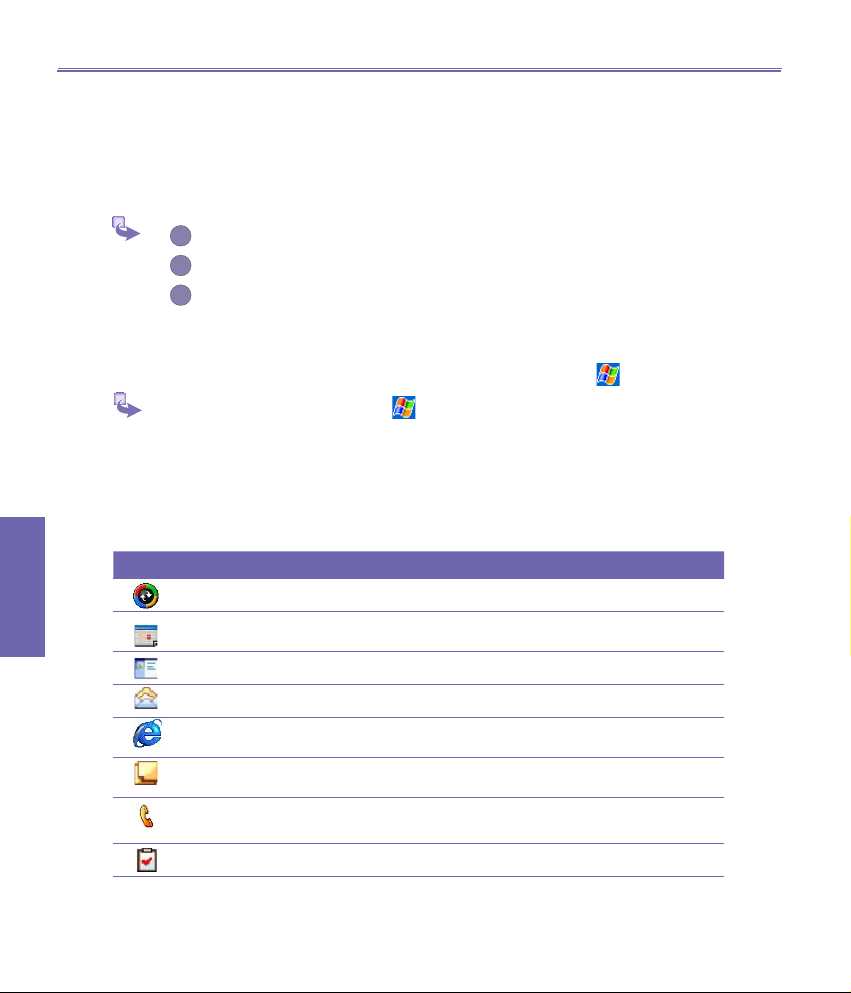
The following table contains a partial list of programs on your device. Look on the
XV6600WOC Companion CD for additional programs that you can install onto your
device.
Icon Program Description
ActiveSync
Calendar
Contacts
Messaging
Pocket IE
Notes
Phone
Tasks
Synchronizes information between your device and PC.
Keeps track of your appointments and creates meeting requests.
Keeps track of your friends and colleagues.
Sends and receives e-mail/ Text messages.
Pocket Internet Explorer browses Web and WAP sites, and
downloads new programs and les from the Internet.
Creates handwritten or typed notes, drawings, and recordings.
Makes and receives calls, switches between calls, and sets up
conference calling.
Keeps track of your tasks.
Page 23
XV6600WOC User Manual 23
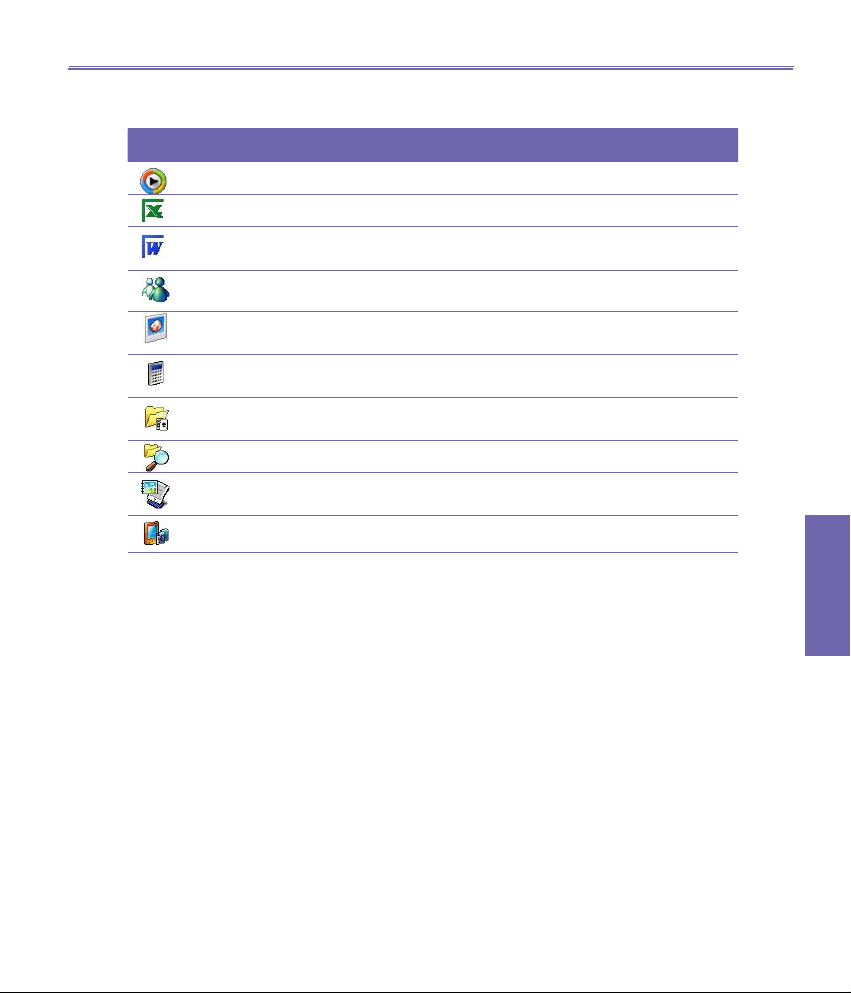
Icon Program Description
Windows Media
Pocket Excel
Pocket Word
MSN Messenger
Pictures
Calculator
Games
File Explorer
Album
xBackup
Enables the multimedia function on your XV6600WOC.
Create new workbooks or view and edit Excel workbooks.
Create new documents or view and edit MS-Word documents.
Sends and receives instant messages with your MSN Messenger
contacts.
Col lec ts, organizes an d sorts .jpg picture file s on your
XV6600WOC or on a storage card.
Performs basic arithmetic, such as addition, subtraction, multiplication, and division.
By default, there are two games, Jawbreaker and Solitaire,
included in this folder.
Views all the les on your XV6600WOC.
Collects, organizes and sorts .JPG/.BMP/.GIF picture les on
your XV6600WOC.
Backs up your XV6600WOC les to ROM or an SD card.
Program for each button can be reprogrammed.
Knowing your
XV6600WOC
Page 24
XV6600WOC User Manual 24
XV6600WOC User Manual 25
Knowing your
XV6600WOC
1
2
3
4
5
£
£
2.2 Entering Information
You can enter information on your device in several ways,
depending on the type of device you have and the program
you are using.
n Synchronizing - Using ActiveSync, exchange infor-
mation between your PC and device. (For more information on ActiveSync, see Chapter 4.)
n Typing - Using the Input Panel or the QWERTY key-
board on the bottom of your device, enter typed text
into the device. You can do this by tapping keys on the
on screen soft keyboard, by pressing the QWERTY
keyboard, or by using the handwriting recognition software.
n Writing - Using the stylus, write directly on the screen.
n D rawing - Using the styl us, draw directly on the
screen.
n Recording - Create a stand-alone recording or embed
a recording into a document or note.
XV6600WOC
Knowing your
Using the Input Panel
Use the input panel to enter information in any program on
your device. You can either type using the QWERTY Key-
board, soft Keyboard or write using Letter Recognizer,
Block Recognizer, or Transcriber. In either case, the
characters appear as typed text on the screen.
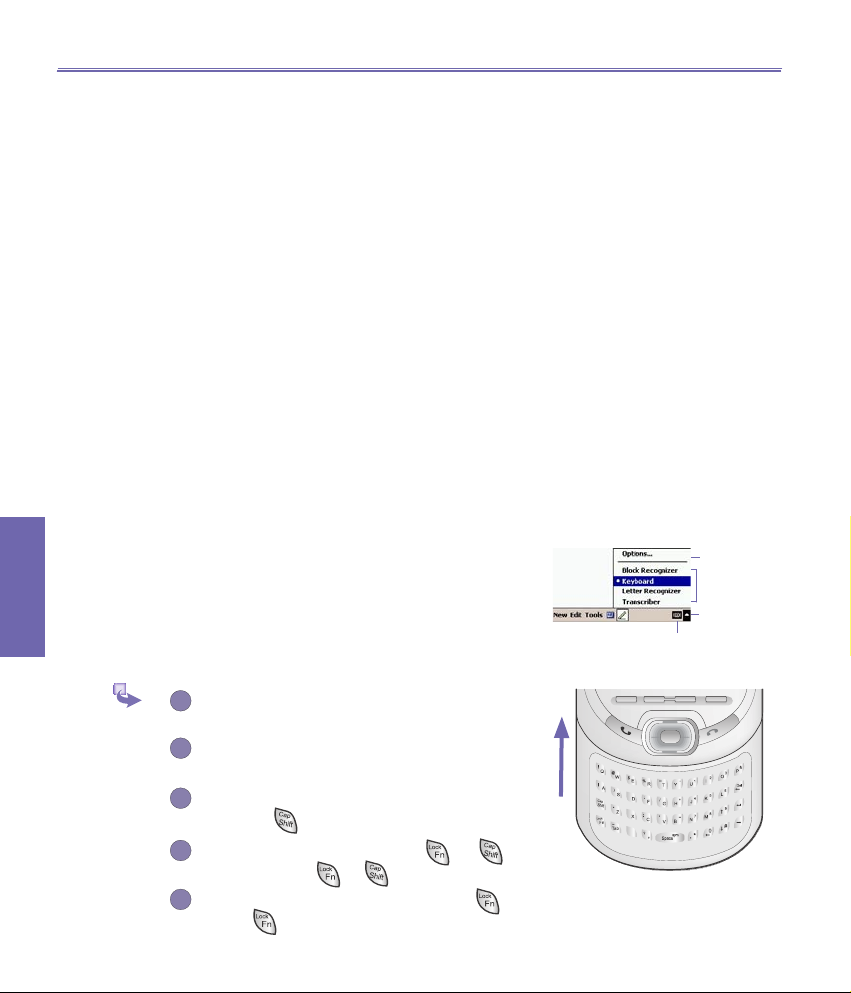
Typing on the QWERTY Keyboard
Slide the main screen upward to reveal the
QWERTY keyboard.
To type lowercase letters, press the keys with
ngers.
To type a single uppercase letter or symbol,
press the key.
To type capital letters, press → , to
release it press → again.
To type a number or symbol, press key.
Press twice to type a serial of numbers
symbols.
Tap to open the selected
input panel.
Tap to change
input panel
options.
Tap to select an
input panel.
Tap to see the
lists of input
panels.
Page 25
XV6600WOC User Manual 25
1
2
3
4
5
6
To type with the soft keyboard
To show or hide the input panel, tap the Input Panel button
. To see your choices, tap the arrow next to the Input
Panel button.
Tap the arrow next to the Input Panel button
and then Keyboard.
To type lowercase letters, tap the keys with the
stylus.
To type a single uppercase letter or symbol, tap
the Shift key. To tap multiple uppercase letters
or symbols, tap the
and hold the stylus on the key and drag up to
type a single uppercase letter.
To add a space besides, tapping the space bar,
you can also tap and hold any key and then
drag the stylus to the right across at least two
others.
To backspace one character besides, tapping the
backspace key, you can also tap and hold any
key and then drag the stylus to the left across
at least two others.
To insert a carriage return, tap and hold the stylus
anywhere on the keyboard and drag down.
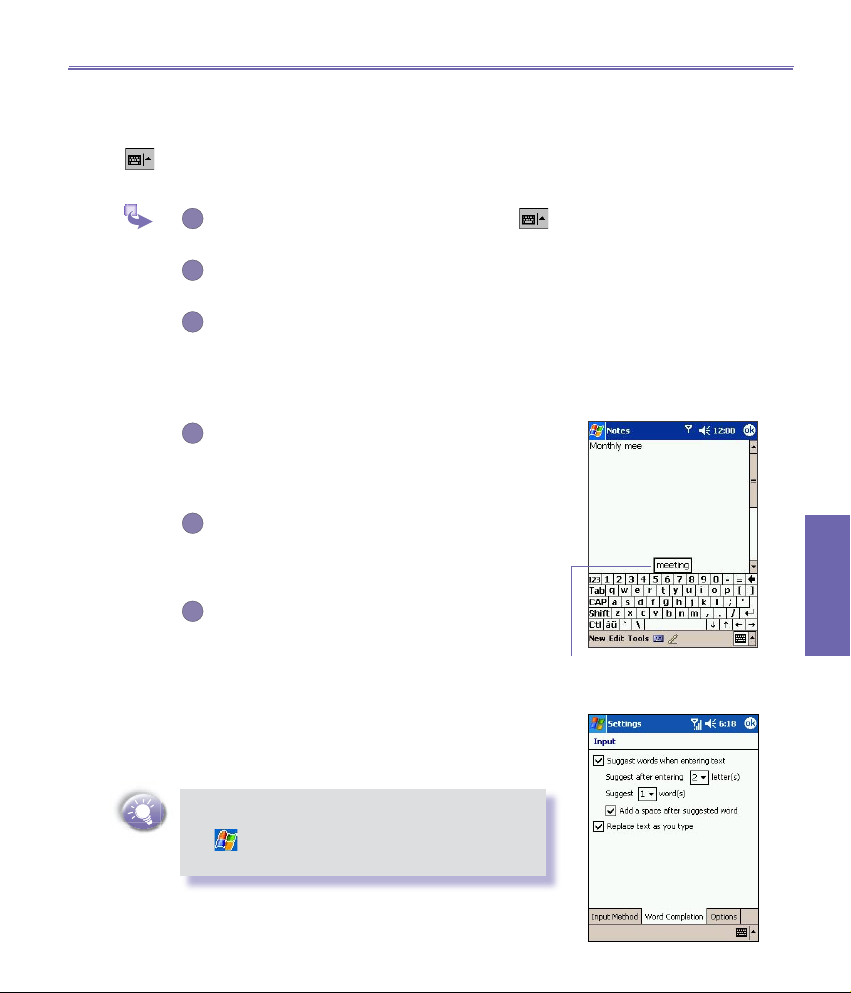
When you use the input panel, your device anticipates the
word you are typing or writing and displays it above the input
panel. When you tap the displayed word, it is automatically
inserted into your text at the insertion point. The more you use
your device, the more words it learns to anticipate.
CAP key. You can also tap
Tap to add the word if this
is the right one for you.
Knowing your
XV6600WOC
To change word suggestion options, such as the
number of words suggested at one time,
tap → Settings → Personal tab → Input →
Word Completion tab.
For more information about Input settings, please see
Chapter 5.
Page 26

XV6600WOC User Manual 26
XV6600WOC User Manual 27
Knowing your
XV6600WOC
1
2
1
2
1
2
Using Letter Recognizer
With Letter Recognizer you can write letters using the stylus
just as you would on paper.
When you write a letter, it is converted to typed text that appears on the screen. For specic instructions on using Letter
Recognizer, with Letter Recognizer open, tap the question
mark next to the writing area.
Using Block Recognizer
With Block Recognizer you can input character strokes using
the stylus that are similar to those used on other devices.
When you write a letter, it is converted to typed text that appears on the screen. For specic instructions on using Block
Recognizer, with Block Recognizer open, tap the question
mark next to the writing area.
XV6600WOC
Knowing your
Switching to Transcriber
With Transcriber you can write anywhere on the screen using
the stylus just as you would on paper. Unlike Letter Recog-
nizer and Block Recognizer, you can write a sentence or
more of information. Then, pause and let Transcriber change
the written characters to typed characters.
Tap the arrow next to the Input Panel button
and then Letter Recognizer.
Write a letter in the box.
Tap the arrow next to the Input Panel button
and then Block Recognizer.
Write a letter in the box.
F
Tap the arrow next to the Input Panel button
and then Transcriber.
Write anywhere on the screen.
For specic instructions on using Transcriber, with Tran-
scriber
open, tap the question mark in the lower right hand
corner of the screen.
F
Page 27
To punctuate in Transcriber :
1
2
3
1
2
XV6600WOC User Manual 27
Tap the keyboard button
Tap the desired punctuation.
Tap OK to hide the keyboard.
on the tool bar.
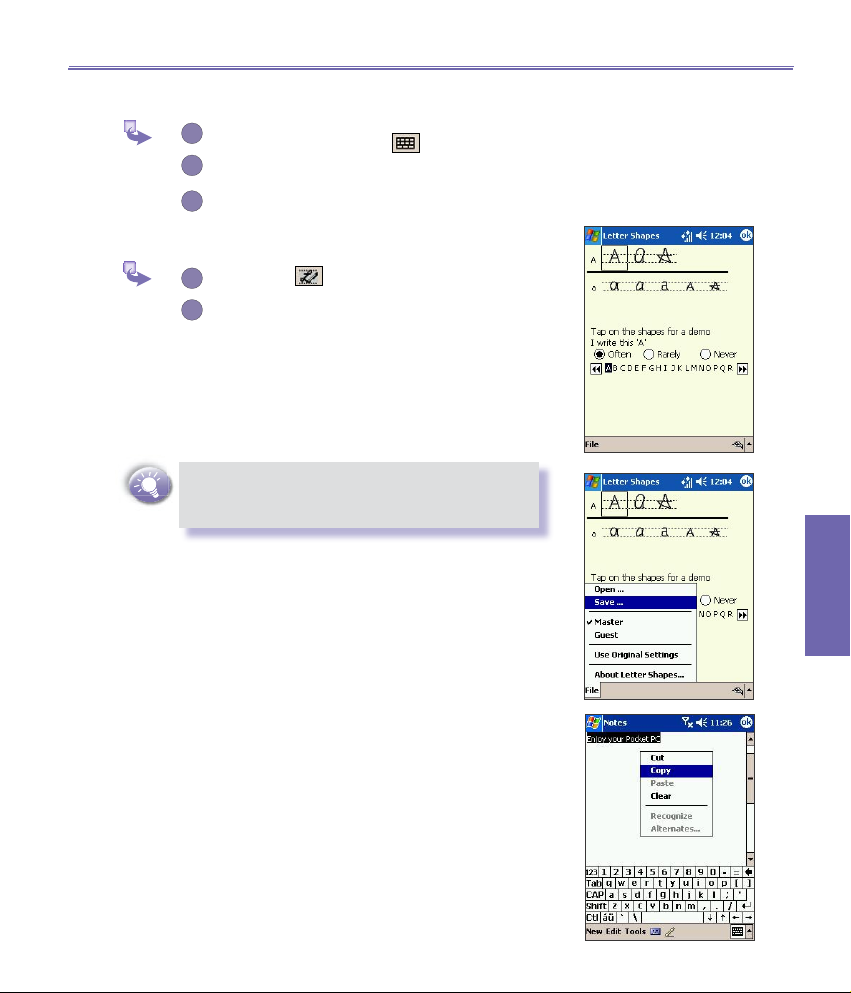
To learn writing in Transcriber :
Tap button
A Letter Shapes Selector screen appears :
n At the bottom of the scre en, select the
character you wish to explore.
n At the top of the screen, tap the picture of
this character. It slowly redraws, showing the
writing sequence.
n Select how often you write the character
using that method.
When you nish the selection through all the
letters, you can save as a prole by tapping
→ Save → and enter a name for the prole.
on the tool bar.
File
Using Proles
Letter Shape Selector supports two proles by tapping File
→ Master or Guest :
n Master : Typically used by the XV6600WOC's primary
user. This prole is unaffected by any Guest user settings.
n
Guest : For temporary device usage by another person.
F
Knowing your
XV6600WOC
Editing/Selecting Text
Each input program provides cursor keys to move through text
and backspace so that you can correct spelling, grammar or
insert additional information. Alternatively, you can use your
stylus to make an insert icon.
To select typed text, drag the stylus across the text you want
to select. You can cut, copy, and paste text by tapping and
holding the selected words, and then tapping an editing command on the pop-up menu, or by tapping the command on
the Edit menu.
Page 28

XV6600WOC User Manual 28
XV6600WOC User Manual 29
Knowing your
XV6600WOC
1
2
3
2.3 Writing on the Screen
In any program that accepts writing, such as the Notes program,
and in the Notes tab in Calendar, Contacts, and Tasks, you
can use your stylus to write directly on the screen. Write the way
you do on paper. You can edit and format what you have written
and convert the information to text at a later time.
Tap the Pen button to switch to writing mode. This
action displays lines on the screen to help you write.
Some programs that accept writing may not have the
Pen button. See the documentation for that program
to nd out how to switch to writing mode.
Selecting Writing
If you want to edit or format writing, you must select it rst.
XV6600WOC
Knowing your
If you accidentally write on the screen, tap Edit, then Undo
and try again.
You can cut, copy, and paste written text in the same way
you work with typed text: tap and hold the selected words and
then tap an editing command on the pop up menu, or tap the
command on the Edit menu.
Tap the button again to exit writing mode. This
helps to select the writing text more easily.
Tap and hold the stylus next to the text you want
to select until the insertion point appears.
Without lifting, drag the stylus across the text you
want to select.
Tap the Pen button and
use your stylus like a pen.
Page 29

XV6600WOC User Manual 29
1
2
Converting writing to text
On the writing note, tap Tools and Recognize
from the menu bar.
If you want to convert only certain words, select
them before tapping
menu (or tap and hold the selected words and
then tap Recognize on the pop up menu).
If a word is not recognized, it will be left as writing. And if the
conversion is incorrect, you can select different words from a
list of alternates or return to the original writing.
Recognize on the Tools
Tap and hold the incorrect word (tap one word at a
time), then tap
menu with a list of alternate words appears. Tap the
word you want to use, or tap the writing at the top of
the menu to return to the original writing.
Alternates from the pop up menu. A
The writing is
turned into text.
To get good recognition :
Write neatly.
Write on the lines and draw descanters below the
line. Write the cross of the “t” and apostrophes
below the top line so that they are not confused
with the word above. Write periods and commas
above the bottom line.
For better recognition, use a zoom level of 150%
or higher by tapping Tools → Zoom to change
the zoom level.
Write the letters of a word closely and leave
big gaps between words so that the device can
easily tell where words begin and end.
Hyphenated words, foreign words that use
special characters such as accents, and some
punctuation cannot be converted.
If you edit or add to a word after attempting to recognize it,
the new writing will not be included if you attempt to recognized it again.
Knowing your
XV6600WOC
Page 30

XV6600WOC User Manual 30
XV6600WOC User Manual 31
Knowing your
XV6600WOC
1
2
2.4 Drawing on the Screen
You can draw on the screen in the same way that you write
on the screen. The difference between writing and drawing
on the screen is how you select items and how they can be
edited. For example, selected drawings can be re-sized,
while writing cannot.
To create a drawing :
Cross three ruled lines on your rst stroke. A drawing
box appears. Subsequent strokes in or touching the
drawing box become part of the drawing. Drawings
that do not cross three ruled lines will be treated as
writing.
The drawing box indicates
the boundaries of the drawing.
To select a drawing :
If you want to edit or format a drawing, you must select it
rst.
XV6600WOC
Knowing your
Tap and hold the stylus on the drawing until the
selection handle appears. To select multiple
drawings, deselect the pen button and then
drag to select the drawings you want.
You can cut, copy, and paste selected drawings
by tapping and holding the selected drawing and
then tapping an editing command on the pop
up menu, or by tapping the command on the
Edit menu. To re-size a drawing, make sure the
Pen button is not selected, and drag a selection
handle.
To change the zoom level so it is easier to work
or view your drawing, tap Tools and then select
a zoom level.
Pen button
Page 31

2.5 Recording a Message
1
2
3
4
5
6
In any program where you can write or draw on the screen,
you can also quickly capture thoughts, reminders, and phone
numbers by recording a message. In Calendar, Tasks, and
Contacts, you can include a recording in the Notes tab.
In the Notes program, you can either create a stand-alone
recording or include a recording in a written note. If you want
to include the recording in a note, open the note rst. In the
Inbox program, you can also add a recording to an e-mail
message.
To create a recording
To add a recording to a note, open the note before
recording.
If you do not see the Record/Playback toolbar,
tap
Hold your device’s microphone near your mouth
or other source of sound.
To start recording, tap . A beep will sound.
To stop recording, tap . Two beeps will sound.
The new recording appears in the note list or as
an embedded icon.
To play a recording, tap in the open note or tap
the recording in the note list.
You can also invoke the
by pressing the Record button, the rst button from
the top on the left side of your XV6600WOC.
Tap → Notes
.
Record/Playback toolbar
XV6600WOC User Manual 31
Indicates an embedded
recording.
Tap to show or hide
the Recording tool bar
Tap to begin recording
Knowing your
XV6600WOC
To quickly create a recording, hold down the
Record button. When you hear the beep, begin
your recording. Release the button when you are
nished. The new recording is stored in the open
note or as a stand-alone recording if no note is
open.
Page 32

XV6600WOC User Manual 32
1
2
1
2
3
4
5
Change recording formats
In the note list, tap Tools → Options → Global Input Options
link (at the bottom of the page).
Mobile Voice is a 2.4 KB audio coded (compressor
decompressor). It is the recommended format
because it provides good voice recording and
takes far less storage space than PCM.
Pulse Code Modulation (PCM) provides slightly
better sound quality. However,
may take up to 50 times more storage space
than Mobile Voice recordings. PCM cannot be
used to create recordings that are embedded in
notes.
2.6 Finding Information
The Find feature on your XV6600WOC helps you quickly
locate the information you need.
Tap → Programs → Find.
In Find, enter the le name, word, or other
information you want to search for. If you have
looked for this item before, tap the
XV6600WOC
Knowing your
and select the item from the list.
To help narrow your search, select a data type
under Type.
Tap Go. The My Documents folder and sub-
folders are searched.
In the Results list, tap the item you want to
open.
PCM recordings
F
Find arrow
To quickly nd information that is taking up storage
space on your device, select Larger than 64 KB
in Type.
Page 33

Chapter 3
Using Your Phone
3.1 About Your Phone
3.2 Making a Call
3.3 Receiving a Call
3.4 In-call Options
3.5 Contacts Information
3.6 Additional Dialing Information
3.7 Securing Your Phone
Page 34

XV6600WOC User Manual34
XV6600WOC User Manual 35
Using Your
Phone
1
2
3
4
5
6
1
2
3
4
5
6
7
8
8
7
3.1 About Your Phone
Like a standard mobile phone you can use your XV6600WOC
to keep track of calls and send SMS messages. You can
also take notes while talking and dial directly from Microsoft
Contacts.
About The Dialer Screen
To access the Dialer Screen, tap , then Phone, or press
on your device. From this screen, you can access Call His-
tory, Speed Dial and Phone Setting. Signal status information
and important icons that tell you about your call include :
The icon indicates the strength of the signal.
Last number details are displayed here.
Keypad for inputting.
Task bar to access phone setting.
Tap to make a call.
Stores numbers you call often.
View all call history, including received, dialed
and missed calls.
Tap to end a call.
Phone
Using Your
Page 35

Indicators
Below are some of the status icons you may see.
Indicator Meaning
Phone off or out of network service. Tap this
icon to turn on the phone
In network service, tap this icon to turn off
the phone.
Call Missed. Tap this icon to view the call(s)
you missed.
Unread E-mail or SMS. Tap the icon to view
unread SMS or E-mail.
Connecting in progress. The icon will dis-
appear when you are connected to your
ISP.
Shows voice privacy is not available.
Ro am in g allow s yo u to use the pho ne
anywhere in the world using local phone
number.
Enables the network to detect your position.
Indicates your connection is at full strength.
XV6600WOC User Manual 35
Using Your
Phone
Page 36

XV6600WOC User Manual36
XV6600WOC User Manual 37
Using Your
Phone
1
2
3
4
5
6
7
1
2
3
4
5
6
7
The Navigation Pad and Dialing
Take Call - Press to take an incoming call.
Dialer Screen -Press to activate the dialer
screen.
Speakerphone - During a call, press and hold
to turn the speakerphone on or off.
Dial - Press to dial a number.
Scroll Up - Press to scroll up through a list.
End Call - Press to end a call.
Call History - After launching the dialer screen,
press to enter the Call History feature.
Scroll Down - Press to scroll down through a
list.
Center - Press to select a menu item.
Speed Dial - After launching the dialer screen,
press to enter the Speed Dial feature.
Checking Your Connection
The default settings for your device are programmed to
assume that you want to use your phone. Your device will
automatically connect your mobile phone to your service
provider’s network.
Phone
Using Your
The icon indicates that you are connected to your service
provider's network. A full strength signal is indicated by .
As the strength of the signal diminishes, so will the number of
vertical bars in the icon, with no bars indicating no signal.
Page 37

XV6600WOC User Manual 37
1
2
3
IN MANY COUNTRIES YOU ARE REQUIRED
BY LAW TO TURN OFF YOUR PHONE WHEN
YOU FLY. TURNING OFF YOUR XV6600WOC
DOESN'T TURN OFF YOUR PHONE; YOU MUST
TURN OFF YOUR WIRELESS CONNECTION
TO YOUR OPERATOR’S NETWORK.
Turning The Phone On and Off
You can turn your phone on and off while keeping your actual
device turned on.
While using any program on your device, tap
in the title bar at the top of the phone’s display.
Tap the Turn on ight mode or Turn off ight
mode option in the pop-up menu.
To receive calls when your device is turned off,
leave the Phone turned on.
You can use other programs on your device during
a call. To quickly switch back to Phone, tap
or tap → Phone.
,
Using Your
Phone
Page 38

XV6600WOC User Manual38
XV6600WOC User Manual 39
Using Your
Phone
1
2
3
4
1
2
Adjusting The Phone Volume
During a call, tap or press the volume on
the side of your device.
You can select to adjust the phone volume
(ring) or device volume (notication levels
and MP3) on the pop-up menu.
If you select Vibrate mode, will appear in
the title bar at the top of the phone display.
Tu rn off the volume by choosin g the Off
option.
To adjust the conversation phone volume, you
must do it during a call. Adjusting the volume at
another time will affect the ring, notication and
MP3 levels.
3.2 Making a Call
With your XV6600WOC, you can make a call from the Dialer,
Contacts, Speed Dial, and Call History.
Phone
Using Your
To make a call from the Dialer :
The most direct method is by using the Phone keypad.
Press to bring up the dialer screen.
Tap the number on the keypad then tap
or press button.
Backspacing and Deleting
If you tap a wrong number, you can tap the backspace
arrow key to erase individual numbers one at a
time.
Page 39

XV6600WOC User Manual 39
You can also delete all the numbers in the window by
tapping Edit and then Clear.
To make a call from Contacts :
You can make a call from Contacts in the following ways :
Option 1
Press the Microsoft Contacts Button, nd the contact
and then tap twice -- once to send to the dialer
screen, and once to call.
The pop up menu and button will by default
display C all Work Tel. However, you can
customize it so that the mobile number or e-mail
is displayed instead. See Option 3 below for
specic details.
Option 2
Select a contact in the contacts list and then press
left or right on the navigation pad to select a phone
number. Press to call.
Option 3
In the contacts list, tap the w in the right column next
to the contact you want to customize. A pop-up menu
will display the phone numbers and e-mail addresses
for this contact. Tap desired phone number to call.
Tap the w here to pop-up all the phoned
numbers and e-mail for this contact
Using Your
Phone
G
Page 40

XV6600WOC User Manual40
XV6600WOC User Manual 41
Using Your
Phone
1
2
3
To make a call from Speed Dial :
Create speed dials to call frequently-used numbers with a single tap. Before you can create
a speed dial entry for a phone number, that number must already exist in Contacts.
From the Phone keypad, tap → New.
Tap the desired contact name and number.
In the Location eld, tap the Up/Down arrows to select an available location
to assign as the new speed dial entry. The rst speed dial location is reserved
for your voice mail.
By memorizing the position in the Speed Dial list of a number, you can dial the number
by entering its position number.
For example:
Alex Liang is at position 3. To dial his number simply tap and hold 3 on the dialer keypad;
if the number holds a position of 10 or more, tap the rst number, and then tap and hold
the second to dial.
By default the Location function will give you the next available position in
the Speed Dial list. If you want to put a number in a position that is already
occupied, the new number will replace the number already there.
Tips for Speed Dial Setting
Phone
Using Your
To create a speed dial entry from Contacts, tap and hold the contact name, tap
Add to Speed Dial, and then tap the Up/Down arrows to select an available
location to assign as the new speed dial entry.
To delete a speed dial entry, go to the
name in the box to the right of the assigned speed dial number, and then tap
Delete.
Speed Dial list, tap and hold the contact
Page 41

To make a call from the Call History :
1
2
3
4
1
2
Go to Phone and press the right side of the
navigation pad or tap
Find the call details by rst selecting the category
it is led under. Tap on All Calls on the top left
corner, a pop-up menu will appear. You can then
select All Calls, Missed, Outgoing, Incoming and
By Caller...For example, if it is in All Calls,
All Calls from the drop down menu in the top-left
corner.
Use the navigation pad to nd the number and then
press or the icon to the left of the number you
wish to call.
Call History icons include :
→ incoming calls ; → outgoing calls;
→ missed calls.
3.3 Receiving a Call
To answer an incoming call :
Tap Answer, or press on your device.
XV6600WOC User Manual 41
select
Tap Ignore or press to reject the call.
Using Your
If you reject a call, the busy tone will be sent out.
Phone
To end a call :
When on a call, you can press or tap to
end the call.
Page 42

XV6600WOC User Manual42
XV6600WOC User Manual 43
Using Your
Phone
1
2
1
2
3.4 In-Call Options
Your device noties you when you have another incoming call
and gives you the choice of rejecting or accepting the call. If
you accept, you can choose to switch between the two callers or set up a conference call between all three parties. A
conference call can include up to six people.
Putting a call on hold
Tap Answer to the take the 2nd call and put the
1st on hold.
To end the 2nd call and go back to the 1st, tap
or press .
To swap between calls :
You can choose to swap backwards and forwards
between 2 callers by tapping or the .
To set up conference calls :
Dial a number, when it is picked up, dial a 2
number and wait for it to be picked up.
nd
Phone
Using Your
When it is picked up, press or to
set up the conference.
If the conference connection is successful, In
Call will appear at the top of the phone dialer
screen ( See right).
You must dial out to set up conference calling
period.
Page 43

XV6600WOC User Manual 43
1
2
1
2
Making a Note
Regardless of whether you call from the Dialer, Contacts,
Call Log, or Speed Dial, you can take notes during a call. After
you have nished the note, it will be saved as an attachment
to your call in one of the Call Log folders.
a. To make a note :
After you have entered a number and tapped
or , tap the icon at the bottom
of the screen.
Use any of the input methods to record your note
and then tap OK. You can nish your note during
or after the call.
b. To view a note :
Press the right side of the navigation pad or tap
, tap and hold the call, and then from
the pop-up menu, tap View Note. (The icon
indicates a note).
Or, go to Notes of the le from the list. (For
more information, see Chapter 2 Entering
Information.)
Tap here to view the notes
F
Using Your
Phone
Page 44

XV6600WOC User Manual44
XV6600WOC User Manual 45
Using Your
Phone
1
1
2
3
Enabling the Speakerphone Mode
Your device has a speakerphone allowing you to talk handsfree and/or let other people listen to the caller.
Wait until the phone is ringing.
Press and hold until the speakerphone
comes on and the icon appears in the top
toolbar.
To turn off the speakerphone, press and hold
again.
DO NOT LEAVE THE PHONE IN SPEAKERPHONE MODE AND HOLD IT TO YOUR EAR;
THE SOUND MAY DAMAGE YOUR EAR.
Checking Your Voice Mail
The rst speed dial location defaults as your voice mailbox. It
will automatically detect and set as default the voice mailbox
number of your mobile service provider.
To retrieve your voice mail :
On the Phone screen, tap or press the left
side of the navigation pad, select Voice Mail
and then press .
3.5 Contacts Information
Phone
Using Your
Contacts can be imported by:
Call History - New contact numbers can be
found in incoming or missed calls.
Creating Contacts in Microsoft Contacts
creates more detailed records.
Page 45

XV6600WOC User Manual 45
1
2
3
Call History
Tap on the phone screen to view the call history list:
To add an entry to Contacts from Call History :
Find the call details you want to add.
Tap an entry and hold with the stylus or press and hold the navigation pad
center; select Save to Contacts in the pop-up menu that appears .
In the Save to Contacts screen, add additional contact details and press
the Action button.
The call details in the Call History will then be amended and displayed under the name
of the contact, not their telephone number.
Manage Your Call History
Call History details all incoming, outgoing, and missed calls, and also provides a sum-
mary of total calls. Call History can also tell you when a call was initiated, how long it
lasted, and provides easy access to any notes taken during the call.
a. Viewing calls details
Tap in the top left corner of the screen and then select a category from the drop down
menu.
Calls are categorized as follows:
n All Calls - displays all calls made to and from the phone in chronological order.
n Missed - displays calls that were answered.
Using Your
Phone
n Outgoing - displays calls made from the phone.
n Incoming - displays calls made to the phone.
n By Caller - list calls alphabetically according to caller.
Page 46

XV6600WOC User Manual46
XV6600WOC User Manual 47
Using Your
Phone
1
2
1
2
3
b. To view duration of calls :
Go to Call History, nd the call you are looking for, then tap it once.
c. To delete individual calls from Call History :
Tap and hold the stylus on the call to be deleted, then select Delete from the
pop up menu.
d. To delete all calls from Call History :
Tap Tools → Delete all Calls.
e. To set limits on the size of your Call History :
Tap → Call Timers.
For deleted history items older than between down menu and select a time
in the drop down menu select a time period then tap OK.
3.6 Additional Dialing Information
To make an emergency call :
Enter the emergency number 911 then tap or press button.
3.7 Securing Your Phone
Phone
Using Your
You can customize the level of security you want to have on your XV6600WOC by locking
the keypad, or the entire device.
Locking the keypad
The keypad lock turns off the keypad functionality. This is a helpful feature if, for example,
your XV6600WOC is turned off and in your pocket, and you want to prevent accidental
key presses from pressing a button etc .
Tap → Settings → System tab → Button Lock
Select Lock all buttons except Power button.
To unlock your keypad, tap Do not lock buttons.
Page 47

XV6600WOC User Manual 47
1
2
3
4
Locking your phone
Locking your XV6600WOC prevents access to personal data.
When you enable this feature, your XV6600WOC will automatically lock after a specied time of inactivity. A screen will
be displayed requiring your XV6600WOC lock password before
access is granted.
Tap → Settings → Personal → Password.
Select the type of password you would like
to use : Simple 4 digit password or Strong
alphanumeric password.
A strong password must have at least 7 characters
that are a combination of uppercase and lowercase
letters, numerals, and punctuation.
Enter the password and, if necessary, conrm the
password.
Select how long your mobile device must be turned
off before the password is required for using the
device by tapping Prompt if device unused for.
Using Your
Phone
Page 48

XV6600WOC User Manual48
Phone
Using Your
Page 49

Chapter 4
Synchronizing Information
4.1 Using ActiveSync
4.2 Synchronizing Information
4.3 Synchronizing by Using
an Infrared Connection
4.4 ActiveSync Errors
Page 50

XV6600WOC User Manual50
XV6600WOC User Manual 51
Synchronizing
Information
4.1 Using ActiveSync
Using Microsoft ActiveSync you can synchronize the information on your PC with the
information on your XV6600WOC. Synchronization compares the data on your device with
your PC and updates both with the most recent information. With ActiveSync, you can:
n Keep Pocket Outlook data up-to-date by synchronizing your device with Microsoft
Outlook data on your PC.
n Choose to synchronize Inbox, Calendar, and Contacts with a server so that you have
the latest information, even when your computer is turned off.
n Copy (rather than synchronize) les between your device and your PC.
n Control when synchronization occurs by selecting a synchronization mode.
n Select which information types are synchronized and control how much data is syn-
chronized.
By default, ActiveSync does not automatically synchronize all types of
information. Use ActiveSync options to turn synchronization on and off for
specic information types.
Using Server ActiveSync, you can synchronize information directly with a
Microsoft Exchange Server if your company is running Microsoft® Mobile
Information Server 2002 or later.
Installing ActiveSync
Before you begin synchronization, install ActiveSync on your computer from the
XV660 0WOC 2003 C ompan ion CD. ActiveSy nc is alread y ins talled on your
XV6600WOC.
Creating a Partnership
After the installation is complete, the New Partnership Wizard helps you set up a partnership between your phone and your computer and/or a server so that you can start
synchronizing information and customizing your synchronization settings.
Information
Synchronizing
Page 51

XV6600WOC User Manual 51
In the New Partnership Wizard select Synchronize with this
desk-top computer. Unless you are certain that your company
is running Microsoft® Mobile Information Server 2002 or later
and you know the server name, then choose Synchronize with
Microsoft® Mobile Information Server and/or this compute.
For more information, contact your network administrator or
service provider.
View connection status.
Your rst synchronization will automatically begin when you nish using the wizard. After the rst synchronization, you will
notice that your Outlook information now
appears on your XV6600WOC.
Tap to synchronize via IR or change
synchronization settings.
Tap to connect and
synchronize
Tap to stop
synchronization
View synchronization
status.
Synchronizing
Information
Page 52

XV6600WOC User Manual52
XV6600WOC User Manual 53
Synchronizing
Information
4.2 Synchronizing Information
This section provides an overview of the types of Outlook information you can synchronize. By default, ActiveSync does not automatically synchronize all types of Outlook
information. Use ActiveSync options to turn synchronization on and off for specic
information types.
Synchronizing Inbox
When you select Inbox for synchronization in ActiveSync, e-mail messages are synchronized as part of the general synchronization process. During synchronization, the
following events occur :
n Messages are copied from the Outlook Inbox folder on your computer, or from a
Microsoft Exchange Server, to the Inbox folder on your XV6600WOC.
n By default, when synchronizing Inbox information with your computer, you will receive
only messages from the last three days and the rst 500 bytes of each new message.
You can also choose to download le attachments.
n The messages on your phone and on your computer are linked. When you delete a
message on your phone, it is deleted from your computer the next time you synchronize,
and vice versa.
n Messages in subfolders in other e-mail folders in Outlook are synchronized only if the
folders have been selected for synchronization in the Inbox on your XV6600WOC.
Messages are not received in your Inbox through synchronization. Instead,
they are sent to your phone by way of your service provider. For more details,
please see Message Features in Chapter 8.
Synchronizing Calendar
n Calendar items stored on your XV6600WOC can be synchronized with calendar items
n Calendar items created on your XV6600WOC are copied to your PC and/or server
Information
Synchronizing
stored on your PC and/or on a Microsoft Exchange Server. By default, calendar items
from the last two weeks will be synchronized.
during synchronization, and vice versa.
Page 53

XV6600WOC User Manual 53
Synchronizing Contacts
n Contacts stored on your phone can be synchronized with contacts stored on your
computer or on a Microsoft Exchange Server. By default, all of your contacts will
be synchronized.
n Contacts created on your phone are copied to your computer and/or server during
synchronization, and vice versa.
Synchronizing Tasks
n Tasks stored on your phone can be synchronized with tasks stored on your computer.
Task synchronization is automatically selected in ActiveSync. By default, all of your
incomplete tasks will be synchronized.
n Tasks created on your phone are copied to your computer during synchronization,
and vice versa.
Tasks can be synchronized only with your computer. They cannot be
synchronized with a server.
Synchronizing
Information
Page 54

XV6600WOC User Manual54
XV6600WOC User Manual 55
Synchronizing
Information
1
2
3
1
2
4.3 Synchronizing Using an Infrared Connection
You can use an infrared connection to create a direct connection between your phone
and another mobile device or computer quickly. This method is ideal for quickly switching
between multiple devices since there are no cables or adapters to change. When creating
a partnership, you must connect using infrared, a cable, or a cradle connection.
For more information about synchronizing using an infrared connection or other connection
types, see ActiveSync Help on your computer.
Transferring Items Using Infrared
Using infrared (IR), you can also send and receive information, such as contacts and
appointments, between two devices.
a. To send information :
Switch to the program where you created the item you want to send and
locate the item in the list.
Align the IR ports so that they are unobstructed and within close range.
Tap and hold the item, then tap Beam Item on the pop up menu.
You can send items, but not folders, from File Explorer. Tap and hold the item
you want to send, and then tap Beam File on the pop up menu.
Information
Synchronizing
b. To receive information :
Align the IR ports so that they are unobstructed and within close range.
Have the owner of the other device send the information to you. Your device
will automatically receive it.
Page 55

XV6600WOC User Manual 55
4.4 ActiveSync Errors
Whenever ActiveSync cannot successfully synchronize your information, it displays an
error on your phone.
To view ActiveSync error information
Press the Action button when the error text is displayed. ActiveSync will then
display more information about the error that occurred.
Some types of errors can interfere with automatic synchronization. If you suspect
that a scheduled automatic synchronization has not occurred, you should attempt
to manually synchronize your information. Successfully completing manual
synchronization will reset automatic synchronization. For more information,
see the Synchronizing Information section of ActiveSync Help on your
computer.
Synchronizing
Information
Page 56

XV6600WOC User Manual56
Information
Synchronizing
Page 57

Chapter 5
Personalizing Your
XV6600WOC
5.1 Device Settings
5.2 Phone Settings
Page 58

XV6600WOC User Manual58
XV6600WOC User Manual 59
Personalizing
5.1 Device Settings
You can adjust device settings to suit the way you work. To see available options, tap
→ Settings → Personal or System tab located at the bottom of the screen.
Personalizing
Personal Tab
Icon Program
Button
Assigns an application program to a hardware button.
Input
Sets up the input portion of your device.
Menus
Customizes the menu appearance and enables a pop up menu from the
New button.
Owner Information
Displays your contact information.
Password
Limits access to your device.
Phone
Sets up the phone function of your wireless feature.
Sounds and Notications
Sets the notication type, event and volume.
Today
Customizes the look and the information that appears on the Today screen.
System Tab
Icon Program
About
Displays important device information.
Add ring tone
To listen to and select new ring tones.
Backlight
Customizes the backlight and brightness for power saving purposes.
Page 59

Icon Program
Button Lock
Enables you to lock the buttons on your device except Power button when device
is off.
Certicates
Displays the name of the certicate issuer and the expiration date.
Clock & Alarm
Changes the time and sets alarms.
Device information
Find information about version, hardware, identity and call duration.
Keyboard
Allows you to customize the keyboard settings, eg. to switch on/off the keyboard
backlight when a time limit is reached.
Memory
Displays the memory allocation status and current running programs.
Microphone AGC
Adjusts the volume automatically when you are recording.
Permanent save
Saves contacts to permanent ash memory.
Power
Maximizes battery life.
Regional settings
Customizes the region and relative format for the region you use.
XV6600WOC User Manual 59
Personalizing
Remove programs
Creates more memory by removing programs.
Screen
Re-calibrates the screen and enable/disable Clear Type feature.
Page 60

XV6600WOC User Manual60
XV6600WOC User Manual 61
Personalizing
2
1
2
Buttons
To customize the program hardware buttons to open your
most used programs :
Personalizing
Default settings:
Tap → Settings → Personal tab → Buttons
→ Program Buttons tab
Under Select a button, tap the button you want
to assign a program, and then select a program
from Assign a program.
1 - Calender
2 - Contact
3 - Start Menu
4 - Messaging
5 - Internet Explorer
6 - OK/Close
7 - Windows Media
8 - Record
In the Up/Down Control tab, Delay before rst repeat
changes the time elapsed before scrolling begins. Repeat
rate changes the time it takes to scroll from one item to the
next. Just press and hold the Up/Down control scrolls through
the items in a list to adjust.
Input
2
1
8
7
5
43
6
Tap → Settings → Personal tab → Input.
On the Input Method tab, select an input method
and change desired options. On the Word
Completion tab, select desired settings for word
completion. On the Options tab, select desired
options for writing and recording. These options
apply to any program on the device where you
can record or write. These options do not apply
to text you enter using the input panel.
You can also change input options by tapping the
arrow and the Options.
Page 61

XV6600WOC User Manual 61
1
2
3
1
2
1
2
3
Menus
To add the programs you use most often to the Start Menu .
Tap → Settings → Personal tab → Menus.
Select the programs you want, then tap OK.
Only 7 programs are allowed in the Start Menu.
On the New Menu tab, you can select Turn on New button menu and
then select the items to appear on the menu. When you do this, an arrow
appears next to New in the command bar of certain programs such as
Pocket Word, Pocket Excel, Contacts, Calendar and Tasks. You can
tap this arrow and then tap a new item to create.
You can create subfolders and shortcuts to appearon the Start Menu. In
ActiveSync on your PC, click Explore → Double-click My Pocket PC →
click Windows → click Start Menu → then create the folders and shortcuts
that you want.
Owner Information
Tap → Settings → Personal tab → Owner Information.
On the Identication tab, enter your personal information.
On the Notes tab, enter any additional text you want to display when the
device is turned on, such as: Reward if found.
On the Options tab, select Identication Information so that if you lose your
device, it can be returned to you.
Personalizing
Password
Tap → Settings → Personal tab → Password.
To enable this function, select how long your mobile device must be turned
off before the password is required for using the device by tapping Prompt
if device unused for.
Select the type of password you would like to use : Simple 4 digit or Strong
alphanumeric.
Page 62

XV6600WOC User Manual62
XV6600WOC User Manual 63
Personalizing
4
1
2
3
A strong password must have at least 7 characters that are a combination of
uppercase and lowercase letters, numerals, and punctuation.
Enter the password and, if necessary, conrm the password.
n If your device is congured to connect to a network, use a strong password
Personalizing
to help protect network security.
n If you forget your password, you must clear the memory before you can
access your device. This will erase all les and data you have created
and programs you have installed. For more information about clearing
memory, please see Appendix A.
n If you've used ActiveSync to create a backup le, all of your program data
can be restored. For more information on creating a backup le, also see
Appendix A.
Sounds and Notications
Tap → Settings → Personal tab → Sounds & Notications.
On the Sounds tab, you can select the actions for which you want to hear
sounds.
On the Notications tab, you can customize how you are notied about
different events. Select the event name and then select the type of reminder.
You can select a special sound, a message, or a ashing light.
n Turning off sounds and the notication light helps conserve battery
power.
n
Use Phone settings to change the ring type and volume for your phone.
Today
You can customize the Today screen the following ways:
a. To change the background :
Tap → Settings → Personal tab → Today.
On the Appearance tab, select the desired theme for the background. To
use your own background, select
tap Browse to locate the desired le.
Use this picture as the background then
Page 63

XV6600WOC User Manual 63
Choose a folder and tap the le you want then tap OK.
Recommended picture size for the background is 240x320 pixels in JPEG
format.
To beam a favorite theme to a friend, on the Appearance tab, select the
desired theme and tap Beam.
b. To customize the information you want displayed :
Tap → Settings → Personal tab → Today → then Items tab.
Select the information you want displayed on the Today screen.
To customize the information further, select an information type, and then
tap Options (not available for all information types).
About
The Version tab displays important device information, including the amount of memory
installed.
On the Device ID tab, you may need to change the device name if you are unable to con-
nect to a network because another device with the same name is already connected.
Backlight
Tap → Settings → System tab → Backlight.
Tap the Battery power tab to turn on/off the back-light when using battery
power.
Personalizing
Tap the External power tab to turn on/off the back-light when using external
power.
Tap the Brightness tab to adjust the brightness level.
Using the backlight while on battery power substantially reduces battery
life.
Page 64

XV6600WOC User Manual64
XV6600WOC User Manual 65
Personalizing
Clock & Alarms
Tap → Settings → System tab → Clock &
Alarms.
Personalizing
n If you visit a particular time zone often, select it as your
Visiting time zone on the Time tab so that you can quickly
see the correct date and time.
n You can use your device as a travel alarm clock by setting
a wake-up alarm on the Alarms tab. Tap the alarm icon
to select the type of alarm you want.
n To change the way the date or time is displayed on your
XV6600WOC, go to Regional Settings by tapping
→ Settings → System tab → Regional Settings.
Memory
Tap → Settings → System tab → Memory.
n The Main tab displays the amount of memory the system
has allocated to le and data storage versus program
storage. This tab also displays the amount of memory in
use versus the available memory. For information about
making memory available, see Free Memory in Appen-
dix A.
n The Storage Card tab displays how much memory is
available on the storage card that is inserted into your
device. If you have more than one card inserted, tap the
list box and then the name of the storage card whose
information you want to view.
n The Running Programs tab displays the list of currently
active programs. You can stop a program by selecting it
in the list and then tapping Stop or just tap Stop All to
stop all the running programs.
You may need to stop a program if it becomes
unstable or program memory is low.
Page 65

XV6600WOC User Manual 65
Power
Tap → Settings → System tab → Power.
n The Battery tab displays the amount of battery power remaining. Battery power
depends on the battery type and how the device is being used.
n On the Advanced tab, you can select options for turning off your device to conserve
battery power. To conserve the most power, select the option that turns off the device
after 3 minutes or less.
Permanent Save
You can choose to back up Contacts and Appointments, Tasks, and Connection Set-
ting to non-volatile memory. Backing them up in this way means they will not be lost in
the event your device loses all power or you have to perform a full reset.
To backup to FlashROM:
Tap → Settings → System tab → and then Permanent Save.
Select the desired item by checking the boxes → tap OK to start backup.
When you select to back up Contacts and Appointments, your XV6600WOC
will automatically back up newly added contacts, appointments or tasks items.
This will not happen for connection settings; if you add a new connection, you
will need to back it up manually.
Personalizing
To restore to FlashROM:
Tap → Settings → System tab → and then Permanent Save.
Se lec t the desired item by checking the boxes → tap OK to start
restoring.
Page 66

XV6600WOC User Manual66
XV6600WOC User Manual 67
Personalizing
Keyboard
Your XV6600WOC comes with a QWERTY keyboard. You can
access it by sliding down the bottom end of the device. Tap
→ Settings → System tab → and then Keyboard to open the
Personalizing
Keyboard setting program which allows you to switch on the
keyboard backlight, set a time limit for the keyboard backlight
to switch off when it is not being used; then give links so you
can customize the way your keyboard repeats and assign a
favorite program to a specic key.
5.2 Phone Settings
You can easily view and change settings, such as the ring type
and ring tone to be used for incoming calls, and the keypad
tone to be used when entering phone numbers. You can also
protect your phone from unauthorized use. There are two ways
to change phone settings:
Tap → Settings → Personal tab → Phone.
To change phone setti ngs from the P hone
keyboard.
Ring Type
You can change the way that you are notied of incoming calls.
For example, you can choose to be notied by a ring, a vibration, or a combination of both.
Tap Tools → Options → Phone tab.
Tap the Ring type list, then select the desired option.
Ring Tone
Tap the Ring tone list, then select the sound you want
to use.
n To set .wav or .mid les as ring tones, use ActiveSync on
your PC to copy the le to the /Windows/Rings folder on
your device. Then, select the sound from the Ring tone
list.
Page 67

XV6600WOC User Manual 67
n To download ring tones, you can make a connection to the
Internet and then download ring tones that are compatible
with the .wav or .mid format.
Add Ring Tone
Add Ring Tone allows you to quickly nd and display all the
ring tones stored on your device, gives you the option to listen,
and then add or remove them from the Phone Settings list
mentioned above.
To display all ring tones on your device, you can
tap
→ Settings → System → then Add
Ring Tone. The program will automatically list
and display all the .wav and .mid les on your
XV6600WOC.
After the ring tones have loaded, you can see
that some are already selected; these are
presently listed in the phone settings.
To play a ring tone, select one by tapping it,
and then tap play. If you don’t like the ring tone,
deselect it; this will add/remove the selected/
deselected ring tones from the list in your phone
settings.
Personalizing
Keypad Tone
You can change the tone you hear when entering a phone
number on the keypad. If set to Tones, the tone is heard
continuously for as long as the number on the keypad is
pressed. If set to Beep, the tone is heard only for one or
two seconds.
Tap the Keypad list, then select the option you
want.
To prevent tones from being heard when entering
a phone number, select
Off.
Page 68

XV6600WOC User Manual68
Services
Services settings on the Settings → Personal → Phone →
Services tab are primarily used to set options such as Voice
Privacy, Network System, and Location Setting.
Personalizing
Feature Function
Voice Privacy A method for encrypting voice calls to
provide extra security.
Location Setting Enables you to allow your network to
lock onto your position or not.
Network System Enables y ou to accept r oa mi ng
(Standard) or restrict your phone to
calls from your home network only
(Home only)
TTY Mode Enables the use of a TTY (for the
deaf) machine together with your
device.
Tap Get Settings to access the settings for a
service.
To change service settings from the Phone Dial
screen, tap Tools → Options → Services tab
→ select a service → Get Settings.
G
Automatic Answer
This feature enables your phone to pick up a call automatically
and transfer it to the headset.
In phone dialer, tap Tools → Options → More.
n To enable, tick the checkbox next to Headset, and
then see the number of rings after which to pick up.
Page 69

Chapter 6
Scheduling and Communicating
- Microsoft Pocket Outlook
6.1 Calendar
6.2 Contacts
6.3 Tasks
6.4 Notes
Page 70

XV6600WOC User Manual70
XV6600WOC User Manual 71
Microsoft
Pocket Outlook
1
2
3
4
1
2
3
4
6.1 Calendar: Scheduling
Appointments and Meetings
Use Calendar to schedule appointments, including meetings
and other events. You can check your appointments in any
of several views (Day, Week, Month, and Agenda) and set
Calendar to remind you of appointments with a sound or other
method. Appointments for the day can be displayed on the
Today screen.
If you use Outlook on your PC, you can synchronize
appointments between your XV6600WOC and PC.
See ActiveSync in Chapter 4.
Tap to go back to view today's appointment.
Tap to display or edit the appointment details.
Tap to create a new appointment.
Microsoft
Pocket Outlook
Creating or Changing an
Appointment
Tap to change the appointments in various
displayed views.
To create an appointment, tap New. To select
a new date from a pop-up calendar, tap the
displayed date. To enter or select a new time,
tap the displayed time. Enter the appointment
details, and when nished, tap
the calendar.
If you are working in Day view, tap the time slot
for the new appointment and then New to have
the time automatically entered for you.
To change an appointment, tap it in the calendar,
and then tap Edit. Change any appointment detail
by tapping it and entering the new information.
OK to return to
When entering a time, you can type military and
abbreviated time forms, such as 2300 (becomes 11:
00 PM), 913pm (becomes 9:13 PM), 911 (becomes
9:11 AM), and 9p (becomes 9:00 PM).
Page 71

XV6600WOC User Manual 71
1
3
4
5
Send a Meeting Request
You can use Calendar to set up meetings with users of Out-
look or Pocket Outlook. The meeting request will be created
automatically and sent either when you synchronize Inbox or
when you connect to your e-mail server.
Create an appointment and enter the meeting
information.
Tap Attendees (you will need to hide the input
panel to see this box).
Select the meeting attendees from the list of
e-mail addresses you’ve entered in Contacts.
Only those contacts with e-mail addresses will
be displayed.
Select other desired options and then tap OK.
Messaging automatically creates a meeting
request and sends it to the attendees the next
time you synchronize with your PC. Any textual
notes entered in the Notes tab (excluding writing
or recordings) will be sent also.
If you are sending the meeting request through
a connection to an ISP or the network, rather
than through synchronization with your PC, tap
Tools
→ Options → Appointments tab. In Send
meeting requests via, tap the service you want
to use to send the meeting request.
Tap the service you want to use
to send the meeting request.
Pocket Outlook
Microsoft
Using the Summary Screen
When you tap an appoint ment in Calendar, a
summary screen is displ ay ed. To change the
appointment, tap Edit.
Page 72

XV6600WOC User Manual72
XV6600WOC User Manual 73
Microsoft
Pocket Outlook
1
2
3
1
2
3
4
Setting a reminder for an appointment
In the Calendar, tap the appointment, and then tap the upper portion of the
summary screen when editting the appointment.
Tap Reminder and select Remind me.
To change how many minutes before the appointment you are reminded, tap
the minutes displayed.
To automatically set a reminder for all new appointments, in the calendar, tap
Tools
→ Options → Appointments tab and select Set reminders for new
items.
Beaming an appointment
To beam an appointment, in the calendar list, tap and hold the appointment. On the pop-up
menu, tap Beam Appointment.
When using infrared (IR), align the IR ports between the devices so that they
Microsoft
are unobstructed and within a close range.
Pocket Outlook
6.2 Contacts: Tracking Friends and
Colleagues
Contacts maintains a list of your friends and colleagues so that you can easily nd the
information you’re looking for, whether you’re at home or on the road. You can enter both
personal and business information.
If you use Outlook on your PC, you can synchronize contacts between your device and
PC. See ActiveSync in Chapter 4.
Viewing contacts
Select the category of contacts you want displayed in the list.
Tap and enter part of a name to quickly nd it in the list.
Tap letters, such as h (home), w (work), or m (mobile) to the right of the
contact to see additional phone numbers and e-mail addresses.
Tap to display or edit the contact details.
Page 73

XV6600WOC User Manual 73
2
1
5
4
3
5
Tap and hold to display a pop-up menu of
available actions.
To change the way information appears in the list,
tap Tools and then Options.
Creating or Changing a Contact :
Tap → Programs → Contacts → New.
Use the input panel, enter a name and other
contact information. You will need to scroll down
to see all available elds.
To assign the contact to a category, scroll to and
tap Categories and select a category from the
list. In the contact list, you can display contacts
by category.
To add notes, tap the Notes tab. You can enter
text, draw, or create a recording.
To change a contact, tap it in the contact list, and
then tap Edit. To cancel edits, tap Edit → Undo.
When nished, tap OK to return to the contact list.
If you enter a name with more than 2 words, the
middle word will be recorded as a middle name.
If your contact has a double rst or last name,
tap the
Name arrow and enter the names in the
proper box.
Pocket Outlook
Microsoft
Page 74

XV6600WOC User Manual74
XV6600WOC User Manual 75
Microsoft
Pocket Outlook
1
2
3
4
5
6
1
2
To Find a contact:
There are several ways to nd a contact:
Tap → Programs → Find, enter the contact name (rst, last, or middle),
phone number, or address, select Contacts for the type, and then tap Go.
From Contacts, start typing a contact name until you see it displayed on the
screen. To show all contacts again, tap the text box at the top of the screen
and clear the text, or tap the arrow icon to the right of the text box.
Tap one of the sets of letters displayed at the top of the contact list. This takes
you to the contact names beginning with those letters.
Microsoft
Pocket Outlook
Beaming a contact
In the contact list, tap the category list (labeled All Contacts by default) and
tap the category to which you’ve assigned a contact. To show all contacts
again, select All Contacts. To view a contact not assigned to a category,
select No Categories.
To view the names of companies your contacts work for, in the contact list, tap
View
→ By Company. The number of contacts that work for that company
will be displayed to the right of the company name.
Press and hold the top of the navigation pad until alphabetical letters appear
on the screen in large type. Then use the navigation pad to scroll through the
alphabet and select a letter.
To beam a contact, in the contact list, tap and hold the contact. On the pop-up
menu, tap Beam Contact.
To beam multiple contacts, tap and drag to select the contacts. Then, tap
Tools → Beam Contacts.
When using infrared (IR), align the
are unobstructed and within close range.
IR ports between the devices so that they
Page 75

Changing Options
1
2
1
2
In the contact list, tap Tools → Options.
To increase the available space for displaying
contacts in the list, clear Show ABC tabs.
The area code and country/region for new
contacts are automatically entered based on
the information in Country/Region settings.
Using the Summary Screen
XV6600WOC User Manual 75
When you tap a contact in the cont act list, a
summary screen is displayed. To change the contact
information, tap Edit.
6.3
Tasks: Keeping a To Do List
Use Tasks to keep track of things you need to do.
A variety of task information can be displayed on the Today
screen.
If you use Outlook on your PC, you can synchronize tasks be-
tween your device and PC. See ActiveSync in Chapter 4.
Creating or Changing a task:
To create a task with detailed information, such
as start and due dates, tap
New.
In the task list, you can disp lay tasks by
category.
To assign the task to a category, tap Categories
and select a category from the list.
To create a new category, tap the Add/Delete
tab, enter the category name, and then tap Add
The new category is automatically selected in
the Select tab.
Pocket Outlook
Microsoft
→ Tasks →
.
Page 76
XV6600WOC User Manual76
XV6600WOC User Manual 77
Microsoft
Pocket Outlook
3
4
1
2
3
4
Setting a reminder for a task
Microsoft
Pocket Outlook
Using the Summary Screen
To add notes, tap the Notes tab. You can enter text, draw, or create a
recording. When nished, tap
To change a task, tap it in the task list, and then tap Edit.
To quickly create a task, enter text in the Tap here to add a new task box at
the top of the screen. If you don't see this box, tap Tools → Entry Bar.
In the task list, tap the task, and then tap Edit.
Tap the Due box and set a due date if you have not already done so.
Tap the Reminder box and select Remind me. You will be reminded at 8:00
in the morning on the due date.
To change the reminder date, tap the date displayed.
To be automatically reminded of new tasks with a due date, in the task list, tap
Tools → Options and select Set reminders for new items.
To choose how you are reminded, for example by a sound, tap
→ Personal tab → Sounds & Notications.
OK to return to the task list.
→ Settings
When you tap a task in the task list, a summary screen is displayed. To change
the task, tap Edit.
Beaming a Task
To beam a task, in the task list, tap and hold the task. On the pop-up menu, tap
Beam Task.
Page 77

XV6600WOC User Manual 77
1
2
1
2
3
6.4 Notes: Capturing Thoughts and Ideas
Notes helps you quickly capture your ideas, notes, and thoughts. You can create a note
using written and typed text, drawings, and recordings. You can also share your notes
with others through e-mail, infrared, and synchronization with your PC. See ActiveSync
in Chapter 4.
To create documents with advanced formatting or templates, such as bulleted
lists and tabs, use word processing software developed for your device, such
as Pocket Word.
To create a note:
Tap → Programs → Notes → New.
Create your note by writing, drawing, typing, or recording. See Entering
Information in Chapter 2 for more information about using the input panel,
writing and drawing on the screen, and creating recordings.
You can insert the date in a note. First, deselect and make sure that no
drawings are selected. Next, tap and hold anywhere on the note and then
tap Insert Date.
Sending a note via e-mail
If you haven’t already set up Messaging to send and receive messages,
please do so now. See the
In the note list, tap and hold the note or recording. To select multiple notes
or recordings, tap and drag. Then, tap and hold the selected items.
On the pop-up menu, tap Send via E-mail. A new message is created with
the item attached.
account settings in Chapter 8.
Pocket Outlook
Microsoft
Page 78

XV6600WOC User Manual78
1
2
Beam a Note
Change options
In the note list, tap Tools → Options.
Microsoft
Pocket Outlook
To beam a note, in the note list, tap and hold the note.
On the pop-up menu, tap Beam File.
From the Default template list, you can select
a pre-designed template to use with all new
notes.
If you store most of your notes and recordings
on a storage card, in Save to, tap Storage card
to have new items automatically stored on your
storage card.
Page 79

Chapter 7
Getting Connected
7.1 About Connections
7.2 Connecting to the Internet
7.3 Terminal Client Service
7.4 Bluetooth
Page 80

XV6600WOC User Manual80
XV6600WOC User Manual 81
Getting
Connected
1
2
3
4
5
7.1 About Connections
You can set up connections to the Internet and corporate network at work in order to do
such activities as browse the Internet or intranet, send and receive e-mail and instant
messages, and synchronize information using ActiveSync.
Connections can be made using a modem, wireless network, or network (Ethernet) card. A
modem connection can be used to set up connections with an external modem, or through
your mobile phone network using a cellular line.
Your XV6600WOC has two groups of connection settings: My ISP and My Work Network.
My ISP settings are used to connect to the Internet, and My Work Network settings can
Getting
Connected
be used to connect to any private network, such as a corporate network you use at work.
Simply ll in the settings and you’ll be ready to start connecting.
7.2 Connecting to the Internet
You can use My ISP settings to connect to the Internet and use the connection to send
and receive e-mail messages and view Web pages.
Connecting to the Internet via ISP
Obtain the following information from your ISP:
- ISP server phone number.
- User name.
- Password.
- Access point name.
(required for CDMA connection)
Tap → Setting → Connections tab → Connections
To create a new connection, in My ISP, tap Add a new modem connection,
and follow the instructions in the New Connection wizard.
Wireless connections can be made via a mobile phone network or CDMA. If
you are using a mobile phone network to connect, in the Select a modem
list, tap Cellular Line.
To view additional information for any screen, tap .
Page 81

XV6600WOC User Manual 81
6
1
2
3
4
5
6
7
8
9
To start the connection, begin using the desired program. For example,
switch to Pocket Internet Explorer and browse to a Web page. Your device
will automatically connect.
To change modem connection settings, in either My ISP or My Work Network
tap Manage existing connections. Select the desired modem connection,
tap Settings, and follow the instructions on the screen.
,
Setting up a WAP gateway
To access WAP sites through Pocket Internet Explorer, congure your device to use a
WAP gateway. Use the following steps to create a new set of connections to the Internet
with WAP gateway settings.
Get the following information from your ISP:
ISP server phone number, user name, and password. Also, contact your
mobile phone service provider and ask for your WAP gateway server name
and port number.
Tap → Settings → Connections tab → Connections → Tasks tab.
Tap Edit my proxy server. If a proxy server has not been set up, tap Set
up my proxy server.
In Programs that should automatically connect to and use the Internet, tap
New and enter a name for the ISP connection.
On the Proxy Settings tab, select This network connects to the Internet
and This network uses a proxy server to connect to the Internet.
If necessary, in the Proxy server box, enter the proxy server name.
Tap Advanced.
Connected
Getting
In the WAP box, enter the WAP gateway server name. Under Port, enter
the port number. The most common WAP
Create a modem connection. Also, if necessary, set dialing rules.
port number is 9201.
Page 82

XV6600WOC User Manual82
XV6600WOC User Manual 83
Getting
Connected
Getting
Connected
Pocket Internet Explorer
Once connected, you can use Pocket Internet Explorer to
view Web HTML, cHTML, xHTML and WAP pages on your
XV6600WOC in two ways: by downloading pages through
synchronization or by connecting to the Internet. While
browsing, you can also download les and programs from
the Internet or intranet.
During synchronization with your PC, download your favorite
links and mobile favorites that are stored in the Mobile Favor-
ites folder in Internet Explorer on the PC.
To synchronize and down load you r favorite
links from your PC, select Tools → Menu →
Options..→ Sync Options in ActiveSync on
your PC,then select the Favorites checkbox.
Browsing the Internet
Open the Pocket Internet Explorer screen by tapping
→ Internet Explorer.
In the address bar that appears at the top of
the screen, enter the Web address you want to
visit.
Tap to go to the web address you entered.
Tap , the Favorites button, then tap the
favorite you want to view.
To add a favorite link while using your XV6600WOC,
go to the page you want to add → tap and hold
on the page, and tap Add to Favorites from the
pop up menu.
Tap to go back to the Homepage you set.
Tap to refresh the web page on the screen.
Tap the arrow to choose from previously
entered addresses.
Page 83

XV6600WOC User Manual 83
7.3 Terminal Services Client
Using the Terminal Services Client, you can log onto a PC running Terminal Services or
Remote Desktop and use all of the programs available on that PC from your mobile device.
For example, instead of running Microsoft Pocket Word, you can run the PC version of
Microsoft Word and access all of the .doc les on that PC from your XV6600WOC.
Connecting to a Terminal Server
Tap → Programs → Terminal Services Client.
To connect to a server you have previously connected to, in Recent Servers,
tap a server. To connect to a new server, enter the server’s name in the Server
box. Select the Limit size of server desktop to t on this screen check
box only when using applications that have been specically sized for use
with XV6600WOC.
Tap Connect.
If the network administrator has congured Terminal Services Client to
reconnect to disconnected sessions, and you previously disconnected from
a Terminal Server without ending the session, the Terminal Services Client
reconnects to that session.
Navigating Within Terminal Services Client
Connected
Getting
Once connected to the server, the PC’s screen may more than ll your mobile device’s
screen. If scroll bars are displayed on the server’s screen, you will see more than one set
of scroll bars on your XV6600WOC: one to scroll information on the PC, and one to scroll
the PC display through the Terminal Services window in Terminal Services Client.
To ensure you are scrolling the PC display through Terminal Services Client, use the ve
directional buttons at the bottom of the Terminal Services Client screen.
To better t information on your mobile device’s screen, select Limit size of server desk-
top to t on this screen. For best effect, programs on the desktop computer should be
maximized.
Page 84

XV6600WOC User Manual84
XV6600WOC User Manual 85
Getting
Connected
Getting
Connected
Disconnecting Without Ending a Session
The following commands must be accessed from the Start menu in the Terminal Ser-
vices window used to access the PC’s commands. Do not use the Start menu on your
XV6600WOC.
In the Terminal Services window, tap Start → Shutdown.
Tap Disconnect.
If your administrator has congured Terminal Services Client to reconnect to
disconnected sessions, you will be reconnected to this session the next time
you connect to this server.
Disconnecting and Ending a Session
In the Terminal Services Client window, tap Start → Shutdown.
Tap Log Off.
Tips and Tricks
Improving display performance
Display performance is improved by decreasing the time it takes for the screen to be
refreshed on the desktop computer.
On your desktop computer, select Start → Settings → Control Panel.
Click Display.
Clear the Transition effects for menus and tooltips check box.
Page 85

XV6600WOC User Manual 85
Improving browser performance
Performance with Internet Explorer on the desktop computer is improved by decreasing
the time it takes for Web pages to be refreshed.
In Internet Explorer on your PC, select Tools → Internet Options.
Click the Advanced tab.
Clear the Use smooth scrolling check box.
7.4 Bluetooth
Bluetooth is a short-range wireless communications technology. Unlike infrared, you
don't need to line up the devices to beam information within a closer range when operating with Bluetooth connection.
With Bluetooth powered on, you can send information or perform the following tasks wire-
lessly between two Bluetooth devices within a range of about 10 meters (30 feet):
n Exchange information, such as les, calendar items, tasks, and contacts or business
cards.
n Synchronize with a PC with Bluetooth capability through an ActiveSync connec-
tion.
n Partner with a Bluetooth-enabled mobile phone and use it as a wireless modem.
n Connect to, use, and disconnect to other Bluetooth devices.
Connected
Getting
Page 86

XV6600WOC User Manual86
XV6600WOC User Manual 87
Getting
Connected
Using Bluetooth
The Bluetooth icon in the lower-right corner of the Today
screen provides quick access to the Bluetooth Manager and
Bluetooth Settings.
The icon changes subject to the Bluetooth using status :
Getting
Connected
- Bluetooth is active.
- Bluetooth is disabled (Default status).
- Bluetooth is initializing.
When your Bluetooth is powered on, the LED
indicator for Bluetooth, located on the left upper
corner of your XV6600WOC, will blink blue every
6 seconds to indicate Bluetooth is on or alternate
between blinking blue.
Bluetooth Settings
With Bluetooth Settings, you can :
n
Turn
Bluetooth
vices.
n
Create or change a name for your XV6600WOC when using
Bluetooth to connect with other devices.
n Set your connection preferences and user prole.
n Specify security settings and dene settings for sharing
and connecting.
Turning On Bluetooth
In the Today screen, lower-right corner, by tapping , you
can turn Bluetooth on by:
or
on/off and enable/disable
Selecting Turn Bluetooth ON.
Selecting Bluetooth Settings → and then tap
Turn On.
Bluetooth
ser-
Tap to create, delete, or
rename a prole
Page 87

XV6600WOC User Manual 87
3
4
Using Proles
Setting the proles allows:
n Different users to quickly re-congure the XV6600WOC to the personal preferences.
For example, if Joe and Mary both use the same XV6600WOC, but each uses it for
a different purpose, selecting a pre-congured prole will alter the settings to those
of the appropriate user.
n A single user to quickly re-congure the XV6600WOC for a different environment.
If Joe uses his device primarily at the ofce, but also uses it when traveling, he can
easily switch to a pre-congured prole that has more secure settings for hotel, airport,
or similar “public” environments.
All Bluetooth Settings are saved in the active prole. When your XV6600WOC
is turned off, Bluetooth Settings saves the last-used prole and reloads that
prole the next time your XV6600WOC is turned on.
a. To Create a new prole:
In the General tab → tap the icon to access a screen from which you can
Add, Rename and Delete a prole.
Tap the New button.
Enter a descriptive name for the new prole, for example, Ofce.
Select an existing prole on which to base the new prole.
Tap OK.
Connected
Getting
The new prole does NOT automatically become the active prole; to activate
the new prole, select it from the Current Prole eld on the
b. To Rename or Delete a prole:
In the General tab → tap the icon to access a screen from which you can
Add, Rename and Delete a prole.
Tap a prole from the prole name list and then tap Rename or Delete
button to rename or delete the selected prole.
General tab.
Page 88

XV6600WOC User Manual88
XV6600WOC User Manual 89
Getting
Connected
3
4
Getting
Connected
c. To Save conguration settings in a prole:
When you make changes to the XV6600WOC's conguration, those changes are automatically saved when you select a different prole, turn Bluetooth off, or shut down your
XV6600WOC.
In the General tab → tap the icon to access a screen from which you can
Add, Rename and Delete a prole.
Select the desired prole from the Current Prole eld on the General
tab.
Setup your XV6600WOC including the necessary settings in Accessibility
and Services tab described later so that it behaves in your desired
manner.
Tap OK and then close the Bluetooth Settings screen; the changes are saved
automatically.
To avoid saving unwanted changes to a regularly used prole, create a new
prole that is based on the prole currently in use, select the new prole, and
then make the changes while the new prole is active.
Setting Accessibility Properties
You can enter or change the accessibility properties to dene how your XV6600WOC
interacts with other Bluetooth devices by tapping the Bluetooth icon on the lower-right
corner of Today screen → Bluetooth Settings → Accessibility tab.
Enter the Bluetooth name of your XV6600WOC, as displayed to remote
devices when the associated prole is active if the Use Pocket PC device
name for Bluetooth checkbox is un-checked.
If the Use Pocket PC device name for Bluetooth checkbox is checked, the
name assigned to your XV6600WOC (by tapping
tab → About → Device ID tab → Device Name) will always be displayed
to the remote user as the Bluetooth name of your XV6600WOC.
→ Settings → System
Page 89

XV6600WOC User Manual 89
3
4
3
Allow other devices to connect - when this option
is enabled, other devices are permitted to connect
to this device. Two mutually exclusive sub-options
provide additional renement. They are:
n All devices - select this option to allow all
devices to connect.
n Paired devices only - select this option
to allow only devices that have a paired
relationship with you r XV6600W OC to
connect.
4 Other devices can discover me - when this
option is enabled, other
see and report your XV6600WOC. This allows
any device, even those unknown to yours, to
connect to your XV6600WOC.
The ability of remote devices to connect is also
subject to the security restrictions, and whether
Bluetooth is enabled on your XV6600WOC.
Bluetooth devices can
Enabling Bluetooth Services
The services that your XV6600WOC provides to other devices
when using Bluetooth include :
n File Transfer - le-related operations such as get a le/use
a le/delete a le, etc.
n Information Exchange - send the default business card
(Pocket Outlook contact) on request.
n Serial Port - Bluetooth serial port operations. Bluetooth
serial ports are used as a replacement for a physical cable
between devices.
n Personal Network Server - join or host a Bluetooth-based
personal area network
n Dial-up Networking - provide access, via a phone line or
other access system, to a remote computer network such
as an Internet service.
n Hands Free - allows you to connect to a remote headset
or other audio device.
Connected
Getting
Page 90

XV6600WOC User Manual90
XV6600WOC User Manual 91
Getting
Connected
1
1
3
4
Getting
Connected
Αll the services can be individually congured by tapping the
Bluetooth icon on the lower-right corner of Today screen →
Bluetooth Settings → Services tab.
In the Services eld, select the service to be
congured.
In the Service settings area, enable the desired
options by checking the Enable service box.
Service Security Settings
Each Bluetooth service has its own individual security settings. Even though the options are the same for each service,
in each case they are specic to the individual service being
congured.
In the Service settings area of the Services tab,
Bluetooth icon in the lower-right corner of Today screen →
Bluetooth Settings:
Authorization required
When enabled, your XV6600WOC will require
that each attempt to establish a connection
be i nd ividually aut ho rized on the pop up
Authorization Request screen; that is, you
must authorize each connection, when a remote
device attempts to connect to this service.
Authentication (Passkey) required
When enabled, a passkey or a Link Key is
required from the remote device before allowing
the connection.
A passkey is a code you enter to authenticate
connections requested by other devices. This
passkey must be known and used by both parties,
otherwise, the connection will not be allowed.
tap the
Page 91

XV6600WOC User Manual 91
3
4
1
You can also enable the Encryption required function if you want to require
all data exchanged between your XV6600WOC and the remote Bluetooth
device to be encrypted.
Some services have advanced conguration options; if available, tab
Advanced to access the additional settings.
Bluetooth Manager
Tap the Bluetooth icon on the lower-right corner of Today screen → Bluetooth
Manager.
The Bluetooth Manager provides a friendly user interface for establishing connections
based on the connection preferences and proles that you have set in the Bluetooth
Settings. With Bluetooth Manager, you can:
n Exchange information or business cards.
n Create, manage, and use the services connection that you have enabled in the
Bluetooth Settings with other remote devices.
n Display shortcuts.
n Control the on-screen display.
Opening Bluetooth Manager automatically turns on Bluetooth.
E
xchanging Information or Business Cards
There are two options : Paired devices and Business Card Exchange, when you
Bluetooth icon on the lower-right corner of Today screen → Select Bluetooth Manager
→ and then tap Tools menu.
a. To pair with another device:
Pairing essentially means giving two devices permission to communicate with each
other.
When two devices are paired, they share, and exchange prior to each connection, an
internally generated security key. This security key, called a Link Key, is based on a
unique Bluetooth Device Address, a random number, and a user-dened password.
tap the
Connected
Getting
In the Bluetooth Manager screen, select Paired devices from the Menu.
On the Paired devices screen, tap Add.
Page 92

XV6600WOC User Manual92
XV6600WOC User Manual 93
Getting
Connected
3
4
1
3
4
Getting
Connected
On the Device Pairing screen: tap the
access the
Select one from the available list to return to
the prior screen and populate the Device: eld.
Enter the correct password in the Passkey
eld.
Tap OK.
b. To exchange Business Cards:
From the Bluetooth Manager → Tools menu,
→ select Business Card Exchange.
Tap the link at the bottom of the screen to
select a default business card. After the
selected, tap OK to return to the Business Card
Exchange screen.
To Send or Exchange business card(s) you
must rst specify your default business card in
the Bluetooth Settings screen → Services tab →
Select Information Exchange service → and then
tap Advanced button to set your business card.
Tap the Send, Exchange or Request icon, as
appropriate.
In the Bluetooth Browser screen, tap the name
of the remote device, and then tap OK.
Select a Bluetooth device screen.
to
card is
Bluetooth Connection Wizard
From the Bluetooth Manager, tap the New menu to start the
Bluetooth Connection Wizard, which walks you through the
process of creating a connection. Choose the type of connection and then tap Next. The succeeding wizard screens will
guide you through establishing the parameters of the connection. The exact content of the succeeding screen will vary,
depending on the type of connection being created.
Tap Next to move to the next page, or Back to return to the
previous page.
Page 93

XV6600WOC User Manual 93
Some of the connection types included in the wizard can help you perform are :
n Hands-free/Headset setup (optional item):
Locate and pair with a Bluetooth headset or other hands-free device.
n ActiveSync via Bluetooth:
Locate a Bluetooth PC and create a connection shortcut that will establish a synchronization link between the Personal Information Manager on your XV6600WOC and
the desktop computer.
n Browse les on a remote device:
Locate and connect to a remote device to examine the contents of a remote folder
and/or send/receive le(s) to/from that device. An optional connection shortcut can be
created.
n Connect to a network:
Locate a remote device that can provide access to the Internet. Examples include a
Bluetooth cell phone, a Bluetooth modem, or possibly a Local Area Network. Once
the connection shortcut is created, open the connection and then open a browser such
as Internet Explorer.
n Join a Personal Network:
Create, or locate and join, a Bluetooth network. Create a shortcut to a connection that can
be used to share les, collaborate with co-workers, participate in multiplayer games….
Connected
Getting
n Exchange business cards:
Locate and connect to a remote Bluetooth device and then send, receive and/or exchange
electronic business cards with that device.
n Explore a Bluetooth device:
Locate a remote device, view the services the remote device can provide, and then create
a connection shortcut to one or more of those services (hold down the Navigation/Action
Button ) to tap and select multiple services.
Page 94

XV6600WOC User Manual94
XV6600WOC User Manual 95
Getting
Connected
1
3
1
3
1
a. Using a Serial Port Connection
The use of a Bluetooth wireless serial port connection is
identical to the use of a physical cable serial port connection
between two devices. As with a physical connection, the application that will use the connection must be congured to
use the correct serial port.
Getting
Connected
To determine the communications port assigned to the
Bluetooth serial port:
Tap the Bluetooth icon on the low er-right
corner of Today screen → Bluetooth Settings
→ Services tab.
Select Serial Port from the services area → and
then tap Advanced.
The Outbound COM Port is the lower listing on
the screen. You must congure the application
that will use the Bluetooth Serial Port to send
data to this port.
For more information about configuring your
application's Outbound COM port, refer to the
application's documentation.
To establish a serial connection:
Tap the Bluetooth icon on the lower-right corner
of Today screen → Bluetooth Manager.
Tap New → select Explore a Bluetooth device
→ tap Next.
Follow the connection wizard instructions.
b. Setting up a Bluetooth Hands-free/Headset
Connection (optional item)
From the Today screen → tap Bluetooth icon
→ Bluetooth Manager.
Page 95

XV6600WOC User Manual 95
3
1
3
4
Tap New → Hands-free/Headset setup → Tap Next.
Be sure that the
receive incoming connection requests. Please refer to the device's manual
for more information.
Follow the connection wizard instructions.
c. Setting up an ActiveSync via Bluetooth on your XV6600WOC
You can set up an ActiveSync partnership with a Bluetooth-enabled computer. First,
you need to set up the Bluetooth Conguration of your computer (follow the instruction
in the user manual of your Bluetooth device or PC), then set up your XV6600WOC.
To establish an ActiveSync connection on your XV6600WOC:
From the Today screen → tap Bluetooth icon → Bluetooth Manager.
Tap New → ActiveSync via Bluetooth → Next.
Follow the connection wizard instructions.
Be sure the ActiveSync COM port setting on your PC is the same as the
COM port setting used for Bluetooth on your PC.
Follow the Bluetooth Browser screen, select the PC you want to
synchronize with → tap Next.
Under Serial Port Selection → select the name of the serial port for the
PC selected above → then tap Next → Finish.
d. Dial-Up Networking : Connect to Remote PC
Hands-free device you are trying to connect to is ready to
Connected
Getting
Dial-up Networking (DUN)
line. Once connected, you can browse the Internet, check your e-mail, etc.
The remote Bluetooth device that will provide the Dial-up Networking service must
have access to a telephone system (either a hard-wired or cellular connection).
Devices that might provide the Dial-up Networking service include:
n Bluetooth-enabled cellular telephones
n Bluetooth-enabled desktop computers that are attached to a telephone system
n Bluetooth modems.
allows you to connect to a remote computer via a phone
Page 96

XV6600WOC User Manual96
XV6600WOC User Manual 97
Getting
Connected
1
3
4
7
1
3
1
3
The remote computer to which you are connecting must also be attached to the phone
system and capable of answering a call.
To use Dial-up Networking :
From the Today screen → tap Bluetooth icon → Bluetooth Manager.
Tap New → Connect to a network → Next.
Getting
Connected
Follow the connection wizard instructions.
After you create the Dial-up Networking shortcut with a device → tap and
hold the shortcut icon in the My Shortcuts tab of the Bluetooth Manager →
and tap Connect.
Tap New Connection → Tap OK.
Enter a name for the connection in the Connection Name eld.
Enter a phone number. You may need to enter the country code and area
code, depending on where you are calling.
Tap OK to begin dialing.
To make this connection the default dial-up connection for Pocket Internet Explorer when
using Bluetooth modem, you still need to complete the following steps:
From the Today screen, tap → Settings → Connections tab.
Tap the Connections icon → Advanced tab → Select Networks.
Enable Bluetooth Settings from the dropdown list.
e. Send via Bluetooth
Pocket Outlook Contacts, Calendar items, and Tasks can be sent individually or col-
lectively to a remote device.
To send data via Bluetooth transfer :
Tap → Programs → open Calendar, Contacts or Tasks.
Highlight the item(s) to be sent
Tap-and-hold the item(s), and from the pop-up menu, tap Send via
Bluetooth.
Page 97

XV6600WOC User Manual 97
4
1
3
On the Select a Bluetooth device screen, tap the
name of the destination device, and then tap OK.
f. Bluetooth Personal Area Network
A Bluetooth personal area network is a private, temporary,
ad-hoc network of up to eight devices. A Bluetooth personal
area network
would normally require a TCP/IP network. For example, most
chat utilities, multi-player games, etc. are fully functional in a
Bluetooth personal area network environment.
Bluetooth personal area networks are subject to the same
security settings that govern other Bluetooth communications (service availability, authorization, authentication, and
encryption).
One Bluetooth device must be the host of the personal
area network. Other Bluetooth devices join the network
as clients. The host can accept and reject clients on an
individual basis.
To host a Personal Area Network :
makes it easy to exchange information that
From Bluetooth Manager → select New →
Connect → Join a personal network → and
then tap Next.
On the nex t wiz ard screen s elect Host a
personal network → and then tap Next.
Add remote devices to the Bluetooth Personal
Area Network, if desired:
- Tap the Add button and select the device to
be added.
- Add additional devices, if desired (up to eight
total, including the host).
After all the desired devices have been added,
tap OK to complete the setup and close the
wizard.
Adding devices is optional; devices do not have to
be added to the personal area network when the
Host is congured. Devices can join the personal
area network later.
Connected
Getting
Page 98

XV6600WOC User Manual98
1
To join a Personal Area Network :
From Bluetooth Manager → select New → Connect → Join a personal
network → and then tap Next.
On the next wizard screen select Join a personal network → and then tap
Next.
The Bluetooth Browser appears; select the host of the personal area network → and
then tap Next to establish a connection to the personal area network. → If asked to enter
IP network settings select Use server-assigned IP address → and then tap OK.
Getting
Connected
The network host’s authorization and authentication settings, and/or its Personal
Area Network service availability, may prevent you from joining the network.
Any application that requires a network connection can use the Personal Area
Network connection.
My Shortcuts
The default tab on the Bluetooth Manager is My Shortcuts. This screen displays the
icons that have been created for connections to other devices. The icons provide visual
feedback about the status of the connection to which they are linked.
The double-tap is context sensitive:
n If the connection is not open—double-tap its icon to establish a connection.
n If the connection is open—double-tap its icon to display the connection’s status.
Connections can also be opened/closed, and other options accessed, using the tap-andhold technique. If you tap a connection icon and hold the stylus in place for a few seconds,
a context sensitive menu appears.
Active Connections
Th is tab display s the active O ut go in g an d In co mi ng Con ne ct io ns on your
XV6600WOC.
Page 99

Chapter 8
Messaging Features
8.1 E-Mail Messages
8.2 Messaging
8.3 MSN Messenger
8.4 Managing Messages
and Folders
Page 100

XV6600WOC User Manual100
XV6600WOC User Manual 101
Messaging
Features
1
2
3
4
5
8.1 E-mail Messages : Using Messaging
You can set up a connection to an e-mail server so that you can send and receive e-mail
messages by using a modem or network connection and Inbox on your device.
The ISP or network must use a POP3 or IMAP4 e-mail server and an SMTP
gateway.
You can use multiple e-mail services to receive your messages. For each e-mail service
you intend to use, rst set up and name the e-mail service. If you use the same service
to connect to different mailboxes, set up and name each mailbox connection.
To set up an e-mail service :
Open Messaging on your device, then tap Accounts → New Account.
Follow the directions in the New Account Wizard.
Fill in your e-mail address then tap Next.
Features
Messaging
Tapping Next will initiate
XV6600WOC to your e-mail server and automatically download the necessary
e-mail connection settings.
n If auto-conguration is successful, you can immediately begin sending/
receiving e-mail.
n If auto-conguration is unsuccessful, you will need to manually enter the
settings.
Enter Your name, User name and Password, then tap Next.
From the drop down menu select the Account type that your e-mail provider
supports (POP3 or IMAP4).
Enter a Name for your e-mail account then tap Next.
auto-conguration, which attempts to connect your
 Loading...