

Page 1
User Guide
Page 2

3
Table of Contents
Introduction. . . . . . . . . . . . . . . . . . . . . . . . . . 5
Features . . . . . . . . . . . . . . . . . . . . . . . . . . . . . . . . . . . . 6
Safety and Care Information . . . . . . . . . . . . . . . . . . . 7
What’s in the Box? . . . . . . . . . . . . . . . . . . . . . . . . . . . 9
Snap Functions . . . . . . . . . . . . . . . . . . . . . . . . . . . . . 10
Snap Connections . . . . . . . . . . . . . . . . . . . . . . . . . . . .11
Installation and Setup . . . . . . . . . . . . . . . . .13
Mount the Magnetic Mount Antenna . . . . . . . . . . . 14
Find a Location for the Snap. . . . . . . . . . . . . . . . . . 18
Initiate the Courtesy Period . . . . . . . . . . . . . . . . . . 19
Connect the Audio . . . . . . . . . . . . . . . . . . . . . . . . . . 21
Subscribe . . . . . . . . . . . . . . . . . . . . . . . . . . . . . . . . . . 26
Using Your Snap . . . . . . . . . . . . . . . . . . . . . 27
The Main Display . . . . . . . . . . . . . . . . . . . . . . . . . . . .28
Navigation Basics . . . . . . . . . . . . . . . . . . . . . . . . . . .29
Favourite Channels . . . . . . . . . . . . . . . . . . . . . . . . . . 31
Scanning Channels in a Category . . . . . . . . . . . . . . 32
Tuning FM Channels . . . . . . . . . . . . . . . . . . . . . . . . . 33
FM Presets . . . . . . . . . . . . . . . . . . . . . . . . . . . . . . . . .33
Radio ID . . . . . . . . . . . . . . . . . . . . . . . . . . . . . . . . . . .35
Set Audio Level . . . . . . . . . . . . . . . . . . . . . . . . . . . . .35
Auto Shut Off. . . . . . . . . . . . . . . . . . . . . . . . . . . . . . . 36
Demo Mode . . . . . . . . . . . . . . . . . . . . . . . . . . . . . . . .36
Troubleshooting. . . . . . . . . . . . . . . . . . . . . . 37
Product Specifications . . . . . . . . . . . . . . . . . 41
Patent Information . . . . . . . . . . . . . . . . . . . . . . . . . .43
Environmental Information . . . . . . . . . . . . . . . . . . .43
Owner’s Record . . . . . . . . . . . . . . . . . . . . . . . . . . . . 46
Page 3

4
5
Introduction
Page 4
6
7
Features
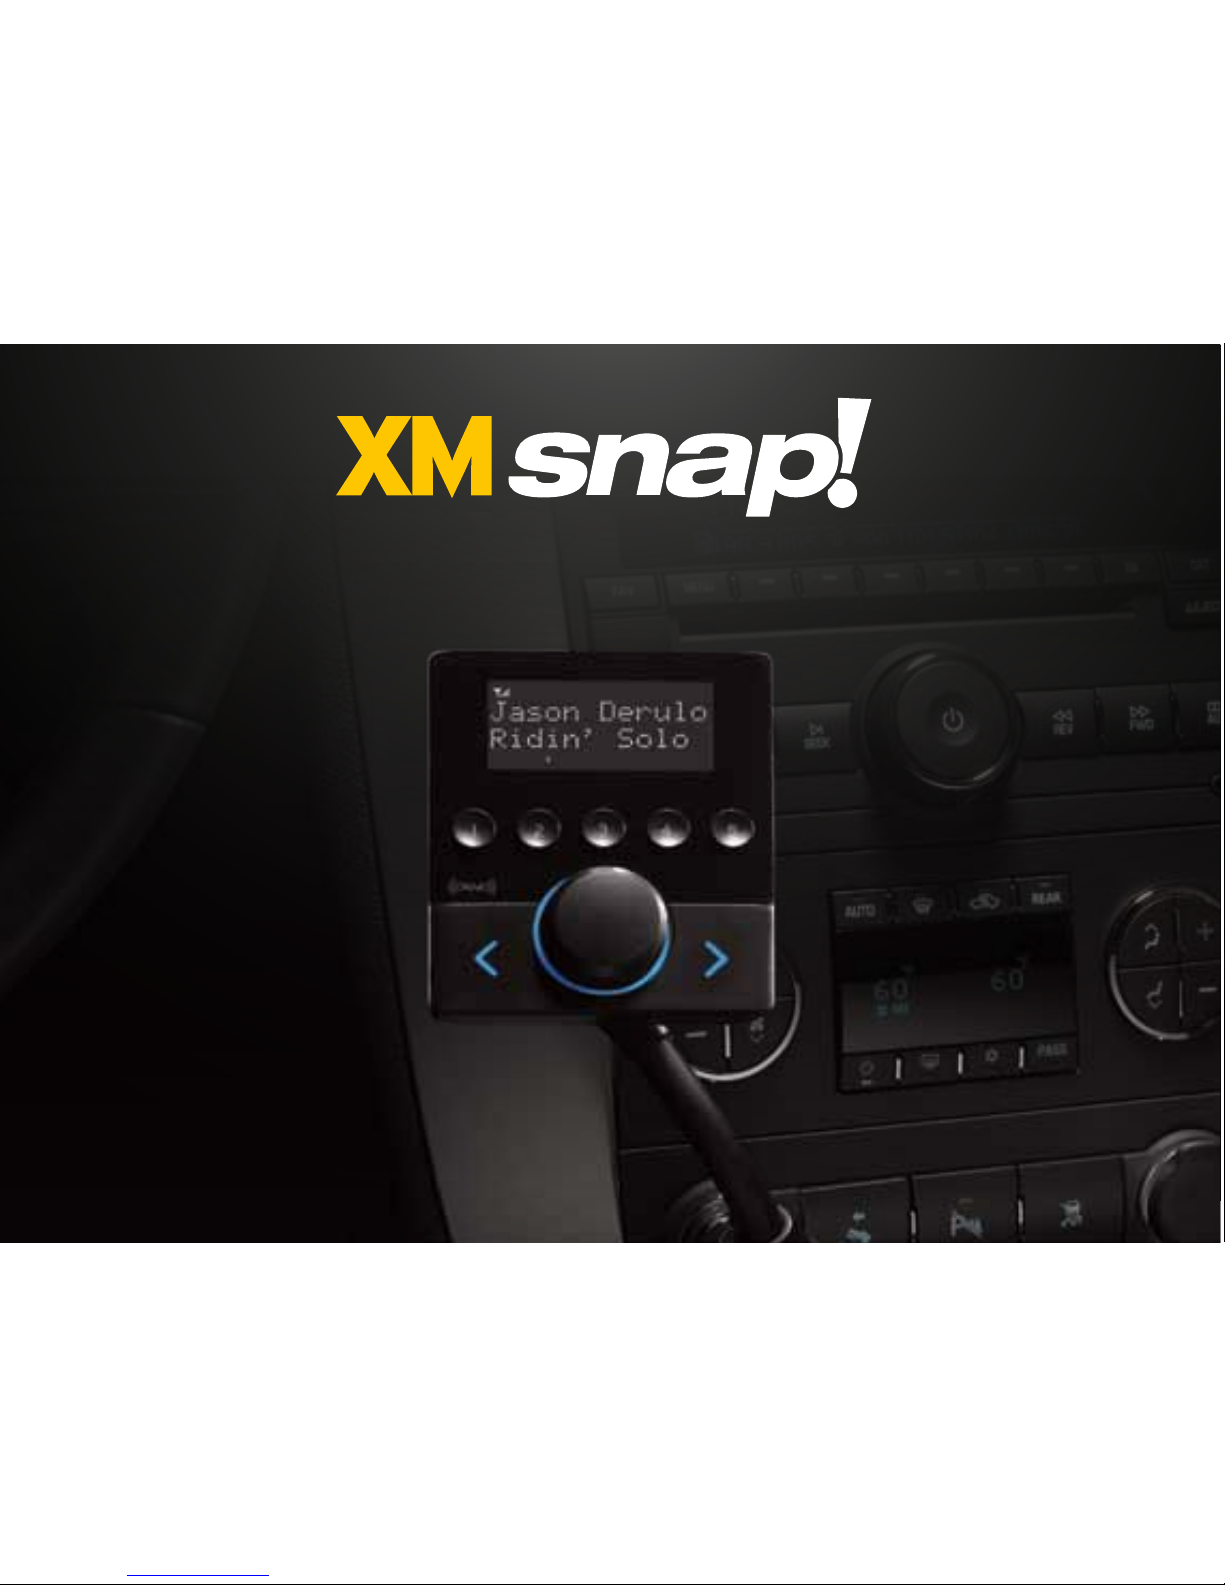
Congratulations on your purchase of the XM Snap!
The XM Snap has these exciting features to enhance your overall experience:
• Convenient and easy set up: Just plug it into your vehicle power adapter socket, connect
the antenna and begin listening to XM Radio immediately. For your convenience, the radio
comes pre-activated with a 5 day courtesy period.
• Large Easy-to-read display: View artist name and song/program title as well as channel
information such as channel name, number, and category on an easy-to- read display.
• Flexible in-box audio connection options: Use either the included Aux In Cable, or the builtin
Power
Connect FM transmitter to play audio through your vehicle’s stereo system.
• Channel scanning: Scan through the channels in a category to find the one you want to
listen to.
• Favourite channel presets: Save and enjoy fast access to up to 5 of your favourite channels.
• FM presets: Store and quickly access 5 FM channels that give you the best audio reception
when using
Power
Connect.
Please read the entire User Guide before using your Snap!
Introduction
Safety and Care Information
IMPORTANT! Always read and understand all the instructions to avoid injury to yourself and/or
damage to your device. XM Radio Inc. disclaims all responsibility for damage from data loss due to
breakdown, repair, or other causes.
• Do not expose to extreme temperatures (above 60°C or below -20°C, or above 140°F or
below -4°F).
• Do not expose to moisture. Do not use device near or in water. Do not touch the device with
wet hands.
• Do not let any foreign matter spill into device.
• Do not store in dusty areas.
• Do not expose to chemicals such as benzene and thinners. Do not use liquid or aerosol
cleaners. Clean with a soft damp cloth only.
• Do not expose to direct sunlight for a prolonged period of time, and do not expose to fire,
flame, or other heat sources.
• Do not try to disassemble and/or repair the device yourself.
• Do not drop your device or subject it to severe impact.
• Do not place heavy objects on device.
• Do not subject device to excessive pressure.
• If the LCD screen is damaged, do not touch the liquid crystal fluid.
Page 5
8
9
Warning!
• Opening the case may result in electric shock.
• If the liquid crystal fluid comes in contact with your skin, wipe the skin area with a cloth
and then wash the skin thoroughly with soap and running water. If the liquid crystal fluid
comes into contact with your eyes, flush the eyes with clean water for at least 15 minutes
and seek medical care. If the liquid crystal fluid is ingested, flush your mouth thoroughly
with water. Drink large quantities of water, and induce vomiting. Seek medical care.
• Make sure that you insert the Snap all the way into the vehicle’s cigarette lighter or power
adapter socket.
• If you are using
Power
Connect as your audio connection option, it is advisable not to insert
a multi-outlet adapter into the same vehicle power adapter socket to simultaneously power
other devices.
• When using this product, it is always important to keep your eyes on the road and hands on
the wheel. Not doing so could result in personal injury, death, and/or damage to your device,
accessories, and/or to your vehicle or other property.
• Vehicle installation and Radio configuration functions should not be performed while driving.
Park your vehicle in a safe location before beginning installation.
Your device should be placed in your vehicle where it will not interfere with the function of safety
features, e.g., deployment of airbags. Failure to correctly place device may result in injury to you or
others, if the unit becomes detached during an accident and/or obstructs the deployment of an airbag.
Introduction
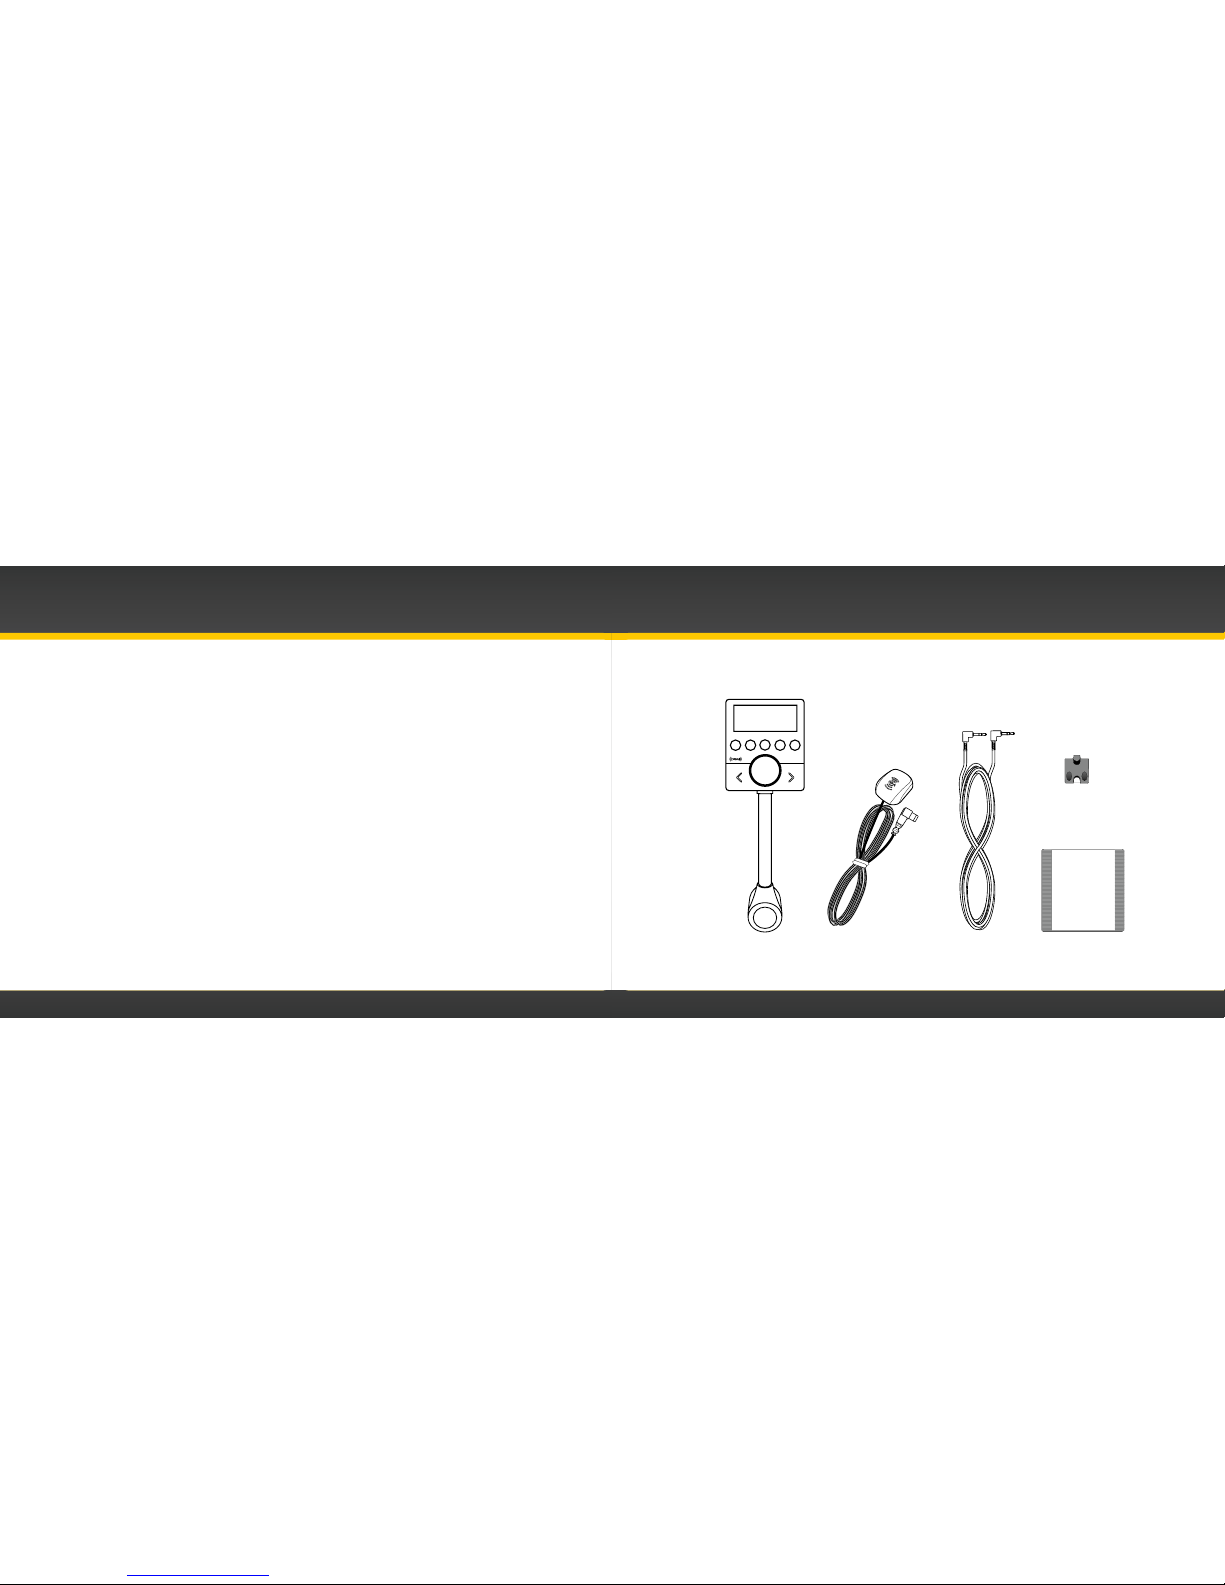
What’s in the Box?
Snap Radio
Magnetic Mount
Antenna
Antenna Alcohol
Preparation Pad
Aux In Cable
1 2 3 4 5
Cable
Routing Adapter
Alcohol
Prep Pad
Page 6

10
11
ANTENNA
AUDIO FM
Snap Functions
Introduction
Snap Connections
ANTENNA
Connection for
the Magnetic
Mount Antenna.
ANTENNA WIRE GUIDE
Guides antenna wire to
connection.
AUDIO
Connection for Aux In
Cable or optional
Cassette Adapter
(sold separately).
FM
Connection for
optional FM Direct
Adapter (sold
separately).
Power Button
Press to turn Radio
on and off.
Top View
Menu Button
Press to access Radio ID
and adjust audio level.
Scan Button
Press to start or stop
a scan of each channel
within the current
category.
FM Button
Press to access FM
channel configuration,
and FM channel presets.
Previous/Next Category
Buttons
Press to access the
previous or next
category; press and hold
to cycle through the
categories.
Number Buttons
Press to select your
favourite channels,
press and hold to set a
favourite channel; also
press to select an FM
channel preset, press
and hold to set an FM
channel preset.
Control Knob
Rotate to tune to
the previous or next
channel within the
current category;
also rotate to tune
FM channels.
1 2 3 4 5
Rock
Underground
25
MENU
FM
Front View
Base
Page 7

12
13
Installation and Setup
Page 8
14
15
WARNING! DO NOT attempt to install the Snap while driving. Park your vehicle in a safe location
before beginning installation.
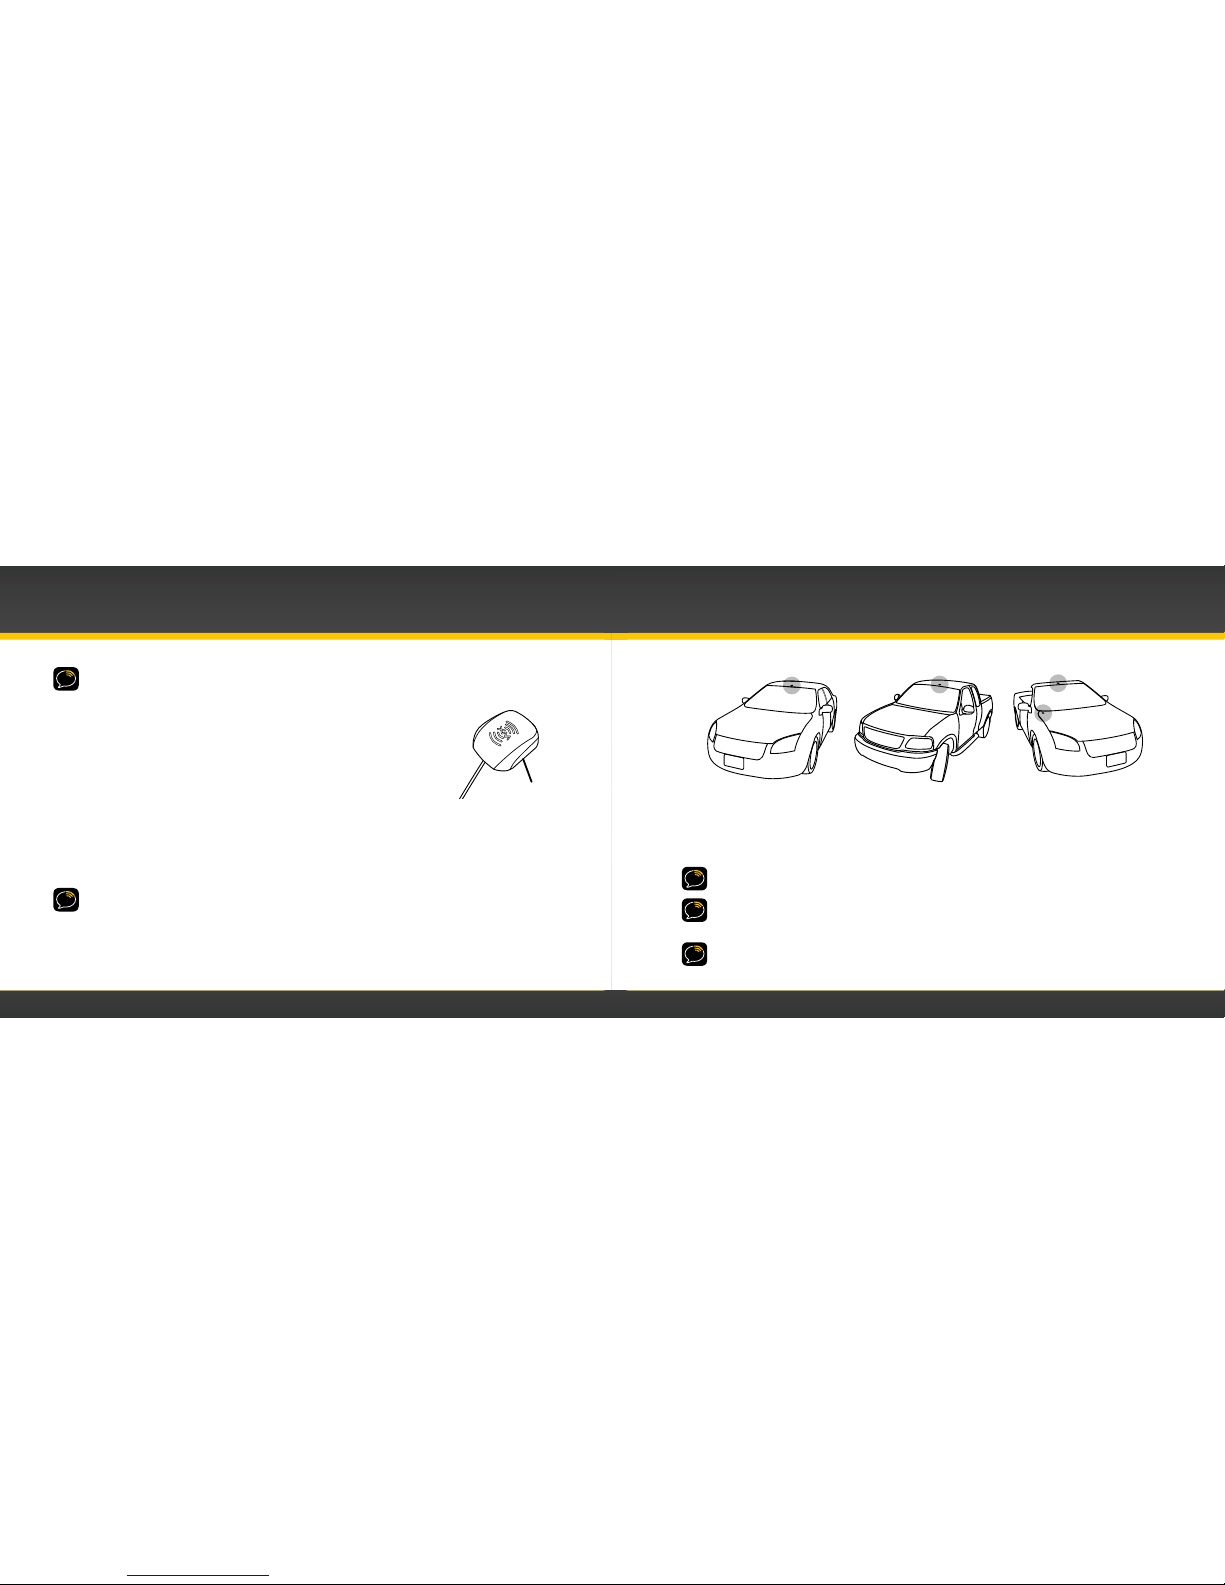
Mount the Magnetic Mount Antenna
Mount the Magnetic Mount Antenna on the outside of your vehicle, on a
horizontal surface that will always face the sky. The antenna contains a
strong magnet that will stick to any metal part of your vehicle, but will not
damage the vehicle.
For most vehicles the best location is on the roof above the front windshield, as close to being
centered between the left and right sides as the cable length will allow. For convertible vehicles
that do not have room above the windshield, place the antenna on the hood of the vehicle at a
corner nearest the windshield. Consult a professional installer if your vehicle roof or hood is nonmetallic (i.e. fiberglass), or you have difficulty finding a location for your antenna.
IMPORTANT: The Snap uses a unique antenna. Do not substitute an antenna from any other XM
radio for the Snap antenna. Replacement Snap antennas are available from xmradio.ca/accessories.
Installation and Setup
Recommended Antenna Locations
TIP: Detailed installation instructions, including videos, can be viewed at xmradio.ca/help/
troubleshooting.xmc.
TIP: When mounting the Magnetic Mount Antenna, be sure that the area is clean and dry by using
the Alcohol Prep Pad. Avoid locating the antenna near other antennas (i.e. GPS, Cellular, or AM/FM)
as well as roof rack or other items that can obstruct the view to the satellites.
IMPORTANT! Consult a professional installer if your vehicle roof or hood is non-metallic (i.e.,
fiberglass), or you have difficulty finding a location for your antenna. (See xmradio.ca/accessories or
visit your favourite retailer.)
Sedans and Coupes
Pickups and SUVs Convertibles*
* If the antenna can not
be placed above the
windshield, place it on
vehicle hood.
Magnet
Page 9

16
17
Installation and Setup
If you are installing the antenna at the roof edge, or hood edge, install the Cable Routing Adapter
to direct the antenna cable downward.
Recommended Antenna Cable Routing
Press the antenna wire under the rubber molding around the front windshield to the nearest
corner. Then route the cable out of the windshield molding and into the rubber weather stripping
around the door opening. Lift the weather stripping from
the opening and tuck the cable inside it, then replace the
weather stripping. Run the cable inside of the weather
stripping to the bottom of the door opening. Hide the
antenna wire inside the cabin. Pull the cable out of the
weather stripping at the bottom of the door opening and
route it under the carpet toward the cigarette lighter power
adapter socket. Coil any excess cable in a hidden location,
such as under the carpet, keeping it away from any vehicle
pedals or controls. Secure the excess cable with wire ties.
TIP: Always be careful to include enough slack in your
routing to accommodate open doors or the hood lid. Use
electrical tape to secure the cable in areas
so that hinges do not pinch the cable with
the door.
Plug the Magnetic Mount Antenna connector into
the ANTENNA connector on the Snap base. The
antenna plug and cable will fit into the recess on
the top of the Snap base.
Place Antenna
Closer to A-Pillar
if Cable Doesn’t Reach
Center of Roof
Cigarette Lighter
or Power Adapter
Location
ANTENNA
AUDIO FM
Antenna
Connector
Antenna
Plug
Place the antenna wire
into the groove of the
Cable Routing Adapter
Slide the Cable Routing
Adapter down the antenna wire
and press it into the antenna
until it is flush with the bottom
of the antenna
Without Cable
Routing Adapter
Installed
With Cable
Routing Adapter
Installed
Cable Routing
Adapter orientation
Page 10

18
19
Installation and Setup
Find a Location for the Snap
The Snap mounts into your vehicle’s cigarette lighter or power adapter
socket. If your vehicle has more than one, be sure to choose the one
that doesn’t interfere with the driver’s vision or access to driving
controls, the one which won’t interfere with the deployment of airbags
or other safety equipment, and makes the Snap easily accessible for
operation.
NOTE: After plugging the Snap into the power adapter socket and
connecting the cables, remember to route the cables so they do not
interfere with the safe operation of the vehicle.
NOTE: Plug the Snap into the power
adapter socket so that the AUDIO and
FM connectors on the base are
accessible for connecting the cables.
Power Adapter or
Cigarette Lighter
Socket
1
2
3
4
5
Rock
Underground
25
Initiate the Courtesy Period
Before proceeding with connecting the audio, the Courtesy Period
included with your Snap needs to be initiated:
1 Be sure the vehicle is outside and the antenna has a clear view
of the sky.
2 Power on your Snap by pressing the Power button.
3 When Snap powers on, after the Welcome to XM message, you
will be prompted to Press 1, 2, 3 To Begin. Press the number
button 1, then 2, then 3.
4 If the Magnetic Mount Antenna has been installed correctly, and
Snap is receiving the XM signal, a Courtesy Period Begun message
will verify that the Courtesy Period has begun. You will then be
notified about the length of the Courtesy Period and prompted to
set up the audio connection.
5 Snap will then tune to channel 247. Although at this point you have access to all the
channels, leave it tuned to channel 247 until you have set up the audio connection.
If Acquiring Signal, Chk Antenna Connection, or No Signal Chk
Antenna is displayed instead of the Courtesy Period Begun message,
this indicates that you are not receiving the XM signal. Be sure the
MENU
FM
Press 1,2,3
To Begin
Courtesy
Period Begun
Acquiring
Signal
Page 11

20
21
vehicle is outside and the antenna has a clear view of the sky. Verify that you have installed and
connected the antenna as described in “Mount the Magnetic Mount Antenna” on page 14.
Refer to “Troubleshooting” on page 38 for additional help.
Installation and Setup
Connect the Audio
To play audio through your vehicle’s stereo or FM radio, decide on one of the following audio
connection options:
• Option 1: Best: Use the provided Aux In Cable if your vehicle’s stereo system has an auxiliary
input connection. Refer to your vehicle’s owners manual to find the location of the auxiliary
input jack, or consult the vehicle dealer. (Page 22)
TIP! The auxiliary input jack may be located on the face plate of the vehicle radio, on the back of
the radio, anywhere on the front dash panel, inside the glove compartment, or inside the center
console in between the front seats.
• Option 2: Better: Use a Cassette Adapter if your vehicle has a built-in cassette player.
Cassette Adapters are sold separately and can be purchased from an electronics retailer, or
go to xmradio.ca/accessories. Follow the installation instructions in Option 1. (Page 22)
• Option 3: Good: Use the
Power
Connect feature of the Snap.
Power
Connect plays the audio
through your vehicle’s FM radio. (Page 23)
• Option 4: Best: Use the FM Direct Adapter. If none of the previous three audio connection
options will work in your vehicle, then you will need to use the FM Direct Adapter (FMDA)
(sold separately). The FMDA needs to be installed by a professional installer and directly
connects the Snap to your vehicle’s FM radio. To learn more, check with the retailer where
you bought your Radio, or go to xmradio.ca/accessories.
Follow the installation instructions in the next several sections for the audio connection option
that you have selected.
Page 12

22
23
Options 1 & 2: Aux In Cable Installation Instructions
1 Plug one end of the Aux In Cable into the AUDIO
connector on the Snap base.
2 Plug the other end into the auxiliary input jack
connection of your vehicle’s stereo system.
3 Turn on your vehicle’s stereo system. Set it to play input
from the auxiliary input source (or cassette mode if using
a cassette adapter). You should hear XM channel 247
through your vehicle’s stereo system. The installation is
complete. Proceed to “Subscribe” on page 26.
4 The audio level output of the Snap
can be increased or
decreased as necessary to match the audio levels of other
sources in your vehicle. Refer to “Set Audio Level” on
page 35.
If the signal reception is good, showing at least one antenna
signal strength bar in the upper left corner of the display
screen, but there is no audio when tuned to channel 247, be sure the vehicle’s stereo system is set
to the correct source, i.e., auxiliary input source (step 3). Also be sure that the audio level is set
high enough to be heard (step 4). Refer to “Troubleshooting” on page 38 for additional help.
AUDIO FM
Audio
Connector
Aux In Cable
Aux In
Optional Cassette
Adapter
Option 3:
Power
Connect Installation Instructions
1 You’ll first need to find an available FM channel. An available FM channel is one that’s
not being used by an FM radio station in your area. When you tune your FM radio to an
available channel, you should only hear static or silence – not talk or music. We recommend
the following method to find an available FM channel:
Manually tune through your local FM channels on your vehicle’s FM radio. Locate and create a
list of channels that aren’t being used by any FM radio station. Write down the list. Once you
have created your list of available FM channels, you will need to find the one that provides the
best match for Snap.
TIP! You’ll need to use the ‘Manual’ tune function on your vehicle’s FM radio to tune through every
FM channel one-by-one. Turn on your vehicle’s FM radio. Start at 88.1 and use the ‘Manual’ tune
function on your vehicle’s FM radio to tune through each FM channel one-by-one (88.1 followed by
88.3 etc.) to locate channels that aren’t being used by a local FM radio station. Write down each FM
channel that has only static or silence on it, until you reach 107.9.
2 Pick the first FM channel on your list from step 1. Turn on your vehicle’s FM radio (if you have
not already done so) and tune it to this FM channel.
Installation and Setup
Page 13

24
25
3 Set your Snap to transmit on the same FM channel that you have selected in step 1:
a. Press the FM button on the top of the Snap. The FM button will
illuminate to indicate the FM transmitter is on.
b. Rotate the Control knob to select the available FM channel you
chose in step 1.
c. You should hear the XM channel 247 through your vehicle’s FM
radio. If you are satisfied with the sound quality installation is
complete. If you are not, move to the next FM channel on your
list, and tune your vehicle’s FM radio and Snap to this new FM
channel. Continue until you have found an FM channel with which
you are satisfied.
4 Once you have found a satisfactory FM channel to use, press and
hold 1 until the 1 button is illuminated. This FM channel is now set as
FM preset 1.
MENU
FM
Turn knob to
set FM chan
FM 90.1
FM1
1 2 3 4 5
FM 90.1
MATCH FM
CHANNELS
1 2 3 4 5
90.1
5 Press the FM button or wait 10 seconds to exit the FM setup. Proceed to “Subscribe” on
page 26.
6 The audio level output of the Snap can be increased or decreased as necessary to match
the audio levels of other sources in your vehicle. Refer to “Set Audio Level” on page 35.
7 If the signal reception is good, but there is no audio when tuned to channel 247, verify that
both the Snap and your vehicle’s FM radio are tuned to the same FM channel (steps 2 & 3).
Also ensure the chosen FM channel is a suitable one to use in your area (step 1). Also be
sure that the audio level is set high enough to be heard (step 6). Refer to “Troubleshooting”
on page 38 for additional help.
Installation and Setup
Page 14

26
27
Subscribe
Subscribe to the XM service by following these steps:
1 Make sure your Snap is turned on, and receiving the XM signal so that you can hear the XM
audio.
2 Make a note of your Radio ID. You can find it by pressing menu, on a label on the bottom of
the gift box, and on the label on the back of your Snap.
3 To subscribe:
• Online: Go to xmradio.ca and click on Activate Radio
OR
• By phone: Call 1-877-GET-XMSR (1-877-438-9677)
4 Activation usually takes 10 to 15 minutes, but may take up to an hour. We recommend that
your Radio remain on until subscribed. Once your radio is subscribed, any messages related
to the Courtesy Period will not appear on the display.
Installation and Setup
Using Your Snap
Page 15

28
29
Using Your Snap
The Main Display
When listening to a channel, information about what is currently playing is displayed. The screen
will alternate between the artist name and song title, and the current category name, and channel
number.
Antenna Signal
Strength
Artist Name
or Talk Show Host
or Sports Teams/Score
Category
Channel Name
Song Title
or Talk Show Schedule
or Game Time/Game
Details
Channel Number
Beach Boys
Good Vibrati
Pop 6
60s on 6
Navigation Basics
Power Button
Pressing the Power button turns the Snap On or Off.
Control Knob
Rotating the Control knob clockwise or counter-clockwise browses and selects channels
within a category. It is also used to tune to an FM channel, and to change the audio level.
Scan Button
Pressing the Scan button starts a scan through the channels in the current category.
Each channel plays for 10 seconds. Pressing the Scan button again stops the scan and
the radio tunes to the last channel being scanned.
Previous/Next Category Buttons
Pressing the Previous or Next Category button selects the previous or next category.
Pressing and holding cycles through the categories.
Menu Button
Pressing menu once displays the Radio ID of your Snap. Pressing menu again displays the
Audio Level option.
MENU
Page 16

30
31
Using Your Snap
FM Button
Puts Snap in FM mode when using
Power
Connect (or FMDA) as the audio connection
option. When the FM button is pressed it will illuminate to indicate the FM transmitter is
on. The display will show the current FM channel. You can then tune to a different FM channel,
store an FM preset, or choose an FM preset while Snap is in FM mode.
Number Buttons
Each number button can store a favourite channel in its button location and provides one touch
access to it afterward. Each button can also store an FM preset which can be selected by pressing
the FM button and then a number button.
Listening to Satellite Radio
Select a category:
Channels are organized into categories to make it easier for you to find
the ones that suit your taste.
1 To change to the next or previous category press and release the
Previous or Next Category button. The radio will automatically
tune to the default channel in that category. The default channel is
FM
1 2 3 4 5
either the first channel in the category (if that category was never accessed before), or the
channel that the radio was tuned to in that category when it was accessed the last time.
2 To view each previous or next category without changing categories, press and hold the
Previous or Next Category button. Each category name will be briefly displayed. When
the desired category is displayed, release the button to select the category. Snap will
automatically tune to the default channel in that category.
Tune a channel within a category:
1 Rotate the Control knob to display the next or previous channel in a category.
2 Stop on a channel to tune to the channel.
TIP! The All category contains all subscribed channels. This is the default category when the Snap
is powered up for the first time.
TIP! To briefly listen to each channel in the category, press the Scan button. Refer to “Scanning
Channels in a Category” on page 32 to learn more about Scan.
Favourite Channels
You can store up to 5 of your favourite channels so you can easily access them. Each favourite
channel can be assigned to a number button.
Pop
Country
Page 17

32
33
To assign a favourite channel to a number button:
1 Tune to the desired channel.
2 Press and hold the number button 1-5 you want to assign to that
favourite channel. A brief pause in the audio confirms that the
favourite has been saved. The number button will be illuminated
confirming that the channel was assigned.
To listen to a favourite channel:
1 Press the number button 1-5 that was assigned to the desired
favourite channel. Snap will tune to that channel and the icon
corresponding to the number button will be illuminated on the
display.
Scanning Channels in a Category
You can scan a category and listen to a channel for 10 seconds before the radio automatically
switches to the next channel.
To scan a category:
1 Press the Previous or Next Category button until the desired category is displayed.
2 Press the Scan button. The scan will begin, and each channel will play for 10 seconds.
3 To stop the scan and tune to the channel currently being played, press the Scan button again.
Using Your Snap
1 2
3
4 5
Beach Boys
Good Vibrati
Tuning FM Channels
When using
Power
Connect, you can tune to an FM channel to match the FM channel of your
vehicle’s stereo system.
To tune an FM channel:
1 Press the FM button on the top of the Snap. The FM button illuminate to indicate the FM
transmitter is on, and the display will show the current FM channel.
2 Rotate the Control knob to select the desired FM channel.
3 To exit, press the FM button or wait 10 seconds until the Snap exits to the main display screen.
FM Presets
FM presets make it easy to store FM channels and then quickly access them.
Use FM presets when you use
Power
Connect to listen to your Snap through your vehicle’s
FM radio. (Refer to “Option 3:
Power
Connect Installation Instructions” on page 23 for more
information.)
To store an FM preset:
1 Press the FM button on the top of the Snap. The FM button will illuminate to indicate the FM
transmitter is on, and the display will show the current FM channel.
Page 18

34
35
Using Your Snap
2 Rotate the Control knob to select the desired FM channel.
3 Press and hold a number button 1-5 until the preset number (1-5)
is displayed. The FM channel is now set as an FM preset.
4 To exit, press the FM button or wait 10 seconds until the Snap
exits to the main display screen.
To access an FM preset:
1 Press the FM button on the top of the Snap. It will light to indicate the FM transmitter is
on.
2 Press the 1-5 button which contains your FM preset. The radio will tune to the FM preset
and the number button corresponding to the preset will be illuminated.
3 To exit, press the FM button or wait 10 seconds until the Snap exits to the main display
screen.
IMPORTANT! You need to ensure that your vehicle’s FM radio is tuned to the same FM channel.
TIP! Be sure complete the FM functions while the FM button is illuminated.
TIP! To configure your preset FM channels, you need to find available FM channels in your area.
Follow step 1 in ”Option 3:
Power
Connect Installation Instructions” on page 23 to find available FM
channels.
Radio ID
Your Snap has an 8 character alphanumeric ID which uniquely identifies your Snap. This ID is used
during the subscription process.
To display the Radio ID:
1 Press the menu button on the top of the Snap. The menu button will illuminate and the
Radio ID will be displayed.
2 Record your Radio ID on page 46.
3 To exit, press the menu button twice or wait 10 seconds until the
Snap exits to the main display screen.
Set Audio Level
The audio level of the Snap can be adjusted when an audio connection is made between the Snap
and the vehicle’s stereo system. Audio level is used to adjust the Snap’s
volume level to match the
volume of other audio sources you may use, such as a CD player, other FM stations, or an MP3
player.
Do not use the audio level as a volume control. Use the volume control on your vehicle’s stereo
instead.
FM 90.1
FM1
Radio ID
1G567H90
Page 19

36
37
Troubleshooting
Using Your Snap
To adjust the audio level:
1 Press the menu button on top of the Snap twice. The menu button will illuminate.
2 Rotate the Control knob to increase or decrease the audio level.
3 To exit, press the menu button or wait 10 seconds until the Snap
exits to the main display screen.
Auto Shut Off
The Snap will automatically shut off after 6 hours of inactivity, i.e., no
buttons have been pressed. This feature prevents the vehicle battery
from being discharged if you forgot to turn your Snap off.
When the Snap is about to shut off, the message Started Auto Shut Off
is displayed, followed by Press 1 to Remain On. If you wish to continue
listening, press the 1 button.
Demo Mode
Your Snap has a demo mode that starts playing when, for a prolonged period of time (more than
5 minutes), the Radio either detects it’s not connected to the antenna, or the antenna stops
receiving a signal. It disappears when the antenna is connected properly or when the Radio starts
receiving a signal. You can also exit demo mode at any time, by pressing and holding the 1 button.
Started Auto
Shut Off
Press 1 to
Remain On
Audio Level
< >
Page 20
38
39
Snap has been designed and built to be trouble-free but if you experience a problem, try this:
• Check that all connections are firm and secure.
• Make sure the vehicle power socket is working, and clean and free of corrosion.
• Make sure you have connected the Snap as described in this User Guide. Verify that the
Snap is fully plugged into the vehicle’s cigarette lighter or power adapter socket. Your
vehicle may need to be running to provide power to the socket.
If you see this on the screen: Try this:
Acquiring Signal
No Signal Chk Antenna
• Make sure that the vehicle is outdoors with a clear view of the sky.
• Make sure the Magnetic Mount Antenna is mounted outside of the
vehicle, in one of the locations shown on page 15.
• Move the antenna away from any obstructed area. For example, if you
are parked in an underground garage, you should receive a signal after
leaving the garage.
• Make sure that the antenna cable is firmly and securely plugged into
the Snap. Make sure the cable is not bent or broken.
• If the message persists, most likely the Magnetic Mount Antenna cable
has been damaged. Replace the antenna.
Troubleshooting
If you see this on the screen: Try this:
Courtesy Period Ended • The 5 day Courtesy Period included with your Snap has ended. Call the
number shown on the screen to subscribe. Also refer to “Subscribe”
on page 26.
If this happens: Try this:
You do not receive all the
channels to which you subscribed
• Ensure that you have subscribed by following the steps in “Subscribe”
on page 26.
• Go to www.xmradio.ca/refresh and enter your Radio ID, and follow the
instructions to refresh your activation signal.
• Call 1-877-438-9677 for more assistance.
Audio fades or has static when
listening
• Check all cables for a firm and secure connection.
• If you are using
Power
Connect to listen via your vehicle’s FM radio,
and the problem persists, it most likely is interference from another
commercial or broadcast FM station. You will need to find an unused
or available FM channel in your area. Refer to step 1 in “Option 3:
Power
Connect Installation Instructions” on page 23.
• If you are using
Power
Connect, and you cannot solve the audio
problem, try connecting the audio using the Aux In Cable or a Cassette
Adapter. (Refer to page 22 and page 23.) If you cannot use those solutions,
consider using an FM Direct Adapter. (Refer to page 21.)
Page 21
40
41
If this happens: Try this:
Audio sounds too soft • Raise the volume of your stereo system or increase the audio level of
your Snap until the sound quality improves. Refer to “Set Audio Level”
on page 35.
No audio when using the Aux In
Cable or Cassette Adapter
• Check all cables between your Snap and your vehicle’s stereo system for
firm and secure connections.
• Ensure you have selected the proper input source on your vehicle’s
stereo system.
No audio when using
Power
Connect or FMDA
• Check that your Snap and your vehicle’s FM radio are tuned to the
same FM channel.
No song title or artist name is
displayed
• The information may not be available or updates may be in progress.
Traffic and Weather channels
sound different from other
channels
• These channels use a different audio technology than other channels
so they often sound different from other channels.
Troubleshooting
Product Specifications
Page 22

42
43
Product Specifications Patent and Environmental Information
Patent Information
It is prohibited to, and you agree that you will not, copy, decompile, disassemble, reverse engineer,
hack, manipulate, or otherwise access and/or make available any technology incorporated in
this product. Furthermore, the AMBE
®
voice compression software included in this product is
protected by intellectual property rights including patent rights, copyrights, and trade secrets of
Digital Voice Systems, Inc. The software is licensed solely for use within this product. The music,
talk, news, entertainment, data, and other content on the Services are protected by copyright
and other intellectual property laws and all ownership rights remain with the respective content
and data service providers. You are prohibited from any export of the content and/or data (or
derivative thereof) except in compliance with applicable export laws, rules and regulations. The
user of this or any other software contained in a XM Radio is explicitly prohibited from attempting
to copy, decompile, reverse engineer, hack, manipulate or disassemble the object code, or in any
other way convert the object code into human-readable form.
Environmental Information
Follow local guidelines for waste disposal when discarding packaging and electronic appliances.
Your Radio is packaged with cardboard, polyethylene, etc., and does not contain any unnecessary
materials.
System
Power Requirements: 9-16 V DC, 500 mA (max)
Operating Temperature: -4°F to +140°F (-20°C to +60°C)
Audio Output: 1.0 V
rms
(max)
Dimensions
Radio Control Unit: 2.7 in (width) x 3.13 in (height) x 0.6 in (depth)
68.5 mm (width) x 79.5 mm (height) x 15 mm (depth)
Flexible Stalk: 0.43 in (Dia.) X 3.1 in (length)
10.9 mm (Dia.) X 80 mm (length)
Base/Mount: 1.3 in (width) X 4.4 in (length)
33 mm (width) X 111.5 mm (length)
Weight: 5.3 oz (151 g)
Vehicle Antenna
Type: XM Magnetic Mount
Connector: SMB female, right angle
Cable Length: 11.5 ft (3.5 m)
Aux In Cable
Connectors: 1/8 in (3.5 mm) stereo male to 1/8 in (3.5 mm)
stereo male
Cable Length: 4 ft (1.2 m)
Page 23

44
45
The user is cautioned that changes or modifications not expressly approved by XM Radio Inc. can void the user’s
authority to operate this device.
This device complies with Part 15 of the FCC Rules and is certified to Industry Canada’s RSS-210 specifications.
Operation is subject to the following two conditions:
1. This device may not cause harmful interference.
2. This device must accept any interference received, including
interference that may cause undesired operation.
This equipment has been tested and found to comply with the limits for a Class B digital device, pursuant to Part
15 of the FCC Rules and Industry Canada’s RSS-210 specifications. These limits are designed to provide reasonable
protection against harmful interference in a residential installation.
This equipment generates, uses, and can radiate radio frequency energy and, if not installed and used in accordance
with the installation instructions, may cause harmful interference to radio communications. However, there is
no guarantee that interference will not occur in a particular installation. If this equipment does cause harmful
interference to radio or television reception, which can be determined by turning the equipment off and on, the user
is encouraged to try to correct the interference by one or more of the following measures:
• Reorient or relocate the receiving antenna of the affected receiver.
• Increase the separation between the XM equipment and the affected receiver.
• Connect the XM equipment into an outlet on a circuit different from that to which the affected receiver is
connected.
• Consult the dealer or an experienced radio/TV technician for help.
WARNING! The FCC and FAA have not certified this Satellite Radio Receiver for use in any aircraft (neither portable
nor permanent installation). Therefore, XM Radio Inc. cannot support this type of application or installation.
FCC and IC Statement
©2010 SIRIUS XM Radio Inc. “SIR IUS”, “XM” and al l related marks and logos are trademarks of SIRIUS
XM Radio Inc. an d its subsidiar ies. “BBC” and “Radio One” are trademar ks of the Britis h Broadcasting
Corporation and are u sed under license. BBC logo © BBC 1996. Radio 1 log o © BBC 2001. Cosm opolitan®
is a registered trademark of Hearst Communicati ons, Inc. Elvi s Radio logo © E PE Reg. U.S. Pat & TM off.
IndyCar (and Design) are registered trademarks of Bri ckyard Trademarks, Inc., used with per mission. Major
League Baseball tradem arks and copyrights are used with pe rmission of Maj or League Baseball Properties,
Inc. Visit the official website at M LB.com. Games subje ct to availability and change and m ay not include all
spring training g ames. All rights reserved. NASCAR® is a registered trademark of t he National A ssociation
for Stock Car Auto Racing, Inc. The NBA iden tifications are th e intellectual prop erty of NBA Propert ies,
Inc. and the respective NBA member teams. © 2010 NBA Prop erties, Inc. © 2010 NFL Propert ies LLC.
All NFL-related trademarks are trademarks of the National Football League. NH L and the NHL Shield are
registered trademarks of the National Hoc key League. © NHL 2010. Al l NHL logos an d marks and NHL team
logos and marks depicted herein a re the property of th e NHL and the respective teams and may not be
reproduced without t he prior written consent of NHL Enter prises, L.P. The Home Ice© channe l is a registered
trademark of XM Satel lite Radio Inc. The Swinger Golfer log o is a registered tradema rk of PGA TOUR, Inc.
Visit www.xmradio.ca/xmlineup for updates. Al l programming/channel lineup/XM ser vice subject to change
or preemption. A ll other marks and logos are the property of their respective owners. All rights reserved.
Hardware, subscription and activation fee requi red. Other fees and taxes may apply. Month-to-mont h
subscriptions mu st be activated vi a telephone. Hardware and s ubscription sold separately. Subscription
governed by XM Customer Agreement, which can be found at x mradio.ca/about/termsand-conditions.cfm.
Prices and programming are subject to c hange.
Copyrights and Trademarks
Page 24

46
Owner’s Record
The Radio model number is located below and the Radio ID is located on the label on the back of
the Snap.
Record the Radio ID in the space provided below. Refer to these numbers whenever you call your
dealer regarding this product.
Radio Model Number: XSN1V1KC
Radio ID:___________________________
Owners Record
Page 25

XSN1V1KC
Audiovox Electronics Corporation
150 Marcus Blvd.
Hauppauge, New York 11788 U.S.A.
1 800 645 4994
www.audiovox.com
XM name and related logos are registered
trademarks of XM Satellite Radio Inc. All
other trademarks are the property of their
respective owners.
© 2010 Audiovox Electronics Corporation. All rights reserved.
 Loading...