

Page 1

XR9 Satellite Radio Recei ver
User Guid e
SATELLITE
RADIO
1
3
2
5
4
6789
0
Page 2

Congratulations
Y ou are one step closer to experiencing the latest innovation in XM Satellite Radio. XM will revolutionize your in-home or vehicle entertainment with:
• Over 130 channels of original programming, including –
68 channels of 100% commercial-free music – guaranteed,
Over 60 channels of world-class sports, news, talk and information.
Y our Audiovox XR9 receiver must be used with an adapter kit, such as the Audiovox Home Kit, Boom
Box or V ehicle Kit as required by your specific installation needs. These kits are available at retailers
where Audiovox main units are sold.
Audiovox Home Kit: Part Number XH9
Audiovox Vehicle Kit: Part Number XC9
Audiovox Boom Box: Part Number XB9
Required subscription for service sold separately. Premium Channels available at additional monthly costs. Installation costs and other fees and taxes may apply, including a one-time activation fee. All fees and programming
subject to change. College sports games subject to availability. Subscriptions subject to Customer Agreement
included with the XM Welcome Kit and available at xmradio.com. Only available in the 48 contiguous United States.
(c) 2004 XM Satellite Radio Inc. XM is a trademark of XM Satellite Radio. All rights reserved. All other trademarks
are the property of their respective owners.
-2-
Page 3

Contents
Cautions and Warnings ...................................... 4
XR9 System Components ................................... 4
Introduction .......................................................... 4
Enjoying Y our XM -XR9......................................... 5
XM XR9 Controls .................................................. 6
Basic Operation ................................................... 8
Tuning by Category .......................................... 8
Channel Listing Options .................................. 8
Direct Tuning ...................................................... 9
Setting/Using Channel Preset Buttons ............. 9
Display Button .................................................. 1 0
Memory Button (T SEL Function) ..................... 11
Menu Display Operations .................................... 1 4
Menu Descriptions ...............................................14
Radio ID ........................................................... 14
Display Setting ................................................. 14
Audio Options ................................................... 15
FM Options ....................................................... 16
Confirm Tone Option ........................................ 16
Lock Option ...................................................... 1 7
Lock/Unlock Default Code Function ................ 1 7
Antenna Aiming (Home Installation) ................ 1 8
Channel Add/Skip ............................................ 18
Memory Options ...............................................19
Time Options .................................................... 19
Clock................................................................. 19
Time Format ................................................. 20
Time Zone ..................................................... 20
Set Alarm ...................................................... 21
Alarm Time ................................................... 2 1
Sleep Mode................................................... 21
Stock Options ...................................................22
Stock On/Off ..................................................22
Stock Add ......................................................22
Stock Erase .................................................. 23
Info Extras......................................................... 24
Info Display Options ..................................... 2 6
Display Mode ................................................26
Factory Default .....................................................26
Remote Control Unit ............................................ 27
Troubleshooting .................................................. 29
Specifications ...................................................... 29
Warranty ...............................................................31
-3-
Page 4
Cautions and Warnings
1. Do not install the XR9 in a position that hinders
your view through the windshield, or obstructs viewing of the dashboard indicators and displays.
2. Do not install the unit where it may obstruct the
operation or deployment of safety devices, such
as airbags, etc.
3. Do not allow operation of the unit to detract from
safe driving practices; remember that you are
responsible as the vehicle operator to adhere to
all safe driving and traffic regulations.
4. This device complies with Part 15 of the FCC Rules.
Operation is subject to the condition that this device
does not cause harmful interference.
5. By adhering to these warnings and safety considerations, serious accidents and/or personal injury can
be avoided.
Introduction
The Audiovox XM XR9 Satellite Receiver processes the
satellite signals received by the externally mounted antenna
(purchased separately as part of the Home, Vehicle or Boom
Box Kits). The XR9 recognizes and decodes the incoming
XM® program information and provides an audio signal to
your radio or other audio output equipment.
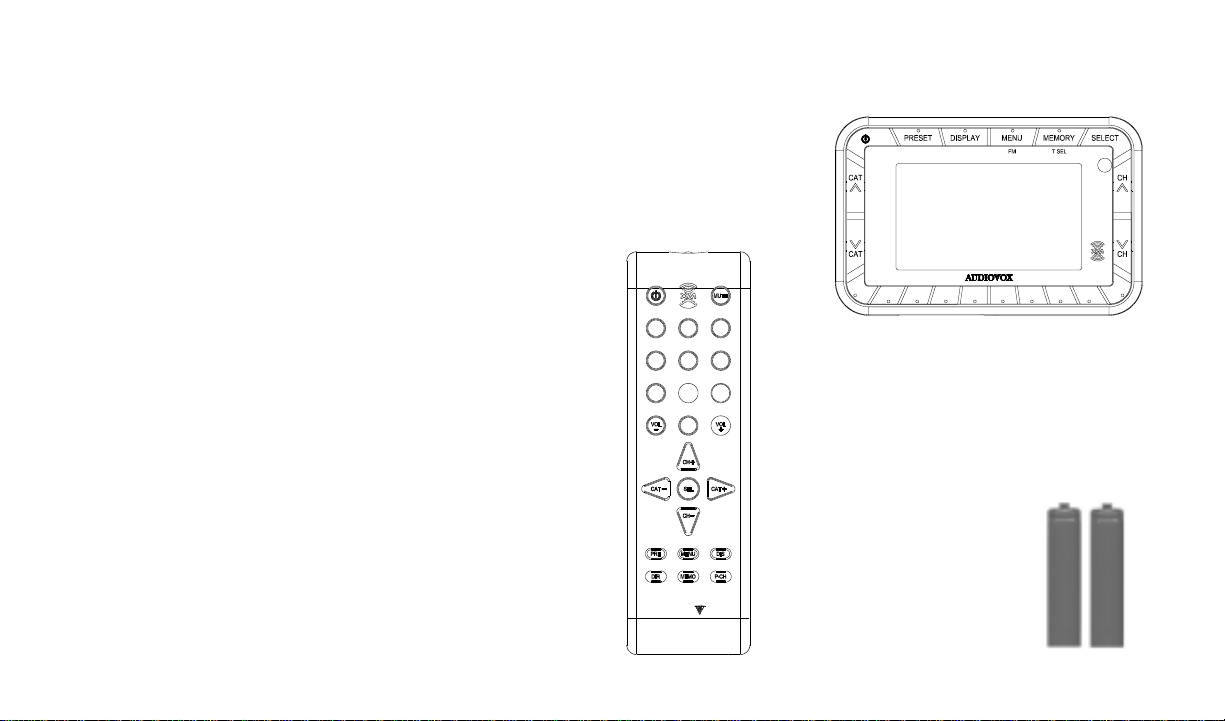
XR9 System Components
XM Receiver
Model XR9,
P/N144-2450
1 2
5
4
7 8 9
0
AUDIO OX
1
2
3
6
Remote Control Unit
P/N136-3773
Batteries for
Remote, (2) “AAA”,
P/N156-2215
5
3
4
6789
SATELLITE
RADIO
0
-4-
Page 5

NOTE: The XM® signal can be received and
processed virtually anywhere as long as there
are no obvious satellite signal obstructions
such as nearby buildings, high terrain,
parking garages or tunnels.
The XR9 is typically installed in an
accessible location of the vehicle (dash area),
consistent with line-of-sight operation of the
remote control, and/or within easy reach of the
driver. For home use, situate the XR9
close to your stereo receiving equipment.
Enjoying Your XM® XR9
You can begin to enjoy XM® Satellite Radio as soon as
the XR9 and Kit installation are complete:
1.Set up your Audiovox XR9 using the installation
instructions included in your Home Kit, Vehicle
Kit or Boom Box Kit, or with the help of a professional installer.
NOTE: Refer to Antenna Aiming (page 18) during
the installation procedure.
2. When power is available to the unit, press the Power
(
) button to turn on the XR9.
3. The XM logo (
followed alternately by the XM preview channel. If
this is the first time using the XR9, the screen will
alternately display the Preview channel screen and
a number of messages, including: “Activate Your
XM 1-800-XM RADIO”. If not, go to channel 1 using
the CH Up/Down buttons.
4.To obtain the XM identification (ID) number, tune to
channel 0 or press the MENU button. The Main Menu
page appears with the Radio ID option highlighted.
Press the SELECT button and the 8-digit XM ID
number will appear. Write the number here for
future reference.
5.Activate your XM® radio service ---- it’s easy . You
have one of two choices to activate your service:
(a) Visit the website at XMRadio.com and click on
the “Activate Radio” section. You will then need
to follow some simple directions and provide XM
withsome basic information in order to activate
your service.
) appears on the display
-5-
Page 6
(b) Call XM at 1-800-XM RADIO (967-2346). One of
XMs friendly Customer Care representatives
will take the necessary information and walk
you through the activation process.
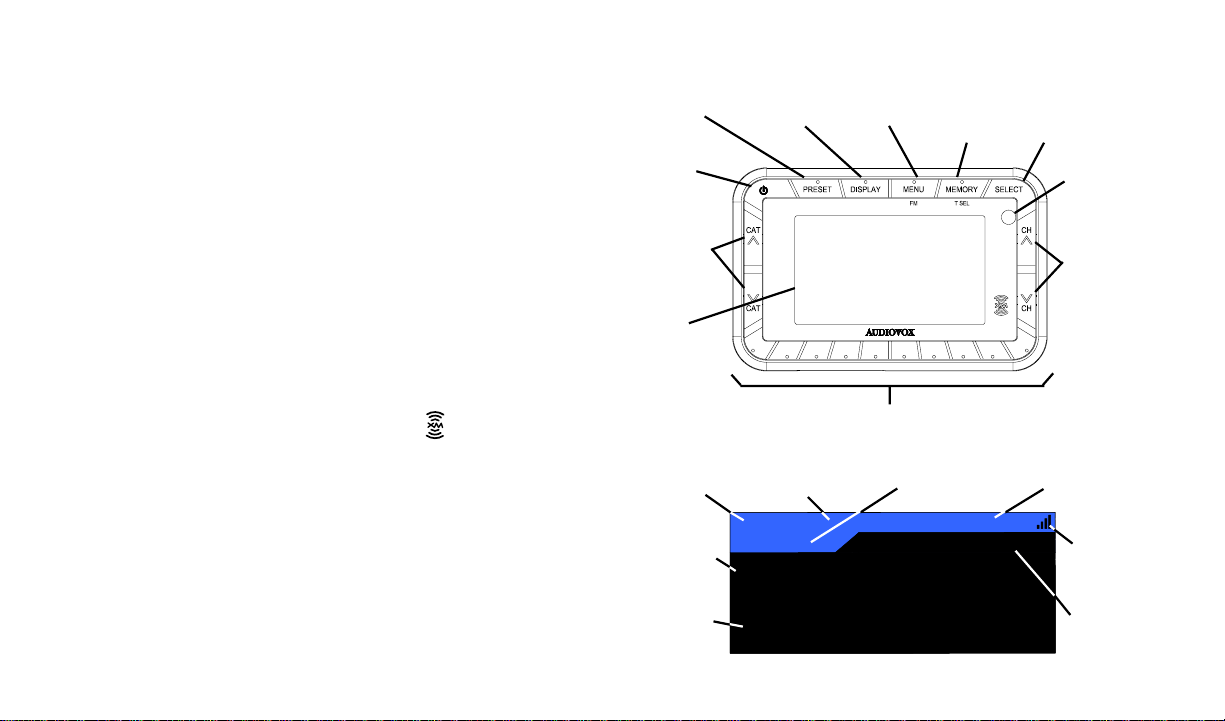
XM XR9 Controls
The Audiovox XM® XR9 Unit provides 10 control buttons
and 10 number keys.
Power Button:
This button applies power to and removes power from
the XM® XR9 as follows:
1. A momentary press of the power button turns on
the receiver, and is accompanied by a confirmation
beep tone. The XM logo/name (
appears on the LCD display for 3 seconds, followed
by the Preview screen (if turned on for the first time),
or by the tuning mode in effect when the unit was
last powered off.
2. A momentary press of the power button turns off
the receiver. While the unit powers down, the
Audiovox logo appears for 2 seconds and the
unit turns off.
) initially
PRESET/DIRECT
BUTTON
POWER
BUTTON
CATEGORY
SEARCH
(UP/DOWN)
BUTTONS
LCD
DISPLAY
3-DIGIT CHANNEL
NUMBER
AUTO SIZING/
SCROLLING
ARTIST NAME
AUTO SIZING/
SCROLLING
SONG TITLE
DISPLAY
BUTTON
1
MENU (FM)
BUTTON
5
3
2
4
PRESET (NUMBER) BUTTONS
MEMORY
(T-SEL)
BUTTON
6789
Default Screen
CATEGORY
NAME
74
Jazz & Blues
A
PRESET BANK
NUMBER
B.B. King
Take It Home
SATELLITE
RADIO
9:38AM
Bluesville
SELECT
(ENTER)
BUTTON
INFRARED
SENSOR
CHANNEL
UP/DOWN
BUTTONS
0
TIME
INFORMATION
SIGNAL
STRENGTH
INDICATOR
CHANNEL
NAME
-6-
Page 7

Channel Up/Down Buttons and Select Button:
The CH
gating through the various lists and option menus available on the unit. In the default mode, these buttons provide sequential tuning through the available program
channels. The Up (
one channel, while the Down (
tunes down one channel. When in the list or menu mode,
pressing the CH
tively, through the various menus and lists. The current
selection from the list will be highlighted on the display.
When the item is highlighted, press the SELECT button
to enter the selection.
Select Button:
In the default mode, when the SELECT button is pressed
and held for at least 2 seconds, the channel listing appears. During normal operation, the SELECT button is
used to confirm and/or enter desired functions.
Category Buttons:
The CAT
the channel groups based on content category . By pressing the Channel Up/Down buttons, the user can then
scroll up or down through the channels within that cat-
∧/∨ buttons are the primary controls for navi-
∧ ) button, when pressed, tunes up
∨ ) button, when pressed,
∨ and ∧ scrolls down and up, respec-
∧/∨ buttons allow the user to advance through
egory. Once a choice has been made, it can be entered
by pressing the SELECT button.
Memory Button (T SEL) Function:
This feature allows the user to capture and store the current program data information (Channel Name & Number/Artist & Song T itle). You can store up to 30 Artist/Song
Title combinations. The XR9 also has the capability to
search the current incoming XM signal, and thereby alert
you if it matches the Artist/Song title stored in XR9 memory .
Display Button:
The DISPLAY button allows the user to choose one of
several ways of presenting the Artist, Song Title and data
service information on the LCD screen.
Menu (FM) Button:
The MENU button is used to access “Main Menu” options
which allows the user to make feature function adjustments to suit your own personal preferences. Upon entering the main menu mode, use the Channel Up/Down
buttons to highlight the desired function and then press
the SELECT button to enter. Pressing and holding the
MENU button will enter FM Frequency setting mode which
will allow you to quickly make frequency changes as required.
-7-
Page 8

Preset Button:
Each momentary press of the PRESET button allows the
user to switch between 3 banks of Channel presets (10
presets each A, B, and C, plus Direct (Dir) channel entry.
When in any of the three preset banks, momentarily pressing any of the number buttons will recall the stored channel. In the Direct (Dir) mode, use the number buttons to
directly enter the desired channel number.
Keypad Buttons 0-9:
These buttons are used to directly enter a desired channel number. They are also used when entering and recalling preset channel numbers into memory.
Basic Operation
With the unit properly installed, activated and connected
to your home or vehicle audio system, proceed as follows:
1. Press the Power button; the XR9 turns on and
the XM logo appears for 3 seconds followed by
the default display for the channel and tuning mode
in effect prior to turnoff.
2. Press the Channel Up/Down buttons to select and
play the desired channel, or use the Category Up/
Down buttons to tune and select a desired channel based on genre.
T uning By Category
When in Category T uning Mode , each momentary
press of the Category Up/Down Button(s) advances
through the available Genres:
L N A
L N A
L N A
ME 1
M E
M E
M E
M E
A
R
C
H
CATEGORY NA
1 CHANNE
2
3
4
CHANNEL N A
CHANNE
CHANNE
1. Using the CH Up/Down buttons to select the desired channel.
2. Press the SELECT button to select that channel.
3. Once the channel has been selected, the unit will
revert to the default screen and your selection
will be played.
Channel Listing Options
This feature allows you to view what is playing on other
channels without having to change the current channel
you are listening to. The content listing options are selected by using the DISPLAY button. When the default
screen is displayed on the LCD, pressing and holding
-8-
Page 9

the SELECT button will display all the available channel
numbers and channel information. The first press will
display the channel name. The second press of the
DISPLAY button will display all currently available artists. The third press of the DISPLAY button will display
song titles.
While viewing the Channel List, pressing the Display
button changes Channel List to Artist List to Song List.
The available content listing now displays information
by the Artist Name.
1 CHANNEL N A M E
2 CHANNEL N A M E
3
4 CHANNEL N A M E
Preset B
1 A R T I S T N A M E
2 A R T I S T N A M E
3 A R T I S T N A M E
4 A R T I S T N A M E
Preset A
CHANNEL N A M E
A
1 S O N G T I T L E
R
2 S O N G T I T L E
3 S O N G T I T L E
C
4 S O N G T I T L E
H
A
R
C
H
Preset C
A
R
C
H
CATEGORY NAME1
1 A R T I S T N A M E
2 A R T I S T N A M E
3 A R T I S T N A M E
4 A R T I S T N A M E
A
R
C
H
CATEGORY NAME1
1 S O N G T I T L E
2 S O N G T I T L E
3 S O N G T I T L E
4 S O N G T I T L E
The DISPLAY button is also used during category tuning. Consecutively pressing the DISPLAY button while
tuning by category will display the Channel Name, Artist
Name or Song Title within the selected category.
While the preceding screens are displayed, pressing
the CH Up/Down buttons allow navigation through the
list. When the desired selection is highlighted, press
the SELECT button and your selection will be played.
Direct T uning
A
Channels can also be directly accessed by pressing the
R
PRESET button until Dir appears; then use the 0-9 number keys to numerically enter the desired channel. Once
C
H
the desired channel number has been entered, wait 3
seconds until the channel automatically plays.
Setting/Using Channel Preset Buttons
The unit contains 10 preset buttons. There are three banks
of preset memory locations offering a total of 30 presets.
These banks are designated A, B and C and can be selected using the PRESET button. The display in the upper
left corner changes to show the corresponding Preset
bank. Each bank will store 10 user-preferred channels.
-9-
Page 10

Select the desired channel you wish to save into memory
by using the CH Up/Down buttons, the direct tuning method
or the category tuning method. With the desired channel
playing, press and hold any of the numbered keypad buttons (0-9). A confirmation tone is heard, and a confirming
message (Channel Stored) is displayed. Continue this
procedure for storing all desired channels. To retrieve a
preset channel, momentarily press and release the number button corresponding to the desired channel. A list of
the preset channels can also be accessed through the
category tuning method.
Display Button
Pressing the DISPLAY button from the Default display
toggles between the artist name/song title screen, large
letter format, or artist name/song title with data service
ticker (sports, stock options, etc.) screen. When the letter size changes, the field will scroll. This feature is
useful when viewing the display at a distance.
74
Jazz & Blues
A
9:38AM
Bluesville
10
Country
A
12:34AM
Channel Stored
America
-10-
B.B. King
Take It Home
74
Jazz & Blues
A-3
9:38A M
Bluesville
B. B. King / Take I
XMSR 30.00
Page 11

Memory Button (T SEL Function):
This feature allows the user to capture and store the
current program data information (Artist & Song title)
with up to 30 listings (30 Artist/Song Title combinations).
The unit also has the capability to search the current
incoming XM signal and alert the user when a saved
song is being played.
1. While the XR9 is in any of the standard display
modes, momentarily pressing and releasing the MEMORY button stores the current program
data information within the unit’s memory. A
pop-up screen (Artist/Song Data Saved) appears
for 1 second, confirming your selection.
10
Country
A
12:34 A M
America
Artist / Song
2. By holding down the MEMORY button for 3 seconds, the
stored memory information is displayed on the LCD
screen in list format. Use the Channel Up/Down buttons
to scroll through the 30 listings and press the SELECT
button to view the information. This function allows you to
recall information regarding the Artist/Song Title for your
own personal review.T o return to the default tuning mode
press and hold the MEMORY button for 3 seconds.
01 David Bowie/Fame Dav
02 B.B. King/Take It Home
03 Sting/Sacred Love Sting
04 Coldplay/Clocks Coldpla
NOTE: If a saved song is entered twice to the
same memory location number, an
Already Stored screen will appear
10
Country
A
12:34A M
America
Data Saved
Already Stored
-11-
Page 12

Momentarily pressing the SELECT button will exit
the current artist/song title information and return
to the memory list.
3. When the T SEL function is active, each time the
XR9 is turned on, it automatically searches
the incoming signal to determine if a match exists
between the signal and the currently saved information stored in receiver memory. If one or more
matches are found, an audible beep tone will be
heard indicating that a match has been found. The
display then reverts to the Song Found screen
which displays the current matches. You can now
select the Artist/Song that you wish to listen to.
a.If one or more matches are found, a display list
appears, and allows you to scroll through the list
of songs using the CH Up/Down buttons. Once a
song is found, it can be selected by pressing the
SELECT button, and the display will revert to either of the selected display modes.
b.If a selection is not chosen within 10 seconds
after the last action, the screen will revert to the
previously selected display and tuning mode.
NOTE: Play of the current selection will con-
tinue until a new selection is made.
-12-
Page 13

4. If the MEMORY button is pressed to save a currently-playing selection, and all of the memory
spaces are full, Memory Full will flash on the display for 1 second.
01 David Bowie/Fame Dav
02 B.B. King/Take It Home
03 Sting/Sacred Love Sting
04 Coldplay/Clocks Coldpla
1 Black Eyed Peas / Jo ..
Stored Data
David Bowie
Fame
ress Memo t o D elete
P
10
Country
A
12:34AM
America
Memory Full
To delete a selection from memory, press and
hold the Memory button to display the list; then
highlight the selection you wish to delete using
the Channel Up/Down buttons. Once highlighted,
press the SELECT button to choose the song to
be deleted. With the song and artist selection
displayed, press the MEMORY button. A pop-up
screen will appear (Memory Delete). Highlight
Yes and press the SELECT button to delete the
selection.
-13-
Stored Data
1 Black Eyed Peas / Jo ..
Davi
Memory Delete
ul Taylor
Fame
Press
Yes NO
dercover
Memory to Delete
Page 14

Menu Display Operations
To enter the Menu Options page, press the MENU Button. The Main Menu list will appear on the LCD display.
Using the CH Up/Down buttons, highlight the option you
wish to adjust and then press the SELECT button.
The following options are available:
Menu Descriptions
Radio ID
Displays your 8 digit XM ID number. No
adjustments are allowed in this mode. To exit this
option, press the SELECT or MENU buttons.
Main Menu
Radio ID
• Radio ID • Channel Add/Skip
• Display Setting • Memory Option
• Audio Options • Time Options
• FM Options • Stock Options
• Confirm T one Option • Info Extras
• Lock Option • Info Display Options
• Antenna Aiming • Factory Default
If, while in the menu screen function, a button is not
pressed within 10 seconds from the previously selected
function, the unit exits the menu screen function and
reverts to the default screen display.
-14-
36DH3084
Display Setting
The following adjustments are possible:
Dimming Control
Contrast Control
To enter any of these modes, use the
buttons to highlight the option you wish to adjust
and press the SELECT button. Upon entering
either the contrast or dimming control, a 10segment horizontal bar graph is displayed with
left and right directional arrows.
CH Up/Down
Page 15

The current numerical setting (1-10) is indicated
above the bar graph. Pressing the CH Up/Down buttons adjusts the bar graph indication and function
accordingly.
D
Dimming Control
Contrast Control
isplay Setting
Dimming Control
6
Audio Options
The following adjustments are possible:
Equalizer Control
V olume Control
Upon selecting this option, use the Channel Up/
Down buttons to highlight either option and press
the SELECT button to enter.
When Equalizer Control is selected, a dual graph
appears representing Bass and Treble adjustments. Use the Channel Up/Down buttons to high
light the desired function and press the Category
Up/Down buttons to make the adjustment. When
either setting is flat (Bass or Treble equalizer setting off) the indication will be at mid-range; any setting to the left (-) or right (+) indicates a respective
decrease or increase in the Bass or Treble setting.
Audio Options
Equalizer Control
Volume Control
Bass
Treble
Equalizer
Control
Equalizer Control
Bass
Treble
When Volume Control is selected, a 32-step (0-31)
bar graph appears; adjust the volume using the CH
Up/Down buttons. No button activity for 10 seconds
will exit this function.
Audio Options
Equalizer Control
Volume Control
Volume Control
Equalizer Setting
Volume Control
16
NOTE: To prevent distortion caused by overdriving
the audio playback device input, it is
recommended that you adjust the volume
of the XR9 at mid-range.
-15-
Page 16

FM Options
The following adjustments are possible:
NOTE: The internal wireless FM transmitter allows
you to play the XR9 audio through any standard FM receiver, eliminating the need to
hardwire connections.
FM On/ Off
Frequency Setting
FM On/Off:
Upon entering this mode, press the CH Up/
Down buttons to toggle between the FM ON
or FM OFF function/display selection. To select
and/or exit this function, press the SELECT
button. (No button activity for 10 seconds will
exit this function.)
FM Options
FM On/Off
Frequency Setting
FM Options
FM On / Off
Frequency Setting
Frequency Setting:
Upon entering this mode, any FM transmitter frequency can be chosen using the CH Up/Down
buttons for frequency selection. The FM frequency
range from 88.1 to 107.9MHz is represented by a
horizontal graph; use the Channel
Up/Down buttons to select the desired frequency.
Press the SELECT but
Frequency Setting
ton to enter the new fre
quency setting, or
89.3MHz
press the MENU button
to return to the menu
options page with no change to frequency.
Confirm T one Option
When this mode is entered, you are provided with
an On or Off option whereby you can select
whether or not a confirmation tone will be heard
each time a preset button is pressed or an alert
sounds. When the option is highlighted, press the
SELECT button to enter.
Confirm Tone Option
NOTE: It is recommended that you turn the FM
Transmitter off if you are using the low level
audio outputs in your particular application.
-16-
On
Off
Page 17

Lock Option
When this feature is selected, the following options
appear on the display:
Lock/UnLock
Edit Code
Lock / Unlo ck
Edit Code
Lock Option
Upon entering this mode, the user is prompted to enter
a four digit numerical code that is used to lock/unlock
channel access. Once the code has been entered, press
the SELECT button; the channel list will be displayed
with the current channel in play highlighted. Use the
Channel Up/Down buttons to navigate the list and highlight the channel to be adjusted.
Lock Options
Enter Code
Lock Options
Enter Code
***
*
Once a channel has been highlighted, pressing the SELECT button displays a check mark (
9) next to the chan-
nel and prevents the channel from being accessible during any of the tuning modes. Locked channels can be
accessed only by direct channel number entry, at which
time the user will be prompted to enter the previously
stored 4-digit code. Once the correct code has been
entered (SELECT), the audio begins to play. The channel returns to the locked status if the channel is changed
or the vehicle/unit is turned off (or by returning to this
menu and going through the same process to return the
channel to the list).
Lock/Unlock Default Code Function
The first time the lock/unlock function is accessed, the
user must enter the default lock code. The default lock
code is “0000”. This code can be maintained or
changed. To change the default lock code perform the
following procedure:
1.Press the MENU button to access the Main
Menu.
2. Use the Channel Up/Down buttons to highlight
the Lock Option and press the SELECT button.
3. Use the Channel Up/Down buttons to highlight
Edit Code and press the SELECT button.
4.Enter the default code 0000 and press the
SELECT button.
5.Enter new code using buttons 0-9.
-17-
Page 18

Lock Options
Enter Code
Lock Options
New Code
Lock Options
Enter Code
***
*
Lock Options
New Code
***
*
6.Press the SELECT button.
7.Confirm the new code using buttons 0-9 and
press the SELECT button.
8.The lock code is now changed.
Antenna Aiming (Home Installation)
Upon entering this mode, two 7-segment vertical bar
graphs are displayed representing terrestrial (tower) and
satellite transmitters. The
signal strength is displayed
Antenna A iming
by the respective graph
segments. Position the
antenna to optimize either
the satellite or terrestrial signal.
The current setting is indicated by number of bars in the
graph. Moving the antenna location should maximize the number of bars in the respective graph, thus ensuring optimum
reception. To exit this function, press the SELECT Button.
NOTE: Terrestrial repeaters are typically used in large
urban areas where structures may affect the line
of sight satellite signal. Terrestrial signals
may not be available in your geographic location.
Channel Add/Skip
Upon entering this mode, a channel list is displayed with the
current channel in play highlighted. Use the Channel Up/Down
buttons to navigate the list and highlight the channel to be
adjusted.
Channel Add/Skip
4 The 40s
5 The 50s
6 The 60s
7 The 70s
Channel Add/Skip
4 The 40s
5 The 50s
6 The 60s
7 The 70s
Channel Add/Skip
4 The 40s
5 The 50s
6 The 60s
7 The 70s
-18-
Page 19

Once a channel has been highlighted, pressing the SELECT
Button displays a check mark (
9) next to the channel, and
prevents the channel from being accessible during any of the
tuning modes. Skipped channels can only be accessed either through direct channel number entry or by returning to
this menu and going through the same process to return the
skipped channel to the list. Upon adding a channel, the check
mark is removed from alongside the channel number/name.
Memory Options
In this mode, the user can turn the Memory Search
Function (T SEL) ON or OFF. In addition, all 30 Memory
Locations can be cleared.
On the display, the top line displays the text,Memory
Options.
The following adjustment options are possible:
1. Clear all Memory Locations. Press the SELECT
button; a prompt display screen appears confirming Are You Sure? Select Yes or No and press the
SELECT button.
2. T Select On/Off Options: - All Off,All On, User Se-
lected Only On.
3. T Select Search Options: - All,Artist Name,Song
Title
Clear All Memory
Yes No
Clear All Memory
Confi rm
Yes No
NoYes
Clear All Memory
Confirm
Yes No
Yes
NoYes No
Time Options
The following adjustments are possible:
Time
Clock
Set Alarm
Sleep Mode
Clock
Set Alarm
Sleep Mode
Options
Upon entering this mode, use
the Channel Up/Down buttons to highlight the desired
function and press the SELECT button.
NOTE: No button activity for 10 seconds will also
Clock
exit the desired (highlighted) function.
When entering this menu option, you can set up the
clock shown on the default display, based on the
format desired, the time zone in which you reside
-19-
Page 20

Daylight Savings Time, if used. The clock data is pro-
(
vided via the XM channel, and will update based on
the received signal.
Clock
Time Format
Time Zone
Daylig ht Savin g T ime
(GMT-09:00) Alaska
(GMT-08:00) Pacific
(GMT-07:00) Mountain
GMT-0 6:00) Central
Time Zone
Time Format:
The clock format option provides:
12 Hour (Default)
24 Hour
Use the Channel Up/Down buttons to highlight
the desired format and press the SELECT button.
Time Zone:
The Time Zone option provides:
(GMT-9:00) Alaska
(GMT-8:00) Pacific
(GMT-7:00) Mountain
(GMT-6:00) Central
(GMT-5:00) Eastern
(GMT-4:00) Atlantic
(GMT-3:30) Newfoundland
-20-
Use the Channel Up/Down buttons to highlight
the desired time zone and press the SELECT
Button.
Daylight Savings Time (DST) Observance:
Activate this function if your area is subject to DST;
press the Channel Up/Down buttons to toggle between DST Observed (default) or DST Not Ob-
served.
Clock
Time Format
Time Zone
Daylig ht Sa ving T ime
Daylight Savings Time
DST Observed
DST not Observed
NOTE: When the XR9 has not been turned on
or has been removed from the docking
port for any length of time be sure to
position the antenna to receive the
satellite signal so the time can be
automatically updated. If the time information has been lost, the XR9 will not display
the time information and preprogrammed
alarms will not be triggered until the XR9
updates the time information using the
satellite signal.
Page 21

Set Alarm:
When this menu option is highlighted and selected,
you will be able to set the unit to turn on at a specific
time. The last selected channel prior to shutdown
will be present when the Alarm feature is activated.
Additionally, a series of beep tones will be heard.
Time Options
Clock
Set Alar m
Sleep Mode
Set Alar m
Alar m On / Of f
Alarm Time
Alarm On/ Off
Alarm On/Off
On
Off
SELECT Button for desired alarm status. When
the alarm is on, the time will be displayed on
the default screen in reverse image.
Alarm Time
When this menu option is highlighted and
selected the current alarm setting is displayed.
The factory default is 12:00PM. Use the category
Up/Down buttons to highlight either the hours,
minutes or AM/PM for adjustment. Once highlighted, use the Channel Up/Down buttons
to adjust the selection. AM or PM will also
switchautomatically when the AM or PM threshold has been exceeded. When the desired time
i s displayed, press the SELECT button to enter.
Press any button on the front panel to silence the
alarm tones. The alarm will trigger again at the set
time unless the Alarm Off feature is selected under
the Set Alarm function.
Set Alarm (Default-Off)
Use the Channel Up/Down buttons to toggle
between Alarm On or Alarm Off and press the
NOTE: Loss of the satellite signal by the XR9
will result in a series of alarm tones only.
Sleep Mode
In this mode, you have the capability of program
ming the unit to shut off after a selected period of
time. The screen displays Sleep MODE on the
top line, with optional time settings as follows:
-21-
Page 22

Stock Ad d
Stock Options
Stock On /Off
Stock Er ase
Sleep Off (Factory Default)
60 minute
120 minutes
180 minutes
Sleep Off is the factory default setting. Use the
Channel Up/Down buttons to scroll through the
desired sleep times. When the desired time is
highlighted, press the SELECT button. The unit
will now turn off after the selected time has expired.
Time Options
Clock
Set Alarm
Sleep Mode
Stock Options
The following stock options are available:
Stock On/Off
Stock Add
Stock Erase
Stock On/Off
When this menu option is highlighted and
selected, you will be able to turn the stock ticker
Sleep Mode
Sleep Off
60 Minutes
120 Minutes
180 Minutes
on or off. Highlight the desired function, on or off,
using the Channel Up/Down buttons and press
the SELECT button to enter. When the stock
ticker is off, stock information will not be shown
when the DISPLAY button is pressed.
Stock Op tion s
On Off
Stock Add
When this option is highlighted, press the
SELECT button to display Enter Stock Symbol
screen which shows a maximum of 8 character
spaces for symbol entry and search. To perform
an alphanumeric symbol search, use the
Channel Up/Down buttons to select the first
character in the symbol name to be entered;
Searching will momentarily appear on the
display. Then press the SELECT button to
access the stock list beginning with that
character.
-22-
Page 23

Pres
s CH to Change Char
B A
Searching ...
Press CH to Change Char
B A
BAA
BAB
BAC
Press CH to Change Char
B A B
Stored
You now have the option to either search this list
for the desired symbol or further fine-tune your
search by entering the next significant character.
Use the Channel Up/Down buttons to search
the list or, by pressing the Category Down button
and then the Category Up button, highlight the
next character. Repeat this procedure to access
other required characters and then press the
SELECT button to enter the stock symbol list.
After entering the each character, search the list
for your complete stock symbol using the
Channel Up/Down buttons. When the symbol is
located, press the SELECT button to enter. A
Stored message momentarily appears on the
display to confirm your selection.
-23-
Stock Erase
When this option is highlighted, press the
SELECT button to display the erase options;
Erase One and Erase All.
If Erase One is highlighted and selected, a list
of all currently stored stock symbols is displayed. Using the Channel Up/Down buttons,
highlight the stock symbol to be erased.
Stoc k Optio ns
Stock On /Off
Stoc k Add
Stoc k Erase
Erase
ne
Stock Options
Erase One
Erase All
ABC
ABD
ABE
ABF
O
Confirm
NoYes
No
Page 24

Once highlighted, press the SELECT button to display
the pop-up confirmation screen with the Yes/No
options. Highlight the Yes selection to erase the
current stock symbol. A pop-up screen appears to
confirm Stock Erased.
If Erase All is highlighted and selected, all of the
currently stored stock symbols will be erased from
memory if the Yes option is highlighted and selected.
Info Extras
When this option is highlighted, press the SELECT button to display the available Info Extras display options;
namely, Sports, News and Horoscopes.
When Sports is highlighted and selected, the following
list of sports venues appears:
• MLB
• NFL
• NBA
" Sports
" News
" Horoscopes
Info Extras
• NHL
• Nascar
• Golf
NOTE: Info Extras information is
subject to current availability;
check the XM website for
updates
• Tennis
• NCAA Basketball
• NCAA Football
Use the Channel Up/Down buttons to highlight the desired sport, and press the SELECT button to enter. Notice that sports leagues, such as Major League Baseball, is displayed with an arrow to the left; this means
that each team (or All Teams) is available for display
when highlighted and selected. Once selected, a box
appears next to the team name; press the SELECT button and a check mark appears within the box.
The remaining sports venues, such as Nascar, each
display a box adjacent to the name; when any of these
are highlighted and selected, a check mark appears
within the box.
Info Extras
" NCAA Football
" MLB
" NFL
" NBA
When News is highlighted and selected, the following
list of news categories appears on the display:
Info Extras
" Tor onto Blue Jays
!" All Teams
" Anaheim Angels
" Arizona DiamondBacks
-24-
Page 25

• Headlines
• World
• National
• Sports
• Entertainment
NOTE: News and associated options are only
available during XM Transmissions
Use the Channel Up/Down buttons to highlight the desired news report, and press the SELECT button to enter. Each item displays a box to the left; when any item is
highlighted and selected, a check mark appears within
the box.
When Horoscopes is highlighted and selected, each of
the 12 horoscope signs appears on the display with a
box next to the sign. When any sign is highlighted and
selected, a check mark appears within the box.
The Info Extras information, if selected, will appear on
the default display in either page mode or scroll mode
(See Info Display Options.) Please use the following
procedure:
1. From the Artist/Song Title default display, repeatedly pressing the Display button will cycle through
the following available display formats:
Artist/Song Title>Artist /Song Title (Large Font)>
Stock Ticker>Info Extras
NOTE: Stock Ticker and Info Extras display for-
mat will only be available if these features
have been activated by the user through
the Main Menu.
2. While in the Info Extras display mode, repeat-
edly pressing the SELECT button will cycle
through the various available Info Extras information. Info Extras information includes sports,
news and other additional information services.
The selected information type will be momentarily displayed in reverse image in the channel
name area on the display.
-25-
Page 26

Info Display Options
When this option is highlighted, two choices are
available:
• Display Mode
• Scroll Speed
Press the Channel Up/Down buttons and then the
SELECT button for the desired option.
Scroll Speed
When Scroll Speed is highlighted and selected,
Normal Speed and Slow Speed options are dis-
played. Use the Channel Up/Down buttons to high
light the desired speed and press the SELECT button to enter. If Slow Speed is selected, it takes
approximately 20 seconds for the ticker to scroll
across the screen; in Normal Speed, the ticker
crosses the screen in about half the time.
Display Mode
when this option is highlighted and selected, additional options, Scroll Mode and Page Mode, are
displayed. In scroll mode, the stock listings scroll
across the display screen; in page mode, each of
the stock listings appear for approximately 1 second on the left side of the display.
Factory Default
The Factory Default screen displays the text Factory
Default with the following adjustments:
Yes/No
Factory Default
Yes
No
Factory Default
Confirm
On Off
On Off
-26-
a
NoYes
Page 27

Upon entering this mode, pressing the Channel Up/Down
buttons toggles between the Yes or No function/display
selection. If Yes is chosen, the unit reverts to the
original factory settings for the following parameters:
• All Presets revert to empty
• Normal Tuning Mode
• Display Contrast to 50%
• FM Modulator to On
• FM Frequency to 88.1MHz
• Access to all skipped channels (Locked chan-
nels remain locked)
• Audio Output Level to 70%
• Memory Search On
• Memory Locations are erased
• 12 Hour Clock Format
• Eastern Time Zone
• Daylight Savings Time Observed
• Alarm Off
• Alarm Time 12:00PM
• Sleep Mode Off
Remote Control Unit
The wireless remote control supplied with the XR9 is
capable of operating most of the features from a remote location. Each button on the remote control functions in the same way as the button on the XR9 unit. For
a full description of a keypad button or function refer to
the preceding sections in this manual. For optimal operation of the remote control, always aim it toward the
Remote Sensor on the front panel of the main unit.
-27-
Page 28

Remote Control Unit
1
1 2
2
4
7 8 9
3
4
5
AUDIO OX
6
1. POWER Turns the XR9 on and off.
2. Presets 0-9 These buttons are used to directly enter a
desired channel number. They are also used when entering
and recalling preset channel numbers into memory.
3. CH+/- Used to access streams in ascending and descending
order. Also used for adjustments in the various menus.
4. PRE Used to switch between the three preset bands A, B
and C, and DIR (tuning).
3
5
6
13
5. MENU Used to access “Menu Options” which displays the
user setup menu plus other feature/function adjustments.
6. DIR Selects direct tuning using the preset buttons.
7. MEMO Used to capture and store current program
12
0
11
information.
8. P CH This button toggles between the current channel and
the previous channel that was being listened to.
9. DIS Allows the user to choose one of three ways of
presenting the Artist and Song title information on the LCD
screen.
10
10. SELECT Used to confirm selection in various lists
and menus.
9
11. CAT+/- Used to access categories in ascending and descending order.
8
7
12. VOL +/- Provide means of increasing and decreasing level
of speaker audio output when used with XB3 Boom Box.
13. MUTE Allows the user to silence the audio signal.
-28-
Page 29

Troubleshooting Specifications
TLUAF
ELBABORP
ESUAC
YDEMER
nonrut
yalpsid
eg
assem
yalpsid9RX
dnuosoNtonselbacoiduA.1
tonseod9RX
annetnakcehC
detcennoc
elbacrewop,esufnwolB
detcennocylreporpton
tonannetnaetilletaS
elbac
9RXotnoitcen
rewopkcehcesufkcehC
-nocetilletaskcehC
Audio Output
(100-250 ohms): 650mV RMS Maximum
Power Supply: 6 Volt, Negative Ground, DC Input
CAUTION: Use only the Audiovox-
ytluaf
rocitatsoiduA
ytiralcfossol
sielbacroannetnA
ycneuqerfrotaludomMF
citatssniatnoc
rodnevro
ycneuqerf
rellatsnimetsystcatnoC
approved adapter specified in the
Home (XH9) and Vehicle (XC9) kit
MFrehtonaothctiwS
for the XR9 Satellite Radio Receiver,
or the XR9 could could be severely
damaged.
tonannetnaelciheV
oidarotdetcennoc
nolangisoN
selcatsborofkcehC
annetnadnuorarorevo
.detcennoc
MFtcerrocnI.2
ycneuqerFrotaludom
.elbac
.oidardna
annetnaelcihevkcehC
Dimensions
(W x H x D): 1 10.0mm x 71.0mm x 26.0mm
otnoitacolegnahC
ybraenetanimile
).cte,segdirb(selcatsbo
9RXtaselbackcehC.1
MFrehtonatceleS.2
.ycneuqerfrotaludom
Weight 6.5 Ounces
(4.30” x 2.8” x 1.02” )
-29-
Page 30

THIS P AGE LEFT BLANK INTENTIONALL Y
-30-
Page 31

12 MONTH LIMITED WARRANTY
AUDIOVOX CORPORATION (the Company) warrants to the original retail purchaser of this product that should this product or any part thereof,
under normal use and conditions, be proven defective in material or workmanship within 12 months from the date of original purchase, such defect(s)
will be repaired or replaced with new or reconditioned product (at the Company's option) without charge for parts and repair labor.
To obtain repair or replacement within the terms of this Warranty, the product is to be delivered with proof of warranty coverage (e.g. dated bill of
sale), specification of defect(s), transportation prepaid, to an approved warranty station or the Company at the address shown below.
This Warranty does not extend to the elimination of externally generated static or noise, to correction of antenna problems, to costs incurred for
installation, removal or reinstallation of the product, or to damage to tapes, compact discs, speakers, accessories, or vehicle electrical systems.
This Warranty does not apply to any product or part thereof which, in the opinion of the Company, has suffered or been damaged through alteration,
improper installation, mishandling, misuse, neglect, accident, or by removal or defacement of the factory serial number/bar code label(s). THE
EXTENT OF THE COMPANY'S LIABILITY UNDER THIS WARRANTY IS LIMITED TO THE REPAIR OR REPLACEMENT PROVIDED ABOVE
AND, IN NO EVENT, SHALL THE COMPANY'S LIABILITY EXCEED THE PURCHASE PRICE PAID BY PURCHASER FOR THE PRODUCT.
This Warranty is in lieu of all other express warranties or liabilities. ANY IMPLIED WARRANTIES, INCLUDING ANY IMPLIED WARRANTY OF
MERCHANTABILITY, SHALL BE LIMITED TO THE DURATION OF THIS WRITTEN WARRANTY. ANY ACTION FOR BREACH OF ANY
WARRANTY HEREUNDER INCLUDING ANY IMPLIED WARRANTY OF MERCHANTABILITY MUST BE BROUGHT WITHIN A PERIOD OF 48
MONTHS FROM DATE OF ORIGINAL PURCHASE. IN NO CASE SHALL THE COMPANY BE LIABLE FOR ANY CONSEQUENTIAL OR
INCIDENTAL DAMAGES FOR BREACH OF THIS OR ANY OTHER WARRANTY, EXPRESS OR IMPLIED, WHATSOEVER. No person or
representative is authorized to assume for the Company any liability other than expressed herein in connection with the sale of this product.
Some states do not allow limitations on how long an implied warranty lasts or the exclusion or limitation of incidental or consequential damage so
the above limitations or exclusions may not apply to you. This Warranty gives you specific legal rights and you may also have other rights which vary
from state to state.
U.S.A. : AUDIOVOX CORPORATION, 150 MARCUS BLVD., HAUPPAUGE, NEW YORK 11788 z 1-800-645-4994
CANADA : CALL 1-800-645-4994 FOR LOCATION OF WARRANTY STATION SERVING YOUR AREA
128-6464
-31-
Page 32

© 2004 Audiovox Electronics Corporation
128-7220A
Page 33

Page 34

Page 35

 Loading...