

Page 1
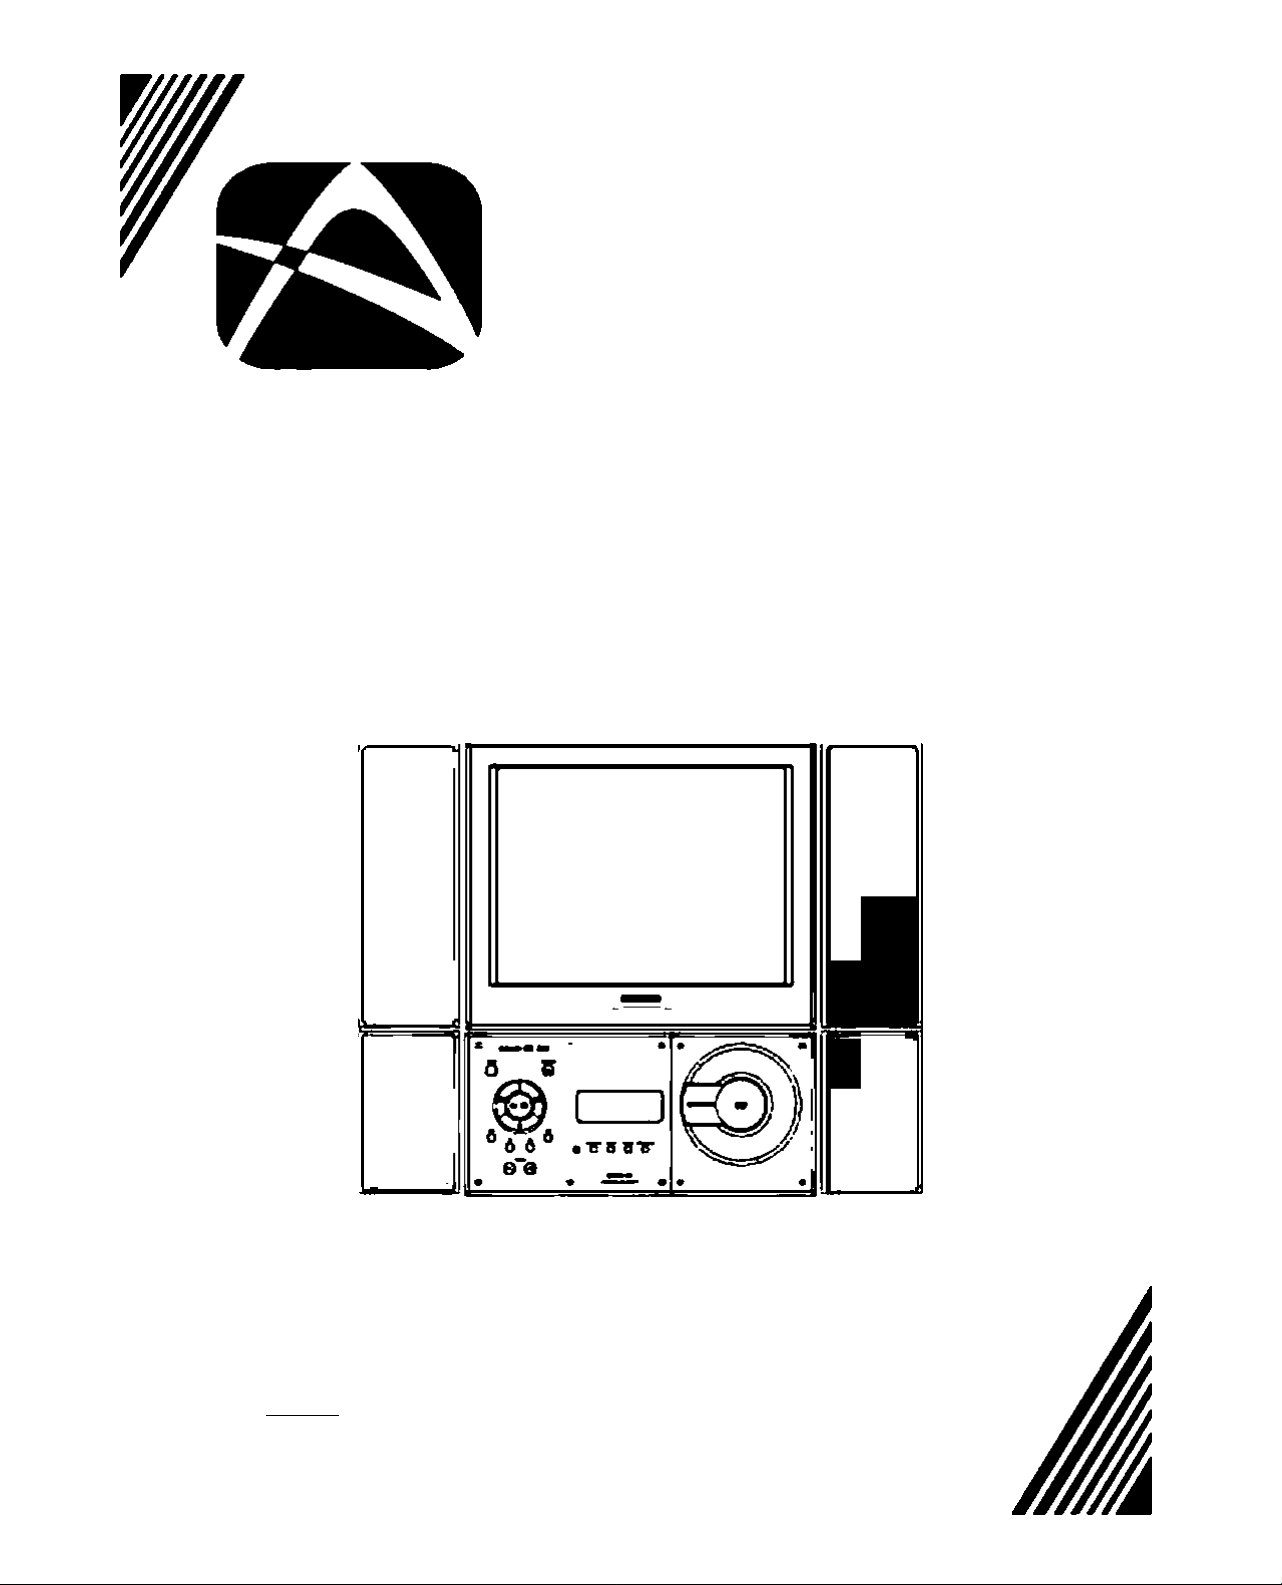
AUDIOTOX
ELECTRONICS CORP.
USER'S MANUAL
Multimedia DVD System
VE1510DV
Il
1M4S1 IgllOCRBY
OlOlTAU
D I O I T A L IBKELflfiS) №3
Page 2

Safety Instructions
Th« Lightning flash with the arrowhead symbol wrtNn an equUsterai triangte is
Intended to alert the user to the presence of uninsuiated t3ANGEROUS VOLTAGE*
CAUnOM
RI8K0^eL£CTRlC
A
serqtieiyciOTOomurKDiaMCgKHtonKL
SHOCK OO NOTORI
ID muGETMt or Kfcntc a»^QC
oo aMn (Oil
no UPMOMMLE PVUr» MCC
A
A
A
CAUTION:
TNs unR employs a laser system. To ensure the proper use of the unH. read this manual carefully
and keep it for future reference. To prevent direct exposure to the laser racttation. do not open the
cabinet Invisibie laser radiation when the cabinet is oper>ed or the interlocks are defeated.
DO NOT stare into the laser beams. Use of any controto. ar^ustments, or procedures other than
those specified herein may result in hazardous radiation axposurel
within the product's enclosure that rr^ be of sufUdent magnitude to constitute a
risk or electric shock to persons.
The Exdarrwtion point wKhin an equilateral triangle la intended to alert the user
to the preserrce of tnYX>rt8nt operatmg and mainienance (servicfr)g irtstrucdons In
the literature accompanying the product)
CLASS 1 LASER PRODUCT
CAUTION
Page 3

Fedeml Commuirtcaflen CommlMlon InfermatSon
The has been tested and found to comply wtth the limts for a TV Broadcast Receiver,
pursuant to Pari ISof the FCC Rules. These ImRs are deslgrted to provide reasonable protection
against harmful Irrterference In a residential instatlation. This equlpfn«^ generates, may cause harmful
interfBfer>ce to radfo oommunicatione. If not Installed equipmerYt does cause or receive Interference,
which can be detennined by turning equipment off and on. the user is encouraged to try to correct the
interference be the V the followlr>g measures:
Reorisnt or relocate the TV antenna.
Increase the separation between TV end other equipment
Connect TV into separate outlet from other equipment
Cormjl the deafer or an eoqMrler>ced radkVTV technician for help.
FCC Ceubon: Any changes or modMIcatlorts rtot expressly approved by the party responsfoie, for
oompiarKa could void the user^ authority to operate this equipment
Important Safety Inelnictiofis
• Read Instructions - All the safety and operating Instructione should be read before Ihe product is
operated.
• Retain Irwtructlons • The safety and operating Inetructiona should be retained for future references.
• Heed Warnings • Al N^nlrtgs on the product and In the operation ktttructlons should be adhered to.
• Follow Instructfons - All Operating end user Instructkms should be fofowed.
• Cteaning - Unplug this product from the wal outlel before cleaning. DO NOT use iQuId deaners or
aerosol cleaners. Use damp CMh for cleaning.
• Altechmente • DO NOT use attachments not recommsnded by the product rrwxifscturer they may
cause hazards.
• Mounting • DO NOT plecs tNs product on an unstable cart stand, tripod, bracket, or table.
The product may tell, causing serious Injury to a chid or adult and serious damage to the product
Use only wtth a cart stand, tripod, bracfcst. or table recommended by the manutecturer or sold with
the product Any mounting of thte product should folow the manutectura's Instructions, and should
use a rrKMjntIng accessory recommended by the mamifBcturer.
• Heat • The Product should be situated away from heat source such as radiators, heat registers,
slaves or other products (Including ampUflers} that produce heat
• \hteter - DO NOT use this product near water. For example; Avoid piecing It near bathtub, wa^bovri.
kitchen sink, or laundry tub, in a wet basement, or near a swimmtog pool. etc.
• Cebinel Slots • NEVER push objects or any kind into the unit through the cabinet slots as they may
touch dar>gerous vottegs points or short out parts that could result in a flna or electric shock.
NEVER spll IqtAl of any klr>d on Ihe product
• Vtentilation • DO NOT block any verttRatfon opanir>gs. Inttell In aooordanoe with manutecture's
instructions. Slota and openings In the cabinet and the back and bottom are provided tor ventftalion,
and to ensure relM)le operation of the product and to protect ft from Overheating. These openings
must NOT be blodted or covered. There should be at least 10cm of spece from these openings.
The openings should never be blocked by placing the unit on a bed. rug or other similar surtece.
This product should NOT be pleoed in a bult*in irwtellation such as s bookcase unless proper
ventilation is provided.
• Grounding or Poiarizatlon -This product may be equipped with e polarized alternating current line
plug (a plug hiring one Made wider then the other). This plug vA fit the povrer outlet only one way.
This Is a safety feature. If you are un^e to Insert the plug fully into (he outlet, try reversir>g the plug.
If the plug should still tel to fit. contact your electrician to replace your obsoieto outlet.
DO NOT defeat the safety purpose of the polartzed plug.
Page 4

Important Safety Instructions (continued)
• Power Cord Protection • Power simply cords should be routed so teat teey are not likely to be
walked on or plr>ched t^ items placed upon or against teem. Pay perticuiar attention to cords at
plugs, convenlenoe receptacles, and tee point where they exit from tee product
• Power Sources - This product should be operated only from tee type of power source Indcated on
tee rear panel. If you are not sure of tee type of power supply to your home consult your product
dealer or local power corr^ny.
• Lightning - For added protection for this product during a lightning storm, or when it Is left unattended
and unused for a long period of time, unplug It from tee outlet arxl disconnect tee antenna or cable
system. This wll prevent damage to the product due to Ightning and power>ilne surges.
• Power Lines - An outside antenna system should not be located in the vldnlty of overhead pcwer
lines or other electric light or povrer circuits, or where It can fol Into such power Bnes or circuits.
When Installing an outside antenna system, extreme care should be taken to keep from touching
such power lines or circuits as contact with them might be fatal.
• Overtoad - DO NOT overloed wall outlets, eoctenslon cords or integral corrvenlence receptacles as
this can result In a risk of fire or electee shock.
Damages Requiring Ssrvtes • Unplug this product from ths wan outlet end refer servicing to
qualified service personnel under the followtng conditions :
• When tee power-supply cord or plug is damaged.
• if liquid has been spied, or <to|acts have follen into tee product
• If the product has been exposed to rain or water.
• if the product does not operate гюгтвПу after following the opereting Instaictiona.
Ad)ust only those controls teat are covered by the operating instructiortt as an Improper adjustment
of other controls may result in damage and will often require extensive work by a qualified technician
to restore the product to Its normal operation.
• If the product has been dropped or damaged In any way.
• VNteen tee product exhibits a distinct change in performance - this Indicates a need for service.
• Replacement parts - When replacemertt parts are required, be sure tee senrice technician has used
rei^acement parts spedfled by tee manufacturer or have tee same characteristics as tee original part
UNAUTHORIZED substitution may result in fire, electee shock or other hazards.
• Safety Check - Upon completion of any service or repair to this product ask the service technician to
perform safety checks to determine that the product Is In proper operating oor>dttlon.
• CAUTION • Danger of explosion If battery is incorrectiy replaced. Replace only with tee same or
equivalent type.
IMPORTANT Information Regarding Usa of Video Games, Computer, Captiorte or other
Fixed Imege Oleplaye.
• The Extended use of a fixed image program material can cause permanent "^ladow Image"
on tee LCD Panel. The Background image Is viewable on normal programs in tee form of
stationary fixed Image. This type at Ineverslble LCD per>el deterioration can be limited by observing
the followfng stops:
• Reduce tee brightnesa/contrast setting to a minimum viewing level.
• DO NOT display the fixed image for extended periods of time.
• Turn tee poww off vrhen not fo actual use.
• Recycling - This product utilizes tin-lead solder, and has a ftuorescent lamp containing a small
amount of mercury. Disposal of these materials may be regulated in your community due to
environmerfial considerations. For disposal or recycling information please contact you local
authorities, or the Electronics Industries Alliar>ce; http://W¥fW.9kM.Ofg
Page 5

Table of Contents
1JNTRODUCT10N
Safety In8tructk>ra_
Preparation
How to Operate the Remote Control
Irrterconnect Diagram_________________
Controls and Indicators
24ysteoi Operating
Function Description__________________
TV Tljner Setting/Auto Scan_________________
Disc Playing (Using the Remote Corrtrol).
How to use SETUP KEY
GENERAL SETUP
SPEAKER SETUP
AUDIO SETUP____________________________
PREFERENCES
EXIT SETUP
How to Play MP3 and PICTURE CD'S
3.Systein Operating (TV)
TV AND AUDIO VIDEO INPUT OPERATING INSTRUCTIONS.
MAIN DISP
SUB DISP
VOV ADJUST_______________
VOV ADJUST(Continued).
AUDIO
CLOSE CAPTK>N_
PARENT CONTROL
OSD SETUP
TV SETUP
PICTURE ADJUST(BRIGHTNESS/CONTRAST/SARIRATION/HUE/SHARPNESS)_ 45
RECALL and EXIT
VGA INPUT SIGNAL AUTO TUNE and SAVE EXIT.
VGA INPUT SIGNAL COLOR SETUP
VGA INPUT SIGNAL QUALITY ADJUST____________________
VGA INPUT SIGNAL PICTURE POSITION SETUP,
4>SyateRi Operating(FM)
OPERATION
S.SyateRi Operatlng(Other)
ADJUSTMENTS(Scund/Audlo Frequency/TIme).
«.TROUBLESHOOTING____________________
TJ^unctlen Uat
SJLcceeaorlee__________________________
9.(FDA)CERT1 FI CATION
__________
________________
____________________
_________________________
__________________________
___________________________
_____________________________
_______________________________
__________________________________________________
___________________________________________________
___________________
___________
____________
______________________
_______________________________________
_________________________
1-3
5-7
8
9-12
13-17
16
-19
20
21
22-23
-24
25-28
27-30
31
32
33
34
35
36
37
38
39
40-42
43
44
-46
47
-48
49
50
51-52
53-54
55-57
58
59
60
Page 6
Preparation
I
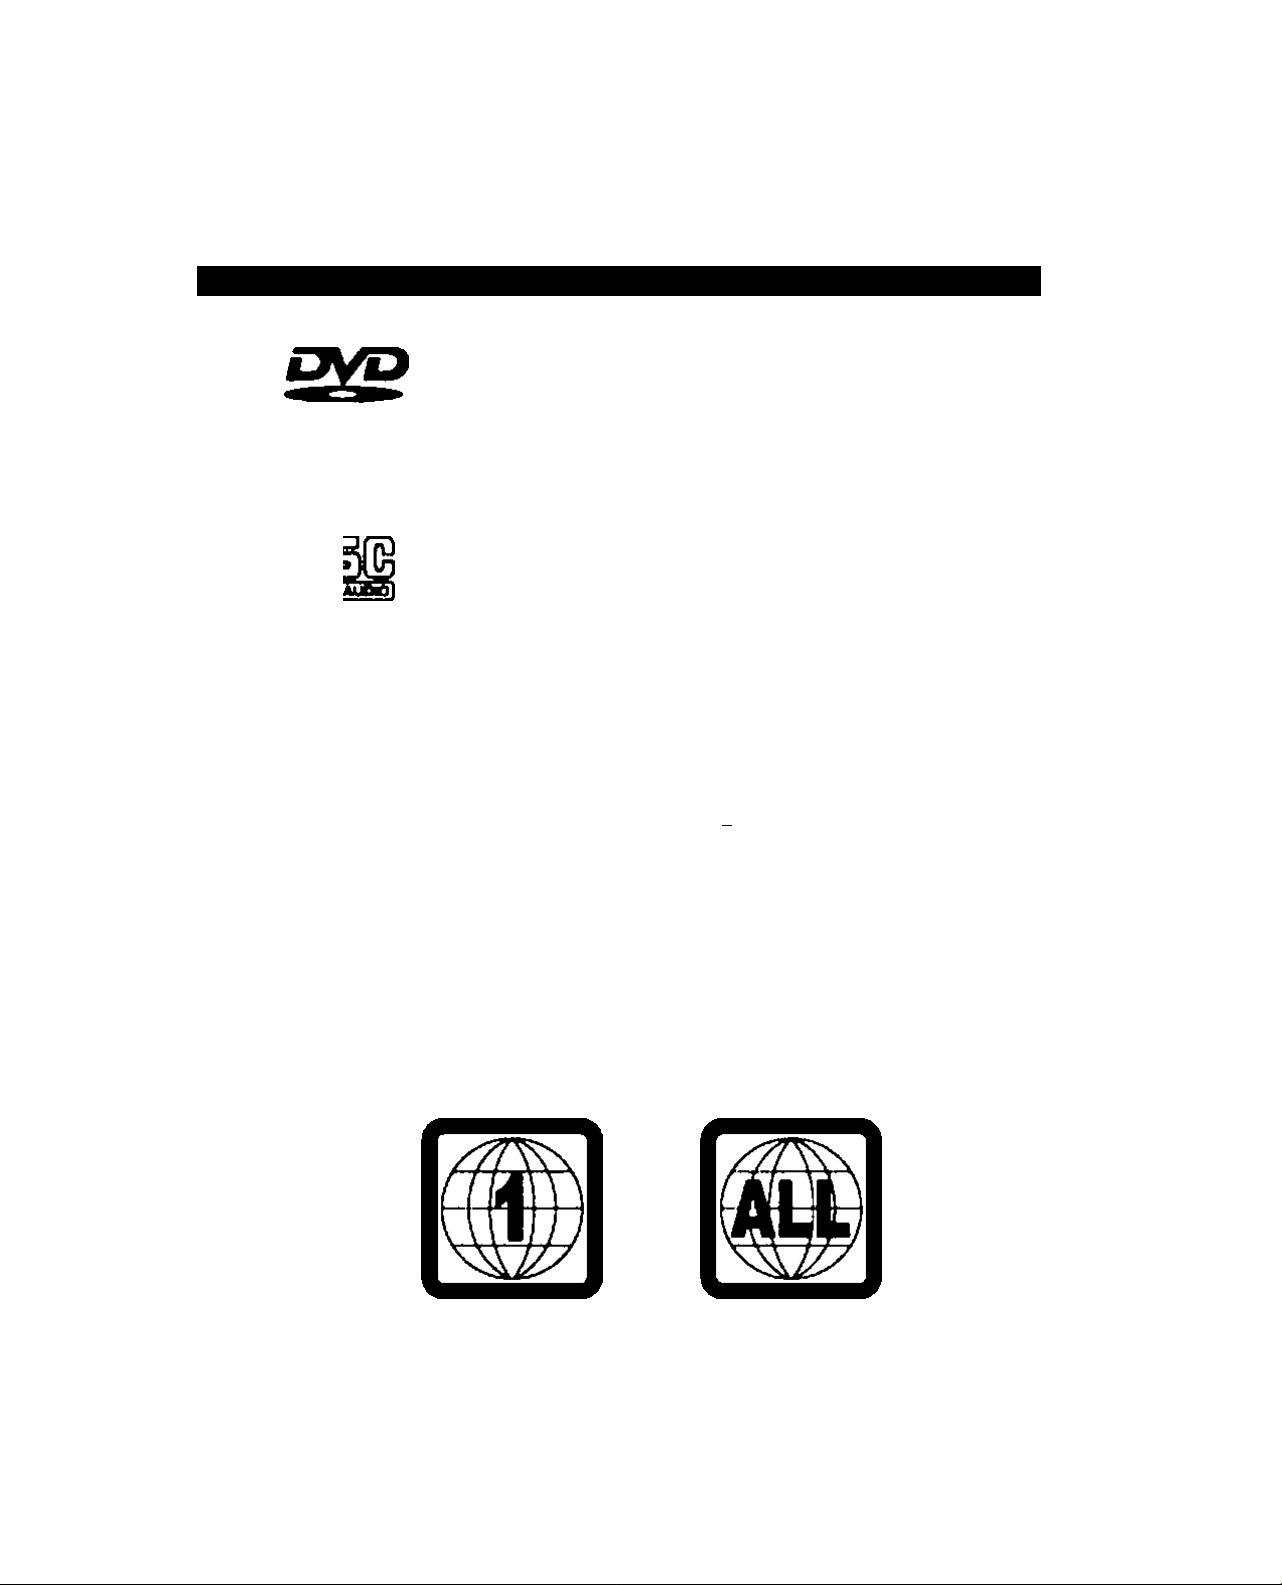
This device supports the foiiowing disc formats:
Suitable dbc8& their mado Diameter/slda/layer Maximum playlr>g dme
DVD
l2cmfSln(^e/S«igia
l2cmfSlngterDoubl9
VIDEO
№3
Region Management Information
This piayar is designed to respond to the Region ManagemerX Information recorded on CATDs.
The region number of this pieyer Is *1*. if the region number on the OVD does not correspond
to the number of this player, this player cannot piey dsc.
This piayer wll also play OVDs made for *AU." reglorts. This player will play DVDs wfth labels
containing the region number T or 'ALL*:
l2cnVDo(jbla/3lngle
12cmCoubtet>0(i)ie
COOA
1 ZcrrVSinglarSlngto
CO^A
8cnvSinÿo/Sto>0*Q
MP3
i2cnVStrtglW8lr)gle
MPEOII TYPE
133Mn. (4.7GB) Max
242Min. (8.50B) Max
2MMn. (9.4QB) Max
464Mbl. (17QB) Max
74 Min. Max.
20 Min. Max.
MPEG 1 tayer-lll
640 Min. Max.
Example:
Page 7

INSTALLATION
• Reoetv»r Location - Locate fbr comfortable viewing.
Avoid placing where sunlight or other bright Bght wll fell on the screen.
Use of some types of florescent Hghting can reduce remote control transmitter range.
Adequate ventilation Is essential to prevwit internal component teilure.
Ke^ away from «ees of excessive heat
To ensure optimum picture quality do not position magnetic eqiJpment nearby.
• Cable Equipment • The VIdeo/Audio connection between components can be made with shielded
video and audto cable. For best performance, Antenna cables should utilize 75 Ohm coaxial
shielded wire. Cables are available from your dealer or electronic supply store.
Before you purchase any cables, be sure you know what type of output and Input connectors your
various components require. Also determine the length of cable you’ll need.
LICENSE CLAIMS
Dolby
Manufoctured under license from Dolby Laboratorias. *Dolby”. "Pro Logic" and the double-D symbol
are trademarics of Dolby Laboratories. Confidential Unpunished Works c 19^*1997 Dolby Laboratories,
Inc. All rights reserved.
DTS
Manufactured und» license from D^itai Theater System. Ir>c. "DTS” and "DTS Oigitai Surround" are
trademarks of Digital Theater System, Inc c 1996 Digital Theater Systems. Inc. Ail rights reserved.
Macravision
This product Incorporates copyright protection technology that Is protected by method dalms of certain
U.S patents and other intellectual property ri^its owned by MacrQf\^sion Corporation and other rights
owners. Use of this copyright protection technology must be authorized by Macrovision Corporation.
And is intended fbr home and other limited dewing use only unless otherwise authorized by
Macrovision Corporation. Reverse engineering or disassembly is prohibited.
Note - Some DTS decoders wttich do not support DVD-OTS Interfoce may not work properly wtth the
DVD/CD Player.
ftofaranea
• Dolby Digital is a digital sound compression technique developed by Dolby Laboratories. Inc.
Supporting 5.1-channe! surround sound, as well as stereo (2 Channel) sound, this technique enables
a large quantity of sound data to be effidentiy recorded on a disc.
• The Digital Theater System (DTS) is a S.1>channel surround sound system, which is widely used in
movie theaters arourKi the world. It allows the bit rate to be Increased In order to provide good aourxi
quality without excessively compressirtg the data.
• Linear PCM (LPCM) is a signal recording format used in a CO. While a CO Is recorded In
44.1 kHz/16 bit. a DVD Is recorded at 48kHz/16 bit up to 96kHz/24 bit
• If you have a Oofoy Pro Logic Surround decoder, you will obtain the full benefit of Pro Logic from the
same DVD movies that provide full 5.1-channel Dolby Digital soundtracks, as w6i\ as from titles wtth
the Oofoy Digital rrark.
• The digitai audio output connector (optical) converts electricai signals Into optical signals (Nght) and
transfers them to m ampBfier. These optical sigr>als are immune from electrIcaJ int^ference, and they
also have minimal effect on other equipment.
Page 8

Handling Discs
L
:a///
Novof XHJdi tho playbeok eido.
SM*
Never add labele or adhesive
- tapes on the (fiscs and do not
scratch or damege the (fiscs.
Discs
CO. DVD. co-rvw, and MP3
Please use (fiscs wtilch are stamped with
or lEC symbols
Never use orackod or deformed (fiscs
The Pteyer operates at high speed.
Never use nort-dreular (fiscs or (alure may occur.
< of-l
Cleaning of Discs:
Um e «011 doth and wipe
Off inoerprinu ar>d staJns,
In a redwing manner from
the center to tie outer rims
when cleaning the (fisc.
Storegs of Disc:
To prevent discs from getting
bent or (Mormed t>ey should
be kept verticaiiy in a diso
storage case.
Page 9
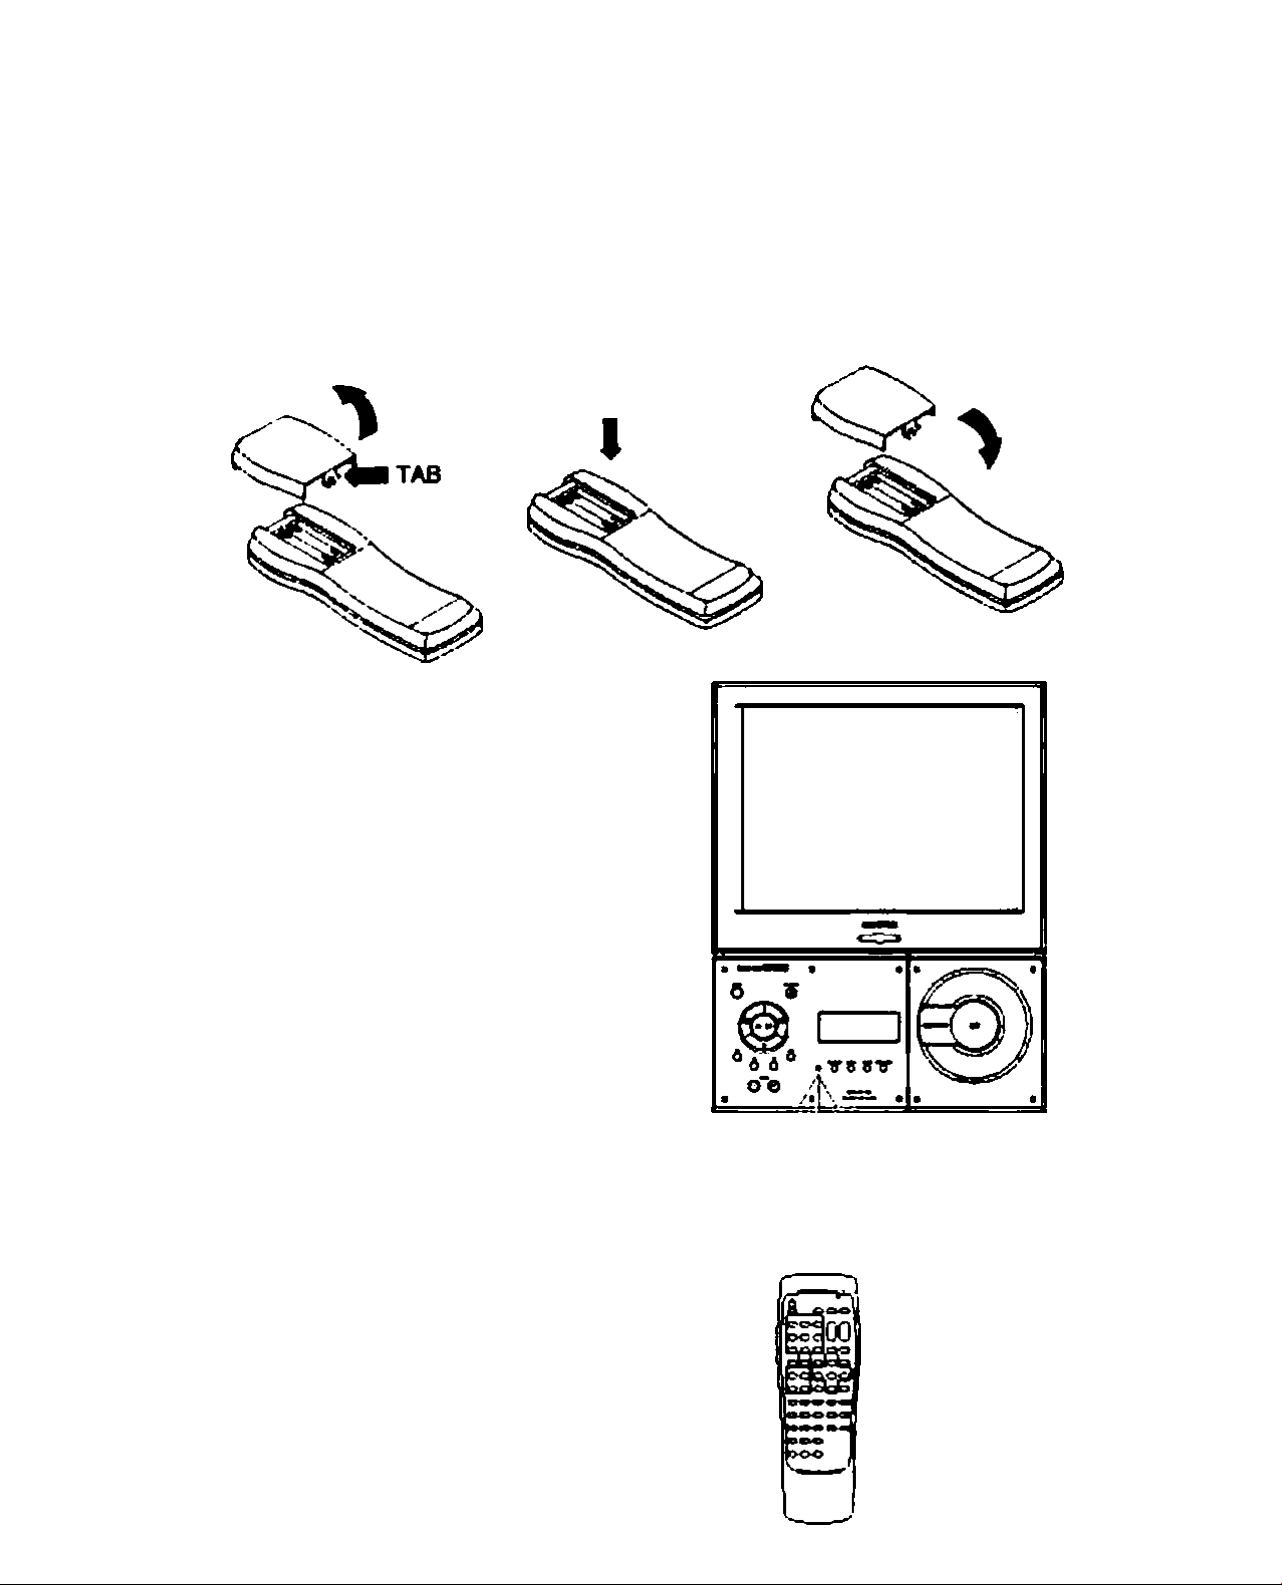
How to Operate the Remote Control
I
Load Batteries
Remove the banery cover
by pushing In and lifting up
the tab.
NOTCt
Replace both batteries simUtar^usly*
Load batteries whBe
observing polartty.
ALIGNMENT
TAB
Place the battery alignment
tabs Into the remote control
and press the cover down into
position.
air-. *-30
Page 10
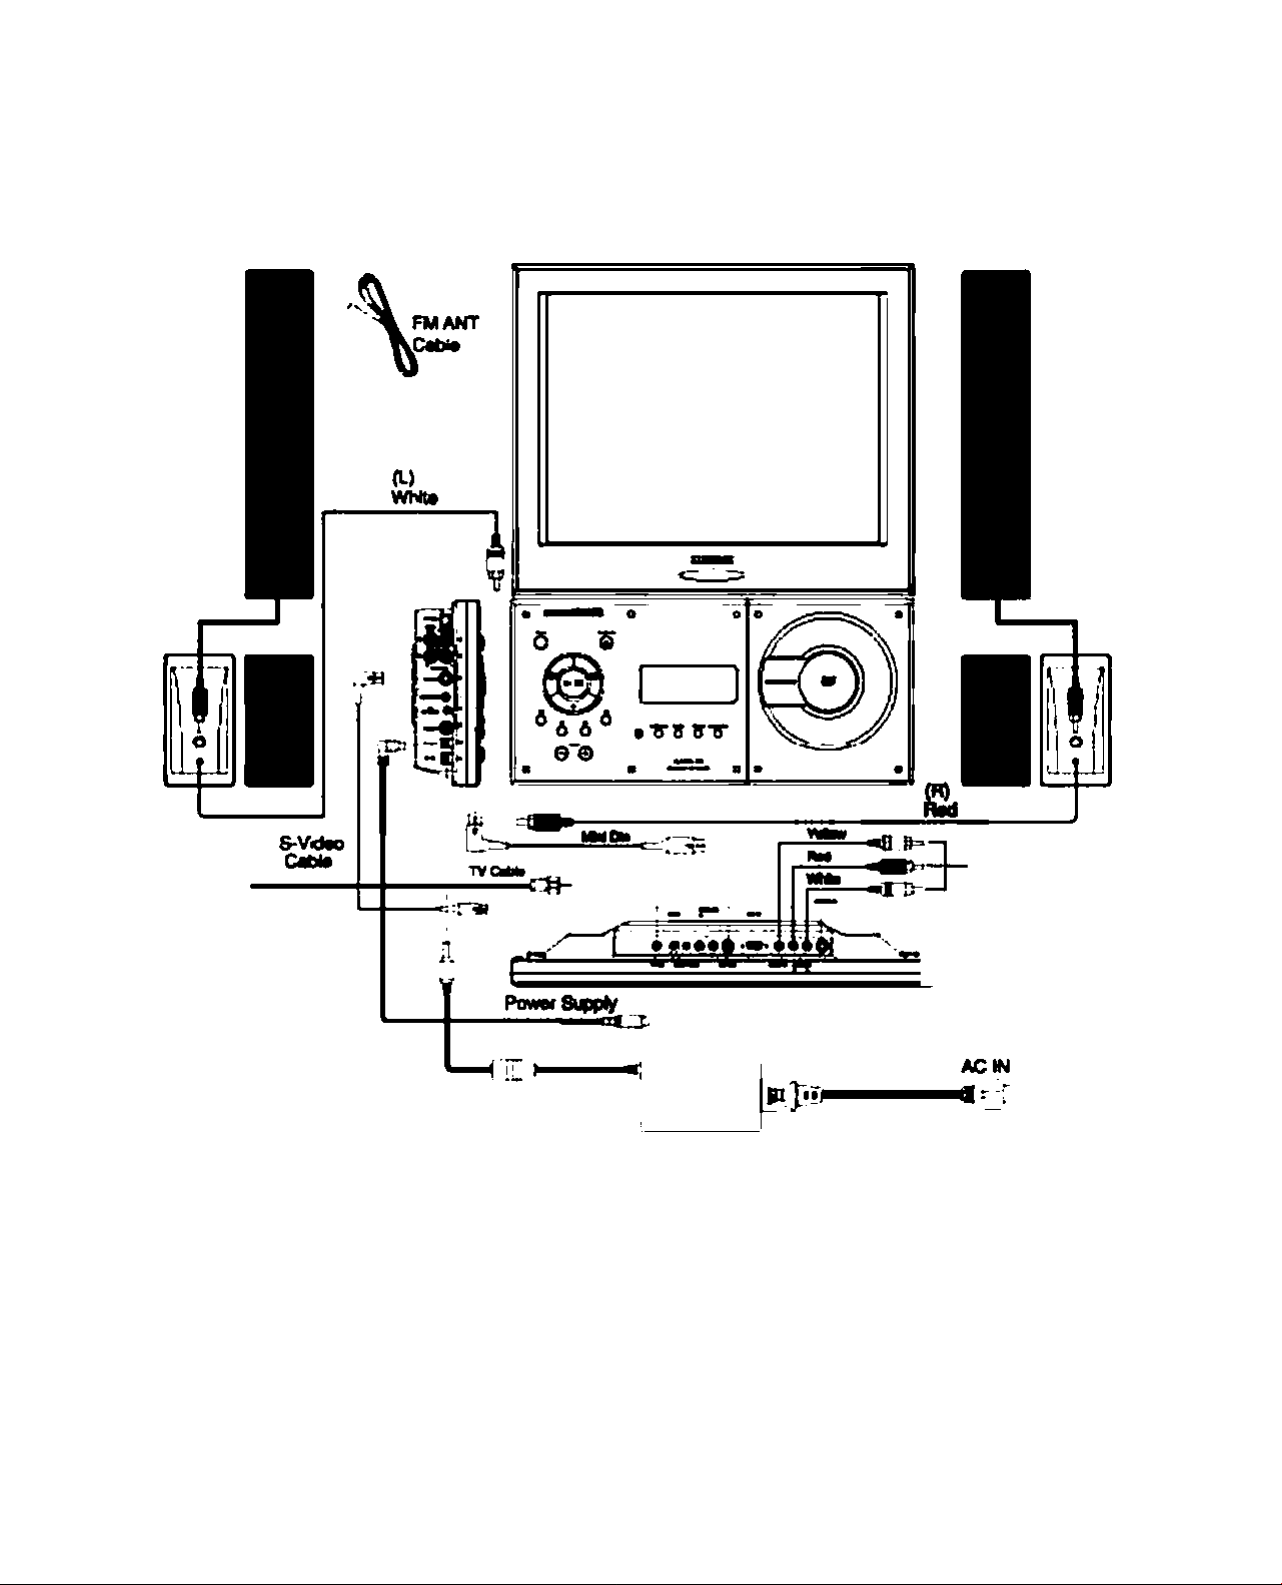
Interconnect Diagram
I
SPEAKS^ (L) SPEAKER (R)
(BKk)
tOO-200VAC INPUT
DC 12V/5A OUTPUT
• Revotsing the oonnootton ol the toft and speakers wiB resuR In the speaker belanco bob^ reversed.
• Prior to mtfdng oonnecdons on the unR remove the AC power oord from the power source.
(Bade)
AV-Tarn*wi output
(No(Si<)pM}
9 (LCOUndwVlOTi)
Page 11
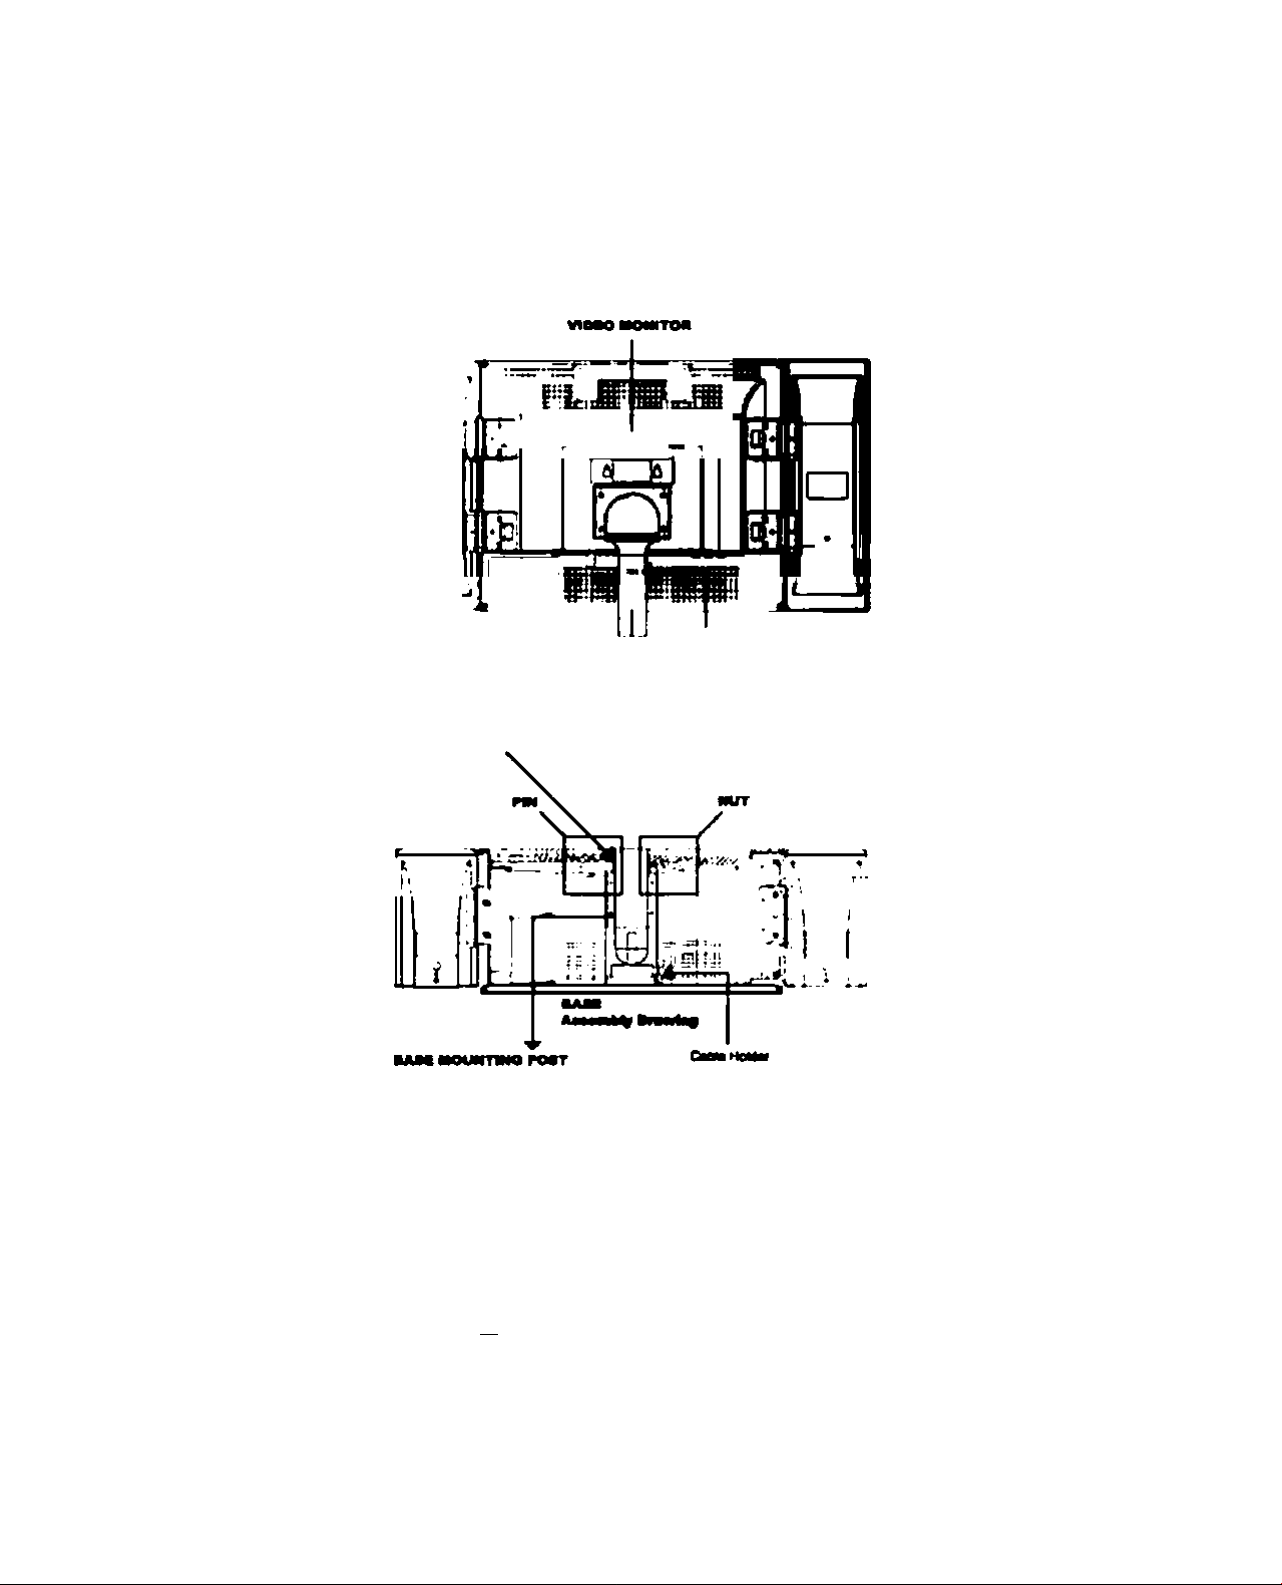
Interconnect Diagram (Continued)
I
Connaction írmüMdóofm:
t. Ramova lha oofurtt from tfia booL
2. Lócala tha unlfa baaa aaaambly.
3. Lócala thavMao ntonitor. PlaoatiavkIaomaniDf mounttngpoatM>№amountngpoalofl^baaaaaaafitty.
CMHattv
Ij«» TOP hm fn^ aaecifST
a» «IP aaa an OVO I
4. LocHo th* D^^ MMmèly.
6. TV tw vidoo monllDr aMombV up«nvd.
6. Algn ihatopholaoflhtOVD ptiiyw Dr*cktt wWì th» hot« on th* but mognttng po«L Inttn th* pin ttvou$^ DVD paytr
eradtM and th* mounong potL Raisr to Pw MMrnbly drawlng-
7. Cornaci tw varkM» cabtoo In tho teBowkìg tnmnor
a. Conrwcl tw Ivllnl OPi cablo wlb Pio 90 ooonodof hoad lo base oomoctor laboied MMIOM.
NOTE: The Mini 09) cablo and thè S-VIdoo cMdo aopaar lo bo IdonOai. Howaver Pw MM Dun cablo contaJno 8 p9ì0
«Mio Dw S-Vidoo cablo coniBlm 4 pino. Do noi fono dio ooADodor ao Ma may roouit bi cablo oonnocior pino boing boni
Remo Pio cablo thfough Pio cablo rwidoron dio mounttrg POOL Cornaci ino oPior ondo! Pio cablo io Pio connoclor
laboied HM DM on dio video monkor.
10
Page 12

Interconnect Diagram (Continued)
I
b. Comgd ^VWeo ciblg w№ thm 90 ccmactor head b bmm oonngobr lobabd S^VR)£0.
NOTE: Tht MIN Db catto and bia5>VbgQcabbippatrtobeb«iUcal. Mowavaf be MìN Dm catto oofitaina > plr^g
«Nto tna S«Vldao catto coNaba 4 pina. Do not torca tha eomaetor aa bla may faau6 In catto eonoactoi pba ttoop toni
Routo ba catto ttfoughtha catto NoWaron toa mounilnopoM. Connaoltftoot>arartooftoacabtobbacomadof
totitod S-VIDEO or ba todao mordi».
cCormacittaOCOUTcabtoaantha90conf>ac№rhaadbtaaaoorwtactoftobatod OCOUT. Routo 0>a catto ttmugh ba
catto hobar on ba mourtong POOL Comact tha ob» and db# catto lo baconnacior libali d OC IN orba vbaomoNtof.
dCermact ba FM antoma catto wth 90 CDimactorhaad tobaconnactar tobatoo FM ANTENNA. Poabon tha ata to
oblato ba baat FM agnal raeaption.
6. Attatf> ba uppar fiffhi tpaaw by aHgrdr)g and baaUng ba tao tpaakar mounb ftom ba vktoo monitor irto tha tDeakar
asaambty racaptoctoa.
B. Rapaat Stop B for ba Ioaar righi »paakar
10. Sacua ba oppar and \om^ dgto apaaeam atoh ba PMIpa tcraaa njppBaO. Tha oppar right ipaafcar raquima two
acrawa and tha tow» Hght raquiraa ona acravr.
11 Rapaat atopa B. 9. and lOfarbatoftaoaakart.
12. Rouiatha vppartoOand rtgN apeekarcattothroughbacattohoWaronbamoudlng poaland B>acattoholdaroniha
baia.
Il Cornaci uppar rtgNapealtar cabla tobabwerrlgNapatow catto Input.
14. Rapato Stop 13 tor ba laA atoa apank»!.
15. Routo tha apaaksr catto Bom batowar tali apaaksrs and oonnaci lo baL SpaaiwConnador.
18. Routo tha epaaàer catto Bomba towarrtditapaeiwihroughbabaea catto hoWer. Cornaci to ba R Spaahar Connaoor.
17. ConnacIBto AC powarconltobaAC Adaptor. Cormact ba OC powar comador lo ba OC M cocY>aclor on ba OVO
piayar aaaimtly.
18. Ineartbe AC power cord IniDanapproprtaea AC powareource.
11
Page 13
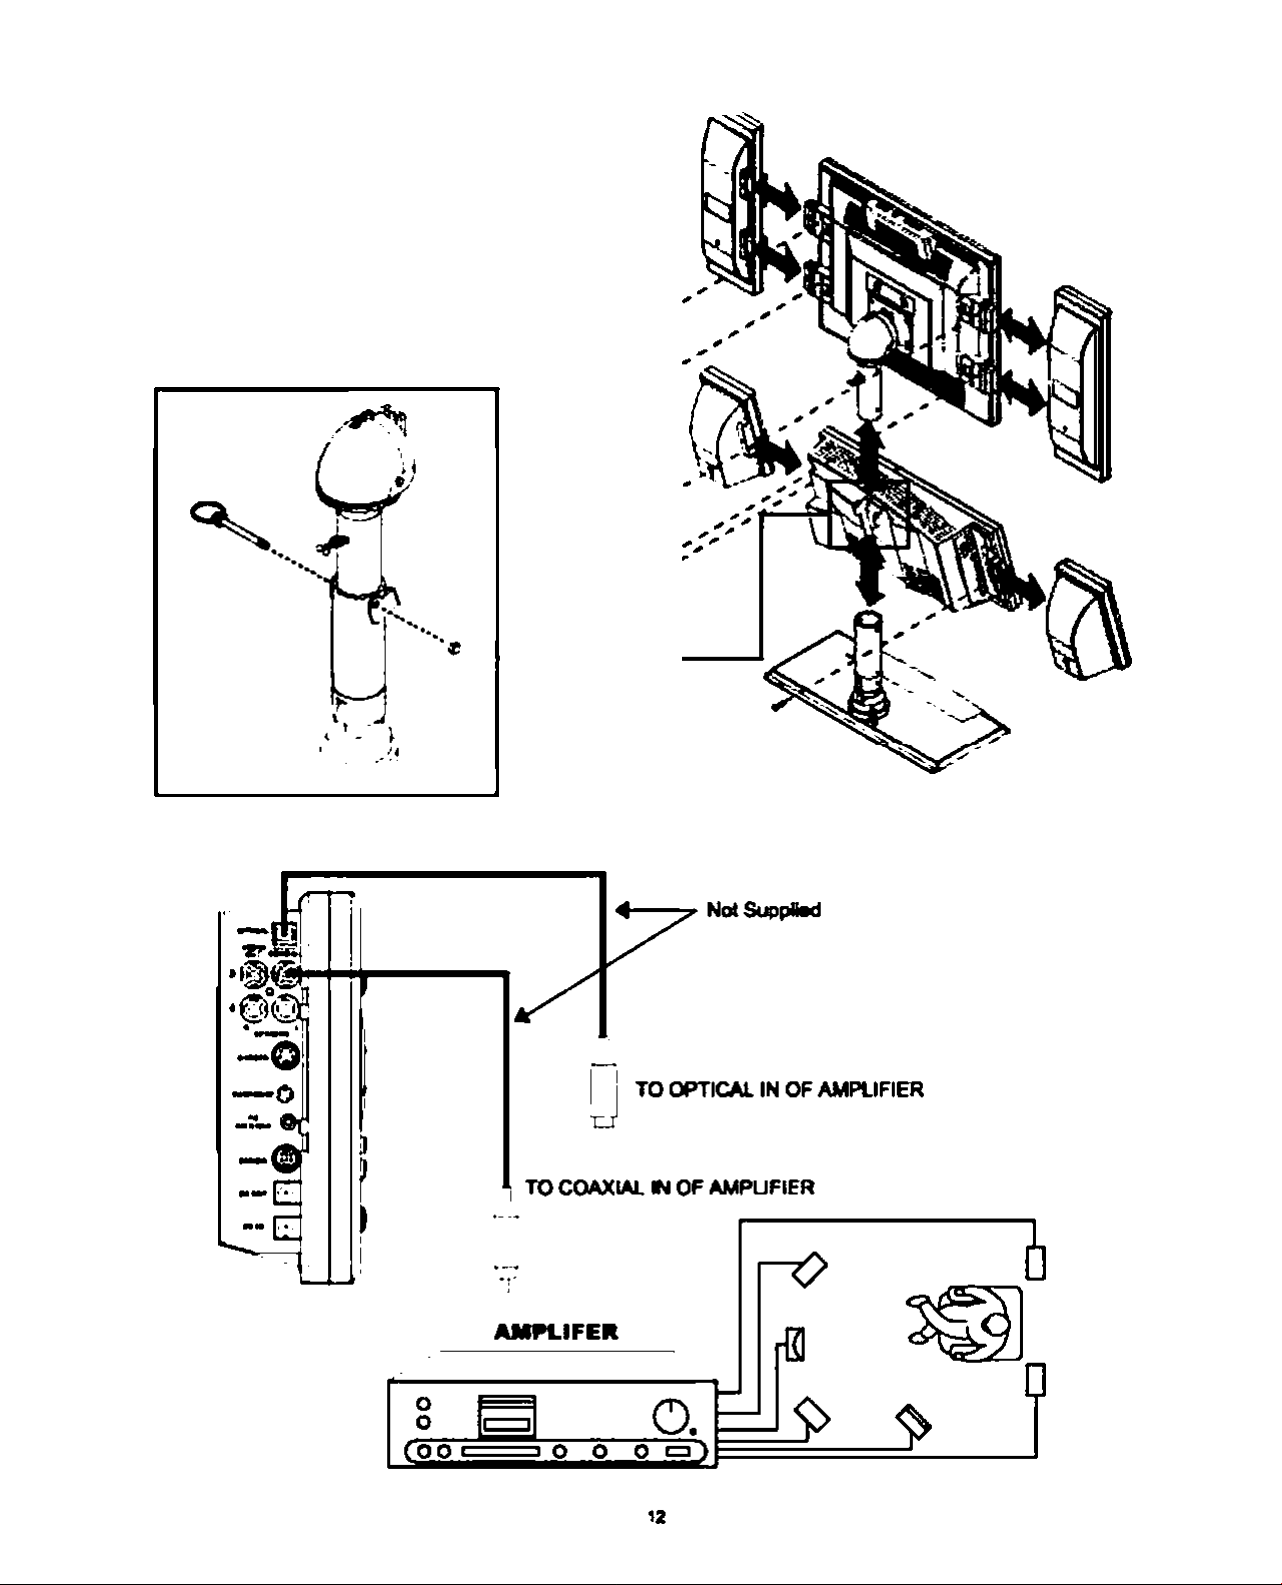
Interconnect Dlegrem (continued)
CONNECTING TO AN EXTERNAL AMPLIFIER t
Page 14
Controls and Indicators
I
LCD Monitor
1 2 3 4 S 6
(Top)
(ftwt)
«M. KJM OK
— — — — — — R > r- •
□ QQ □ □□
F*rTVUSCl
1. V04.* t Dior»—■ ttf vtum» tM bro»4c»»t TV mné mrtfwl »m4I> »Igiiato.
2. MENU t Efitar rmifi mwMi of LCO panal. Alao yaad to aaloct laonu funcHona.
3. VOL * 2 Incfoaaaa tho voliatia of hrooEcaat TV ami oxtomal auEio alpnala.
4. POWER : Tama ttw TV awnltor On anU Off.
E. CH • t Oocroaaaa diannol numkom.
E. CH * I Incrooaaa channel numhara.
7. Ron>o»a Control.
IS
Page 15
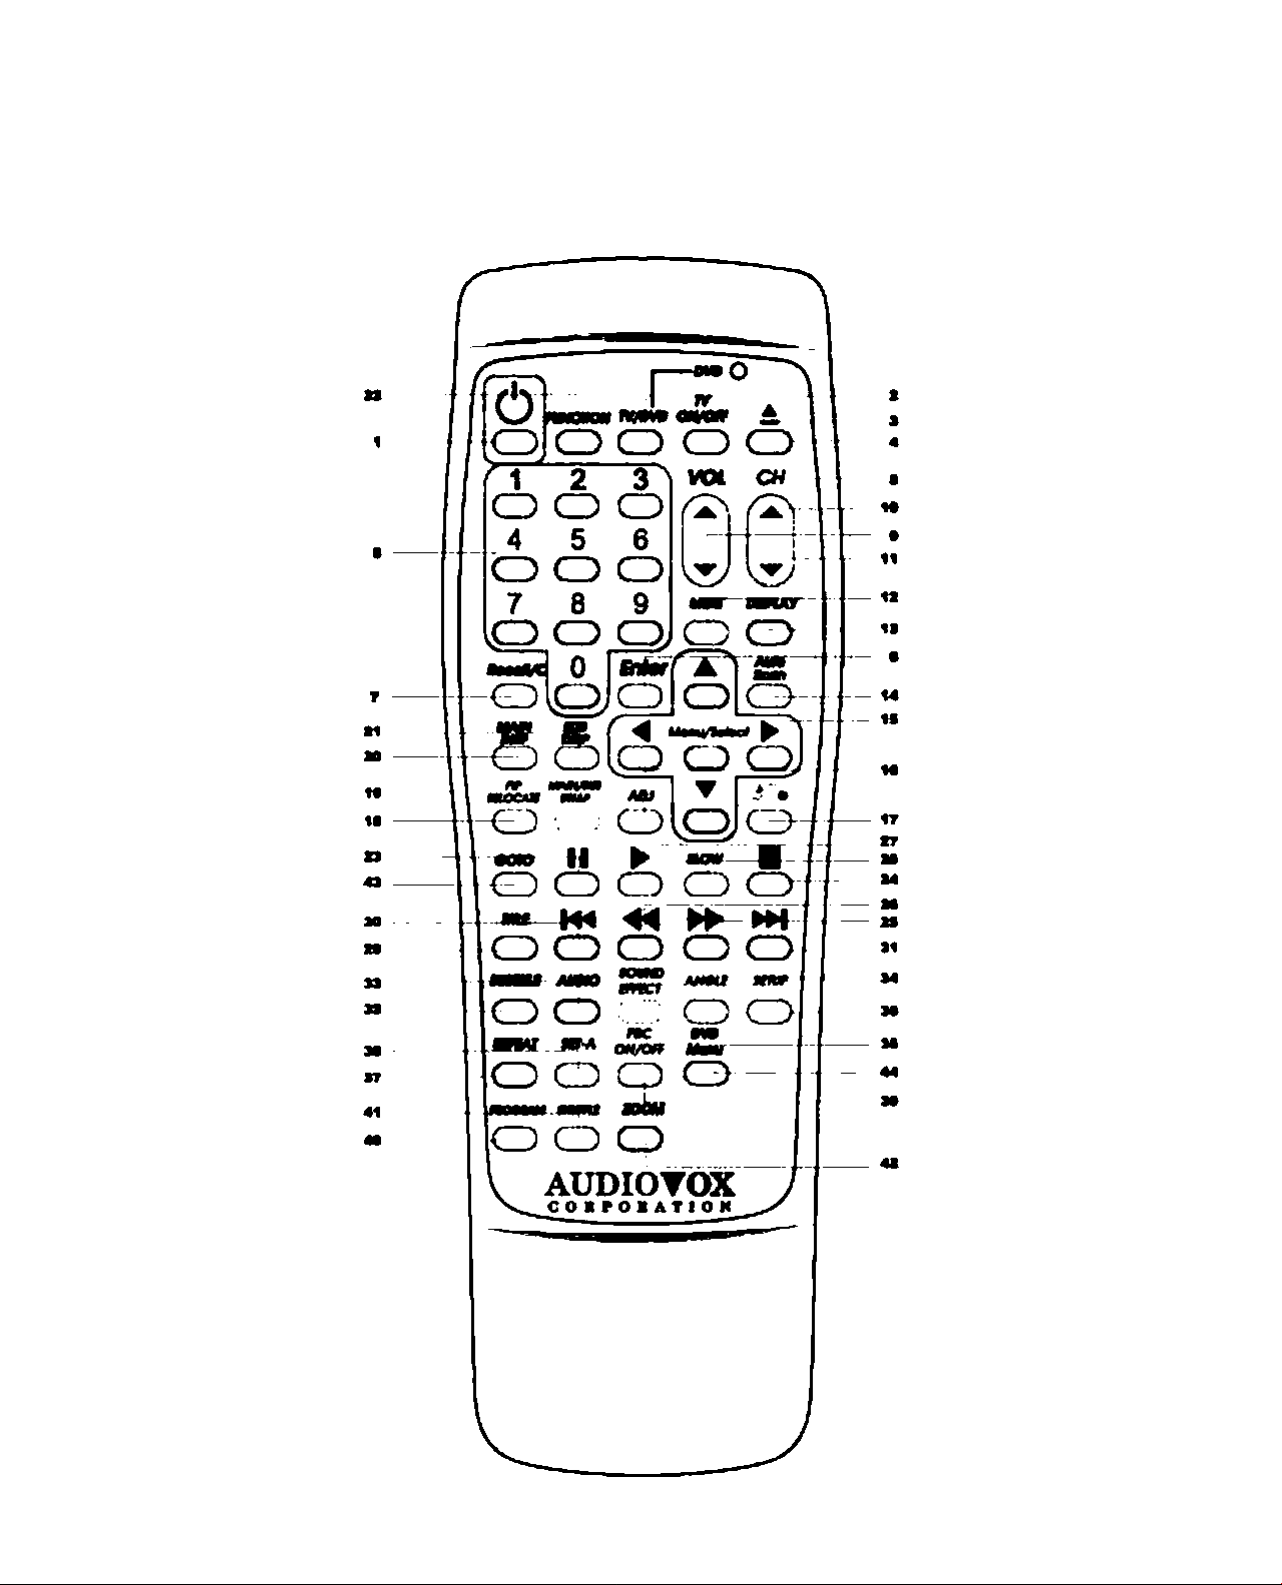
Control and Indicators (Continued)
I
Remote Control
15
Page 16

Control and Indlcators(Contlnued)
I
Display
1
2
n
1, >
2.
3. R
4.
S.
vr
...ir
H
st
^MLEEP «ItA DDooijy
[OVDJ LMP3J |L/a PBC REPBATi A-a
^8 rs 18:8 8;B 8
Displays the direction of playback.
Displays the type of disc inserted.
Displays pause mode.
Indicates the sleep.
Indicates the alarm mode.
6.
7-
8.
9.
10.
11.
11 • BiiinBae Character displays including frequency, time, number etc.
-.«H-
BiiinBae
Displays time.
(h
Displays audio settings.
urn
Displays Lefl/Right audio channel.
f*e
Displays playback control.
17
Page 17
Function Description
Pow«r
NOTE: Th0 powtt kmy ot /f>« vfctoo mordtor 1$ locaf^d onthmtop ofpanttl.
Place the power plug Into the wall outlet and wait 7 seconds whfle the systein Inltialteeds.
Press the POWER button on the remote control or the front of unit.
• Wait one second before pressing the next key
There are two methods to turn the power or and off of the unit:
Remote Control i
Press power button of the remote control to turn the power On or Off.
Front PofMl:
Press power button of front panel to turn the power On or Off.
KHaplay Mode Switching
Remote Control:
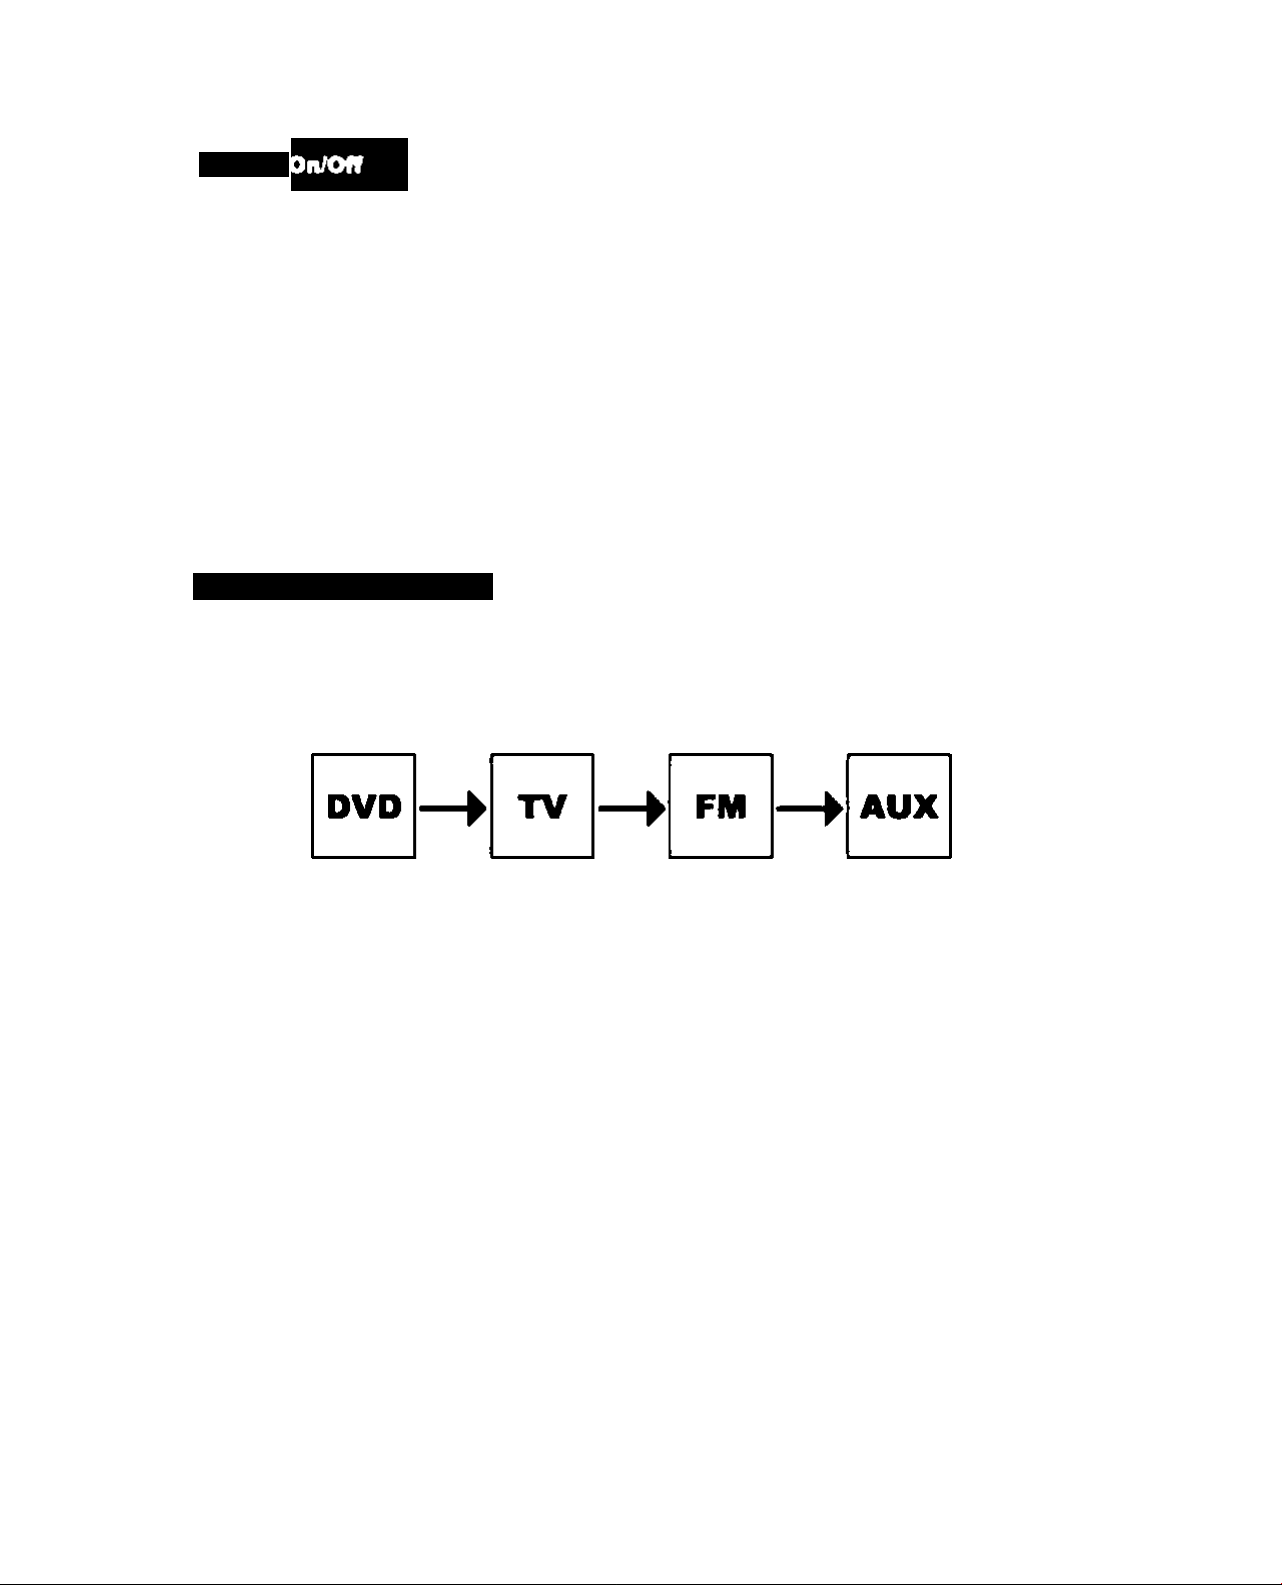
Press function key to switoh the display mode in order as following :
NOTE : 1. When you use the DVD function, press the TV/DVD button until the LED light red.
2. If you choose FM dispisy mode, the video monitor display will shut down and the
back-lighted panel will displayed the FM frequency.
Front Panel t Press button to select the OVD player function.
o
Press M. button to select the TV fimction.
ft
m
button to select the FM tonction.Press
o
Press button to select the ADX function.
NOTE: Tb» AUXfunction d^autts lo VGA fof computoesuppoft.
18
Page 18

TV Tun«r Setting / Alito Sean
NOTE: Verify ttf DVD Indtcatof locofad onthmtop right of Ihm nenotm control doo* not
fla$h or stay rod. ff doo«, prots tho TV/DVD button.
TV Tunor Sotup
Press the TV functton button on the front of the DVD unit.
TVSoloctlon
If you need to switch between CATV or TV(AIR), press the Menu/Select button.
Enter the MAIN DISP and select either CATV or TV(AIR). Press the Menu/Select button to
confirm.
Auto Scan
Once the CATV or TV(AJR) Is displayed press the Auto Scan button to begin scanning for valid TV
channds ar)d place them Into the unit's memory.
NOTE:
The TV Function button on the front of the unit r>eeds to be pressed In order for the speakers to
switch to the tuner.
IS
Page 19

Disc Playing (Using the Remote Control)
1
11Ш player can play OVO, CO. CO-R/W, MP3.
M07F;
№• DVD bdcotor on №# gaowfa Controi
(upper riifN ссгтш) jhotid HgM et^ady to
oecaw the DVD/CD Menu Option».
1. Turn POWER on
a. Praaa tha POWER button to turn On tha unH
b. Tba dlaplay Indtcalm LOAD and tha Scraan displays
LOAOINC. (Vedry OVD ГипсЯоп » selected)
2. Insert the dte
a. Prase OPENA:lOSE * " button ID open the OVO
playar door and the scraan w9 display ” OPEN*
b. Inssrt tha <isc In №e center end smarm Into place.
aPrasaPOENlCLOSE* £ * button aoatn to dose trte
door and the back-lighted panel wil display *CLOSE*
If the OVO <Scc hBs an auto-play the player wlH
automattcaty play the program altar the door Is dotao.
3. Press the TLAY* button to vfsw the program
a. If the <Ssc inaeitod is a DVD disc, the mo^ menu can
be selected-
4. STOP playing
a. Press iha STOP" ■* button and the program ай stop
playlpg Immsdiataiy.
• Press the PLAY* ^ * button again to start pleytog.
• Press the STOP* ■ * button twice whie viowing a
DVD to stop playtog and return to the beglrmtog of the
program, when the PLAY* ► * button is pressed the
program wM start from the beginning.
5. Remove toe dtac
a. Press 0PEWCL06E* ±* button and tha video monitor
sod tha bacfc-lghled panel will <ft4>tay OPEN.
Remove thedtoc. PressOPE№CLOSE* £*butlanagain
artd the video monitor and back-lighted panel wil dsplay
NO DISC.
e. Power Off
a. Press the POWER button to turn power Off.
20
Page 20

iZ
P
9Щ a^Cun pM 1МОШ *114100 *M) <
1
Ш Ш1 1 ua uH
¿ ï « A««*4«^» w m
• Щ ^ V ~
r '• Y
«амош oi^ •• tfo jtaMi ■«» Лд|бц0 «e
C.i'' ---
|[!ii,»»-r
lis « »
M
•Moam ViT
Mi»
1
•U.
Ч
«o^
АЭМ dnX38 asn o| moh
Page 21

GENERAL SETUP
TV DISPLAY t
e»l*l4)eihaw Si»li|iplcMsiee|Oi»Www (S»irertoMMMQ»l«ndrtgnpofffwflleMMCuteir^
4?#LSH<)U»ram>:
Sibd 4 3 UW SfiB 1» • iw TV ww. <I*w or bdti we (U4 end 4wi)d t» picMe « cut dll
14: «WIOC 064 MM Sew):
4: 3M
4:3U
lata/wlOE
Etc MODE (PICTURE MODE) i
yhtmtnfvmnoom^wop^BfiQgtcknqjtHr.
AUTOl
A«4QMtC»ly «IhMt dliV*1f IM*
HimOir n—4>lwQ:
^Mi 4«D MW Iv Npn IWOuW.
MUCMS OM/IMar):
PvwMiMWtai
ANGLE MARK t
E tw OVD DUiwli en^ Wbr, you w *led diSiPirM t) iWp 4w 8Mg»m eiy lWT#ig OR IhR 4II0L1WW
4Mlt MAM. f« ANQl£ IM WW • U'
AMMJI9
WMm Eyoobm^th«
Page 22

GENERAL SETUP
080 LAÑO (080 LANGUAGE) :
□CP
CAPT10N8 :
K tü CM) Mppocli cMom« you cao d^iplty f)o cMcn tOÉtího tw CAptcr füwion.
□CP
8CR SAVCil (SCREEN SAVER) 8
Erallwtwecrw wwmodmwftotuncioosimaecaiiadNraproiergidpirtedef IM
□CP
MAIN PAGE 8
BadibSalup Mona
23
Page 23

SPEAKER SETUP
Y Al cur CAOOM ¥V1m tOWrri AooM V« SPCAKER SCTUP and t>«A th* Mowing <Mdm
DOWNMIX t
You can g»e fw DO^MUC bncSon to <MuM» g.l mnd allicto Ivffi« 2 ctsnnal ouM
1 LTmT: Цело.
A STSttO: Smtoo.
2d
Page 24

AUDIO SETUP
Ai»wB you e eel** yw wnhg prWw>w
SPDIF
OP MODE
DUAL MONO
DYNAMIC
LPCM OUTPUT
MAIN PAGE
SPDIF:
8P0lF;(CMQiMS.1 CNrvMCMpuO
Uwdlooofv>octMuoa««hobut-MOateydUMOTS. MPCCIork№EG2
nCr
OP MODE (OpMBtlonal Modo) t
Pow AiMpAir Oj^mI
Uood lo tficff tm ouSo Mprai to wri orr«! olOo Oomoo
DUAL MONO :
Tt» eu*o eignel B BppW So Ihe lit «Id right
0^
25
Page 25

AUDIO SETUP
DYNAMIC I
Aitowi 1w vw l> sDled fM <tyTW#c mno» d Pie MuOo «Ign*
oCr
LPCM OUTPUT t (LlfiMir PCM)
Sgril ivQOfdh^ «rmil UMd In • CO or (MX
MAIN PAGE
Side t» Setup MenA
8
cC^
26
Page 26

PREFERENCES
Wh«r>you enlr tie PREFERENCES, rieu*rw*ieGHM)itoeing proMtM
TV TYPE
AUDIO
SUBTITLE
DISC MENU
LOCALE
PARENTAL
PASSWORD
DEFAULTS
SMART NAV
MAIN PAGE
TVTYMi
wm irrsc end NIL syNwi we BUlpmetBiiy
NTSC: NTK UfM SWet and CaneSk
niL: RM. Eftnpw
tyfttuni enCM)ianB*
oCr
AUDIOS
ChQow t* wte lwv»t* fuppofW by tw CND such es EngW. ffwA SpertPk. Oswe end Jj^erw.
ENGUSH
FRENCH
SPANISH
CHINESE
JAPANESE
27
Page 27

PREFERENCES (Continued)
SUBTITLE t
Ciocie >e »gOOTB urguigi tun m Cngitfi. ftsrd*, ind iiptfeie
Oryou wchooBBtNOFf lo cesCreiheBufeiii tendon.
ENGLISH
FRENCH
SPANISH
CHINESE
JAPANESE
OFF
DISC MENU I
Choow teer^JigaBd^^QSO wBTuby
ENGUSH
FRENCH
SPANISH
CHINESE
JAPANESE
LOCALE t
Onbrod courMi IVRidilteonC porente corM steMda (Noi UBBd)
o::>^
2S
Page 28

PREFENCES (Continued) :
РА1ШГГAL (Pwwtod Level CmpSiQ i
the piTMd iMl coiM аЮ«*1 wemiv Ml iho Imi nvcMvtry N 0foNM
chldmnliemvtewIngmevessuehâÉlhew «Ah vCMneioredit
•u&loelfflMNr.
OVOMAiKdpedwM tpMekâlf*ghretiûni#oiM<4ei*çi6Ncor»olM.
ТЫ41ЬеН1мМмемЪ1ом ;
О iGonwMAudtano» (ApproqMolordlaQM).
F# I Pwenlal Oiédence SuogeMed (8em» irwMrtd яму nd be «и1»Ы# 1er diHm*
P^IS t РмгМ ЭЮдГу Cluüoned (8ме ямММ яму be irMpproprtMe for cNMma mMm 1S^
ÂiRsMkMdflJrdir 17 Mgsàee MBenMM^àig pâreM y edMl gwdeft)
fiC»17 iNotnMrditf Ъгелуопо lîindunMr.
АМЯ.Г (X) I X4«Md<FM ÉKhiMMty).
NoPMMNTAL I No vMftQ меОШоп.
>yftiMreMe»MigieM»iMliblo lM»l.mefM>M,dOMMMl,rAWbi,MarwMNoM9W
thedMlridloiMl Then ртам pwdM pnevord aod oontrm by ргамгд «мм*
NOIE:7NsopeenortywodaiiorOVDA*ng TboTVOwlboonPerenMlcoRbeiilрМеемередело
NOIE : OMmI РмеиМ М *3306*.
29
Page 29

PREFERENCES (Continued)
PASSWORD I
Yew «n dw>ge the peweofd of piPifNIledi by Iw totowlng prooedun.
1. Oiooee CHiWOe Ftywn M ivliteiieew IP ew the Pwwom Owg* Pie^
2. Nlif> t* owa eei me defcUt Pawoftf.
T>» deflM pewod Is »01» «* "SSW
S. T>w IS ifl tw Ur*s etlh the N»w Paweid
4. n P) ?« Mrta «9^ Vw Nee PMHord flosin and conim tw pmpmkL
DEFAULTS
U* fw ddmiMWeioo tp rwi H preWwees be* to liflBfy oftw asemps.
NOTE;RwN wilnoUnttdifawtNftoPtoafltol Cortool
qCp
SMART NAV;
Ydu can choo* b dliFtoy tie MPd Smart NevigNton mw» Piw SNART HAV epaw. ard pws *Na llwW bUtoh 10 dwbls th# msmi
MAIN PAOE
Sack to Saiup Marw»
X
Page 30

EXIT SETUP
EjSSv^Mm
SETUP MBAI-MAIN FMOE 1
0
00
11
E)9T8ETUPMENU
GENERAL 3ETU(>
SPEAKER SETUP
AUDIO SETUP
PREFERENCES
Exit SETUP
3^
Page 31

How to Play MP3 and PICTURE CD'S
Tl)« SMART NAV will appear on lha «croan.
1
Opwaitonai nwO»*d* •# «MART NAV MODC i
I.TTaro «rt №гм «vim. indudrtg roo! Oroctofy^bdbvcttry «nd tno pley modo. Uoing tho rightWI Duaoo to «wllc*> Ю a
d«fNronttamo.oMhoupMownbuaontoMloct««liofnwAhlnoochaMroctory. Proas PlayboanyoUVwoomnand.
¿Rom Oradory; Snows ai loUon
3.8ubdlractory: Showa all Rioa wNwn oach fobar. (0.4. MP3. JPEG)
4.PLAYMODE;All0M«uaaraUMlactvariout play modot. Praaattio BuaontoonOr «wPUCf
WODE. Uto tho up and down butona to ehoooo №0 play modo :
Uaan hM tho ЫсяИпд aatocttooa;
{1} Stopo: nay ono oong on tho dkc.
(2) Ropoat Ona: Ropoat ona aong dtoc.
(3) FaUor; Play OI aongo n tw toldor onco.
{4} Fotoor Rapoat: Play NI aooe« n toa «oidor rapoataoly.
(5) Diac Sean : flnt 10 tooorCa of avory song in too aaloctod fbidor.
(в) Olee: Play aO wngs of dlac
{/) nao Raooat: Kopoat au loriga of too dac
<8) Random: Songa piayed in a random ordor.
{9) Shuflio On: Songa playad In a random ordar.
(Ю) Programming; Alowa programng of aong piay ordor.
Projiaiii «оыр}
1. (A) Uamg too loft and rtghl bttftan to aocaea toa Р1ЛУ MOOC
Than ualng up (a) and down (V) bjitot«. changa too tbncoon and chooao PR004N0 tonoton. Proaa •»<*»>
0ШОП to SMitoh on PROO.PO Itnctioa The uaor can program aortga In daalrod ordar.
Z (A) Uamg too up (a) and down (f} bultona 10 movo too potocar. chooaing tho aong you wari and toen pmtabutton
to chooao toa aong. Ropoat lor aooone. tolrd....oong.
(B)On tpariolt atoe of too «croan aopoara too oodonumMr you programmod and toa numborof tola aorgin toa МРЭ
sor>gM.
For axampie:lf you chooao too aongatom «10 IBaaatodcwr Nos. NaS. NaMwflappoaraa P01D5, Р02:0в. Р0ЭЛ7.
NOTE :Tho aonga in dftoroni МРЭ totdara cannot be programmodMM mual ohooao too songa In too same foldsr.
4. Aflar programrráng. proas STOP buoon to «nd toa programmtog prooesa. Tho PIAY MOOE wH ratum to toa PROG^NO
dsplay The pro^mmlng proooaa la comptoto.
& Presa PLAY (») buOon ю piay toe aonga to toa programmod ordar.
32
Page 32

3.TV AND AUDIO VIDEO INPUT OPERATING INSTRUCTIONS
TV and AV Inputs
WOÆ
MAIN DISPLAY (MAIN DI5P)
Press and release the
button to display the following main
menu for TV and AV functions ;
nw DM) ijprtf Meteor on ft* wne«» central
A|pAr eemw) etocM net llpW l0
ooeee »w n//AV*Nnu9peow
Press and release the Menu/Mec/
button again to access the MAIN OISP menu
AUDIOVOX
MAIN OISP
SUB DiSP
AUDIO
CLOSE CAPTION
F¥KRENT CONTROL
OSO SETUP
TV SETUP
BRIGHTNESS
CONTRAST
SATURATION
HUE
SHARPNESS
RECALL
S40X4a0
H:31.4KHZ V:S9.8HZ
MAIN DISPLAY OPTIONS :
Can select a total of 14 input functions :
1. Main Display
2. Sub Display
3. Audio Option
4. Subtitle Display Controls
6. Parental Control (Viewing Levels)
6. On>Screen-Display(OSD) Option
7. TV tuner setup
8. Brightness
9. Contrast
AUDIOVOX
VGA
AVIDEO
SVIDEO
CATV
TV
RETURN
640X4SO
H;31.4KHZ V:S9.8HZ
NOTE :
Screen Resolution
(Will vary)
INPUT SIONAL SELECTIONS :
1. VGA-Computer Input Signal
2. AVIOEO; AV Input Signal
3. SVIDEO: S-VIdeo Input Signal
4. CATV: Cable TV Input Signal
5. TV: Broadcast TV Input Signal
RETURN to Previous Menu
10. Saturation
11. Hue
12. Sharpness
13. Recall (Factory Default)
14. Exit
33
Page 33

MAIN DISP
«ICII* *1
ООО g QQ
MAJN MSPLAY (MAIN MST)
Wi »oggêst yow IvnitoH/s yotntff wit) m# rsmoM concrpl щпб OSO (Qr^Se^M^
ONpl«y}oplîorabsfbrsutine(hs*MAIN DISP* тм opCon.
The Msr dlaplsy msnu option вйом оЫосОопш of the Rvs oourcso of Algnâl tnputo.
1.veA(Compgler hpulsignN) rComodtbo vxMoMonSorwth • psnofiN coiPpolsr.
г. AV1D60 <AV hpol Ngrwi) : AccopN NI oT AV outpMt tlgnsN kom 4«riou»
S. SW)£0 (S-VU»o InpU Nonol) : Accspta ii oi 8*V<Noo NodoIa
4. CATV(CabloWlf)pUNgrttO:CabtoWciiennsto МЫпд chimsl 1 to dwv«l12S.
5. TV(7V mputfignN) iTVchannNo indodlnochsmsl2 bchannN 13 of VHP bsnd «nd
cNmsl 14 to chsnnN eO of UHF bond
A RETURN : Baek to iMl cTNng (060 picàn).
TboIVkificSon tMlorilocibdonthobMotfiimusl bo preoscd lo noorthe
audio %«ЫЬ «кяИпд breaüct and саЫо TV. Whan an odemN auxilary doHae
(Camoorder. VCR, elo.)ThoAUX button tocalod on tie CM) pUyar base unll
must be pmsad lohesr be audbof twaudlary «iputaignM». .
aalacl optlanaOperwtfni t Prwe Vp belt* (▲ ) ar Dows butlon (T) ta
) MsrxVSaMcf button ta aanürm.
сжоравяРЬрЬу
УЮСШАМО
Э4
Page 34

SUB DI8P
Sub CNSP (aub Stoplay)
Tbs tubdloptoyielBcIi the aignaltourcQ ktipU:( AVktoa S-VMeo,CXrVorTV.)
Vktoon*vbso (VOV) OfF:% turn oft the
Oywetloiw Press tlw Vykuttofi (A| OP the Down button I ▼ )
to soloct options mn4 prose the Alonu/Mocf button to confirm.
aoD
:: I o »■
4 • • I I
^ O
V »1 4
■■ »y»
fWiWH
D OD
IT" *■ •
? • • ^ ~
MM//K£Cr
SiMtsCK)M№rM
OIDOlDSDnOMrp
.. ¿cartes
ooevtoeirsoL
OtOMV\r
rvonr
momcii
OCMTOWT
»(Uft
owmew
«CiU
»f
iJM
omo
pmo
ir
>a£3
HiSI
mir?
Vtee-Omifttfso end Wesrs if» Wtlioo i OioiaTMAMSan
NOJi:
yOA connof bo
ronMOAftUK
40fWAl0
wspupn
SAOrWAID
few i^bbo-On*MS»s; non to tenet snes Is isseb fit mb 4Sptor sM Mb dbplof
lb cbonor ^ oO Oeior <
UMN/SW
SWAP
CJ
So PO> MOCUf biODft ¿'texMiy wC cAcrtpr Inoffterotl
o»o. ^o«o^
35
Page 35

VOV ADJUST
VOV ADJUST
In «MHion lo thf rrvifi pctim, tnoSivrTVpnvv^o^vtdnoiogmMngmKvd
throggb VDSO input jade» can te d»pi»y»d »anultan»ou»^ •• • »mai pidun»
1>ka A calad VUao-OivVUao (VO^0 or F^lura ^ Pldua (PIP)^
OiwstSae* Praaa tt»a Up Svflow (A) ar tha Dawn Siittari
lo »alapt opOofia and prwa tha Manu/iatacf button to oaaftrm*
000
o oo
•• M t
g J IS ^
i u s
I
r‘
(?9i ^TiS
ovctotoioiator
- I
■ I
--■»'iipy
roawAJM
aACmoD
» pB QHife HD
AM
MMt/SiCr
NOTE i VOV ADJUST afily affacta t»M SuS Dtoaiay Ml tha Mato Dtoatoy
eeeeawrewpwtoitoOtobytoaai • .toA^to^Ma»«#to
AWiO SVIDfO
rV^CATV
ae
Page 36

VOV ADJUST (Continued)
VOV AOHJtT
000
o oo
Operebwei
9p^om9
•cth# Down
OODOpOonOOptof
0* ^
sar
tW%«MWW
Mt .aSvSooKt
tho Up Puttoo (A) Of tho Down PoWofi {▼ ) to ooioot
tM A«pnu/Moc^ Puttoo to UlnarHw Moo «to Up Oman (▲ )
(▼ ) a o«|ool ao votftooi pie loro control i
fiOtWAMO
OACPWAJD
NwOplM«*»
MMt/sfcr
COiWteQiO«»««
37
Page 37

AUDIO
AU010
Vbu cw adMt wund quillty (BASS. TREBLE. LOUDNESS «nd QAM) to
sutyourtaato.
Ow byltwi (A)
lyUn»
lAI •r #»•
Down
hmHmm
(▼)
tm m^amt
irm. Um til«
plel
NOfi:
ihknmnucMom
AVI/wtcfTV
hifm.
aofwMp
A4CriM0
NOffir
Ihaaa ai fia BoK. I>«6A Ooi%
ontf coMdwi am Jdr ffi# IV 0^.
may ■ « no# dOtaf ta DVD. CO or m
38
Page 38

CLOSE CAPTION
QoM Caption diapleys the audio content of a program on the video monitor.
1. CAPTION • Show or hide the caption.
2. DISPLAY:
a. BOX • \bu can choose to box the caption.
b. SHADOW -Мэи can choose to show the caption in shadow (not boxed) brmaL
3. RETURN • Back to main menu display
NOTE:
Not aU channels will provide CLOSE CAPTION.
In the TV Main Display, press and release
the Down button (▼ ) to hIghBght CLOSE
CAPTION
Press and release the Menp/Sefecf button
to display the CAPTION Menu.
AUDIOVOX
MAIN OfSP
SUB OtSP
АиОЮ
CLOSE CAPTION
n^RCNT CONTROL
OSD SETUP
TV SETUP
BRIGHTNESS
CONTRAST
SATURATION
HUE
SHARPNESS
RECALL
EXIT
H:31^KHZ V:59.8HZ
Pressand release the Мег»ц/5е#ес#button
to select CAPTlON(1-4) and text (1-4) options.
DISPLAY CAP1
RETURN CAP2
640X480
AUDIOVOX
NO
CAP3
CAP 4
TXT1
TXT2
TXT3
TXT4
AUDIOVOX
CAPTION
DISPLAY
RETURN
640X480
H:31^KHZ V:59.8HZ
Pressand release the Шпц/УамсГbutton to
select DISPLAY.
NO
BOX
AUDIOVOX
NO
BOX/SHADOW
RETURN
640X480
1 H:31.4KHZV:59.8HZ |
640X480
H:31^KHZ V:59.8HZ
Э9
Page 39

PARENT CONTROL
In the Main Menu, press and release the
Down bution(T)tohighlight R\RENT
COr^TRCX.:
MAIN OISP
SUB DISP
MJDiO
CLOSE CAPTION
RWEVT CONTROL
oro SETUP
TV SETUP
BRIGHTNESS
CONTRAST
SATURATION
HUE
SHARPNESS
RECALL
EXIT
AUDIOVOX
6MX480
H:31^
Using the number buttons to Input the
fbur-dIgK Parent Control Password and
confirm using the Mww/wecf button
(Default Code is 3308)
IKHZ1M9^HZ
After entering the password the follawing
menu wll appear;
AUDIOVOX
SET PASSWORD
VCHIPLOCK
CLASS OPTION
MRAA OPTION
RETURN
640X480
H:31.4KHZ V:59.8HZ
After accessing the Parent Control Menu,
highlight SET PASSWORD and press and
release theWenu/Sefacfbutton.Then enter
8 4><Sgtt Password to change the Parental
Control Menu Password if de^red
40
Page 40

PARENT CONTROL (Continued)
From №e Parental Control Main Menu.
Press and release the Down button (t)
to highlight V-CHIP lock. Press and
release the Menu/Saiecf button:
Enable №e V-CHIP lock ftjnction by selectk^
YES ar)d disable by selecting NO.
From the Parental Control Menu.
Press and release the Down button to {▼)
highlght CLASS OPTION. Press and release
the Msnu/Mscf button:
AUDIOVOX
TV-Y
TV-Y7 YE8/NO
TV-G
TV«3 YES/NO
TV-14 YES/NO
TVMA YES/NO
RETURN
YES/NO
YES/NO
840X480
H:31^HZ V:59.8HZ
Select the desired age ctass and press and
release the Mwm/Tsiecf button.
Select RETURN to go back to the Parental
Control Мегш.
41
Page 41

PARENT CONTROL (Continued)
PARENTAL CONTROL RATINGS
From the Parental Control Menu, press and
release the Down button to highlight
MR^ OPTION and press Mttu/Stttet button.
AUDIOVOX
m
PG-13
R
NC-17
X
RETURN
YES/NO
YES/NO
YES/NO
YES/NO
YES/NO
YES/NO
Select the desired ratirtg level and press
ktmnu/Saimcibutton Srrtect RETURN to return
to the main Parental Control Menu.
CLASS OPTION
TV-Y TV-14
TV-Y7 TV-MA
TV-G Return
7V-PG
640X480
V;S9.SHZ
G
R
MPAA OPTION
PG
PG-13
NC-17
X
RETURN
42
Page 42

OSD SETUP
0«D SETUP
1.050 DMptoy Language • Salact the lenguaga of tna OSD
2.050 Dttotoy Cotor-Select >)« color of iBXt of №a OSD
3.0SD Displey Time-TTie user leleclBd ttrne peitod tfw tne OSD
dSpiayi (5.10,15 second»)
OfureUotiat PtmmM Up huttaa (A) #rlb# Dawt ШиНшл (▼)
rOMAfD
lAOrMVMP
Щк1М
UiM
VMTC
• 'HI «
4Э
Page 43

TV SETUP
TV SETUP
You can choose cable etandards.
AOOIERA8E : Add or Erase a TV or caole TV channel.
AUTO PROGRAM ; Used to scan TV or CATV for vaid channels Md placa I
into memory
Openalenei Preee the Up butte» ( A) or the E>ewn bultoe (▼)
te »elect eptfena end aree» the Menu/MTecT butte» to confirm.
fOtWAJD
9ACtWAJB>
MOTI
fh# iiD, WC »C w loeoi ccÉiJ# Sender* fid# il piviWd te pev by
fom èocot cobè$ COflIpQfty» if Pi# Cq*s Of Murid II vsiypoof
Py cf>qn*ig id do# *ti# Pire# cc*djySini end lUffAtdoScqw
op*L I#wcflÉ*prot*mSEp«Éb*KÌw/S*#bPi#
tou*d*0d#)9 ^
Page 44

PICTURE ADJUST(BRIGHTNESS/CONTRAST/SAnjRATION/HUE/SHARPNESS)
nCTUM ADJUST
You can a4ual picture funcSon.
Op^rwbcmm PrME tti# Up ayHoR (A)
•pliMM M«a prmm tto Manu/Mfac^
(A)*f Uw Oewm OntlM (▼) I*
MAIN OIS^
SU9DISP
AUOO
CLOSE CAPTON
RAREST CONTROL
OSD SETUP
CONTRAST
SATURATION
RUE
btfttw to
*'*" 640X4S0
H:31 ^HZVtSS.BHZ
MtM (▼) to(
UMtfMUp tofitofi
ptolurs wilt
iAOrVAaD
Page 45

RECALL and EXIT
HECALL
Automaticalty rmets all settings bed( to factory dstouL
O^aiatiwi Freaa the biitSeii I A) sf the DewR bwHee (▼ )
to aeleat opHeee mmd preee the Menu/M^ecT huttoe te eefrflrm.
OiDO^teOtapisr
IMN MP suaoisp
AUOO
CLOSE CAPTXJN
M^ENT CONTROL
OSOSCTUP
rvssnjp
BRIGHTNESS
CONTRAST
SATURATION
HUE
POtWAm
MCatWAfD
EXIT
NOTE: Recall wB not affect Parental Control ssOings.
EXIT
Exits the orvecreen-menu.
Operational Press the Up hutton (A) er the Down hetten {▼ )
te aelect optieea eeS press the Menu/wlocf hutten te cerHIrm.
IMJN OOP
8U6 0IBP
Hi31
a4flX4S0
AMZ
AUOC
CLOSE OPTION
h^RENT CONTROL
OSOSTTUP
TvarrxiP
SRHSHTHESS
CONTRAST
SATURATION
HUE
8KARPNCSS
JlSSISSa AHZ
46
Page 46

VGA INPUT SIGNAL AUTO TUNE AND SAVE EXIT
NOfL
topogmMelltMmanuollBrniinKltetmlomtcfitoVOAi/IOOt
AUTO TUNE
Automattcsiy adjusts piotur« quafity of tna VGA siQrtal input
fOSWASD
lAOrWUD
. tiM Up kuttMi (A) or tfM Dawn button (T)
to soloct opttena and prosa tho Manu/Soáocf button to confimi.
SAVE EXIT
Sava your saltings than axit manu.
47
Page 47

VGA INPUT SIGNAL COLOR SETUP
COLOR (Color toHipofturo)
You ctn choose four color Mtting».
1.9300 • The 9300 sating ii more blue than 6550.
2 7500 - The 7500 sattng le lees blue tien 9300.
3.6550 • The color ternperature eet№>g k stanOard
4. USER • Increases or decreases Red. Green or Blue color depenrttrtg
upon wrich is selected.
I the Up ewtte* I A) er bw Oew* betlee (▼) to eeleet
ithe Menui>:te<ee*e»ttoe to uitowuMeetoeWp tom—
(A) er toe Oewm hwttee (^ to eS|«et toe »ettoMe pletHre ceebol here.
NOTE:
9300,7500 and 6550 standards for Ms are preset at foe factory.
4S
Page 48

VGA INPUT SIGNAL QUALITY ADJUST
QUALITY
You can sdju«: VGA inpul signal ptdure quality.
o^mtan« ^nwMwUabMMwi(A)*rtlw
•StiwM ana tlM M«nu/3«iacf feutsaa t*
( A| er ew Oewe a*tte* ( ▼ ) ta aaNat «»•
oaopBaweapiBy
<amt^
tar**
&S^
rcanv
hM«a*i(T)la
UmMmUs
fOfMfJIO
lACXWAIO
!
QUALITY
1. Advanced Tuning AOV. TUNE - Autorrwticaliy adjusts image ctarrty and
stability.
2. SIZE - Adjusts imago size relative to the screen.
3. FOCUS • Controls imago clarity.
4. TEXT/OFX - Adjusts text sharpness when PC is in DOS mode.
6. SHARPNESS - At^usts imago sharpness relativo to the backgrcxjnd.
48
Page 49

VGA INPUT SIGNAL PICTURE POSITION SETUP
posmoN
You csn chooee vvtiere you would like the Image/OSO potiSoo to appear on your screen. You csn also choose the osd display mods and speed.
OpenOonsi Prww the Up Sutteii (A) sr the Dews Svtlsn (▼ ) ts select
eptleee mS pfsee the Msou/sstocT hiftten te oenWfitv Use the Up auttea
(A) Of
the Dewp battea < ^ Is sAiiet ttis vertoue plelure centre! I
_««BP
lauw
PSOTEi
•PCED OS t Used le anlmale the OSO.
•aeco AlU t Used te adjust the speed ef the MiokeUeii»
60
Page 50

OPERATION
1. ToanWFMMODC:
(A) Ramot* Control : Ргма tho FUNCTION budon. Tbo CVD plorar front panai AtnoOon Puttona wM IqM
evo-TV— FM.
(B) CM) Pl^far Front Pmi : Praaa tha FM butlarv
2. Ctianpa Channal
(A) RemoM Control ; Praax >*• ibution to inaaaaa FM atadon. Praax ibiAon to ооегама FM atation.
For aKBmpla: Wtian you lliten to Vta radio FM 107.7 ban praaa(»» Itogoto FM 107.8.
(B) Front Panai : RapUy ргам< /►»■ibutton to incraaaa tha FM мбог.
Raplety praax ««/»«« itxiOon to backward dacraaaa ba FM itxtof.
3. Auio-Scanrttog FM Chennai
(A) Ratnota Control ; Praax № tear atationa In ш upward Aaetton.
PtaaX raw )tMtton to acan ataliona In a downmwd dractfoa
(B) Front PanX ; Praaa arid hoW( WW4 / Ibuaon far about 3 aaoonda to aean h an upward dkacton
Praaa aiM noUr^w/nMibutMntoacanlnadowTMard diraettan.
4. Stop Auto-Seannino
(A) Ran^ Control : Praax ■ )bulton to atop auto-acannirtg.
(B) FmitF^Met Praax ■ »Mon to atop auibacannfrtg.
15
Um'
a '
i
nr,
3
A
i
or
51
Page 51

OPERATION (Continued)
I
Programming Preset Channels
This funtlon can only be performed using the remote contrt^:
1. Select an FM channel
Pressk>g by( mh )or(>«4 )to tune to your station.
For erample: FM107.7
2. Program
(A) Press the PROGRAM button, the back-Aghted panel wtl cAsplay the Image below.
(B) Pras8(»» x>r( )button to change the preset number.
For example: If you want to make FM 107.7 as the first Preset Channel, presar »»> ]or(
button, Increesi^ or decreasing the preset number.
Pnmmt numlMr
01 107.7 P
1
Ready to Program
Frequency
(C) Press PLAY( ^ )button to complete the proTamming process.
3. Playing a Channel
Praes the PLAYc > ^button one time, and the radio will tune to the first preset station.
Press the PLAY( > }two times, and the racSo will turn» to the second preset station.
NOTE:
If you pregrenonod 2 dWerwit diannol« by tho nnw ooSo numètr, tho erlglftal chon not wll
bo woiwitWow. Tbo oystom can only momoriao tho totoot piupoiiiiiwd cfcannoi.
NOTI:
TMs unit ho* a total of It prooots.
&2
Page 52

ADJUSTMENTS (Sound/Audio Frequency/Time)
L
DVD Player Front Panel Operatk)n
A. Рлма vex име-or VOLUME * f to
ОНАРНЮ EQ](Son( ршШ) Rmob СолМ )
Ргшл tie oppreprtsla bubxi to f>e efbcl
(NOWIAL - NOCK CUUStC - JAZZ -» POT)
SHOPS tbeCIseli
Pisn CLOCKmMEN buNort on Vw OVD PM f^nO
GIOCK • ALARM 8LECT.
APrwCLOavmiERbueofiisioewoocMOiOddtoptoyippwsto 12hMi
B. Prset TME SET Mton. Now *Hour* dOploy boglr« to ftdte.
РгмК № s4mI'Hour'dlHNt.
CPtoMimetSTbuaonitoto мп»«м*мьмм*(М||1*гЬоегаюаь«г
Pma< >«« Ми )to афм‘Mi'uto* Ом«ц1
£L P*e TIME SET buttort Mw Ihe •Seoorxf OepMy boohi to Nchw
Prw( )to s*M •SocomT dhpOy.
or
!«*S*s- •■s
I
AM
tÍ4SiS
thetMdúfm
B. Press TIME SET buSan to oomptoM Ihs Ctocfc ЛТтег A<luelnnenl pmoBSS.
натшгммшн Ssteni M Шш шН St s in«
1 Alarm Ssttng
A Prm ClOCKmMCR bum uno Sw FW Pvwl OMpMy ALARM.
B. Pmss TIME SET bumri. Now M "Hour* dOptoy bogirs to ibcNM.
PfSSs(»w-#^/wwws-)teiM*Houf'dliptoy
A« 5
¡W
C Pr«M ТШЕ scr bulon IT« Moorto mw N(M> tr« TAnuto* 0«ptoy bagnw to
Рпм( >•« ^ МИ )to Mt *Mnuto*
«Ir
300«
e PriM TIME ear button, tto Ь«*-1вМк< **• аррмт ALARM.
Tbsri peses end hold too to NmDoo tor 9 еюпек, the fnjri PenO Ooploy wN
B.Ths ALARM SotongpmsM Sttmplotod.
r 0 (Atom Symbol.
2 Сегюо Atom SeStoff
К PieesCLOCKHThCR button vnC too oscA-lghleddepliyB ALARM
B. Press TIME SET button unB ALARM oppe«.PwOi^t»8TOP( ■ button tor 3
ThoOwmK symbol eSdtooppow.Tho ALARM Sotting hoMieoiod.
S3
Page 53

Adjiistmont (Continued)
L
SLEEP
Th« System will ^Hrt Off a the preset ^HJt Off Time.
1 Sleep Setting:
A. Frees CLOCK/TIMER button until the Front Panel Display eppeers SLEEP.
B. Press TIME SET button to choose the time period that the unit wil shut off.
30mln Mmln 90min
C. Press and hold the PLAY{ ^ ^Mtton for few seconds The back*lighted panel win display the
i: SLEEP symbol
The Sleep Setting process is completed.
2 Cancel Sleep Setting:
A. Press CLOCKH'IMER button until the back-lighted display shows .SLEEP.
B. Press TIME SET button and then press STOP( ■ ibutton for Iw/ seconds.
The .SLEEP symbol wil dneppear. The SLEEP Setting is canoeled-
54
Page 54

TROUBLESHOOTING
I
Qeiord rsquMbog MMoa for Mt unK. ohock mo cht/i below tor o poMiole coum of the
proUen you «0 expertendog. Some Mnpie chedoi or • mMor eUMWw»< on your pert mcy emunaie
tte problem and loMom proper operttor . V you ere in doubt about eome of the check poin^ or tf the
ramedee tndeated in the chert do not eove tf« problem. eoneuR your doubt dealer.
DVD OPERATION
Symplam
When the pteytMick button ti
preeeed, pieybBCk does not
begm
No eeurd» or tou^ !•
dMbled
Sutione cannot be cperaieo •» buocmi de nd operate al el, try tuming ite power
Pia^eeok doae noi awt even
ehanafiieiaaaMM
The tttoc M hot when a I»
letavied
Subtldae do not appear
The engle wew cannot be
Ghen0Mt
DVD sebp eereen Room up * HI dia 8En№ MQon lo try and oanod tw ecreen
*lethefeconòerttibon7 (bttf tor4-Shoum)
*Keveyou raertededeìcotber than i OVDor Mueic
CO? {Ify^NMpieeee renKwett)
*le trw te (frty? (Wipe II de«))
*leihe CD ineened oonecty (Pleeee vertfy ite itel li
loeino oulwero)
* le mute eelhieiad? (Preea №e mute builon or
thè remoto)
* Ara au oeMaa oonnaoiad oorrecdy? (vohfy al Auditf
Video ceblaa are flmtly comaeted)
'Whan conreded lo an axlamal AMP, aet thè SPOIP
output IO *0N* (aee AUDIO SETUP)
iupply biiion d ttw mem latti *0^ end *On*
* liopereSanfofblddef)? (Commend mey not be
eaowed on M diec)
* ttthebutonlisuppoeelowofkbUdoeenotabyend
lum OFF and ON (he meln power.
* Seme Mae cennoi be ptayed back vlawng tmikaom
neve been aet. (8ae Pareni Contmi eeodon).
* TNa li noi e problem
* SubiMea ara r>ol recontaJ on thè DVD.
* Even witia DVD« iwiLhlriy cemat be dona al politi
where muft-enu^ iand eiored.
*Wno buBon li fucttonéng unpiug thè una end 10
iacondi balore pluggng II bade m.
•Try and rasatine firmware. Tum oFttia power and on
ma top d thè laiti prete and hokS me VOLv and hll me
Power buOorv. Onceyouseeme Voàmelnoeedng
on me vte) monitor retaeae me VOL-f button.
*tf tMi occun Irequengy, pteeae oodact your deder
Oegnoel^oluaoni
S5
Page 55

Troubleshooting (Continued)
I
For TV broadcuts
Symptom Diagnosis / SoluHon
Power does fW go on
Imsos tnekes. orimege Is
undatr
Thom are «pod on №•
ptdure. or tfw tcmn
shtttM
The ^nage eppears
onvrwi
Aeolor appoan.
or cekfs daappear
*la (no powar supply unptuggod Irom the wto eottet?
(Mska surs R is kiaartad into »a wsR ouUot)
*ls lha DC M on lha baao unR Rrmty oonnactad?
*la lha DC OUT on lha basa unR Ir^ connadod?
*la lha DC M on tha TV aacRon flnWy connedad?
*ls thers dagenarston, breakaga or aiaconnactton of
toe antenna or antenna wts7
*1$ toe antenna wtra oonnactoo oonsoRy?
*le the lyeltm etftacted (by fBcFo wave Msde^ence or
Induced eisUioniegnetic wave») by eademsl eouroet
(euioniQQne cr vam, ragn-venege wvae, neon,
motors, magnaCzad ttoal ftama.sto.)?
Turn off ttia power supply and try changing toe
equipment setup toeelton
*Tha antonna drscRon BhNtad?
‘Are rsllectivw slectiomegneec waves being received
from mountains or buMtogt 7
*le the equ^inteni being efleded by another TV
(eisctromegnedc Irderlsrartce}?
Cher^big the TV locMon mey cause improyement
Whan tna Imago is not
staUa. lha scraan turns
cpmplilety BLACK lora
patodoftims
The soeen goes darit
momeNaity when the
channel It changed.
Unable 10 Receive
broedcaating
*rNs occurs when tie slgrwHor drMng the video
mordlor is host, snd is not s maNuncdon.
*Tha screen is dvx tors moment to oonceal
no<aa generated whan cAangiig ohannats.
'Change caUa system stmidard(SRO. IRC. HRC)
(Imaga not dean change Cabla Standard)
* To chariga the cable standard »elect M£NU/SE1£CT bUton to erder the
TVOSO.
saloct TV SETUP end eotect the CABLE standard thet your cablo
prtntoar ie prnrkSrg to you.
* If you do not know the cable standard plaasa contact your cable prowldar
se
Page 56

Troubleshooting (Continued)
I
Ш»о*Пап*ом
Remole control cennot De
ooereied
hnag* Savori lo
OtMtmS
IMI dote oot FuKten M
Per Deer Merdai
TV « OFF «Kt №ere •
s8ll sound
* le battery exhausted, or la t)etiefy poiariy wrong?
* Aie you uiéng a un^vanel remola?
(The unit wiN not operate wttt ertother remote other then
the one supplied from the rnanufecbnr).
* Thv OVUM might be from e poor power oonrteeSon to the unft.
(Veri^ when you put the i#iS together that the DC power oorwtedor
wee oonnacted to the unit fkst before pluggir>g the AC a0a(4er mio the
ouOei).
* Unplug frie AC edapter from the weft end reinsert efter 10 seconds lo
meotve.
* Reset Ths Unit:
(1) Tum OFFlheunt
(Veifry that the top and button fghi are red, tndteatfrrg friey are OFF).
(2) ONLY from the top of the unti (Do Not Uee Remote) prees and
hotd the VOL «-button.
(3) Quiokfy press end releeee frie power button. (Green Ight ¥vH Re)
(4) Continue to prees and hold ths VOL « button undl ths vohjme
numbers start to Inaeaae on the TV.
(5) Power OFF the TV wiBi the TV POWER button on the top of me isml
(6) Wal 5 seconds and hit the main POWER button to turn on the DVD
and TV together.
(NOTE: The fbsl tme you power up the unK. ft needs 10 seconds to
fuly mwalln. Oo not touch any buttons).
* If uni does not respond Pul power end wsl 10 secor>ds befom
Ineertlng posmr.
This le 8 known Issue and Is part of the design. (The DVD base umt
needs to be powered OFF).
TV uni « ItfTìed on end
Me H NO plctufs nepc
■teysblech
Fr»qu*ntty nk*d quMtton« (Q&A)
Queetton Answer
Con 1 do video reoommg?
Ceni playback tea wlh
no region manbar?
Sound aaama
lowar than TV or redto,
ale
Can 1 playi^ick OVDa
porchaaao abroad?
Gan 1 playback yioaoa or
COapuchaaad ovaraaaa?
Once power « not gomg to the TV sectton. N acts as an mdepenoent unIL
The TV section needs a response from the base uni to inlielize.
(Prose me function button (OVD. TV, FM. AUX) on the bese to InItiaBzs)
'Abnoet el DVD (fiaoe have copy protection so recording io not pocsible
*The region number tndleatas toat toe dise oonflrme to the DVD stenderd.
* Dtecs which do not comply with the standard cwmot be played
‘Dolby oigiiel audio sHm*frt f>we a wUe dynemte range (Le., the
rartge between Ngh and low volume) so m gsneral volums sssms
to sound tow.
*1 ths reg>on numbar oonteins *ALL* or *1* and the formst ie NTSC,
it can be pisyed beefe
*They can be played beck tft^ey ere in NTSC formal.
S7
Page 57

Function List
1
TELEVISION
LCD Monitor
DVD Player
Support TV System NTSC
Support CATV 125 ChannolB STD/IRCmRC (tor North
Americs)
Support AIRTVVHF/UHF
Automatically scan TV channels
Use httgh-brfghtneaa TFT4.CD monitor 350 ctiM.
OSD (0n<^creen-Dtspl8y) setting
VOV (Video-On-ViPeo) display function
Support caption function
OSD adjustment function
Multi-input signals
Maximum high-resolution XGA 1024*768
DB-15 RGB mput(VGA)
Auto- tune input signal function
Definition 6300 temperature
DVD/JEPG/PIcturB - CD/MP3/Compact Disc
Composite A-Vxleo, S-Vkteo function
Digital Output System for Dotoy 5.1 channel and DTS 5.1
output
OSD (On-Scraen-Oisplay) arxl program function
Analog Dolby Pro Logic /DTS 2 channel output
Bult-in NTSC/PAL system decode function
FM Tuner
AUX
Clock Setting Clock display function
TVnerSettkig 12 hours mode setting, Alarm mode, Sleep mode
Input Connection TV antenna input
Auto-Scannfog
19 Presets
Choose external multi-device InpuKS -Video. A-Video or VGA)
FM antenna input
DC connector input (12V 5.0A max. (60w max)
S-Vxteo signal input
DB-1S VC^ Signal input
A-Video signal input
MINI DIN output (By manufacturer define)
58
Page 58

I
mm
U&er Manual
MINI DIN Cablo
(8 PIN) Q
Remote Control
Power Cord
DC to DC Cablo
S-Video Cable
(4 PIN) Q
VGA Cable
FM ANT Cable
w
Page 59

(FDA)CERTIFICATION
POWER CONSUMPTION 60WÎPOWER ON), lOWiSTAND BY)
WEIGHT lOKfl
DIMENSION
OPERATION ENVIRONMENT 576mmfWìx487mmÌH)x192nimiD)
TEMPERATURE
HUMIDITY 5-90%iNO CONOENSATIONÌ
. STORAGE ENVIRONMENT
HUMIDITY
5-50*0
5-50*0
5-90%(NO CONDENSATION)
Radiant Power frotn DVD
Laser Diode
Radiant №wer from CD Laser
Okxte
Radiant Power on surface
Oparation ar>d Storage
Environment
Temperature
Humidity
0.688 uW
1.24 uW
Meet FDA Gass)
5*50*0
5-90%(No condensation)
60
Page 60

AUDIOTOX
90 DAY LIMITED WARRANTY
COBPOBATION
MiDiOVOX ELECTRONICS COf№. (the Company) warrants to the original retail purchaser of this product that should this product or any part
thereof. UTKlor normal use and corrditlons, bo proven defective in material or workmanship wttNn 90 days from the dato of original purchase,
such defecUs) wil be repaired or replaoed vrilh recorxfttioned product (at ^ Company's option) without charge for parts arfo repair labor.
To obtain repair or replacemerTt within the terms of this Warranty, the product is to be delivered with proof of warranty coverage (a.g. dated
bin of sale}, specification ^ defect(8). transportation prepM, to the Company at the address shown below.
This Warrttity does not extend to the efimination of extemaly generated static Of noise, to oonection of anteorta problems, to costs incurred
for installBtion. removal or ralnstalatlon of the product, or to damage to 'apes, discs, speakers, accessortes. or electrical systems.
This Warranty does not apply to any product or part thereof which, In the opinion of the Company, has suffered or been damegad through
alteration, inproper installation, mishandling, misuse, neglect. accidenL or by removal or defacement of the factory serial number/bar code
label(8). THE EXTENT OF THE COMPANTS LIABILfTY UNDER THIS WARRANTY IS LIMITED TO THE REPAIR OR REPLACEMENT
PROVIDED ABOVE A№). IN NO EVENT. SHALL THECOMPANTS LIABILTIY EXCEED THE PURCHASE PRICE PAID BY PURCHASER FOR
THE PRODUCT.
This Warranty is in r»eu ofafl other express warranties or liabilities. ANY IMPUEO WARRANTIES. INCLUDING ANY IMPLIED WARRANTY
OF MERCHANTABIUTY. SHALL BE UMITEDTOTHE DURATION OF THB WRITTEN WARRANTY. ANY ACTION FOR BREACH OF ANY
WARRANTY HEREUNDER INCLUDING ANY IMPLIED WARRANTY OF MERCHANTABILITY MUST BE BROUGHT WITHIN APERIOD OF
30 MONTHS FROM DATE OF ORIGINAL PURCHASE. IN NO CASE SHALL THE COMPANY BE LIABLE FOR ANY CONSEQUENTIAL OR
INCIDENTAL DAMAGES FOR BREACH Of THIS OR ANY OTHER WARRANTY, EXPRESS OR IMPLIED, WHATSOEVER. No person or
representative is authorized to assume for the Company any lablity other than expressed herein in connection wHh the sale of this product.
Applies to Audiovox Video Products
Some states do not aHow limitations on how lortg Impled warranty lasts cr the exclusion or limitation of Incidental or consequential damage
so the M)ove liTritatione or exclusions may not apply to you. This Warranty gives you specific legal rights and you may also have other rights
which vary from state to state.
U.SX: AUDIOVOXELECTRONICSCORPORAT10N,1SOMARCUSBlVD..HAUPPAOOE.NEWYORK 11788 yl*a0(V645<4994
CANADA: CALL 1-800445-49M FOR LOCATK3N Of WARRANTY STATKDN SERVING YOUR AREA
raaaaBC a
 Loading...