

Page 1
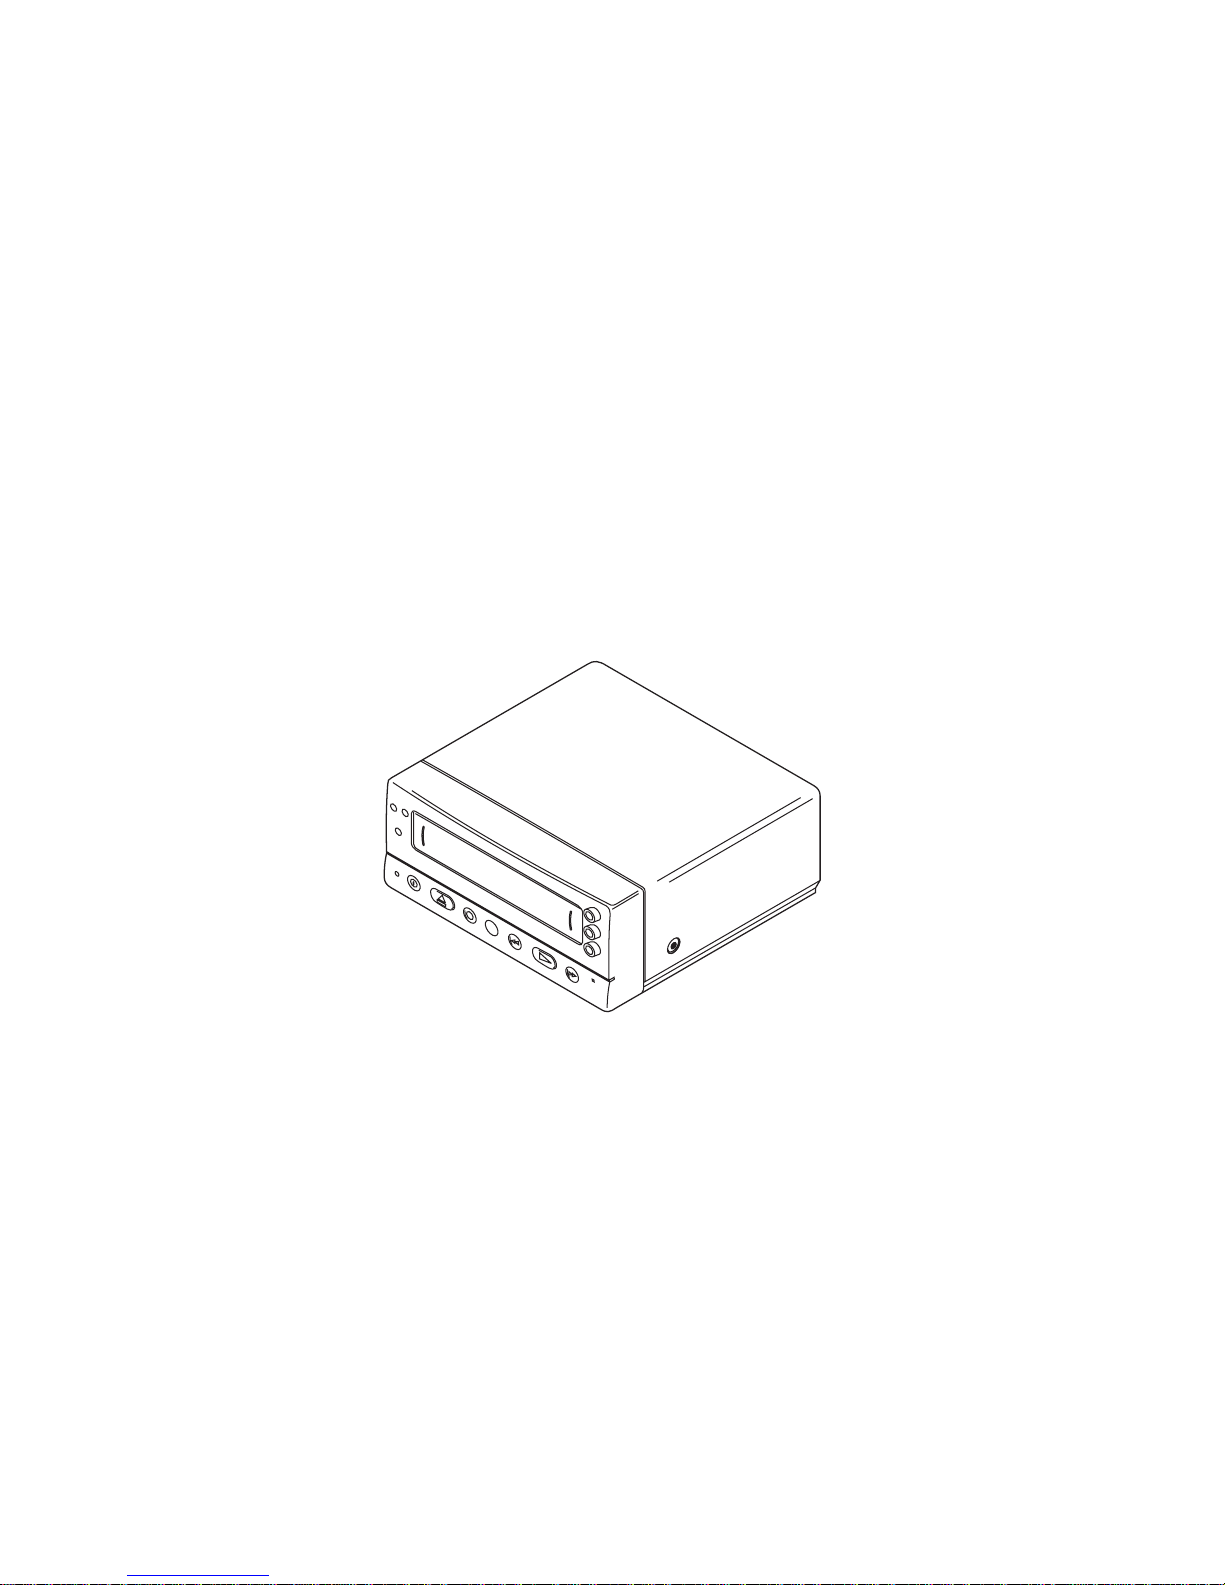
MINI VIDEO CASSETTE PLAYER
MODEL NO.:
VCP-752
OPERATING INSTRUCTION
Page 2

SAFETY INSTRUCTIONS
1. Read Instructions-All the safety and operating instructions should be read before the
appliance is operated.
2. Retain Instructions- The safety and operating instructions should be retained for future
reference.
3. Heed Warnings-All warnings on the appliance and in the operating instructions should
be adhered to.
4. Follow Instructions-All operating and use instructions should be followed.
5. Cleaning-Unplug this video product from the wall outlet before cleaning. Do not use
liquid cleaners or aerosol cleaners. Use a damp cloth for cleaning.
6. Attachments-Do not use attachments not recommended by the video product manufacturer as they may cause hazards.
English
7. Water and Moisture-Do not use this video product near water-for example, near a bath
tub, wash bowl, kitchen sink, or laundry tub, in a wet basement, or near a swimming
pool, and the like.
8. Accessories-Do not place this video product on an unstable cart, stand, tripod, bracket,
or table. The video product may fall, causing serious injury to a child or adult, and
serious damage to the appliance. Use only with a cart, stand, tripod, bracket, or table
recommended by the manufacturer, or sold with the video product.
9. Ventilation-Slots and openings in the cabinet are provided for ventilation and to ensure
reliable operation of the video product and to protect it from overheating, and these
openings must not be blocked or covered. The openings should never be blocked by
placing the video product on a bed, sofa, rug, or other similar surface. This video
product should never be placed near or over a radiator or heat register. This video
product should not be placed in a built-in installation such as a book case or rack
unless proper ventilation is provided or the manufacturer’s instructions have been
adhered to.
10. Power Sources-This video product should be operated only from the type of power
source indicated on the marking label. If you are not sure of the type of power supply
to your home, consult your appliance dealer or local power company. For video products intended to operate from battery power, or other sources, refer to the operating
instructions.
2
Page 3

English
11. Power-Cord Protection-Power-supply cords should be routed so that they are not
likely to be walked on or pinched by items placed upon or against them, paying particular attention to cords at plugs, convenience receptacles, and the point where they
exit from the appliance.
12. Lightning-For added protection for this video product receiver during a lightning storm,
or when it is left unattended and unused for long periods of time, unplug it from the
wall outlet and disconnect the antenna or cable system. This will prevent damage to
the video product due to lightning and power-line surges.
13. Overload-Do not overload wall outlets and extension cords as this can result in a risk
of fire or electric shock.
14. Object and Liquid Entry-Never push objects of any kind into this video product through
openings as they may touch dangerous voltage points or short out parts that could
result in a fire or electric shock. Never spill liquid of any kind on the video-product.
15. Servicing-Do not attempt to service this video product yourself as opening or removing covers may expose you to dangerous voltage or other hazards. Refer all servicing
to qualified service personnel.
16. Damage Requiring Service-Unplug this video product from the wall outlet and refer
servicing to qualified service personnel under the following conditions:
a. When the power-supply cord or plug is damaged.
b. If liquid has been spilled, or objects have fallen into the video product.
c. If the video product has been exposed to rain or water.
d. If the video product does not operate normally by following the operating instruc-
tions. Adjust only those controls that are covered by the operating instructions as
an improper adjustment of other controls may result in damage and will often
require extensive work by a qualified technician to restore the video product to its
normal operation.
e. If the video product has been dropped or the cabinet has been damaged.
f. When the video product exhibits a distinct change in performance-this indicates a
need for service.
3
Page 4

17. Replacement Parts-When replacement parts are required, be sure the service technician has used replacement parts specified by the manufacturer that have the same
characteristics as the original part. Unauthorized substitutions may result in fire, electric shock or other hazards.
18. Safety Check-Upon completion of any service or repairs to this video product, ask the
service technician to perform safety checks to determine that the video product is in
proper operating condition.
19. The ON/ST ANDBY Button does not completely shut off mains power from the unit, but
switches operating current on and off.
English
4
Page 5
English
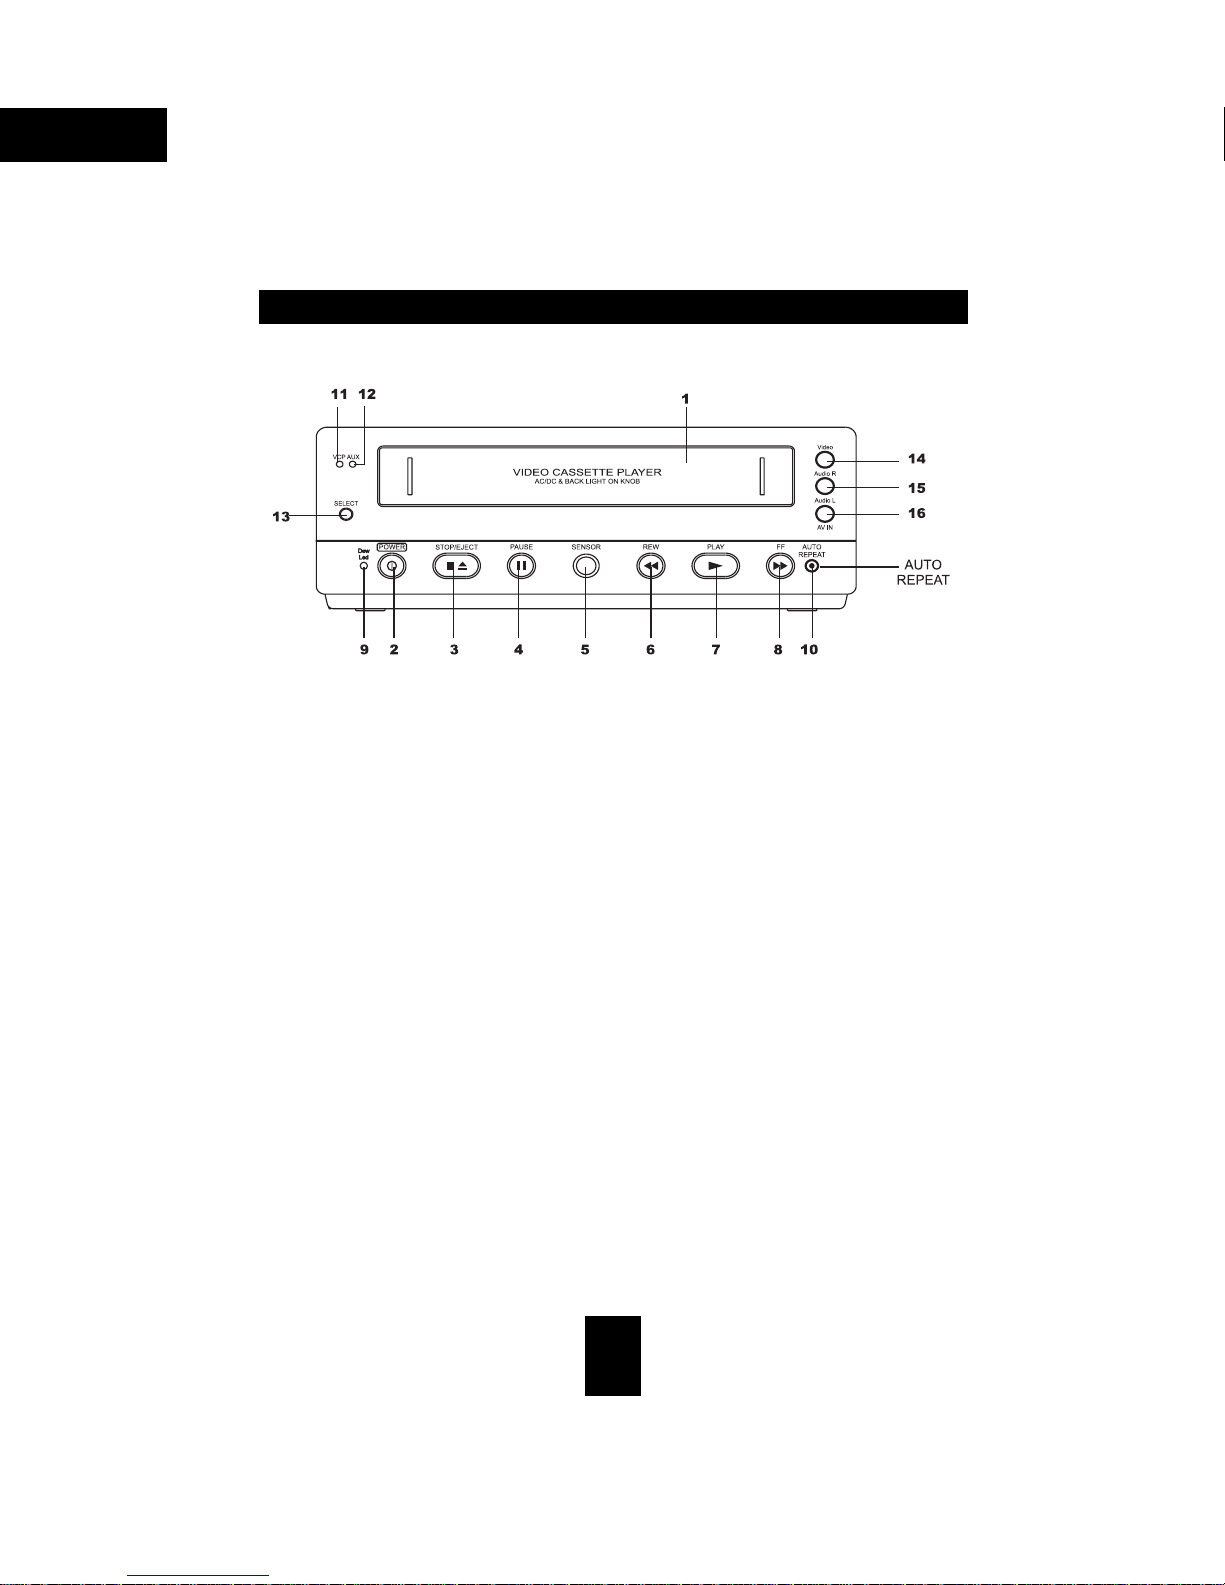
CONTROLS AND COMPONENTS
FRONT
1. VIDEO CASSETTE COMPARTMENT
Push the cassette gently into the compartment until you feel automatic pull. And then,
power on automatically and VCP goes to “PLAY MODE.”
2. ON/STANDBY BUTTON
Push this button turns to power ON or STANDBY.
3. STOP/EJECT BUTTON
Push to stop the tape during playback, rewind or fast-forward. One again push this
button to remove the cassette.
4. PAUSE BUTTON
Push this button turns picture pause. If push this button again, that will be frame
advance.
5. INFRARED REMOTE SENSOR
Receives from infrared Remote control.
6. REW (Rewind/Reverse Picture Search) BUTTON
Push this button to rewind the tape. Push for reverse picture search during playback.
Push for high speed reverse picture search during the reverse picture search. When
the picture reaches the point you are looking for, push the PLAY button to resume.
5
Page 6

7. PLAY BUTTON
Push this button to playback a recorded tape. when auto tracking working. PLAY led
blinks.
8. FF(Fast Forward/Forward Picture Search) BUTTON JET-FPS
Push to move the tape forward rapidly. Push for forward rapidly. Push for forward
picture search during playback. Push for high speed forward pictures search during
the forward picture search. When the picture reaches the point you are looking for,
push the PLAY button to resume normal playback.
9. DEW LED
When DEW LED light is on, the VCP will not be able to work, which shows the VCR is
under a high moist circumstance. Then the VCP will dry itself automatically and turn
the light off, while moist disappear, and works normally.
10. AUTO REPEA T BUTTON
Press “AUTO REPEAT” button to turn on the auto repeat function. When the tape
reaches the end, the VCP will automatically rewind the tape to the beginning and
replay the VCP. Unless the “AUTO REPEAT” is off, the repeating cycle will continue.
While auto repeat is functioning, other functions of the VCP will not be able to be
used. If you want to use other functions, press repeat.
English
11. VCP LED
When output is VCP mode, the VCP LED is lit.
12. AUX LED
When output is AUX mode, the AUX LED is lit.
6
Page 7

English
13. VCP/AUX BUTTON
Push this button to select VCP mode output or AUX mode output.
14. VIDEO INPUT
To receive video signal from your TV game or other video source.
15. RIGHT AUDIO INPUT
To receive right audio signal from your TV game or other (right) audio source.
16. LEFT AUDIO INPUT
To receive left audio signal from your TV game or other (left) audio source.
NOTE:
If you want to go to “FF(REW)” mode directly after inserting the tape, you must do a
“STOP-FF(REW)” sequence.
7
Page 8

REAR
1. 12V DC POWER INPUT JACK
Permits DC 12V power source connection of your unit to a DC battery, car battery, or
AC/DC adapter.
English
2. AUDIO OUTPUT
To send audio signals for FM transmitter.
3. AUDIO INPUT
To receive audio signals from a TV tuner.
4. VIDEO INPUT
To receive video signals from a TV tuner.
5. VIDEO OUTPUT
To send video signals from your unit to a monitor or another VCP, connect the video
output jack to a monitor/VCP’S video input jack.
6. RIGHT AUDIO OUTPUT
To send right audio signal output to a monitor or another VCP, connect the right audio
output jack to a monitor/VCP’s right audio input jack.
8
Page 9

English
7. LEFT AUDIO OUTPUT
To send left audio signal output to a monitor or another VCP, connect the left audio
output jack to a monitor/VCP’s left audio input jack.
CAUTION:
Under DC power source (12V) condition, if DC power source level of a DC battery or
car battery drops, noise bar may be flow in FF/REW picture search mode.
NOTE:
When the unit is not used for a long time, turn off power button and pull out AC power
plug.
9
Page 10

CONNECTIONS
HOW TO HOOK UP YOUR VCP TO YOUR TV OR MONITOR
PLA Y MODE.
Connect your VCP video output jack to TV or MONITOR’S video input jack.
VCP audio output jack to TV or MONITOR audio input jack.
English
HOW TO USE THE AUX JACK
(THERE ARE FRONT AND REAR TWO WAYS)
1. FRONT
Input the TV game’s Audio and Video signals.
10
Page 11

English
2. REAR
Input the TV tuner or other normal Audio and Video signals.
NOTE:
When both front and rear input are plug in. Front input is first priority than input.
HOW TO USE DC POWER SUPPLY
The VCP is designed for DC 12 Volt operating.
Vehicle Battery Power
Use only DC power cord with the same polarity as made in
back
panel to operate the VCP in your vehicle. If you do not DO so,
the VCP will be damaged.
1. Plug the end of DC power cord into the DC 12V jack on the
back of the unit.
2. And then, plug the other end into the cigarette lighter socket
in your vehicle.
Follow the operation instructions in this manual.
Note:
To assure solid connection, make sure the cigarette lighter socket is free of cigarette
ash built-up.
Do not leave the DC power cord plugged into the cigarette lighter socket, when the other
end is disconnected from the VCP. This prevents a shock hazard and a damage in your
car or DC power cord.
If you want to purchase DC power cord, purchase from dealer or a qualified service
center after asking an advice.
11
Page 12

PLA Y BACK
1. Turn TV on and select to Video mode.
2. Insert VIDEO CASSETTE TAPE.
3. Then, POWER ON/STAND BY turns on automatically.
4. And, VCP goes to PLAYBACK mode automatically.
5. At the end of tape. The VCP rewinds the tape automatically.
HOW TO USE THE TRACKING CONTROL
If there is a noise bar in the playback picture. On your remote control set. Adjust the
TRACKING UP/DOWN Button . Slowly in either “∠” or “∩” direction until you get the clear
picture.
English
PICTURE SEARCH
During playback, you can move the tape quickly in either direction (forward/FF, reverse/
REW) to search for a particular tape segment:
If you wish to move the tape forward at high speed, push FF(fast forward) button.
If you wish to move the tape backward (in reverse) at high speed, push REW button.
During picture search mode, there will be no sound.
PUSH FOR RPS & JET-RPS
(reverse picture search)
Press FF/REW button during play back to get 5-time speed searching, twice to get 7-
time speed. And the FF/REW LED blinks when searching.
PUSH FOR FPS & JET-FPS
(forward picture search)
12
Page 13

English
A WORD ABOUT THE CASSETTE
TYPES OF VIDEO CASSETTE USE
Maximum
Playback Time(SP)
T-180 T-120 T-60
3HRS 2 HRS 1 HR
In addition to the tapes specified above, the unit will accept any cassette tape which has
the VHS mark.
NOTES FOR VIDEO CASSETTE USE
Video Cassettes and their tapes are made with high precision.
Be sure to observe the following points.
Don’t subject the tape to unnecessary movement.
Video Cassettes can only be used with the window side up, and the arrow pointing
away from you.
Don’t insert and eject the video cassette over and over again, because this may result
in tape looseness or scratches on the tape.
Never try to disassemble the cassette or splice the tape.
Don’t open the cassette, touch the tape, or put anything inside the cassette.
VIDEO CASSETTE STORAGE
Avoid places where humidity is high or there is dust.
Avoid places where there is magnetism (magnets, motors, transformers, speakers, etc.)
Avoid dropping the cassette, don’t subject it to intense shaking or vibration.
Don’t place cassettes in direct sunlight, keep them away from sources of heat. Store in
a vertical position.
For best results, store the cassette with the tape fully rewound.
Do not touch the tape surface itself. Dirt and oil from your skin may deteriorate the tape
coating.
For your convenience your VCP Model comes with a remote control which has VCP
functions.
13
Page 14

INFRARED REMOTE CONTROL
POWER BUTTON
P AUSE/ STILL BUTT ON
REWIND BUTTON
Push this button to rewind
the tape rapidly
English
STOP BUTTON
PLA Y BUTTON
FAST FORWARD BUTTON
Push this button to move the
tape forward rapidly
TRACKING UP/ DOWN
BATTER Y REPLACEMENT CAUTION
The Infrared Remote Control is powered by two “AAA” size batteries. The life of the batteries is about one year, although this will depend on the number of times the unit is used.
Replace or inspect the batteries once a year.
Load the new batteries with their polarities (“∠” or “∩”) aligned properly.
Do not threat, disassemble or short-circuit the old batteries.
If you do not intend to use the Remote Control for a long period of time, remove the
batteries and store them in a cool, dry place.
Remove old batteries immediately and dispose of them.
Do not mix old and new batteries.
An extend of Infrared Remote Control could be shortened in direct sunlight.
14
Page 15

English
LOAD THE BATTERIES AS FOLLOWS
1. Remove the Battery Compartment lid.
2. Place two batteries in the Battery
Compartment as indicated inside the
Battery Compartment.
3. Replace the lid.
CLEANING CARE FOR VIDEO HEADS
Head Cleaning
Picture playback may become blurred or interrupted while the TV program received is
clear. Normally, VCP will not require head cleaning. But dirt accumulated on the video
heads after long periods of usage causes such troubles. In this case, head cleaning may
be required.
Cleaning the Heads
To clean the heads, obtain a head cleaning tape from your local video dealer. Be sure to
follow the instructions that come with the cleaning tape as excessive use can shorten head
life.
15
 Loading...