

Page 1

PRESTIGE
aWiMER’S
af=»EnATIi\iG
UMSTRUCTiOfMS
PRESTIGE
IK5 Oser Ave.. Huuppauge. NY 117KX
1^4 Prinleil in Jupun
HANDHELD PORTABLE
CELLULAR TELEPHONE
Page 2

TABLE OF CONTENTS
SYSTEM CONFIGURATION
WRIST STRAP ATTACHMENT (OPTION)
BATTERY INSTALLATION AND
RECHARGING..........................................................8
To Attach the Battery Pack
To Detach the Battery Pack
To Recharge Battery
IMPORTANT SAFETY INSTRUCTIONS...................11
PRECAUTIONS
GENERAL SPECIFICATIONS ....................................13
FEATURES AND OPTIONS
FUNCTIONS
BASIC OPERATION.....................................................17
Turning the Unit On/Off
• Antenna Position
• Receiving Signal Strength Indicator
• Battery Level Indicator
To Store a Number in Memory
To Recall a Number from Memory
To Review the Prefix
Display Own Telephone Number
Repertory Memory Scroll
Automatic Storing into a Vacant Memory
Address
To Lock the Unit
To Unlock the Unit
Volume Control
...........................................................
................................................................
.......................................
................
........................................
12
14
15
6
7
Page 3

PLACING TELEPHONE CALLS
To Place a Call
If the Call Fails to Go Through
Automatic Redial (NAM Option)
Terminating a Call
To Receive Calls
Silent Incoming Calls
Any Digit Key Answering (NAM Option)
Automatic Answering
To Place a Call with a Number in the Memory
Speed Dialing
Last Number Redial
Programmable Emergency Call (NAM Option)
One Touch Emergency Call
To Mute a Phone Conversation
ONE TOUCH DIALING...............................................24
To Store a Number into One Touch Memory
To Place a Call to a Number in One Touch Memory
END-TO-END SIGNALING
SCRATCH PAD DIALING..........................................25
SCRATCH-PAD DIALING
WITHOUT KEYING TONES
CALL TIME DISPLAY
To Display the Talk Time
Outgoing Call Timer Only (NAM Option)
To Clear the Timer
................................................
.................................
........................................
................................
20
25
25
26
SID MANAGEMENT (NAM OPTION)
A/B SYSTEM SELECTION.........................................27
MULTIPLE CITY REGISTRATION...........................28
LAST RESCAN SID INDICATOR..............................29
AUTOMATIC CALLS IN ABSENCE
INDICATOR.........................................................29
IMPORTANT SAFETY INFORMATION...................30
WARNING....................................................................30
......................
27
Page 4

PRESTIGE
PR-140
HANDHELD PORTABLE
CELLULAR TELEPHONE
Congratulations... You have just purchased one of the
most advanced, yet simple to use handheld cellular
telephones in the market today. Your new PR-140
allows you the freedom to enjoy the benefits of cellular
communications without the limitations.
It has been built to the same exacting level of high
engineering standards that has made the Prestige
cellular telephone line a top rated brand in the
industry.
The PR-140 is packed with advanced features that
provide the ultimate in convenience and safety, like
one touch dialing, programmable emergency calling
and a constant signal strength and battery life
indicator.
It also features “Any Digit Key Answer” that allows
you to answer a call by pressing any of the numbered
keys on the keypad. For ease of operation, the PR-140
has been designed with a feature menu printed directly
on the key pad. By simply pressing the green function
button and the feature you wish to access, your
desired function is complete. It's that simple!
SYSTEM
CONFIGURATION
System configuration and the equipment list are as
shown below.
Optional accessories include a desk top charger, a
slim profile battery and an earphone microphone for
hands free use. A cigarette lighter adapter and leather
carrying case are also available.
And of course, your new PR-140 comes with something
only a Prestige phone can provide. The proven reli
ability that has made Prestige one of the worlds
leading suppliers of cellular communications
equipment.
List of Equipment
No.
Name of the Equipment
Handheld Portable Telephone
Battery Pack (BTE-425)
Travel Battery Charger (TRC-700B)
Page 5
WRIST STRAP
ATTACHMENT (OPTION)
BATTERY INSTALLATION
AND RECHARGING
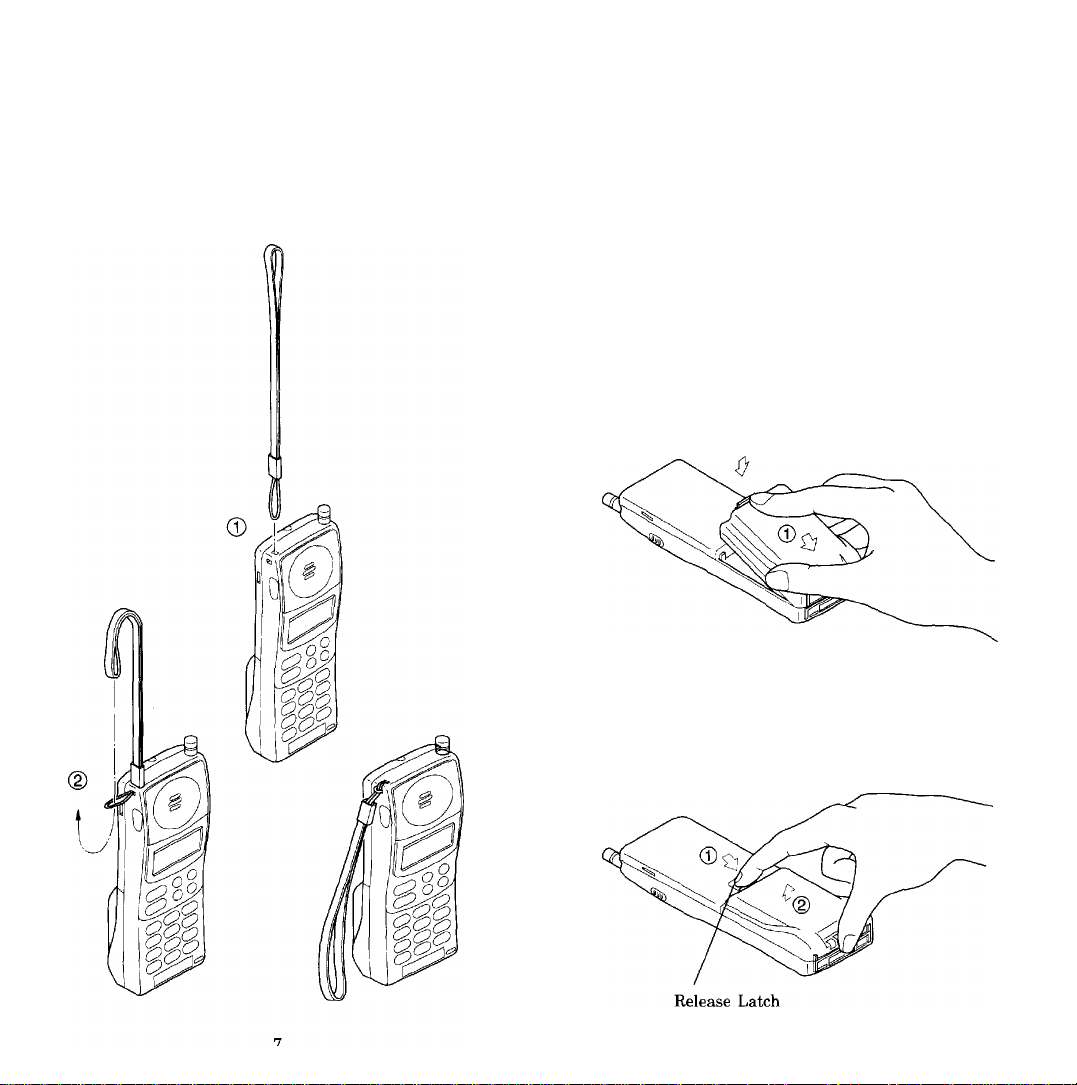
Attach the wrist strap WS700 (option) to the unit through
the strap hole as shown below (D.
Then put the long loop through the smaller loop as
shown below
The Portable Telephone contains a Detachable Battery
Pack (BTE-425). Fully charged Battery Pack offers
approximately 90 minutes Talk Time or 16 hours standby.
It is recommended to carry one fully charged spare
Battery Pack for longer operation.
(Additional Battery Packs may be purchased at your
Cellular Telephone Dealer.)
To Attach the Battery Pack
0 Insert the hook at the end of the Battery Pack into
the slot at the end of the unit.
® Press the Battery Pack down to lock the Battery
Pack onto the unit.
To Detach the Battery Pack
© Press the Release Latch as shown below.
® Lift up to remove the Battery Pack from the unit
gently.
Page 6
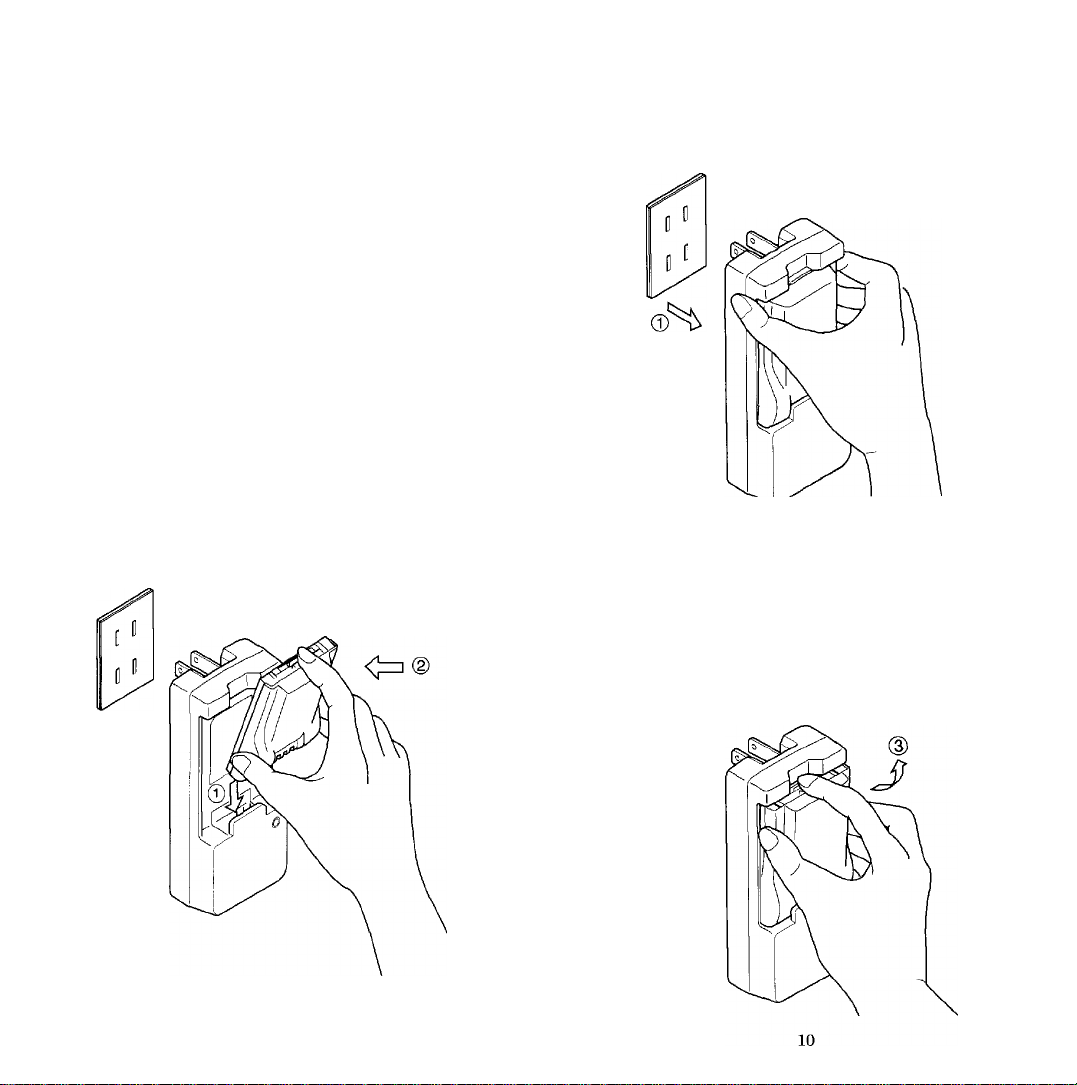
To Recharge Battery
The Travel Battery Charger (TRC-700B) can recharge
the Standard Battery (BTE-425) in 10 hours, the
optional Slim Battery (BTR-700) at 6 hours or the optional
Long Life Battery (BTE-700) in 10 hours respectively.
1. Set the Battery Pack
(D Holding the Travel Battery Charger in your hand,
insert the Battery Pack into the Travel Battery
Charger.
@ Press the Battery Pack down to lock the Battery
Pack onto the Travel Battery Charger.
2. Flip up the blades on the back side of the Travel
Battery Charger and plug into AC outlet. The LED
(Light Emitting Diode) on the Travel Battery Charger
will light red while recharging.
The light will shut off when charging is complete.
3. After recharging has been finished, unplug from AC
outlet and take off the Battery Pack so as not to
reduce the life and capacity of the Battery Pack.
(D Unplug from AC outlet by holding the top of
Travel Battery Charger as shown below.
Note: (1) Environmental temperature for full battery
recharging with fixed time: 0 ~ +35“C
(2) We recommend you to set the Battery Pack
in to the Travel Battery Charger and plug
into AC outlet as shown below.
Holding the Travel Battery Charger with your
hand, and then press the Release Latch as shown
below.
I Lift up to remove the Battery Pack from the
Travel Battery Charger gently.
Page 7

IMPORTANT
PRECAUTIONS
SAFETY INSTRUCTIONS
for Travel Battery Charger
1. SAVE THESE INSTRUCTIONS - This manual con
tains important safety and operating instructions for
battery charger.
2. Before using battery charger, read all instructions
and cautionary markings on (1) battery charger, (2)
battery, and (3) product using battery.
3. CAUTION - To reduce risk of injury, charge only Nicd type and Ni-MH type rechargeable batteries. Other
types of bat-teries may burst causing personal injury
and damage.
4. Do not expose charger to rain or snow.
5. Use of an attachment not recommended or sold by
the battery charger manufacturer may result in a
risk of fire, electric shock, or injury to persons.
6. An extension cord should not be used unless abso
lutely necessary. Use of improper extension cord
could result in a risk of fire and electric shock. If
extension cord must be used, make sure:
a. That pins of plug of extension cord are the same
number, size, and shape as those of plug on
charger;
b. That extension cord is properly wired and in good
electrical condition; and
c. That wire size is large enough for AC ampere
rating of charge.
7. Do not operate charger with damaged plug - replace
charger immediately.
8. Do not operate charger if it has received a sharp
blow, been dropped, or otherwise damaged in any
way; take it to an authorized Audiovox cellular
service center.
9. Do not disassemble charger; take it to an authorized
Audiovox cellular service center when service or repair
is required. Incorrect reassembly may result in a risk
of electric shock or fire.
10. To reduce risk of electric shock, unplug charger from
outlet before attempting any maintenance or cleaning.
Your Handheld Portable Telephone is a high quality
piece of equipment. Before operating the equipment,
please take the following precautions.
1. Don’t use this equipment in an extreme environment
where high temperature or high humidity exists.
2. Don't abuse the equipment. Avoid striking, shaking
or shocking. When not using the unit, lay down the
unit to avoid possible damage due to instability.
3. Don’t expose this equipment to rain or spilled bever
ages.
4. Recharge the battery fully before your first use of the
unit.
5. When the battery becomes discharged, two beep tones
will be heard every 10 seconds, and the battery level
indicator Balll will be flashing. In such a case,
replace the battery with a fully charged one, and
recharge the discharged battery.
6. To ensure long battery life, operate the unit until the
battery level indicator Balll flashes, then
recharge the battery. Remove Battery Pack from the
unit when it is not expected to be used for a long
period.
Recharging at least once every month is recommended
when not being used.
7. Don't charge the Battery in an area with direct
exposure to sunlight.
The product that you have purchased contains a rechargeable Battery. The Battery
Ni-Cd is recyclable. At the end of it's useful life,
under various state and local laws, it may
be illegal to dispose of this Battery into the municipal
waste stream. Check with your local solid waste
officials for details in your area for recycling options
or proper disposal.
11
12
Page 8

GENERAL
SPECIFICATIONS
FEATURES AND
OPTIONS
{Subject to change without notice)
Frequency Range
Number of RF Channels
Channel Spacing
Duplex Spacing
Frequency Stability
RF Output Power
Receiver Sensitivity
Modulation/Demodulation
Operating Temperature
Supply Voltage
Current Drain
Operating Time
Size
Weight
824 to 849 MHz, Transmit
869 to 894 MHz, Receive
832, Full Duplex
30 KHz
45 MHz
+2.5 PPM
0.6W ERP With Power
Control
-116 dBm (12 dB SINAD)
Voice PM (With Compander)
Data FM
-20°C to +60°C
4.8 V
(Nicd Battery 1.2 V x 4,
800 mAH)
In Use;
Approx. 500 mA
Standby;
Approx. 50 mA
Talk;
Approx. 90 min.
(at full power output)
Standby;
Approx. 16 hours
Approx.
25 (H) x 53 (W) X 160 (D) mm
0.96 (H) X 2.1 (W) X 6.3 (D) inch
Approx. 260 gr (9.2 oz)
Push Button Dialing
Large Size LCD Display
Status/Function Indicator
8 Digits Dial Number
Receiving Signal Strength Indicator
Battery Level Indicator
(Electronic) Volume Control
Pre-set Dialing up to 32 Digits
Extended Readability (Prefix Review)
Last Digit Clear
Digit Display Clear
Programmable Emergency Call (NAM Option)
One Touch Emergency Call
Repertory Dialing: 32-Digit 30 Memories
Speed Dialing
Repertory Memory Scroll
Automatic Storing into a Vacant Memory Address
One Touch Dialing
Any Digit Key Answering (NAM Option)
Automatic Answering
Last Number Redial
Automatic Redial (NAM Option)
Mute
Scratch-pad Dialing (with/without Ke3nng Tones)
End-to-End Signaling
Continuous DTMF from Keypad
Silent Incoming Calls
Call Time Display
Automatic Calls in Absence Indicator
Display Own Telephone Number
Multiple A/B System Selection
SID Management (NAM Option)
Multiple City Registration
Last Rescan SID Indicator
Electronic Lock
13
14
Page 9

FUNCTIONS
EarphoneMic Jack
(1) IN USE —
(2) NO SVC(3) ROAM —
(4) LOCK—
(5) Power
(6) Receiving-
(10) Send Key—.
(11) End Key—
(13) One Touch J
(14) Digit-
---
Indicator
Signal
Strength
Indicator
Emergency
Key
Keys
Retractable
Whip Antenna
Earpiece
-(7) Battery
Level
Indicator
|—(8) Digit
_| Display
-(9) Mute
Indicator
(12) Power
On/Off Key
(15) One Touch
Dial Key
16)Volume
Key
—(17) Function
Key
“Microphone
IIN USEl indicator lights when a call is in progress.
(1)
I NO SVCl (no service) indicator lights when the unit is
(2)
in a non-coverage area.
(3)
I ROAM I indicator lights when the unit is out of the
home area.
(4)
I LOCK I indicator lights when the unit is locked.
H is used as a POWER ON indicator which lights
(5)
when the unit is turned on.
(6)
RECEIVING SIGNAL STRENGTH INDICATOR;
The number of shaded blocks indicates the Receiv
ing Signal Strength.
(7)
B.lll is used as a battery level indicator.
(8)
8-CHARACTER FUNCTIONAL DIGIT DISPLAY:
The remaining character show the last digits of the
dialed number.
(9)
informs that the microphone has been switched
off.
(10) (si^ (send key) is used for placing or receiving
a call.
(11) (™) (end/clr key)
• To terminate a call, press more than 0.5 sec.
• To clear the last digit, press less than 0.5 sec.
• To clear all the digits, press @,
(12) @ (power on/off key) is used to turn on/off the unit.
(13) One Touch Emergency key.
(14) DIGIT KEYS to enter a phone number.
(15) ® (one-touch key) allows you to place a call with a
single key stroke.
(16) @ (volume key) is used to control Earpiece audio
level as well as the Alert Tone.
(17) (function key) shifts the digit keys to the
functional keys.
• Earphone Mic Jack is used for handsfree operation
with EM-425 Earphone Mic (option).
15
16
Page 10

BASIC OPERATION
Turning the Unit On/Off
Press @ for about one second to turn on the unit. All the
indicators and digit display will light momentarily, and
a tone will be heard. The indicator |T] will stay while the
unit is turned on. Press @ again for about one second to
turn off the unit.
• Antenna Position
Your portable cellular telephone is equipped with a dual
position antenna system.
This dual position antenna has been especially designed
to allow your phone to receive calls while the antenna is
down. However, for optimum performance and signal
strength or while operating in poor signal areas, it is
recommended that the antenna be fully extended.
Note: The antenna can be used in its fully extended or
fully retracted position only.
• Receiving Signal Strei^h Indicator (Talll )
The number of shaded blocks indicates the Signal
Strength in your area. Four blocks show the maximum
level. The display will vary as you move with the unit.
If the signal is not strong enough to place a call, the
INO SVCl indicator will appear on the readout.
• Battery Level Indicator
You can always monitor the current battery voltage level
with the constant battery level indicator. The number of
blocks indicates the battery conditions as follows:
а
В
■ ■ ■
■
в
в
в
-;в
а ■
_ _ _
а
■ ■ ii
■
_ _
To Store a Number in Memory
1. Press then enter the phone number.
2. Press (0), (^, then enter the memory address
(01 through 30).
Example: Press (©, key (£) then (§), the
displayed number will be stored into memory
address 15.
Full charge
_
Normal phone call
Short phone call
Recharge battery
(Flashing is discharged)
To Recall a Number from Memory
Press , then enter the memory address (01 through
30).
Example: Press @ (© , key (£) then , the number
stored in memory address 15 will be dis
played on the readout.
To Review the Prefix
(Number longer than 8 digits)
After pressing @), (£), hold down the second digit of the
memory address.
Display Own Telephone Number
You can see your system ID number anc^our own phone
number on the readout. Press ®, кет (©. Your system
ID will be displayed while the key (© is held down.
Repertory Memory Scroll
This feature is useful in finding a certain phone number
by scrolling the repertory memory from one of the desig
nated starting addresses.
1. Press (£), key [x] then (J).
H is the digit to assign the starting address as
follows.
X Starting address
0 01
1 11
2 21
2. Press (£) or (£) .
(£) : Scroll upward (with roll back to 01)
: Scroll downward (with roll up to 30)
Memory address and the last 5 digits of the stored
number will be displayed on the readout as follows.
Example: r^OT 1 3l'-i 1^1
Address No. Tel. No.
Note: In this scroll feature, any vacant memory
address(es) will be skipped.
17
18
Page 11

Automatic Storing into a Vacant
Memory Address
This feature allows automatic storing into a vacant rep
ertory memory address. This ends the possible problem
of writing over a previously stored number.
1. Enter the phone number.
2. Press key , then .
3. The number will be stored automatically to the
memory address of the smallest number among the
available vacant locations.
4. Press (©. The memory address and the last 5 digits
of the stored phone number will be displayed on the
readout as follows.
Example: EISEllIDIZlllliHlEI
Note: If there is no vacant address, the phone number
will not be stored in the memory.
To Lock the Unit
Press then key (£) (LOCK).
The I LOCK I indicator lights. The unit will remain locked
until unlocked, even if the power is turned off.
To Unlock the Unit
Enter the three-digit unlock code. The I LOCK I indicator
will go out when the three-digit code is the same as the
code registered in the NAM.
Volume Control
The audio level of the earpiece and the alert tone can be
adjusted by the Volume Control Key ®.
• Earpiece:
Keep pressing until you get the desired sound level.
Sound level will be displayed on the readout digitally
during the level adjustment and the sample tone will
indicate the sound level when you are not engaged in
a telephone conversation. The display format is as
EEsnanm
(X = 1 ~ 5)
• Alert Tone:
Press @, ® key. Then adjust the alert tone level in
the same manner as above. Your telephone will ring at
the new level. In this case, the display format is as
follows.
(X :
19 20
PLACING TELEPHONE
CALLS
To Place a Call
1. Enter the phone number. The last 8 digits of the
dialed number are displayed on the readout.
2. If a dialing error is made, press (^0, then enter the
phone number again. Pressing (^) momentarily
(less than approx. 0.5 sec.) clears only the last digit.
3. Press (send). The IINUSEl indicator will light. When
the called party answers, proceed with your conver
sation.
If the Call Fails to Go Through
1. If you hear the “reorder” signal, press C™) (more
than approx. 0.5 sec.), then if there were no dialing
errors, press (send) for redial. (Redialing with digit
keys is not necessary.)
2. If the “intercept” signal is heard, press (™) (more
than approx. 0.5 sec.), then redial the correct number.
Automatic Redial (NAM Option)
If the feature of Automatic Redial (NAM Option) is
selected, your unit will automatically make five attempts
to reach the cell site when the first try is not successful.
The I IN USEI indicator will stay on, but the speaker will be
muted for twenty seconds. This is done so that you do
not hear the reorder signals out of the speaker. If you
need to terminate the automatic redial, press (^o.°) (more
than approx. 0.5 sec.).
Terminating a Call
Press C^) (more than approx. 0.5 sec.) and the IlN USEl
indicator will go out.
To Receive Calls
1. When the telephone rings, press (send) to answer the
call. The IlN USEl indicator will light.
5)
Page 12

Silent Incoming Calls
If Silent Alert feature is set, a single beep and a flashing
IL IHIL im message on the display will alert you of an
incoming call.
Once you have switched to silent alert, the phone stays
in that mode until you deactivate it.
1. Press @, then (©. The 151 - fWlTli: I fiTTnl will
appear in the display will alert you.
2. When you receive a call, a single beep and a flashing
InWnrLl message on the display.
3. Press (send) to answer the call.
ICIRII t fn on the readout will go out.
4. This mode is deactivated by pressing @, then (^.
mpli^fl ll 11 101 f I will be displayed for 5 seconds.
5. If the Silent Incoming Calls is activated when the
unit is powered up, [5l-|i-l|Lli:l lofiTI will appear
on the readout for 5 seconds.
Any Digit Key Answering (NAM Option)
This feature permits you to answer an incoming call by
pressing any of the digit keys on the key pad.
To Place a Call with a Number in the Memory
1. Press @, (©, then enter the memory address (01
through 30). The last 8 digits of the number will
appear on the readout. If the number is longer than
8 digits, hold down the second digit of the memory
address (after pressing @, (©) to see the prefix.
Note; See “To Recall a Number from Memory” and
“To Review the Prefix” for more details.
2. Press (send). The IlN USEl indicator will light as the call
is placed.
Speed Dialing
This feature permits you to place a call from the stored
memory locations without using the recall @, (© key.
Speed dialing is a quick method of placing calls from
memory.
1. Enter the one or two digits of memory address (1
through 9 and 10 through 30).
2. Press (send). The last 8 digits of the phone number
will appear on the readout, and the IlN USEl indicator
will light.
Automatic Answering
With this feature, the incoming call will be automatically
connected for operation after two alert tones, and the
IIN USEl indicator will light on the readout.
Then the unit is ready for conversation.
To activate this mode, press @ and then key (©.
I I -1BI n151 IQ11^ will appear on the readout.
2.
This mode is deactivated when @ and then key (§)
are pressed again.
I Pi I 'T^rnTSl I o fFl will be displayed for 5 seconds.
3.
This feature will not function if the unit is in the
Lock and Silent Incoming Calls.
If the Automatic Answering is activated when the
unit is powered up, IBI-lfllolSI lofni will appear
on the readout for 5 seconds.
21
Last Number Redial
This feature permits you to redial any of the last phone
numbers you attempted to call.
Numbers will be stored in memory only if (send) key
is pressed.
1. Press @, © then (§[).
2. Press (sb^ to send a displayed number.
Note: To clear the stored number, press @, (^HP). then
(si®)
22
Page 13

Programmable Emergency Call
(NAM Option)
This feature permits you to place a call to two emergency
numbers (maximum of 7 digits i even if your telephone
has been locked.
The two emergency numbers must be pre-programmed in
the NAM.
Note: 911 is preset emergency number, (you may change
this number if you wish.i
Operation in Lock Mode
1. Enter the emergency call number (911); (£) (£)
(“911” does not indicate, but the I LOCK I indicator will
light.)
2. Press (send), the IIN USEl indicator will light.
3. To terminate the call, press <3© (more than approx.
0.5 sec.).
(The IlNUSEI indicator will go out.)
To Mute a Phone Conversation
1. Press (@, then key (|^. (Mute indicator) will
appear on the readout. The transmit audio will be
muted and the receive audio will be heard from the
receiver.
2. To return to normal conversation;
Press then key (© again.
3. Mute is reset when the call is terminated.
(iNliSF) NOSVC ROAM LOCK
H
When this mode is ON: Turned ON
When this mode is OFF: Turned OFF
ONE TOUCH DIALING
One Touch Emergency Call
This feature permits you to place a call to an emergency
number by a single key stroke, even when the unit is in
lock mode. You can deactivate this feature to prevent
unintentional call by mistake.
1. Press key (£) for more than 2 seconds. The first
emergency number that is pre-programmed in the
NAM will be displayed, and IlN USEl indicator will light
as a call is placed. The factory pre-set number is 911.
2. If you wish to deactivate this feature, press the
following kw sequence.
ix1[Y][z1 @(£)(©(£) (XYZ is Security Code)
To activate this feature again, follow the same key
sequence.
When this mode is ON :
OFF :
See also Programmable Emergency Call.
23
EE
3
This feature permits you to place a call by a single key
stroke.
To Store a Number into One Touch Memory
1. Press (1*1?), then enter a phone number.
2. Press @, (¿) , the One Touch Key ( <S) ).
Stored numbers can be reviewed by pressing @, (IE)
then the One Touch Key you want to review.
To Place a Call to a Number in One Touch Memory
Press the One Touch Key for approx. O.Ssec.
The last 8 digits of the number will be displayed on the
readout, and the IlN USEl indicator will light as a call is
placed.
24
Page 14

END-TO-END SIGNALING CALL TIME DISPLAY
This feature permits you to utilize additional phone
services, such as accessing an alternate long distance
network, signaling pager, or banking by phone etc..
For these services the signaling should be in DTMF
(Touch Tone™).
SCRATCH-PAD DIALING
This feature permits you to enter a number to be redialed
(or store a number in memory) while engaged in a
conversation.
SCRATCH-PAD DIALING
WITHOUT KEYING
TONES
This feature permits you to activate scratch-pad memory
without annoying key tones over the circuit.
1. Press then key (^ , then enter a phone number.
fFI o 1 n mi To I f I ~l will be displayed for 5 seconds.
The Microphone circuit will remain active, but the
tones will not be heard.
2. If necessary, press ®, (£) , then enter the memory
address.
3. To exit the Scratch-pad Mode, press (®), then key
(© again.
I ■- IQI n in I o I i-i I I will be displayed for 5 seconds.
This feature automatically records the elapsed time per
conversation. The talk time of the last call and cumula
tive talk time, can be displayed on the readout. The
timers can also be cleared if necessary.
To Display the Talk Time
1. Press then key ©.
2. While the key (© is held down, the cumulative talk
time will be displayed on the readout in minute
format.
I i161 'I ... 18 min.
3. The talk time of the last call will be displayed on the
readout for 5 seconds after the (© is released.
While in a conversation, the talk time of a call in
progress will be displayed. The display format is as
follows.
___
I '(31 ' FT?151 ... 1 min. and 25 sec.
Outgoing Call Timer Only (NAM Option)
Normal call timer operation is to time both the calls
made and the calls received. If the “outgoing call timer
only” function is activated (NAM Option), the call timer
will only amount of time when placing calls. It will not
amount of time for calls received.
To Clear the Timer
1. Press (§), then enter the three-digit security
code.
2. Press @, key © then (©, ©. lOlOlGIfW^ will be
displayed for 5 seconds.
The timers will be cleared, and the count for the
cumulative talk time will start from zero.
25 26
Page 15

SID MANAGEMENT
(NAM OPTION)
This feature enables you (by NAM option) to take advan
tage of the family of SID groups. This is a group of
cellular systems in cities that your carrier owns or has
special billing arrangements with. Your close family
SID's (like brothers and sisters) will be billed at the same
rate as your home billing and will be indicated as “Home”
(i.e. both INOSVCI and [RÔÂM] are off) on your display.
More distant family SID's (like cousins) that your
cellular service provider has roaming agreements with
will be displayed as a solid I ROAM I. When flashing I ROAM I
is displayed, you are using a SID system that is not
included in the NAM assigned groups.
If your display indicates flashing I NO SVCl, you will need
to change your A/B switch selection or, please refer to
Multiple City Registration to change phone registration
to enable you to make a call.
If in question as to what SID (system identification) you
are using, push @, to display the current SID.
A/B SYSTEM SELECTION
This feature permits you to select the system you need to
use. The system that you are registered with is the
preferred system, and your home system.
When you turn the unit on, the unit remembers the last
position of the A/B system selected, and will start to scan
the radio frequency channels of that selection.
1. Press @, key (©. The current mode will be displayed.
2. You can change the current mode by pressing
(© or (£).
Scroll upward
Scroll downward
: Standard Mode
: Home Only Mode
Timmr
: Preferred System Only Mode
: Non-preferred System Only Mode
• Standard Mode
The unit will scan the preferred system channels. If
unable to find an acceptable preferred channel, the
unit switches to scan the non-preferred channels.
• Home Only Mode
You can place or receive calls only within your home
area.
• Preferred System Only Mode
The unit will scan the preferred system only and
prevents switching over to the non-preferred system.
• Non-preferred System Only Mode
The unit will scan the non-preferred system only.
MULTIPLE CITY
REGISTRATION
Some cellular users find it beneficial to register their
phone in multiple cities, rather than rely on “roam”. The
multiple city registration feature permits you to repro
gram from the telephone unit, the different phone num
bers for the cities in which you are registered. Each
programmed phone number will be designated as your
home system.
Press @, (™). and enter the new system ID number (5
digits) followed by the corresponding phone number (10
digits). Please include your area code. You must register
your unit with the carrier in order to get both the system
ID number and your phone number.
Press @ then key (|^, Your new phone number will be
displayed on the readout. (Holding down , to display
your new system ID number.)
Note: (1) System ID number and phone number can
not be programmed during a call.
(2) Calls are placed or received using only the
programmed phone number, in use at the
time of call.
27
28
Page 16

LAST RESCAN SID
INDICATOR
IMPORTANT SAFETY
INFORMATION
This feature permits you to recall the last system iden
tification accessed by your phone.
Press then .
The last rescan SID is displayed on the readout for 5sec.
The disnlav format is as follows:
I ,lc/Mxixlxixlxl
If the I NO SVCl indicator is on, the display will show
AUTOMATIC CALLS IN
ABSENCE INDICATOR
This feature indicates the number of unanswered incom
ing calls. If incoming calls are unanswered, the unit will
indicate the following.
EllEiDEinixlSn
[EIXl is the number of calls (01 to 99) missed. Depressing
any key (other than the Power Key) will clear the number
of calls indicated in Display. However, the number of
calls will remain if the unit is turned off.
Please read and follow these cautions carefully.
TURN OFF your unit in an explosive atmosphere (near
a fuel pump, blasting area, etc.).
DO NOT dial when your unit is moving in states where
this action is illegal (this is not a prudent practice, even
where it is legal).
DO NOT permit untrained personnel to operate the unit.
DO NOT use unauthorized accessories.
DO NOT disassemble the phone or its accessories;
If service or repair is required, return unit to an
authorized Audiovox cellular service center. If unit is
disassembled, the risk of electric shock or fire may result.
DO NOT open the battery case. If the battery is
accidentally broken, avoid skin contact with the internal
chemical contents. If there is skin contact, wash the
affected area immediately and seek medical advice.
WARNING
The following offences can punished by fine, imprison
ment, or both:
• Using obscene, indecent, of profane language.
• Using the unit to give off false distress calls.
• Wiretapping or otherwise intercepting a telephone call,
unless that person has first obtained the consent of the
parties participating in the call.
• Making anonymous calls to .annoy, harass, or molest
other people.
• Charging to an account without authorization to avoid
payment for service.
• Refusing to yield a party line, when informed that it is
needed for an emergency call (It is also unlawful to
take over a party line by stating falsely that it is
needed for an emergency).
29
30
Page 17

12 MONTH LIMITED
WARRANTY
AUDIOVOX CORPORATION (the Company), warrants
to the original retail purchaser of this Audiovox Ceilular
Teiephone, that should this product or any part thereof
(except the items listed below), under normal use and
conditions, be proven defective in material or work
manship within the first twelve (12) month period from
the date of purchase, such defect(s) will be repaired or
replaced (with new or rebuilt parts) at the Company's
option, without charge for parts or labor directly related
to the defect(s).
The following items, if supplied, are similarly warranted
from the date of purchase for 90 days: Retractable
Antenna, Transportable Antenna, Rechargeable Bat
tery-Pack, Desk Top Charger, AC/DC Adaptor, Ciga
rette Lighter Adaptor, Carrying Bag and Bag Hard
ware, Wrist Strap, Travel Charger.
To obtain repairs or replacement within the terms of
this Warranty, the product should be delivered with
proof of warranty coverage, specification of defect(s),
transportation prepaid, to the Company at the address
shown below.
Call toll free to (800) 229-1235 [in NY State, (516) 2313410]
This Warranty does not apply to fuses, or costs incurred
for removal, reinstallation, testing, evaluation, or to any
product or part thereof which has suffered through al
teration, serial number defacement, improper installa
tion, excessive temperature or humidity, environmental
conditions, mishandling, misuse, neglect or accident.
This Warranty is not assignable or transferable.
THE EXTENT OF THE COMPANY'S LIABILITY UNDER
THIS WARRANTY IS LIMITED TO THE REPAIR OR
REPLACEMENT PROVIDED ABOVE AND, IN NO
EVENT, SHALL THE COMPANY'S LIABILITY
EXCEED THE PURCHASE PRICE PAID BY PURCHASER
FOR THE PRODUCT.
IN U.S.A.: AUDIOVOX CORPORATION
185 Oser Avenue, Hauppauge, New York 11788
(516) 233-3300
IN CANADA: AUDIOVOX CANADA LTD.
1070 Kamato Road, Unit 15 Mississauga, Ontario
L4W2W5 (905) 629-1400
Page 18

ÍS/l I ^NJ I \/ о X. SV^ Ll-r
Accessory
Catalog
MVX70Ö/MVX750
MVX525/MVX550
MVX425/IV1VX450
Page 19

0%
OTC700
Desk Fop Charger
TRC700A/B
Travel Charger
BTE700
Extended Life Battery
{Nickel Metal Hydride}
BTH700
standard Life Battery
Nickel Metal Hydride)
EM-425
Ear Phone Microphone
For Hands Free Use
(For MVX-425 Series only)
HF700A
Hands-Free/Rj-ll
Car Adapter Kit
(For MVX700/525 Series only)
LB55Q
Leather Carrying Case
(For MVX525/425 Series)
LB700
Leather Carrying Case
(For MVX700 Series)
RC700 CLA700
Rapid Charger Battery Eliminator
(For BTE70a'BTR700 only)
PBK700
3 Watt Power Booster
(Für use with HF700A)
WS700 Wrist Strap
BTE425
Extended Lite
NiCd Battery
(Canrot be cterged wth RC70O)
Page 20

PROTECT YOUR WARRANTY
Read your Warranty carefully, with the
special consideration to paragraph seven
of the Limited Warranty for your unit.
"Warranty does not apply to...or to
any product or part thereof which has
suffered through alterationmishandling, misuse, neglect, or
accident".
Many companies are making look-alike
accessories and in some cases, promoting
that their product is equal to or better than
the Audiovox product. Be careful. Some of
these products may not be compatible for
use with your Audiovox product and may
damage the unit or cause it to malfunction. If
service is required on your unit, and it is
determined that a non-Audiovox accessory
has created the problem with your unit, the
Warranty will not apply. In addition, if the unit
has already suffered irreversible damage by
reason of a non-compatible accessory, the
Warranty will be voided. To protect your
Warranty, use only compatible accessories
which cannot damage or interfere with the
functioning of your Audiovox product.
CeMorCommun/cat/ons
 Loading...