

Page 1
getting
started
guide
Audiovox
PPC-5050
Mobility Business Solutions
read me first
1965_Bell_Aud_PC5050_GSG_E_r14 3/19/04 2:59 PM Page i
Page 2

audiovox ppc-5050 getting started guide
Congratulations on purchasing the Audiovox PPC-5050™. This guide will
help you wirelessly set up your PPC-5050 for Data and Voice use on the Bell
Mobility 1X Network.
Please refer to your Audiovox PPC-5050 Pocket User Guide for detailed
product and safety information.
table of contents
Features . . . . . . . . . . . . . . . . . . . . . . . . . . . . . . . . . . . . . . . . . . . . . . . . . . 2
Setting up your PPC-5050 . . . . . . . . . . . . . . . . . . . . . . . . . . . . . . . . . . 4
Connection to Your Computer . . . . . . . . . . . . . . . . . . . . . . . . . . . . . . . 6
Setting up Your Device for Wireless Use . . . . . . . . . . . . . . . . . . . . . . 7
Setting Up Your POP3 Account . . . . . . . . . . . . . . . . . . . . . . . . . . . . . .10
Basic Phone Functionality . . . . . . . . . . . . . . . . . . . . . . . . . . . . . . . . . . . . 12
Optional Wireless Services and Features . . . . . . . . . . . . . . . . . . . . .14
Bell Mobility – Our Agreement With You . . . . . . . . . . . . . . . . . . . . 15
what’s in the box?
1 Audiovox PPC-5050 device
1AC Adapter with Plug and Connector Adapters
1 Carrying Case
1 Stereo Headset
2Stylus Pen
1 USB Cradle
1 Companion CD
1 Audiovox PPC-5050 Pocket User Guide
1 Read Me First Getting Started Guide (Provided by Bell)
1
1965_Bell_Aud_PC5050_GSG_E_r14 3/19/04 2:59 PM Page ii
Page 3
2
3
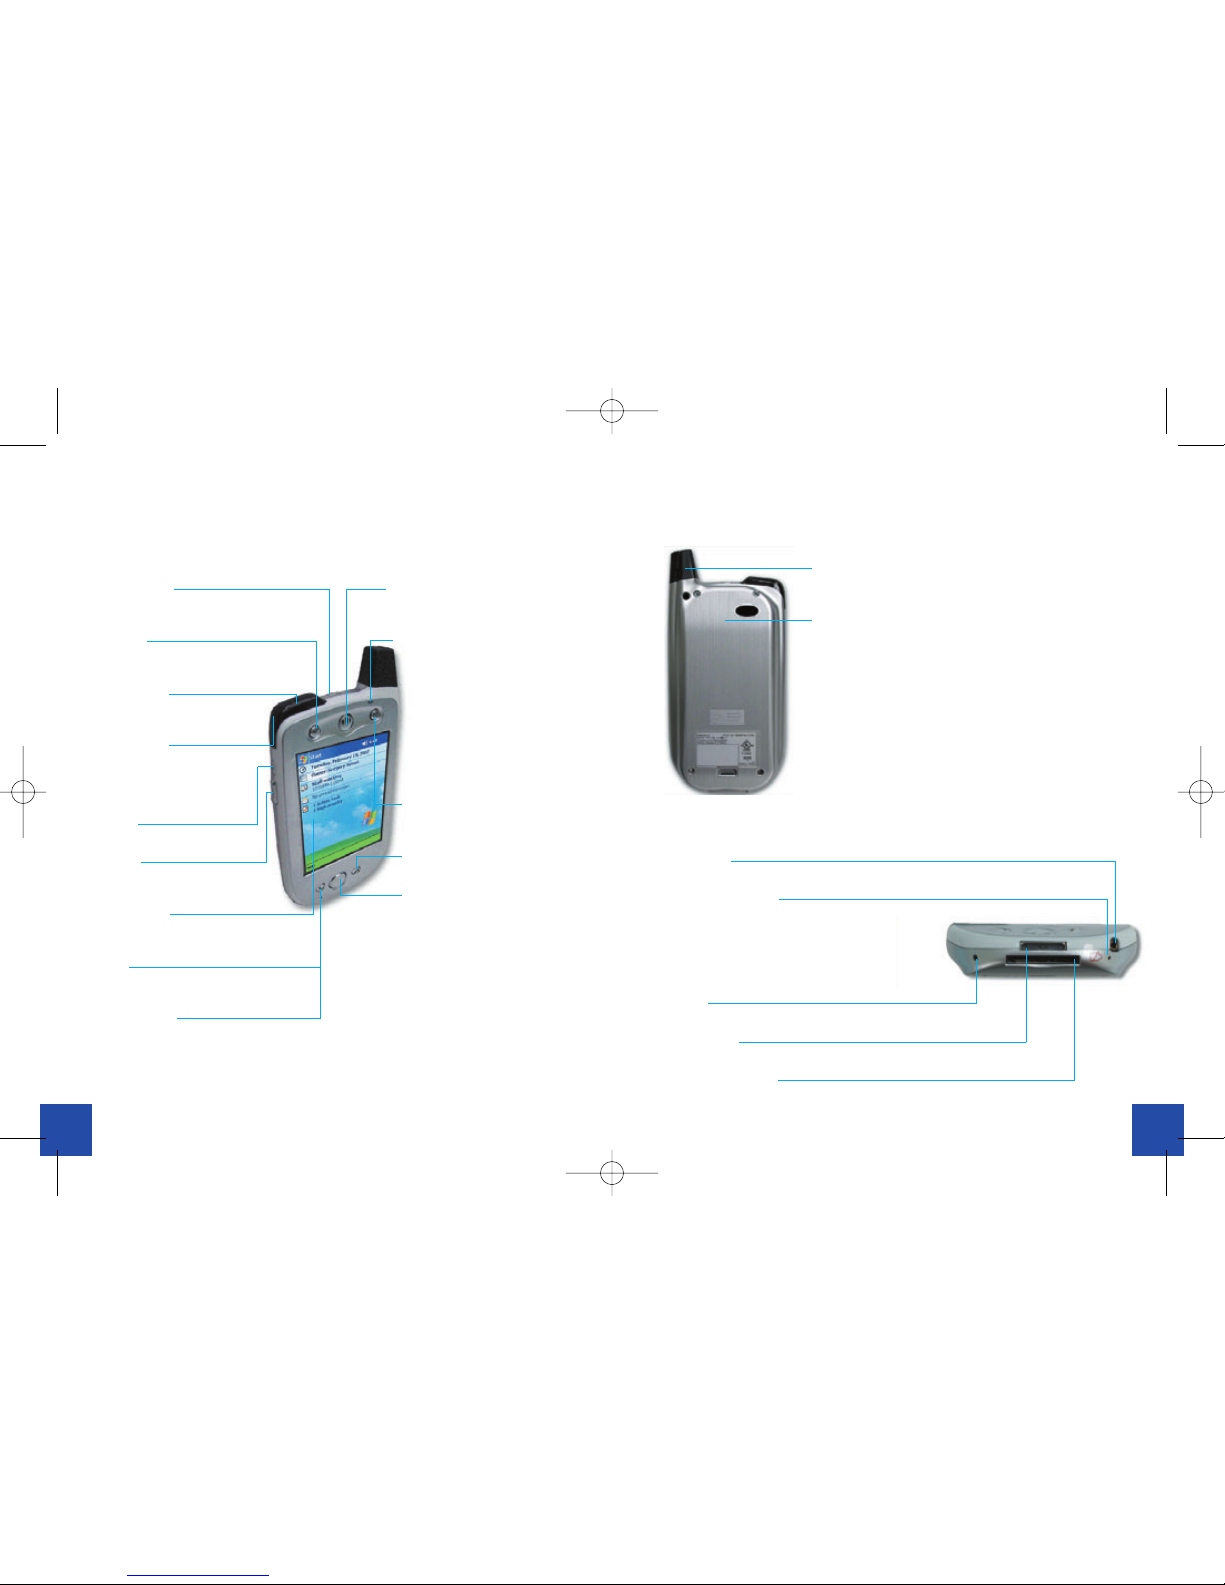
ppc-5050 features:
Main Unit
Power Button:
Press to turn on/off
your pocket PC.
Contacts:
Press for quick access to
your Contacts.
GPS Receiver:
This is your GPS receiver
for locations based services.
Infrared Port:
Enables you to exchange
file(s) or data with other
devices without cables/
wires.
Record:
Press to record a voice note.
Volume:
Press to adjust the volume
of your device.
Touch Screen:
For handwriting, drawing or to
make a selection with the stylus.
Send:
Press to take an incoming call.
Press to dial a number.
Speakerphone:
Press and hold for speakerphone mode.
Speaker:
Listen to audio media or a phone call
from here.
Notification LED:
a) Flashing Green (Every 3 seconds)
– CDMA network Signal.
b) Flashing Green (Every second)
– Notification Alarm Reminder.
c) Steady Red – Battery empty.
d) Flashing Red – Low battery.
e) Steady Amber – Battery charging.
f) Steady Green – Fully charged.
Calendar:
Press to quickly access
the Calendar.
End:
Press to end a call.
Navigation Pad:
Allows you to move up/ down and left/
right through any of the drop down
menus or program instructions; select
by pressing in the center.
Left: When in the Dialer screen, press
once to access the Speed Dial
feature.
Right: When in the Dialer screen,
press once to access the
Call Log feature.
Antenna, Stylus Slot and Stylus:
The antenna has a neatly hidden slot for housing the stylus.
Main battery unit:
The main battery is housed permanently inside the device –
It should only be changed through an authorized sales
center.
Back panel components
Bottom edge components
Earphone Jack:
Allows you to listen to audio media.
Battery On/ Off Switch:
Press into the hole with the end of the
top-half of your stylus to return the device
to factory settings.
Battery Off will wipe all the data
from your device.
Soft Reset:
Press into the hole with the end of your stylus to reset your device.
Sync Connector:
Use this connector when synchronizing/ transmitting data or recharging.
MMC and SD Card Slot:
Insert either MMC or SD cards in this slot.
1965_Bell_Aud_PC5050_GSG_E_r14 3/19/04 2:59 PM Page 2
Page 4
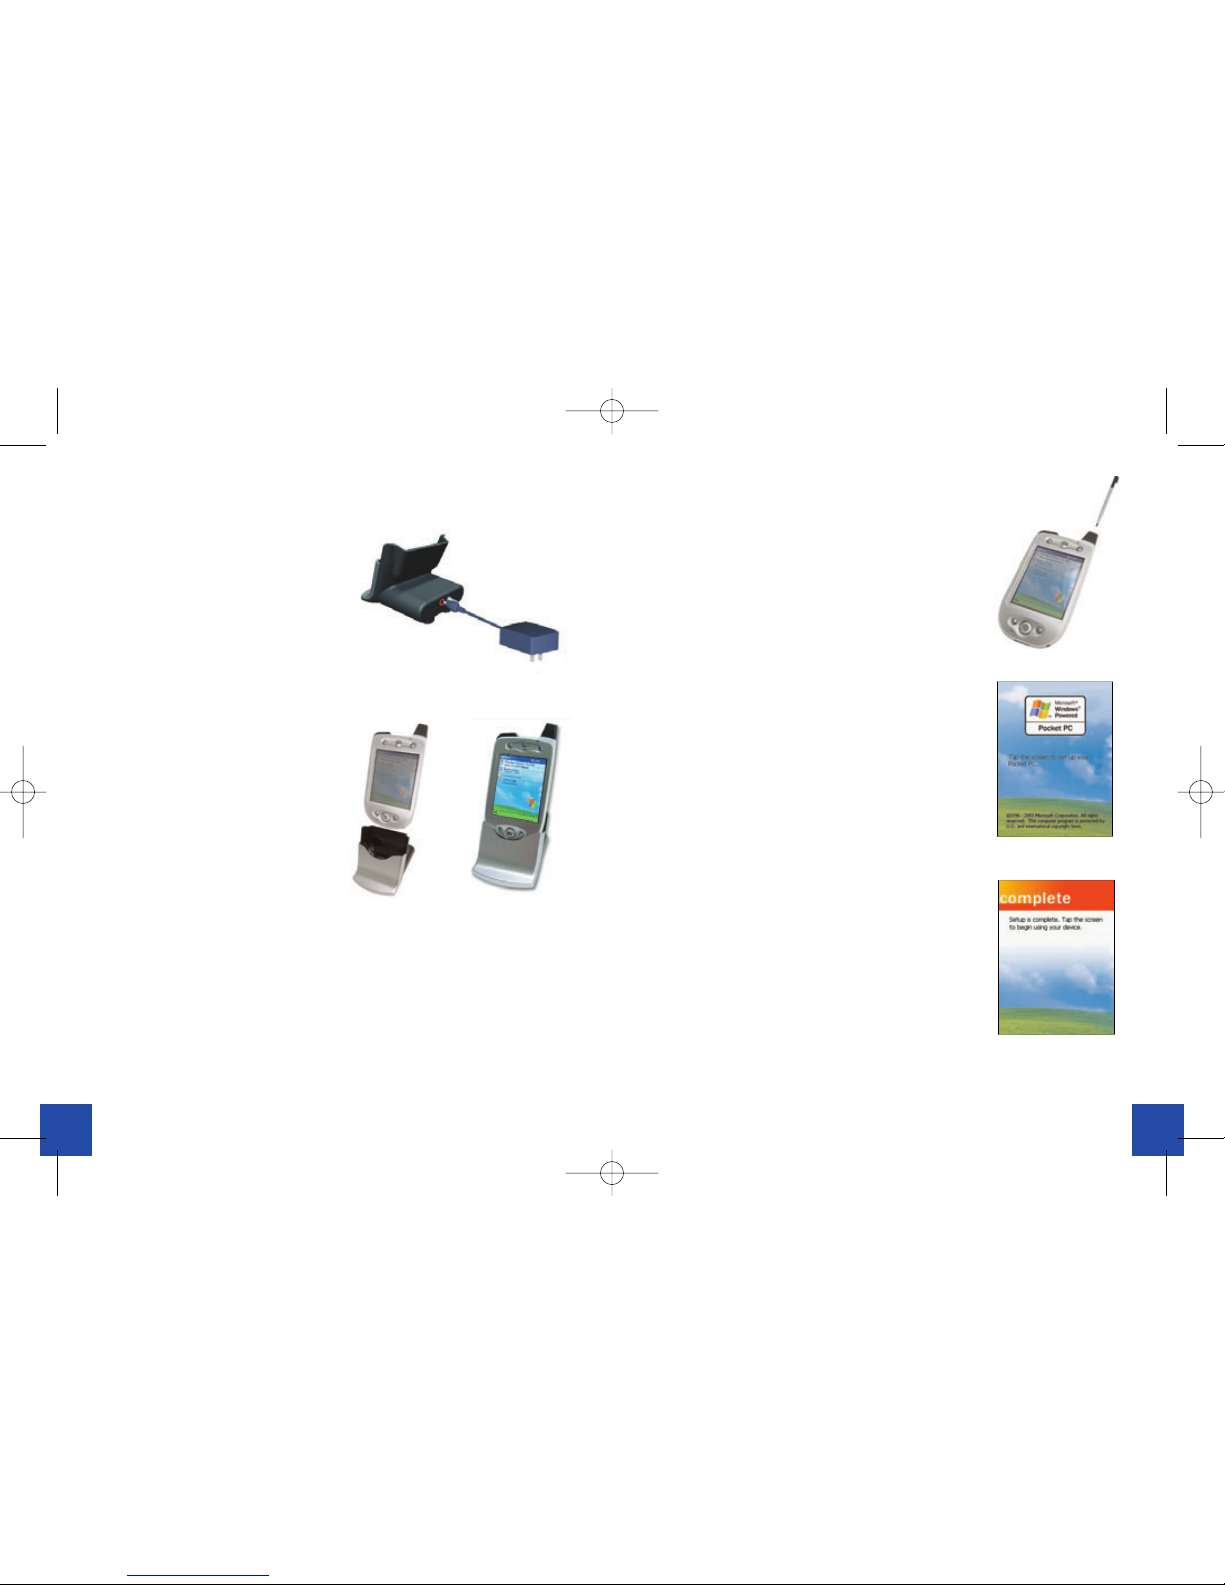
setting up your ppc-5050
Step 1 : Charge the battery
i. Insert the AC adapter into the
back of the cradle, and then plug
into external power source.
ii. Dock your Pocket PC in its
cradle and fully charge for
approximately 4 hours A steady amber LED
indicates charging; solid
green fully charged.
Note
• For charging the built-in battery, maintain an ambient temperature from
approx. 5°C (41°F) to 35°C (95°F). If the ambient temperature is too low
or too high, the charging will pause. According to the operating status,
the charging may pause even when the ambient temperature is below
35°C (95°F). The flashing in yellow of the charging LED indicates the
pause of the charging.
• Charge time is dependent on the ambient temperature.
• Charging time to fully charge the built-in battery for the first time or
when completely drained is approximately 4 hours.
4
5
Step 2 : Remove the stylus
1. Remove the stylus from its slot on the back of
the device.
Step 3 : Follow the set up wizard
1. When charging is completed, press the Power
button to turn on the power. The welcome
screen appears.
2. Proceed with initial set up following the on
screen instructions.
i. When the ‘complete’ screen appears, the
initial set up is done.
ii. Tap the screen to begin using your
PPC-5050.
1965_Bell_Aud_PC5050_GSG_E_r14 3/19/04 2:59 PM Page 4
Page 5

7
6
connection to your computer
When the connection is made for the first time, install ActiveSync on to
your computer. Using Microsoft ActiveSync, you can synchronize
information between your computer and your PPC-5050. Synchronization
compares the data on your PPC-5050 with your computer and updates
both computers with the most recent information.
1. Insert Companion CD into CD-ROM drive of the computer.
The screen showing the startup of a setup program is displayed.
Note If a setup program does not start up even after insertion of the
CD-ROM, double click SETUP.EXE in the route directory contained on
the CD-ROM.
2. Click ‘Start Here’.
3. Install Outlook 2002. Click ‘Install Outlook 2002’ and follow the
instructions on the screen.
4. Install ActiveSync 3.7.
i. Click ‘Install ActiveSync 3.7’ and follow the instructions on the
screen.
ii. When installation is completed, a connection wizard appears.
5. When the Get Connected screen appears, connect the USB cradle to the
USB port of your computer.
6. Place the PPC-5050 to the USB cradle with the PPC-5050 power turned
off.
7.Proceed with the setting according to the instructions on the screen.
Note For more information on the connection to the PPC-5050 or other
settings, please see the Help option in ActiveSync.
setting up your device for wireless use
Your device should already be programmed by your Bell Mobility or Bell
World representative for use on the Bell Mobility network. You should have
the following information :
i. Mobile Number
ii. Voice mail password (4-digit number)
iii. Activation Lock code Number (6-digit number)
If you are missing any of the above information, please call Bell Mobility
Customer Service at 1-800-667-0123 prior to starting this process.
Setting up the Connection:
Make sure your wireless connection is enabled before you start (this will
allow you to use the phone and access data). To do so, you must ensure
that your connection reads Flight Mode OFF.
What is Flight Mode?
On all airplane flights, you are requested to turn off your wireless device.
When you are getting ready for take-off, you should enable Flight Mode.
Therefore, when your PPC-5050 has Flight Mode ON, it means that your
phone has been turned off. In this mode you will still be able to access
offline information including Calendar, Contacts, etc. and will also help
conserve battery power since the device is not being used for wireless
access.
When Flight Mode is OFF, your phone is turned on and you are able to
make calls and access data (i.e. Internet & E-mail). Your Flight Mode
should always be OFF unless you need to completely shut down your
device.
To turn Flight Mode ON, which turns your phone off, tap the icon
and then tap ‘Turn ON Flight Mode’.
1965_Bell_Aud_PC5050_GSG_E_r14 3/19/04 2:59 PM Page 6
Page 6

9
8
To turn your Flight Mode OFF, which turns your phone on, simply tap on
the icon. Then, tap ‘Turn OFF Flight Mode’.
To disable your wireless DATA connectivity, simply hold down button for
a minimum of 5 seconds. You know your data connectivity is disabled when
you see the icon. Your device will then be ready for making and
receiving voice calls.
Please note: While you are using Pocket Explorer, if it is in the process of
trying to download the page, hitting the button will not terminate the
data connection. The device will try to reconnect instead. Wait until the web
page has finished downloading and then hit the button to end the data
session.
1. Go to ‘Start’, then ‘Settings’.
2. Tap on the ‘Connections’tab.
3. Tap on ‘Connections’.
4. Under ‘My ISP’, tap on ‘Add a new modem connection’.
i. Enter a name for the connection.
ii. Choose ‘Cellular Line’ under ‘Select a modem’.
iii. Tap ‘Next’.
5. In the connection screen, enter #777 in the field.
6. Tap ‘Next’.
7. Enter the following information in the following fields:
i. Username: your mobile number@1x.bell.ca
i.e. 4165550123@1x.bell.ca
ii. Password: Voicemail password (your original voicemail passsword)
iii. Domain: 1x.bell.ca
8. Tap on ‘Finish’.
To start a connection:
Once you have successfully set-up your 1X connection, ensure Flight Mode
is OFF, and your phone is turned ON (refer to page 7 & 8 for clarification on
Flight Mode). To do this:
i) Tap
ii) Tap ‘Tu rn ON Flight Mode’
iii) Tap ‘Inbox’ or ‘Internet Explorer’
These programs will connect automatically.
Once connected, you can:
• Send and receive e-mail messages by using Inbox. Before you can use
Inbox, you need to provide the information it needs to communicate
with the e-mail server. For specific instructions, see Setting Up Your
POP3 E-mail Account (see next page).
• Visit Web and WAP pages by using Pocket Internet Explorer.
A pop-up screen will appear once you begin connecting, and leave when
the connection is complete.
1965_Bell_Aud_PC5050_GSG_E_r14 3/19/04 2:59 PM Page 8
Page 7

11
10
3/5
4/5
3. i) Enter ‘Your name’ (ex. John Smith).
ii) Your ‘User Name’ should already be
configured. If not, please enter.
iii) Enter your ‘Password’.
vi) Tap ‘Next’.
v) From the drop down menu select the
“Account type” that your e-mail provider
supports (POP3 or IMAP4).
4. Enter a ‘Name’ for your e-mail account then
tap ‘Next’.
5. If not already set-up, enter your
e-mail provider’s server name information
for Incoming mail, Outgoing mail,and
Domain, then tap ‘Finish’.
5/5
John Smith
Setting Up Your POP3 E-mail Account
You can set up a connection to an e-mail server so that you can send and
receive e-mail messages by using a modem or network connection and
Inbox on your device.
The ISP or network must use a POP3 or IMAP4 e-mail server and an SMTP
gateway.
You can use multiple e-mail services to receive your messages. For each
e-mail service you intend to use, first set up and name the e-mail service.
If you use the same service to connect to different mailboxes, set up and
name each mailbox connection.
to set up your pop3 service:
1. In Inbox on your device,
tap ‘Accounts
’, and then
‘New Account
’.
2. Enter your e-mail
address in the field, and
then tap ‘Next’.
Next will initiate auto-configuration – which attempts to connect your Pocket
PC Phone to your e-mail server and automatically download the necessary
e-mail connection settings. Tap ‘Next’ to continue.
1/5 2/5
1965_Bell_Aud_PC5050_GSG_E_r14 3/19/04 3:00 PM Page 10
Page 8

13
12
Enabling the Speakerphone Mode
Your device’s speakerphone mode allows you to talk hands-free and/or let
other people listen to a call.
Please refer to the Audiovox PPC-5050 Pocket User Guide to find out more
about the enhanced phone functionalities of this device, including :
• Making a call from your Contact list
• Making a call from your Speed Dial
• Making a call from the Call History
• Answering or Rejecting calls
• Setting up a Conference Call
• Making Notes
Do not leave the phone in speakerphone mode and hold it on your ear;
the sound will damage your ear.
1. Wait until the phone is ringing.
2. Hold down until the speakerphone
comes on and the icon appears in
the top toolbar.
3. To turn off the speakerphone hold down
again.
basic phone functionality
The Dialer Screen
To access the Dialer Screen, tap and then Phone, or press .
From the dialer screen you can:
• Make calls.
• Access Call History, Speed Dial and Phone Settings.
• Find signal status information and important icons that tell you about your call.
Making a call
With your Pocket PC Phone, you can make a call from the Dialer, Speed Dial,
Call History and Contacts.
Making a call from the dialer :
1. To bring up the Dialer Screen, press .
2. Tap the phone number into the keypad, then tap
or press button.
5. Shows voice privacy is
not available.
6. For numbers you call
often.
7. See all calls received,
made and missed.
8. Contacts.
1. Signal icon will change
when making a call.
2. Last number details are
displayed here.
3. The number you are
dialing will appear here.
4. Click Tool, Options to
access phone settings.
1
2
5
6
7
4
8
3
1965_Bell_Aud_PC5050_GSG_E_r14 3/19/04 3:00 PM Page 12
Page 9

15
14
Got Questions?
Contact our Customer Care Centre
Whenever you call, you’ll enjoy friendly, individual attention and you’ll get
fast answers to any questions you have.
For Billing and Service inquires please call : 1 800 667-0123 or *611 from
your device.
For Technical and Data Support please call : 1 877 DATA-123
our agreement with you
Thank you for selecting Bell Mobility as your wireless service provider. These
Ter ms of Service are needed for legal reasons and form the contract (the
“Contract”) that will govern your relationship with Bell Mobility (sometimes
referred to as “us” or “we”). The Contract is binding on you and us for each
Device that you connect to our network and for service we provide to you for
your Device.
Definitions
Cancellation Fee: The fee you pay us if you end your Contract having a Term
of 12 months ($99) or 24 months ($199) before it expires.
Devices: Any wireless communication device, including cellphones, pagers,
camera phones, handheld computers or other communicators that you
connect to our network.
E9-1-1 Services: Any emergency services that we are mandated to provide
you
Ter m: The service period of either 30 days, 12 months or 24 months selected
by you, starting on the date your service is activated.
Roaming Charges: The charges payable by you when the call made with
your Device is routed to another provider’s network.
optional wireless services
and features from bell mobility
The following are just a few of the optional features that are available to you
to use along with your new voice enabled device.
Note Must activate on a Bell Mobility Voice plan to be subscribed to these
services.
Message Centre
Message Centre is a versatile, easy-to-use automated voice messaging
service that is an optional feature available to you. The service answers your
phone and records your callers’ messages when you’re on the line, away
from your phone, out of coverage area or have your phone turned off. It can
store up to 25 messages for as long as 7 to 14 days (depending on the
province) and your passcode ensures all your messages are completely
private.
Tex t Messaging
Phone to Phone: Send short messages to Bell Mobility Subscribers
provisioned for the services whenever you like. All that's required is a
CH@T-ready device and the Bell Mobility cellphone number you want to
send a message to.
By E-mail: Bell Mobility assigns a personal e-mail address to each
Text Messaging subscriber (e.g. 0123456789@txt.bellmobility.ca). Your
friends and business contacts can therefore reach you by sending an
e-mail to this address.
World Wide Web: Text messages can also be sent from our website at
www.txt.bellmobility.ca Simply type your message and click SEND.
The recipient will get the message in seconds. For more information on
Text Messaging, visit www.bell.ca/datadevices
Bell Mobility has more features and services available for you. For more
information on the availability of these features and services, please visit
our website at www.bell.ca. Please note some features may not be
available in all areas.
1965_Bell_Aud_PC5050_GSG_E_r14 3/19/04 3:00 PM Page 14
Page 10

17
16
We also protect your personal information in accordance with the Bell
Customer Privacy Policy and the Bell Code of Fair Information Practices,
which apply to the Bell Companies, including Bell Canada, Bell Mobility, Bell
ExpressVu and Bell World or Espace Bell stores. Unless you tell us otherwise,
by signing this Contract you consent to Bell Mobility sharing your personal
information with the other Bell Companies to help us identify your
communication and entertainment needs, and to provide you with relevant
information, advice, and solutions. The Bell Companies do not provide or sell
your personal information to any outside company without your explicit
consent. To view the full Policy and Code, or if you prefer at any time that
Bell Mobility not share your personal information with the Bell Companies,
visit www.bell.ca or call 1 800 667-0123 for more details. By signing this
Contract you also consent to Bell Mobility obtaining information about your
credit history from a credit reporting agency for the purpose of activating
your service, and to disclosing your Bell Mobility credit history to a credit
reporting agency.
Your Telephone Number
You do not own the telephone number that we have provided to you and we
reserve the right to change it if required. We will notify you in advance and
we will not be liable for any costs associated with this change.
Your telephone number may be automatically transmitted to the person you
call, other carriers, or to us. You may permanently block the display by telling
us when you activate your service, or on a per call basis at any time by
dialing *67 before you dial the desired phone number. If you choose to
permanently block your display, you can unblock the display by dialing *82
before you dial the desired phone number.
Warranty and Return Policy
The performance, quality, or suitability of your Device is subject to the
manufacturer’s specifications and warranty. We do not guarantee
uninterrupted service and will not be liable for any damages, losses or
expenses that may arise due to temporary network failure or disruption of
your services.
Long Distance Charges: The charges payable by you for establishing long
distance connections with your Device.
System Access Fee: The fee payable by you to cover a portion of network
operating costs and government license fees.
what we’ll provide to you
Guaranteed Airtime Pricing
We will not increase your monthly access fee or your airtime rates for local
out of bundle calls during the Term. Fees and charges for features or
services, Long Distance and Roaming charges, text messaging, mobile
browsing and picture messaging charges, System Access Fee, 9-1-1
emergency service fees, connection charges, Device leasing charges and
late payment charges may increase during the Term at our discretion after
giving you at least 30 days notice. Promotional offers may be available to
you when you activate your service and during the Term and are offered
at our discretion for limited periods of time.
Protection of Your Privacy
All information that Bell Mobility keeps about you is confidential, other than
publicly available information such as your name, address and listed
telephone number. Unless you provide express consent or Bell Mobility is
required by law, Bell Mobility will not disclose your personal information to
anyone other than to:
i) you;
ii) a person who, in our reasonable judgment, is seeking your personal
information as your agent;
iii) another telecommunications service provider for the purpose of providing
you with efficient and cost-effective telecommunications service;
iv) another company for the purpose of supplying you telephone or
telephone directory related services;
v) an agent that we retain for the purposes of evaluating your credit
worthiness or collecting your account;
vi) a public authority if it appears there is imminent danger to life or property.
1965_Bell_Aud_PC5050_GSG_E_r14 3/19/04 3:00 PM Page 16
Page 11

19
18
your Contract and terminate your service. Your monthly charges will include
your monthly access fee, all applicable taxes, and may include: local out of
bundle minutes, fees and charges for features, Long Distance and Roaming
charges; text messaging, mobile browser and picture messaging charges;
System Access Fee, 9-1-1 emergency service fees, connection charges, Device
leasing charges, late payment charges and all applicable taxes.
Prepaid Service
Prepaid customers are also subject to these Terms of Service. Charges will
be deducted (i) immediately for usage and pay per use services, and (ii)
every month for recurring features, in each case from your Bell Mobility
Prepaid account in accordance with the terms described in your Prepaid
Activation Kit.
Security Deposits
Should your credit rating or usage charges warrant, we may require a
refundable security deposit from you. Your security deposit will be
returned to you after 6 months of consistent payments in the same form
as originally provided
Transferring Responsibility
You may not transfer your account to anyone else without our prior consent.
You must contact our Customer Service department and a
transfer service fee may be charged.
Loss or Theft
It is your responsibility to notify us immediately if your Device is lost, stolen
or destroyed. You are responsible for replacing it and for all fees and charges
incurred prior to you notifying us.
Responsible use of Services
You cannot use the services or your Device for any illegal or abusive
purposes. You cannot use the services or Device if your use causes our
network, or our ability to provide services to others, to be adversely affected.
You cannot threaten or abuse any Bell Mobility employee or representative.
For details on our return policy for Devices and service cancellation without
paying Cancellation Fees, please visit www.bell.ca/warrantyandrepairs. You
may be permitted to do so within 15 days of purchase but you will be
responsible for all fees and charges for usage incurred prior to return and
cancellation
ending your contract
Your Contract will end if:
1) You contact us to terminate your service before your Contract expires.
2) We contact you to end your Contract if at anytime you do not pay any
amount owing when due, including a required deposit, or you otherwise
violate these Terms of Service.
Your Contract will end if:
1) Your service will terminate 30 days later, or immediately in some cases if
we have ended your Contract.
2) You must immediately pay all charges that are due including any
Cancellation Fee and any outstanding payments or finance charge(s) –
in connection with Device leasing.
3) You must contact your financial institution to cancel direct debits and
credit card authorization relating to your account. If your Contract has not
ended then upon the expiration of your Term, your Contract will be
automatically renewed on a monthly basis and if your former rate plan is
not available, we will provide you an alternative.
your obligations
Payments
Monthly Service
Your monthly bill is payable upon receipt and if not paid within 30 days of
the date indicted on the bill you will be charged interest on the balance
owing at the late payment rate indicated on your bill. If you fail to pay your
bill, or any interim payment, on time, we may suspend your service or end
1965_Bell_Aud_PC5050_GSG_E_r14 3/19/04 3:00 PM Page 18
Page 12

21
20
iv) our acts or omissions, including those of our employees, agents and
persons for whom we are legally responsible, whether negligent or
otherwise;
v) any violation by you of these Terms of Service, your negligence, or acts or
omissions when using the service, features or your Device;
vi) loss, theft or unauthorized use of any Bell Mobility Prepaid cards or the12
digit-pin.
The following applies when we provide e9-1-1 Services. Our liability is not
limited by the limitations set out below in cases of our deliberate fault, gross
negligence or anti-competitive conduct or in cases of breach of contract
where the breach results from our gross negligence. Except in cases where
our negligence results in physical injury, death or damage to your property
or premises, our liability for negligence related to our provision of e9-1-1
Services is limited to the greater of $20 and three times the amount you
would otherwise be entitled to receive as a refund for the provision of
defective service under this Contract. In respect of our provision of e9-1-1
Services, we are not liable for:
(i) libel, slander, defamation or the infringement of copyright arising from
material or messages transmitted over our telecommunications network
from your property or premises or recorded by your Device or our
equipment;
(ii) damages arising out of your acts, default, neglect or omission in the use
or operation of equipment we have provided to you; and
(iii) any act, omission or negligence of other companies or
telecommunications systems when facilities of such other companies or
telecommunications systems are used in establishing connections to or
from your facilities and Device.
To protect the integrity of our network, you may not resell any of our services
or allow any alteration of the electronic serial number located on your
Device. In addition, you must agree to follow all other service regulations
issued or adopted by us.
Indemnity
You are responsible for and will indemnify us for all damages, losses,
expenses and any action, claim and judgment which may be made against us
by anyone in connection with your use of our services or violation of these
Ter ms of Service.
Licenses
You grant us and our suppliers a world-wide, royalty-free, unrestricted license
to use, copy, adapt, transmit, display and perform, distribute and create
compilations and derivative works from any and all user content you elect to
post in connection with the service, solely as required for us to provide you
the service. You acknowledge that we may store your user content on our
facilities for the purposes of you accessing such content, but that if you fail to
access such content within a certain period of time (not less than 30 days
from the last access unless we tell you otherwise) or if your service
terminates, we may delete such content without notice to you.
limits on our liability
Except for physical injuries or death, or damage to property caused by our
gross negligence, we are not liable to you or anyone using your Device for
the following:
i) defects, failures or interruptions in transmission;
ii) any damages, loss of profits, loss of property, loss of earning, loss of
business opportunities, or any other loss, however caused, arising directly
or indirectly from your use of the service, features or your Device;
iii) any content transmitted on or recorded by our network, including
content that may be illegal, dangerous, defamatory or annoying or which
may infringe upon the intellectual property, privacy or other rights of
another party;
1965_Bell_Aud_PC5050_GSG_E_r14 3/19/04 3:00 PM Page 20
Page 13

23
22
notesagree, sign and activate
If you do not agree with the above Terms of Service, do not proceed with the
activation of your Device and please return it to us undamage in its original
packaging within 15 days of the purchase date. If you do not sign below but
activate your Device and use the service, you agree that you are bound by
the above Terms of Service.
IF YOU AGREE WITH THE ABOVE TERMS OF SERVICE, INCLUDING THE LIMITS
ON OUR LIABILITY, please sign below.
I prefer that Bell Mobility not share my personal information with the other
Bell Companies.
Thank you for reviewing the Terms of Service, we look forward to serving you.
Sincerely,
Cameron McCuaig
VP Customer Service
Bell Mobility Inc.
Accepted by:
[Customer Name]________________________________________________
Date: __________________________________________________________
Customer Signature: ____________________________________________
These Terms of Service cannot be modified in any way by your Bell Mobility
sales representative or agent. If you require further information please
contact www.bell.ca or Customer Service at 1 800 667-0123.
DATA 1007 0204 61320 A+CO 1965
1965_Bell_Aud_PC5050_GSG_E_r14 3/19/04 3:00 PM Page 22
Page 14

1965_Bell_Aud_PC5050_GSG_E_r14 3/19/04 3:00 PM Page 24
 Loading...