

Page 1

1
AAUUDDIIOOVVOOXX PPPPCC44110000
AAUUDDIIOOVVOOXX PPPPCC44110000
Tri-band GSM (850/1800/1900)
Pocket PC with Built-in Phone
In today’ s fast paced world, it has become a necessity to
have access to real time information.Your communications
tools must provide you with this access from anywhere
at anytime. With that in mind, Audiovox developed the
PPC4100, a tri-band GSM Pocket PC device with built-in
phone functionality.
Operating on the 850, 1800 and 1900 MHz GSM frequencies,
the PPC4100 allows for seamless nationwide coverage
as well as offering state-of-the-art,
user-friendly features.
The PPC4100 has Intel
®
Mobile Media Technology at
400 MHz with 64 MB RAM and 64 MB ROM.It also offers
a 3.5” TFT LCD with QVGA resolution, speed
dialing, two-way speakerphone, and GPRS functionality
for wireless internet connection.
Your new PPC4100 Pocket PC provides you with
something only an Audiovox phone can: the proven
reliability that has made us a leading wireless handset
provider. Read through this User’s Guide to help make
the most efficient use of this valuable
communications tool.
Page 2

2 3
TTAABBLLEE OOFF CCOONNTTEENNTTSS
CCHHAAPPTTEERR 11 FFIIRRSSTT TTHHIINNGGSS FFIIRRSSTT .. .. .. .. .. .. .. .. .. ..
PPaacckkaaggee CCoonntteennttss
.. .. .. .. .. .. .. .. .. .. .. .. .. .. .. .. .. .. .. .. .. ..
HHaannddsseett SSeettuupp .. .. .. .. .. .. .. .. .. .. .. .. .. .. .. .. .. .. .. .. .. .. .. .. ..
Installing the Battery Pack
.................
Connecting the USB Cradle
................
Charging the Handset
.....................
Starting Up the Handset
...................
SSyysstteemm PPrroocceedduurreess .. .. .. .. .. .. .. .. .. .. .. .. .. .. .. .. .. .. .. .. ..
Recalibrating the Screen ..................
Creating Backup Files . ....................
Resetting the Handset ...................
Locking the Handset . ....................
CCHHAAPPTTEERR 22 GGEETTTTIINNGG SSTTAARRTTEEDD
.. .. .. .. .. .. .. .. .. .. ..
HHaannddsseett FFeeaattuurreess .. .. .. .. .. .. .. .. .. .. .. .. .. .. .. .. .. .. .. .. .. .. ..
HHaannddsseett TToouurr .. ..
.. .. .. .. .. .. .. .. .. .. .. .. .. .. .. .. .. .. .. .. .. .. .. ..
Front View
..............................
Rear View . ....................
.........
Left View . . ..................
...........
Using the Backlight . ......................
Using the SD/MMC Slot . ..................
PPeerriipphheerraallss TToouurr .. ..
.. .. .. .. .. .. .. .. .. .. .. .. .. .. .. .. .. .. .. .. .. ..
USB Cradle
.............................
Stereo Headset and Single Earbud Headset . .
Charging an Optional Spare Battery Pack . . . .
Send/End Button Operation . .. . . . . . . . . . . . . .
CCoommmmaanndd IInntteerrffaaccee .. ..
.. .. .. .. .. .. .. .. .. .. .. .. .. .. .. .. .. .. .. ..
Hardware Buttons and the Stylus . ...........
Today Screen . ............................
Status Icons . ............................
Navigation Bar ...........................
Command Bar . ...........................
Pop-up Menus ............................
Notifications . ............................
99
1100
1111
11
13
14
18
1199
19
20
21
23
2255
2266
2299
29
32
33
35
36
3388
38
39
41
42
4433
43
43
44
45
46
46
47
Page 3

4 5
TTAABBLLEE OOFF CCOONNTTEENNTTSS
TTAABBLLEE OOFF CCOONNTTEENNTTSS
PPhhoonnee OOppeerraattiioonn .. .. .. .. .. .. .. .. .. .. .. .. .. .. .. .. .. .. .. .. .. .. .. ..
Tur ning the Phone On and Off
..............
Erasing Number Input
.....................
Answering a Call
.........................
Ignoring a Call
..........................
Ending a Call
...........................
Adjusting the Phone Volume
...............
Using the Speakerphone
................
..
Muting A Call
................
............
MMaakkiinngg PPhhoonnee CCaallllss .. .. .. .. .. .. .. .. .. .. .. .. .. .. .. .. .. .. .. .. .. ..
PPhhoonnee FFeeaattuurreess .. .. .. .. .. .. .. .. .. .. .. .. .. .. .. .. .. .. .. .. .. .. .. ..
Call Notification and Identification
...........
Call Hold
...............................
Conference Call
.........................
Call Notes
.......................... ...
SMS Service
............................
Voice Mail
..............................
Contacts Integration
......................
Call History ..............................
PPhhoonnee PPrreeffeerreenncceess .. .. .. .. .. .. .. .. .. .. .. .. .. .. .. .. .. .. .. .. .. ..
Phone Tab
..............................
Services Tab
............................
Network Tab
............................
Special Tab
..............................
CCHHAAPPTTEERR 66 CCUUSSTTOOMMIIZZIINNGG YYOOUURR HHAANNDDSSEETT .. ..
AAddjjuussttiinngg SSeettttiinnggss .. .. .. .. .. .. .. .. .. .. .. .. .. .. .. .. .. .. .. .. .. .. ..
Personal Tab . . ...........................
System Tab..............................
Connections Tab . ........................
AAddddiinngg PPrrooggrraammss .. .. .. .. .. .. .. .. .. .. .. .. .. .. .. .. .. .. .. .. .. .. .. ..
Adding Programs to Your Device ............
Adding Programs to the Start Menu .........
RReemmoovviinngg PPrrooggrraammss .. .. .. .. .. .. .. .. .. .. .. .. .. .. .. .. .. .. .. .. ..
CCHHAAPPTTEERR 33 MMAANNAAGGIINNGG PPRROOGGRRAAMMSS .. .. .. .. .. .. .. ..
AAcccceessssiinngg PPrrooggrraammss .. .. .. .. .. .. .. .. .. .. .. .. .. .. .. .. .. .. .. .. ..
Opening a Program . ......................
Switching Between Programs ...............
Program List .............................
UUssiinngg FFiinndd .. .. .. .. .. .. .. .. .. .. .. .. .. .. .. .. .. .. .. .. .. .. .. .. .. .. .. ..
UUssiinngg FFiillee EExxpplloorreerr .. .. .. .. .. .. .. .. .. .. .. .. .. .. .. .. .. .. .. .. .. ..
UUssiinngg AAccttiivveeSSyynncc .. .. .. .. .. .. .. .. .. .. .. .. .. .. .. .. .. .. .. .. .. .. ..
Installing Microsoft ActiveSync .............
Creating a Partnership ....................
Synchronizing With Your Computer ..........
Synchronizing With a Server ...............
Synchronizing Information .................
Synchronizing Using Infrared ...............
Using ActiveSync to Exchange Files . ........
ActiveSync Errors .......................
CCHHAAPPTTEERR 44 EENNTTEERRIINNGG DDAATTAA .. .. .. .. .. .. .. .. .. .. .. .. .. ..
UUssiinngg tthhee IInnppuutt PPaanneell .. .. .. .. .. .. .. .. .. .. .. .. .. .. .. .. .. .. .. .. ..
Using the Soft Keyboard ..................
Using Letter Recognizer ..................
Using Block Recognizer ...................
Using Transcriber . ......................
Selecting and Editing Typed Text . ...........
WWrriittiinngg oonn tthhee SSccrreeeenn .. .. .. .. .. .. .. .. .. .. .. .. .. .. .. .. .. .. .. ..
DDrraawwiinngg oonn tthhee SSccrreeeenn .. .. .. .. .. .. .. .. .. .. .. .. .. .. .. .. .. .. ..
RReeccoorrddiinngg aa MMeessssaaggee .. .. .. .. .. .. .. .. .. .. .. .. .. .. .. .. .. .. .. ..
UUssiinngg MMyy TTeexxtt .. .. .. .. .. .. .. .. .. .. .. .. .. .. .. .. .. .. .. .. .. .. .. .. .. ..
CCHHAAPPTTEERR 55 UUSSIINNGG TTHHEE PPHHOONNEE
FFUUNNCCTTIIOONN .. ..
PPhhoonnee SSeettuupp .. .. .. .. .. .. .. .. .. .. .. .. .. .. .. .. .. .. .. .. .. .. .. .. .. .. ..
Installing the SIM Card ...................
Entering Y our PIN ........................
DDiiaalleerr SSccrreeeenn .. .. .. .. .. .. .. .. .. .. .. .. .. .. .. .. .. .. .. .. .. .. .. .. .. .. ..
4499
5500
50
50
50
5533
5544
5555
56
57
60
62
64
66
67
68
6699
7700
71
72
73
74
76
7777
8811
8833
8855
8877
8888
88
89
9911
9933
93
94
95
95
95
95
96
97
9988
110066
107
108
109
110
112
116
117
122
112255
125
129
134
136
113377
113388
138
143
150
115522
152
154
115566
Page 4

76
TTAABBLLEE OOFF CCOONNTTEENNTTSS
CCHHAAPPTTEERR 77 GGEETTTTIINNGG CCOONNNNEECCTTEEDD .. .. .. .. .. .. .. ..
..
IInnffrraarreedd CCoonnnneeccttiioonn .. .. .. ..
.. .. .. .. .. .. .. .. .. .. .. .. .. .. .. .. .. ..
IInntteerrnneett CCoonnnneeccttiioonn ..
.. .. .. .. .. .. .. .. .. .. .. .. .. .. .. .. .. .. .. .. ..
NNeettwwoorrkk CCoonnnneeccttiioonn
.. .. .. .. .. .. .. .. .. .. .. .. .. .. .. .. .. .. .. .. .. ..
EEmmaaiill SSeerrvveerr CCoonnnneeccttiioonn .. .. .. .. .. .. .. .. .. .. .. .. .. .. ..
.. .. ..
CCHHAAPPTTEERR 88 MMIICCRROOSSOOFFTT PPOOCCKKEETT OOUUTTLLOOOOKK
..
PPoocckkeett OOuuttllooookk OOvveerrvviieeww
.. .. .. .. .. .. .. .. .. .. .. .. .. .. .. .. .. ..
CCaalleennddaarr .. .. .. .. .. .. .. .. .. ..
.. .. .. .. .. .. .. .. .. .. .. .. .. .. .. .. .. .. ..
..
CCoonnttaaccttss .. .. .. .. .. .. .. .. .. .. .. .. .. .. .. .. .. .. .. .. .. .. .. .. .. .. .. .. .. .. ..
TTaasskkss .. .. .. .. .. .. .. .. .. .. .. .. .. .. .. .. .. .. .. .. .. .. .. .. .. .. .. .. .. .. .. .. ..
NNootteess .. .. .. .. .. .. .. .. .. .. .. .. .. .. .. .. .. .. .. .. .. .. .. .. .. .. .. .. .. .. .. .. ..
OOffffiiccee OOnnlliinnee .. .. .. .. .. .. ..
.. .. .. .. .. .. .. .. .. .. .. .. .. .. .. .. .. .. .. ..
CCHHAAPPTTEERR 99 CCOOMMPPAANNIIOONN PPRROOGGRRAAMMSS .. .. .. .. .. ..
..
PPoocckkeett WWoorrdd .. ..
.. .. .. .. .. .. .. .. .. .. .. .. .. .. .. .. .. .. .. .. .. .. .. .. ..
PPoocckkeett EExxcceell .. ..
.. .. .. .. .. .. .. .. .. .. .. .. .. .. .. .. .. .. .. .. .. .. .. .. ..
WWiinnddoowwss MMeeddiiaa PPllaayyeerr .. ..
.. .. .. .. .. .. .. .. .. .. .. .. .. .. .. .. .. ..
Program Enhancements . ..................
Copying Files to Your Device ...............
The Playlist ..............................
File Playback ............................
Customizing the Player ....................
MMiiccrroossoofftt RReeaaddeerr .. .. .. .. .. .. ..
.. .. .. .. .. .. .. .. .. .. .. .. .. .. .. .. ..
CCHHAAPPTTEERR 1100 WWIIRREELLEESSSS DDAATTAA PPRROOGGRRAAMMSS
.. .. ..
PPoocckkeett IInntteerrnneett EExxpplloorreerr .. .. .. .. .. .. .. .. .. .. .. .. .. .. .. .. .. .. ..
Mobile Favorites . .........................
IInnbbooxx .. .. .. .. .. .. .. .. .. .. .. .. .. .. .. .. .. .. .. .. .. .. .. .. .. .. .. .. .. .. .. .. ..
MMSSNN MMeesssseennggeerr .. ..
.. .. .. .. .. .. .. .. .. .. .. .. .. .. .. .. .. .. .. .. .. ..
TTeerrmmiinnaall SSeerrvviicceess CClliieenntt .. ..
.. .. .. .. .. .. .. .. .. .. .. .. .. .. .. ..
115577
115588
116600
116611
116633
116655
116666
116677
117711
117788
118811
118844
118855
118866
119911
119944
194
196
197
203
205
221100
221177
221188
220
222244
223322
223366
TTAABBLLEE OOFF CCOONNTTEENNTTSS
CCHHAAPPTTEERR 1111 AACCCCEESSSSOORRYY PPRROOGGRRAAMMSS
.. .. .. .. .. ..
SSIIMM MMaannaaggeerr .. .. .. .. .. .. .. .. .. .. .. .. .. .. .. .. .. .. .. .. .. .. .. .. .. ..
PPiiccttuurreess .. .. ..
.. .. .. .. .. .. .. .. .. .. .. .. .. .. .. .. .. .. .. .. .. ..
.. .. .. .. ..
Copying JPEG Files to Your Device
.........
Using Pictures
...........................
Customizing Pictures
.....................
WWiiBBaacckkuupp ..
.. .. .. .. .. .. .. ..
..
.. .. .. .. .. .. .. .. .. ..
..
.. .. .. .. .. .. .. ..
Using WiBackup ..........................
Customizing WiBackup ....................
CCHHAAPPTTEERR 1122 UUSSEERR SSUUPPPPOORRTT .. .. .. .. .. .. .. .. .. .. .. .. .. ..
CCuussttoommeerr SSuuppppoorrtt .. ..
.. .. .. .. .. .. .. .. .. .. .. .. .. .. .. .. ..
.. .. .. ..
TTrroouubblleesshhoooottiinngg .. ..
.. .. .. .. .. .. .. .. .. .. .. .. .. .. .. .. ..
.. .. .. .. .. ..
Troubleshooting Reminders . ................
Troubleshooting Procedures . ...............
CCHHAAPPTTEERR 1133 SSAAFFEETTYY IINNFFOORRMMAATTIIOONN .. .. .. .. .. .. .. ..
SSaaffeettyy IInnffoorrmmaattiioonn .. .. .. .. .. .. .. .. .. .. .. .. .. .. .. .. .. .. .. .. .. .. ..
Radiofrequency (RF) Energy Emission
......
Usage Precautions
.......................
Storage Precautions
......................
Usage Instructions
.......................
Device Damage and/or Data Loss Prevention
.
Antenna Information
......................
Battery Pack Information
..................
AC Adapter Precautions
...................
Phone Operation
.........................
Phone Usage Regulations
.................
SSAARR IInnffoorrmmaattiioonn .. .. .. .. .. .. .. .. .. .. .. .. .. .. .. .. .. .. .. .. .. .. .. .. ..
FFDDAA CCoonnssuummeerr UUppddaattee .. .. .. .. .. .. .. .. .. .. .. .. .. .. .. .. .. .. ..
CCHHAAPPTTEERR 1144 WWAARRRRAANNTTYY IINNFFOORRMMAATTIIOONN .. .. .. .. ..
WWaarrrraannttyy PPrrootteeccttiioonn .. ..
.. .. .. .. .. .. .. .. .. .. .. .. .. .. .. .. .. .. .. ..
1122 MMoonntthh LLiimmiitteedd WWaarrrraannttyy .. ..
.. .. .. .. .. .. .. .. .. .. .. .. .. ..
223399
224400
224411
242
243
252
225544
255
260
226611
226622
226633
263
263
227733
227744
274
277
279
280
281
284
285
286
289
290
229911
229933
330033
330044
330055
Page 5

8
FFIIRRSSTT TTHHIINNGGSS FFIIRRSSTT
Please read this User’s Guide before using your
PPC4100 Pocket PC.
This chapter describes the procedures you need to follow
to prepare your handset for operation.
1.
Package Contents
2.
Handset Setup
3.
System Procedures
9
CCHHAAPPTTEERR 11
CCHHAAPPTTEERR 11
Page 6

Perform the following tasks before using your device:
1. Install the battery pack.
2. Connect the USB cradle.
3. Charge the handset.
4. Start up the handset.
IINNSSTTAALLLLIINNGG TTHHEE BBAATTTTEERRYY PPAACCKK
Your PPC4100 uses a high-density removable and
rechargeable 1480 mAh Lithium Ion battery pack.
A backup battery cell is embedded into your device to
prevent data loss in instances when the battery pack is
removed or completely discharged.This backup battery
cell will support the system for a maximum of
30 minutes.
For information on conserving power to make your
battery pack last longer, see page 264.
1110
Thank you for purchasing the PPC4100 Pocket PC
wireless handset. The PPC4100's giftbox contains all of
the items listed below.
!
PPC4100 Pocket PC with Built-in Phone
!
AT&T Wireless SIM card
!
Stylus
!
Lithium Ion Battery Pack
!
USB Cradle
!
AC Adapter
!
Stereo Headset
!
Single Earbud Headset
!
Leather Pouch
!
PPC4100 Companion CD
!
PPC4100 User’s Guide with Warranty
Validation Card
!
PPC4100 Quick Reference Guide
!
PPC4100 Features and Service Guide
!
PPC4100 Activations Instructions Guide
PPAACCKKAAGGEE CCOONNTTEENNTTSS
PPAACCKKAAGGEE CCOONNTTEENNTTSS
HHAANNDDSSEETT SSEETTUUPP
HHAANNDDSSEETT SSEETTUUPP
NNOOTTEE:: RReeppoorrtt aannyy pprroodduucctt ddeeffeeccttss ttoo tthhee ppllaaccee ooff ppuurrcchhaassee
iimmmmeeddiiaatteellyy..
WWAARRNNIINNGG:: TThheerree iiss aa rriisskk ooff ffiirree aanndd bbuurrnnss iiff tthhee bbaatttteerryy ppaacckk
iiss hhaannddlleedd iimmpprrooppeerrllyy.. DDOO NNOOTT ddiissaasssseemmbbllee,, ccrruusshh,,
ppuunnccttuurree,, sshhoorrtt eexxtteerrnnaall ccoonnttaaccttss,, oorr ddiissppoossee tthhee bbaatttteerryy ppaacckk
iinn ffiirree oorr wwaatteerr.. DDOO NNOOTT aatttteemmpptt ttoo ooppeenn oorr sseerrvviiccee tthhee
bbaatttteerryy ppaacckk.. DDiissppoossee ooff uusseedd bbaatttteerriieess aaccccoorrddiinngg ttoo llooccaall
rreeccyycclliinngg gguuiiddeelliinneess iinn yyoouurr aarreeaa..
NNOOTTEE:: TToo eennaabbllee tthhee iinntteerrnnaall bbaatttteerryy cceellll ttoo pprroovviiddee bbaacckkuupp
ppoowweerr ssuuppppllyy,, cchhaarrggee yyoouurr ddeevviiccee wwiitthh tthhee mmaaiinn bbaatttteerryy ppaacckk,,
ffoorr aatt lleeaasstt eeiigghhtt ((88)) hhoouurrss..
Page 7
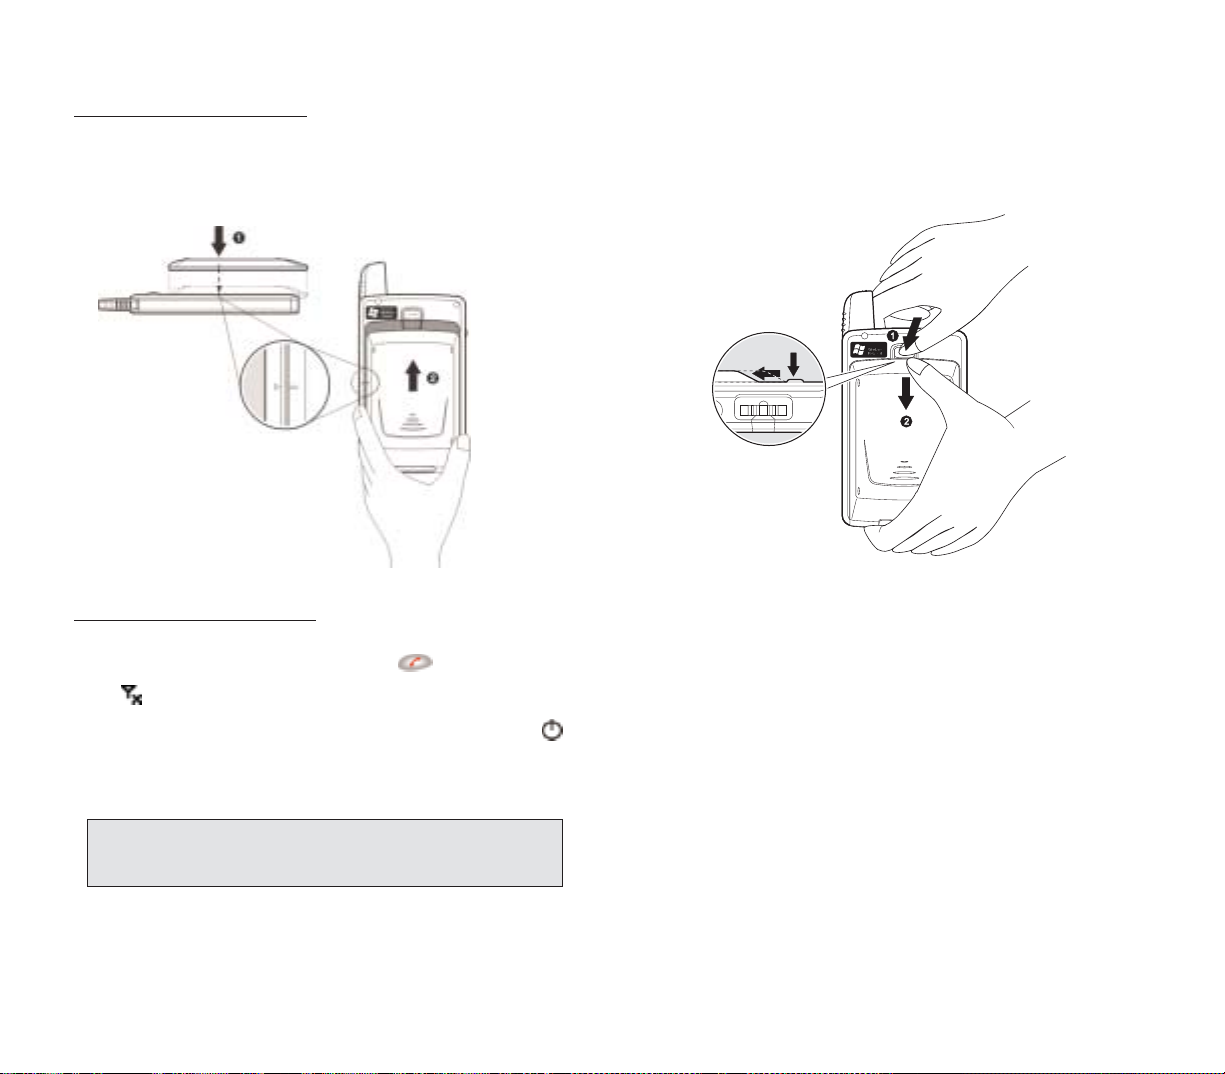
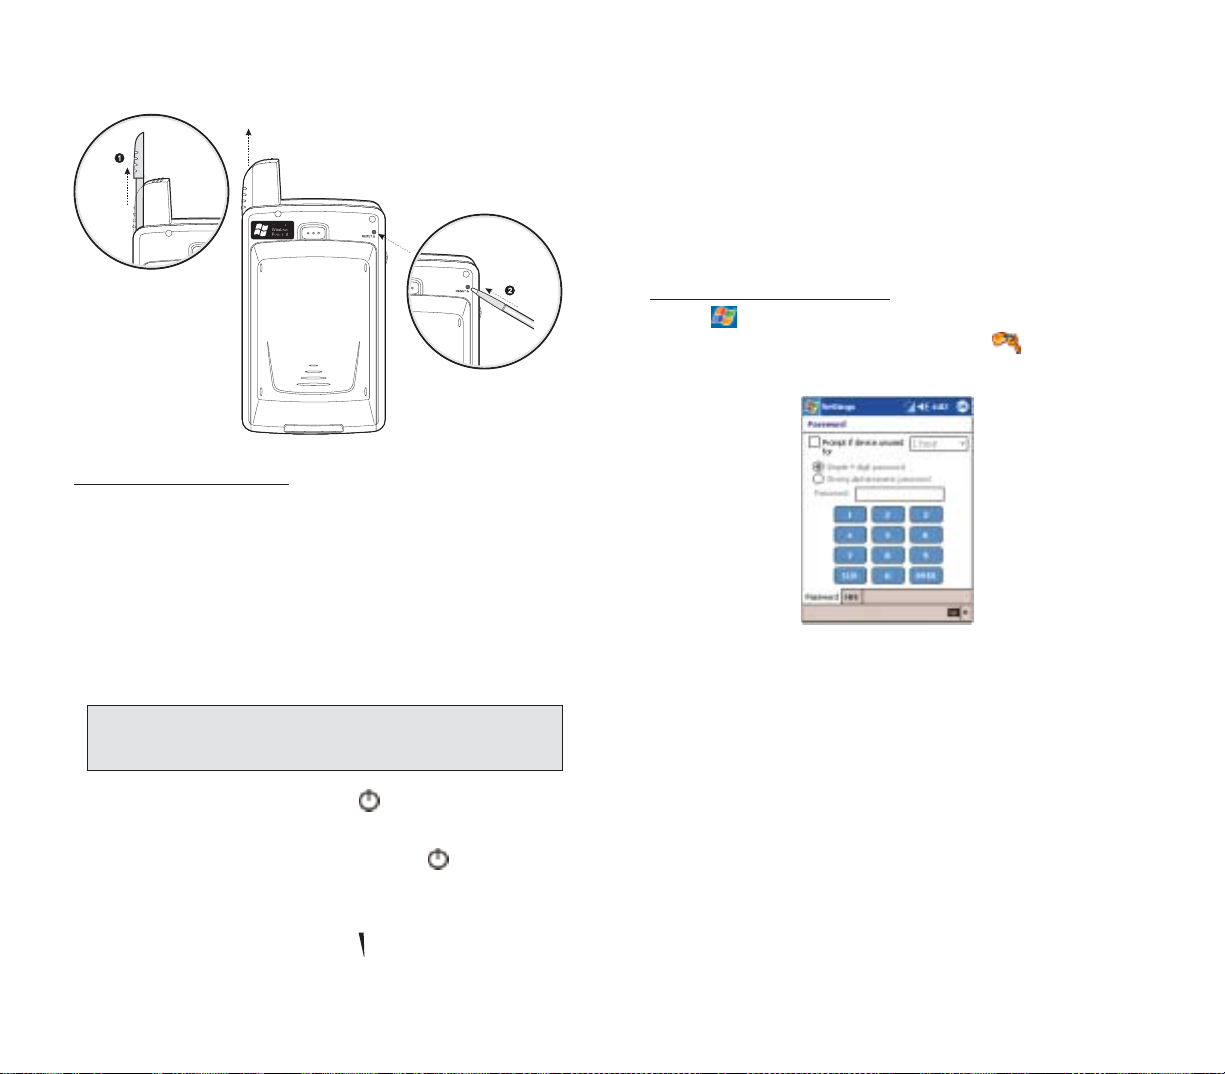
2. Follow the substeps below:
(1) With one hand, press and hold the battery release
switch, then
(2) Slide the battery pack out from its bay.
CCOONNNNEECCTTIINNGG TTHHEE UUSSBB CCRRAADDLLEE
The cradle that comes with your device enables you to
charge your device, as well as synchronize the
information on your device with those on your computer
using ActiveSync technology. The dual-pocket design
also allows simultaneous charging of the device and an
optional spare battery pack if you have purchased one.
13
To install the batter y pack:
1. Align the battery marker on the battery pack with the
one located on the device.
2.Slide the battery pack into the battery bay until it clicks
into place.
T
o detach the battery pack:
1. If the device is on:
a. Press and hold the
EEnndd
button on your device
until appears in the navigation bar.
b. To turn off the device, press the
PPoowweerr
button .
c. Wait for five (5) seconds to allow the device to
completely enter sleep mode.
12
IIMMPPOORRTTAANNTT:: FFaaiilluurree ttoo pprrooppeerrllyy ttuurrnn ooffff tthhee ddeevviiccee bbeeffoorree
uunniinnssttaalllliinngg tthhee bbaatttteerryy ppaacckk mmaayy rreessuulltt iinn tthhee lloossss ooff aallll ddaattaa
ssttoorreedd iinn tthhee iinntteerrnnaall mmeemmoorryy ooff yyoouurr ddeevviiccee..
Page 8
1514
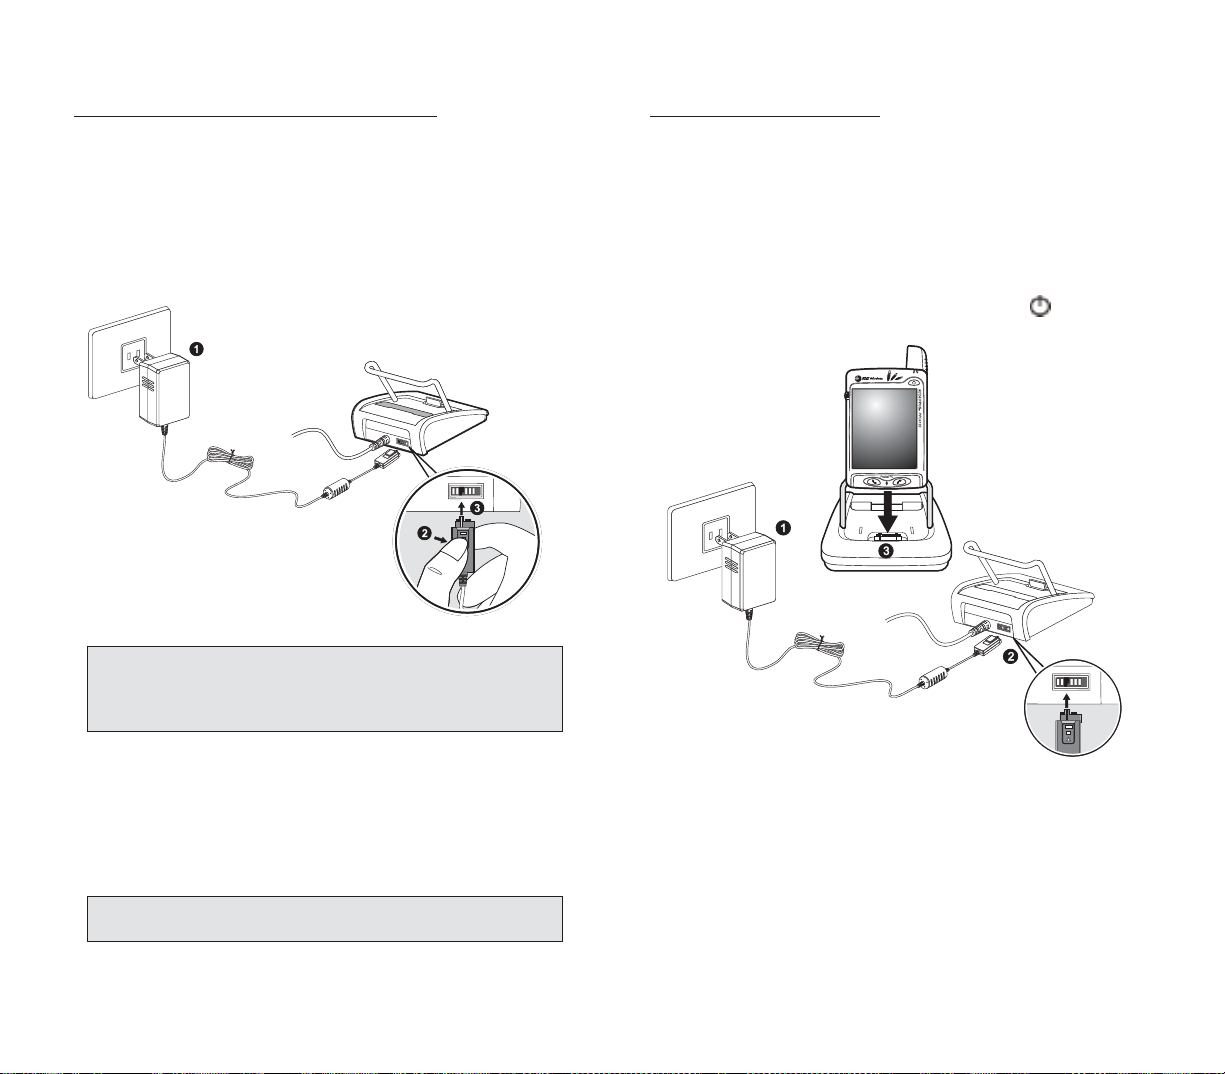
To charge your PPC4100:
1. Plug the AC adapter into any AC current outlet.
2. Connect the AC adapter cord to the power socket at
the back of the cradle.
3.Slide the device into the front pocket of the cradle until
it clicks into place.
The connection is secure when the bottom edge of the
device is aligned smoothly with the cradle, and the LED
indicator on the device’s power button lights up
green.
LED status during charging:
!
Flashing green: Charging
!
Solid green: Charging complete
4. Remove the device from the cradle after charging.
Go to the next page for instructions.
To connect the cradle to a pow
er source:
1. Connect the AC adapter cord to the power socket at
the back of the cradle.
2. Press and hold the connector button on the AC
adapter cord.
3. Plug it into the power socket at the back of the
cradle.
4. Plug the AC adapter into any AC current outlet.
CCHHAARRGGIINNGG TTHHEE HHAANNDDSSEETT
For initial use, you need to charge your device for about
eight (8) hours. After that, you can charge it everyday to
recharge the battery to full capacity.
IIMMPPOORRTTAANNTT:: TToo aavvooiidd ddaammaaggiinngg tthhee AACC aaddaapptteerr,, mmaakkee ssuurree
ttoo pprreessss aanndd hhoolldd tthhee ccoonnnneeccttoorr bbuuttttoonn bbeeffoorree ccoonnnneeccttiinngg oorr
ddiissccoonnnneeccttiinngg tthhee ccoorrdd ffrroomm tthhee ppoowweerr ssoocckkeett ooff tthhee
ccrraaddllee//ddeevviiccee..
IIMMPPOORRTTAANNTT:: MMaakkee ssuurree tthhaatt tthhee SSIIMM ccaarrdd hhoollddeerr iiss cclloosseedd
bbeeffoorree cchhaarrggiinngg tthhee ddeevviiccee..
Page 9
1716
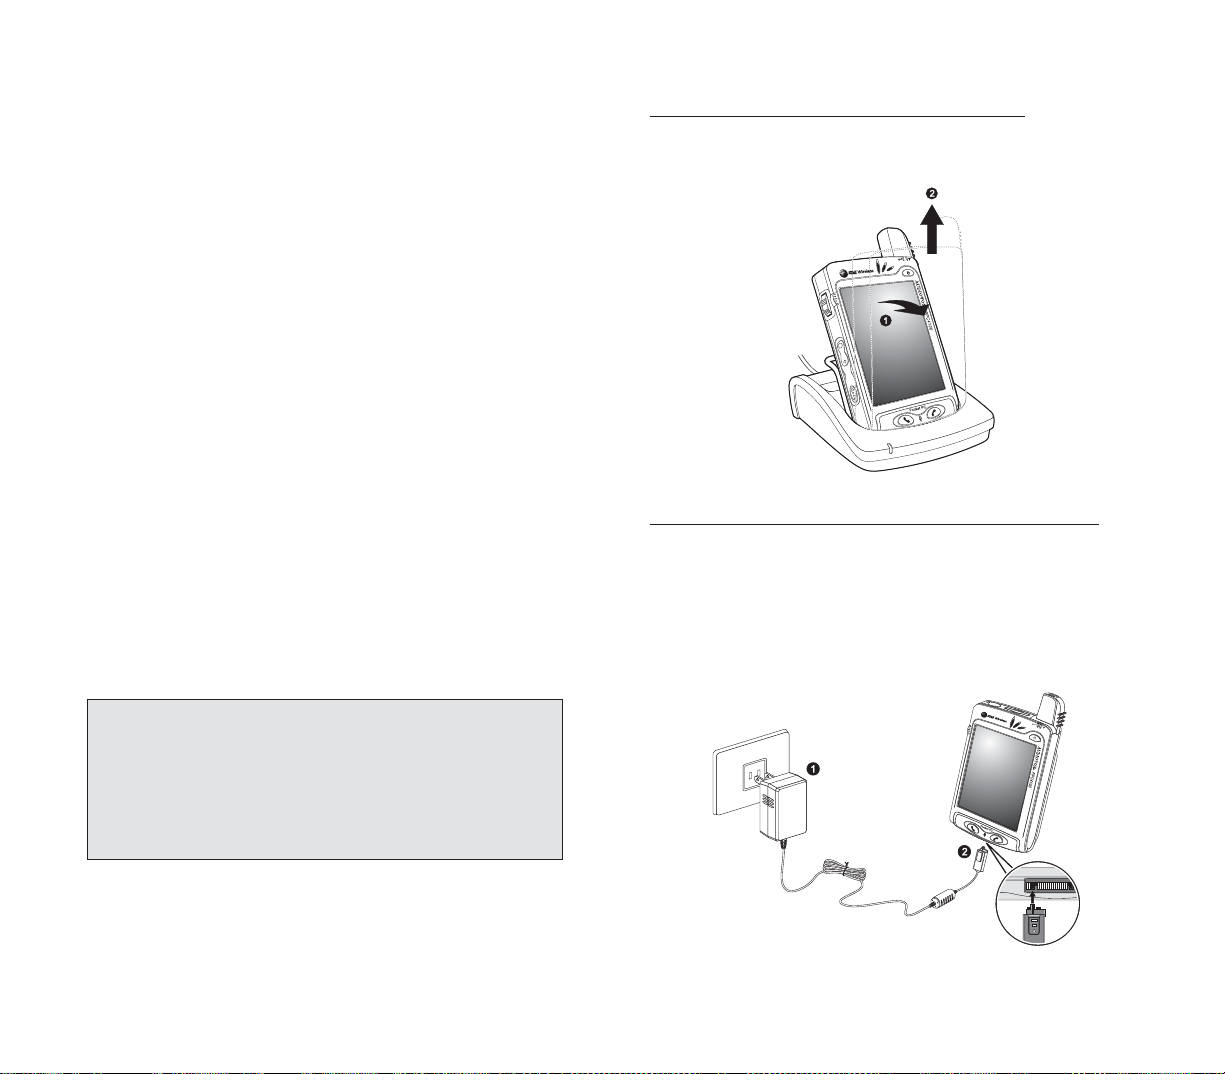
To remove y
our PPC4100 from the cradle:
1. Gently tilt the device forward.
2. Pull the device up to detach it from the cradle.
T
o recharge the device using the AC adapter cord:
When traveling, you can still recharge your device and
avoid the bulk of carrying the cradle by using the AC
adapter cord to directly connect to a power outlet.
1. Plug the AC adapter into any AC current outlet.
2. Connect the AC adapter cord to the universal
connector of your device.
If the battery level becomes low in the course of normal
use, a status icon appears on the device screen
indicating low or very low battery status (see “Status
icons” on page 44). In both cases, perform an
ActiveSync operation to back up your data, then
recharge your device as soon as possible.
If the battery level reaches low status, the device will
enter sleep mode; if the battery level reaches very low
status, the device will enter deep sleep mode. In this
case, you have about 72 hours to recharge your device
after which you risk losing all data on your device’s
internal memory.
For information on how to wake up your device from
sleep mode, refer to page 265.
The battery pack is removable. Refer to page 12 for
instructions on how to remove it from the battery bay.
You have the option to purchase a spare battery pack for
your device. You can charge this spare battery pack in
the back pocket of the cradle. Refer to page 41 for
instructions.
NNOOTTEE::
!
IItt iiss mmoorree eeffffiicciieenntt ttoo cchhaarrggee tthhee ddeevviiccee wwhheenn iitt iiss ttuurrnneedd
ooffff..
!
IIff tthhee ppoowweerr LLEEDD fflliicckkeerrss wwhhiillee cchhaarrggiinngg,, tthhee mmeettaall
ccoonnttaaccttss oonn tthhee bbaatttteerryy ppaacckk mmaayy nneeeedd cclleeaanniinngg..
!
BBaatttteerryy ooppeerraattiinngg ttiimmee ggrraadduuaallllyy ddeeccrreeaasseess oovveerr ttiimmee..
!
IIff tthhee bbaatttteerryy ffaaiillss ttoo ppeerrffoorrmm nnoorrmmaallllyy,, yyoouu mmaayy nneeeedd ttoo
rreeppllaaccee tthhee bbaatttteerryy..
Page 10
1918
The following sections describe various system
procedures that will help you use the device more
efficiently.
RREECCAALLIIBBRRAATTIINNGG TTHHEE SSCCRREEEENN
When you first startup your PPC4100, you will be asked
to calibrate the screen by tapping the center of a cross
with your stylus as it moves around the screen. This
process ensures that when you tap the screen with your
stylus the item tapped is activated. If, however, while
using your device, you discover tapping an item doesn’t
bring up the appropriate response, it means your device
has lost its calibration.
T
o recalibrate the screen:
1.Launch the Align Screen window by doing either of the
following:
!
Software launching
a.Tap , then Settings.
b.On the System tab, tap Screen .
c. On the Screen window, tap
AAlliiggnn SSccrreeeenn
.
!
Hardware launching
Simultaneously press the
PPoowweerr
button and the
jog dial.
2.T ap the center of the cross with y our stylus as it mov es
around the screen.
SSYYSSTTEEMM PPRROOCCEEDDUURREESS
SSYYSSTTEEMM PPRROOCCEEDDUURREESS
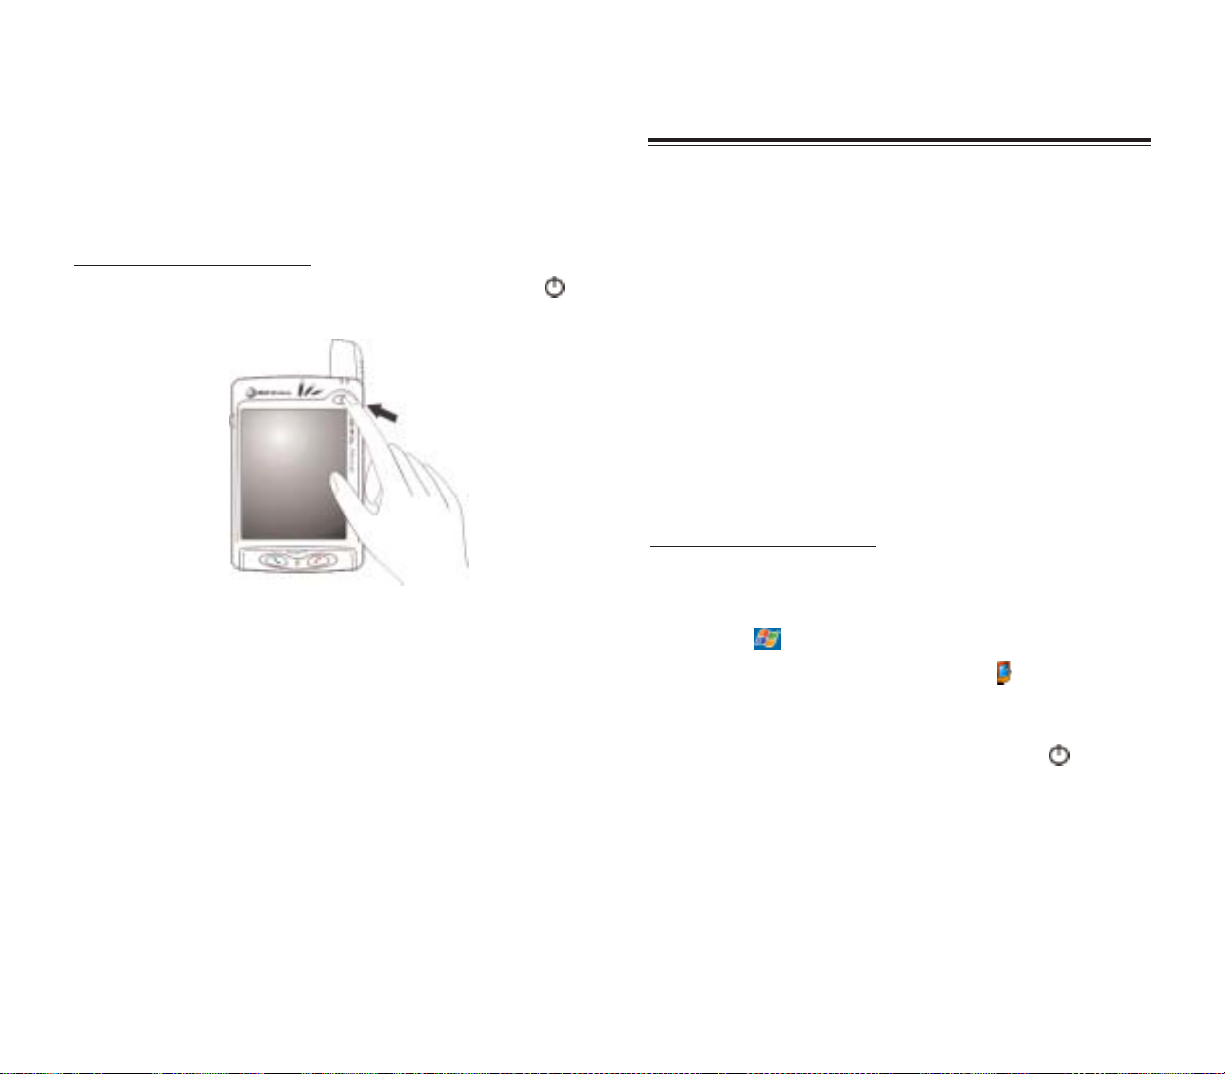
SSTTAARRTTIINNGG UUPP TTHHEE HHAANNDDSSEETT
After initially charging your device for about eight (8)
hours it is ready to be used.You can now star t up your
device where you’ll calibrate the display, learn some
basic stylus usage, and set up the system date and time.
T
o star
t up your PPC4100:
1.Turn on your device by pressing the
PPoowweerr
button
on the front panel.
2. Follow the onscreen instructions on the Welcome
Screen Wizard.
Page 11

2120
!
Back up individual Word, Excel or Notes files using
the Rename/Move command.Follow the steps below.
1. Insert an SD or MMC card into the SD/MMC slot
on the top edge of your device.
2. Open the file you want to back up.
3.Tap
TToooollss
, then
RReennaammee//MMoovvee
.
4. On the Rename/Move screen, enter a file name
in the Name field.
5.T ap the Location pic k list, then select
SSttoorraaggee CCaarrdd
.
6.T ap the F older pick list, then select the f older where
you want to save the file.
7.Tap
OOKK
.
8.After the backup process, remove the card from the
slot.
RREESSEETTTTIINNGG TTHHEE HHAANNDDSSEETT
You may have to perform a reset if the device freezes
(i.e., device no longer responds to the buttons on the
screen).
T
o perf
orm a soft reset:
A soft reset allows your device to get a fresh start,
similar to rebooting a computer. This will restart your
device and adjust memory allocation. All records and
entries are retained after a soft reset. Unsaved data in
open programs may in some cases be lost.
1. Remove the stylus from its holder.
2. Lightly press the tip of the stylus to the reset button
located on the rear panel of the device.
CCRREEAATTIINNGG BBAACCKKUUPP FFIILLEESS
Any additional programs or new data on your device are
stored in RAM (random access memory). These items
will be lost if you have to perform a hard reset or your
device loses all power for any other reason. Because of
this it is imperative that you regularly back up files to
your computer via ActiveSync or to a storage card using
the device’s built-in SD/MMC slot.
If have access to your computer, use ActiveSync to
synchronize files to create backup files of information
stored on your device. Refer to page 55 for more
information on using ActiveSync.
In instances where you are unable to access your
computer, you can back up files to an SD or MMC card.
You have the following options:
!
Back up individual files using the Cut and Paste
commands in File Explorer.
!
Back up all stored data files or all PIM data using
WiBackup - For instructions on using WiBackup, go to
page 254.
Page 12
2322
LLOOCCKKIINNGG TTHHEE HHAANNDDSSEETT
Your device is not just a financial investment but a
wealthy source of personal information, some of which
may be confidential so it is only logical to protect it from
any unauthorized access.The Security setting gives you
the option of assigning a lock password that will be
required to access your device after a set period of
inactivity.
To assign a lock password:
1.Tap , then
SSeettttiinnggss
.
2. On the Personal tab, tap
PPaasssswwoorrdd
.
The Password Settings window appears.
3. On the Password tab, select the check box to enable
the password function.
4.Tap the pick list to select the period of inactivity before
the lock password will be required for access.
5. Tap a radio button corresponding to the password
mode you want to apply.You have two options.
!
Simple 4 digit password
This password mode requires a 4-digit password.
!
Strong alphanumeric password
This password mode requires an alphanumeric
password (i.e., a combination of upper- and lower case
letters, numbers, and symbols) consisting of at least
seven characters.
6. If you want to set a keyword to serve as a password
reminder in case you forget it, tap the
HHiinntt
tab.
7.Tap
OOKK
.
T
o perform a hard reset:
A hard reset will cut off power to your device. This will
erase all records and entries, delete all programs you
have added, and restore the device default factory
settings. Never perform a hard reset unless a soft reset
does not correct your problem. When you perform your
next ActiveSync operation, y ou can restore an y data that
you previously synchronized to your computer or you
can restore data that you backed up to a storage card.
1. Hold down the
PPoowweerr
button on the front panel of
your device.
2.While holding down the power button , gently press
the tip of the stylus to the reset button.
The Confirmation message box appears.
3. Press the volume rocker key up.
NNOOTTEE:: WWhheenn yyoouu ppeerrffoorrmm aa hhaarrdd rreesseett,, tthhee ccuurrrreenntt ddaattee aanndd
ttiimmee aarree nnoott bbee rreettaaiinneedd.. FFoorrmmaattss,, pprreeffeerreenncceess,, aanndd ootthheerr
sseettttiinnggss aarree rreessttoorreedd ttoo tthheeiirr ffaaccttoorryy ddeeffaauulltt sseettttiinnggss..
Page 13

25
GGEETTTTIINNGG SSTTAARRTTEEDD
After completing the setup procedures, you can now
familiarize yourself with the hardware and software
functions of your handset to better understand the
basics on how to use your device.
This chapter explains the handset features. It also gives
you a tour of the hardware and software interf ace of y our
device.
1. Handset Features
2. Handset Tour
3. Peripherals Tour
4. Command Interface
CCHHAAPPTTEERR 22
CCHHAAPPTTEERR 22
24
Page 14

2726
PPHHOONNEE FFEEAATTUURREESS
!
Tri-band GSM broadband function (900/1800/1900)
!
Contacts migration service using SIM Manager
!
Integration with Microsoft Contacts
!
Features include Speed Dial, Caller ID, Conference
Call, Call Waiting, Call Barring, Call History,
speakerphone mode, note taking, voice mail, and
emergency number setting
!
SMS mailbox/Inbox integration
!
Seamless transition between voice and data
connections
!
Hardware and software launch function
!
Operation time:
- Talk Time:up to 3 hours
- Standby Time: up to 100 hours
- Typical Time:up to 12 hours of PDA usage only
- Data Time:up to 5 hours
CCOONNNNEECCTTIIVVIITTYY
!
19-pin universal connector
!
Built-in SD/MMC (Standard Digital/MultiMedia Card)
expansion slot
!
IrDA-standard Infrared wireless function
!
Wireless Internet access via AT&T’s GPRS
!
One-touch ability to toggle on and off all
wireless functions using Connection Manager
Listed below are the system features of your new
PPC4100 Pocket PC.
PPEERRFFOORRMMAANNCCEE
!
IntelMobile Media Technology of up to 400 MHz
!
Integrated Intel XScaleTMTechnology
!
System memory:
- 64 MB SDRAM for application storage
- 64 MB Flash ROM for operating system
!
Windows Mobile™ 2003 software for Pocket PC
Phone Edition
DDIISSPPLLAAYY
!
3.5" Transreflective TFT LCD (Thin Film Transistor
Liquid Crystal Display)
with QVGA resolution
!
240 x 320 resolution
!
16-bit color depth support
!
Software-configurable backlight settings
!
Microsoft ClearType technology for clearer, crisper
font display
AAUUDDIIOO
!
Embedded AC '97 CODEC with CD-quality stereo
output
!
Built-in industry-standard 2.5-mm earphone jack
!
Built-in speaker and microphone
!
Separate volume control for system sounds and
phone function volume
!
Playback support for both Windows Media and MIDI
sound files for personalizing ring tones and sound
notifications
HHAANNDDSSEETT FFEEAATTUURREESS
HHAANNDDSSEETT FFEEAATTUURREESS
Page 15
2928
The following sections gives you a tour of the hardware
interface.
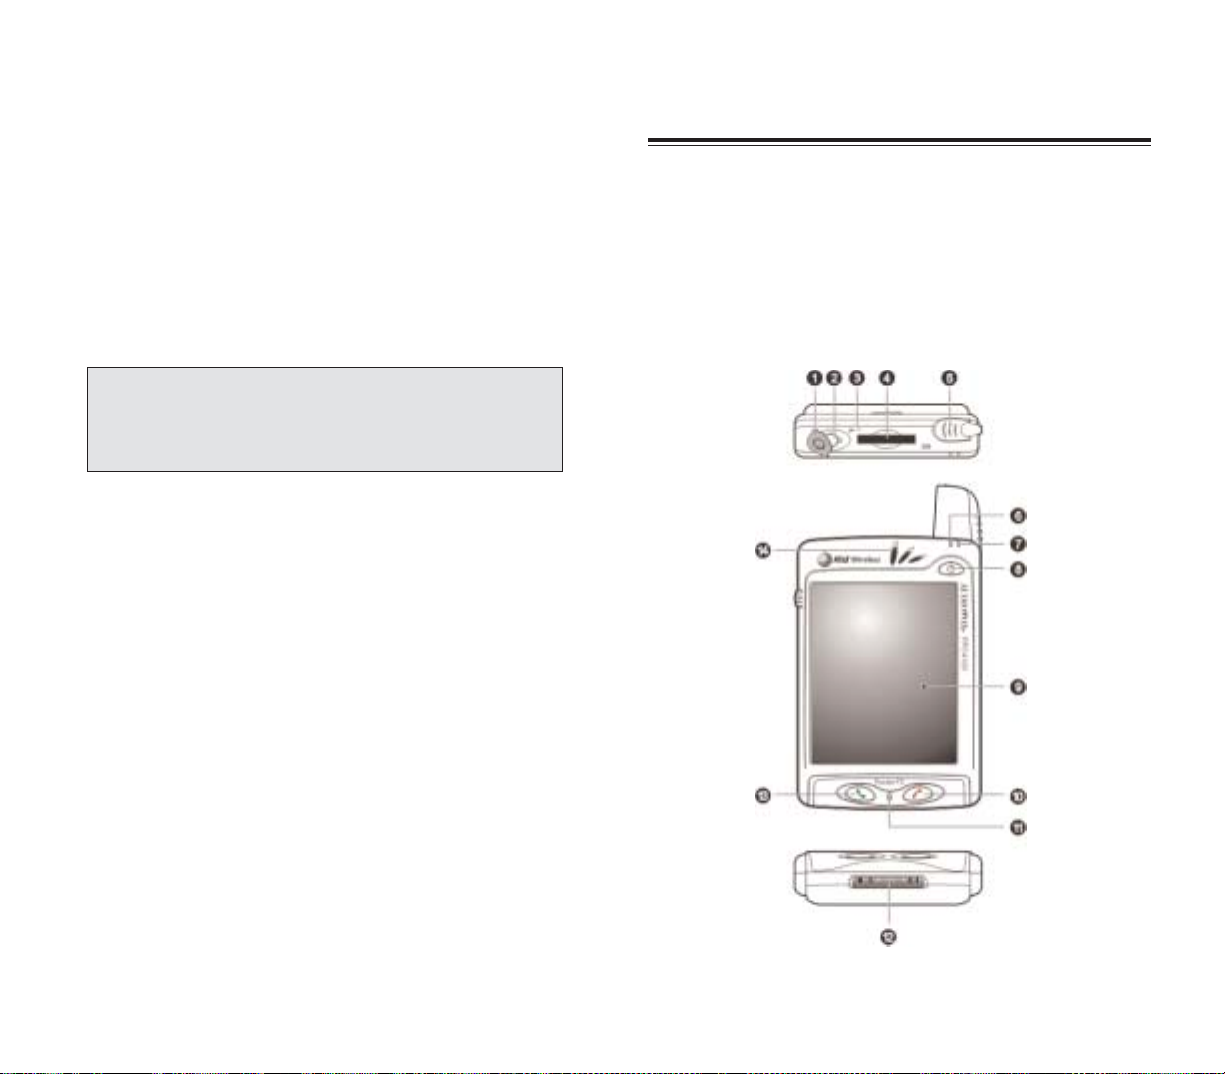
FFRROONNTT VVIIEEWW
The illustration below show the front panel of your de vice
as well as the top and bottom edges.
HHAANNDDSSEETT TTOOUURR
HHAANNDDSSEETT TTOOUURR
BBAATTTTEERRYY PPAACCKK
!
Removable and rechargeable 1480 mAh Lithium Ion
battery pack
!
Embedded backup battery cell
!
Charging time from empty to full capacity: 8 hours
!
Operation time
- MP3 Playback Time (LCD off): up to 12 hours
- WMV Playback Time (LCD on, average level
backlight, phone function off): up to 7 hours
- Internet Browsing Time: up to 4 hours
DDEESSIIGGNN AANNDD EERRGGOONNOOMMIICCSS
!
Stylish and sleek design
!
Dimensions
- Length: 4.29 in.
- Width: 2.69 in.
- Depth: .85 in. (batter y pack attached)
- Weight: 5.6 oz. (batter y pack attached)
!
User-friendly navigation features
- 3-way jog dial for one-hand operation
- Rocker key for volume control
- Hold switch lets you lock all buttons from being
accidentally pressed when device is placed in pocket
or in a bag.
NNOOTTEE:: LLeennggtthh ooff bbaatttteerryy ooppeerraattiioonn wwiillll ddeeppeenndd oonn ppoowweerr
ccoonnssuummppttiioonn wwhhiicchh iinn ttuurrnn iiss bbaasseedd oonn ssyysstteemm rreessoouurrcceess uussee..
FFoorr eexxaammppllee,, ccoonnssttaannttllyy uussiinngg tthhee bbaacckklliigghhtt oorr uussiinngg
ppoowweerr--ddeemmaannddiinngg aapppplliiccaattiioonnss wwiillll sshhoorrtteenn tthhee lleennggtthh ooff
bbaatttteerryy ooppeerraattiioonn..
Page 16

3130
NNOO..
CC
OOMMPPOONNEENNTT
DD
EESSCCRRIIPPTTIIOONN
10 End button
!
When there’s an incoming call, press
to reject the call.
!
During an ongoing call, press to end
the call.
!
When manually dialing a number,
press to delete the number input.
11 Microphone Inputs audio into your device when
receiving/making a call or recording
voice notes.
12 Universal Connects your device to the cradle,
connector which in tur n connects to the back of
your computer and through the AC
adapter to an external power source.
This allows you to recharge your de vice
and perform an ActiveSync operation.
You can also use the universal
connector to connect peripheral
hardware devices, such as an external
keyboard, to your device.
NNOOTTEE:: YYoouu nneeeedd ttoo iinnssttaallll aann
aapppprroopprriiaattee ddrriivveerr ttoo yyoouurr ddeevviiccee bbeeffoorree
uussiinngg aa ppeerriipphheerraall ddeevviiccee..
13 Send button
!
When there’s an incoming call, press
to accept the call.
!
During an ongoing call, press and
hold to toggle on/off the speakerphone
mode.
!
From Speed Dial, press to call the
currently selected number.
!
From Call History, press to call the
currently selected log item.
!
In mailbox, press to send a
composed email/SMS message or
display options for a received
email/SMS.
!
From a PDA application, press to
display the Dialer screen or press twice
to redial the last called number.
14 Speaker Emits system sounds.
NNOO..
CC
OOMMPPOONNEENNTT
DD
EESSCCRRIIPPTTIIOONN
1 Earphone jack A non-detachable protective covering
cap for the earphone jack.
2 Earphone jack Connects to audio line-out devices
(earphones/headphones).
3 Infrared (IR) Uses infrared technology to transmit
port and receive data from other IR-enabled
devices.
4 SD/MMC Accepts SD, MMC, and SDIO (Secure
expansion slot Digital Input Output) cards, allowing
you to add more memory .Install add-on
applications or use audio or text files
stored in it for use with internal
applications. You can also use it to
back up data from your device.
5 Antenna/stylus The antenna includes a neatly hidden
holder slot for holding the stylus. To use the
stylus, remove it from its holder and
hold it the same way you hold a pen or
pencil.
6 Notification Lights up solid amber for alarm
indicator reminders and email receipt.
7 Phone Lights up green to indicate phone
indicator function status.
8 Power button If the device is off, press the button to
turn it on (LED lights up green).
If the device is on, press to turn it off.
The status of the power LED indicates
the charging status.
!
Flashing green - Charging device
!
Solid green - Charging complete
As a backlight control, press and hold
to toggle the backlight on/off.
9 LCD Displays the applications and data
touchscreen stored on your device.It is
touch-sensitive and responds to the
stylus or your finger.
Page 17

3332
LLEEFFTT VVIIEEWW
NN
OO
.. CC
OOMMPPOONNEENNTT
DD
EESSCCRRIIPPTTIIOONN
1 Jog dial Pressing the jog dial results in an
action similar to pressing the Enter key
on a regular keyboard. For example, to
open any of the applications in the Start
menu simply select that application
then press the jog dial; or in using a
Help menu, simply select a hyperlink
then press the jog dial to display the
linked information.
In pop-up menus:
!
Rotate up/down to go through menu
options.
!
Press to select a highlighted option.
RREEAARR VVIIEEWW
NN
OO
.. CC
OOMMPPOONNEENNTT
DD
EESSCCRRIIPPTTIIOONN
1 Main battery Press to release the main battery from
release latch its bay.
2 Reset button Press the end of the stylus into the
hole to reset your device.
3 Main battery Removable and rechargeable
1480 mAh Lithium Ion battery pack.
Page 18

3534
NNOO..
CC
OOMMPPOONNEENNTT
DD
EESSCCRRIIPPTTIIOONN
Hold switch When there’s an incoming call and the
hold switch is enabled:
!
Backlight is turned on with the caller
ID displayed
!
All hardware keys except for the
SSeenndd
or
EEnndd
buttons are
disabled
!
Backlight turns off after ending call
NNOOTTEE:: EEnnaabblliinngg tthhee hhoolldd sswwiittcchh ddooeess
nnoott lloocckk tthhee rreesseett bbuuttttoonn;; yyoouu ccaann ssttiillll
rreesseett yyoouurr ddeevviiccee eevveenn iiff tthhee hhoolldd
sswwiittcchh iiss ttuurrnneedd oonn..
UUSSIINNGG TTHHEE BBAACCKKLLIIGGHHTT
If lighting conditions make it difficult for you to see the
information on your device, use the backlight to
illuminate your screen. You can change the backlight
settings. Refer to “Brightness” on page 145.
T
o activate the backlight:
!
Press and hold the
PPoowweerr
button until the
backlight turns on.
- or If the hold switch is enabled, disable it.
T
o tur
n off the backlight:
!
Press and hold the
PPoowweerr
button until the
backlight turns off.
- or If the hold switch is disabled, enable it.
NNOO..
CC
OOMMPPOONNEENNTT
DD
EESSCCRRIIPPTTIIOONN
Jog dial In Dialer:
!
Rotate up to access Call History.
!
Rotate down to access Speed Dial.
From Speed Dial:
!
Rotate up/down to scroll through the
list.
!
Press to call the currently selected
number.
From Call History:
!
Rotate up/down to scroll through the
log items.
!
Press to call the currently selected
log item.
!
Press and hold to display the pop-up
menu for the currently selected log
item.
From SIM Manager:
!
Rotate up/down to scroll through the
numbers stored in your SIM card.
!
Press and hold to display the pop-up
menu for the currently selected entry.
2 Volume Press the key up to increase volume,
rocker key press down to decrease volume.
3 Hold switch Slide up to lock all buttons from being
accidentally pressed when the device
is placed in pocket or in a bag.
When the hold switch is enabled:
!
Backlight is turned off and all
hardware buttons are disabled
!
Auto power off function is still active
!
Sound notification for alarms,
reminders and SD/MMC/SDIO card
movement are enabled
Page 19
3736
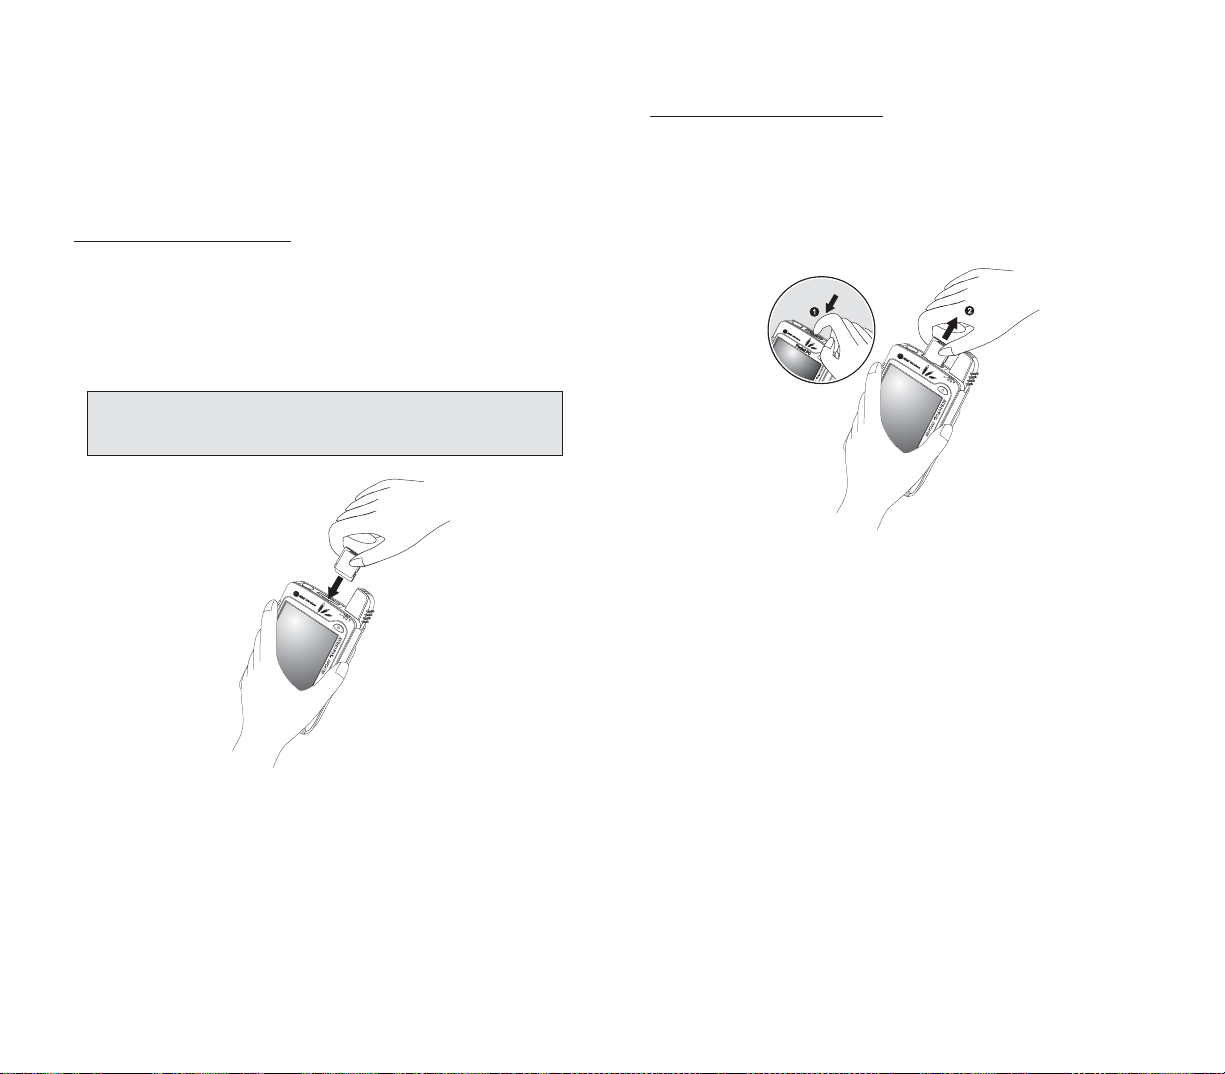
To remove a stor
age card:
1. Hold your device securely, then push against the top
of the card, as if you were pushing it further into the slot,
letting the card spring out. An audible system sound will
signal that the card has been released.
2. Gently remove the card from the slot.
UUSSIINNGG TTHHEE SSDD//MMMMCC SSLLOOTT
Your device has an expansion slot compatible with a
range of SD , MMC , and SDIO storage cards that you can
use to back up or transfer files and data.
T
o insert a storage card:
!
Hold your device securely, then push the card into the
slot until you hear an audible system sound; this will
signal that the card is already properly seated within the
slot.The card is secure when it is not protruding from the
base.
NNOOTTEE:: TThhiiss ddeevviiccee ccoommeess wwiitthh aa pprrootteeccttiivvee ppiieeccee iinn tthhee ccaarrdd
sslloott.. RReemmoovvee tthhee ppllaassttiicc ccaarrdd ffrroomm tthhee sslloott bbeeffoorree ttrryyiinngg ttoo
iinnsseerrtt aann SSDD oorr MMMMCC ccaarrdd..
Page 20
3938
NNOO..
CC
OOMMPPOONNEENNTT
DD
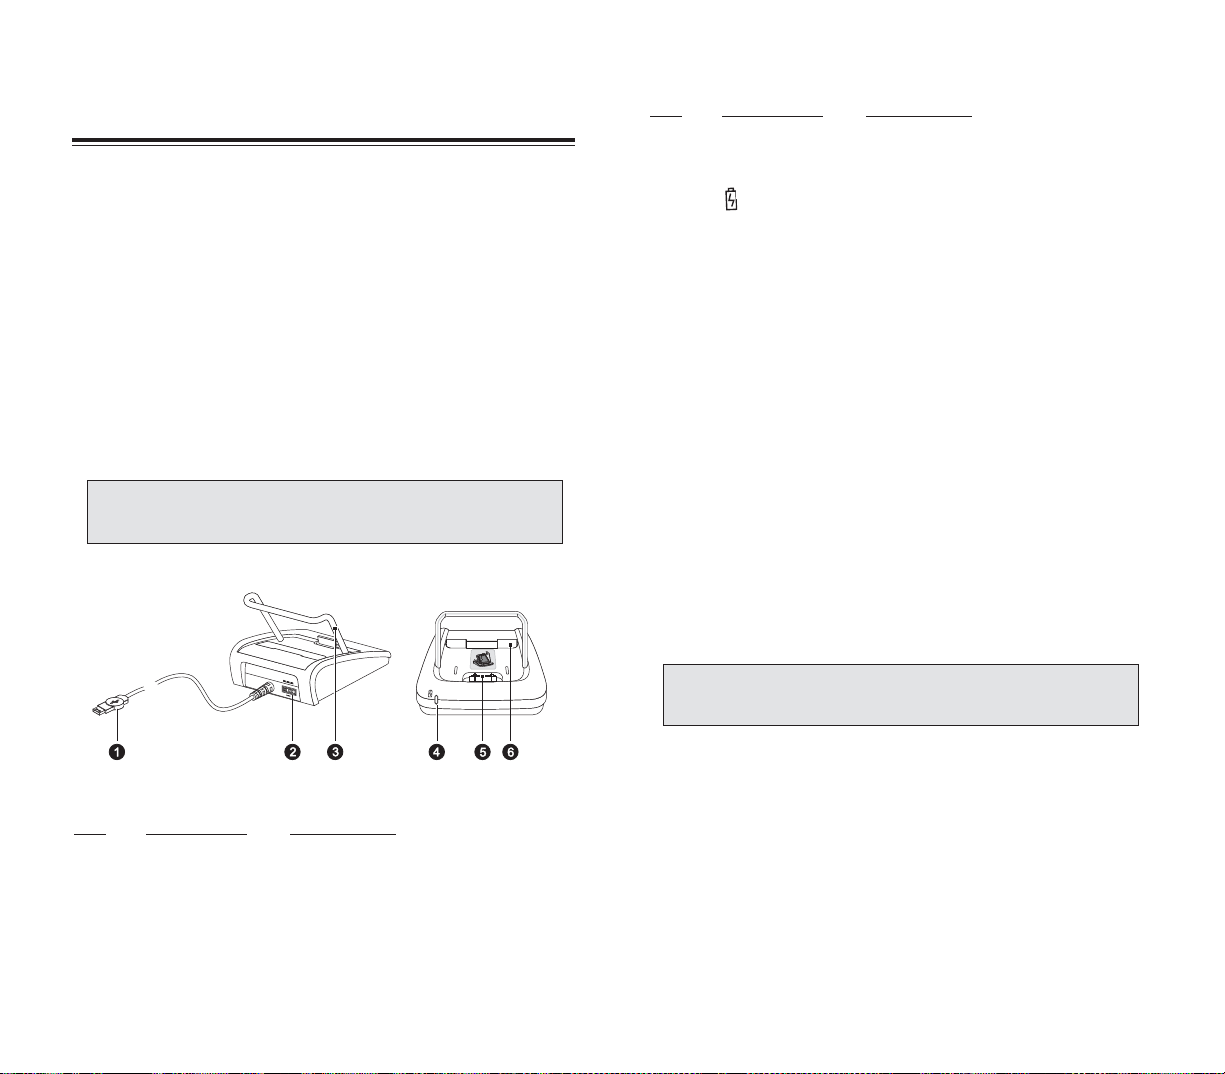
EESSCCRRIIPPTTIIOONN
4 Front pocket Recharges your device.
5 Spare battery Lights up to indicate charging status
indicator for the spare battery pack.
LED status description:
!
Flashing green - Charging battery
pack
!
Solid green - Charging complete
6 Rear pocket Recharges a spare battery pack.
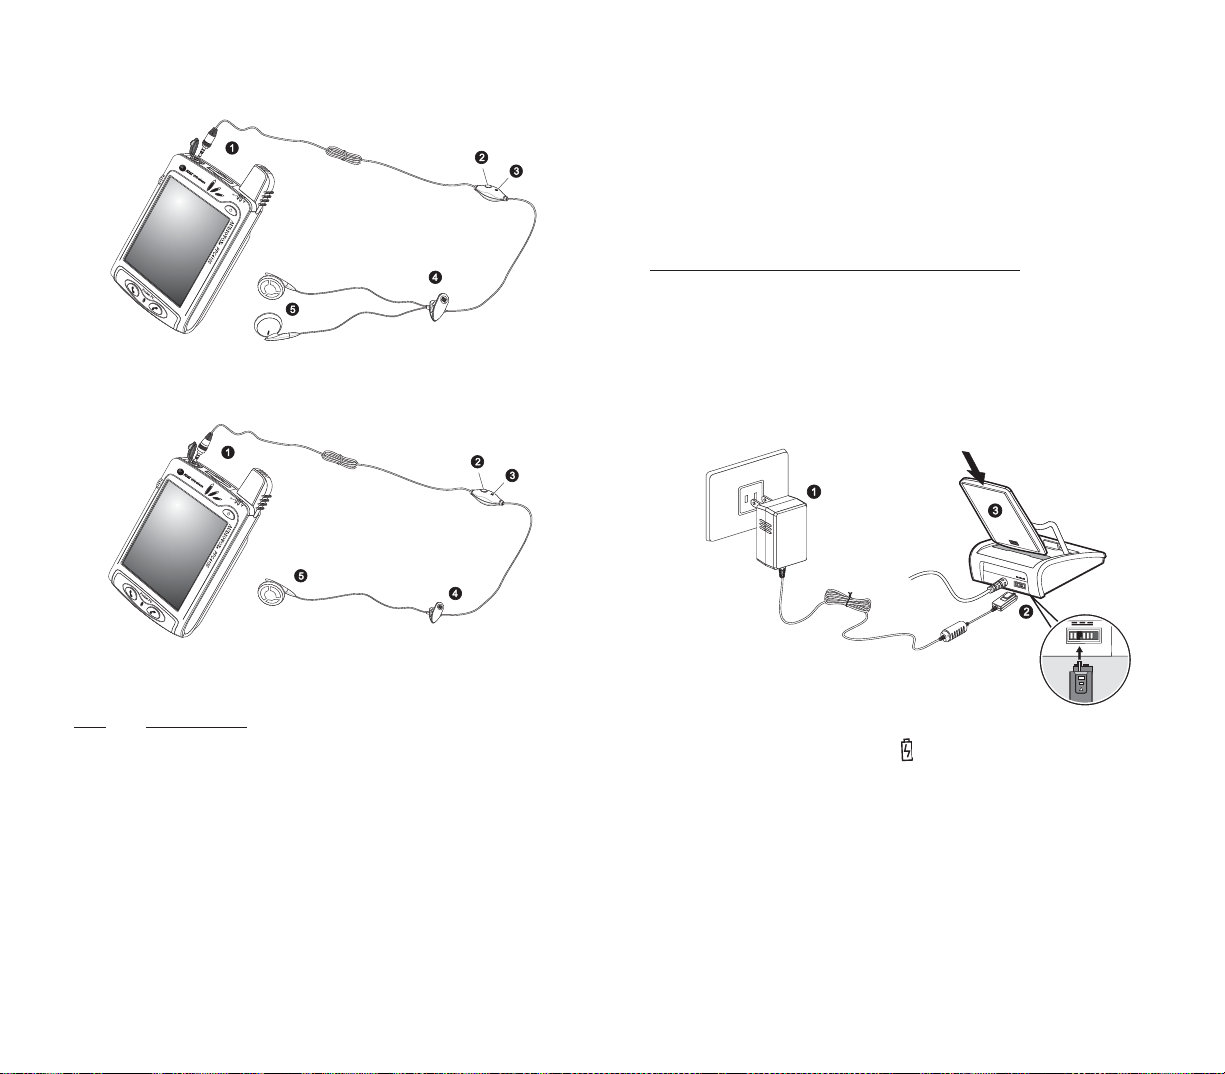
SSTTEERREEOO HHEEAADDSSEETT AANNDD SSIINNGGLLEE EEAARRBBUUDD
HHEEAADDSSEETT
The ergonomically designed stereo headset and single
earbud headset that come with your device provide
quality sound output and maximum comfort fit.
Use the stereo headset to play your favorite audio and
video files, and to attend to phone calls during
non-driving sessions. For safety reasons, DO NOT use
the stereo headset while driving.
Use the single earbud headset to enjoy hands-free
phone operation while driving.
You can configure the operation of these two peripherals
under the Phone Settings - Special tab.Go to page 136
for more information.
NNOOTTEE:: WWhheenn uussiinngg tthhee mmiiccrroopphhoonnee oonn tthhee sstteerreeoo hheeaaddsseett//
ssiinnggllee eeaarrbbuudd hheeaaddsseett dduurriinngg aann oonnggooiinngg ccaallll,, tthhee bbuuiilltt--iinn
ddeevviiccee mmiiccrroopphhoonnee iiss ddiissaabblleedd..
This sections provides an overview of the peripheral
devices bundled with y our handset.This include the USB
cradle, stereo headset, and the single earbud headset.
UUSSBB CCRRAADDLLEE
The USB cradle that comes with your device enables
you to charge your device, as well as synchronize the
information on your device with those on your computer
using ActiveSync technology. The dual-pocket design
allows simultaneous charging of the device and an
optional spare battery pack.
NN
OO
.. CC
OOMMPPOONNEENNTT
DD
EESSCCRRIIPPTTIIOONN
1 USB Connects the cradle to a USB
port connector on your computer.
2 Power Connects the cradle to a power outlet.
connector
3 Support Holds the device in place during
bracket charging.
PPEERRIIPPHHEERRAALLSS TTOOUURR
PPEERRIIPPHHEERRAALLSS TTOOUURR
NNOOTTEE:: WWhheenn yyoouurr ddeevviiccee iiss ddoocckkeedd iinn tthhee UUSSBB ccrraaddllee wwhhiillee
tthhee GGPPRRSS ffuunnccttiioonn iiss oonn,, yyoouu wwiillll nnoott bbee aabbllee ttoo bbrroowwssee wweebb
ppaaggeess..
Page 21
4140
CCHHAARRGGIINNGG AANN OOPPTTIIOONNAALL SSPPAARREE
BBAATTTTEERRYY PPAACCKK
The dual-pocket design of the USB cradle that comes
with your device allows y ou to simultaneously charge the
the device and an optional spare battery pack.
T
o charge an optional spare battery pack:
1. Plug the AC adapter into any AC current outlet.
2. Press and hold the connector button on the AC
adapter cord, then plug it into the power socket at the
back of the cradle.
3.Slide the spare battery pack into the rear pocket of the
cradle until it clicks into place.
The spare battery indicator on the cradle will light up
green to indicate that the battery pack is properly
inserted into the cradle pocket.
NN
OO
.. CC
OOMMPPOONNEENNTT
1 6-pole, 2.5 mm headset plug
2 Remote Send/End button
3 Microphone
4 Clip
5 Stereo headset: Dual earpiece
Single earbud headset: Single earpiece
Stereo Headset
Single Earbud Headset
Page 22

4342
HHAARRDDWWAARREE BBUUTTTTOONNSS AANNDD TTHHEE SSTTYYLLUUSS
Your device has hardware buttons that control actions
and scroll functions, and a stylus for selecting items and
entering information.
On your device, the stylus replaces the mouse.
!
Tap - Touch the screen once with the stylus to open
items and select options.
!
Drag - Hold the stylus on the screen and drag across
the screen to select text and images. Drag in a list to
select multiple items.
!
Tap and hold - Tap and hold the stylus on an item to
see a list of actions available for that item. In the
pop-up menu that appears, tap the action you want to
perform.
TTOODDAAYY SSCCRREEEENN
When you turn on your device for the first time each day
(or after a preset period of inactivity), you'll see the
Today screen.You can also display it by tapping and
then
TTooddaayy
.
T
o define a preset period of inactivity after which the
Today screen is displayed:
1.Tap ,
SSeettttiinnggss
, then
PPeerrssoonnaall
tab.
2.Tap
TTooddaayy
.
3. On the Items tab, select the “Display Today screen... “
check box.
4.Tap the pick list below the check box to set the period
of inactivity.
5.Tap
OOKK
.
CCOOMMMMAANNDD IINNTTEERRFFAACCEE
CCOOMMMMAANNDD IINNTTEERRFFAACCEE
SSEENNDD//EENNDD BBUUTTTTOONN OOPPEERRAATTIIOONN
This section describes the action of the Send/End button
on the stereo headset/single earbud headset when
there’s an activ e call.When there’s no active call or when
the phone function is turned off, the headset's Send/End
button is disabled.
During an incoming call:
!
Quick Press - Accept the call
!
Press and hold for more than 2 seconds - Accept the
call
During an ongoing call:
!
Quick Press - Ter minate the call
!
Press and hold for more than 2 seconds - Record the
ongoing call
Page 23
4544
If more notification icons need to be displayed than there
is room for, the Notification icon appears. Tap the
icon to view all notification icons.
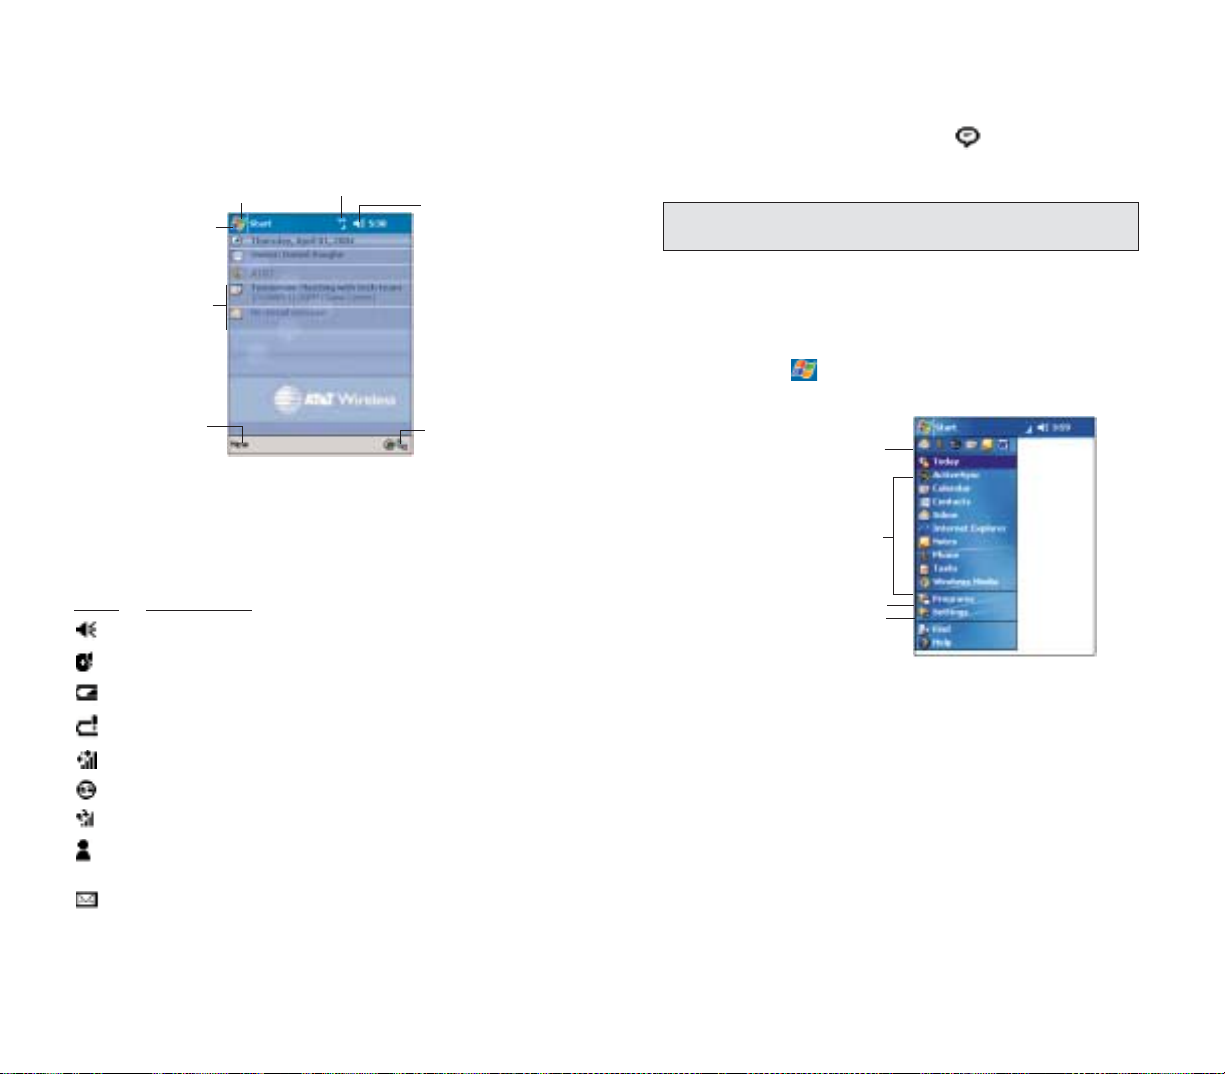
NNAAVVIIGGAATTIIOONN BBAARR
The navigation bar is located at the top of the screen. It
displays the active program and current time, as well as
the Start menu , which allows you to switch to other
programs.
Tap to quickly select a
recently used program.
Tap a program
icon to open it.
Tap to see more programs.
Tap to customize your device.
NNOOTTEE:: FFoorr ssttaattuuss iiccoonnss rreellaatteedd ttoo tthhee pphhoonnee ffuunnccttiioonn,, rreeffeerr ttoo
ppaaggee 9922..
The Today screen provides an at-a-glance view of
important reminders and details for the day.
SSTTAATTUUSS IICCOONNSS
The table below describes some of the status icons you
may see on your device.
II
CCOONN
DD
EESSCCRRIIPPTTIIOONN
Turns all sounds on and off
Backup battery is low
Main battery is low
Main battery is very low
Data connection is active
Synchronization is beginning or ending
Synchronization is occurring
Notification that one or more instant messages were
received
Notification that one or more email/SMS/voice mail
messages were received
Tap to view
the Start menu
Indicates the mobile
connection status.
Tap to adjust
volume or mute all
sounds.
Tap to change
date and time.
Tap to view the
connection status.
Your day at
a glance.
Tap to create a
new item (e.g.new
appointment).
Page 24
4746
NNOOTTIIFFIICCAATTIIOONNSS
Your device reminds you in a variety of ways when you
have something to do or when you receive a message.
For example, if you've set up an appointment in
Calendar, a task with a due date in Tasks, or an alarm in
Clock, you'll be notified in any of the following ways:
!
A message box appears on the screen.
!
A sound, which you can specify, is played.
!
The notification indicator on the front panel of your
device lights up amber.
T
o choose reminder types and sounds f
or your device:
1.Tap ,
SSeettttiinnggss
, then
PPeerrssoonnaall
tab.
2.Tap
SSoouunnddss && NNoottiiffiiccaattiioonnss
.
3. On the Notifications tab, select the kind of events you
want to be notified of and the manner of
notification you prefer.The options you choose here are
applied globally on your device.
4.Tap
OOKK
.
Lift the stylus and tap
the action you want.
Tap and hold a selected item
to display a pop-up menu.
Tap outside the menu to
close it without performing
an action.
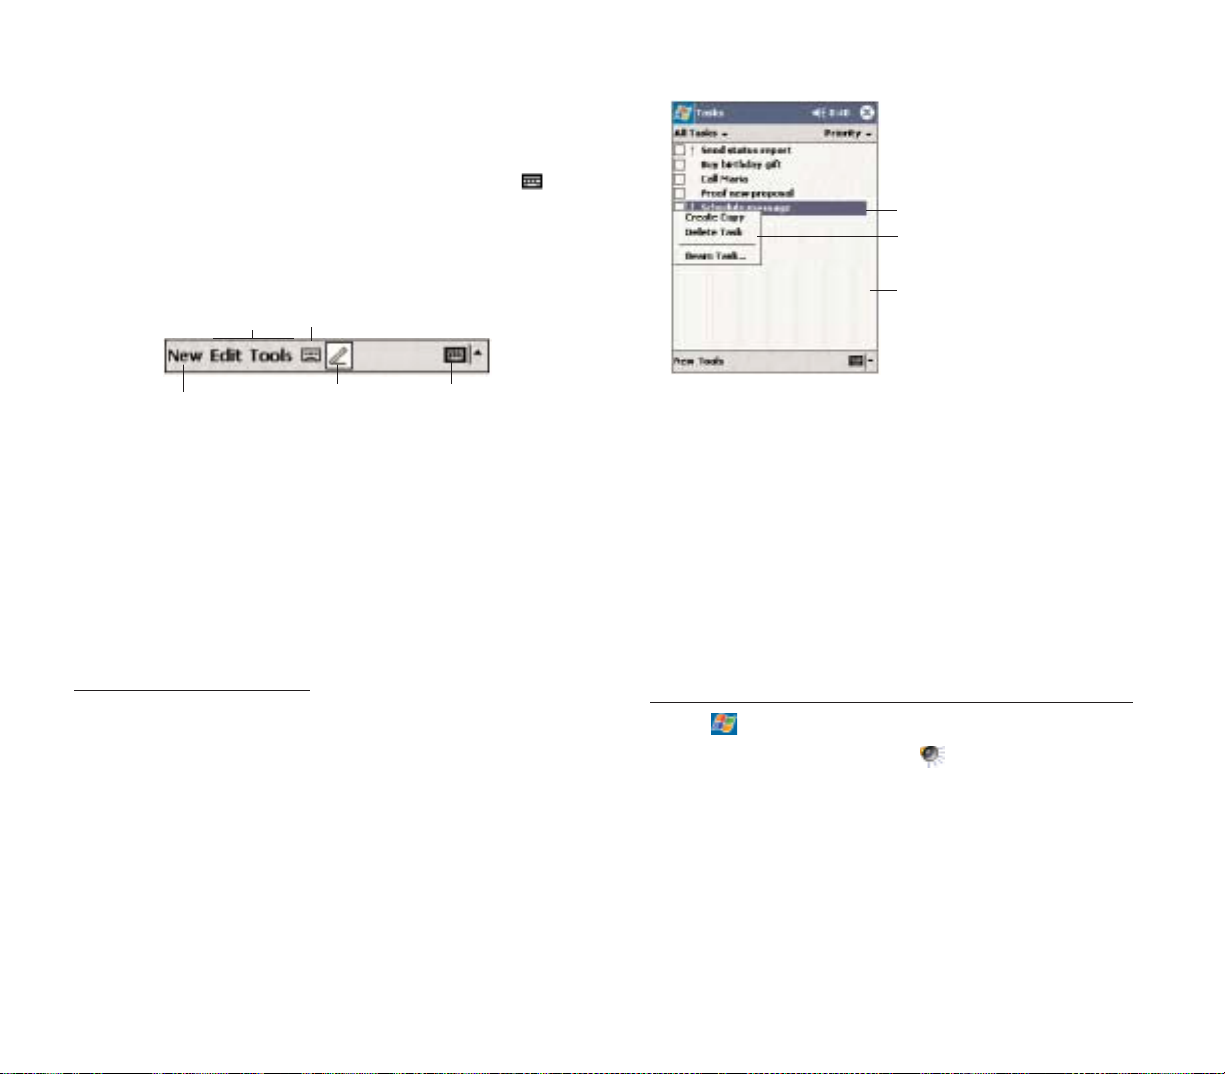
CCOOMMMMAANNDD BBAARR
Use the command bar at the bottom of the screen to
perform tasks in programs. The command bar includes
menu names, buttons, and the Input Panel button .
!
To create a new item in the current program, tap
NNeeww
.
!
To see the name of a button, tap and hold the stylus
on the button. Drag the stylus off the button so that the
command is not carried out.
PPOOPP--UUPP MMEENNUUSS
With pop-up menus, you can quickly choose an action
for an item. For example, you can use the pop-up menu
in the contact list to quickly delete a contact, make a
copy of a contact, or send an email message to a
contact. The actions in the pop-up menus vary from
program to program.
To access a pop-up menu:
1. Tap and hold the stylus on the item that you want to
perform the action on.
2.When the menu appears, lift the stylus, then do any of
the following:
!
Tap the action you want to perform.
!
Tap anywhere outside the menu to close the menu
without performing an action.
Input
Panel
button
Menus
New button
Record button
Pen button
Page 25

4948
MMAANNAAGGIINNGG PPRROOGGRRAAMMSS
Your handset has several preinstalled programs that y ou
can use to organize your daily activities.These include
programs that will help you search, organize, and
synchronize information.
This chapter describes the procedures for launching
programs. It also shows how to use Find and File
Explorer, as well as procedures for performing an
ActiveSync operation.
1. Accessing Programs
2. Using Find
2. Using File Explorer
4. Using ActiveSync
CCHHAAPPTTEERR 33
CCHHAAPPTTEERR 33
Page 26
5150
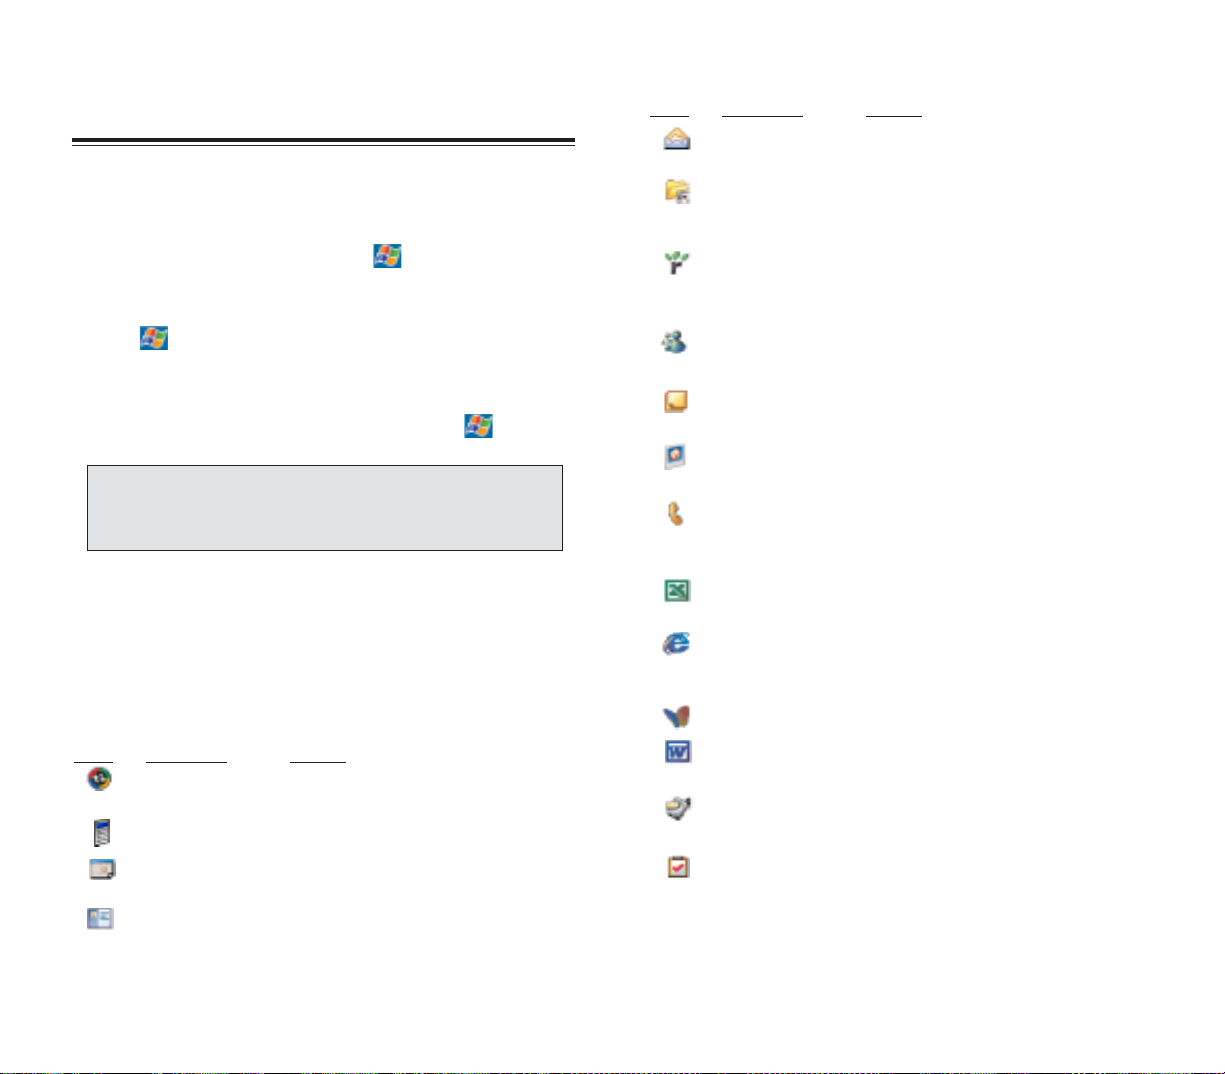
II
CCOONN
PP
RROOGGRRAAMM
UU
SSAAGGEE
Inbox Send and receive email and SMS
messages.
Games Play your favorite computer games,
including Jawbreaker and Solitaire,
for on-the-road entertainment.
Microsoft Reader Download and read eBooks on your
for Pocket PC device.
MSN
®
Messenger Send and receive instant messages
from your MSN Messenger contacts.
Notes Create handwritten or typed notes,
drawings, and recordings.
Pictures Access and edit JPEG files on your
device.
Phone Make and receive calls and SMS messages;
swap between calls and set up a
conference call.
Pocket Excel Create new workbooks or view and edit
Excel workbooks created on your computer.
Pock et Internet Browse Web and WAP sites, and
Explorer download new programs and files from
the Internet.
Pocket MSN Subscribe to popular MSN services.
Pock et Word Create new documents or view and edit
Word documents created on your computer .
SIM Manager Export the contents of your SIM card to
your Microsoft Contacts list.
Tasks Keep track of your tasks.
OOPPEENNIINNGG AA PPRROOGGRRAAMM
You can open programs in the following ways:
!
Tap a program name from the menu.
You can select which programs are displayed on the
menu. For instructions, see page 154.
!
Tap , then
PPrrooggrraammss
to see more programs.
SSWWIITTCCHHIINNGG BBEETTWWEEEENN PPRROOGGRRAAMMSS
!
Select another program from the menu.
PPRROOGGRRAAMM LLIISSTT
The following is a partial list of programs that are
available on your device. Refer to the PPC4100
Companion CD for additional programs that you can
install on your device.
II
CCOONN
PP
RROOGGRRAAMM
UU
SSAAGGEE
ActiveSync Synchronize information between your
device and your computer.
Calculator Perform basic arithmetic calculations.
Calendar Keep track of your appointments and
create meeting requests.
Contacts Keep track of your friends and
colleagues.
AACCCCEESSSSIINNGG PPRROOGGRRAAMMSS
AACCCCEESSSSIINNGG PPRROOGGRRAAMMSS
NNOOTTEE::
SSoommee pprrooggrraammss hhaavvee aabbbbrreevviiaatteedd llaabbeellss ffoorr
cchheecckk
bbooxxeess aanndd ddrroopp--ddoowwnn mmeennuuss.. TToo sseeee tthhee ffuullll ssppeelllliinngg ooff aann
aabbbbrreevviiaatteedd llaabbeell,, ttaapp aanndd hhoolldd
tthhee ssttyylluuss oonn tthhee llaabbeell.. DDrraagg tthhee
ssttyylluuss ooffff tthhee
llaabbeell ssoo tthhaatt tthhee ccoommmmaanndd iiss nnoott ccaarrrriieedd oouutt..
Page 27
5352
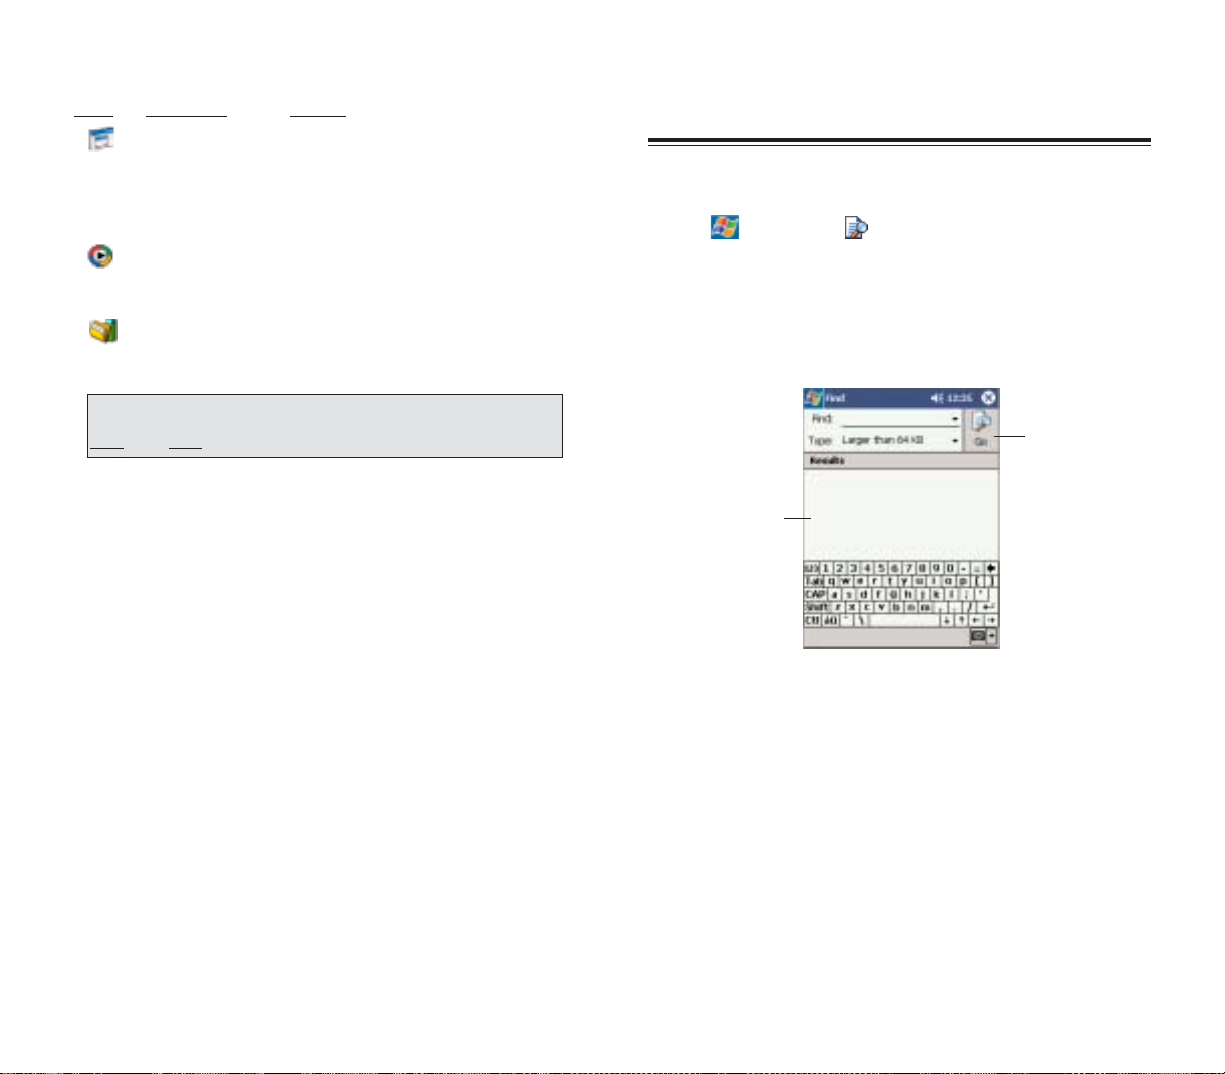
The Find function helps you quickly locate specific files.
1.Tap , then
FFiinndd
.
2.Enter the text you want to find, then select a data type.
3. To quickly find information that is taking up storage
space on your device, select the “Larger than 64 KB”
option from the Type drop-down box.
3.Tap the
GGoo
button to start the search.
UUSSIINNGG FFIINNDD
UUSSIINNGG FFIINNDD
Type the text you
want to find.
Tap to start the
search.
II
CCOONN
PP
RROOGGRRAAMM
UU
SSAAGGEE
Terminal Services Log onto a Windows NT server type
Client PC that is running Terminal Services
software and use all of the programs
that are available on that PC from your
device.
Windows Media
TM
Play digital audio and video files that
Player are stored on your device or on a
network.
WiBackup Create backup files of data and
applications stored on your device.
NNOOTTEE:: TToo ggeett ddeettaaiilleedd iinnffoorrmmaattiioonn oonn uussiinngg aannyy ooff tthhee aapppplliiccaattiioonnss
lliisstteedd iinn tthhiiss sseeccttiioonn ((eexxcceepptt SSIIMM MMaannaaggeerr)),, ooppeenn tthhee pprrooggrraamm,, ttaapp
SSttaarrtt
,, tthheenn HHeellpp..
Page 28
5554
Use Microsoft®ActiveSync®technology to synchronize
information between your Pocket PC and your computer
and/or a server so you always have the most up-to-date
information wherever you are.
Each time you synchronize, ActiveSync compares the
information on your device with the information on your
computer and/or the server and updates all locations.
This means you’ll always have the most recent
information at all times. Use ActiveSync to:
!
Keep Pocket Outlook data up-to-date by
synchronizing your device with the Microsoft Outlook
data on your computer.
!
Synchronize Inbox, Calendar, and Contacts with a
server so that you have the latest information, even
when you don’t have access to your computer.
!
Open and edit your Microsoft Word and Microsoft
Excel files in your device and synchronize it back to your
computer. Files are automatically converted to the
correct format.
!
Copy (rather than synchronize) files between your
device and your computer.
!
Control when synchronization occurs by selecting a
synchronization schedule. For example, you can
synchronize continually while connected to your
computer or only when you select the synchronize
command.
UUSSIINNGG AACCTTIIVVEESSYYNNCC
UUSSIINNGG AACCTTIIVVEESSYYNNCC
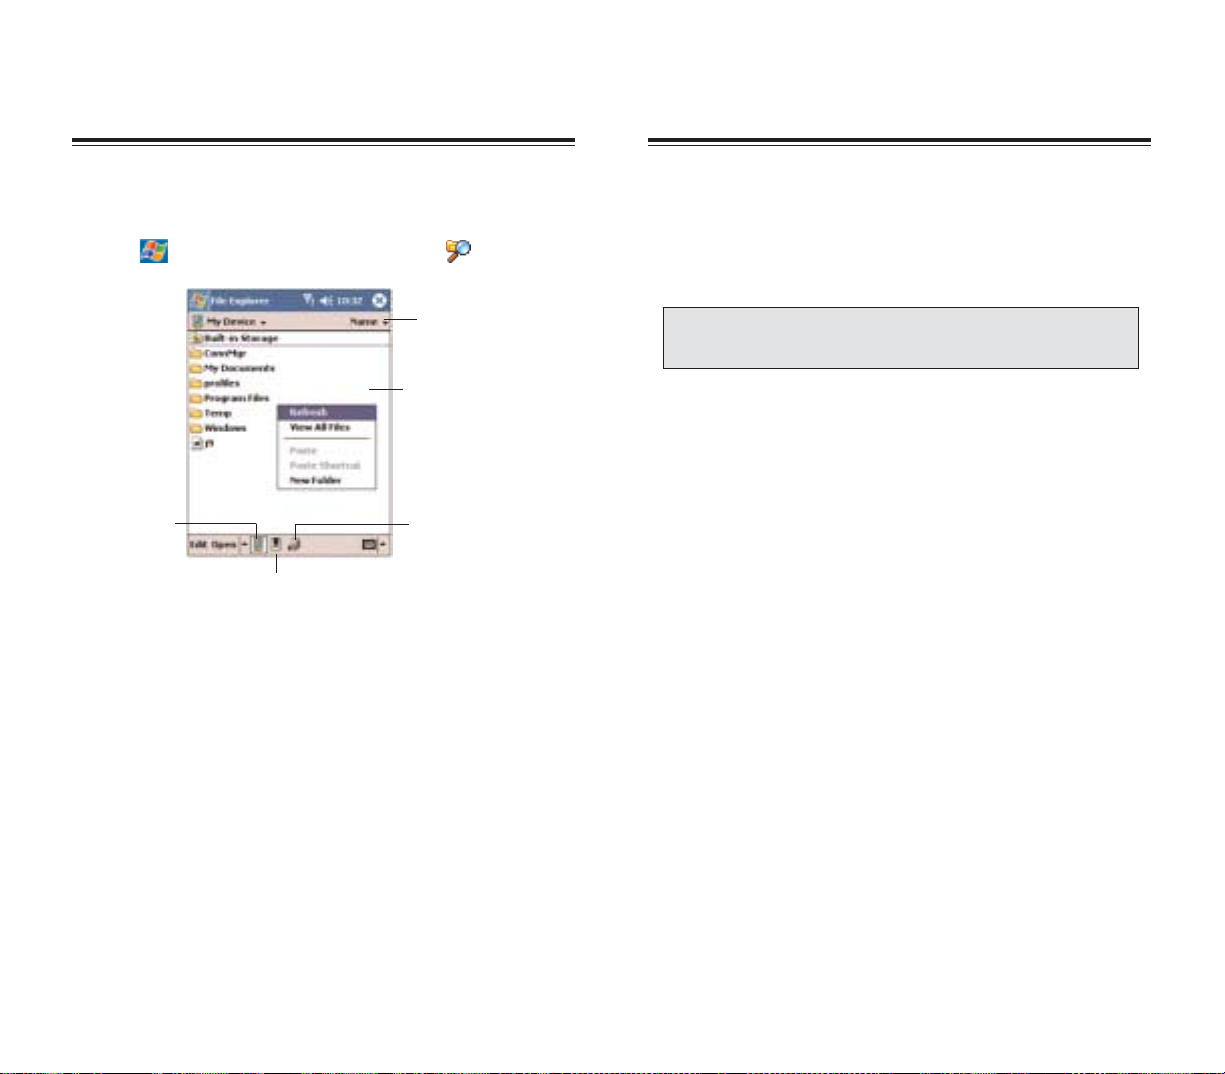
Use File Explorer to locate files on your device and to
organize these files into folders.
!
Tap ,
PPrrooggrraammss
, then
FFiillee EExxpplloorreerr
.
UUSSIINNGG FFIILLEE EEXXPPLLOORREERR
UUSSIINNGG FFIILLEE EEXXPPLLOORREERR
Tap here to select a
sort order for the list.
Tap and hold a blank
area to display the New
Folder command.
Tap to view the files
stored in your storage card.
Tap to open a file in
the network you’re
connected to.
Tap to view the
files stored on
your device.
NNOOTTEE:: YYoouu ccaann oonnllyy ssyynncchhrroonniizzee iinnffoorrmmaattiioonn wwiitthh aa sseerrvveerr iiff yyoouurr
ccoommppaannyy iiss rruunnnniinngg MMiiccrroossoofftt EExxcchhaannggee SSeerrvveerr wwiitthh EExxcchhaannggee
AAccttiivveeSSyynncc..
Page 29

5756
To install Microsoft ActiveSync on your computer
:
1. Exit any open programs, including those that run at
startup, and disable any virus-scanning software.
2. Insert the PPC4100 Companion CD into the
computer’s CD-ROM drive.
The CD's welcome page appears.
3. To go to the next screen, click the animated forward
icon .
4.Click the
SSttaarrtt HHeerree
tab on the right side of the screen.
5. Read the instructions and installation notes indicated
on the Start Here screen.
6. Click the buttons on the left pane to install each of the
individual applications.
After installation, the ActiveSync icon will appear on
your computer’s system tray (on the lower right-hand
corner of the screen).
For detailed information about using ActiveSync on your
computer, start ActiveSync on your computer, click
HHeellpp
,
then
MMiiccrroossoofftt AAccttiivveeSSyynncc HHeellpp
.
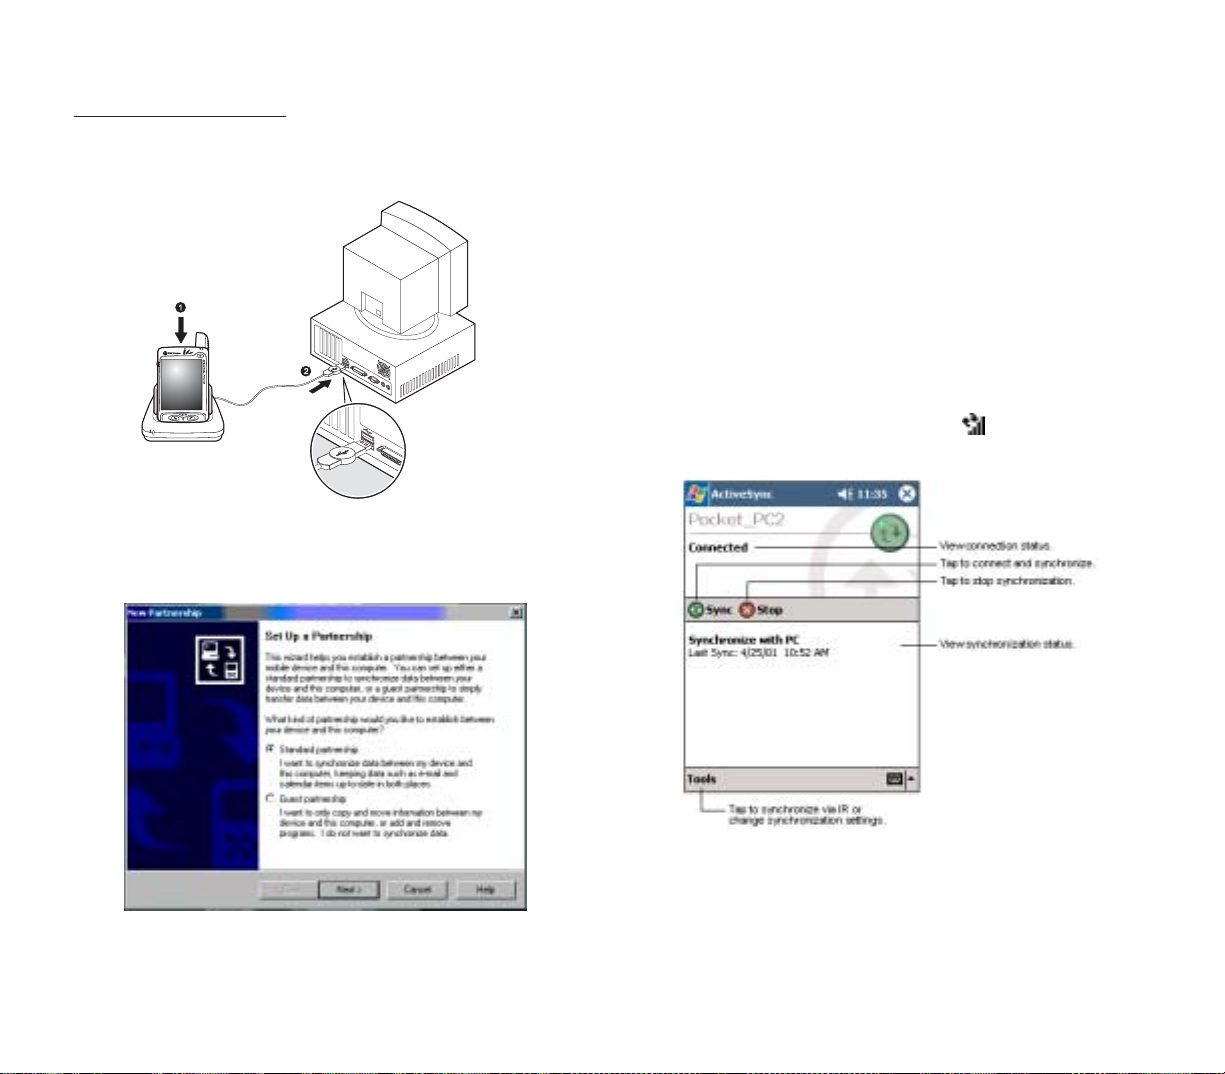
CCRREEAATTIINNGG AA PPAARRTTNNEERRSSHHIIPP
After completing the installation procedures you can now
set up a partnership between your PPC4100 Pocket PC
and your computer and/or a server with the help of the
New Partnership setup wizard.This wizard will help you:
!
Set up a partnership so you can synchronize
information between your device and your computer
!
Customize your synchronization settings
If you choose continuous synchronization, changes
made on the computer or device are duplicated
immediately.To recover a sudden loss of data, you can
configure ActiveSync to back up data on your device.
Choose whether to copy all information in the
internal storage on your device, or just the information
that has changed since the last backup.
!
Select which information types are synchronized and
control how much information is synchronized. To
illustrate, when synchronizing Calendar, you can set
ActiveSync to synchronize appointments within a certain
date range and for specific categories only. For example
business appointments from the past two weeks only.
IINNSSTTAALLLLIINNGG MMIICCRROOSSOOFFTT AACCTTIIVVEESSYYNNCC
ActiveSync is already installed on your PPC4100 Pocket
PC; you only need to install it on your computer.
MMIINNIIMMUUMM PPCC CCOOMMPPUUTTEERR RREEQQUUIIRREEMMEENNTTSS
!
Microsoft Windows®XP, 2000, ME, NT Workstation
4.0 with Service Pack 6 or later, or 98
!
Microsoft Outlook®98 or later required for
synchronization
!
MicrosoftInternet Explorer 4.01 with Service Pack 1
or later
!
Hard disk drive with 12 to 65 MB of availab le hard disk
space (actual requirements will vary based on selection
of features and user’s current system configuration)
!
Available infrared port or USB port
!
CD-ROM drive
!
VGA graphics card or compatible video graphics
adapter at 256 color or higher
!
Keyboard and mouse
NNOOTTEE:: IIff tthhee wwiizzaarrdd ddooeess nnoott aauuttoommaattiiccaallllyy aappppeeaarr,, llaauunncchh
AAccttiivveeSSyynncc oonn yyoouurr ccoommppuutteerr bbyy cclliicckkiinngg oonn iittss iiccoonn ffrroomm
SSttaarrtt
,, tthheenn PPrrooggrraammss..
Page 30
5958
To prevent synchronization problems, select the
“Synchronize with Microsoft Mobile Information
Server and/or this desktop computer” option in the
New Partnership setup wizard only if you are
certain that your company is running Microsoft
Exchange Server with Exchange ActiveSync and you
know the server name. Otherwise, select the
“Synchronize with this desktop computer” option.
For more information, contact your corporate
network administrator or service provider.
The initial synchronization process will automatically
begin when you finish using the wizard. During the
synchronization process this icon appears on your
device’s navigation bar.
To create a par tnership:
1. Dock your device in the front pocket of the cradle.
2. Plug the cradle’s USB connector into a USB port on
your computer.
The New Partnership setup wizard will automatically
start on your computer screen.
3. Follow the onscreen instructions.
Page 31

6160
4. Select one or both of the following options:
!
Use mobile schedule to sync with this PC - to set
synchronization at scheduled intervals
!
Sync with this PC during manual sync - to set
your device to sync with the selected computer
every time you sync manually
5.Tap
OOKK
.
T
o set mobile schedule during wireless synchronization
with your computer:
You can set two separate mobile schedules when
wirelessly synchronizing your device with your
computer.
!
Peak time schedule - to synchronize during work hours
or other times you receive higher mail volumes
!
Off-peak schedule - to synchronize during times when
you receive lower mail volumes
1. On your device tap , then
AAccttiivveeSSyynncc
.
2. Tap
TToooollss, OOppttiioonnss
, then
MMoobbiillee SScchheedduullee
tab.
3. Select the frequency of synchronization for the three
conditions—during peak times, off-peak times, and
when roaming.
4. Tap
PPeeaakk TTiimmeess
to set the days and hours of your
peak time schedule.
5. Tap
OOKK
.
After the initial synchronization, take a look at Calendar,
Contacts, and Tasks on your device. You'll notice that
information you've stored in Microsoft Outlook on your
computer has been copied to your device, and you
didn't have to type a word.Disconnect your device from
your computer and you're ready to go!
Once you have completed the first synchronization
process, you can initiate synchronization from your
device anytime, using either the USB cradle or via
infrared.
T
o start and stop synchronization:
1. Connect your device and computer via:
!
USB cradle - Follow steps 1-2 under the “To create
a partnership” section on page 57.
!
Infrared - See page 66 for more information.
2. On your device tap , then
AAccttiivveeSSyynncc
.
3.To start synchronization, tap
SSyynncc
.
To stop synchronization, tap Stop .
SSYYNNCCHHRROONNIIZZIINNGG WWIITTHH YYOOUURR CCOOMMPPUUTTEERR
You can define settings for remote synchronization with
your computer, and set a mobile schedule during
wireless synchronization.
T
o set remote synchronization with your computer:
1. On your device tap , then
AAccttiivveeSSyynncc
.
2.Tap
TToooollss, OOppttiioonnss
, then
PPCC
tab.
3. Tap the pick list and select the appropriate computer
name.
NNOOTTEE:: TToo ssyynncchhrroonniizzee rreemmootteellyy wwiitthh aa yyoouurr ccoommppuutteerr,, iitt mmuusstt bbee
ttuurrnneedd oonn..
NNOOTTEE:: WWhheenn yyoouu aarree iinn rrooaammiinngg mmooddee,, yyoouu ccaann ssyynncchhrroonniizzee
mmaannuuaallllyy ttoo rreedduuccee rrooaammiinngg cchhaarrggeess,, oorr yyoouu ccaann uussee tthhee mmoobbiillee
sscchheedduullee yyoouu’’vvee sseett..
Page 32

9. Define the synchronization settings for each
information type by tapping the type of information, then
SSeettttiinnggss
.
10. Tap
OOKK
T
o set up automatic synchronization with a Microsoft
Exchange server:
Enabling automatic synchronization between your
device and Microsoft Exchange server ensures that you
always get real-time information from the server
every time an item arrives or is changed on the server.
1. On your device tap , then
AAccttiivveeSSyynncc
.
2. Tap
TToooollss, OOppttiioonnss
, then
MMoobbiillee SScchheedduullee
tab.
3. Tap
AAss iitteemmss aarrrriivvee
for the peak time and/or off-peak
time mobile schedule.
4. Tap the
SSeerrvveerr
tab.
5. Tap
OOppttiioonnss
.
6. Tap
DDeevviiccee AAddddrreessss
.
7. Tap one of the option below:
!
Corporate Service Provider - If your company has
instructed you to use a predefined service provider
profile.
a. Enter the profile name under Ser vice Provider
Name.
b. Enter your de vice’ s phone number under De vice
Phone number (optional)
!
Device SMS Address
- Enter the address that identifies your device on
the network.This is the same address that other Internet
users use to send SMS messages to your device.
8. Tap
OOKK
63
SSYYNNCCHHRROONNIIZZIINNGG WWIITTHH AA SSEERRVVEERR
The option to synchronize your device with a server is
available when you first create a partnership.Before you
can begin to synchronize information with a server, you
need to request the following server configuration
information, either from your service provider or from
your corporate network administrator:
!
Your user name and password in your corporate
network
!
The name of the Microsoft Exchange server
To set up synchronization with a Microsoft Exchange
server:
1. On your device tap , then
AAccttiivveeSSyynncc
.
2. Tap
TToooollss, OOppttiioonnss
, then
SSeerrvveerr
tab.
3. In the “Use this server” box, enter the name of the
Microsoft Exchange server to which you want to
connect.
Select the “This server uses an SSL connection”
check box if it’s applicable to your corporate network.
4. Tap
OOppttiioonnss
.
5. On the Connection tab, enter your user name,
password, and domain name under “Logon credentials”.
If you intend to enable automatic synchronization,
select the “Save password” check box.
6. On the Rules tab:
a. Select the frequency of synchronization with the
server when you are connected to your computer.
b. Define the rules for resolving conflicts if items
change on both your device and on the server.
7. Tap
OOKK
.
8. Under “Sync these items”, select the check box
opposite the types of information that you want to
synchronize with the server.
62
NNOOTTEE:: TThheerree aarree nnoo ssyynncchhrroonniizzaattiioonn sseettttiinnggss ffoorr CCoonnttaaccttss..
Page 33

!
Messages in subfolders in other email folders in
Outlook are synchronized only if the folders have been
selected for synchronization in Inbox on your device.
SSYYNNCCHHRROONNIIZZIINNGG CCAALLEENNDDAARR
!
Calendar items created on your device are copied to
your computer and/or on a Microsoft Exchange server
during synchronization, and vice versa. By default,
Calendar items from the last two weeks will be
synchronized.
!
Similarly, Calendar items that are deleted from your
device are deleted from your computer and/or server
during synchronization, and vice versa.
SSYYNNCCHHRROONNIIZZIINNGG CCOONNTTAACCTTSS
!
Contacts created on your device are copied to your
computer or on a Microsoft Exchange server during
synchronization, and vice versa. By default, all of your
contacts will be synchronized.
!
Similarly, contacts that are deleted from your device
are deleted from your computer and/or server during
synchronization, and vice versa.
SSYYNNCCHHRROONNIIZZIINNGG TTAASSKKSS
!
Task synchronization is, by default, automatically
selected in ActiveSync.
!
Tasks can only be synchronized with your computer;
they cannot be synchronized with a server.
65
To stop synchronizing with a ser ver
:
You can stop synchronizing an information type with a
server, and instead synchronize it with your computer.
1. On your device tap , then
AAccttiivveeSSyynncc
.
2. Tap
TToooollss, OOppttiioonnss
, then
SSeerrvveerr
tab.
3. Under “Sync these items”, deselect the check box
opposite the types of information that you no longer want
to synchronize with the server.
4. Tap
OOKK
.
SSYYNNCCHHRROONNIIZZIINNGG IINNFFOORRMMAATTIIOONN
By default, ActiveSync does not enable automatic
synchronization of all types of information.To select the
types of information you want synchronized, on either
your device or y our computer, go to
TToooollss
, then
OOppttiioonnss
.
This section gives you an overview of the types of
Outlook information you can synchronize.
SSYYNNCCHHRROONNIIZZIINNGG IINNBBOOXX
When you select Inbox for synchronization in
ActiveSync, email messages are synchronized as part
of the general synchronization process. During
synchronization, the following events occur:
!
Messages are copied from the Outlook Inbox folder on
your computer, or from a Microsoft Exchange server, to
the Inbox folder (under the ActiveSync account) on your
device.
!
By default, when synchronizing Inbox information with
your computer, you will receive only messages from the
last three days and the first .5 KB of each new message.
You can also choose to download file attachments.
!
The messages on your device and on your computer
are linked.When you delete a message on your device,
it is also deleted from your computer the next time you
synchronize, and vice versa.
64
NNOOTTEE:: SSMMSS mmeessssaaggeess aarree nnoott rreecceeiivveedd iinn IInnbbooxx tthhrroouugghh
ssyynncchhrroonniizzaattiioonn.. IInnsstteeaadd,, tthheeyy aarree sseenntt ttoo yyoouurr ddeevviiccee bbyy wwaayy ooff
yyoouurr mmoobbiillee sseerrvviiccee pprroovviiddeerr..
Page 34

UUSSIINNGG AACCTTIIVVEESSYYNNCC TTOO EEXXCCHHAANNGGEE FFIILLEESS
You can use ActiveSync to exchange information from
your device y our computer and vice versa.Changes you
make to the information on one location will not affect
the information on the other one. If you want to
automatically update information on both your device
and computer, synchronize the information instead.
You can copy two types of information to your device:
files and Pocket Access Windows CE Store information.
The procedure below only applies to copying files.Refer
to the ActiveSync Help on your computer f or instructions
on how to copy Pocket Access Windows CE Store
information.
T
o cop
y files:
1. Connect your device to your computer.
2. In ActiveSync on your computer, click
EExxpplloorree
.
Windows Explorer will open the Mobile Device
window for your device.
3.Locate the file that you want to copy on your de vice or
computer.
4. Do one of the following:
!
To copy the file to your device, right-click the file and
click
CCooppyy
.Place the cursor in the desired folder for your
device, right-click, then click
PPaassttee
.
!
To copy the file to your computer, right-click the file
and click
CCooppyy
. Place the cursor in the desired folder for
your computer, right-click, then click
PPaassttee
.
67
!
Tasks created on your device are copied to your
computer during synchronization, and vice versa. By
default, only incomplete tasks will be synchronized.
!
Similarly, tasks that are deleted from your device are
deleted from your computer during synchronization, and
vice versa.
SSYYNNCCHHRROONNIIZZIINNGG UUSSIINNGG IINNFFRRAARREEDD
Your device is equipped with an IrDA-standard infrared
port that you can use to synchronize information with
your computer. Simply align the infrared port of your
device with that on your computer.This method is ideal
for quickly switching between multiple devices since
there are no cables or adapters to change.
T
o synchronize information via infrared connection:
1. Perform the steps below on your computer:
a. Install and configure an infrared port on your
computer following the manufacturer’s instructions.
b. Once your computer’s IR port is ready, open
ActiveSync.
c. Click
FFiillee
, then
CCoonnnneeccttiioonn SSeettttiinnggss
.
d. Under the “In the Allow serial cable or infrared
connection to this COM port” list, select
IInnffrraarreedd PPoorrtt
((IIRR))
.
2. Perform the steps below on your device:
a. Align the IR port of your device with that on
your computer so that they are unobstructed and within
a close range.
b. Initiate connection by tapping ,
AAccttiivveeSSyynncc
,
TToooollss
, then
CCoonnnneecctt vviiaa IIRR
.
66
NNOOTTEE:: FFiilleess ccrreeaatteedd oonn yyoouurr ccoommppuutteerr mmaayy nneeeedd ttoo bbee ccoonnvveerrtteedd
bbyy AAccttiivveeSSyynncc ssoo tthhaatt tthheeyy ccaann bbee vviieewweedd aanndd eeddiitteedd oonn yyoouurr
ddeevviiccee,, aanndd vviiccee vveerrssaa..
Page 35

69
EENNTTEERRIINNGG DDAATTAA
This chapter describes how to use the different text entry
methods on your device.
1. Using the Input Panel
2.Writing on the Screen
3. Drawing on the Screen
4.
Recording a Message
5. Using My Text
CCHHAAPPTTEERR 44
CCHHAAPPTTEERR 44
AACCTTIIVVEESSYYNNCC EERRRROORRSS
Whenever ActiveSync cannot successfully synchronize
information, it displays an Error link on the ActiveSync
window on your device. Tap the link to display more
information about the error that occurred.
Some types of errors can interfere with automatic
synchronization. If you suspect that a scheduled
automatic synchronization has not occurred, you should
try to manually synchronize your information.
Successfully completing manual synchronization will
reset automatic synchronization.
68
Tap to learn more about the
error and how to resolve it.
Page 36

7170
T
o change word suggestion options:
To set word suggestion options such as the number of
words suggested at one time:
1.Tap , then
SSeettttiinnggss
, then
PPeerrssoonnaall
tab.
2.Tap
IInnppuutt
.
3. On the
WWoorrdd CCoommpplleettiioonn
tab, define the word
suggestion settings.
4.Tap
OOKK
.
UUSSIINNGG TTHHEE SSOOFFTT KKEEYYBBOOAARRDD
The soft keyboard allows you to “type” information just
like in a regular keyboard, b y tapping the onscreen keys.
T
o use the soft keyboard:
1.Tap the arrow next to the Input Panel button, then tap
KKeeyybbooaarrdd
.
2. On the soft keyboard that is displayed, tap the keys
with your stylus.
Tap here if this is
the correct word.
UUSSIINNGG TTHHEE IINNPPUUTT PPAANNEELL
UUSSIINNGG TTHHEE IINNPPUUTT PPAANNEELL
Use the input panel to enter information in any program
on your device. You can either type using the soft
keyboard or write using Letter Recognizer, Block
Recognizer, or Transcriber.In either case, the characters
appear as typed text on the screen.
T
o show or hide the input panel:
1.Tap the
IInnppuutt PPaanneell
button .
2. Tap the arrow next to the Input Panel button to see
your choices.
When you use the input panel, your device anticipates
the word you are typing or writing and displays it above
the input panel. When you tap the displayed word, it is
inserted into your text at the insertion point. The more
you use your de vice, the more words it learns to anticipate.
Tap to see your choices.
Select an input method.
Input Panel button
Page 37

7372
UUSSIINNGG BBLLOOCCKK RREECCOOGGNNIIZZEERR
With Block Recognizer you can input character strokes
using the stylus that are similar to those used on other
devices.
T
o use the Block Recognizer:
1.Tap the arrow next to the Input Panel button, then tap
BBlloocckk RReeccooggnniizzeerr
.
2.Write a letter in the box.
When you write a letter, it is converted to typed text
that appears on the screen.
For specific instructions on using Block Recognizer, with
Block Recognizer open, tap the question mark next to
the writing area.
Write all caps
letters here.
Write lower case
letters here.
Write numbers here.
UUSSIINNGG LLEETTTTEERR RREECCOOGGNNIIZZEERR
With Letter Recognizer you can write letters using the
stylus just as you would on paper.
T
o use the Letter Recognizer:
1.Tap the arrow next to the Input Panel button, then tap
LLeetttteerr RReeccooggnniizzeerr
.
2.Write a letter in the box.
When you write a letter, it is converted to typed text
that appears on the screen.
For specific instructions on using Letter Recognizer , with
Letter Recognizer open, tap the question mark next to
the writing area.
Tap the onscreen keys
with your stylus.
Page 38

7574
T
o learn how to wr
ite a letter in Transcriber:
1.Tap on the toolbar.
2. In the screen that appears, select the letter you want
to learn about, then tap one of the examples.
Click a character for
a demonstration.
UUssiinngg TTrraannssccrriibbeerr
Transcriber allows you to write anywhere on the screen
using the stylus just as you would on paper.
To use the Tr
anscriber:
1.Tap the arrow next to the Input Panel button, then tap
TTrraannssccrriibbeerr
.
2.Write anywhere on the screen.
Pause and let Transcriber change the written
characters to typed characters.
For specific instructions on using Transcriber, with
Transcriber open, tap the question mar k in the toolbar.
Write letters here.
Write numbers here.
Page 39

7776
In any program that accepts writing, such as Notes, and
in the Notes tab of Calendar, Contacts, and Tasks, you
can use your stylus to write directly on the screen.Write
the way you do on paper. You can edit and format what
you've written and convert the information to text at a
later time.
T
o write on the screen:
!
Tap the
PPeenn
button to switch to writing mode.
This action displays lines on the screen to help you
write.
WWRRIITTIINNGG OONN TTHHEE SSCCRREEEENN
WWRRIITTIINNGG OONN TTHHEE SSCCRREEEENN
Tap the Pen button to use
your stylus like a pen
NNOOTTEE:: SSoommee pprrooggrraammss tthhaatt aacccceepptt wwrriittiinngg mmaayy nnoott hhaavvee tthhee PPeenn
bbuuttttoonn.. SSeeee tthhee ddooccuummeennttaattiioonn ffoorr tthhaatt pprrooggrraamm ttoo ffiinndd oouutt hhooww ttoo
sswwiittcchh ttoo wwrriittiinngg mmooddee..
To punctuate in Tr
anscriber:
1.Tap on the toolbar.
2.Tap the punctuation mark you need.
3.Tap
OOKK
to hide the toolbar.
SSEELLEECCTTIINNGG AANNDD EEDDIITTIINNGG TTYYPPEEDD TTEEXXTT
If you want to edit or format typed text, you must select
it first.
1. Drag the stylus across the text to select it.
2.To cut, copy, and paste typed text:
a.Tap and hold the selected words
b. Tap an editing command on the pop-up menu, or
tap
EEddiitt
on the command bar, then tap an editing
command.
Page 40

7978
To conv
ert writing to text:
!
Tap
TToooollss
, then
RReeccooggnniizzee
.
If you want to convert only certain words, select them
before tapping Recognize on the Tools menu (or tap and
hold the selected words and then tap
RReeccooggnniizzee
on the
pop-up menu). If a word is not recognized, it is left as
writing.
If the conversion is incorrect, you can select different
words from a list of alternates or return to the original
writing.To do so:
1. Tap and hold the incorrect word (tap one word at a
time).
2. In the pop-up menu, tap
AAlltteerrnnaatteess
.
A menu with a list of alternate words appears.
3. Do either of the following:
!
Tap the word you want to use.
!
Tap the writing at the top of the menu to retur n to
the original writing.
Select the text you want to
convert and tap
RReeccooggnniizzee
on the pop-up menu.
The writing is
turned into text.
To select and edit written text:
If you want to edit or format written text, you must select
it first.
1. Tap and hold the stylus next to the text you want to
select until the insertion point appears.
2.Without lifting, drag the stylus across the text you want
to select.
If you accidentally write on the screen, tap
EEddiitt
, then
UUnnddoo
, and try again.
-orTap the
PPeenn
button to deselect it and then drag the
stylus across the screen.
3.You cut, copy, and paste written text in the same way
you work with typed text:
a.Tap and hold the selected words.
b.Tap an editing command on the pop-up menu, or
tap
EEddiitt
on the command bar, then tap an editing
command.
Page 41

8180
You can draw on the screen in the same way that you
write on the screen. The difference between writing and
drawing on the screen is how you select items and how
they can be edited. For example, selected drawings can
be resized, while writing cannot.
T
o create a drawing:
1. Cross three ruled lines on your first stroke.
A drawing box appears.
2. Subsequent strokes in or touching the drawing box
become part of the drawing. Drawings that do not cross
three ruled lines will be treated as writing.
You may want to change the zoom level so that it is
easier to work on or view your drawing.Tap
TToooollss
and
then select a zoom level.
DDRRAAWWIINNGG OONN TTHHEE SSCCRREEEENN
DDRRAAWWIINNGG OONN TTHHEE SSCCRREEEENN
The drawing box indicates the
boundaries of the drawing
CCOONNVVEERRSSIIOONN RREEMMIINNDDEERRSS
!
Hyphenated and foreign words that use special
characters such as accents and some punctuation
cannot be converted.
!
If you add writing to a word to change it (such as
changing a "3" to an "8") after you attempt to recognize
the word, the writing you add will not be included if you
attempt to recognize the writing again.
TTIIPPSS FFOORR GGEETTTTIINNGG GGOOOODD RREECCOOGGNNIITTIIOONN
!
Write neatly.
!
Write on the lines. Write the cross of the "t" and
apostrophes below the top line so that they are not
confused with the word above. Write periods and
commas above the line.
!
For better recognition, try increasing the zoom lev el to
300% using the Tools menu.
!
Write the letters of a word closely and leave big gaps
between words so that your device can easily tell where
words begin and end.
Page 42

8382
In any program where you can write or draw on the
screen, you can also quickly capture thoughts,
reminders, and phone numbers by recording a
message.
!
In Calendar, Tasks, and Contacts, you can include a
recording in an item.
!
In Notes, you can either create a stand-alone
recording or include a recording in a written note.
!
In Phone, you can create a recording during a call.
!
In Inbox, you can add a recording to an email
message.
To create a recording in Notes:
1.Tap , then
NNootteess
.
If you want to include the recording in a note, open the
note first.
2.Tap on the command bar.
3. Position your device's built-in microphone near your
mouth or other source of sound.
You can also use the microphone in the stereo
headset/single earbud headset bundled with your device
to create a recording.
4. On the Recording toolbar, tap .
5.Tap to stop recording.
The new recording appears in the note list or as an
embedded icon.
RREECCOORRDDIINNGG AA MMEESSSSAAGGEE
RREECCOORRDDIINNGG AA MMEESSSSAAGGEE
To select a drawing:
If you want to edit or format a drawing, you must select
it first.
!
Tap and hold the stylus on the drawing until the
selection handle appears.
!
To select multiple drawings, deselect the
PPeenn
button
and then drag to select the drawings you want.
T
o edit a drawing:
1.Tap and hold the selected drawing.
2.Tap an editing command on the pop-up menu, or tap
EEddiitt
on the command bar, then tap an editing command.
T
o resize a drawing:
1. Make sure the
PPeenn
button is not selected.
2. Drag a selection handle until the desired size is
attained.
Page 43

8584
When using Inbox or MSN Messenger, use My Text to
quickly insert preset messages into the text entry area.
T
o insert a My Text message:
1.Tap
MMyy TTeexxtt
on the screen’s command bar.
2.Tap a message.
3.Tap
OOKK
.
You can add text after inserting a My Text message
before sending it.
T
o edit a My Text message:
1. In the Tools menu, tap
EEddiitt
and then tap
EEddiitt MMyy TTeexxtt
MMeessssaaggeess
.
2. Select the message you wish to edit and make the
desired changes.
UUSSIINNGG MMYY TTEEXXTT
UUSSIINNGG MMYY TTEEXXTT
To play a recording:
!
Tap it in the list or tap its icon in the note.
Indicates an embedded recording
Tap to begin recording.
Tap to show or hide the Recording toolbar.
Page 44

87
86
UUSSIINNGG TTHHEE PPHHOONNEE FFUUNNCCTTIIOONN
The phone function of your PPC4100 Pocket PC boasts
of standard cell phone features—such as mailbox and
SMS—as well as several handy call features including
Speed Dial, Caller ID, Conference Call, Call Waiting,
Call Barring, Call History, speakerphone mode, note
taking, voice mail, and emergency number setting.
The Phone program is integrated with both Microsoft
Contacts and Inbox. This means you can make a call
and send email/SMS messages from any of these three
programs. This fully integrated functionality of Phone
also makes sharing contact information between
programs an easier task.
This chapter shows you how to install a SIM card on
your device. It also describes basic phone operations
and features, as well as ways of customizing the phone
function based on your preferences.
1. Phone Setup
2. Dialer Screen
3. Phone Operation
4. Making Phone Calls
5. Phone Features
6. Phone Preferences
CCHHAAPPTTEERR 55
CCHHAAPPTTEERR 55
Page 45

8988
(4) Press the SIM card holder down.
(5) Slide the SIM card holder to the left to lock it into
place.
4. Reinstall the battery pack.See page 12 for instructions.
The default settings for your device are programmed on
the assumption that you’ll be using the phone
function so once you’ve properly installed a SIM card
(and in some cases, entered a PIN), you can then
proceed to establishing a connection to your mobile
service provider’s network.
EENNTTEERRIINNGG YYOOUURR PPIINN
After you have installed the SIM card you’ll be able to
activate your mobile service connection. In most cases,
SIM cards are preset with a PIN (Personal Identity
Number), provided by your mobile service provider,
which you need to enter to establish mobile service
connection.
NNOOTTEE:: IIff yyoouu’’rree nnoott ggooiinngg ttoo iinnssttaallll aa SSIIMM ccaarrdd oonn yyoouurr ddeevviiccee,,
kkeeeepp tthhee PPhhoonnee pprrooggrraamm cclloosseedd ttoo mmiinniimmiizzee ppoowweerr ccoonnssuummppttiioonn..
IINNSSTTAALLLLIINNGG TTHHEE SSIIMM CCAARRDD
If you wish to use the phone function, you need to first
install a valid SIM (Subscriber Identity Module) card.
A SIM card is a small printed circuit board that must be
installed when signing on as a subscriber in a
GSM-based mobile phone like your PPC4100. It
contains subscriber details, security information and
memory for a personal directory of numbers. An AT&T
Wireless SIM card is included in your PPC4100 gitftbox.
T
o install the SIM card:
1. If the device is switched on:
(1) Press and hold the
EEnndd
button on your device
until appears in the navigation bar.
(2) Press the
PPoowweerr
button to tur n off the device.
(3) Wait five (5) seconds to allow the device to
completely enter sleep mode.
2. Remove the battery pack. See page 12 for instructions.
3. Perform the following steps with the open rear panel
facing you:
(1) Slide the SIM card holder to the right.
(2) Lift the holder halfway from the recess area.
(3) Insert the SIM card into SIM card holder.
Note the proper position of the SIM card—the card
connector (i.e., gold area) should be facing downward
with the bevelled corner fitting the lower-left corner of the
recess area.
PPHHOONNEE SSEETTUUPP
PPHHOONNEE SSEETTUUPP
Page 46

9190
Launching Phone opens the Dialer screen. To do this
you can do either of the following:
!
Tap , then
PPhhoonnee
.
!
On your device’s front panel, press the
SSeenndd
button .
DDIIAALLEERR BBUUTTTTOONNSS
The list below shows the actions of the Dialer screen
buttons.
BB
UUTTTTOONN
AA
CCTTIIOONN
Tap to erase the number you entered.
Tap to see all received, made, and missed calls.
Tap to view the Speed Dial list.
DDIIAALLEERR SSCCRREEEENN
DDIIAALLEERR SSCCRREEEENN
To enter your PIN:
1.Tap , then
PPhhoonnee
.
2. On the Dialer screen, enter the preset PIN from your
mobile phone service provider.
3.Tap .
If you consecutively enter a wrong PIN for three times,
the SIM card will be blocked. If that happens, you can
unblock it with the PIN Unblocking Key also provided by
your mobile phone service provider.
This icon indicates the status of
the mobile service connection.
Tap to back space
over individual
numbers
Tap to view the
Call History entries
Tap to view the
Speed Dial list.
The last number
called is displayed
here.
Soft keypad
for inputting
Tap to create a call note.
Tap
TToooollss
, then
OOppttiioonnss
to
view phone settings
.
Tap to call the
currently displayed
number.
Tap to view the contact list.
Page 47

9392
TTUURRNNIINNGG TTHHEE PPHHOONNEE FFUUNNCCTTIIOONN OONN AANNDD OOFFFF
If you have turned the phone function off, removed and
then reinstalled the SIM card, the connection to your
mobile service provider’s network is not automatically
enabled. You have the option to just use the device’s
PDA features or you can reestablish the mobile service
connection.
T
o turn on the phone function:
!
Press and hold the
EEnndd
button on your device
until appears.
- or Tap on the navigation bar, then from the
Connectivity callout, tap
TTuurrnn ooffff fflliigghhtt mmooddee
.
This icon will change indicating your device is
getting ready to search for a mobile connection. This
may take a few seconds. During connection, the icon
changes to then to once a mobile connection is
established.
PPHHOONNEE OOPPEERRAATTIIOONN
PPHHOONNEE OOPPEERRAATTIIOONN
IIMMPPOORRTTAANNTT:: IInn mmaannyy ccoouunnttrriieess iitt iiss rreeqquuiirreedd bbyy llaaww ttoo ttuurrnn ooffff
cceellll pphhoonneess wwhheenn bbooaarrddiinngg ccoommmmeerrcciiaall fflliigghhttss.. TTuurrnniinngg ooffff yyoouurr
PPPPCC44110000 ddooeess nnoott ttuurrnn ooffff tthhee ddeevviiccee’’ss pphhoonnee ffuunnccttiioonn;; yyoouu mmuusstt
ddiissccoonnnneecctt tthhee mmoobbiillee sseerrvviiccee ccoonnnneeccttiioonn bbyy eennaabblliinngg fflliigghhtt mmooddee..
BB
UUTTTTOONN
AA
CCTTIIOONN
Tap to call the displayed number.
Tap to end a call.
Tap during a call to create a note for that
particular call.
PPhhoonnee SSttaattuuss IIccoonnss
The list below shows the Phone-related status icons.
II
CCOONN
NN
AAMMEE
DD
EESSCCRRIIPPTTIIOONN
Network Indicates that the device is attempting
search to establish mobile service connection.
No network Indicates that the device is not able to
establish mobile service connection.
Phone off Tap to display the Connectivity callout.
In network Tap to tur n off the phone function.
service
Signal status The number of bars indicates the
strength of the connection signal. As
the strength of the signal diminishes,
so will the number of bars in the icon,
with no bars indicating no signal.
Active call Notifies you that a call is being made or
there is an incoming call.
Speakerphone Indicates that the speakerphone mode
is enabled.
Missed call Tap to view missed calls.
Unread email Tap to view unread SMS or email
message(s), as well as voice mail
notification(s).
Page 48

AANNSSWWEERRIINNGG AA CCAALLLL
!
Tap
AAnnsswweerr
or press the
SSeenndd
button .
RREEJJEECCTTIINNGG AA CCAALLLL
!
Tap
IIggnnoorree
or press the
EEnndd
button .
Depending on your mobile service subscription, either
a busy tone will be sent out, or the call will be forwarded
to your voice mailbox.
EENNDDIINNGG AA CCAALLLL
!
Tap or press the
EEnndd
button .
AADDJJUUSSTTIINNGG TTHHEE PPHHOONNEE VVOOLLUUMMEE
To adjust the phone volume, you must do it during a call.
If you adjust the volume at another time it will only affect
the level of the system sounds (i.e., ring and notification
alerts, .wmv/MP3 playback).
T
o adjust the phone conversation volume:
1. Tap on the navigation bar or press the volume
rocker key down to bring up the In Call callout.
2. Drag the slider to adjust the phone volume.
9594
To tur n off the phone function:
!
Press and hold the
EEnndd
button on your device
until appears in the navigation bar.
- or -
Tap on the navigation bar, then from the
Connectivity callout, tap
TTuurrnn oonn fflliigghhtt mmooddee
.
EERRAASSIINNGG NNUUMMBBEERR IINNPPUUTT
If you entered a wrong phone number when dialing, you
can either backspace to erase individual digits or you
can delete the entire phone number
!
Tap to backspace over digits.
!
From the command bar, tap
EEddiitt
, then
CClleeaarr
or tap
and hold .
Tap to backspace and
erase individual numbers.
Tap to delete the entire
phone number entry.
Page 49

9796
MMUUTTIINNGG AA CCAALLLL
During a call you can mute the microphone so that the
person with whom you are speaking cannot hear you,
but you can still hear him or her. This is useful if, for
example, you do not want the other person to hear a
conversation or background noise on your side of the
call.
T
o mute a call:
!
During a call, tap to toggle the mute function on
and off.
The mute icon is displayed on the Dialer screen’s
entry area to indicate that the mute function is enabled.
UUSSIINNGG TTHHEE SSPPEEAAKKEERRPPHHOONNEE
To attend to phone calls, attach the single earbud headset
calls, attach the single earbud headset or activate the
speakerphone mode.The speakerphone function allows
you to talk hands-free and/or let other people listen to
the caller.
T
o enable speakerphone mode:
!
Press and hold the
SSeenndd
button until the
speakerphone turns on as indicated by the appearance
of the Speakerphone icon on the navigation bar.
T
o disable speakerphone mode:
!
Press and hold the
SSeenndd
button again until the
Speakerphone icon disappears from the navigation
bar.
Page 50

9998
MMAAKKIINNGG AA CCAALLLL UUSSIINNGG MMIICCRROOSSOOFFTT CCOONNTTAACCTTSS
There are several ways to make a call in Contacts. In this
section, only the method using the hardware buttons will be
described.For instructions on other methods, see page 174.
1. Tap , then
CCoonnttaaccttss
.
Contacts will open to the contact list.
2. Rotate the jog dial up/down to scroll through the
contact list and select the contact you want to call.
3. Press the
SSeenndd
button twice—once to launch
Phone and another to make the call. The call will be
made to that contact’s priority number.
The integrated nature of your device’s phone function
lets you make calls in a variety of ways across different
applications.You can make a call by:
!
Manually entering a phone number using the Dialer
keypad.
!
Accessing numbers using Speed Dial, Call History,
Microsoft Contacts or SIM Manager.
Once a call has been initiated this icon changes to
indicating an active call.
MMAAKKIINNGG AA CCAALLLL UUSSIINNGG DDIIAALLEERR
1.On the Dialer keypad, tap the phone number you want
to call.
2.Tap or press the
SSeenndd
button .
MMAAKKIINNGG PPHHOONNEE CCAALLLLSS
MMAAKKIINNGG PPHHOONNEE CCAALLLLSS
This icon indicates a call is being
made and the strength of the signal.
The number
being called is
displayed here.
Tap to terminate
the call.
Page 51

101100
!
Alternatively, if you don’t remember the position of a
number in the Speed Dial list follow the steps below:
1. Tap or rotate the jog dial down .
2. On the Speed Dial window, scroll the jog dial to go
through the list to find the number you want to call.
3. Once the number is selected, you can either press
the jog dial or the
SSeenndd
button to initiate the call.
MMAAKKIINNGG AA CCAALLLL UUSSIINNGG CCAALLLL HHIISSTTOORRYY
Call History is a record of all incoming, outgoing, and
missed calls.
1.Tap or rotate the jog dial up.
2.Find the number you want to call.You can select a call
category—All Calls, Missed, Outgoing, Incoming, and
By Caller—by tapping the pick list in the top-left corner
of the screen.
Tap a Speed Dial
number to call
that contact.
Tap to adjust voice
mail settings.
Tap to edit
contact details.
Tap to add a
contact to the
Speed Dial list.
MMAAKKIINNGG AA CCAALLLL UUSSIINNGG SSPPEEEEDD DDIIAALL
Speed Dial is a list you create for numbers you call
regularly .Only numbers stored in Microsoft Contacts can
be added to this list.
T
o make a call using Speed Dial:
You can make a call in two ways:
!
By memorizing a phone number’s position in the
Speed Dial list, you can dial the number by entering its
location number.
In the picture above, Kyla Devon is at position 3.To dial
her number, tap and hold 3 on the Dialer keypad until
you hear a beep.
If a number holds a position of 10 or higher tap the first
number, and then tap and hold the second to dial. For
instance, to call the number in position 12, tap 1 then tap
and hold 2.
Page 52

103102
3.Once the number has been selected, make the call by
doing any of the following:
!
Press the jog dial.
!
Press the
SSeenndd
button .
!
Tap and hold the selected number, then select
CCaallll
from the pop-up menu.
MMAAKKIINNGG AANN IINNTTEERRNNAATTIIOONNAALL CCAALLLL
For making a call to an overseas number that is not
stored either in your SIM card or on your device, follow
the steps below.
1.Tap and hold the 00key until the ‘+’sign appears.
‘+’ replaces the inter national number prefix ‘00’.
2. Enter the full phone number you want to dial.
It includes the country code, area code (without the
leading zero), and phone number.
3.Tap or press the
SSeenndd
button .
3.Once the number has been selected, make the call by
doing any of the following:
!
Press the jog dial.
!
Press the
SSeenndd
button .
!
Tap the category icon on the left of the selected
number.
MMAAKKIINNGG AA CCAALLLL UUSSIINNGG SSIIMM MMAANNAAGGEERR
SIM Manager is a program you can use to view and
manage the contents of your SIM card.
1.Tap ,
PPrrooggrraammss
, then
SSIIMM MMaannaaggeerr
.
Wait for the SIM card contents to load.
2. Select the number you want to call.
Tap here to select
a call category.
Tap a category icon
to call the number
opposite it.
Page 53

105104
To make an emergency call:
1. Dial the emergency number by using Dialer.
!
For international emergency calls, dial 112.
!
For US/Canada emergency calls, dial 911.
2.Tap or press the
SSeenndd
button .
MMAAKKIINNGG AANN EEMMEERRGGEENNCCYY CCAALLLL
Your handset supports the international emergency
number 112, and for US/Canada residents, the
emergency number 911 as well. You can call these
numbers for emergency police, fire, and medical
assistance.
Generally, you can make a call to these emergency
numbers, with or without a SIM card installed on your
device, as long as a mobile phone service network is
available in your area. However, some mobile phone
service providers may require that a SIM card is
inserted, and in some cases that the PIN has been
entered as well, before an emergency call can be made.
Contact your mobile service provider for the
requirements applicable to your mobile subscription.
NNOOTTEE:: IInn ssoommee ccaasseess,, aaddddiittiioonnaall llooccaall eemmeerrggeennccyy nnuummbbeerrss mmaayy
bbee pprroovviiddeedd bbyy yyoouurr mmoobbiillee pphhoonnee sseerrvviiccee pprroovviiddeerr..
Page 54

107106
CCAALLLL NNOOTTIIFFIICCAATTIIOONN AANNDD IIDDEENNTTIIFFIICCAATTIIOONN
The Call Notification feature lets you know if another
person is trying to call you when you are talking on the
phone.When this happens the following callout appears.
The Caller Identification feature matches the incoming
call number with those stored in Contacts so you know
who is calling you.
Flexibility is a hallmark of your device’s phone function.
This is best exemplified in such features as Call
Notification, Call Hold and Conference Call, which
allows you to attend to more than one call
simultaneously—all with a simple tap of your stylus.
Variety is another hallmark of your device’s phone
function. This is implemented in such range of features
as Call Notes, SMS/email Messaging, Voice Mail, and
Contacts Integration.
PPHHOONNEE FFEEAATTUURREESS
PPHHOONNEE FFEEAATTUURREESS
NNOOTTEE:: TThhee aavvaaiillaabbiilliittyy ooff ssoommee ooff tthhee pphhoonnee ffeeaattuurreess ddeessccrriibbeedd iinn
tthhiiss sseeccttiioonn mmaayy ddeeppeenndd oonn yyoouurr mmoobbiillee sseerrvviiccee ssuubbssccrriippttiioonn..
CCoonnttaacctt yyoouurr mmoobbiillee sseerrvviiccee pprroovviiddeerr ffoorr iinnffoorrmmaattiioonn..
Page 55
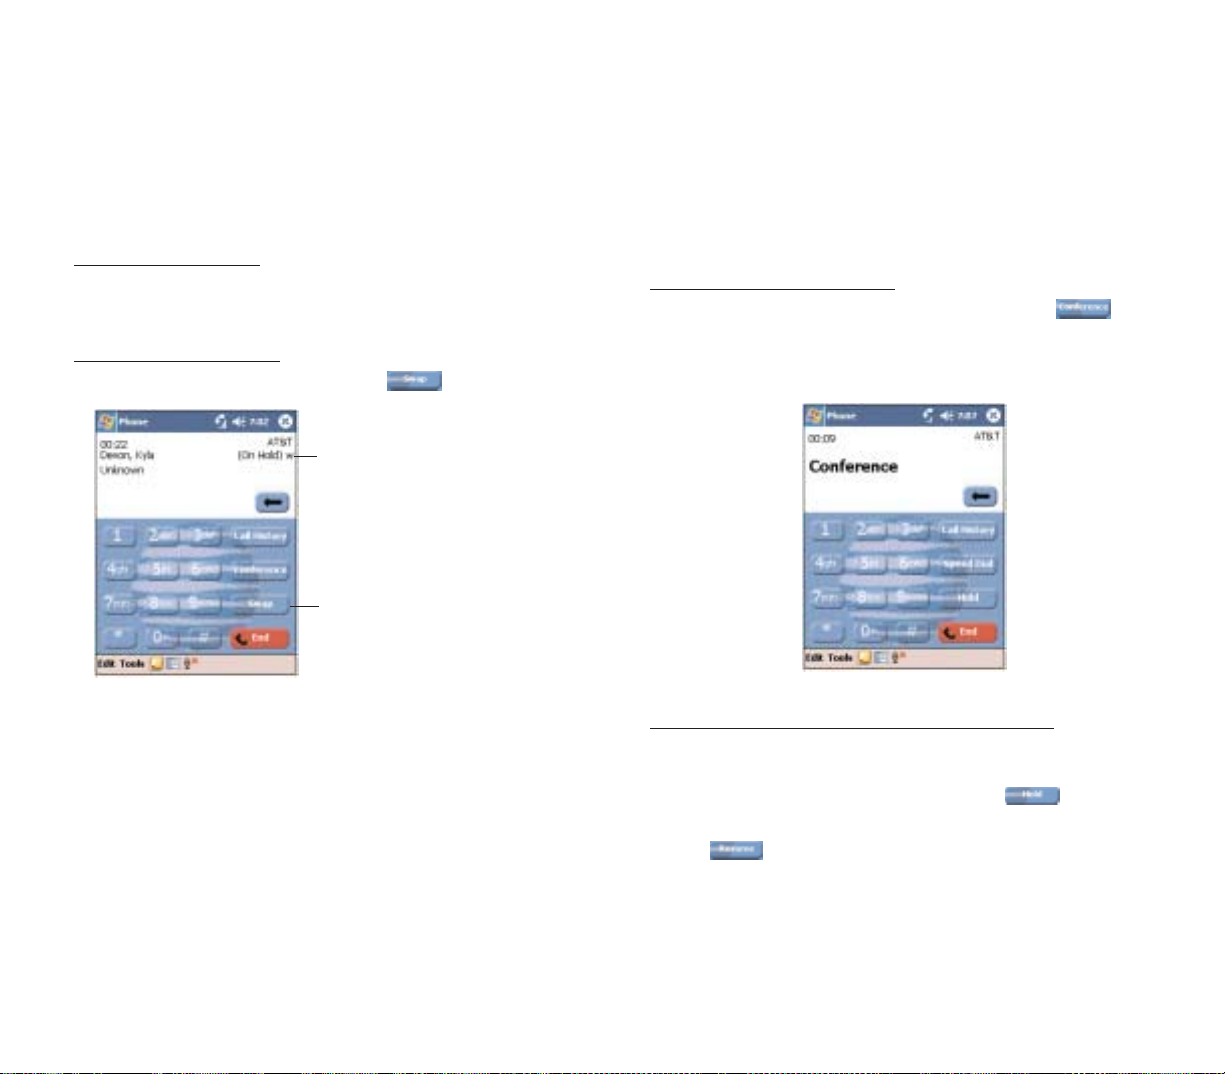
109108
CCOONNFFEERREENNCCEE CCAALLLL
With the Conference Call feature you can create a
conversation line between se v eral callers.Y ou can either,
put a call on hold, then dial another number and wait for
it to be picked up; or accept an incoming call when you
already have one in progress.
T
o set up a conference call:
!
During a call with two active numbers, tap .
If the conference connection is successful the word
Conference will appear in the input area of the Dialer
screen.
T
o add additional people to a conference call:
You can connect up to six (6) callers at a time in a
conference call.
1. During an active conference call, tap .
2. Key in the new number.
3.Tap to return and continue with the conference
call.
4. Repeat steps 1-3 to add more people in the
conference call.
CCAALLLL HHOOLLDD
After being notified of an incoming call while already on
the phone, you can choose to reject a call by tapping the
IIggnnoorree
button on the Call Notification callout, or you can
use the Call Hold feature to attend to both calls.
T
o put a call on hold:
!
On the Call Notification callout, tap
AAnnsswweerr
to take the
incoming call and put the original one on hold.
T
o swap between calls:
!
To shift between two callers tap .
Indicates which number is on hold.
Tap to swap between calls.
Page 56

111110
!
From Notes:
In the Notes window, tap the call note from the list.
A call note’s label corresponds to the name or phone
number of the related contact.
CCAALLLL NNOOTTEESS
The Call Notes feature allows you to create a written or
recorded note during a call. The call note will be saved
as an attachment to your call as viewed in Call History.
T
o create a call note:
1. During an active call, tap
NNoottee
on the command
bar.
2. In the Notes window, use any of the input methods to
compose your call note.
3. After you finished your call note, tap
OOKK
.
T
o view a call note:
You can view call notes either from the Call History
window or from the Notes program.
!
From the Call History window:
1.Tap or rotate the jog dial up .
2. Select a log item marked with this icon .
3. Tap and hold the selected log item, then tap
VViieeww
NNoottee
from the pop-up menu.
Page 57

113112
!
When the phone function is off, you can still view
received SMS message in Inbox:
1.Tap , then
IInnbbooxx
.
2.Tap the pick list on the top-left corner to display
the navigator panel.
3.Tap
IInnbbooxx
under the SMS account.
4. In the message list, tap an SMS message.
Tap to view the
previous message
in the list.
Tap to view the
next message in
the list.
Tap to reply, call the
sender, or forward
the message.
Tap to delete
the message.
NNOOTTEE::
If the phone function is turned off and you tried to call the
sender, send a reply, or forward the message, you will be
prompted to turn the phone function on.
SSMMSS SSEERRVVIICCEE
Just like a regular mobile phone, you can send and
receive SMS messages using your device. Your SMS
account is automatically setup in Inbox when you
activated your mobile service subscription.
T
o vie
w an SMS message:
You can view an SMS message whether the phone
function is on or off.
!
When the phone function is on, you can view an SMS
message from its notification callout:
Tap the SMS notification icon on the navigation
bar to display the message.
The SMS Caller Identification feature matches incoming
SMS numbers with those stored in Contacts so you
know who is sending you a message. Fur thermore, the
“New SMS message” callout gives you the option to call
the SMS sender back, reply, or delete the message.
Page 58

115
T
o send an SMS message:
1. On the Dialer screen’s navigation bar, tap
TToooollss
, then
SSeenndd SSMMSS
.
Inbox will be launched displaying a new message
window.
2.Tap the double arrows next to the Subject field.
3.Tap the
AAccccoouunntt
field, then
SSMMSS
.
4. In the To field, enter the SMS number of one or more
recipients, separating them with a semicolon.You can do
this in two ways:
!
Manually enter the SMS number using any of the
input panel options.
!
Tap the
TToo
field or
AAddddrreessss BBooookk
to display the
contact list, then tap a contact from the list.
Tap the
TToo
field or
AAddddrreessss BBooookk
again to hide
the contact list.
5. Compose your message.
The auto-correct feature automatically fixes common
spelling errors as you type so your messages are more
accurate.
The character counter lets you see and control the
size of the message as you compose.
114
To enter preset or frequently used messages, tap
MMyy TTeexxtt
, then select a message.
To attach a voice recording, tap , then proceed
with creating the recording.Refer to page 83 for detailed
instructions.
If you want to know if your SMS message was
received, tap the
EEddiitt, OOppttiioonnss
, then select the “Request
SMS text message delivery notification” check box.
7. Tap when you've finished the message.
If the phone function is turned on, your SMS
message will be immediately sent out. If it’s off, you will
be prompted to turn on the phone function. If you do so,
the message will sent out; otherwise when you tap
OOKK
,
the message will be saved in the Drafts folder and you
can send it out later.
Character counter
Page 59

117116
CCOONNTTAACCTTSS IINNTTEEGGRRAATTIIOONN
Your device’s phone function is integrated with other
applications making it easy for you to share
contacts—phone numbers—between programs. Listed
below are the places where contacts can be stored on
your device:
!
Microsoft Contacts
Your contacts list contains phone numbers that you
can use in Phone.
!
Your SIM card
You interchange your SIM card between
your PPC4100 and another device;while using the other
device you can create new contacts on the SIM card.
!
Call History
New contact numbers can be found in incoming or
missed calls.
SSHHAARRIINNGG CCOONNTTAACCTTSS IINN MMIICCRROOSSOOFFTT CCOONNTTAACCTTSS
Below are several advantages for exporting contact
information to Microsoft Contacts:
!
As a backup in case you lose your SIM card while
using it with another device.
!
If you are using your SIM with another device, you
may need the numbers stored in Microsoft Contacts.
!
Exporting phone numbers to Microsoft Contacts
allows you to create a more detailed record.
T
o add contacts to Microsoft Contacts:
You can choose to create new contacts or add contacts
from SIM Manager or from Call History.
!
For instructions on creating new contacts, see
page 171.
!
For instructions on adding Call History items, see
page 121.
!
For instruction on adding SIM Manager contacts, see
page 120.
VVOOIICCEE MMAAIILL
With the voice mail service you need not miss a
message when you miss a call.Unattended calls (i.e., no
answer, phone function is turned off or is out of network
service) or a busy line will automatically forward callers
to your voice mailbox where they can leave their
messages.
When you insert your SIM card into your device, it will
automatically detect and set as default the voice mailbo x
number provided by your mobile service provider. By
default, the first Speed Dial location is assigned to your
voice mailbox.
T
o retrieve your voice mails:
!
Tap and hold on the Dialer keypad.
Your voice mail retrieval number is automatically
dialed.
!
Tap the
SSMMSS NNoottiiffiiccaattiioonn
icon informing you of the
new voice mail, then tap
CCaallll
from the “New SMS
message” callout
Page 60

119118
c. Select a location.You can either :
- Accept the default location which is the first
available position in the Speed Dial list.
- Use the up and down arrows in the Location field
to scroll and select the desired location. If you want to
put a number in a position that is already occupied, the
new number will overwrite the number already there.
d.Tap
OOKK
.
SSHHAARRIINNGG CCOONNTTAACCTTSS IINN SSIIMM MMAANNAAGGEERR
SIM Manager enable you to manage all contacts stored
in your SIM card with the option to export this
information to Microsoft Contacts.
T
o add contacts to SIM Manager:
1.Tap
NNeeww
on the command bar.
2. In the Add Entry box, fill out the Name and Phone
fields.
3.Tap
AAdddd
.
To export contacts from Microsoft Contacts:
1. Do either of the following:
!
Tap and hold a contact to display the pop-up menu.
!
Tap a contact to select it, then tap the
TToooollss
menu.
If you do not select a contact, the first entry on the list
will be exported.
2. Select the location where to export the contact.
!
To export a contact to a SIM card:
a.Tap
SSaavvee TToo SSIIMM
.
A screen appears to display the export status.
b.After exporting, tap
OOKK
.
!
To export a contact to Speed Dial:
a.Tap
AAdddd ttoo SSppeeeedd DDiiaall......
.
A screen appears to display the export status.
b.In the next screen add the contact details.
Page 61

121120
A screen appears to display the transfer status.
2. After completing the export, tap
OOKK
.
SSHHAARRIINNGG CCOONNTTAACCTTSS IINN CCAALLLL HHIISSTTOORRYY
Call History is a record of all incoming, outgoing, and
missed calls.You have the option to export new numbers
under the Incoming and Missed categories to Microsoft
Contacts.
T
o export Call History entr
ies to Microsoft Contacts:
1. Display the Incoming or Missed categories.
2.Tap and hold the number you want to export.
2. In the pop-up menu that appears select
SSaavvee ttoo
CCoonnttaaccttss
.
3. On the Contact screen add additional contact details.
4.Tap
OOKK
or press the jog dial.
The call details in the Call History for the transferred
number will change to display the contact name
specified.
To export SIM Manager contacts:
You can choose to export individual or all SIM Manager
contacts to Microsoft Contacts.
!
To export individual SIM Manager contact:
1.T ap and hold a contact, then from the pop-up menu,
select
SSaavvee ttoo CCoonnttaaccttss
.
A pop-out message will confirm export to Microsoft
Contacts.
2.Tap
OOKK
to close the box.
!
To export all SIM Manager contacts:
1.Tap
TToooollss
from the command bar, then select
SSaavvee
AAllll TToo CCoonnttaaccttss
.
Page 62

123122
CCAALLLL DDEETTAAIILLSS
Call History allows you to check the date and time a call
was made, as well as the duration.
T
o view call details:
!
Find the call you are interested in, then tap it once.
CCAALLLL HHIISSTTOORRYY LLIIMMIITT
To minimize the memory space occupied by the Call
History items, you can set a limit for the number of
entries retained after a specific period of time. You can
also delete items that you no longer need.
T
o set the Call History limit:
1. From the command bar, tap
TToooollss
, then
CCaallll TTiimmeerrss
.
2. On the Call Timers window, tap the ”Delete call
history items older than” pick list, then, tap a time period
option.
CCAALLLL HHIISSTTOORRYY
All calls made on your device are recorded in Call
History.You can refer to it to check call details as well as
access any notes taken during a call.You can set a limit
on the number of entries or delete them as necessary to
save memory space.
CCAALLLL HHIISSTTOORRYY CCAATTEEGGOORRIIEESS
Entries in the Call History are grouped into the five
categories listed below. Tap the pick list on the top-left
corner to select a call category.
II
CCOONN
CC
AATTEEGGOORRYY
DD
EESSCCRRIIPPTTIIOONN
All Calls Shows all calls made to and from your
device in a chronological order
Missed Shows calls made to your device that
were not answered
Outgoing Shows all calls made from your device
Incoming Shows all calls made to your device
By Caller... Shows all calls made to and from your
device in an alphabetical order based
on caller ID
Tap to select a
call category.
Page 63

125124
PPHHOONNEE PPRREEFFEERREENNCCEESS
PPHHOONNEE PPRREEFFEERREENNCCEESS
You can configure most features of the phone function t o
suit your preferences. You do this by accessing the
Phone option under Settings.
T
o access Phone settings:
!
From the Dialer screen’s command bar, tap
TToooollss
,
then
OOppttiioonnss
.
- or -
From any other screen, tap ,
SSeettttiinnggss, PPeerrssoonnaall
tab, then tap
PPhhoonnee
.
The Phone Settings window has four tabs—Phone,
Services, Network, and Special. Refer to the following
sections for the configuration options available for each
tab.
PPHHOONNEE TTAABB
Configure sound and security settings in this tab. The
SIM card number is indicated on the first line of the
window.
3.Tap
OOKK
.
To delete individual Call Histor y entries:
!
Tap and hold the entr y you want to delete, then from
the pop-up menu, select
DDeelleettee
.
To delete all Call Histor y entries:
!
From the command bar, tap
TToooollss
, then
DDeelleettee
aallll ccaallllss
.
Tap to select a basis for
the call history limit.
Page 64

127126
VVIIEEWWIINNGG TTHHEE RRIINNGG TTOONNEE LLIISSTT
1.Tap ,
SSeettttiinnggss
, then
PPeerrssoonnaall
tab.
2.Tap
MMyy RRiinngg TToonnee
.
2.Tap the
RRiinngg
tab to display the My Ring Tone window.
3.Tap the file format pick list on the lower-right corner of
the screen to display the type of ring tone files you wish
to display.
A marked check box beside a file indicates that it is
included under the “Ring tone” options of Phone
Settings.
T
o listen to a ring tone:
!
Check the box next to the ring tone file you want to
play, then tap .To stop ring tone playback, tap .
T
o add a ring tone to Phone Settings:
!
Select the box next to the ring tone file you want to
add, then tap
AAppppllyy
.
CCOONNFFIIGGUURRIINNGG RRIINNGG TTYYPPEE,, RRIINNGG TTOONNEE,, AANNDD
KKEEYYPPAADD SSOOUUNNDDSS
!
Under the Sounds option, tap the pick list for each
field, then select your choice from the drop-down menu.
T
o download ring tones:
For a more personalized ring tone, you can choose to
download additional sound files to your device. File formats
supported include .wav and mono .midi formats.You can
download sound files in several ways, including:
!
Via synchronization using ActiveSync
!
Via Internet access using Pocket Internet Explorer
!
Via IR transfer
Ring Type
Ring Tone
Keypad Sounds
Page 65

129128
2. Enter the old PIN, input a new one, then retype it for
confirmation.
SSEERRVVIICCEESS TTAABB
Configure the different phone services in this tab—Call
Barring, Caller ID, Call Forwarding, Call Waiting; and
Voice Mail and SMS.
NNOOTTEE:: TThhee aavvaaiillaabbiilliittyy ooff ssoommee ooff tthhee pphhoonnee sseerrvviicceess ddeessccrriibbeedd iinn
tthhiiss sseeccttiioonn mmaayy ddeeppeenndd oonn yyoouurr mmoobbiillee sseerrvviiccee ssuubbssccrriippttiioonn..
CCoonnttaacctt yyoouurr mmoobbiillee sseerrvviiccee pprroovviiddeerr ffoorr iinnffoorrmmaattiioonn..
T
o remove a ring tone from Phone Settings:
!
Deselect the box next to the ring tone file you want to
remove, then tap
AAppppllyy
.
T
o adjust the ring tone volume:
1.Tap the
VVoolluummee
tab.
2.To adjust the ring tone volume drag the slider.
CCOONNFFIIGGUURRIINNGG YYOOUURR PPIINN
Under the Security options, you can change your PIN
and have it enabled or disabled.
T
o enable your PIN:
!
Select the “Require PIN when phone is used” check
box.
T
o disable your PIN:
!
Deselect the “Require PIN when phone is used”check
box.
To change your PIN:
1. Tap the
CChhaannggee PPiinn
button.The Dialer screen will be
displayed.
Page 66

131130
CCAALLLLEERR IIDD
When this service is enabled and you make a call, your
phone number will be displayed on the phone screen of
the person you’re calling.
T
o enable or disab
le Caller ID:
1.Tap
CCaalllleerr IIDD
from the services list.
2.Tap the
GGeett SSeettttiinnggss
button (retrieving settings may
take a few minutes).
3. In the next screen, define the caller ID settings.
!
Everyone - to enable Caller ID, or
!
No one - to disable Caller ID
4.Tap
OOKK
.
CCAALLLL FFOORRWWAARRDDIINNGG
This service allows you to forward incoming calls to
another phone number. You can choose to forward all
calls to the same number or specify a number based on
the following conditions:
!
Unavailable - the phone function is turned off or is out
of network service
!
Busy - when you are attending to a phone call
!
No answer - when you are not answering your phone
calls
CCAALLLL BBAARRRRIINNGG
You have the option to block calls in specific situations.
T
o enable or disab
le call barring:
1.Tap
CCaallll BBaarrrriinngg
from the services list.
2. Tap the
GGeett SSeettttiinnggss
button (retrieving settings may
take a few minutes).
3. In the next screen, define the call barring settings.
!
Block incoming calls
- All calls - to prevent an y calls from coming through
- When roaming - to block incoming calls when in
phone service is in roaming status
- Off - to accept all incoming calls
!
Block outgoing calls
- All calls - to prevent any calls from being made
from your device
- International - to block outgoing international
calls
- International except to home country - to block all
outgoing international calls other than those being made
to the set home country
- Off - to disable call barring for all outgoing calls
4.Tap
OOKK
.
Page 67

133132
CCAALLLL WWAAIITTIINNGG
This service allows you to receive another call during an
active call.
T
o enable or disab
le call waiting:
1.Tap
CCaallll WWaaiittiinngg
from the services list.
2. Tap the
GGeett SSeettttiinnggss
button (retrieving settings may
take a few minutes).
3. In the next screen, define the call waiting settings.
!
Notify me - to enable call waiting, or
!
Do not notify me - to disable call waiting
4.Tap
OOKK
.
VVOOIICCEE MMAAIILL AANNDD SSMMSS
By default your device will automatically detect and set
the voice mail and SMS access numbers provided by
your mobile service provider.You can view these numbers
for your reference.
T
o view voice mail and SMS access numbers:
1.Tap
VVooiiccee MMaaiill aanndd SSMMSS
from the services list.
2.Tap the
GGeett SSeettttiinnggss
button (retrieving settings may
take a few minutes).
To enable or disable call f
orwarding:
1.Tap
CCaallll FFoorrwwaarrddiinngg
from the services list.
2.Tap the
GGeett SSeettttiinnggss
button (retrieving settings may
take a few minutes).
3. In the next screen, follow these steps to enable or
disable call forwarding:
!
To enable call forwarding:
– Tap the “Forward all incoming calls” check box,
then specify the call forward phone number on the
TToo
field.
- or -
– Tap the check box for one or all particular conditions,
then specify the call forward phone number on the box
opposite it.
!
To disable call forwarding, deselect all the check
boxes.
4.Tap
OOKK
.
Page 68

135134
To select a network:
Set the mode for conducting a network search.
!
Under “Network selection”, tap either
AAuuttoommaattiicc
or
MMaannuuaall
. Retrieving network settings may take a few
minutes if you select Manual.
T
o set preferred networks:
If there are many mobile phone service providers available
in your area, you can configure this function to select
your preferred ones and set its priority level.
1.Under Network selection, tap the
SSeett NNeettwwoorrkkss
button.
2.To include a listed netw ork as a pref erred network, tap
the check box opposite it.
3. To set the priority level, tap a preferred network, then
tap the
MMoovvee UUpp//MMoovvee DDoowwnn
buttons.
NNEETTWWOORRKK TTAABB
This tab allows you to configure settings related to mobile
service networks. The currently activated network is
indicated on the first line of this tab.
T
o find a network:
Do this when the network status is currently out of network
service and you want to conduct a search.
!
Tap the
FFiinndd NNeettwwoorrkk
button (search process may tak e
a few minutes).
Page 69

137
CCUUSSTTOOMMIIZZIINNGG YYOOUURR HHAANNDDSSEETT
You can customize your PPC4100 Pocket PC based on
your personal requirements and preferences as well as
depending on your usual work modes. Customize your
device by either adjusting the device settings or by
adding/removing programs.
1. Adjusting Settings
2. Adding Programs
3. Removing Programs
CCHHAAPPTTEERR 66
CCHHAAPPTTEERR 66
SSPPEECCIIAALL TTAABB
In this tab you can enable the auto-pickup function as
well as set the ringing mode for incoming calls when the
stereo headset or the single earbud headset is plugged
into the device.
!
Select the Auto Pickup check box to accept an
incoming call after a specified number of rings without
pressing any hardware or software button.
!
Select the Headset Mode check box to set ringing for
incoming calls to emit from both the device speaker and
from the stereo headset/single earbud headset.
136
Page 70

139138
BBUUTTTTOONNSS
Assign the Send/End button on the stereo headset/
single earbud headset to commonly-used programs.You
can also adjust the onscreen scrolling speed here.
IINNPPUUTT
Select an input method, options for word completion and
other related settings.
You can adjust the settings of your device to suit the way
you work. Adjusting cer tain settings, such as backlight,
auto power off timer, system volume, and processor
speed, from the factory default settings may decrease
your standby time.
T
o access Settings:
!
Tap , then
SSeettttiinnggss
.
The Settings window has three tabs—Personal,
System, and Connections, each of which has its own set
of options.
The following sections show the configuration page for
each Settings option. For detailed instructions on these
pages, access the page from your device,
tap , then
HHeellpp
.
PPEERRSSOONNAALL TTAABB
AADDJJUUSSTTIINNGG SSEETTTTIINNGGSS
AADDJJUUSSTTIINNGG SSEETTTTIINNGGSS
Page 71

141140
OOWWNNEERR IINNFFOORRMMAATTIIOONN
Enter personal information and customize text display
when device is turned on.
PPAASSSSWWOORRDD
Set a password to prevent unauthorized access to your
device.You also have the option to set a password hint
to serve as a reminder in case you forget your password
MMEENNUUSS
Customize what appears on the menu, and on the
New button menu.
MMYY RRIINNGG TTOONNEE
Manage and listen to all ring tones stored on your
device, as well as adjust the phone volume.
Page 72

143142
TTOODDAAYY
Customize the look and the information that is displayed
on the Today screen.
SSYYSSTTEEMM TTAABB
PPHHOONNEE
Set up the phone function of your device. For more
information on this Settings option, see page 125.
SSOOUUNNDDSS && NNOOTTIIFFIICCAATTIIOONNSS
Set the volume level for system sounds and select the
types of action you want to hear sounds for.Y ou can also
define how you want to be notified about different
events. Options for personalizing sound notifications are
also available.
Page 73

145144
BBRRIIGGHHTTNNEESSSS
Define settings for the display brightness and backlight
control.
AABBOOUUTT
Displays your device’s version and copyright
information; includes an option to define a device ID.
AABBOOUUTT MMYY DDEEVVIICCEE
Displays your device’s hardware, version, and model
information. Also displays a log showing the duration of
all calls received and made on your device.
Page 74

147146
MMEEMMOORRYY
Adjust allocation of storage and main memory.
PPOOWWEERR
View the power level for both the main and backup
battery.To minimize power consumption, you can define
settings for the auto-off function and CPU operation
mode.
CCEERRTTIIFFIICCAATTEESS
View and manage the public ke y certificates availab le on
your device.
CCLLOOCCKK
Change the settings for time zone, time and date; and
set alarms.
Page 75

149148
RREEMMOOVVEE PPRROOGGRRAAMMSS
Removes programs from storage memory.
SSCCRREEEENN
Recalibrate screen and enable the ClearType feature.
RREEGGIIOONNAALL SSEETTTTIINNGGSS
Set default number and time display formats and other
related options.
Page 76

151150
CCOONNNNEECCTTIIOONNSS
Adjust settings for connecting to your ISP or to a local
network.
CCOONNNNEECCTTIIOONNSS TTAABB
BBEEAAMM
Define settings for the beam function.
Page 77

153152
2.Download the program to your computer (or insert the
CD or disk that contains the program into your computer).
You may see a single *.xip, *.exe, or *.zip file, a
Setup.exe file, or several versions of files for different
device types and processors.Be sure to select the program
designed for a Pocket PC and your device’s processor
type.
3. Connect your device to your computer.
4. Double-click the *.exe file.
!
If the file is an installer, the installation wizard will
begin. Follow the directions on the screen. Once the
software has been installed on your computer, the
installer will automatically transfer the software to your
device.
!
If the file is not an installer, you will see an error
message stating that the program is valid but it is
designed for a different type of computer. You will need
to move this file to your device. If you cannot find any
installation instructions for the program in the Read Me
file or documentation, use the ActiveSync Explore button
to copy the program file to the Program Files folder on
your device.For more information on copying files using
ActiveSync, see page 67.
5.Once installation is complete, tap ,
PPrrooggrraammss
, then
the program icon to launch it.
AADDDDIINNGG PPRROOGGRRAAMMSS
AADDDDIINNGG PPRROOGGRRAAMMSS
AADDDDIINNGG PPRROOGGRRAAMMSS TTOO YYOOUURR DDEEVVIICCEE
Programs bundled with your device at the factory
are
stored in ROM (read-only memory). You cannot remove
these programs, and you'll never accidentally lose ROM
contents. ROM programs can be updated using special
installation programs with a *.xip extension.All other programs
and data files installed to your device after factory
installation are stored in RAM (random access memory).
You can install any program created for your device, as
long as it has enough memory .The most popular place to
find software for your de vice is on the P oc ket PC W eb site
(http://www.microsoft.com/mobile/pocketpc/). You can
add programs to your device either by using ActiveSync
or by downloading the program from the Internet.
T
o add a program using ActiveSync:
Before installing a program on y our device , you m ust first
install the appropriate software for your device on your
computer.
1.Determine your device and processor type so that you
know which version of the software to install.
a.Tap ,
SSeettttiinnggss
, then
SSyysstteemm
tab.
b.Tap
AAbboouutt
.
c. In the Version tab, make a note of the processor
information.
NNOOTTEE:: RReeaadd aannyy iinnssttaallllaattiioonn iinnssttrruuccttiioonnss,, RReeaadd MMee ffiilleess,, oorr
ddooccuummeennttaattiioonn tthhaatt ccoommee wwiitthh tthhee pprrooggrraamm.. MMaannyy pprrooggrraammss
pprroovviiddee ssppeecciiaall iinnssttaallllaattiioonn iinnssttrruuccttiioonnss..
Page 78

155154
If you do not see the program you w ant, you can either
use File Explorer on your device to move the program to
the Start Menu folder, or use ActiveSync on your
computer to create a shortcut to the program and place
the shortcut in the Star t Menu folder.
T
o add a program to the Start Menu using File Explorer
on y
our device:
1.Tap ,
PPrrooggrraammss
, then
FFiillee EExxpplloorreerr
.
2.Tap the
MMyy DDeevviiccee
icon on the command bar.
3. Open the path:
WWiinnddoowwss || SSttaarrtt || PPrrooggrraammss
.
4. Tap and hold the program you want to add to the
menu, then tap
CCuutt
on the pop-up menu.
5. Open the path:
WWiinnddoowwss || SSttaarrtt MMeennuu
.
6. Tap and hold a blank area of the window, then tap
PPaassttee
on the pop-up menu.
The program will now appear on the menu.
T
o add a program to the Start Menu using ActiveSync on
your computer:
1. In ActiveSync on your computer, click
EExxpplloorree
to
explore your device’s files and locate the program.
2. Right-click the program, then click
CCrreeaattee SShhoorrttccuutt
.
3. Move the shortcut to the Start Menu folder in the
Windows folder.
The shortcut now appears on the menu.For more
information on using ActiveSync, see ActiveSync Help
on your computer.
To add a program directly from the Inter
net:
1.Determine your device and processor type so that you
know which version of the software to install.
a.Tap ,
SSeettttiinnggss
, then
SSyysstteemm
tab.
b.Tap
AAbboouutt
.
c. In the Version tab, make a note of the processor
information.
2.Download the program to your de vice straight from the
Internet using Pocket Internet Explorer.
You may see a single *.xip, *.exe or *.zip file, a
Setup.exe file, or several versions of files for different
device types and processors. Be sure to select the
program designed for a Pocket PC and your device’s
processor type.
3. Tap the file, such as a *.xip or *.exe file. The
installation wizard will begin.
4. Follow the onscreen instructions.
AADDDDIINNGG PPRROOGGRRAAMMSS TTOO TTHHEE
SSTTAARRTT MMEENNUU
You can choose what program icons should appear on
the menu based on which ones you use most often.
T
o add a program to the Start Menu program
using Settings:
1.Tap , then
SSeettttiinnggss
, then
PPeerrssoonnaall
tab.
2.Tap Menus .
3. In the Star t Menu tab, select the check box for the
programs you wish to add.
Page 79

157
156
GGEETTTTIINNGG CCOONNNNEECCTTEEDD
You can use your PPC4100 Pocket PC to exchange
information with other mobile devices and connect to
your computer, a network, or the Internet. You have the
following connection options:
!
Use the infrared (IR) port on your device to send and
receive files from another IR-enabled device.
!
Connect to your mobile Internet service provider
(ISP). Once connected, you can send and receive email
messages by using Inbox and view Web or WAP pages
by using Pocket Internet Explorer.
The communication software for creating an ISP
connection is already installed on your device. Your
service provider will provide software needed to install
other services, such as paging and fax services.
!
Connect to the virtual private network (VPN) at the
company or organization where you work. Once
connected, the added security of a VPN means that you
can access the full resources of your company’s
network. For example, you can use File Explorer to
access the files of computers on that network.
1. Infrared Connection
2. Internet Connection
3. Network Connection
4. Email Server Connection
CCHHAAPPTTEERR 77
CCHHAAPPTTEERR 77
RREEMMOOVVIINNGG PPRROOGGRRAAMMSS
RREEMMOOVVIINNGG PPRROOGGRRAAMMSS
To save storage space on your device, you may want to
remove programs that are rarely or never used.You can
choose to reinstall them later as long as you keep the
installation file for the removed program.
1.Tap ,
SSeettttiinnggss
, then
SSyysstteemm
tab.
2.Tap
RReemmoovvee PPrrooggrraammss
.
3.Tap the program you wish to remove.
4.Tap the
RReemmoovvee
button.
If the program does not appear in the list of installed
programs, use File Explorer on your device to locate the
program:
1.Tap and hold the program.
2.Tap
DDeelleettee
on the pop-up menu.
Page 80

159158
RREECCEEIIVVIINNGG IINNFFOORRMMAATTIIOONN
1. Align the IR port of your device with that of the
IR-enabled device so they are unobstructed and within a
close range.
2. Have the owner of the other device send the information
to you.Your device will automatically receive it.
3. On the Receiving Data callout, tap
YYeess
.
Using infrared, you can send and receive information,
such as contacts and appointments from another
IR-enabled device.
SSEENNDDIINNGG IINNFFOORRMMAATTIIOONN
1. Switch to the program where you created the item
you want to send and locate the item in the list.
2. Align the IR port of your device with that of the
IR-enabled device so that they are unobstructed and
within a close range.
3. Tap and hold the item, then tap the
BBeeaamm
option on the
pop-up menu.
-orSend items (but not folders) using File Explorer.
!
Tap and hold the item you want to send, then tap
BBeeaamm FFiillee
on the pop-up menu.
IINNFFRRAARREEDD CCOONNNNEECCTTIIOONN
IINNFFRRAARREEDD CCOONNNNEECCTTIIOONN
Page 81

161160
If you have access to a network at work, you can send
email messages, view Intranet pages, synchronize your
device, and possibly access the Internet. You can
connect to a network by creating a modem connection
via a RAS account. Before you can create this modem
connection, your network administrator will need to set
up a RAS account for you. Your network administrator
may also give you VPN settings.
CCRREEAATTIINNGG AA MMOODDEEMM CCOONNNNEECCTTIIOONN
TTOO AA NNEETTWWOORRKK
1. Ask your network administrator for the following
information:
!
Dial-up access telephone number
!
User name and password
!
Domain name
!
TCP/IP settings
2.Tap ,
SSeettttiinnggss
, then the
CCoonnnneeccttiioonnss
tab.
3.Tap
CCoonnnneeccttiioonnss
.
4.In the Connections window , tap the
AAdddd aa nneeww mmooddeemm
ccoonnnneeccttiioonn
link, either in the mMode MMS or My Work
Network list.
5. In the Make New Connection window, enter a name
for the connection.
NNEETTWWOORRKK CCOONNNNEECCTTIIOONN
NNEETTWWOORRKK CCOONNNNEECCTTIIOONN
Your PPC4100 Pocket PC allows you to connect to the
Internet via GPRS (General Packet Radio Service).
Once connected you can:
!
Use Inbox to send and receive email messages
!
Use Pocket Internet Explorer to access Web or WAP
pages
!
Use Windows Media Pla y er 9 Series f or Pocket PC to
listen to streaming media
For more information on configuring your de vice’ s GPRS
setting, contact your mobile ISP.
IINNTTEERRNNEETT CCOONNNNEECCTTIIOONN
IINNTTEERRNNEETT CCOONNNNEECCTTIIOONN
Page 82

163162
You need to set up a connection to an email server so
that you can send and receive email messages by using
a modem or network connection and Inbox on your
device.You can use multiple email accounts to receive
your messages. For each email account you intend to
use, first set up and name the email service. If you use
the same service to connect to different mailboxes, set
up and name each mailbox connection.
There are two types of email account that that can be
managed using your device.
!
Microsoft Outlook
Using Microsoft Outlook, your Inbox is updated each
time you sync with your computer or corporate email
server. And if you’ve sign up for the Office Online
service, you could also access your office emails
wirelessly.See page 184 for more information on how to
sign up for this service.
!
POP3/IMAP4
This includes email service from providers such as
Quest, Earthlink and attbi/Comcast. These email
accounts can be managed remotely using a wireless
connection.
EEMMAAIILL SSEERRVVEERR CCOONNNNEECCTTIIOONN
EEMMAAIILL SSEERRVVEERR CCOONNNNEECCTTIIOONN
6. In the Select a modem list, select your modem type.
If your modem type does not appear, try re-inser ting
the modem card. If you are using an external modem
that is connected to your device with a cable, select
HHaayyeess CCoommppaattiibbllee oonn CCOOMM11
.
7.Tap
NNeexxtt
to continue configuring your modem connection
depending on the modem type you selected.
You need not change any settings in the Advanced
window. Most ISPs now use a dynamically assigned
address. If the ISP you are connecting to does not use a
dynamically-assigned address, tap
AAddvvaanncceedd
, then the
TTCCPP//IIPP
tab, and enter the address.When finished, tap
OOKK
.
8.Tap
FFiinniisshh
to create the new modem connection.
Page 83

165
MMIICCRROOSSOOFFTT PPOOCCKKEETT OOUUTTLLOOOOKK
This chapter describes the Microsoft Pocket Outlook
programs, as well as an overview of AT&T’s Office
Online service.
1. Pocket Outlook Overview
2. Calendar
3. Contacts
4.Tasks
5. Notes
6. Office Online
CCHHAAPPTTEERR 88
CCHHAAPPTTEERR 88
SSEETTTTIINNGG UUPP AANN PPOOPP33//IIMMAAPP44 AACCCCOOUUNNTT
For an explanation on any of the setup screens, tap
, then
HHeellpp
.
1. In Inbox, tap
AAccccoouunnttss
on the command bar.
2.Tap
NNeeww AAccccoouunntt
.
3. Fill out the email address field, then tap
NNeexxtt
.
This will initiate auto-configuration which attempts to
connect your device to your email server and
automatically download the necessary email connection
settings. If auto-configuration is successful you can begin
sending/receiving emails straight away. If unsuccessful
you will need to manually enter the settings.
4. Fill out the following fields:Your Name, User name,
Password.
5. Select the Save Password check box unless you want
to be prompted when you get your mail.
6.Tap
NNeexxtt
.
7. From the Account type drop-down menu, select the
service type that your email provider supports (POP3 or
IMAP4).
8. Fill out the Name field for your email account, then
tap
NNeexxtt
.
9. Enter your email provider’s server name information
for incoming and outgoing mail.
8.Tap
FFiinniisshh
.
164
NNOOTTEE:: IIff yyoouurr mmaaiill sseerrvviiccee pprroovviiddeerr ddooeess nnoott pprroovviiddee aann
oouuttbboouunndd//SSMMTTPP sseerrvveerr,, AATT&&TT WWiirreelleessss ccuussttoommeerrss ccaann eenntteerr
""ssmmttpp..aattttwwiirreelleessss..nneett"" ffoorr tthhee oouuttggooiinngg mmaaiill sseerrvveerr sseettttiinngg..
Page 84

167166
Calendar enables you to conveniently manage your
schedules and appointments or any other activities
associated with a time and date. You can schedule
appointments, including meetings and other events.
Checking your appointments is easy using one of
several views—Agenda, Day, Week, Month, and Year.
Switch display views b y tapping an y of the view icons on
the command bar.
T
o open Calendar:
!
Tap , then
CCaalleennddaarr
.
Calendar will open to today’s schedule.
You can customize the Calendar display, such as
changing the first day of the week, by tapping
TToooollss
,
then
OOppttiioonnss
.
CCAALLEENNDDAARR
CCAALLEENNDDAARR
Tap to go to
current date.
Tap to display or edit
the appointment details.
Tap to create a
new appointment.
Tap to set
display options.
Year view
Month view
Week view
Day view
Agenda view
PPOOCCKKEETT OOUUTTLLOOOOKK OOVVEERRVVIIEEWW
PPOOCCKKEETT OOUUTTLLOOOOKK OOVVEERRVVIIEEWW
Microsoft Pocket Outlook includes Calendar, Contacts,
Inbox, Notes and Tasks. You can use these programs
individually or in tandem with each other. For example,
email addresses stored in Contacts can be used to
address email messages in Inbox.
Using ActiveSync, you can synchroniz e inf ormation from
Microsoft Outlook or Microsoft Exchange on your PC
with your device. You can also synchronize this
information directly with a Microsoft Exchange server.
Each time you synchronize, ActiveSync compares the
changes you made on your de vice and PC or server and
updates both locations with the latest information. For
information on using ActiveSync, see Activ eSync Help on
your computer.
Page 85

169
VVIIEEWWIINNGG AANN AAPPPPOOIINNTTMMEENNTT
You can view an appointment schedule in all views except
for Year view .
!
To see the details of an appointment, tap the
appointment.
!
To see a pop-up menu of available actions for an
appointment, tap and hold the appointment.
!
In Agenda view , upcoming appointments are display ed in
bold text.
!
In Month view , the time of appointments are indicated b y
symbols. An upward triangle means a morning
appointment; a downward triangle means an afternoon
appointment. A solid square indicates an appointment that
overlaps the noon day border.
FFIINNDDIINNGG AANN AAPPPPOOIINNTTMMEENNTT
There are two ways to find an appointment:
!
Tap ,
FFiinndd
, enter the appointment name, select
Calendar for the type, then tap the
GGoo
button.
!
In Calendar, tap
TToooollss, CCaatteeggoorriieess
, then select the check
box opposite the type of appointment you want displayed.
To show all appointments again, tap
TToooollss, CCaatteeggoorriieess
,
then clear all check boxes.
BBEEAAMMIINNGG AANN AAPPPPOOIINNTTMMEENNTT
You can send an appointment to another IR-enabled device
by beaming it.
1. In Agenda, Day or Month view, tap and hold the
appointment.
2. Tap
BBeeaamm AAppppooiinnttmmeenntt
on the pop-up menu.
3. Align the IR por t of your device with that of the
other IR-enabled device so that they are unobstructed
and within a close range.
SSCCHHEEDDUULLIINNGG AANN AAPPPPOOIINNTTMMEENNTT
You can use Calendar to create an appointment schedule.
T
o create an appointment:
1. If you are in Day or Week view, tap the desired date
and time for the appointment.
2.Tap
NNeeww
.
3. Using the soft keyboard, enter a description and a
location.
To select a field, tap it.
4. If needed, tap the date and time to change them.
5. Enter other desired information.
You will need to hide the input panel to see all
available fields.
6.To add notes, tap the
NNootteess
tab.
You can enter text, draw, or create a recording.
7. After completing the details, tap
OOKK
.
If you select “Remind me” in an appointment, your
device will remind you according to the options set in
,
SSeettttiinnggss, PPeerrssoonnaall
tab,
SSoouunnddss && NNoottiiffiiccaattiioonnss
.
Tap to return to the calendar main window
(the appointment is saved automatically).
Tap to choose from
predefined text.
Tap to select a time.
Tap to select a date.
168
Tap to choose
from previously
entered location.
Notes is a good
place for maps
directions, or
meeting
reminders
Page 86

171170
CCOONNTTAACCTTSS
CCOONNTTAACCTTSS
KKEEEEPPIINNGG TTRRAACCKK OOFF FFRRIIEENNDDSS AANNDD CCOOLLLLEEAAGGUUEESS
Contacts maintains a list of your friends’ and colleagues’
contact information. Using your device’s infrared (IR)
port, you can quickly share this list with other
Windows-based, IR-enabled device users.
T
o open Contacts:
!
Tap , then
CCoonnttaaccttss
.
Contacts will open to the contact list. To change
the way information is displayed in the list, tap
TToooollss,,
then
OOppttiioonnss
.
CCRREEAATTIINNGG AA CCOONNTTAACCTT
1.Tap
NNeeww
.
2.Using the soft keyboard, enter a name and other
contact information.
You will need to scroll down to see all available fields.
3. To assign the contact to a category, scroll down, tap
CCaatteeggoorriieess
, then select a category from the list.
Enter the name of
the contact you’re
searching for.
Tap one of the
letter blocks to
display only
contact names
starting with
such letters.
Tap to create a
new contact.
Tap to select a
category display.
UUSSIINNGG TTHHEE CCAALLEENNDDAARR SSUUMMMMAARRYY SSCCRREEEENN
When you tap an appointment in Agenda or Day view, a
summary screen is displayed.To change the appointment,
tap
EEddiitt
.
CCRREEAATTIINNGG AA MMEEEETTIINNGG RREEQQUUEESSTT
You can use Calendar to set up meetings with users of
Outlook or Pocket Outlook.The meeting request will be
created automatically and sent when you synchronize
Inbox or when you connect to y our email server.Indicate
how you want meeting requests sent by tapping
TToooollss,,
then
OOppttiioonnss
.
T
o schedule a meeting:
1. Create an appointment.
2. In the appointment details, hide the input panel, then
tap
AAtttteennddeeeess
.
3. Select the check box before the email address of the
contacts you want to send a meeting request to.
4. Tap
OOKK
twice—once to return to the appointment
details page and another to save the appointment.
The meeting request is created automatically and
placed in the Outbox folder.
View appointment details.
View appointment notes.
Tap to change appointment.
Page 87

173172
!
Tap the categor y pick list on the top-left corner of the
screen and select the type of contact that you want
displayed.
To show all contacts, tap
AAllll CCoonnttaaccttss
.
To view a contact that is not assigned to a category,
tap
NNoo CCaatteeggoorriieess
.
!
To view the names of companies your contacts work
for, in the command bar, tap
VViieeww
, then
BByy CCoommppaannyy
.
The number of contacts that work for that company will
be displayed to the right of the company name.
!
Tap , then
FFiinndd
, enter the contact name, select
CCoonnttaaccttss
for the type, then tap the
GGoo
button.
UUSSIINNGG TTHHEE CCOONNTTAACCTTSS SSUUMMMMAARRYY SSCCRREEEENN
When you tap a contact in the contact list (or select it
using the jog dial), a summary screen is displayed.This
is referred to as a contact card. To change the contact
information, tap
EEddiitt
.
View contact details.
View contact notes.
Tap to change
contact information.
In the contact list, you can display contacts by
category by tapping the pick list on the top-left corner of
the screen.
4.To add notes, tap the
NNootteess
tab.
5. After completing the details, tap
OOKK
.
FFIINNDDIINNGG AA CCOONNTTAACCTT
There are several ways to find a contact.You can do any
of the following.In the contact list:
!
Rotate up and hold the jog dial until large type letters
appear on the screen. Release the jog dial once the
letter for the contact you’re looking for is displayed. The
first contact name starting with that letter will
automatically be selected.
!
Tap one of the letter blocks displayed across the top of
the screen.
!
Use the Smart Lookup function by entering the first
few letters of the contact you’re looking for in the search
box under the navigation bar.To show all contacts again,
clear text from the box or tap the b utton to the right of the
box.
Tap to return to the contacts list (the
new contact is saved automatically).
Scroll to see
more fields.
Tap a field to
enter contact
information.
Notes is a good
place for additional
contact information.
Page 88

The letter that appears opposite a contact entry
corresponds to a particular contact information. These
are as follows:
- w - Work phone number
- w2 - Second work phone number
- h - Home phone number
- h2 - Second home phone number
- m - Mobile phone number
- pgr - Pager phone number
- e - Email address
- e2 - Second email address
- e3 - Third email address
- sms - SMS address
- web - Web page
!
Using the hardware buttons
1.Rotate the jog dial up/down to scroll through the
contact list and select the contact you want to call.
2. Press the
SSeenndd
button twice—once to launch
Phone and another to make the call. The call will be
made to that contact’s priority number.
175174
CCAALLLLIINNGG AA CCOONNTTAACCTT
You can make a call to a contact using either the contact
list or the contact card.
T
o make a call from the contact list:
There are several ways to make a call from the contact
list.
!
Using commands in the pop-up menu
1.Tap and hold a contact to display a pop-up menu of
actions.
2.Tap any of the
CCaallll
options to make a call.
!
Using the contact list abbreviation
1.Tap the letter in the right column next to the contact
you want to call. On the pop-up menu, phone numbers
for this contact are displayed, with a dot next to the
priority number.
2.Tap which number to call.
Tap any of the Call
options to make a call.
Page 89

177176
Inbox will open to a new message window with the To
field automatically filled out with the selected
contact’s email/SMS address.
3. Proceed to composing the message.
BBEEAAMMIINNGG AA CCOONNTTAACCTT CCAARRDD
You can send a contact card to another IR-enabled
device either from the contact list or from a contact card
window.
T
o beam a contact card from the contact list:
1. Tap and hold a contact to display a pop-up menu of
actions.
- or -
Rotate the jog dial up/down to scroll through the list
and select a contact, then press the jog dial to display a
pop-up menu of actions.
2.Tap
BBeeaamm CCoonnttaacctt
.
- or From the pop-up menu, select
BBeeaamm CCoonnttaacc
t, then
press the jog dial.
2. Align the IR port of your device with that of the
other IR-enabled device so that they are unobstructed
and within a close range.
T
o beam an open contact card:
1.Tap
TToooollss
, then
BBeeaamm CCoonnttaacctt
.
2. Align the IR port of your device with that of the
other IR-enabled device so that they are unobstructed
and within a close range.
To make a call from a contact card:
!
Tap any of the listed phone numbers.
!
Rotate the jog dial up/down to scroll through the
listed numbers and select one, then press the jog dial to
make the call.
SSEENNDDIINNGG AA MMEESSSSAAGGEE TTOO AA CCOONNTTAACCTT
You can send an email or SMS message to a contact
either from the contact list or from a contact card
window.
T
o send a message from the contact list:
1. Tap and hold a contact to display a pop-up menu of
actions.
- or Rotate the jog dial up/down to scroll through the list
and select a contact, then press the jog dial to display a
pop-up menu of actions.
2. Tap
SSeenndd EEmmaaiill orSSeenndd SSMMSS
.
- or -
Rotate the jog dial up/down to select either Send
option, then press the jog dial to enable it.
Inbox will open to a new message window with the To
field automatically filled out with the selected
contact’s email/SMS address.
3. Proceed to composing the message.
T
o send a message from a contact card:
1.Tap any of the listed email/SMS addresses.
- or -
Rotate the jog dial up/down to scroll through the
listed email/SMS addresses and select one, then press
the jog dial.
Page 90

179178
4. To assign the task to a category, tap
CCaatteeggoorriieess
and
select a category from the list.
In the task list, you can display tasks by category by
tapping the pick list on the top-left corner of the screen.
5.To add notes, tap the
NNootteess
tab.
You can enter text, draw, or create a recording.
6. After completing the details, tap
OOKK
.
BBEEAAMMIINNGG AA TTAASSKK
You can send a task to another IR-enabled device by
beaming it.
1.Tap and hold the task item.
2.Tap
BBeeaamm TTaasskk
on the pop-up menu.
3. Align the IR port of your device with that of the
other IR-enabled device so that they are unobstructed
and within a close range.
Tap to return to the tasks list (the
new task is saved automatically).
Tap a field to
enter task
information.
Notes is a good
place for additional
task information.
Tap to choose
from predefined
subjects.
TTIIPP:: TToo qquuiicckkllyy ccrreeaattee aa ttaasskk wwiitthh oonnllyy aa ssuubbjjeecctt,, ttaapp EEnnttrryy BBaarr oonn
tthhee TToooollss mmeennuu.. TThheenn,, ttaapp TTaapp HHeerree ttoo aadddd aa nneeww ttaasskk aanndd eenntteerr
yyoouurr ttaasskk iinnffoorrmmaattiioonn..
TTAASSKKSS
TTAASSKKSS
KKEEEEPPIINNGG AA TTOO DDOO LLIISSTT
Use Tasks to keep track of what you have to do and
prioritize them based on their importance and urgency.
T
o open Tasks:
!
Tap , then
TTaasskkss
.
Tasks will open to the tasks list. To change the way
information is displayed in the list, tap
TToooollss,,
then
OOppttiioonnss
.
CCRREEAATTIINNGG AA TTAASSKK
1.Tap
NNeeww
.
2. Using the input panel, enter a description.
3.You can enter a start date and due date or enter other
information by first tapping the field.
If the soft keyboard is open, you will need to hide it to
see all available fields.
Select the category of tasks
you want displayed in the list.
Select the sort
order of the list.
Tap to display or edit
the task details.
Tap and hold to
display a pop-up
menu of actions.
Indicates high priority.
Tap to create
a new task.
Page 91

181180
NNOOTTEESS
NNOOTTEESS
CCAAPPTTUURRIINNGG TTHHOOUUGGHHTTSS AANNDD IIDDEEAASS
Quickly capture thoughts, reminders, ideas, drawings,
and phone numbers with Notes.You can create a written
note or a recording.You can also include a recording in
a note. If a note is open when you create the recording,
it will be included in the note as an icon. If the note list is
displayed, it will be created as a stand-alone recording.
To open Notes:
!
Tap , then
NNootteess
.
Notes will open to the note list.
Tap to open a note
or play a recording.
Tap and hold to display a
pop-up menu of actions.
Tap to create a new item.
Tap to show or hide
the Recording toolbar.
Tap to start recording.
Tap to change the sort
order of the list.
UUSSIINNGG TTHHEE TTAASSKKSS SSUUMMMMAARRYY SSCCRREEEENN
When you tap a task in the task list, a summary screen
is displayed.To change the task, tap
EEddiitt
.
View task details.
View task notes.
Tap to change
task information.
Tap to show and hide
additional summary
information
Page 92

183182
To send a note by beaming:
1. In the task list, tap and hold the note.
2.Tap
BBeeaamm FFiillee
on the pop-up menu.
3. Align the IR port of your device with that of the
other IR-enabled device so that they are unobstructed
and within a close range.
T
o send a note by email:
1. In the task list, tap and hold the note.
2.Tap
SSeenndd vviiaa EE--mmaaiill
on the pop-up menu.
A new message window in Inbox will be displa y ed with
the selected note shown as an attachment (*.pwi).
3. Proceed to completing the email message.
CCRREEAATTIINNGG AA NNOOTTEE
1. Tap
NNeeww
.
2. Create the note by writing, drawing, typing, or
recording.
For more information about using the input panel,
writing and drawing on the screen, and creating a
recording, go to Chapter 4 on page 69.
SSEENNDDIINNGG AA NNOOTTEE
You can send a note to another person either by email or
by beaming it to that person’s IR-enabled device.
Tap to show or hide
the input panel.
Tap to return to the note list (the
note is saved automatically).
Tap to write on the screen.
Tap to add a recording to the note.
NNOOTTEE:: YYoouu mmuusstt ffiirrsstt sseett uupp aann eemmaaiill aaccccoouunntt oonn yyoouurr ddeevviiccee
bbeeffoorree yyoouu ccaann sseenndd aa nnoottee bbyy eemmaaiill.. GGoo ttoo ppaaggee 116633 ffoorr
iinnssttrruuccttiioonnss oonn sseettttiinngg uupp aann eemmaaiill aaccccoouunntt..
Page 93

185
184
CCHHAAPPTTEERR 99
CCHHAAPPTTEERR 99
CCOOMMPPAANNIIOONN PPRROOGGRRAAMMSS
This chapter describes the companion programs availab le
on your device—Pocket Word, Pocket Excel, Windows
Media Player 9 Series for Pocket PC and Microsoft
Reader.
1.
Poc k et Word
2.
Pocket Excel
3.
Windows Media Player 9 Series for Pocket PC
4.
Microsoft Reader
Office Online software allows you to wirelessly access
your Microsoft Outlook or Lotus Notes office email,
calendar and contacts when you're on the go. This
convenient service comes in two versions: Pro and
Premier.Everything you do with Office Online while you
are mobile is reflected back on your PC, so there's no
need to sync up when you return to the office.
Office Online is easy to install and use—set-up takes
just minutes. Once the software is on your office PC,
accessing information on your PPC4100 is easy and
intuitive.
To add Office Online Pro or Office Online Premier
service to your data plan, call AT&T Wireless Customer
Care at 866-293-4634. If you are already an AT&T
Wireless customer, simply go to this site,
http://attwireless
.com/officeonline, to add Office Online
to your existing account.
OOFFFFIICCEE OONNLLIINNEE
OOFFFFIICCEE OONNLLIINNEE
Page 94

187186
UUSSIINNGG TTHHEE PPOOCCKKEETT WWOORRDD FFIILLEE LLIISSTT
Pocket Word contains a list of the files stored on your
device.The file list is the default window when you open
Pocket Word. Every time you tap
OOKK
in an open
document, the file list will again be displayed.
!
Tap a file in the list to open it.You can open only one
document at a time;when you open a second document,
you'll be asked to save the first.
!
To delete, make copies of, and send files, tap and
hold a file in the list, then select the appropriate action
on the pop-up menu.
EENNTTEERRIINNGG IINNFFOORRMMAATTIIOONN
You can enter information in Pocket Word in one of four
modes—typing, writing, drawing, and recording—which
are displayed on the View menu.
If you're opening a Word document created on a computer,
select
WWrraapp ttoo WWiinnddooww
on the View menu so that you
can see the entire document.
Select the type of folder you
want displayed in the list.
Tap to change the
sort order of the list.
Tap to open a document.
Tap and hold an item
to see a pop-up menu
of actions.
Tap to create a
new document.
PPOOCCKKEETT WWOORRDD
PPOOCCKKEETT WWOORRDD
With Pocket Word you can:
!
Create new documents on your device or you can
copy documents from your PC to your device.
!
Synchronize documents between your PC and your
device so that you have the most up-to-date content in
both locations.
T
o open Word:
!
Tap ,
PPrrooggrraammss
, then
PPoocckkeett WWoorrdd
.
Word will open to the Pocket Word file list.
CCRREEAATTIINNGG AA NNEEWW DDOOCCUUMMEENNTT
!
In the document list window, tap
NNeeww
.
A blank document appears. Or, if you've selected a
template for new documents in the Options dialog box,
that template appears with appropriate text and
formatting already provided.
You can save a document you create or edit in a variety
of formats, including:
!
Word (.doc)
!
Poc k et Word (.psw)
!
Rich Text Format (.rtf)
!
Plain Text (.txt)
Pocket Word provides basic formatting options, such as
font style, paragraph alignment, and bullet options, in its
toolbar.You can show and hide this toolbar by tapping
the
SShhooww//HHiiddee TToooollbbaarr
icon on the command bar.
Page 95

189188
Writing Mode
In writing mode, use your stylus to write directly on the
screen. Ruled lines are displayed as a guide, and the
zoom magnification is greater than in typing mode to
allow you to write more easily.
If you cross three ruled lines in a single stylus stroke, the
writing becomes a drawing, and can be edited and
manipulated as described in the following section.
Written words are converted to graphics (metafiles)
when a Pocket Word document is converted to a Word
document on you r computer.
Tap to select formatting
options, such as pen
weight and line color.
With the Space button selected,
drag to insert space. An arrow
appears showing the space
direction and size.
Tap to highlight selected text.
Space button
Pen button
You can change the zoom magnification by tapping
VViieeww, ZZoooomm
, then select the percentage you want.
Select a higher percentage to enter text and a lower one
to see more of your document.
T
yping Mode
!
Using the input panel, enter typed text into the
document.
!
To format existing text and to edit text, first select the
text.You can select text as you do in a Word document,
using your stylus instead of the mouse to drag through
the text you want to select.
!
To find text in a document, tap
EEddiitt,,
then
FFiinndd//RReeppllaaccee
.
Tap and hold to see a
pop-up menu of actions
.
Tap to select
formatting
options.
Tap a formatting
command.
Tap to show or
hide the toolbar.
Tap to return to the document list
(changes are saved automatically).
Page 96

191190
With Pocket Excel you can:
!
Create new spreadsheets on your device or you can
copy spreadsheets from your PC to your device.
!
Synchronize spreadsheets between your PC and your
device so that you have the most up-to-date content in
both locations.
T
o open Excel:
!
Tap ,
PPrrooggrraammss
, then
PPoocckkeett EExxcceell
.
Excel will open to the Pocket Excel file list.
CCRREEAATTIINNGG AA NNEEWW SSPPRREEAADDSSHHEEEETT
!
In the Pocket Excel file list, tap
NNeeww
.
A blank spreadsheet appears.Or, if you've selected a
template for new spreadsheets in the Options dialog
box, that template appears with appropriate text and
formatting already provided.
You can save a workbook you create or edit it in a
variety of formats, including:
!
Pocket Excel (.pxl)
!
Excel (.xls)
Pocket Excel provides fundamental spreadsheet tools,
such as formulas, functions, sorting, and filtering, in its
toolbar.You can show and hide this toolbar by tapping
the
SShhooww//HHiiddee TToooollbbaarr
icon on the command bar.
PPOOCCKKEETT EEXXCCEELL
PPOOCCKKEETT EEXXCCEELL
Drawing Mode
In drawing mode, use your stylus to draw on the screen.
Gridlines appear as a guide.When you lift your stylus off
the screen after the first stroke, you'll see a drawing box
indicating the boundaries of the drawing. Every
subsequent stroke within or touching the drawing box
becomes part of the drawing.
Recording Mode
In recording mode, you can embed a recording into your
document. Recordings are saved as .wav files.For more
information on recording, see page 83.
Resize an object
by dragging the
selection handles.
Select
SShhaappee
on the
pop-up menu to
convert objects to
their proper shapes.
Pen button
Tap an arrow to see more choices.
Page 97

193
UUSSIINNGG TTHHEE PPOOCCKKEETT EEXXCCEELL FFIILLEE LLIISSTT
Pocket Excel contains a list of the files stored on your
device.The file list is the default window when you open
Pocket Excel. Every time you tap
OOKK
in an open
workbook, the file list will again be displayed.
!
Tap a file in the list to open it. You can open only one
workbook at a time; when you open a second workbook,
you'll be asked to save the first.
!
To delete, make copies of, and send files, tap and hold
a file in the list, then select the appropriate action from
the pop-up menu.
PPRROOTTEECCTTIINNGG YYOOUURR WWOORRKKBBOOOOKKSS
If your workbook contains sensitive information, you can
protect it with a password.Follow the steps below:
1. Open the workbook.
2.Tap
EEddiitt
, then
PPaasssswwoorrdd
.
3. Enter a password, then verify it.
192
4.Tap
OOKK
.
Every time you open the workbook, you will need to
enter the password, so choose one that is easy for you
to remember but hard for others to guess.
TTIIPPSS FFOORR WWOORRKKIINNGG IINN PPOOCCKKEETT EEXXCCEELL
Note the following when working in large worksheets in
Pocket Excel:
!
View in full-screen mode to see as much of your
worksheet as possible.
- Tap
VViieeww
, then
FFuullll SSccrreeeenn
.
- To exit full screen mode, tap
RReessttoorree
.
!
Show and hide window elements.
- Tap
VViieeww
, then tap the elements you want to show
or hide.
!
You might want to freeze the top and left-most panes
in a worksheet to keep row and column labels visible as
you scroll through a sheet.
1. Select the cell where you want to freeze panes.
2.Tap
VViieeww
, then
FFrreeeezzee PPaanneess
.
!
Split panes to view different areas of a large
worksheet.
1.Tap
VViieeww
, then
SSpplliitt
.
2. Drag the split bar to where you want it.
To remove the split, tap
VViieeww
, then
RReemmoovvee SSpplliitt
.
!
Show and hide rows and columns.
- To hide a row or column:
1. Select a cell in the row or column you want to
hide.
2.Tap
FFoorrmmaatt, RRooww
or
CCoolluummnn
, then
HHiiddee
.
- To show a hidden row or column:
1.Tap
TToooollss
, then
GGoo TToo
.
2. Type a reference that is in the hidden row or
column.
3.Tap
FFoorrmmaatt, RRooww
or
CCoolluummnn
, and then
UUnnhhiiddee
.
Tap to return to the spreadsheet list
(changes are saved automatically).
Cell contents appear
here as you enter them.
Zoom button
AutoSum button
Page 98

195194
EENNHHAANNCCEEDD BBRROOAADDBBAANNDD PPLLAAYYBBAACCKK SSUUPPPPOORRTT
!
Significant improvements in performance now allows
you to play back nearly any content from the web.
Supports up to 300 Kbps content played back directly
from the Web over either a wired or Wi-Fi connection.
!
Improved networking support for new IPv6 protocols
lets you enjoy easier Internet connection for enhanced
Web streaming, providing you with a seamless browsing
and media playback experience.
FFRRIIEENNDDLLIIEERR PPLLAAYYBBAACCKK CCOONNTTRROOLLSS
!
The button mapping function allows you to assign
hardware buttons on your device to perform standard
playback functions such as Play, Pause, Stop or Fast
Forward.You can also assign a button to toggle off the
screen to help minimize power consumption while
continuing to listen to music.
!
The Player volume control is now separate from the
system sounds control allowing you to adjust the level of
your media playbac k while retaining the volume lev el set
for system sounds.
BBEETTTTEERR MMEEDDIIAA MMAANNAAGGEEMMEENNTT
!
Supports auto-discovery of suppor ted media content
means that the Player now automatically scans your
device‘s main memory and storage cards for all
supported digital media types including WMA, MP3,
WAV, and ASF.
!
Direct support in Windows Media Player 9 Series on
your computer lets you chose your playlists and easily
transfer them to your device.
Enjoy your f a v orite music and movies on the road, online
or offline, with the new Windows Media Player 9 Series
for Pocket PC.The Player provides you with the highest
quality audio and video experience for your mobile
entertainment.
PPRROOGGRRAAMM EENNHHAANNCCEEMMEENNTTSS
A lot of new features are added to the new Windows
Media Player 9 Series for Pocket PC.
IIMMPPRROOVVEEDD PPLLAAYYBBAACCKK SSUUPPPPOORRTT
!
Supports Windows Media Audio and Video 9 Series
codecs, which gives 20 percent improvements in audio
compression and as much as 50 percent for video
compared with previous versions.
!
Better MP3 playback support lets your enjoy MP3
music files more.
!
Smoother video playback improves playback of
broadband content from the Web as well as local video
content that is processor-intensive.
!
Multiple bit-rate (MBR) support enhanced your music
experience with automatic sensing and selection of the
bit rate that is best suited for your device and
connection.
!
Variable Bit Rate (VBR) support lets you play content
that has been optimized for quality to give you optimum
playback experience.
WWIINNDDOOWWSS MMEEDDIIAA PPLLAAYYEERR
WWIINNDDOOWWSS MMEEDDIIAA PPLLAAYYEERR
Page 99

197196
To open
Windows Media Player 9 Series for Pocket PC:
!
Tap , then
WWiinnddoowwss MMeeddiiaa
.
The Player displays the last open window from your
previous session.
TTHHEE PPLLAAYYLLIISSTT
A playlist is a customized list of digital media files that
you want to watch or listen to. Using a playlist lets your
group various digital media files together and specify the
order you want the files to play in. You can also use
playlists to copy files to your computer.
You can create a playlist based on:
!
Source - For example , trac ks from v arious CDs of your
favorite artist or streaming media from an online music
site.
!
Personal preferences - For example, a playlist of
tracks belonging to your favored music genre or video
clips from your funny movie collection.
!
Mood or activities - For example, a playlist of tracks
you want to listen while travelling or during your R&R
periods.
The Player has two default playlists:
!
Local Content - Consists of all compatible audio and
video files stored on your device and/or storage card.
!
Web Favorites - Consists of your favorite streaming
media files. This playlist is empty until you add items to
it.
NNOOTTEE:: TToo ffaacciilliittaattee ffaasstteerr ccooppyyiinngg ooff aauuddiioo ffiilleess ttoo yyoouurr ddeevviiccee,, iitt iiss
rreeccoommmmeennddeedd tthhaatt yyoouu ccoonnffiigguurree WWiinnddoowwss MMeeddiiaa PPllaayyeerr oonn yyoouurr
ccoommppuutteerr ttoo aauuttoommaattiiccaallllyy ddeetteerrmmiinnee tthhee qquuaalliittyy lleevveell sseettttiinnggss
aapppplliiccaabbllee ttoo yyoouurr PPPPCC44110000 PPoocckkeett PPCC..
CCUUSSTTOOMMIIZZEEDD EENNTTEERRTTAAIINNMMEENNTT EEXXPPEERRIIEENNCCEE
!
Match the Player’s look with your style and mood by
downloading a variety of custom skins ranging from
cute rubber duckies to retro Elvis themes.
!
Use your favorite WMA music to create and apply
your own custom WMA ring tones.
CCOOPPYYIINNGG FFIILLEESS TTOO YYOOUURR DDEEVVIICCEE
Use the Windows Media Player on your computer to
copy your digital media files to your PPC4100 Pocket
PC. Doing this, instead of simply copying files using the
Explore button in ActiveSync, ensures that licences are
copied with protected files.
1. In Windows Media Player on your computer, click
CCooppyy ttoo CCDD oorr DDeevviiccee
.
-or-
On the File menu, point to
CCooppyy
, and then click
CCooppyy
ttoo PPoorrttaabbllee DDeevviiccee
(you must first connect your de vice to
your computer).
2. In the Items to Copy pane, in the drop-down list,
click the playlist, category, or other item that you want to
copy.
3. Clear the check boxes next to any files you do not
want to copy.
4. In the Items on Device pane, in the drop-down list,
click the name of your device.
5. Click the
CCooppyy
button.
The device Player verifies that there is sufficient
storage space on your device to copy the selected files.
If there is sufficient space, the files are converted (if
necessary) and copied.
6. Repeat steps 2-5 for any other items that you want to
copy to your device.
Page 100

199198
7. Tap the check box opposite each item you want to
include in the playlist.
To control which files are displayed, tap the pick list.
8. Tap
OOKK
.
Screen displays the new playlist.
Tap and hold a track to display a pop-up menu of
available actions.
CCRREEAATTIINNGG AA PPLLAAYYLLIISSTT
1.Tap
PPllaayylliisstt
in the Player window.
2.Tap the pick list, then
OOrrggaanniizzee PPllaayylliissttss
.
3.Tap
NNeeww
, and then enter a playlist name.
4. If you want, specify the folder where you want to save
the playlist.
5. Specify the location—inter nal device memory or in a
storage card—where you want to save the playlist.
6. Tap the
OOKK
button.
NNOOTTEE:: YYoouu ccaann nnoott uussee tthhee ffoolllloowwiinngg cchhaarraacctteerrss iinn aa ppllaayylliisstt nnaammee::
\\ [[ ]] :: ;; || ,, ++ ““ &&
NNOOTTEE:: YYoouu ccaann oonnllyy ccrreeaattee ppllaayylliisstt iinn tthhee WWiinnddoowwss MMeeddiiaa ffoorrmmaatt;;
nnoo ootthheerr ppllaayylliisstt ttyyppee iiss ssuuppppoorrtteedd..
 Loading...