

Page 1
User Manual
Model NVXM1000
Navigation With XM™ Ready
Copyright Audiovox Electronics Corp.
150 Marcus Blvd.,
Hauppauge, NY 11788
Call center: 800 290 6650
128-7995
Page 2

The product and the information contained herein may be changed at any time without
prior notification.
This manual or any parts of it may not be reproduced, transmitted in any form either
electronically or mechanically (including photocopying) without the express written
consent of Audiovox Electronics Corp.
© Copyright 2007, Audiovox Electronics Corp.
© Copyright 2006, NVXM1000
1
Page 3

Table of Contents
Introduction........................................................................................................4
1. NVXM1000 Location of Controls, Indicators and Connectors .................5
2. Operating Navigation with XM Ready......................................................6
3. Getting Started........................................................................................ 6
4. Modes of Operation Default Display.......................................................7
5. Implementing NVXM1000 Modes of Operation ....................................... 8
A. Navigation Mode ............................................................................... 8
B. XM Ready Mode................................................................................ 9
1. Hardware and Subscription.......................................................... 9
2. Equipment Setup ......................................................................... 9
3. Note Your ID Number ..................................................................10
4. Activate Your Satellite Radio Service ..........................................10
5. Online Activation Process ............................................................ 11
6. Call-In Activation Process ............................................................ 11
XM Ready Default Display Screen.............................................11
Channel Up/Down Buttons......................................................... 13
Preset and Tune Select Functions............................................. 13
Preset Function .............................................................. 13
Tune Select Function ..................................................... 13
Preset ....................................................................................... 14
Jump Button ............................................................................... 15
Category Button ......................................................................... 16
Setup Button .............................................................................. 16
Antenna Aiming Display ................................................. 17
Tune Select Display ....................................................... 17
Channel Add/Skip Display.............................................. 18
Data Service................................................................... 19
Display Button ............................................................................ 24
XM Ready and Navigation Dual Operation ................................ 24
C. Music Mode....................................................................................... 25
Playing Music................................................................................... 27
Music and Navigation Dual Display .................................................27
D. Back-Up Cam Mode (Optional Cradle Required) Available
Late 2007 ....................................................................................... 28
Getting Started................................................................................. 28
Back-Up View .................................................................................. 29
E. Media Mode....................................................................................... 29
Store Demo ................................................................................ 30
Photo Mode................................................................................ 30
F. Setup Mode ....................................................................................... 31
G. Remote Control Configuration .......................................................... 36
H. Media, Back-Up Camera, Photo, Music and Setup........................... 37
I. PC-to-NVXM1000 Connections and File Copy.................................. 37
Copying Files (Brief) ........................................................................ 38
J. Specifications ..................................................................................... 39
K. Troubleshooting................................................................................. 39
Warnings and Safety Information ...................................................................... 3
2
Page 4

Warnings and Safety Information
The NVXM1000 is a navigation system with integral XM® Radio that helps you find your way to your
selected destination. It will determine your exact location with the help of an internal GPS device. The
position information obtained from the GPS receiver will not be transmitted anywhere, so others will not be
able to track you.
If you are the driver of the vehicle, we recommend that you familiarize yourself with the operation of the
NVXM1000 before beginning your journey. The driver’s attention should be on the road. Plan your route
before departure and pull over if you need to change route parameters. Navigation with XM® Ready has a
built-in (optional) Safety Mode that will prevent you from using the screen functions if your car is in motion.
Unless a passenger will be the only one to operate, we strongly encourage you to turn on the Safety
Mode.
It is also important that you look at the display only if it is absolutely safe to do so.
You should always observe traffic signs and road geometry before you obey any instruction from the
NVXM1000. If you need to deviate from the recommended direction, the unit will suggest a modified route
according to the new situation.
Never place the NVXM1000 where it can obstruct the view of the driver, is within the deployment zone of
airbags, or where it can cause injuries in case of an accident. General information
Navigation with XM® Ready is a navigation system optimized for in-car use. It provides door-to-door
navigation for both single and multi-point routes using adaptable route parameters. Navigation with XM®
Ready is capable of planning routes throughout the whole map region installed on the memory card.
Unlike some other products, the NVXM1000 does not require that you change maps or switch to a poorly
detailed general map to navigate between map segments or countries. You always have complete
freedom to go wherever you wish. Just insert the memory card and go.
You do not need a stylus to use the NVXM1000. All screen buttons and controls are designed so that you
can operate them with your fingertips.
When using Navigation with XM® Ready, you do not need to ‘double tap’ or ‘tap & hold’ the touch screen
as these functions cannot be used reliably in a moving vehicle. A single tap triggers most of the screen
controls. The only exceptions are ‘drag & drop’ for moving the map, or scaling it in Map mode.
Most of the screens have a Return button (
screen or directly to one of the map screens.
) in the top left corner. This arrow returns to the previous
NOTICE TO DRIVERS IN CALIFORNIA AND MINNESOTA:
State law prohibits drivers in California and Minnesota from using suction mounts on their windshields
while operating motor vehicles. Other Audiovox dashboard mounting options should be used. Audiovox
does not take any responsibility for any fines, penalties, or damages that may be incurred as a result of
disregarding this notice. (See California Vehicle Code Section 26708(a); Minnesota Statutes 2005,
Section 169.71)
3
Page 5

Introduction
Thank you for choosing the Navigation with XM® Ready unit, Model NVXM1000, as your door-to-door incar navigator complete with integral XM® Radio capability. In addition, the NVXM1000 exhibits other
features, such as Back-Up Camera input using an appropriate cradle and interconnect cable, and Music
input from an external source such as an SD card. This document is a detailed description of the software.
Although Navigation with XM® Ready operation can be obtained easily by user experience, it is still
recommended that you read through this manual to clearly understand the exact function of each button
and icon.
4
Page 6
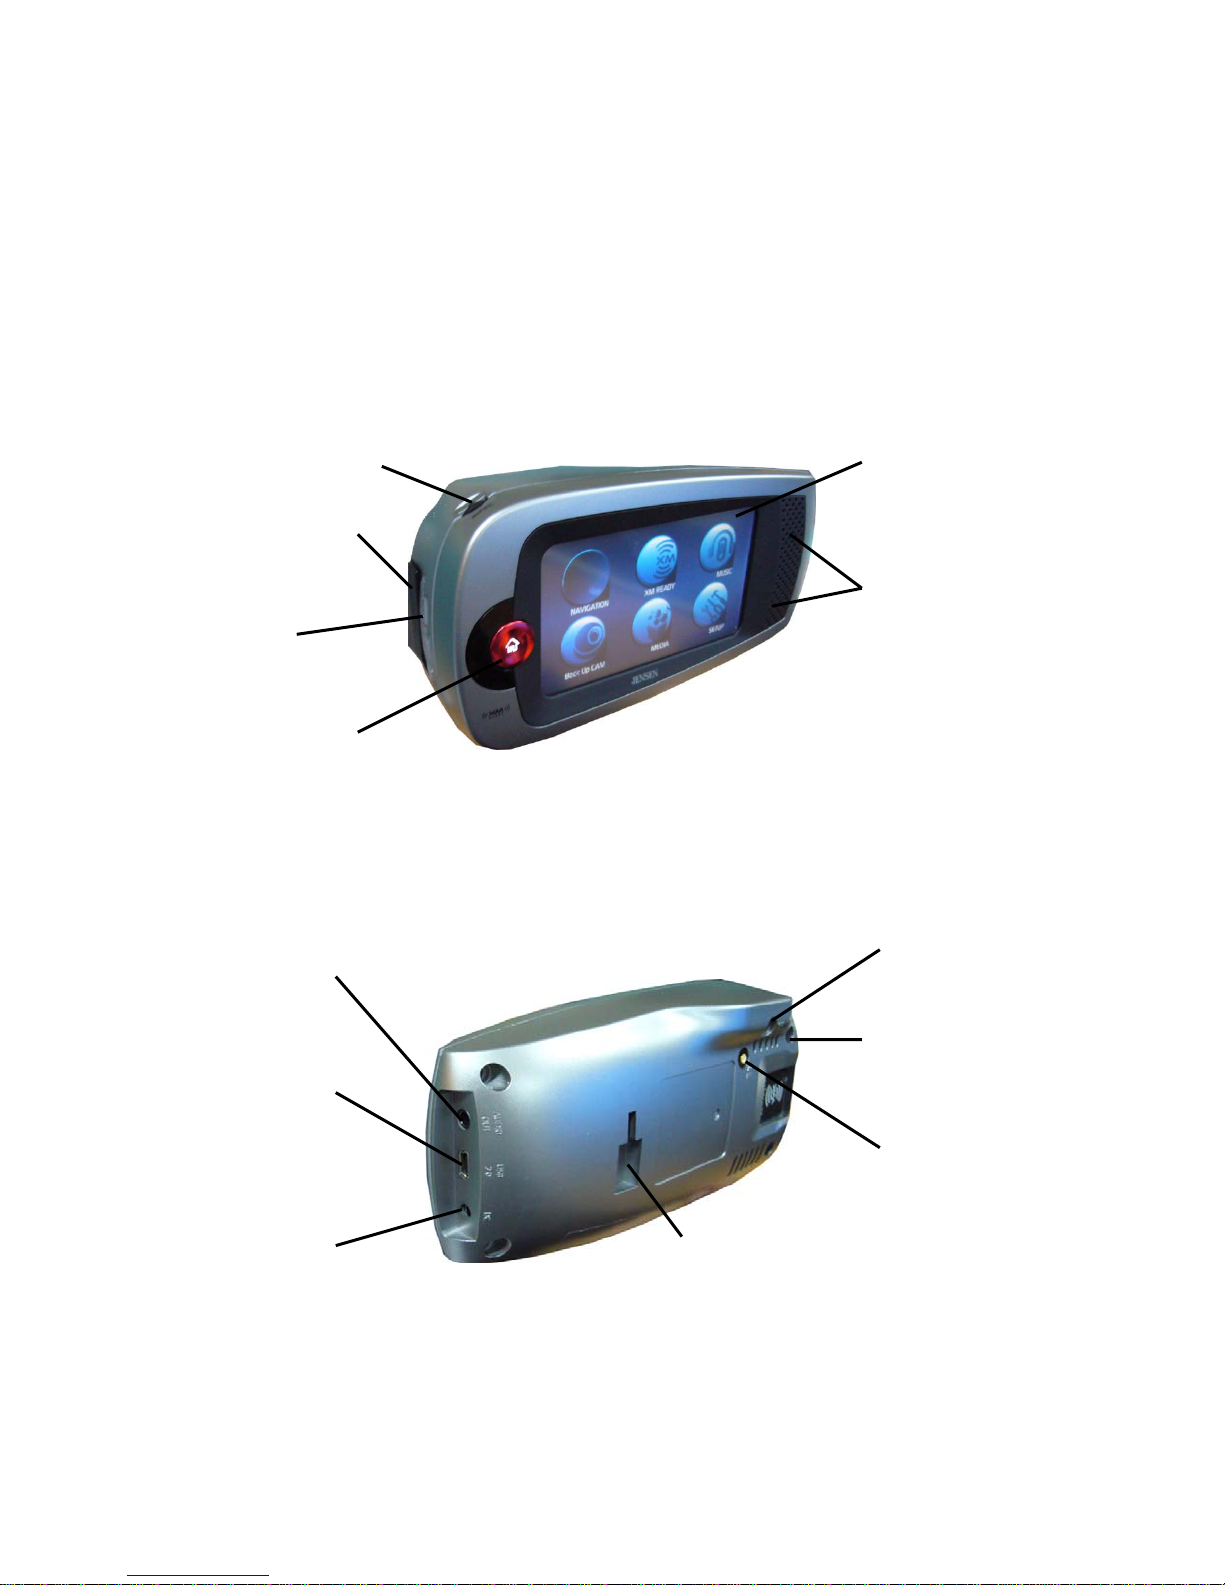
1. NVXM1000 Location of Controls, Indicators and
Connectors
The NVXM1000 provides a number of controls, indicators and connectors to facilitate user operation and
interconnection with external power, navigation, music and XM® inputs and outputs.
FRONT
Volume Up/Down
Control
XM Mini-Tuner
Slot
Liquid Crystal
Display (LCD) and
Touch Screen
SD Card
Slot
Home Button
(Main Menu)
Audio Output
Connector
(3.5mm)
USB 2.0 (Device)
Connector
(mini-usb)
Stereo Speakers
REAR
External GPS
Antenna
Connector (MCX)
Heat Vent
(Do Not Block)
XM® Antenna
Connector (SMB)
DC IN
Connector
(5 Vdc)
Figure 1A. NVXM1000 Controls, Indicators and Connectors
Suction Cup Locking
Slot (Connects to
Suction Head)
5
Page 7

BOTTOM
Power On/Off
Slide Switch
Input/Output Connector for
Optional Cradle Docking
Figure 1B. NVXM1000 Controls, Indicators and Connectors
Note: To prolong battery life, make sure the Power On/Off slide switch is in the Off position whenever
the unit is not in use or is being moved to another location or vehicle.
2. Operating Navigation with XM® Ready
Navigation with XM® Ready is designed for easy operation. Consistent with these criteria, a minimum of
hardware buttons is used on the NVXM1000; these consist of the Home button, Power On/Off slide switch
and the Volume control. The remaining controls are operated by touching the LCD screen to access
submenus pertaining to the various operating modes and their submenus and lists.
3. Getting Started
To initialize NVXM1000 operation, proceed as follows:
a. Connect the adapter power cord to a power source (home, car adapter); then plug the adapter
DC power connector into the DC connector on the right side of the unit.
b. If the XM® receiver is to be used, connect the XM antenna cable to the XM ANT connector on
the rear left side of the unit.
c. Adjust the tilt, angle and horizontal position of the unit to suit your personal preference.
Note: If the unit is being turned on for the first time, or after a prolonged period of not being
used, perform step d; otherwise, perform step e.
d. On the bottom of the unit, on the right side, position the power On/Off slide switch to the On
position to initially turn on the unit; the JENSEN logo appears on the screen for about 10
seconds, after which the operational modes default display appears.
6
Page 8

Figure 2. Jensen Logo at Power On
e. If the NVXM1000 was recently on and being used, and has been turned off (standby mode)
using the Home button (
unit and the operational modes default display appears.
), pressing the Home button for 2 seconds again turns on the
Figure 3. Operational Modes Default Display
4. Modes of Operation Default Display
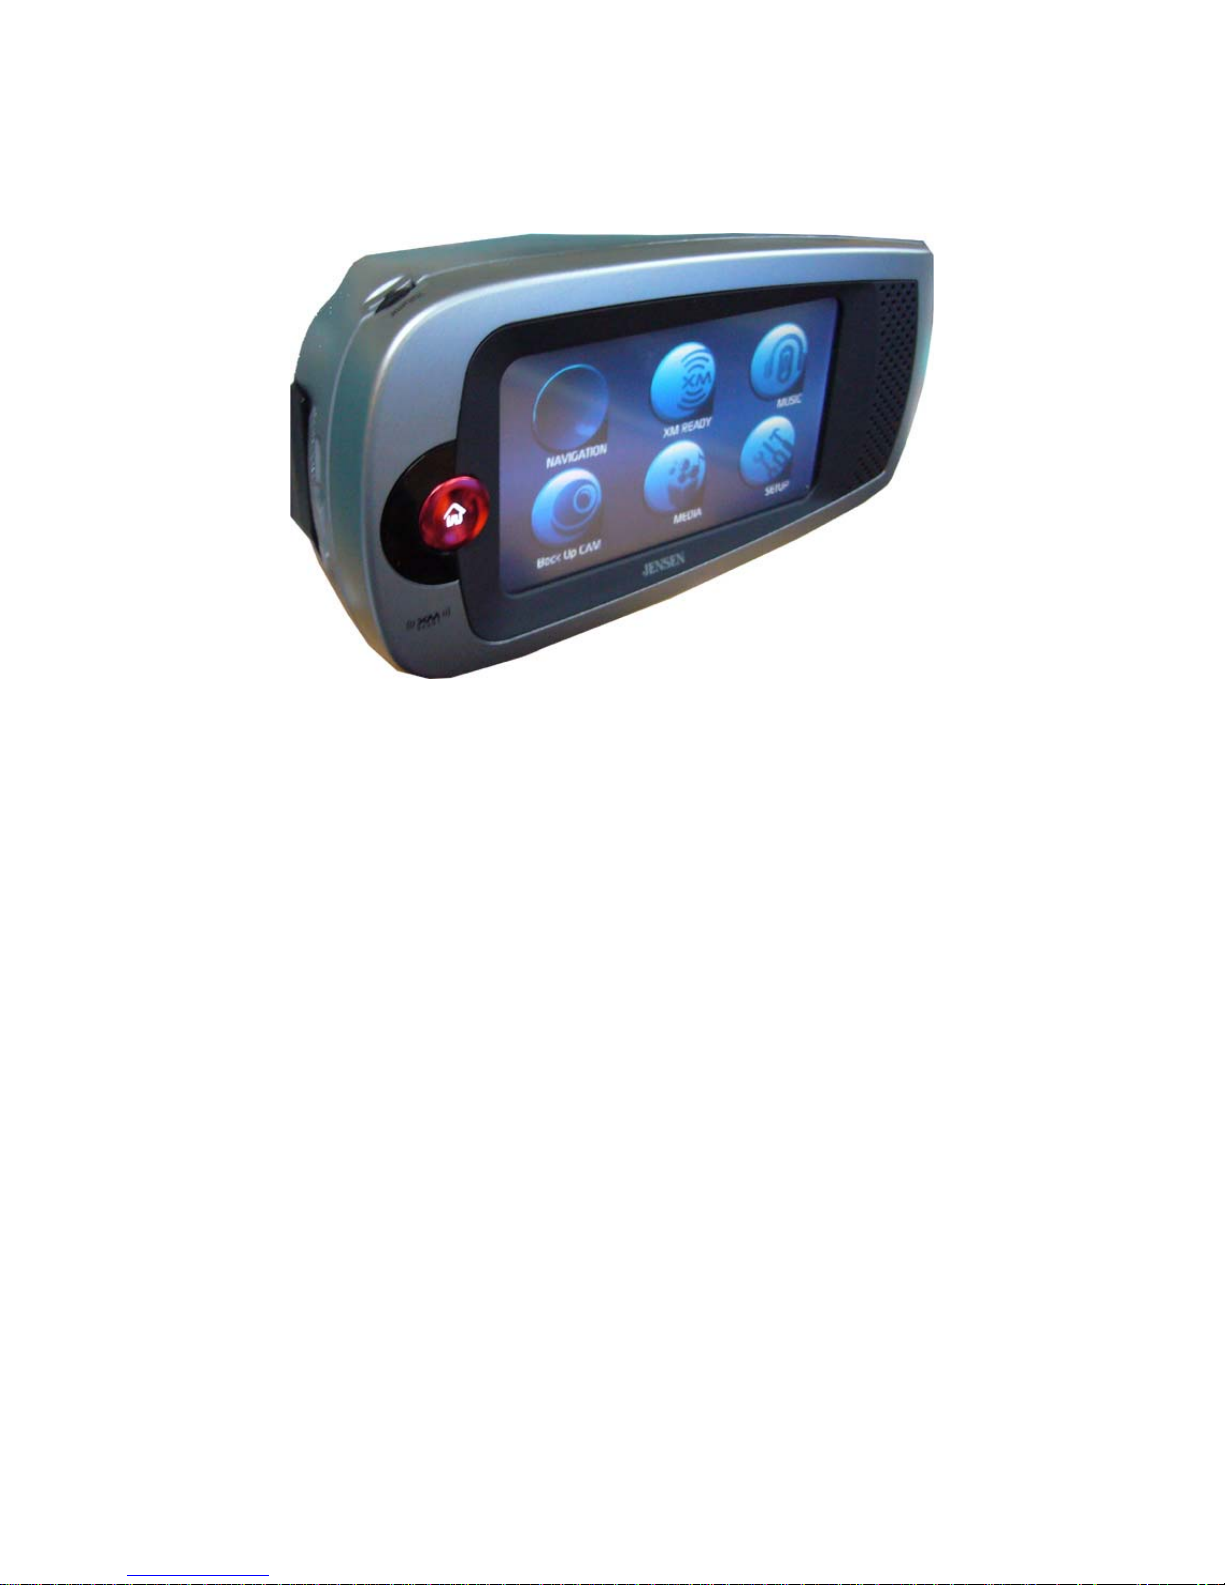
Note that the Operational Modes Default Display resembles a tool box containing six features for touchscreen selection; these features consist of:
a. NAVIGATION: Using GPS information and preprogrammed navigation information.
b. XM® READY: Using the Mini XM® Tuner, installed in the XM MINI TUNER slot on the
left side of the unit, with the external XM antenna attached.
7
Page 9
c. MUSIC: Play music stored on the internal hard drive or the external multi-media slot (SD)
on the left side of the unit.
d. Back Up Cam: Using an optional NVXM1000 cradle and back-up camera installed in the
vehicle, and a cable for camera-to-cradle interconnection.
Note: Requires a Reversing Image Camera.
e. MEDIA: Provides access to a preprogrammed store demonstration showing operation of
the NVXM1000 modes of operation, and also provides playback of photo show from
internal and external memory.
f. SETUP: Provides access to basic NVXM1000 parameters, such as display brightness,
audio level, etc.
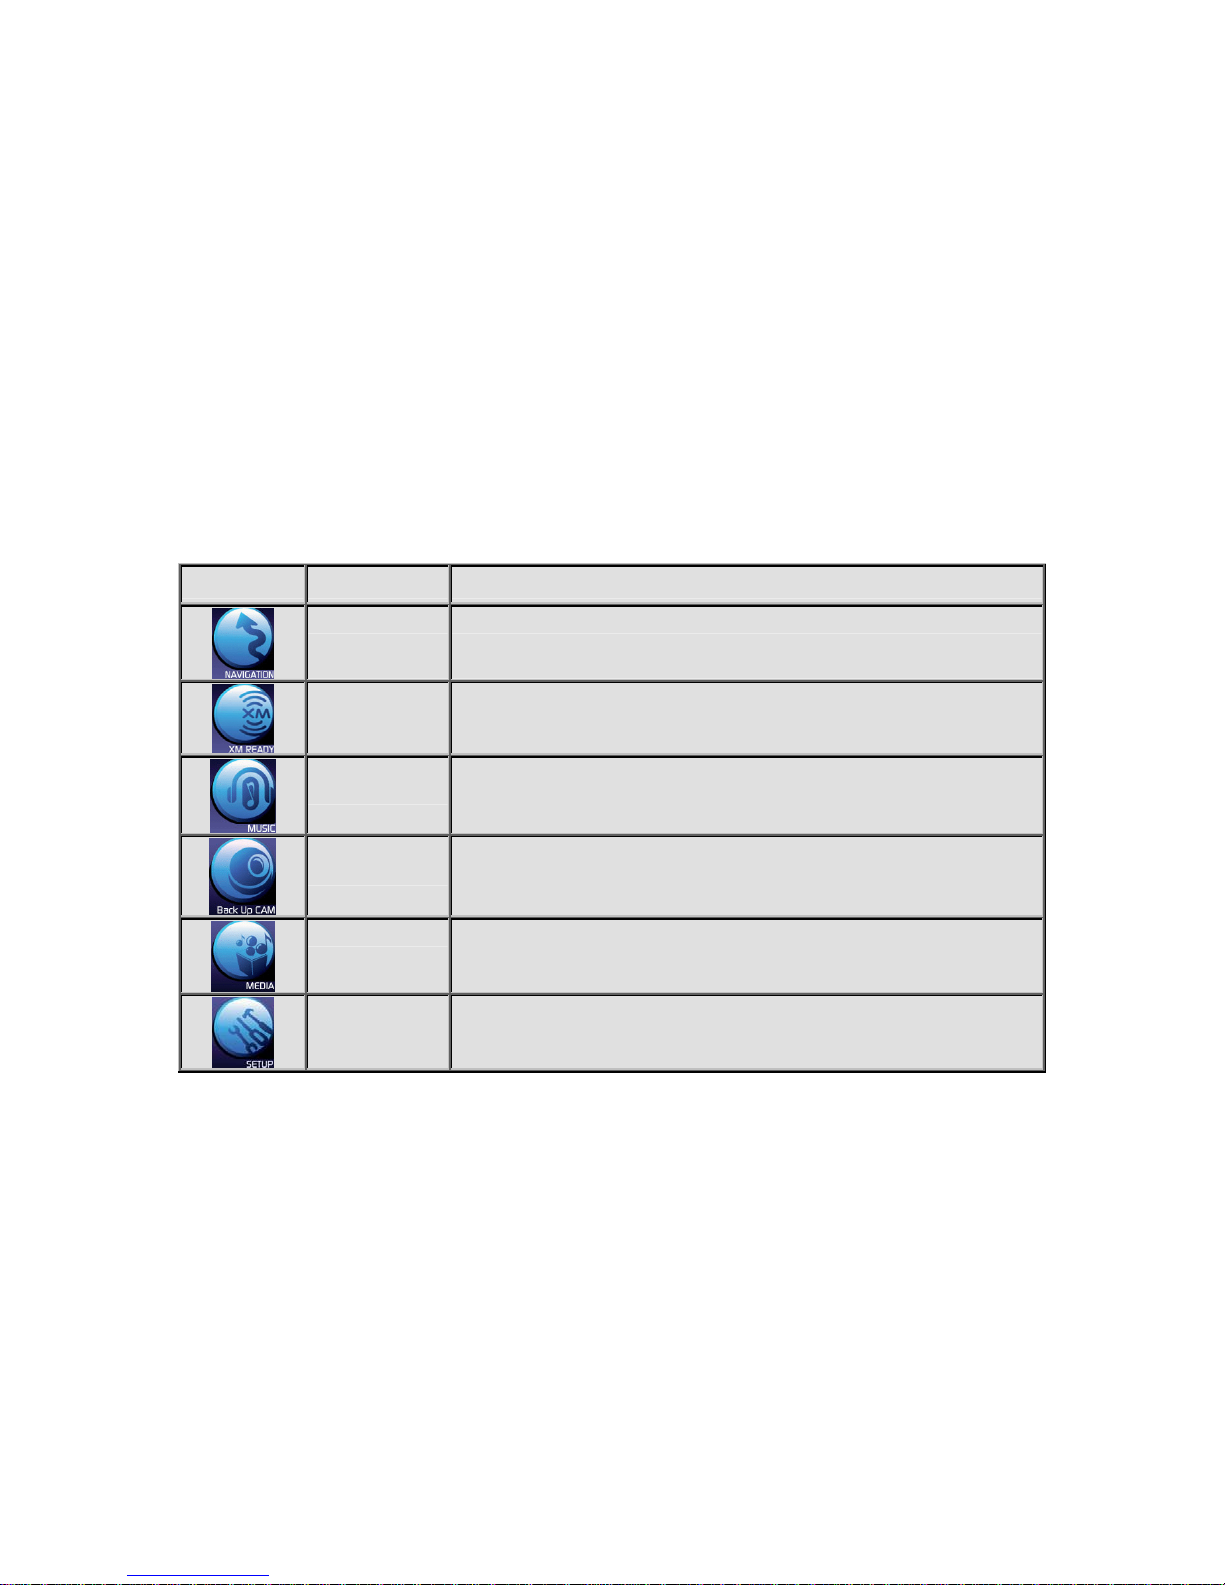
Table 1. Summary of Default Display Button Icon Functions
Icon Button Touch the Button Icon to…
NAVIGATION Initiate the Navigation mode using internal navigation and GPS information.
XM READY
Initiate XM® radio operation provided by the XM® Receiver inserted in the XM
MINI-TUNER card slot on the left side of the unit together with an external XM®
antenna.
MUSIC
Enable music listening capability contained on an external source, such as the
hard drive of the unit, together with the external multi-media slot.
Back Up CAM
MEDIA
SETUP
Launch back-up camera mode when unit is mounted on an optional cradle, and
a Back-Up Camera is installed, together with a camera-to-cradle interconnecting
cable.
Provide access to two stored demonstration programs—NVXM1000 operational
modes and photo/slide-show capability. External photo inputs in JPEG or BMP
format can be displayed using internal HDD or multi-media slot.
Provide access to configuration options, such as display brightness, audio level,
etc.
5. Implementing NVXM1000 Modes of Operation
The following sections present a description of each of the NVXM1000 operational modes and include
interconnect data when applicable.
A. Navigation Mode
To enable the Navigation mode of the NVXM1000, perform the following steps:
1. Turn on power to the unit.
8
Page 10
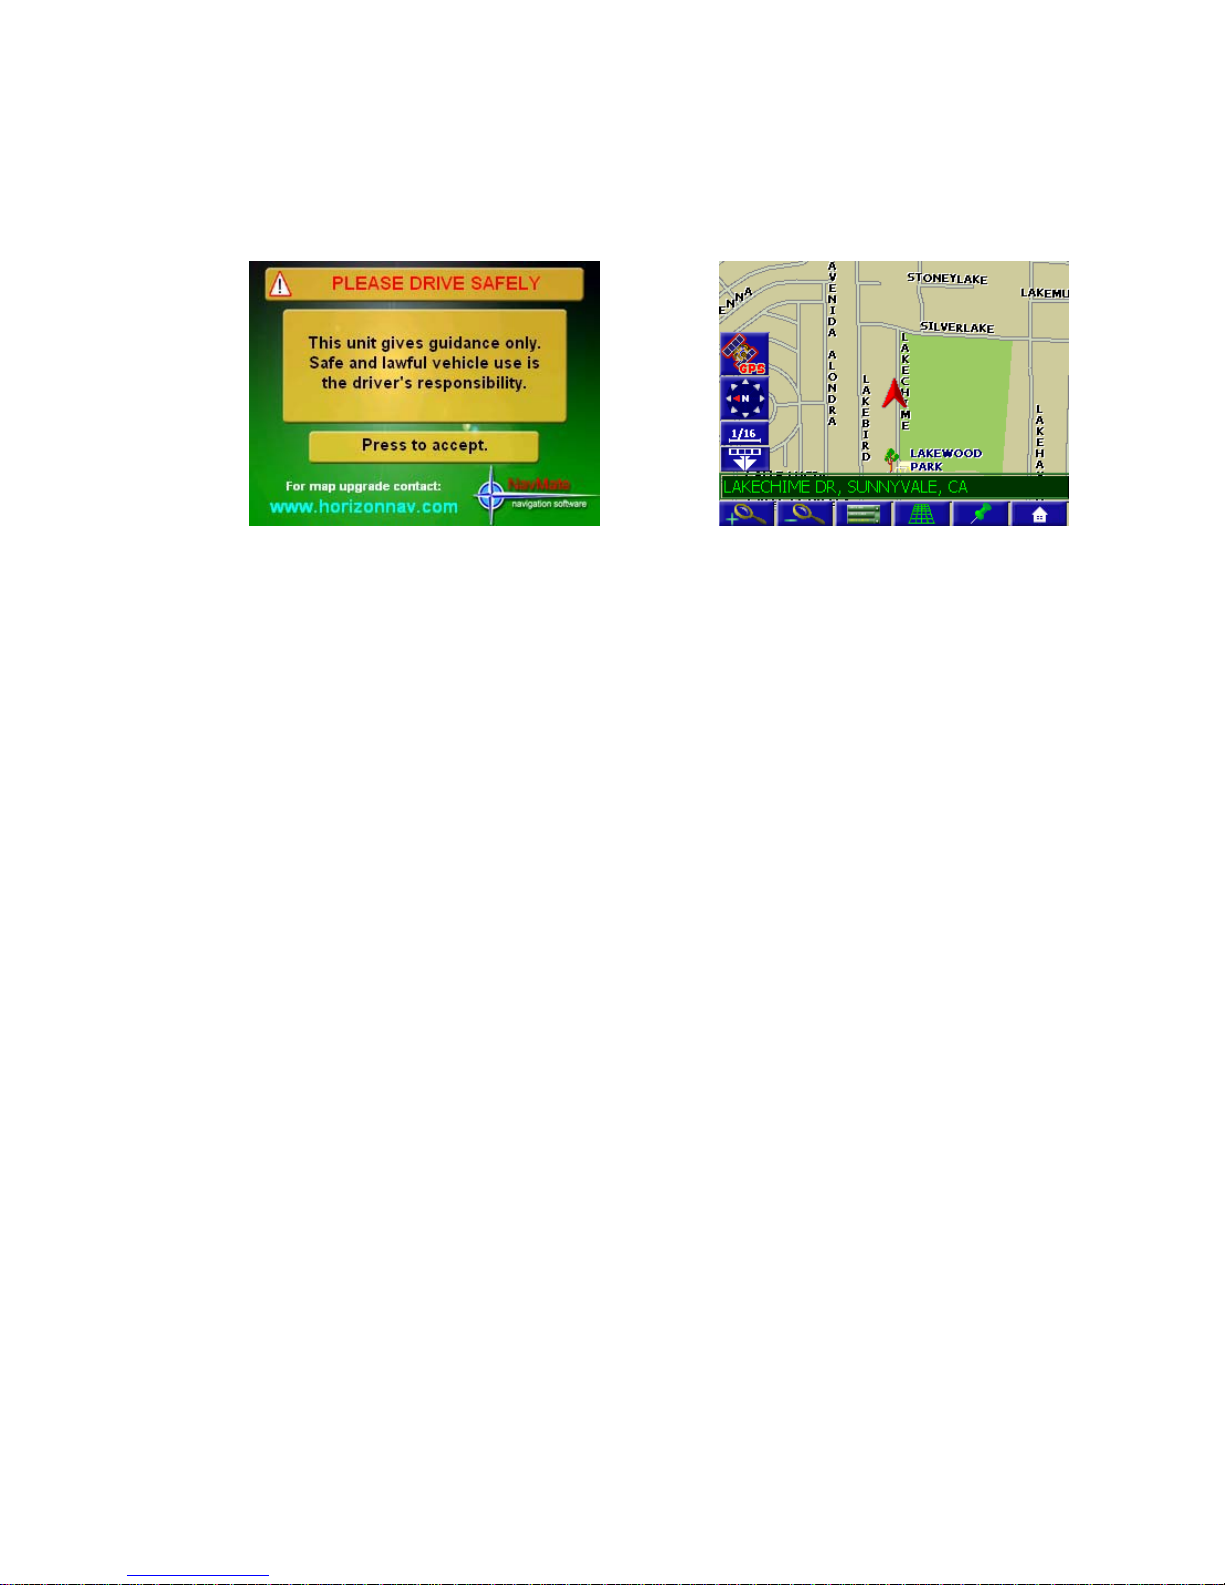
2. When the operational modes default display appears, press the NAVIGATION icon on
the LCD touch screen. A navigation warning screen will appear on the display followed
by the Main Map Screen.
Figure 4. Navigation Mode Warning and Main Map Screens
3. Refer to NavMate Navigation Software User Manual, 128-7837, for a detailed
description of navigation mode operation using the NVXM1000.
B. XM Ready Mode
1. Hardware and Subscription
To listen to XM satellite radio on the NVXM1000, the following optional items are
required:
• XM Mini-Tuner
• XM antenna installed in your vehicle.
• A subscription to XM® Satellite Radio.
2. Equipment Setup
Perform the following steps to prepare the NVXM1000 for XM® Radio operation:
a. Insert the Tuner into the Mini-XM Tuner slot at the left side of the unit; make sure
the connectors mate easily and firmly without binding. If no tuner is installed, the
following message appears on the display:
9
Page 11
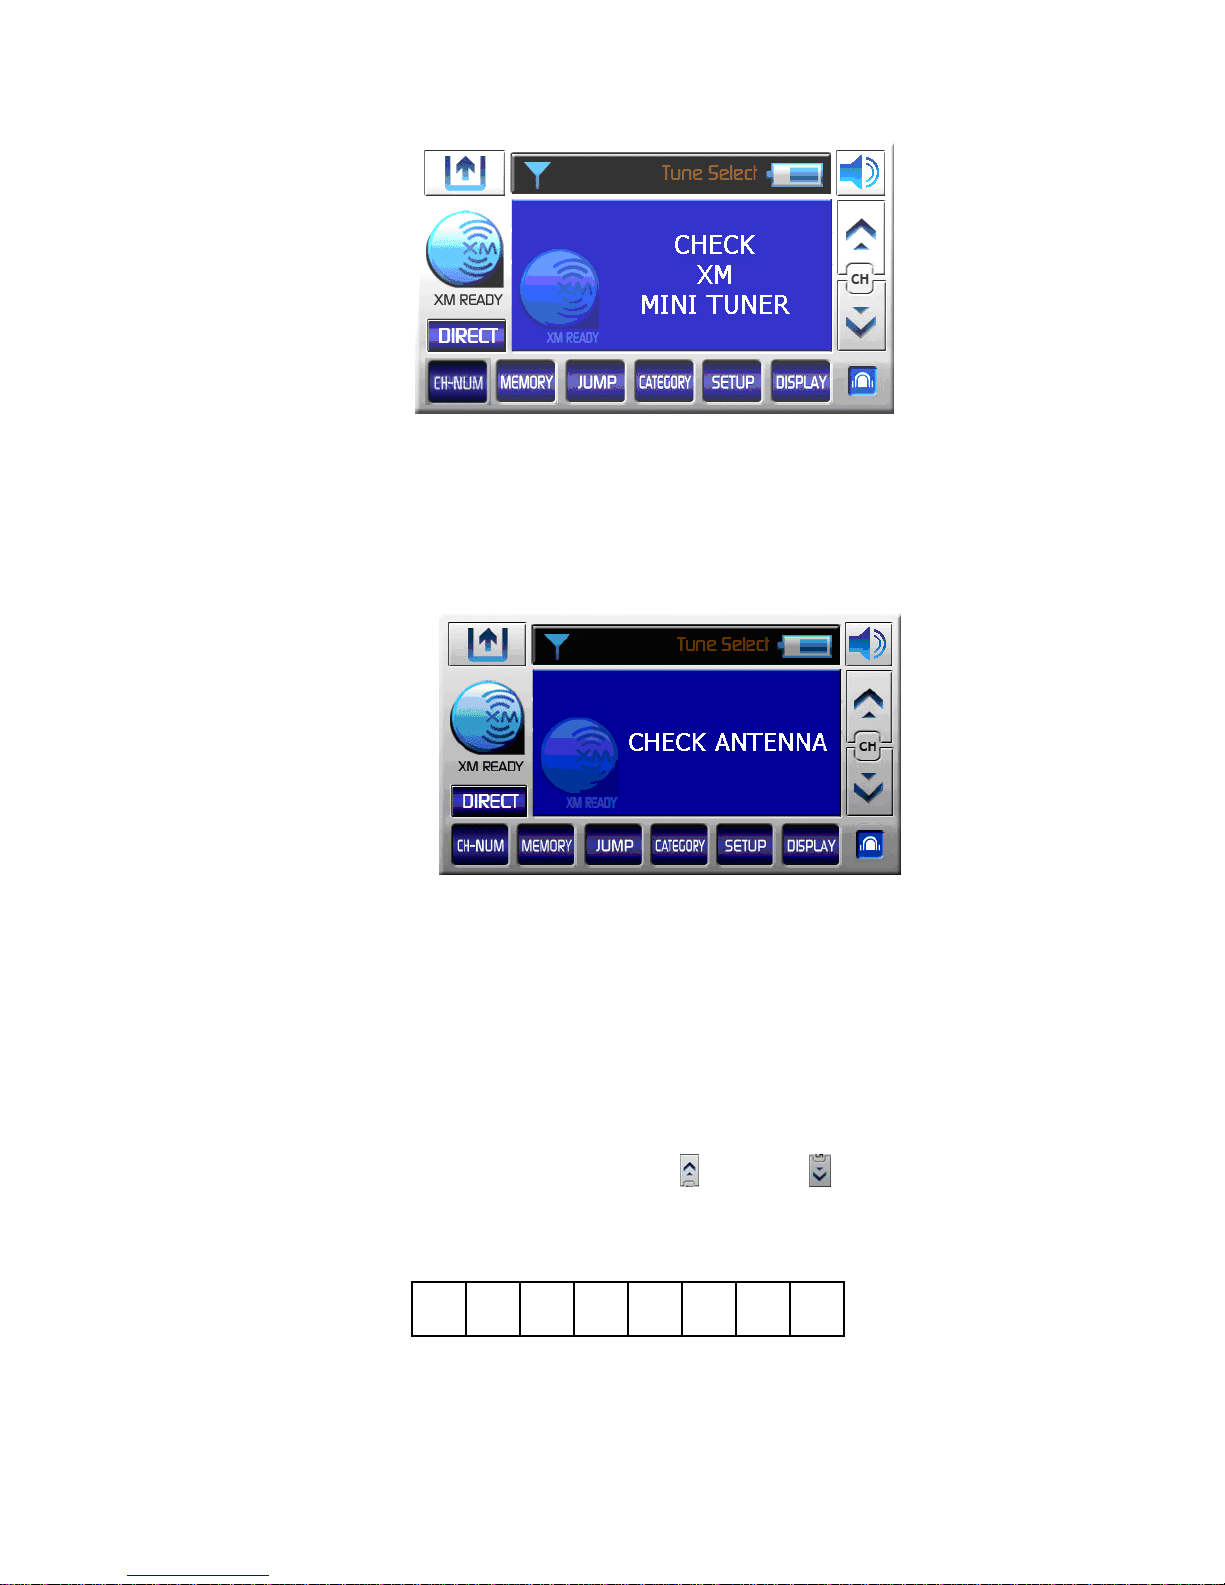
Figure 5. Check XM Mini-Tuner Warning Display Message
b. Plug the external XM antenna cable into the XM ANT jack at the rear of the unit
and set the Power On/Off slide switch to the On position. If the antenna is faulty
or improperly connected, the following message appears on the display:
Figure 6. Check Antenna Warning Display Message
3. Note Your ID Number
a. When the operational modes default display appears, press the XM READY
toolbox button on the LCD touch screen; the XM READY logo appears for 10
seconds, followed by the XM default screen.
b. Select Channel 0 using the CH Up ( ) or Down ( ) buttons on the touch
screen. The XM Mini tuner’s eight-digit XM Satellite Radio ID number will appear
on the display. Write the number here:
4. Activate Your Satellite Radio Service
10
Page 12

Figure 7. Channel 0 Eight-Digit Satellite Radio ID Number
5. Online Activation Process
Once the ID code is obtained, log on to XM® at
the easy instructions to activate your Mini XM® Tuner unit.
6. Call-in Activation Process
Call XM® at 1-800-XM RADIO (1-800-967-2346). One of XM®’s friendly Customer
Care representatives will take the necessary information and walk you through the
activation process. After the activation form is submitted you should keep your receiver
ON for at least 1 hour. This will complete the activation process. When the Mini XM®
Tuner unit is activated, you will be able to access over 170 digital radio channels.
XM Ready Default Display Screen
While tuned to an XM channel, the NVXM1000 XM default display contains information
about that channel as shown below.
http://activate.xmradio.com and follow
11
Page 13
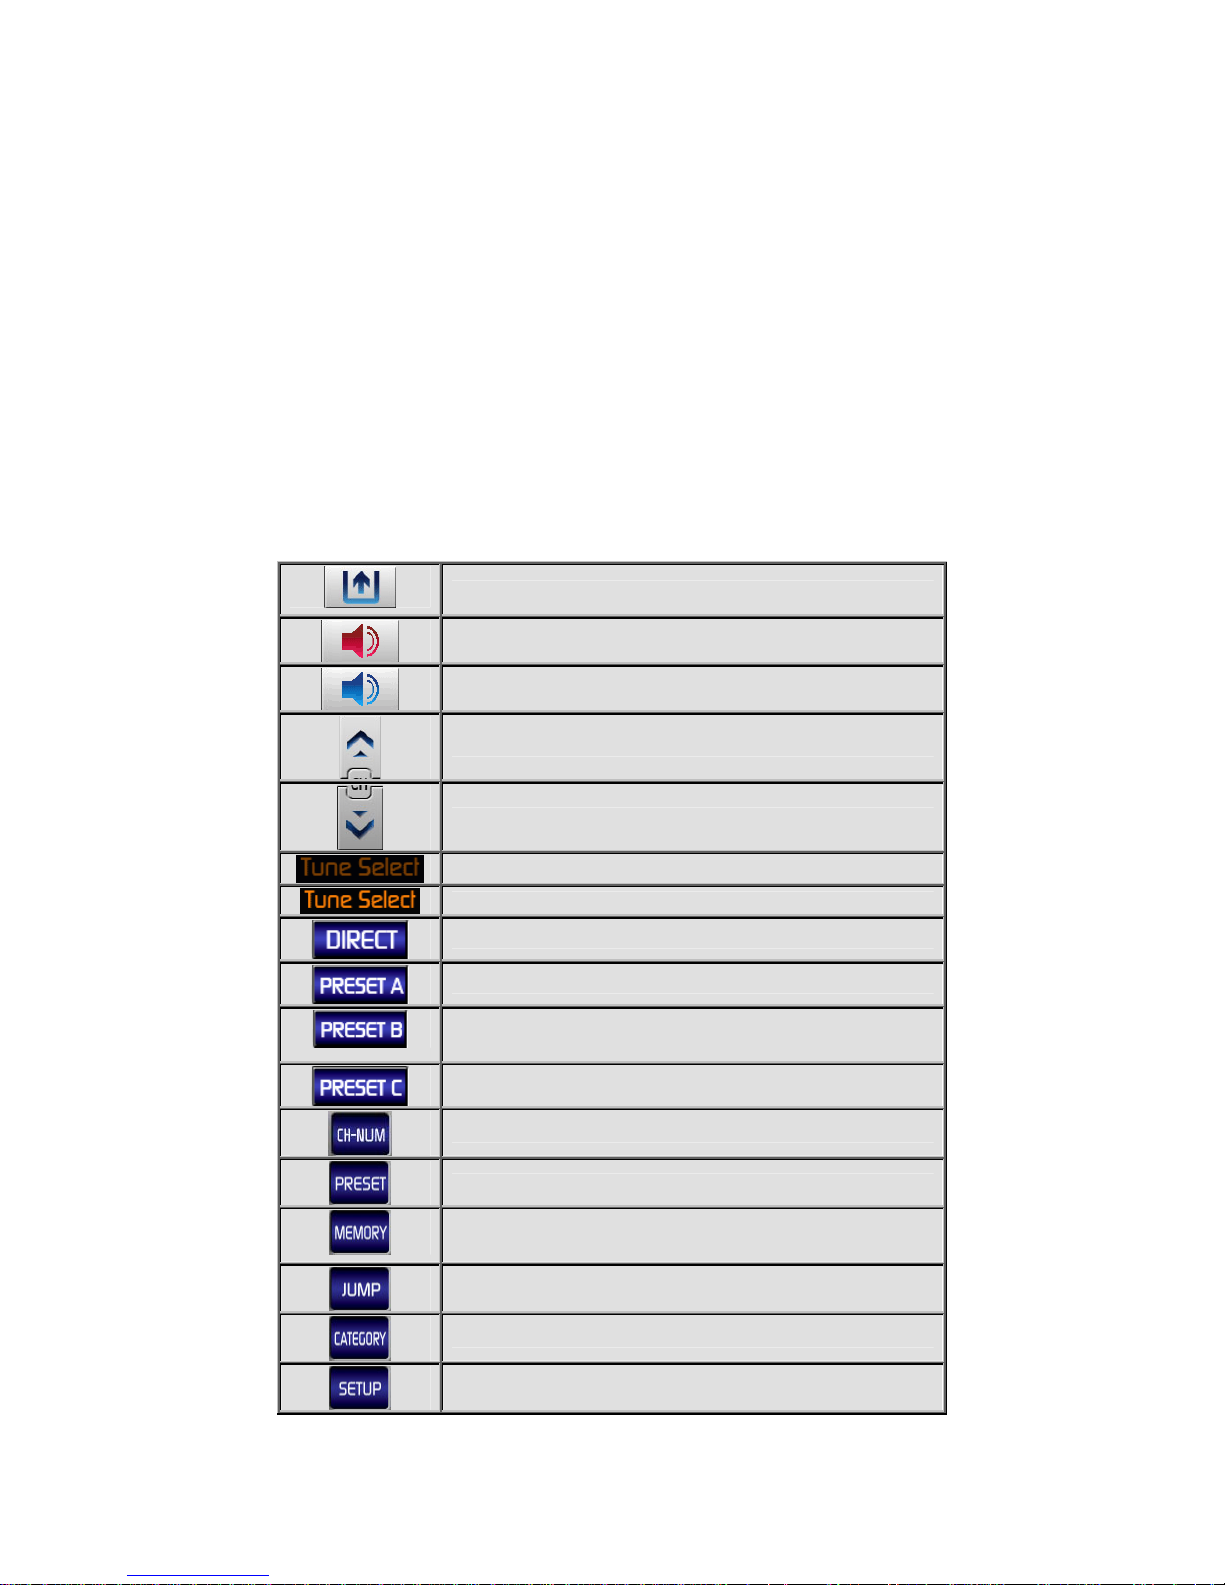
Figure 8. Typical XM Channel Default Display Screen
Note: Initial activation may require up to 15 minutes to download the XM
channel list to the NVXM1000.
Table 2. XM Default Display Function Buttons
Return to Operational Modes Default Display .
Mute On (Red)
Mute Off (Blue)
Tune to Next Higher Channel & Preset A/B/C
Tune to Next Lower Channel & Preset A/B/C
Disable Tune Select
Enable Tune Select (Orange)
Direct Channel Tune Input via CH-NUM Entry or CH Up/Down
Select Preset A (A0-9)
Select Preset B (B0-9)
Select Preset C (C0-9)
Channel Number Direct Entry via Kepad
Preset setting
Enter Current Channel Into Memory
Jump to Previous Channel
Display Category List
Display User Menu List Window
12
Page 14

Display Mode change
Return to Main Setup Menu (Set up FM Transmitter, etc.)
Channel Up/Down Buttons
The CH
option menus available on the unit. In the default mode, these buttons provide sequential
tuning through the available program channels. The Up (
up one channel, while the Down (
Each button, when pressed and held for approximately 2 seconds, tunes up or down at an
accelerated rate. When in the list or menu mode, pressing CH
respectively, through the various menus and lists.
/ buttons are the primary controls for navigating through the various lists and
Preset and Tune Select Functions
a. Preset Function
There are three banks of favorite memory locations, or presets, offering a total of
30 preferred channels. These banks are designated A, B and C and can be
selected using the DIRECT, PRESET A, PRESET B, PRESET C button in the
lower left corner to show the corresponding preset bank. Each bank will store 10
user-preferred channels.
b. Tune Select Function
Select “Tune Select” on the upper portion of the screen. When the “Tune Select”
icon is orange, “Tune Select” is enabled; when “Tune Select” is a darker color, it
is disabled. If you wish to save the current song as a favorite for later recall, press
the MEMORY button. A memory pop-up screen appears (Figure 9) indicating the
number of memory locations remaining and the artist and song title of the
currently saved entry. This feature allows you to capture and store the current
program data information (Channel Name & Number/ Artist & Song Title). You
can store up to 30 Artist/Song Title combinations. The NVXM1000 also has the
capability to search the current incoming XM signal, and thereby alert you if it
matches the Artist/Song title stored in NVXM1000 memory, or becomes available
on any other channel. Figure 10 shows a pop-up screen of one of your saved
songs/artists. Press ”Yes” to go to the song. Press ”No” to remove the pop-up
screen.The screen will disappear after 10-15 seconds with no user action.
) button, when pressed, tunes
) button, when pressed, tunes down one channel.
/ scrolls up and down,
13
Page 15

Figure 9. Saving a Favorite Artist / Song in Memory
Figure 10. Recalling a Saved Artist / Song Title from Memory
Preset
1. Preset Banks A, B and C, and Direct Button
To preset favorite channels into memory, you can use the preset functions consisting of
the preset bank (Preset A, Preset B, Preset C) and the ” PRESET” button.
2. Entering Channels Into a Preset Bank
To enter a channel into a specific preset bank:
a. Toggle the
bank.
b. Press the PRESET button just below the preset bank button; the following
preset display appears (Figure 12).
c. Select a number 0-9.
d. Press the SET button to store the currently playing channel into the current
preset bank.
, , or button to choose the desired preset
14
Page 16

Figure 12. Preset Display For Storing a Desired Channel
c. Recalling a Channel From a Preset Bank
To recall a channel from a preset bank:
1. Toggle the
bank.
2. Press the PRESET button just below the preset bank button; the preset channel
appears on the display as shown above.
3. Pressing any of the number buttons (0-9) will recall the stored channel.
4. Press the SELECT button to recall the preset channel, which then begins to play.
d. Direct Channel Number Entry
To enter a channel using the direct method:
1. Toggle the
2. Press CH-NUM button; the direct entry keypad appears on the display.
3. Enter the desired channel number using the keypad and then press ENTER.
4. When the channel number has been entered, the selected channel automatically
display.
plays.
, , or button to choose the desired preset
, or button until appears on the default
Figure 11. Direct Method Display For Channel Selection
15
Page 17

Table 3. Preset Mode Function Button Summary
~
Jump Button
The JUMP button, when pressed, allows you to immediately return to the previous channel, or
alternately jump between the previous and current channel.
Category Button
The CATEGORY button, when pressed, allows you to advance through the channel groups based
on content category. When the desired category is chosen, you can then page up or down
through the channel list within that category by pressing the Channel Up/Down buttons. Once a
choice has been made (highlighted), channel selection is accomplished by pressing the touch
screen. In addition, pressing the DISPLAY button allows you to display the performing artist on the
highlighted channel within the category, prior to channel selection.
Exit preset mode
Keypad buttons
Store preset channel numbers
Recalling preset channel numbers into memory
Figure 12. Category List Display
Setup Button
When the SETUP button is pressed on the XM default display, the following setup display appears
with four sub-menu choices:
16
Page 18

Figure 13. XM Setup Display
A description of the setup choices is presented in Table 4.
Table 4. XM Setup Button Functions
Exit Setup Mode
Display Antenna Aiming
Display Channel Add/Skip
Display Tune Select
Display Data Service
1. Antenna Aiming Display.
Upon entering this mode, two vertical bar graphs are displayed representing terrestrial
(tower) and satellite transmitters. The signal strength is displayed by the respective graph
segments. Position the antenna to optimize either the satellite or terrestrial signal. The
current setting is indicated by the number of bars in the graph. Moving the antenna location
should maximize the number of bars in the respective graph, thus ensuring optimum
reception. To exit this function, press the exit Button.
Figure 14. Antenna Aiming Display
Note: Terrestrial repeaters are typically used in large urban areas where structures may
affect the line of sight satellite signal. Terrestrial signals may not be available in
your geographic location.
2. Tune Select Display
17
Page 19

Upon entering this mode, you may clear all 30 memory locations (erase all), or just specific
memory locations (erase some) can be cleared. The following adjustment options are
possible:
Figure 15. Tune Select Display
a. Clear all Memory Locations. Press the Erase All button; a prompt display screen
appears confirming Please Confirm Your Selection? Press the Yes or No button as
desired.
Figure 16. Confirm Erase Selection Display
b. Clear Some Memory Locations. Press the Erase Some button; a prompt display
appears with a list of saved artist/song title entries. Touch the entry you wish to erase;
the confirm erase selection display appears. Press the Yes or No button as desired.
c. Select Clear by Artist, Clear by Song Title, or Clear by Artist/Song Title. To
select one of these three erase options, press the Select By Artist/Song Title button
on the Tune Select display; the current option is replaced by Select By Artist. Press
this button again, and this option is replaced by Select By Song Title. Thus, the three
options are selected in a wrap-around configuration as shown below.
Figure 17. Memory List Display
18
Page 20

Figure 18. Selecting Clear by Artist, Song Title or Both
3. Channel Add/Skip Display
When the Channel Add/Skip button is pressed on the setup display, a channel list is
displayed with the current channel highlighted. Use the channel up/down buttons to
navigate through the list. Once a channel has been selected, touch the item; when the item
is pressed, its color changes from white to gray on the display and thus prevents the
channel from being accessed during any of the tuning modes. Skipped channels can only
be accessed either through direct channel number entry or by returning to this menu and
repeating the same process to return the skipped channel to the list. Upon adding a
channel, the check mark is removed from alongside the channel number/name.
Figure 19. Channel List Add/Skip Display
4. Data Service
When the Data Service button is pressed on the XM Ready Setup display, the Data Service
screen appears and offers two information options for your use; namely, Stock and Info
Extra.
Figure 20. Data Service Display
19
Page 21

Table 5. Summary of Data Service Sub-Modes
Display Info Extra Service control window
Exit Data Service mode
Display Stock Service control window
a. Stock Service Operation
When the Stock button is pressed, Stock On/Off, Add Stock, Erase All and Erase
Some options are displayed for information and control:
Figure 21. Data Service Stock Options Display
A summary of available stock operational modes is presented in Table 6.
Table 6. Summary of Stock Operation Modes
1) Stock On/Off – Pressing this button toggles between the Stock On and
Stock Off options. In the On state, stocks can be observed scrolling rightto-left at the bottom of the main XM Ready display, provided the display
presentation is set to this mode. In the Off state, no stock ticker is
displayed.
Exit Stock Mode and Return to Previous Menu
Stock On Enable
Stock Off Enable
Add Stock List
Erase All Present Stock Entries
Erase Some Present Stock Entries
20
Page 22

Figure 22. Scrolling Stock Information Display
2) Add Stock – Pressing this button enables the Data Service Add Stock
display as shown in Figure 22; Table 7 explains the control buttons on
this display.
Figure 23. Add Stock Display
Table 7. Summary of Add Stock Control Buttons
Next character entry
Exit Stock Add mode
Spelling scroll up
Spelling scroll down
Previous character entry
List page up
List page down
3) Add Selected Stock – When the add stock entry button is pressed, the
Stored pop-up window appears for 2 seconds and reverts to the Add
Stock disiplay; if the same stock has been stored previously, the Already
Stored pop-up window appears for 2 seconds. If the stock memory is full,
the Stock Full pop-up screen appears for 2 seconds.
21
Page 23

Figure 24. Stored, Already Stored and Stock Full Pop-Up Windows
4) Erase All/Erase Some Stock Entries – When the Erase All button is
pressed on the Data Service menu, a pop-up window appears on the
display asking Please Confirm Your Selection. In the case of erase all,
when Yes is pressed, all stock entries are erased and the display reverts
to the Add Stock display. In the case of erase some, a list of saved stock
entries appears with the first entry highlighted. You can scroll down
through the list to select which entry you wisn to erase. Press this
highlighted entry and the stock disappears from the list. Repeat this
process to delete each entry from the list as desired.
Figure 25. Erase All Confirm Pop-Up Window
Figure 26. Erase So me Pop-Up List and Confirm Pop-Up Display Windows
b. Info Extra Operations
22
Page 24

When the Info Extra button is pressed, Info Extra On/Off, and Select options are
displayed for information and control:
Figure 27. Data Service Info Extra Display
A summary of available Info Extra operational modes is presented in Table 7.
Table 7. Summary of Info Extra Control Buttons
Exit Info Extra mode
Info Extra ON
1) Info Extra On/Off – Pressing this button toggles between the Info Extra
On and Info Extra Off options. In the On state, sports information can be
observed scrolling right-to-left at the bottom of the main XM Ready
display, provided the display presentation is set to this mode. In the Off
state, no sports information is displayed.
Info Extra OFF
Select info Extra
23
Page 25

Figure 28. Scrolling Sports Information Display
2) Info Extra Select – When this button is pressed, Sports appears on the
Data Service Info Extra display; pressing the Sports button results in a
listing of sports venues such as Major League Baseball (MLB), National
Football League (NFL), etc. When the desired sports venue button is
pressed, such as MLB, the following display screen appears:
Figure 29. Typical Sports Venue Display Screen
By pressing the Team name, a + sign appears to the left of the name;
otherwise, a minus sign is displayed. Information about the team, such as
schedule, scores, etc., now appears on the XM Ready scrolling display.
5. Display Button
The DISPLAY button allows the user to choose one of several ways of presenting the Artist, Song Title
and data service information on the LCD screen.
6. XM Ready and Navigation Dual Operation
It is possible to simultaneously listen to XM radio while operating in the navigation mode on the
NVXM1000. To accomplish dual operation, proceed as follows:
a. Initiate the Navigation mode of operation following the previous instructions in this manual.
b. Return to the modes of operation default display using the Home button (
screen (Nav), or the home button on the front of the unit.
c. Press the XM Ready button on the modes of operation default display.
) on the display
24
Page 26

d. The dual modes display appears as shown in Figure 30. In this operational environment, both
modes --- Navigation and XM Ready --- are fully operational. The same is true for the Music and
Navigation dual operating modes.
Figure 30. Navigation and XM Ready Dual Operating Modes Display
Table 8. summarizes the control button functions on the Navigation/XM Ready dual display.
Table 8. Navigation/XM Ready Dual Operating Mode Control Buttons
Display XM Ready Music Default Mode
Next XM Channel & Preset A/B/C
Previous XM Channel & Preset A/B/C
XM Ready Mode Done
Channel Direct, Preset A/B/C Setting
D=Direct, A=Preset A, B=Preset B, C=Preset C
Display Current Channel Number
Note: When curret channel number is ”RED”, there is no XM signal.
C. Music Mode
The Music Mode is initiated from the Operational Modes Default Display by pressing the
Music button. When this occurs, the following typical display appears:
25
Page 27

Figure 31. Music Mode Default Display
Table 9 summarizes the control button functions on the Music mode display.
Table 9. Music Mode Control Button Functions
Play Present Song Being Loaded
Play Previous Song
Play Next Song
Pause Current Song
Stop Current Song
Display Main Setup Menu (FM Transmitter, etc.)
Display Folder Lst
Randomly Play All Songs Within HDD or SD
Normal Play Sequence
Repeat Play Present Song
26
Page 28

Repeat Play Present Folder
Repeat Play All Songs Within HDD or SD
Display All Current Files in SD Memory
Display All Current Files in HDD Memory.
Return to Main Menu
Display Previous List Within Current Folder
Display Next List Within Current Folder
Select Highlighted File
a. Playing Music
You can play music stored on the NVXM1000 hard disk (HDD), or from an SD card.
1. If music is stored on a personal computer, insert the USB connector directly into
the USB port on the right side of the unit, and the other end into an available
USB port on your PC.
2. The PC will auto-detect the NVXM1000 and install the USB drivers
automatically.
3. Brouse your local PC HDD, and search for the newly created HDD; usually the
F: Drive.
4. Open the new drive letter and copy and post the music from your local PC to
the F:/Music folder. If no music folder is present, you can create a folder called
”Music”. (See page 38 for more detail.)
5. Disconnect the unit from the PC once the MP3 music is copied.
6. Turn on the unit and press the MUSIC button; a list of songs appears on the
display with the first (top) song currently playing.
7. To change the song, press the title of a different song in the list.
To play a song stored on SD Memory, press the SD/HDD button; a list of songs
appears on the display with the first song currently playing.
Figure 32 depicts a typical hard Drive Disc (HDD) Display.
27
Page 29

Figure 32. Music Mode Typical HDD List Display
b. Music and Navigation Du al Display
It is possible to simultaneously listen to music while operating in the navigation mode on
the NVXM1000. To accomplish dual operation, proceed as follows:
1. Initiate the Navigation or Music mode following the previous instructions in this
manual.
2. Return to the modes of operation default display using the Home button (
the display screen (Nav), or the home button on the front of the unit.
3. Press the Music or Navigation button on the main menu.
4. The dual modes display appears as shown in Figure 33. In this operational
environment, both modes --- Navigation and Music --- are fully operational.
) on
Figure 33. Navigation and Music Dual Operating Modes Display
Table 10 summarizes the control button functions on the Navigation/Music dual display.
Table 10. Navigation/Music Dual Operating Mode Control Buttons
28
Page 30

Display Music Default Mode
D. Back Up CAM Mode (Optional Cradle Required) Available Late 2007
The NVXM1000 can be used in the back-up camera mode provided all the necessary
equipment and interconnections have been satisified.
1. Getting Started
To view the Back up camera screen two things are required in addition to your
NVXM1000:
• Optional NVXM1000 Cradle & Back up camera (reversed) installed in your
vehicle (Recommend CCDLFR camera).
• Interconnecting cable from the Back up camera to the NVXM1000 Camera
Cradle
2. Back-Up View
To operate the Backup camera, press the Back Up CAM icon on the operational modes
display.The rear camera back-up mode is activated automatically whenever the vehicle
shift is placed in reverse.
Figure 34 depicts a typicay back-up camera display, while Table 11 describes the
control button functions.
Play Previous Song
Pause Current Song
Music Mode Close
Play Next Song
Display Current Folder List
Figure 34. Typical Back-Up Camera Display
29
Page 31

Table 11. Back-Up Camera Operating Mode Control Button Functions
Quit and Exit Back up mode
Mute ON
Mute OFF
Display full screen
E. Media Mode
The Media mode is accessed when the Media button is pressed on the Operational Modes
display. This mode provides two options related to media functions; namely, STORE DEMO and
PHOTO.
Figure 35. Media Display
Table 12 describes the control button functions on this display.
Table 12. Media Display Control Button Functions
1. Store Demo – Enter STORE DEMO to obtain a slideshow of how to operate the
NVXM1000.
Quit Media and
Return to Main Menu
Operate Video Demo Mode
Operate Photo Mode
30
Page 32

2. Photo Mode – The photo mode is initiated when the PHOTO button is pressed. This
mode supports JPEG and BMP formats. Photo inputs can be accomplished using an
Quit Photo Mode and
Return to Media Default Display
Mute ON
Mute OFF
DisplayFull Screen and Slide Mode
Display Full Screen
SD card containing digital camera images, or by using an external USB input from a
computer hard drive, and copy the files to the NVXM1000. (Similar operation to music
download explained in the Music Mode previously.) Figure 36 illustrates a typical pnoto
display, while Table 13 summarizes the button functions.
Display Previous Image
Display Next Image
Display Image File List
Figure 36. Typical Photo View Display
Table 13. Summary of Photo Mode Button Functions
31
Page 33

Figure 37. Full Screen and Slide Mode Display
F. SETUP MODE
Prior to operating the NVXM1000 and implementing the various modes available to you,
you may wish to configure the unit to your personal preferences. To accomplish this goal,
you must enter the SETUP mode, which is offered on the Main Menu.
Figure 38. Setup Mode General Display
Table 14 defines the General Setup button functions on this display.
Table 14. General Setup Mode Button Functions
32
Page 34

Set Display Duration of Main Menu Screen
Increase Brightness Level (1- 2 - 3 - 4 - 5)
Increase Display Duration (2, 4, 6, 8 sec, ON)
Decrease Brightness Level (5 - 4 - 3 - 2 - 1)
Decrease Display Duration (ON, 8, 6, 4, 2sec)
Quit and Exit Setup Mode
Battery Charge Status Indicator
Speaker Volume Status Indicator
Execute Set Calibration Program
Set Brightness Level
FM Frequency and Audio Setting Mode
System Specifications Menu
1. Calibrate Sub-Mode – To adjust the stylus pressure for your particular touch,
press the Calibrate button on the Setup display; the following display appears:
Figure 39. Calibrate Sub-Mode Display
a. Carefully press and briefly position stylus/finger on the center of the target.
33
Page 35

b. Repeat as the target moves around the screen; the pressure for your
particular touch is now calibrated.
2. Brightness Sub-Mode – To adjust the brightness of the LCD display, press the +
or – buttons to increase or decrease LCD screen brightness per your personal
taste.
3. Duration of Main Sub-Mode - This feature allows you to adjust the main menu
display time-out period. When the main menu for each mode of operation is
displayed, for example NAVIGATION, XM READY, MUSIC, etc., any sub-menu
that is entered from the main menu will revert to the main menu automatically
after the time-out period has expired. The length of time each sub-menu is
displayed is dependent on the duration setting of 2 sec, 4 sec, 6 sec, 8 sec or
ON; when the “ON” setting is selected, the display will not return to the main
menu until you press the return (
4. Audio Setup Mode – To enter the Audio Setup mode, press the Audio button on
the Setup display; the following screen appears with the Audio button highlighted:
) button.
Figure 40. Setup Mode Audio Display
Table 15. Setup Mode Button Functions
34
Page 36

Quit and Exit Setup Mode
Display General Menu.
a. Speaker
This feature allows the user to control internal speaker ON or OFF
Green back ground : Internal Speaker ON / FMT OFF
Grey back ground : Internal Speaker OFF / FMT ON
b. FMT (FM Transmitter)
Upon entering this mode, 20 FM transmitter frequencies can be chosen by selecting
the frequency within a range from 96.1MHz to 99.9MHz.
c. Preset1/2/3
If you want to store a desired frequency channel, first adjust the frequency using the
touch screen +/-button. Then, press the Preset 1or2or3 button for 3 seconds. The
desired frequency can be recalled by selecting the associated preset number.
d. Direct:
Audio Direct Setup: You can directly set the desired FM frequency as follows:
- Press the Direct button
- Enter the desired FM frequency directly using the numeric keys.
- Press the SELECT button: the screen automatically returns to the FM setting
menu.
- Press the FMT button.
Note: 1. In order for Fmt to work properly, a local FM radio station should not be
broadcasting on the selected frequency.
Store Current Channel / Recall the Stored Fmt Channel
Store Current Channel / Recall the Stored Fmt Channel
Store Current Channel / Recall the Stored Fmt Channel
Display System Menu.
Increase Channel (88.1 - 107.9)
Decrease Channel (88.1 - 107.9)
Operate Speaker On (Green)
Operate FM Modulation On (Green)
Display Direct FM Channel List
35
Page 37

2. In order for the Fmt to work properly, the XM antenna needs to be
connected or the Fmt pigtail needs to be installed in the XM antenna
connector.
Note: The FM Modulation button, redirects the audio output from the speakers in
the NVXM1000. to the speakers in your car using a wireless connection.
FMT Mode: Directs the audio output to your vehicle’s stereo speakers.
Speaker Mode: Directs the audio output to the NVXM1000 internal
speakers.
e. Setup System Mode – When the System button is pressed on the Setup screen the
display presents the Model Name of the unit (NVXM1000) plus the OS Version,
Software (SW) Version, and the Navigation (NAV) Version of the current unit.
Figure 41. System Setup Display
Table 16. System Setup Button Functions
FM Frequency and audio setting mode
Exit current mode
Show the system information
36
Page 38

G. Remote Control Configuration
Table 17 summarizes the button functions on the remote control.
Table 17. Remote Control Button Functions
H. Media, Back-Up Camera, Photo, Music and Setup
37
Page 39

Table 18 summarizes the remote control buttons used for all modes with exception of XM Ready.
Table 18. Summary of Remote Control Media, Back-Up Camera, Photo, Music
and Setup Button Functions
I. PC-to-NVXM1000 Connections and File Copy.
Connect your NVXM1000 to a PC using a USB cable.
1. Make sure both the PC and the NVXM1000 are turned on.
2. Connect one end of a USB cable to the USB port on the NVXM1000.
3. Connect the other end of the USB cable to the PC’s USB port.
4. The PC will automatically install standard Windows USB Drivers.
Figure 42. PC-to-NVXM1000 Connection Screen
Copying Files (Brief)
38
Page 40

1. On the PC, open My Computer or Windows Explorer. Consult your Windows manual if
you need help.
2. Windows opens a screen showing all the drives on your computer and assigns a drive
letter to the NVXM1000 based on the other drives in your system. Therefore, the drive
letter you see may be different from the one in the example of Figure 44 below.
Figure 43. Windows Typical Drive Screen
3. Open the drive associated with the NVXM1000.
4. Navigate to the desired folder Music/Photo.
5. If no Music/Photo folder is present, select from the top menu: File/New/Folder. Name
the folder ”Music” or ” Photo”.
6. Copy and paste from your local computer to the desired folder. (See Windows manual
for instructions.)
7. Confirm copy is complete.
8. Disconnect the USB cable.
Warning: Do not copy or delete any files in the
the unit will need to be returned to Audiovox for repair.
J. Specifications
NAV folder. If files become corrupt,
39
Page 41

Dimensions (W x H x D): 159 x 81.60 x 37.66 mm
Operating System: Windows CE Version 5.0
Embedded Processor: Atlas II 300MHz
Memory: 64MB SDRAM
Flash Memory: 64MB
Hard Disk Drive: 8GB
Power Source: 12 ~ 24V DC (Using Cigar Jack)
Power Draw (Standby): 0.2W
Map Database: NavTeq Map Database
Liquid Crystal Display (LCD): 4" LCD Antiglare Touch Panel TFT Touch Screen
LCD Pixels: 480 Horizontal x 272 Vertical pixels
K. Troubleshooting
Table 19 presents a troubleshooting chart representing the most common trouble symptoms
affecting the NVXM1000.
Table 19. NVXM1000 Troubleshooting Chart
Description Probable Cause Remedy
NVXM1000 does not turn on.
GPS signal strength is weak
You hear no sound from the
unit’s internal speaker.
You hear no sound from your
car stereo speakers
The power cable may not be
properly connected.
Main hardware switch on bottom of
unit is set to OFF.
In some
applications/installations,
GPS signal may be difficult to
receive.
The speaker may be turned off or
redirected to the stereo speakers in
your car or home.
You’ve selected an
unavailable FM frequency.
Check power cable.
Position the built-in GPS antenna
to a better angle for signal reception.
Relocate the antenna or purchase an
external MCX GPS antenna.
1. Press Setup/Audio.
2. Press the button to change the
setting from FMT Mode to Speaker
Mode
1. Tune to the correct FM frequency on
Your car radio.
2. Confirm Fmt is on.
3. Confirm XM antenna or Fmt pigtail is
Connected.
40
 Loading...