

Page 1

ylUDIOrOX
fe/Marrom/nun/cat/ons
Division of Audiovox Corperation
185 Oser Ave., Hauppauge, NY 11788
PRINTED IN TAIWAN 5-95
Page 2

TABLE OF CONTENTS
SYSTEM CONFIGURATION
WRIST STRAP ATTACHMENT
BATTERY INSTALLATION AND
RECHARGING..........................................................7
To Attach the Battery Pack
To Detach the Battery Pack
To Recharge Battery
PRECAUTIONS..............................................................9
GENERAL SPECIFICATIONS....................................10
FEATURES AND OPTIONS........................................11
FUNCTIONS.................................................................12
BASIC OPERATION....................................................14
Turning the Unit On/Off
• Antenna Position
• Receiving Signal Strength Indicator
• Battery Level Indicator
To Store a Number in Memory
To Recall a Number from Memory
To Review the Prefix
Display Own Telephone Number
Repertory Memory Scroll
Automatic Storing into a Vacant Memory
Address
Secret Memory
• To Store the Secret Number
• To Confirm the Secret Number
To Lock the Unit
Automatic Lock
To Unlock the Unit
Keypad Lock
Backlighting On/Off Control
Volume Control
• Earpiece
• Alert Tone
MEMORY NAME TAG
To Enter Names using Alpha (Letters)
To Store Name with Phone Number
To Recall from Memory with Name
ALPHA SEARCH..........................................................22
PLACING TELEPHONE CALLS
To Place a Call
If the Call Fails to Go Through
Automatic Redial (NAM Option)
Terminating a Call
To Receive Calls
Any Digit Key Answering
Alert Tone Selection
Silent Alert
Automatic Answering
.......................................
...................................
...............................................
................................
2
20
23
5
6
Anti-fraud Security Feature
To Place a Call with a Number in the Memory
Speed Dialing
Last Three Number Redial
Programmable Emergency Call (NAM Option)
One Touch Emergency Call
To Mute a Phone Conversation
VOICE MAIL DIALING
To Store Numbers
To Place a Call
CALL RESTRICTION (NAM OPTION)
To Set Call Restricted Mode
END-TO-END SIGNALING
Touch Tone™ from Memory
Link Dialing
• To Link Number/To Store Linked Numbers
in Memory-
• To Place Linked Numbers
SCRATCH-PAD DIALING..........................................32
SCRATCH-PAD DIALING
WITHOUT KEYING TONES................................33
CALL TIME DISPLAY
To Display the Talk Time of the Last Call
To Display the Outgoing Call Timer Only
To Display the Cumulative Talk Time
To Clear the Timer
One Minute Beep (NAM Option)
SID MANAGEMENT (NAM OPTION)
A/B SYSTEM SELECTION
MULTIPLE CITY REGISTRATION
LAST RESCAN SID INDICATOR
RADIO FREQUENCY (RF)
CHANNEL INDICATOR.....................................37
AUTOMATIC CALLS IN ABSENCE
INDICATOR.........................................................37
FUNCTION MENU
SERIAL DATA MODE
FUNCTION ALL RESET
IMPORTANT SAFETY INFORMATION
WARNING....................................................................41
ACCESSORY CATALOG
Touch Tone^^^ is a registered trade mark of AT & T.
..............................................
.....................
........................................
................................................
......................
.........................................
...........................
..............................
......................................................
................................................
.............................................
...................
............................................
3
28
29
30
33
34
35
36
36
38
40
40
41
44
Page 3
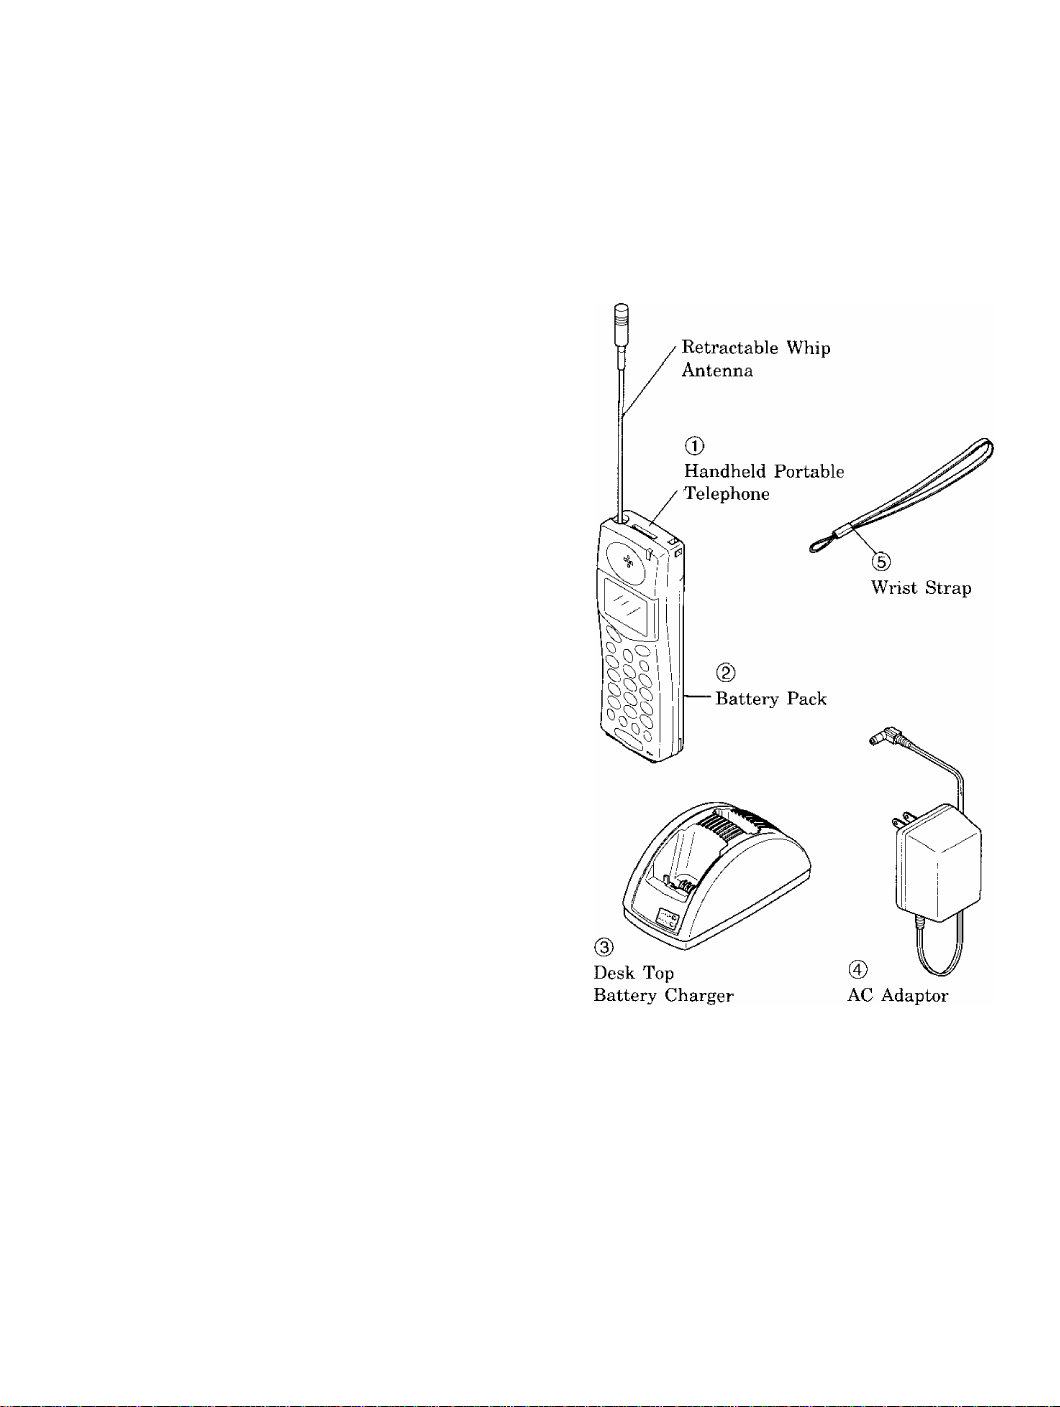
SYSTEM
CONFIGURATION
MVX-850
Personal Cellular Data
Communicator
Audiovox introduces the “Minivox MVX-850” the
most technologically advanced Handheld Portable
Cellular Telephone in the v^orld. This Personal
Cellular Data Communicator is only lOOcc’s in
total volume, making it the smallest handheld
cellular telephone in the world. Weighing in at a
mere 5.4 oz., the MVX-850, is also one of the
lightest cellular telephones available today!
Utilizing the latest in microelectronics and battery
technology, the MVX-850 delivers 65 minutes of
talk time and 11 hours of standby time. The
MVX-850 provides the most advanced features in
one very compact unit to meet all your personal
and business requirements like one touch emer
gency dialing and constant battery life and signal
strength indicators.
The MVX-850 features a new LED call indicator, a
key pad lock, one touch emergency dialing, a one
touch voice mail access key and a large, easy to
read, 30 character liquid-crystal display. The MVX850 will also allow you the capability to send data
or a facsimile via an optional PCMCIA card mo
dem.
System configuration and the equipment list are
as shown below.
Optional accessories include: a 100 minute talk
time, extended life nickel metal hydride battery, a
200 minute high capacity nickel metal hydride
battery, a rapid charger, a cigarette lighter charger,
and a handsfree car kit with provisions for exter
nal antenna and power booster. A travel charger
and battery eliminator are also available.
And of course, your new Minivox MVX-850 comes
with something only an Audiovox phone can pro
vide. The proven reliability that has made Audiovox
one of the worlds leading suppliers of cellular
communications equipment.
List of Equipment
No.
Name of the Equipment
©
Handheld Portable Telephone
Battery Pack
CD
Desk Top Battery Charger (DTC-800)
@
AC Adaptor (CNR-800)
Wrist Strap (WS-700)
Page 4
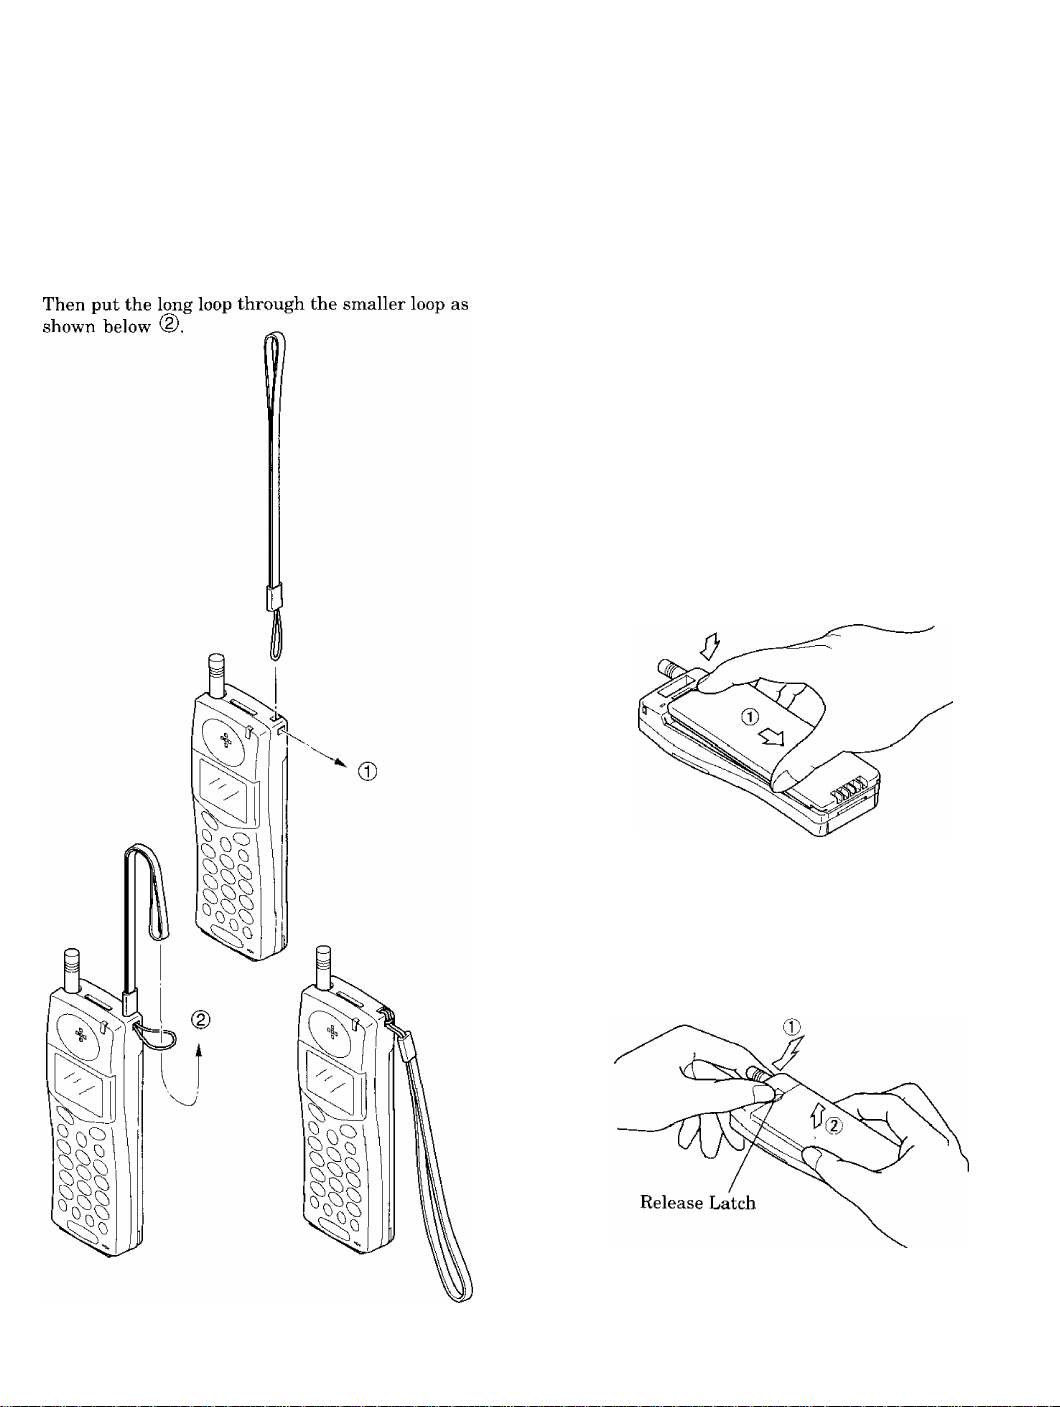
WRIST STRAP
ATTACHMENT
BATTERY INSTALLATION
AND RECHARGING
Attach the wrist strap to the unit through the
strap hole as shown below
The Portable Telephone contains a detachable
Battery Pack (BTR-800). A fully charged Battery
Pack offers 65 minutes Talk Time or 11 hours
standby.
It is recommended to carry one fully charged spare
Battery Pack for longer operation,
(Additional Battery Packs may be purchased at
your Cellular Telephone Dealer.)
To Attach the Battery Pack
® Insert the hook at the end of the Battery Pack
into the slot at the end of the unit.
(2) Press the Battery Pack down to lock the Bat
tery Pack onto the unit.
To Detach the Battery Pack
® Press the Release Latch as shown below,
d) Lift up to remove the Battery Pack from the
unit gently.
Page 5
To Recharge Battery
The Desk Top Battery Charger (DTC-800) can
recharge spare Battery and the Battery connected
to the Portable Telephone at the same time.
Moreover, the Battery Charger can recharge an
optional Extended Life Battery (BTE-800) and a
High Capacity Battery (BTX-800). DC voltage is
supplied by the separate AC Adaptor. It takes
approximately eight hours for full charge.
1. Two LEDs (Light Emitting Diode) on the Desk
Top Battery Charger light green when DC
voltage is supplied from the AC Adaptor.
2. The Battery charging starts when the Portable
Phone and/or a spare Battery are/is placed into
the Battery Charger, the LED(s) light(s) red.
3. When the charging is finished, the LED(s)
return(s) a flash green.
Note: (1) Environmental temperature for full bat
tery recharging with 8 hours: 0 ~ h-35°C.
(2) We recommend you to turn off the power
of the telephone to secure complete re
charging of the battery.
(3) The Battery Charger and the Battery
Pack will get warm during the charging
cycle. This is normal.
Battery Charger
AC Adaptor
PRECAUTIONS
Your Handheld Portable Telephone is a high qual
ity piece of equipment. Before operating the equip
ment, please take the following precautions.
1. Don’t use this equipment in an extreme envi
ronment where high temperature or high hu
midity exists.
2. Don’t abuse the equipment. Avoid striking, shak
ing or shocking. When not using the unit, lay
down the unit to avoid possible damage due to
instability.
3. Don’t expose this equipment to rain or spilled
beverages.
4. Recharge the battery fully before your first use
of the unit.
5. When the battery becomes discharged, two beep
tones will be heard every 10 seconds, and the
display will show iBattery Dischargedl. in such a
case, replace the battery with a fully charged
one, and recharge the discharged battery.
6. To ensure long battery life, operate the unit
until ¡Battery Discharged! is displayed, before re
charging the battery. Remove Battery Pack
from the unit when it is not expected to be used
for a long period.
Recharging at least once every month is recom
mended when not being used.
7. Don't charge the Battery in a place exposed to
direct sunlight.
8. The Battery charging and charging timer will
become inactive in case of lower or higher
environmental temperature. (However, the LED
remains at red.)
When the temperature returns to normal, the
charging will be automatically resumed. In this
case, it will take longer than 8 hours for the
LED(s) to flash green.
The product that you have purchased
contains a rechargeable Battery. The
Ni-MH Battery is recyclable. At the end of it’s
useful life, under various state and local
laws, it may be illegal to dispose of this Battery
into the municipal waste stream. Check with your
local solid waste officials for details in your area
for recycling options or proper disposal.
Page 6

GENERAL
SPECIFICATIONS
FEATURES AND
OPTIONS
(Subject to change without notice)
Frequency Range
Number of RF Channels
Channel Spacing
Duplex Spacing
Frequency Stability
RF Output Power
Receiver Sensitivity
Modulation/Demodulation
Operating Temperature
Supply Voltage
Current Drain
Operating Time
Size
Weight
824 to 849 MHz, Transmit
869 to 894 MHz, Receive
832, Full Duplex
30 KHz
45 MHz
±2.5 PPM
0.6W ERP With Power
Control
-116 dBm {12 dB SINAD)
Voice PM (With Compander)
Data FM
-20°C to +60"C
4.8 V
(NiMH Battery 1.2 V x 4,
550 inAH)
In Use;
Approx. 470 mA
Standby;
Approx. 50 mA
Talk;
Approx. 65 min.
(at full power output)
Standby;
Approx. 11 hours
Approx.
23 (H) X 44 (W) X 128 (D) mm
0.90 (H) X 1.7 (W) X 5.0 (D) inch
Approx. 153 gr (5.4 oz)
10
Push Button Dialing
Backlit Keypad and Display with On/Off Control
Incoming Call Indicator
Large Size Dot-matrix LCD Display
Status/Function Indicator
20 Digits Dial Number
Receiving Signal Strength Indicator
Battery Level Indicator
(Electronic) Volume Control
Pre-set Dialing up to 32 Digits
Extended Readability (Prefix Review)
Last Digit Clear
Digit Display Clear
Programmable Emergency Call in locked or
restricted modes
One Touch Emergency Call
Repertory Dialing: 32/80-Digit 100 Memories
Speed Dialing
Repertory Memory Scroll
Automatic Storing into a Vacant Memory Address
Secret Memory
Memory Name Tag
Alpha Search
Linked Preset Dialing from Memory
Voice Mail Dialing
Any Digit Key Answering
Automatic Answering
Last Three Number Redial
Automatic Redial (NAM Option)
Mute or Hold
Scratch-pad Dialing (with/without Keying Tones)
End-to-End Signaling
Touch Tone^'** from Memory
Continuous DTMF from Keypad
Call Restrictions (NAM Option)
Alert Tone Selection
Silent Alert with Alert Beep Tone
Call Time Display (Four Functions)
Automatic Calls in Absence Indicator
One Minute Beep (NAM Option)
Display Own Telephone Number
Multiple A/B System Selection
SID Management (NAM Option)
Multiple City Registration.
Last Rescan SID Indicator
RF Channel Indicator
Anti-fraud Security Feature
Electronic Lock
Automatic Lock
Keypad Lock
Function Menu
Function All Reset
11
Page 7
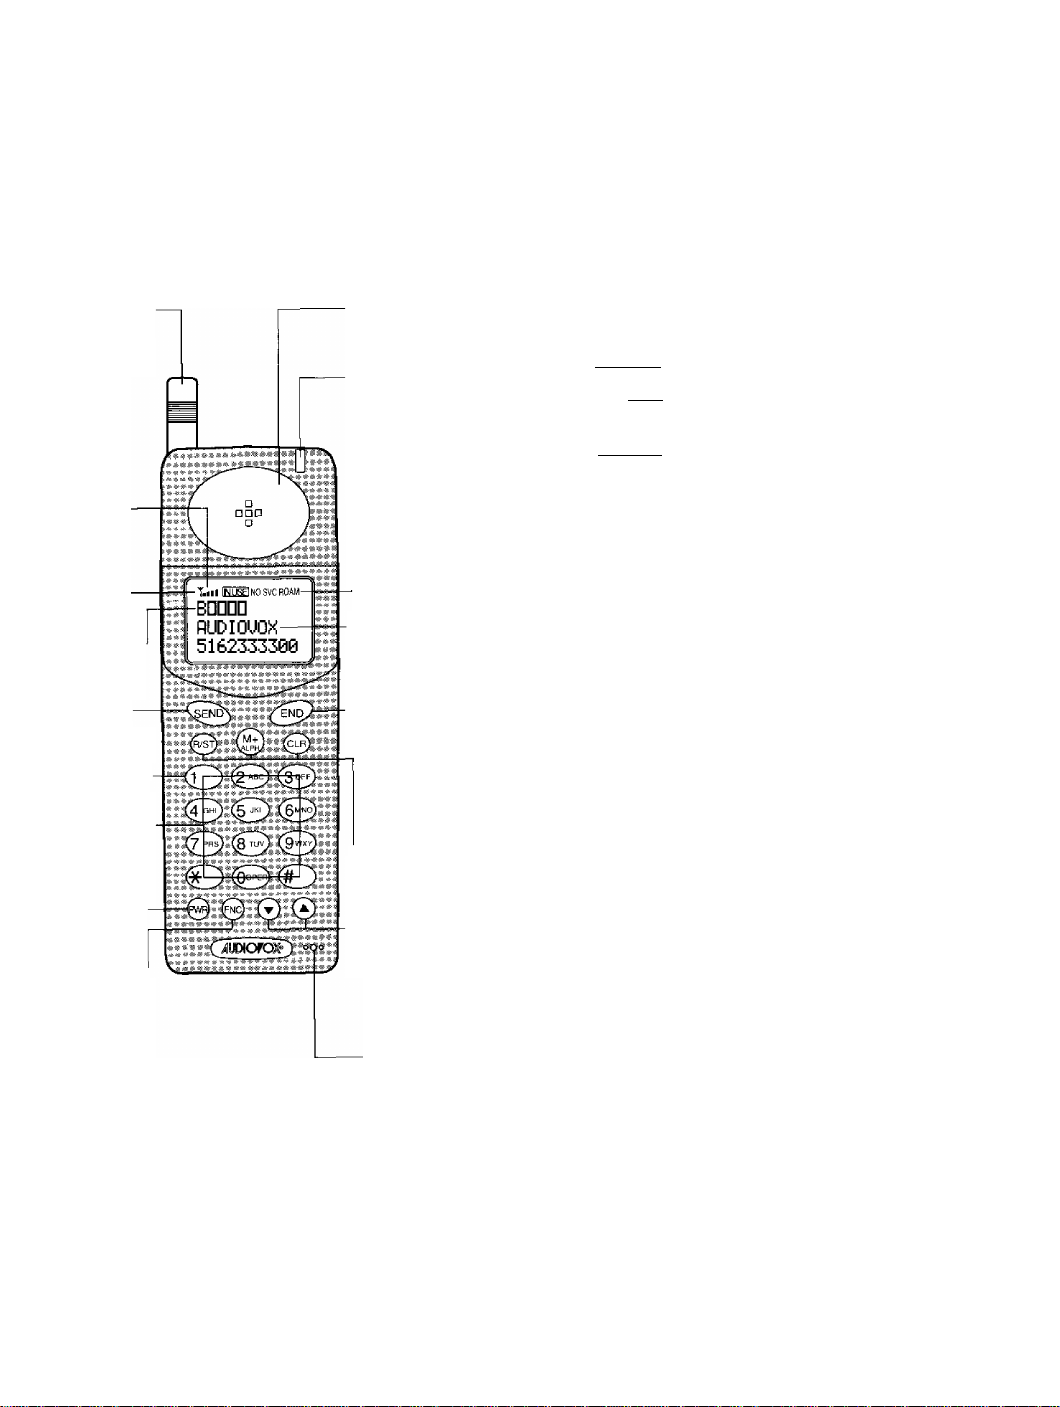
Retractable
Whip Antenna
(1) Receiving
Signal
Strength
Indicator
(2) Povv'er-
Indicator
(3) Battery-
Level
Indicator
(9) Send Key
(10) One Touch-
Emergency
Key
(11) Digit"
Keys
(12) Po\ver
On/Off
Key
(13) Function—'
Key
FUNCTIONS
-Earpiece
(4) Incoming
Call
Indicator
p(5) IN USE
-(6) NO SVC
-(7) ROAM
--(8) Alpha
Numeric
Display
-(14) End Key
-(15) RecalP
Store Key
-(16) Voice Mail
DiaPAlpha
Key
L(17) Clear
Key
-(18) Volume
Keys
Microphone
(1) RECEIVING SIGNAL STRENGTH INDICATOR:
The number of shaded blocks indicates the Re
ceiving Signal Strength.
(2) ¡T] is used as a POWER ON indicator which
lights when the unit is turned on.
(3)B
(4) INCOMING CALL INDICATOR:
(5) I IN USEI indicator lights when a call is in progress.
(6) NO SVC (no service) indicator lights when the
(7) tROAMi indicator lights when the unit is out of
(8) 30-CHARACTER FUNCTIONAL ALPHANU
(9) (send key) is used for placing or receiving a
(10) Cl) One Touch Emergency key.
(11) DIGIT KEYS to enter a phone number.
(12) (power on/off key) is used to turn on/off the
(13) L9 (function key) shifts the digit keys to the
(14) (e^ (end key) terminates a call.
(15) (recalPstore key)
(16) '1^ (voice maiPalpha key)
(17) -0 (clear key) clears the digit(s) from the dis
(18) 0 or 0 (volume key)
is used as a battery level indicator.
Flashing LED alerts you of an incoming call.
unit is in a non-coverage area,
the home area.
MERIC DISPLAY:
First 10 characters indicate a battery level,
current function and status conditions. The re
maining 20 characters show the name and the
last 10 digits of the dialed number.
call.
unit.
functional keys.
• To recall phone numbers from repertory
memory, press
• To store phone numbers in repertory memory,
press is ’Ll).
“ To access the linked speed dialing capability,
press
• To enter alphabetical characters, press '0 0.
play.
• To control earpiece audio level, press 0 or 0.
• To control alert tone level, press 0 -▼) or 0.
12
13
Page 8

BASIC OPERATION
Turning the Unit On/Off
Press '^3 for about one second to turn on the unit.
The indicator ffl will light (all indicators will light
momentarily: display will show the programmed
name or your phone number, Incoming Call Indi
cator will light, and a tone will be heard). Press 3(3
again for about one second to turn off the unit.
• Antenna Position
Your portable cellular telephone has been equipped
with a dual position antenna system.
This dual position antenna has been especially
designed to allow your phone to receive calls while
the antenna is down. However, for optimum per
formance and signal strength or while operating in
poor signal areas, it is recommended that the
antenna be fully extended.
Note: The antenna can be used in its fully ex
tended or fully retracted position only.
• Receiving Signal Strength Indicator Mill
The number of shaded blocks indicates the Signal
Strength in your area. Four blocks show the maxi
mum level. The display will vary as you move with
the unit. If the signal is not strong enough to place
a call, the |NQ SVCj indicator will appear on the
readout.
To Recall a Number from Memory
Press 5^, then enter the memory address (01
through 99).
Example: Press the number stored in
memory address 15 will be displayed on
the readout.
To Review the Prefix
(Number longer than 10 digits)
After pressing 5^, hold down the second digit of
the memory address.
Display Own Telephone Number
You can see your system ID number and your own
phone number on the readout. Press (O-
Repertory Memory Scroll
This feature is useful in finding a certain phone
number by scrolling the repertory memory from
the designated memory address.
1. Press '3^, then enter the memory address (01
through 99).
Note: Only memory address number is dis
played, if no phone number is stored in
memory address.
• Battery Level Indicator
You can always monitor the current battery volt
age level with the constant battery level indicator.
The number of blocks indicates the battery condi
tions as follows:
Full charge
Normal phone call
Short phone call
Recharge battery
To Store a Number in Memory
1. Press then enter the phone number.
2. Press then enter the memory address
(01 through 99).
Example: Press '0 '3^ CL3 the displayed
number will be stored into memory ad
dress 15.
14 15
2. Press 0 or 0.
0 : Scroll upward (with roll back to 01)
: Scroll downward (with roll up to 99)
Memory address and the last 10 digits of the
stored number will be displayed on the readout
as follows.
Example:
Note: In this scroll feature, any vacant memory
address(es) will be skipped.
g U□P
A s
12 ZH5:6 7. 9 9
CO
y;
3:
V
T
Page 9

Automatic Storing into a Vacant
Memory Address
This feature allows automatic storing into a va
cant repertory memory address. This will avoid
the possible problem of writing over a previously
stored number.
1. Enter the phone number.
2. Press %9
3. Enter the memory address group number in
which you want to store a number.
From 01 to 10
(D
•
From 11 to 20
From 21 to 30
Example: To store the secret number 9876 into
memory address 41 or automatically store
this number into a vacant memory ad
dress of 40's.
1. Press
2. Enter secret number;
CB) (0
IMT7i6l
3. Press (secret memory store)
I I { I I I I
918I716
4. Press iO- (address number)
or
press B) (to store vacant memory
address of 40's)
I S l e l c I r i e l t ■
I
(B :
:
O :
From 81 to 90
From 91 to 99
From 01 to 99
4. Press '^LJ.
The memory address and the last 10 digits of
the stored phone number will be displayed on
the readout as follows.
Example:
ma
4 2 3:
E
4
5 7
J
.3 f
■g\&.
T
0
Note: If there is no vacant address in the assigned
area, the phone number will not be stored in
the memory. iMembry FuB| will appear on the
readout.
Secret Memory
This feature allows you to store ID code, telephone
credit card numbers, etc. in secret memory loca
tions. For security purposes, you must enter your
three-digit security code to display the secret
number. For practical use of the secret memory,
refer to “END-TO-END SIGNALING”.
• To Store the Secret Number
1. Press then enter secret number.
2. Press 0 then enter the memory ad
dress (01 through 99). will appear on
the readout.
•
To Confirm the Secret Number
1
Enter the three-digit security code.
2.
Press then enter the memory address (01
through 99). The last 10 digits of the secret
number will be displayed on the readout.
Example: To confirm the secret number stored
into memory address 41.
1. Enter the three-digit security code;
O.
imm
2. Press B (L).
Note: If you recall the secret memory without the
three-digit security code, the secret number
is not displayed on the readout as shown
below:
Press B (iB-
i9l8T^
n ~ " l ^ l c l r ! e l t I I I
16
17
Page 10

To Lock the Unit
Press then key (LOCK),
ILOCKI will appear on the readout. The unit will
remain locked until unlocked, even if the power is
turned off.
Automatic Lock
If you request the feature of Automatic Lock, so
that your unit will automatically go into the locked
condition when the power of the unit is turned
“off”. When is turned “on”, the unlock code is
required to operate the unit.
1. Press (4^.
I Auto Lock! will appear on the readout.
The current mode will flash.
2. Press and Automatic Lock is activated.
3. Press and Automatic Lock is deactivated.
To Unlock the Unit
Enter the three-digit unlock code. The ¡LOGIC indi
cator will go out when the three-digit code is the
same as the code registered in the NAM.
Keypad Lock
This feature makes the keypad temporarily in
active to prevent unintentional key operations
while carrying the phone with the power on.
1. Press IS 2>. and Keypad Lock mode is acti
vated.
2. The iKeypadLo^ will appear on the readout.
3. Press 1)5 (?3, and Keypad Lock mode is deac
tivated.
Note: The following functions are available when
this feature is on.
(1) To answer incoming call by key.
(2) Emergency Call (Except for OneTouch
Emergency Call).
(3) Silent Mode (Alert Tone Selection OFF
Mode).
The following functions are not available
when this feature is on.
(1) Automatic Answering.
(2) Any Key Answering.
(3) OneTouch Emergency Call.
(4) To turn off the unit by 0 key.
Backlighting On/Off Control
LCD display and the keypad are backlit automati
cally after the Power-On. If needed, backlighting
can be turned off by pressing 0 '53 ■
iBackHghtj will appear on the readout. The current
mode will flash. Press CL), and Backlight is acti
vated.
Press ■■^3, and Backlight is deactivated.
Even if the unit is in the backlighting “Off ” mode,
the backlighting will be turned on again automati
cally for 10 seconds when any key operation is
conducted or a call is received.
Volume Control
The audio level of the earpiece and the alert tone
can be adjusted by the Volume Control Key.
3 : To increase the sound level.
0 : To decrease the sound level.
• Earpiece:
Keep pressing '0 or 0 until you get the desired
sound level.
Sound level will be displayed on the readout
digitally during the level adjustment and the
sample tone will indicate the sound level when
you are not engaged in a telephone conversation.
The display format is as follows.
F unction
Current Volume
Key Operation
Alert Tone:
Press 0, 0 or 0.
Then adjust the alert tone level in the same
manner as above. Your telephone will ring at the
new level. In this case, the display format is as
follows.
A
mnsoTO
OODIHIS
100701
Function
Current Volume
Key Operation
18
19
Page 11

MEMORY NAME TAG
This feature permits you to tag an identifying
name (in up to 10 characters) to each phone number
in the memory address. The name will be dis
played each time you recall a number from memory
address.
To Enter Names using Alpha (Letters)
1. Press I Alpha I will appear on the readout
to indicate the Alpha Mode is active.
Press digit keys repeatedly until the character
2.
you need appears. The following table shows
which character is assigned with each digit key.
Key
1
2 (ABC)
3 (DEF)
4 (GHI)
5 (JKL)
6 (MNO)
7 (PRS)
8 (TUV)
9 (WXY)
0
*
#
When the letter or number you want is shown
3.
ASSIGNED ALPHA CHARACTERS
(Blank)
A
D
G
J
M
P
T
W
0
*
#
on the display, press to locate the second
letter or number.
Go back to step 2, and repeat the same proce
4.
dures until the complete character name is
displayed.
When an entry error is made, press mo
5.
mentarily to erase the last character. If you
press more than a second, all characters on
the readout will be erased.
6. To exit Alpha Mode, press
Notes: I. If the next letter or number is assigned
on the other key (not same key), you can
display the next letter or number with
out pressing '!§),
2, You must enter the phone number first,
then apply the name. Entering a number
after applying the name will erase its
name.
* *
To Store Name with Phone Number
1. Enter the phone number.
2. Press H) to set Alpha Mode.
3. Enter the name you need. (Refer to “To Enter
Names using Alpha”.)
4. Press 0 then enter the memory address
(01 through 99), to store the number with the
name into memory.
Note: If you enter the phone number after
entering the name, the name will be
erased.
Example: To store the phone number 1234567890
with the name JACK into memory ad
dress 01.
1. Enter the phone number;
2. Set Alpha Mode; 0 ©
3. Enter the Name;
(J) (A) (C) (K)
4. Store the Number; 0 C0i
To Recall from Memory with Name
Recalling from the repertory memory with name is
identical to standard repertory recall. When the
number is recalled, the display will show the Al
pha Name Tag as well as the stored phone number.
20
21
Page 12

ALPHA SEARCH
This feature permits you to find a phone number
stored in the memory by the first character of the
Alpha Name Tag. This search can retrieve all
entries beginning with the assigned initial charac
ter.
1. Press to set the Alpha Mode.
2. Enter the initial character, by which you need
to- search the phone number.
3. Press ® 0. The display will show the first
entry whose Name Tag begins with the as
signed initial character, and which is stored in
the lowest memory address. Display shows
Name Tag, Memory Address and Phone
Number.
4. Press 0 or 0.
0 : Scroll memory address upward.
■0 : Scroll memory address downward.
Example:
0
Display
0
p:
h
A
Operation
©
PLACING TELEPHONE
CALLS
To Place a Call
1. Enter the phone number. The last 20 digits of
the dialed number are displayed on the readout.
Note: After 60sec., display will return to the
10-digit display mode.
2.3.If a dialing error is made, press 0, then enter
the phone number again. Pressing 0 momen
tarily (less than approx. 0.5 sec.) clears only
the last digit.
Press The IIN USEl indicator will light.
When the called party answers, proceed with
your conversation.
If the Call Fails to Go Through
1.
If you hear the “reorder” signal, press C0),
then if there were no dialing errors, press (§0)
for redial. (Redialing with digit keys is not
necessary.)
2.
a
If the “intercept” signal is heard, press
then redial the correct number.
0 Q0 0^
« CK
X
i;
b
[4
2
BO U
J:0 MN
00 B
B
0 0 u
XA M£S'*:
2 tDO0 8 7: a E
B
m
0f9
4
bfSi 0
7
0-
--
I
m
t
0*&
l;
2 it
5
n
0
1':
Automatic Redial (NAM Option)
If the feature of Automatic Redial is selected, your
unit will automatically make seven attempts to
reach the cell site when the first try is not success
ful. The IIN USEi indicator will stay on, but the
speaker will be muted for thirty seconds. This is
done so that you do not hear the reorder signals
out of the speaker. If you need to terminate the
automatic redial, press 02^.
Terminating a Call
Press and the liN USEI indicator will go out.
J.
0
22
B
00 0
“1- 817)6
V
lM8
4'
8 2
To Receive Calls
When the telephone receives an incoming call,
press 00 to answer the call. The IIN USEI indica
tor will light.
23
Page 13

Any Digit Key Answering
This feature permits you to answer an incoming
call by pressing any of the digit keys on the key
pad.
Alert Tone Selection
This feature permits you to select a most suitable
alert tone among four options.
1. Press 0 (2^ to enter into Alert Tone
Selection Mode.
The cuirent Alert Tone Pattern will appear.
2. Press CiO or to scroll four options of Alert
Tones, and press 5^ to determine the Tone.
3. Select “OFF” to Mute Alert Tone, and the unit
enters into Silent Alert. If Silent Alert is acti
vated when the unit is powered up, will
appear on the readout for 10 seconds.
Silent Alert
If an incoming call is received in this mode, iCAtLi
will flash on the display and the Incoming Call
Indicator (LED) will flash without an obtrusive
audible ring signal.
Single “beep” at the beginning of call will allow the
user to know a phone call is being received.
Automatic Answering
With this feature, the incoming call will be auto
matically connected for operation after two alert
tones, and the llNDSEl indicator will light on the
readout.
Then the unit is ready for conversation.
1. Press 0 (3 CD.
The lAutaAnswerl will appear on the readout.
The current mode will flash.
2. Press (D, and Automatic Answering is acti
vated.
If the Automatic Answering is activated when
the unit is powered up, A Ansi will appear on
the readout for 10 seconds.
3. Press ^^53, and Automatic Answering is deacti
vated.
4. This feature will not function if the unit is in
the Lock, Keypad Lock and Silent Alert.
Anti-fraud Security Feature
Your new Audiovox Cellular telephone has been
engineered with the latest technology to help pro
tect from the fraudulent use of your cellular tel
ephone number.
Cellular fraud most often occurs by cellular thieves
using electronic devices that can read your unique
cellular phone number and your phone's electronic
serial number (E.S.N.). This information can then
be programmed into another phone for fraudulent
use.
Certain cellular systems provide for an ANTI
FRAUD security feature to help protect the unau
thorized use of your cellular telephone number.
This feature utilizes a special personal identifica
tion number (PIN).
Should your cellular carrier offer this enhanced
service, your new phone may be programmed with
a PIN chosen by you. For your protection, you
cannot make any outgoing calls until you have
established your PIN. To establish your PIN, please
contact your cellular service provider for specific
instructions.
To place a call using the PIN security feature
1. Enter the number you are calling by either
dialing the number or recalling the number
from a specific memory location.
2. Press the key as your call is being
processed the word [gEND PIN] will appear in
the display.
3. Press the key again, your call will then
be placed.
To turn the ANTI-FRAUD feature On/Off.
1. Press 0 3 3.
The IPINI will appear on the readout.
The current mode will flash.
2. Press D, and PIN mode is activated.
3. Press and PIN mode is deactivated.
To change the PIN.
1, Press '0 '"D-
The
I
pin! will appear on the readout.
2, Press and PIN .number is changed.
3, Enter the three-digit security code. Old
number will appear on the readout.
4, Enter the new PIN number.
5, Press 3-
24
25
Page 14

To place a call with PIN entry feature in Voice
Mail Dialing.
1. Press the key for more than 0.5 seconds.
The last 10 digits of the number in memory
address 91 will appear in the display. As
your call is being processed, ISEND Plfl] will
appear in the display.
2. Press the key again, your call will then be
sent digitally to the cell site. After you hear
the signal from the Operating Office, press
“Voice Mail Access” key again. The second
number in memory address 92 is sent with
DTMF tones. You will monitor the tones
through the loudspeaker. The third through
fifth number in memory address 93 though
95 can be accessed sequentially in the same
manner as above.
To Place a Call with a Number in the Memory
1, Press then enter the memory address (01
through 99). The last 10 digits of the number
will appear on the readout. If the number is
longer than 10 digits, hold down the second
digit of the memory address (after pressing @)
to see the prefix.
Note: See “To Recall a Number from Memory’
and “To Review the Prefix” for more details.
2. Press CsE^. The i^..:.D3E| indicator will light as
the call is placed.
Speed Dialing
This feature permits you to place a call from the
stored memory locations without using the recall
key. Speed dialing is a quick method of placing
calls from memory.
1. Enter the one or two digits of memory address
(1 through 9 and 10 through 99).
2. Press The last 10 digits of the phone
numbe^r will appear on the readout, and the
I1H..U8EI indicator will light.
Last Three Number Redial
This feature permits you to redial any of the last
three phone numbers you attempted to call.
Numbers will be stored in memory only if key
is pressed.
Note: If same telephone number is attempted more
than once phone will only utilize one memory
location.
1. Press The last phone number is
displayed on the readout.
Example:
2. Press 0 or 0, the scrolled number is dis
played on the readout.
[¡mnsiminiin
0 : Scroll upward (with roll back to #1)
0 : Scroll downward (with roll up to #3)
3. Press 0^ to send a displayed number.
Note: Tq^ clear the stored number, press (0, then
three times.
Programmable Emergency Call
(NAM Option)
This feature permits you to place a call to 3
emergency numbers (maximum of 7 digits) even if
your telephone has been set to the locked, keypad
locked or restricted modes.
The three emergency numbers must be pre-pro
grammed in the NAM,
Note: 911 is preset emergency number, (you may
change this number if you wish.)
Operation in Lock Mode or Keypad Lock Mode
1. Enter the emergency call number (911);
CD CD
(“911” does not indicate, but the or
will appear on the readout.)
2. Press the indicator will light^
3. To terminate the call, press (The
indicator will go out.)
____
Operation in Call Restriction Mode
The operation and display are the same as in the
normal mode.
One Touch Emergency Call
This feature permits you to place a call to an
emergency number by a single key stroke, even
when the unit is in lock mode. You can deactivate
this feature to prevent unintentional call by mis
take.
1. Press key D) for more than 2 seconds. The
first emergency number that is pre-programmed
in the NAM will be displayed, and
indicator will light as a call is placed. The
factory pre-set number is 911.
2. Press 0 Q.
The (1 ktfidhwill appear on the
readout.
Page 15

3. Enter the three-digit security code.
The current mode will flash.
4. Press (O, and One Touch Emergency Call is
activated.
5.
Press (^, and One Touch Emergency Call is
deactivated.
6.
This feature will not function if the unit is in
the Keypad Lock.
CALL RESTRICTION
(NAM OPTION)
This feature permits you to impose various kinds
of restrictions on Outgoing Calls.
To Mute a Phone Conversation
1. Press 0 LMutel will appear on the
readout. The transmit audio will be muted and
the receive audio will be heard from the re
ceiver. The mute (or hold) feature will permit
you to converse privately with a passenger
during a call.
2. To return to normal conversation:
Press 0 (|3 again,
3. Mute is reset when the call is terminated.
VOICE MAIL DIALING
This feature permits you to access, through tel
ephone lines, a computer system and send DTMF
number codes in sequence. Up to five numbers can
be stored and are sequentially accessed with one
touch of the “Voice Mail Access” key. The first
number is sent in digital form to the cell site, then
up to four other numbers are sent with DTMF
signaling.
To Store Numbers
Store the numbers to be linked into the special
memory address 91 through 95. Each number
should be within 32 digits.
To Place a Call
Press 0 “Voice Mail Access” key for approx. O.Ssec.
The first number in memory address 91 will ap
pear on the readout and will be sent digitally to
the cell site. After you hear the signal from the
Operating Office, press “Voice Mail Access” key
again. The second number is memory address 92
will appear on the readout and is sent with DTMF
tones. You will monitor the tones through the
loudspeaker. The third through fifth number in
memory address 93 through 95 can be accessed
sequentially in the same manner as above.
To Set Call Restricted Mode
1. Press 0 (9^ (4^.
The [Restrict [ will appear on the readout.
2. Enter the three-digit security code.
The current mode will flash.
You can change the current mode by pressing
'lO or C]).
■-$3 ■- Scroll upward.
'^0 ; Scroll downward.
11 digits : Only phone numbers having 11 dig
its or less are accepted. Operator
assisted dialing is prohibited.
7 digits : Only phone numbers having 7 dig
its or less are accepted. Operator
assisted dialing is prohibited.
Operator : Operator assisted dialing (0 Origi
nation) is prohibited.
Recall 1-9: No phone calls can be placed ex
cept for repertory dialing from
memory address 01 to 09. How
ever, programmable emergency call
will be available.
OFF : No restriction.
3. Press 0.
Note: (1) When in the “Recall 1-9” mode, number
storage into the memory will not be
permitted.
(2) In the restriction mode, a short beep
tone will be heard to inform you of the
improper operation, and the word
IRfeSiricted]
will be shown on the readout.
28
29
Page 16

END-TO-END SIGNALING
This feature permits you to utilize additional phone
services, such as accessing an alternate long dis
tance network, signaling pager, or banking by
phone etc.
For these services the signaling should be in DTMF
(Touch Tone™b- The following two features will
make it easier to send in DTMF codes.
Note: When you use this feature with a secret
number, the number must be previously
stored in a memory address. (Refer to “To
Store the Secret Number”.)
Touch Tone^“^ from Memory
DTMF signaling by repertory dialing is available
while engaged in a telephone conversation,
1. Press then enter the repertory memory
address (01 through 99).
The last 10 digits of the number will appear on
the readout.
Note: However, if the memory address entered
has been set as a secret memory,
i^iCretl will be displayed on the readout
instead of the number.
2. Press Then DTMF signaling will be placed
and the DTMF tone can be monitored through
the speaker.
Note: Continuous DTMF from keypad can be manu
ally dialed as well to access answering ma
chines when engaged in a telephone call.
Link Dialing
This feature permits you to link a series of num
bers to be sent in DTMF Signaling. The linked
numbers can be programmed in Repertory Memory.
The first set of numbers will be sent in Digital
Signaling to the cell site, and the rest of the
numbers will be sent in DTMF Signaling individu
ally by pressing key each time.
Notes;(l) The maximum length of each linked
number is 32 digits including Linking
Mark
(2) Total length of the whole linked num
bers should be up to 80 digits.
(3) The linked numbers of more than 32
digits can be stored only in the Reper
tory Memory 96 through 99.
Example; To access the alternate long distance
service using a secret number, you should
call your long distance service office first,
and enter your ID number, then the
phone number to be placed.
• To Link Number/To Store Linked Num
bers in Memory
1. Recall the phone number of the long distance
service office.
Press then enter the memory address (01
through 99).
2. Press
Linking Mark will be added at the end of
the number. , . ,
3. Enter the ID Number,
Press (13 -(23 33-
4. Press (3 lt3-
5. Enter the phone number.
6. Press (3 23 '33 (^.
m- .1714161314171^1^
.............
m? 14161314171-91=1
4
6 3
■■ 1 ■
3 4
6
3
&
12
.............
'i ■
9 J
4 7
41719
■3l4t5re 7<8 9
. I" .■■(.17:^4
T 9
n
1 2 3
2(3
• To Place Linked Numbers
1. Press 23 (O 'I3-
P P
1 2 3 415 61T9
2. Press The UN USE I indicator will light as
the call is placed. 1st. Number will appear on
the readout.
I - 1 1714
3. After you received an answer frorn the long
distance service office, press again. The
DTMF signal will be placed and the DTMF
tone of your ID number can be monitored
through the speaker.
2nd. Number will appear on the readout.
i:
S
0
z z
1:1
7
¿3
.5i
zz
9
30
31
Page 17

4. If your ID number is accepted, the long dis
tance service office will answer again, so press
(SB^_
Then the long distance call will be placed and
the DTMF tone can be monitored through the
speaker.
3rd. Number will appear on the readout.
Note; The number linked can also be stored in
secret memory as stated in the “Secret
Memory”.
1. When a set of linked numbers which
includes a secret number has been stored
in memory address 01 through 99, enter
the three-digit security code, press
memory address (01 through 99), and
then to place the call. The first
linked number will be called as shown in
step 2 above.
If the secret number is not included in
the linked number, you need not enter
the three-digit security code in the above
operation.
2. To complete the call, continue opera
tions as shown in the steps 3 and 4.
Pf^l^
41516t7l8l9i0
SCRATCH PAD DIALING
SCRATCH PAD DIALING
WITHOUT KEYING
TONES
l
This feature permits you to activate scratch-pad
memory without annoying key tones over the cir
cuit.
1. Press Tone will appear on the readout.
The Microphone circuit will remain active, but
the tones will not be heard.
2. Enter the phone number.
If necessary, press @ then enter the
memory address.
3. To active the tones, press 0 again.
CALL TIME DISPLAY
This feature automatically records the elapsed time
per conversation. The talk time of the last call,
cumulative outgoing call time and cumulative talk
time can be displayed on the readout. The timers
can also be cleared if necessary.
With beep tones you can be notified of the approxi
mate talk time (NAM Option) in approximately 60
seconds increments.
This feature permits you to enter a number to be
redialed (or store a number in memory) while
engaged in a conversation.
32
To Display the Talk Time of the Last Call
1. Press 0 (0 OThe talk time of the last call will be displayed
on the readout for 10 seconds.
While in a conversation, the talk time of a call
in progress will be displayed, and updated each
second. The display format is as follows.
,,, 1 min. and 25 sec.
To Display the Outgoing Call Timer
Only
1. Press 0 (iB C0).
The outgoing call time will be displayed on the
readout for 10 seconds.
SSrI ...12 min.
33
Page 18

To Display the Cumulative Talk Time
1. Press 0 '¡^3.
The cumulative talk time will be displayed on
the readout in minute format for 10 seconds.
il8m: ...18 min.
To Clear the Timer
1. Press 0 'i©, then enter the three-digit
security code.
The timers will be cleared, and the count for
the cumulative talk time and the cumulative
outgoing call time will start from zero.
ITirmr Cleared! will be displayed on the readout
for 10 seconds.
One Minute Beep (NAM Option)
During conversation, you can be notified of the
approximate talk time by tones for the first five
minutes, (a short monotone signal will sound every
minute and a double beep tone will be heard after
approximately 5 minutes.)
SID MANAGEMENT
(NAM OPTION)
This feature enables you (by NAM option) to take
advantage of a family of SID groups. This is a
group of cellular systems in cities that your carrier
owns or has special billing arrangements with.
Your close family SID's (like brothers and sisters)
will be billed at the same rate as your home billing
and will be indicated as “Home” (i.e. both
and
family SID's (like cousins)
preferred rate. Your phone will display solid iBOAlMi
when using these groups of systems in their cities.
When flashing is displayed, you are using a
SID system that is not included in the NAM
assigned groups.
If yoUr display indicates flashing , you will
need to change your A/B switch selection or, please
refer to Multiple City Registration to change phone
registration to enable you to make a call.
If in question as to what SID (system identifica
tion) you are using, push 0 ’^^3 to display the
current SID.
are off) on your display. More distant
will be billed at a
A/B SYSTEM SELECTION
This feature permits you to select the system you
need to use. The system that you are registered
with is the preferred system, and your home sys
tem.
When you turn the unit on, the unit remembers
the last position of the A/B system selected, and
will start to scan the radio frequency channels of
that selection.
1.
Press 0 iV).
The [A/B Switch] will appear on the readout.
The current mode will appear.
You can change the current mode by pressing
2.
v'O or 0).
'43 : Scroll upward
43 : Scroll downward
• Standard Mode
The unit will scan the preferred system chan
nels. If unable to find an acceptable pre
ferred channel, the unit switches to scan the
non-preferred channels.
• Home Only Mode
You can place or receive calls only within
your home area.
• Preferred System Only Mode
The unit will scan the preferred system only
and prevents switching over to the non
preferred system.
• Non-preferred System Only Mode
The unit will scan the non-preferred system
only._
3.
Press 43.
The ISelectedl will appear on the readout.
34
35
Page 19

MULTIPLE CITY
REGISTRATION
RADIO FREQUENCY (RF)
CHANNEL INDICATOR
Some cellular users find it beneficial to register
their phone in multiple cities, rather than rely on
“roam”. The multiple city registration feature per
mits you to reprogram from the telephone unit, the
different phone numbers for the cities in which
you are registered. Each programmed phone
number will be designated as your home system.
Press and enter the new system ID
number (5 digits) followed by the corresponding
phone number (10 digits). Please include your area
code. You must register your unit with the carrier
in order to get both the system ID number and
your phone number.
Press Your new phone number will be dis
played on the readout.
Note; (1) System ID number and phone number
can not be programmed during a call.
(2) Calls are placed or received using only
the programmed phone number, in use
at the time of call.
LAST RESCAN SID
INDICATOR
This feature permits you to recall the last system
identification accessed by your phone.
Press
The last rescan SID is displayed on the readout for
lOsec. The display format is as follows;
■f:
R
a*SiQn
i,
JÌ s V D
0 ÌÓp2 0
If necessary, you can see the RF channel status in
which your unit is operating.
1. Press 0
The RF channel number, RSSI, SAT color code,
and transmitting power level will be displayed
on the readout. The display format is as fol
lows:
C123....
R187....
SO....
P2....
2. The display will remain on the readout until
you manually reset it by pressing key
F
8 4
R F
R 187S-0 P 2
RF channel number
RSSI value
SAT color code
Transmitting power level
c
1:2 3
AUTOMATIC CALLS IN
ABSENCE INDICATOR
This feature indicates the number of unanswered
incoming calls. If incoming calls are unanswered,
the Incoming Call Indicator lights intermittently
and the unit will indicate the following.
ESidB
XX is the number of calls (01 to 99) missed.
Depressing any key (other than the Power Key)
will clear the number of calls indicated in Display
and the Incoming Call Indicator will no longer
light intermittently. However, the number of calls
will remain if the unit is turned off.
If the jNCiSYC^ indicator is on, the display will
show as follows:
36
F
'§
h!:::
t.
D
37
Page 20

FUNCTION MENU
This feature permits you the following functions.
1. To review the key operation.
2. Set or change the function status.
3. To confirm the current function status (The
current mode will flash).
Press @ for about one second.
Scroll the menu up or down, using the ® or (▼)
key respectively.
The display information will appear as follows.
38
Note; (1)
______
(2) These features are available only when
(3) XY = Repertory Memory Address.
= Three-digit Security Code
the unit is connected with a Car Kit
(option).
(01 through 99)
39
Page 21

SERIAL DATA MODE
When the phone is placed in SERIAL DATA MODE,
the IS-DataJytoddi is displayed and the keypad be
comes non-functional (except for the power on/off
key). This mode can be activated by pressing @
(jB (5^.
Press Cl), and SERIAL DATA MODE is activated.
Press (3^, and SERIAL DATA MODE is deacti
vated.
While in this mode, an automated interface device
(optional) can be connected to the handset. This
will allow a laptop computer or fax machine to be
connected for data transmission as well as provide
the capability of connecting “phone line” based
equipment (standard phone, answering machine,
TDD devices for the hearing impaired, etc.) to the
handset.
To deactivate this feature press 0 key to turn the
power off.
FUNCTION ALL RESET
IMPORTANT SAFETY
INFORMATION
Please read and follow these cautions carefully.
TURN OFF your unit in an explosive atmosphere
(near a fuel pump, blasting area, etc.).
DO NOT dial when your unit is moving in states
where this action is illegal (this is not a prudent
practice, even where it is legal).
DO NOT permit untrained personnel to operate
the unit.
DO NOT use unauthorized accessories.
DO NOT disassemble the phone or its accessories;
If service or repair is required, return unit to an
authorized Audiovox cellular service center. If unit
is disassembled, the risk of electric shock or fire
may result.
DO NOT open the battery case. If the battery is
accidentally broken, avoid skin contact with the
internal chemical contents. If there is skin contact,
wash the affected area immediately and seek medi
cal advice.
This feature permits you to initialize the User-
Programmable functions.
Press L9 to enter Eunction All Reset
Mode, and enter your three digit security code. If
the correct security code was entered, the following
functions will be reset to the initial setting.
Functions
DTMF Tone
Automatic Answering
Call in Absence (Safety Timer)
Auto DATA Transmission
Backlighting Control
A/B System Selection
Automatic Lock
Call Restriction Mode
OneTouch Emergency Call
PIN
Alert Tone Selection
Portable Use
With Car Kit ,ON
40 41
Initial Setting
ON
OFF
OFF
OFF
OFF
STD
OFF
OFF
ON
OFF
PATl
WARNING
The following offences can punished by fine, im
prisonment, or both:
• Using obscene, indecent, or profane language.
• Using the unit to give off false distress calls.
• Wiretapping or otherwise intercepting a tele
phone call, unless that person has first ob
tained the consent of the parties participating
in the call.
• Making anonymous calls to annoy, harass, or
molest other people.
• Charging to an account without authorization
to avoid payment for service.
• Refusing to yield a party line when informed
that it is needed for an emergency call (It is
also unlawful to take over a party line by
stating falsely that it is needed for an emer
gency).
Page 22

36 MONTH LIMITED
WARRANTY
AUDIOVOX CORPORATION (the Company), war
rants to the original retail purchaser of this
Audiovox Handheld Portable Cellular Telephone,
that should this product or any part thereof
(except the items listed below), under normal
use and conditions, be proven defective in ma
terial or workmanship within the first thirty-six
(36) month period from the date of purchase,
such defect(s) will be repaired or replaced (with
new or rebuilt parts) at the Company’s option,
without charge for parts or labor directly related
to the defect(s).
The keypad and display are similarly warranted
for twelve (12) months from date of purchase.
The accessories consisting of the antenna and
rechargeable battery pack, desk top battery
charger, wrist strap are similarly warrantied for
only ninety (90) days from original purchase.
This Warranty does not apply to batteries, fuses,
or costs incurred for testing or checking, or to
any product or part hereof which has suffered
through alteration, serial number defacement,
improper installation, excessive temperature or
humidity, environmental conditions, mishandling,
misuse, neglect or accident. This Warranty is not
assignable or transferable.
To obtain repairs or replacement within the terms
of this Warranty, the product should be deliv
ered with proof of warranty coverage, specifica
tion of defect(s), transportation prepaid, to the
Company at the address shown below. For
TRAVELERS WARRANTY SERVICE.
Call toll free to (800) 229-1235 (in N.Y. State,
(516) 233-3410) for reference to an Authorized
Warranty Station in your area,
THE EXTENT OF THE COMPANY’S LIABILITY
UNDER THIS WARRANTY IS LIMITED TO THE
REPAIR OR REPLACEMENT PROVIDED ABOVE
AND, IN NO EVENT, SHALL THE COMPANY’S
LIABILITY EXCEED THE PURCHASE PRICE PAID
BY PURCHASER FOR THE PRODUCT.
The Company disclaims liability for geographic
coverage, inadequate signal to antenna, com
munications range or operation of the Cellular
System as a whole.
ANY IMPLIED WARRANTIES, INCLUDING ANY
IMPLIED WARRANTY OE MERCHANTABILITY
SHALL BE LIMITED TO THE DURATION OF
THIS WRITTEN WARRANTY. ANY ACTION FOR
BREACH OF ANY WARRANTY HEREUNDER IN
CLUDING ANY IMPLIED WARRANTY OF
MERCHANTABILITY MUST BE BROUGHT
WITHIN A PERIOD OF 48 MONTHS FROM DATE
OF ORIGINAL PURCHASE. IN NO CASE SHALL
THE COMPANY BE LIABLE FOR ANY CONSE
QUENTIAL OR INCIDENTAL DAMAGES EOR
BREACH OF THIS OR ANY OTHER WARRANTY,
EXPRESS OR IMPLIED, WHATSOEVER,
No person or representative is authorized to
assume for the Company any liability other than
expressed herein in connection with the sale of
this product.
Some states do not allow limitations on how long
an implied warranty lasts or the exclusion or
limitation of incidental or consequential damage
so the above limitation or exclusions may not
apply to you. This Warranty gives you specific
legal rights, and you may also have other rights
which vary from state to state.
IN U.S.A.:
185 Oser Avenue, Hauppauge,
New York 11788
(516) 233-3300
IN CANADA:
#101-405 Britania Road East,
Mississauga, Ontario, Canada L4Z3E6
(905) 712-9299
Page 23

ACCESSORY CATALOG
DTC-800
Desk Top Charger
TRC-800
Travel Charger
BTE-800
Extended Life Battery
(Nickel Metal Hydride)
BTR-800
Standard Life Battery
(Nickel Metal Hydride)
HF-800
HandS'Free/RJ-11
Car Adapter Kit
(For MVX-800/850
Series)
PBK-800
3 Watt Power Booster
(For use with HF-800)
RC-800 (not shown)
Rapid Charger
(For use with BTE-800/BTR-800 or BTX-800)
LB-800
Leather Carrying Case
(For MVX-800/850
Series)
BTX-800
High Capacity Battery
(Nickel Metal Hydride)
CLC-800
Cigarette Lighter
Charger
CLA-800
Battery Elinninator
44
ST180 (not shown)
Standard Telephone Interface
45
Page 24

PROTECT YOUR WARRANTY
Read your Warranty carefully, with the special
consideration to paragraph seven of the Limited
Warranty for your unit.
‘Warranty does not apply to...or to any
product or part thereof which has
suffered through alteration... mishandling,
misuse, neglect, or accident”.
Many companies are making look-alike
accessories and in some cases, promoting that
their product is equal to or better than the
Audiovox product. Be careful. Some of these
products may not be compatible for use with
your Audiovox product and may damage the
unit or cause it to malfunction. If service is
required on your unit, and it is determined that a
non-Audiovox accessory has created the problem
with your unit, the Warranty will not apply. In
addition, if the unit has already suffered
irreversible damage by reason of a non
compatible accessory, the Warranty will be
voided. To protect your Warranty, use only
compatible accessories which cannot damage or
interfere with the functioning of your Audiovox
product.
AJDIOrOX*
ûs//u/arû7/n/nun/a7ffons
46
 Loading...