

Page 1
vtJDICrOX-
'¿rnnmuff/ŒiAmû^
185 OSER AVE., HAUPPAUGE,NY 11766
>1UDIOrOX-
&mmwi/Nma€WNs
HANMilDPORrABiBCiUUiÂRrSlBPHmi
coMnmwmcHAmRANDBAmRr
Page 2

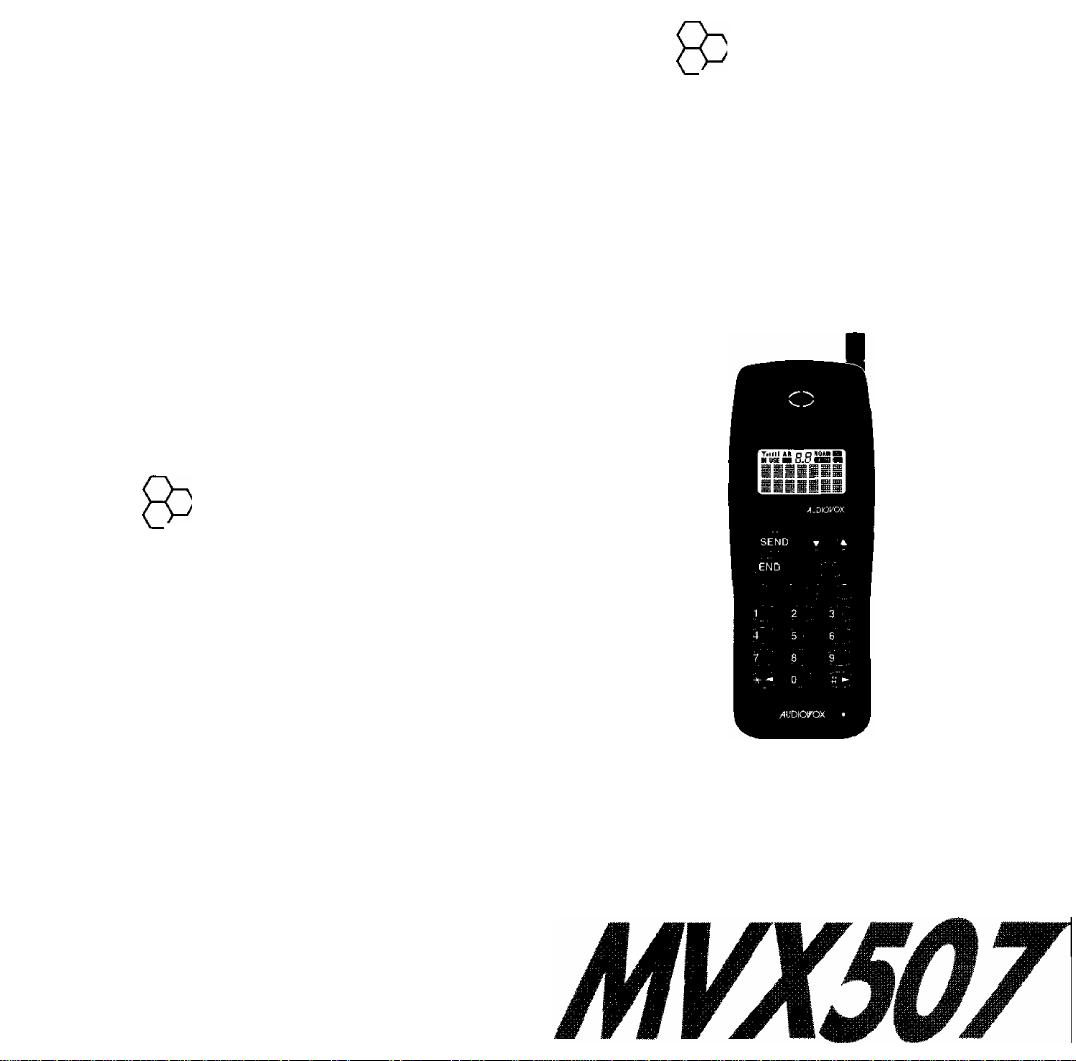
MVX507 HANDHELD CELLULAR
TELEPHONE
Congratulations. By choosing the MVX507, you have joined
the millions of satisfied customers who are enjoying the ben
efits and quality performance that only an Audiovox Cellular
Telephone can provide.
Your Audiovox Portable Cellular Telephone has been designed
to the highest standards of quality and manufacturing excel
lence to fulfill both your personal and business requirements.
Fully charged standard Extended Life Nickel Metal Hydride
Battery provides approximately 120 minutes of continuous talk
time or approximately 20 hours of standby time.
The Audiovox MVX507 is packed with advanced features like
Programmable One Touch Emergency Dialing, Anti-Fraud Se
curity Features, Automatic Call Retry, a Constant Signal
Strength Indicator and Battery Level Indicator.
Optional Acces.sories include; a Ni-Cad battery, a Slim Profile
Nickel Metal Hydride Battery, a Hands free Mobile Kit with
provisions for external antenna and a 3 watt RF Power Booster.
A Desk Top Charger, Cigarette Lighter Charger, Battery Elimi
nator and a Leather Carrying Case are also available.
And of course, your new Audiovox MVX507 comes with some
thing only an Audiovox phone can provide. The proven reli
ability that has made Audiovox one of the world’s leading sup
pliers of cellular communications equipment.
The following pages describe your phone’s functions and will
help you make the most efficient use of this wonderful com
munications tool.
Eollowing codes can be obtained through your
authorized Audiovox dealer.
a. 3-digit Initial Lock (Unlock) Code
b. 3-digit Initial Call Restriction Code
c. 2-digit Initial Call Counter Code
d. 2-digit Initial Call Timer Code
Keep these codes in a safe place!
TABLE OF CONTENTS
INTRODUCTION
Safety Information for Wireless Handheld Phones
Features
Key/Display Names and Functions......................................8
Wrist Strap Attachment
...............................................................................
BATTERY OPERATION
Battery Insertion/Removal...................................................10
Battery Charging..................................................................10
Battery Level Indicator
Low Battery Warning..........................................................13
BASIC OPERATION
Turning Your Phone ON and OFF......................................13
Backlighting
Antenna Position
Display Own Telephone Number....................................13
Display Own System ID..................................................13
Placing Calls........................................................................14
Call-in Progress Protection
Receiving Calls....................................................................14
Call in Absence Indication...............................................14
Silent Incoming Calls
Automatic Answering......................................................15
Redialing Functions.............................................................15
Last Three Numbers Dialed.............................................15
Automatic Redial (Programmable Option)
MIC Mute During Conversation..........................................16
Volume Adjustment.............................................................16
Earpiece Volume
Alert Volume...................................................................16
Keypad Tone Volume
....................................................................
ENHANCED OPERATION
Locking/Unlocking Your Phone
Locking Your Phone
Changing Your Unlock Code
Automatic Lock (Programmable Option)
Keypad Disable Function in Handsfree Mode
(Programmable Option).......................................................18
Storing in the Memory
Name Entry Keys.............................................................19
Manual Storage................................................................20
Automatic Storage
Storage After Vacant Memory Location Search
Editing the Telephone Numbers and Names
Editing the Telephone Numbers
Editing the Names............................................................24
Editing Phone Number under Stored Name
Memory Search................................................................24
.............................................
...............
.......................................................
...............................
........................................................
......................................
.............................................................
..............................................
......................................................
......................
.............................................................
.....................................................
...........................
.........................................
.......................................................
..........................................
...........................
........................................................
...........................................................
.............
.......................
......................................
....................
1
10
10
13
13
13
14
14
16
16
17
17
17
17
17
18
19
22
22
23
23
24
3
3
7
12
Page 3

Recalling Numbers from Memory.......................................24
Memory Dialing...............................................................24
Dialing after Telephone Number Search
Dialing after Name Search...............................................25
Speed Dialing
Link Dialing.........................................................................26
One Touch Dialing
Storing in the One Touch Memory
Placing a Call with One Touch Memory
Programmable One Touch Emergency Call
Placing One Touch Emergency Call................................27
One Touch Emergency Call ON/OFF..............................27
Programming a New Emergency Number
Scratch Pad Memory.............................................................28
Storing Numbers in the Scratch Pad Memory...................28
Dialing Numbers in the Scratch Pad Memory
Emergency and Priority Dialing
Storing the Emergency and ftiority Number
Dialing the Emergency and Priority Number
..................................................................
..............................................................
..........................................
.........................
..................................
.........................
........................
........................
.................
.....................
...................
25
25
27
27
27
27
28
28
EXTENDED FEATURES AND FUNCTIONS
Call Restriction
To Activate Call Restriction..............................................29
To Change your Call Restriction Code
Keypad (DTMF) Tones
Keypad (DTMF) Tones Duration Selection
Keypad (DTMF) Tones Mute during conversation
Sending DTMF Tones During a Call................................30
Timer and Counter Functions...............................................30
Elapsed Time Display.......................................................30
Outgoing Call Timer
Cumulative Call Timer
Temporary Accumulated Call Counter.............................31
Outgoing Call Counter......................................................32
Accumulated Call Counter
To Change Your Call Timer/Call Counter Codes
Call Time Warning Tone..................................................33
SID Management (Programmable Option)
A/B System Selection
Multiple City Registration
Current SID, Channel and RSSI Level Display
ESN (Electronic Serial Number) Display
Anti Fraud Security Feature (PIN Feature)
Function Review
Enhanced Feature Operation................................................38
Audiovox Accessory Catalog
.....................................................................
........................................................
.........................................................31
.....................................................
...............................................
..........................................................
...................................................
..................................................................
..........
.............................
.....................
..........
............
..........................
...................
............................
..........................
.....................................
27
28
28
............
29
29
30
30
30
31
32
32
33
33
34
35
35
35
36
45
INTRODUCTION
First introduced in 1984, the handheld portable cellular tele
phone is one of the most exciting and innovative electronic
products ever developed. With it you can stay in contact with
your office, your home, emergency services, and others.
SAFETY INFORMATION FOR WIRELESS
HANDHELD PHONES
READ THIS INFORMATION BEFORE US
ING YOUR HANDHELD PORTABLE CEL
LULAR TELEPHONE
EXPOSURE TO RADIO FREQUENCY SIGNALS
Your wireless handheld portable telephone is a low power
radio transmitter and receiver. When it is ON, it receives
29
and also sends out radio frequency (RF) signals.
In August, 1996, the Federal Communications Commission
(FCC) adopted RF exposure guidelines with safety levels
for hand-held wireless phones. Those guidelines are consis
tent with the safety standards previously set by both U.S,
and international standards bodies:
ANSIC95.1 (1992)*
NCRP Report 86 (1986)*
ICNIRP(1996)*
• American National Standards Institute; National Council
on Radiation Protection and Measurements; International
Commission on Non-Ionizing Radiation Protection
Those standards were based on comprehensive and periodic
evaluations of the relevant scientific literature. For example,
over 120 scientists, engineers, and physicians from univer
sities, government health agencies, and industry reviewed
the available body of research to develop the ANSI Stan
dard (C95.1).
The design of your phone complies with the FCC guidelines
(and those standards).
GENERAL SPECIFICATIONS......................49
TABLE OF KEY OPERATION...,
.................
50
12 MONTH LIMITED WARRANTY............53
INDEX
ANTENNA CARE
Use only the supplied or an approved replacement antenna.
Unauthorized antennas, modifications, or attachments could
damage the phone and may violate FCC regulations.
Page 4

PHONE OPERATION
NORMAL POSITION: Hold the phone as you would any
other telephone with the antenna pointed up and over your
shoulder.
TIPS ON EFFICIENT OPERATION : For your phone to op
erate most efficiently:
• Extend your antenna fully.
• Do not touch the antenna unnecessarily when the phone is
in use. Contact with the antenna affects call quality and
may cause the phone to operate at a higher power level
than otherwise needed.
DRIVING
Check the laws and regulations on the use of wireless tele
phones in the areas where you drive. Always obey them. Also,
if using your phone while driving, please:
• Give full attention to driving - - driving safely is your first
responsibility.
• Use hands-free operation, if available.
• Pull off the road and park before making or answering a
call if driving conditions so require.
ELECTRONIC DEVICES
Most modem electronic equipment is shielded from RF sig
nals. However, certain electronic equipment may not be
shielded against the RF signals from your wireless phone.
PACEMAKERS
The Health Industry Manufacturers Association recommends
that a minimum separation of six (6") inches be maintained
between a handheld wireless phone and a pacemaker to avoid
potential interference with the pacemaker. These recommen
dations are consistent with the independent research by and
recommendations of Wireless Technology Research,
Persons with pacemakers;
• Should ALWAYS keep the phone more than six inches from
their pacemaker when the phone is turned ON.
• Should not carry the phone in a breast pocket.
• Should use the ear opposite the pacemaker to minimize
the potential for interference.
• If you have any reason to suspect that interference is tak
ing place, turn your phone OFF immediately.
HEARING AIDS
Some digital wireless phones may interfere with some hear
ing aids. In the events of such interference, you may want to
consult your service provider or call the customer service
line to discuss alternatives.
OTHER MEDICAL DEVICES
If you use any other personal medical device, consult the
manufacturer of your device to determine if they are ad
equately shielded from external RF energy. Your physician
may be able to assist you in obtaining this information.
Turn your phone OFF in health care facilities when any regu
lations posted in these areas instruct you to do so.
Hospitals or health care facilities may be using equipment
that could be sensitive to external RF energy.
VEHICLES
RF signals may affect improperly installed or inadequately
shielded electronic systems in motor vehicles. Check with
the manufacturer or its representative regarding your vehicle.
You should also consult the manufacturer of any equipment
that has been added to your vehicle.
POSTED FACILITIES
Turn your phone OFF in any facility where posted notices
so require.
AIRCRAFT
FCC regulations prohibit using your phone while in the air.
Switch OFF your phone before boarding an aircraft.
BLASTING AREAS
To avoid interfering with blasting operations, turn your phone
OFF when in a “blasting area” or in areas posted: “Turn off
two-way radio”. Obey all signs and instructions.
POTENTIALLY EXPLOSIVE ATMOSPHERES
Turn your phone OFF when in any area with a potentially
explosive atmosphere and obey all signs and instructions.
Sparks in such areas could cause an explosion or fire result
ing in bodily injury or even death.
Areas with a potentially explosive atmosphere are often but
not always clearly marked. They include fueling areas such
as gasoline stations; below deck on boats; fuel or chemical
Page 5

transfer or storage facilities; vehicles using liquefied petro
leum gas (such as propane or butane); areas where the air
contains chemicals or particles, such as grain, dust or metal
powders: and any other area where you would normally be
advised to turn off your vehicle engine.
FOR VEHICLES EQUIPPED WITH AN AIR
BAG
An air bag inflates with great force. DO NOT place objects,
including both installed or portable wireless equipment, in
the area over the air bag or in the air bag deployment area. If
in-vehicle wireless equipment is improperly installed and
the air bag inflates, serious injury could result.
FEATURES
• SID management (programmable option)
• Multiple city registration
• Easy to read LCD display with alphanumeric and status indi
cators
• Back-lit keypad and LCD display
• Microphone mute control
• Priority/emergency calling with automatic retry
• 9 number speed dialing
• Link dialing
• Automatic redial (programmable option)
• 89 alphanumeric memory locations
• 7 location scratch pad, with automatic scroll
• Vacant memory location search
• Automatic entry into vacant memory location
• Phone number search
• Name search
• Programmable one touch dialing
• Programmable one touch emergency call
• Last 3 number dialed memory
• Silent incoming calls
• Automatic answering
• Call in progress protection
• Call time warning tone
• DIME tone dialing from memory
• DIME keypad mute
• DTME extended tone dialing
• A/B system selection
• Current SID, RE channel and RSSI level display
• Automatic self diagnostics
• Electronic serial number display (own)
• Telephone number display (own)
• System ID display (own)
• 6 function call timer
• Eunction review
• Constant battery level indicator
• Auti-Eraud PIN feature capability
• Automatic lock (programmable option)
• Keypad disable in handsfree mode (programmable option)
This cellular telephone is also capable of supporting the fol
lowing optional network services.
1) Caller ID
2) Voice Mail Notification
3) Short Messaging Service
Note: Your cellular service provider may use different
terminology when referring to the enhanced fea
tures listed above. Please check with your cellular
service provider for an explanation and availabil
ity of these enhanced features.
7
Page 6

KEY/DISPLAY NAMES AND FUNCTIONS
System A IndicatoKT) —
System B Indicator® _
Received Signal @
Strength Indicator
IN USF Indicator®
Mute Indicator®
fallili AB n n HOAM
—T USE IH 0.0 an-
[— ®2-digit Display
(— @ROAM Indicator
©Message Indicator
) Function Mode
Indicator
) Battery Level
Indicator
® 14-digit Display
(T) A lights when the system A (non-wireline) is sefected.
(D B lights when the system B (wireline) is selected.
Note: AB lights when standard mode is selected.
(D Received Signal Strength IndicatorTHill constantly dis
plays the signal strength represented by the number of bars.
(4) IN USE lights when a call is in progress.
(5) LMUl lights when the mute control is in effect.
(D 2-digit display S .8 shows the memory location number
and the status of various functions.
(7) ROAM lights when receiving services other than a reg
istered home system.
(D SIH lights when is pressed to select extended func
tions, etc.
(9) Battery Level Indicator iHl constantly displays Battery
Level by the number of bar segments.
@ 14-digit display shows the telephone number dialed, etc,
@ IMESSAGEI flashes when Message is received where En
hanced Feature Service is provided.
@ initiates and answers a call.
@ C^®)terminates a call.
@ (@i(Power) turns your phone on and off.
© <1^ (Programmable One Touch Emergency Key) places
a call to the programmed emergency number by a single
key stroke.
© Digit keys enter telephone numbers, alphanumeric in
formation, etc.
© Up/Down keys ® and (▼) adjusts the alert, earpiece and
keypad tones, (a) and © are also used to select
ON/OFF setting and scroll.
® (^) (One Touch Dial, Link Dial, Mute and Alpha Key):
• In standby mode, the stored telephone number in the
one touch memory is dialed with a single key stroke.
• During conversation except Link Dialing, switches off
the microphone to mute your voice.
• Used to make Link Dialing and to enter alphanumeric
characters.
® @) (Clear) clears the digit(s) from the display.
@ @) (Function) is used with digit keys to allow opera
tion of extended functions, etc.
(g) (Recall/Store) recalls telephone numbers from the
memory. Also used to store telephone numbers in the
memory.
9
Page 7
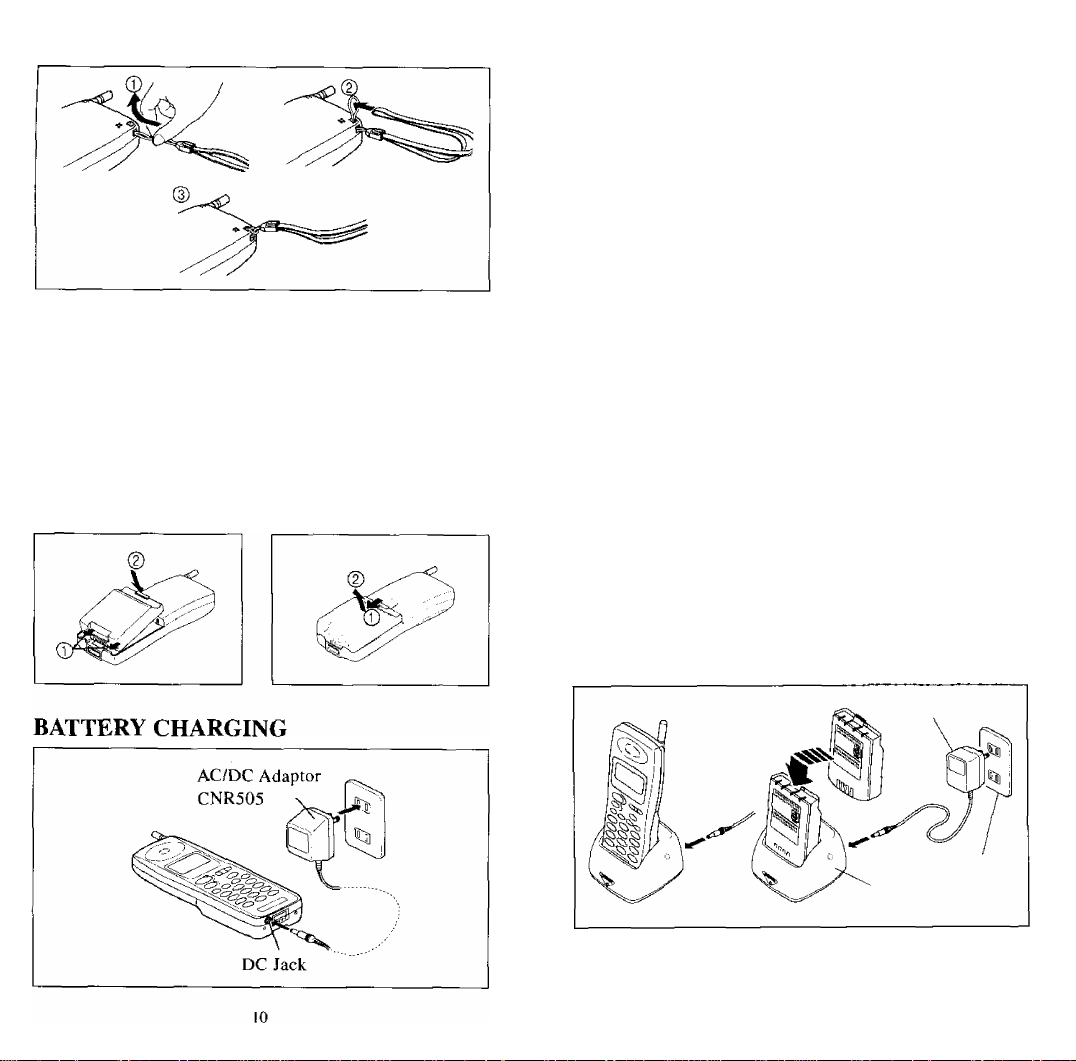
WRIST STRAP ATTACHMENT
BATTERY OPERATION
Be sure that your battery is fully charged before using your
cellular telephone for the first time. Your telephone will not
operate without a charged battery.
BATTERY INSERTION/REMOVAL
Battery Insertion Battery Removal
When your battery is charged as illustrated in the previous
page, “Bat-t-er’d Charge” will be displayed. The bar seg
ment of the Battery Level Indicator will flash during charg
ing.
• When “F-ul ly Char ged” is displayed, battery charg
ing is completed.
Notes: • The standard battery BTE405 will be fully
charged in about 3 hours. The optional BTR405
and BTM405 will be fully charged in about 2
hours. However, actual charging time varies
with battery conditions.
• To place or receive calls during charging, press
and hold @) to turn your phone on. After calls,
press and hold @) again to turn your phone
off.
The desk top type Rapid Charger RC505 is standard acces
sory of MVX507. During charging by use of RC505, LED
on the Rapid Charger will light red. When the charging is
completed, the LED color will change to green.
A flashing red light indicates when the battery temperature
is out of charge range or defective.
Note: When charging your Battery only, make sure
that the battery label faces the LED side of
Rapid Charger.
11
Page 8

CAUTIONS:
• Use only the supplied AC/DC Adaptor CNR505. Using
other AC/DC Adaptors can damage the battery and/or the
handset.
• Do not discard the battery into fire.
• Do not “short out” the battery (direct connection of the +
and - terminals on the battery).
• Do not use any batteries or chargers other than those spe
cifically designed for use with this phone.
• Charge the battery indoors with the ambient temperature
between 4UF and 104“F (5°C and 40X).
• Do not charge the battery in direct sunlight or in high hu
midity places like a bathroom,
• Do not recharge or “top-off’ the battery pack by charging
for short periods of time to avoid shortening the battery
life. It is recommended to charge the battery after the bat
tery is discharged completely.
• The product that you have purchased contains a recharge
able Battery. The Battery is recyclable. At the end of its
useful life, under various state and local laws, it may be
illegal to dispose of this Battery into the municipal waste stream. Check with your local
solid waste officials for details in your area
for recycling options or proper disposal.
Power Management
Talk & Stand-By Times
Battery
800 mAH NICAD
BTR4Ü5
1200mAH NiMH
BTE405
800 mAH NiMH
BTM405
Please note all times are approximate.
Talk-Time Stand-By Time
80 Minutes
120 Minutes 20 Hours
80 Minutes 12 Hours
12 Hours 7.6 oz.
Weight
8.1 oz.
7.6 oz.
BATTERY LEVEL INDICATOR
The Battery Level Indicator shows the current strength of
the battery in the three-level bar segment in the battery sym
bol. Note that the battery level indication may be affected
by variables such as temperature, battery age, and charging
conditions.
12
Talk & Stand-by times can vary and are dependent upon the
coverage of the network and how you use your phone.
LOW BATTERY WARNING
When “Loui Bat and the Battery Level Indicator
flashes every second, and an alarm tone sounds, there are
only a few minutes left for call processing. If usage continues,
“Low Bott erw” flashes more frequently. A few moments
later, your call is terminated and your phone is automatically turned
off.
BASIC OPERATION
TURNING YOUR PHONE ON AND OFF
Press and hold @) to turn on your phone. Your own tele
phone number will be momentarily displayed.
Note: When “NO SUC” (No Service) is displayed, you
cannot place or receive calls as the “Cellular Sys
tem” is not available.
To turn off your phone, press and hold again.
Backlighting
When you press any key, the backlighting for display and
keypad turns on to provide easier operation of your phone.
It will go out 8 seconds after the last key press.
Antenna Position
The dual position antenna allows your phone to receive calls
while the antenna is down. However, for optimum perfor
mance and signal strength or while operating in poor signal
areas, please extend your antenna fully.
Note: The antenna can be used in its fully extended or
fully retracted position only.
Display Own Telephone Number
Press @),
To clear the display, press <^.
Display Own System ID
Press
To clear the display, press @i.
13
Page 9

PLACING CALLS
1. Enter a telephone number.
2. Press
The IN USE indicator will light.
3. When you finish talking, press d^.
Example: To call 123-4567
1. Enter <3 ^
Note: tf the Silent Incoming Calls is activated,
Oleri on” will be displayed when your phone is
powered up. To clear the display, press @).
To Activate the Silent Incoming Calls:
Press <1^.
“Silent Olert on ” will be displayed.
To clear the display, press @).
2. Press Cje^.
Talk with the other party.
3. To terminate the call, press .
To Correct Entered Digits:
• Press @1 to erase the last digit entered.
• Press and hold to erase the whole number.
To View Whole Number (Hidden Digits):
Although you can enter up to 32 digits, the display can show
the last 14 digits only. To view the whole number, press and
hold @). The hidden digits (over 14 digits) and the last 14
digits will scroll displaying “P /” (for the last 14 digit), “Pp”
(for the next 14 digits) and “P5” (for the rest of upper digits).
Call-in Progress Protection
Even if @) is pressed during conversation, your call is not
interrupted.
RECEIVING CALLS
1. When an incoming call is attempted, an alert tone will
sound and “COLL” will flash repeatedly.
2. Press any key except CiNP>. ®, and {▼).
The IN USE will light and you can talk with the other party.
3. To terminate your call, press
Call in Absence Indication
If calls go unanswered, “CO!
swered calls will appear in the 2-digit display.
To clear the display, press @).
and the number of unan-
Silent Incoming Calls
When this feature is activated, a single beep and a flashing
“COLL” message will alert you of an incoming call.
To Deactivate the Silent Incoming Calls:
Press (™), again.
“S i 1 ent H1 ert- o F ” will be displayed.
To clear the display, press
Automatic Answering
When this feature is activated in handsfree mode, your phone
will automatically answer an incoming call on the second alert.
To Activate Automatic Answering:
Press <1^,
“Huto Answer on” will be displayed.
To clear the display, press @>.
To Deactivate Automatic Answering:
Press @), again.
“Rut-O Hnsuier oF” will be displayed.
To clear the display, press
Notes: * Automatic Answering will function in
handsfree mode only.
• Automatic Answering will not function if your
phone is in the lock, call restriction, or silent in
coming calls mode.
• If Automatic Answering is activated, “Huto
flnsi-jei Oil” will be displayed when your
phone is powered up.
REDIALING FUNCTIONS
Last Three Numbers Dialed
You can display and redial any of the last three telephone
numbers you tried to call.
1. Select one of the telephone numbers out of three.
14
15
Page 10

• Press to display the most recent number.
• Press (§5), to display the second most re
cent number.
• Press (r^, to display the third most recent
number.
2. Press <5^ for redialing.
Note: If “R E ad d” is displayed and you wish to redial the
last number dialed, simply press
Automatic Redial (Programmable Option)
If Automatic Redial is selected, your phone will automati
cally continue redialing in 20 seconds if the attempt to reach
the cell site is not successful. The IN USE indicator will
stay on, but the earpiece speaker will be muted.
Note: Automatic Redial will initiate only on a ^‘Cellular Sys
tem” busy signal but not on a “Line” busy signaL
MIC MUTE DURING CONVERSATION
To Mute the Microphone:
During conversation, press
To Release Mute:
During conversation, press again.
Notes: • The mute will be automatically released when
the call is terminated.
• The MIC Mute will not function during Link
Dialing.
VOLUME ADJUSTMENT
Your phone has 7-level volume controls each for the Ear
piece volume, the alert level and the keypad tone level.
Earpiece Volume
During conversation, press ® or 0 to raise or lower the
loudness of other party's voice.
While not in use, press Cp^ to display
“Uo ice”. Press (*) or ® to adjust the earpiece Volume.
While not in use, press @), to display
“Й1 ert”. Press 0 or 0 to adjust the Alert Volume.
Keypad Tone Volume
In standby mode, press 0 or 0 to raise or lower the key
pad tone volume level.
ENHANCED OPERATION
LOCKING/UNLOCKING YOUR PHONE
You can restrict outgoing calls except for the Programmable
One Touch Emergency Call, Emergency (911, 000, 119), and
the number stored in the emergency/priority dialing area.
Your phone will receive calls normally even if it is locked.
Locking your Phone
1. Press C^,
2. Enter your 3-digit Unlock code.
Notes: * Please contact your authorized Audiovox
dealer to check your initial Unlock code.
• If your phone is locked.
played when your phone is powered up.
To Unlock your Phone:
While “Locked” is displayed, enter your 3-digit Unlock
code.
Changing your Unlock Code
1. Press @), ilH).
“Un 1 ock Pr e?” will be displayed.
2. Enter your current 3-digit Unlock code.
Note; Please contact your authorized Audiovox dealer to
check your initial Unlock code.
“Unlock New?” will be displayed.
3. Enter a new 3-digit Unlock code except 911, 000, and
119.
4. Press C^.
CAUTION: Keep the record of new code in a safe place!
will be dis
Alert Volume
During ringing, press ® or 0 to raise or lower the alert
volume level.
16
17
Page 11

AUTOMATIC LOCK
(Programmable Option)
You can automatically lock your phone by programmable
option each time your phone is turned on.
The display shows “Lock ed” when your phone is turned on.
Even in automatic lock mode, your phone will receive calls nor
mally.
To Unlock your Phone:
Enter your 3-digit Unlock code.
KEYPAD DISABLE FUNCTION IN
HANDSFREE MODE
(Programmable Option)
This function prevents accidental or unintentional use of the
keypad in handsfree mode.
When this function is activated by Programmable option,
no key operations in handsfree mode are possible. The dis
play shows “Keypad Lis
is turned on.
Note: Even in keypad disable mode, your phone will re
ceive calls normally.
To Temporarily Release Keypad Disable Mode:
Press and hold and simultaneously.
“Keypad D i sab 1 e” will disappear.
To Return to Keypad Disable Mode:
Press and hold ^nd (Q) simultaneously again.
“KeyF-ad D i sab J. s” will be displayed.
Notes: • When handsfree curly cord is disconnected
from your phone, key operations become pos
sible and “Keypad D1 sab 1 e” disappears.
• When both automatic lock and keypad disable
modes are selected by Programmable option
and your phone is disconnected form the curly
cord, your phone goes into the locked mode au
tomatically.
• When both automatic lock and keypad disable
modes are selected by Programmable option
and your phone is connected to the handsfree
kit with curly cord, the display shows K
D i sab 1 e” upon powering up.
18
each time your phone
STORING IN THE MEMORY
You can store telephone numbers and names in the 89
memory locations. For each memory location, you can store
a telephone number of up to 32 digits and a name of up to 7
characters. (Entry of name can be omitted.)
Name Entry Keys
To enter names, the following keys are used:
[Alphanumeric Character Entry Keys]
Key
o
(@)
1st 2nd 3rd
u
L= e:
.J
M N ij E.
F'
T
Key Presses
U.i
Space
El; c
h-l
k: L..
-
4th 5th
1
f
T
“i;
-I-
’7
9
ti
[Editor Function Keys]
Key Function
&
&
Press Deletes the character where the cursor is
Hold
@1
Shifts cursor to the right.
Shifts cursor to the left.
positioned.
Deletes all the characters.
19
Page 12

The following example shows how to enter the name JOHN.
You can learn the characters behind the digit keys and how
to move the characters with the cursor keys. Note this ex
ample illustrates how to enter a name but not actually store
the name.
The following examples show how to store the telephone
number together with name, as well as how to store tele
phone number alone.
Example l:To store telephone No. 123-4567 with name
JOHN in memory location No. 10
1. Press then enter
.
in
2. Press @)C^).
“hLPHhT'” will flash.
3. Enter the name JOHN with the name
entry keys.
TiiillAB
üi
4. Press “Stor e ?” will be
displayed.
5. Enter After the momentary
display of “Stored”, the stored
memory location number, telephone
number and name will be displayed.
TiilllAe rn
i 2345i b?
y'l
6. Press @1 to clear the display.
Manual Storage
Telephone numbers and names can be stored manually into
the memory locations 01 to 89.
1. Press then enter a telephone number.
2. Enter the name.
1) Press @), (^). “MLPHH?” will flash.
2) Enter the name with the name entry keys.
3. Press @), “Store will be displayed.
4. Enter a 2-digit location number (01-89). After the mo
mentary display of “Stored”, the stored memory loca
tion number, the telephone number and name remain dis
played.
5. Press @).
Note: If the selected memory location number is already
used, the previous information will be overwrit
ten.
20
Note: If telephone number is not entered before press-
mg
press
to enter the telephone number.
J?” is displayed. In this case,
Example 2: To store telephone No. 234-5678 alone in
memory location No. 11
1. Press @), then enter
TiilllAB
.
2. Press @)(^.
3. Enter while the telephone
number is flashing.
TiilltAB , ,
1 1
4. Press @) to clear the display.
2345i b?0
21
ill
«q
Page 13

Automatic Storage
You can automaticaliy store telephone numbers and names in
vacant memory locations. (You may choose to omit names.)
1. Press C@, then enter the telephone number.
2. Enter the name.
1) Press (g), ®will flash.
2) Enter the name with the name entry keys.
3. Press @), (^3).
The telephone number and name are automatically stored
in the first available vacant memory location.
4. Press C^.
Note: If there is no available location, “Nei iory Fu l l”
will be displayed momentarily. In this case, choose
a memory location that you wish to overwrite with
the new information (Name, Number).
Example: To automatically store telephone No, 345-6789
with name JOHN in vacant memory
1. Press @), then enter
(gW)^ .
2. Enter the name.
1) Press @), C^). “hLPHH':''” will flash.
2) Enter the name with the name entry keys.
3. Press (^(r3)Cr^.
The telephone number and name are
automatically stored in the vacant
memory location 12, for example.
4. Press @).
Storage After Vacant Memory Location Search
You can search for unused memory locations for which tele*
phone numbers and names can be stored. (You may choose to
omit names.)
1. Press @), then enter the telephone number.
2. Enter the name.
1) Press C^, <^w). “hLPHh'“'” will flash.
2) Enter the name with the name entry keys.
3. Press C23).
4. Press ® or 0 to search for the desired vacant memory
location.
5. Press to store in that memory location.
6. Press @).
22
Example: To store telephone No. 456-7890 with name
JOHN in the vacant memory location No. 13
1. Press then enter
2. Enter the name.
1) Press @ (^. “hLPHP?” will flash.
2) Enter the name with the name entry keys.
3. Press @) (^.
4. Press 0 or 0 to search for vacant
memory location 13, for example.
5. Press (^.
TmIIIAB
1 “i
tj "Pi
45FV 7 P:
6. Press @).
Notes; • To exit the Vacant Memory Location Search
function, press
• If there is no available location, “llei oi u Fu 11”
will be displayed momentarily. In this case,
choose a memory location that you wish to over
write with new information (Name, Number).
EDITING THE TELEPHONE NUMBERS
AND NAMES
You can edit the telephone numbers or names as required.
Editing the Telephone Numbers
To Change the Telephone Number of Location No. XX
(01-89):
1. Press @), then enter a new telephone number.
2. Press @), The entered telephone number will flash.
3. Enter 2-digit location number OjOOjO to store the new
number.
To Delete the Telephone Number of Location No. XX (1-
89):
1. To display the telephone number, follow one of the next
procedures.
« To search for the telephone number, press («3), then
®/0.
• Press CR3), CX^/CX^CX^-
2. Press @1. “tiemory Cle.3r will be displayed.
3. Press (@) again. “Menioriri Cl eared” will be displayed
momentarily.
23
Page 14

Editing the Names
To edit the name of location No. XX (1-89), follow the next
steps.
1, Press (¿5^, and enter CX^.
2. Press
3. Edit the name with the name entry keys.
4, Press @), (r^ to store the new name.
Note: To exit the editing mode, press at any time.
Editing Phone Number under stored Name
To edit phone number under stored name, follow the next
steps.
1. Press
2. Enter the name with the name entry keys.
3. Enter <23) for direct search.
4. Press C^)C^)tto set phone number edit mode.
5. Enter a new Phone Number.
6. Press <™c) (r7|) dl) to store.
7. Press to clear the display.
Memory Search
When you wish to search the memory information:
1. Press (dE)- “Kecal 1” will be displayed.
2. Press or ® to scroll up/down memory information.
Note: Holding 0 or 0 automatically scrolls up/down
memory information.
RECALLING NUMBERS FROM
MEMORY
Memory Dialing
Telephone numbers can be recalled and dialed from one of
any 89 different memory locations.
1. Press (£3).
2. Enter the 1 or 2 digit location number (1-89).
The telephone number and name will be displayed.
3. Press to initiate dialing.
Note: If nothing is stored in a particular memory loca
tion, “i l0i ior d Empty*’ will be displayed momen
tarily.. In this case, check the memory location with
Memory Search.
24
Example: To place a call using memory location No. 10
1. Press (53).
2. Enter
3. Press (si^.
TiiiiiAB m
'Ll $11
Dialing after Telephone Number Search
You can scan, recall and dial numbers stored in memory lo
cations 1 through 89.
1. Press (¿3).
2. Press 0 or 0 to scroll up or down the memory locations.
3. If your desired telephone number is displayed, press
Csewd) to initiate dialing.
Note: To exit the search mode, press at any time.
Dialing after Name Search
You can dial after searching for telephone numbers by their
names.
1. Press
“hLPHh?” will flash.
2. Enter the beginning part of name with the digit keys.
Example: Enter J, JO, or JOH for JOHN,
3. Press (r^. “SedPch” will be displayed.
4. Press 0 or 0 to search for the desired name.
5. Press (JEN^ to initiate dialing.
Notes: • If no name is found, “Mot i ■ ound’’ will be dis
played momentarily in step 4. Enter another
character(s) to continue name search.
• To exit from the search mode, press at
any time.
Speed Dialing
You can place a call from the stored memory locations 1 to
9 using the keys to (9^.
1, Press one of keys to
2. Press CsE^ to initiate dialing.
25
Page 15

LINK DIALING
When you receive service such as Voice Mail from your cel
lular service provider, you can dial a number and make Link
Dialing with key only.
Five Link Dialing Memories (Ml to M5) are provided with
your phone.
Storing Number in Link Dialing Memory
1. Enter a number to be stored.
2. To store the number as non-secret number, press @) (¿5^
and enter Link Dialing Memory Number.
To store the number as secret number, press @) («5^
<55* and enter Link Dialing Memory Number.
Note: Maximum 16 digits can be stored in each Link
Dialing Memory. When you try to store more than
16 digits, the lastly entered 16 digits are valid.
Recalling number from Link Dialing Memory
1. To recall a non-secret number from a Link Dialing
Memory, press and enter Link Dialing Memory
Number.
To recall a secret number from a Link Dialing Memory,
press 3 digit lock code, and enter Link
Dialing Memory Number.
Making Link Dialing
1. To display a Link Dialing Number stored in “Ml”, press
Note: When the Link Dialing number is stored as secret,
“Secr et” will be displayed.
To dial the Link Dialing Number and activate Link Dial
ing, keep holding C^).
2. To transmit DTMF signals for numbers stored in M2 to
M5, press each time during conversation.
Notes: • When the number is stored as secret number,
“Secret” will be displayed.
• When PIN mode is ON, “P i H” will Hash.
In this case, press (^) or to send the PIN
first.
3, To exit from Link Dialing mode, press (c^.
ONE TOUCH DIALING
By using Link Dial Memory Ml, you can place a call with
key after storing a telephone number in the one touch
memory assigned to key.
Storing in the One Touch Memory
1. Press then enter a telephone number.
2, Press @>,
Note: The stored telephone number can be reviewed by
pressing ®), dis
placing a Call with One Touch Memory
1. Press and hold
2. The telephone number will be displayed, and the !N USE
indicator will light as the call is placed.
PROGRAMMABLE ONE TOUCH EMER
GENCY CALL
You can place an emergency call with key alone, even
when your phone is in lock and/or call restriction mode. 911
is the preset emergency number. You can reprogram this num
ber with another number (up to 7 digits) if you wish. Also,
you can deactivate this feature to avoid an unintentional call
by mistake.
Placing One Touch Emergency Call
1. Press and hold for 2 seconds.
The pre-programmed emergency number will be displayed,
and the IN USE indicator will light as the call is placed.
One Touch Emergency Call ON/OFF
1. Press di«).
2. Enter your 3-digit Unlock code.
3. Press ® to select “on”, or ® to select “of ”.
4. Press <51)10 store.
5. Press to clear the display.
Programming a New Emergency Number
1. Press <d5)> dli)-
2. Enter your 3-digit Unlock code.
3. Enter a new emergency number (Max, 7 digits).
4. Press <53) to store.
5. Press to clear the display.
26
27
Page 16

SCRATCH PAD MEMORY
As a sort of numerical note pad, you can enter up to 7 en
tries in special memory locations (memory locations 90 to
96) of up to 32 digits each. Also, you can place a call from
the scratch pad memory. The 8th entry scrolls the scratch
pad memory and the number entered first is erased.
Note; Contents of the scratch pad memory will not be
cleared even if your phone is turned off.
Storing Numbers in the Scratch Pad Memory
1. Press @) and enter a number you wish to store (up to 32
digits).
2. Press (^, Cl3-
Dialing Numbers in the Scratch Pad Memory
1. Press <53).
2. Enter one of the location numbers (90 to 96).
Example: Enter to recall the last number en
tered.
3. Press to initiate dialing.
EMERGENCY AND PRIORITY DIALING
You can store a single telephone number up to 32 digits for
emergency or priority purpose. The memory location 97 is
reserved for this purpose.
Storing the Emergency and Priority Number
1. Press @), then enter a telephone number.
2. Press @), <£3^-
3. Enter <9^, while the telephone number is flash
ing.
4. Press @) to clear the display.
Dialing the Emergency and Priority Number
1. Press (¿3),
2. Press CgEw^.
Note: The emergency and priority number will automati
cally be redialed up to 3 times at 50 second inter
vals or until a connection is made. During redialing
sequence, “Pi 1 or i ' to D i a 1 ” will be displayed
indicating that this feature is in operation.
28
EXTENDED FEATURES AND FUNCTIONS
CALL RESTRICTION
In the call restriction mode, only specific keys are effective
to prevent unauthorized operation of the phone. Only the
following keys are operative to place a call.
1) Any combination of numbers 1 and 2 for a call:
• (¿s) -I- (1, 2, 11, 12, 21, 22) CsENp>
2) Emergency Calls:
• H- 9 -I- 7 -t- (5^
• 9 -t- 1 1 -t-
• 0 -t- 0 -t- 0 -I- Cgerig)
• 1 -H 1 -f 9 -I- CsEWD>
3) One Touch Emergency Call:
• Holding for 2 seconds.
Note: You can receive a call even if your phone is in the
call restriction mode.
To Activate Call Restriction
1. Press @), ($3), C|^.
2. Enter your 3-digit Call Restriction code.
Note: Please contact your authorized Audiovox dealer to
check your initial Call Restriction code.
“CR” will be displayed to indicate that call restriction is in effect.
Note: The call restriction is effective until it is deacti
vated. When the power is turned on, “CR” will be
displayed. (‘
phone is locked.)
To Exit Call Restriction Mode:
While “CR” is displayed, enter your 3-digit Call Restriction
code. Then, “K0
play, press
To Change your Call Restriction Code
1. Press <^, (#3, C|^, C|^.
“ReiE-tr,. Pr-0?” will be displayed,
2. Enter your current 3-digit Call Restriction code.
“Resir. Heio?” will be displayed.
3. Enter a new 3-digit Call Restriction code except 911,
000,and 119.
4. Press СЕз)-
will be displayed if your
will be displayed. To clear the dis-
29
Page 17

CAUTION: Keep the record of new code in a safe place!
Note: If you enter a wrong code in step 2, your phone
will return to standby mode.
KEYPAD (DTMF) TONES
Dual Tone Multi-Frequency (DTMF), or “Keypad Tone” sig
nals can be transmitted during a call by entering digits on
the keypad or recalling numbers from the memory. By send
ing the DTMF signals, you can access special services such
as voice mail and answering machines that require long du
ration tone.
Keypad (DTMF) Tones Duration Selection
To toggle the Long Tone and Short Tone for the time dura
tion of DTMF tones, press <|^.
Keypad (DTMF) Tones Mute during conversa
tion
To mute the keypad (DTMF) tone, press (@, during
conversation.
To enable the keypad (DTMF) tones, press @), again
during conversation.
Sending DTMF Tones During a Call
From the Keypad:
1. During a call, press any key on the keypad.
From the Memory:
1. During a call, press
2. Enter a 2-digit memory location (01-89).
Outgoing Cali Timer
You can display your outgoing call time.
1. Press @), <3^, (5^.
2, Enter your 2-digit Call Timer code.
Note: Please contact your authorized Audiovox dealer to
check your initial Call Timer code.
“Outgo - T hhhh: iPPi” will be displayed, (hhhh: Hours, mm:
Minutes)
To exit this mode, press @),
To reset the Outgoing Call Timer to 00(X):00, press •
Note: The timer will automatically reset to 0000:00 af
ter 9,999 hours and 59 minutes.
Cumulative Call Timer
You can display a running total of on-air usage.
1. Press (0), C|^, <1^.
2. Enter your 2-digit Call Timer code.
Note: Please contact your authorized Audiovox dealer to
check your initial Call Timer code.
“Total - T hhhh: rnr i” will be displayed, (hhhh: Hours, mm:
Minutes)
To exit this mode, press @).
To reset the Cumulative Call Timer to 0000:00, press
Note: The timer will automatically reset to 0000:00 af
ter 9,999 hours and 59 minutes have been accu
mulated.
TIMER AND COUNTER FUNCTIONS Elapsed Time Display
You can display the elapsed time of the current call or last
call while not in use.
1. Press (§), <1^,
“T ip!0 r iPi: ss” will be displayed, (mm: Minutes, ss:
Seconds)
2. Press @) to exit this mote.
Note: The time count will automatically reset to 00:00
after 99 minutes and 59 seconds.
30
Temporary Accumulated Call Counter
You can display the temporary accumulated number of calls.
1. Press @), (^5^,
“Ca 11 KKhX” will be displayed. (XXXX: Number of,
calls)
To exit this mode, press @).
To reset the total number to 0000, press
Note: The call counter will automatically reset to 0 after
9,999 calls.
31
Page 18

Outgoing Call Counter
You can check the accumulated number of outgoing calls.
1. Press @1, (^3^, <5Z^-
2. Enter your 2-digit Call Counter code.
Note: Please contact your authorized Audiovox dealer
to check your initial Call Counter code.
“Out 90-C KiOOi” will be displayed. (XXXX: Number of
outgoing calls)
To exit this mode, press @i.
To reset the Outgoing Call Counter to 0000, press
Note: The call counter will automatically reset to 0 after
9,999 calls.
Accumulated Call Counter
You can check the accumulated number of calls.
1, Press @), <*3^, C|^, <2^.
2. Enter your 2-digit Call Counter code.
Note; Please contact your authorized Audiovox dealer to
check your initial Call Counter code.
“Total -C KtKt” will be displayed. (XXXX: Number of
calls)
To exit this mode, press @).
To reset the Accumulated Call Counter to 0000, press (^3, @)-
Note: The call counter will automatically reset to 0 after
9,999th call has been made.
To Change your Call Timer/Call Counter Codes
• In case of Call Timer code change, press
“Timer Prer” will be displayed.
• In case of Call Counter code change, press @),
“Comi-rter Pre?” will be displayed.
2. Enter the current code.
Note: Please contact your authorized Audiovox dealer
to check your initial code.
“Timer Nem?” or “Counter Heo?” will be displayed.
3. Enter a new 2-digit code.
4. Press (¿3).
CAUTION: Keep the record of new codes in a safe
placet
32
Call Time Warning Tone
You can turn the Call Time Warning Tone on and off. When
it is set to on, a single warning tone will be heard every 1
minute and a double warning tone will be heard every 5 min
utes during a call.
To l\irn the Warning Tone ON:
1. Press @), <33^ while not in use.
“Beep Tono g r," will be displayed.
2, Press @) to clear the display.
To Thrn the Warning Tone OFF:
1. Press (S^ttiB^tCil^^again while not in use. On/off
toggles and i'onp □ r ’
2. Press to clear the display.
will be displayed.
SID MANAGEMENT (Programmable Option)
You can take advantage of a family of SID (System Identifi
cation) groups by this Programmable option. This is a group
of cellular systems in cities that your carrier owns or has
special billing arrangements with. Your close family SID’s
will be billed at the same rate as your home billing. (Both
“Hu SUC”
will be billed at a preferred rate. Your phone will display
solid ROAM. When flashing ROAM is displayed, you are us
ing a SID system that is not included in the groups assigned
at the time of programming.
If your display indicates “NO SUC”, you will need to change
your A/B system selection or, please refer to Multiple City
Registration to change phone regi.stration to enable you to
make a call.
Note: For specific information regarding special billing
and ROAM are off.) More distant family SID’s
arrangements, please consult your cellular service
provider.
A/B SYSTEM SELECTION
You can select the system you need to use. The system that
you are registered with is the preferred system and your home
system.
1. Press @1- <1^.
2. Press 0 or ® until your desired system is displayed.
3. Press
4. Press @) to clear the display.
Note: When you turn your phone on, your phone will
start to scan the system of the last power-off.
33
Page 19

standard Mode:
Your phone will scan the preferred system channels. If un*
able to find an acceptable preferred channel, your phone
switches to scan the non-preferred system channels. “A B”
will light in the display.
System A Only Mode:
Your phone will scan the system A only. “A” will light in the
display.
System B Only Mode:
Your phone will scan the system B only. “B” will light in the
display.
Home Mode:
Your phone will scan preferred system and Brother/Sister
system channels.
You can place or receive calls only within your Home area.
Family Mode;
Your phone will scan both systems A and B regardless of
Brother/Sister or Cousin system channels,
MULTIPLE CITY REGISTRATION
You can reprogram the different phone numbers for the cit
ies in which you are registered. Each programmed phone
number will be designated as your home system.
Note: To use this feature, you must register your phone
with the carrier in order to get both the system ID
number and your phone number.
To Program the Phone Number:
1. Press then enter the new system ID number (5 dig
its).
2. Enter corresponding phone number including your area
code (10 digits).
3. Press
4. Enter your 3-digit Unlock code.
After programming the new number, your phone auto
matically wakes up again and displays the new phone
number.
Note: Calls are placed or received using the progranuned
phone number only.
34
CURRENT SID, CHANNEL AND RSSI
LEVEL DISPLAY
You can see the current SID (System Identification), chan
nel No. and RSSI level at a time. The RSSI is the signal
strength of the current channel of operation represented in
voltage. The higher voltage shows the better connection and
clearer communications. rssi level
1. Press @),
2. To clear the display, press @)
CHANNEL NO.
ESN (Electronic Serial Number) Display
Press to display your ESN.
To clear the display, press @).
ANTI FRAUD SECURITY FEATURE (PIN
Feature)
If your cellular carrier offers Personal Identification Num
ber (PIN) service, your new phone must be programmed with
your PIN. For your protection, you cannot make any outgo
ing calls until establishing your PIN. Please contact your
cellular service provider for specific instructions.
To Place a Call Using the PIN service:
1. Enter the telephone number
2. Press
“PIN” will flash in the display.
3. Press again. Your call will then be placed.
To Enter the PIN and 'Dim the PIN Feature ON or OFF:
1. Press C*3^-
2. Enter your 3-digit Unlock code.
Note: Please contact your authorized Audiovox dealer to
check your initial Unlock code.
3. Enter your PIN (up to 6 digits).
4. Press (J) or 0 to turn the PIN feature on or off.
5. Press
6. To exit the mode, press
35
Page 20

FUNCTION REVIEW
To Review the Function Menus:
1. Press @), then ® or (r). “FnC Rev leu!” will be dis
played.
2. Press ® or ® to scroll up or down the function menus.
3. Press @1 to exit the mode.
Notes: • You can directly access to “F HC h 1 ” by press
ing
* You can directly access to “
ing <0, C#i), ®/®.
To Directly Enter the Function Setting Mode:
1. Press @), then ® or ® to search for the desired func
tion menu.
2. Press @). Then, you can enter the function setting mode.
The following table shows each function menu. In the ac
tual display, “PNC 1 bcratch” and “PNC 1 F-^ad” are
alternately displayed in case of FNC 1.
Display
PNC 1
Scratch Pad
FNC 3
DTMF To
FNC 5
LocF:
FNC b
Sastapi bt-andard
FNC 8
Si lent PI art
FNC 9
ne
Scratch pad memory
DTMF tone mute (during a call)
Locking your phone electronically
Scan mode selection
Silent alert selection
Automatic answer selection
Function
HLitO Hn
FNC ?:l
Nessaaa node
FNC 72
Message
FNC ai
Beep To
BeeF=-
ne
Message mode selection
Message beep selection
Call time warning tone selection
” by press-
Display
FNC r4
1 - Touch Erier'9.
FNC
Call Restrv
FNC as
Diapiaa RSSI
FNC a20
Cal 1 Counter-
FNC :i^21
Outgo Call
FNC :^22
Total Call
FNC ecu
Cal 1 Tiner
FNC a31
Outgo Tine
FNC b32
Total Tine
FNC b90
No ice Uoluma
FNC
Hlert volume
FNC ^+^92
Tone volume
FNC +93
M-Beep Uolume
FNC #1
Oun Phone
FNC #2
Dlap lag ESN
FNC #3
Dlaplag SIDM
FNC tfB
Change DTMF
FNC #51
Change Unlook
FNC #52
Change UK
Function
One touch emergency call selection
Call restriction mode selection
Current SID, RF Channel
and RSSI level display
Temporarily accumulated call
counter display
Accumulated outgoing call counter
display
Accumulated call counter display
Elapsed timer display for current or
last call
Outgoing call timer display
Cumulative call timer display
Earpiece volume selection
Alert volume selection
Keypad tone volume selection
Message Beep volume selection
Own telephone number display
Own ESN display
(Electronic Serial Number)
Own system ID display
DTMF (keypad) tone duration
selection
Lock/Unlock code change
Call restriction access code change
36
37
Page 21

Display Function
FNC #53
Change C-Uouni
FNC #54
FNC #Change PIN
FNC ##
Call counter access code change
Call timer access code change
PIN entry mode
Multiple city registration (phone
number and SID entry)
ENHANCED FEATURE OPERATION
The feature operation on the following pages pertains to “En
hanced Features” that may be offered by your cellular ser
vice provider. Before you can use these features, you must
subscribe to them through your home cellular service pro
vider.
Note: These optional network services may not be
available in all areas.
Message Indicator
When your phone has unreviewed messages. Message Indi
cator will be displayed. When your phone receives a mes
sage, Message Indicator will flash in the display.
Message Display On/Off Mode Selection
Message Display ON Mode is preset at the factory.
1. To change the Message Display ON/OFF Mode, press
2. Enter 3 digit Lock code.
3. Press ® to select ON mode or ® to select OFF mode.
4. Press (^.
5. To clear the display, press @).
Message Display at Message Receiving
When Message Display Mode is On and your phone receives
Call Back Number, Short Message or Voice Mail, “CfiLL
BhCK”, “SHORT MESShGE” or “UGICE MO IL” will be dis
played respectively. To view the message, press any key
except @) and
When Message Display Mode is Off and your phone receives
the message, the Message Indicator will flash in the display.
To view the message, enter Message Review Mode by press
ing (r^(^ (Hold the second for 2 seconds).
Message Display Upon Power Up
When Message Display Mode is On and there are unreviewed
messages in the memory, the display will indicate the num
ber of stored messages and the number of unreviewed mes
sages.
For example, if the display indicates “10 - 03 MESSRBE”,
“10” indicates the number of stored messages and “03”
indicates the number of unreviewed messages.
When Message Display Mode is Off and your phone with
unreviewed messages is powered up, the Message Indicator
will be displayed.
To view the message, enter Message Review Mode by press
ing (Hold the second (53) for 2 seconds).
Common Incoming Memory Stack
Your phone has a memory stack of 30 messages for the
Message Services. Each message consists of up to 32 digits
or 32 characters.
When your phone receives more than 30 messages, the
message marked with will be deleted from memory
first. When your phone has no memory marked with
the oldest message will be deleted so that the latest 30
messages remain in the memory stack.
Note; When a particular message is marked with “ i ”,
the message will not be deleted by this operation.
Message Review
1. Press (r^(r3) to enter Message Review Mode.
(Hold the second (53) for 2 seconds)
“10-03 MESSAGE” will be displayed, for example.
In this case, “IG” indicates the number of stored mes
sages and “03” indicates the number of unreviewed mes
sages.
38
39
Page 22

Note: When your phone has no messages, “NC
will be displayed. To clear the display, press @).
Example
2. For specific key operations for message service, please
use the following key operations:
a. To search and display unreviewed messages, press
b. To show the message from the latest memory, press
0-
c. To show the message from the oldest memory, press
0.
d. To hold the message in memory, press .
“ t ” will be displayed. Maximum 10 messages can be
held in the memory.
e. To prioritize deletion of a specific message, press the
key while message is displayed.
When your phone attempts to store over 30 messages,
the message with the ’ mark will be deleted first.
f. To delete the displayed message from memory, press
g. To delete all the messages from memory, press @)@)
(Hold the first @) for 2 seconds).
h. To store the displayed message except Short Messages
and Voice Mail into a phone number memory, press
and enter a memory number of 01 to 89.
i. To originate a call to the displayed number except
Short Message, press (5^-
j. To exit Message Review Mode, press
T
TMitltt
p c; G0P'
hr
i 1 1 Ik
Any key
excapl
T.mt*
1^91
t|:
UO I CE :!.
® T i
TmilM in - — ■
lu
r #HSMS
Ci4LL
* I Address
® T i® ® I--4P
.
...
* no
uO
W ffuCLI
9980012
® ^ I®
rmll« no
L.tO lEffilll
wm^eee
7778899
® t i®
.
...
«no
UD
:i. l:i.22
2333444
® I 4®
.
.......
»no
uD
1 i-t18
12 ! 3453
Voica Mail Notification
This display is shown first
when Voice Mail eidsls.
—Message Waiting Number
^ Storod Message Number
Tulli* rn
Displiy
Change
4—►
_► I....
^_[
Key 1
!l. !i. 1 k!
Tulli* o
Voice MaN Statue
Tmlltt no
Display
Change
UU Etaan
4—►
lU
81
Keep Mling
^ Keep holding
,1 V
n i ip-ic;
Notes: • The mark in the display indicates there is
a hidden display. Press {▼) to view the display.
• When a message has been reviewed, will be
displayed.
• When all the messages have been reviewed by
(^operation, “RLL F ev i ew” will be dis
played momentarily.
40
®
U
VMN
VMS
VMS(!)
CL! : Call Line Identifier
SMS : Short Message Status
CID : Caller ID
: Voice Mail Notification
: Voice Mail Status
: Voice Mail Status (Urgent)
Alert with Info
Flash with Info
41
Page 23

Deleting a Message Individually
1. Press @) momentarily. “C lear ?” will be displayed.
2. If you do not wish to delete the message, press
Or to execute the deletion of the message, press
“Cleared” will be displayed momentarily.
Deleting all the Messages
1. Press and hold @) for two seconds.
“RLL Clear ?” will be displayed.
2. If you do not wish to delete all the messages, press
Or to execute the deletion of all the messages, press @).
“RLL C leared” will be displayed momentarily.
Storing a Digit Message of Call Back Number and Caller ID into Phone Number Memory
1, Press @)(r3).
2. Enter XY . (XY is a location number of 01 to 89)
Or to automatically store a digit message at an unused
memory location, press @)C5^<R3). The stored memory
number will be displayed for one second.
Notes: ■ Only digit messages can be stored.
• UNA (Number not available) and RES (Num
ber Restricted) or Short Message will not be
stored.
Caller ID
When your phone receives a call, the caller’s phone number
will be displayed and stored in the memory. If you are in a
conversation and another call is attempted, your phone beeps
three times and the caller’s phone number will be displayed
in Call Waiting,
Voice Mail Access Number
1. Press to recall your Voice Mail Number.
2. In the following cases, press to place a call to the
Voice Mail Number.
• At Voice Mail Notification
• At Short Message “MRS” display during Message Re
view Mode
Note: It will be necessary to store your voice mail re
trieval number in in advance to use the
one touch dialing feature.
Refer to Storing Number in Link Dialing
Memory (Page 26).
Message Beep Alert
Your phone will beep when receiving Message services:
• Short Message
.........................
Repeat of single Beep
• Voice Mail Number/
Voice Mail Notification
• Call Back Number
• Flash with Info
........................
..........
...................
Repeat of two Beeps
Repeat of three Beeps
Repeat of three Beeps
Note: When Message Display Mode is the above
Beep Alert will not be repeated.
Message Beep Alert Tone Level Control
You can adjust Beep Alert tone level to seven levels
while not in use.
1. Press
The current Beep Alert Tone will be heard and the level
will be displayed.
2. Press ® or ® according to your desired tone level.
3. To clear the display, press
To answer the call, press any key except and
If you do not answer the call, the message indicator will
flash and the Caller ID will be displayed.
42
43
Page 24

Message Beep On/OfI Selection
Message Beep ON mode is preset at the factory.
1. To toggle Message Beep On/Off mode, press
“Mess39e E^eep oF” or “Message
Beep on” will be displayed.
2. To clear the display, press
When Message Beep Alert Mode is Off, Message Beep Alert
will not sound even if your phone receives Message services.
When Message Beep Alert Mode Is Off, “ii^aaage Reap
oi- ” will be displayed upon power up. To clear the display,
press
AUDIOVOX
ACCESSORY CATALOG
MVX-501/505/506/507
44
45
Page 25

BTR-405
StanJard Life NiCad Baoerv
(S(K) mAh) (standard with
MVX-501/505/506)
Extended Life NiMH Battery
(1200 mAh)
(standard with MVX-.W7)
tLP-505
Cigarette Lighter
Charger (option)
LB-405
Leather Carrying Case
(option)
BTM-405
Slim NiMM Battery
(8(X) mAh) (option)
HF-505
Hands Free Mobile Kit
(option)
RC-505
Rapid Charger
(standard with MVX507)
DTC-405
Desk Top Charger
(option)
PBK-405
3 Watt RF Pow-cr
Booster (must be used
with HF-505) (option)
CLA-505
Cigarette Lighter Adapter
(option)
PCP505 WS-700
F'ersonalized Colored Plastics Wrist Strap (Not shown)
These accessories are available at your local AUDIOVOX
Dealer. For more information call I-800-1 CEL.
CHF-S05
Cigarette Lighter Hands
Free (option)
46 47
CNR-505
A(? Rapid Charger (stan
dard with MVX-501/505/
506)
Available Colors;
• Dark Blue PCP505DB
• Forest Green PCP505FG
• Yellow PCP505Y
• Ruby Red PCP505RR
• Wood Grain PCP505WG
2 J 5
Page 26

PROTECT YOUR WARRANTY
Read your Warranty carefully, with the special consideration
to paragraph seven of the Limited Warranty for your unit,
“Warranty does not apply to...or to any
product or part thereof which has
suffered through alteration... mishandling,
misuse, neglect, or accident”.
Many companies are making look-alike accessories and in some
cases, promoting that their product is equal to or better than
the Audiovox product. Be careful. Some of these products may
not be compatible for use with your Audiovox product and may
damage the unit or cause it to malfunction. If service is re
quired on your unit, and it is determined that a non-Audiovox
accessory has created the problem with your unit, the Warranty
will not apply. In addition, if the unit has already suffered irre
versible damage by reason of a non-compatible accessory, the
Warranty will be voided. To protect your Warranty, use only
compatible accessories which cannot damage or interfere with
the functioning of your Audiovox product.
Qo/WDiorox-
AUDIOVOX COMMUNICATIONS CORP.
185 Oser Avenue, Hauppauge, New York 11788, 516-233-3300
16808 Marquardt Avenue, Cerritos, California 90701,562-802-5100
Audiovox Canada
405 Britannia Rd. East, Ste 101, Mississauga, Ontario, Canada
L4Z3E6, 905-712-9299
Audiovox Pacific Pty Ltd
110 Rocky Point Road, Kogarah, NSW 2217, Australia, 02-9587-0011
Audiovox New Zealand Pty Ltd
Unit B, 6 Henderson Place, Auckland, 6496345720
Audiovox Singapore Pte Ltd
268 Orchard Road, #07-07, Singapore, 238856, 65-733-5902
http://www.audiovox.cora
©1997 Audiovox Corporation
GENERAL SPECIFICATIONS
Frequency Range:
Transmit;
Receive:
Number of RF Channels: 2412 Channels, Full Duplex
Channel Spacing: 10 KHz
Duplex Spacing: 45 MHz
Frequency Stability: ±1.0 PPM
Operating Temperature:
Main Unit: -22“F to -i-140°F (-30°C to -i-60°C)
Battery: -i-5“F to h-1 22°F (-15°C to -l-50°C)
Battery Charging
Temperature: -t-41°F to h-104“F (5°C to-l-40°C)
Supply Voltage: 4.8 V - DC
RF Power Output: 0.6 W
Dimensions: 6.3" x 2.3" x 0.9"
Weight:
with Standard Extended life
Ni-MH Batteiy: Approx. 8.1 oz. (229 g)
with Ni-Cad Battery; Approx. 7.6 oz. (216 g)
with Slim profile Ni-MH Battery: Approx. 7.6 oz. (216 g)
Talk Time:
with Standard Extended life
Ni-MH Battery: Approx. 120 Minutes
with Ni-Cad Battery: Approx. 80 Minutes
with Slim profile Ni-MH Battery: Approx. 80 Minutes
Stand-by Time:
with Standard Extended life
Ni-MH Battery: Approx. 20 Hours
with Ni-Cad Battery: Approx. 12 Hours
with Slim profile Ni-MH Battery: Approx. 12 Hours
* Subject to change without notice.
824.030 to 848.980 MHz
869.030 to 893.980 MHz
(159 mm x 60 mm x 24 mm)
48
49
Page 27

TABLE OF KEY OPERATION
Key operation
Holding (@) turns your phone
on and off.
Phone No.+@i+<i3
(During conversation)
@i+c|^+3 Digit Code
@)+C|^+(5)+(a)'• ■ ■ (r^ Selects Scan Mode.
@)+cj^+(5^
+3 Digit Code+®/®+@
(f^ + (7p^ + (2a^ Turns the Message Beep on and off.
@ + <|^
(^)+(g^)
@) + (^
@)+c*5'+C>
@1+(^3)++iCD
+2 Digit Code
@)+(*5*+<1^+c|^
+2 Digit Code
@)+<*3^+<1^+c@)
@)+(*3^+<1^+(535
+2 Digit Code
(@i+<J3^+<I3E)+
+2 Digit Code
@+(*3^+<i^
+3 Digit Code+New Emer
gency No. +®/®+Cs3)
®+c*3>+®
+3 Digit Code
Stores to Scratch Pad Memory.
Turns the DTMF tone on and off.
Locks your phone electronically.
Displays current scan mode.
Turns the Message Mode on and
Off.
Turns the Silent Alert mode on
and off.
Turns the Automatic Answer
mode on and off.
Enters the Alphanumeric entry
mode.
Turns the Call Time Warning
Tone on and off.
Displays the temporarily accu-
mulated number of calls.
Displays the number of outgo
ing calls.
Displays the accumulated num
ber of calls.
Displays the time of current or
last call.
Displays the time of outging
calls.
Displays the cumulative call
time.
Changes Emergency Number
and turns the One Touch Emer
gency call mode on and off.
Activates the Call Restriction
mode.
Function
Key operation Function
(^+(*3^+C|32^
+®/®
@+<*3>+<&+iO
+®/®
+®/®
(№^h-<£3)+
+®/®
@)+c£3)+<0
(@+-1-c|^
(£§>+(£3)-H (13)+(5115
<£3)+*^35’+
c^+(#®>+*^35+
(@+<£3^+(£3)+*313^
Digit
Code+Pl N+®/®+C£s)
^ 5 Digit 10 Digit
^ New SID Phone No.
+<S)+<&+<^
+3 Digit Code
Phone No.+(@-i-(£s)
-i-Memory Location No.
Displays the current SID, current
Channel and the RSSi Level.
Adjusts the earpiece volume
level.
Adjusts the alert sound output
volume level.
Adjusts the tone volume level.
Adjusts the Message Beep vol
ume level.
Displays own telephone number.
Displays your Electronic Serial
Number (ESN).
Displays the Home System ID
(SIDH).
Changes your Lock/Unlock Code.
Changes your Call Restriction
Access Code.
Changes your Call Counter Ac
cess Code.
Changes your Air Timer Access
Code.
Changes the Keypad (DTMF)
Tone Duration
Enters PIN and turns
PIN feature on and off
Multiple City Registration
(Changes the phone number
and SIDH)
Clears the last digit. If held in,
erases the entire number from
display.
Clears the entire number from
display.
Stores the telephone number in
the memory.
50
51
Page 28

Key operation
Phone No.-f@)-i-(^
-i-Name-H@)-f-CR3)
-»-Memory Location No.
Stores the telephone number
and the alphanumeric informa
tion in the memory.
Function
Phone No.-h@-k53)-h(^ Searches the vacant memory
and stores the telephone num
ber automatically.
Phone No.-»-@i-»-C^
-F N a m e-F @)-F +C23)
Searches the vacant memory
and stores the telephone num
ber and alphanumeric informa
tion automatically.
Phone No.-f@i-fCr3)+®/® Searches the vacant memory
address to store.
(53)-F -F
Displays the telephone number
of three latest calls.
C5|)+Memory Location N0. Recalls the'telephone number
from the memory.
(R3)-F(*H>
-FMemory Location No.
®+®/®
(0-FC^-FName
+®+®/®
Adds the DTMF tone to the re
called number.
Recalls the telephone number in
address order.
Searches the telephone number
by alphanumeric characters.
In standby mode, holding (§) ini
tiates a call to the number stored in
One Touch Memory or Link. Dial
ing Memory. During conversation,
except Link Dialing, pressing
switches the Mute mode on
and off. During conversation mode
of Link Dialing, pressing C^) ac
tivates Link Dialing in order. In al
phanumeric entry mode, pressing
C^) toggles between phone num
ber entry and name entry mode.
Receives the call when “C ::i 11”
is flashed in the display.
Redials the last number dialed
when is displayed.
Phone No.-f (se^
Processes the call.
Terminates the call.
12 MONTH LIMITED WARRANTY
AUDIOVOX COMMUNICA
TIONS CORPORATION (the
Company), warrants to the origi
nal retail purchaser of this
Audiovox Cellular Telephone,
that should this product or any
part there of (except the items
listed below), under normal use
and conditions, be proven defec
tive in material or workmanship
within the first twelve (12) month
period from the date of purchase,
such defect(s) will be repaired or
replaced (with new or rebuilt
parts) at the Company’s option,
without charge for parts or labor
directly related to the defect(s).
Accessories, if supplied, except
rechargeable battery packs, are
similarly warranted for 12
months. Battery packs are war
ranted from the date of purchase
for 90 days.
To obtain repairs or replacement
within the terms of this Warranty,
the product should be delivered
with proof of warranty coverage,
specification of defect(s), trans
portation prepaid, to the Com
pany at the address shown be
low.
In the United States call toll free
to (800) 229-1235 [in NY State
and other areas, call (516) 233-
3410]
This Warranty does not apply to
fuses, or costs incurred for re
moval, reinstallation, testing,
evaluation, or to any product or
part there of which has suffered
through alteration, serial number
defacement, improper installa
tion, excessive temperature or
humidity, environmental condi
tions, mishandling, misuse, ne
glect or accident. This Warranty
is not assignable or transferable.
THE EXTENT OF THE COMPANY’S
LIABILITY UNDER THIS WAR
RANTY IS LIMITED TO THE RE
PAIR OR REPLACEMENT PRO
VIDED ABOVE AND, IN NO EVENT,
SHALL THE COMPANY’S LIABILITY
EXCEED THE PURCHASE PRICE
PAID BY PURCHASER FOR THE
PRODUCT.
The Company disclaims liability
for geographic coverage, inad
equate signal to antenna, com
munications range or operation of
the Cellular System as a whole.
ANY IMPLIED WARRANTIES, IN
CLUDING ANY IMPLIED WAR
RANTY OF MERCHANTABILITY
SHALL BE LIMITED TO THE DURA
TION OF THIS WRITTEN WAR
RANTY, ANY ACTION FOR
BREACH OF ANY WARRANTY
HEREUNDER INCLUDING ANY IMPLIED WARRANTY OF MER
CHANTABILITY MUST BE
BROUGHT WITHIN A PERIOD OF
24 MONTHS FROM DATE OF
ORIGINAL PURCHASE. IN NO
CASE SHALL THE COMPANY BE
LIABLE FOR ANY CONSEQUEN
TIAL OR INCIDENTAL DAMAGES
FOR BREACH OF THIS OR ANY
OTHER WARRANTY, EXPRESS OR
IMPLIED, WHATSOEVER.
No person or representative is
authorized to assume for the
Company any liability other than
expressed herein in connection
with the sale of this product.
Some slates do not allow limita
tions on how long an implied war
ranty lasts or the exclusion or limi
tation of incidental or consequen
tial damage so the above limita
tion or exclusions may not apply
to you. This Warranty gives you
specific legal rights, and you may
also have other rights which vary
from state to state.
IN U.S.A.:AUDIOVOX COMMU
185 Oser Avenue, Hauppauge,
New York 11788 (516) 233-3300
IN CANADA: AUDIOVOX
CANADA, LTD.
405 Britannia Road East Suite 101
Mississauga, Ontario L4Z 3E6
(905)712-9299 (800)465-9672
NICATIONS CORPO
RATION
52
53
Page 29

INDEX
Accessory Catalog...............................................................45
Automatic Lock...................................................................18
Automatic Redial.................................................................16
Automatic Storage.............................................................. 22
Battery Operation................................................................10
Call Counter Display ...........................................................31
Call Restriction
Call Time Warning Tone
Call Timer Display..............................................................30
Caller ID..............................................................................42
Emergency and Priority Dialing
ESN Display
Function Review.................................................................36
Key/Display Names and Functions.....................................8
Keypad Disable
Keypad Tones.....................................................................30
Link Dialing........................................................................26
Locking...............................................................................17
Manual Storage...................................................................20
Memory Dialing..................................................................24
Memory Search...................................................................24
Message Review
Mic Mute.............................................................................16
Multiple City Registration
One Touch Dialing..............................................................27
One Touch Emergency Call................................................27
PIN Feature.........................................................................35
Placing Calls
Receiving Calls
Redialing (Last three numbers dialed)
Scratch Pad Memory...........................................................28
Speed Dialing......................................................................25
System ID (Current System ID) Display
System ID (Own System ID) Display.................................13
System Selection.................................................................33
Table of Key Operation.......................................................50
Telephone Number (Own) Display
Unlocking............................................................................17
Volume Adjustment.............................................................16
...................................................................
..................................................
.........................................
.......................................................................
..................................................................
.................................................................
..................................................
......................................................................
...................................................................
................................
............................
.....................................
29
33
28
35
18
39
34
14
14
15
35
13
 Loading...