

Page 1

Q:>a[}d\ovox^
^Ce//u/ar telephones
150 Marcus Blvd. Hauppauge, NY 11788
PRINTED IN JAPAN 9-91
Page 2

TABLE OF CONTENTS
SYSTEM CONFIGURATION
BATTERY INSTALLATION AND
RECHARGING...................................................7
To Attach Battery Pack
To Detach Battery Pack
To Recharge Battery
PRECAUTIONS
GENERAL SPECIFICATIONS...........................10
FEATURES AND OPTIONS
FUNCTIONS
BASIC OPERATION
Turning the Unit On/Off
• Antenna Position
• Receiving Signal Strength Indicator
• Battery Level Indicator
To Store a Number in Memory
To Recall a Number from Memory
To Review the Pi'efix
Display Own Telephone Number
Repertory Memory Scroll
Automatic Storing into a Vacant Memory
Address
Secret Memory
To Lock the Unit
Automatic Lock (NAM Option)
To Unlock the Unit
Backlighting On/Off Control
Volxime Control
MEMORY NAME TAG
To Enter Names using Alpha (Letters)
To Store Name with Phone Number
To Recall from Memory with Name
ALPHA SEARCH................................................21
PLACING TELEPHONE CALLS.......................22
To Place a Call
If the Call Fails to Go Through
Automatic Redial (NAM Option)
Terminating a Call
To Receive Calls
Silent Incoming Calls
Any Digit Key Answering (NAM Option)
Automatic Answering
To Place a Call with a Number in the Memory
911 Emergency Call (NAM Option)
To Mute a Phone Conversation
....................................................
......................................................
..........................................
..............................
..............................
......................................
11
12
14
19
6
9
Page 3

ONE TOUCH DIALING
To Store a Number into One Touch Memory
To Place a Call to a Number in One Touch Memory
CALL RESTRICTION (NAM OPTION)
To Set Call Restricted Mode
To Exit Call Restriction Programming Mode
END-TO-END SIGNALING
Touch Tone™ from Memory
Link Dialing
SCRATCH-PAD DIALING.................................28
SCRATCH-PAD DIALING
WITHOUT KEYING TONES
CALL TIME DISPLAY.......................................29
To Display the Talk Time of the Last Call
To Display the Cumulative Talk Time
To Display the Niimber of Calls
To Clear the Timer
One Minute Beep (NAM Option)
A/B SYSTEM SELECTION
SYSTEM INHIBIT (NAM OPTION)
MULTIPLE CITY REGISTRATION..................31
RADIO FREQUENCY (RE)
CHANNEL INDICATOR
LAST RESCAN SID INDICATOR.....................32
FUNCTION REVIEW
IMPORTANT SAFETY INFORMATION
WARNING...........................................................34
Touch Tone™ is a registered trade mark of AT & T.
......................................
.............
...............................
.........................
................................
.................
...............................
.........................................
.........
24
25
26
28
30
31
32
33
34
AUDIOVOX
MINI HANDHELD
PORTABLE CELLULAR
TELEPHONE
Audiovox introduces Minivox, MVX-500, one of the
smallest mini portable cellular phones in the world.
It weighs a feather-light 10.6 ozs. and provides ap
proximately 65 minutes of talk time and 12 hours of
standby time. The optional extended life battery give
you up to 120 minutes of talk time and 20 hours of
standby time.
The Minivox MVX-500 delivers exceptionally high
performance in one very compact package. Audiovox
has utilized the latest in micro electronic technology
to deliver a handheld portable phone that is over 35%
smaller and lighter than previous models.
Minivox is the slimmest phone on the market today
and it will fit neatly into you pocket or purse. The
entire cellular electronics and transceiver are built
right into the remarkably slim handset (only 0.7
inches thick).
The Minivox is packed with features. Its dual posi
tion antenna enables calls to be made or received
while the antenna is in the down position. It has two-
one touch speed dialing keys, a battery level indica
tor, large send and end keys and a “stay alive” feature
that gives the user time to change batteries without
losing the call.
The MVX-500 also features “any digit key” answer
that allows you to push any digit key to answer the
phone.
Optional accessories include and extended life bat
tery, travel trickle charger (for greater portability
when away from home), leather carrying case and a
hands-free car kit for in vehicle use with a RJl 1 Jack.
The Minivox also comes with something only an
Audiovox phone can give you... a “where ever you
need us” nationwide network of cellular service
centers, ready whenever you need us.
Page 4
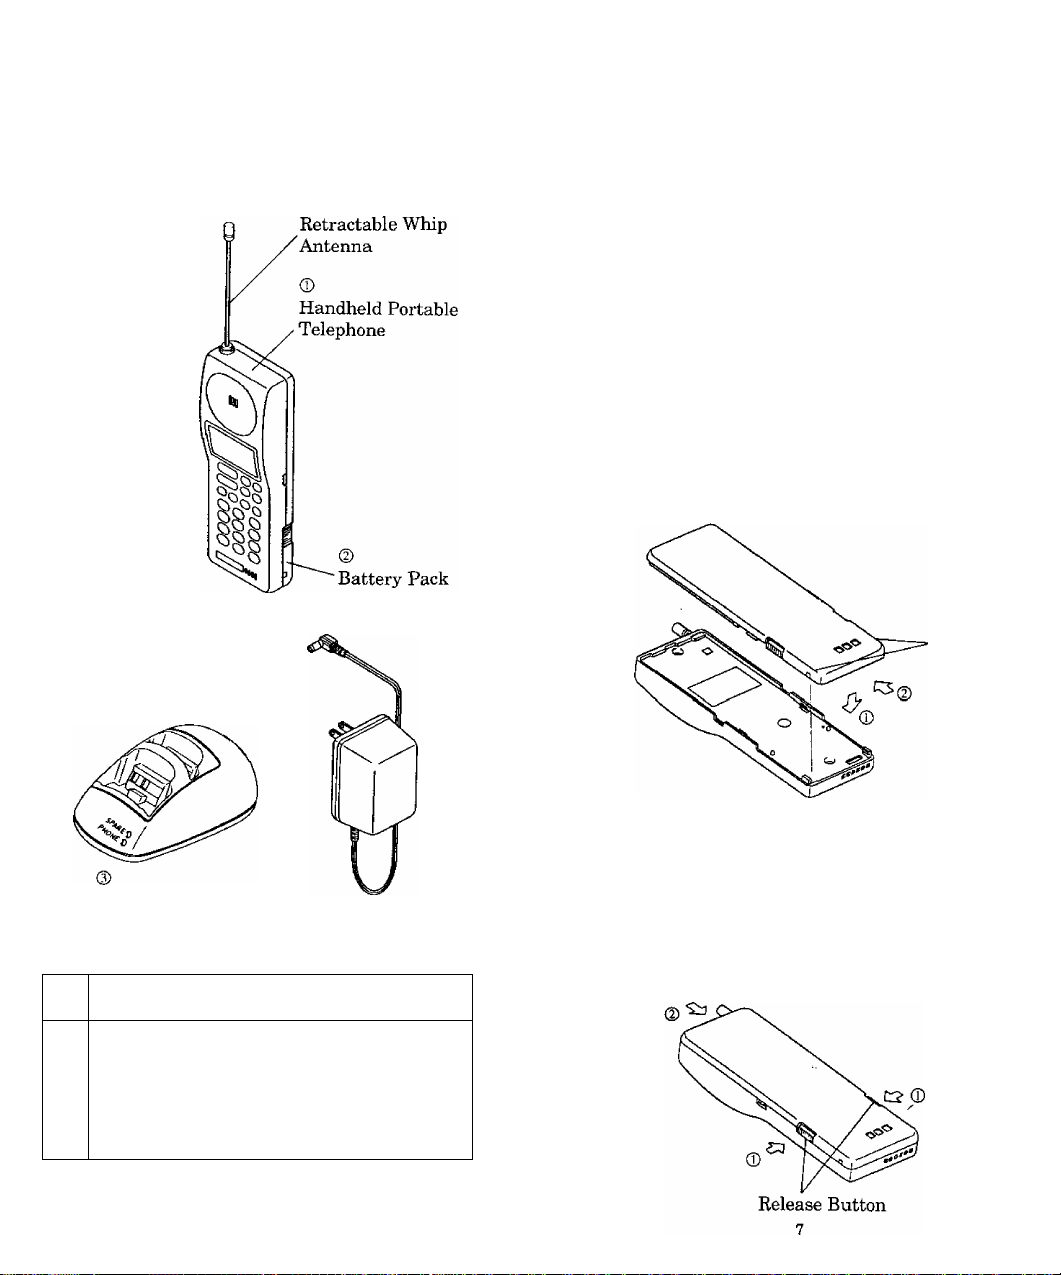
SYSTEM
BATTERY INSTALLATION
CONFIGURATION
System configuration and the eqxiipment list are as
shown below.
AND RECHARGING
The Portable Telephone contains a Detachable Bat
tery Pack (BTR-500). Fully charged Battery Pack
offers approximately 65 minutes Talk Time or 12
hours standby.
It is recommended to carry one fully charged spare
Battery Pack for longer operation.
(Additional Battery Packs may be purchased at your
Cellular Telephone Dealer.)
To Attach Battery Pack
(1) Position Battery Pack to the unit using the
indents on the Battery Pack as guides to the
lower end of the unit as shown by arrow ©.
(2) Press and slide the Battery Pack as shown by
arrow ® to lock the Battery Pack to the unit.
Indicators
Desk Top
Battery Charger
List of Equipment
Name of the Equipment
No.
Handheld Portable Telephone
(D
Battery Pack
Desk Top Battery Charger (DTC-500)
(D
AC Adaptor (CNR-500)
AC Adaptor
To Detach Battery Pack
(1) Press the Release Buttons on both sides of the
Battery Pack as indicated by arrow ® while
sliding it down approximately 1/4" as shown by
arrow ®.
(2) Then lift up to remove the Battery Pack from the
unit.
Page 5

To Recharge Battery
Desk Top Battery Charger (DTC-500) can recharge
spare Battery and the Batteiy connected to the Port
able Telephone at the same time. Moreover, the
Battery Charger can recharge an optional Extended
Life Battery (BTE-500). DC voltage is supplied by the
separate AC Adaptor.
1. Two LEDs (Light Emitting Diode) on the Desk
Top Battery Charger light green when DC voltage
is supplied from the AC Adaptor.
2. The Battery charging starts when the Portable
Phone and/or a spare Battery are/is placed into
the Battery Charger, the LED(s) light(s) red.
3. When the chargingis finished, the LED(s) retmn(s)
to as follows:
LED(s)
Standard Battery
(BTR-500)
Extended Life
Battery
(BTE-500)
Note: (1) Environmental temperature for battery
recharging: 0 - -i-45°C
(2) We recommend you to turn off the power of
the telephone to secure complete recharg
ing of the battery.
Orange
Green
Charging Time
Approx. 8 hours
Approx. 11 hours
PRECAUTIONS
Your Handheld Portable Telephone is a high quality
piece of equipment. Before operating the equipment,
please take the following precautions.
1. Don’t use this equipment in an extreme environ
ment where high temperature or high humidity
exists.
2. Don’t abuse the equipment. Avoid striking, shak
ing or shocking. When not using the unit, lay
down the unit to avoid possible damage due to
instability.
3. Don’t expose this equipment to rain or spilled
beverages.
4. Recharge the battery fully before your first use of
the unit.
5. When the battery becomes discharged, two beep
tones will be heard every 10 seconds, and the
display will show
charged battery with a fully charged one, and
recharge the discharged battery.
Note: When the battery becomes discharged
during a conversation, you can continue
your conversation without redialing if a
discharged battery was replaced with a
charged one within 3 seconds (before cell
site disconnects).
6. To ensure long battery life, operate the unit until
is displayed, then recharging the
battery. Remove Battery Pack from the unit when
it is not expected to be used for a long period.
Recharging at least once every month is recom
mended when not being used.
Replace the dis
Page 6

GENERAL
SPECIFICATIONS
(Subject to change without notice)
Frequency Range :
Number of RF Channels
Channel Spacing
Duplex Spacing :
Frequency Stability :
RF Output Power :
Receiver Sensitivity
Modulation/Demodulation
Operating Temperature
Supply Voltage
Current Drain
Operating Time :
Size
Weight
824 to 849 MHz, Transmit
869 to 894 MHz, Receive
832, Full Duplex
30 KHz
45 MHz
±2.5 PPM
0.6W ERP With Power
Control
-116 dBm (12 dB SINAD)
Voice PM (With Compander)
Data FM
-20“C to +60“C
6.0 V
(NiCd Battery 1.2 Vx 5,
600 mAH)
In Use;
Approx, 500 mA
Standby;
Approx. 50 mA
Talk;
Approx. 65 min.
(at full power output)
Standby;
Approx. 12 hours
Approx.
18(H)x56 (W)xl65 (D) mm
0.7(H)x2.2(W)x6.5 (D)inch
Approx. 300 gr (10.6 oz)
FEATURES AND
OPTIONS
Push Button Dialing
Backlit Keypad and Display with On/Off Control
Large Size Dot-matrix LCD Display
Status/Function Indicator
15 Digits Dial Number
Receiving Signal Strength Indicator
Battery Level Indicator
(Electronic) Volume Control
Pre-set Dialing up to 16 Digits (32 Digits: NAM
Option)
Extended Readability (Prefix Review)
Last Digit Clear
Digit Display Clear
911 Emergency Call in all modes
Repertory Diahng: 16/80-Digit 99 Memories
Repertory Memory Scroll
Automatic Storing into a Vacant Memory Address
Secret Memory
Memory Name Tag
Alpha Search
Linked Preset Dialing from Memory
One Touch Dialing
Any Digit Key Answering (NAM Option)
Automatic Answering
Last Number Redial
Automatic Redial (NAM Option)
Mute or Hold
Scratch-pad Dialing (with/without Keying Tones)
End-to-End Signaling
Touch Tone™ from Memory
Continuous DTMF from Keypad
Call Restrictions (NAM Option)
Silent Incoming Calls
Call Time Display (Five Fimctions)
Display Own Telephone Number
Multiple A/B System Selection
System Inhibit (NAM Option)
Multiple City Registration
Last Rescan SID Indicator
RF Channel Indicator
Electronic Lock
Automatic Lock (NAM Option)
Function Review
10
11
Page 7

Retractable
Whip Antenna
(DIN USE
(2) NO SVC(3) ROAM —
(4) LOCK
(5) Power ■
Indicator
{8} Send Key
(9) End Key
(10) Power
On/Off
Key
(11) Digit
Keys
FUNCTIONS
t*IUSEl NO SVC ROMI LOCK
g)«0llTelNo1i]
-Earpiece
-(6) Receiving
Signal
Strength
Indicator
.(7) Alpha
Numeric
Display
■(12) One
Touch
Dial
Keys
-(13) Store
Key
■(14) Recall
Key
■il5) Clear
Key
-(16) Function
Key
-(17) Volume/
Alpha
Key
Sounder
Microphone
IN indicator lights when a call is in progress.
(1)
(2)
INOSVCI (no service) indicator lights when the
unit is in a non-coverage area.
(3) IROAMI indicator lights when the unit is out of
the home area.
(4)
ILOCKI indicator lights when the unit is locked.
(5)
H is used as a POWER ON indicator which
lights when the unit is turned on.
RECEIVING SIGNAL STRENGTH INDICA
(6)
TOR;
The number of shaded blocks indicates the
Receiving Signal Strength.
15-CHARACTER FUNCTIONAL ALPHA
(7)
NUMERIC DISPLAY:
First 5 characters indicate current function and
status conditions.
The remaining 10 characters show the last 10
digits of the dialed number.
(8)
ISENDKsend key) is used for placing or receiving
a call.
(9) lENOl (end key) terminates a call.
(10) (power on/offkey) is used to turn on/off the
unit.
(11) DIGIT KEYS to enter a phone number.
kMf I, Mb (one-touch keys) allows you to place a
call with a single key stroke.
(13)
iSTPDIl store key) stores phone numbers in repertory memory.
(14)
(recall key) recalls phone numbers from
repertory memory.
(15)
iCml (clear key) clears the digit(s) from the
display.
(16)
(function key) shifts the digit keys to the
functional keys.
(17)
key) is used to con
trol Earpiece audio level as well as the Alert
___
Tone, r
3 is also used as д№Я (alpha key) in
combination with ИГО to enter 5 Aphabetical
characters.
12
13
Page 8

BASIC OPERATION
Turning the Unit On/Off
Press for about one second to turn on the unit.
The indicator S will light (all indicators will light
momentarily; display will show your phone number,
and a tone will be heard). Press WW again for about
one second to turn off the unit.
* Antenna Position
Your portable cellular telephone has been equipped
with a dual position antenna system.
This dual position antenna has been especially de
signed to allow your phone to receive calls while the
antenna is down. However, for optimum performance
and signal strength or while operating in poor signal
areas, it is recommended that the antenna be fully
extended.
Note: The antenna can be used in its fully extended
or fully retracted position only.
• Receiving Signal Strength Indicator
The number of shaded blocks indicates the Signal
Strength in your area. Four blocks show the maxi
mum level. The display will vary as you move with
the unit. If the signal is not strong enough to place a
call, the WO
• Battery Level Indicator
You can monitor the exigent battery voltage level.
Press I
dition will be displayed on the readout in one of four
steps for 5 sec..
The number of shaded blocks indicates the battery
condition as follows;
To Store a Number in Memory
1. Press , then enter the phone number.
2. Press , then enter the memory address
(01 through 99).
Example; Press Bfi0L key 5]then S, the displayed
Note: A number of more than 16 digits can be
Ww indicator will appear on the readout.
i, key M then ffl, the battery voltage con
B Full charge
Normal phone call
Short phone call
Recharge battery
number will be stored into memory ad
dress 15-
stored only into memory address 91
through 99.
To Recall a Number from Memory
Press IRCLl , then enter the memory address (01
through 99).
Example: Press IR^ , key Ij] then [§], the number
stored in memory address 15 will be dis
played on the readout.
To Review the Prefix
(Number longer than 10 digits)
After pressing [R^LI, hold down the second digit of
the memory address.
Note: When a set of linked numbers is recalled, you
can review only the last linked number by this
feature. To review Link 1 to Link 5, use ffld
iRCLithenkev [X](Xis 1 to 5). See “LinkDialing”.
Display Own Telephone Number
You can see your system ID number and your own
phone number on the readout. Press IRCLl, key ®
then @ again. The System ID number is shown while
pressing key at the 2nd time.
Repertory Memory Scroll
This feature is useful in finding a certain phone
number by scrolling the repertory memory from one
of the designated starting addresses.
1. Press (Pbci, key
[E! is the digit to assign the starting address as
follows.
X
0 01
1
2
•
•
#
8
9
[El
then Ml ■
Starting address
11
21
•
•
•
81
91
14
15
Page 9

2.
Press [йог Я.
1Й : Scroll upward (with roll back to 01)
Й iScroll downward (with roll up to 99)
Memory address and the last 7 digits of the stored
number will be displayed on the readout as fol
lows.
Example:
Address No. Tel. No.
Note: In this scroll feature, any vacant memory
addressees) will be skipped.
Automatic Storing into a Vacant Memory Address
This feature allows automatic storing into a vacant
repertory memory address. This ends the possible
problem of writing over a previously stored number.
1. Enter the phone number.
2.
Enter the memory address group number in which
3.
you ’^nt to store a number.
From 01 to 10
From 11 to 20
From 21 to 30
From 81 to 90
From 91 to 99
From 01 to 99
4. Press 3J •
The memory address and the last 7 digits of the
stored phone number will be displayed on the
readout as follows.
Note: If there is no vacant address in the assigned
area, the phone number will not be stored in
the memory.
To Store the Secret Number
1. Press
2. Press
dress (01 through 99).
will be displayed on the readout.
Example: To store the secret number 9876 into
1. Press FCtBi.
2. Enter secret number
3. Press
4. Press keys |
or
press keys Э, Ц]. (to store vacant memory
address of 40's)
To Confirm the Secret Number
1. Enter the three-digit security code.
2. Press , then enter the memory address (01
through 99). The last 10 digits of the secret
number will be displayed on the readout.
Example: To confirm the secret number stored into
1. Enter the three-digit security code
2. Press I, key Й0 then
Note: If you recall the secret memory without the
three-digit security code, the secret number is
not displayed on the readout as shown below:
Press
, then enter secret number.
, then enter the memory ad
memory address 41 or automatically store
this number into a vacant memory ad
dress of 40's.
. (secret memory store)
!. (address niimber)
memory address 41.
, key В then
Secret Memory
This feature allows you to store ID code, telephone
credit card numbers, etc. in secret memory locations.
For security purposes, you must enter your threedigit security code to display the secret number. For
practical use of the secret memory, refer to “END-
TO-END SIGNALING”.
16
or
Press
i key м3 then
To Lock the Unit
Press
The indicator lights. The unit will remain
locked until unlocked, even if the power is turned off.
, then key m (LOCK).
17
Page 10

Automatic Lock (NAM Option)
If you request the feature of Automatic Lock, your
NAM can be programmed so that yoxir unit will
automatically go into the locked condition when the
power of the unit is turned “off”. When iR^ is turned
“on”, the unlock code is required to operate the unit.
MEMORY NAME TAG
This feature permits you to tag an identifying name
(in up to 5 characters) to each phone number in the
memory address. The name will be displayed each
time you recall a number from memory address.
To Unlock the Unit
Enter the three-digit unlock code. The LOCK I indicator
will go out when the three-digit code is the same as
the code registered in the NAM.
Backlighting On/Off Control
LCD display and the keypad are backlit automati
cally after the Power-On. If needed, backlighting can
be turned off by pressing IRCLl, key H then [H ,
Even if the unit is in the backlighting “Off” mode, the
backlighting will be turned on again automatically
for 10 seconds when any key operation is conducted
or a call is received.
To return to the backlighting “On” mode, press IRGLI.
key @ then again.
Volume Control
The audio level of the earpiece and the alert tone can
be adjusted by the Volume Control Key IVOU.
• Earpiece:
Keep pressing [VOLJuntil you get the desired sound
level.
Sound level will be displayed on the readout dig
itally during the level adjustment and the sample
tone will indicate the sound level when you are not
engaged in a telephone conversation. The display
format is as follows.
H.SQ (1 to 9)
To Enter Names using Alpha
(Letters)
Press iRSiCl, then lALPHl. iMihal will appear on
1.
the readout to indicate the Alpha Mode is active.
Press digit keys repeatedly until the character
2.
you need appears. The following table shows
which character is assigned with each digit key.
Key ASSIGNED ALPHA CHARACTERS
1 (Blank)
2 (ABC) A B c
(DE F)
3
4 (G H I) G H
5
(JKL)
6
(MNO)
7
(PRS)
(TUV) T
8
(WX Y )
9
0
* *
#
D
J K
M N
P
w
0
#
3. When the character you need is displayed, press
IMPHi to move to the next space.
4. Go back to step 2, and repeat the same procedures
xmtil the complete character name is displayed.
5. When an entry error is made, press mo
mentarily to erase the last character. If you press
ICLf^ more than a second, all characters on the
readout will be erased.
6. To exit Alpha Mode, press ^Cl, then
- 1
2
E F
Q
u
X Y Z 9
I
L
0
R
V 8
3
4
5
5
S
7
• Alert Tone:
Press l^C^I. key @ then S].
Then adjust the alert tone level in the same manner
as above. Your telephone will ring at the new level.
In this case, the display format is as follows.
ALT □ (1 to 9)
18
19
Page 11

To Store Name with Phone Number
1. Enter the phone number.
2. Press
3. Enter the name you need. (Refer to “To Enter
Names using Alpha”.)
4. Press , then enter the memory address (01
through 99), to store the number with the name
into memory.
Note: If you enter the phone number after enter
Example: To store the phone number 123-4567 with
1. Enter the phone number;
2. Set Alpha Mode;
3. Enter the Name;
4. Store the Number;
!, then I
ing the name, the name will be erased.
the name JOHN into memory address 15.
I to set Alpha Mode.
To Recall from Memory with Name
Recalling from the repertory memory with name is
identical to standard repertory recall. When the
number is recalled, the display will show the Alpha
Name Tag as well as the stored phone number.
ALPHA SEARCH
This feature permits you to find a phone ntimber
stored in the memory by the first character of the
Alpha Name Tag. This search can retrieve all entries
beginning with the assigned initial character.
1. Press , then to set the Alpha Mode.
2. Enter the initial character, by which you need to
search the phone number.
3. Press I
the first entry whose Name Tag begins with the
assigned initial character, and which is stored in
the lowest memory address. Display shows Name
Tag, Memory Address and Phone Number.
4.
Press ® or S ■
H : Scroll memory address upward.
S :Scroll memory address downward.
Example:
Operation
i , then . The display will show
Display
IMIIPIM
mmmm
|gi1H4ISI6l7tSI§tOI
mmm
20
mm
mmw
SilBHHB
21
Page 12

PLACING TELEPHONE
CALLS
To Place a Call
1.
Enter the phone number. The last 15 digits of the
dialed number are displayed on the readout.
Note: After 120 sec., display will return to the 10-
digit display mode.
2.
If a dialing error is made, press ICLRl, then enter
the phone number again. Pressing iCLRl mo
mentarily (less than approx. 0.5 sec.) clears only
the last digit.
3.
Press ISB^jPl. The Msj USBindicator will light. WTien
the called party answers, proceed with your
conversation.
Note: If assigned in NAM, the phone number can be
pre-set up to 32 digits. However, in this case it
is neccessary to confirm with system operator
whether such service is available or not.
If the Call Fails to Go Through
1. If you hear the “reorder” signal, press , then
if there were no dialing errors, press i^B^I for
redial. (Redialing with digit keys is not neces
sary.)
2. Ifthe “intercept” signal is heard, press ^N0, then
redial the correct number.
Automatic Redial (NAM Option)
If the feature of Automatic Redial (NAM Option) is
selected, your unit will automatically make five
attempts to reach the cell site when the first try is not
successful. The
speaker will be muted for twenty seconds. This is
done so that you do not hear the reorder signals out
of the speaker. If you need to terminate the automatic
redial, press l^'l^.
Terminating a Call
Press and the indicator will go out.
To Receive Calls
1. When the telephone rings, press to answer
the call. The WiJtlM indicator will light.
IN
i^Sindicator will stay on, but the
22
Silent Incoming Calls
This feature alerts you visually of an incoming call by
flashing IQAUJ on the readout instead of hearing the
Alert Tone.
1. Press , key 8 then O - The BJdfB will appear
on the readout.
2. When a call is received, the unit indicates it by
flashing feAkUnn the readout without Alert Tone.
3. Press to answer the call.
on the readout will go out. __
4. This mode is deactivated by pressingSS, key
then m again.
5. If the Silent Incoming Calls is activated when the
unit is powered up, will appear on the
readout for 5 seconds.
Any Digit Key Answering
(NAM Option)
This feature permits you to answer a call by pressing
any digit keys the same as pressing
Automatic Answering
With this feature, the incoming call will be automati
cally connected for operation after two alert tones,
and the mm indicator will light on the readout.
Then the unit is ready for conversation.
To activate this mode, press BliOland then key S-
1.
IJrAfWd will appear on the readout.
This mode is deactivated when and then key
2-
m are pressed again.
This feature will not function if the unit is in the
3.
Lock and Silent Incoming Calls.
If the Automatic Answering is activated when
4.
the unit is powered up, will appear on the
readout for 5 seconds.
To Place a Call with a Number in the
Memory
1. Press PyU, then enter the memory address (01
through 99). The last 10 digits of the number will
appear on the readout. If the number is longer
than 10 digits, hold down the second digit of the
memory address (after pressing PQU) to see the
prefix.
Note: See “To Recall a Number from Memory”
and “To Review the Prefix” for more de
tails.
2. Press . The MIISB indicator will light
as the call is placed.
23
Page 13

911 Emergency Call (NAM Option)
This feature permits you to place an emergency call
(911) even if your telephone unit has been set to the
Lock Mode or Call Restriction Mode.
Operation in Lock Mode
1. Enter the emergency call number (911); [T] |
(“911” does not indicate, but the (LOCKI indica
tor will light.)
Press BBNDt, the to^USS indicator will light.
To terminate the call, press
liN USB indicator will go out.)
Operation in Call Restriction Mode
The operation and display are the same as in the
normal mode.
(The
To Mute a Phone Conversation
1.
Press IFNQ, then key S] • Mutd will appear on the
readout. The transmit audio will be muted and
the receive audio will be heard from the receiver.
You may converse privately with a passenger
during a call.
To return to normal conversation;
2.
Press I^CI, then key [U again.
3.
Mute is reset when the call is terminated.
CALL RESTRICTION
(NAM OPTION)
This feature permits you to impose various kinds of
restrictions on Outgoing Calls.
To Set Call Restricted Mode
Enter the three-digit security code, then press [|
key then [7] •
The following key operation is needed to activate one
of the restricted modes:
m: Only phone numbers having 11 digits or less
are accepted. Operator assisted dialing is
prohibited.
: Only phone numbers having 7 digits or less
are accepted. Operator assisted dialing is
prohibited.
[3]: Operator assisted dialing {0 Origination) is
prohibited.
13: No phone calls can be placed except for reper
tory dialing from memory address 01 to 09.
However, emergency call by “911” will be
available.
[5]: Only One Touch dialing is permitted. How
ever, emergency call with “911” are available.
[O]: No restriction.
ONE TOUCH DIALING
This feature permits you to place a call by a single key
stroke.
To Store a Number into One Touch Memory
1. Press KJl, then enter a phone number.
2, Press KM, then one of the two One Touch Keys
Stored numbers can be reviewed by pressing feCJU
then the One Touch Key you want to review.
To Place a Call to a Number in One Touch Memory
Press the One Touch Key for approx. O.Ssec..
The last 10 digits of the number will be displayed on
the readout, and the ifOBBl indicator will light as a
call is placed.
24
To Exit Call Restriction Program
ming Mode
Press fflS , then {Ml ■
Note: (1) When in the restriction mode 4, number
storage into the memory will not be per
mitted.
(2) In the restriction mode, a short beep tone
will be heard to inform you of the improper
operation, and the word IRestnefe^ will be
shown on the readout.
25
Page 14

END-TO-END SIGNALING
This feature permits you to utilize additional phone
services, such as accessing an alternate long distance
network, signaling pager, or banking by phone etc..
For these services the signaling should be in DTMF
(Touch Tone™). The following two features will make
it easier to send in DTMF codes.
Note: When you use this feature with a secret number,
the number must be previously stored in a
memory address. (Refer to “To Store the Secret
Number”.)
Touch Tone™ from Memory
DTMF signaling by repertory dialing is available
while engaged in a telephone conversation.
1.
Press I^BD PQ
memory address (01 through 99).
The last 10 digits of the number will appear on
the readout.
then enter the repertory
Example: To access the alternate long distance serv
ice using a secret number, you should call
your long distance service office first, and
enter your ID number, then the phone
number to be placed.
1. Recall the phone number of the long distance
service office.
Press , then enter the memory address (01
through 99).
2. Press
Linking Mark “=” will be added at the end of the
Recall your ID number stored with secret attri
3.
bution.
3-1. Enter the three-digit security code.
I, then key
I
Press keys ffi, -
1 1 Ì7Ì416JI
itn
m
'0
0: "B:
A\7
Note: However, if the memory address entered
has been set as a secret memory,
ITl -1 will be displayed on
the readout instead of the number.
2.
Press . Then DTMF signaling will be
placed and the DTMF tone can be monitored
through the speaker.
Note: Continuous DTMF from keypad can be manu
ally dialed as well to access answering ma
chines when engaged in a telephone call.
Link Dialing
This feature permits you to pre-set from repertory
memory or the keypad up to five numbers before
placing a call. With this feature, the first number is
sent in digital form to the cell site. Then up to four
other numbers can be sent with DTMF signaling by
simply pressing for each additional number.
Note: (1) Each number to be linked may be recalled
from memory or entered by keypad.
(2) Each number to be linked should be within
16 digits including linking mark “=” at the
end.
(3) Linked number can be stored in the
memory. However, number of more than
16 digits should be stored into memory
address 91 through 99.
26
TOM
Note: When you recall the ID number
stored without the secret attribu
tion, omit the step 3-1 and
proceed to next step 3-2.
Recall the secret memory (ID number).
3-2.
Press[
4. Press
5. Recall or dial the phone number to be called.
6. Pressi
I
Press , then enter the memory address (01
through 99) to recall the phone number to be
called.
I, key m then |
I, then key
16»
iindicator will light as the
call is placed. will appear on the readout.
.. ..................
1
After you received an answer from the long dis
7.
tance service office, press again. The DTMF
signal will be placed and the DTMF tone of your
ID number canbe monitored through the speaker.
will appear on the readout.
If your ID number is accepted, the long distance
service office will answer again, so press .
Then the long distance call will be placed and the
DTMF tone can be monitored through the speaker,
will appear on the readout.
27
1
Page 15

Note: The number linked in steps 1 through 5 can
also be stored in secret memory as stated in the
“Secret Memory”.
1. When a set of linked numbers which in
cludes a secret number has been stored in
memory address 91 through 99, enter the
three-digit security code, press iflCL ,
memory address {91 through 99), and then
to place the call.
on the readout, and the first linked number
will be called as shown in step 6 above.
If the secret number is not included in the
linked number, you need not enter the
three-digit security code in the above op
eration.
2. To complete the call, continue operations
as shown in the steps 7 and 8.
appear
SCRATCH PAD DIALING
This feature permits you to enter a number to be
redialed (or store a number in memory) while en
gaged in a conversation.
SCRATCH PAD DIALING
WITHOUT KEYING TONES
This feature permits you to activate scratch-pad
memory without annoying key tones over the circuit.
1. Press PNC! , then key , then enter a phone
number. WWMI will be displayed for 5 seconds.
The Microphone circuit will remain active, but
the tones will not be heard.
2.
If necessary, press iST0i, then enter the memory
address.
3.
To exit the Scratch-pad Mode, press , then
key ^ again.
CALL TIME DISPLAY
This feature automatically records the elapsed time
per conversation. The talk time of the last call,
cumulative talk time, and the number of calls can be
displayed on the readout.
The timers can also be cleared if necessary.
With beep tones you can be notified of the approxi
mate talk time (NAM Option) in approximately 60
seconds increments.
To Display the Talk Time of the Last Call
1. Press IRCLi, key ® then [T].
The talk time of the last call will be displayed on
the readout for 5 seconds.
While in a conversation, the talk time of a call in
progress will be displayed, and updated each
second. The display format is as follows.
. 1 min. and 25 sec.
To Display the Cumulative Talk Time
1. Press
The cumulative talk time will be displayed on the
readout in minute format for 5 seconds.
i18m ...18 min.
To Display the Number of Calls
1. Press
The number of calls will be displayed on the
readout for 5 seconds. The display format is as
follows.
To Clear the Timer
1. Press 0LRI, then enter the three-digit security
code.
2. Press ISTd . key then M .
The timers will be cleared, and the count for the
cumulative talk time and the number of calls will
start from zero.
, key S then'
...Received or placed 86 calls.
28
One Minute Beep (NAM Option)
During conversation, you can be notified of the ap
proximate talk time by tones for the first five minutes,
(a short monotone signal will sound every minute
and a double beep tone will be heard after approxi
mately 5 minutes.)
29
Page 16

A/B SYSTEM SELECTION
SYSTEM INHIBIT
This feature permits you to select the system you
need to use. The system that you are registered with
is the preferred system, and your home system.
1. Standard Mode
When you turn the unit on, the unit remembers
the last position of the A/B system selected, and
will start to scan the radio frequency channels of
that selection.
]^ you want to confirm the current mode, press
, key ^ then H • Status indicator shows
the current mode. To return the unit to the
standard mode, press , key ^ then ^
again. Status indicator shows FSIfill. The unit
will scan the preferred system channels. If unable
to find an acceptable preferred channel, the unit
switches to scan the non-preferred channels.
2. Preferred System Only Mode
Press R40 , key ^ then ® . Status indicator
shows . The unit will scan the preferred
system only and prevents switching over to the
non-preferred system.
3. Non-preferred System Only Mode
® then ^ . Status indicator
shows . The unit will scan the non-preferred system only.
4. Home Only Mode
Press , key ^ then ^ . Status indicator
shows . You can place or receive calls only
within your home area.
Note: (1)
The indicator lights as follows.
Lights continuously;
When the unit is in the preferred
system in another city.
Flashes;
When the unit is in the nonpreferred system.
(2) The M
unit is requesting service but not in the
requested service area.
indicator flashes when the
(NAM OPTION)
This feature permits you to inhibit (by NAM Option)
cellular systems, or Roam Systems you do not want to
use, even when in that service area. The [NOSVCl
indicator flashes, if your A/B switch is selected to any
system that is inhibited.
MULTIPLE CITY
REGISTRATION
Some cellular users find it beneficial to register their
phone in multiple cities, rather than rely on “roam”.
The multiple city registration feature permits you to
reprogx’am from the telephone unit, the different
phone numbers for the cities in which you are regis
tered. Each programmed phone number will be des
ignated as your home system.
Press ICLRl, and enter the new system ID number (5
digits) followed by the corresponding phone number
(10 digits). Please include your area code. You must
register your unit with the carrier in order to get both
the system ID number and your phone number.
Press ^Cl then key . Your new phone number will
be displayed on the readout. (Holding down [§], to
display your new system ID number.)
Note: (1) System ID number and phone number can
not be programmed during a call,
(2) Calls are placed or received using only the
programmed phone number, in use at the
time of call.
30
31
Page 17

RADIO FREQUENCY (RF)
CHANNEL INDICATOR
If necessary, you can see the RF channel status in
which your unit is operating.
1. Press 'WMi, key ® then H.
The RF channel number, RSSI, SAT color code,
and transmitting power level will be displayed on
the readout. The display format is as follows:
C123....
R187....
SO....
P2....
2. The display will remain on the readout until you
manually reset it by pressing any key.
RF channel number
RSSI value
SAT color code
Transmitting power level
LAST RESCAN SID
INDICATOR
This feature permits you to view the last rescan SID
accessed by your phone.
Press key H then ^ .
The last rescan SID is displayed on the readout for
5sec. The display format is as follows:
FUNCTION REVIEW
This feature shows you which numbered keys to use
for different FUNC/RCL key functions.
To review the function menu:
Press for about one second.
Scroll the menu up or down, using the or H
key respectively.
The display information will appear as follows.
DISPLAY FUNCTION
[Lock ] [FNC 1 ] Lock
[A.D/T]
[A.Ans]
[Mute ] [FNC 8
[Tone ] [FNC 9
[ABsys] [FNC 0 0-4
[Timer][RCL*1-3
[RF CH]
[Light] [RCL* 5
[Alert][RCL
[Silen][RCL
[Batt.] [RCL*8 ] Battery Level Indication
[R.SID][RCL *
[<ID> ]
[FNC 2
[FNC 5
[RCL*4
*
* 7
* *
[RCL
[Alpha] [FNC ALPH ] Alpha Mode
[Data ] [FNC SEND ] Data Transmission'^'
[Secrt][FNC STO N ] Secret Memory
[Restr]
[ID ]
[XYZ FNC #7] Call Restricted Mode
[<ID> FNC
] Automatic DataTransmissioh^^
] Automatic Answering
] Mute
] DTMF Tone Mute
] A/B System Selection
] Call Turner
] RF Channel Indication
] Backlighting Control
] Alert Volume Control
6
] Silent Incoming Calls
9 ] Last Rescan SID Indication
] Present SIDH+Phone Number
6 ] Multiple City Registration
i .1 i; !ô№.lo1ài&
If the iNQ SVG] indicator is on, the display will show
32
Note: (1)
1 N = Repertory Memory Address
(01 through 99)
(2) XYZ = Three-digit Security Code
(3) <ID> = System ID number + Own
Phone Number
(4) These features are available only when
the unit is connected with a Car Kit (op
tion).
33
Page 18

IMPORTANT SAFETY
INFORMATION
Please read and follow these cautions carefully. TURN
OFF your unit in an explosive atmosphere (near a
fuel pump, blasting area, etc.).
DO NOT dial when your unit is moving in states
where this action is illegal (this is not a prudent
practice, even where it is legal).
DO NOT permit untrained personnel to operate the
unit.
WARNING
The following offences can punished by fine, impris
onment, or both;
• Using obscene, indecent, or profane language.
• Using the unit to give off false distress calls.
• Wiretapping or otherwise intercepting a telephone
call, unless that person has first obtained the
consent of the parties participating in the call.
• Making anonymous calls to annoy, harass, or mo
lest other people.
• Charging to an account without authorization to
avoid payment for service.
• Refusing to yield a party line when informed that
it is needed for an emergency call (It is also unlaw
ful to take over a party line by stating falsely that
it is needed for an emergency).
34
 Loading...