

Page 1

Audiovox Communications Corp
MVX-480 Series
Handheld Portable Cellular Telephone
Congratulations…You have just purchased one of the most advanced, yet simple to use handheld cellular telephone in the
market today . Your Audiovox portable telephone allows you the freedom to enjoy the benefits of cellular communications
without the limitations.
It has been built to the same exacting level of high engineering standards that has made the Audiovox cellular telephone
line a top rated brand in the industry.
Your new Audiovox cellular telephone has been engineered to support a number of enhanced services that may be offered
by your cellular service provider. In order to take advantage of these special, enhanced services, you must subscribe to
them through your home cellular service provider.
The Audiovox MVX-480 Series is packed with advanced features that provide the ultimate in convenience and safety like
one touch emergency dialing, a constant signal strength and battery life indicator, a voice mail access key and the most
advanced anti-fraud security features in the industry.
It also features a multi-function access key that allows for simplified storing and recalling of numbers in memory.
For ease of operation, the MVX-480 Series has been designed with a feature menu printed directly on the keypad. By
simply pressing the green function button and the feature you wish to access, your desired function is complete. It’s that
simple!
Optional accessories include a rapid charger, an extended life battery and an earphone microphone for hands free use. A
cigarette lighter charger, leather carrying case and battery eliminator is also available.
And of course, your new Audiovox MVX-480 Series phone comes with something only Audiovox phone can provide.
The proven reliability that has made Audiovox one of the worlds’s leading suppliers of cellular communications equipment.
Page 2
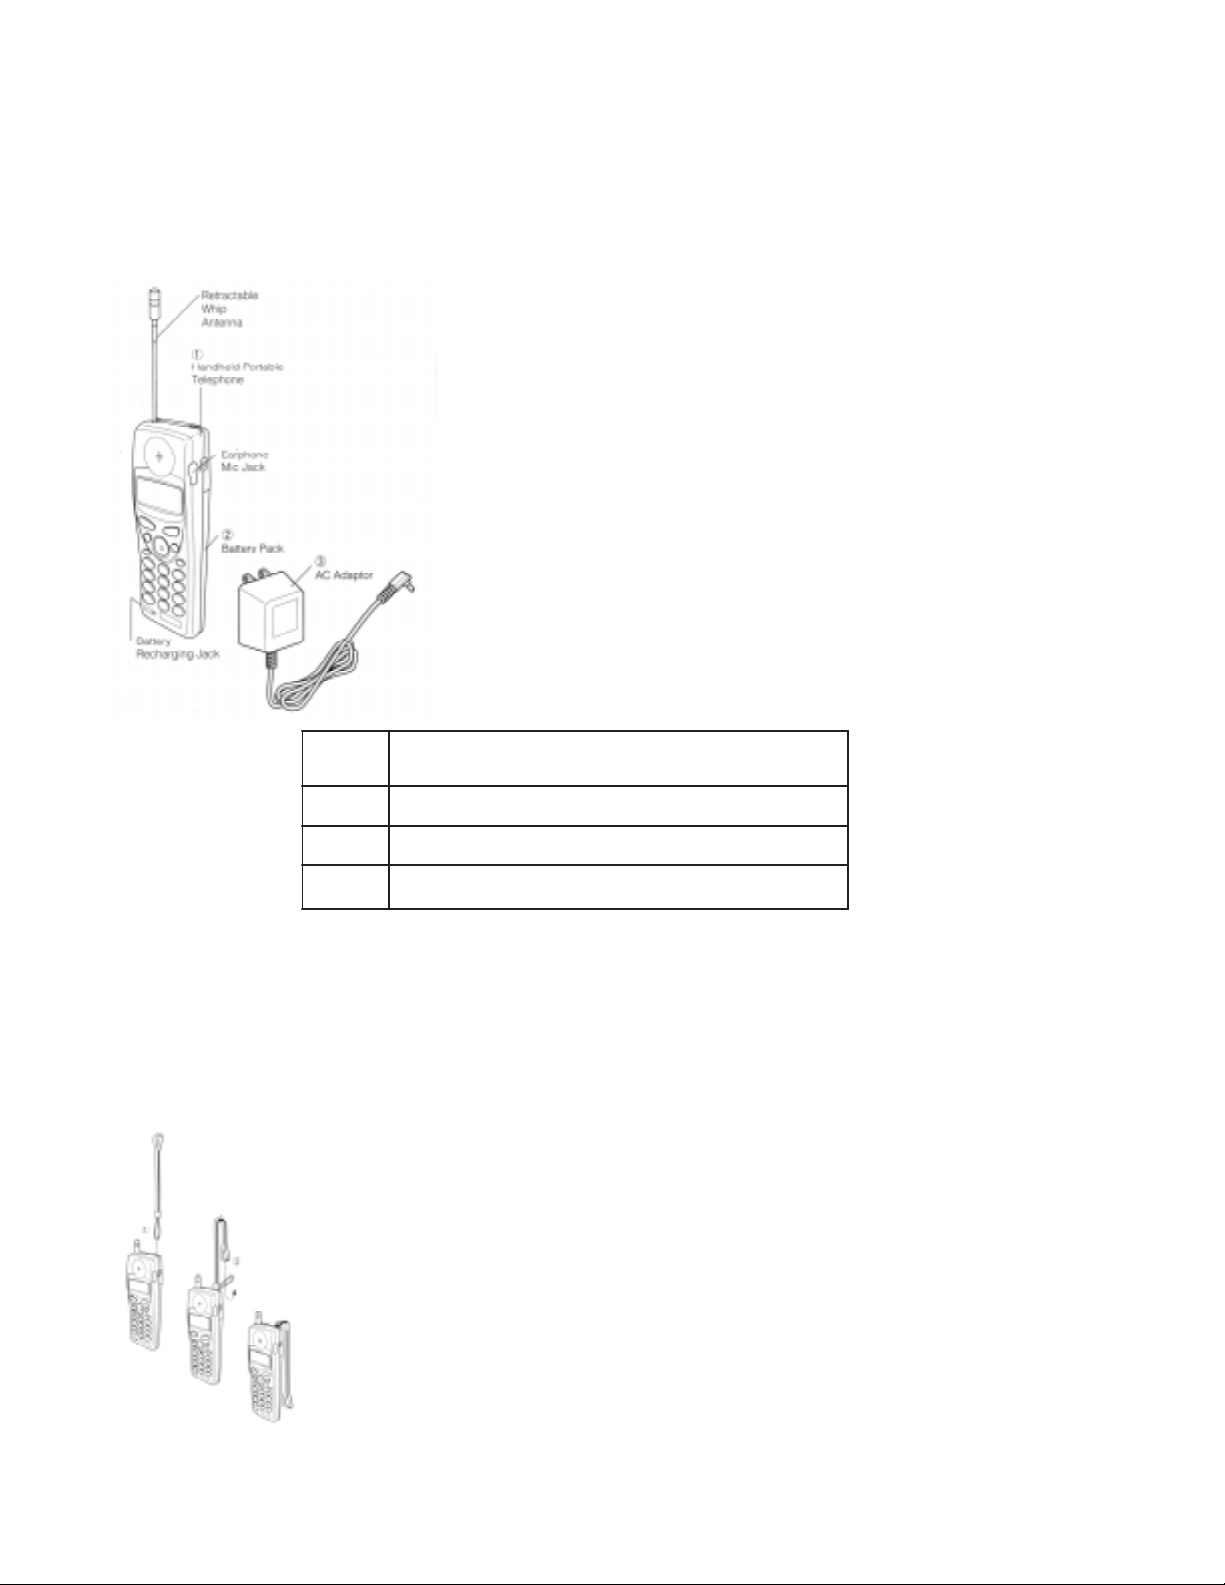
SYSTEM CONFIGURA TION
System configuration and the equipment list are as shown below
.oNtnempiuqEehtfoemaN
1enohpeleTelbatroPdlehdnaH
2)044-RTB(kcaPyrettaB
3)044-RNC(rotpadACA
WRIST STRAP A TTACHMENT
Attach the wrist strap WS-700 (option) to the unit through the strap hole as shown below 1
Then pull the long loop through the smaller loop as shown below 2
BA TTER Y INSTALLATION AND RECHARGING
Page 3
The portable T elephone contains a Detachable Battery Pack (BTR-440). A fully char ged Battery Pack offers approximately 80 min minutes T alk or 17 hours standby. It is recommended to carry one fully charged spare Battery Pack for
longer operation.
(Additional battery packs may be purchased at your Cellular T elephone Dealer.)
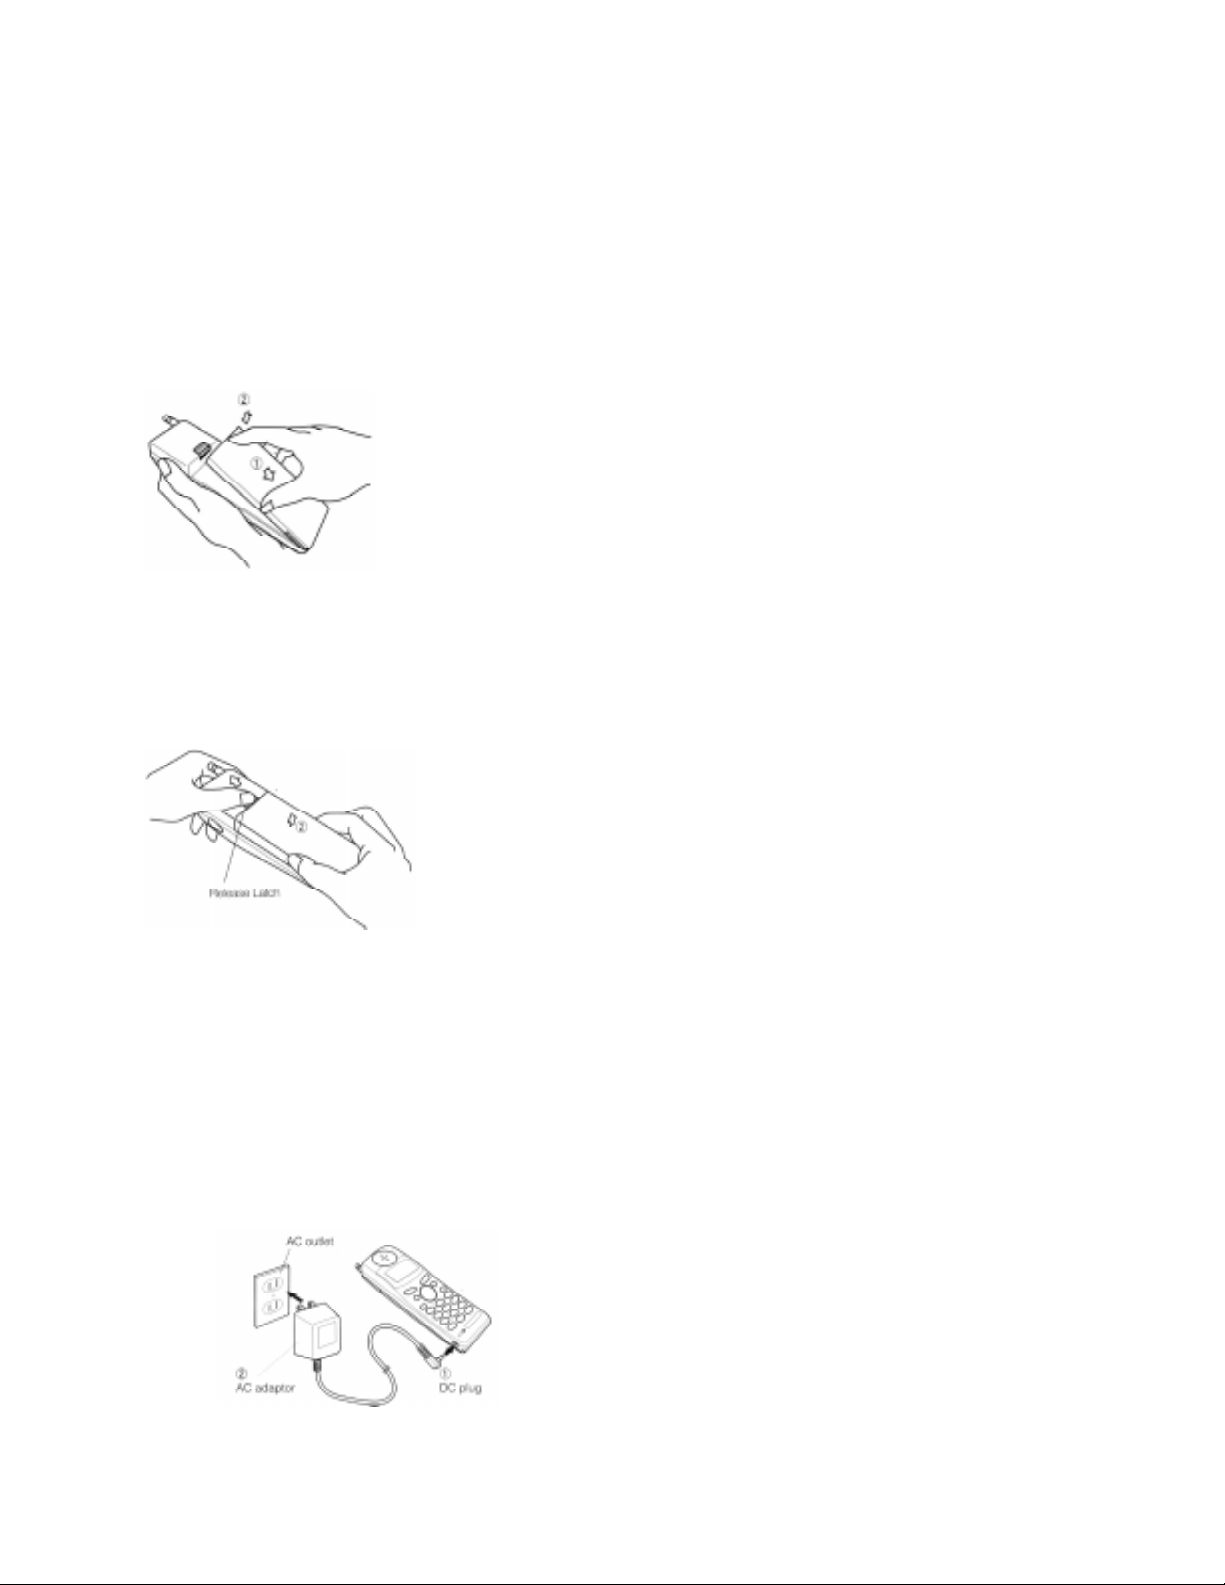
To Attach the Battery Pack
1. Insert the hook at the end of the Battery Pack into the slot at the end of the unit.
2. Press the Battery Pack down to lock the Battery Pack onto the phone.
To Detach the Battery Pack
1. Slide back the Release Latch as shown below.
2. Lift up to remove the Battery Pack from the unit gently.
TO RECHARGE BATTERY
The AC Adaptor (CNR-440) can recharge the Standard Battery (BTR-440) in 7 hours or the optional Extended Battery
(BTE-440) in 10 hours respectively .
1. Attach the Battery pack to the Phone
2. Set the AC Adaptor
1) Insert the DC plug of the AC Adaptor into the battery recharging jack on the phone.
2) Plug the AC Adaptor into the AC Outlet.
3. Then battery recharging will start.
Note: For complete recharging, it is recommended that the phone’ s power is of f while rechar ging the battery.
Page 4
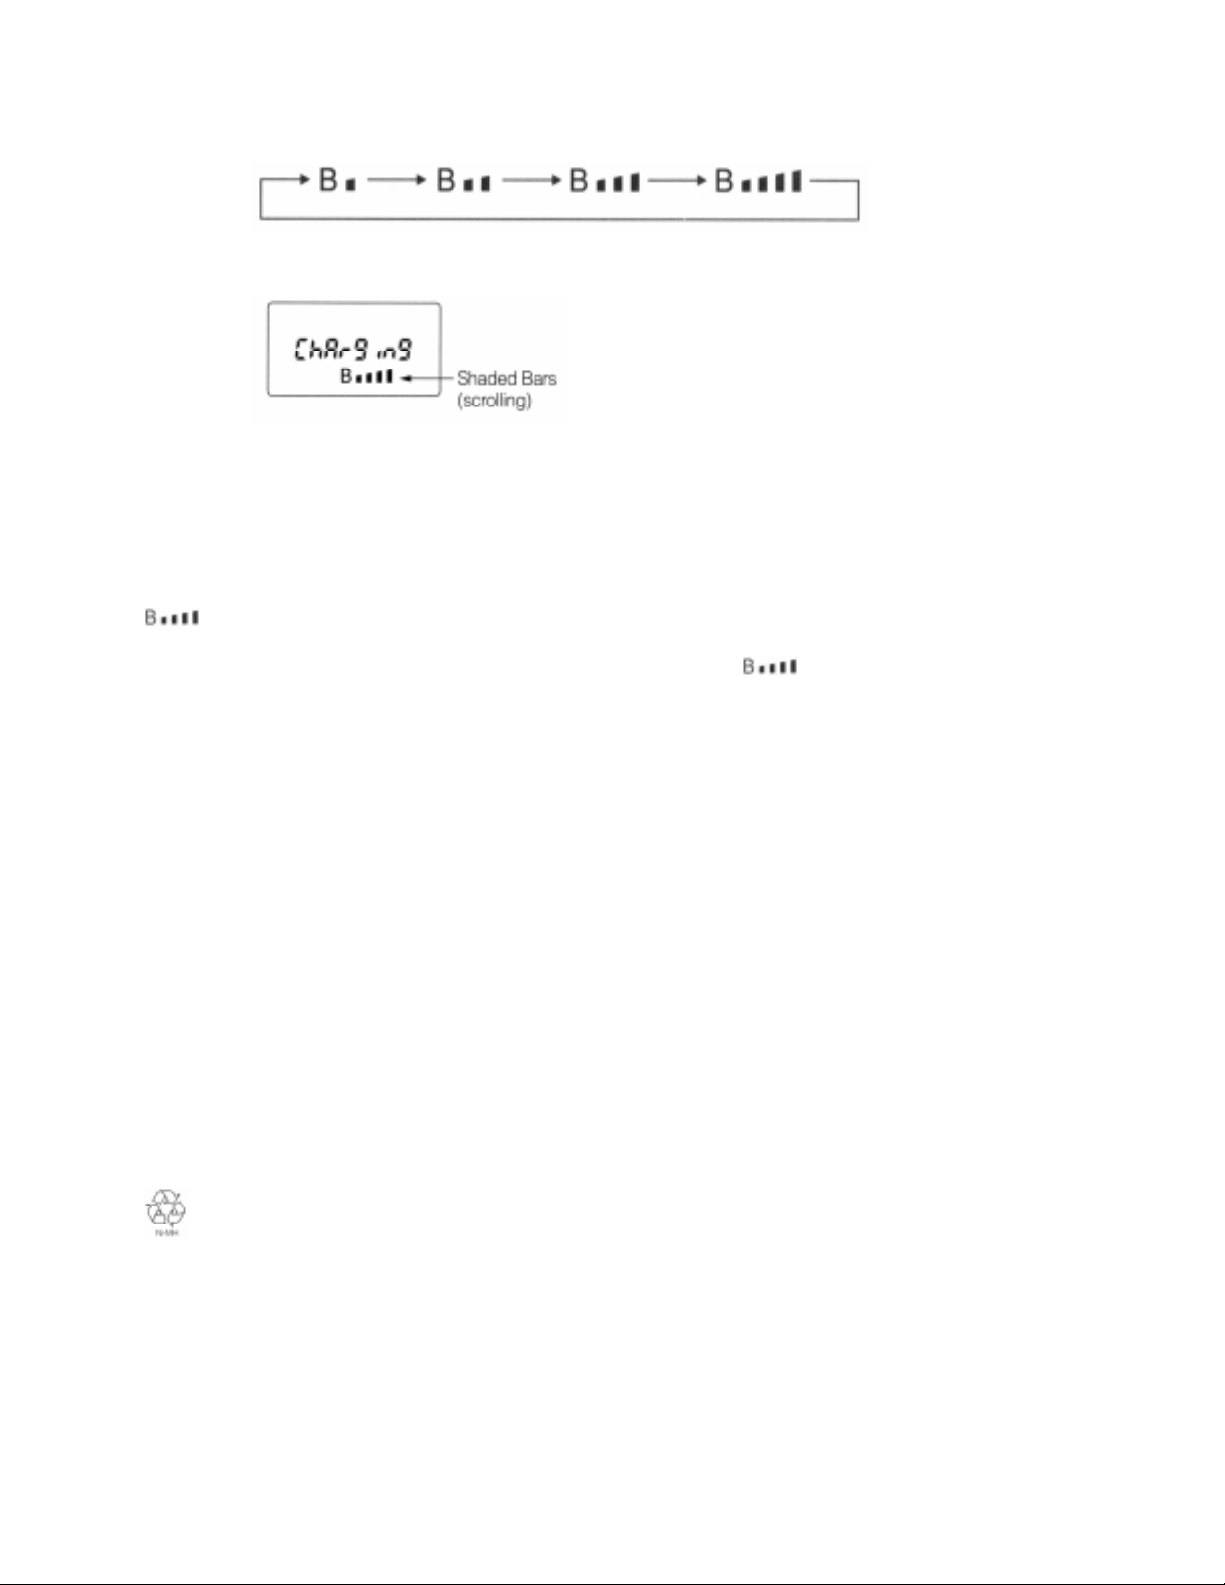
4. Battery charging indication.
1) While charging the battery , the battery life indicator will scroll on the readout and be displayed as shown below.
2) If the phone’s power is of f, “ Char ging” will appear in the readout during the battery Char ging operation as
shown below .
3) After all of the segments of the battery indicator stop scrolling, the battery is fully charged.
4) Environmental temperature for full battery recharging with fixed time;0˜+35ºC
5. Disconnect the AC Adaptor (battery charger) from the AC outlet and from the phone.
6. After recharging, battery pack may become a little warmer. However, this is normal.
7. Recharge the battery fully before your first use of the unit.
8. When the battery becomes discharged, two beep tones will be heard every 10 seconds, and the battery level indicator
will be flashing. In such a case, replace the battery with a fully charged one, or recharge the discharged
battery.
9. T o ensure long battery life, operate the unit until the battery level indicator flashes, then recharge the battery.
Remove Battery Pack from the unit when it is not expected to be used for a long period. Recharging at least once
every month is recommended when not being used.
10. DO NOT charge Battery in an area with direct exposure to sunlight.
11. All batteries can cause property damage, injury or burns if a conductive material, such as jewelry, keys or beaded
chains, touches exposed terminals. The material may complete an electrical circuit (short circuit) and become quite
hot. Exercise care in handling any charged battery, particularly when placing it inside your pocket, purse or other
container with metal objects.
12. DO NOT open the battery case. If the battery is accidentally broken, avoid skin contact with the internal chemical
contents. If there is skin contact, wash the affected area immediately and seek medical advice.
13. Do NOT put the battery close to, nor dispose it into fire.
14. Use of an attachment not recommended or sold by the AC adaptor manufacturer may result in a risk of fire, electric
shock, or injury to persons.
15. An extension cord should not be used unless absolutely necessary. Use of improper extension cord could result in a
risk of fire and electric shock. If extension cord must be used, make sure:
a. That plug of extension cord are the same number, size and shape as those of plug of AC adaptor.
b. That extension cord is properly wired and in good electrical condition.
c. That wire size is large enough for AC ampere rating of charge.
16. DO NOT operate AC adaptor with damaged plug. Replace AC adaptor immediately .
17. DO NOT operate charger if it has received a sharp blow, been dropped, or otherwise damaged in any anyway; take it
to an authorized Audiovox cellular service center.
18. T o reduce risk of electric shock, unplug char ger from outlet before attempting any maintenance or cleaning.
19. the product that you have purchased contains a rechargeable Battery. The Battery is recyclable. At the end of
it’s useful life, under various state and local laws, it may be illegal to dispose of this Battery into the municipal waste
stream. Check with your local solid waste officials for details in your area for recycling options or proper disposal
FEA TURES AND OPTIONS
· Push Button Dialing
· Large Size LCD Display
Status/Function Indicator
10 Digit Number Display
Receiving Signal Strength indicator
Page 5

Battery Level Indicator
Envelope Message Icon
· (Electronic) Volume Control
· Pre-set dialing up to 32 Digits
· Extended Readability (prefix Review)
· Last Digit Clear
· Digit Display Clear
· Programmable emergency Call (Programmable Option)
· One T ouch Emergency Call
· Repertory Dialing: 32-Digit 30 Memories
· Speed Dialing
· Repertory Memory Scroll
· Automatic Storing into a Vacant Memory Address
· Voice Mail Dialing
· Memory Name T ag
· Any Digit Key Answering
· Automatic Answering
· Anti Fraud Security Feature
· Last Number Redial
· Automatic Redial ( Programmable Option)
· Mute
· Scratch-pad Dialing ( with/without Keying Tones)
· End-to End Signaling
· Continuous DTMF from Keypad
· Silent Incoming Calls
· Call Time Display
· Automatic Calls in Absence Indicator
· Display Own T elephone Number
· A/B System Selection
· SID Management (Programmable Option)
· Multiple City Registration
· Last rescan SID Indicator
· Electronic Lock
· Enhanced Features*
Caller ID*
Voice Mail Notification*
*; Service Provider Dependant
Page 6
Page 7
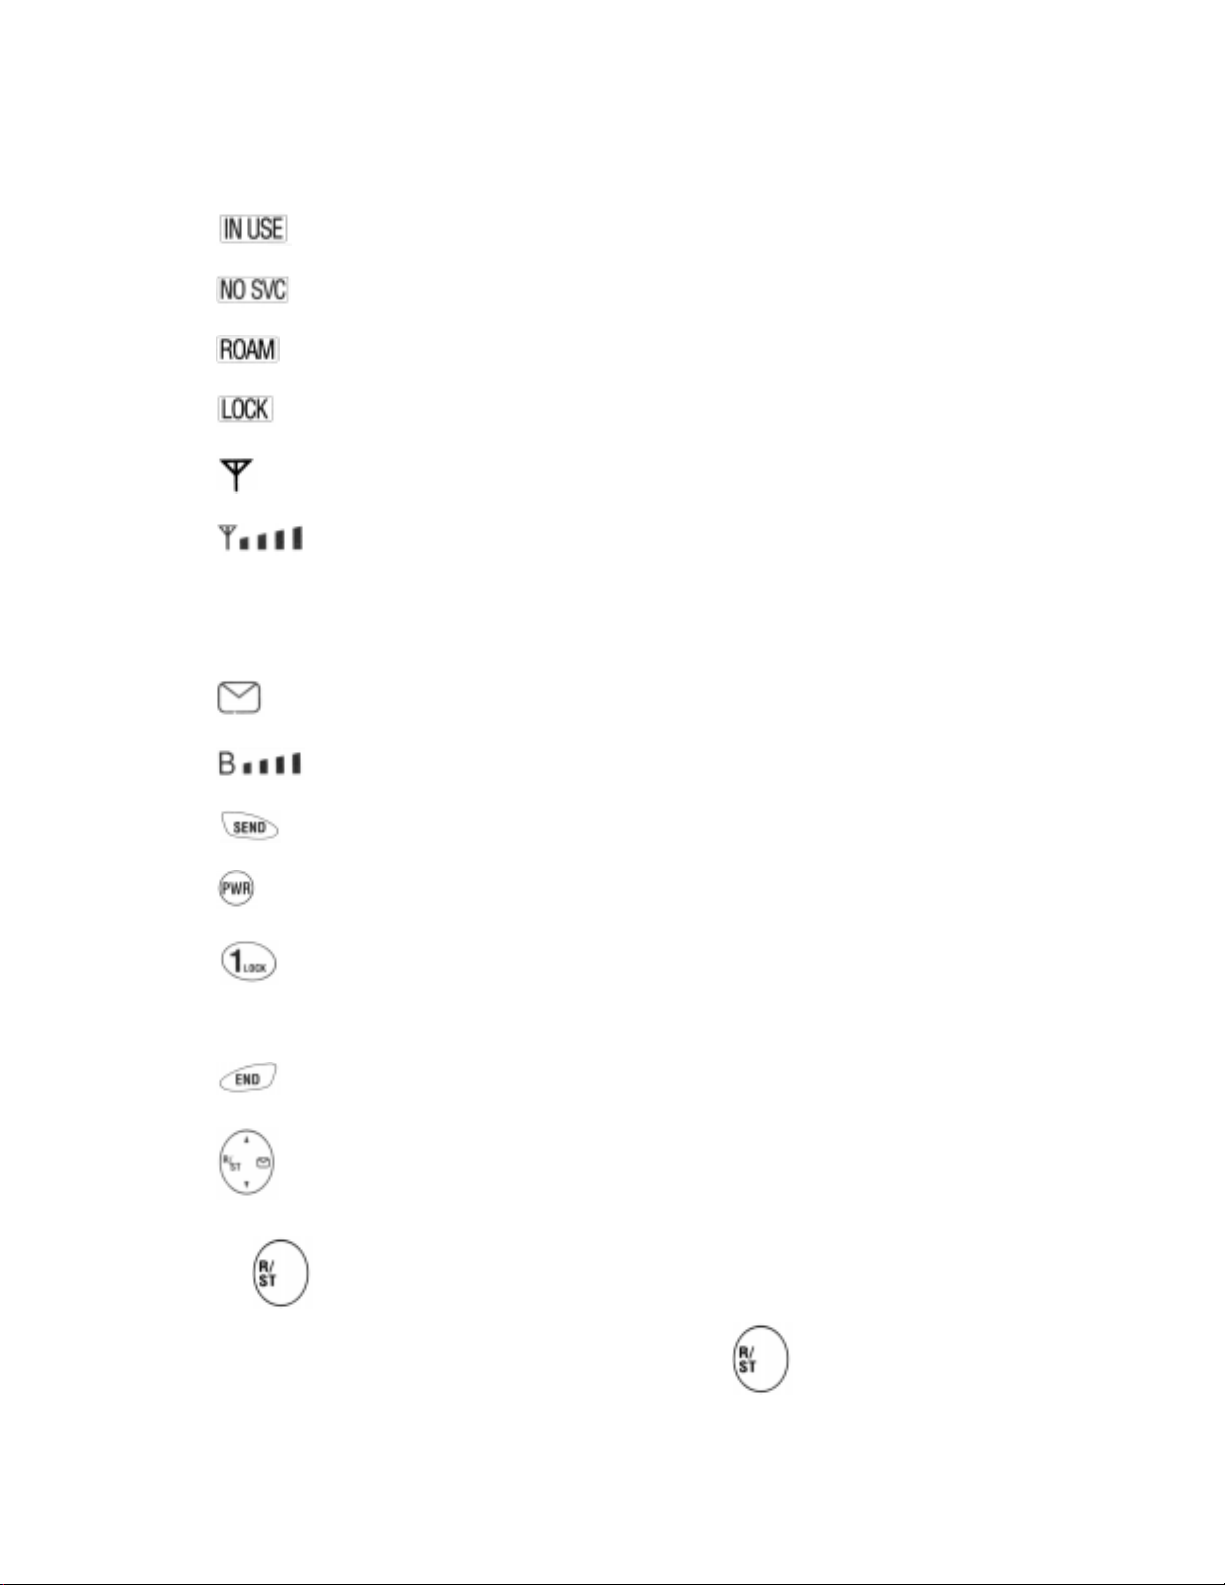
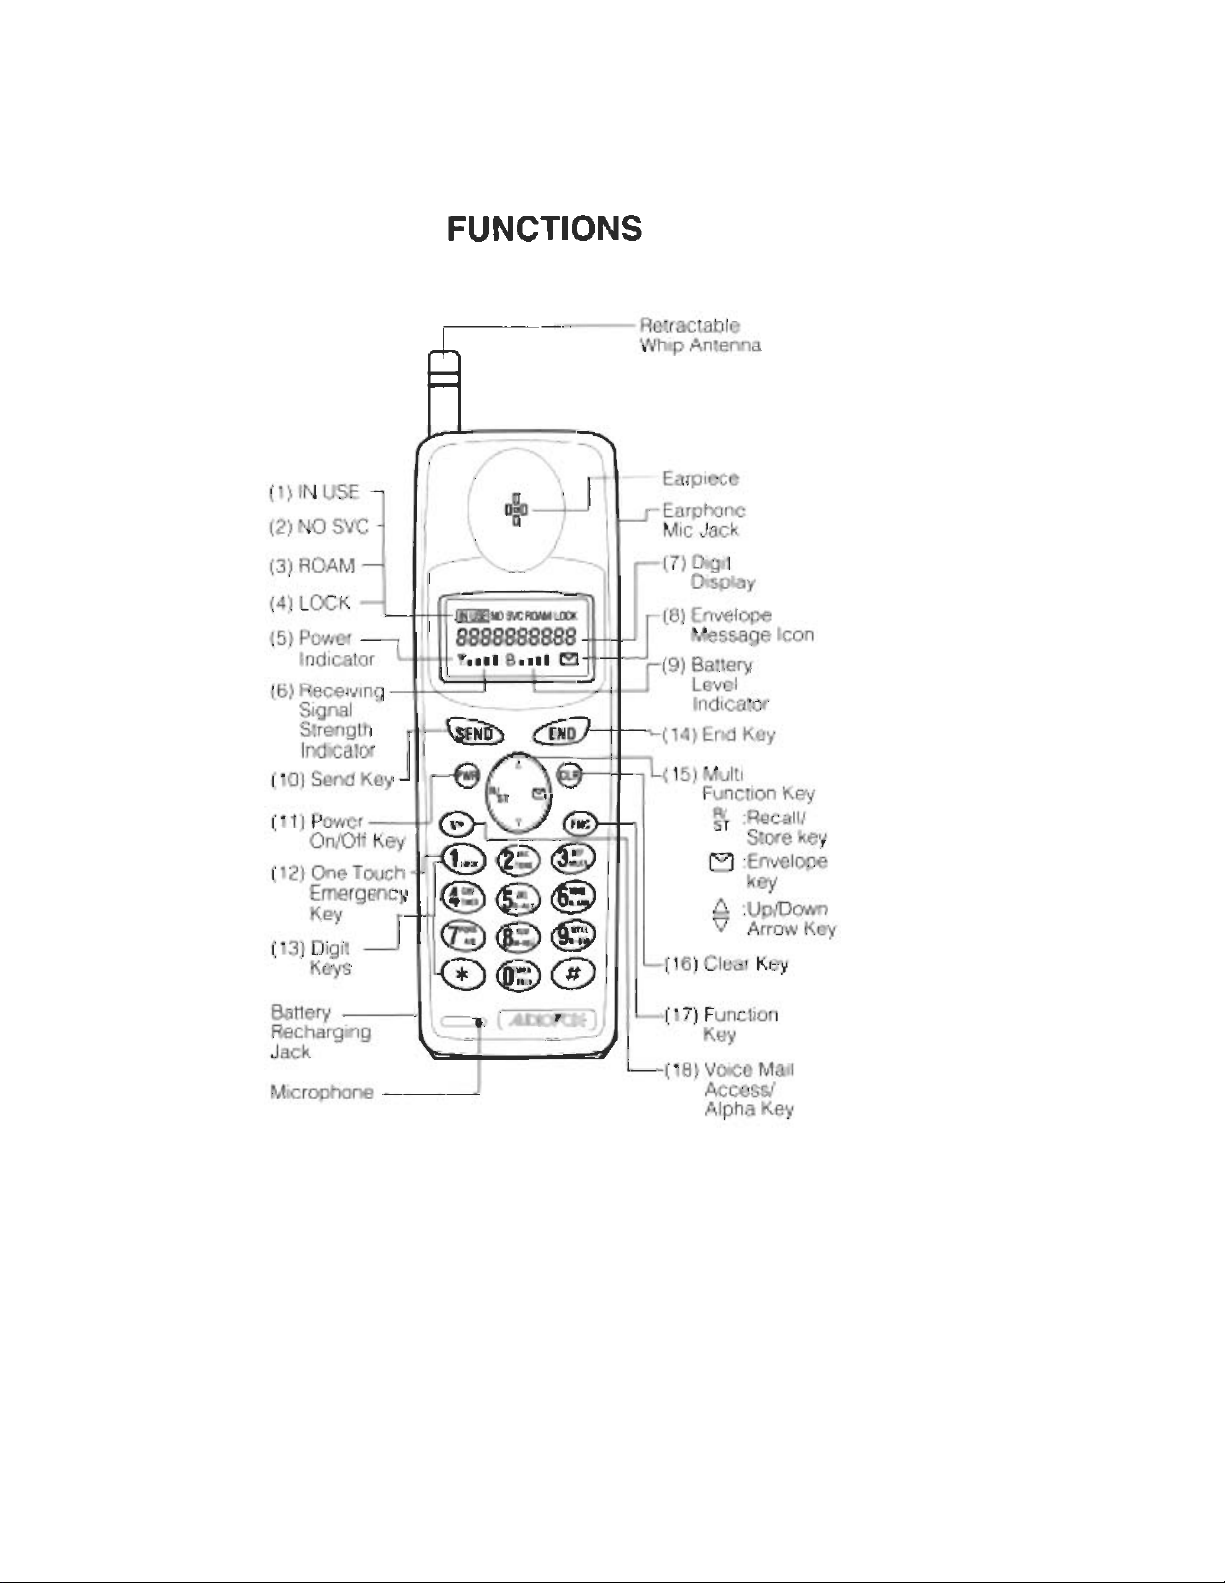
(1) indicator lights when a call is in progress.
(2) (no service) indicator lights when the unit is in a non-coverage area.
(3) indicator lights when the unit is out of home area.
(4) indicator lights when the unit is locked.
(5) is used as a POWER ON indicator which lights when the unit is turned on.
(6) is used as a receiving signal strength indicator. The number of shaded blocks indicates the Receiving
Signal Strength.
(7) 10-CHARACTER FUNCTIONAL DIGIT DISPLAY: The remaining character show the last digits of the dialed
number.
(8) Envelope Message Icon informs that there are messages and/or calling line ID numbers in the memory.
(9) is used as a battery level indicator.
(10) (send key) is used for placing or receiving a call.
(11) (power on/off key)is used to turn on/off the unit.
(12) One Touch Emer gency key.
(13)DIGIT KEYS to enter a phone number.
(14) (end key) terminates a call.
(15) (Multi Function Key)
a) INSERT Recall/Store key
· T o recall phone numbers from repertory memory, press
Page 8
· T o store phone numbers in repertory memory,press , .
b) (Envelope Key) is used for Voice Mail Notification and Caller ID
c) or (Up-arrow key or Down arrow Key)
· To control earpiece audio level, press or .
· To control alert tone level,press FNC or .
(16) (Clear Key) clears the digit(s) from the display.
(17) (Function key) shifts the didgit keys to the function keys.
(18) (Voice mail access/alpha key)
· T o access the linked speed dialing capability, press .
· To enter alphabetical characters, press .
Earphone Mic Jack is used for handsfree operation with EM-425 Earphone Mic (Option).
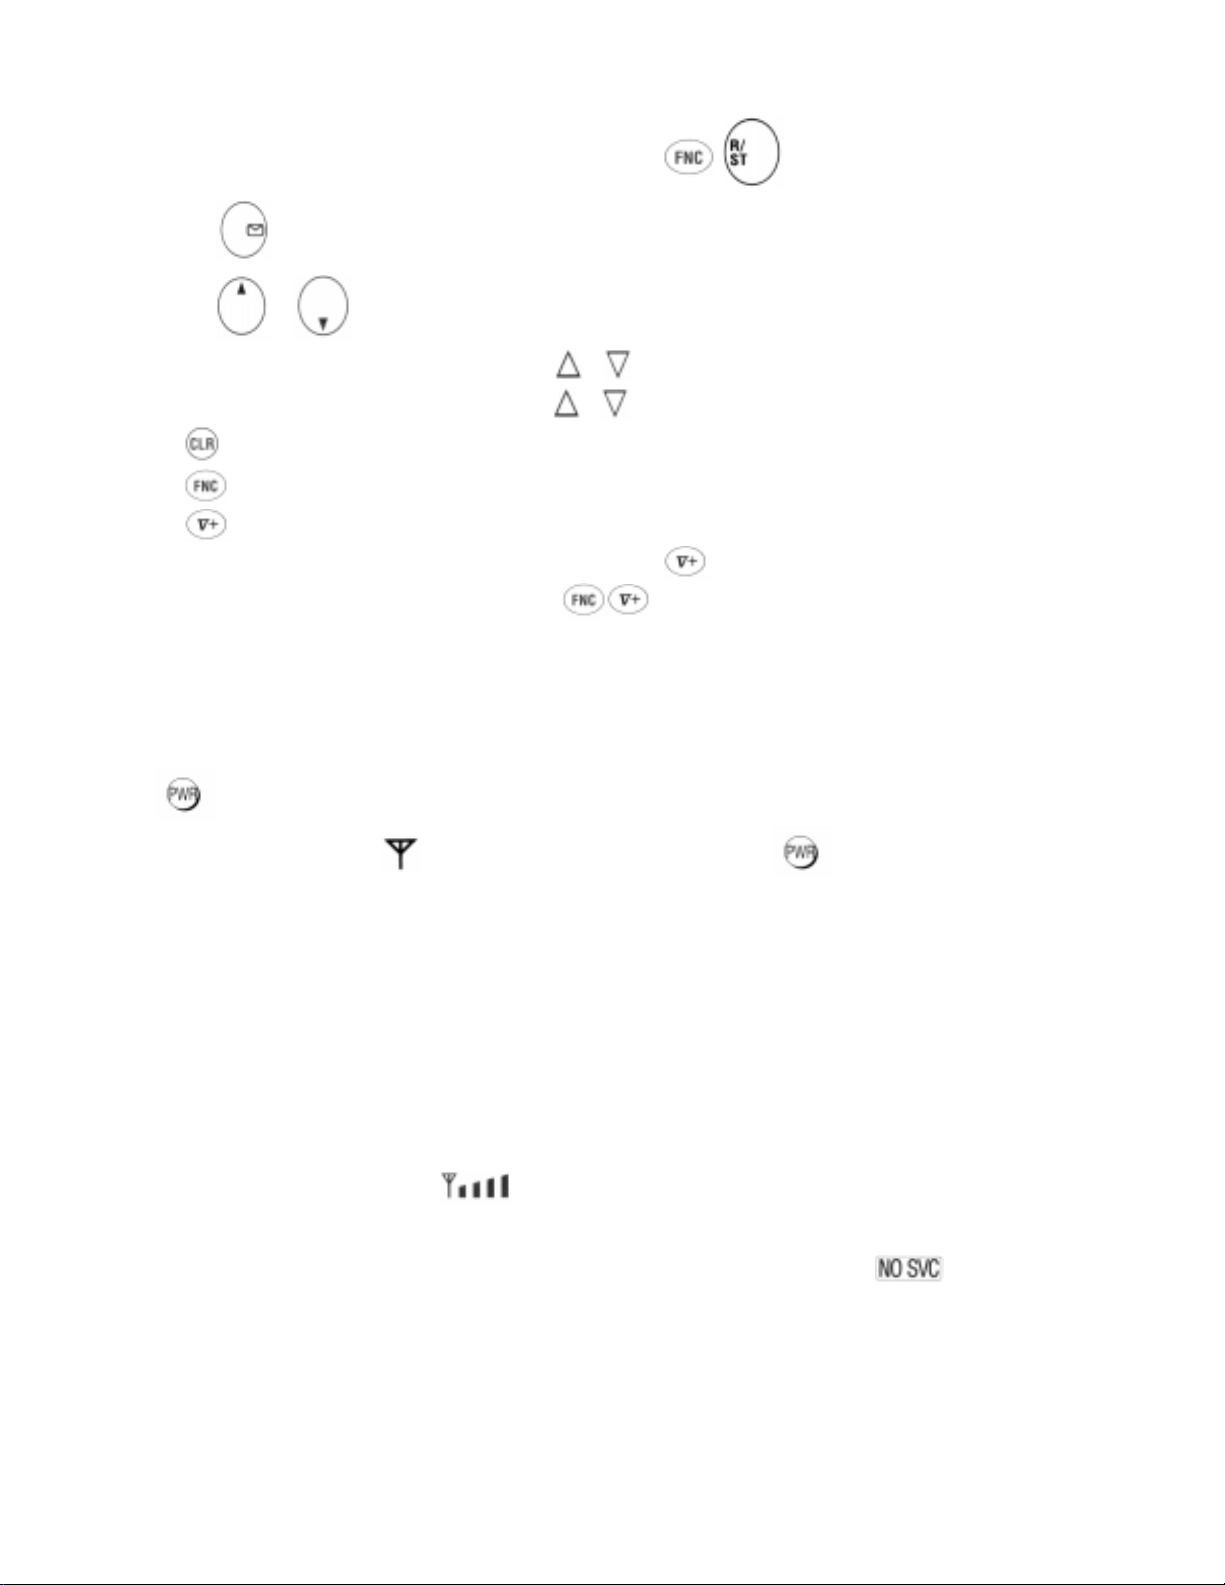
BASIC OPERA TION
Turning the Unit On/Off
Press for about one second to turn on the unit. All the indicators and digit display will light momentarily, and a
tone will be heard. The indicator “ ” will stay while the unit is turned on. Press again for about one second to
turn off the unit.
· Antenna Position
Your portable cellular telephone is equipped with a dual position antenna system.
This dual position antenna has been especially designed to allow your phone to receive calls while the antenna is down.
However, for optimum performance and signal strength or while operating in poor signal areas, it is recommended that
the antenna be fully extended.
NOTE: The antenna can be used in its fully extended or fully retracted position only.
· Receiving Signal Strength Indicator ( )
The number of shaded blocks indicates the Signal Strength in your area. Four blocks show the maximum level. The
display will vary as you move with the unit. If the signal is not strong enough to place a call, the indicator will
appear on the readout.
· Battery Level Indicator
You can always monitor the current battery voltage level with the constant battery level indicator. The number of blocks
indicates the battery conditions as follows:
Page 9
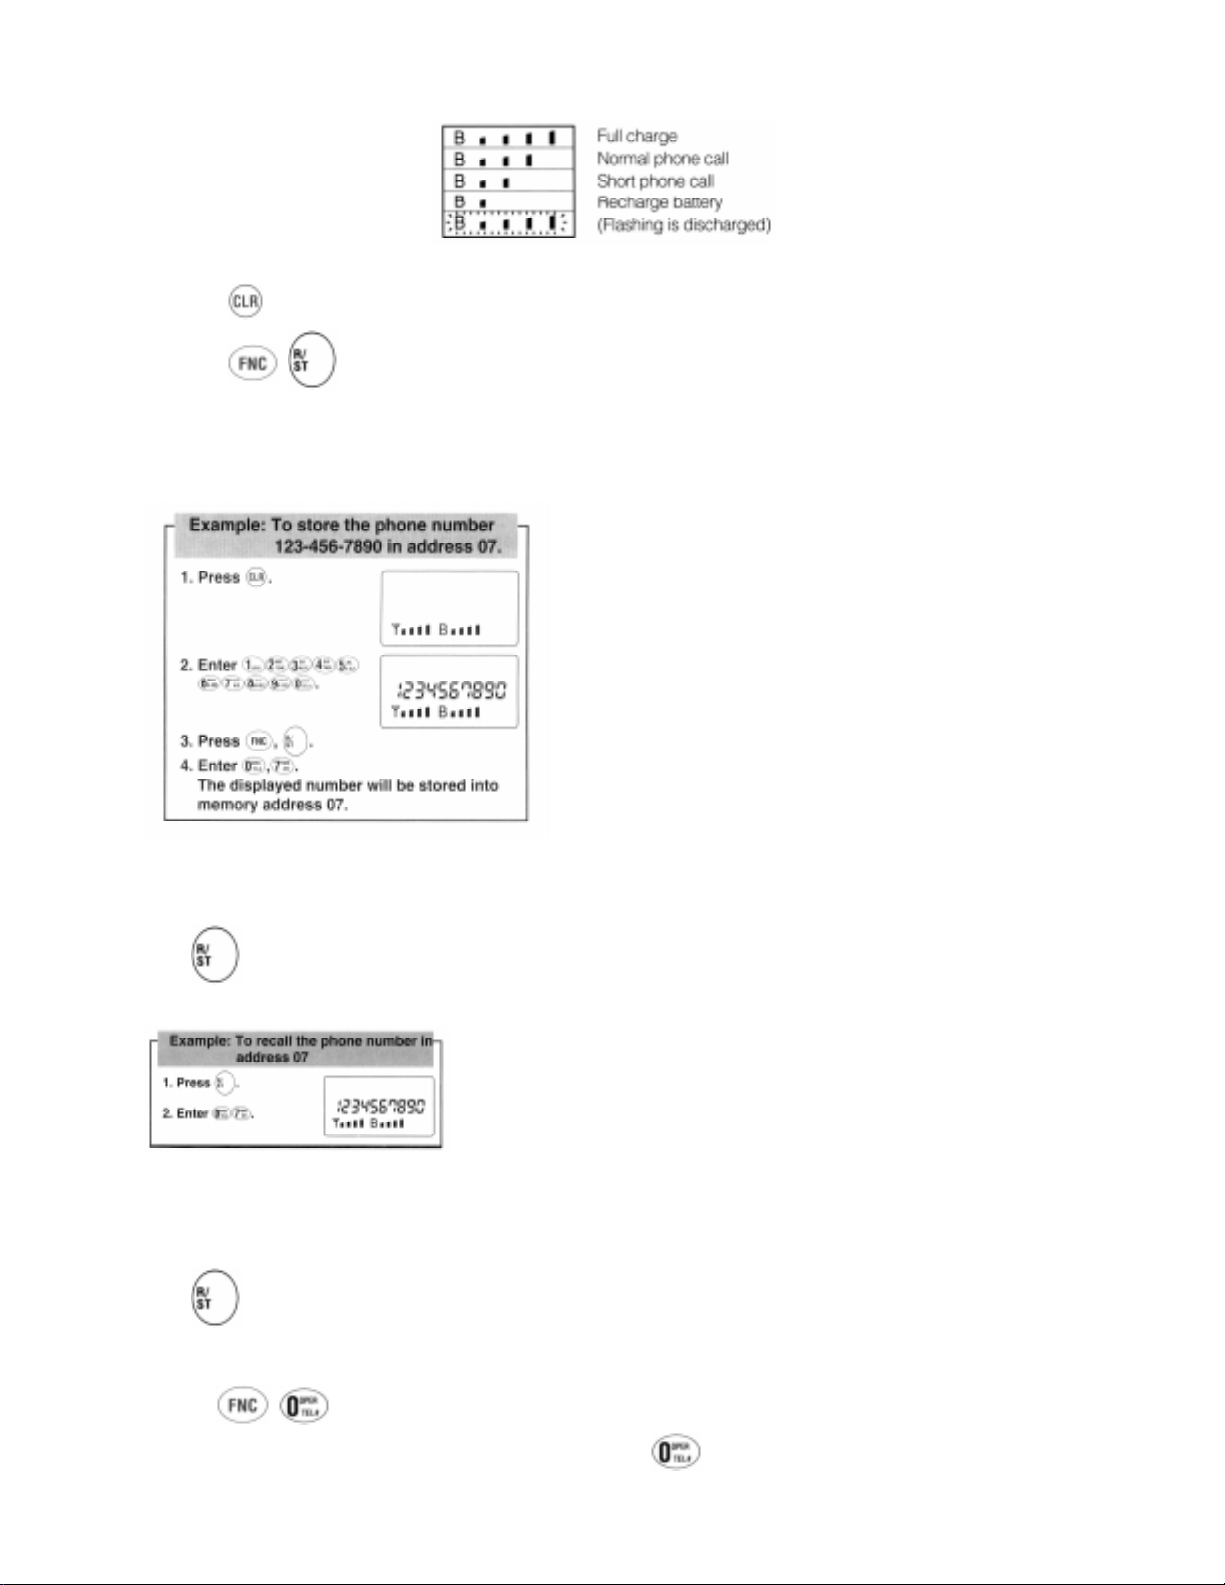
1. Press , then enter the phone number
2. Press , , then enter the two diogit memory address. (01 through 30).
Example: To store the phone number 123-456-7890 in address 07.
To Recall a Number from Memory
Press , then enter the two digit memory address (01 through 30)
Note: You can see the last 10 digits on the readout. If the number is longer than 10 digits, see “T o Review the Prefix.”
To Review the Previx
(Number longer than 10 digits)
Press , then enter the first digit of the memory address, then hold down hte second digit of the memory address.
Display Own T elephone Number
1. Press , .
Your system ID number will be displayed while the key is held down and your own phone number will be
Page 10
displayed when you stop pressing key .
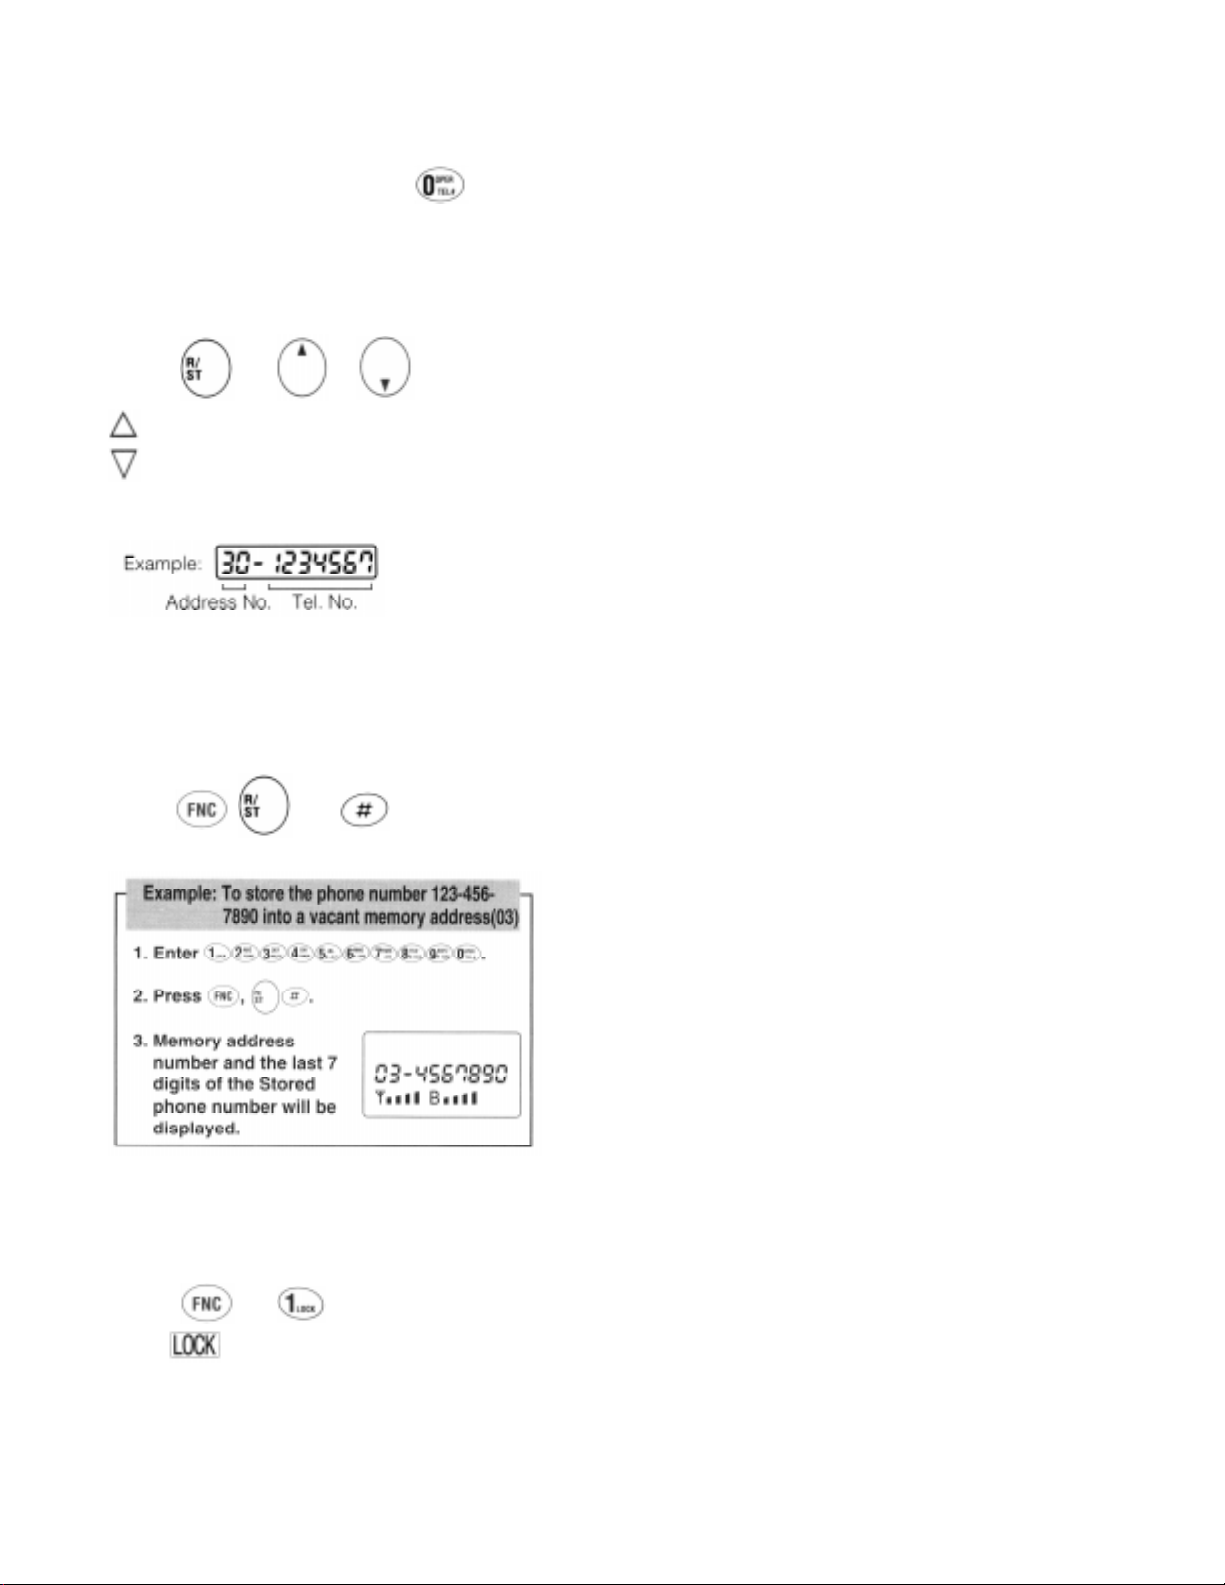
Repertory Memory Scroll
(Memory Address)
This feature is useful in finding a certain phone number by scrolling the repertory memory .
1. Press then or .
: Scroll upward (with roll back to 01)
: Scroll downward (with roll up to 30)
Memory address and the last 7 digits of the stored number will be displayed on the readout as follows.
Note: In this scroll feature, any vacant memory address(es) will be skipped.
Automatic Storing into a Vacant Memory Address
This feature allows automatic storing into a vacant repertory memory address. This can prevent the possible over writing of
a previously stored number.
1. Enter the phone number.
2. Press , , then .
Note: The number will be stored in hte smallest available vacant memory address number. However, if no vacant address
is available, the phone number will not be stored.
To Lock the Unit
1. Press then .
2. The indicator turns on.
Note: The unit will remain locked until unlocked, even if teh power is turned off.
To Unlock the Unit
1. Enter the three-digit unlock code.
Page 11
2. The indicator will go out.
Note: The unlock code is registered in the programmable option and advised by your dealer when you purcahse the phone.
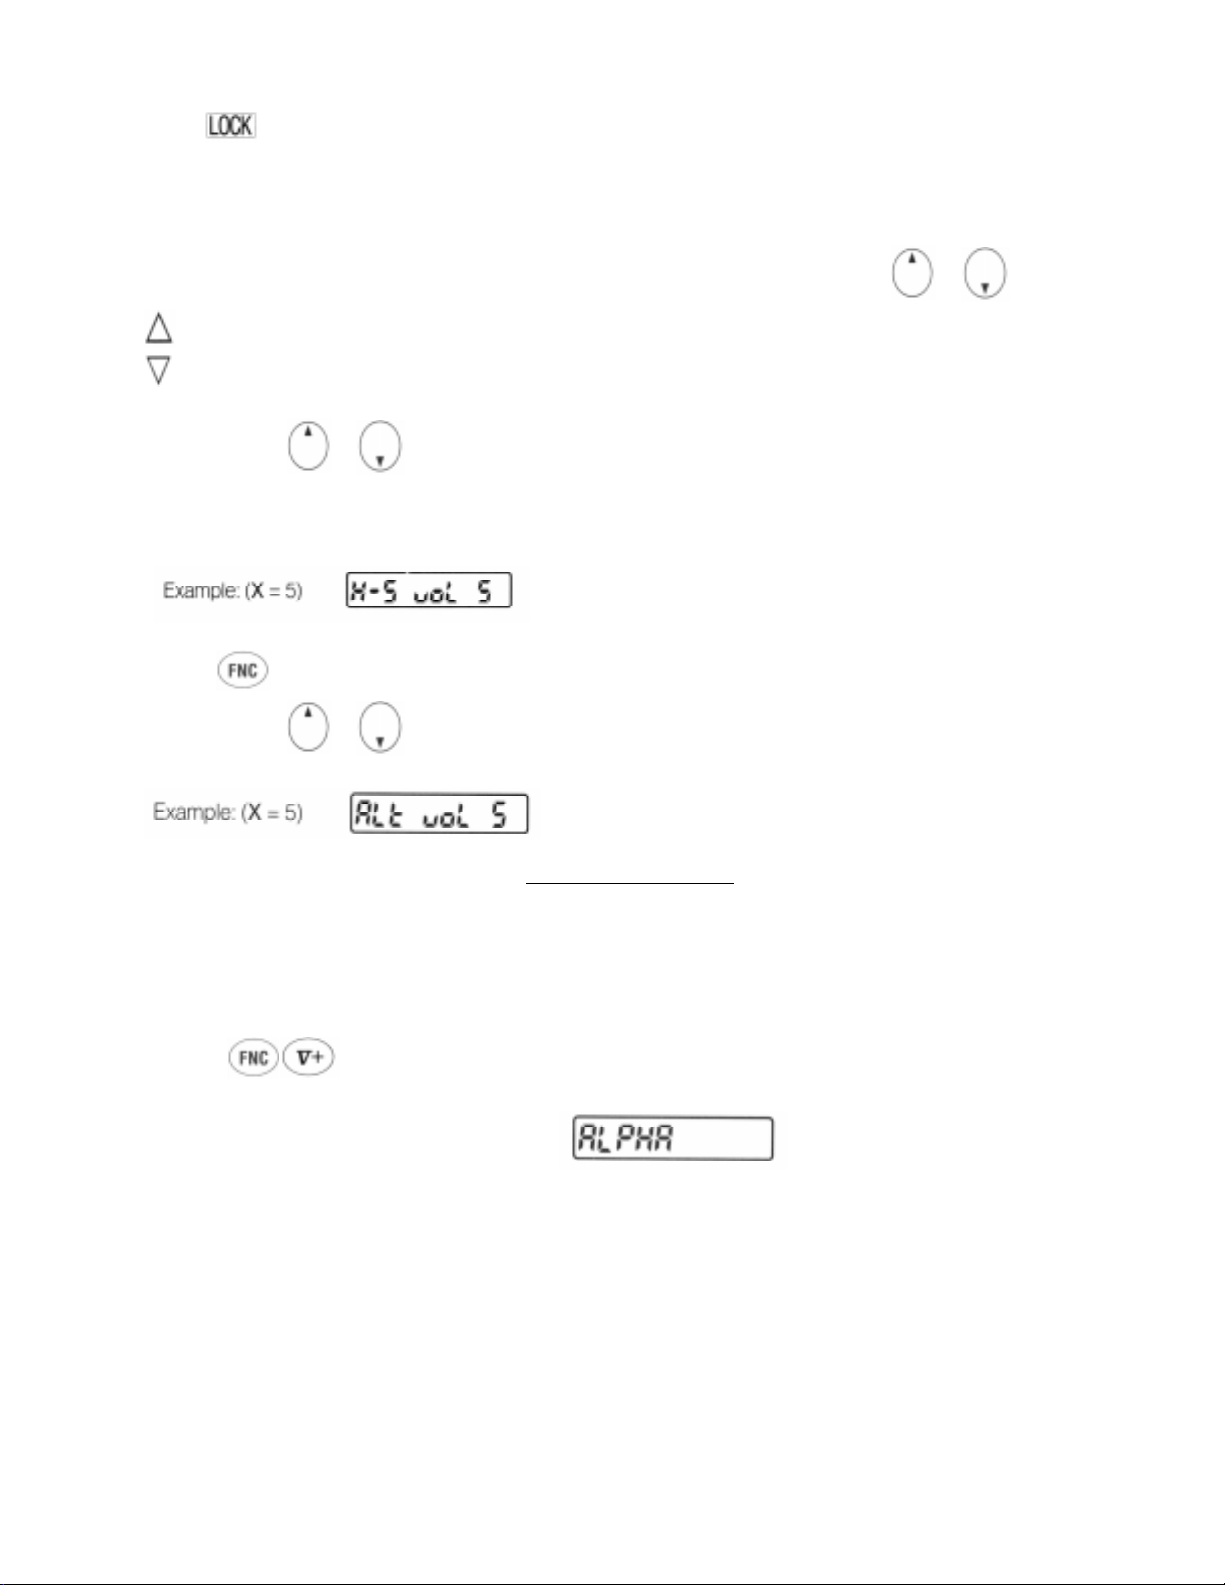
V olume Contr ol
The audio level of the earpiece and the alert tone can be adjusted by the Volume Control Key or .
: T o increase the sound level.
: To decrease the sound level.
Earpiece volume:
1. Keep pressing or until you get the desired sound level.
2. Sound level “H-S VOL X” (X=1~5)” will be the displayed on the readout. You can monitor the sound level with the
sample tone when you are not engaged in a phone conversation.
Alert T one:
1. Press .
2. Keep pressing or until you get the desired sound level.
3. Sound level “ALT VOL X” (X=1~5)” will be displayed on the readout.
MEMORY NAME TAG
This feature permits you to tag an identifying name (up to 5 characters) to each phone number in the memory address. The
name will be displayed each time you recall a number from memory address.
To Enter names using Alpha (Letters)
1. Press . “ALPHA” will appear on the readout to indicate the Alpha Mode is active.
2. Press digit keys repeatedly until the character you need appears. The following table shows which character is assigned
with each digit key .
Page 12
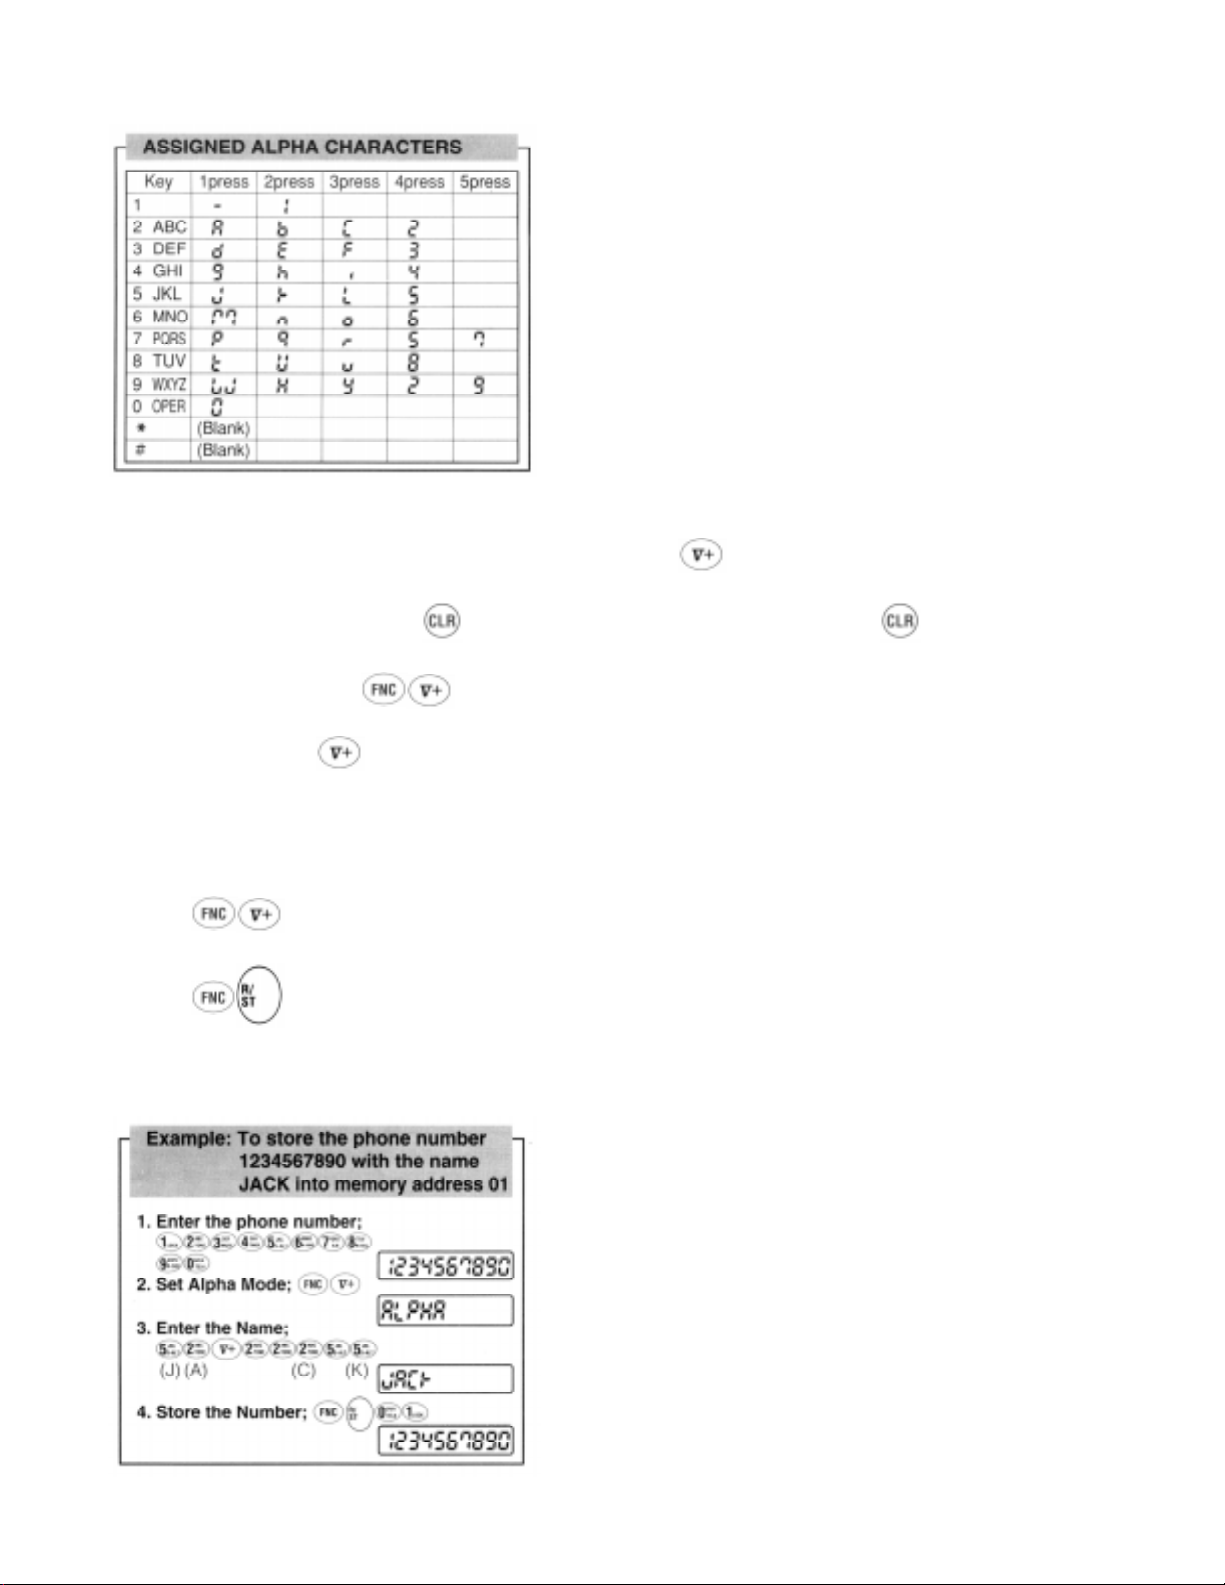
3. When the letter or number you want is shown on the display, press to locate the second letter or number .
4. Go back to step 2, and repeat the same procedures until the complete character name is displayed.
5. When an entry error is made, press momentarily to erase the last character . If you press more than a second,
all characters on the readout will be erased.
6. To exit Alpha Mode, press .
Notes: 1. If the next letter or number is assigned on the other key (not same key), you can display the next letter or number
without pressing .
2. Y ou must enter the phone umber first, then apply the name. Entering a number after applying the name will erase
its name.
To Store Name with Phone Number
1. Enter the phone number.
2. Press to set Alpha Mode.
3. Enter the name you need. (Refer to “To Enter Names using Alpha”)
4. Press , then enter the memory address (01 through 30), to store the number with the name into memory .
Note: If you enter the phone number after entering the name, the name will be erased.
Page 13
To Recall from Memory with Name
Recalling from the repertory memory with name is identical to standard repertory recall. When the number is recalled, the
display will show the Alpha Name T ag as well as the stored number.
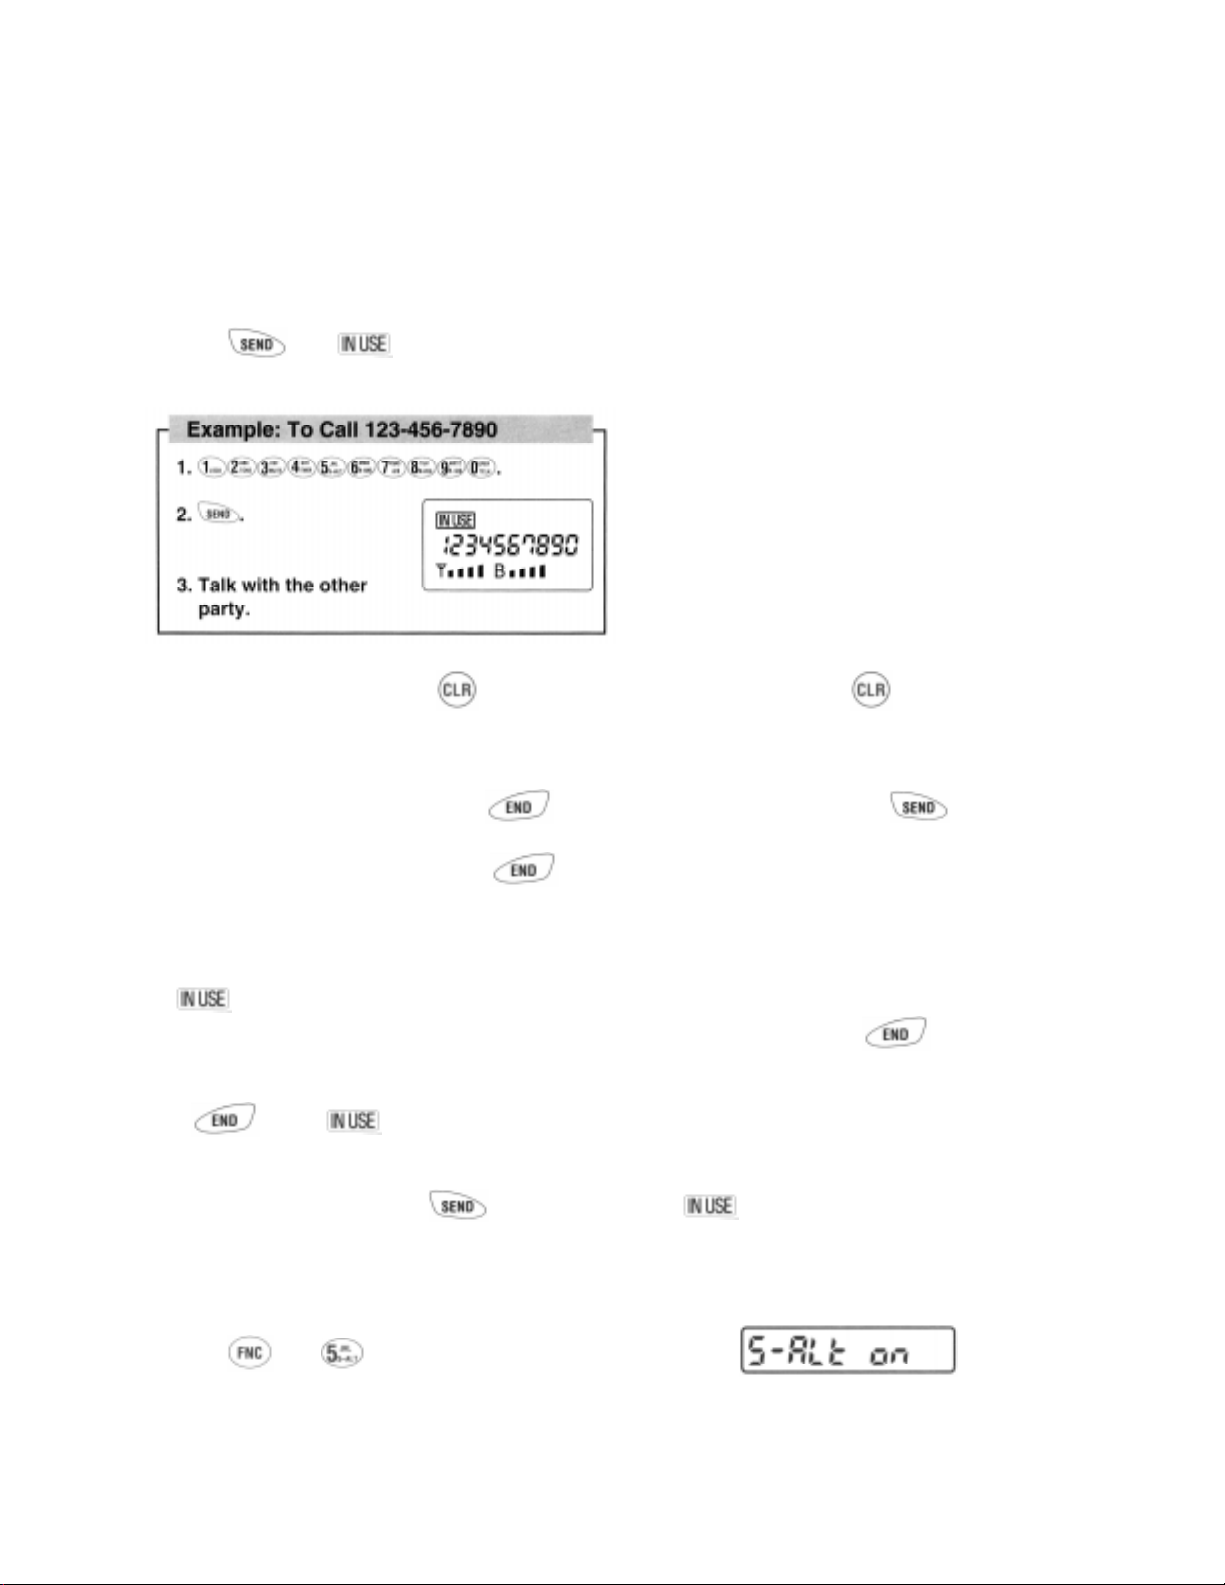
PLACING TELEPHONE CALLS
To Place a Call
1. Enter the phone number.
2. The last 10 digits of the dialed number are displayed on the readout.
3. Press . The indicator will light.
Note: If dialing error is made, press , then enter the phone number again. Pressing momentarily (Approximately less than 0.5 sec.) clears the last digit only .
If the Call Fails to Go Through
· If you hear the “reorder” signal, press , then if there were no dialing errors, press for redial.
(Redialing with digit keys is not necessary .)
· If the “intercept” signal is heard, press then redial the correct number.
Automatic Redial (Programmable Option)
If the feature of Automatic Redial (Programmable Option) is selected, your unit will automatically make seven attempts
to reach the cell site when the first try is not successful.
The indicator will stay on, but the speaker will be muted for thirty seconds. This is done so that you do not hear
the reorder signals out of the speaker. If you need to terminate the automatic redial, press .
Terminating a Call
Press and the indicator will go out.
To Receive Calls
1. When the telephone rings, press to answer the call. The indicator will light.
Silent Incoming Calls
If Silent Alert feature is set, a single beep and a flashing “CALL” message on the display will alert you of an incoming
call. Once you have switched to silent alert, the phone stays in that mode until you deactivate it
1. Press , then . The “S-ALT ON” will appear in the display.
Page 14
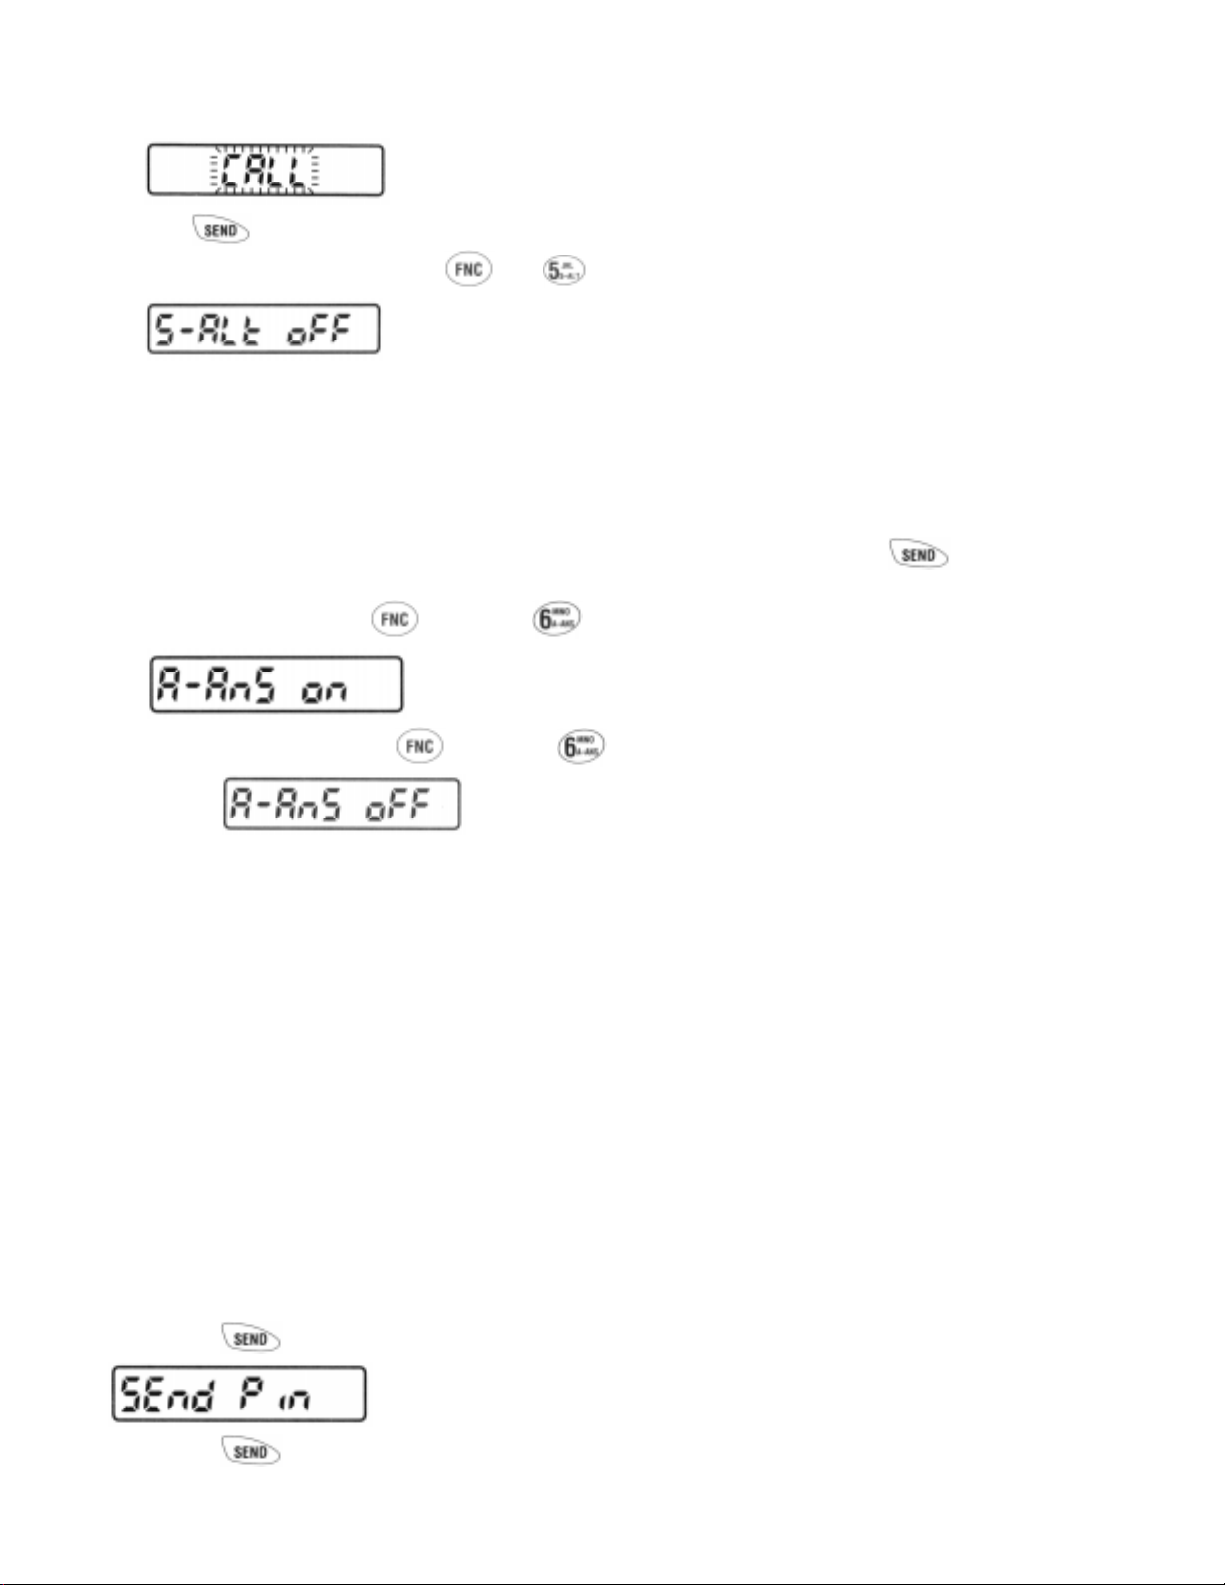
2. When you receive a call, a single beep and a flashing “CALL” message on the display will alert you.
3. Press to answer the call. “CALL” on the readout will go out.
4. This mode is deactivated by pressing , then . “S-ALT OFF” will be displayed for 5 seconds.
5. If the Silent Incoming Calls is activated when the unit is powered up “S-ALT ON” will appear on the readout for 5
seconds.
Any Digit Key Answering
This feature permits you to answer on incoming call by pressing any of the digit keys on the key pad.
Automatic Answering
With this feature on, incoming calls will be automatically answered after two alert tones, and the “ ” indicator will
light on the readout. Then the unit is ready for conversation.
1. T o activate this mode, press and then key . “A-ANS ON” will appear on the readout.
2. This mode is deactivated when and then key are pressed again. “A-ANS OFF” will be displayed for 5
seconds.
3. This feature will not function if the unit is in the Lock or Silent Incoming Call Mode. If the Automatic Answering is
activated when the unit is powered up, “A-ANS ON” will appear on the readout for 5 seconds.
Anti Fraud Security Features
Your new Audiovox Cellular telephone has been engineered with the latest technology to help protect from the fraudulent
use of your cellular telephone number. You phone is equipped with Authentication and PIN (Personal Identification
Number) Dialing. (A vailability of these features depends on your Service Provider). Should your Service Provider
require use of a PIN, your PIN can be sent manually or programmed into the phone for more convenient use. Cellular
fraud most often occurs by cellular thieves using electronic devices that can read your unique cellular phone number and
your phone’s electronic serial number (E.S.N.). This information can then be programmed into another phone for
fraudulent use. Certain cellular systems provide for an ANTI-FRAUD security feature to help protect the unauthorized
use of your cellular telephone number. This feature utilizes a special personal identification number (PIN). Should your
new cellular carrier offer this enhanced service, your new phone must be programmed with a PIN chosen by you. For
your protection, you cannot make any outgoing calls until you have established your PIN. T o establish your PIN, please
contact your cellular service provider for specific instructions.
To place a call using PIN security feature
1. Enter the umber you are calling by either dialing the number or recalling the number from a specific memory
location.
2. Press the key as your call is being processed the word “SEND PIN” will appear on the display.
3. Press the key again, your call will then be placed.
Page 15
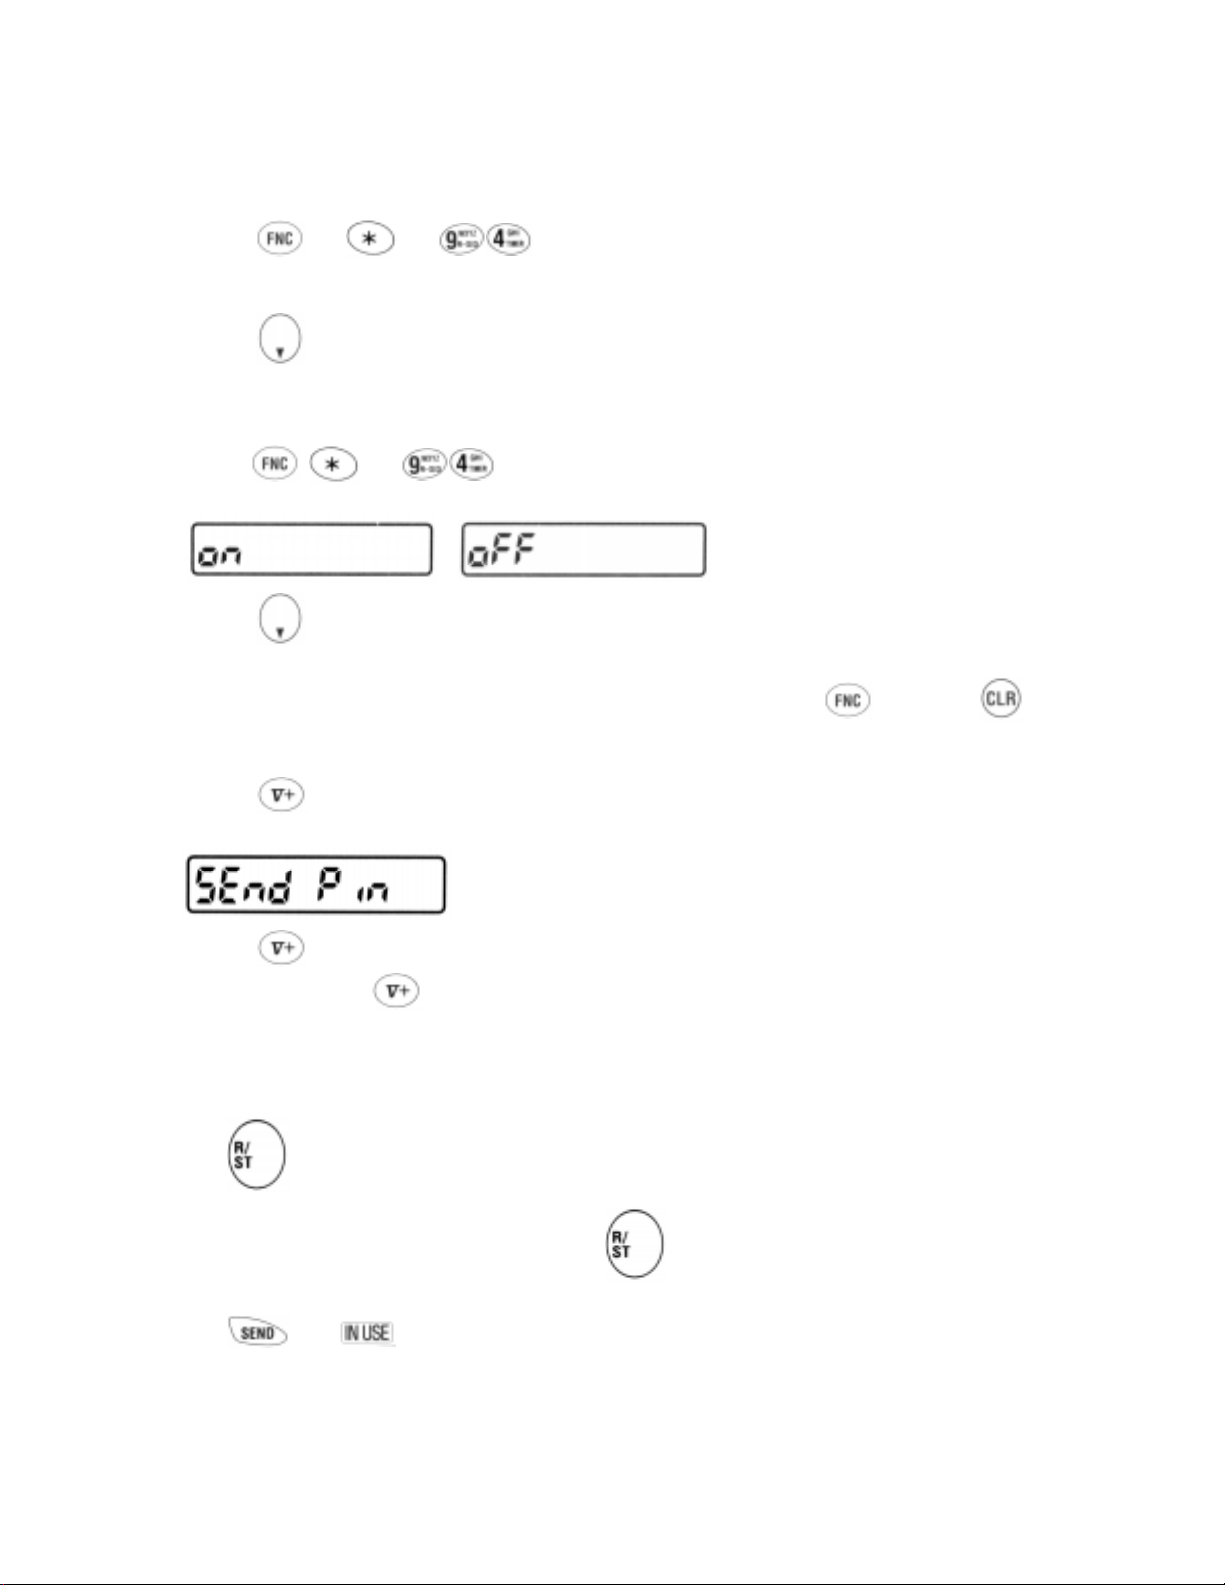
To program your PIN
1. Enter your three digit security code.
2. Press the key, then .
3. The word “OFF” will appear in the display.
4. Enter your 4 digit PIN.
5. Press the key to turn your PIN feature on.
To turn the ANTI FRAUD feature on / off and change PIN Number.
1. Enter your three digit security code.
2. Press the , then .
3. Your PIN number and the “ON/OFF” status will appear in the display.
or
4. Press the key to turn the PIN entry feature on or off.
5. If necessary, enter the new PIN Number.
6. After you have entered the desired on or off status or new PIN Number, press the key then the key.
To place a call with the PIN entry feature in Voice Mail dialing (See “Voice MAIL DIALING” for more details)
1. Press the key for more than 0.5 seconds. The last 10 digits of the number in memory address 41 will appear
in the display. As your call is being processed, the word “SEND PIN” will appear in the display.
2. Press the key again, your call will then be sent digitally to the cell site. After you hear the signal from the
Operating Office, press “Voice Mail Access” key again. The second number in memory address 42 is sent
with DTMF tones. You will monitor the tones through the loudspeaker. The third through fifth number in memory
address 43 through 45 can be accessed sequentially in the same manner as above.
To Place a Call with a Number in the Memory
1. Press , then enter the memory address (01 through 30). The last 10 digits of the number will appear on the
readout. If the number is longer than 10 digits, press , then enter the first digit of the memory address, then
hold down the second digit of the memory address.
2. Press . The indicator will light as the call is placed.
Page 16

Speed Dialing
This feature permits you to place a call from the stored memory locations without using the recall key. Speed
dialing is a quick method of placing calls from memory .
1. Enter the one or two digits of memory address (1 through 9 and 10 through 30).
2. Press . The last 10 digits of the phone number will appear on the readout, and the indicator will light.
Last Number Redial
This feature permits you to redial the last phone number you attempted to call. Numbers will be stored in memory only if
key is pressed.
1. Press , then .
2. Press to send a displayed number.
Note: To clear the stored number, press then .
Programmable Emergency Call (Programmable Option)
This feature permits you to place a call to two emergency number (maximum of 7 digits) even if your telephone has been
locked.
The two emergency numbers must be pre-programmed in the NAM memory (NAM: Number Assignment Module).
Note: 911 and *911 are preset emer gency numbers. (you may change this number if you wish.)
Operation in Lock Mode
Note: T o terminate the call, press . (The indicator will go out.)
Page 17

OneTouch Emergency Call
This feature permits you to dial an emergency number by a single keystroke, even when the unit is in “Lock” mode. You
can deactivate this feature to prevent unintentional call by mistake.
1. Press key for more than 2 seconds. The first emergency number that is pre-programmed in the memory will be
displayed, and indicator will light as a call is placed. The factory pre-set number is 911 .
2. If you wish to deactivate this feature, press the following key sequence.
T o activate this feature again, follow the same key sequence.
To Mute a Phone Conversation
VOICE MAIL DIALING
This feature permits you to access, through telephone lines, a computer system and send DTMF number codes in sequence. Up to five numbers can be stored and are sequentially accessed with one touch of the “V oice Mail access” key
. The first number is sent in digital form to the cell site, then up to four other numbers are sent with DTMF signal-
ing.
To Store Numbers
Store the numbers to be linked into special memory address 41 through 45. Each number should be within 32 digits.
To Place a Call
Press “Voice Mail Access” key for approx. 0.5 sec. The first number in memory address 41 will appear on the
readout and will be sent digitally to the cell site. After you hear the signal from the Operating Office, press “Voice
Mail Access” key again. The second number is memory address 42 will appear on the readout and is sent with DTMF
tones. You will monitor the tones through the loudspeaker. The third through fifth number in memory address 43 through
45 can be accessed sequentially in the same manner as above.
Page 18

END-TO-END SIGNALING
This feature permits you to utilize additional phone services, such as accessing an alternate long distance network,
signaling a pager, or banking by phone etc.. For these services the signaling should be in DTMF (TouchTone™).
SCRA TCH PAD DIALING
This feature permits you to enter a number to be redialed (or store a number in memory) while engaged in a conversation.
SCRA TCH-PAD DIALING WITHOUT KEYING TONES
This feature permits you to enter a number into the display without annoying key tones.
1. Press , , then enter a phone number.
“TONE OFF” will be displayed for 5 seconds.
The Microphone circuit will remain active, but the tones will not be heard.
2. If necessary , press , , then enter the memory address to store the number.
3. T o exit the Scratch-pad Mode, press , then key again.
“TONE ON” will be displayed for 5 seconds.
CALL TIME DISPLAY
This feature automatically records the elapsed time per conversation. The talk time of the last call and cumulative talk
time can be displayed on the readout. The timers can also be cleared if necessary.
To Display the Talk Time
1. Press , then key .
2. While the key is held down, the cumulative talk time will be displayed on the readout in minute format.
Example … 18 min.
3. The talk time of the last call will be displayed on the readout for 5 seconds after the is released. While in
conversation, the talk time of a call in progress will be displayed. The display formate is as follows. Example …
1min. and 25 sec.
Outgoing Call Timer Only (Programmable Option)
Normal call timer operation is to time both the calls made and the calls received. If the “outgoing call timer only”
function is activated (Programmable Option), the call timer will only display the amount of time when placing call. It will
not display the amount of time for calls received.
Page 19

To Clear the Timer
1. Press , then enter the three-digit security code.
2. Press , key , .
“CLEARED” will be displayed for 5 seconds.
The timers will be cleared, and the count for the cumulative talk time will start from zero.
SID MANAGEMENT
(Programmable Option)
Cellular systems are identified by a number called System Identifier or SID. This feature, which can be programmed by
your carrier or dealer enables you to take advantage of the families of cellular systems (SIDs) that your Carrier owns, or
has special billing arrangements with, in different cities. In Cellular areas which are very closely associated with your
carrier (called brother/sister SIDs) your phone may be billed at the same rate as your “Home” system and your phone’s
display will appear the same as when operating in the Home system (i.e. both and are off in your
display). In areas (called cousin SIDs) where your Carrier has Roaming agreements, your phone will display a steady
“ ” indication. If your display indicates a flashing “ ”, you are in a cellular system which is not associated
with your Carrier (you can still make or receive calls). If your display indicates a flashing , you may have to
change you’re A/B System Selection or NAM selection in order to obtain service. If your display indicates a steady
, you are in an area where there is no cellular service.
A/B System Selection
This feature permits you to select the system you need to use. The system that you are registereed with is the preferred
system, and your home system. When you turn the phone on, it remembers the last A/B setting and will scan the radio
frequency channels of that setting.
1. Press , key . The current mode will be displayed
2. You can change the current mode by pressing or .
: Scroll upward
: Scroll downward
· Standard Mode
The phone will scan the preferred system channels. If unable to find an acceptable preferred channel, the phone switches
to scan the non-preferred channels.
· Home Only Mode
You can place or receive calls only within your home area.
· Preferred System Only
The phone will scan the preferred system only and prevents switching over to the non-preferred system.
Page 20

· Non-preferred System Only Mode
The phone will scan the non-preferred system only .
MUL TIPLE CITY REGISTRATION
Some cellular users may find it beneficial to register their phone in multiple, rather than rely on “roaming”. The multiple
city registration feature permits you to reprogram from the telephone unit, the different phone numbers for the cities in
which you are registered. Each programmed phone number will be designated as your home system.
Press , and enter the new system ID number (5 digits) followed by the corresponding phone number (10 digits).
Please include your area code. You must register your unit with the carrier in order to get both the system ID number and
your phone number.
Press then key . Y our new phone number will be displayed on the readout. (Holding down , to display
your new system ID number.)
Note: (1) System ID number and phone number can not be programmed during a call.
(2) Calls are placed or received using only the programmed phone number in use at the time of call.
LAST RESCAN SID INDICA T OR
This feature permits you to recall the last system identification accessed by your phone.
Press , then .
The last rescan SID is displayed on the readout for 5 sec.
The display format is as follows:
If the indicator is on, the display will show as follows.
AUTOMATIC CALLS IN ABSENCE INDICATOR
This feature indicates the number of unanswered incoming calls. If incoming calls are unanswered, the unit will indicate
“CALLED XX”.
”XX” is the number of calls (01 to 99) missed. For example “XX” is “02”, the unit will indicate the following.
Depressing any key (other than the Power Key) will clear the number of calls indicated in Display. However, the number
of calls will remain if the unit is turned off.
ENHANCED FEA TURES
Your new Audiovox Cellular T elephone has been engineered to operate with the latest technology that will allow you to
enjoy the benefit of two new exciting features.
CALLER ID: Allows you to preview in your display the number of the party calling you.
VOICE MAIL NOTIFICATION: Y our Cellular telephone notifies you when new messages are in your voice mailbox.
(Please note that operation of these features depends on the Cellular system and therefore may not be available in all
areas.)
Page 21

Operation
CALLER ID: If your phone is ON but not in a conversation, Caller ID operates as follows: When the phone rings, the
Calling Number flashes in the phone’s display. If you do not answer the Call (by pressing the “SEND” key) the Calling
Number is stored in the phone’s Memory Stack.
The Memory Stack can store up to three Calling Numbers for your retrieval and later use. T o conserve memory, if consecutive calls are received from the same number, that number is stored only once.
When information such as “Voice Mail” or “Caller ID” is stored in the memory stack, the “ ” icon at the lower right of
the display, flashes.
Your phone also counts and displays the number of unanswered calls. For example, if two calls were not answered,
“CALLED 02” will appear in the phone’s display.
CALL WAITING CALLER ID: If your phone is in use and another call is directed to your phone, a short three beep
tone alerts you of the new call and the new Calling Number is flashed in the display as described above. Upon viewing the
new incoming Calling Number, you may choose whether or not to answer the call. If you choose to answer the call simply
press the key. This places the first party on hold while allowing you to converse with the new incoming caller. If
choose not to answer the new incoming call, this number is not stored in the memory stack. However, this number may be
accessed by pressing the key after completion of the original call.
(Note: you may switch back and forth and converse with both calling parties by alternately pressing the key.)
Unavailable or Restricted Numbers: In addition to incoming caller ID, two additional indications are possible. When the
display indicates “RES” the calling number is Restricted by the calling party who does not want the number to be dis-
played.
A display of “UNA” indicates that the number is unavailable for display.
VOICE MAIL NOTIFICATION: When messages are left in your voice mail, the “ ” icon at the lower right of the
display, flashes to alert you. The memory stack stores the number of new messages that are in your mailbox. (New
messages are messages that you have not retrieved). T wo indications can be displayed “NO VOICE” when ther e ar e no
messages or “VOICE XX” (xx indicates the number of new messages).
Reviewing the Memory Stack
Memory Stack: The memory Stack contains four memory locations. The first memory location is used to store the
number of new Voice Messages in your voice mail.
Memory Stack Alert: Whenever the Memory Stack contains information for your review (Calling Numbers or Voice Mail
Notification) the flashing “ ” icon at the lower right side of the display flashes to alert you. In addition, if your voice
mail contains new messages, you will occasioanlly hear a short beep as a reminder of pending messages.
Memory Stack Retreival: T o retrieve information from the memory stack the following two-key stroke sequence should
Page 22

be used: Press ( , Then or ). The first memory displayed after this sequence shows the number of
new voice messages in your voice mail. As an example, if four new messages are in your voice mail the “VOICE-04”
will be displayed by the first memory stack location. T o continue to scroll through the memory locations press the
key to scroll forward and the key to scroll backwards.
Calling numbers in the memory stack are displayed in two parts:
While the key is pressed, “CX-“ (X=1~3) is displayed. After the key is released, the 10 digit telephone
number is displayed.
Memory Stack Clearing: To clear the memory stack you must first be in the memory stack viewing mode , Then
or ) then press , . This will clear all four memory stack locations and also delete the flashing
“ ” icon. The memory stack does not allow for individual locations to be deleted.
(Note: If there are still new messages in your voice mail, your phone will beep and the “ ” will resume flashing when
the system reminds your phone of the pending messages).
Page 23

Page 24

Page 25

Page 26

Page 27

Page 28

Page 29

Page 30

Page 31

Page 32

Page 33

Page 34

Page 35

Page 36

Page 37

Page 38

Page 39

Page 40

Page 41

Page 42

Page 43

Page 44

Page 45

Page 46

Page 47

Page 48

Page 49

Page 50

 Loading...