

Page 1
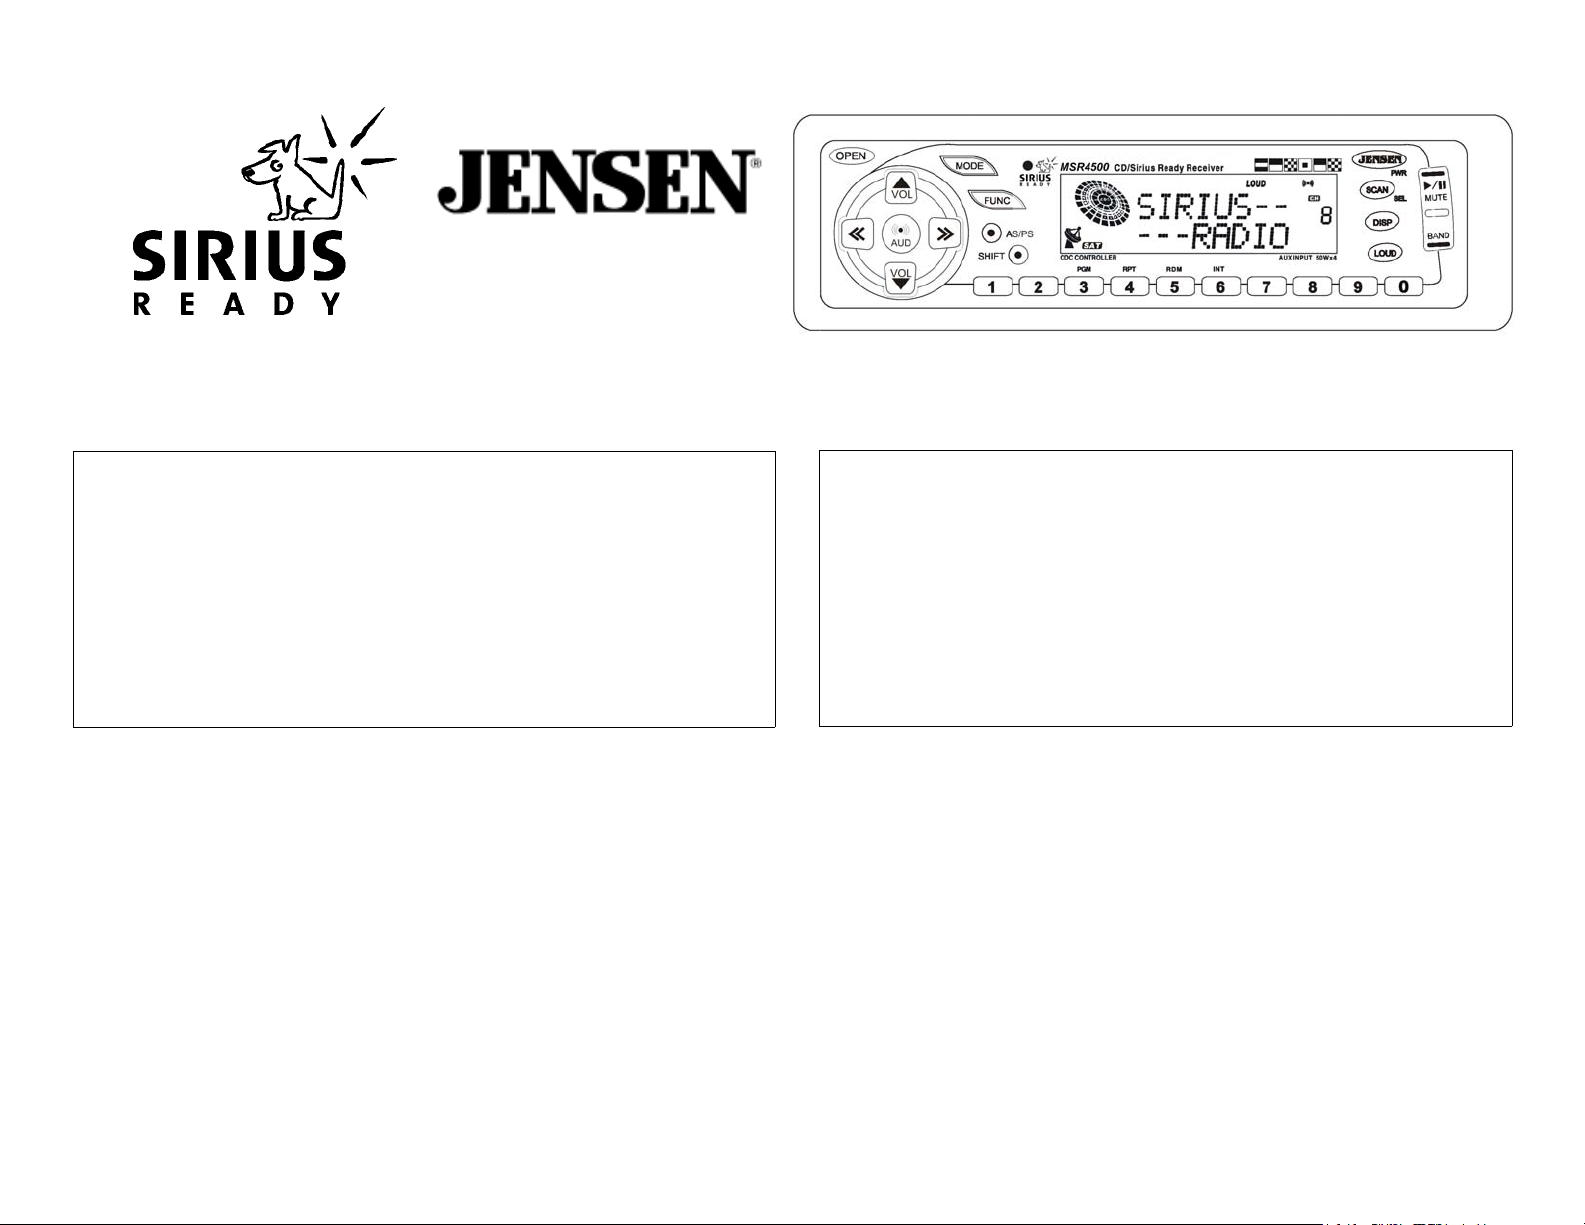
MSR4500
Thank You!
Thank you for choosing a JENSEN product. We hope you will find the instructions in this
owner’s manual clear and easy to follow. If you take a few minutes to look through it, you’ll learn
how to use all the features of your new JENSEN / Sirius MSR4500 satellite radio for maximum
enjoyment.
Installation . . . . . . . . . . . . . . . . . . . . . . . . . . . . . . . . . . . . . . . . . . . . . .1
Operation . . . . . . . . . . . . . . . . . . . . . . . . . . . . . . . . . . . . . . . . . . . . . . .6
Specifications . . . . . . . . . . . . . . . . . . . . . . . . . . . . . . . . . . . . . . . . . . .18
Troubleshooting . . . . . . . . . . . . . . . . . . . . . . . . . . . . . . . . . . . . . . . . . 19
Warranty . . . . . . . . . . . . . . . . . . . . . . . . . . . . . . . . . . . . . . . . . . . . . . . 20
Installation
Getting Started
It’s a good idea to read all of the instructions before you begin the installation.
System Components
The following components are required for complete operation of the satellite radio features.
• MSR4500 head unit
• Power cable (included)
• Jensen/Sirius DLP2000 satellite receiver (purchased separately)
• Sirius satellite antenna (purchased separately)
Note: You will need to subscribe to Sirius Satellite Radio in order to use the
satellite features of this radio. After purchasing the required satellite receiver
(DLP2000) and Sirius Antenna, contact Sirius at 1-888-539-SIRIUS to subscribe.
¡Muchas gracias!
Muchas gracias por escoger un producto JENSEN. Hemos hecho lo posible para que las
instrucciones en este manual sean claras y fáciles de seguir. Si se da unos pocos minutos para
leerlo, aprenderá a usar todos los elementos de su nuevo estéreo Jensen/Sirius para carros
para que pueda disfrutarlo al máximo.
Instalación . . . . . . . . . . . . . . . . . . . . . . . . . . . . . . . . . . . . . . . . . . . . . . 1
Operación . . . . . . . . . . . . . . . . . . . . . . . . . . . . . . . . . . . . . . . . . . . . . . 6
Especificationes . . . . . . . . . . . . . . . . . . . . . . . . . . . . . . . . . . . . . . . . 18
Correción de problemas . . . . . . . . . . . . . . . . . . . . . . . . . . . . . . . . . 19
Garantie . . . . . . . . . . . . . . . . . . . . . . . . . . . . . . . . . . . . . . . . . . . . . . . 20
Installation
Getting Started
It’s a good idea to read all of the instructions before you begin the installation.
System Components
The following components are required for complete operation of the satellite radio features.
• MSR4500 head unit
• Power cable (included)
• Jensen/Sirius DLP2000 satellite receiver (purchased separately)
• Sirius satellite antenna (purchased separately)
Note: You will need to subscribe to Sirius Satellite Radio in order to use the
satellite features of this radio. After purchasing the required satellite receiver
(DLP2000) and Sirius Antenna, contact Sirius at 1-888-539-SIRIUS to subscribe.
Page 2
MSR4500
Remove Radio from Sleeve
Retire la Radio de la Camisa
GMC / Dodge / Jeep
Ford
Installation (continued)
Tools and Supplies
The following tools and supplies are needed to install the
radio.
• Torx type, Flat and Phillips screwdrivers
• Wire cutters and strippers
• Tools to remove existing radio (screw driver, socket
wrench set or other tools)
• Electrical tape
• Crimping tool
• Volt meter/test light
• Crimp connections
• 18 gauge wire for power connections
• 16-18 gauge speaker wire
Speaker Requirements: Only connect speakers rated in
the load impedance range of 4 to 8 ohms. Speakers with
a load impedance less than 4 ohms could damage the
unit.
Preparation
Disconnect Battery
Before you begin, always disconnect the battery negative
terminal.
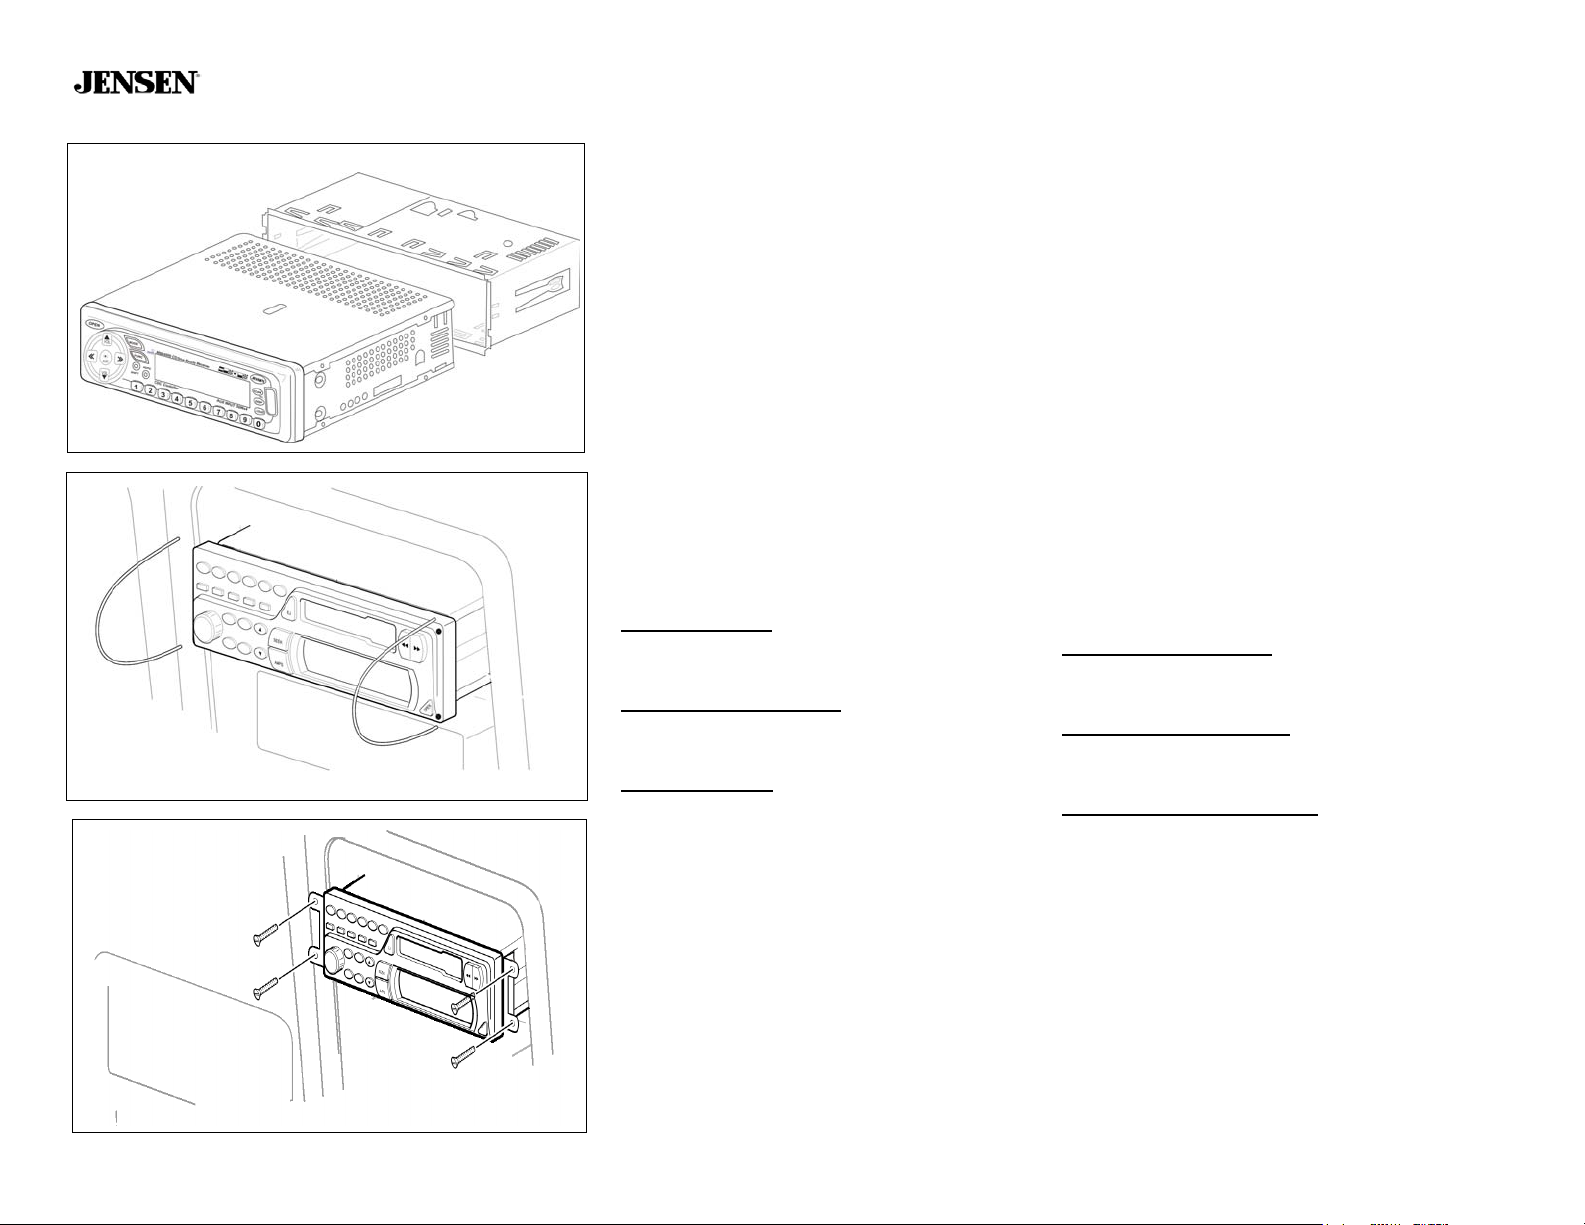
Remove Radio from Sleeve
Lift latches on both sides of sleeve to remove half-sleeve
from radio.
Remove Old Radio
Ford
1. Insert removal tool(s).
2. Pull the radio out.
3. Disconnect wiring harness, and remove radio.
GMC, Dodge or Jeep
1. Remove dashboard faceplate.
2. Unscrew brackets.
3. Disconnect wiring harness and remove radio.
Instalación (continuado)
Herramientas y Materiales
Los materiales y las herramientas siguientes son necesarios
instalar la radio.
• Tipo tórico, destornilladores de estrella y de cabeza plana
• Cortadores de alambre y pelacables
• Herramientas para sacar la radio vieja (destornillador,
llaves ajustables u otras herramientas)
• Cinta aislante
• Herramienta especial para ajustar conexiones de presión
• Voltímetro/Luz de prueba
• Conectores de presión
• Cable de calibre 18 para conexiones de corriente
• Cable de calibre 16-18 conector para altoparlantes
Requisitos de los altoparlantes: Se debe conectar el
componente musical sólo a altoparlantes que posean un
promedio de carga de impedancia de 2 a 8 ohms. Los
altoparlantes con una carga menor de 2 ohms pueden dañar el
radio.
Préparation
Desconexión de la Batería
Antes de comenzar la instalación, siempre se debe desconectar
la terminal negativa de la batería.
Retire la Radio de la Camisa
Levante los pestillos en ambos lados de la camisa para retirar
del radio la media camisa.
Cómo Desmontar la Radio Vieja
Ford
1. Inserte la(s) herramienta(s).
2. Hale el radio hacia afuera.
3. Desconecte el arnés del cableado, y quite el radio.
GMC, Dodge or Jeep
1. Quite la placa frontal del table o de instrumentos.
2. Destornille los soportes.
3. Desconecte el arnés del cableado y quite el radio.
2
Page 3
MSR4500
Import
Importe
Replacing an Aftermarket Radio
Reemplazo de la Radio Vieja
Installation (continued)
Preparation (continued)
Remove Old Radio (continued)
Import
1. Remove dash panel to expose DIN chassis.
2. Remove screws that secure radio to the dashboard.
3. Disconnect wiring harness and remove radio.
4. Remove brackets from the side of radio.
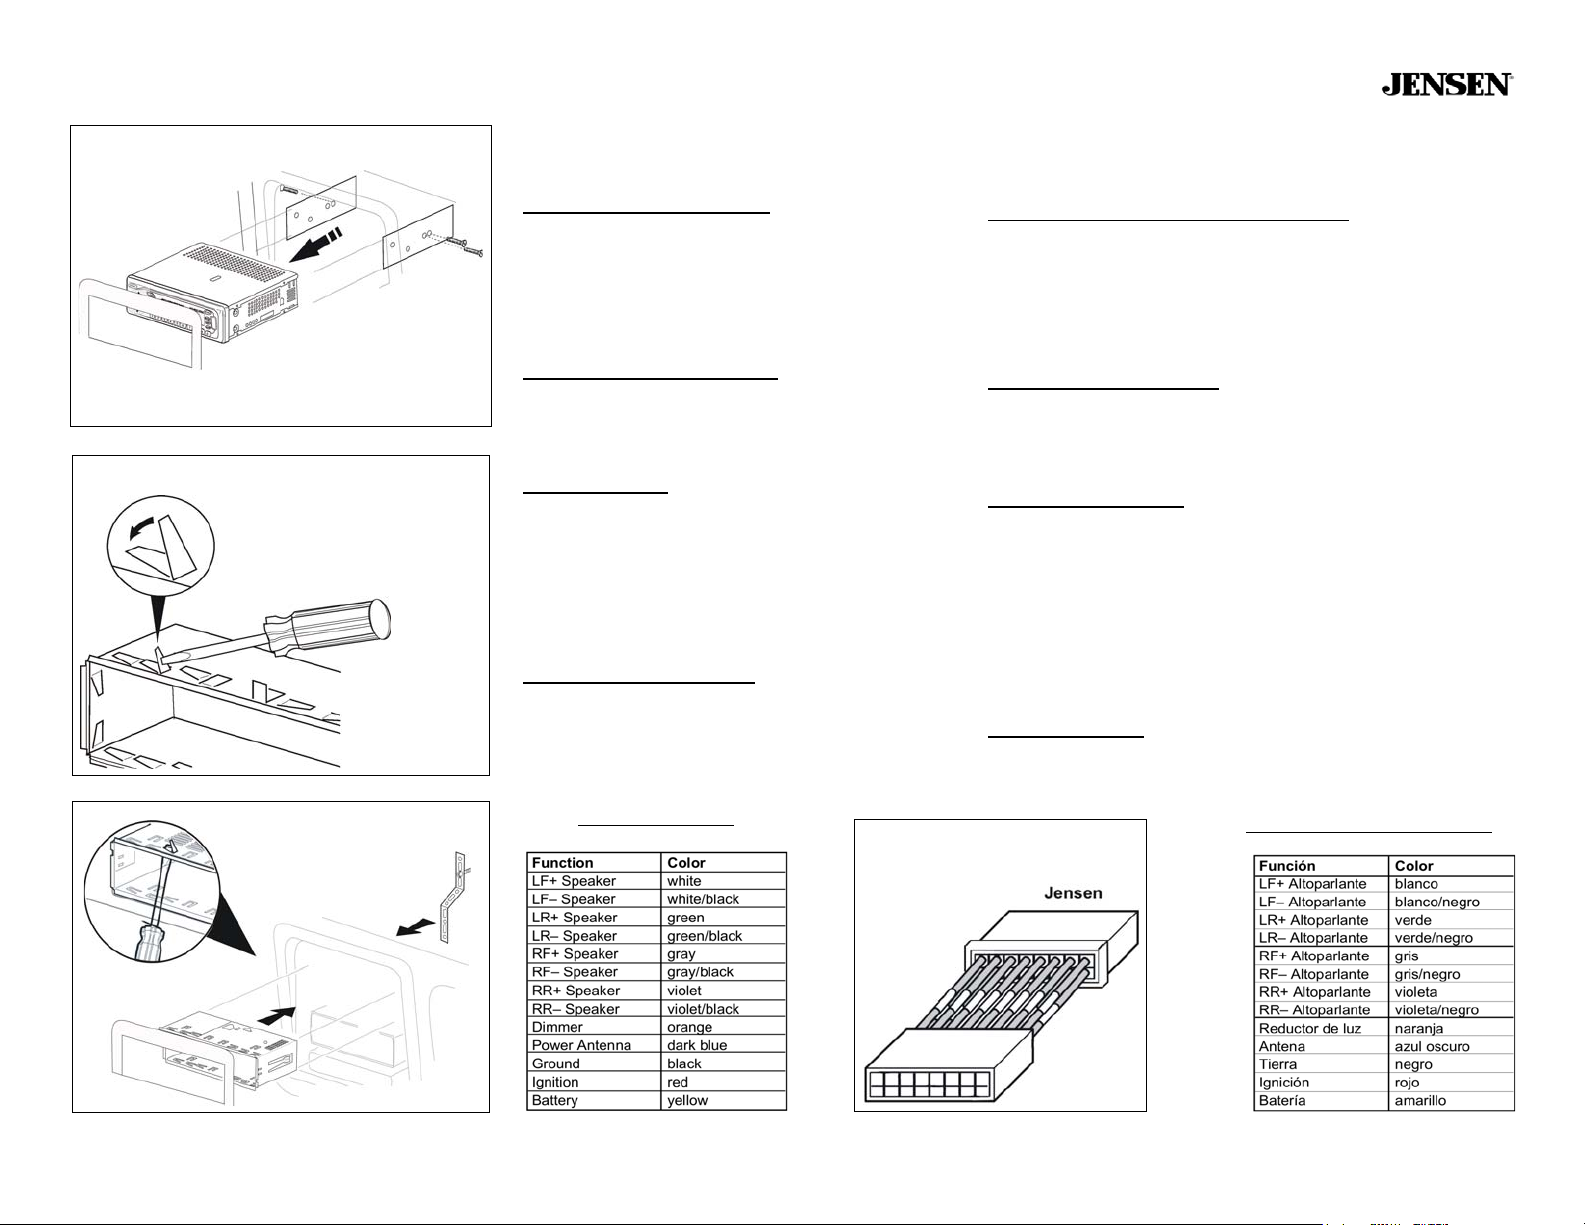
Replacing an Aftermarket Radio
1. Bend tabs flat.
2. Pull sleeve from dashboard.
Caution: Edges are sharp. Use a rag or wear a glove.
Install Half-Sleeve
1. Install adapter if necessary.
2. Install half-sleeve into adapter or dashboard.
3. Push tabs out to secure half-sleeve in the radio opening.
4. Install support strap to make unit more stable.
Wiring
Wiring with a Wiring Adaptor
1. Crimp or solder (refer to wiring color codes).
2. Attach wiring adaptor to wiring harness.
Instalación (continuado)
Preparación (continuado)
Cómo Desmontar la Radio Vieja (continuado)
Importe
1. Quite el panel del tablero para exhibir los canales DIM.
2. Quite los tornillos quie aseguran el radio al tablero de instrumentos.
3. Desconecte el arnés del radio y quite el radio
4. Quite los soportes del lado del radio.
Reemplazo de la Radio Vieja
1. Doble las aletas hasta que están planas.
2. Hale la camisa del tablero de instrumentos. Quítela con cuidado.
Cuidado: Los bordes son puntiagudos. Use un trapo o un guante.
Instalación de la Camisa
1. Instale el adaptador, si es necessario.
2. Instale la media camisa en el adaptador o en tablero de instrumentos.
3. Hale las aletas hacia afuera para asegurar la media camisa en al apertura del radio.
4. Instale la abrazadera de soporte para que la unidad quede más estable.
Cableado
Conecte los Cables
1. Una o conecte a presión (vea los códigos de color del cableado).
2. Una el adaptador de cableado al arnés del cableado.
Install Half-Sleeve
Instalación de la Camisa
Wiring Color Codes
Connect Wires
Conecte los Cables
Códigos en Color de Cableado
3
Page 4

Wiring Diagram
Diagrama de Cableado
MSR4500
4
Page 5
MSR4500
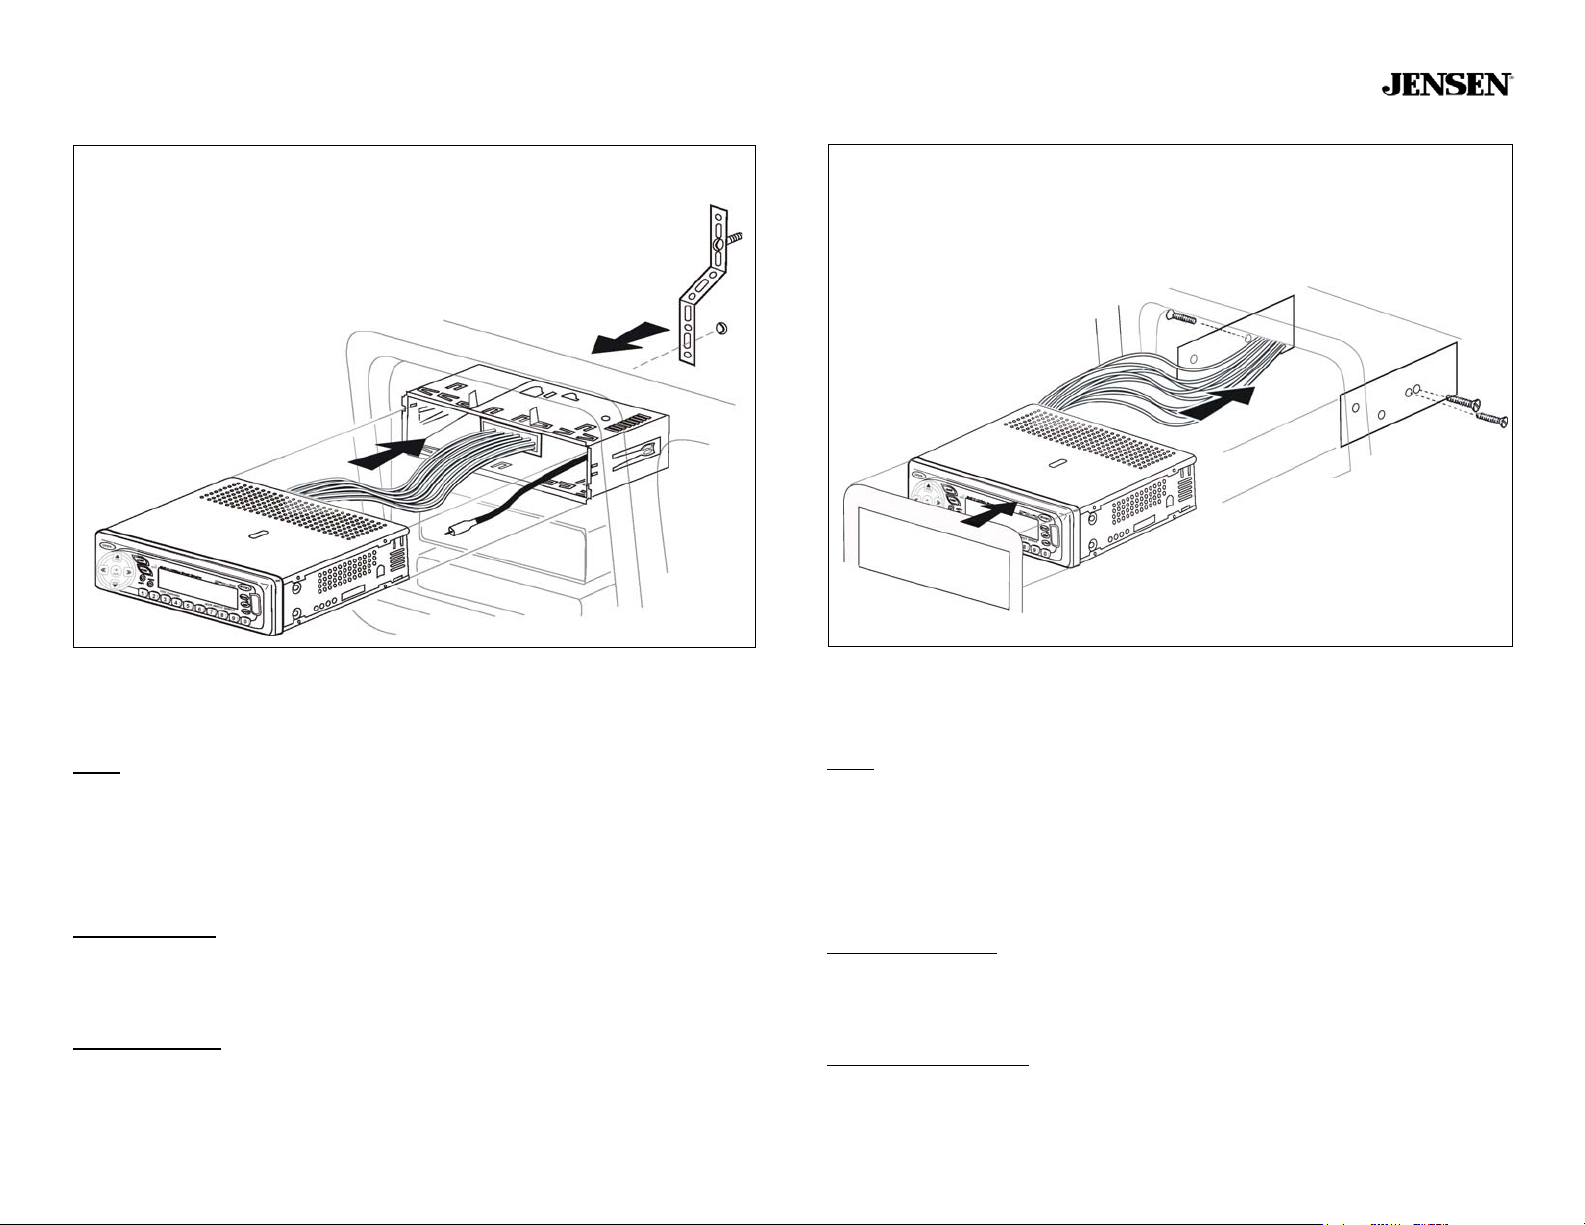
Final Radio Installation
Instalacion Final de Radio
Installation (continued)
Final Installation
Radio
1. Connect wiring adaptor to existing wiring harness.
2. Connect antenna lead, and make any appropriate connections for Sirius and Auxiliary Input.
3. Slide radio chasis into half-sleeve.
4. Secure Radio to bracket using nut (if possible).
5. Replace any items you removed from the dashboard.
ISO-DIN Brackets
1. Mount factory brackets on new radio.
2. Slide radio chassis into dash opening and secure.
3. Reinstall dash panel.
Reconnect Battery
When wiring is complete, reconnect the battery negative terminal.
ISO-DIN Brackets
Soportes de ISO-DIN
Instalación (continuado)
Instalación Final
Radio
1. Conecte el adaptador del cableado al arnés existente del cableado.
2. Donecte la cabeza de la antena, y haga cualquier conexión apropiada para Sirius y la entrada auxiliar.
3. Deslice el chasis del radio en la media.
4. Asegure el radio al soporte usando una tuerca (si es posible).
5. Ponga en su lugar cualquier artículo que haya quitado del tablero de instrumentos.
Soportes de ISO-DIN
1. Instale los soported de fábrica en el radio nuevo.
2. Deslice el chasis del radio en la apertura del tablero y asegurelo.
3. Reinstale el panel del tablero.
Reconexión de la Batería
Cuando haya terminado de colocar los cables, podrá hacer la reconexión de la batería a la
terminal negativa de la misma.
5
Page 6

MSR4500
Basic Operation
Audible Beep
Press AUD for three seconds to turn beep on or off. When beep is on, the Audible Beep symbol
appears in the display.
Mode
Press MODE to select from the following modes: Radio (TUNER), Satellite Radio (SIRIUS), CD
Player (CD Player), CD changer (CD Changer) or Auxilliary (AUX) . If a CD is not loaded, and/or
the satellite DLP or CD changer is not connected, these modes will be skipped.
Power
Press PWR or any other button to turn unit on. Press PWR to turn unit off.
Loudness
Press LOUD to increase bass output. The “LOUD” icon appears in the display.
Mute
Press MUTE to silence the receiver. To restore sound, press MUTE again.
Volume
Press VOL up (S) or down (T) to increase or decrease the volume.
Display Priority
Time Priority (TIME)
To select Time Priority, press and hold DISP while pressing the Down tuning button (<<).
Pressing DISP while in Time Priority will temporarily display selected station frequency (Radio
mode) or CD elapsed time (CD mode). To display the time again, press DISP momentarily.
Frequency Priority (FREQ)
To select Frequency Priority, press and hold DISP while pressing the Up tuning button (>>).
Pressing DISP while in Frequency Priority will temporarily display the time. To display the
frequency again, press DISP momentarily.
Set the Clock
1. Press and hold DISP for three seconds until clock display flashes, then release.
2. Press the Down tuning button (<<) to change hours and the Up tuning button (>>) to change minutes.
Operación Básica
Pitido Audible
Presione AUD por tres segundos para encender or apagar el pitido audible (beep). Cuando el
pitido audible está encendido en el visualizador aparece el símbolo del pitido audible.
Modalidad
Presione MODE para seleccionar la modalidad de Radio (TUNER), Radio Satélite (SIRIUS),
Reproductor de CD (CD Player), Tocador de CD (CD Changer) or Auxiliar (AUX). Los modos
serán exhibidos solamente si todas las conexiones necesarias se han hecho correctamente.
Potencia
Presione PWR o cualquier otro botón para encender la unidad. Presione PWR para apager la
unidad.
Intensidad
Presione LOUD para aumentar el tono del bajo. “LOUD” aparece en el visualizador cuando se lo
activa.
Silenciador
Presione MUTE para silenciar el receptor.
Volumen
Presione los botones de volumen (S o T) para aumentar o para disminuir el volumen.
Prioridad del Visualizador
Prioridad del Reloj (TIME)
Para seleccionar la Prioridad de Reloj, mantenga presionado DISP al tiempo que presiona el
botón <<. Si presiona DISP mientras se halla en Prioridad del Reloj, el visualizador indicará
temporalmente la frecuencia de la emisora seleccionada (en el modo de radio) o el tiempo
transcurrido del CD (en el modo CD).
Prioridad de Frecuencia (FREQ)
Para seleccionar la Prioridad de Frecuencia, mantenga presionado DISP al tiempo que presiona
el botón >>. Si presiona DISP mientras se halla en Prioridad de Frecuencia, el visualizador
indicará temporalmente el reloj.
Cómo Poner en Funcionamiento el Reloj
1. Presione y sostenga DISP por tres segundos hasta que el visualizador del reloj destelle.
Entonces su
2. Pulse << para cambiar las horas y >> para cambiar los minutos.
éltelo.
6
Page 7

MSR4500
Volume
Volumen
Audible Beep
Pitido Audible
Adjust Sound
Ajuste Sonido
Mode
Modalidad
Basic Operation
Operación Basica
Basic Operation (continued)
Bass
1. Momentarily press AUD until “BASS” appears in the display.
2. Press the volume buttons to adjust Bass up or down from -6 to +6.
Treble
1. Momentarily press AUD until “TREB” appears in the display.
2. Press the volume buttons to adjust Treble up or down from -6 to +6.
Balance
1. Momentarily press AUD until “BAL” appears in the display.
2. Press volume buttons to adjust Balance left or right from L12 to R12.
Fader
1. Momentarily press AUD until “FAD” appears in the display.
2. Press volume buttons to adjust Fader front or rear from F12 to R12.
Power
Potencia
Mute
Silenciador
Display Priority
Prioridad del Visualizador
Loudness
Intensidad
Operación Básica (continuado)
Sonidos Graves
1. Presione AUD hasta que en el visualizador aparezca “BASS”.
2. Pulse los botones de volumen para regular los Bajos hacia arriba o hacia abajo de -6 a +6.
Sonidos Aguidos
1. Presione AUD hasta que en el visualizador aparezca “TREB”.
2. Pulse los botones de volumen para regular los Agudos hacia arriba o hacia abajo de -6 a +6.
Balance
1. Presione AUD hasta que en el visualizador aparezca “BAL”.
2. Pulse los botones de volumen para regular el Balance Acústico a la izquierda o a la derecha de L12 a R12.
Atenuación Acústica
1. Presione AUD hasta que en el visualizador aparezca “FAD”.
2. Pulse los botones de volumen para regular el Atenuador hacia adelante o hacia atrás de L12 a R12.
7
Page 8

MSR4500
Removing the Faceplace
Retire la Placa Frontal
Reset Button
El Botón Reset
Basic Operation (continued)
Flip-Down Detachable Faceplace
The flip-down faceplace can be detached by following these
steps:
1. Press OPEN, and the faceplate will flip down.
2. Remove the locking screw (if used). (The locking screw can be reinstalled if detachable faceplate is not desired.)
3. Lift and pull from the center to remove faceplate.
To reinstall, slip bottom edge into radio, flip faceplate up, and
press into place.
Reset Button
When the unit is not responding (error message on display,
controls locked up, etc.), press RESET to restart the system.
1. Remove faceplate.
2. Use a pencil (or other non-metallic object) to press RESET.
Operación Básica (continuado)
Placa Frontal Desmontable y Reversible
Puede retire la placa frontal terminando estos pasos:
1. Presione OPEN, y la placa frontal se abrirá hacia abajo.
2. Retire el tornillo que asegura. (El tornillo que aegura puede ser reinstalado si la placa frontal desmontable no se desea.)
3. Levante y hale la placa frontal.
Para volver a instalar, deslice el extremo inferior en la radio,
levante la placa frontal y presiónela en su lugar.
Botón de Reset
Cuando la unidad no está respondiendo (hay mensaje del
anerror en la exhibición, o los controles se traban para
arriba), presione RESET para recomenzar el sistema.
1. Quite la placa frontal.
2. Use la punta de un lápiz (u otro objeto no metálico) para pulsar RESET.
Remove Radio from Dash
Extracción del Radio del Aotomóvil
Remove Radio from Dash
In case of abnormal operation, you may need to remove the
radio from the dash.
1. Remove faceplate.
2. Remove trim ring by gently pulling up on the middle of the trimming to release the plastic snaps.
3. Insert removal keys between radio and dash to depress locking springs. Pull radio out of dash.
8
Extracción del Radio del Automóvil
En caso de mal functionamiento, pueda necesitar quitar la
radio del automóvil.
1. Quite la placa frontal.
2. Quite el anillo ornamental halando suavemente hacia arriba desde el centro de la guarnición para aflojar los broches plásticos de presión.
3. Inserte las llaves de retiro entre la radio a la gurnaición del tablero de instrumentos para oprimir los resortes de seguridad. Saque la radio del tablero de instrumentos.
Page 9

MSR4500
Radio Operation
Seek Tuning
Press the up or down tuning buttons (>> or <<) for less than one second to seek the next strong
station in the current band.
Scan
Press SCAN to scan through strong stations in the current band. The radio will pause for five
seconds at each station. Press SCAN again to stop scanning and listen to the current station.
Manual Tuning
1. Press the up or down tuning buttons (>> or <<) for more than three seconds to select manual tuning mode.
2. Press the up or down tuning buttons (>> or <<) for less than one second to move radio frequency up or down one step.
3. Press and hold the up or down tuning buttons (>> or <<) to quickly advance to desired frequency.
Band
Press BAND to change between one AM and two FM bands.
Frequency Spacing
Frequency spacing may be set to either the U.S. or European standard. Press BAND and <<
simultaneously. Release, and the frequency spacing will change to European standard. Press
BAND and >> simultaneously. Release, and the frequency spacing will change to U.S. standard.
Store and Recall a Station
Up to 30 preset stations (10 on each band) can be stored for quick recall.
1. To store a station, select the station and hold the desired preset button for three seconds. When stored, the preset number will appear in the display.
2. To recall a station, press the corresponding preset button in the selected band.
Automatically Store Stations
Select 10 strong stations and store them in the current band using the Automatically Store
Stations feature. To enable this feature, hold AS/PS for more than three seconds. The new
stations replace stations already stored in that band.
Preset Scan
Scan stations stored in the current band using
the Preset Scan feature. To enable Preset
Scan, press AS/PS for less than three seconds.
The radio will pause for five seconds at each
station. Press AS/PS again to stop scanning
and listen to the current station.
Radio Operation
Operación de la Radio
Operación de la Radio
Syntonización por Búsqueda
Presione<< ó >> por menos de un segundo para buscar la siguiente emisora.
Rastreo
Presione SCAN para rastrear las emisoras de señal fuerte de la banda actual. La radio hace pausa
por cinco segundos en cada emisora de señal fuerte. Presione de nuevo SCAN para escuchar la
emisora actual.
Sintonización Manual
1. Presione << ó >> por más de tres segundos para seleccionar el modo de sintonización manual.
2. Presione << ó >> por menos de un segundo para mover el número de frecuencia del radio una parada hacia arriba o hacia abajo.
3. Presione y sostenga << ó >> para avanzar rápidamente a la frecuencia deseada.
Banda
Presione BAND para sintonizar la radio entre las dos bandas FM y uno banda AM.
Intervalo de Frecuencias
El intervalo de frecuencias se puede fijar al estándar Americano o al estándar Europeo. Presione
simultáneamente BAND y << . El intervalo de frecuencias cambia al estándar Europeo. Presione
simultáneamente BAND y >>. El intervalo de frecuencias cambia al estándar Americano.
Cómo Almacener una Emisora
Hasta 30 estaciones preestablecidas (10 en cada venda) se pueden almacenar.
1. Seleccione una emisora, y mantenga pulsado durante tres segundos un boton de preselección.
2. Pulse un botón de preselección para seleccionar una emisora almacenada previamente.
Almacenamiento Automático de Emisoras
Seleccione 10 emisoras de señal fuerte y almacénelas en la banda actual. Mantenga pulsado AS/
PS en forma por más de tres segundos. Los emisoras reemplazaran a aquellas que se habian
almacenado previamente.
Preselección Mediante Escáner
Busque con el escáner las emisoras
almacenadas en la banda actual. Pulse AS/PS
por menos de tres segundos. La radio hará una
pausa de cinco segundos en cada emisora que
encuentre. Pulse AS/PS neuvamente para que
el escáner se detenga cuando haya encontrado
la emisora deseada.
9
Page 10

MSR4500
Satellite Operation
Acquiring Signal
When Satellite Mode is selected, “Sirius” will scroll across the first line of the display one time,
then “Acquiring Signal” will scroll. Once a signal is acquired, the letters “SAT”, along with the
satellite dish icon, will appear in the display.
If the user is not subscribed, “Call 888.539.SIRIUS To Subscribe” will appear in the display. The
phone number will scroll two times and stop. To scroll this text again, press FUNC for more than
three seconds.
Acquiring Text
After tuning channels, the radio will display either Channel Name/Song Title or Channel Name/
Artist Name. While waiting for text data, “Acquiring Text” will appear in the display.
Modes of Operation
Direct Mode
Direct mode allows a user to select individual channels or access channels directly. Direct mode
is the default mode for the unit.
While in direct mode, the display will show Channel Number and either Channel Name/Song Title
or Channel Name/Artist Name. The Channel Name will always appear on the first line of the
display, and the Song Title or Artist Name will appear on the second line.
Channel Name/Song Title is the default setting for the unit. To toggle between the two display
settings, press SHIFT for less than three seconds.
If text data is longer than eight characters, the display will scroll the information one time, then
only the first eight characters will be displayed. To scroll text again, press and hold FUNC for
more than two seconds. The unit will beep twice, and the data will scroll two times then default to
the first eight characters.
Category Mode
Category mode allows a user to select individual channels within a certain category. There are
currently 12 categories to choose from, and each reflects a different type of programming.
While in category mode, Channel Number will always be displayed, and the Category Name and
Category Number will be briefly displayed each time a category or channel is selected. After three
seconds, the display will revert to Channel Name/Song Title or Channel Name/Artist Name.
The Channel Name will always appear on the first line of the display, and the Song Title or Artist
Name will appear on the second line. Channel Name/Song Title is the default setting for the unit.
To toggle between the two display settings, press SHIFT for less than three seconds.
If text data is longer than eight characters, the display will scroll the information one time, then
only the first eight characters will be displayed. To scroll text again, press and hold FUNC for
more than two seconds. The unit will beep twice, and the data will scroll three times.
Satellite Operation
Acquiring Signal
When Satellite Mode is selected, “Sirius” will scroll across the first line of the display one time,
then “Acquiring Signal” will scroll. Once a signal is acquired, the letters “SAT”, along with the
satellite dish icon, will appear in the display.
If the user is not subscribed, “Call 888.539.SIRIUS To Subscribe” will appear in the display. The
phone number will scroll two times and stop. To scroll this text again, press FUNC for more than
three seconds.
Acquiring Text
After tuning channels, the radio will display either Channel Name/Song Title or Channel Name/
Artist Name. While waiting for text data, “Acquiring Text” will appear in the display.
Modes of Operation
Direct Mode
Direct mode allows a user to select individual channels or access channels directly. Direct mode
is the default mode for the unit.
While in direct mode, the display will show Channel Number and either Channel Name/Song Title
or Channel Name/Artist Name. The Channel Name will always appear on the first line of the
display, and the Song Title or Artist Name will appear on the second line.
Channel Name/Song Title is the default setting for the unit. To toggle between the two display
settings, press SHIFT for less than three seconds.
If text data is longer than eight characters, the display will scroll the information one time, then
only the first eight characters will be displayed. To scroll test again, press and hold FUNC for
more than two seconds. The unit will beep twice, and the data will scroll two times then default to
the first eight characters.
Category Mode
Category mode allows a user to select individual channels within a certain category. There are
currently 12 categories to choose from, and each reflects a different type of programming.
While in category mode, Channel Number will always be displayed, and Category Name/
Category Number will be briefly displayed each time a category or channel is selected. After three
seconds, the display will revert to Channel Name/Song Title or Channel Name/Artist Name.
The Channel Name will always appear on the first line of the display, and the Song Title or Artist
Name will appear on the second line. Channel Name/Song Title is the default setting for the unit.
To toggle between the two display settings, press SHIFT for less than three seconds.
If text data is longer than eight characters, the display will scroll the information one time, then
only the first eight characters will be displayed. To scroll test again, press and hold FUNC for
more than two seconds. The unit will beep twice, and the data will scroll three times.
10
Page 11

MSR4500
Satellite Operation (continued)
Selecting a Mode
Direct mode is set as the default mode for the unit. To select category mode, press FUNC for
less than one second. “CATEGORY” will appear in the lower right corner of the display. To return
to direct mode, press FUNC for less than one second. “DIRECT” will appear in the display.
Display
Press DISP to briefly display the time on the display. After five seconds, the display will revert
back to the previously-selected display setting (Channel Name/Song Title or Channel Name/Artist
Name).
Seek Tuning
Use seek tuning to move quickly through available channels and categories in either direct or
category mode.
Direct Mode
Press and hold the up (>>) or down (<<) tuning button for more than three seconds, then continue
to hold to seek up or down through all channels. Release the tuning button to stop seeking and
listen to the selected channel.
Category Mode
Press and hold the the up (>>) or down (<<) tuning button for more than three seconds, then
continue to hold to seek up or down through all categories. Release the tuning button to stop
seeking and listen to the desired category.
Note: In category mode, seek tuning is only used to select a category. Seek tuning cannot
be used to select channels within a category. Use manual tuning to select channels within
a category.
Satellite Operation (continued)
Selecting a Mode
Direct mode is set as the default mode for the unit. To select category mode, press FUNC for less
than one second. “CATEGORY” will appear in the lower right corner of the display. To return to
direct mode, press FUNC for less than one second. “DIRECT” will appear in the display.
Display
Press DISP to briefly display the time on the display. After five seconds, the display will revert
back to the previously-selected display setting (Channel Name/Song Title or Channel Name/Artist
Name).
Seek Tuning
Use seek tuning to move quickly through available channels and categories in either direct or
category mode.
Direct Mode
Press and hold the up (>>) or down (<<) tuning button for more than three seconds, then continue
to hold to seek up or down through all channels. Release the tuning button to stop seeking and
listen to the selected channel.
Category Mode
Press and hold the the up (>>) or down (<<) tuning button for more than three seconds, then
continue to hold to seek up or down through all categories. Release the tuning button to stop
seeking and select the desired category.
Note: In category mode, seek tuning is only used to select a category. Seek tuning cannot
be used to select channels within a category. Use manual tuning to select channels within
a category.
Direct Mode / Modo Directo
Satellite Operation
Operación de Satélite
Category Mode / Modo Categoria
11
Page 12

MSR4500
Satellite Operation (continued)
Manual Tuning
Use manual tuning to move through channels one at a time in either direct or category mode.
Direct Mode
Press the up (>>) or down (<<) tuning button momentarily to select the next sequential channel.
Category Mode
Press the up (>>) or down (<<) tuning button momentarily to select the next sequential channel.
Note: In category mode, manual tuning is only used to select a channel within the current
category. Manual tuning cannot be used to change categories. Use seek tuning to select a
different category.
Direct Access Tuning
In direct mode, channels can also be accessed directly by channel number. Press SEL (also the
Scan button), then enter the desired channel number using the number buttons (0-9).
Note: Direct access is used in direct mode only. There is no direct access in category mode.
Scan Tuning
In direct mode, the scan function will scan up through all channels sequentially and provide five
seconds of listening time before moving to the next channel. Press SCAN for more than three
seconds to activate the scan function. While scanning, press SCAN momentarily to stop scanning
and listen to the selected channel.
Note: Scan tuning is used in direct mode only. There is no scan tuning in category mode.
Satellite Operation (continued)
Manual Tuning
Use manual tuning to move through channels one at a time in either direct or category mode.
Direct Mode
Press the up (>>) or down (<<) tuning button momentarily to select the next sequential channel.
Category Mode
Press the up (>>) or down (<<) tuning button momentarily to select the next sequential channel.
Note: In category mode, manual tuning is only used to select a channel within the current
category. Manual tuning cannot be used to change categories. Use seek tuning to select a
different channel.
Direct Access Tuning
In direct mode, channels can also be accessed directly by channel number. Press SEL (also the
Scan button), then enter the desired channel number using the number buttons (0-9).
Note: Direct access is used in direct mode only. There is no direct access in category mode.
Scan Tuning
In direct mode, the scan function will scan up through all channels sequentially and provide five
seconds of listening time before moving to the next channel. Press SCAN for more than three
seconds to activate the scan function. While scanning, press SCAN momentarily to stop scanning
and listen to the selected channel.
Note: Scan tuning is used in direct mode only. There is no scan tuning in category mode.
Tuning Options
Tuning Method Direct Mode Category Mode
Seek Tuning
Manual Tuning
Direct Access Tuning
Scan Tuning
Tune quickly up or down through
available channels
Tune up or down through all available
channels one at a time
Tune directly to a channel by entering
the channel number
Tune up through all channels
sequentially, providing five seconds of
listening at each channel
Tune quickly up or down through
available categories
Tune up or down through all available
channels within the current category
one at a time
N/A
N/A
12
Tuning Options
Tuning Method Direct Mode Category Mode
Seek Tuning
Manual Tuning
Direct Access Tuning
Scan Tuning
Tune quickly up or down through
available channels
Tune up or down through all available
channels one at a time
Tune directly to a channel by entering
the channel number
Tune up through all channels
sequentially, providing five seconds of
listening at each channel
Tune quickly up or down through
available categories
Tune up or down through all available
channels within the current category
one at a time
N/A
N/A
Page 13

MSR4500
Satellite Operation (continued)
Store Preset Channels/Categories
Up to 20 channels and 20 categories can be stored in
memory for quick recall using the number buttons (0-9).
When a preset is stored, “Preset ##” will appear in the
display for two seconds.
Preset Channels
Preestablecen el Canal
Direct Mode
1. To store a single-digit preset (1-9), tune the radio to the desired channel. Press the desired preset number button (1-9) for more than three seconds to store the current channel.
2. To store a double-digit preset (10-20), tune the radio to the desired channel. Press the first digit
of the desired preset number (1 or 2) momentarily, then press and hold the second digit (0-9) for
more than three seconds to store the selected channel. When entering a double-digit preset,
the second digit must be entered within three seconds of the first or the function will time out.
Category Mode
1. To store a single-digit preset (1-9), tune the radio to the desired category. Press the desired preset number button (1-9) for more than three seconds to store the current category.
2. To store a double-digit preset (10-20), tune the radio to the desired category. Press the first
digit of the desired preset number (1 or 2) momentarily, then press and hold the second digit (0-
9) for more than three seconds to store the selected category. When entering a double-digit
preset, the second digit must be entered within three seconds of the first or the function will time
out.
Recall Preset Channels/Categories
Once preset channels and categories are stored into memory, they can be quickly and automatically
accessed by pressing the corresponding preset number button.
Satellite Operation (continued)
Store Preset Channels/Categories
Up to 20 channels and 20 categories can be stored in
memory for quick recall using the number buttons (0-9).
When a preset is stored, “Preset ##” will appear in the
display for two seconds.
Direct Mode
1. To store a single-digit preset (1-9), tune the radio
to the desired channel. Press the desired preset
number button (1-9) for more than three seconds
to store the current channel.
1. To store a double-digit preset (10-20), tune the radio to the desired channel. Press the first
digit of the desired preset number (1 or 2) momentarily, then press and hold the second digit
(0-9) for more than three seconds to store the selected channel. When entering a double-digit
preset, the second digit must be entered within three seconds of the first or the function will
time out.
Category Mode
1. To store a single-digit preset (1-9), tune the radio to the desired category. Press the desired preset number button (1-9) for more than three seconds to store the current category.
2. To store a double-digit preset (10-20), tune the radio to the desired category. Press the first
digit of the desired preset number (1 or 2) momentarily, then press and hold the second digit
(0-9) for more than three seconds to store the selected category. When entering a double-digit
preset, the second digit must be entered within three seconds or the function will time out.
Recall Preset Channels/Categories
Once preset channels and categories are stored into memory, they can be quickly and
automatically accessed by pressing the corresponding preset number button.
Direct Mode
1. To recall a single-digit preset (1-9), press the desired preset number button for less than three seconds to access the corresponding channel.
2. To recall a double-digit preset (10-20), press the first digit of the desired preset number (1 or 2)
momentarily, then press the second digit (0-9) momentarily to access the selected channel.
When entering a double-digit preset, the second digit must be entered within three seconds of
the first or the function will time out.
Category Mode
1. To recall a single-digit preset (1-9), press the desired preset number button for less than three seconds to access the corresponding category.
2. To recall a double-digit preset (10-20), press the first digit of the desired preset number (1 or 2)
momentarily, then press the second digit (0-9) momentarily to access the selected category.
When entering a double-digit preset, the second digit must be entered within three seconds of
the first or the function will time out.
13
Page 14

MSR4500
Satellite Operation (continued)
Skip and Restore Channels
In direct mode, the radio can be programmed to skip selected channels. There is no skip function
in category mode.
Skip Channel
1. Select direct mode.
2. Use direct access to select the channel you want to skip.
3. Press FUNC and SELECT simultaneously for more than three seconds.
The selected channel will now be skipped during seek, manual, and scan tuning. It can still be
selected through direct access tuning.
Restore Channel
1. Select direct mode.
1. Use direct access to select the channel you want to restore.
2. Press FUNC and SELECT simultaneously for more than three seconds.
The selected channel will now be restored for seek, manual, and scan tuning as well as direct
access tuning.
Invalid Channels
If an invalid channel is selected, “Invalid Channel” will appear momentarily on the display. After
three seconds, the display will revert back to the previous active channel.
Accessing the Sirius ID Number
1. Use direct access to select channel number “000”.
2. The 12-digit Sirius ID number will be displayed for 15 seconds.
3. Press FUNC to revert back to the previous mode before the 15 seconds are over.
Non-Subscribed Channels
If a channel not currently subscribed to is selected, “Call 888.539.SIRIUS To Subscribe” will scroll
across the display two times. To scroll data again, press FUNC for more than three seconds.
Preview Channel
The preview channel can be accessed to verify proper installation and operation.
1. Select direct mode.
2. Use direct access to select channel 184.
3. If preview channel functions properly, contact Sirius at 888-539-SIRIUS to subscribe.
The Sirius preview channel is a special content channel with program audio that can only be
tuned prior to customer subscription.
Satellite Operation (continued)
Skip and Restore Channels
In direct mode, the radio can be programmed to skip selected channels. There is no skip function
in category mode.
Skip Channel
1. Select direct mode.
2. Use direct access to select the channel you want to skip.
3. Press FUNC and SELECT simultaneously for more than three seconds.
The selected channel will now be skipped during seek, manual, and scan tuning. It can still be
selected through direct access tuning.
Restore Channel
1. Select direct mode.
1. Use direct access to select the channel you want to restore.
2. Press FUNC and SELECT simultaneously for more than three seconds.
The selected channel will now be restored for seek, manual, and scan tuning as well as direct
access tuning.
Invalid Channels
If an invalid channel is selected, “Invalid Channel” will appear momentarily on the display. After
three seconds, the display will revert back to the previous active channel.
Accessing the Sirius ID Number
1. Use direct access to select channel number “000”.
2. The 12-digit Sirius ID number will be displayed for 15 seconds.
3. Press FUNC to revert back to the previous mode before the 15 seconds are over.
Unsubscribe Channels
If a channel not currently subscribed to is selected, “Call 888.539.SIRIUS To Subscribe” will scroll
across the display two times. To scroll data again, press FUNC for more than three seconds.
Preview Channel
The preview channel can be accessed to verify proper installation and operation.
1. Select direct mode.
2. Use direct access to select channel 184.
3. If preview channel functions properly, contact Sirius at 888-539-SIRIUS to subscribe.
The Sirius preview channel is a special content channel with program audio that can only be
tuned prior to customer subscription.
14
Page 15

MSR4500
CD Player Operation
Insert CD
1. Press OPEN. Faceplate will flip down.
2. Insert CD into slot with the label side facing up.
3. Flip the faceplate up to close.
Inserting and Ejecting CD
Para Insertar y Expulsar el CD
Eject CD
1. Press OPEN. Faceplate will flip down.
2. Press the eject button to eject the CD from the slot. The power does not need to be on to eject the CD.
3. Flip the faceplate up to close.
Note: Do not expose the CD player to extremely high or low temperatures. Do not drive with
an ejected CD in the slot.
Repeat (RPT)
Press RPT for more than three
seconds to continuously repeat the
same track on a CD. The “RPT”
icon appears in the display. Press
RPT again for more than three
seconds to stop repeating, and the
“RPT” icon will disappear.
CD Player Operation
Operación del Reproductor de CD
Random (RDM)
Press RDM for more than three
seconds to play all tracks on a CD in
random order one time. The “RDM”
icon appears in the display. Press
RDM again for more than three
seconds to stop random play, and
the “RDM” icon will disappear.
Intro (INT)
Press INT for more than three
seconds to play the first ten seconds
of each track on a CD. The “INT”
icon appears in the display. Press
INT again for more than three
seconds to stop intro and listen to
track, and the “INT” icon will
disappear.
Operatión del Reproductor de CD
Para Insertar el CD
1. Presione OPEN. La placa frontal se abrirá hacia abajo.
2. Inserte el CD con la etiqueta haca arriba en la ranura.
3. Levante el panel hacia arriba para cerrar.
Para Expulsar el CD
1. Presione OPEN. La placa frontal se abrirá hacia abajo.
2. Presione el boton de expulsar para expulsar el CD de la ranura. No es necesario que el radio esté encendido para expulsar el CD.
3. Levante el panel hacia arriba para cerrar.
Nota: No exponga el reproductor de CD a temperaturas extremas. No conduzca su vehiculo
con el CD expulsado por la ranura del reproductor de CD.
Repetir (RPT)
Presione RPT para repetir
continuamente la misma posta. En el
visualizador aprece “RPT”. Presione
de nuevo por mas de tres segundos
para detener la repetición.
Reproducción Aleatoria (RDM)
Presione RDM para reproducir una
vez todas las pistas del CD en orden
aleatorio. En el visualizador aparece
“RDM”. Presione de neuvo por mas
de tres segundos para detener la
reproducción al azar.
Intro (INT)
Presione INT para reproducir los
primeros diez segundos de cada
pista del CD actual. En el
visualizador aparece “INT”. Presione
de nuevo por mas de tres segundos
para detener INT y escuchar la pista.
15
Page 16

Open
MSR4500
CD Player Operacion / Operación del Reproductor de CD
Play / Pause
Reproducir / Pausa
Fast Forward and Fast Reverse
Avance y Retroceso Rápidos
Program / Programa
Repeat / Repitir
CD Player Operation (continued)
Program Mode
Press PGM for more than three seconds. The PROGRAM icon will flash on the display when
program mode is accessed.
Program up to 24 CD tracks to play in any order by selecting a track for each spot in the playing
sequence. In program mode, the display will show one of the following: P-01 (program is empty),
P-24 (last track in memory), PR-C (program has been cleared), or FULL (program is full).
You must be in program mode to perform the following functions:
Store Tracks in Memory
Press << or >> to select a track number. Press PGM to program the selected track into memory.
“P-02” will appear in the display. Repeat to program up to 24 tracks into memory.
Play Program
Press the Play/Pause button to begin play or to pause play at any time.
Clear Program
Press PGM for more than three seconds to clear the current program from memory.
Fast Forward and Fast Reverse
Press and hold << or >> to fast forward or fast reverse a track. CD play will resume after the
button is released.
Skip Tracks
Press << or >> to advance to the next or previous track. The track number will appear in the
display.
Direct Track Access
Select the track number by pressing the numbered keys (1-0). For example, to access track 12,
press button 1 followed by button 2. If selected track is not on the disk, “No Track” appears in the
display.
Number Buttons (1 - 10)
Los Botones Numeradas (1 - 10)
Intro / Intro
Random / Reproducción Aleatoria
Operatión del Reproductor de CD (continuado)
Modo Programa
Presione PGM por más de tres segundos. El icono programa empieza a destellar lo que le indica
que usted está ahora en el modo programa.
Programe hasta 24 pistas de CD para reproducirlas en cualquier orden seleccionando una pista
por cada punto de la secuencia de reproduccion. En el modo programa, el visualizador mostrara
uno de los siguiented indicadores: P-01 (el programa está vacio), P-24 (la última pista en
memoria), PR-C (el programa ha sido borrado), o FULL (el programa está lleno).
Usted debe estar en el modo programa para ejecutar las sigulented funciones:
Almacenar Pistas en la Memoria
Presione << ó >> para seleccionar el número de pista. Presione PGM para programar en la
memoria la pista seleccionada. En el visualizador aparecerá “P-02”.
Reproducir el Programa
Presione el botón de reproducir/pausa para reproducir o para pausa en cualquier momento.
Borrar el Programa
Presione PGM por más de tres segundos para borrar el programa del la memoria.
Avance y Retroceso Rápidos
Presione y sostenga << ó >> para retroceder o avanzar rápidamente una pista. La reproducción
del CD se reanuda luego que se suelta el botón.
Para Saltar las Pistas
Presione << ó >> para ir a la anterior o a la siguiente pista. En el visualizador aparece el número
de la pista.
Acceso Directo a la Pista
Seleccione el número de pista presionando las teclas muneradas (1-0). Si la pista seleccionada no
está en el disco, en el visualizador aparace “No Track”.
16
Page 17

MSR4500
CD Changer Operation
Note: The MSR4500 is designed to control
an optional CD changer. The compact disc
changer plays all songs on a disc then
advances to the next disc in order. Skip
Tracks, Direct Track Access, Fast
Forward, Fast Reverse, Pause, Repeat,
Random and Intro Scan functions can be
performed on CD’s played through the CD
changer. See CD player instructions for
details on performing these functions.
CD Changer Mode
Modo del Cambiadiscos de CD
Direct Disc Access
Press SHIFT, then select the disc number using the number keys. If the selected disk is not in the
changer, “No Disk” appears in the display.
Note: Depending on the CD changer, if selected disc tray is empty, the CD changer may
either advance to the next disc or revert back to the previous disc.
Program Mode
Press PGM for more than three seconds. The PROGRAM icon will flash on the display when
program mode is accessed.
Program up to 32 CD tracks to play in any order by selecting a track for each spot in the playing
sequence. In program mode, the display will show one of the following: P-01 (program is empty),
P-32 (last track in memory), PR-C (program has been cleared), or FULL (program is full).
You must be in program mode to perform the following functions:
Store Tracks in Memory
1. Press SHIFT then select disc number using number keys.
2. Press << or >> to select a track number.
3. Press PGM to program the selected track into memory. “P-01” will appear in the display.
4. Repeat to program up to 32 tracks into memory.
Play Program
Press the Play/Pause button to begin play or to pause play at any time.
Clear Program
Press PGM for more than three seconds to clear the current program from memory.
Operación de la Radio
Nota: El MSR4500 está deseñado para
controlar un cambiadiscos opcional de
CD. El cambiador de discos compactos
reproduce todas las sanciones en el disco
y luego en orden avanza al siguiente
disco. Las funciones de Saltar Pistas,
Acceso Directo a Pistas, Avance y
Retroceso Rápidos, Pausa, Repetición,
Reproduducción Aleatoria y Rastrea
pueden realizarse en los discos
compactos reproducidos por medio del
cambiadiscos de CD. Vea las
instrucciones del Reproductor de CD.
Accesso Directo al Disco
Presione SHIFT y luego seleccione el número de disco utilizando las teclas numeradas. Si el disco
seleccionado no está en el cambiadiscos, en el visualizador aparece “No Disk”.
Nota: Dependiendo del cambiadiscos de CD, si la bandeja del disco seleccionado está vacía,
el cambiadiscos de CD puede ya sea avanzar al siguiente disco o volver al disco anterior.
Modo Programa
Presione PGM por más de tres segundos. El icono programa empieza a destellar lo que le indica
que usted está ahora en el modo programa.
Programe hasta 32 pistas de CD para reproducirlas en cualquier orden seleccionando una pista por
cada punto de la secuencia de reproduccion. En el modo programa, el visualizador mostrara uno de
los siguiented indicadores: P-01 (el programa está vacio), P-32 (la última pista en memoria), PR-C
(el programa ha sido borrado), o FULL (el programa está lleno).
Usted debe estar en el modo programa para ejecutar las sigulented funciones:
Almacenar Pistas en la Memoria
1. Presione SHIFT para seleccionar el número de disco usando las tecias numericas.
2. Presione << ó >> para seleccionar el número de pista.
3. Presione PGM para programar en la memoria la pista seleccionada. En el visualizador aparecerá “P-01”.
4. Repita igual para programar en la memoria hasta 32 pistas.
Reproducir el Programa
Presione el botón de reproducir/pausa para reproducir o para pausa en cualquier momento.
Borrar el Programa
Presione PGM por más de tres segundos para borrar el programa del la memoria.
17
Page 18

MSR4500
Specifications
CD Player
Signal/noise ratio. . . . . . . . . . . . . . . . . . . . . . . . . . . . . . . . . . . . . . . . . . . . . . . . . . . . . . . . . >86 dB
Frequency response . . . . . . . . . . . . . . . . . . . . . . . . . . . . . . . . . . . . . . . . . . . . . . . . 20 Hz - 20 kHz
Channel separation . . . . . . . . . . . . . . . . . . . . . . . . . . . . . . . . . . . . . . . . . . . . . . . . . . . . . . . >65 dB
D/A converter . . . . . . . . . . . . . . . . . . . . . . . . . . . . . . . . . . . . . . . . . . . . . . . . . . . . . . . . . . 1 Bit/CH
FM Tuner
Tuning range . . . . . . . . . . . . . . . . . . . . . . . . . . . . . . . . . . . . . . . . . . . . . . . . 87.5 MHz - 107.9 MHz
FM mono sensitivity. . . . . . . . . . . . . . . . . . . . . . . . . . . . . . . . . . . . . . . . . . . . . . . . . . . . . . . . 12 dBf
50 dB quieting sensitivity (stereo) . . . . . . . . . . . . . . . . . . . . . . . . . . . . . . . . . . . . . . . . . . . . . 16 dBf
Stereo separation @ 1 kHz . . . . . . . . . . . . . . . . . . . . . . . . . . . . . . . . . . . . . . . . . . . . . . . . . . . 40dB
AM Tuner
Tuning range . . . . . . . . . . . . . . . . . . . . . . . . . . . . . . . . . . . . . . . . . . . . . . . . . . 530 kHz - 1720 kHz
Amplifier
Total system power . . . . . . . . . . . . . . . . . . . . . . . . . . . . . . . . . . . . . . . . . . . . . . . . . 200 watts peak
Power output . . . . . . . . . . . . . . . . . . . . . . . . . . . . . . . . . . . . . . . . . . . . . . . . . . . . . . . . . . . 4 x 50W
General
Power supply. . . . . . . . . . . . . . . . . . . . . . . . . . . . . . . . . . . . . . . . . . . 11-16 VDC, negative ground
Speaker output impedance . . . . . . . . . . . . . . . . . . . . . . . . . . . . . . . . . . . . . . . . . . . . . . . 4-8 Ohms
Fuses. . . . . . . . . . . . . . . . . . . . . . . . . . . . . . . . . . . . . . . . . . . . . . . . . . . . . fast blow ATO (10 amp)
Dimensions . . . . . . . . . . . . . . . . . . . . . . . . . . . . . . . . . . . . 7” x 6” x 2” (178mm x 155mm x 51mm)
Specifications subject to change without notice.
Especificationes
Reproductor de CD
Promedio de ruido/señal . . . . . . . . . . . . . . . . . . . . . . . . . . . . . . . . . . . . . . . . . . . . . . . . . . . >86 dB
Respuesta de frecuencia . . . . . . . . . . . . . . . . . . . . . . . . . . . . . . . . . . . . . . . . . . . . . 20 Hz - 20 kHz
Separación de canales. . . . . . . . . . . . . . . . . . . . . . . . . . . . . . . . . . . . . . . . . . . . . . . . . . . . . >65 dB
Transformador D/A. . . . . . . . . . . . . . . . . . . . . . . . . . . . . . . . . . . . . . . . . . . . . . . . . . . . . . . 1 Bit/CH
Sintonización FM
Alance de sintonización . . . . . . . . . . . . . . . . . . . . . . . . . . . . . . . . . . . . . . . 87.5 MHz - 107.9 MHz
Sensibilidad mono FM . . . . . . . . . . . . . . . . . . . . . . . . . . . . . . . . . . . . . . . . . . . . . . . . . . . . . 12 dBf
50 dB de umbral de sensibilidad (estereo). . . . . . . . . . . . . . . . . . . . . . . . . . . . . . . . . . . . . . 16 dBf
Separación de ester
Sintonización AM
Alance de sintonización . . . . . . . . . . . . . . . . . . . . . . . . . . . . . . . . . . . . . . . . . . 530 kHz - 1720 kHz
Amplificador
Capacidad total de corriente. . . . . . . . . . . . . . . . . . . . . . . . . . . . . . . . . . . . . . . . . . . 200 watts pico
Salida de corriente . . . . . . . . . . . . . . . . . . . . . . . . . . . . . . . . . . . . . . . . . . . . . . . . . . . . . . . 4 x 50W
General
Suministro de corriente . . . . . . . . . . . . . . . . . . . . . . . . . . . . . . . . . . . 11-16 VDC, negativo a tierra
Impedancia de salida del altoparlante . . . . . . . . . . . . . . . . . . . . . . . . . . . . . . . . . . . . . 4-8 Ohmios
Fusibles . . . . . . . . . . . . . . . . . . . . . . . . . . . . . . . . . . . . . . . . . . . . . . . fast blow ATO (10 ampieros)
Dimensiones. . . . . . . . . . . . . . . . . . . . . . . . . . . . . . . . . . . 7” x 6” x 2” (178mm x 155mm x 51mm)
Las especificationes están sujetas a cambio sin previo aviso.
éo a 1 kHz . . . . . . . . . . . . . . . . . . . . . . . . . . . . . . . . . . . . . . . . . . . . . . . 40dB
18
Page 19

MSR4500
Troubleshooting
Problem Cause Corrective Action
Does not operate (display
does not light)
No power to unit Inline fuse blown Check/replace fuse
Speakers not operating
(display lights normally)
Not all speakers operate Incorrect splices or connections Check all splices and connections
Blows fuses Power wire shorting to ground Make sure wire is not pinched
ER-1 appears on display Disc loading malfunction Press RESET button
ER-2 appears on display Disc loading/eject malfunction Press RESET button
CD skips too much Receiver mount is not solid or backstrap
No sound Loss of signal * See note *
Intermittent sound Satellite mode not selected Ensure Satellite mode is selected
Antenna disconnected Satellite antena cable not connected Check cable connections
Technical assistance is available Monday through Friday from 8:00 AM until 5:00 PM EST by calling 1-800323-0221. To receive technical information at any time, visit www.jensen.com.
* Note: Man-made objects (metal truss-type bridges, tall buildings, tunnels, etc.) and
natural objects (mountains, canyons, valleys, etc.) can cause a loss of satellite and
terrestrial signals momentarily. If the signal is lost, the DLP will try and reacquire the
satellite and/or terrestrial signal(s). When the DLP is repeatedly trying to reacquire a
signal, the sound will be intermittent.
No power to yellow wire, or no power to
red wire
Inline fuse blown Replace fuse
Speaker harness not connected Connect speaker harness; check
Speaker wires shorting to chassis
ground to to each other
Speaker wires shorting to ground Make sure wire in not pinched
Incorrect fuse/fuse too small Install fuse of correct rating
is not secure
Satellite mode not selected Ensure Satellite mode is selected
Audio cable not connected Ensure proper cable connections
Audio cable not connected Ensure proper cable connections
Faulty antenna cable Replace antenna cable
Check connection with test light; check
boat fuse with test light
speaker wires
Check splices; insulate all bare wires
Check mounting and backstrap; tighten if
needed
Corrección de Problemas
Problema Causa Correccion
El equipo no funciona
(el visualizador ne se
enciende)
La alimentatión no va a
la unidad
Ninguno de los
altoparlantes funciona
(las luces del visualidor
funcionan)
No todos los
altoparlanted funcionan
Fusibles quemados El cable hace cortocircuito en la conexión
ER-1 en el visualizador Mal funcionamiento de la carga de disco Presione el botón RESET
ER-2 en el visualizador Disco cargando/mal funcionamiento del
El CD salta demasiado El montaje del receptor ne está sólido o la
No hay sonido Pérdida de la señal* Vea nota*
Sonido intermitente Modo basado en los satélites no
Antena desconectada El cable de la antena no está conectado Revise las conexiones del cable
La asistencia técnica es lunes disponible a viernes a partir de la 8:00 y de 5:00 P.M. EST llamando 1-800-3230221, o la visita www.jensen.com en cualquier momento.
No hay corriente en el cable amarillo; no
hay corriente en el cable rojo
El fusible en-linea está quemado Reemplace el fusible
El fusible en-linea está quemado Examine/reemplace el fusible
El colector del altoparlante no está
conectado
Conexiones o conectored incorrectas Examine todas las conexiones y los
Los cables del altoparlante hacen
cortocircuitos hasta la conexión a tierra
a tierra
Los cables del altoparlante producen
cortocircuitos en la conexión a tierra
Fusible incorrecto/fusible demasiado
pequeño
expulsor
correa de retensión no está bien segura
Modo basado en los satélites no
seleccionado
Cable(s) de audio no conectado(s) Revise las conexiones del cable
seleccionado
Cable(s) de audio no conectado(s) Revise las conexiones del cable
Cable de la antena defectuoso Reemplace la antena
Revise la conexión con la luz de prueba;
revise el fusible del barco con la luz de
prueba
Cenecte el colector de cables del
altoparlante; revise los cables del
altoparlante
conectores
Examine las conexiones y recubra los
cables pelados con cinta aislante
Asegurese de que el cable no esté
pellizcado
Asegurese de que el cable no esté
pellizcado
Instale el fusible de voltaje apropiado
Presione el botón RESET
Revise la correa de montaje y retención;
ajustela si es necessario
Seleccione el modo basado en los
satélites
Seleccione el modo basado en los
satélites
*Nota: Los objetos hechos por el hombre (puentes metálicos tipo armadura, edificios
altos, túneles, etc.) y objetos naturales (montañas, cañones, valles, etc.) pueden ocasionar
pérdida momentánea de las señales del satélite y terrestres. Si la señal se pierde el DLP
tratará de recuperar la(s) señal(es) del satélite y/o terrestres. Cuando el DLP está tratando
repetidamente de captar una señal, el sonido será intermitente.
19
Page 20

MSR4500
Warranty
Limited One Year Warranty–USA & Canada
Length of Warranty: This warranty from Recoton Mobile Electronics shall be in effect for a
period of one year from the date of the first consumer purchase.
Persons Protected: This warranty will be enforceable by the original owner and any
subsequent owners during the warranty period so long as proof of date of purchase from an
authorized Jensen dealer is presented whenever warranty service is required.
What is Covered: Except as otherwise specified below, this warranty covers all defects in
material and workmanship in this product. The following are not covered: damage resulting
from accident, misuse, abuse, neglect, product modification, improper installation, incorrect
line voltage, unauthorized repair or failure to follow instructions supplied with the product;
damage occurring during shipment (claims must be presented to the carrier); elimination of
boat static or other electrical interferences; any product purchased outside USA, or on which
the serial number has been defaced, modified or removed.
How You Can Get Service: Please telephone Jensen at 1-800-323-4815. We will either
inform you of the name and address of an authorized Jensen repair station which will service
the product or will advise you to send the product to a factory service center.
If shipment of the product is required, it should be packed securely. The original dated bill of
sale must always be included with the product as proof of warranty coverage.
What We Will Pay For: We will pay for all labor and material expenses required to repair the
product, but you must pay any labor costs for the removal and/or installation of the product. If
the product is shipped for warranty service, you must prepay the initial shipping charges, but
Jensen will pay the return shipping charges if the product is returned to an address inside the
USA or Canada.
Exclusion of Certain Damages: Jensen’s liability is limited to the repair or replacement, at
our option, of any defective product and shall not include incidental or consequential economic
damages of any kind.
Some states and/or provinces do not allow limitations on how long an implied warranty lasts
and/or do not allow the exclusion or limitation of incidental or consequential damages, so the
above limitations and exclusions may not apply to you.
This warranty gives you specific legal rights, and you may also have other rights which vary
from state to state and province to province.
Garantía
Garantía limitada por un año – en los Estados Unidos de América y Canadá
Plazo de garantía: Esta garantía de Recoton Mobile Electronics es válida por un año a partir de la
fecha de compra del primer comprador.
Personas Protegidas: Esta garantía tiene validez para el dueño original y los dueños subsiguientes
durante el período de garantía siempre que se pueda presentar prueba de la fecha de compra de un
representante autorizado de Jensen dondequiera que se requieran servicios cubiertos por la garantía.
Cobertura de la Garantía: Salvo especificación contraria, esta garantía cubre todos los desperfectos
de material y de mano de obra del producto. A continuación se detalla lo que no está cubierto por la
garantía: daños producidos debidos a accidentes, uso inapropiado, abuso, negligencia, modificación
del producto, instalación incorrecta, voltaje inadecuado, reparaciones no autorizadas o errores por no
haber seguido las instrucciones provistas junto al producto, daños ocurridos durante el envío (los
reclamos deben presentarse al transportista), eliminación de estática o interferencias eléctricas,
cualquier producto comprado fuera de los Estados Unidos de América en el cual se haya modificado,
borrado o removido el número de serie.
Cómo conseguir el servicio: Por favor ponerse en contacto con Jensen al teléfono 1-800-323-4815.
Le daremos el nombre y dirección de una casa autorizada por Jensen para realizar reparaciones o le
aconsejaremos que envíe el producto a un centro de fabricación.
Si se requiere el envío del producto, se deberá empaquetarlo en forma adecuada. Siempre se deberá
incluir la factura original con la fecha de compra junto al producto como prueba de la cobertura de
garantía.
Costos Cubiertos: El fabricante pagará los costos de mano de obra y de material que se requieran
para la reparación del producto, pero el comprador se hará cargo de los costos de mano de obra
necesarios para desmontar y/o instalar el producto. Si el producto es enviado para servicios cubiertos
por la garantía, el comprador debe pagar los costos iniciales del envío pero Jensen se hará cargo de
los costos de envío al comprador si el producto es devuelto desde una dirección de los EE.UU. o
Canadá.
Exclusión de Ciertos Daños: La responsabilidad de Jensen se limita a la reparación y reemplazo del
producto, según su propia decisión, por cualquier artículo defectuoso y no incluye daño económico o
incidental de cualquier naturaleza.
Algunos estados y/o provincias no permiten limitaciones de la garantía en cuanto a la duración de la
garantía y/o no permiten la exclusión o limitación sobre daños emergentes o incidentales, de modo
que las limitaciones previamente indicadas pueden no aplicarse en su caso.
Esta garantía le otorga un derecho específico y usted puede ejercer otros derechos que varían
conforme al estado o provincia de su residencia.
Recoton Mobile Electronics, Inc.
1090 Emma Oaks Trail
Lake Mary, FL 32746
1-800-323-0221
www.jensen.com
© 2002 Recoton
20
 Loading...