

Page 1
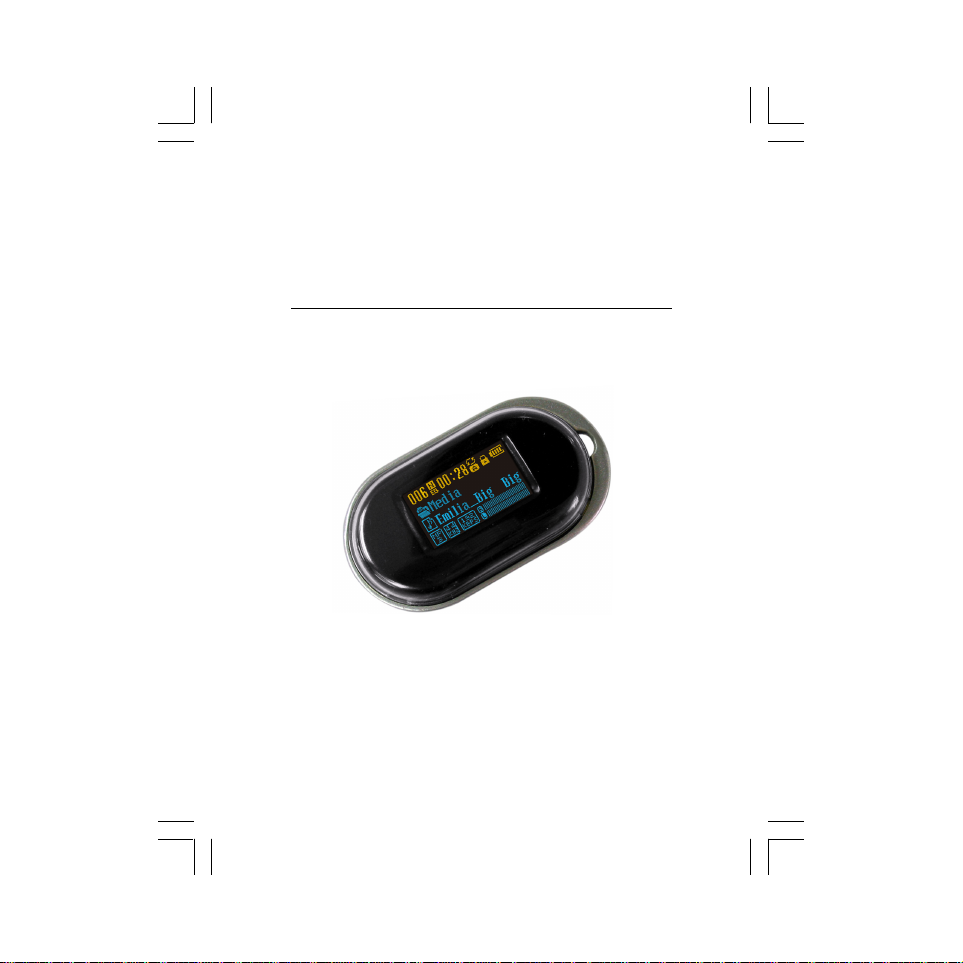
User’s Manual
MP3/WMA DIGITAL AUDIO PLAYER
Thank you for purchasing our products.
Before using the unit, please read this manual carefully
to obtain the best performance from your unit and
retain it for future reference.
Page 2

C
C
THIS DEVICE COMPLIES WITH PART 15 OF THE FCC RULES.
OPERATION IS SUBJECT T O THE FOLLOWING TWO CONDITIONS:
(1) THIS DEVICE MAY NOT CAUSE HARMFUL INTERFERENCE, AND
(2) THIS DEVICE MUST ACCEPT ANY INTERFERENCE RECEIVED,
INCLUDING INTERFERENCE THAT MAY CAUSE UNDESIRED
OPERATION.
Note: This equipment has been tested and found to comply with the
limits for a Class B digital device, pursuant to Part 15 of the FCC
Rules. These limits are designed to provide reasonable protection
against harmful interference in a residential installation. This equipment
generates, uses, and can radiate radio frequency energy and, if not
installed and used in accordance with the instructions, may cause
harmful interference to radio communications. However, there is no
guarantee that interference will not occur in a particular installation. If
this equipment does cause harmful interference to radio or television
reception, which can be determined by turning the equipment off and
on, the user is encouraged to try to correct the interference by one or
more of the following measures:
-Reorient or relocate the receiving antenna.
-Increase the separation between the equipment and receiver.
-Connect the equipment into an outlet that is on a circuit
different from the one the receiver is connected.
-Consult the dealer or an experienced radio/TV technician
for help.
Warnings: Changes or modifications to this unit not expressly
approved by the party responsible for compliance could void the
user authority to operate the equipment.
THIS CLASS B DIGITAL APPARATUS COMPLIES WITH CANADIAN
ICES-003.
- I -
Page 3

T ABLE OF CONTENTS
WARNING & CAUTIONS ...................................................................1
NAMES OF EACH PART ...................................................................2
CHARGING THE BATTERY ................................................................4
DISPLAY .......................................................................................6
GETTING STARTED ........................................................................7
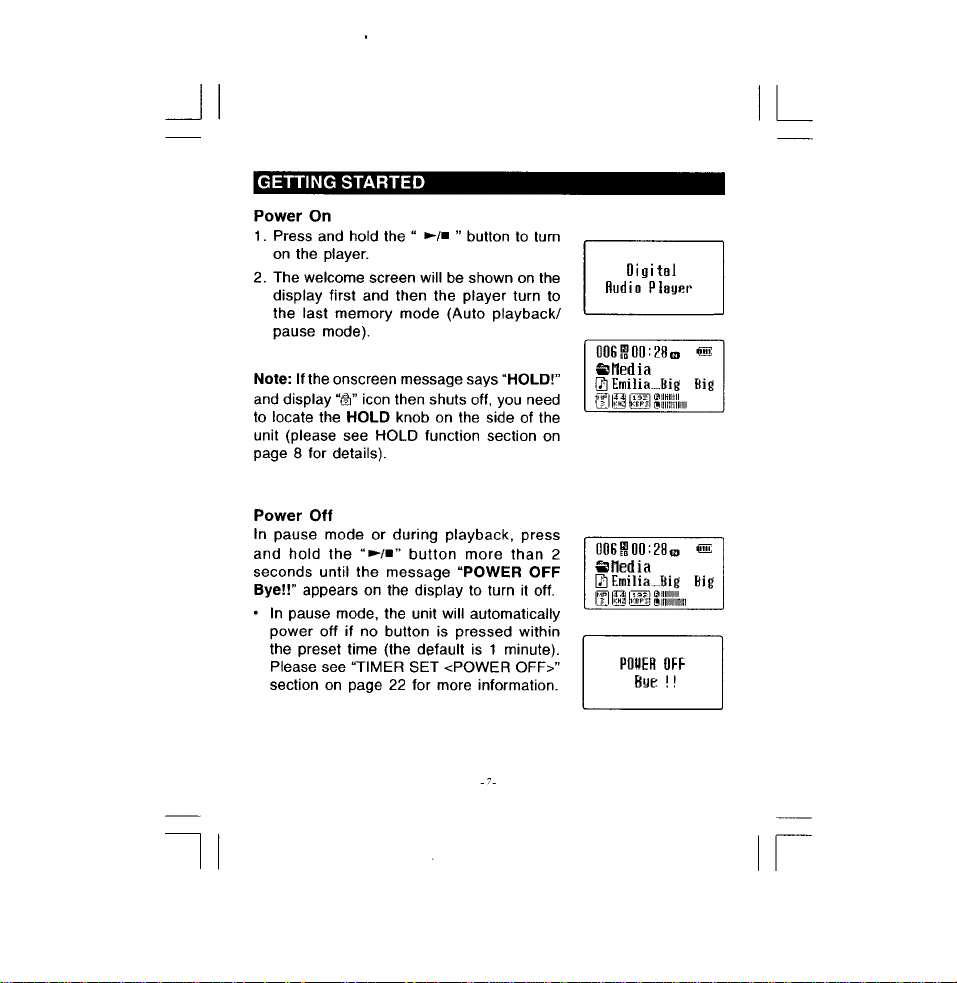
POWER ON ................................................................................7
POWER OFF ..............................................................................7
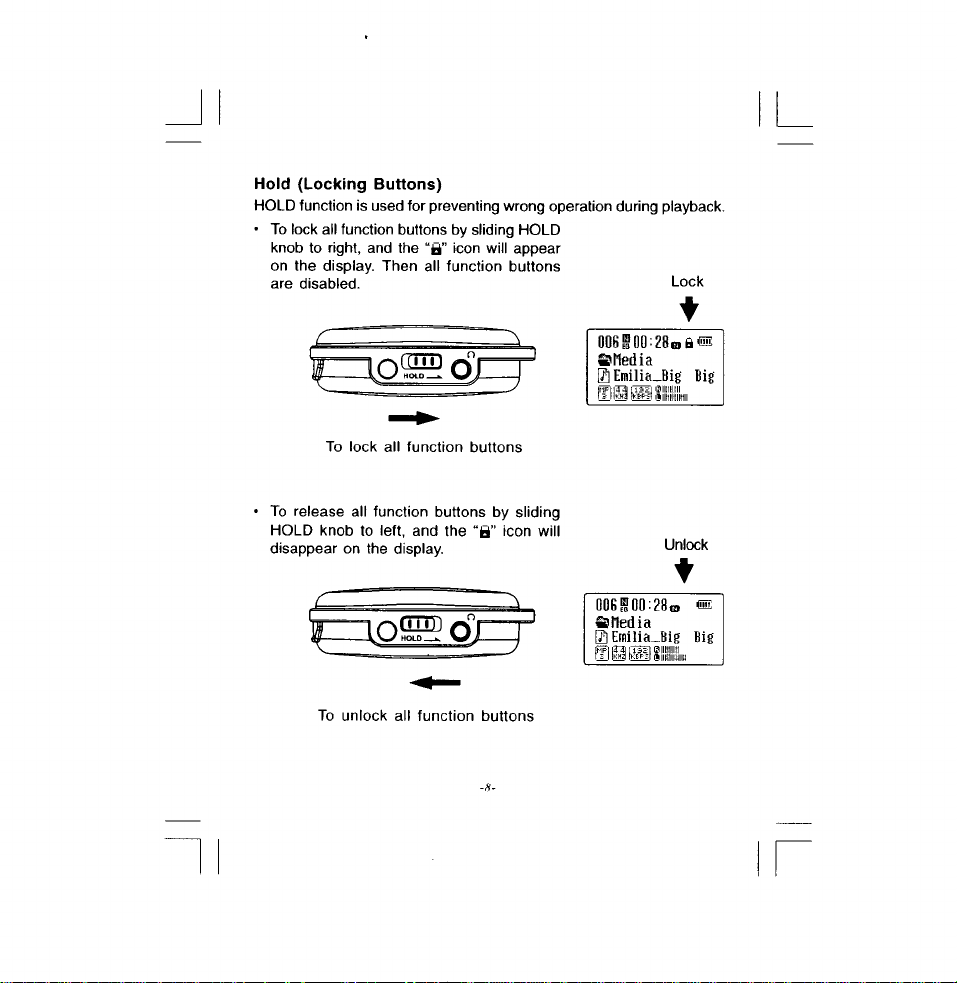
HOLD (LOCKING THE BUTTONS) ...................................................8
PLA YING MUSIC FILES ......................................................................9
MAIN MENU OVERVIEW ................................................................11
NAVIGATION...................................................................................12
ARTISTS ......................................................................................12
ALBUMS ......................................................................................13
TRACKS .......................................................................................13
FAVORITES .................................................................................14
NEW MUSICS ...........................................................................15
GENRES .....................................................................................16
YEARS ....................................................................................16
PLAYLISTS ...............................................................................17
FOLDERS ...................................................................................17
PLAY SET ....................................................................................17
SET EQ. ...................................................................................18
SET USER EQ .........................................................................18
PLAY MODE .............................................................................19
RETURN .....................................................................................21
- II -
Page 4

TIMER SET....................................................................................21
POWER OFF...............................................................................22
SLEEP TIME...............................................................................22
RETURN...................................................................................22
GENERAL SET...............................................................................23
LCD CONTRAST.........................................................................23
USB MODE SET..........................................................................23
FREE MEMORY.........................................................................24
FACTORY RESET.........................................................................24
BACK LIGHT ...............................................................................25
LANGUAGE ...............................................................................25
DELETE ONE ...............................................................................26
QUICK FORMAT ...........................................................................26
ABOUT......................................................................................27
RETURN...................................................................................27
EXIT...................................................................................................27
USB DRIVER INSTALLATION (forWindows 98 only).....................28
USING IN PC.....................................................................................31
Using Y our MP3 Player without Windows Media Player 10...............31
Using Your MP3 Player with Windows Media Player 10.................32
Synchronize Tracks to the MP3 Player...........................................33
Creating a Playlist......................................................................35
Deleting Tracks of the Playlist from your MP3 Player..................38
Disconnecting the Player from your Computer............................39
TROUBLE SHOOTING GUIDE......................................................40
SPECIFICATIONS............................................................................41
- III -
Page 5
WARNING & CAUTIONS
WARNING: TO PREVENT FIRE OR SHOCK HAZARD, DO NOT
EXPOSE THE UNIT TO RAIN OR MOISTURE.
TO A VOID ELECTRICAL SHOCK, DO NOT OPEN THE
CABINET.
REFER SERVICING TO QUALIFIED PERSONNEL
ONLY.
Cautions
• All the safety and operating instructions should be read before
the unit is operated.
• Do not expose the product to direct sunlight or any source of
heat for a long period.
• Do not pull the accessory wires (earphone & USB cord) with
excessive force.
• The unit should not be used near water - for example, near a
bathtub, washbowl, kitchen sink, laundry tub, in a wet basement,
or near a swimming pool, etc.
• Do not use volatile chemicals on this unit. Clean by lightly wiping
with a soft cloth.
• Do not attempt to service the appliance.
Refer servicing to qualified personnel.
-1-
Page 6
NAMES OF EACH PART
Front View
1
2
3
4
Rear View
8
9
10
5
6
7
11
12
-2-
Page 7
F.F Button
1
Press the “” lightly/repeatedly:
To locate the beginning of the next tracks.
Keep the “” depressed:
To go ahead at high speed.
REW Button
2
Press the “” lightly/repeatedly:
To locate the beginning of the current track or previous tracks.
Keep the “” depressed:
To go back at high speed.
3
MINI USB Port
For connecting to your PC with the supplied USB cord.
Display
4
To display current status.
5
MENU Button
Press this button to enter main menu or return to the previous
screen in any setting mode.
PLAY/STOP Button
6
Press and hold the “ ” button to begin playing.
Press the “ ” button to pause. Press it again to resume.
/
Press and hold the “ ” button to stop during playback.
Strip Mount
7
/
/
For buckling the supplied strip.
HOLD Knob
8
To lock the buttons.
RESET Hole
9
For resetting the player.
VOLUME - Button
10
To decrease the volume.
11
PHONES Jack
For connecting the headphones/earphones.
VOLUME + Button
12
To increase the volume.
-3-
Page 8
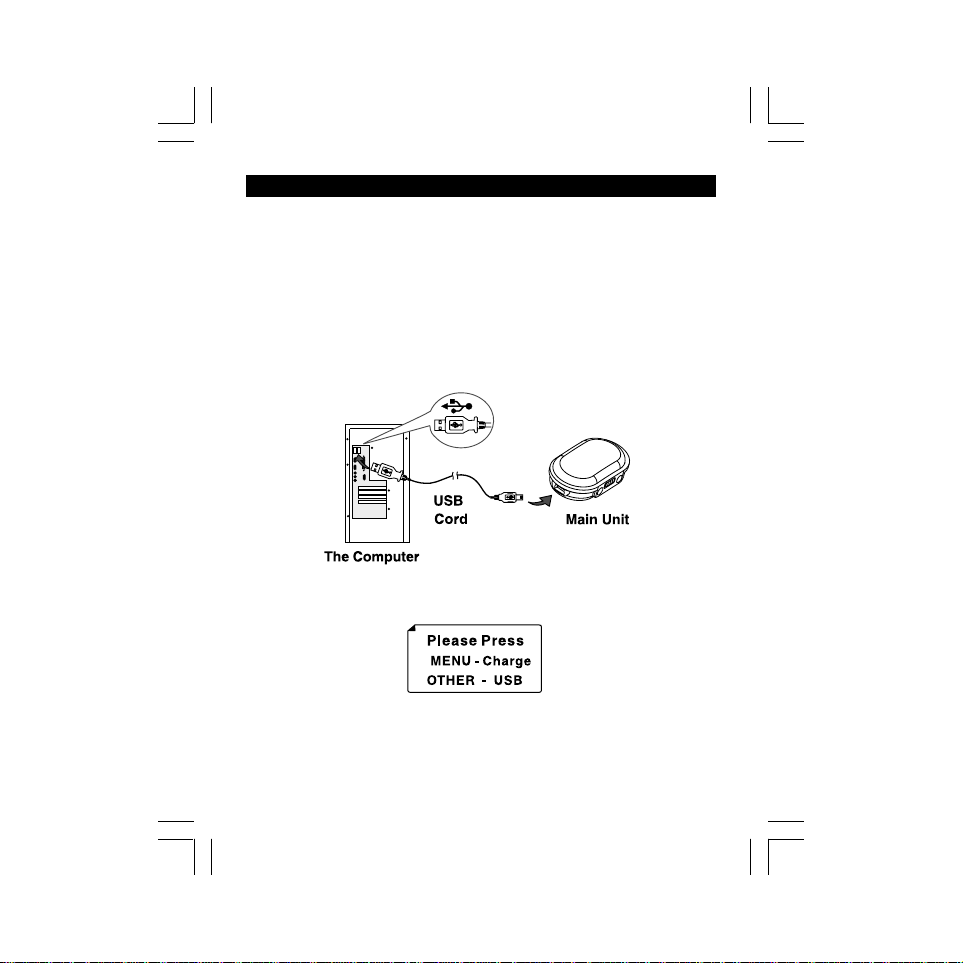
CHARGING THE BATTERY
The MP3 player has a built-in, non-user-replaceable, rechargeable
battery.
Connecting to a Computer and Charging the Battery
1. Turn on your computer.
2. Connect the unit to your computer via the supplied USB cord.
• Connect the small connector of the USB cord to the MINI USB
port of the unit.
• Connect the large connector of the USB cord to the USB port of
the computer.
3. Press the “M” button (MENU) to charge the battery according to
the notice message on the unit screen as below:
• If you press other buttons (except the “M” button), the unit will
turn to USB mode.
• If no button is pressed within 30 seconds, it will turn to USB
mode automatically.
-4-
Page 9
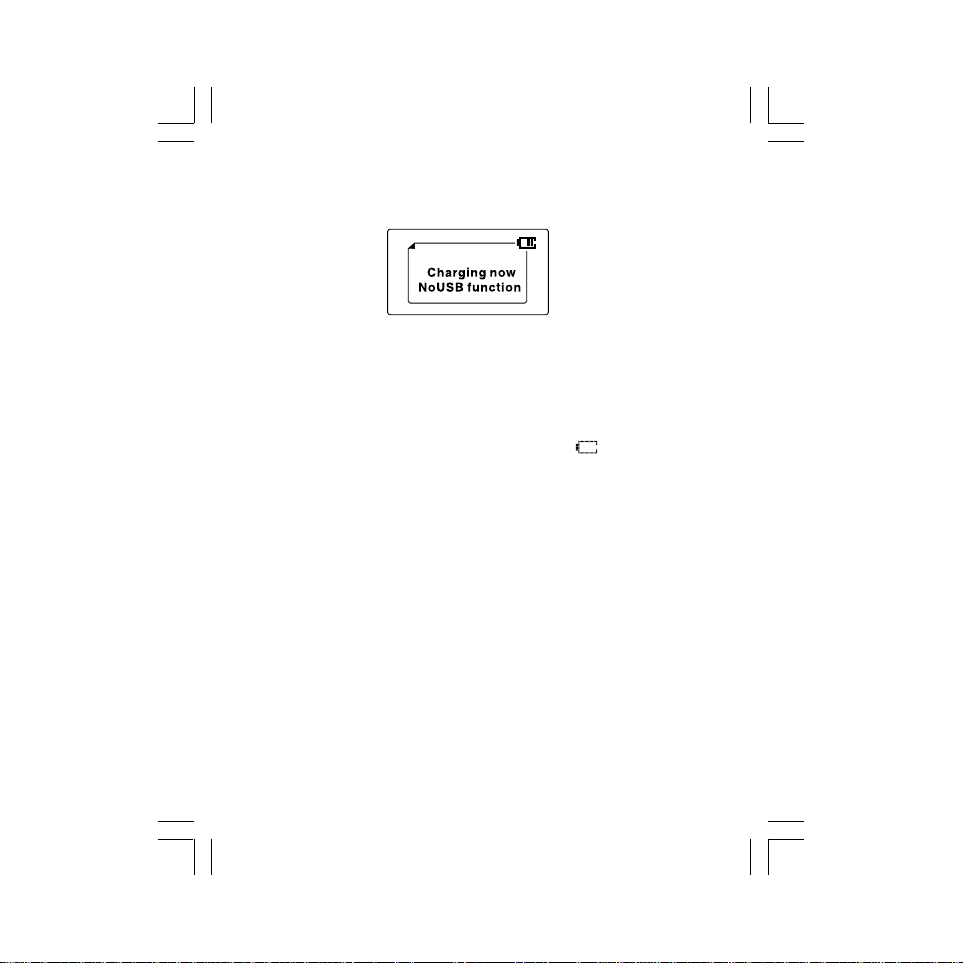
4. The charging begins when the “Charging now No USB function”
appears on the unit screen.
• To install the Windows98 USB driver, please see page 28.
• To use the unit in your computer, please see page 31.
Notes:
• When the built-in battery voltage level is low, “ ” will flash on the
screen of the player.
• Playback will automatically come to a stop when the built-in battery
has no more power. Please recharge it.
• If the built-in battery is fully charged, the charging process will
automatically terminate and the “Battery Full” appears on the screen
of the player.
• The built-in battery recharge time is approximately 2-3 hours.
Important Note
If the notice message “No Space For DB Please Delete More
Than 4.0MB” always appears on the display, it means that it is not
enough space free. Please delete more than 4MB songs from the
unit.
-5-
Page 10
Page 11
Page 12
Page 13
Page 14
Page 15

Page 16

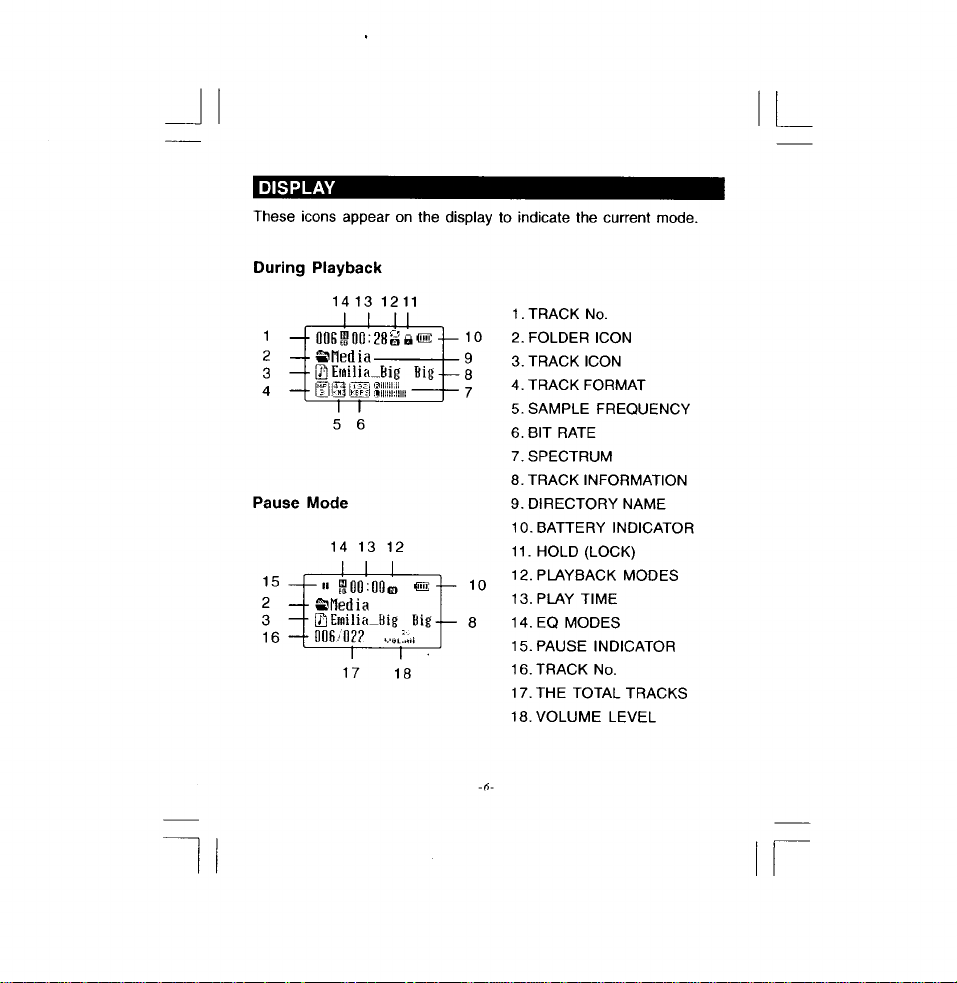
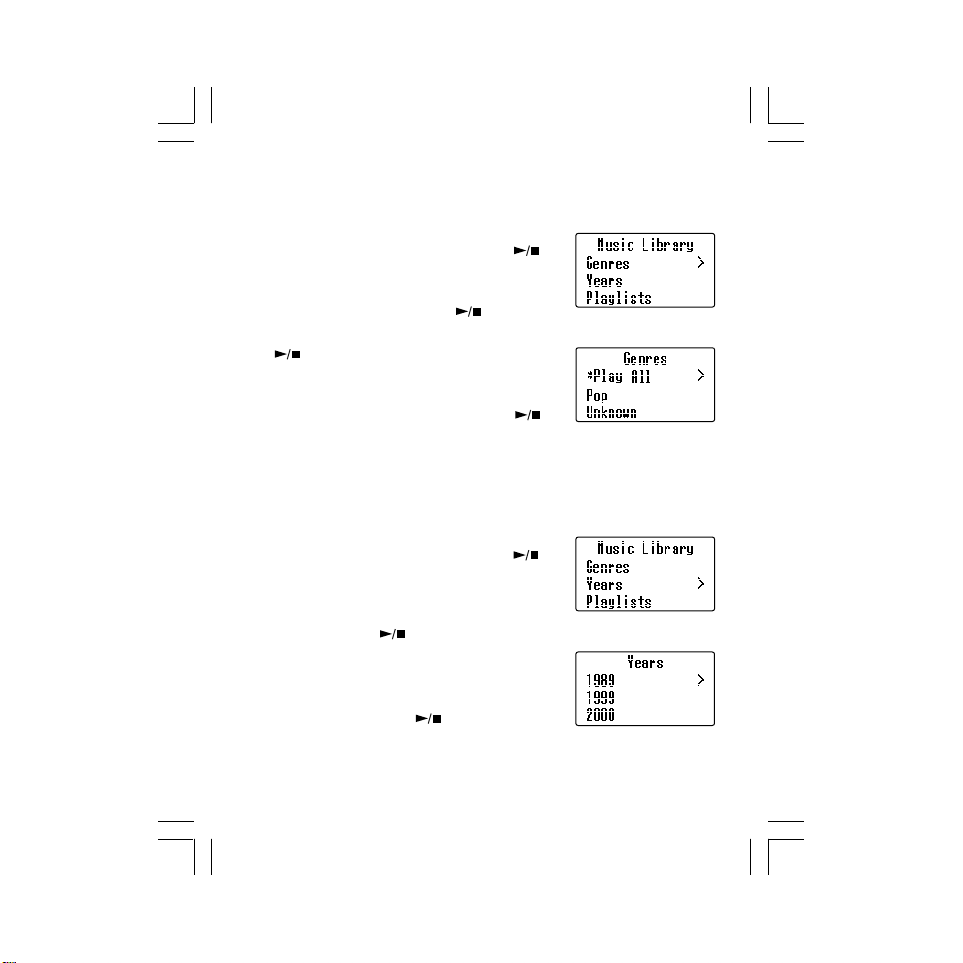
NA VIGA TION
In main menu, press the “” or “” button to select the NAVIGATION
item and then press the “ ” button to enter the Music Library. The
following example illustrates steps to search and play songs in the
Music Library.
• Nine searching methods are available to you: Artists, Albums,
Tracks, Favorites, New Musics, Genres, Years, Playlists or
Folders.
• After transferring the musics to the player, the system will sort them
automatically according to the searching methods.
• Play All means that all tracks of the current folder will be played.
• Press the “M” button in a sub-menu to go back to the previous
menu.
Artists
• To search a track via the artists.
1. In the Music Library menu, press the “”
or “” button to select the Artists item
and then press the “ ” button.
2. Press the “” or “” button to select an
artist name and then press the “ ”
button.
3. Select the Play All option and press the
“ ” button to play all tracks of the artist.
Or,
4. Press the “” or “” button to select other
options and then press the “ ” button.
-12-
Page 17

Albums
• To search a track via the albums.
1. In the Music Library menu, press the “”
or “” button to select the Albums item
and then press the “ ” button.
2. Press “” or “” button to select an album
and then press the “ ” button.
3. Press the “” or “” button to select a
track and press the “ ” button to start
playing.
Or,
4. Select the Play All option to play all tracks
of the album.
Tracks
• To search a track via the tracks.
1. In the Music Library menu, press the “”
or “” button to select the Tracks item and
then press the “ ” button.
2. Press the “” or “” button to select a
track and press the “ ” button to start
playing.
Or,
3. Select the Play All option to play all tracks
of the Tracks folder.
-13-
Page 18

Favorites
• To listen to your favorite songs.
• User can select favorite musics and add them to Favorites or
delete them from it.
Add Tracks to Favorites
1. Go into the Music Library menu to search
your favorite music.
2. Select a favorite track, press and hold the
“M” button, then it will pop up a dialog box
as right figure.
3. Press the “” or “” button to select “Add
To Favorite” or “EXIT” option.
4 .Select “Add To Favorite” and press the
“ ” button to confirm.
• This track is stored into Favorites.
5. Or select “EXIT” and press the “ ”
button to exit.
Delete Tracks from Favorites
1. Go into the favorites screen and select a
track.
2. Press and hold the “M” button and it will
pop up a dialog box as right figure.
3. Press the “” or “” button to select
“DELETE” or “EXIT” option.
4. Select “DELETE” and press the “ ”
button to confirm.
• This track is deleted from Favorites.
5. Or select “EXIT” and press the “ ”
button to exit.
-14-
Page 19

Play your Favorite Music
1. Go into the favorites screen and select a
track by pressing the “” or “” button.
2. Press the “ ” button to start playing.
Or,
3. Select the Play All option to play all tracks
of the favorites folder.
New Musics
• To search a track via the new musics.
1. In the Music Library menu, press the “”
or “” button to select the New Musics
item and then press the “ ” button.
2. Press the “” or “” button to select 1Day,
1Week or 1Month and press the “ ”
button.
3. Press the “ ” or “” button to select a
track and press the “ ” button to start
playing. Or,
4. Select the Play All option to play all tracks
of the folder.
Note:In the 1Day, 1Week & 1Month folder, it will display 20 latest
tracks.
-15-
Page 20
Genres
• To search a track via the genres.
1. Press the “” or “” button to select the
Genres item and then press the “ ”
button.
2. Press the “ ” or “” button to select a
genre and then press the “ ” button.
3. Select the Play All option and press the
“ ” button to play all tracks of the genre
folder. Or,
4. Press the “ ” or “” button to select
another option and then press the “ ”
button.
Years
• To search a track via the years.
1. Press the “” or “” button to select the
Years item and then press the “ ”
button.
2. Press the “” or “” button to select an
option (such as, 1989,1999 or 2000) and
then press the “ ” button.
3. Select the Play All option to play all tracks
of the year folder. Or,
4. Press the “ ” or “” button to select a
track, then press the “ ” button to start
playing.
-16-
Page 21

Playlists
• To search a track via the playlists.
1. Press the “” or “” button to select the
Playlists item, then press the “ ”
button.
2. Press the “” or “” button to select an
option, then press the “ ” button.
3. Press the “ ” or “” button to select a
track, then press the “ ” button to start
playing.
Note:Please refer to page 35 for details about
how to create playlists.
Folders
• To search a track via the folders.
1. Go into the Music Library menu and press
the “” or “” button to select the Folders
item, then press the “ ” button.
2. Press the “” or “” button to select a
folder or a track and press the “ ”
button to confirm.
-17-
Page 22

Page 23

Page 24

Page 25
Page 26

Page 27

Page 28
Page 29

Page 30

Page 31

ABOUT
In GENERAL SET mode, press the “” or “ ” button to select
ABOUT and then press the “ ” button to read the version
information.
RETURN
In GENERAL SET mode, press the “” or “” button to select
RETURN and then press the “ ” button to return to previous
menu.
EXIT
In main menu mode, press the “” or “” button to select EXIT and
then press the “ ” button to exit the main menu.
-27-
Page 32

USB DRIVER INSTALLA TION (for Windows 98 only)
When connecting the unit to your PC (Windows 98 OS) for the first
time, the USB mass storage function will not be activated without
driver installation. Please use the installation CD to install the driver
and follow the two kinds of installation methods below.
Method One:
1. Insert the supplied installation CD into the CD-ROM drive first.
2. Read the readme file of the installation CD.
3. Double Click “77xinst”, then Restart Computer.
Method Two:
1. Insert the supplied installation CD into the CD-ROM driver and
connect the unit to your PC via the supplied USB cord.
Note: Do not select the charging battery mode after connecting the
unit to your PC. Please see page 4 for details.
2. If the player is recognized by your PC, the “Add New Hardware
Wizard” is activated, and click “Next”.
-28-
Page 33
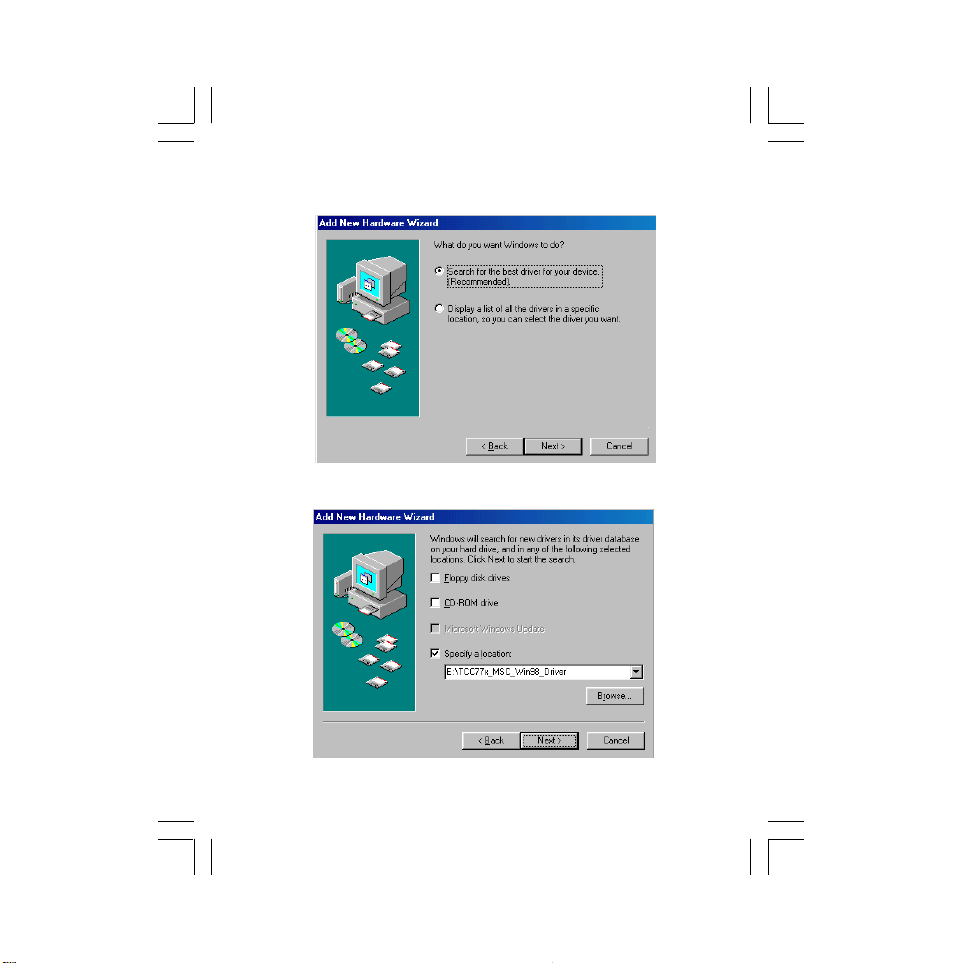
3. Select “Search for the best driver for your device (Recommended)”.
Click “Next”.
4. Select “Specify a location:” and click “Next”.
-29-
Page 34
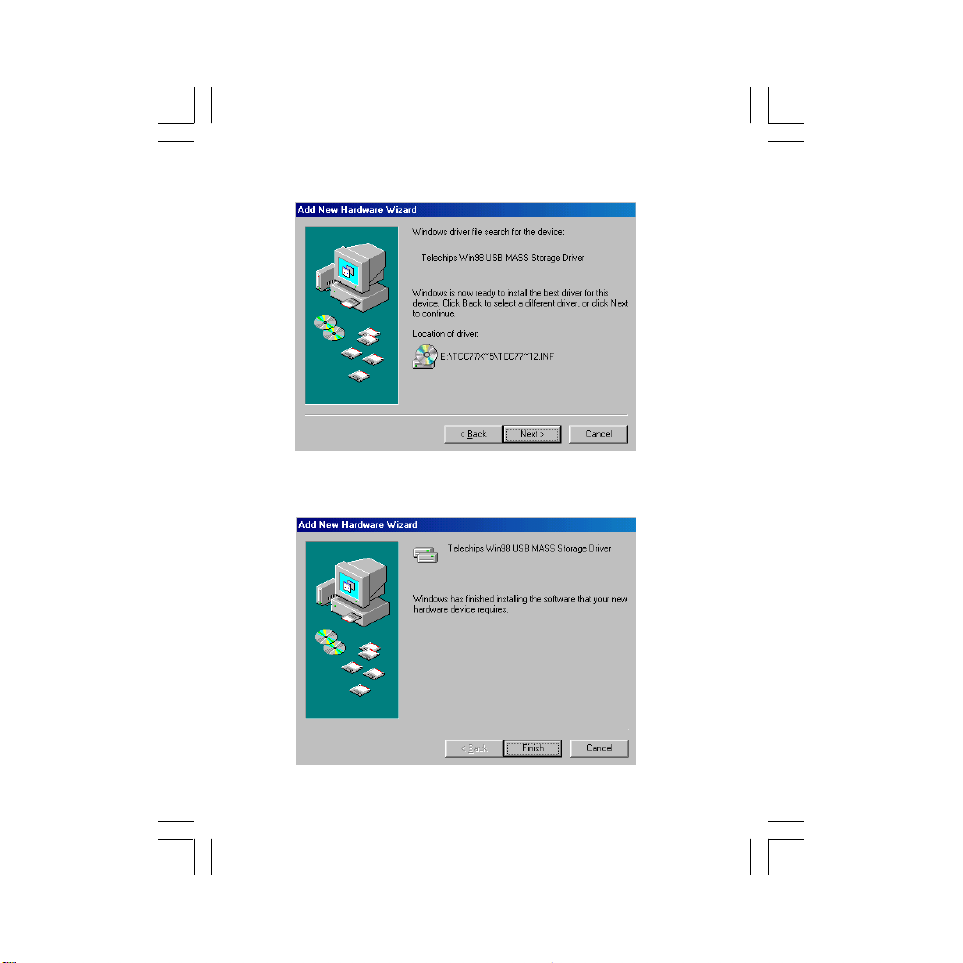
5. USB driver file is found. Click “Next”.
6. USB driver installation is completed, click “Finish” and restart your
computer.
-30-
Page 35

USING IN PC
No Driver is required for Windows Me/2000/XP Operating System.
They will detect the Audio Player automatically after the connection
with the USB port is established.
Note:Do not select the charging battery mode after connecting the
unit to your PC. Please see page 4 for details.
This player supports MSC (Mass Storage Class) and MTP (Media
Transfer Protocol) USB modes, Please see page 23 for setting
USB mode.
MSC devices can act as removable hard drives for storage of
important files and information.
MTP is REQUIRED with the Player if you want to purchase/subscribe/
rent music content in Windows XP (above version SP1) from your
favorite music provider. It is used to validate the licenses of existing
music files as well as new music files you may have purchased from
online sources.
Using your MP3 Player without Windows Media Player 10
It is unnecessary to set USB mode if you are running the Windows
98/ME/2000/XP without Windows Media Player10. After connecting
the player to PC, the player will be recognized as the USB Mass
Storage Device.
1. Use the supplied USB cord to connect the
unit to your PC.
2. Open Windows Explorer and an additional
drive will be listed as “Removable Disk”. (In
Windows Me/2000/XP, the icon appears
on the bottom of the desktop.)
3. Transferring files to the Player (in MSC mode)
a) From Windows Explorer, highlight all files or folders you want to
transfer and copy to the “Removable Disk” drive.
-31-
Page 36

b) Once all files/folders appear on the “Removable Disk” drive, the
transferring is complete. (In MSC mode, you can not view files
under the MTP mode in your computer.)
Note: The device is capable of transferring files at hi-speed mode of
USB 2.0. If USB 2.0 port is available on your computer, use it to
connect to your device. The device is still compatible with the older
USB 1.1 ports. However, you will not be able to take full advantage
of the potential speed increase.
Using your MP3 Player with Windows Media Player 10
This player supports Digital Rights Management (DRM) to enable
networked devices to access content acquired from a host of online
music services. Windows Media Player 10 and Windows XP (above
version SP1) PC are required for the device to properly function
when in MTP mode.
• You can download Windows Media Player 10 from Microsoft by
going to www.microsoft.com/windows/windowsmedia/download/
default.asp.
1. Set the USB mode to MTP (Media Transfer Protocol).
• If you set the USB mode to MSC, it will act as removable hard
drive for storage of the files.
2. Use the supplied USB cord to connect the
device to your PC.
3. Open Windows Explorer and an additional drive
will be listed as “MTP/JANUS Player”.
4. Open the drive and the “Data” & “Media” folders
appears.
Notes:
• Do not transfer media files to the Data folder, as the unit can not
recognize the media files of the Data folder.
• In MTP mode, you can not view files under the MSC mode.
-32-
Page 37
Do You Want to Buy Musics from an Online Service?
You may download musics from an online service (such as, Napster,
MusicNow). It is necessary to sign in to your account to perform
certain functions in the online service you selected.
You may visit http://www.microsoft.com/windows/windowsmedia/mp10/
onlinestrores.aspx for details. Below is an example for your reference.
1. Login to the online service (example, Napster).
2. Search for music on the online service.
3. Select the tracks you would like to download and click the
“download” button in the track list or right click and choose
download track(s).
4. The track(s) will begin downloading to your PC.
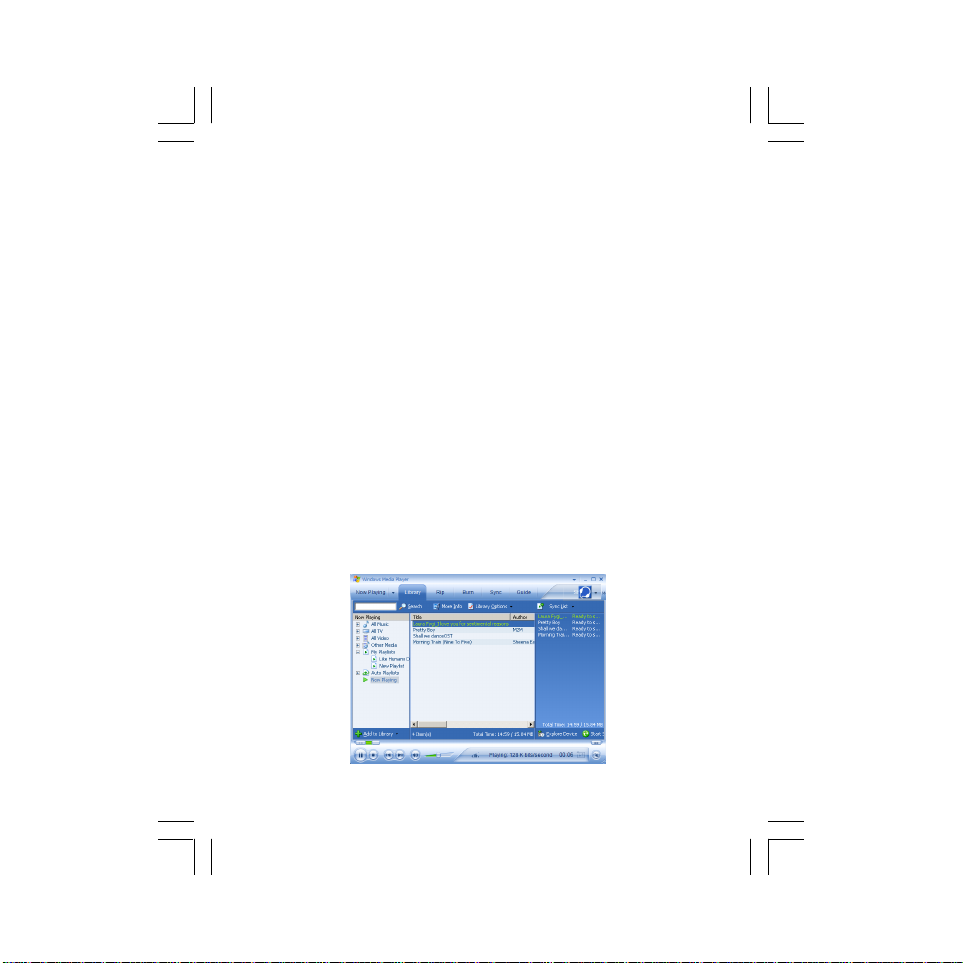
Synchronize tracks to the MP3 Player
1. Open Windows Media Player10.
a) Click the Library tab from the menu bar on the top of the
Windows Media Player screen.
b) All songs purchased from online services should be listed in
Windows Media Player Library.
-33-
Page 38

2. Locate a music in the Library and right-click on it. Select “Add to ->
Sync List”, then the song will be added to “Sync List”. Repeat and
add other songs.
3. In Windows Media Player, click Sync and the “Sync List” pane
appears. Then select the “MTP/JANUS Player” from the dropdown
list on the right side of this screen.
-34-
Page 39

4. Click “Start Sync” to transfer the musics. A progress indicator will
show each file transferring.
After transferring, the “Synchronized to Device (4 items)” message
appears. Total 4 songs are synchronized to the MP3 player.
Creating a Playlist
Playlists are a great way to control what you listen to on your player.
By creating a playlist you can mix any combination of songs you
want, and then enjoy them. Microsoft Windows Media Player 10
makes it easier than ever to create playlists.
You may visit http://www.microsoft.com/windows/windowsmedia/
mp10/newdesign.aspx for details about how to create a playlist.
Below is an example for your reference:
-35-
Page 40

1. In Windows Media Player, click Library and then, in the List pane,
click the List Name <example, Now Playing List> dropdown menu.
2. Select “New List -> Playlist” to build a new playlist.
-36-
Page 41

3. Drag items from the contents pane to the new playlist and then
click “Save Playlist As...”.
4. In the File Name box, type the playlist name. Once you save the
playlist, it’s added to the My Playlists category in the library. Then
you may click Sync Settings to choose a synchronization method
and the playlists you want to synchronize.
a. Click Synchronize device automatically and then,
b. Choose the option you created or other options from the list
pane.
c. Click “OK”. Then the tracks of this playlist will be transferred to
the Playlists folder of your MP3 player.
-37-
Page 42
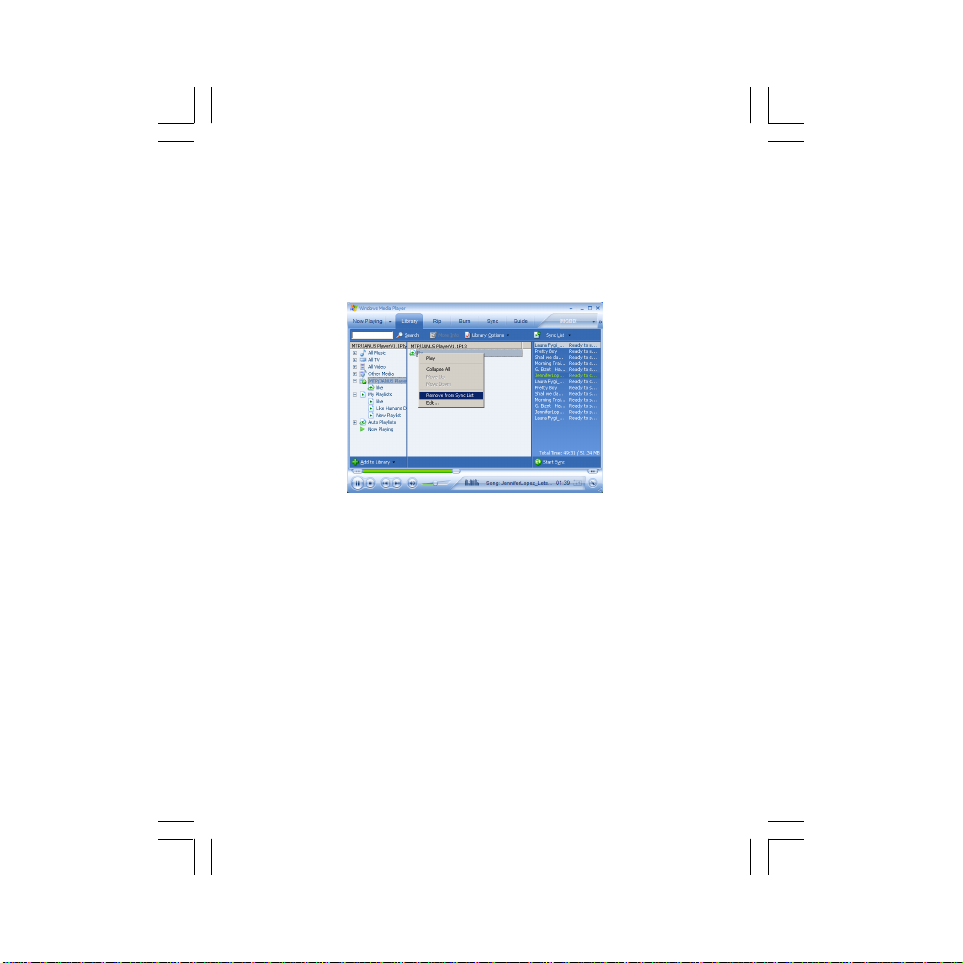
Deleting Tracks of the Playlist from your MP3 Player
1. In Windows Media Player, click the Library tab and the “MTP/
JANUS Player” in the folder tree.
2. Select a folder (like folder) from the device tree or select a track
from the folder. Right-click the folder/track and choose Remove
from Sync list.
3. Wait for the track to be deleted and disconnect your MP3 player
from your computer.
Note: After download musics online, the license of the musics will
take some space of the unit. Even if the musics are removed, the
license will still remain. It is recommended that the unit be formatted
periodically.
-38-
Page 43

Disconnecting the Player from your Computer
— Windows 98:
After use, you can directly unplug the device and the “Removable
Disk” disappears on the screen of your computer.
— Windows XP with MTP mode
1) After use, you can directly unplug the device.
2) The “MTP/JANUS Player” disappears on the screen of your
computer.
— Windows Me/2000/XP(Such as Windows 2000):
1) Move the mouse to the icon on the bottom of the desktop,
and the “Unplug or Eject Hardware” message appears on the
display as below:
2) Click the icon and the “Stop USB Mass Storage Device”
message is shown as below:
3) Click the “Stop USB Mass Storage Device” message and pops
up the notice message as below:
4) Click “OK”, and then you can unplug the unit safely.
-39-
Page 44
TROUBLE SHOOTING GUIDE
Should any problem persists after you have made the following checks,
consult your nearest service facility.
The player cannot power on.
• Check if the built-in battery is discharged.
Charge the built-in battery.
The player does not work.
• Make sure the Hold knob is in the off position.
• Reset the Player via the RESET hole.
• Low level format (All files will be erased after formatting.)
a. Slide the HOLD knob to the ON position first.
b. Hold the “
No sound from the headsets.
• The headphones/earphones plug is not firmly connected to the
“ PHONES ” jack .
• Check if the volume level is 0. Adjust the “ VOLUME ” control.
The files cannot be played normally.
• Check if there are MP3 or WMA files on the player.
• Check if the audio files are corrupted.
Heavy noise
• Check if plug of the earphones is clean. Dirty plug may cause the
noise.
• Check the music file. If the file data is damaged, heavy noise or
skipping may result. Try another music file to confirm.
The device cannot appear on the computer as a drive.
• Check if the USB cable is correctly connected.
• Check the USB control in BIOS and ensure it is enabled.
If you have any questions, please contact dealer or refer servicing
to qualified personnel.
” button and then press the “ ” button.
-40-
Page 45
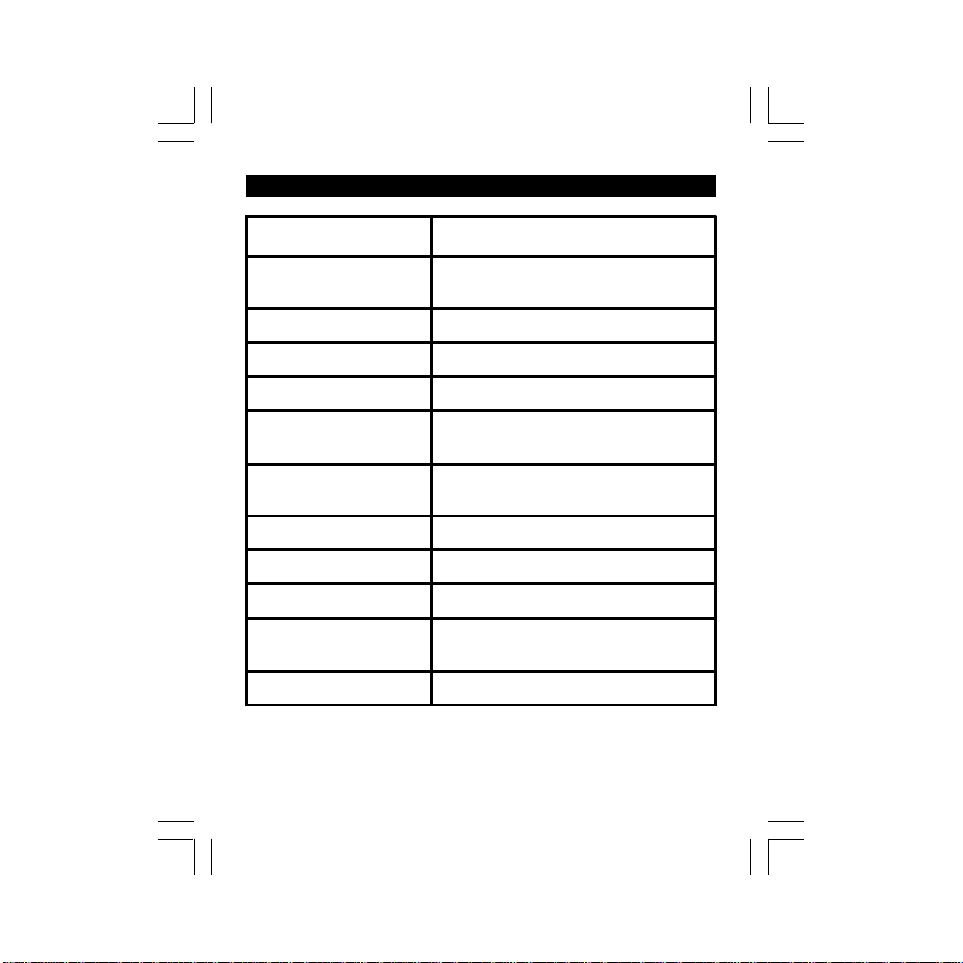
SPECIFICA TIONS
Item Specification
Memory
Fla s h Me mo ry
(128Mb/256Mb/512Mb/1G)
MPEG support MP3, WMA, WMA-DRM
Supported OS Win.98, Win.Me, Win.2000 & Win.XP
PC Interface Standard USB 2.0
Battery
Maximu m Outp u t
S/N Ratio 90dB ("A" filter)
Output Frequency 20Hz~20KHz
USB Interface
Dimensions
Weight Approx. 20g
Design and specifications are subject to change without notice!
Buil t-in Li thiu m-ion R e cha rgeabl e
Battery
2 x 7mW (32 )
(Output through E arphone)
Ω
MSC & MTP
Approx. 58mm x 34
(W x D x H)
-41-
mm x 15 mm
Page 46

-42-
Printed in China
811-331091-01 1
 Loading...