

Page 1
MMD102
10.2” LCD MIT KLAPPBAREM MONITOR
UND DVD PLAYER
10.2” LCD OVERHEAD MONITOR WITH DVD PLAYER
10.2” LCD MONITOR A SCOMPARSA CON LETTORE DVD
BEDIENUNGSANLEITUNG/GARANTIEURKUNDE
MANUAL/WARRANTY CARD
MANUALE PER L´UTENTE/CARTA DI GARANZIA
Page 2

3
35
66
Page 3

INDEX
- Wichtige Warn- und Sicherheitshinweise S. 4
- Technische Merkmale S. 6
- Bedienelemente und Anzeigen S. 6
- Beschreibung der Hauptfunktionen S. 7
- Fernbedienung S. 8
- Beschreibung der DVD-Funktionen S. 9
- Ein- und Ausschalten des MMD102 S. 13
- Bedienung S. 14
- Zubehör S. 18
- DVD-Grundlagen S. 19
- Grundeinstellungen und Anpassungen S. 20
- Wiedergabe von DVDs S. 27
- Wiedergabe von Audio-CDs S. 28
- Wiedergabe von MP3-Discs S. 30
- Fehlerbeseitigung S. 32
- Technische Daten S. 34
- Garantiebestimmungen, Garantiekarte S. 100
Page 4

Achtung
Ein LCD-Display bzw. Videomonitor, der im Sichtfeld des Fahrers im
Fahrzeuginnern angebracht wird, dient vorrangig zum Anzeigen von
Fahrzeugdaten, zur Systemsteuerung, zur Beobachtung des seitlichen
und rückwärtigen Verkehrs als auch zur Navigation. Soll zudem der
Empfang von Fernsehprogrammen oder das Abspielen von Videofilmen
oder DVDs ermöglicht werden, so muss das Display bzw. der Monitor so
geschaltet sein, dass diese Zusatzfunktion nur während des Parkens oder
bei angezogener Handbremse zur Verfügung steht.
Sofern ein LCD-Display oder Videomonitor auch während der Fahrt oder
bei nicht angezogener Handbremse für den Empfang von
Fernsehprogrammen sowie das Abspielen von Videokassetten bzw.
DVDs gedacht ist, muss das Gerät im Fahrzeuginnenraum an einer Stelle
angebracht werden, an der es die Sicht des Fahrers weder direkt noch
indirekt behindert.
W
arnhinweise
• Verwenden Sie zum Reinigen des Video-Monitors keine Lösungs- oder
Reinigungsmittel.
• Verwenden Sie keine Scheuermittel, da sie den Bildschirm verkratzen können.
Verwenden Sie zum Abreiben des Bildschirms ein leicht angefeuchtetes fusselfreies
Tuch.
• Klappen Sie den LCD-Bildschirm bei Nichtbenutzung vollständig ein, damit er fest
geschlossen ist.
• Stellen Sie die Kopfhörer vor dem Aufsetzen auf die niedrigste Lautstärke.
• Vergessen Sie nicht, die Deckenleuchten auszuschalten oder auf „automatisch“ zu
stellen, wenn Sie das Fahrzeug verlassen, da sich sonst die Fahrzeugbatterie entladen
kann.
• Drücken Sie nicht mit dem Finger auf den Bildschirm.
4
Page 5
5
Sicherheitsmaßnahmen
Aus Sicherheitsgründen sollten die Discs oder CDs nicht während des Fahrens gewechselt werden. Darüber hinaus sollten Kinder ihre Sicherheitsgurte nicht lösen, um die
Discs oder CDs zu wechseln oder sonstige Einstellungen oder Anpassungen am System
vorzunehmen. Systemeinstellungen oder -anpassungen können mit der Fernbedienung
vorgenommen werden, ohne dass die Sicherheitsgurte gelöst werden müssen. Viel
Spaß beim Audiovox-Unterhaltungssystem und vergessen Sie nicht, höchste Priorität
hat die Sicherheit der Fahrzeuginsassen.
Ländercode Angabe:
Ländercode-Angaben: Dieser Mobile DVD-Player berücksichtigt die
Ländercode-Angaben auf einer DVD. Stimmt der Ländercode der DVD nicht
mit dem Ländercode für diesen Mobile DVD-Player überein, kann das Gerät
die Disk nicht abspielen.
Batterie Entsorgung:
Bitte führen Sie das Gerät am Ende seiner Lebensdauer den zur
Verfügung stehenden Rückgabe- und Sammelsystemen zu.
Vielen Dank, dass Sie sich für den Audiovox Movies 2 Go MMD102 DVD-Player mit
klappbarem Video-Monitor entschieden haben. Der MMD102 wird Ihnen und Ihrer
Familie viele Jahre Freude bereiten und Sie unterwegs in den vollen Genuss der
Videounterhaltung bringen. Lesen Sie die folgenden Anweisungen bitte aufmerksam
durch, um sich mit dem Produkt vertraut zu machen und Ihr Gerät optimal zu nutzen.
Wichtiger Hinweis: Die Installationsoptionen können variieren. Studieren Sie
daher die jeweilige Bedienungsanleitung zu jeder einzelnen Systemkomponente, um
sich mit deren Bedienung vertraut zu machen.
Page 6
6
Technische Merkmale
• 10.2” Zoll Active Matrix TFT/LCD-Monitor mit DVD-Player
• Bildschirmmenü (OSD) für die Steuerung der Bildqualität und Funktionen
• Spielt DVD/CD/MP3
• IR-Sender für optionale IR-Köpfhörer
• Drei Audio/Video-Signaleingänge (AV1, AUX, DVD)
• IR-Weiterleitungssensor
• Deckenleuchten mit dreifachem Umschalter
• Automatische LCD Ein-/Abschaltung, wenn der Monitor eingeklappt ist/wird
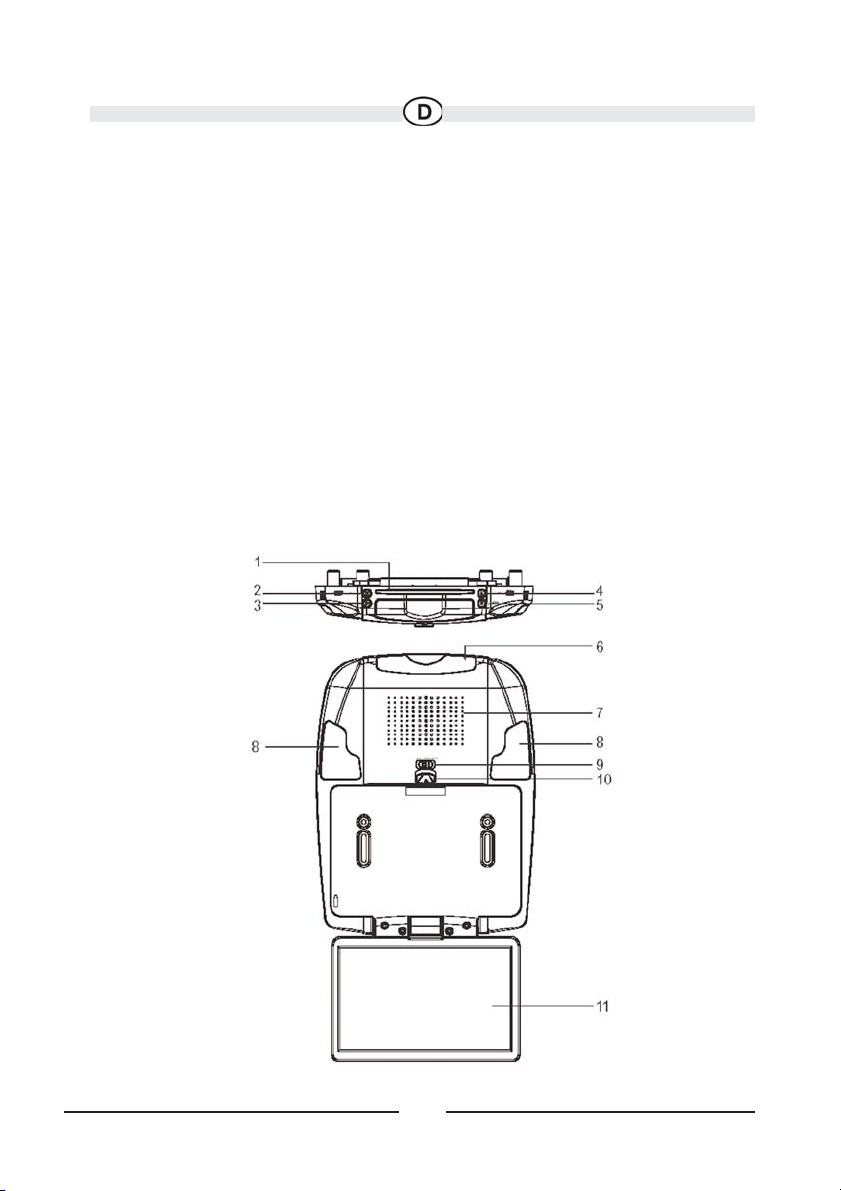
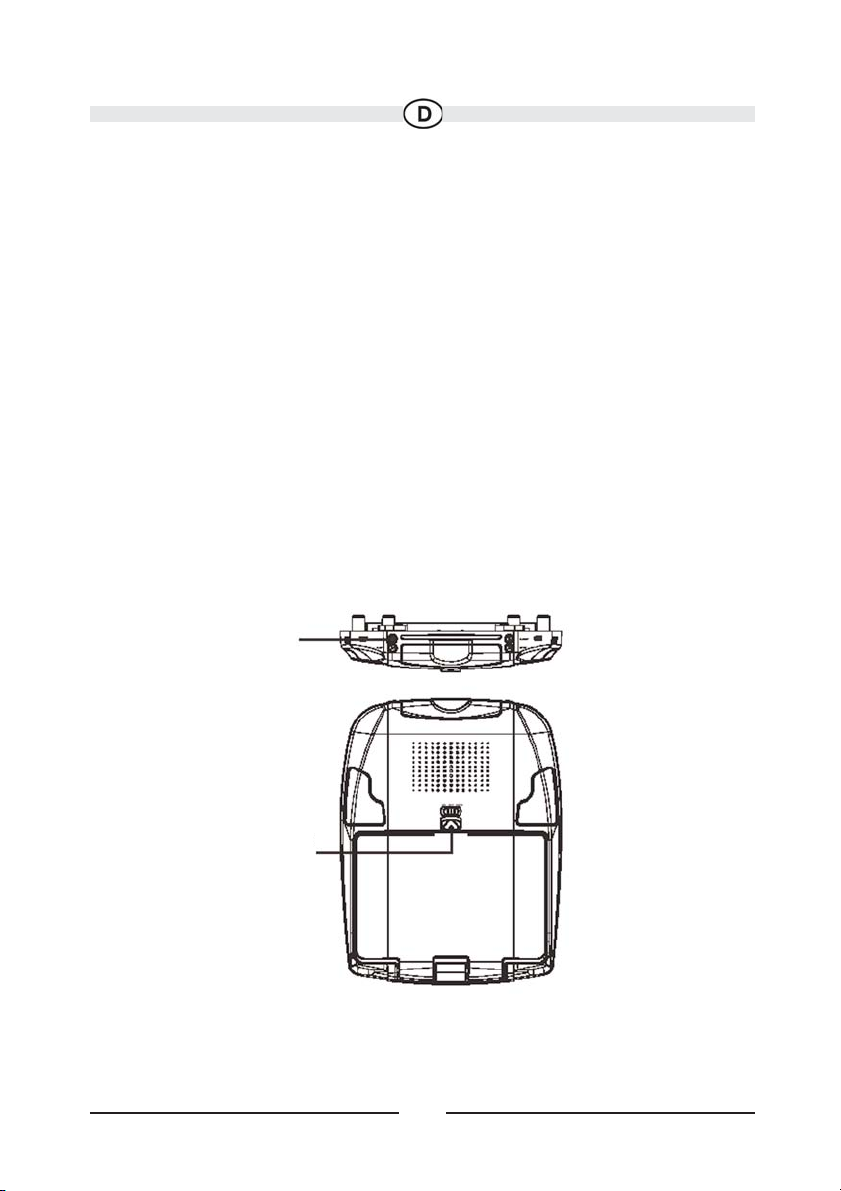
Bedienelemente und Anzeigen
Page 7

7
Beschreibung der Hauptfunktionen
1. DVD Ladeschacht – Disc laden.
2. POWER-Taste – Hellrot, wenn das System eingeschaltet ist. Schwach, wenn es
ausgeschaltet ist.
3. PLAY-Taste – Startet die Wiedergabe
4. EJECT-Taste – Wirft Discs aus dem Disc-Einschub aus.
5. STOP-Taste – Stoppt die Wiedergabe.
6. IR-Sender/Empfänger – Sendet Audio-Signale an kabellose Kopfhörer.
Ermöglicht ebenfalls, das MMD102-System mit der Fernbedienung zu betreiben und
anderes Zubehör im System zu steuern.
7. MMD102 Belüftungsöffnung
8. Deckenleuchten – Bietet eine zusätzliche Innenbeleuchtung.
9. Drei Positionen des Deckenleuchtenschalters
• Auto – Schaltet automatisch die Deckenleuchten zusammen mit der Innenbeleuchtung
des Fahrzeugs ein.
• Off – Schaltet die Deckenleuchten aus.
• On – Schaltet die Deckenleuchten ein.
10. Bildschirmverriegelung – In Pfeilrichtung bewegen, um den Bildschirm aufzuklappen.
11. LCD-Panel
Page 8
8
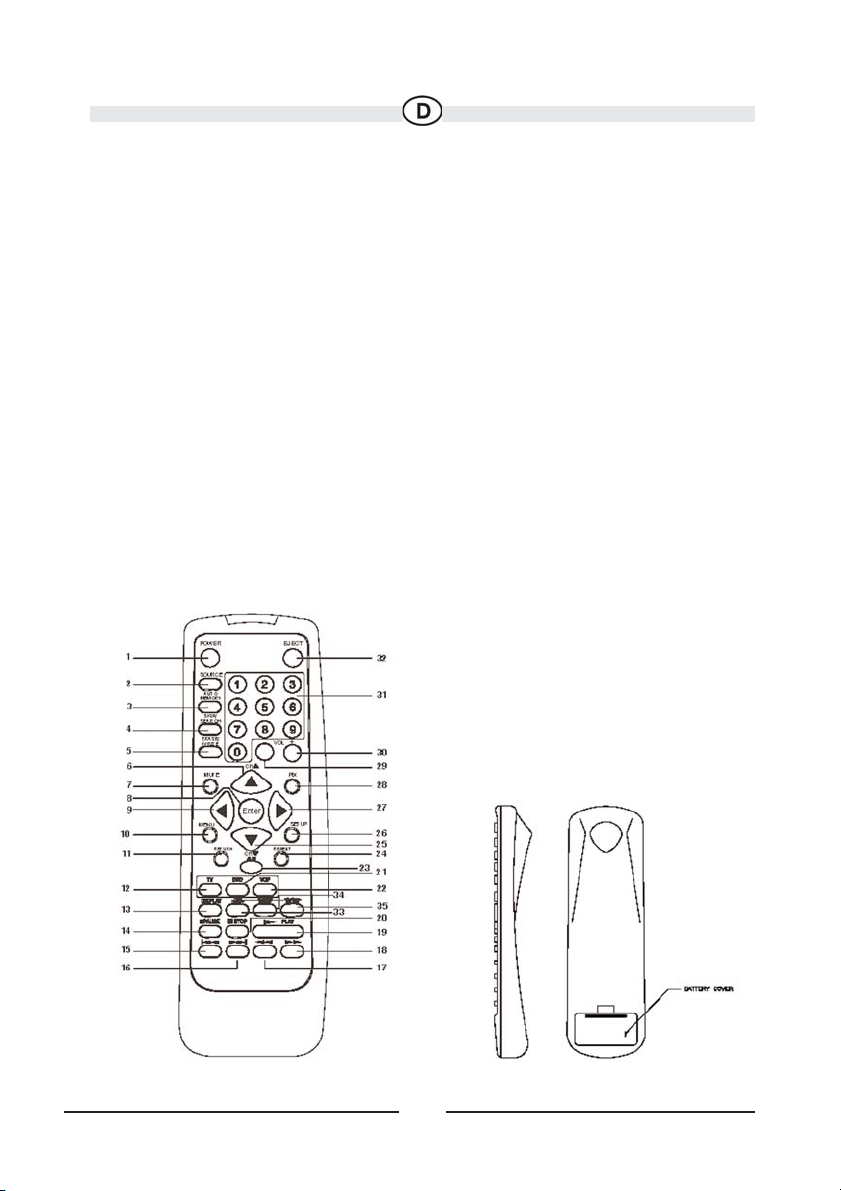
Fernbedienung
Einlegen der Batterien
Sie müssen zuerst die Batterien wie folgt einlegen, bevor Sie die Fernbedienung verwenden:
1) Drehen Sie die Oberseite der Fernbedienung nach unten. Entfernen Sie die
Batterieabdeckung mit dem Fingernagel.
2) Installieren Sie zwei „AAA”-Batterien (siehe Abbildung). Beachten Sie dabei die
richtige Polarität (+ oder -).
3) Richten Sie die Abdeckungszungen auf die Fernbedienung aus und drücken Sie auf
die Abdeckung, so dass sie einrastet.
Mit dieser Fernbedienung kann der MMD102 von Audiovox betrieben werden. Sie ist
jedoch keine Universalfernbedienung und kann daher nicht für Geräte anderer
Hersteller verwendet werden.
Page 9

9
Beschreibung der DVD-Funktionen
*Die Funktionen können auf dem Gerät und über die Fernbedienung gesteuert werden.
** Die Funktionen sind nicht belegt
1. POWER-Taste*
Drücken Sie auf diese Taste, um den MMD102 einzuschalten. Drücken Sie erneut auf
diese Taste, um den MMD102 auszuschalten.
2. Taste SOURCE
Wenn Sie auf diese Taste drücken, können Videosignale aus Videogeräten, die an
Audio-/Video-Eingänge angeschlossen sind, auf dem Monitor angezeigt werden. Mit
jedem Drücken der Taste wird die Quelle der Audio-/Video-Quelle gewechselt: DVD,
AV1 und AUX.
3. Taste AUTO MEMORY**
4. Taste SKIP/SEARCH**
5. Taste ERASE/WRITE**
6. CH-Taste ()**
7. Taste MUTE
Drücken Sie diese Taste, um den Ton stummzuschalten. Wenn Sie erneut auf die Taste
drücken, wird der Ton in der zuvor eingestellten Lautstärke wieder eingeschaltet.
8. Taste ENTER
Bestätigt die ausgewählte Einstellung.
9. Taste ()
Wechselt in den Menüoptionen nach links.
10. Taste MENU
Ruft das Hauptmenü auf oder das System Menü bei betätigen der TV und Menü Taste.
Page 10
10
11. Taste RETURN
Kehrt zum Menü zurück, während PBC eingeschaltet ist.
Hinweis: Diese Funktion wird nur bei VCD2.0 angeboten.
12. TV-Taste (Modusauswahl)
Schaltet bestimmte Funktionstasten auf der Fernbedienung für TV-Funktionen um.
13. Taste DISPLAY
Zeigt die aktuellen Informationen zur DVD-Disc an
Um den Titel und das Kapitel anzuzeigen, wählen Sie die Titel bzw.
das Kapitel mit den Pfeiltasten aus und drücken dann auf ENTER,
damit die Auswahl bestätigt wird.
Bei UNTERTITEL, AUDIO, BILDWINKEL, A-B-Status und REPEAT
drücken Sie wiederholt auf ENTER, um die Optionen zu wechseln.
Diese Optionen können von den einzelnen Discs abhängen.
14. Taste PAUSE (II)
Unterbricht die Wiedergabe.
15. Taste ()
Kehrt zum vorherigen Kapitel oder Track zurück.
16. Taste ()
Geht zum nächsten Kapitel oder Track.
Drücken der Taste Display Anzeige auf dem DVD-Player
Einmal
Zweimal
Dreimal
Viermal
Fünfmal
Sechsmal
Siebenmal
Aktueller Titel und aktuelles Kapitel
Aktueller Untertitel
Aktuelle Sprache und aktueller Kanal für Audioausgabe
Aktueller Winkel
Aktueller A-B-Status
Aktueller Wiederholungsstatus
Display wird ausgeschaltet
Page 11

11
17. Taste ()
Sucht rückwärts, 2-, 4-, 8-, 16 und 32-Mal schneller als die normale Geschwindigkeit.
18. Taste ()
Sucht vorwärts, 2-, 4-, 8-, 16 und 32-Mal schneller als die normale Geschwindigkeit.
19. Taste PLAY ()
Aktiviert den Wiedergabemodus, wenn eine Disc in den Disc-Einschub gelegt wird.
20. Taste STOP ()
Beendet die Wiedergabe der DVD-Disc.
21. DVD-Taste (Modusauswahl)
Schaltet bestimmte Funktionstasten auf der Fernbedienung für DVD-Funktionen um.
22. VCP-Taste (Modusauswahl)**
23. A-B
Wiederholt die Wiedergabe einer DVD oder CD von Punkt A zu Punkt B.
24. Taste REPEAT
Wiederholt verschiedene Positionen einer DVD, CD oder MP3.
25. Taste CH ()
Mit dieser Taste durchlaufen Sie die Kanalnummern und Menüoptionen in
Rückwärtsrichtung.
26. Taste SETUP
Wählt die Optionen des DVD-Players aus (Anzeige, Bildschirmmenüsprache (OSD),
Standardwerte, Jugendschutz, Passwort, SETUP-Menü verlassen).
27. Taste ()
Wechselt in den Menüoptionen nach rechts.
Page 12

12
28. Taste PIX (Bildauswahl)
Bei jedem Drücken dieser Taste werden auf dem Bildschirm „Einstellungsbalken” für die
Helligkeit, den Kontrast, die Farbe angezeigt. Wenn der gewünschte Einstellungsbalken
angezeigt wird, drücken Sie auf die VOLUME UP/DOWN-Tasten, um die Einstellung
vorzunehmen. Wenn innerhalb von 6 Sekunden keine Einstellung erfolgt oder keine
andere Taste gedrückt wird, wird die Anzeige automatisch ausgeblendet.
29. VOL-Taste (-)
Drücken Sie auf diese Taste, um die Lautstärke der Kopfhörer leiser zu stellen. Diese
Taste wird auch verwendet, um das Bild im Bildauswahlmodus einzustellen.
30. VOL-Taste (+)
Drücken Sie auf diese Taste, um die Lautstärke der Kopfhörer lauter zu stellen. Diese
Taste wird auch verwendet, um das Bild im Bildauswahlmodus einzustellen.
Hinweis: Mit diesen Tasten lässt sich nicht die Lautstärke kabelloser Kopfhörer einstellen. Wenn Sie diese Geräte verwenden, muss die Lautstärke über die
Lautstärkeneinstellung der kabellosen Kopfhörer oder des Radios eingestellt werden.
31. Nummerntasten
Dient zur Eingabe der Zahlen 0 bis 9, um CD-Tracks oder DVD-Kapitel auszuwählen
und das Passwort einzustellen.
32. EJECT (
) Taste*
Wirft die Disc aus dem Disc-Einschub aus.
33. FM Transmitter ON/OFF-Taste**
34. SOURCE SELECT Taste**
35. Taste CHANNEL SELECT**
Page 13
13
Ein- und Ausschalten des MMD102
1. Wenn Sie die Bildschirmverriegelung nach vorne schieben, wird der LCD-Bildschirm
entriegelt und klappt aus. Klappen Sie den Bildschirm so weit nach unten, bis ein komfortabler Sichtwinkel eingestellt ist. Durch die Reibarretierung wird die
Bildschirmposition während der Benutzung gehalten.
2. Wenn die Ein/Aus-Taste auf dem Gerät oder der Fernbedienung gedrückt wird, wird
das System ein bzw. ausgeschaltet. Während der Benutzung werden die
Bedienelemente durch die interne Hintergrundbeleuchtung beleuchtet.
3. Wenn das Gerät eingeschaltet ist und ein Bild angezeigt wird, drehen Sie den
Bildschirm, um den Sichtwinkel nachzustellen und eine bessere Bildqualität zu erhalten.
4. Vergessen Sie nicht, das Gerät bei Nichtbenutzung abzuschalten und den LCDBildschirm wieder zu verriegeln.
Ein/Ausschalter
Monitor
Ver-/Entriegelung
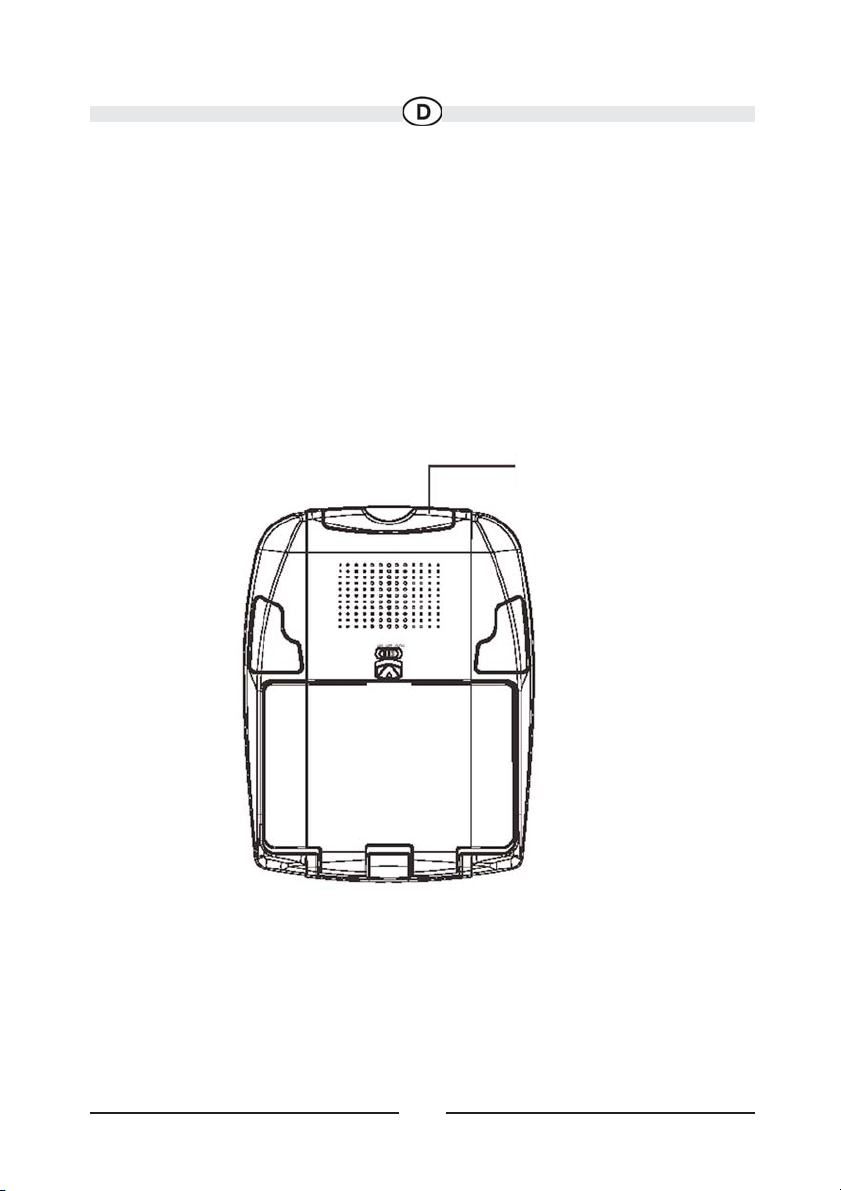
Page 14

14
Bedienung
Deckenleuchten
Die im MMD102 integrierten Leuchten werden über einem Lichtschalter mit drei
Positionen gesteuert. Wenn der Schalter auf die Position Ein (ON) gestellt wird, werden
die Leuchten eingeschaltet. Die Schalterposition Aus (OFF) bewirkt, dass die
Deckenleuchten unabhängig von der Fahrzeug-Innenbeleuchtung ausgeschaltet
bleiben, wogegen die Schalterposition Auto dafür sorgt, dass die Leuchten zeitgleich
mit der Innenbeleuchtung ein- bzw. ausgeschaltet werden. Informationen zu den
Kabelanschlüssen finden Sie im Installationshandbuch. Verlassen Sie Ihr Fahrzeug
niemals für längere Zeit, ohne den Lichtschalter zuvor auszuschalten (Position Off).
Andernfalls könnte sich die Autobatterie entladen.
Deckenleuchtenschalter
Page 15
15
Fernbedienungssensor
Im MMD102 sind zwei IR-Sensoren eingebaut, die die von der Fernbedienung gesendeten Signale empfangen, so dass das Gerät einfach gesteuert werden kann, wenn die
Fernbedienung auf den Sensor gerichtet wird. Der MMD102 ist in der Lage
Fernbedienungssignale an angeschlossene Geräte weiterzuleiten. Der IR-Sensor kann
die Signale der Fernbedienungen nahezu aller Hersteller an der jeweiligen
Komponente empfangen, die an den Videoeingang 1 angeschlossen ist. Es muss jedoch
stets die mit der betreffenden Komponente mitgelieferte Fernbedienung verwendet werden.
Fernbedienungssensor/
IR-Sender
Page 16
16
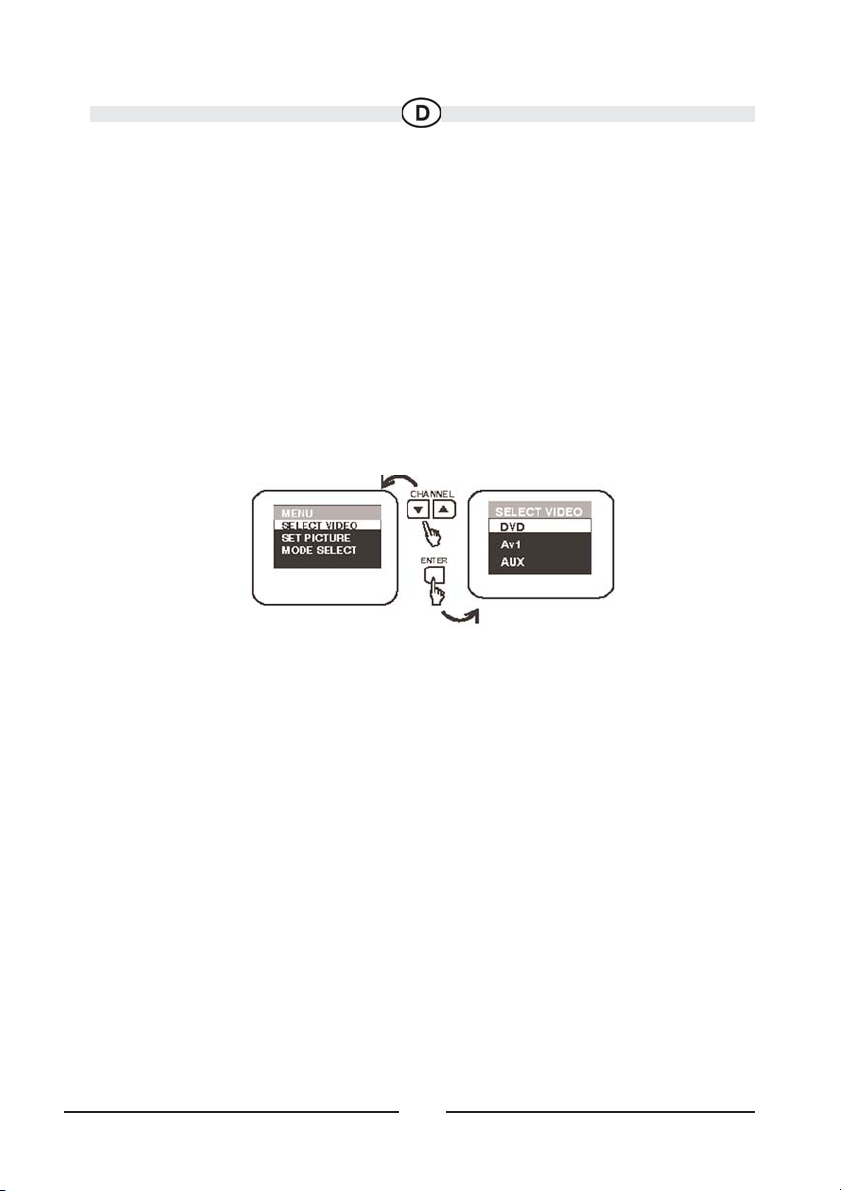
Videoquellen Auswahl
Sie können mittels der SOURCE Taste zwischen den 3 verschiedenen Eingangsquellen
auswählen. Durch Betätigung der SOURCE Taste auf der Fernbedienung können Sie die
Eingangsquellen in folgender Reihenfolge durchschalten: DVD, AV1 und AUX.
Die Eingangsquelle kann gleichfalls durch drücken der TV Taste und dann durch die
Menütaste umgeschaltet werden. Um die Quelle auszuwählen, markieren Sie SELECT
VIDEO und drücken Sie die ENTER Taste. Dann gelangen Sie in ein Untermenü in
welchem Sie durch die UP/ DOWN Taste die verschiedenen Quellen selektieren und
auswählen können (DVD, AV1 und AUX).
Verlassen des Menüs
Um das Menü zu verlassen/auszuschalten reicht es aus, wenn Sie die Menütaste auf
der Fernbedienung drücken.
Hinweis:
Das Menü erlischt automatisch nach einigen Sekunden wenn keinerlei Tasten betätigt
werden.
Wichtiger Hinweis:
Die Menü Funktion lässt sich nur einstellen, wenn vorher die TV Taste betätigt wurde!
Die Setup Funktion lässt sich nur einstellen, wenn vorher die DVD Taste betätigt wurde!
Page 17

17
BILDEINSTELLUNG
Beim Anschauen beliebiger Programme können Sie die Bildqualität entsprechend Ihren
Wünschen einstellen.
Wenn Sie hierfür auf die Taste TV und MENU drücken, erscheint auf dem Display das
Hauptmenü. Drücken Sie die Taste DOWN/UP um die Menüoption auszuwählen, für
die Sie die Einstellungen ändern möchten. Drücken Sie die Taste MENU erneut, um die
gewünschte Menüoption auszuwählen. Beispiel: Drücken Sie die Taste MENU wählen
Sie die Option SET PICTURE aus, und drücken Sie dann die Taste ENTER. Das Menü
PICTURE wird angezeigt. Wählen Sie BRIGHTNESS aus, und drücken Sie dann die
Taste ENTER. Drücken Sie dann die Taste DOWN/UP , um die gewünschte
Helligkeitsstufe einzustellen. Auf diese Funktionen können Sie auch zugreifen, indem
Sie mehrmals die Taste PIX auf der Fernbedienung drücken.
Beschr
eibung der Menüoptionen zum Einstellen der Bildqualität:
Menüoption Drücken Sie die Taste DOWN Drücken Sie die T
aste UP
HELLIGKEIT Helligkeit des Bilds reduzieren Helligkeit des Bilds erhöhen
KONTRAST Kontrast verringern, um weiche Kontrast erhöhen, um lebendige
Farben zu erzielen Farben zu erzielen
FARBTON Farbintensität verringern Farbintensität erhöhen
Um das Gerät auf die Werkseinstellungen zurückzusetzen, drücken Sie die Taste RESET
und anschließend die Taste ENTER. Alle Einstellungen bezüglich der Bildqualität werden auf die Werkseinstellungen zurückgesetzt.
Page 18
18
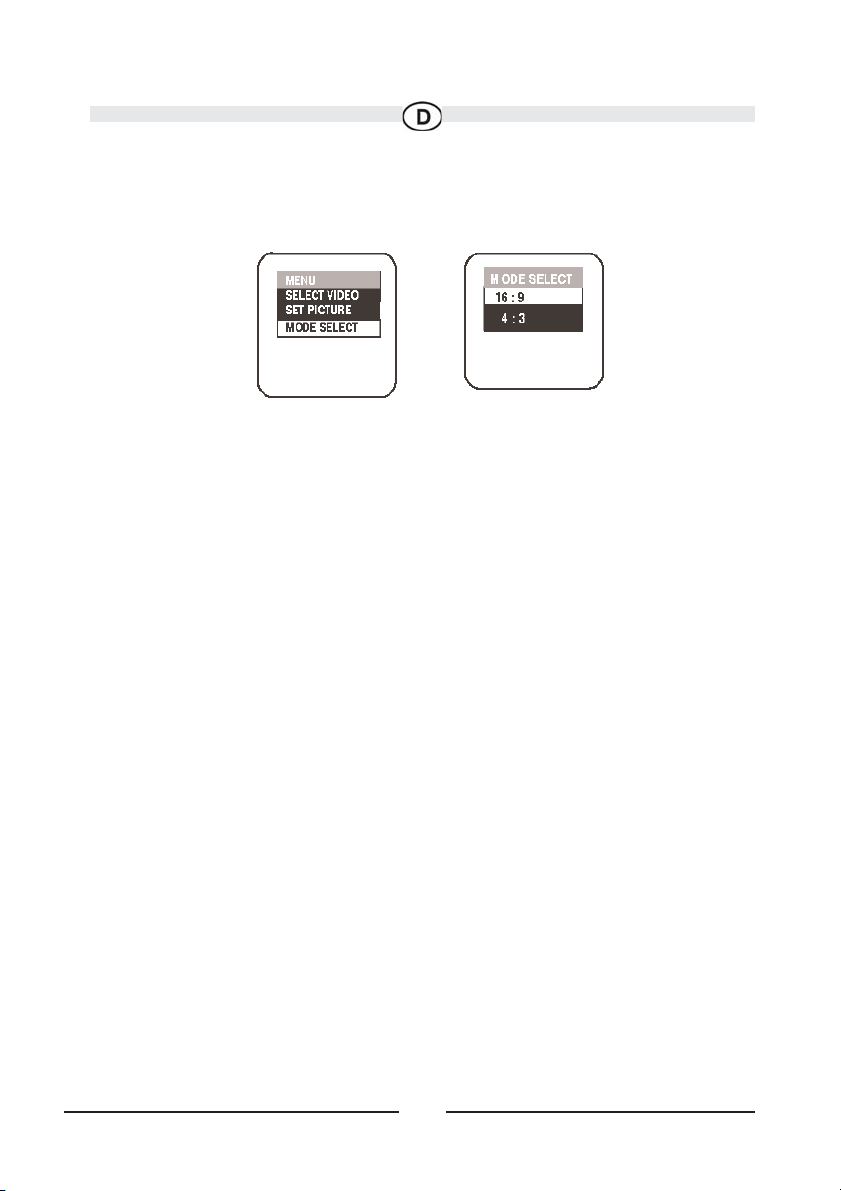
SCREEN MODE SELECT - Bildschirmmodus-Auswahl
Ändert das Anzeigeformat (Seitenverhältnis, 4:3 oder 16:9)
Wählen Sie zur Auswahl des Anzeigeformats die Option MODE SELECT aus, und
drücken Sie dann die Taste ENTER, um das Untermenü zu öffnen. Drücken Sie anschließend die Taste UP/DOWN, um das 16:9- oder das 4:3-Format auszuwählen. Drücken
Sie zur Bestätigung Ihrer Auswahl die Taste ENTER.
Zubehör
AV1-/AUX Eingang
An die Video-Eingänge können Videorecorder (VCP), Spielekonsolen oder andere
Audio-/Video-Geräte angeschlossen werden. Um die A/V-Eingänge zu aktivieren,
schalten Sie den MMD102 ein und drücken die SOURCE-Taste auf dem Gerät oder auf
der Fernbedienung, bis auf dem Bildschirm „AV1 oder AUX“ angezeigt wird. Schalten
Sie die Videoquelle mittels Ein/Aus-Taste oder per Fernbedienung ein. Der MMD102
kann nun die Audio- und Videosignale der an den AV1 oder AUX-Eingang angeschlossenen Quelle wiedergeben.
Auf diese Funktionen können Sie auch zugreifen, indem Sie mehrmals die Taste
SOURCE auf der Fernbedienung drücken.
* Hinweis: Um eine zweite Videoquelle an den MMD102 anschließen zu können, ist
u. U. ein Zusatzkabel erforderlich.
Page 19

19
DVD - Grundlagen
Lesen Sie diesen Abschnitt vollständig durch, um die DVD-Funktion optimal nutzen zu
können.
Regionaler Code
Sowohl DVD-Player als auch die DVD-Discs sind nach Regionen codiert. Diese regionalen Codes müssen für die fehlerfreie Wiedergabe übereinstimmen. Andernfalls kann
eine Disc nicht abgespielt werden. Der Code für dieses Geräts lautet „Region 2“.
Andere regionale Codes können mit diesem Gerät nicht wiedergegeben werden. In
dem Fall zeigt das Gerät “WRONG REGION” an.
Von Ihrem DVD-Gerät akzeptierte Disc-Formate
• DVD Discs – DVD-Discs mit Videobildern bzw. -filmen.
• Audio-Discs – Audio-CDs, die ausschließlich Musik bzw. Tonsignale enthalten.
• MP3-Discs – eine Disc, die Audiodateien enthält (beispielsweise eine CD-R mit heruntergeladenen MP3-Dateien).
Einlegen und Wiedergeben von Discs
Stellen Sie sicher, dass die Disc mit dem Player kompatibel ist, bevor sie eingelegt wird.
Hinweis: Folgende Discs KÖNNEN NICHT mit diesem Player wiedergegeben werden:
• MiniDisc
• Laserdisc
• CD-I, CD-ROM, DVD-ROM
Disc einlegen und wiedergeben
Drücken Sie auf die POWER-Taste, um das Gerät einzuschalten. Wählen Sie den DVDModus aus und legen Sie die Disc (mit dem Etikett nach oben) in den Disc-Einschub ein.
SPEICHER-POSITION
Das Gerät speichert die letzte Wiedergabeposition. Bei Ausschalten der Stromzufuhr
wird diese Funktion deaktiviert.
Hinweis:
Diese Funktion is nur möglich auf DVD, VCD and Audio CD.
Page 20
20
Grundeinstellungen und Anpassungen
In diesem Kapitel wird erklärt, wie Grundeinstellungen und Anpassungen mit dem
SETUP-Menü vorgenommen werden.
Verwenden des Setup-Menüs
Im SETUP-Menü können Sie das Gerät konfigurieren, die Bildqualität anpassen und die
verschiedenen Ausgänge einstellen.
Darüber hinaus können Sie die Sprache der Bildschirmmenüs (OSD) und des SETUPMenüs einstellen und die Wiedergabe für Kinder bzw. Jugendliche einschränken.
1) Drücken Sie auf die SETUP-Taste, um das SETUP-Menü auf dem Bildschirm anzuzeigen.
2) Wählen Sie die gewünschte Hauptoption mit den Pfeiltasten () und drücken Sie
anschließend auf die Taste ENTER.
Schließen des Setup-Menüs
Drücken Sie die Taste SETUP erneut, oder wählen Sie das Symbol “ “ aus, und bestätigen Sie Ihre Auswahl dann, indem Sie die Taste ENTER drücken.
Systemeinstellungen
Audio Einstellungen
Passwort Einstellungen
Präferenzen Menü
Verlassen des Menüs
Page 21
21
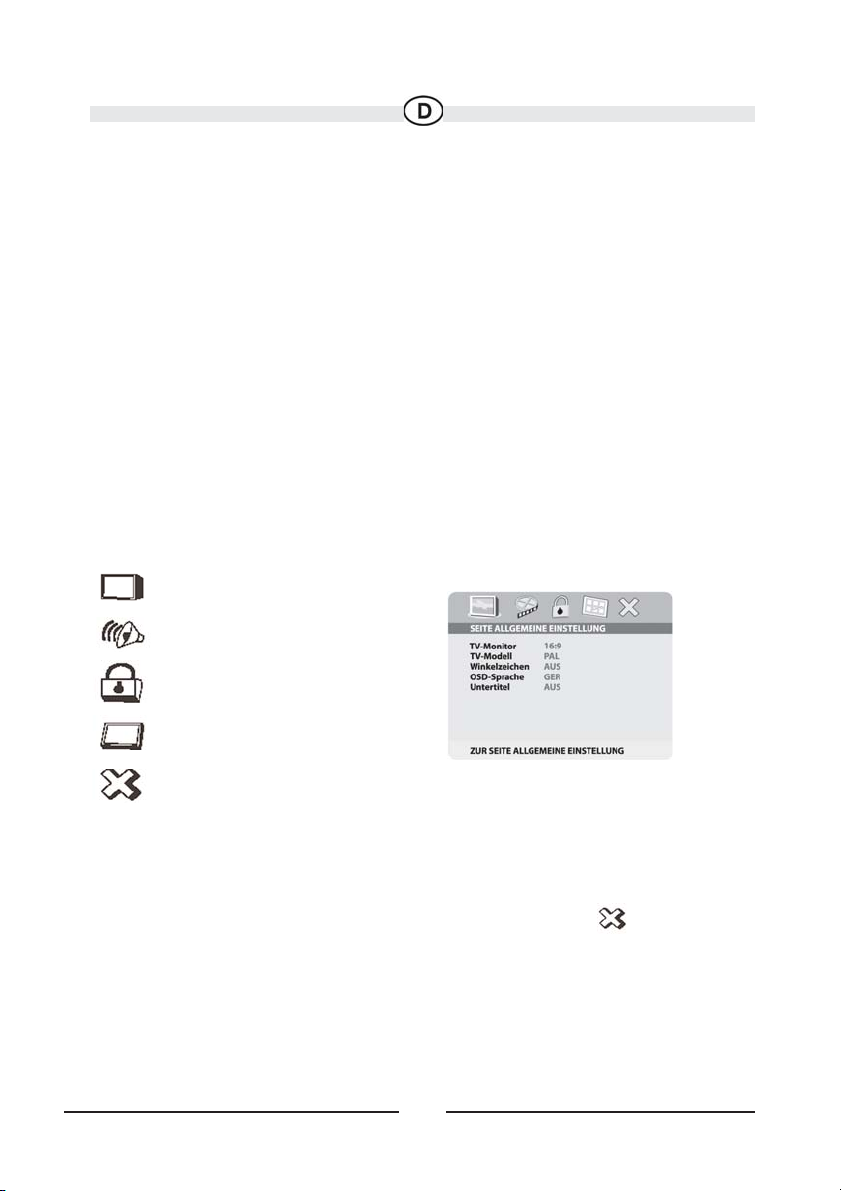
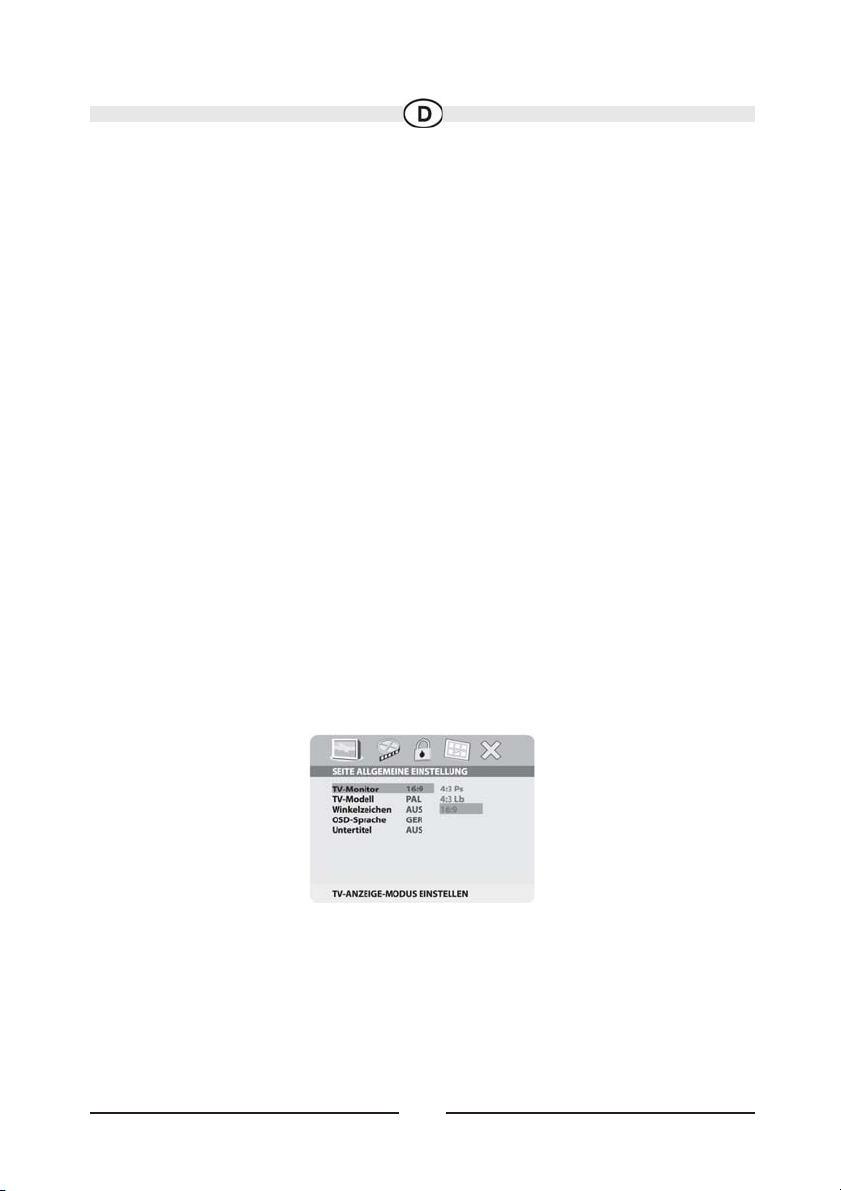
Bildschirmeinstellungen
Drücken Sie auf die Taste SETUP und wählen Sie anschließend ANZEIGE aus. Über TVANZEIGE-MODUS EINSTELLEN können Sie die Bildschirmeinstellungen
(Seitenverhältnis) anpassen. Drücken Sie auf und anschließend auf die Tasten
(), um die gewünschten Einstellungen auszuwählen.
4:3 / PS
Zeigt auf dem Bildschirm ein Breitbild an, bei dem die rechte und linke Seite abgeschnitten sind.
4:3 / LB
Zeigt auf dem Bildschirm ein Breitbild mit schwarzen Balken am oberen und unteren
Bildschirmrand an.
16:9
Zeigt auf dem Bildschirm ein Bild mit schwarzen Balken am oberen und unteren
Bildschirmrand an. Drücken Sie anschließend auf ENTER, um Ihre Auswahl zu bestätigen.
Hinweis: Diese Einstellung kann nur erfolgen, wenn keine CD/DVD eingelegt ist oder
wenn die CD Abdeckung geöffnet ist!
Page 22
22
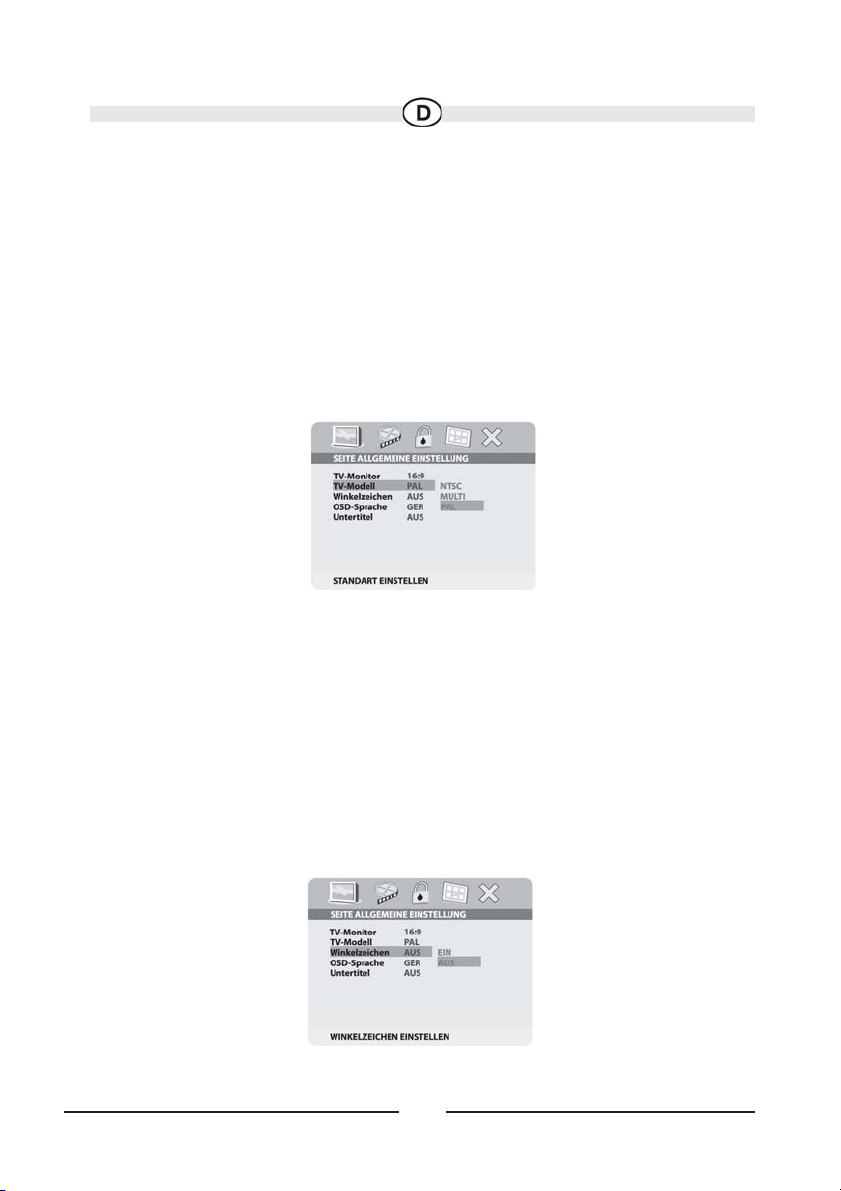
TV MODELL
Wählen Sie mit Hilfe der UP-oder Down-Taste TV MODELL aus und drücken Sie
anschließend auf die RIGHT-Taste um ins Untermenü zu gelangen. Wählen Sie das TVModell auf dem Bildschirm aus mit den Tasten UP/DOWN aus und drücken Sie auf
ENTER um die Einestellung zu bestätigen. Drücken Sie auf die LEFT-Taste um zurückzukehren.
PAL - Wählen Sie dieses Format für PAL TV
MULTI - Wählen Sie dieses Format für multi-system TV
NTSC - Wählen Sie dieses Format für NTSC TV
WINKELZEICHEN
Wählen Sie mit Hilfe der UP/DOWN-Taste WINKELZEICHEN aus, und drücken Sie
anschließend auf die RIGHT-Taste, um ins Untermenü zu gelangen. Wählen Sie bei
WINKELZEICHEN mit den Tasten UP/DOWN die Option EIN oder AUS aus, und
drücken Sie anschließend auf ENTER, um die Einstellung zu bestätigen. Drücken Sie auf
die LEFT-Taste, um zurückzukehren.
* EIN: Auf dem Bildschirm wird die Winkelmarkierung angezeigt.
(*sofern die Winkeloption von der DVD unterstützt wird)
AUS: Auf dem Bildschirm wird keine Winkelmarkierung angezeigt.
Page 23
23
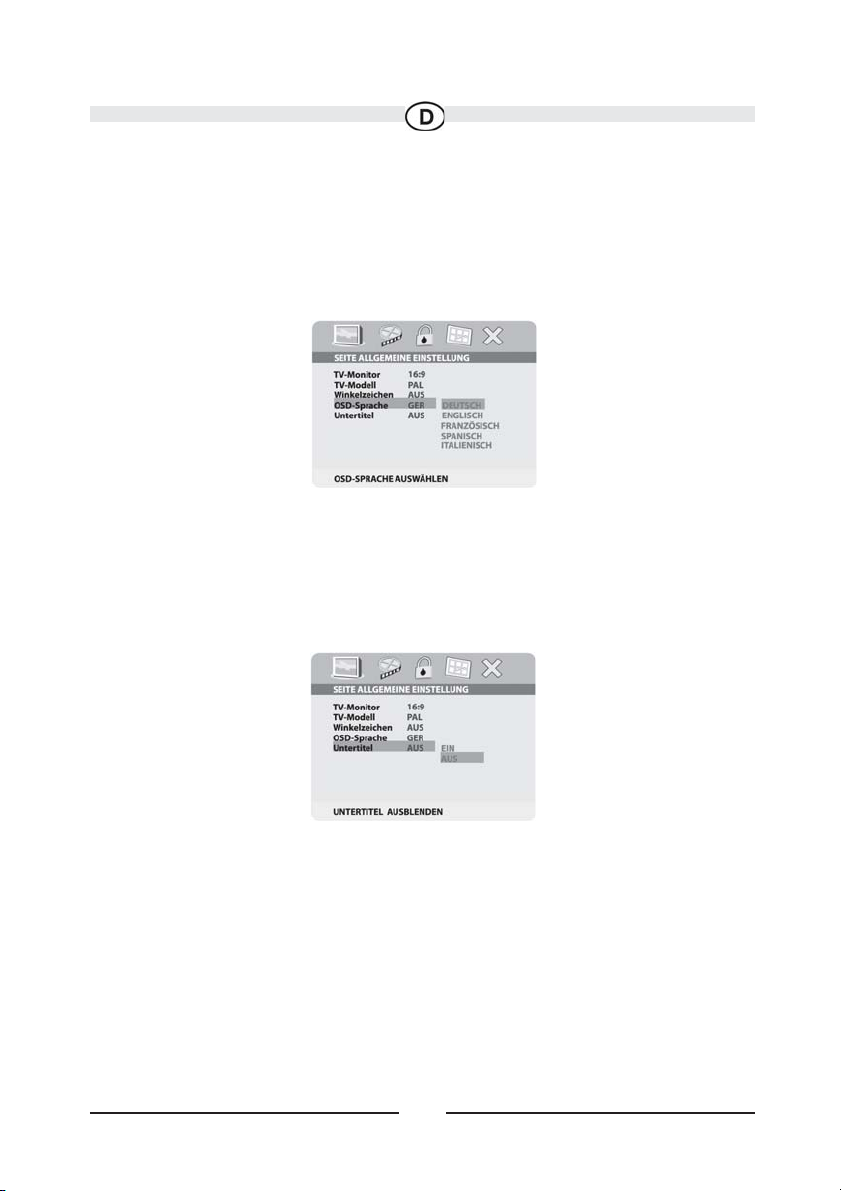
Menü OSD SPRACHE
Über das Menü OSD SPRACHE können Sie die Sprache für das Bildschirmmenü auswählen. Drücken Sie auf und anschließend auf die Tasten (), um die
gewünschte Sprache auszuwählen. Als OSD-Sprache können Sie Englisch,
Französisch, Deutsch, Spanisch oder Italienisch auswählen.
UNTERTITEL (Closed-Captions)
Das Setup-Menü für UNTERTITEL bietet die Möglichkeit, das Closed-Captions-Signal,
das zwecks Dekodierung über den Videoeingang an den Fernseher übermittelt wird,
ein- oder auszuschalten.
ON – Einschalten des Closed-Captions-Signals, das zwecks Dekodierung an den
Fernseher übermittelt wird.
OFF – Ausschalten des Closed-Captions-Signals, das zwecks Dekodierung an den
Fernseher übermittelt wird.
Page 24
24
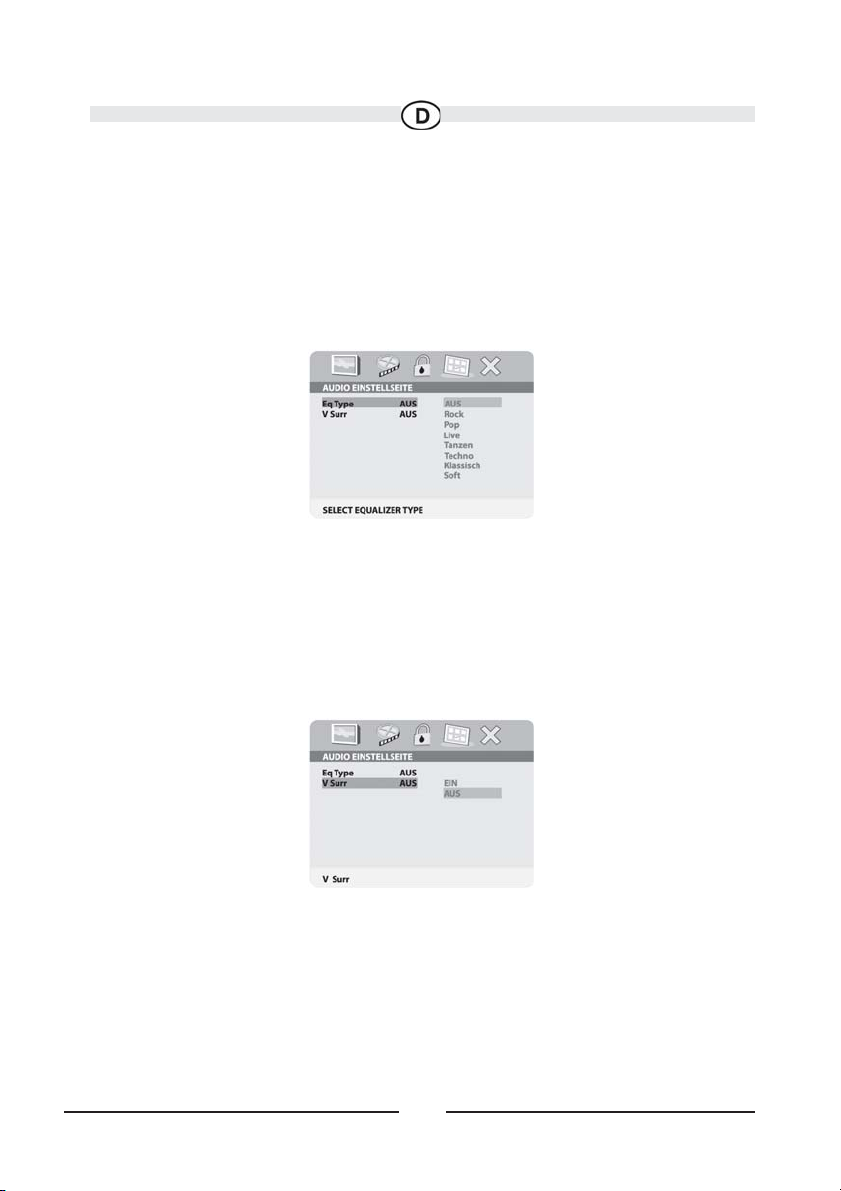
AUDIO EINSTELLUNGEN
EQ TYPE - Equalizertyp
Über die EQ TYPE-Optionen können Sie einen Equalizer auswählen, um einen spezifischen Klang für eine Disk zu bestimmen.
Folgende Optionen sind verfügbar:
OFF, ROCK, POP, LIVE, TANZEN, TECHNO,
KLASSISCH und SOFT.
V SURR (Virtual Surround-Effekt)
Über diese Option können Sie einen Surround-Effekt für die Audiowiedergabe aktivieren.
ON – Einschalten des Surround-Effekts
OFF – Ausschalten des Surround-Effekts
Page 25
25
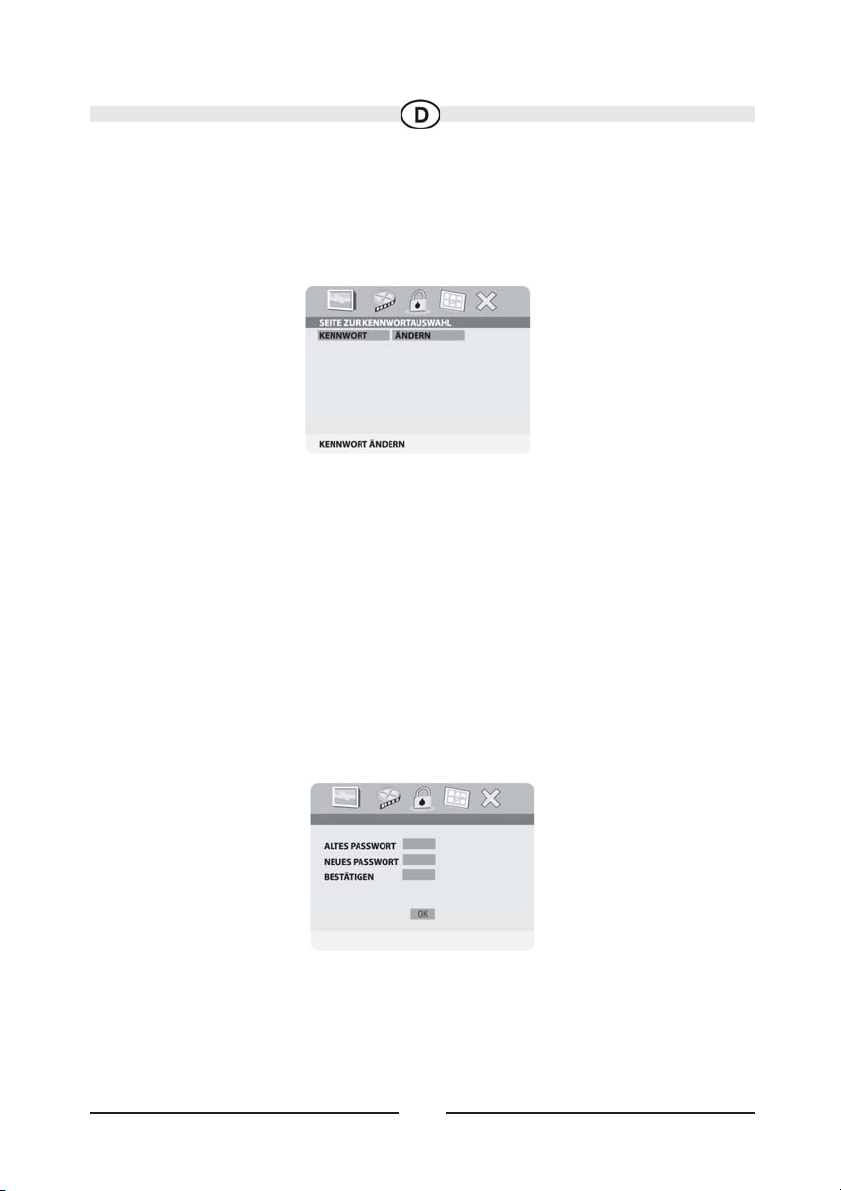
Kennworteinstellungen (Kennwort für die Jugendschutzkontrolle)
Drücken Sie auf die Taste SETUP und wählen Sie KENNWORT aus. Über KENNWORT
ÄNDERN können Sie das Kennwort für die Jugendschutzkontrolle ändern. Drücken Sie
auf und anschließend auf ENTER.
ALTES PASSWORT
Geben Sie das alte Passwort bzw. das vorgegebene Passwort ein (4-stelliges Passwort)
NEUES PASSWORT
Geben Sie über die Nummerntasten das neue (4-stellige) Passwort ein
BESTÄTIGEN
Bestätigen Sie das neue Passwort. Dazu geben Sie dasselbe neue Passwort erneut ein.
Drücken Sie anschließend auf ENTER, um das Passwort gültig zu machen.
Das werkseitige Passwort/Kennwort ist 3308.
Page 26
26
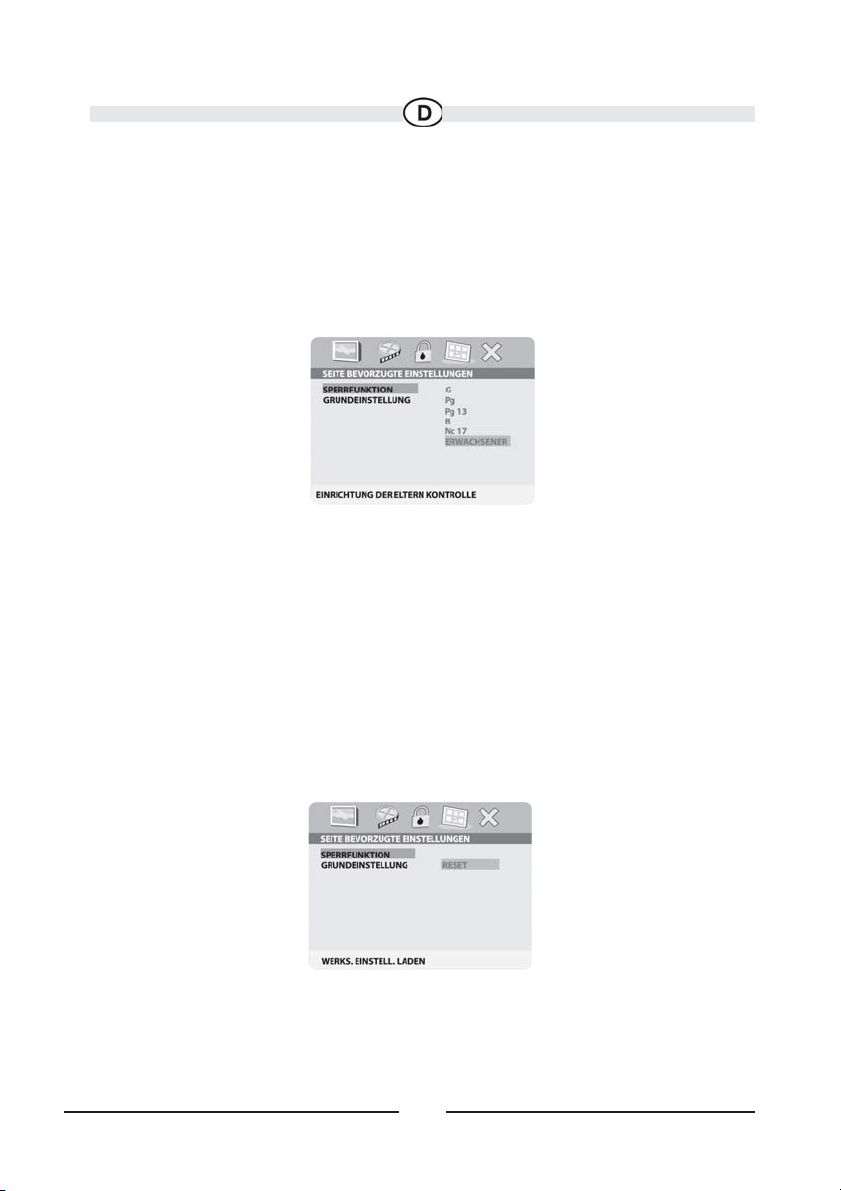
Einstellungen für den Jugendschutz (Jugendschutzkontrolle)
Über die Option SPERRFUNKTION des Menüs SETUP können Sie die Wiedergabe des
Filminhalts von G bis ERWACHSENER kontrollieren. Mit der Jugendschutzkontrolle können Sie die Wiedergabe nach Ihren Wünschen einschränken
1. Verwenden Sie die Tasten (), um Ihre Wahl zu treffen:
G (Kinder)
PG
PG 13
R
NC-17
ERWACHSENER
Hinweis: Je niedriger der Wert, desto höher die Einschränkung. Drücken Sie zum
Bestätigen der Auswahl die Taste ENTER.
GRUNDEINSTELLUNG
Wenn Sie in den werkseitig eingestellten Modus zurückkehren möchten, drücken Sie auf
ENTER.
Hinweis: Die Standardfunktion hat keine Auswirkung auf die Einstellung für den
Jugendschutz.
Page 27

27
Wiedergabe von DVD
´s
Drücken Sie auf der Fernbedienung die Taste DISPLAY, um die Statuszeile anzuzeigen.
Durch mehrmaliges Drücken der Taste DISPLAY werden nacheinander die folgenden
Optionen aufgerufen:
Auswählen eines Kapitels
Sie können zu einem bestimmten Kapitel springen, indem Sie die entsprechenden
Zahlentasten drücken.
Wenn Sie beispielsweise zu Kapitel 2 springen möchten, drücken Sie ‘02’.
Ändern der Einstellungen für die Surround-Effekte
1. Drücken Sie während der Wiedergabe einer Disk die Taste DISPLAY viermal.
Daraufhin wird die Zeile SURROUND DISPLAY angezeigt.
2. Durch Drücken der Taste ENTER werden nacheinander die folgenden Optionen aufgerufen: CONCERT, LIVING ROOM, HALL, BATHROOM, CAVE, ARENA, CHURCH
und OFF.
Drücken der Taste Display Anzeige auf dem Bildschirm
Einmal
Zweimal
Dreimal
Viermal
Fünfmal
Sechsmal
Siebenmal
Achtmal
Aktueller Titel und aktuelles Kapitel
Aktueller Untertitel
Aktuelle Sprache und aktueller Kanal für Audioausgabe
Aktueller Surround sound
Aktueller Winkel
Aktueller A-B-Status
Aktueller Wiederholungsstatus
Display wird ausgeschaltet
Page 28

28
Verwenden der Funktion REPEAT
Der Standardmodus der REPEAT-Funktion ist OFF. Wenn Sie mehrmals hintereinander
auf REPEAT drücken, ändern sich die Optionen dieser Funktion:
- KAPITEL - wiederholt das derzeit wiedergegebene Kapitel
- TRACK - wiederholt den derzeit wiedergegebenen Track.
- ALL - wiederholt die derzeit wiedergegebene Disc.
Hinweis: Der Modus der Repeat Off Funktion hat kein OSD display.
Wiedergabe von Audio-CDs
Wenn Sie eine Audio-CD wiedergeben, wird automatisch die DISPLAY-Kopfzeile angezeigt: Der aktuelle Track und die Wiedergabezeit des Tracks, die
Gesamtwiedergabezeit der Disc und die verstrichene Zeit der Wiedergabe.
Drücken Sie auf der Fernbedienung auf DISPLAY, um den DISPLAY-Banner anzuzeigen.
In den folgenden Abbildungen werden die Optionen angezeigt, die nach Drücken der
Taste DISPLAY auf dem Bildschirm angezeigt werden.
Drücken Sie einmal auf DISPLAY AKTUELL ABGELAUFEN wird zusammen mit dem derzeit
wiedergegebenen Track und der Wiedergabezeit des
Tracks angezeigt.
Drücken Sie zweimal auf DISPLAY
AKTUELL VERBLEIBEND wird zusammen mit dem derzeit
wiedergegebenen Track und der verbleibenden
Wiedergabezeit angezeigt.
Drücken Sie dreimal auf DISPLAY GESAMT ABGELAUFEN wird zusammen mit dem derzeit
wiedergegebenen Track und der gesamten
Wiedergabezeit angezeigt.
Drücken Sie viermal auf DISPLAY GESAMT ABGELAUFEN wird zusammen mit dem derzeit
wiedergegebenen Track und der gesamten
Wiedergabezeit angezeigt.
Drücken Sie fünfmal auf DISPLAY Die DISPLAY-Kopfzeile wird ausgeblendet.
Page 29

29
Auswählen eines Titels
Sie können zu einem bestimmten Titel springen, indem Sie die entsprechenden
Zahlentasten drücken.
Verwenden der Funktion REPEAT
Der Standardmodus der REPEAT-Funktion ist OFF. Wenn Sie mehrmals hintereinander
auf REPEAT drücken, ändern sich die Optionen dieser Funktion:
- TRACK- wiederholt den derzeit wiedergegebenen Track.
- ALL- wiederholt die derzeit wiedergegebene Disc.
Beim Durchblättern der Optionen ändert sich die Funktionsweise entsprechend. Die
Tracks werden beispielsweise wiederholt, sobald diese Tracks bis zum Ende wiedergegeben sind. Die ausgewählte Option wird wiederholt, bis Sie sie abschalten.
Hinweis: Der Modus der Repeat Off Funktion hat kein OSD display.
Page 30
30
Wiedergabe von MP3-Discs
MP3 ist ein digitales Audio-Format. Ein Song mit der Qualität einer Audio-CD kann im
MP3-Format komprimiert werden, um weniger Platz in Anspruch zu nehmen. Der
Qualitätsverlust ist dabei nur sehr gering. Auf Ihrem DVD-Player können im MP3Format codierte CD-R-Discs abgespielt werden.
Drücken Sie auf der Fernbedienung die Taste DISPLAY, um die DISPLAY-Kopfzeile anzuzeigen. In den folgenden Abbildungen werden die Optionen angezeigt, die nach
Drücken der Taste DISPLAY auf dem Bildschirm angezeigt werden.
• ABGELAUFENE ZEIT und die restlich verbleibende Zeit werden solange auf dem
Bildschirm angezeigt, bis Sie erneut auf DISPLAY drücken.
• VERBLEIBENDE ZEIT wird zusammen mit der Zeit angezeigt, die der Titel weiterhin
wiedergegeben wird.
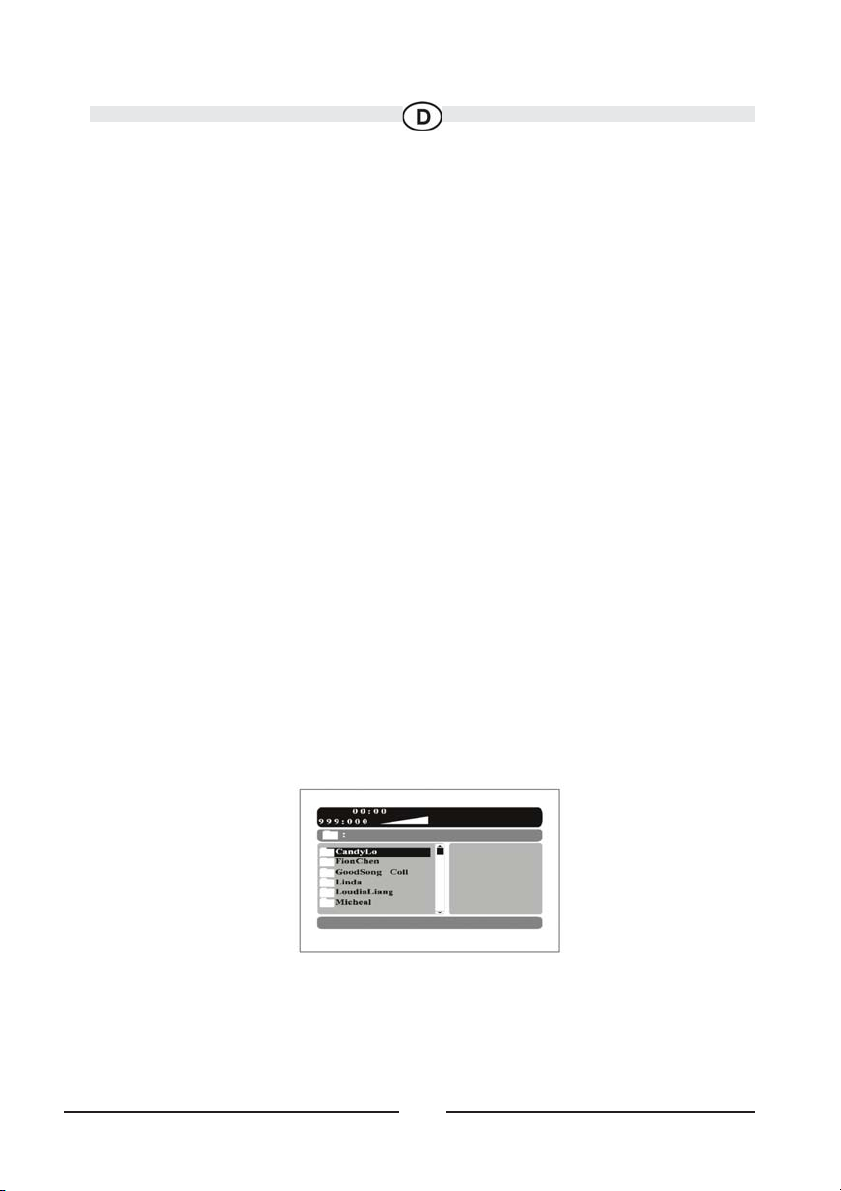
Auswählen von Ordnern und Songs
Wenn Sie eine MP3-Disc in den Player einlegen, wird automatisch der zugehörige
Bildschirm angezeigt.
1. Sobald der gewünschte Ordner markiert ist, drücken Sie auf ENTER, worauf die im
Ordner enthaltenen Songs auf der rechten Seite angezeigt werden.
Page 31

2. Drücken Sie auf die Aufwärts- oder Abwärts-Pfeiltaste, um durch die Songliste zu
blättern, und markieren Sie den gewünschten Song. Drücken Sie auf ENTER um die
Wiedergabe des markierten Songs zu starten.
Überspringen von Songs
Drücken Sie auf der Fernbedienung die Taste NEXT () , um zum nächsten Song zu
wechseln. Drücken Sie auf die Taste PREVIOUS (), um zum Anfang des derzeit wiedergegebenen Songs zurückzukehren. Drücken Sie zweimal auf die Taste , um zum vorherigen Song zu wechseln.
Auswählen eines Wiedergabemodus
Sie können die Reihenfolge wählen, in der die Songs auf einer Disk vorübergehend
wiedergegeben werden sollen. Der Wiedergabemodus FOLDER entspricht dem
Standardmodus. Drücken Sie zur Auswahl des gewünschten Wiedergabemodus mehrmals die Taste REPEAT. Folgende Optionen zur Auswahl des Wiedergabemodus sind
verfügbar:
• ORDNER - Gibt die in einem Ordner gespeicherten Stücke in der Reihenfolge
wieder, in der sie aufgezeichnet wurden.
• VERMISCHEN - Gibt die in einem Ordner gespeicherten Stücke in einer zufälligen Reihenfolge wieder (innerhalb des ausgewählten Ordners).
• RANDOM - Gibt die in einem Ordner gespeicherten Stücke in einer zufälligen
Reihenfolge wieder
• EINZEL - Spielt einen ausgewählten Song
• EINZEL WIEDERHOLEN - Wiederholen der Wiedergabe eines Songs
• ORDNER WIEDERHOLEN - Wiederholen der Wiedergabe eines bestimmten
Ordners
31
Page 32

32
Fehlerbeseitigung
PROBLEM LÖSUNG
IR-Sensor funktioniert
nicht
• Überprüfen Sie, ob die Batterien der
Fernbedienung neu sind.
• Stellen Sie sicher, dass der
Fernbedienungssensor nicht verschmutzt ist.
• Stellen Sie sicher, dass der IR-Sender über
dem Sensor der zu steuernden Komponente
befestigt ist.
Die Disc lässt sich nicht
abspielen
• Legen Sie die Disc mit der beschrifteten
Seite nach oben ein.
• Überprüfen Sie den Disc-Typ. Der DVDPlayer gibt nur DVDs, Audio-CDs und
MP3s wieder.
Beginnt mit der
Wiedergabe und stoppt
direkt im Anschluss
• Sowohl der DVD-Player als auch die Disc
sind nach Regionen codiert. Sollten die
Codes nicht übereinstimmen, kann die Disc
nicht wiedergegeben werden. Der regionale Code dieses DVD-Players ist 2.
• Die Disc ist verschmutzt. Reinigen Sie die
Disc.
• Es hat sich Kondenswasser gebildet.
Warten Sie, bis die Feuchtigkeit verdunstet
ist.
Page 33

33
Fehlerbeseitigung
PROBLEM
LÖSUNG
Kein Ton oder verzerrter Ton • Stellen Sie sicher, dass der DVD-Player richtig
angeschlossen ist. Stellen Sie sicher, dass alle Kabel
sicher an den richtigen Buchsen angeschlossen
sind.
• Wenn Sie die IR-Kopfhörer benutzen, müssen
diese eingeschaltet sein.
Kein Schnellvorlauf des Films
möglich
• Sie können den Vorspann oder die Warnungen am
Anfang des Films nicht schneller durchlaufen lassen
bzw. überspringen, weil die Disc so programmiert
ist, dass dieser Vorgang nicht möglich ist.
Auf dem Bildschirm erscheint
das Handzeichen-Symbol
• Die Funktion oder Aktion kann an dieser Stelle aus
folgenden Gründen nicht ausgeführt werden:
1. Die Funktion bzw. Aktion wird durch die Software
der Disc eingeschränkt.
2. Die Funktion (z. B. Kamerawinkel) wird von der
Disc-Software nicht unterstützt.
3. Die Funktion ist derzeit nicht verfügbar.
4. Sie haben einen Titel oder ein Kapitel außerhalb
des Nummernbereichs aufgerufen.
Kein Bild • Überprüfen Sie den Anschluss der Signalquelle.
• Überprüfen Sie, ob die ordnungsgemäße
Verwendung der Ausgänge DVD, AV1 und AUX.
• Wenden Sie sich ggf. an den Kundendienst.
Page 34

34
Technische Daten
LCD Hintergrundbeleuchtung: CCFL
Auflösung: 800 x 480
Pixel: 1.152.000
Betriebstemperatur: 0 - 50° C
Lagertemperatur: -20 - 70° C
Lebensdauer: 10.000 Stunden
Video-Norm: NTSC/PAL
Audio Ausgangssignal: 1V p-p
1 kHz an -8dB
Video Ausgangssignal: 1.0Vp-p an 75 ohms
Stromquelle: 9-12 V Gleichspannung
TECHNISCHE ÄNDERUNGEN VORBEHALTEN
Page 35

CONTENT
- Important Warnings and Safety Precaution p. 36
- Features p. 38
- Controls and Indicators Diagram p. 38
- Main Function Descriptions p. 39
- Remote Control Operation p. 40
- DVD Function Descriptions p. 41
- Turning the MMD102 on or off p. 46
- Operation p. 47
- Optional Accessories p. 51
- DVD Basics p. 52
- Settings and Adjustments p. 53
- Playing DVDs p. 59
- Playing MP3 Discs p. 61
- Troubleshooting p. 63
- Specifications p. 65
- Guarantee conditions, warranty card p. 100
Page 36

36
Notice
An LCD panel and/or video monitor may be installed in a motor vehicle
and visible to the driver if the LCD panel or video monitor is used for
vehicle information, system control, rear or side observation or navigation. If the LCD panel or video monitor is used for television reception,
video or DVD play, the LCD panel or video monitor must be installed so
that these features will only function when the vehicle is in “park” or
when the vehicle’s parking brake is applied.
An LCD panel or video monitor used for television reception, video or
DVD play that operates when the vehicle is in gear or when the parking
brake is not applied must be installed to the rear of the driver’s seat
where it will not be visible, directly or indirectly, to the operator of the
motor vehicle.
W
arnings
• Do not use any solvents or cleaning materials when cleaning the video system.
• Do not use any abrasive cleaners, they may scratch the screen. Use only a lightly
dampened lint free cloth to wipe the screen if it is dirty.
• Lock the LCD screen in the fully closed position when not in use.
• Before putting on headphones always adjust the volume setting to the lowest position.
• Remember to leave the dome light switch in the off or auto position when the vehicle
is unattended, as the dome lights, if left on, can drain the vehicle’s battery.
• Do not put pressure on the screen.
• Caution children to avoid touching or scratching the screen, as it may become dirty
or damaged.
Page 37

37
Safety Precaution
For safety reasons, when changing video media it is recommended that the vehicle is
not in motion, and that you do not allow children to unfasten seatbelts to change media
or make any adjustments to the system. System adjustments can be accomplished using
the remote control unit, while seatbelts remain fastened. Enjoy your Movies 2 Go entertainment system but remember safety of all passengers remains the number one priority.
Regional Coding
Note:
Both the DVD-Player and discs are coded by region. These region codes
must match in order for the disc to play. If the codes do not match, the disc
won’t play. This unit’s code is 2. DVD’s with other region codes cannot be
played in this unit.
Battery disposal:
At the end of the product´s useful life, please dispose of it at
appropriate collection points provided in your country.
Congratulations on your purchase of the Movies 2 Go MMD102 drop-down Video
Monitor with DVD player. The MMD102 has been designed to give you and your family many years of video entertainment in the mobile environment. Please read the directions that follow to familiarize yourself with the product and to ensure that you obtain
the best results from your equipment.
NOTE: Installation options vary, see the individual owner’s manuals for each component
in your system to obtain a full understanding of each component’s operation.
Page 38

38
FEATURES
•10.2” TFT (Thin Film Transistor) Active Matrix LCD (Liquid Crystal Display)
Monitor with DVD player
• OSD (On Screen Display) for Control of Picture Quality and Functions
• DVD/CD/MP3 compatible
• Infrared Transmitter for Optional IR Wireless Headphones
• Three Audio / Video Source Inputs (AV1, AUX, DVD)
• Remote Repeater Sensor
• Dome Lights with Built-in Three Way Switch
• Video Display ON/OFF Control (when LCD Panel is Opened and Closed)
CONTROLS AND INDICATORS DIAGRAM
Page 39

39
MAIN FUNCTION DESCRIPTIONS
1. DVD disc insertion slot.
2. Power Button
3. Play Button
4. Eject Button
5. Stop Button
6. Infrared Transmitter and Sensor – Used to transmit audio to wireless head-
phones. Also allows the remote control to operate the MMD102 and to control other
accessories in the system.
7. Ventilation opening
8. Dome Lights – Provide additional interior illumination.
9. Three Position Dome Light Switch
• Auto – Automatically switches on the dome lights in conjunction with the vehicle’s inte-
rior illumination.
• Off – The Dome lights will not turn on in this position.
• On – Turns on the Dome lights.
10. Screen Release – Slides in the direction of the arrow to release the drop down
screen.
11. LCD Panel
Page 40

40
REMOTE CONTROL OPERATION
Battery Installation
Before attempting to operate your Remote Control, install the batteries as described
below.
1) Turn the Remote Control face down. Using a fingernail, lift the battery cover off.
2) Install two “AAA” batteries as shown. Make sure that proper polarity (+ or -) is
observed.
3) Align the cover tabs with the remote control and press down until the cover clicks.
The remote control will operate the MMD102 and most Audiovox VCP’s. It is not a universal remote control and will not control equipment from other manufacturers.
Page 41

41
DVD FUNCTION DESCRIPTIONS
*Function control is available on the unit and the remote control.
** Not used in this model
1. POWER Button*
Press this button to turn the MMD102 on. Press the button again to turn the MMD102
off.
2. SOURCE Button
Video signals from video equipment connected to the audio / video inputs can be displayed on the monitor by pressing this button. Each time the button is pressed, the audio
/ video source will change the sources: DVD, AV1 and AUX.
3. AUTO MEMORY Button**
4. SKIP/SEARCH Button**
5. ERASE/WRITE Button**
6. Channel Up () Button**
7. MUTE Button
Press this button to mute the audio.
Pressing the button again restores sound to the previously set level.
8. ENTER Button
Used to implement setting selected.
9. LEFT () Button
Allows the user to shift left in the menu options.
10. MENU Button
Allows the user to access the main DVD menu or system menu by pressing the TV
and Menu button in sequence.
Page 42

42
11. RETURN Button
Allows the user to return to the menu while PBC on.
Note: This function only present on VCD2.0.
12. TV Mode Select Button
Switches certain function keys on the remote control for TV functions.
Press this button and the menu button to access the system menu.
13. DISPLAY Button
Press to display DVD Disc current information.
For Title & Chapter, use cursor buttons to do title/chapter selection,
then press Enter button to implement the selection.
For Subtitle, Audio, Angle, A to B & Repeat, press Enter key repeatedly to change the options. These options may vary from disc to disc.
Press DISPLAY button DVD Player Perform
Once
Twice
3 times
4 times
5 times
6 times
7 times
Display current TITLE & CHAPTER
Display current SUBTITLE
Display current AUDIO language & channel
Display current ANGLE
Display A-B current status
Display REPEAT current status
Display off
Page 43

43
14. PAUSE (II) Button
Allows the user to pause the playback.
15. PREVIOUS () Button
Allows the user to return to the previous chapter or track.
16. NEXT () Button
Allows the user to skip to the next chapter or track.
17. REV () Button
Allows the user to search in a backward direction at 2,4, 8,16 and 32 times the
normal speed.
18. FWD () Button
Allows the user to search in a forward direction at 2,4,8,16 and 32 times the normal
speed.
19. PLAY () Button*
Press this button to activate the play mode while a disc is loaded into the disc
compartment.
20. STOP ( ) Button*
DVD disc play will be stopped.
21. DVD Mode Select button
Switches certain function keys on the remote control for DVD functions.
22. VCP Mode Select button**
23. A-B Button
Allows the user to repeat play of a DVD or CD from point A to point B.
24. REPEAT Button
Allows the user to repeat various portions of a DVD, CD or MP3.
Page 44

44
25. Channel Down () Button
Use this button to decrease the channel number to the desired channel and to scroll
downward in the menu options.
26. SETUP Button
Allows the user to select the DVD player’s options (Display, OSD Language, Defaults,
Parental Control, Password, Exit Setup).
27. RIGHT () Button
Allows the user to shift to the right in the menu options.
28. PIX Button (PICTURE SELECT)
Each time this button is pressed, the on screen picture adjustment display the “adjustment bars” for BRIGHTNESS, CONTRAST, COLOR. Once the desired adjustment bar is
displayed, use the VOLUME UP/DOWN buttons to adjust the setting. The display will
automatically turn off if no adjustments are made within 6 seconds, or if any other button is depressed.
29. VOLUME DOWN (-) Button
Use these buttons to decrease the volume level of the headphone jacks. They are also
used to make picture adjustments in picture select mode.
30. VOLUME UP (+) Button
Use these buttons to raise the volume level of the headphone jacks. They are also used
to make picture adjustments in picture select mode.
Note: The volume buttons will not affect the volume of wireless headphones. When using these devices the volume must be adjusted with
the wireless headphone volume control or with your radio’s volume
control.
Page 45

45
31. NUMBERS Buttons
Allows the user to enter the numbers 0 to 9 for selection of CD tracks, DVD chapters,
and password setting.
32. EJECT (
) Button*
Use this button to eject the disc.
33. FM TRANSMITTER ON/OFF Button**
34. SOURCE SELECT Button**
35. CHANNEL SELECT Button**
Page 46

46
TURNING THE MMD102 ON OR OFF
1. Sliding the screen release lock forward will unlock the LCD screen and it will drop
down slightly. Pivot the screen downward until a comfortable viewing angle is reached.
The internal friction will hold the screen in position while the system is in use.
2. Pressing the power button on the unit or the remote control will turn the system on or
off alternately. When in use the internal backlighting will illuminate the controls.
3. After the unit has been turned on and is displaying a picture, adjust the viewing
angle by pivoting the screen to optimize the picture quality.
4. Remember to turn the unit off and pivot the LCD to the locked position when not in
use.
Page 47

47
OPERATION
OVERHEAD DOME LIGHTS
The dome lights integrated into the MMD102 are controlled by a three-position slide
switch. Sliding the switch to the ON position will turn the lights ON. The OFF position
will prevent the lights from turning ON with the vehicle’s interior lighting, and the auto
position will allow the lights to turn ON and OFF with the vehicle’s interior lighting. Do
not leave the vehicle unattended with the dome light switch in the ON position, as this
could result in a discharged battery.
Page 48

48
REMOTE SENSOR
The MMD102 incorporates an Infrared sensor which relays signals from the remote
control to allow the source connected to DVD and AV1 to be controlled simply by pointing its remote control at the remote sensor eye. This provides control of auxiliary equipment such as a Video Cassette Player. The infrared sensor can relay signals from most
manufacturer’s remote control to its respective component connected to the AV1 input.
In this case you must use the remote control supplied with the component.
Page 49

49
SELECT VIDEO
There are 3 inputs to select from the SOURCE Select. Pressing the source button on the
remote control will change the source selected in the following order: DVD, AV1and
AUX.
The source can also be changed by pressing the TV button followed by the menu button. To select the source, highlight SELECT VIDEO and press the ENTER button to enter
the submenu. Then, press the UP / DOWN button to select from DVD, AV1, AUX. Press
ENTER to confirm the setting.
EXIT THE MENU
To exit the main menu, press the MENU button of Remote Control again to Exit, the
menu will disappear.
NOTE: The menu also disappears from the screen automatically if you do not press
any button within a few seconds.
IMPORTANT NOTE:
The menu function is available after pressing the TV button on the remote control.
The setup function is available after pressing the DVD button on the remote control.
Page 50

50
SET PICTURE
When watching the program, the quality of the picture can be adjusted to suit your
taste.
Press the TV and MENU button of Remote Control, the main menu will appear. Press
the DOWN/UP button to select the item which you need to adjust. Press the MENU button again to select the item.
For example: Press MENU button, highlight the SET PICTURE and press the ENTER button. The PICTURE menu will appear, highlight BRIGHTNESS and press the ENTER button. Then press DOWN/UP button to adjust the desired level. These functions can also
be accessed by repeatedly pressing the PIX button on the remote.
Description of Adjustment Items:
Item
Press DOWN button Press UP button
BRIGHTNESS To darken the picture To brighten the picture
CONTRAST Decrease the contrast Increase contrast for
for soft color vivid color
COLOR To decrease the color To increase the color
intensity intensity
To restore the factory settings, select RESET and press the ENTER button. All the picture
adjustment function (BRIGHTNESS, CONTRAST, COLOR) will go back to the factory settings.
Page 51

51
SCREEN MODE SELECT
This allows the user to change the SCREEN format ( Aspect, 4:3 or 16:9 )
To select the screen format highlight MODE SELECT and press the ENTER button to enter
the submenu. Then press the UP/DOWN button to select from16:9 or 4:3. Press
ENTER to confirm the setting.
OPTIONAL ACCESSORIES
AV 1 and AUX *
The AV1 or AUX input may be connected to a DVD player, video game system, or other
audio / video input. To play the AV1 or AUX source, turn the MMD102 ON and press
the TV Menu button on the Remote Control. Select INPUT SELECT and press UP/DOWN
button until “AV1”or “AUX” is displayed on the screen and press ENTER. Turn the source component on with its power button or remote control. The MMD102 is now ready
to play the audio and video signals from the source connected to AV1 or AUX inputs.
These functions can be also be accessed by repeatedly pressing the source button on
the remote.
* NOTE: Additional Accessory Cable may be required to connect more than one video
source to the MMD102.
Page 52

52
DVD Basics
To get the optimum use out of the DVD player, make sure you read this section completely.
Regional Coding
Both the DVD player and disc are coded by region. These regional codes must match
in order for the disc to play. If the codes don’t match, the disc won’t play. This unit’s
code is region 2. Other regional codes cannot be played in this unit. The unit will display “WRONG REGION.”
Types of Discs your DVD will play
• DVD discs – DVDs discs which contain video.
• Audio discs – Audio CDs contain musical or sound content only.
• MP3 discs – A disc that contains audio files (for example, a CD-R with downloaded
MP3 files).
Loading and Playing Discs
Before you load a disc, make sure that it is compatible with the player.
Note: the following Discs CANNOT be used with this player:
• MiniDisc
• Laserdisc
• CD-I, CD-ROM, DVD-ROM
To load and Play a Disc
When you press the Power button the unit will turn on and display the source selected.
Select DVD mode and insert the disc (Label Up) into the disc compartment. When the
disc is half way in it will be automatically pulled in and play will begin.
Last Memory
The player is able to resume the playback from the last position if any power interruption happens, provided the disc is not remove from the player.
Note:
The function is only available on DVD, VCD and Audio CD.
Page 53

53
Settings and Adjustments
The Setup Menu contains features and options that let you customize your DVD player.
For example, you can set a language for the on-screen display, limit playback for children, load default settings for the picture quality and DVD players etc.
Using the Setup Menu
1. Press the SETUP button on the remote. The Setup Menu appears on the screen as
shown per diagram.
There are 5 icons on the top part of the Setup Menu. Each icon represents a page.
2. In order to Go to the desired page, move the highlight using the cursor button
or to the icon indicated.
3. After entering the desired page, highlight the desired item using the cursor button
or .
4. Press to move the highlight to the different options for the selected item.
Press or to select the desired options, and then press ENTER to confirm the selec-
tion.
5. Repeat steps 3~4 to continue setting the items in the same Setup Page.
6. To change to another Setup page, press until the highlight moves back to the icon
on the top part of the Setup Menu. Then, repeat steps 2~5.
Closing the Setup Menu
Press SETUP button again or Move the highlight to " " ico” and then press ENTER.
Main Page
Audio Setup
Password Setup
Preference Setup
Exit Setup
Page 54

54
MAIN PAGE
TV DISPLAY
The TV DISPLAY setup allows you to adjust screen setting (aspect ratio).
4:3 PS
This displays the wide picture on the screen with a portion of the left & right side removed.
4:3 LB
This displays the wide picture with black bands on the upper and lower portions of the
screen.
16:9
This displays a wide picture with black bands on the upper and lower portion of the
screen. The bands will vary, depending on what aspect ratio the disc is.
Note: This setting can only be made when the player door is open or when there is no
disc in the player
Page 55

55
TV TYPE
The TV TYPE setup allows you to select the system to fit to the color system of the TV to
be connected.
PAL - Select this type for PAL TV
MULTI - Select this type for multi-system TV
NTSC - Select this type for NTSC TV
ANGLE MARK
The ANGLE MARK setup allows you to turn on/off the angle mark display on the
screen.
ON - The screen shows angle mark if an angle option is available on a DVD
OFF - There is no angle mark display on the screen even though there is an angle option available on a DVD.
OSD LANG (Language for On-Screen Display)
The OSD LANGUAGE setup allows you to select the language for the on-screen display. The user can either select English, French, German, Spanish or Italian for the OSD
language.
Page 56

56
CAPTIONS (Closed Caption)
The CAPTIONS setup allows you to turn on and off the closed caption signal to be passed to the television through the video output for decoding.
ON -To turn on the closed caption signal to be passed to the television for decoding
OFF - To turn off the closed caption signal to be passed to the television for decoding
AUDIO SETUP PAGE
EQ TYPE
The equalizer allows you to choose a specific sound for a disc through the EQ TYPE
options.
The options are:
OFF, ROCK, POP, LIVE, DANCE, TECHNO, CLASSIC and SOFT.
Page 57

57
V SURR (Virtual Surround)
The Virtual Surround allows you to add a surround sound effect to the audio.
ON - Turn on the surround sound effect
OFF - Turn off the surround sound effect
PASSWORD SETUP PAGE
PASSWORD CHANGE
This item allows you to change the passord.
After you have selected the password change, the figure below is shown:
OLD PASSWORD
Input the old password or the default password (4 digits)
NEW PASSWORD
Input a new password (4 digits) using the numbers buttons (0~9)
CONFIRM PWD
Confirm the new password by entering the same password again. Then press ENTER
to apply the changes.
After you selected password, just use the numeric buttons to key in the default password
(3308), then press Enter.
Page 58

58
PREFERENCE PAGE
The setting in this page can only be made when the player door is open or when there
is no disc in the player.
PARENTAL CONTROL
This item allows you to limit the content of movie playback from G to Adult. The lower
the value, the more strict the control.
G
PG
PG - 13
R
NC - 17
ADULT
Page 59

59
DEFAULT - RESET
The DEFAULT - RESET allows you to reset all options to factory settings.
Note: This function will not affect the parental control settings.
Playing DVDs
Press the DISPLAY button on the remote control to display the status banner. Pressing the
DISPLAY button consecutively changes the options as below.
Selecting a Chapter
You can skip to a specific chapter by using the numbers keys.
For example, if you want to skip to chapter 2, press ‘02’.
Press DISPLAY button Information display on the screen
Once
Twice
3 times
4 times
5 times
6 times
7 times
8 times
Current title and chapter
Current subtitle information
Current audio language and audio channel
Current surround sound setting
Current angle setting
Current A-B setting
Current repeat status
Display banner disappear
Page 60

60
Changing the Surround Sound Setting
1. While a disc is playing, press DISPLAY 4 times. The SURROUND DISPLAY banner
appears.
2. Press ENTER consecutively changes the options: CONCERT, LIVING ROOM, HALL,
BATHROOM, CAVE, ARENA, CHURCH and OFF.
Using the Repeat Feature
The default mode for the Repeat feature is OFF. Pressing REPEAT consecutively changes
the repeat options:
• CHAPTER - repeat the chapter that is playing
• TITLE - repeat the title that is playing
• ALL - repeat the entire disc
Note: Repeat Off mode has no OSD display.
Page 61

61
Playing MP3 Discs
MP3 is a format for storing digital audio. An audio CD-quality song can be compressed into the MP3 format with very little loss of quality, while taking up much less space.
CD-R discs that have been encoded in MP3 format can be played on your DVD player. The DVD player plays the songs in the order they were burned on to the disc.
Press DISPLAY button on the remote to display the current play mode and to change the
time counter display style between time elapsed and time remain.
• Time elapsed is the time that the song has played
• Time remaining is the amount of time left for the song being played.
Selecting Folders and Songs
When an MP3 is loaded in the player, the navigation menu appears automatically.
1. Press or to move the highlight to the desired folder and press ENTER to display
the songs in the folder.
2. Press or to move the highlight to the desired song and press ENTER to begin
playback of the highlighted song.
Page 62

62
Skipping Songs
Use the Next () button on the remote control to move to the next song. Use the
Previous () button to move to the previous song.
Selecting a Play Mode
You can choose what order the songs will play on a disc temporarily. The default play
mode is FOLDER. Press REPEAT consecutively to choose the desired play mode. The
play mode options are:
• FOLDER - Plays the songs in a folder in the order they were recorded.
• SHUFFLE - Plays the songs in a folder in random order (from within the selected fol-
der).
• RANDOM - Plays the songs in a folder in random order.
• SINGLE - Plays a selected song.
• REPEAT ONE - Repeat the song that is playing.
• REPEAT FOLDER - Repeat the folder that is playing.
Page 63

63
Troubleshooting
PROBLEM SOLUTION
IR sensor
inoperative
• Verify that the batteries in the remote are
fresh.
• Verify that the remote sensor eye is not
obstructed.
• Verify that the infrared transmitter is
affixed over the sensor eye of the component
to be controlled.
Disc won’t play • Insert a disc with the label side facing
up.
• Check the type of disc you put into disc
tray. This DVD only plays digital video
discs, audio CDs and MP3s.
• Both the unit and the disc are coded by
region. If the regional codes don’t match, the
disc can’t be played. This DVD is Region
Number 2.
Play starts, but
then stops
immediately
• The disc is dirty. Clean it.
• Condensation has formed. Allow player to
dry out
.
Page 64

64
Troubleshooting
PROBLEM SOLUTION
No sound or distorted sound • Make sure your DVD is connected properly.
Make sure all cables are securely inserted into the
appropriate jacks.
• If you are using the IR headphones, make sure you
turn on the IR power and the batteries are fresh.
Can´t advance through a
movie
• You can´t advance through the opening credits and
warning information that appears at the beginning of
movies because the disc is programmed to prohibit
that action.
The icon ( ) appears on
screen
The feature or action cannot be
completed at this time because:
1. The disc’s software restricts it.
2. The disc’s software doesn’t support the
feature (e.g., angles)
3. The feature is not available at the
moment.
4. You’ve requested a title or chapter
number that is out of range.
No Picture • Check that the signal source is connected.
• Check that DVD, AV1 and AUX is selected correctly.
• Contact the service department.
Page 65

65
SPECIFICATIONS
LCD Backlighting CCFL
Resolution 800 X 480
Pixels 1,152,000
Operation Temperature 0 - 50° C
Storage Temperature -20 - 70° C
Expected Backlight life 10,000 Hours
Video Display System NTSC / PAL
Audio Line Output 1 Vp-p
1 kHz at -8dB
Video Output 1.0Vp-p at 75ohms
Power Source 12V DC
SUBJECT TO TECHNICAL CHANGE
Page 66

INDICE
- Avviso importante, Avvertenze, Ricezione televisiva p. 67
- Caratteristiche p. 69
- Schema dei comandi e degli indicatori p. 69
- Descrizioni delle funzioni principali p. 70
- Funzionamento del telecomando p. 71
- Descrizioni delle funzioni del DVD p. 72
- Accensione o spegnimento del MMD102 p. 77
- Manovra p. 78
- Accessori Optional p. 82
- Informazioni principali sul DVD p. 83
- Impostazioni e regolazioni p. 84
- Riproduzione di DVDs p. 91
- Riproduzione di CD Audio p. 92
- Riproduzione dei dischi con formato MP3 p. 94
- Risoluzione dei problemi p. 96
- Specifiche p. 98
- Condizioni e scheda di garanzia p. 99
Page 67

67
Avviso
Un pannello LCD e/o un monitor video può essere installato su un veicolo a motore ed essere visibile dal guidatore se tale pannello o video
monitor vengono utilizzati per mostrare informazioni relative al veicolo,
al sistema di controllo, per l’osservazione laterale o posteriore o per la
navigazione satellitare. Se il pannello LCD o il video monitor sono utilizzati come ricevitori televisivi o per la visione di video o DVD devono
essere installati in modo da funzionare solo a veicolo fermo o quando il
freno di parcheggio è attivato.
Un pannello LCD o un video monitor utilizzati come ricevitori televisivi o
per la visione di video e DVD in grado di funzionare con il veicolo in
moto o non in condizioni di parcheggio devono essere installati alle
spalle del guidatore in posizione tale da non essere visibili nè direttamente nè indirettamente dal posto di guida del veicolo.
A
vvertenze
• Per pulire il monitor video, non utilizzare solventi o altri prodotti per la pulizia.
• Non utilizzare detergenti abrasivi che potrebbero graffiare lo schermo.
• Se lo schermo è sporco, pulirlo esclusivamente con un panno privo di peli e
leggermente inumidito.
• Quando non viene utilizzato, chiudere completamente lo schermo LCD.
• Prima di indossare le cuffie auricolari, regolare sempre l’impostazione del volume
sul valore più basso.
• Se il veicolo rimane inutilizzato, ricordarsi di lasciare l’interruttore della
plafoniera in posizione spenta o automatica, onde evitare che si scarichi
accidentalmente la batteria.
• Non esercitare pressione sullo schermo.
Page 68

68
Ricezione televisiva
Questo impianto di intrattenimento è stato progettato essenzialmente per vedere filmati preregistrati o riprodurre videogiochi. La ricezione televisiva in un veicolo in movimento è limitata; in alcune aree non è possibile a causa di un segnale debole e variabile. La visione della televisione è migliore a veicolo fermo, ma anche in questo caso
potrebbe essere condizionata dalla potenza del segnale. La qualità dell’immagine non
è paragonabile a quella della ricezione domestica. La qualità di ricezione può variare
a seconda delle condizioni atmosferiche o della distanza dall’emittente. Un segnale
debole può causare l’ondulamento dell’immagine, l’effetto neve o la perdita di colore.
Nota:
Informazioni relative alla gestione delle zone: il lettore DVD mobile è stato
progettato e realizzato per essere conforme alle informazioni relative alla
gestione delle zone registrate su un DVD. Se il numero relativo alla zona
riportato su un DVD non corrisponde a quello del lettore, quest’ultimo non
è in grado di leggere il disco.
Batteria eliminazione:
Onde tutelare l`ambiente, non buttate l`apparecchio tra i
normali rifiuti al termine della sua vita utile, ma portatelo
presso i punti di raccolta specifici per questi rifiuti previsti
dalla normativa vigente.
Congratulazioni per aver acquistato il lettore DVD Audiovox Movies 2 Go MMD102
con monitor video a scomparsa. Il modello MMD102 è stato progettato per offrire agli
utenti un intrattenimento video a lungo termine in un ambiente mobile. Leggere le istruzioni riportate di seguito per conoscere bene il prodotto e poterne trarre i migliori risultati.
N.B. Le opzioni di installazione possono variare: per comprendere bene il funzionamento di ogni componente dell’impianto, consultare il relativo manuale dell’utente.
Page 69

69
Caratteristiche
• Monitor LCD (a cristalli liquidi) da 10.2 pollici a matrice attiva TFT
(Thin Film Transistor)
• OSD (On Screen Display) per il controllo della qualità delle immagini e delle
funzioni
• DVD/CD/MP3 compatibili
• Trasmettitore a infrarossi per le cuffie IR wireless opzionali
• Tre ingressi audio/video (AV1, AUX, DVD)
• Sensore ripetitore remoto
• Plafoniera con switch integrato a tre vie
• Comando ON/OFF per display video (da utilizzare quando il pannello LCD
viene aperto e chiuso)
Schema dei comandi e degli indicatori
Page 70

70
Descrizioni delle funzioni principali
1. Fessura di inserimento del DVD: per caricare il disco.
2. Pulsante POWER (ACCENSIONE): rosso acceso a impianto funzionante; rosso
spento a impianto inattivo.
3. Pulsante PLAY (RIPRODUCI): questo pulsante consente di entrare in modalità
di riproduzione.
4. Pulsante EJECT (ESTRAI): per estrarre i dischi dal relativo vano.
5. Pulsante STOP: per interrompere la riproduzione.
6. Trasmettitore e sensore a infrarossi: utilizzato per trasmettere il segnale
audio alle cuffie auricolari senza fili. Consente anche di utilizzare il telecomando per
far funzionare il MMD102 e per controllare altri accessori dell’impianto.
7. Aperture di aerazione del MMD102.
8. Plafoniere: forniscono un’illuminazione interna supplementare.
9. Interruttore plafoniera a tre posizioni
• Auto: illumina automaticamente le plafoniere nel momento in cui si illumina l’interno
del veicolo.
• Off: le plafoniere non si accedono.
• On: le plafoniere si accedono.
10. Sblocco dello schermo: spostandolo in direzione della freccia consente di
sbloccare lo schermo a scomparsa.
11. Pannello LCD a scomparsa.
Page 71

71
Funzionamento del telecomando
Installazione della batteria
Prima di cercare di utilizzare il telecomando, installare le batterie come descritto di
seguito.
1) Ribaltare il telecomando. Con l’unghia, sollevare il coperchio della batteria.
2) Installare due batterie “AAA” come da figura. Accertarsi di rispettare la corretta
polarità (+ o -).
3) Allineare le linguette del coperchio con il telecomando e premere verso il basso fino
a farle scattare.
Il telecomando fa funzionare il MMD102 e la maggior parte dei lettori di videocassette Audiovox. Non è un telecomando universale e non funziona con apparecchi di altri
produttore. Nel caso in cui con il MMD102 si debba utilizzare un telecomando universale, per programmarlo scegliere lo schema di codifica remoto dei televisori Audiovox.
Page 72

72
Descrizioni delle funzioni del DVD
*I comandi delle funzioni sono disponibili sia sull’unità che sul telecomando.
** Non utilizzato in questo modello
1. Pulsante POWER (ACCENSIONE)*
Premere il pulsante POWER per accendere il MMD102. Premere nuovamente il pulsante per spegnere il MMD102.
2. Pulsante SOURCE (FONTE)
Se si preme questo pulsante, è possibile visualizzare sul monitor i segnali video delle
apparecchiature video collegate agli ingressi audio/video. Ogni volta che viene premuto il pulsante, viene visualizzato a turno il segnale di una delle seguenti fonti
audio/video: DVD, AV1 e AUX.
3. Pulsante AUTO MEMORY (MEMORIA AUTOMATICA) o pulsante
AUTO PROGRAM (PROGRAMMA AUTOMATICO)**
4. Pulsante SKIP/SEARCH (SALTA/CERCA)**
5. Pulsante ERASE/WRITE (CANCELLA/SCRIVI)**
Dopo essersi sintonizzati su un canale, premere questo pulsante per memorizzare il
canale o cancellarlo dalla memoria. I numeri dei canali memorizzati vengono visualizzati in verde sullo schermo LCD, mentre i numeri dei canali non memorizzati sono di
colore rosso.
6. Pulsante Canale Su ()**
7. Pulsante MUTE (MUTO)
Premere questo pulsante per togliere l’audio. Premerlo nuovamente per ripristinarlo in
base ai livelli audio precedentemente impostati.
8. Pulsante ENTER (INVIO)
Serve per implementare l’impostazione selezionata.
Page 73

73
9. Pulsante di SINISTRA ()
Consente all’utente di passare a sinistra delle opzioni di menu.
10. Pulsante MENU
Consente all’utente di accedere al menu principale.
11. Pulsante RETURN (INDIETRO)
Con PBC attivo, consente all’utente di tornare al menu.
Nota: la funzione è presente soltanto sul modello VCD2.0.
12. Pulsante di selezione Modalità TV
Consente di commutare alcuni tasti funzione del telecomando per attivare le funzioni
TV.
13. Pulsante DISPLAY
Premere questo pulsante per visualizzare le informazioni attuali relative al disco DVD.
Pressione del pulsante DISPLAY Azione sul lettore DVD
1 volta Visualizzazione TITOLO E CAPITOLO
corrente
2 volte Visualizzazione SOTTOTITOLO corrente
3 volte Visualizzazione lingua e canale AUDIO
corrente
4 volte Visualizzazione ANGOLO corrente
5 volte Visualizzazione stato A-B corrente
6 volte Visualizzazione stato RIPETI corrente
7 volte Visualizzazione disattivata
Page 74

74
Per il titolo e il capitolo, utilizzare i pulsanti del cursore per selezionare uno dei due elementi; quindi premere il pulsante Enter (Invio) per
confermare la selezione.
Per i sottotitoli, l’audio, l'angolazione, la funzione da A a B e la ripetizione, premere più volte il pulsante Enter (Invio) per modificare le
opzioni. Le opzioni disponibili possono variare in base al disco.
14. Pulsante PAUSE (II, PAUSA)
Consente all’utente di interrompere la riproduzione.
15. Pulsante PREVIOUS (PRECEDENTE)
Consente all’utente di tornare al capitolo o alla traccia precedente.
16. Pulsante NEXT (SUCCESSIVO)
Consente all’utente di passare al capitolo o alla traccia successivo.
17. Pulsante REV (INDIETRO)
Consente all’utente di cercare indietro ad una velocità superiore di 2, 4, 8, 16 o 32
volte rispetto alla velocità normale.
18. Pulsante FWD ( AVANTI)
Consente all’utente di cercare in avanti ad una velocità superiore di 2, 4, 8, 16 o 32
volte rispetto alla velocità normale.
19. Pulsante PLAY ()*
Premere questo pulsante per attivare la modalità di riproduzione dopo aver caricato
un disco nel relativo vano.
20. Pulsante STOP () *
La riproduzione del disco DVD viene interrotta.
21. Pulsante di selezione Modalità DVD
Consente di commutare alcuni tasti funzione sul telecomando per attivare le funzioni
DVD.
Page 75

75
22. Pulsante di selezione Modalità VCP**
23. Pulsante A-B
Utilizzare questo pulsante per ripetere la riproduzione di una sezione specifica del
DVD o del CD, da un punto “A” a un punto “B”.
24. Pulsante REPEAT (RIPETI)
Consente all’utente di ripetere la riproduzione di diversi punti di un DVD, CD o MP3.
25. Pulsante Canale Giù ()*
Utilizzare questo pulsante per passare a numeri dei canali inferiori e fare scorrere
verso il basso le opzioni del menu.
26. Pulsante SETUP (CONFIGURA)
Consente all’utente di selezionare le opzioni del lettore DVD (visualizzazione, lingua
OSD, impostazioni predefinite, controllo dei contenuti non autorizzati, password, uscita configurazione).
27. Pulsante di DESTRA ()
Consente all’utente di passare a destra delle opzioni di menu.
28. Pulsante PIX (SELEZIONE DELL’IMMAGINE)
Ogni volta che si preme questo pulsante, sullo schermo vengono visualizzate le regolazioni per l’immagine; le barre di regolazione disponibili sono BRIGHTNESS
(LUMINOSITÀ), CONTRAST (CONTRASTO) e COLOR (COLOR). Dopo aver visualizzato la barra appropriata, modificare l’impostazione mediante i pulsanti di regolazione del volume. Se non vengono effettuate regolazioni o non si rilasciano altri pulsanti
entro 6 secondi, lo schermo si spegne automaticamente.
29. Pulsante Volume Giù (-)
Utilizzare questo pulsante per ridurre il livello del volume dei jack per cuffie auricolari. Il pulsante consente anche di effettuare regolazioni all'immagine in modalità di selezione dell'immagine.
Page 76

76
30. Pulsante Volume Su (+)*
Premere il pulsante per aumentare il volume dei jack per cuffie auricolari. Il pulsante
serve anche per effettuare regolazioni all’immagine in modalità di selezione dell’immagine.
Nota: i pulsanti del volume non influiscono sul volume delle cuffie auricolari senza fili.
Se si utilizzano questi dispositivi, regolare il volume utilizzando il controllo del volume
della cuffia auricolare senza fili o quello della radio.
31. Pulsanti numerici
Consentono di immettere i numeri da 0 a 9 per selezionare le tracce dei CD, i capitoli dei DVD e per impostare la password.
32. Pulsante EJECT (
ESTRAI)*
Consente di estrarre il disco dal relativo vano.
33. Pulsante FM ON/OFF**
34. Pulsante SOURCE SELECT (SELEZIONE FONTE)**
35. Pulsante CHANNEL SELECT (SELEZIONE CANALE)**
Page 77

77
Accensione o spegnimento del MMD102
1. Far scorrere in avanti il dispositivo di sblocco dello schermo per sbloccare lo scher-
mo LCD e farlo scendere lentamente verso il basso. Girare lo schermo verso il basso
fino a trovare l’angolazione visiva adeguata. L’angolo di attrito dell'apparecchio consente di mantenere lo schermo nella posizione desiderata durante il suo utilizzo.
2. Premere il pulsante di accensione sull’unità o sul telecomando per accendere o speg-
nere l'apparecchio. I comandi vengono generalmente illuminati mediante retroilluminazione.
3. Dopo aver acceso l’unità e aver visualizzato un’immagine, regolare l’angolo visivo
girando lo schermo fino ad ottimizzare la qualità dell’immagine.
4. Quando non viene utilizzata, ricordarsi di spegnere l’unità e di riportare lo scher-
mo LCD alla posizione di blocco.
Pulsante
Power
Gancio di rilascio
dello schermo
Page 78

78
Manovra
Plafoniere
Le luci integrate nel MMD102 sono controllate da un interruttore a scorrimento a tre
posizioni. Per accendere le luci, far scorrere l’interruttore in posizione ON. La posizione OFF impedisce alle luci di accendersi in qualsiasi momento, mentre la posizione
AUTO consente l’accensione e lo spegnimento delle luci in sincronia con l’illuminazione interna del veicolo. Per il cablaggio, consultare il Manuale di installazione. Non lasciare il veicolo inutilizzato con l’interruttore della plafoniera in posizione ON, onde evitare che si scarichi la batteria del veicolo.
Interruttore
plafoniera
Page 79

79
Sensore remoto
Il MMD102 è dotato di due sensori a infrarossi che inoltrano i segnali provenienti dal
telecomando, in modo da consentire il controllo dell'unità puntando semplicemente il
telecomando in direzione della cellula del sensore. La funzione di ripetitore consente il
controllo di apparecchiature ausiliarie, come ad esempio il lettore di videocassette
Audiovox. Il sensore a infrarossi è in grado di inoltrare i segnali provenienti dalla maggior parte dei telecomandi del produttore ai rispettivi componenti collegati all’ingresso
video 1. In questo caso è necessario utilizzare il telecomando in dotazione con il componente.
Cellula del
sensore remoto/
IR Transmitter
Page 80

80
SELEZIONE VIDEO
Con SOURCE Select è possibile selezionare una delle 3 sorgenti di input. Premendo il
tasto Source sul telecomando si modifica la sorgente nel seguente ordine: DVD, AV1 e
AUX. È anche possibile modificare la sorgente premendo il tasto TV seguito dal tasto
menu. Per impostare la sorgente, selezionare SELECT VIDEO e premere il tasto ENTER
per accedere al sottomenu. Con i tasti UP e DOWN selezionare DVD, AV1 o AUX.
Premere ENTER per confermare l'impostazione.
USCITA DAL MENU
Per uscire dal menu principale premere nuovamente il tasto MENU sul telecomando. Il
menu scomparirà.
Nota:
Il menu scompare automaticamente dallo schermo se per alcuni secondi non si preme
alcun tasto.
Nota importante:
La funzione menu si renderà disponibile alla pressione del tasto TV sul telecomando.
La funzione setup si renderà disponibile alla pressione del tasto DVD sul telecomando.
Page 81

81
REGOLAZIONE DELL'IMMAGINE
Durante la visione di un programma è possibile regolare l'immagine in base alle proprie preferenze.
Premere i tasti TV e MENU sul telecomando per visualizzare il menu principale. Con i
tasti DOWN e UP selezionare la funzione da regolare. Premere nuovamente il tasto
MENU per confermare la selezione. Esempio: Premere il tasto MENU, evidenziare la
funzione SET PICTURE e premere il tasto ENTER. Verrà visualizzato il menu PICTURE.
Evidenziare BRIGHTNESS e confermare con ENTER. Con i tasti DOWN e UP regolare
il livello desiderato. È possibile accedere a queste funzioni anche premendo ripetutamente il tasto PIX sul telecomando.
Descrizione delle regolazioni:
Funzione
Premere il tasto DOWN Premere il tasto UP
(GIU') (SU)
BRIGHTNESS Per scurire l'immagine Per schiarire l'immagine
(Luminosità) To brighten the picture
CONTRAST Per diminuire il contrasto Per aumentare il
(CONTRASTO) (colori più morbidi) (colori più brillanti)
COLOR (COLORE) Per ridurre l'intensità del colore Per aumentare l'intensità
del colore
Per tornare alle impostazioni di fabbrica selezionare RESET e confermare con il tasto
ENTER. Tutte le regolazioni di immagine (BRIGHTNESS, CONTRAST e COLOR ) torneranno alle impostazioni originarie.
Page 82

82
SELEZIONE FORMATO SCHERMO
Questa funzione consente di modificare il formato dello schermo (4:3 o 16:9).
Per scegliere il formato desiderato selezionare MODE SELECT e premere il tasto ENTER
per accedere al sottomenu. Con i tasti UP e DOWN scegliere 16:9 o 4:3. Premere
ENTER per confermare l'impostazione.
Accessori Optional
Ingresso AUX A/V
Il MMD102 può ricevere i segnali d'ingresso audio/video attraverso i jack RCA posizionati a lato dell’unità. L'apparecchio audio/video può essere una consolle per videogiochi, una videocamera o un altro tipo di dispositivo.
È possibile accedere a queste funzioni anche premendo ripetutamente il tasto SOURCE
sul telecomando.
* NOTA:
Per collegare più di una sorgente video all'apparecchio MMD102 potrebbe
essere necessario acquistare il cavo accessorio opzionale Accessory Cable.
Page 83

83
Informazioni principali sul DVD
Per ottimizzare l'uso della funzione DVD, leggere tutta la presente sezione.
Codifica regionale
Sia il lettore che il disco DVD dispongono di un codice regionale. Per riprodurre il
disco, tali codici devono corrispondere. In caso contrario, il disco non viene riprodotto. Questa unità è progettata per riprodurre esclusivamente i supporti della zona 2. Se
si cerca di riprodurre il supporto di una zona diversa, viene visualizzata la scritta
“WRONG REGION” (ZONA ERRATA).
Tipi di dischi riprodotti dal DVD
• Dischi DVD che contengono filmati.
• Dischi audio, ovvero CD audio che contengono solo contenuto musicale o sonoro.
• Dischi MP3, che contengono file audio (ad esempio un CD-R su cui sono stati scari-
cati file MP3).
Caricamento e riproduzione dei dischi
Prima di caricare un disco, verificare che sia compatibile con il lettore.
Nota: NON è possibile utilizzare nel lettore i dischi elencati di seguito.
• MiniDisc
• Laserdisc
• CD-I, CD-ROM, DVD-ROM
Procedura di caricamento e riproduzione di un disco
Premere il pulsante Power (Accensione) per accendere l’unità. Selezionare la modalità
DVD e inserire il disco (etichetta rivolta verso l’alto) nel relativo vano.
Ultima Memory
Selezionare ‘Ultima Memory’ usando pulsanti SU/GIÙ e premere DESTRA per aprire
il sottomenu. Impostare Ultima Memory su On oppure Off usando i pulsanti SU/GIÙ e
premere INVIO per confermare la selezione. Premere SINISTRA per ritornare.
Nota: Questa funzione è disponibile esclusivamente per DVD, VCD e Audio CD.
Page 84

84
Impostazioni e regolazioni
Nel presente capitolo viene descritto come utilizzare il menu SETUP (CONFIGURA) per
effettuare impostazioni e regolazioni.
Utilizzo del menu di configurazione
La visualizzazione della configurazione consente di effettuare la configurazione iniziale, di regolare la qualità dell’immagine e di impostare diverse uscite. È anche possibile impostare la lingua e la configurazione del display e limitare l’uso da parte dei minori.
1) Per visualizzare sullo schermo il menu di configurazione, premere il pulsante SETUP
(CONFIGURA).
2) Selezionare la voce principale desiderata utilizzando i pulsanti del cursore ()
e quindi premere ENTER (INVIO).
Chiusura del menu Setup
Premere nuovamente il tasto SETUP oppure spostare la selezione sull'icona “ “ e
confermare con ENTER.
Main Page
Audio Setup
Password Setup
Preference Setup
Exit Setup
Page 85

85
Impostazioni del display
Premere il pulsante SETUP (CONFIGURA) e selezionare Display. La configurazione del
display consente di regolare le impostazioni dello schermo (aspetto). Premere il pulsante e quindi utilizzare i pulsanti () per selezionare le impostazioni appropriate.
4:3 / PS
Sullo schermo viene visualizzata un’immagine panoramica con una porzione tagliata
sia a sinistra che a destra.
4:3 / LB
Sullo schermo viene visualizzata un’immagine panoramica con strisce nere nella parte
superiore e inferiore dello schermo.
16:9
Sullo schermo viene visualizzata un’immagine panoramica con striscia nera nella parte
superiore e inferiore dello schermo.
Premere ENTER (INVIO) per confermare la selezione.
Nota: Questa impostazione può essere definita solo quando lo sportello del lettore è
aperto e non sono stati caricati dischi nel lettore.
Page 86

86
TIPO TV
Selezionare ‘TIPO TV’ usando pulsanti SU/GIU e premere DESTRA/INVIO per aprire
il sottomenu. Selezionare la modalitá TV sullo usando i pulsanti SU/GUIU e premere
INVIO per confermare a selezione. Premere SINISTRA per ritomare.
PAL - Selezionare questo formato per le trasmissioni TV PAL.
MULTI - Selezionare questo formato per sistemi TV multipli.
NTSC - Selezionare questo formato per le trasmissioni TV NTSC.
ANGLE MARK
Selezionare ‘Angle Mark’ usando pulsanti SU/GIÙ e premere DESTRA per aprire il sottomenu. Impostare Angle Mark su On oppure Off usando i pulsanti SU/GIÙ e premere INVIO per confermare la selezione. Premere SINISTRA per ritornare.
*On: Lo schermo mostrerà l’icona angle mark.
(*se tale opzione è disponibile).
*Off: Sullo schermo non comparirà l’icona Angle Mark.
Page 87

87
Menu della lingua OSD
Il menu della lingua OSD consente all’utente di selezionare la lingua della visualizzazione sullo schermo. Premere i pulsanti e quindi utilizzare i pulsanti () per
selezionare la lingua desiderata. Le lingue disponibili sono inglese, francese, tedesco
spagnolo o italiano.
CAPTIONS (Closed Caption)
Le impostazioni per la funzione CAPTIONS consentono di attivare e disattivare il segnale closed caption da inviare al televisore per la codifica attraverso l'uscita video.
ON - Attiva il segnale closed caption da passare al televisore per la codifica.
OFF - Disattiva il segnale closed caption da passare al televisore per la codifica.
Page 88

88
EQ TYPE (Selezione equalizzazione)
Con l'equalizzatore è possibile scegliere la regolazione audio più adatta per un certo
disco selezionando una delle opzioni EQ TYPE.
Le opzioni EQ TYPE disponibili sono le seguenti:
OFF (Nessuna), ROCK, POP, LIVE,
DANCE, TECHNO, CLASSIC e SOFT.
V SURR (Virtual Surround)
Con Virtual Surround si ottiene un effetto audio avvolgente.
ON - Attiva l'effetto audio surround.
OFF - Disattiva l'effetto audio surround.
Page 89

89
Impostazioni della password (password per il controllo dei contenuti
non autorizzati)
Premere il pulsante SETUP (CONFIGURA) e selezionare PASSWORD. L'opzione PASSWORD SETUP consente di modificare la password per il controllo dei contenuti non
autorizzati. Premeree quindi Enter (Invio).
OLD PASSWORD (VECCHIA PASSWORD)
Immettere la vecchia password o la password predefinita (4 cifre).
NEW PASSWORD (NUOVA PASSWORD)
Immettere una nuova password (4 cifre) utilizzando i pulsanti numerici.
CONFIRM PWD (CONFERMA PASSWORD)
Confermare la nuova password digitandola nuovamente. Quindi premere Enter (Invio)
per implementare la scelta.
Nota: La password predefinita è 3308.
Page 90

90
Impostazioni Parental (Controllo dei contenuti non autorizzati)
Questa sezione del menu di configurazione consente di controllare il contenuto dei filmati, con livelli che vanno da G ad Adult (Adulti). La funzione di controllo dei contenuti non autorizzati consente di limitare la visione in base alle proprie preferenze.
1. Utilizzare i pulsanti per scegliere tra le opzioni riportate di seguito.
G (Children, Minori)
PG
PG 13
R
NC-17
ADULT (Adulti)
Nota: più è basso il valore e maggiore è la limitazione. Premere ENTER (INVIO) per
confermare la selezione.
Impostazioni predefinite
Premere il pulsante SETUP (CONFIGURA) e selezionare Defaults (Impostazioni predefinite). La configurazione delle impostazioni predefinite consente di ripristinare tutte le
opzioni originali. Premere e quindi Enter (Invio) per implementare il ripristino.
Nota: questa funzione non influisce sulle impostazioni del controllo dei contenuti non
autorizzati.
Page 91

91
Riproduzione di DVDs
Premere il tasto DISPLAY sul telecomando per visualizzare la barra di stato. Premendo
consecutivamente il tasto DISPLAY si modificano le opzioni come indicato sotto.
Selezione di un capitolo
Con i tasti numerici è possibile passare direttamente ad un capitolo specifico.
Ad esempio, premere '02' per iniziare dal capitolo 2.
Modificare le impostazioni audio surround
1. Durante la riproduzione del disco premere DISPLAY per 4 volte. Verrà visualizzata
la barra SURROUND DISPLAY.
2. Premere consecutivamente ENTER per selezionare le opzioni: CONCERT, LIVING
ROOM, HALL, BATHROOM, CAVE, ARENA, CHURCH e OFF.
Pressione del pulsante DISPLAY Azione sul display
1 volta Visualizzazione TITOLO E CAPITOLO
corrente
2 volte Visualizzazione SOTTOTITOLO corrente
3 volte Visualizzazione lingua e canale AUDIO
corrente
4 volte Visualizzazione SURROUND SOUND corrente
5 volte Visualizzazione ANGOLO corrente
6 volte Visualizzazione stato A-B corrente
7 volte Visualizzazione stato RIPETI corrente
8 volte Visualizzazione disattivata
Page 92

92
Utilizzo della funzione REPEAT
Per impostazione predefinita, la funzione Repeat (Ripeti) è disattivata. Premere più
volte di seguito REPEAT (RIPETI) per modificare le opzioni di ripetizione.
• CAPITOLO: viene ripetuta il capitolo in esecuzione.
• TITOLO: viene ripetuta il titolo in esecuzione.
• ALL (TUTTO): viene ripetuto l’intero disco in esecuzione.
Nota: La riproduzione in modalità OFF non prevede la visualizzazione OSD.
Riproduzione di CD Audio
Durante la riproduzione di un CD audio, viene visualizzato automaticamente il banner
DISPLAY nel quale vengono indicati la traccia corrente, la durata della traccia riprodotta, la durata complessiva del disco e il tempo di esecuzione corrente del disco. Per
visualizzare tale banner dal telecomando, premere il pulsante DISPLAY. Le opzioni
riportate di seguito mostrano che cosa succede quando si preme il pulsante DISPLAY.
Selezione di un brano
Utilizzando i tasti numerici è possibile accedere direttamente a un brano specifico.
Pressione di DISPLAY (1 volta) Oltre alla traccia in esecuzione e al tempo della
traccia, viene visualizzata anche la scritta SINGLE ELAPSED (TEMPO TRASCORSO SINGOLO
BRANO).
Pressione di DISPLAY (2 volte) Oltre alla traccia in esecuzione e al tempo della
traccia, viene visualizzata anche la scritta SINGLE REMAIN (TEMPO RESIDUO SINGOLO
BRANO).
Pressione di DISPLAY (3 volte) Oltre alla traccia in esecuzione e al tempo della
traccia, viene visualizzata anche la scritta TOTAL
ELAPSED (TEMPO TOTALE TRASCORSO).
Pressione di DISPLAY (4 volte) Oltre alla traccia in esecuzione e al tempo della
traccia, viene visualizzata anche la scritta TOTAL
REMAIN (TEMPO RESIDUO TOTALE).
Pressione di DISPLAY (5 volte) Disattivazione del banner DISPLAY.
Page 93

Utilizzo della funzione REPEAT
Per impostazione predefinita, la funzione Repeat (Ripeti) è disattivata. Premere più
volte di seguito REPEAT (RIPETI) per modificare le opzioni di ripetizione.
• Traccia: viene ripetuta la traccia in esecuzione.
• ALL (TUTTO): viene ripetuto l’intero disco in esecuzione.
Passando da un’opzione all’altra, le opzioni di ripetizione si modificano di volta in
volta. Per le tracce, ad esempio, la ripetizione viene effettuata al termine della traccia.
L'opzione selezionata continua a funzionare fino a quando non viene disattivata.
Nota: La riproduzione in modalità OFF non prevede la visualizzazione OSD.
93
Page 94

Riproduzione dei dischi con formato MP3
Il formato MP3 viene utilizzato per memorizzare l’audio digitale. Un brano audio con
qualità da CD può essere compresso nel formato MP3: questo consente di perdere
pochissimo in termini di qualità e di guadagnare molto in termini di spazio. I dischi
CD-R codificati in formato MP3 sono compatibili con questo lettore DVD.
Premere il pulsante DISPLAY sul telecomando per visualizzare il banner. Le opzioni
riportate di seguito mostrano che cosa succede quando si preme il pulsante DISPLAY.
• Oltre al tempo trascorso del brano in esecuzione, viene visualizzata anche la scritta
TIME ELAPSED (TEMPO TRASCORSO).
• Oltre al tempo residuo del brano in esecuzione, viene visualizzata anche la scritta
TIME REMAIN (TEMPO RESIDUO).
Selezione di cartelle e brani
Quando nel lettore viene inserito un disco MP3, viene visualizzata automaticamente la
schermata Smart Nav (Navigazione intelligente), che consente di modificare le cartelle e i brani. Il lettore DVD riproduce i brani nell’ordine in cui sono stati masterizzati sul
disco.
1. Dopo aver evidenziato la cartella desiderata, premere Enter (Invio); l’elenco delle
cartelle passa sul lato sinistro dello schermo, mentre in quello destro vengono visualizzati i brani contenuti nella cartella.
94
Page 95

2. Premere il pulsante con la freccia rivolta verso l’alto o verso il basso per scorrere
l’elenco dei brani ed evidenziare quello desiderato. Premere Enter (Invio) per iniziare
a riprodurre il brano evidenziato.
Salto di alcuni brani
Utilizzare il pulsante Successivo () del telecomando per passare al brano successivo.
Utilizzare il pulsante Precedente () per spostarsi all’inizio del brano in esecuzione.
Premere due volte il pulsante per passare al brano precedente.
Selezione di una modalità di riproduzione
È possibile scegliere in quale ordine riprodurre temporaneamente i brani di un disco.
La modalità di riproduzione standard è FOLDER. Premere REPEAT più volte per selezionare la modalità di riproduzione desiderata. Le opzioni di riproduzione sono le
seguenti:
• Folder (CARTELLA) - Riproduce i brani di una cartella nell'ordine in cui sono stati
registrati.
• SHUFFLE - Riproduce i brani di una cartella in ordine casuale (solo quelli della cartella selezionata).
• RANDOM (CASUALE) - Riproduce i brani di una cartella in ordine casuale.
• SINGLE (BRANO SINGOLO) - viene riprodotto il brano selezionato
• REPEAT ONE (RIPETI UNA VOLTA) - viene ripetuto il brano in esecuzione
• FOLDER REP (RIPETI CARTELLA) - viene ripetuta la cartella in esecuzione
95
Page 96

96
Risoluzione dei problemi
PROBLEMA SOLUZIONE
Sensore a infrarossi non
funzionant
e
• Verificare che le batterie del telecomando siano
nuove.
• Verificare che la cellula del sensore remoto non sia
ostruita.
• Verificare che il trasmettitore a infrarossi sia rivolto
nella direzione della cellula del sensore del componente da controllare.
Il disco non viene riprodotto • Inserire un disco con l’etichetta rivolta verso l’alto.
• Controllare il tipo di disco inserito nell’alloggiamento. Il lettore DVD riproduce soltanto DVD, CD
audio e MP3.
• Sia l’unità che il disco dispongono di un codice
regionale. Se tali codici non combaciano, il lettore
non è in grado di leggere il disco. Il codice regionale del lettore DVD è 2.
La riproduzione si avvia ma si
interrompe immediatamente
• Il disco è sporco. Pulirlo.
• Si è formata della condensa. Lasciar asciugare il
lettore.
Page 97

Risoluzione dei problemi
97
PROBLEMA SOLUZIONE
Suono assente o distorto • Accertarsi che il lettore DVD sia collegato
correttamente. Verificare che tutti i cavi siano
perfettamente inseriti nei jack corrispondenti.
• Se si utilizzano cuffie auricolari a infrarossi,
ricordarsi di accenderle.
Impossibile scorrere
direttamente al filmato
• Non è possibile scorrere velocemente attraverso i
titoli di testa e le informazioni di avvertimento
visualizzate all'inizio del filmato perché il disco è
stato programmato per impedire tale azione.
Sullo schermo viene
visualizzata l’icona ( )
La funzione o l’azione non può essere
momentaneamente completata perché:
1. il software del disco prevede una restrizione;
2. il software del disco non supporta la funzione
(es. angoli);
3. la funzione non è al momento disponibile;
4. è stato richiesto un titolo o un capitolo al di fuori
dell’intervallo.
Non Immagine • Verificare che il segnale sorgente sia collegato.
• Verificare che DVD, AV1 e AUX siano
correttamente selezionati.
• Contattare l'assistenza
Page 98

98
Specifiche
LCD retroilluminato CCFL
Risoluzione 800 x 480
Pixel 1,152,000
Temperatura di esercizio 0 - 50 ºC
Temperatura di conservazione -20 - 70 ºC
Durata retroilluminazione 10.000 ore
Sistema di visualizzazione video NTSC/PAL
Uscita Audio 1 Vp-p
1 kHz a -8dB
Uscita video 1,0 V p-p a 75 ohm
Alimentazione 12 V c.c.
CON RISERVA DI APPORTARE MODIFICHE TECNICHE
Page 99

La Vostra garanzia
Gentile Cliente,
grazie per aver acquistato questo prodotto Audiovox, prodotto studiato secondo i più
elevati standard di qualità e sottoposto a test rigorosi. Se utilizzato correttamente, esso
funzionerà perfettamente per molti anni.
La garanzia copre la sostituzione gratuita dei ricambi e la prestazione di manodopera
per tutti i prodotti Audiovox di elettronica di consumo venduti in Italia.
La responsabilità legale di soddisfare le richieste di servizi di garanzia per il Vostro
prodotto è del rivenditore dal quale avete acquistato il prodotto : se il rivenditore non
fosse abilitato alle riparazioni, questi si può rivolgere per qualsiasi lavoro ad un Centro
Assistenza Autorizzato.
La garanzia è valida per un periodo di 24 mesi dalla data di acquisto, purché il
prodotto sia trattato in modo appropriato secondo le istruzioni d’uso, dietro presentazione
del documento fiscale originale indicante la data d’acquisto e il nome del rivenditore con
la descrizione del prodotto (modello e numero di matricola).
La garanzia Audiovox non è valida nei seguenti casi :
i documenti sono stati alterati o resi illeggibili.
il modello e/o il numero di matricola del prodotto sono stati alterati, cancellati,
rimossi o resi illeggibili.
la riparazione è stata effettuata da personale non autorizzato.
per negligenza o trascuratezza nell’uso (mancata osservanza delle istruzioni per il
corretto funzionamento dell’apparecchio), errata installazione, danni da trasporto
ovvero di circostanze che, comunque, non possono farsi risalire a difetti di
fabbricazione dell’apparecchio.
non sono inoltre coperti dalla garanzia i prodotti modificati o adattati per la ricezione
di trasmissioni al di fuori del paese per il quale sono stati progettati e costruiti,
approvati e/o autorizzati o per qualsiasi danno provocato da queste modifiche.
Si raccomanda di leggere attentamente le istruzioni d’uso prima di interpellare il
Centro Assistenza Autorizzato.
Audiovox è un marchio distribuito per l’Italia da :
Siemens VDO Trading srl
Via Vialba 50
20026 Novate Milanese (MI)
Servizio Tecnico
Tel. 02 35 680 403
Page 100

Wir gratulieren Ihnen! Durch Ihre kluge Wahl sind Sie Besitzer eines Audiovox Mobile Video-Produktes geworden. Audiovox Mobile Video-Produkte erfreuen sich aufgrund der hohen Qualität eines ausgezeichneten Rufes weltweit. Dieser hohe Qualitätsstandard ermöglicht es für Audiovox Mobile Video-Produkte 2 Jahre Garantie zu gewähren.
Die Produkte werden während des gesamten Fertigungsvorganges laufend kontrolliert und geprüft. Im Servicefall beachten Sie bitte folgendes:
1. Die 2-jährige Garantiezeit beginnt mit dem Kauf des Produktes und gilt nur für den Erstbesitzer.
2. Während der Garantiezeit beseitigen wir etwaige Mängel, die nachweislich auf Material- oder Fabrikationsfehler beruhen, nach
unserer Wahl durch Austausch oder Nachbesserung der defekten Teile. Weitergehende Ansprüche, insbesondere auf Minderung,
Wandlung, Schadenersatz oder Folgeschäden sind ausgeschlossen. Die Garantiezeit wird von einer Garantieleistung durch uns nicht berührt.
3. Am Produkt dürfen keine unsachgemäßen Eingriffe vorgenommen worden sein.
4. Bei Inanspruchnahme der Garantie wenden Sie sich bitte zunächst an Ihren Fachhändler. Sollte es sich als notwendig erweisen,
das Produkt an uns einzuschicken, so sorgen Sie bitte dafür, daß • das Produkt in einwandfreier Originalverpackung verschickt wird,
• die Kontrollkarte ausgefüllt dem Produkt beiliegt, • die Kaufquittung beigefügt ist.
5. Von der Garantie ausgenommen sind: • Leuchtmittel • Verschleißteile • Transportschäden, sichtbar oder unsichtbar (Reklamationen für solche Schäden müssen umgehend bei der Transportfirma, Bahn oder Post eingereicht werden.) • Kratzer in Metallteilen, Frontabdeckungen u.s.w.
(Diese Defekte müssen innerhalb von 5 Tagen nach Kauf direkt bei Ihrem Händler reklamiert werden.) • Fehler, die durch fehlerhafte Aufstellung, falschen Anschluß, unsachgemäße Bedienung (siehe Bedienungsanleitung), Beanspruchung oder äußere gewaltsame Einwirkung entstanden sind. • Unsachgemäß reparierte oder geänderte Geräte, die von anderer Seite als von uns geöffnet wurden. • Folgeschäden an fremden
Geräten • Kostenerstattung bei Schadensbehebung durch Dritte ohne unser vorheriges Einverständnis • Batterien und Akkus.
Congratulations! You have made a wise selection in becoming the owner of a Audiovox Mobile Video equipment. Due to high
quality Audiovox products have earned an excellent reputation through the western world. And this high quality standard enables us to grant
a 2-years warranty for Audiovox Mobile Video products.
The equipments are checked and tested continously during the entire production process. In case you have problems with your
Audiovox Mobile Video equipment, kindly observe the following:
1. The 2-years guarantee period commences with the purchase of the component and is applicable only to the original owner.
2. During the guarantee period we will rectify any defects due to faulty material or workmanship by replacing or repairing the defective part at
our discretion. Further claims, and in particular those for price reduction, cancellation of sale, compensation for damages or
subsequential damages, are excluded. The guarantee period is not altered by the fact that we have carried out guarantee work.
3. Unauthorized tampering with the equipment will invalidate this guarantee.
4. Consult your authorized dealer first, if guarantee service is needed. Should it prove necessary to return the component to the factory, please insure that • the component is packed in original factory packing in good condition • the quality control card has been filled out and enclosed with the component, • your enclose your receipt as proof of purchase.
5. Excluded from the guarantee are: • Illuminates • Wear parts • Shipping damages, either readily apparent or concealed (claims for such damages must be lodged immediately with forwarding agent, the railway express office or post office). • Scratches in cases, metal components,
front panels, etc. (You must notify your dealer directly of such defects within three days of purchase.) • Defects caused by incorrect installation or connection, by operation errors (see operating instructions), by overloading or by external force. • Equipments which have beenrepaired
incorrectly or modified or where the case has been opened by persons other than us. • Consoquential damages to other equipments. • Reimbursement of cools, without our prior consent, when repairing damages by third parties • batteries and battery packs.
Toutes nos félicitations! Vouz avez bien choisi et êtes le propriétaire heureux d’un produit Audiovox. Les produits Audiovox ont
une excellente réputation pour leur bonne qualité. Pour cette raison, nous accordons 2 ans de garantie sur tous les produits Audiovox.
Les appareils sont soumis pendant toutes les opérations de fabrications à des contrôles et vérifications constants. Si, pourtant, vous
rencontrez des difficulés avec votre appareil Audiovox veuillez tenir compte de ce qui suit:
1. La garantie débute avec l’achat de l’appareil et est valable uniquement pour le premier propriétaire.
2. Pendant la période de garantie nous réparons les dommages provenant des défauts de matériel ou de fabrication et nous procédons, à
notre guise, à l’échange ou à la réparation des pièces défectueuses.
3. Aucune réparation impropre ne doit avoir été effectuée à l’appareil.
4. Lors d’une demande de garantie, veuillez vous adresser en premier lieu à votre distributeur. Si ce dernier décide que l’appareil doit nous être
retourné, veuillez tenir compte que: • l’appareil soit expédié dans son ermballage d’origine, • la carte de contrôle dûment remplie soit jointe, •
le bon d’achat soit joint.
5. Ne sont pas compris dans la garantie: • Matériel d’éclairage • Pièces d’usure • Avaries de transport, visibles ou non (de telles réclamations doivent être faites immédiatement auprès du transporteur, du chermin de fer ou de la poste). • Des rayures sur le boîtier, pièces métalliques, couvercles etc. (ces dommages doivent être signalés directement à votre distributeur dans les trois jours suivant l’achat). • Dommages
résultant d’un raccordement incorrect, maniement incorrect (voir instructions de service), surcharge ou application de force extérieure. • Appareils réparés non conformément ou modifiés et qui ont été ouverts par une personne autre que nous. • Dommages ultérieurs à d’autres appareils. • Remboursement des frais à des tiers ayant effectué les réparations sans notre accord préalable • Accus et batteries.
D
GB
F
 Loading...