

Page 1

MM1500
15.4” TFT LCD DECKENMONITOR
15.4” TFT LCD OVERHEAD DISPLAY
MONITOR PER AUTO DA 15,4 POLLICI
BEDIENUNGSANLEITUNG/GARANTIEURKUNDE
USER MANUAL/WARRANTY CARD
MANUALE D’USO/CARTA DI GARANZIA
Page 2

1
Index:
- Sicherheitshinweise s. 3
- Montage s. 4
- OSD Funktion I s. 6
- Fernbedienung s. 8
- OSD Funktion II s. 9
- Beschreibung des Zubehörs s. 12
- Abmessungen s. 14
- Spezifikation s. 16
- Warranty, Warranty Card s. 47
Page 3

2
Sicherheitshinweise
1. Drücken Sie nicht auf die Anzeigefläche des Monitors.
2. Spritzen Sie zum Reinigen keine Flüssigkeiten auf den LCD-Monitor. Verwenden
Sie zum Reinigen nur das LCD-Monitorreinigungstuch.
3. Schließen Sie nur Komponenten und Zubehör an, das vom Hersteller geliefert
wird.
4. Betreiben und lagern Sie das Gerät nicht in Umgebungen mit übermäßig hohen
Temperaturen. (Lagertemperatur: 5~48°, Betriebstemperatur 5~39°)
5. Achten Sie beim Anschluss der Kabel auf die richtige Polung: Anode (Positiv) und
Kathode (Negativ). Andernfalls kann der Monitor beschädigt werden.
6. Tragen Sie den Monitor äußerst vorsichtig, um ihn nicht zu beschädigen.
BEACHTEN SIE FOLGENDE PUNKTE BEI DER MONTAGE:
1. Verwenden Sie zum Anschluss des Stroms den ACC- und nicht den ACC/StartAnschluss.
2. Wenn Sie den ACC/Start-Anschluss verwenden, ist es möglich, dass sich der
Monitor beim Starten des Fahrzeugs abschaltet.
3. Wird der Monitor aus diesem Grund ausgeschaltet, müssen Sie das Gerät
erneut einschalten.
Anmerkung
Zubehör Schrauben:
1: M4: 0,7 L= 6 mm Schraube 10x
2: M4: 10 L= 5 mm Schraube 10x
Page 4
3
Montage
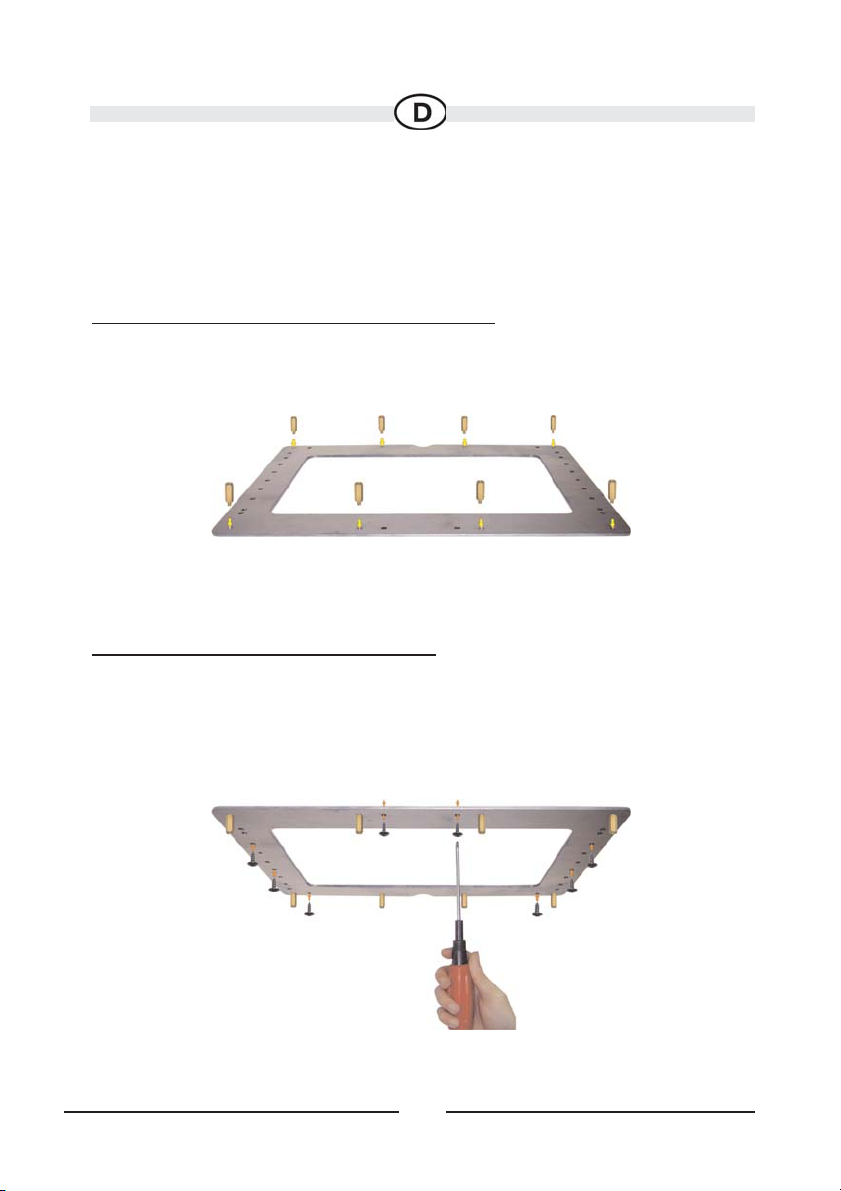
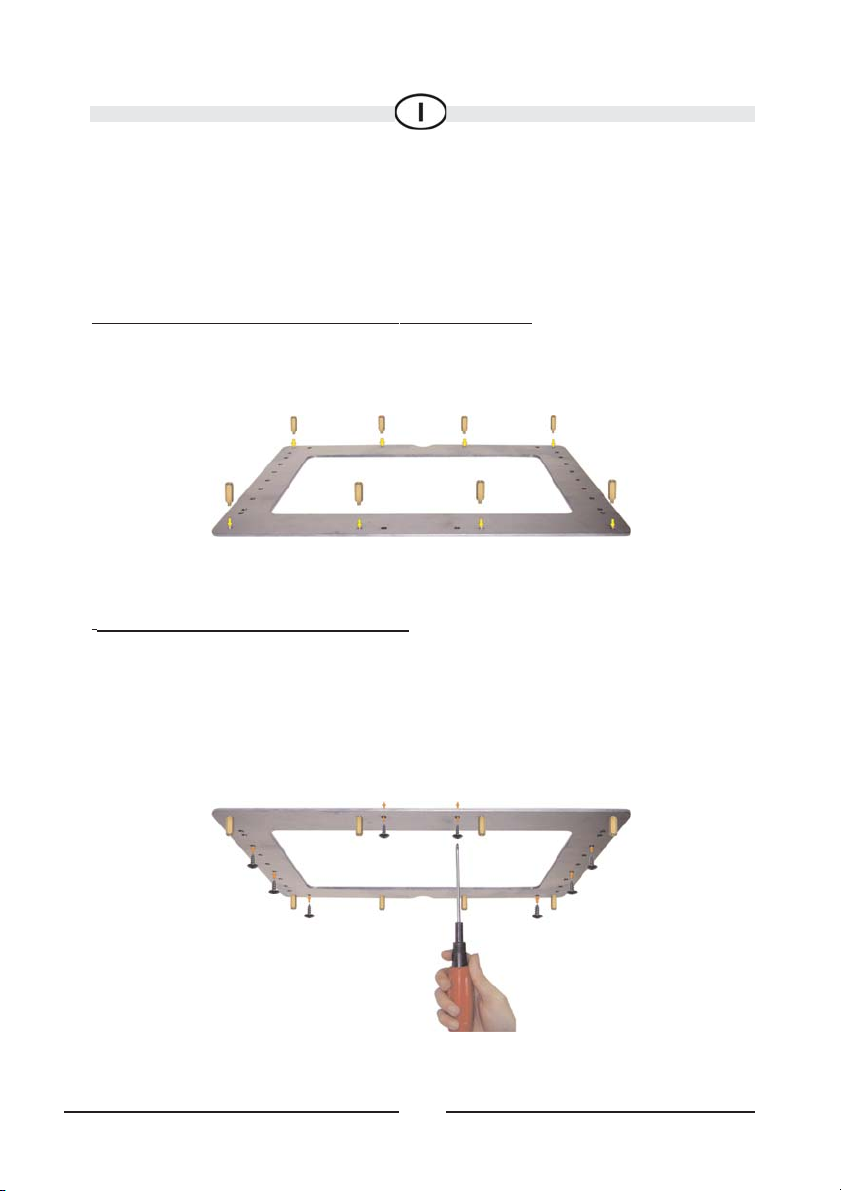
Schritt 1:
Vorsicht: Achten Sie auf die Ausrichtung der Haltevorrichtung.
Anleitung zum Festschrauben der Haltevor
richtung.
Anleitung zum Festschrauben des Monitors.
Page 5
4
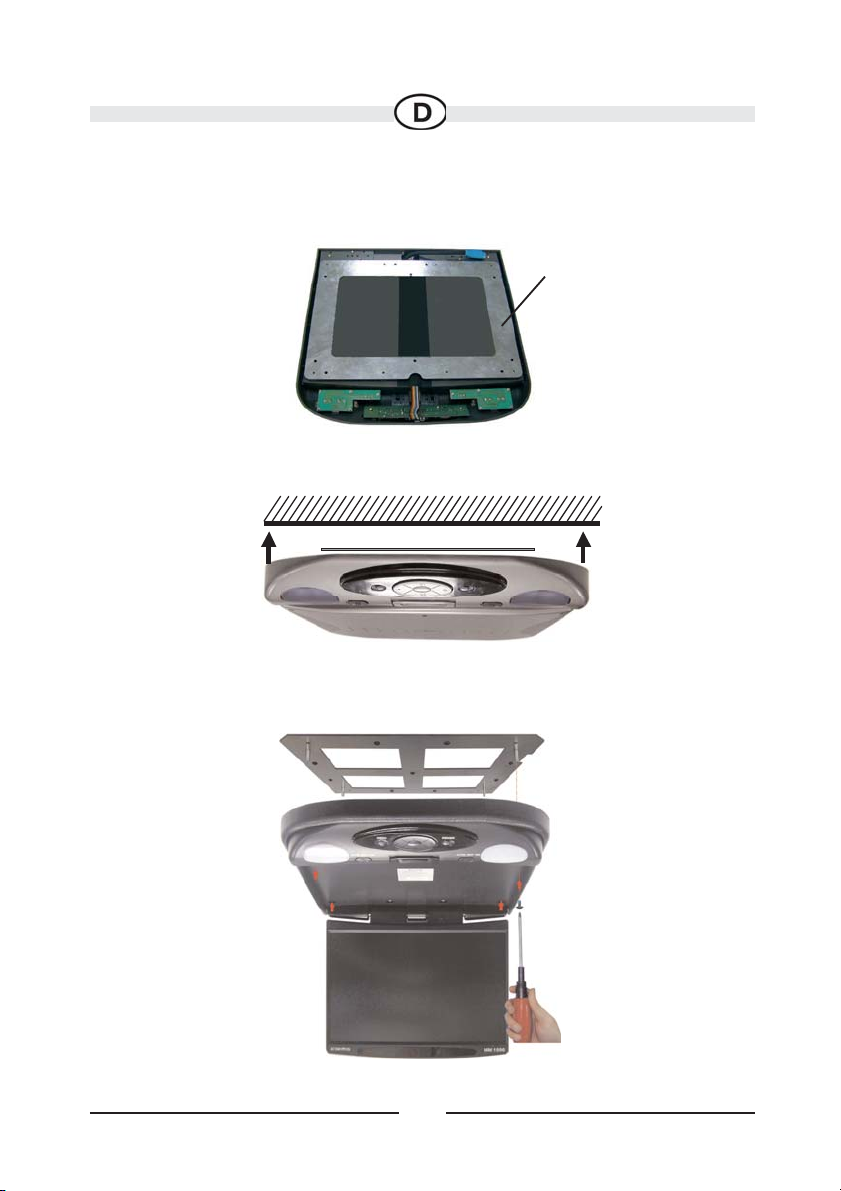
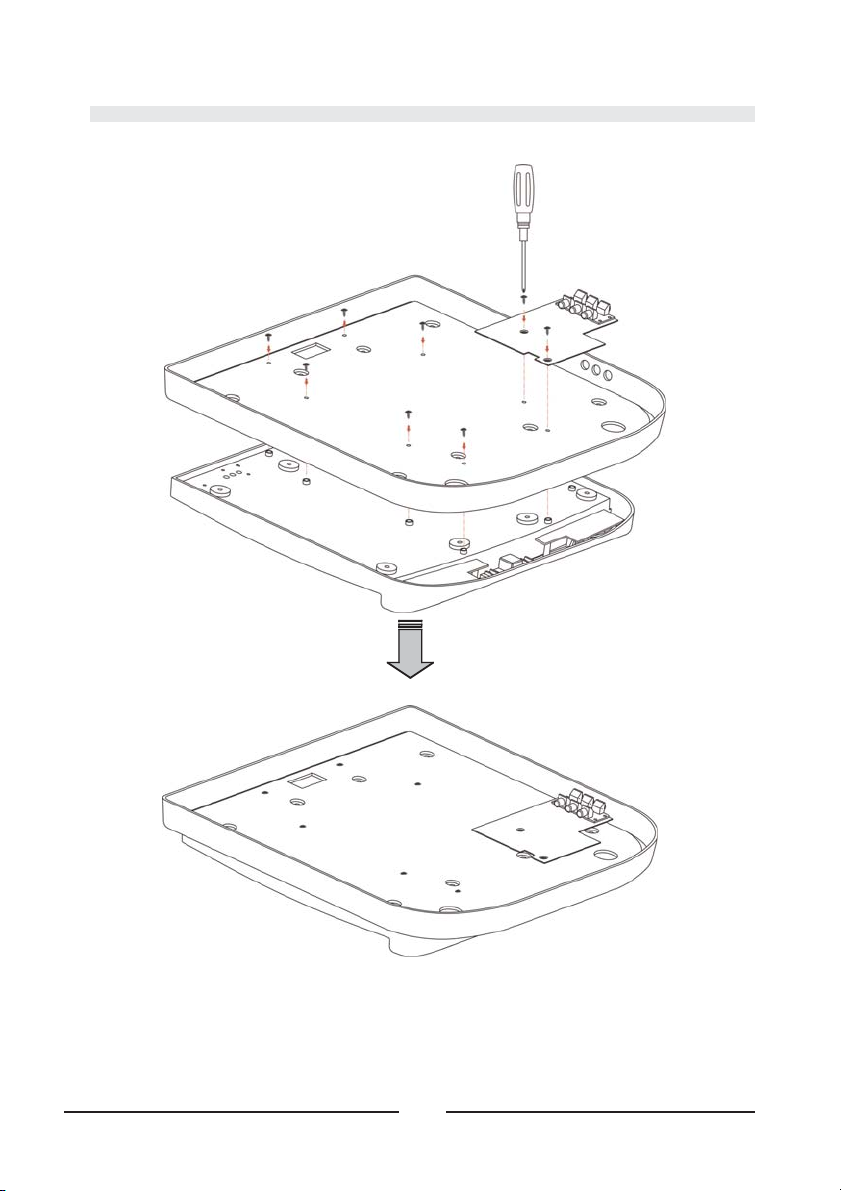
Schritt 2:
Befestigen Sie den Monitor am Fahrzeughimmel.
Schritt 3:
Befestigen Sie den Monitor mit den Schrauben an der Haltevorrichtung.
Dach
himmel
Befestigungsplatte
Page 6
5
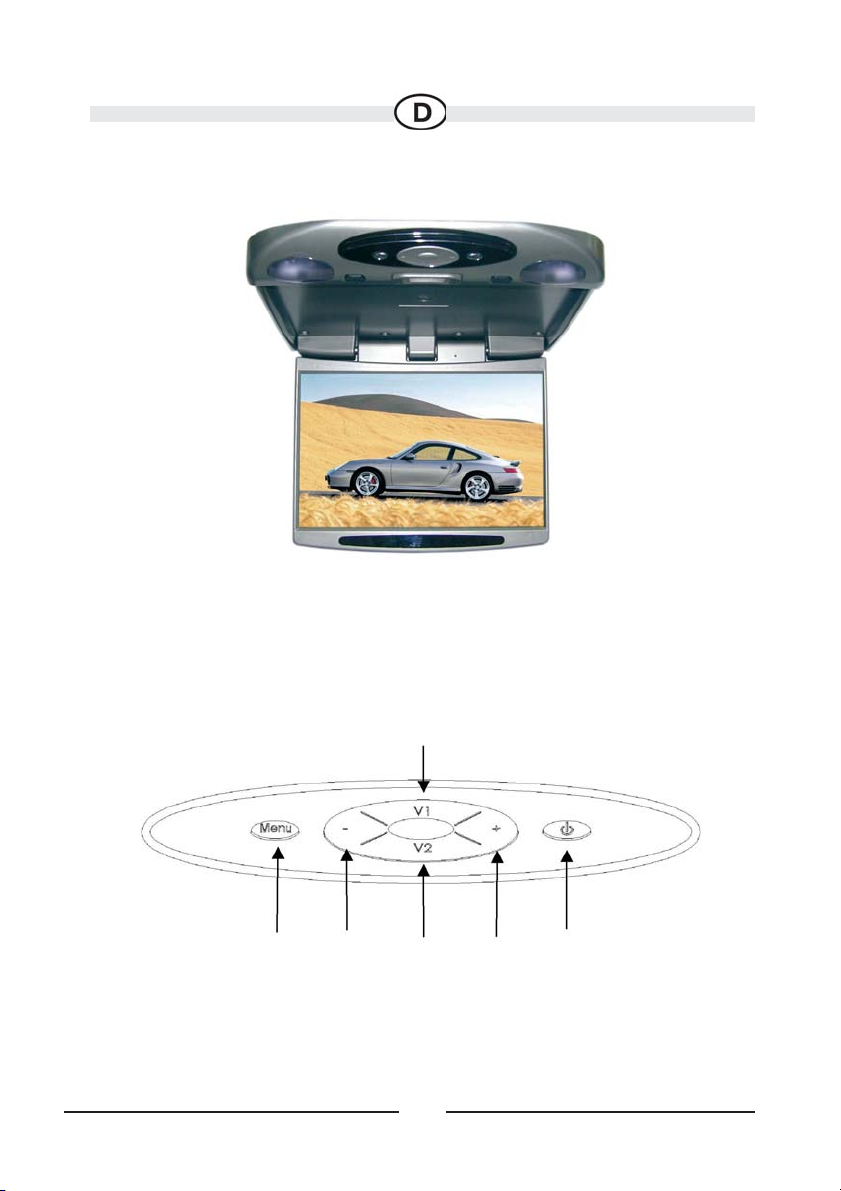
Installiert!
OSD-Funktion
Video-Bedientasten
1
5
3
6
4
2
Page 7

6
1. Einschalten: Durch Drücken dieser Taste schalten Sie den LCD-Monitor ein oder
aus.
2. V1 Video-Eingang: 1. Drücken Sie diese Taste, um die Video-Daten der Video
Quelle-1 wiederzugeben.
3. V2 Video-Eingang: 2. Drücken Sie diese Taste, um die Video-Daten der Video
Quelle-2 wiederzugeben.
4. Menu (Menü/Auswahl): Diese Taste dient zur Anzeige der
Funktionsmenüliste. Die Auswahl einer Funktion der Liste erfolgt durch Drücken der
Taste.
5. “+”: Drücken Sie diese Taste, um den Wert für die ausgewählte Funktion zu erhöhen.
6. “-”: Drücken Sie diese Taste, um den Wert für die ausgewählte Funktion zu verringern.
Page 8
7
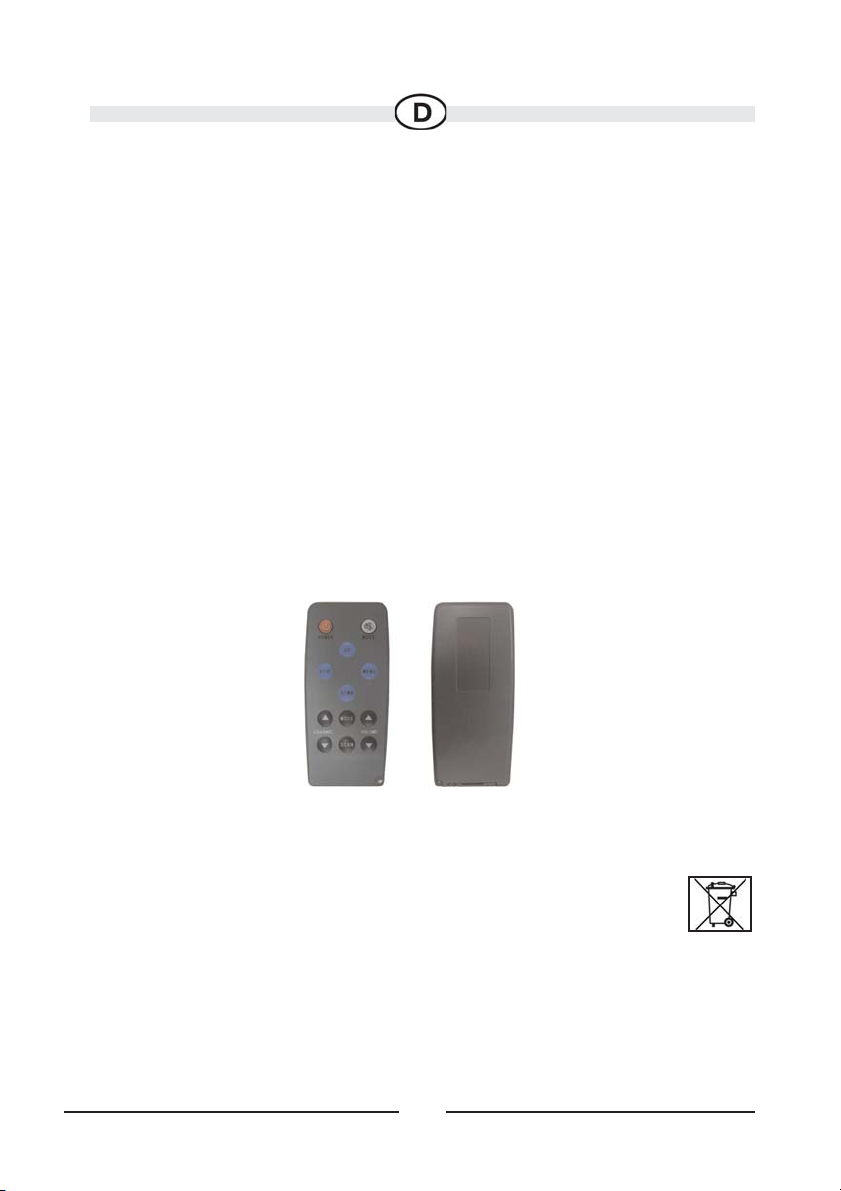
Fernbedienung:
Power (Einschalten): Durch Drücken dieser Taste schalten Sie den LCD-Monitor
ein oder aus.
Select (Auswahl): Durch Drücken dieser Taste wählen Sie zwischen der Quelle
Video 1 und Video 2.
Menu (Menü): Diese Taste dient zur Anzeige der Funktionsmenüliste. Die Auswahl
einer Funktion der Liste erfolgt durch Drücken der Taste.
Batterie Entsorgung:
Bitte führen Sie das Gerät am Ende seiner Lebensdauer den
zur Verfügung stehenden Rückgabe- und Sammelsystemen
zu.
1x CR 2025 Batterie
Page 9
8
Up (Nach oben): Drücken Sie diese Taste, um den Wert für die ausgewählte
Funktion zu erhöhen.
Down (Nach unten): Drücken Sie diese Taste, um den Wert für die ausgewählte
Funktion zu verringern.
Display (Anzeige): Hiermit wählen Sie den Anzeigemodus: 16:9/4:3/16:9 oder
Full (Vollbild).
Mute (Stummschaltung): Hiermit schalten Sie den Ton aus. Durch erneutes
Drücken dieser Taste wird der Ton wieder eingeschaltet.
OSD-Funktion
OSD-Menüliste
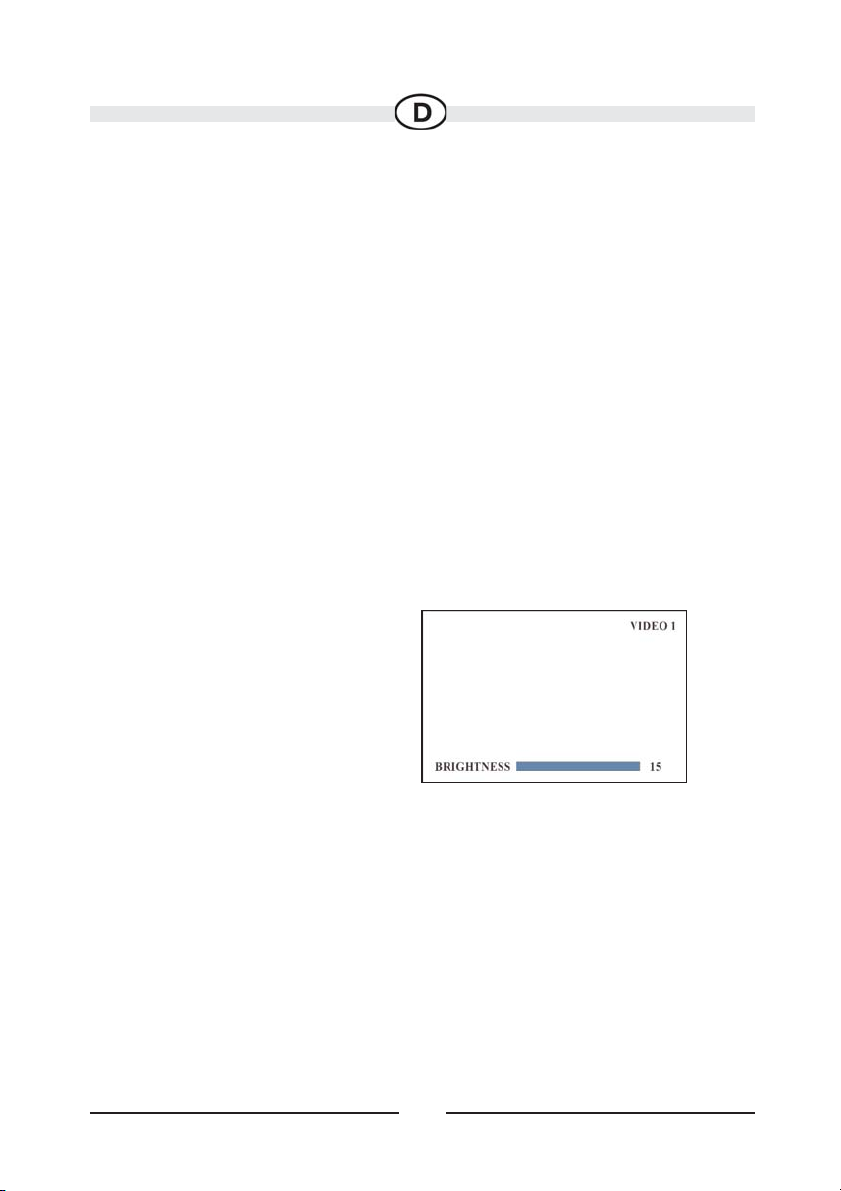
Brightness (Helligkeit):
·
Regelt die Bildhelligkeit.
· Einstellbereich: 0 ~ 15
Page 10
9
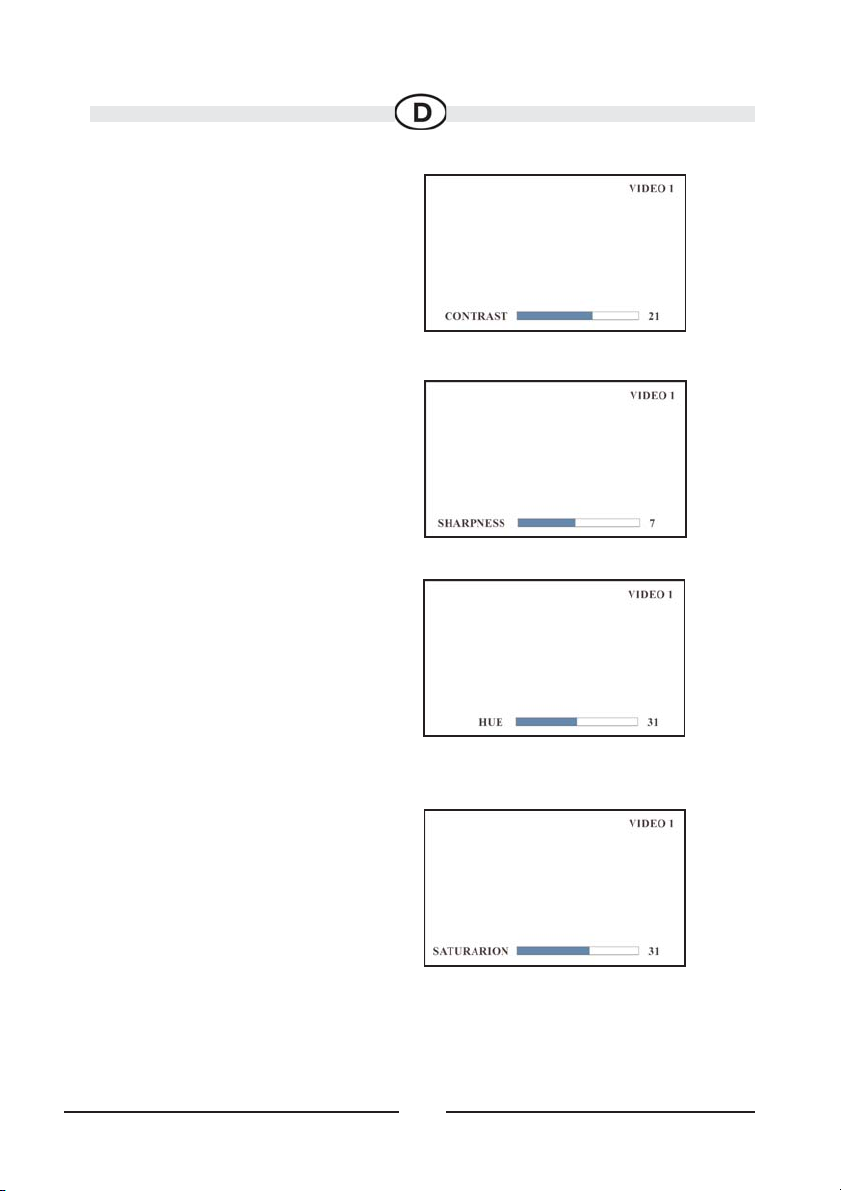
Contrast (Kontrast):
Regelt den Bildkontrast.
Einstellbereich: 0 ~ 31
Sharpness (Bildschärfe):
Regelt die Bildschärfe.
Einstellbereich: 0 ~15
Hue (Farbton):
Dient zum Einstellen des Farbtons.
Einstellbereich: 0 ~ 62
Saturation (Sättigung):
Dient zum Einstellen der Farbsättigung.
Einstellbereich: 0 ~ 62
Page 11
10
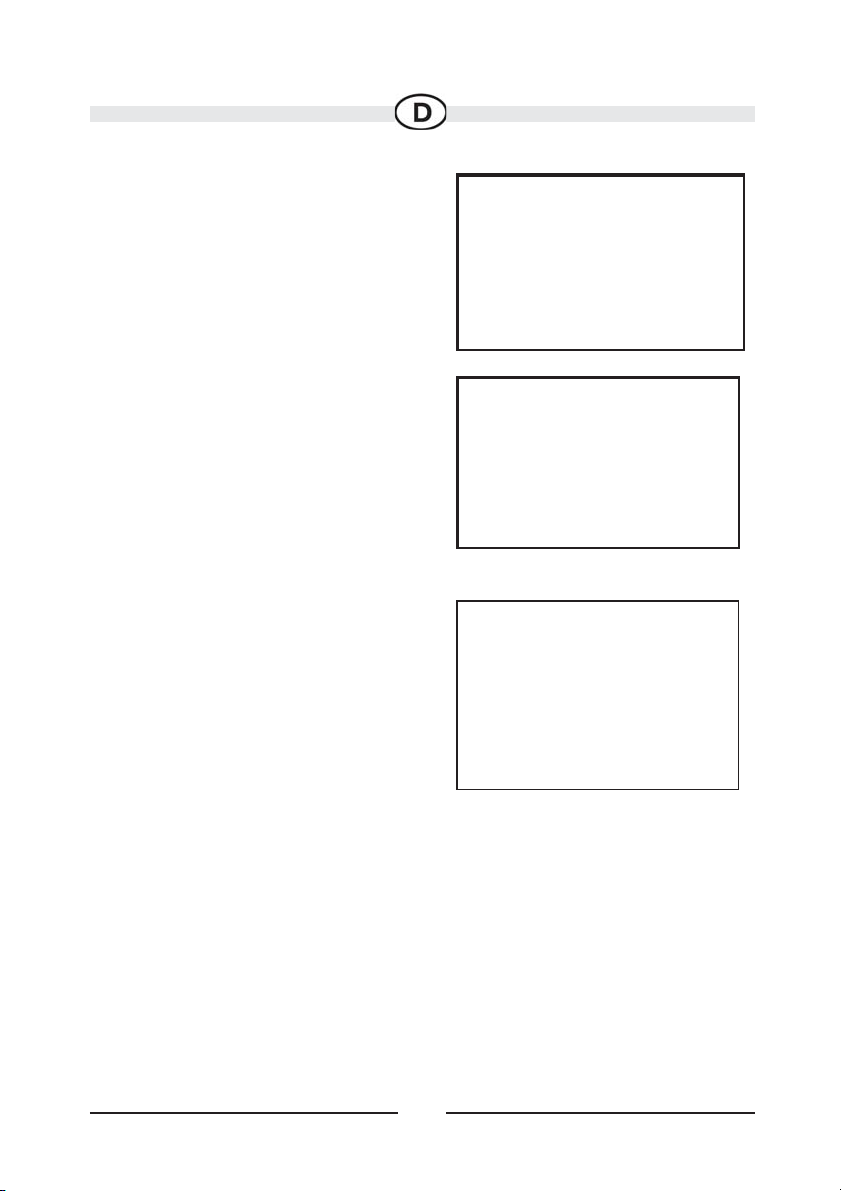
Default (Voreinstellung):
Stellt die Werkseinstellungen des
LCD-Monitors wieder her.
Display mode (Anzeigemodus):
Hiermit wählen Sie den
Anzeigemodus: 16:9/4:3
16:9 oder Full (Vollbild).
Save and Exit
(Speichern und Beenden):
Speichert die Einstellung und
wechselt zum Menümodus.
VIDE O 1
DEFAULT (VX.XX)
VIDE O 1
DISPLAY MODE 16:9
VIDE O 1
SAVE AND EXIT
Page 12
11
Video Source 2 Input:
Page 13
12
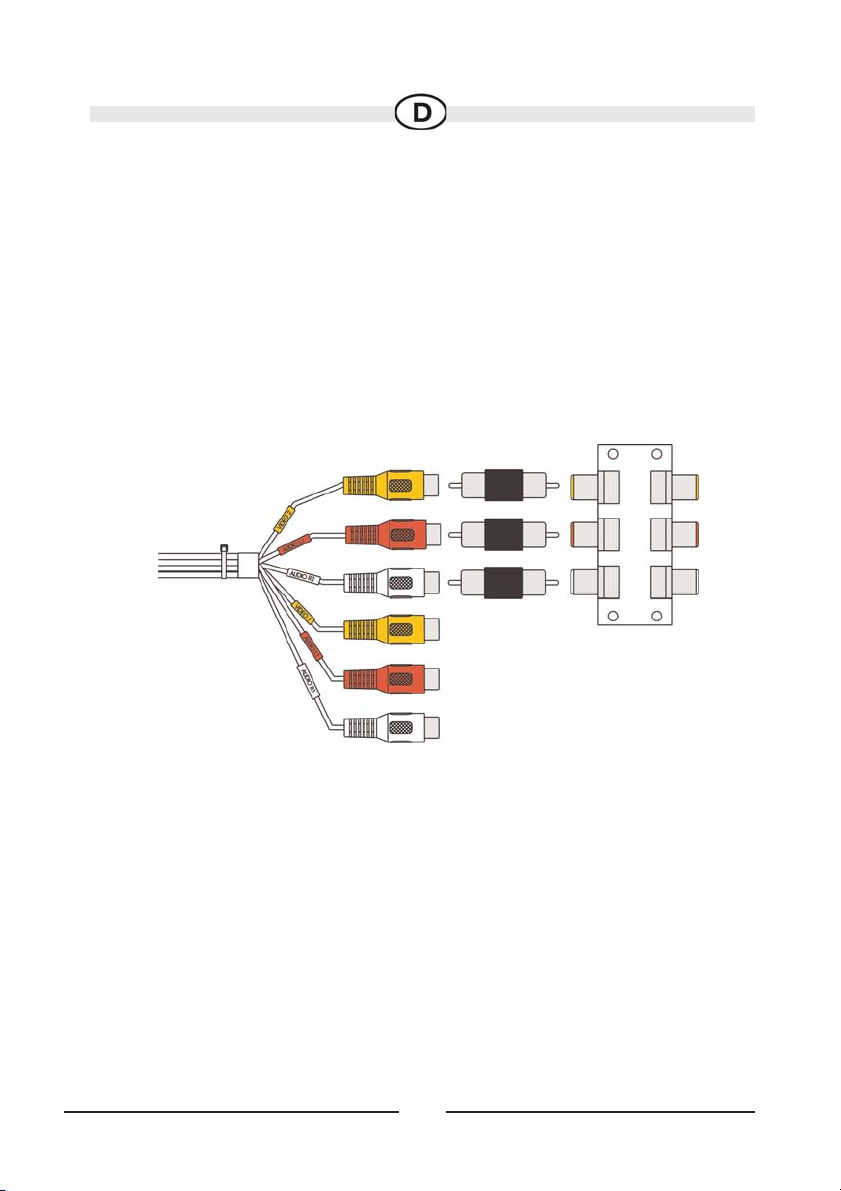
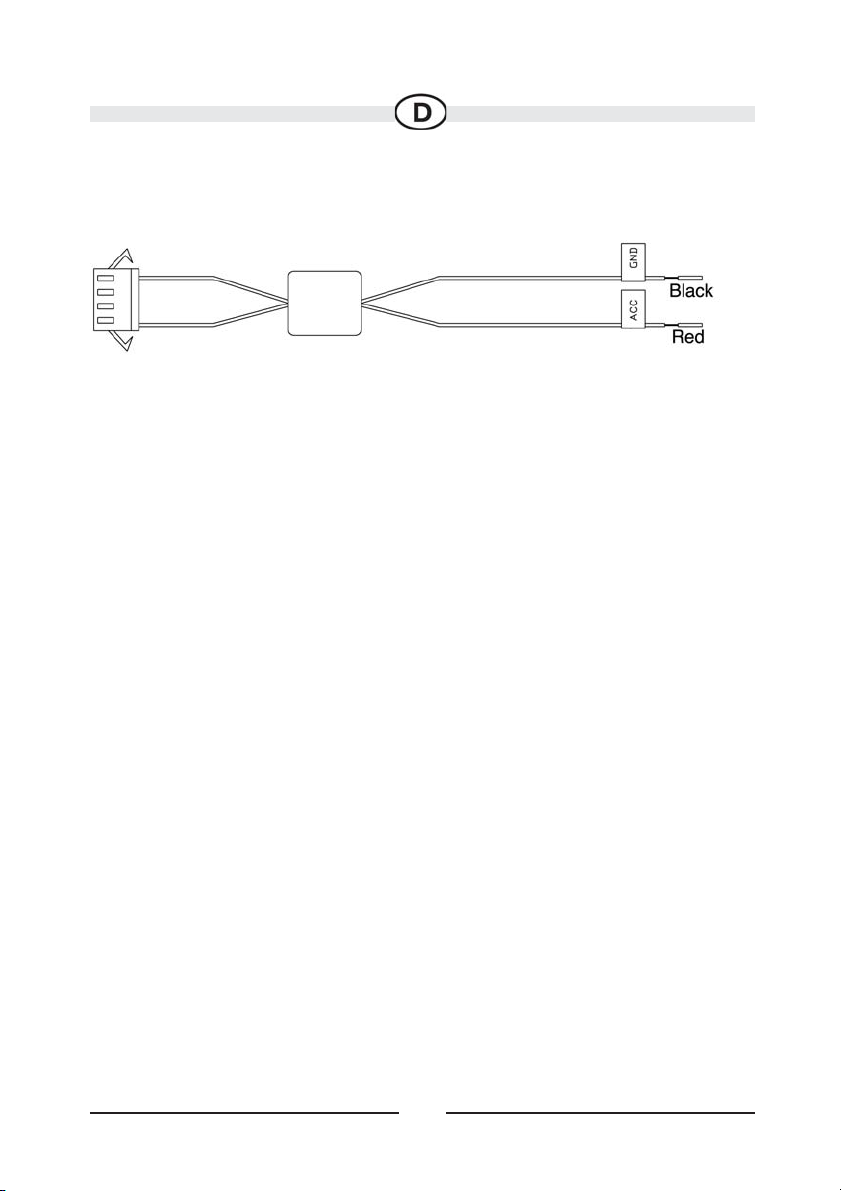
Beschreibung des Zubehörs:
(Masse)
(+12V)
Page 14
13
Page 15

14
Abmessungen:
Page 16

15
Abmessungen der Haltevorrichtung mit Monitor
*Abmessungen in mm
Page 17

16
Spezifikationen
15,4 Zoll TV-System für Fahrzeuge
Auflösung: 1280 (H) x 800 (V)
Anzeigebereich: 331,2 (B) x 207,0 (H)
Größe: 15,4” TFT
Bildhelligkeit: 450cd
2
( typisch)
Reaktionszeit: Ansteigend: 9 ms (typisch)
Abfallend: 16 ms ( typisch)
Sichtwinkel: Oben=50°, Unten=50°
Links=65°, Rechts=65°
Video-Eingang: Composite Video (RCA)(F) x2
(NTSC, PAL, SECAM)
Audio-Eingang: Stereo-Sound-Eingang (RCA)(F) x 2
TV-Signaleingang: NTSC, PAL, SECAM
Stromanschluss: DC 12~35 V, 3 A (max)
Steuerung: Bedienung über Bildschirmtasten (6 Tasten)
Fernbedienung
Einstellung: Helligkeit
Kontrast
Bildschärfe
Farbton
Sättigung
Formatumschaltung: 16:9/16:9 Full/4:3
Leistungsaufnahme: 20 W (max)
Temperatur: Betrieb: 0~50°C, Lagerung: 0~60°C
Gewicht: 4 kg ± 200 g
Page 18

17
Content
- Precaution: p. 18
- Installation: p. 19
- OSD function: p. 21
- Remote control function: p. 23
- Content of OSD function: p. 24
- Discription of accesories: p. 28
- Dimension: p. 29
- Specification: p. 31
- Warranty, Warranty Card: p. 47
Page 19

18
Precaution
1. Do not apply Pressure to the screen
2. Do not sprinkle any liquid to clean LCD. If you need to clean it, please use LCD
Clean cloth.
3. Please do not add any parts or use any accessory which is not provided from the
manufacturer.
4. Please do not use and store in the high Temperature. (Storage 5~48°, Operating
5~39°)
5. When you connect cable, please make sure Anode (Positive) and Cathode
(Negative) is correct. If incorrect, it might damage your LCD.
6. Please be careful when moving the monitor, in case to damage the LCD.
WHEN YOU DO THE INSTALLATION:
1. Please connect the power to ACC, instead of ACC/Start.
2. If you connect the power to ACC/Start, the monitor might be shutdown when you
start the engine of car.
3. If the monitor thus shutdown due to this reason, please re-start the power of the
car.
Remark
Accessoris
1: M4: 0.7 L= 6 mm screw 10x
2: M4: 10 L= 5 mm screw 10x
Page 20

19
Installation
Step 1:
Attention: It’s directional for the mounting bracket.
Instr
uction to fix the screw of the mounting bracket.
Instruction to fix the screw of the monitor.
Page 21

20
Step 2:
Fix the monitor on the car roof.
Step 3:
Fix the monitor on the iron mounting bracket with the screws.
Page 22

21
COMPLETED !
OSD function
VIDEO control keys
1
5
3
6
4
2
Page 23

22
1. Power: When you push this button, it will Power ON or OFF the LCD.
2. V1 Video input: 1. When you push this button, it will show the picture from
video 1.
3. V2 Video input: 2. When you push this button, it will show the picture from
video 2.
4. MENU/SELECT: Show function menu list and select the function on the menu,
when you push this key.
5. ” +“: When you push this button, it will increase the function that you selected.
6. ” - “: When you push this button, it will decrease the function that you selected.
Page 24

23
Remote control function
POWER: When you push this button, it will Power On or Off the LCD.
SELECT: Select Video 1 or Video 2 Input, when you push this key.
MENU: Show Function Menu List and Select the function on the menu, when you
push this key.
Battery disposal:
At the end of the product´s useful life, please dispose of it
at appropriate collection points provided in your country.
1x CR 2025 Battery
Page 25

24
UP: When you push this button, it will increase the function that you selected.
DOWN: When you push this button, it will decrease the function that you selected.
DISPLAY: Adjust the display mode to 16:9/4:3/16:9 FULL.
MUTE: Mute the audio. When you push this key one more time, it will stop the
“Mute” mode.
Content of OSD Function
OSD MENU LIST
BRIGHTNESS:
Adjust the brightness of the Screen.
Adjustment range: 0 ~ 15
Page 26

25
CONTRAST:
Adjust the Contrast of the Screen
Adjustment range: 0 ~ 31
SHARPNESS:
Adjust the Sharpness of the Screen
Adjustment range: 0 ~15
HUE:
Adjust HUE Function
Adjustment range: 0 ~ 62
SATURATION:
Adjust the saturation of the picture
Adjustment range: 0 ~ 62
Page 27

26
DEFAULT:
Return to the original setting of the LCD.
DISPLAY MODE:
Adjust the display mode to 16:9, 4:3
16:9 or FULL.
SAVE AND EXIT:
Save your personal setting and exit
To menu mode.
VIDE O 1
DEFAULT (VX.XX)
VIDE O 1
DISPLAY MODE 16:9
VIDE O 1
SAVE AND EXIT
Page 28

27
Gelb an Gelb
Rot an Rot
Weiß an Weiß
Video Source 2 Input:
Page 29

28
Description of accessories:
Chart 2:
(Ground)
(+ 12V)
Page 30

28
Mounting mainmonitor with trimring:
Page 31

29
Outside dimension
Page 32

30
Mounting bracket dimension with screen placing
*Dimension in mm
Page 33

31
Specification
Flip-down Overhead Display 15.4 Inch
Resolution: 1280 (H) x 800 (V)
Display area: 331.2 (W) x 207.0 (H)
Size: 15.4" TFT
Brightness: 450 cd
2
(Typ)
Response time: Rising 9ms (Typ)
Fallillg: 16ms (Typ)
View angle: Top=50°, Bottom=50°
Left=65°, Right=65°
Video input: Composite Video (RCA)(F) x2
(NTSC,PAL,SECAM)
Audio input: Stereo Sound Input (RCA)(F) x2
TV signal input: NTSC,PAL,SECAM
Power input: DC 12~35V, 3A (Max)
Control function: Display Key (6 Key) Control
Remote Key Control
Adjustment: BRIGHTESS
CONTRAST
SHARPNESS
HUE
SATURATION
Format Switch: 16:9/16:9 Full/ 4:3
Power consumption: 20W (MAX)
Temperature: Working: 0~5°C, Storage: 0~60°C
Weight: 4kg ±200g
Page 34

32
Indice:
- Misure di sicurezza: p. 33
- Installazione: p. 34
- Funzione OSD p. 35
- Funzione telecomando p. 38
- Contenuto della funzione OSD p. 39
- Descrizione degli accessori p. 42
- Dimensioni p. 45
- Soecifiche techniche p. 46
- Warranty, Warranty Card p. 47
Page 35

33
Misure di sicurezza
1. Non esercitare pressione sullo schermo.
2. Non usare detergenti liquidi per pulire lo schermo. Se è necessario pulirlo, utilizzare uno straccio pulito per LCD.
3. Non aggiungere componenti e non utilizzare accessori ad eccezione di quelli forniti dal produttore.
4. Non utilizzare e non conservare ad elevate temperature. (Conservazione 5~48°,
funzionamento 5~39°).
5. Quando si collega il cavo, verificare la correttezza dei poli positivo (anodo) e
negativo (catodo). In caso contrario lo schermo LCD potrebbe essere danneggiato.
6. Adoperare la massima cura nello spostare il monitor, per non danneggiare lo
schermo LCD.
PROCEDURA DI INSTALLAZIONE
1. Collegare l’alimentazione ad ACC anziché ad ACC/Start.
2. Se si collega l’alimentazione ad ACC/Start, il monitor potrebbe spegnersi quando si mette in moto l’auto.
3. Se il monitor dovesse spegnersi per questo motivo, rialimentare l’impianto elettrico dell’auto.
Nota:
1: M4: 0,7 L= vite da 6 mm 10x
2: M4: 10 L= vite da 5 mm 10x
Page 36
34
Installazione
Fase 1
Attenzione: è direzionale per il supporto di montaggio.
Istr
uzioni per serrare la vite del supporto di montaggio.
Istruzioni per serrare la vite del monitor.
Pannello anteriore
Page 37

35
Fase 2
Fissare il monitor al tetto dell’auto.
Fase 3
Fissare il monitor sul supporto di montaggio in ferro con le apposite viti.
Staffa di montaggio
Page 38

36
COMPLETATO
Funzione OSD
Tasti di comando VIDEO
1
5
3
6
4
2
Page 39

37
1. Power: premendo questo pulsante, il display LCD viene acceso (ON) e spento
(OFF).
2. Ingresso V1 Video: 1. Premendo questo pulsante, le immagini vengono
mostrate sul video 1.
3. Ingresso V2 Video: 2. Premendo questo pulsante, le immagini vengono
mostrate sul video 2.
4. MENU/SELECT: premendo questo tasto, viene visualizzato l’elenco dei menu
funzione ed è possibile selezionare la funzione desiderata del menu.
5. ” +“: premendo questo pulsante, si incrementa il valore della funzione scelta.
6. ” - “: premendo questo pulsante, si riduce il valore della funzione scelta.
Page 40

38
FUNZIONE TELECOMANDO
POWER: premendo questo pulsante, il display LCD viene acceso (ON) e spento
(OFF).
SELECT: premendo questo pulsante, è possibile selezionare l’ingresso Video 1 o
Video 2.
MENU: premendo questo tasto, viene visualizzato l’elenco dei menu funzione ed è
possibile selezionare la funzione desiderata del menu.
Batteria eliminazione
Onde tutelare l`ambiente, non buttate l`apparecchio tra i
normali rifiuti al termine della sua vita utile, ma portatelo
presso i punti di raccolta specifici per questi rifiuti previsti
dalla normativa vigente.
1 x CR 2025
Page 41

39
UP: premendo questo pulsante, si incrementa il valore della funzione scelta.
DOWN: premendo questo pulsante, si riduce il valore della funzione scelta.
DISPLAY: consente di regolare la modalità del display su 16:9/4:3/16:9/FULL.
MUTE: consente di rimuovere l’audio. Premendo questo tasto una seconda volta, la
modalità “Mute” viene disattivata.
Contenuto della funzione OSD
OSD MENU LIST
BRIGHTNESS (LUMINOSITÀ):
Consente di regolare la luminosità
dello schermo.
Gamma di regolazione: 0 ~ 15
Page 42

40
CONTRAST (CONTRASTO):
Consente di regolare il contrasto
dello schermo.
Gamma di regolazione: 0 ~ 31
SHARPNESS (NITIDEZZA):
Consente di regolare la nitidezza
dello schermo.
Gamma di regolazione: 0 ~15
HUE (COLORE):
Consente di regolare la funzione HUE.
Gamma di regolazione: 0 ~ 62
SATURATION (SATURAZIONE):
Consente di regolare la saturazione
dll’immagine.
Gamma di regolazione: 0 ~ 62
Page 43

41
DEFAULT (IMPOSTAZIONE
PREDEFINITA):
Consente di ripristinare
l’impostazione originale del display LCD.
DISPLAY MODE:
consente di regolare la modalità del display su 16:9, 4:3, 16:9 o FULL.
SAVE AND EXIT:
consente di salvare le impostazioni personali e uscire per tornare alla modalità
menu.
VIDE O 1
DEFAULT (VX.XX)
VIDE O 1
DISPLAY MODE 16:9
VIDE O 1
SAVE AND EXIT
Page 44

42
Descrizione degli accessori
Schema 1
Giallo per Giallo
Rosso per Rosso
Bianco per Bianco
Page 45

43
Schema 2
Mass
(+12V)
Page 46

Montaggio del monitor principale con anello di rifinitura.
Page 47

44
Dimensioni esterne
Page 48

45
Dimensioni del supporto di montaggio con posizionamento dello schermo
Dimensioni in mm
Page 49

46
Specifiche tecniche
Monitor per auto da 15,4 pollici
Risoluzione: 1280 (H) x 800 (V)
Area display: 331,2 (W) x 207,0 (H)
Dimensioni: 15,4” TFT
Luminosità: 450 cd2 (valore tipico)
Tempo di risposta: Salita 9ms (valore tipico)
Discesa: 16ms (valore tipico)
Angolo visivo: Superiore=50°, Inferiore=50°
Sinistro=65°, Destro=65°
Ingresso Video: Video Composite (RCA)(F) x2
(NTSC, PAL, SECAM)
Ingresso audio: Ingresso audio stereo (RCA)(F) x2
Ingresso segnale TV: NTSC, PAL, SECAM
Alimentazione: DC 12~35V, 3A (max)
Funzione di comando: comando a visualizzazione tasti (6 tasti)
Telecomando a tasti
Regolazione BRIGHTESS (LUMINOSITÀ)
CONTRAST (CONTRASTO)
SHARPNESS (NITIDEZZA)
HUE (COLORE)
SATURATION (SATURAZIONE)
Fomato: 16:9
Assorbimento: 20W (max)
Temperatura: di esercizio: 0~50°C, di conservazione: 0~60°C
Peso: 4kg ± 200g
Page 50

La Vostra garanzia
Gentile Cliente,
grazie per aver acquistato questo prodotto Audiovox, prodotto studiato secondo i più
elevati standard di qualità e sottoposto a test rigorosi. Se utilizzato correttamente, esso
funzionerà perfettamente per molti anni.
La garanzia copre la sostituzione gratuita dei ricambi e la prestazione di manodopera
per tutti i prodotti Audiovox di elettronica di consumo venduti in Italia.
La responsabilità legale di soddisfare le richieste di servizi di garanzia per il Vostro
prodotto è del rivenditore dal quale avete acquistato il prodotto : se il rivenditore non
fosse abilitato alle riparazioni, questi si può rivolgere per qualsiasi lavoro ad un Centro
Assistenza Autorizzato.
La garanzia è valida per un periodo di 24 mesi dalla data di acquisto, purché il
prodotto sia trattato in modo appropriato secondo le istruzioni d’uso, dietro presentazione
del documento fiscale originale indicante la data d’acquisto e il nome del rivenditore con
la descrizione del prodotto (modello e numero di matricola).
La garanzia Audiovox non è valida nei seguenti casi :
i documenti sono stati alterati o resi illeggibili.
il modello e/o il numero di matricola del prodotto sono stati alterati, cancellati,
rimossi o resi illeggibili.
la riparazione è stata effettuata da personale non autorizzato.
per negligenza o trascuratezza nell’uso (mancata osservanza delle istruzioni per il
corretto funzionamento dell’apparecchio), errata installazione, danni da trasporto
ovvero di circostanze che, comunque, non possono farsi risalire a difetti di
fabbricazione dell’apparecchio.
non sono inoltre coperti dalla garanzia i prodotti modificati o adattati per la ricezione
di trasmissioni al di fuori del paese per il quale sono stati progettati e costruiti,
approvati e/o autorizzati o per qualsiasi danno provocato da queste modifiche.
Si raccomanda di leggere attentamente le istruzioni d’uso prima di interpellare il
Centro Assistenza Autorizzato.
Audiovox è un marchio distribuito per l’Italia da :
Siemens VDO Trading srl
Via Vialba 50
20026 Novate Milanese (MI)
Servizio Tecnico
Tel. 02 35 680 403
Page 51

Wir gratulieren Ihnen! Durch Ihre kluge Wahl sind Sie Besitzer eines Audiovox Mobile Video-Produktes geworden. Audiovox Mo-
bile Video-Produkte erfreuen sich aufgrund der hohen Qualität eines ausgezeichneten Rufes weltweit. Dieser hohe Qualitätsstandard ermöglicht es für Audiovox Mobile Video-Produkte 2 Jahre Garantie zu gewähren.
Die Produkte werden während des gesamten Fertigungsvorganges laufend kontrolliert und geprüft. Im Servicefall beachten Sie bitte folgendes:
1. Die 2-jährige Garantiezeit beginnt mit dem Kauf des Produktes und gilt nur für den Erstbesitzer.
2. Während der Garantiezeit beseitigen wir etwaige Mängel, die nachweislich auf Material- oder Fabrikationsfehler beruhen, nach
unserer Wahl durch Austausch oder Nachbesserung der defekten Teile. Weitergehende Ansprüche, insbesondere auf Minderung,
Wandlung, Schadenersatz oder Folgeschäden sind ausgeschlossen. Die Garantiezeit wird von einer Garantieleistung durch uns nicht berührt.
3. Am Produkt dürfen keine unsachgemäßen Eingriffe vorgenommen worden sein.
4. Bei Inanspruchnahme der Garantie wenden Sie sich bitte zunächst an Ihren Fachhändler. Sollte es sich als notwendig erweisen,
das Produkt an uns einzuschicken, so sorgen Sie bitte dafür, daß • das Produkt in einwandfreier Originalverpackung verschickt wird,
• die Kontrollkarte ausgefüllt dem Produkt beiliegt, • die Kaufquittung beigefügt ist.
5. Von der Garantie ausgenommen sind: • Leuchtmittel • Verschleißteile • Transportschäden, sichtbar oder unsichtbar (Reklamationen für solche Schäden müssen umgehend bei der Transportfirma, Bahn oder Post eingereicht werden.) • Kratzer in Metallteilen, Frontabdeckungen u.s.w.
(Diese Defekte müssen innerhalb von 5 Tagen nach Kauf direkt bei Ihrem Händler reklamiert werden.) • Fehler, die durch fehlerhafte Aufstellung, falschen Anschluß, unsachgemäße Bedienung (siehe Bedienungsanleitung), Beanspruchung oder äußere gewaltsame Einwirkung entstanden sind. • Unsachgemäß reparierte oder geänderte Geräte, die von anderer Seite als von uns geöffnet wurden. • Folgeschäden an fremden
Geräten • Kostenerstattung bei Schadensbehebung durch Dritte ohne unser vorheriges Einverständnis • Batterien und Akkus.
Congratulations! You have made a wise selection in becoming the owner of a Audiovox Mobile Video equipment. Due to high
quality Audiovox products have earned an excellent reputation through the western world. And this high quality standard enables us to grant
a 2-years warranty for Audiovox Mobile Video products.
The equipments are checked and tested continously during the entire production process. In case you have problems with your
Audiovox Mobile Video equipment, kindly observe the following:
1. The 2-years guarantee period commences with the purchase of the component and is applicable only to the original owner.
2. During the guarantee period we will rectify any defects due to faulty material or workmanship by replacing or repairing the defective part at
our discretion. Further claims, and in particular those for price reduction, cancellation of sale, compensation for damages or
subsequential damages, are excluded. The guarantee period is not altered by the fact that we have carried out guarantee work.
3. Unauthorized tampering with the equipment will invalidate this guarantee.
4. Consult your authorized dealer first, if guarantee service is needed. Should it prove necessary to return the component to the factory, please insure that • the component is packed in original factory packing in good condition • the quality control card has been filled out and enclosed with the component, • your enclose your receipt as proof of purchase.
5. Excluded from the guarantee are: • Illuminates • Wear parts • Shipping damages, either readily apparent or concealed (claims for such damages must be lodged immediately with forwarding agent, the railway express office or post office). • Scratches in cases, metal components,
front panels, etc. (You must notify your dealer directly of such defects within three days of purchase.) • Defects caused by incorrect installation or connection, by operation errors (see operating instructions), by overloading or by external force. • Equipments which have beenrepaired
incorrectly or modified or where the case has been opened by persons other than us. • Consoquential damages to other equipments. • Reimbursement of cools, without our prior consent, when repairing damages by third parties • batteries and battery packs.
Toutes nos félicitations! Vouz avez bien choisi et êtes le propriétaire heureux d’un produit Audiovox. Les produits Audiovox ont
une excellente réputation pour leur bonne qualité. Pour cette raison, nous accordons 2 ans de garantie sur tous les produits Audiovox.
Les appareils sont soumis pendant toutes les opérations de fabrications à des contrôles et vérifications constants. Si, pourtant, vous
rencontrez des difficulés avec votre appareil Audiovox veuillez tenir compte de ce qui suit:
1. La garantie débute avec l’achat de l’appareil et est valable uniquement pour le premier propriétaire.
2. Pendant la période de garantie nous réparons les dommages provenant des défauts de matériel ou de fabrication et nous procédons, à
notre guise, à l’échange ou à la réparation des pièces défectueuses.
3. Aucune réparation impropre ne doit avoir été effectuée à l’appareil.
4. Lors d’une demande de garantie, veuillez vous adresser en premier lieu à votre distributeur. Si ce dernier décide que l’appareil doit nous être
retourné, veuillez tenir compte que: • l’appareil soit expédié dans son ermballage d’origine, • la carte de contrôle dûment remplie soit jointe, •
le bon d’achat soit joint.
5. Ne sont pas compris dans la garantie: • Matériel d’éclairage • Pièces d’usure • Avaries de transport, visibles ou non (de telles réclamations doivent être faites immédiatement auprès du transporteur, du chermin de fer ou de la poste). • Des rayures sur le boîtier, pièces métalliques, couvercles etc. (ces dommages doivent être signalés directement à votre distributeur dans les trois jours suivant l’achat). • Dommages
résultant d’un raccordement incorrect, maniement incorrect (voir instructions de service), surcharge ou application de force extérieure. • Appareils réparés non conformément ou modifiés et qui ont été ouverts par une personne autre que nous. • Dommages ultérieurs à d’autres appareils. • Remboursement des frais à des tiers ayant effectué les réparations sans notre accord préalable • Accus et batteries.
D
GB
F
Page 52

G
ARANTIEKARTE
W
ARRANTY
C
ARD
Typ /Type
Serien-Nr./Serial-No.
Name und Anschrift des Händlers/Stempel
Name and address of the dealer/stamp
Käufer/Customer
Name/Name
Straße/Street
PLZ, Ort/City
Land/Country
Nur gültig in Verbindung mit Ihrer Kaufquittung!
No warranty without receipt!
Kaufdatum/buying date
Page 53

Audiovox Audio Produkte GmbH
Lise-Meitner-Str. 9 · 50259 Pulheim
Tel.: +49 2234/807-0 · Fax: + 49 2234/807-399
www.audiovox-germany.de
 Loading...