

Page 1
LCM972TS
12
7” Rearzone Touch Screen Monitor for:
VME 9122 TS
VME 9512 TS
VME 9312 TS
Page 2

Precaution 14
Accessories 15
Main Features 15
Discription for keys 16
Diagramm for connections 17
Basis operations 18
Parameters adjust 21
Warranty Card 46
13
Page 3
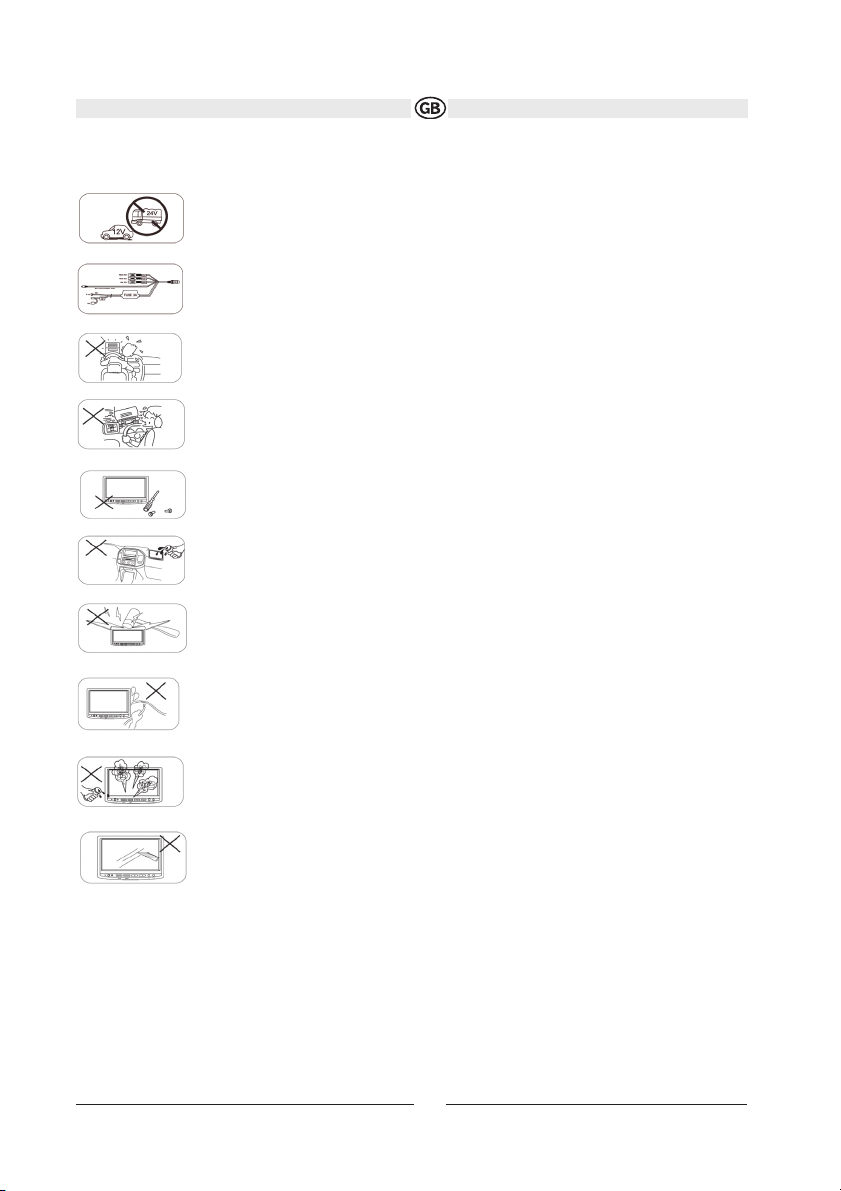
Precaution
Warning:
1. Only connect the unit to a 12-volt power supply with negative grounding
Warning:
2. Before installation, please make sure proper connections are conducted. Otherwise, the unit will
be damaged by short circut.
Warning:
3.Never install this unit where the operation & condition for safety driving is restrained
Warning
4.Never use the video display function in the front when driving to prevent the violation of laws &
regulations and also to reduce the risk of traffic accident.
Warning
5.Never disassemble or adjust the unit without any professional operation. For details, please consult any professional car shop / dealer for inquiry.
Warning
6.Never expose this unit to moisture or water for preventing electronic sparks or fires or other
damages.
Warning
7.No fierce impact to the LCD monitor when it is in open position for preventing the damage to any
mechanisms inside.
Warning
8.Please don't change the fuse on the power cord without professional guidanceusing improper
fuse may cause damage to this unit or even cause fire.
Warning
9.Please power off this unit at once and send it back to the after-sales service center or the dealer
/ distributor you purchased from if one of the following symptoms is found:(a) No audio output; (b)
No image output; (c) Water or other obstacle enters the unit; (d) Smoking; (e) Peculiar smell.
Warning
10.To prevent the damage to the screen avoid touching it with sharp objects.
PROMPT
1.If the front panel or the monitor is squalid, please use a clean silicone cloth and neutral detergent to wipe off the spot.
Using a rough cloth and non-neutral detergent such as alcohol for cleaning may result in scratching or decoloration to
the applicant.
2.If you have parked the car in hot or cold weather for a long time, please wait until the temperature in the car becomes normal before operating the unit.
3.Operate the unit correctly according to the manual instruction to prevent unnecessary problem. The guarantee won't
be valid if the problem is caused by inappropriate operation.
14
Subject to technical changes
Page 4
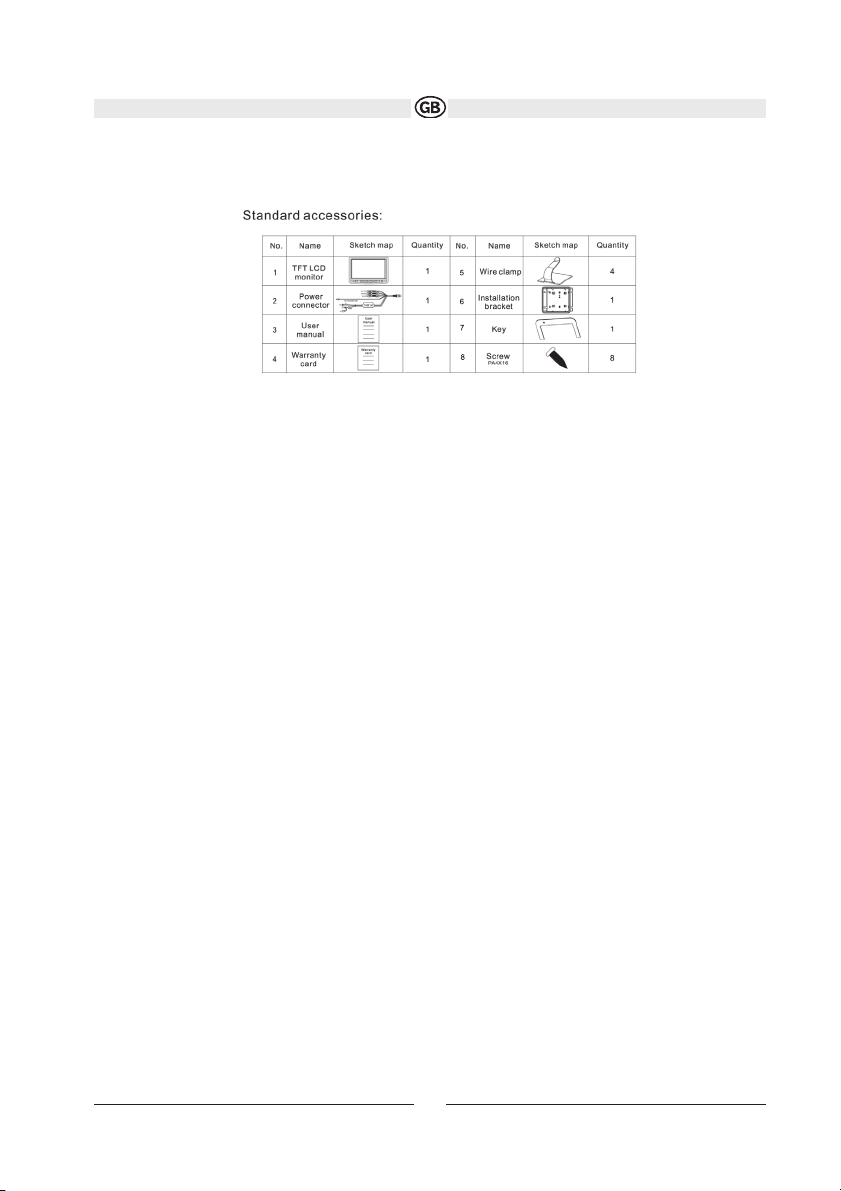
ACCESSORIES
MAIN FEATURES
• 7 inch true color TFT LCD display
• Touch screen function
• Auto Dimmer
• English OSD
• NORMAL / FULL / WIDE display mode
• Image mirror function
• Auto detect for NTSC / PAL
• BUS communication and transport control, connectable at VME 9122 TS, VME 9512 TS, VME 9312 TS
• 1 composite video / stereo audio signal input (RCA)
• 1 composite video / stereo audio signal input (Mini)
• Stereo headphone output
• Slim size and almighty installation methods
15
Subject to technical changes
Page 5

Description for Keys
1. Reset key
2. Induction window for surroundings rays
3. Receiving window for remote control
4. Power/Mute key
5. Source selection/Menu key
6. Volume down/down direction key
7. Volume up/up direction key
8. Output jack for earphone stereo
9. Input jack for external audio and video signal
16
Subject to technical changes
Page 6

Diagramm for connections
17
Subject to technical changes
Page 7

BASIC OPERATIONS
Power on / off
• Under standby mode, pressing the [POWER/MUTE] key briefly to turn the unit on.
• Under work mode, pressing and holding the [POWER/MUTE] key to turn the unit off.
Source switch
• To switch mode between play mode and menu mode, press the [SOURCE/ MENU] key briefly.
• To switch play mode between two AV input (AV1 and AV2), press and hold the [SOURCE/MENU] key.
Mute
• Under work mode, pressing the [POWER/MUTE] key briefly to close the audio output.
Volume icon is displayed when you touch the display bottom area. Touching the green icon of speaker to close the
audio output and the icon turns red. Touching the red icon of speaker to release MUTE function.Mute function is
released automatically if you adjust the volume under mute mode.
Volume adjust
Under play mode, pressing the [] [] key to adjust the volume step by step; pressing and holding the
[] [] key to adjust the volume continuously.
Volume icon is displayed when you touch the display bottom area. Touching the volume bar briefly to adjust the volume step by step; touching and holding to adjust the volume continuously.
18
Subject to technical changes
Page 8

PARAMETERS ADJUST
You can adjust the parameters according to the environment and your interest to get the best display effect.
Enter Main Menu
• To enter menu mode, press the [SOURCE/MENU] key or touch the top area of the display. The main menu will be
displayed as follows:
Enter Main Menu
• Under main menu mode, pressing and holding the [SOURCE/MENU] key or touching the exit option or stopping
operation for some seconds to exit main menu mode.
Enter Sub-Menu
You can enter sub-menu by following methods under the main menu:
• Touch the option you want to set directly (Need touch screen function to support).
• Press the [ ] [ ] key to select the option you want to set and then press the [SOURCE/MENU] key to confirm
19
Subject to technical changes
Page 9

PARAMETERS ADJUST
Parameter items are displayed after entering a sub-menu. You can adjust the values by touching, (Need touch
screen function to support.) or using the keys on the panel as well. The steps will be followings when you do the
operation by pressing the keys on the panel:
Pressing the [] [] key to select one item;
Pressing the [SOURCE/MENU] key to confirm;
Pressing the [] [] key to adjust the value.
Pressing the [SOURCE/MENU] key to exit current item;
Adjust values
PICTURE
The following menu will be displayed after entering the 'PICTURE' option:
You can adjust the values of brightness and contrast according to the environment and your interest.
Adjustable range of brightness:-30~0.
Adjustable range of contrast: -15~+15.
Adjustable range of color: -15~+15.
Adjustable range of TINT: -15~+15.
Note: Brightness adjustment is useless when Dimmer is set to 'On'
20
Subject to technical changes
Page 10

PARAMETERS ADJUST
FUNCTION
The following menu will be displayed after entering the 'FUNCTION' option:
(1)BLUE SCREEN
The background is blue screen when this option is set to ON . The background is black screen when this option is
set to OFF .
(2)DISPLAY MODE
Adjustable value of display Mode: Normal / Full / Wide. You can select different display modes according to different
playing sources to get the best effect.
(3)Mirror Image
Adjustable value of Mirror Image: Normal / Left/Right / Up/Down / L/R U/D. Normal: Image mirror function is closed.
Left/Right: Left and Right mirror effect Up/Down: Up and down mirror effect. L/R U/D: Left, right, up and down mirror
effect.
You can select different display mode according to the installation type and your interest.
(4)
DIMMER ON/OFF AND DIMMER SCOPE
When DIMMER ON/OFF is set to OFF , changing the value of DIMMER SCOPE doesn't influence the brightness
of the display. When DIMMER ON/OFF is set to ON , the unit adjusts the brightness according to the surroundings
rays and changing the value of BRIGHTNESS in PICTURE option doesn't influence the brightness of the display.
• SOURCE
The following menu will be displayed after entering the 'SOURCE' option:
• SCREEN ADJUST
When the touch operation is not sensitive or valid, you should calibrate the Touch screen through 'Screen Adjust'
function. The following menu will be displayed after entering the 'SCREEN ADJUST' Option:
.
You should touch the '+' symbol in the left top corner when the above menu displays and then touch the '+' symbol in the right bottom corner.
21
Subject to technical changes
Page 11

LCM 972 connected at the VME 9122 TS, VME 9512 TS and VME 9312 TS
The LCM 972 TS is able to control most of the headunits touch screens buttons if the BUS connection cable is connected with the moniceiver (MZ-TFT) BUS output.
Then you have the opportunity to control i.e. fully the rearzone by using the TS Monitor of the LCM 972 TS.
PARAMETERS
Rating operation Voltage: 12V (Negative Grounding system)
Maximum operation current: 1A
Operation temperature: -10°C ~ +60°C
Storage temperature: -20°C ~ +70°C
Display resolution: 1440x234
Brightness: "e300 cd/m
2
(brightness of the center area after turning on for 30 minutes)
Video input amplitude: 1Vp-p (75Ohms input impedance)
Audio input amplitude: 1Vrms
Audio amplitude response: ±3 dBˇ100Hz-20kHzˇ
Audio S/N: "e50dB
T.H.D: "d1%
Headphone output impedance: 32 Ohms
Headphone output power: 0.125W
22
Subject to technical changes
 Loading...