

Page 1

|NGt|NGt
TFT LCD TELEVISION
Model no. LCM1505TV
Page 2
1
FCC Compliance Statement
Note :
This equipment has been tested and found to comply with the limits for a
Class B digital device, pursuant to Part 15 of FCC Rules. These limits are
designed to provide reasonable protection against harmful interference in a
residential installation. This equipment generates, uses, and can radiate radio
frequency energy and, if not installed and used in accordance with the instructions,
may cause harmful interference to radio communications.
However, there is no guarantee that interference will not occur in a particular
installation. If this equipment dose cause harmful interference to radio or television
reception, which can be determined by turning the equipment off and on, the user is
encouraged to try to correct the interference by one or more of the following
measures:
- Reorient or relocate the receiving antenna.
- Increase the separation between the equipment and receiver.
- Connect the equipment into an outlet on a circuit different from that to which
the receiver is connected.
- Consult the dealer or an experienced radio /television technician for help.
Notice 1 :
The changes or modifications not expressly approved by the party responsible
for compliance could void the user's authority to operate the equipment.
Notice 2 :
Shielded interface cables, if any, must be used in order to comply with the
emission limits.
INSTRUCTION
MAIN FEATURE 2
FRONT/BACK OF TELEVISION 2,3
FUNCTION 3
INST ALLING
COMPONENTS 4
PRECAUTIONS IN INSTALLING 4
CONNECTING TO YOUR PC For 15" Only 5
TV/VIDEO FUNCTION SETTING
PICTURE CONTROL 6
SOUND CONTROL 7
INSTALL 8
OSD 9
PC FUNCTION SETTING
OSD CONTROL 10
CONTRAST / BRIGHTNESS /ADJUST CONTROL 11,12
OTHERS
REMOTE CONTROL 13
DOC CLASS B NOTICE
This digital apparatus does not exceed Class limits for radio noise emission
for a digital apparatus as set out in the Radio Interference Regulations of the
Canadian Department of Communications.
PRECAUTIONS 14
TROUBLE SHOOTING 15
SPECIFICATIONS 16
Page 3
2
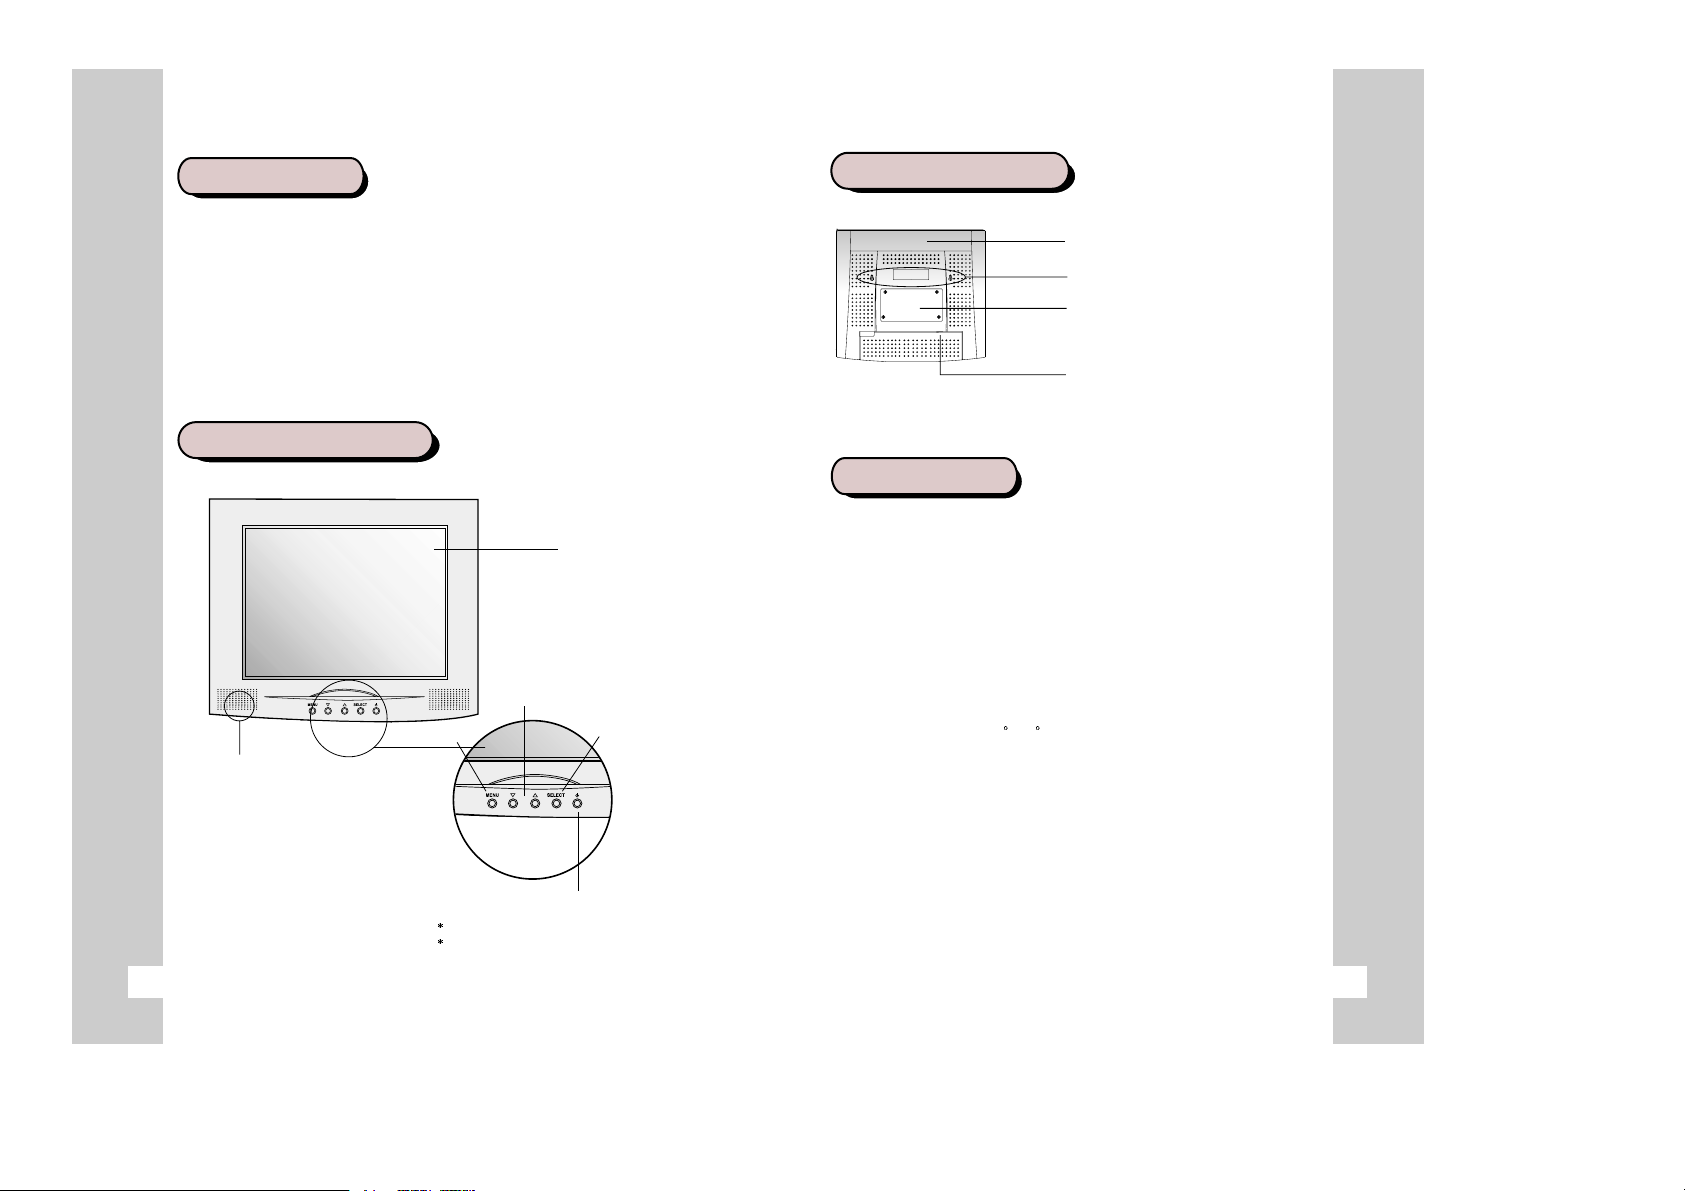
BACK OF TELEVISION
Ventilator(Caution! )
Do not block the ventilator
Hole for wall hanging
Detachable for other equipments
(VESA ARM) and wall hanging use.
Connector to External Functions
Connects signals with external
equipments and PCs. (TV/VIDEO)
MAIN FEATURES
LCD Panel
Menu
Control Button
Select
Power Switch
Used in turning on/off the screen.
The power light shows regular and
safe mode functions with colors.
Speaker
3
Thank you for purchasing our high resolution TFT LCD Television.
We recommend that you thoroughly read through this user's guide
before using the product.
It is also recommended to safely store the guide in times of
immediate need in the course of using the product.
FRONT OF TELEVISION
FUNCTIONS
Although regular monitors for PCs use CDT as a medium for display, the TFT
LCD television is a Flat Panel Display based on digital technology, and was
originally used only for laptops PCs. Now it is used for desktops and laptops
alike, opening a world of conveniences and quality to those ardent PC users.
The following functions are provided in our products.
1. Convenient and easy to handle Control Button.
2. From PC function to TV/VIDEO functions.
3. Remote Control.
4. A slim and space reducing television.
5. Monitor transferable for wall hanging.
6. Industrial robot and VESA install able.
7. Liberal angle control.(+30
8. Low energy consumption.
9. Scarcely influences surrounding objects, with no harmful electronic waves,
noise, heat or magnetic activities.
~-5 )
Page 4

12V DC S-VHS ( Y Pb Pr )
AV1
PC
LR
AUDIO
H-
PHONE
S/T- IN ANTENNA
COMPONENTS
After discarding the package and wrapping of the LCD TV,
check for the following components in the box.
Components
LCD TV User s Guide
Battery (AA) 1.5V x 2
Remote Controller
CONNECTING TO YOUR PC
1
12V DC Jack
2
PC 15 pin Jack
3
S-VHS Jack
Terminal Cable Y (Composite or Component)
4
Terminal Cable Pb (Component)
5
Teminal Cable Pr (Component)
6
Audio Cable L . R
7
Head Phone Jack
8
PC Audio Jack
9
TV Antenna Jack
10
PRECAUTIONS IN INSTALLING
Install on safe ground.
: There's a possibility of damage of the product or harming people.
Always cover the product or keep in a well ventilated place.
: There is danger of fire and also for safe maintenance.
Do not put anything containing water, medicine, small metal material,
or heavy objects on the product.
: Danger of fire, electrocution, and damage to the product.
Do not install in damp, dusty, or wet places. : Danger of fire and electrocution.
Do not put candles, cigarettes, or other objects with excessive heat.
: Danger of fire.
Do not install any external connections, only connecting cords and
adapter included in the box. : Damage and fire may occur.
4
1 2 3456 7 89 10
1. Connect to 12V DC with the adapter included in the box to 12V DC only.
2. Connect signal cable to PC. "Check Signal Cable" will appear on the
television if improperly connected. In case of using Macintosh, use the
exclusive adapter.
3. Connect to S-VHS Terminal of VCR, DVD,Camcorder.(optional)
4. Connect to Terminal of composite or Y-Terminal of component.
5. Connect to Pb-Terminal of component.
6. Connect to Pr-Terminal of component.
7 . Connect to input terminals L, R that need Audio output.(DVD, VCR or
CAMCORDER)
8. Connect headphones to the connecting terminal.
9. Connect to PC Audio output.
10.Connect to antenna or CATV connecting cable to the 'Antenna' terminal.
5
Page 5

TV/ VIDEO FUNCTION SETTING
Picture
Controlling Screen Contrast
Menu Picture Contrast Select
Control with Menu
You can control the contrast of the images or letter on the screen.
Controlling Screen Brightness
Menu Picture Brightness Select
Control with Menu
You can control the brightness of the screen.
Controlling Screen Color
Menu Picture Color Select
Control with Menu
You can control the color of the screen.
Controlling Screen Sharpness
Menu Picture Sharpness Select
Control with Menu
You can select the sharpness of the screen.
Controlling Screen Tint(only NTSC)
Menu Picture Tint Select
Control with Menu
You can select the tint of the screen.
Sound
Adjust Volume
SelectMenu Sound Volume
Control with Menu
You can adjust volume of this screen.
Adjust Balance
Menu Sound Balance Select
Control with Menu
You can adjust the Balance of this screen.
Adjust Bass
Menu Sound
Control with Menu
You can adjust the Bass of this screen.
Adjust Treble
Menu Sound Treble Select
Control with Menu
You can adjust the Treble of this screen.
Bass
Select
6
7
Page 6

Install
Auto search
Menu Instal Auto search
You can search channels automatically
TV System(PAL Only)
Menu
Control with Menu
You can choose the TV System(PAL SECAM).
TV Sound(PAL Only)
Menu TV S ound Select
Control with Menu
You can choose the TV Sound(BG DK I).
Manual tune
Menu
Control with
You can change channel range positively or nagatively.
Fine Tune
Menu
Control with Menu
You can change range of tuner positively or negatively( 0.05Mhz)
Store to
Menu
Control with
You can store the channel(P0 P99).
Skip
Menu
Control with
You can skip the channel(Yes No).
TV S ystem
Install
Install
Install
Install
Manual tune
Fine Tune
Store to
Skip Select
Select
Menu
Menu
Menu
OSD (On Screen Display)
Vertical position of OSD
Menu
Control with Menu
You can adjust vertical position of OSD.
OSD V Position
Select
Horizontal position of OSD
Menu OSD H Position S elect
Control with Menu
You can adjust horizontal position of OSD.
Halftone of OSD
Menu
Control with
You can adjust halftone
OSD
Halftone Select
Menu
Input
TV or changing to another mode
Me nu INP UT S e lec t C ontrol with Menu
You can change input mode
(TV COMPOSITE S-VHS COMPONENT PC)
8
9
Page 7

PC FUNCTION SETTING
Information
Information of the screen
Menu Information Select
Control with Menu
You can see the information of the screen.
Input Source
TV or changing to another mode
Menu INPUT Select
Control with Menu
You can change input mode.
(TV - Composite - S-VHS - Component - PC)
OSD Control
Vertical Position of OSD
Menu OSD Control V Position Select
Control with Menu
You can adjust vertical position of OSD.
Horizontal Position of OSD
Menu OSD Control H Position Select
Control with Menu
You can adjust horizontal position of OSD.
Contrast
To clarify the screen
Menu Picture Contrast Select
Control with Menu
You can control the contrast of the images or letter on the screen
Brightness
To control brightness of the screen
Menu Picture Brightness Select
Control with Menu
You can control the brightness of the screen.
Adjust
Vertical Position
Menu Adjust V Po. Select
Control with Menu
You can adjust th vertical position of the screen.
Horizontal Position
Menu Adjust H P. Select
Control with Menu
You can adjust the horizontal position of the screen.
10
Halftone of OSD
Menu
Control with Menu
You can adjust halftone of OSD.
OSD Control Halftone
Select
12
11
Page 8

Clock Adjust
Menu
Control with Menu
You can adjust the clock.
Adjust Clock Adj.
REMOTE CONTROL
Select
Phase Adjust
Menu
Control with Menu
You can adjust the phase.
Adjust
Phase Adj. Select
Auto Adjust
Menu
Control with Menu
You can adjust position of the screen automatically.
Adjust
Auto Adj. Select
Reset
Menu
Control with Menu
You can reset the screen.
Adjust Reset.
Select
POWER
NUMBER
TV
CHANNEL UP
CHANNEL DOWN
SLEEP
MENU
123
456
789
100
TV
+
CH
_
MENU
RECALL
0
PC
AV
SEL
AU
EP
D
LE
I
O
S
MUTE
RECALL
PC
AV
+
VOL
_
VOLUME UP
VOLUME DOWN
SELECT
AUDIO
12
13
Page 9

1514
PRECAUTIONS
The below precautions should be carefully followed for the effective function
of the product and safety of users.
Do not expose the product to severe impacts.
(This could occur damage)
Do not try to disassemble, repair,
renovate the product without expert assistance.
(Contact the service for parts needing repair)
Do not leave the product in damp
or wet places as there is danger
when the product is exposed to water
or metal. (Danger of electrocution)
TROUBLE SHOOTING
When failure or problems occur, refer to the following. For further assistance,
contact our customer support centers.
"The power does not
turn on."
"Check signal cable"
sign appears
"Out of range"
appears on the screen.
"Distorted Video" Check if the resolution and frequency of the
The screen is too
bright
The color of the
screen appears as if
there is a shadow.
There is no sound
The volume is too low
Check whether the plug is in place and try to
reconnect it.
Check if the signal cable is properly connected
to the computer or video card and try to reconnect
it.
Set the resolution and frequency compatible to
the monitor.
computer or the video card is set to accommodate
the monitor and then reset the screen according
to the present mode of the monitor menu and
the standard signal timing chart.
Try to control the brightness or contrast of the
screen.
Go to the OSD color control menu, the user mode
and control the door.
Check the connecting cable.
Control with the up and down buttons
Other Precautions
In cleaning the product, make sure power is turned off, wipe with,
a soft and clean cloth then with water. Never use benzene,
alcohol or other cleaners. (Contact the service center or a store near
you for static controllers and cleaners. The LCD polarizing plate may
peel off or the product may decolorize, dissolve, or crack.
The TV won
tturnon
Check if the antenna is connected and control
and control the mode with the TV.
Page 10

SPECIFICATIONS
Category Specification
LCD Screen Size 15 inch (diagonal length)
(PANEL) Visible Screen size 304.1(H) X 228.1(V)
Frequency Horizontal Frequency 48.36 ~ 60 KHz(Auto Set)
Color Display Display color 16.7M Color
Input Signal Video Signal Analog 0.714Vp_p POSITIVE(75 ohm)
TV TV Color System NTSC
Sound Sound Output 2W + 2W ( 1KHz MOD 80%)
Power/Voltage Voltage Use DC 12V/3A
Energy Regular Energy
Consumption Consumption
Movement Temperature 0'C ~ 40'C
Conditions Humidity 10% ~ 85%
Size Excluding Base 380(W) X 58(D) X 336(H)
Weight Net 4.7Kg (10.36 Ibs)
Features Channel auto programming
Jack & TV ANT Input
Terminals Video In RCA jack
The above specifications can be changed without prior notice for quality
improvement.
Pixel Range 0.297(H) X 0.297(V)
Type A-si TFT LCD(liquid crystal display)
Visual Angle Upper 65'/lower 65' , left 70'/right 70'
Vertical Frequency 60 ~ 75 Hz (Auto Set)
Channel memory 181 Channel Memory
Video Input Color NTSC
Maximum 30W
Safe Mode
Consumption
Gross 7.0Kg (15.4 Ibs)
Full function remote control
Composite video Input
S-VHS video Input
Component Input
PC sound Input
Audio In RCA jack
4-Pin Mini Din jack
15-Pin Mini D-Sub
Less then 5W
16
 Loading...