

Page 1
IPD-2FM
OWNERS MANUAL
Page 2

Congratulations on your purchase of the IPD-2FM Rear Seat Entertainment Mount. Please read the
instruction manual for this product before using it. The documentation provided will alow you to
enjoy all the features this product has to o er. Please save this manual for future reference.
The IPD-2FM Rear Seat Entertainment Mount is Made for iPad®. Supported models include:
• New iPad
• iPad 2
“Made for iPad” means that an electronic accessory has been designed to connect speci cally to
iPad and has been certi ed by the developers to meet Apple performance standards. Apple is not
responsible for the operation of this device or its compliance with safety or regulatory standards.
Please note that the use of this accessory with iPad may a ect wireless performance.
iPad is a trademark of of Apple Inc., registered in the U.S. and other countries.
FCC Notice
This device complies with part 15 of the FCC Rules. Operation is subject to the following two
conditions: (1) This device may not cause harmful interference, and (2) this device must accept any
interference received, including interference that may cause undesired operation.
Warning! Changes or modi cations to this unit not expressly approved by the party responsible
for compliance could void the user’s authority to operate the equipment.
Licensed under one or more of the following patents:
Patent Numbers: 8,109,569 and 6,678,892.
2
Page 3

What’s In the Box?
For Customer Service
Visit OurW ebsite At
www.audiovox.com
ProductInformation, Photos,
FAQ’s,Owner’s Manuals
For customer service and
technical information::
1.800.290.6650
Protective Case
Universal
Seatback Dock
Vehicle DC
Power Adaptor
Manual
Features
• Easily docks and undocks to the seatback by a Quick Connect attachment mechanism
• Universal Seatback Dock can be installed on driver or passenger side
• Six depth settings to allow proper tting to the seat depending on the size of the headrest
• Adjustible tilt (up or down)
• Protective case
• Charges the iPad when plugged into the vehicle power source
• Built-in DC charging port (for use with optional Home Power Supply)
• Built-in infrared (IR) headphone transmitter
• Built-in FM transmitter
IPD-2FM
OWNERS MANUAL
3
Page 4
15
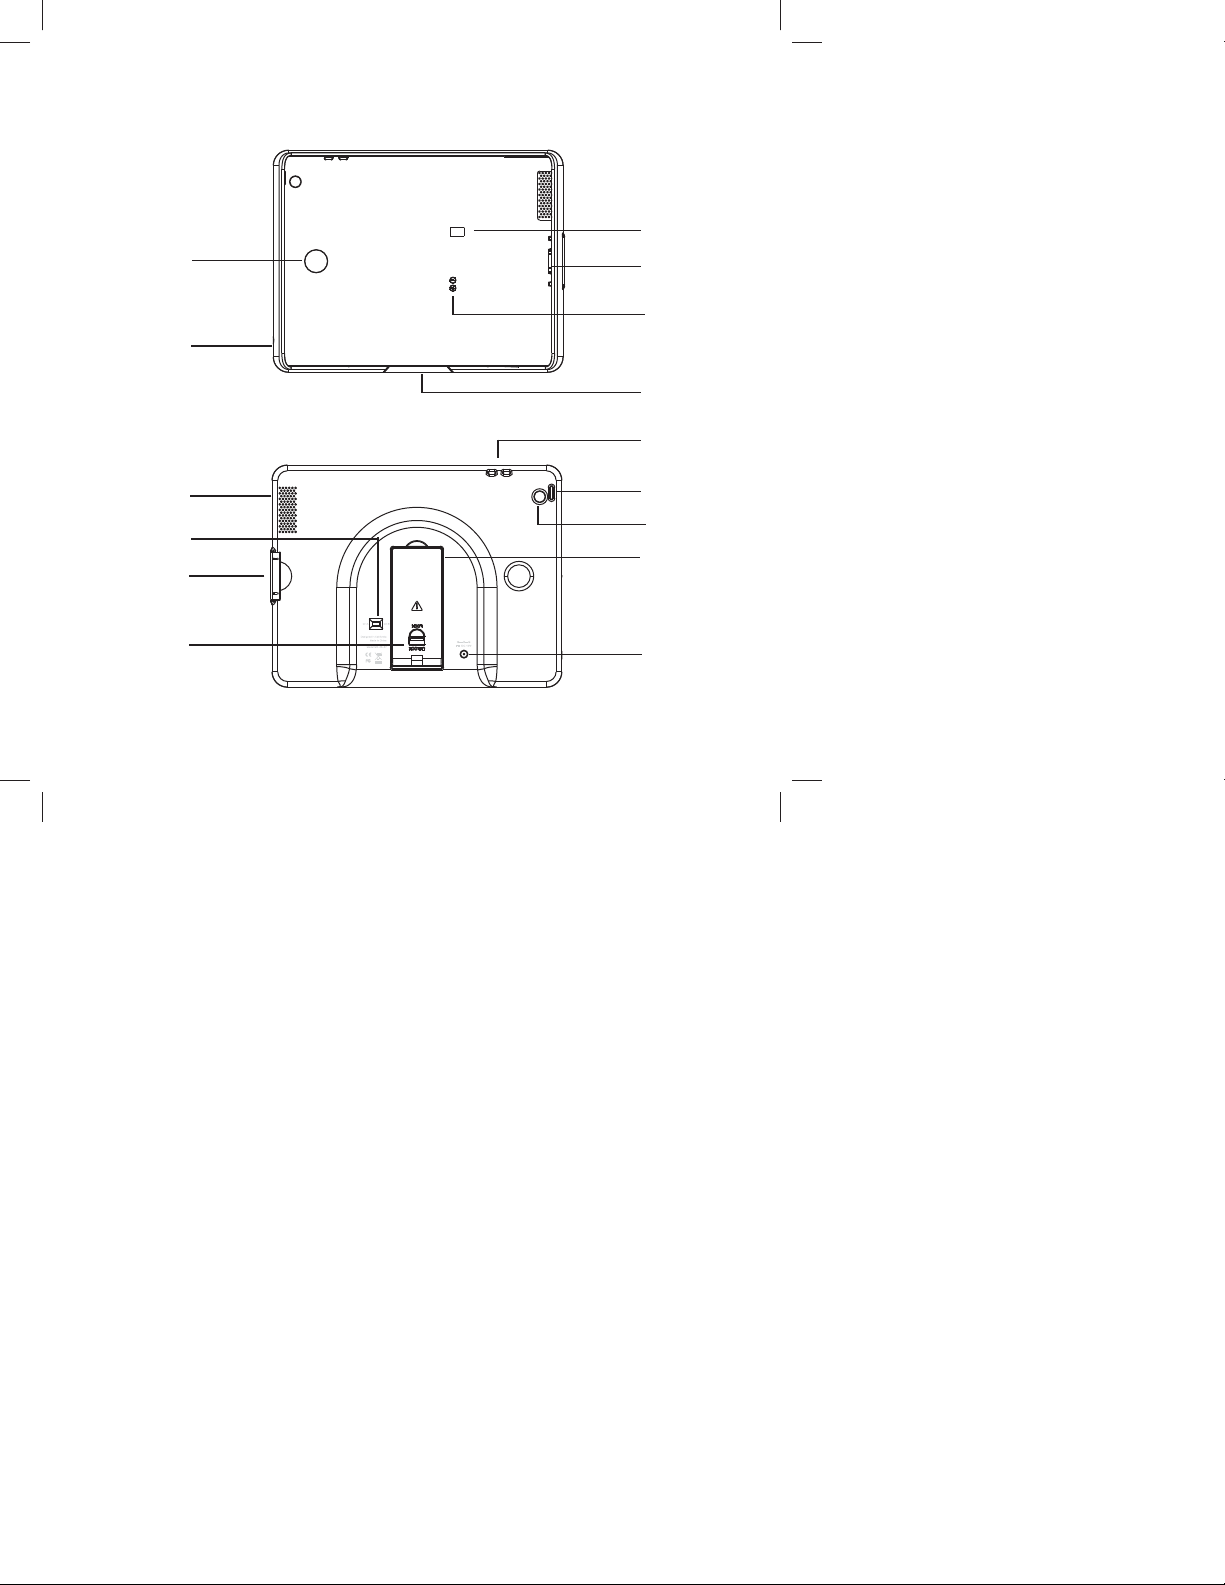
Front
2
1
3
4
5
14
12
11
13
Back
6
7
8
9
10
4
Page 5

1. Finger Push Out Window
To push out the iPad from the Protective Case.
2. LCD Screen
Displays the current FM Transmitter frequency.
3. 30 Pin Connector
4. FM Frequency Down/FM Frequency Up Buttons
Selects the wireless FM Transmitter frequency
5. IR Transmitter
Used to broadcast audio signals to the wireless IR headphones (not included).
6. Volume -/Volume + Buttons
7. Power On/O Button
To turn the iPad on or o .
8. Camera Lens Window
9. Mounting Arm
Attaches and locks the Protective Case to the Universal Seatback Dock.
10. DC 12V Charging Port
Power in jack for 12 V/1.5 A power adapter.
11. Red Switch
Hold to lock or unlock the Mounting Arm into Universal Seatback Dock.
12. Locking Key
Used to insert or release the iPad.
13. CH A/CH B Channel Switch
Select CH A or CH B to match the wireless IR Headphone channel.
14. Speaker Port
15. 3.5 mm Audio Out Port
5
Page 6

To insert your iPad into the Protective Case:
1. Make sure the Locking Key is in the closed
(pushed in) position so that it is ush
within the case.
2. Slide your iPad into the Protective Case.
Match the iPad charging connector with
the Protective Case’s 30 Pin Connector
position and gently pull the Locking Key
out while sliding the iPad into the case.
3. Push your iPad down into the Protective
Case.
4. When your iPad is inside the Protective
Case, slide the iPad to the left while at the
same time pushing in the Locking Key.
5. Press the Locking Key to ensure the iPad is
held rmly by the Protective Case.
Push
Press
6
Page 7

To remove your iPad from the Protective Case:
1. Hold the iPad and Protective Case
vertically.
2. Pull the Locking Key gently while holding
the Protective Case in a vertical position.
The iPad will slide down.
Note: Please do not pull the Locking Key
too hard when removing your iPad
from the Protective Case to prevent
damaging the locking parts.
3. Use your index nger to push your iPad
out of the Protective Case using the Finger
Push Out Window.
4. Remove your iPad from the Protective Case
in the indicated direction.
Pull
Push
7
Page 8

To install the Universal Seatback Dock on the Headrest:
The Universal Seatback Dock can be installed on either the driver or passenger seat.
1. Adjust the headrest position.
DC 12V
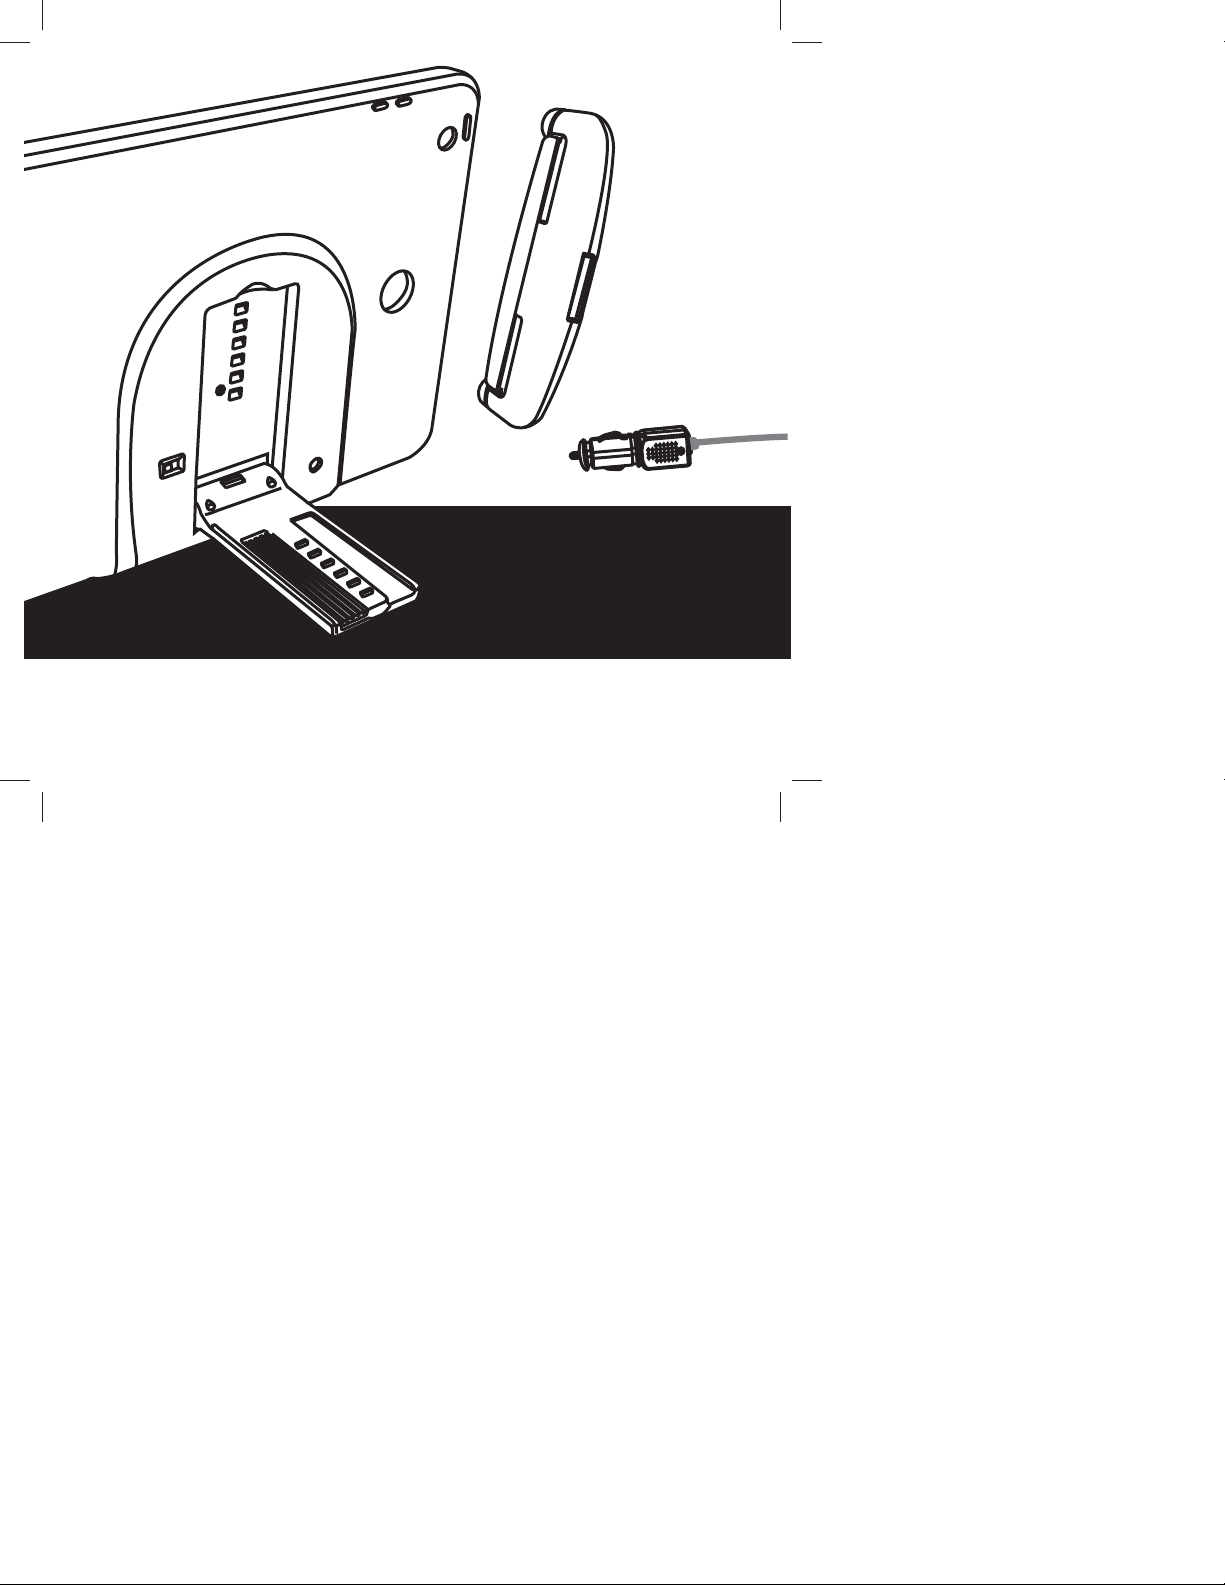
2. Plug one end of the Vehicle DC Power
Adapter into the DC 12V Charging Port on
the bottom of the Universal Seatback Dock.
3. Turn Screws (A) counterclockwise and
remove the Screws to disassemble the
Universal Seatback Dock.
4. Clamp the Front Bracket (B) and Rear
Bracket (C) around the headrest posts. Note
the location of the bottom side engraved
on the Rear Bracket. Ensure that this side is
facing down and the slot is facing the rear
of the vehicle.
5. Secure the brackets in place with the
Screws. Turn the Screws clockwise and
hand tighten.
A
Charging Port
B
C
Front of Seat
6. Plug the other end of the Vehicle DC Power
Adapter into the Vehicle DC Accessory
Socket of your car.
8
Page 9

To attach the Protective Case to the Universal Seatback Dock:
The Mounting Arm has six depth settings to
allow for proper tting to the seat depending
on the size of the headrest.
Warning! Always make sure the Red Switch is in
the UNLOCK position when inserting
or removing the Mounting Arm,
otherwise damage will occur to both
units.
1. Hold the Red Switch in the UNLOCK
position.
2. While holding the Red Switch in the
UNLOCK position, insert the Mounting Arm
into the slot in the Rear Bracket.
3. Once the Mounting Arm is inserted into
the Rear Bracket su ciently, release the
Red Switch so that it returns to the LOCK
position.
Warning! Ensure the Mounting Arm is inserted
and locked in the Rear Bracket before
moving your vehicle.
4. Adjust the tilt angle to the desired viewing
position.
Fully inserted and
locked-in position
First locked-in position
To remove the Protective Case from the Universal Seatback Dock:
1. Hold the Red Switch in the UNLOCK
position.
2. At the same time, pull the Mounting Arm
out of the Rear Bracket.
3. When the Mounting Arm is fully removed
from the Rear Bracket, release the Red
Switch so that it returns to the LOCK
position.
9
Page 10

To charge your iPad in your car or at home:
In car charging:
Plug one end of the Vehicle DC Power Adapter
into the DC 12V Charging Port on the bottom
of the Universal Seatback Dock, then plug the
other end into the Vehicle DC Accessory Socket
of your car.
At Home charging:
Plug one end of the Home AC/DC Power
Adapter (Part Number IPD-HPS, not included)
into the DC 12V Charging Port on the back of
the Protective Case, then plug the other end
into an electrical outlet.
10
Page 11

To Use the IR Transmitter:
The IPD-2FM Rear Seat Entertainment Mount has a built-in two channel infrared audio transmitter
for use with wireless Infrared Headphones (sold separately).
IR Transmitter
(The IR Transmitter will turn on after the power is connected.)
Infrared Headphone
(sold separately)
1. Connect the power supply to the Universal Seatback Dock.
2. Select CH A or CH B. The channel selected must match the channel of the Infrared Headphone
(sold separately) that you are using.
Note: If two IPD-2FMs are installed in a vehicle, set one unit to CH A and the other to CH B. Set
the two channel headphones accordingly.
3. For best audio quality, turn the volume of the iPad to maximum and adjust the wireless
headphone volume to a comfortable listening level.
To ensure good reception:
The wireless IR Headphone must be used within a line of sight from the IR Transmitter as infrared
transmission, like visible light, travels only in an unrestricted line of sight.
To disable the IR Transmitter when the power is connected and enable iPad speaker mode:
During Play Mode, press PAUSE, PLAY, PAUSE, PLAY, PAUSE, PLAY in sequence within three seconds.
To resume infrared transmission:
1. Remove the Protective Case from the Universal Seatback Dock.
2. Reinsert the Protective Case on to the Universal Seatback Dock (this will reconnect the power
supply).
11
Page 12

To Use the FM Transmitter (87.5 - 107.9 MHz):
The FM Transmitter allows you to listen to your iPad’s audio through the vehicle’s radio.
1. Remove your iPad from the Protective
Case.
2. Connect the power supply to the Universal
Seatback Dock. The LCD screen will display
the current FM station setting.
3. Tune your radio to a frequency not used by
a radio station in the area.
Note: Tune your radio to an odd frequency
such as 91.1 or 102.3. Do not tune your
radio to an even frequency such as 91.2 or
102.4.
4. Tune the FM Transmitter to the same
frequency by pressing the FM Frequency
Up or FM Frequency Down button.
5. Reinsert your iPad into the Protective Case.
6. For best audio quality, turn the volume
of the iPad to maximum and adjust the
volume using the vehicle radio.
LCD Screen
Freq Down
Freq Up
12
Page 13

Troubleshooting
Problem Cause Solution
The Protective Case does not
t into the Mounting Arm.
The iPad can not be charged. • Power supply is not
The IR Transmitter does not
work.
The FM Transmitter does not
work.
• Red Switch is not unlocked
when you are inserting the
Protective Case into the
Universal Seatback Dock.
• Universal Seatback Dock is
upside down.
properly connected.
• Incorrect channel setting.
• IR signal is blocked.
• iPad volume is too low.
• Incorrect frequency
settings.
• iPad volume is loo low.
• Hold Red Switch in UNLOCK
position.
• Repeat installation steps
again.
• Use the Vehicle DC Power
Adapter for in-car application,
use the Home AC/DC Power
Adapter at home.
• Make sure the channel
selected matches the channel
of the Infrared Headphone
that you are using.
• The wireless IR Headphone
must be used within a line of
sight from the IR Transmitter.
• Turn the iPad volume to
maximum.
• Make sure the frequency
shown on the Protective
Case LCD Screen is the same
shown on your vehicle’s radio.
• Turn iPad volume to
maximum.
13
Page 14

Notes
14
Page 15

12 MONTH LIMITED WARRANTY
Applies to Audiovox Mobile Video Products
AUDIOVOX ELECTRONICS CORP. (the Company) warrants to the original retail purchaser of this product that should this product
or any part thereof, under normal use and conditions, be proven defective in material or workmanship within 12 months from
the date of original purchase, such defect(s) will be repaired or replaced with reconditioned product (at the Company’s option)
without charge for parts and repair labor. A game controller, if supplied, is similarly warranted for ninety (90) days.
To obtain repair or replacement within the terms of this Warranty, the product is to be delivered with proof of warranty coverage
(e.g. dated bill of sale), speci cation of defect(s), transportation prepaid, to the Company at the address shown below.
This Warranty does not extend to the elimination of externally generated static or noise, to correction of antenna problems, to
costs incurred for installation, removal or reinstallation of the product, or to damage to digital memory/media devices, gaming
devices, discs, speakers, accessories, or vehicle electrical systems.
This Warranty does not apply to any product or part thereof which, in the opinion of the Company, has
su ered or been damaged through alteration, improper installation, mishandling, misuse, neglect, accident,
or by removal or defacement of the factory serial number/bar code label(s). THE EXTENT OF THE COMPANY’S
LIABILITY UNDER THIS WARRANTY IS LIMITED TO THE REPAIR OR REPLACEMENT PROVIDED ABOVE AND, IN
NO EVENT, SHALL THE COMPANY’S LIABILITY EXCEED THE PURCHASE PRICE PAID BY PURCHASER FOR THE
PRODUCT.
This Warranty is in lieu of all other express warranties or liabilities. ANY IMPLIED WARRANTIES, INCLUDING
ANY IMPLIED WARRANTY OF MERCHANTABILITY, SHALL BE LIMITED TO THE DURATION OF THIS WRITTEN
WARRANTY. ANY ACTION FOR BREACH OF ANY WARRANTY HEREUNDER INCLUDING ANY IMPLIED WARRANTY
OF MERCHANTABILITY MUST BE BROUGHT WITHIN A PERIOD OF 24 MONTHS FROM DATE OF ORIGINAL
PURCHASE. IN NO CASE SHALL THE COMPANY BE LIABLE FOR ANY CONSEQUENTIAL OR INCIDENTAL DAMAGES
FOR BREACH OF THIS OR ANY OTHER WARRANTY. No person or representative is authorized to assume for the
Company any liability other than expressed herein in connection with the sale of this product.
Some states do not allow limitations on how long an implied warranty lasts or the exclusion or limitation of incidental or
consequential damage so the above limitations or exclusions may not apply to you. This Warranty gives you speci c legal rights
and you may also have other rights which vary from state to state.
Audiovox Electronics Corporation, 150 Marcus Blvd., Hauppauge, New York 11788 1-800-645-4994
128-5495F
15
Page 16

128-9127
 Loading...