

Page 1
FTS 100
SUB
AUX1 AUX3FMAM
AUX2
CLK
3D
Wichtige Hinweise zur Installation / Garantieurkunde
Important notes for installation / warranty card
Mode d’emploi / certificat de garantie
Avvertenze importanti per l’installazione / certifcato di garanzia
Notas importantes sobre la instalación y certificado de garantía
Важная информация по инсталляции / гарантия
Page 2

Inhalt
Sicherheitshinweise 4
Entsorgungshinweise 4
Beschreibung des FTS 100 5/6
Anschlüsse 7
Beschreibung der Fernbedienung 8
Inbetriebnahme 9
Technische Daten 10
Garantiebedingungen/Garantiekarte 46/47
Contents
Safety precautions 11
Instructions for disposal 11
Description of the FTS 100 12/13
Connections 14
Description of the Remote Control 15
Operation 16
Specifications 17
Warranty conditions / warranty card 46/47
Sommaire
Consignes de sécurité 18
Instructions pour la mise au rebut 18
Description du FTS 100 19/20
Connecteurs 21
Description de la télécommande 22
Mise en service 23
Caractéristiques techniques 24
Conditions de garantie / carte de garantie 46/47
2
Page 3

Indice
Avvertenze di sicurezza 25
Avvertenze per lo smaltimento 25
Descrizione del FTS 100 26/27
Attacchi 28
Descrizione del telecomando 29
Messa in funzione 30
Dati tecnici 31
Condizioni di garanzia / Scheda di garanzia 46/47
Índice
Precauciones de seguridad 32
Instrucciones de eliminación 32
Descripciòn del FTS 100 33/34
Conexiones 35
Descripciòn del control remoto 36
Primeros pasos 37
Especificaciones 38
Condiciones de garantía / tarjeta de garantia 46/47
Содержание
Указания по безопасности 39
Указания по утилизации 39
Описание FTS 100 40/41
Разъемы 42
Описание пульта дистанционного управления 43
Включение 44
Технические данные 45
Гарантийные условия / Гарантийная карточка 46/47
3
Page 4

Sehr geehrter Kunde,
vielen Dank, dass Sie sich für den Audiovox FTS 100 entschieden haben.
Bitte lesen Sie unsere folgenden Hinweise vor Inbetriebnahme des FTS 100 genau
durch.
Sicherheitshinweise
!
Setzen Sie das Gerät, das Netzteil und die Fernbedienung weder Wasser noch
Feuchtigkeit aus.
!
Betreiben Sie das Gerät nur im angegebenen Temperaturbereich von 0°C bis
40°C.
!
Sorgen Sie für eine ausreichende Belüftung des Gerätes. Ein Mindestabstand
von 10 cm zu Gegenständen seitlich, nach hinten und oben sollte nicht
unterschritten werden.
!
Bei Kontakt mit Feuchtigkeit oder Flüssigkeiten sofort den Netzstecker ziehen.
!
Reinigen Sie das Gerät nur mit einem trockenen Tuch. Verwenden Sie keine
Reinigungsmittel oder chemische Lösungsmittel, da sonst die Oberfläche
beschädigt werden könnte.
!
Öffnen Sie niemals das Gerät.
!
Bei sichtbaren Beschädigungen des Netzkabels darf das Gerät nicht mehr
betrieben werden. Ein beschädigtes Kabel darf nicht repariert, sondern muss
ausgetauscht werden.
!
Überlassen Sie Wartungs- oder Reparaturarbeiten immer qualifiziertem
Fachpersonal.
Entsorgungshinweise
Gemäß der europäischen Richtlinie 2002/96/EC müssen alle
elektrischen und elektronischen Geräte über lokale Sammelstellen
getrennt entsorgt werden. Bitte beachten Sie die lokalen Vorschriften
und entsorgen Sie Ihre Altgeräte nicht mit dem normalen Hausmüll.
4
Page 5

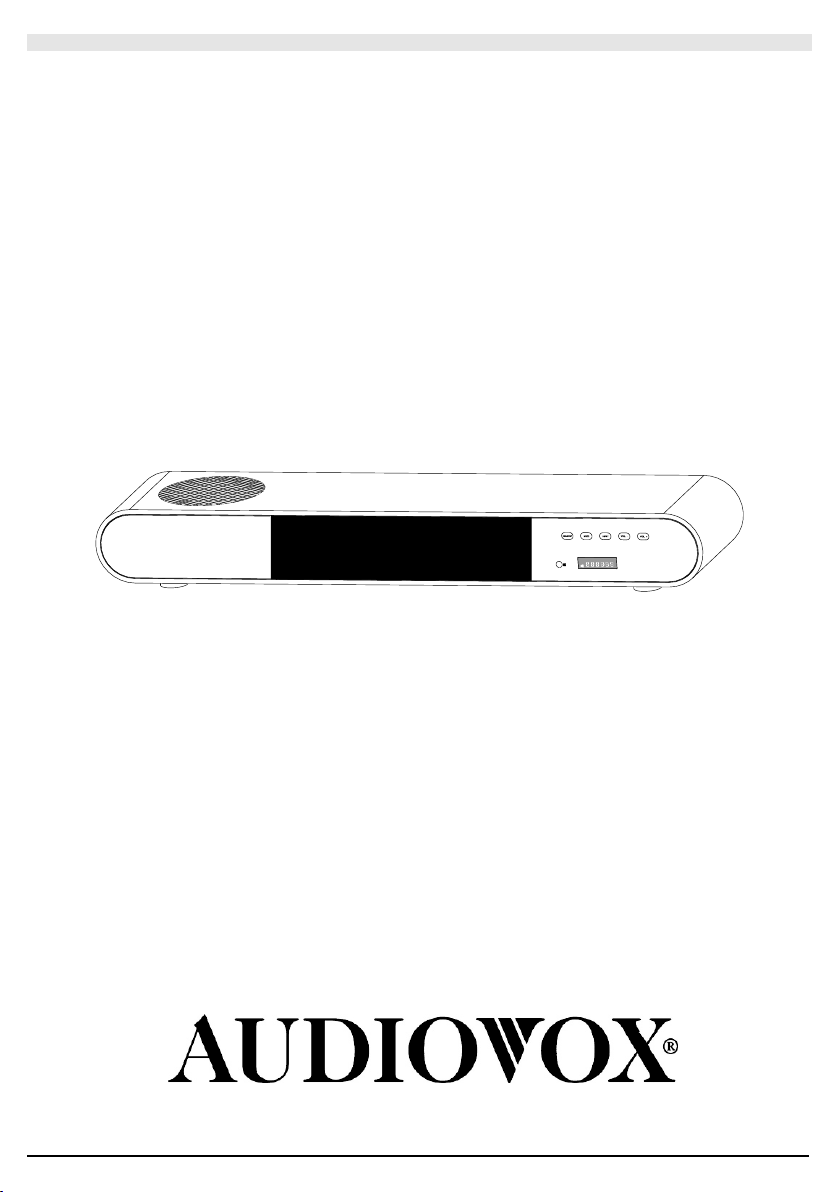
BESCHREIBUNG DES FTS 100
VORDERSEITE
Sensor-Tastenfeld
21 3 4 5
SUB
AUX1 AUX3FMAM
AUX2
3D
CLK
6
7
SUB
AUX1 AUX3FMAM
AUX2
CLK
3D
1. Standby/Power-Taste 5. Volume-Up-Taste, lauter
2. Mute-Taste, Stummschaltung 6. Sensor für die Fernbedienung
3. INPUT-Taste, Wahl des Eingangs 7. LED-Anzeige
4. Volume-Down-Taste, leiser
5
Page 6
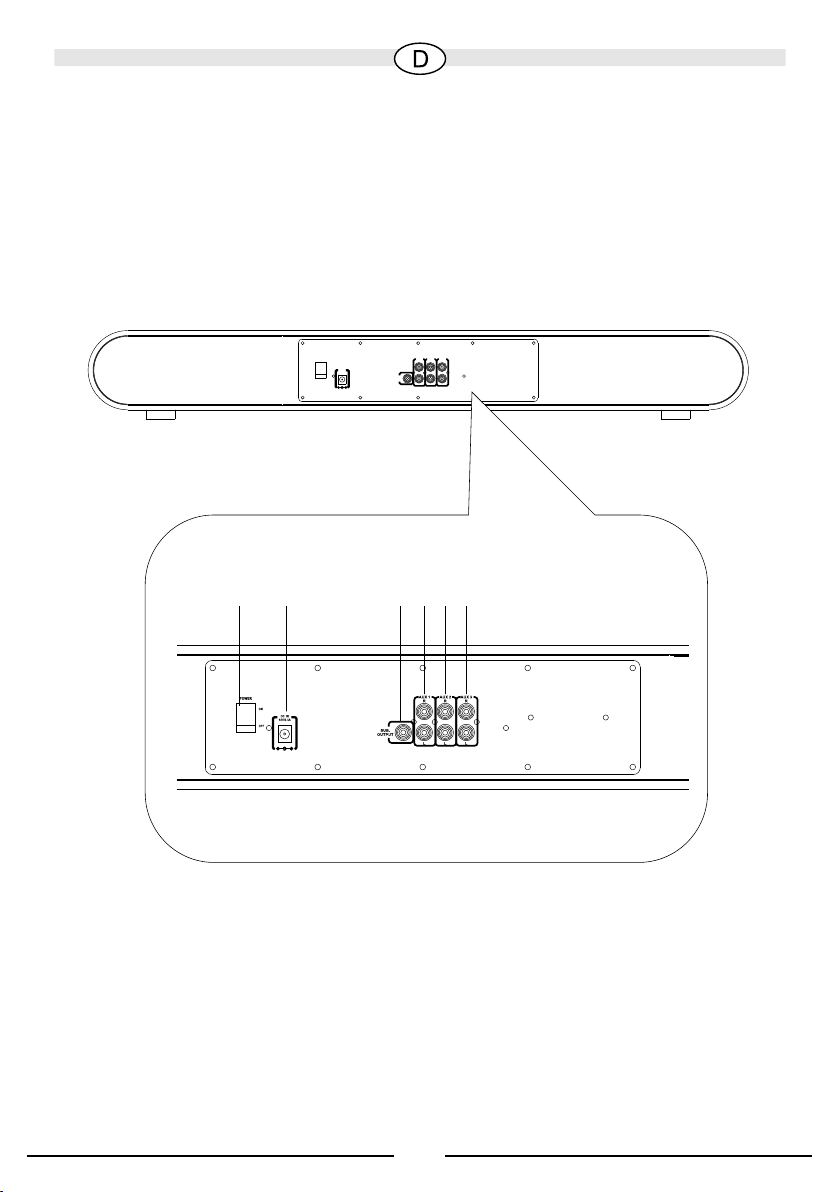
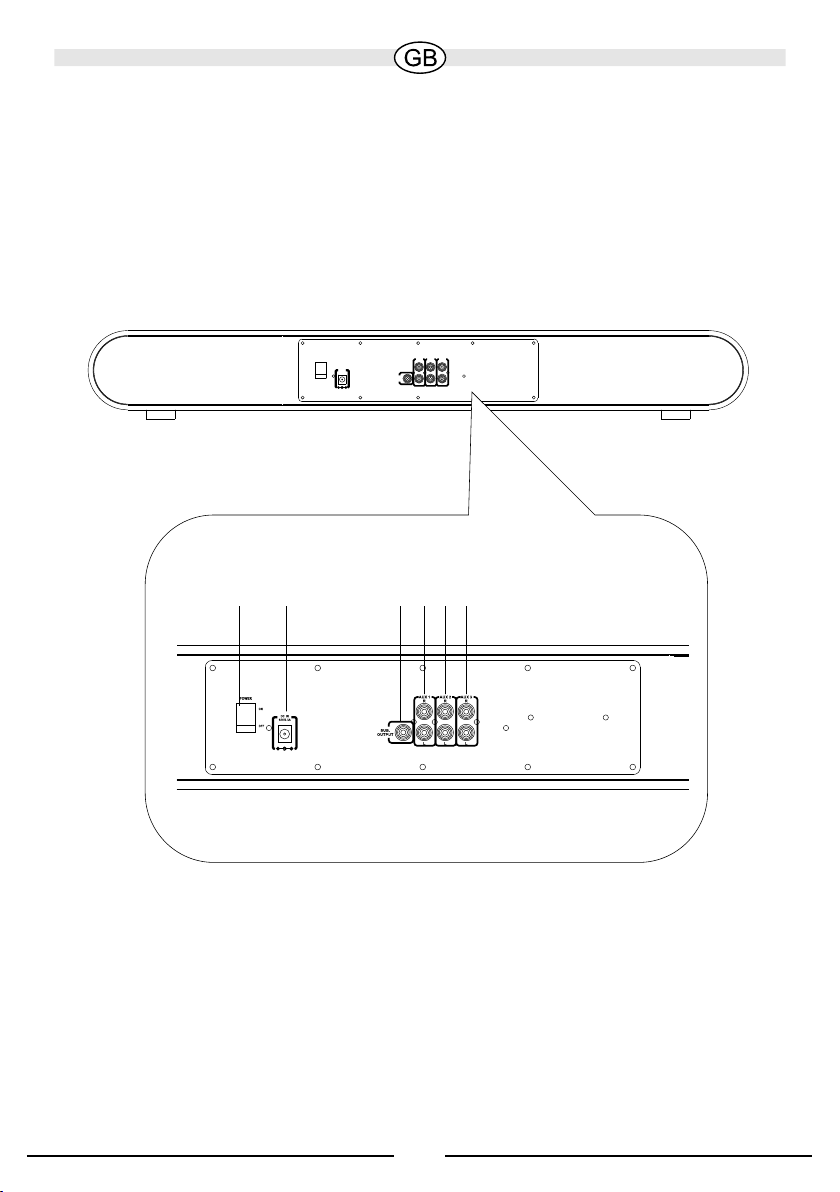
BESCHREIBUNG DES FTS 100
RÜCKSEITE
POWER
ON
OFF
21 3
AUX 2AUX 1
AUX 3
R
DC IN
18V/3.3A
R
SUB.
OUTPUT
L
LRL
5
4
6
1. Netzschalter
2. Eingang für das separate Netzteil
3. Subwoofer Ausgang
4. Aux1 Cinch-Eingang
5. Aux2 Cinch-Eingang
6. Aux3 Cinch-Eingang
6
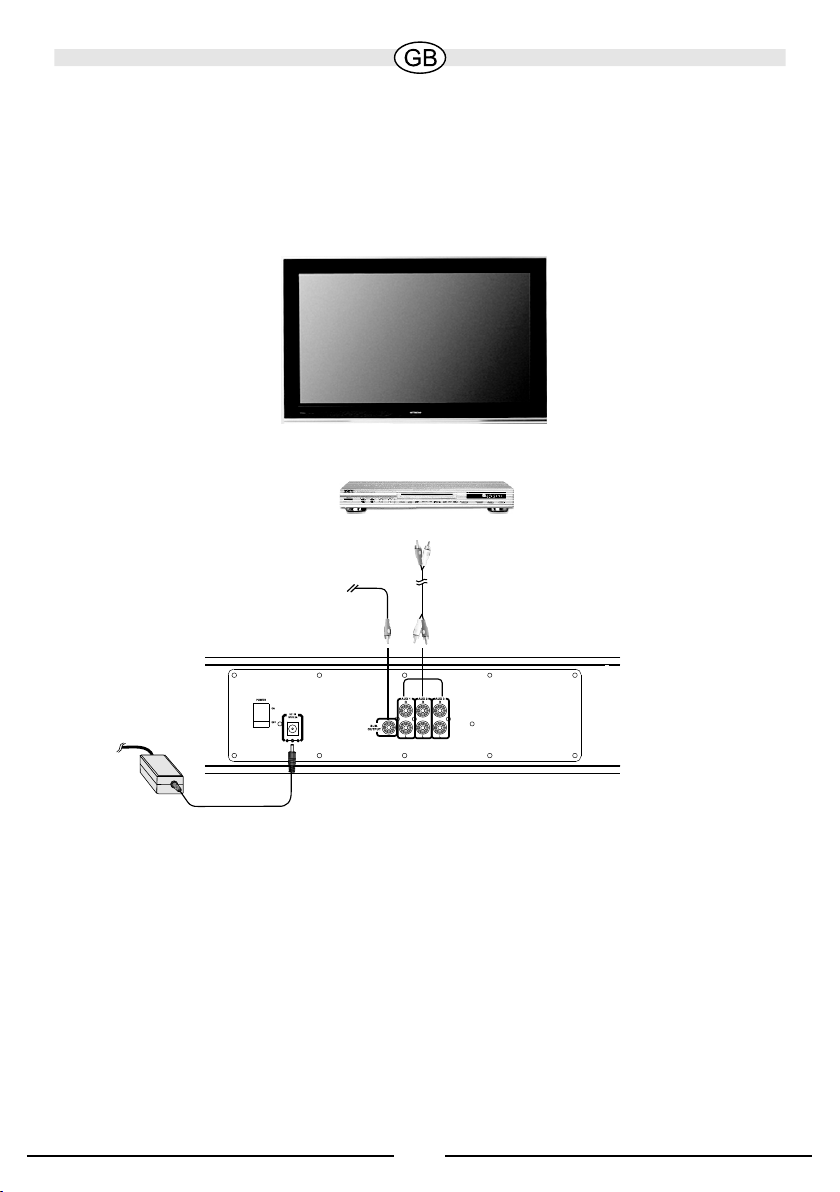
Page 7

ANSCHLÜSSE
Steckdose
oder
TV
DVD
Subwoofer-Ausgang
Rückseite des FTS 100
Verbinden Sie jeweils die beiden Stereokanäle
mit der gewünschten Audioquelle (CD, DVD,
MP3, iPOD, Spielkonsole, Computer usw.)
7
Page 8
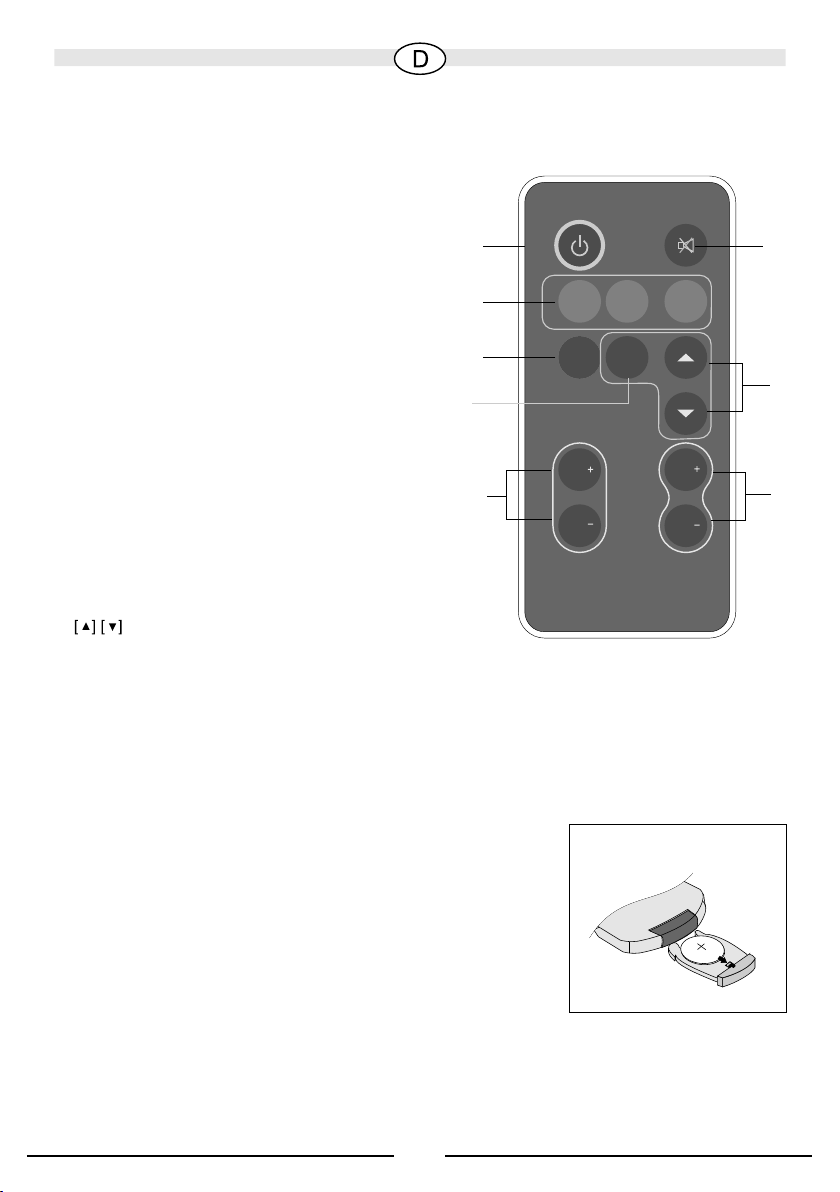
BESCHREIBUNG DER FERNBEDIENUNG
1.Standby/Power:
Schaltet das Gerät ein/aus.
2.Input
AUX1: Drücken Sie diese Taste, um den
AUX1-Eingang zu aktivieren.
AUX2: Drücken Sie diese Taste, um den
AUX2-Eingang zu aktivieren.
AUX3: Drücken Sie diese Taste, um den
AUX3-Eingang zu aktivieren.
3.Effect
Bei Tastendruck wird der 3D-Sound-Effekt
eingeschaltet. Ein weiterer Druck schaltet
den 3D-Sound-Effect wieder ab.
4.Set
Taste zur Einstellung der Uhrzeit.
5.Subwoofer Volume +/Erhöht/senkt die Lautstärke des Subwoofers.
6.Mute
Schaltet die Tonwiedergabe aus/an.
7.
Drücken Sie diese Tasten, um die
gewünschte Uhrzeit einzustellen.
8.Master Volume +/Erhöht/senkt die Gesamtlautstärke
1
2
3
4
5
AUX1 AUX2
EFFECT
SUB
SUB
AUX3
SET
VOL
VOL
6
7
8
Batterie einsetzen/auswechseln
Die Fernbedienung wird von einer vorinstallierten LithiumBatterie versorgt. Um ein Entladen vor der Benutzung des
Gerätes zu verhindern, wurde ein Isolierstreifen eingesetzt.
Bitte entfernen Sie diesen vor der ersten Benutzung. Sollte
die Fernbedienung nicht einwandfrei funktionieren, muss die
Batterie durch eine Batterie des gleichen Typs ersetzt
werden. Öffnen Sie das Batteriefach. Ziehen Sie die Batterie
in Pfeilrichtung aus dem Fach. Bevor Sie die leere Batterie
entfernen, merken Sie sich bitte genau die Position. Das "+"
Zeichen muss nach oben zeigen, andererseits funktioniert
die Fernbedienung nicht und kann sogar beschädigt
werden. Wechseln Sie die Batterie und schieben Sie das
Fach wieder zurück.
Wichtig: Batterien müssen vorschriftsmäßig entsorgt werden und gehören nicht in den
Hausmüll.
8
Page 9

INBETRIEBNAHME
ON/OFF
Schließen Sie das separate Netzteil auf der Rückseite des FTS 100 an. Verbinden
Sie die Audioquellen mit den gewünschten AUX-Eingängen (Cinch) auf der
Rückseite des Gerätes; wenn vorhanden auch den Subwoofer. Stecken Sie den
Netzstecker in eine Steckdose und schalten Sie den FTS 100 mit dem Netzschalter
auf der Rückseite ein. Drücken Sie nun den STANDBY-Knopf auf der Vorderseite des
Gerätes oder auf der Fernbedienung, das Gerät ist nun im STANDBY-Modus.
INPUT MODUS
Drücken Sie den INPUT Knopf auf der Vorderseite des Gerätes und wählen Sie
zwischen AUX1, AUX2, und AUX3. Mit den AUX-Knöpfen (1, 2, 3) auf der
Fernbedienung können Sie die Eingänge direkt anwählen.
LAUTSTÄRKEREGELUNG
Sie können den MASTER VOLUME-Regler auf der Vorderseite des FTS 100
benutzen, oder die VOL (+/-)-Tasten auf der Fernbedienung. Mit den SUB VOLUME
(+/-) Tasten auf der Fernbedienung können Sie die Lautstärke des Subwoofers
anpassen.
MUTE
Wenn Sie die MUTE-Taste auf der Vorderseite oder auf der Fernbedienung
betätigen, wird der FTS 100 stumm geschaltet. Ein erneuter Druck auf eine dieser
Tasten deaktiviert die Stummschaltung wieder.
EINSTELLEN DER UHRZEIT
Wenn Sie die SET-Taste auf der Fernbedienung drücken, beginnt die
Stundenanzeige zu blinken. Mit den Tasten können Sie nun die richtige
" " " "
Uhrzeit einstellen. Ein weiterer Druck auf die SET-Taste lässt die Minutenanzeige
blinken, mit der Sie ebenso verfahren. Danach wird die richtige Uhrzeit noch einmal
mit der SET-Taste bestätigt.
HINWEISE:
Bitte beachten Sie auch die Bedienungsanleitungen der anderen angeschlossenen
Geräte.
Manche DVD-Player liefern einen sehr hohen Ausgangspegel. Sollten bei hohen
Lautstärken Verzerrungen auftreten, stellen Sie das Gerät am MASTER VOLUME
Regler leiser, um Beschädigungen am Verstärker oder den Lautsprechern zu
vermeiden.
9
Page 10

TECHNISCHE DATEN
AUSGANGSLEISTUNG
Subwoofer (RMS) 30 W
Front-/ Center-Lautsprecher (RMS) 3 x 10 W
Maximale Ausgangsleistung (Impuls) 150 W
Abmessungen (B x H x T) 800 x 96 x 170 mm
ZUBEHÖR
Fernbedienung inkl. Batterie
Cinchkabel
Bedienungsanleitung
Netzteil
Technische Änderungen vorbehalten.
10
Page 11

Dear customer,
thank you for choosing the Audiovox FTS 100.
Please read the following information carefully before starting to use your FTS 100.
Safety precautions
• Do not expose the device, the mains adapter and the remote control to water or
moisture.
• Only operate the device in the specified temperature range of 0°C to 40°C.
• Make sure there is sufficient ventilation for the device. There must be a minimum
gap of 10 cm between objects to the side, to the rear and above the device.
• In the event of contact with moisture or liquids remove the mains adapter
immediately.
• Only clean the device using a dry cloth. Do not use any cleaning agents or chemical
solvents when cleaning, as these could damage the surface of the device.
• Never open the device.
• The device should not continue to be operated if there is visible damage to the
mains cable. A damaged cable should not be repaired, but must be replaced.
• Always refer to a qualified specialist for any maintenance or repair work.
Instructions for disposal
In accordance with European Directive 2002/96/EC all electrical and
electronic appliances must be disposed of separately via local collection
points. Please observe the local regulations and do not dispose of your
old appliances with normal household waste.
11
Page 12
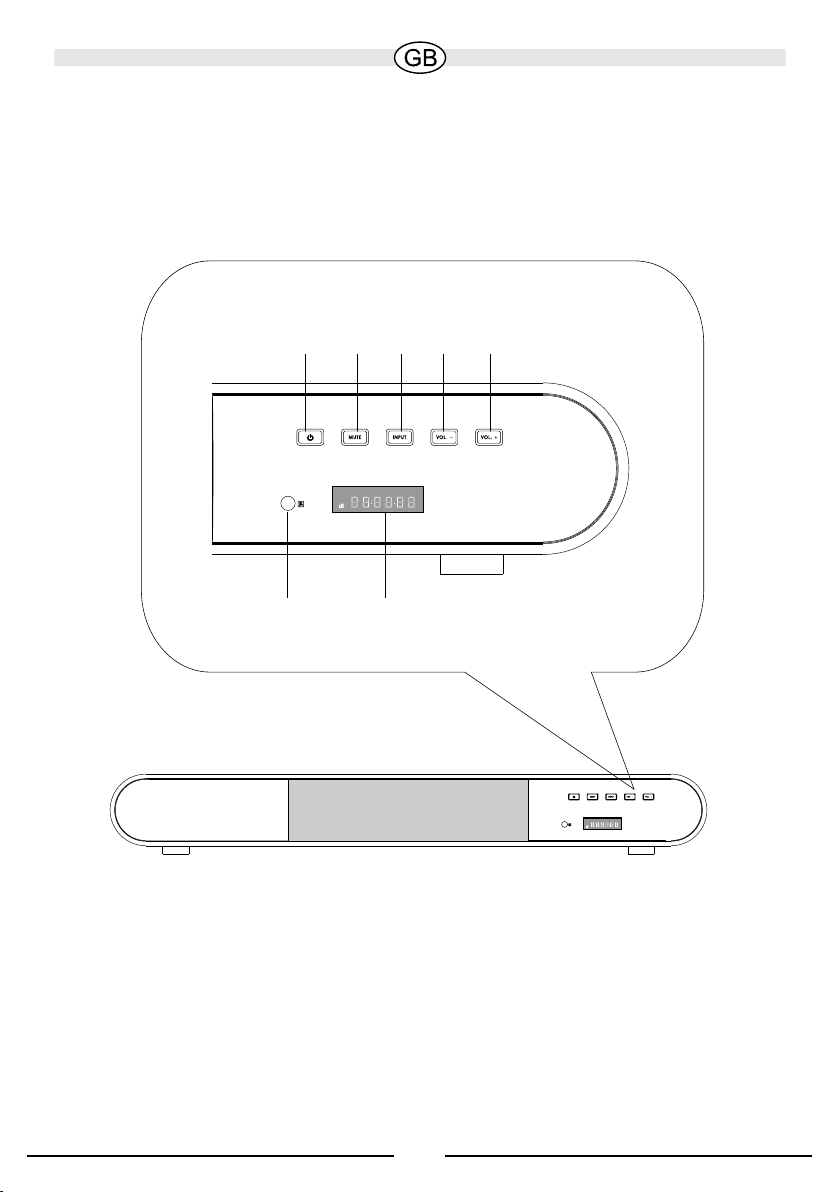
DESCRIPTION OF THE FTS 100
Front panel
Sensor keypad
21 3 4 5
SUB
AUX1 AUX3FMAM
AUX2
3D
CLK
6
7
SUB
AUX1 AUX3FMAM
AUX2
CLK
3D
1. Standby/power button 5. Volume-Up button, louder
2. Mute button, mute function 6. Sensor for the remote control
3. Input button, select the input 7. LED display
4. Volume-Down button, quieter
12
Page 13
DESCRIPTION OF THE FTS 100
Rear panel
POWER
ON
DC IN
18V/3.3A
OFF
21 3
AUX 2AUX 1
AUX 3
R
R
SUB.
OUTPUT
L
LRL
5
4
6
1. Power switch
2. Input for the separate mains adapter
3. Subwoofer output
4. AUX1 RCA jack input
5. AUX2 RCA jack input
6. AUX3 RCA jack input
13
Page 14
CONNECTIONS
Socket
or
TV
DVD
Subwoofer output
Rear of the FTS 100
Connect the two stereo channels to the desired
audio source (CD, DVD, MP3, iPod, games
console, computer, etc.)
14
Page 15

DESCRIPTION OF THE REMOTE CONTROL
1. Standby/Power
Switches the device on/off.
2.Input
AUX1: Press this button to activate the AUX1
input.
AUX2: Press this button to activate the AUX2
input.
AUX3: Press this button to activate the AUX3
input.
3.Effect
Pressing this button will activate the 3D
sound effect. Pressing the button again will
deactivate the 3D sound effect.
4.Set
Button for setting the time.
5.Subwoofer Volume +/Increases/decreases the volume of the
subwoofer.
6.Mute
Switches the sound on/off.
7.
Press these buttons to set the desired time.
8.Master Volume +/Increases/decreases the overall volume
1
2
3
4
5
AUX1 AUX2
EFFECT
SUB
SUB
AUX3
SET
VOL
VOL
6
7
8
Inserting/replacing the battery
The remote control is powered by a pre-installed lithium
battery. An isolating strip has been inserted to prevent the
battery from running out before the device is used. Please
remove this before the first use.
If the remote control doesn't work flawlessly, the battery must
be replaced with a new battery of the same type.
Open the battery compartment. Remove the battery from the
compartment in the direction of the arrow. Before removing
the empty battery please observe its exact position. The "+"
symbol must face upwards otherwise the remote control will
not work and it could become damaged. Exchange the
battery and slide the compartment closed again.
Battery disposal
Old batteries are hazardous waste and must be
disposed of in accordance with current regulations.
15
Page 16

INITIAL OPERATION
ON/OFF
Connect the separate mains adapter to the rear of the FTS 100. Connect the audio
sources to the desired AUX inputs (RCA) on the rear of the device, as well as the
subwoofer if available. Insert the mains adapter into an electric socket and switch on
the FTS 100 using the power switch on the rear. Now press the STANDBY button on
the front of the device or on the remote control. The device is now in the STANDBY
mode.
INPUT MODE
Press the INPUT button on the front of the device and choose between AUX1, AUX2
and AUX3. You can select these inputs directly by using the AUX buttons (1, 2, 3) on
the remote control.
VOLUME CONTROL
You can use the MASTER VOLUME controller on the front of the FTS 100 or the VOL
(+/-) buttons on the remote control.
The volume of the subwoofer can be adjusted by using the SUB VOLUME (+/-)
buttons on the remote control.
MUTE
If you press the MUTE button on the front or on the remote control, the sound of the
FTS 100 will be muted. Pressing one of these buttons again will deactivate the mute
function.
SETTING THE TIME
If you press the SET button on the remote control, the hours will start to flash. You can
now set the correct time by using the “5” “6” buttons. Pressing the SET button again
will make the minutes start to flash; use the same method to set the minutes. Confirm
the correct time by pressing the SET button once again.
PLEASE NOTE
Please also observe the instruction manuals for the other connected devices.
Some DVD players deliver a very high output level. If distortions occur at high
volumes, decrease the volume on the device by using the MASTER VOLUME
controller; doing this will prevent causing damage to the amplifier or the speakers.
16
Page 17

SPECIFICATIONS
OUTPUT POWER
Subwoofer (rated power) 30 W
Front / Centre speaker (rated power) 3 x 10 W
Max power output (pulse power) 150 W
Dimensions (W x H x D) 800 x 96 x 170 mm
Scope of delivery
Remote control incl. battery
RCA cable
Instruction manual
Mains adapter
Subject to technical change.
17
Page 18

Chère cliente, cher client,
Merci d'avoir choisi le FTS 100 de Audiovox.
Avant d'utiliser votre FTS 100, veuillez lire attentivement les informations qui suivent.
Consignes de sécurité
• N'exposez l'appareil, le bloc d'alimentation et la commande ni à l'eau ni à
l'humidité..
• Utiliser l'appareil uniquement dans une plage de température de 0 à 40 °C.
• S'assurer que l'appareil est placé dans un endroit suffisamment ventilé. Ne placer
aucun objet à moins de 10 cm des faces latérales, arrière et supérieure de
l'appareil.
• En cas de contact avec un milieu humide ou liquide, retirer l'adaptateur secteur
immédiatement.
• Nettoyer l'appareil avec un chiffon sec uniquement. Ne pas utiliser d'agents
nettoyants ou de solvants chimiques, ceux-ci pouvant endommager la surface de
l'appareil.
• Ne jamais ouvrir l'appareil.
• Ne pas continuer à utiliser l'appareil en cas de dommage visible sur le câble
secteur. Un câble endommagé ne doit pas être réparé mais doit être remplacé.
• Toujours demander conseil à un spécialiste pour tout travail de maintenance ou de
réparation.
Instructions pour la mise au rebut
Conformément à la directive européenne 2002/96/CE, tous les
appareils électriques et électroniques usagés doivent être triés et
déposés dans des points de collecte locaux. Veuillez respecter les
réglementations locales et ne pas jeter vos appareils usagés avec les
déchets ménagers.
18
Page 19

DESCRIPTION DU FTS 100
Vue avant
Clavier à effleurement
21 3 4 5
SUB
AUX1 AUX3FMAM
AUX2
3D
CLK
6
7
SUB
AUX1 AUX3FMAM
AUX2
CLK
3D
1. Touche Standby/Power 5. Touche Volume-Up, plus fort
2. Touche Mute, sourdine 6. Capteur pour télécommande
3. Touche Input, sélection de l'entrée 7. Affichage à LED
4. Touche Volume-Down, plus faible
19
Page 20

DESCRIPTION DU FTS 100
Vue arrière
21 3
AUX 2AUX 1
POWER
ON
DC IN
18V/3.3A
OFF
AUX 3
R
R
SUB.
OUTPUT
L
LRL
5
4
6
1. Interrupteur d'alimentation
2. Entrée pour bloc d'alimentation externe
3. Sortie subwoofer
4. Entrée cinch AUX1
5. Entrée cinch AUX2
6. Entrée cinch AUX3
20
Page 21

CONNECTEURS
Prise de
courant
ou
TV
DVD
Sortie subwoofer
Panneau arrière du FTS 100
Branchez les deux canaux stéréo à la source
audio souhaitée (CD, DVD, MP3, iPOD,
console de jeu, ordinateur, etc.)
21
Page 22

DESCRIPTION DE LA TELECOMMANDE
1.Standby/Power
Marche/Arrêt de l'appareil.
2.Input
AUX1 : appuyez sur cette touche pour activer
l'entrée AUX1.
1
AUX2 : appuyez sur cette touche pour activer
l'entrée AUX2.
AUX3 : appuyez sur cette touche pour activer
2
l'entrée AUX3.
3.Effect
3
Appuyez sur cette touche pour activer l'effet
sonore 3D. Pour désactiver l'effet sonore 3D,
4
appuyez à nouveau sur cette touche.
4.Set
Touche de réglage de l'heure.
5.Subwoofer Volume +/-
5
Augmente/baisse le volume sonore du
subwoofer.
6.Mute
Active/désactive la reproduction sonore.
7.
Appuyez sur ces touches pour régler l'heure
souhaitée.
8.Master Volume +/Augmente/baisse le volume sonore général.
Mise en place/remplacement de la pile
La télécommande est alimentée par une pile lithium
préinstallée. Pour éviter une décharge de la pile avant la
première utilisation de l'appareil, une bande isolante a été
insérée. Retirez cette bande isolante avant la première
utilisation.
Si la télécommande ne fonctionne pas correctement, la pile
doit être remplacée par une pile du même type.
Ouvrez le compartiment de la pile. Retirez la pile du
compartiment dans le sens de la flèche. Avant de retirer la
pile usagée, notez sa position correcte. Pour que la
télécommande fonctionne et qu'elle ne soit pas
endommagée, le signe « + » doit être situé en haut.
Remplacez la pile et refermez son compartiment.
AUX1 AUX2
EFFECT
SUB
SUB
6
AUX3
SET
7
VOL
8
VOL
Mise au rebut de la pile
Les piles usagées sont des déchets dangereux et doivent être mises au rebut
conformément aux réglementations en vigueur.
22
Page 23

MISE EN SERVICE
ON/OFF
Branchez le bloc d'alimentation externe au dos du FTS 100. Connectez les sources
audio aux entrées AUX souhaitées (cinch) situées au dos de l'appareil, ainsi que le
subwoofer, le cas échéant. Branchez le câble d'alimentation dans une prise
électrique et allumez le FTS 100 à l'aide de l'interrupteur d'alimentation situé au dos.
Appuyez sur le bouton STANDBY situé sur la face avant de l'appareil ou sur la
télécommande. L'appareil est maintenant en mode STANDBY.
MODE INPUT
Appuyez sur le bouton INPUT situé sur la face avant de l'appareil et sélectionnez
AUX1, AUX2 ou AUX3. Les boutons AUX (1, 2, 3) de la télécommande vous
permettent de sélectionner directement les entrées.
RÉGLAGE DU VOLUME SONORE
Vous pouvez utiliser le bouton de réglage MASTER VOLUME situé sur la face avant
du FTS 100 ou les touches VOL (+/-) de la télécommande.
Pour adapter le volume sonore du subwoofer, appuyez sur les touches SUB
VOLUME (+/-) de la télécommande.
MUTE
La touche MUTE de la face avant ou de la télécommande vous permet de mettre en
sourdine le FTS 100. Pour désactiver la sourdine, appuyez à nouveau sur cette
touche.
RÉGLAGE DE L'HEURE
Dès que vous appuyez sur la touche SET de la télécommande, l'affichage de l'heure
commence à clignoter. Pour régler l'heure exacte, appuyez sur les touches “5” “6”.
En appuyant à nouveau sur la touche SET, l'affichage des minutes clignote. Procédez
de la même manière pour régler les minutes. Une fois l'heure correcte réglée,
confirmez en appuyant une nouvelle fois sur la touche SET.
NOTEZ
Tenez compte des notices d'utilisation des autres appareils raccordés.
Certains lecteurs DVD possèdent un niveau de sortie très élevé. Si des distorsions
apparaissent à fort volume sonore, baissez le volume de l'appareil à l'aide du bouton
de réglage MASTER VOLUME afin d'éviter d'endommager l'amplificateur ou les
haut-parleurs.
23
Page 24

CARACTÉRISTIQUES TECHNIQUES
Puissance de sortie
Subwoofer (nominale) 30 W
Haut-parleurs frontaux/central ( 3 x 10 W
nominale)
Puissance de sortie max. (d’impulsion) 150 W
Dimensions (L x W x P) 800 x 96 x 170 mm
Eléments fournis
Télécommande avec pile incluse
Câble cinch
Manuel d’instruction
Bloc d’alimentation
Sous toutes réserves de modifications techniques.
24
Page 25

Gentile cliente,
La ringraziamo per aver deciso di acquistare il Audiovox FTS 100.
La preghiamo di leggere accuratamente le seguenti avvertenze prima di mettere in
funzione il FTS 100.
Avvertenze di sicurezza
·Non esporre l'apparecchio, l'alimentatore ed il telecomando all'acqua o l'umidità.
·Utilizzare il dispositivo solo in presenza delle temperature prescritte comprese tra
0°C e 40°C.
·Accertarsi che il dispositivo sia ben aerato. La distanza dagli oggetti laterali,
posteriori e superiori non deve essere inferiore a 10 cm.
·In caso di contatto con l'umidità o liquidi è necessario scollegare immediatamente
la spina di rete.
·Pulire il dispositivo solo con uno straccio asciutto. Non utilizzare detergenti o
solventi chimici poiché altrimenti si potrebbe danneggiare la superficie.
·Non aprire mai il dispositivo.
·In caso di danneggiamenti visibili del cavo di alimentazione è necessario non usare
più il dispositivo. Un cavo danneggiato non deve essere riparato, ma sostituito.
·Gli interventi di manutenzione o di riparazione devono essere affidati sempre a
personale qualificato.
Avvertenze per lo smaltimento
Secondo quanto prescritto dalla direttiva europea 2002/96/EC è
necessario che tutti i dispositivi elettrici ed elettronici vengano smaltiti
separatamente dai centri di raccolta preposti. Si prega di rispettare le
regolamentazioni locali e smaltire i dispositivi usati non insieme ai
normali rifiuti domestici.
25
Page 26

DESCRIZIONE DES FTS 100
Lato anteriore
Campo tasti a sensore
21 3 4 5
SUB
AUX1 AUX3FMAM
AUX2
3D
CLK
6
7
SUB
AUX1 AUX3FMAM
AUX2
CLK
3D
1. Tasto Standby/Power 5. Tasto Volume-Up, più alto
2. Tasto Mute, disattivazione volume 6. Sensore per il telecomando
3. Tasto Input, scelta dell'ingresso 7. Indicatore LED
4. Tasto Volume-Down, più silenzioso
26
Page 27

DESCRIZIONE DES FTS 100
Lato posteriore
21 3
AUX 2AUX 1
POWER
ON
DC IN
18V/3.3A
OFF
AUX 3
R
R
SUB.
OUTPUT
L
LRL
5
4
6
1. Interruttore di rete
2. Ingresso per l'alimentatore a parte
3. Uscita Subwoofer
4. Ingresso AUX1 Cinch
5. Ingresso AUX2 Cinch
6. Ingresso AUX3 Cinch
27
Page 28

ATTACCHI
Presa di
corrente
o
TV
DVD
Uscita subwoofer
Lato posteriore del FTS 100
Collegare i due canali stereo alla fonte audio
desiderata (CD, DVD, MP3, iPOD, console di
gioco, computer ecc.)
28
Page 29

DESCRIZIONE DEL TELECOMANDO
1.Standby/Power:
Attiva/Disattiva l'apparecchio.
2.Input
AUX1: Premere questo tasto per attivare
l'ingresso AUX1.
AUX2: Premere questo tasto per attivare
l'ingresso AUX2.
AUX3: Premere questo tasto per attivare
l'ingresso AUX3.
3.Effect
Premendo sul tasto si attiva l'effetto sonoro
3D. Premendo un'altra volta si disattiva
l'effetto sonoro 3D.
4.Set
Tasto per l'impostazione dell'ora.
5.Volume Subwoofer +/Aumenta/riduce il volume del subwoofer.
6.Mute
Disattiva/attiva la riproduzione audio.
7.
Premere questo tasto per impostare l'orario
desiderato.
8.Volume Master +/Aumenta/riduce il volume complessivo
1
2
3
4
5
AUX1 AUX2
EFFECT
SUB
SUB
AUX3
SET
VOL
VOL
6
7
8
Introdurre/sostituire la batteria
Il telecomando è alimentato da una batteria al litio
preinstallata. Per prevenire che si scarichi prima di utilizzare
l'apparecchio è strata introdotta una fascia isolante. Si prega
di rimuoverla prima dell'uso.
Nel caso in cui il telecomando non dovesse funzionare
correttamente è necessario sostituire la batteria con una
dello stesso tipo.
Aprire l'alloggiamento per la batteria. Estrarre la batteria
dall'alloggiamento seguendo la direzione della freccia.
Prima di rimuovere la batteria scarica, memorizzare
esattamente la posizione. Il simbolo "+" deve essere rivolto
verso l'alto, altrimenti il telecomando non funziona e si
potrebbe addirittura danneggiare. Sostituire la batteria e
rispingere indietro l'alloggiamento.
Smaltimento della batteria
Le batterie esauste sono da considerarsi rifiuti speciali e devono essere smaltite secondo
le regolamentazioni attuali.
29
Page 30

MESSA IN FUNZIONE
ON / OFF
Collegare l'alimentatore a parte sul retro del FTS 100. Collegare le fonti audio agli
ingressi AUX (Cinch) desiderati sul retro dell'apparecchio e se presente anche al
subwoofer. Introdurre la spina di rete nella presa ed attivare il FTS 100 con
l'interruttore di rete sul retro. A questo punto premere il tasto STANDBY sulla parte
anteriore dell'apparecchio o sul telecomando. L'apparecchio a questo punto si trova
in modalità STANDBY.
MODALITA INPUT
Premere il tasto INPUT sulla parte anteriore dell'apparecchio e scegliere tra AUX1,
AUX2 e AUX3. Con i tasti AUX (1, 2, 3) sul telecomando è possibile selezionare
direttamente gli ingressi.
REGOLAZIONE DEL VOLUME
Può essere usato il regolatore del VOLUME MASTER sulla parte anteriore del FTS
100 oppure i tasti VOL (+/-) sul telecomando.
Con i tasti SUB VOLUME (+/-) sul telecomando è possibile adattare il volume del
subwoofer.
MUTE
Quando si preme il tasto MUTE sul lato anteriore o sul telecomando, si disattiva il
volume del FTS 100. Premendo nuovamente sul tasto, il volume di riattiva.
IMPOSTAZIONE DELL'ORA
Quando si preme il tasto SET sul telecomando, l'indicatore delle ore inizia a
lampeggiare. Con i tasti “5” “6” a questo punto è possibile impostare l'ora esatta.
Premendo nuovamente sul tasto SET lampeggia l'indicatore dei minuti. Procedere
allo stesso modo delle ore. Successivamente l'ora esatta viene confermata
premendo nuovamente il tasto SET.
NOTE
Si prega di rispettare anche le istruzioni d'uso degli altri apparecchi collegati.
Alcuni lettori DVD emettono un livello di uscita molto alto. Nel caso in cui a volumi
elevati si dovessero verificare delle distorsioni, abbassare il volume dell'apparecchio
dal regolatore del MASTER VOLUME per prevenire danneggiamenti all'amplificatore
o le casse.
30
Page 31

DATI TECHNICI
POTENZA DI USCITA
Subwoofer (nominale) 30 W
Altoparlante frontale/centrale (nominale) 3 x 10 W
Potenza di uscita max. (ad impulsi) 150 W
Dimensioni (L x A x P) 800 x 96 x 170 mm
Fornitura
Telecomando incl. batteria
Cavo Cinch
Manuale d’uso dettagliato
Alimentatore
Con riserva di apportare modifiche tecniche.
31
Page 32

Estimado cliente,
gracias por haber seleccionado il Audiovox FTS 100.
Lea la siguiente información detenidamente antes de comenzar a utilizar su FTS 100.
Precauciones de seguridad
• No exponga el dispositivo, el adaptador de alimentación y el control remoto al agua
o la humedad.
• Utilice el dispositivo únicamente dentro del rango de temperatura especificado, de
0ºC a 40ºC.
• Asegúrese de que existe ventilación suficiente para el dispositivo. Debe existir un
espacio mínimo de 10 cm. entre los objetos situados en los laterales y las partes
frontal y posterior del dispositivo.
• En caso de contacto con humedad o líquidos, retire inmediatamente el adaptador
principal.
• Limpie el dispositivo utilizando únicamente un paño seco. No utilice productos de
limpieza o disolventes químicos durante la limpieza. Ello podría dañar la superficie
del dispositivo.
• No abra el dispositivo.
• No continúe utilizando el dispositivo si existen señales visibles de deterioro en el
cable de alimentación. Un cable deteriorado no debe ser reparado, sino
reemplazado.
• Consulte siempre con un especializar cualificado para cualquier operación de
mantenimiento o reparación.
Instrucciones de eliminación
De acuerdo con la Directiva Europea 2002/96/EC, todos los aparatos
eléctricos y electrónicos deben ser eliminados por medio de puntos
de recogida locales e independientes. Respete la normativa local y no
elimine los aparatos usados junto a los residuos domésticos.
32
Page 33

DESCRIPCIÓN DEL FTS 100
Parte frontal
Taclado de sonsor
21 3 4 5
SUB
AUX1 AUX3FMAM
AUX2
3D
CLK
6
7
SUB
AUX1 AUX3FMAM
AUX2
CLK
3D
1. Botón Standby/Power 5. Botón Volume-Up, más sonoro
2. Botón Mute, función de silencio 6. Sensor del control remoto
3. Botón Input, selección de entrada 7. Pantalla LED
4. Botón Volume-Down, más
silencioso
33
Page 34

DESCRIPCIÓN DEL FTS 100
Parte posterior
21 3
AUX 2AUX 1
POWER
ON
DC IN
18V/3.3A
OFF
AUX 3
R
R
SUB.
OUTPUT
L
LRL
5
4
6
1. Interruptor de encendido
2. Entrada de adaptador de alimentación independiente
3. Salida de subwoofer
4. Entrada de conector AUX1 RCA
5. Entrada de conector AUX2 RCA
6. Entrada de conector AUX3 RCA
34
Page 35

CONEXIONES
Enchufe
o
TV
DVD
Salida de subwoofer
Parte posterior des FTS 100
Conecte los dos canales estéreo a la fuente de
audio que desee (CD, DVD, MP3, iPod,
consola de juegos, ordenador, etc.)
35
Page 36

DESCRIPCIÓN DEL CONTROL REMOTO
1. Standby/Power:
Enciende o apaga el dispositivo.
2. Input
AUX1: Pulse este botón para activar la
entrada AUX1.
AUX2: Pulse este botón para activar la
entrada AUX2.
AUX3: Pulse este botón para activar la
entrada AUX3.
3. Effect
Al pulsar este botón se activará el efecto de
sonido 3D. Si pulse de nuevo el botón se
desactivará el efecto de sonido 3D.
4. Set
Pulse este botón para establecer la hora.
5. Subwoofer Volume +/Aumenta/reduce el volumen del altavoz
subwoofer.
6. Mute
Activa y desactiva el sonido.
7.
Pulse estos botones para establecer la hora
que desee.
8. Master Volume +/Aumenta/reduce el volumen general
1
2
3
4
5
AUX1 AUX2
EFFECT
SUB
SUB
AUX3
SET
VOL
VOL
6
7
8
Inserción/sustitución de las baterías
El control remoto funciona con una batería del litio
preinstalada. Se ha insertado una tira aislante para evitar
que la batería se agote antes de utilizar el dispositivo. Retire
la tira antes de utilizar el aparato por primera vez.
Si el control remoto no funciona bien, sustituya la batería por
otra nueva del mismo tipo.
Abra el compartimento de las baterías. Extraiga las baterías
del compartimento en la dirección de la flecha. Antes de
retirar las baterías vacías, observe su posición. El símbolo
“+” debe orientarse hacia arriba. De lo contrario, el control
remoto no funcionará y podría resultar dañado. Cambie la
batería y cierre de nuevo el compartimento.
Eliminación de la batería
Las baterías usadas son un residuo peligroso y deben ser eliminadas de acuerdo con las
normativas actuales.
36
Page 37

PRIMOS PASOS
ON/OFF
Conecte el adaptador de alimentación al conector ubicado en la parte posterior del
FTS 100. Conecte las fuentes de audio a las entradas AUX que desee (RCA) también
en la parte posterior del dispositivo, así como el altavoz subwoofer, si está disponible.
Inserte el adaptador de alimentación en una toma eléctrica, y encienda el FTS 100
utilizando el interruptor situado en la parte posterior. Pulse ahora el botón STANDBY
en la parte frontal o en el control remoto. El dispositivo se hallará ahora en el modo
STANDBY.
MODO INPUT
Pulse el botón INPUT en la parte frontal del dispositivo y seleccione AUX1, AUX2. o
AUX3. Puede seleccionar las entradas directamente utilizando los botones AUX (1,
2, 3) en el control remoto.
CONTROL DE VOLUMEN
Puede utilizar el control de MASTER VOLUME situado en la parte frontal del FTS 100
o los botones VOL (+/-) en el control remoto.
Es posible ajustar el volumen del subwoofer utilizando los botones SUB VOLUME
(+/-) en el control remoto.
MUTE
Si pulsa el botón MUTE en la parte frontal del aparato o en el control remoto se
desactivará el sonido del FTS 100. Pulse una vez los botones para desactivar la
función de silencio.
ESTABLECER LA HORA
Si pulsa el botón SET en el control remoto, las horas comenzarán a parpadear. Ahora
podrá establecer la hora correcta utilizando los botones “5” “6”. Pulse de nuevo el
botón SET para que comiencen a parpadear los minutos. Utilice el mismo método
para establecer los minutos. Confirme la hora correcta pulsando de nuevo el botón
SET.
NOTAS
Consulte también los manuales de instrucciones de los demás equipos conectados.
Algunos reproductores DVD ofrecen un nivel de sonido muy alto. Si se producen
distorsiones con el volumen alto, reduzca el nivel de volumen del dispositivo
utilizando el controlador de volumen MASTER VOLUME; al hacerlo evitará causar
daños al amplificador o los altavoces.
37
Page 38

ESPECIFICACIONES
Potencia de salida
Subwoofer (nominal) 30 W
Altavoz frontal / central (nominal) 3 x 10 W
Potencia de salida màx. ( ) 150 W
de pulsación
Dimensiones (A x A x P) 800 x 96 x 170 mm
Volumen de suministro
Control remoto con baterías
Cable RCA
Manual de instrucciones
Adaptador de alimentación
Reservados los derechos de realizar cambios técnicos.
38
Page 39

Уважаемый покупатель!
Благодарим Вас за решение приобрести Audiovox FTS 100.
Пожалуйста, внимательно прочитайте следующую информацию перед
включением FTS 100.
Указания по безопасности
· Не подвергайте прибор, блок питания и пульт дистанционного управления
воздействию воды и влаги.
· Эксплуатируйте устройство только в рамках указанного температурного
диапазона от 0°C до 40°C.
· Позаботьтесь о достаточной вентиляции устройства. Необходимо соблюдать
минимальное расстояние от устройства к другим предметам в 10 см по бокам,
сзади и сверху.
· В случае контакта с влагой или жидкостью немедленно отсоедините
устройство от сети питания.
· Вытирать устройство можно только сухой салфеткой. Не используйте
чистящие средства или химические растворители, так как они могут
повредить поверхность.
· Никогда не открывайте устройство.
· Если на сетевом кабеле будут обнаружены повреждения, эксплуатировать
устройство больше нельзя. Поврежденный кабель ремонтировать нельзя, его
нужно заменить.
· Работами по техническому обслуживанию и ремонту устройства должны
заниматься только квалифицированные специалисты.
Указания по утилизации
Согласно европейской директиве 2002/96/EC все электрические и
электронные приборы для утилизации должны сдаваться отдельно
в местные сборные пункты. Пожалуйста, выполняйте местные
предписания и не выбрасывайте старые устройства вместе с
обычным домашним мусором.
39
Page 40

ОПИСАНИЕ FTS 100
Передняя панель
Сенсорная клавиатура
21 3 4 5
SUB
AUX1 AUX3FMAM
AUX2
3D
CLK
6
7
SUB
AUX1 AUX3FMAM
AUX2
CLK
3D
1. Кнопка Standby/Power 5. Кнопка Volume-Up, громче
2. Кнопка Mute, отключение звука 6. Датчик дистанционного
3. Кнопка Input, выбор входа управления
4. Кнопка Volume-Down, тише 7. ЖК-индикатор
40
Page 41

ОПИСАНИЕ FTS 100
Задняя сторона
POWER
ON
DC IN
18V/3.3A
OFF
21 3
AUX 2AUX 1
AUX 3
R
R
SUB.
OUTPUT
L
LRL
5
4
6
1. Сетевой выключатель
2. Вход для отдельного блока питания
3. Выход для сабвуфера
4. Контактный вход AUX1
5. Контактный вход AUX2
6. Контактный вход AUX3
41
Page 42

РАЗЪЕМЫ
гнездо силы
или
TV
DVD
Выход для сабвуфера
Задняя сторона FTS 100
Соедините оба стереоканала с нужным
источником звука (CD, DVD, MP3, iPOD,
игровая приставка, компьютер и т.д.)
42
Page 43

ОПИСАНИЕ ПУЛЬТА ДИСТАНЦИОННОГО УПРАВЛЕНИЯ
1. Power/Standby
Включает/выключает устройство.
2. Input
AUX1: Нажмите на эту кнопку, чтобы
активировать вход AUX1.
1
AUX2: Нажмите на эту кнопку, чтобы
активировать вход AUX2.
AUX3: Нажмите на эту кнопку, чтобы
2
активировать вход AUX3.
3. Effect
3
При нажатии на эту кнопку включается
эффект 3D-Sound. После еще одного
4
нажатия на кнопку эффект 3D-Sound
выключается.
4. Set
Кнопка для установки времени.
5
5. Subwoofer Volume +/-
Увеличивает/уменьшает громкость
сабвуфера.
6. Mute
Выключает/включает звук.
7.
Нажимайте на эти кнопки, чтобы
установить нужное время.
8. Master Volume +/-
Увеличивает/уменьшает общую громкость
AUX1 AUX2
EFFECT
SUB
SUB
6
AUX3
SET
7
VOL
8
VOL
Вставить/заменить батарейку
Питание пульта ДУ осуществляется от литиевой
батарейки, входящей в комплект и вставленной в пульт ДУ.
Для предотвращения разрядки до эксплуатации пульта ДУ
была вставлена изолирующая полоска. Перед первым
использованием пульта ДУ ее следует вынуть.
Если пульт ДУ не функционирует безупречно, батарейку
следует заменить на батарейку такого-же типа.
Откройте отсек для батарейки. Выньте батарейку из отсека
по стрелке. Прежде чем вынуть израсходованную
батарейку, запомните, в каком точно положении она
находилась. Символ "+" должен указывать вверх, в
противном случае пульт ДУ не будет работать и даже
может выйти из строя. Замените батарейку и снова
закройте отсек.
Утилизация батареек
Старые батарейки относятся к особым отходам и подлежат утилизации согласно
действующим предписаниям.
43
Page 44

ВКЛЮЧЕНИЕ
ON/OFF (ВКЛ./ВЫКЛ.)
Подключите отдельный блок питания на задней стороне FTS 100. Соедините
аудиоисточники с нужными входами AUX (контактные) на задней стороне
прибора, если имеется, также и сабвуфер. Вставьте блок питания в сетевую
розетку и включите FTS 100 с помощью сетевого выключателя на задней
стороне. Теперь нажмите на кнопку STANDBY на передней стороне прибора
или на пульте ДУ. Теперь прибор находится в режиме STANDBY (ожидания).
INPUT MODUS (РЕЖИМ ВВОДА)
Нажмите на кнопку INPUT на передней стороне прибора и выберите AUX1,
AUX2 или AUX3. С помощью кнопок AUX (1, 2, 3) на пульте ДУ входы можно
выбирать напрямую.
РЕГУЛИРОВАНИЕ ГРОМКОСТИ
Можно воспользоваться регулятором MASTER VOLUME на передней стороне
FTS 100 или кнопками VOL (+/-) на пульте ДУ.
С помощью кнопок SUB VOLUME (+/-) на пульте ДУ можно регулировать
громкость сабвуфера.
MUTE (ВЫКЛЮЧЕНИЕ ЗВУКА)
Если нажать на кнопку MUTE на передней стороне прибора или на пульте ДУ,
звук FTS 100 выключается. Повторное нажатие на одну из этих кнопок опять
включает звук.
НАСТРОЙКА ВРЕМЕНИ
Если нажать на кнопку SET на пульте ДУ, индикатор времени начнет мигать. С
помощью кнопок “5” “6” можно установить нужное время. После еще одного
нажатия на кнопку SET начинает мигать индикатор минут, повторите процедуру
по предыдущему предложению. Затем правильное время подтверждается еще
раз кнопкой SET.
ПРИМЕЧАНИЯ
Учитывайте и руководства по эксплуатации других подключенных приборов.
Некоторые проигрыватели DVD дают очень высокий выходной уровень. Если
при высоком уровне громкости возникают искажения, следует уменьшить
громкость прибора с помощью регулятора MASTER VOLUME, чтобы
предотвратить повреждение усилителя или громкоговорителей.
44
Page 45

ВЫХОДНАЯ МОЩНОСТЬ
Сабвуфер (Номинальная мощность) 30 Вт
Фронтальный/центральный громкоговоритель
(Номинальная мощность) 3 x 10 Вт
Макс. выходная мощность (Импульсная мощность) 150 Вт
Размеры (Ш x В x Г) 800 x 96 x 170 мм
ОБЪЕМ ПОСТАВКИ
Пульт дистанционного управления в комплекте с батарейкой
Контактный кабель
Руководство по эксплуатации
Блок питания
ВОЗМОЖНЫ ТЕХНИЧЕСКИЕ ИЗМЕНЕНИЯ.
45
Page 46

D
Wir gratulieren Ihnen! Durch Ihre kluge Wahl sind Sie Besitzer eines Audiovox Produktes geworden.
Audiovox-Produkte erfreuen sich aufgrund der hohen Qualität eines ausgezeichneten Rufes weltweit.
Dieser hohe Qualitätsstandard ermöglicht es für Audiovox-Produkte 2 Jahre Garantie zu gewähren.
Die Produkte werden während des gesamten Fertigungsvorganges laufend kontrolliert und geprüft. Im
Servicefall beachten Sie bitte folgendes:
1. Die 2-jährige Garantiezeit beginnt mit dem Kauf des Produktes und gilt nur für den Erstbesitzer.
2. Während der Garantiezeit beseitigen wir etwaige Mängel, die nachweislich auf Material- oder
Fabrikationsfehler beruhen, nach unserer Wahl durch Austausch oder Nachbesserung der defekten Teile.
Weitergehende Ansprüche, insbesondere auf Minderung, Wandlung, Schadenersatz oder Folgeschäden
sind ausgeschlossen. Die Garantiezeit wird von einer Garantieleistung durch uns nicht berührt.
3. Am Produkt dürfen keine unsachgemäßen Eingriffe vorgenommen worden sein.
4. Bei Inanspruchnahme der Garantie wenden Sie sich bitte zunächst an Ihren Fachhändler. Sollte es sich
als notwendig erweisen, das Produkt an uns einzuschicken, so sorgen Sie bitte dafür, daß • das Produkt in
einwandfreier Originalverpackung verschickt wird, • die Kontrollkarte ausgefüllt dem Produkt beiliegt, • die
Kaufquittung beigefügt ist.
5. Von der Garantie ausgenommen sind: • Leuchtmittel • Verschleißteile • Batterien • Transportschäden,
sichtbar oder unsichtbar (Reklamationen für solche Schäden müssen umgehend bei der Transportfirma,
Bahn oder Post eingereicht werden.) • Kratzer in Metallteilen, Frontabdeckungen u.s.w. (Diese Defekte
müssen innerhalb von 5 Tagen nach Kauf direkt bei Ihrem Händler reklamiert werden.) • Fehler, die durch
fehlerhafte Aufstellung, falschen Anschluss, unsachgemäße Bedienung (siehe Bedienungsanleitung),
Beanspruchung oder äußere gewaltsame Einwirkung entstanden sind. • Unsachgemäß reparierte oder
geänderte Geräte, die von anderer Seite als von uns geöffnet wurden. • Folgeschäden an fremden
Geräten • Kostenerstattung bei Schadensbehebung durch Dritte ohne unser vorheriges Einverständnis.
GB
Congratulations! You have made a wise selection in becoming the owner of a Audiovox equipment. Due to
high quality Audiovox products have earned an excellent reputation through the western world. And this
high quality standard enables us to grant a 2-years warranty for Audiovox products. The equipments are
checked and tested continously during the entire production process. In case you have problems with your
Audiovox equipment, kindly observe the following:
1. The 2-years guarantee period commences with the purchase of the component and is applicable only to
the original owner.
2. During the guarantee period we will rectify any defects due to faulty material or workmanship by
replacing or repairing the defective part at our discretion. Further claims, and in particular those for price
reduction, cancellation of sale, compensation for damages or subsequential damages, are excluded. The
guarantee period is not altered by the fact that we have carried out guarantee work.
3. Unauthorized tampering with the equipment will invalidate this guarantee.
4. Consult your authorized dealer first, if guarantee service is needed. Should it prove necessary to return
the component to the factory, please insure that • the component is packed in original factory packing in
good condition • the quality control card has been filled out and enclosed with the component, • your
enclose your receipt as proof of purchase.
5. Excluded from the guarantee are: • Illuminates • Wear parts • Batteries • Shipping damages, either
readily apparent or concealed (claims for such damages must be lodged immediately with forwarding
agent, the railway express office or post office). • Scratches in cases, metal components, front panels, etc.
(You must notify your dealer directly of such defects within three days of purchase.) • Defects caused by
incorrect installation or connection, by operation errors (see operating instructions), by overloading or by
external force. • Equipments which have beenrepaired incorrectly or modified or where the case has been
opened by persons other than us. • Consequential damages to other equipments. • Reimbursement of
costs, without our prior consent, when repairing damages by third parties.
46
Page 47

G
ARANTIEKARTE
W
ARRANTY
Typ/Type
Serien-Nr./ Serial-No.
Name und Anschrift des Händlers/Stempel
Name and address of the dealer/stamp
Käufer/Customer
Name/Name
Straße/Street
C
ARD
PLZ, Ort/City
Land/ Country
Kaufdatum/ buying date
Nur gültig in Verbindung mit Ihrer Kaufquittung!
No warranty without receipt!
Page 48

Audiovox Audio Produkte GmbH
Lise-Meitner-Str. 9 · 50259 Pulheim · Germany
Tel.: ++49 (0) 2234 807-0 · Fax: ++49 (0) 2234 807-399
www.audiovox.de
 Loading...