

Page 1

OWNER'S MANUAL
FPE1708DVS
17” HD FLAT PANEL LCD TV
WITH BUILT-IN DVD PLAYER
FOR ASSISTANCE CALL CUSTOMER SERVICE AT 1-800-645-4994
OR VISIT US AT WWW. AUDIOVOX.COM
128-8327
Page 2
E - 1
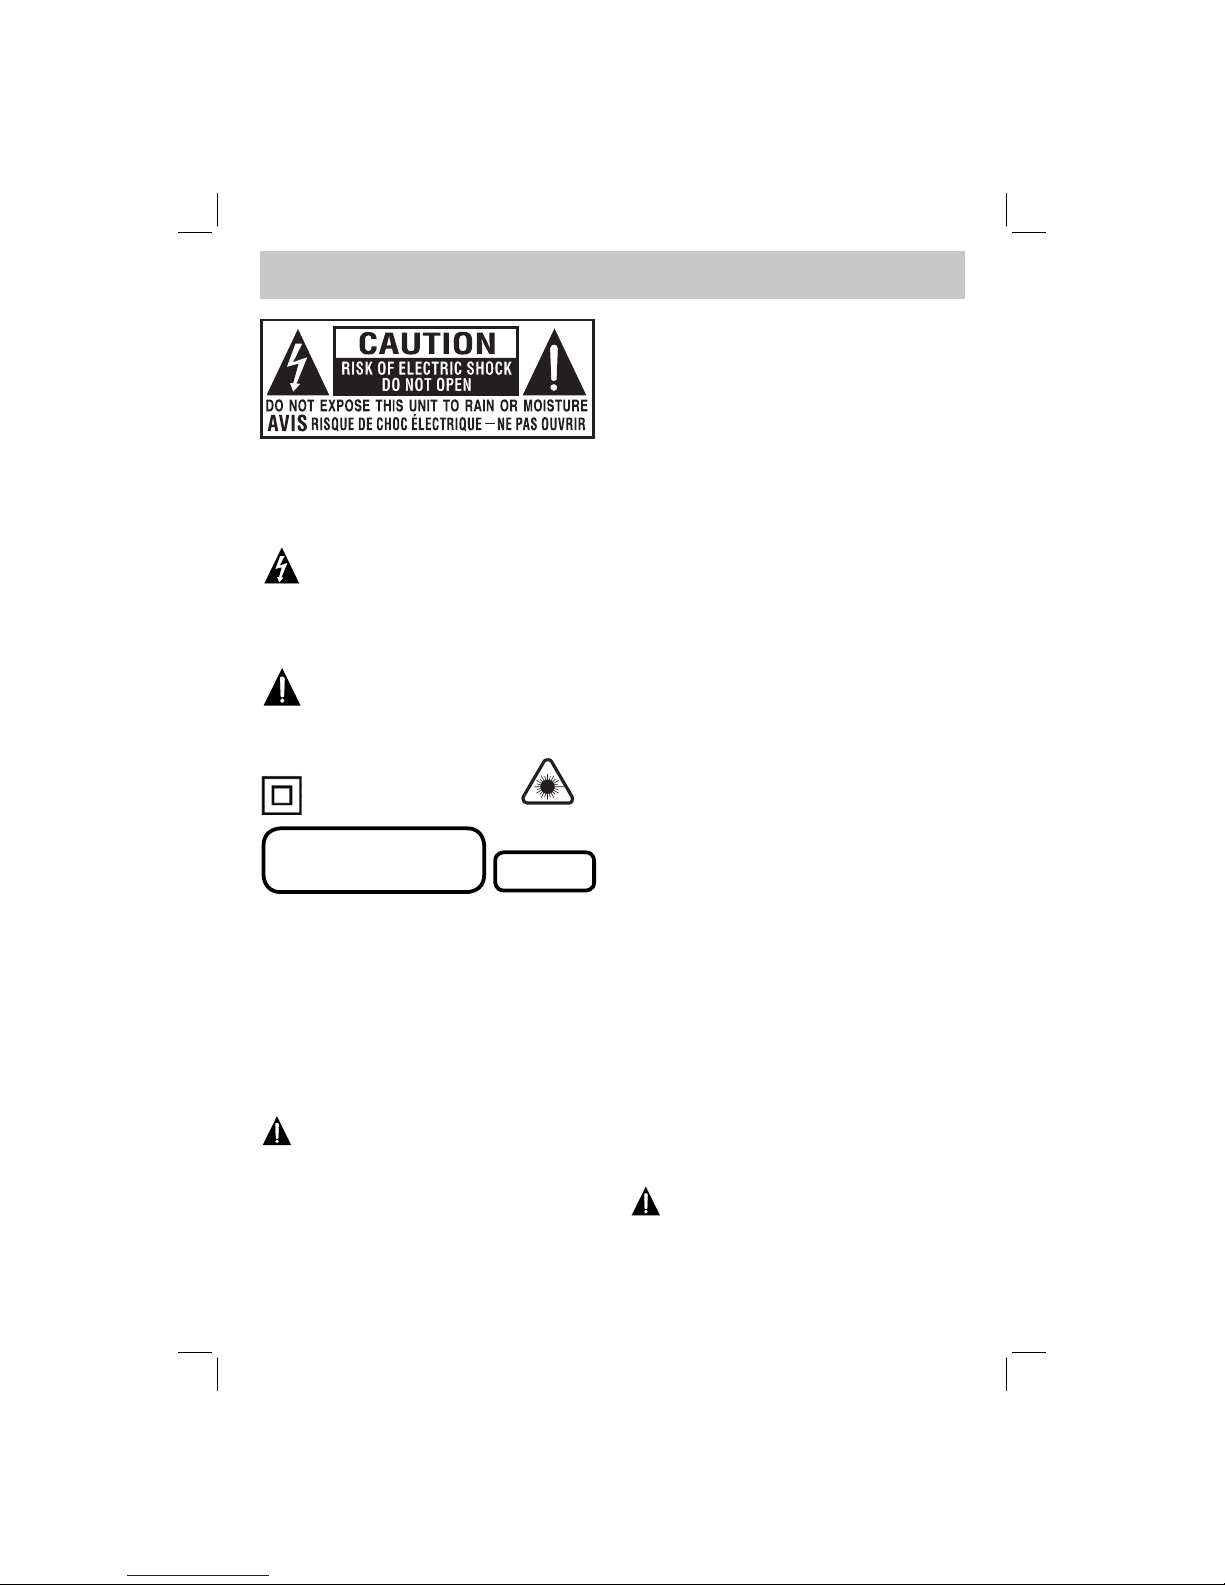
SAFETY PRECAUTIONS
The lightning fl ash with arrowhead symbol,
within an equilateral triangle, is intended to
alert the user to the presence of uninsulated
“dangerous voltage” within the product’s enclosure
that may be of suffi cient magnitude to constitute a
risk of electric shock to persons.
The exclamation point within an equilateral
triangle is intended to alert the user to
the presence of important operating and
maintenance (servicing) instructions in the literature
accompanying the appliance.
WARNING : TO REDUCE THE RISK OF ELECTRIC
SHOCK, DO NOT REMOVE COVER (OR BACK).
NO USER SERVICEABLE PARTS INSIDE.
REFER SERVICING TO QUALIFIED SERVICE
PERSONNEL.
CAUTION
• DANGER OF EXPLOSION IF BATTERY IS
INCORRECTLY REPLACED. REPLACE ONLY
WITH THE SAME OR EQUIVALENT TYPE.
• TO PREVENT ELECTRIC SHOCK, MATCH
WIDE BLADE OF PLUG TO WIDE SLOT OF
WALL OUTLET, THEN FULLY INSERT.
• USE OF CONTROLS OR ADJUSTMENTS OR
PERFORMANCE OF PROCEDURES OTHER
THAN THOSE SPECIFIED MAY RESULT IN
HAZARDOUS RADIATION EXPOSURE.
WARNING :
• TO PREVENT FIRE OR SHOCK HAZARD,
DO NOT EXPOSE THIS UNIT TO RAIN OR
MOISTURE. DO NOT PLACE OBJECTS FILLED
WITH LIQUIDS ON OR NEAR THIS UNIT.
• SHOULD ANY TROUBLE OCCUR,
DISCONNECT THE AC POWER CORD
AND REFER SERVICING TO A QUALIFIED
TECHNICIAN.
PLACEMENT INFORMATION
• Do not use this unit in places that are extremely
hot, cold, dusty or humid.
• Do not restrict the airfl ow of this unit by placing it
somewhere with poor airfl ow, by covering it with
a cloth, by placing it on bedding or carpeting.
SAFETY INFORMATION
• When connecting or disconnecting the AC power
cord, grip the plug and not the cord itself. Pulling
the cord may damage it and create a hazard.
• When you are not going to use the unit for a long
period of time, disconnect the AC power cord.
CONDENSATION INFORMATION
• When left in a heated room where it is warm and
damp, water droplets or condensation may form
inside the equipment. When there is condensation
inside the unit, the unit may not function normally.
Let the unit stand for 1-2 hours before turning the
power on or gradually heat the room and let the
unit dry before use.
RATING PLATE LOCATION
The rating plate is located on the rear of the unit.
FCC STATEMENTS
NOTE: This unit has been tested and found to comply
with the limits for a Class B digital device, pursuant
to Part 15 of the FCC Rules. These limits are
designed to provide reasonable protection against
harmful interference in a residential installation.
This unit generates, uses and can radiate radio
frequency energy and, if not installed and used in
accordance with the instructions, may cause harmful
interference to radio communication. However, there
is no guarantee that interference will not occur in a
particular installation. If this unit does cause harmful
interference to radio or television reception, which
can be determined by turning the unit off and on, the
user is encouraged to try to correct the interference
by one or more of the following measures:
- Reorient or relocate the receiving antenna.
- Increase the separation between the unit and
receiver.
- Connect the unit into an outlet on a circuit different
from that to which the receiver is connected.
- Consult the dealer or an experienced radio/TV
technician for help.
WARNING: Changes or modifi cations to this unit
not expressly approved by the party responsible
for compliance could void the user authority to
operate the unit.
The symbol for Class II
(Double Insulation)
CAUTION
INVISIBLE LASER RADIATION WHEN
OPEN AND INTERLOCKS DEFEATED.
AVOID EXPOSURE TO BEAM
This product
contains a low
power laser device.
CLASS 1 LASER
PRODUCT
FPE1708DVS_UL_IB_MSTAR+MTK_E1-20.indd 1FPE1708DVS_UL_IB_MSTAR+MTK_E1-20.indd 1 3/11/2008 10:39:12 AM3/11/2008 10:39:12 AM
Page 3

E - 2
IMPORTANT SAFETY INSTRUCTIONS
1) Read these instructions.
2) Keep these instructions.
3) Heed all warnings.
4) Follow all instructions.
5) Do not use this apparatus near water.
6) Clean only with a dry cloth.
7) Do not block any ventilation openings.
Install in accordance with the manufacturer’s
instructions.
8) Do not install near any heat sources such
as radiators, heat registers, stoves, or
other apparatus (Including amplifi ers) that
produce heat.
9) Do not defect the safety purpose of the
polarized or grounding-type plug. A polarized
plug has two blades with one wider than the
other. A grounding type plug has two blades
and a third grounding prong. The wide blade
or the third prong is provided for your safety.
If the provided plug does not fi t into your wall
outlet, consult an electrician for replacement
of the obsolete outlet.
10) Protect the power cord from being walked on
or pinched particularly at plugs, convenience
receptacles, and the point where they exit
from the apparatus.
11) Only use attachments / accessories specifi ed
by the manufacturer.
12) Use only with the cart, stand,
tripod, bracket, or table
specifi ed by the manufacturer,
or sold with the apparatus.
When a cart is used, use caution when
moving the cart / apparatus combination to
avoid injury from tip-over.
13) Unplug this apparatus during lightning
storms or when unused for long periods of
time.
14) Refer all servicing to qualified service
personnel. Servicing is required when the
apparatus has been damaged in any way,
such as the power cord or plug is damaged,
liquid has been spilled or objects have
fallen into the apparatus, the apparatus has
been exposed to rain or moisture, does not
operate normally, or has been dropped.
MAINTENANCE
CLEANING THE DISC
A defective or soiled disc inserted into the unit can cause sound to drop out during
playback.
Handle the disc by holding its inner and outer edges.
• Do NOT touch the surface of the unlabeled side of the disc.
• Do NOT stick paper or tape on the surface.
• Do NOT expose the disc to direct sunlight or excessive heat.
• NEVER use solvents such as benzine or alcohol to clean the disc.
• Clean the disc before playback. Wipe the disc from the center outward with a cleaning cloth.
• Do NOT use irregular shaped discs (example : heart shaped, octagonal, etc.). They may cause
malfunctions.
CLEANING THE UNIT
• Be sure to turn the unit off and disconnect the AC power cord before maintaining the unit.
• Wipe the unit with a dry soft cloth. If the surfaces are extremely dirty, wipe clean with a cloth that has been
dipped in a weak soap-and-water solution and wrung out thoroughly. Wipe with a dry cloth.
• Never use alcohol, benzine, thinner, cleaning fl uid or other chemicals. Do NOT use compressed air to
remove dust.
IMPORTANT NOTE
Before transporting the unit, remove the disc from the disc compartment.
FPE1708DVS_UL_IB_MSTAR+MTK_E1-20.indd 2FPE1708DVS_UL_IB_MSTAR+MTK_E1-20.indd 2 3/11/2008 10:39:13 AM3/11/2008 10:39:13 AM
Page 4

E - 3
CONTENTS
SAFETY PRECAUTIONS .......................... 1
IMPORTANT SAFETY INSTRUCTIONS .......
...................................................................... 2
MAINTENANCE ........................................ 2
CONTENTS ............................................... 3
QUICK INSTALLATION ............................. 4
DISC FORMATS ........................................ 5
ACCESSORIES ......................................... 6
GETTING STARTED ................................. 6
CONTROL REFERENCE GUIDE ........ 7 – 9
CONNECTIONS .............................. 10 – 17
Connecting a TV Antenna / Cable / Satellite
............................................................... 10
Connecting an A / V Device .................. 10
Connecting Devices with a Composite
(Yellow RCA-Type) Video Output .......... 11
Connecting Devices with a Composite (Y ellow
RCA-Type) Video Input ......................... 11
Connecting a High-Defi nition (HD) Source
............................................................... 12
Connecting a PC .................................. 12
Connecting an Audio Amplifi er ............. 13
POWER SUPPLY .................................... 13
Using the Car Power Adapter ............... 13
Using the AC Power Adapter ................ 13
INSTALLATION ....................................... 14
Removing the base stand ................... 14
Mounting on the wall ............................. 14
USING HEADPHONES ........................... 15
UNIT OPERATION .................................. 15
SOUND SYSTEM .................................... 15
TV SETUP ........................................ 16 – 20
Picture menu ........................................ 16
Audio menu .......................................... 16
Time menu ............................................ 17
Setup menu ................................... 17 – 18
Parental menu ............................... 18 – 19
TV menu ............................................... 20
CD/DVD OPERATION ..................... 21 – 22
Playing a disc ........................................ 21
Playing a picture fi le disc .................... 21
Pausing playback (still mode) ............. 21
Stopping playback ................................. 21
Skipping to a different track ................ 21
Fast forward / fast reverse ................. 22
Slow-motion play (DVD) ....................... 22
Audio selection (DVD) ......................... 22
Subtitle selection (DVD) ....................... 22
Angle Selection (DVD) .......................... 22
SPECIAL FUNCTIONS ........................... 23
Display function (DVD) ......................... 23
Locating a specifi c title (DVD) ............ 23
Locating a specifi c chapter/track .......... 23
Locating a specifi c time ........................ 23
REPEAT PLAYBACK ...................... 23 – 24
Repeating a chapter (DVD) .................. 23
Repeating a single track (CD) .............. 24
Repeating a specifi c section (DVD) (CD) ...
................................................................ 24
DVD PROGRAMMABLE MEMORY ........ 24
Programmable memory ........................ 24
Title/chapter programmed playback (DVD) .
................................................................ 24
CUSTOMIZING THE DVD FUNCTION
SETTINGS ............................................... 25
Language setup .................................... 25
Video setup ........................................... 25
System setup ........................................ 25
TV display ......................................... 25
Default ................................................ 25
TROUBLE SHOOTING GUIDE ............... 26
FPE1708DVS_UL_IB_MSTAR+MTK_E1-20.indd 3FPE1708DVS_UL_IB_MSTAR+MTK_E1-20.indd 3 3/11/2008 10:39:13 AM3/11/2008 10:39:13 AM
Page 5
E - 4
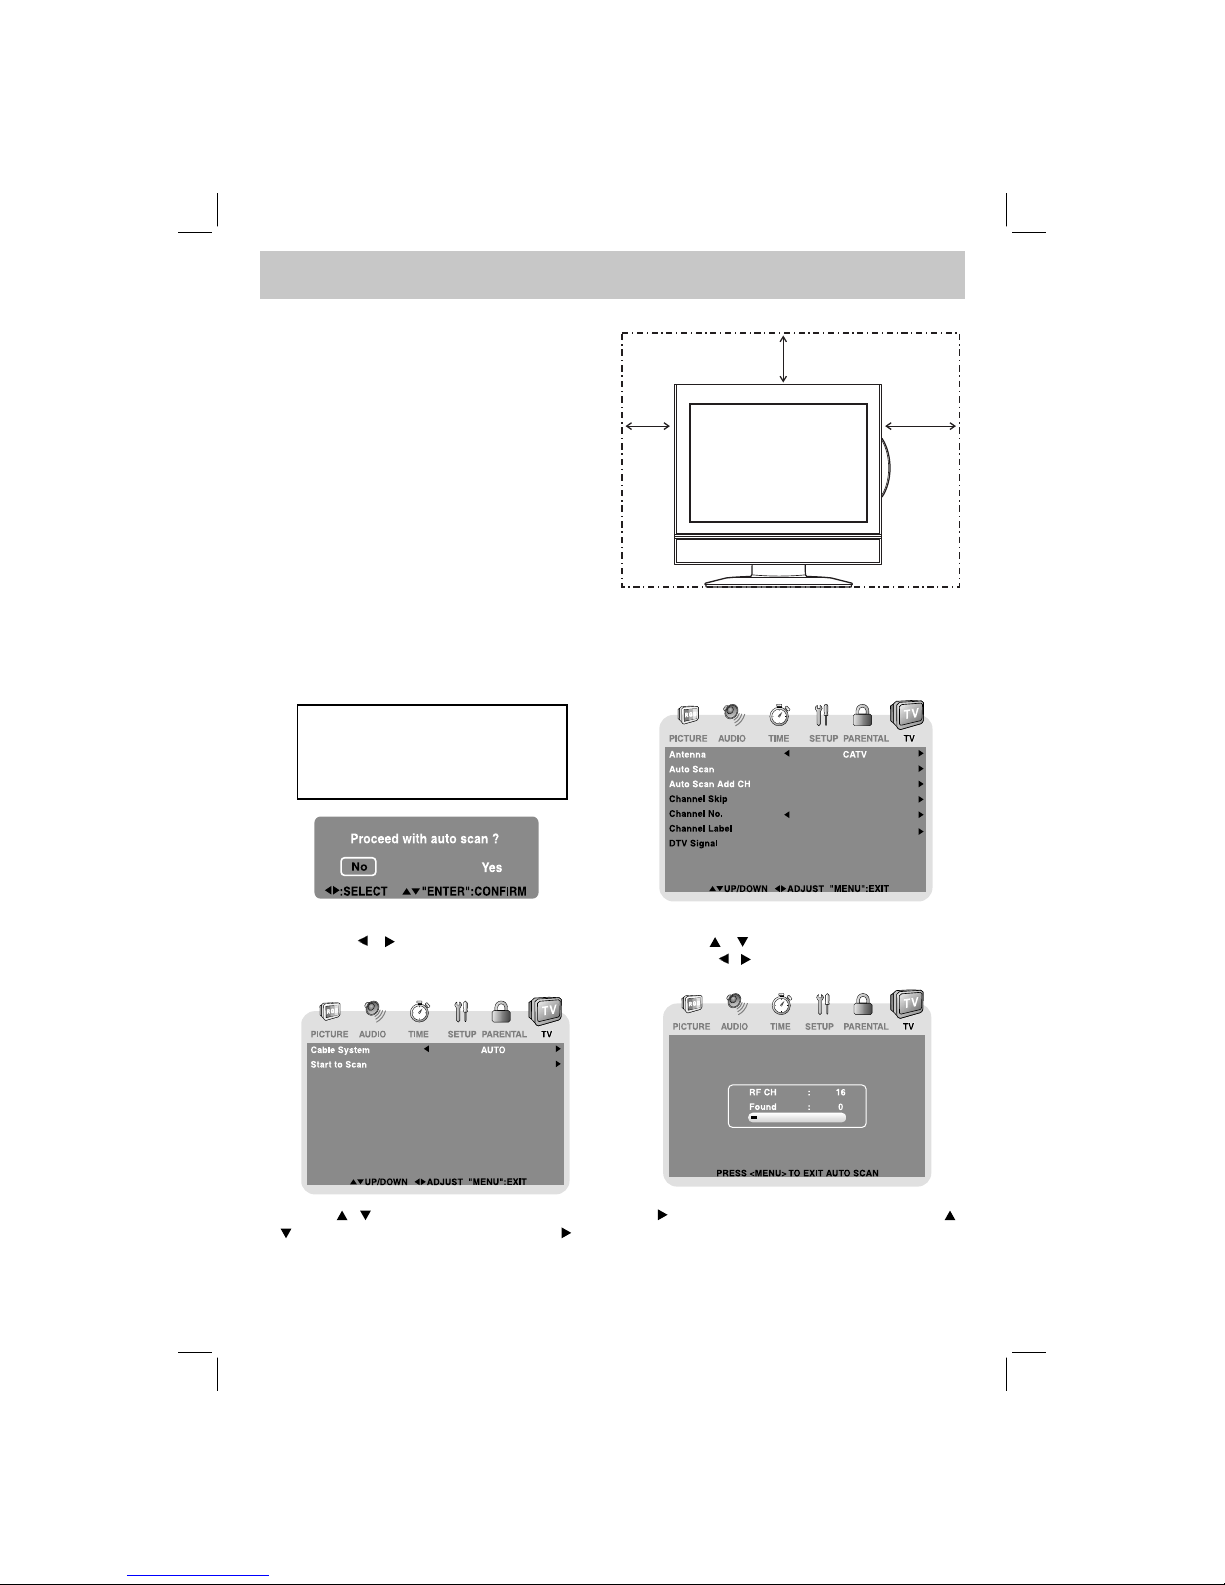
QUICK INSTALLATION
TURNING ON THE UNIT FOR THE FIRST TIME
The fi rst time you turn on the unit, the unit will enter the setup mode. You can easily follow the prompt
message on the screen to complete basic TV settings.
1. Press the
/ button to select Yes. Press
the ENTER button to proceed with the initial
setup.
2. Use the / button to select Antenna, then
press the / button to select Air or CATV.
3. Use the
/ button to select Auto Scan, then press the button to enter auto scan menu. Use the /
button to select Start to Scan, press the button to begin scanning. (If you selected CATV on Step 2,
you need to select Cable System before Start to Scan). The system will automatically start to scan and
preset all available TV channels.
4. After scanning has fi nished the system will return to the fi rst TV channel scanned.
Make sure the RF aerial has
been connected properly to the
TV ANTENNA input jack on the rear
of the system.
When you turn on your television set for the fi rst
time, be sure to place it on a solid stable surface.
T o avoid danger , do not expose the TV to water ,
or a heat source (e.g. lamp, candle, radiator).
Do not obstruct the ventilation grid at the rear
and be sure to leave suffi cient gaps around the
unit as shown.
23/8"
"
8/77"8/32
FPE1708DVS_UL_IB_MSTAR+MTK_E1-20.indd 4FPE1708DVS_UL_IB_MSTAR+MTK_E1-20.indd 4 3/11/2008 10:39:14 AM3/11/2008 10:39:14 AM
Page 6
E - 5
DISC FORMATS
NOTES ON COPYRIGHT
It is forbidden by law to copy, broadcast, show,
broadcast on cable, play in public or rent copyrighted
material without permission.
Apparatus Claims of U.S. Patent Nos. 6,836,549;
6,381,747; 7,050,698; 6,516,132; and 5,583,936
licensed for limited viewing uses only.
DVDs are copy protected, and any recordings made
from these discs will be distorted. This product
incorporates copyright protection technology that is
protected by method claims of certain U.S. patents
and other intellectual property rights owned by
Macrovision Corporation and other rights owners.
Use of this copyright protection technology must
be authorized by Macrovision Corporation, and is
intended for home and other limited viewing uses
only, unless otherwise authorized by Macrovision
Corporation. Reverse engineering or disassembly
is prohibited.
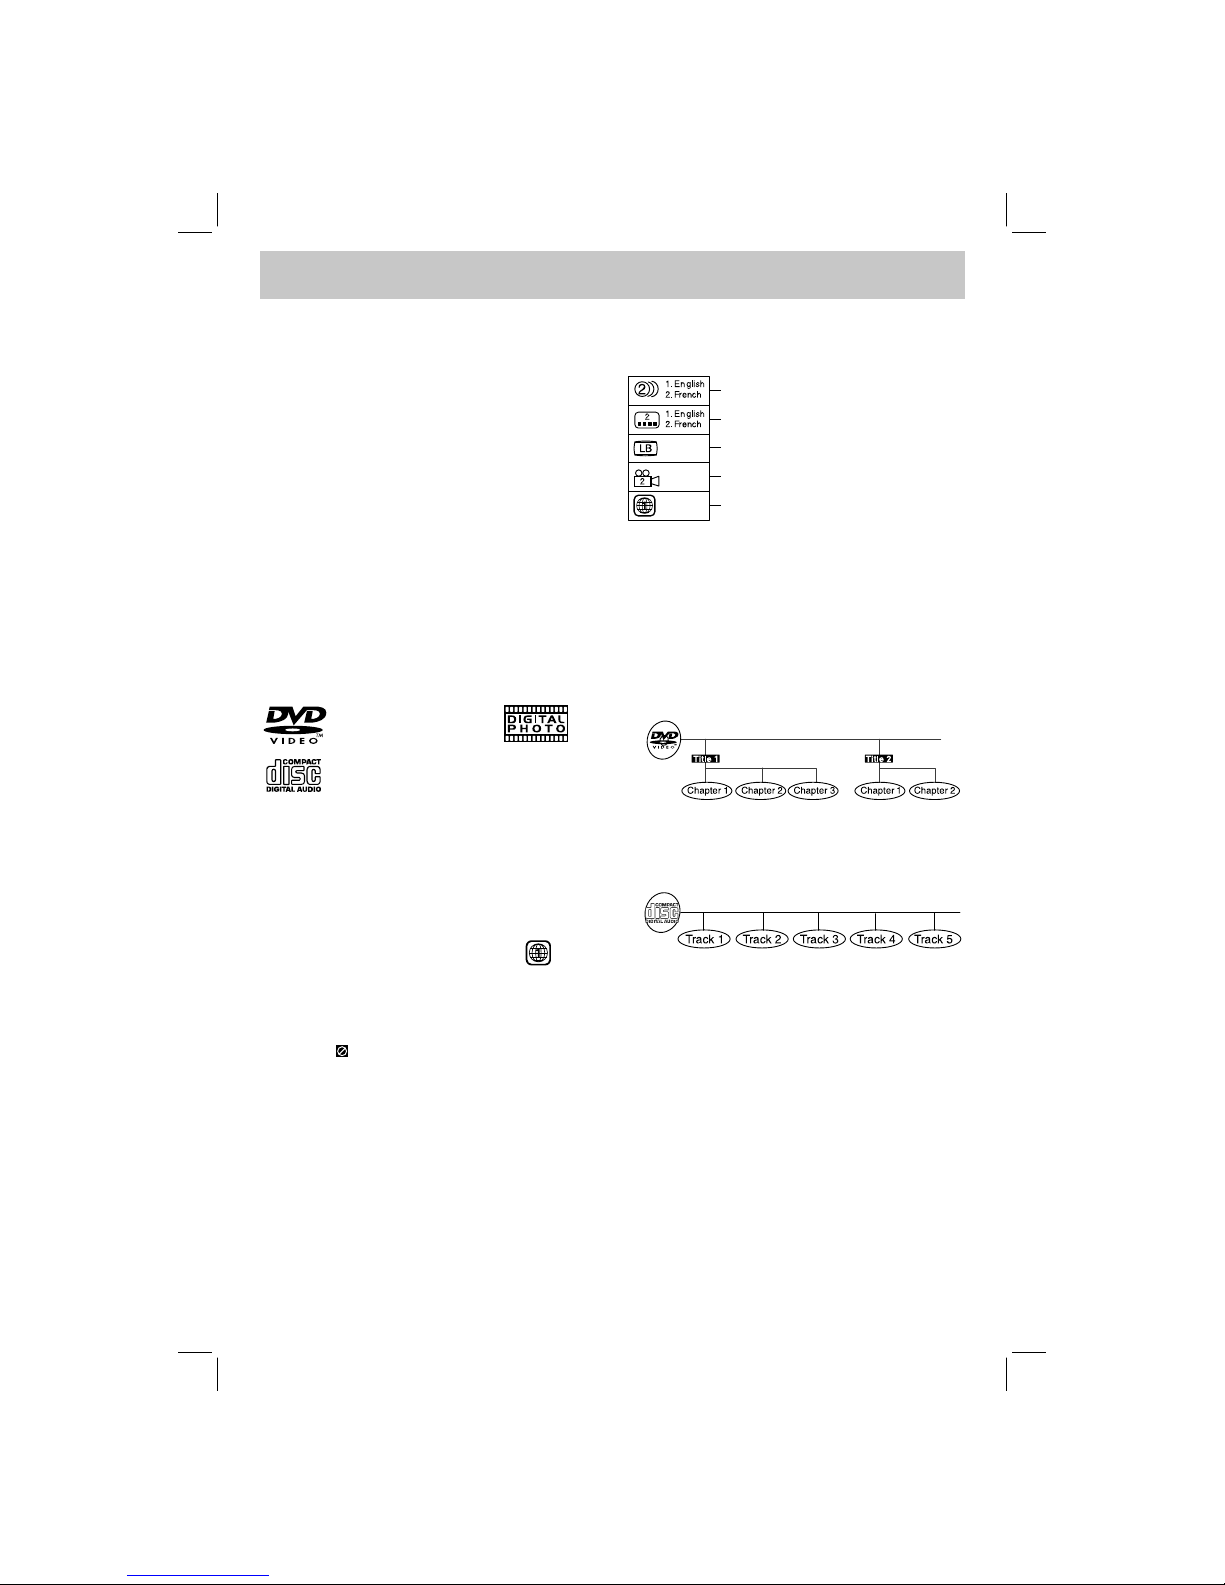
The unit can play:
DVDs
[8cm/12cm disc]
Audio CDs
[8cm/12cm disc]
CD-R CD-RW
Compatible
REGION MANAGEMENT INFORMA TION
Region Management Information: This unit is
designed and manufactured to respond to the
Region Management Information that is encoded
on DVDs. If the region number printed on the DVD
does not correspond to the region number of this
unit, this unit cannot play that disc.
The region number of this equipment is .
DISC FUNCTION OR OPERATION
THAT IS NOT AVAILABLE
When the symbol appears on the screen, it
indicates that the function or operation attempted
is not available at that time. This occurs because
the DVD manufacturer determines the specific
functions. Certain functions may not be available
on some discs. Be sure to read the documentation
provided with the DVD.
ICONS USED ON DVDs
Sample Icons:
Language selections for audio
Language selections for subtitles
Screen aspect ratio
Multiple camera angles
Region code indicator
NOTE
When playing back a CD-G (Graphics) or CD
EXTRA disc, the audio portion will be played, but
the graphic images will not be shown.
TITLES, CHAPTERS AND TRACKS
• DVDs are divided into “TITLES” and “CHAPTERS”.
If the disc has more than one movie on it, each
movie would be a separate “TITLE”. “CHAPTERS”
are sections of titles.
• Audio CDs are divided into “TRACKS”. A “TRACK”
is usually one song on an Audio CD.
NOTE
Numbers identify each title, chapter and track on
a disc. Most discs have these numbers record on
them, but some do not.
NOTES ON UNAUTHORIZED DISCS
Y ou may not be able to playback some DVDs on this
equipment if they were purchased from outside your
geographic area or made for business purposes.
FPE1708DVS_UL_IB_MSTAR+MTK_E1-20.indd 5FPE1708DVS_UL_IB_MSTAR+MTK_E1-20.indd 5 3/11/2008 10:39:14 AM3/11/2008 10:39:14 AM
Page 7
E - 6
ACCESSORIES
Please check and identify the supplied accessories.
Remote control (with batteries) ...................................................................................................... x 1
GETTING STARTED
USING THE REMOTE CONTROL
• Point the remote control at the remote sensor located on the unit.
• When there is a strong ambient light source, the performance of the infrared remote sensor may be
degraded, causing unreliable operation.
• The recommended effective distance for remote operation is about 16 feet (5 meters).
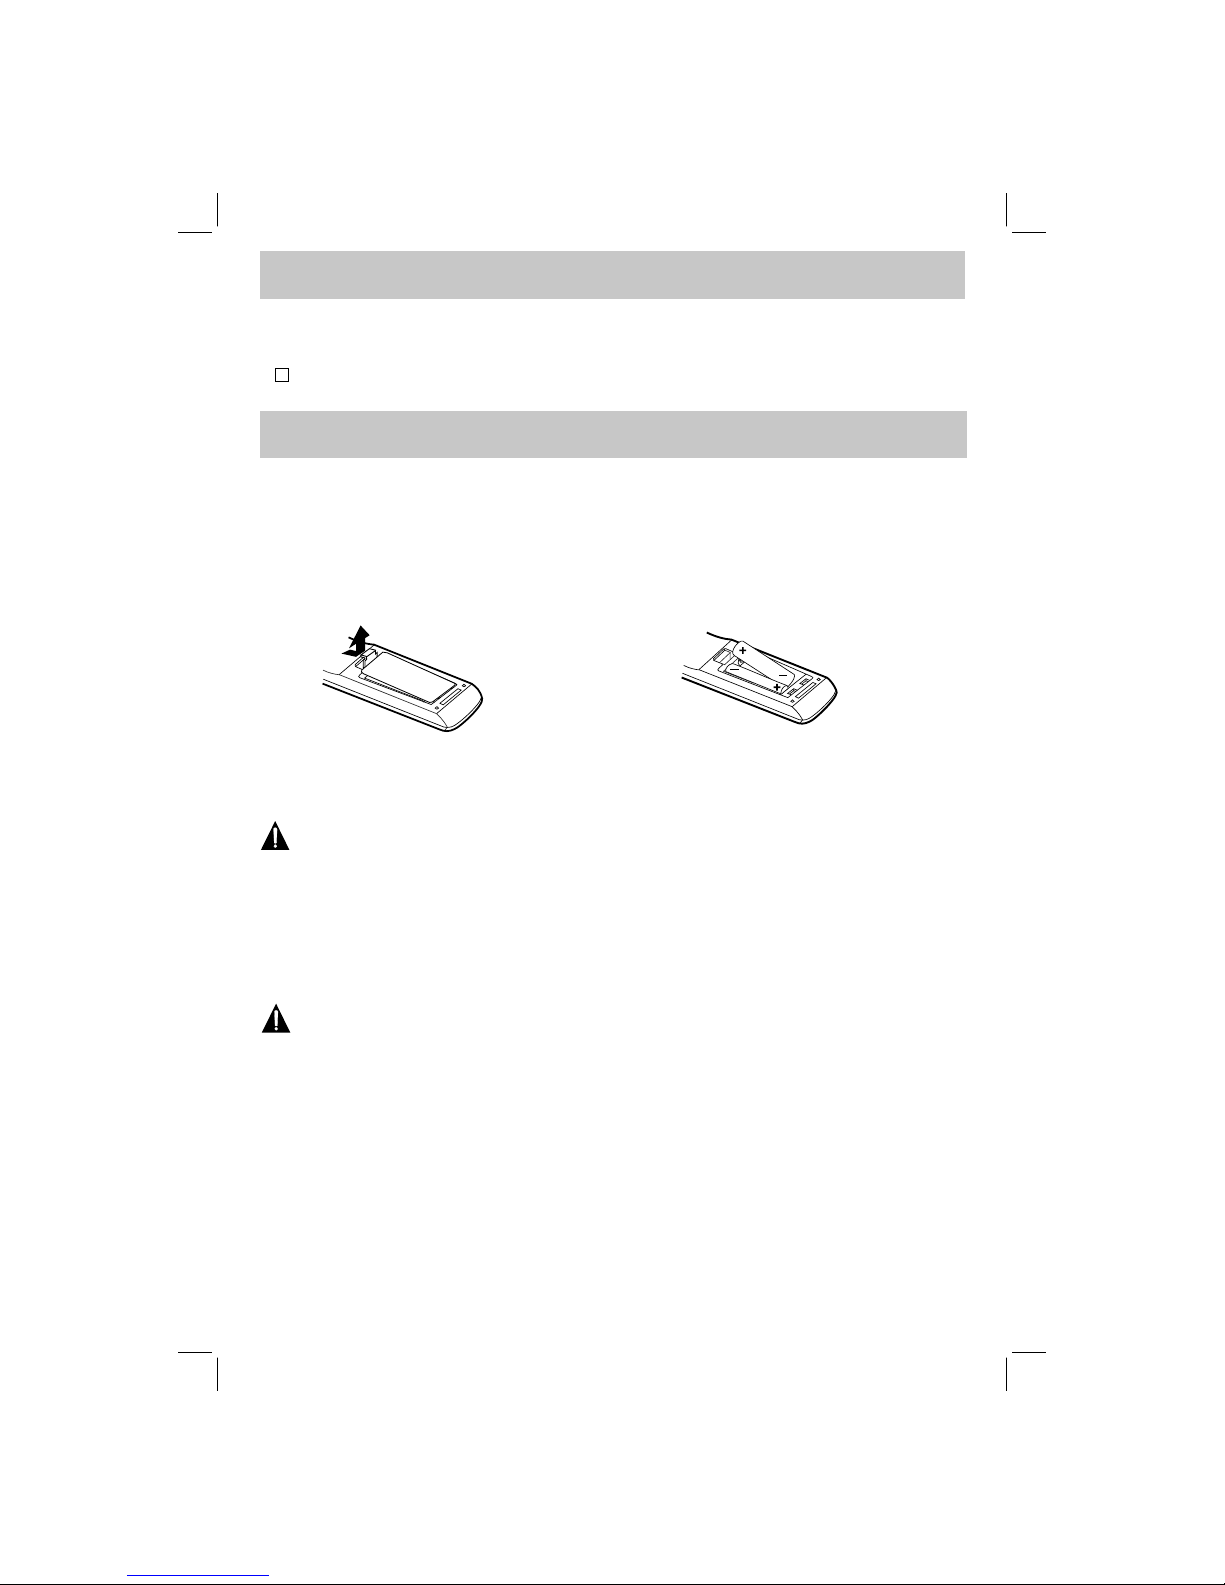
TO INSTALL THE BATTERIES
1. Open the battery door.
Many universal remote controls have a “learning” feature. We recommend you use that feature to program
the remote control.
For any questions or problems related to programming a universal remote control, you must contact the
customer service department of the universal remote control manufacturer for assistance, or refer to the
instructions included with the universal remote control. We cannot offer assistance in programming universal
remote controls.
BATTERY REPLACEMENT
When the batteries become weak, the operating distance of the remote control is greatly reduced and you
will need to replace the batteries.
CAUTION: Danger of explosion if battery is incorrectly replaced.
NOTES
• If the remote control is not going to be used for a long time, remove the batteries to avoid damage caused
by battery leakage corrosion.
• Do not mix old and new batteries. Do not mix ALKALINE, standard (CARBON-ZINC) or rechargeable
(NICKEL-CADMIUM) batteries.
• Always remove batteries as soon as they become weak.
• Weak batteries can leak and severely damage the remote control.
2. Insert 2 “AAA” batteries.
WARNING : Do not dispose of batteries in a fi re. Batteries may explode or leak.
FPE1708DVS_UL_IB_MSTAR+MTK_E1-20.indd 6FPE1708DVS_UL_IB_MSTAR+MTK_E1-20.indd 6 3/11/2008 10:39:14 AM3/11/2008 10:39:14 AM
Page 8
E - 7
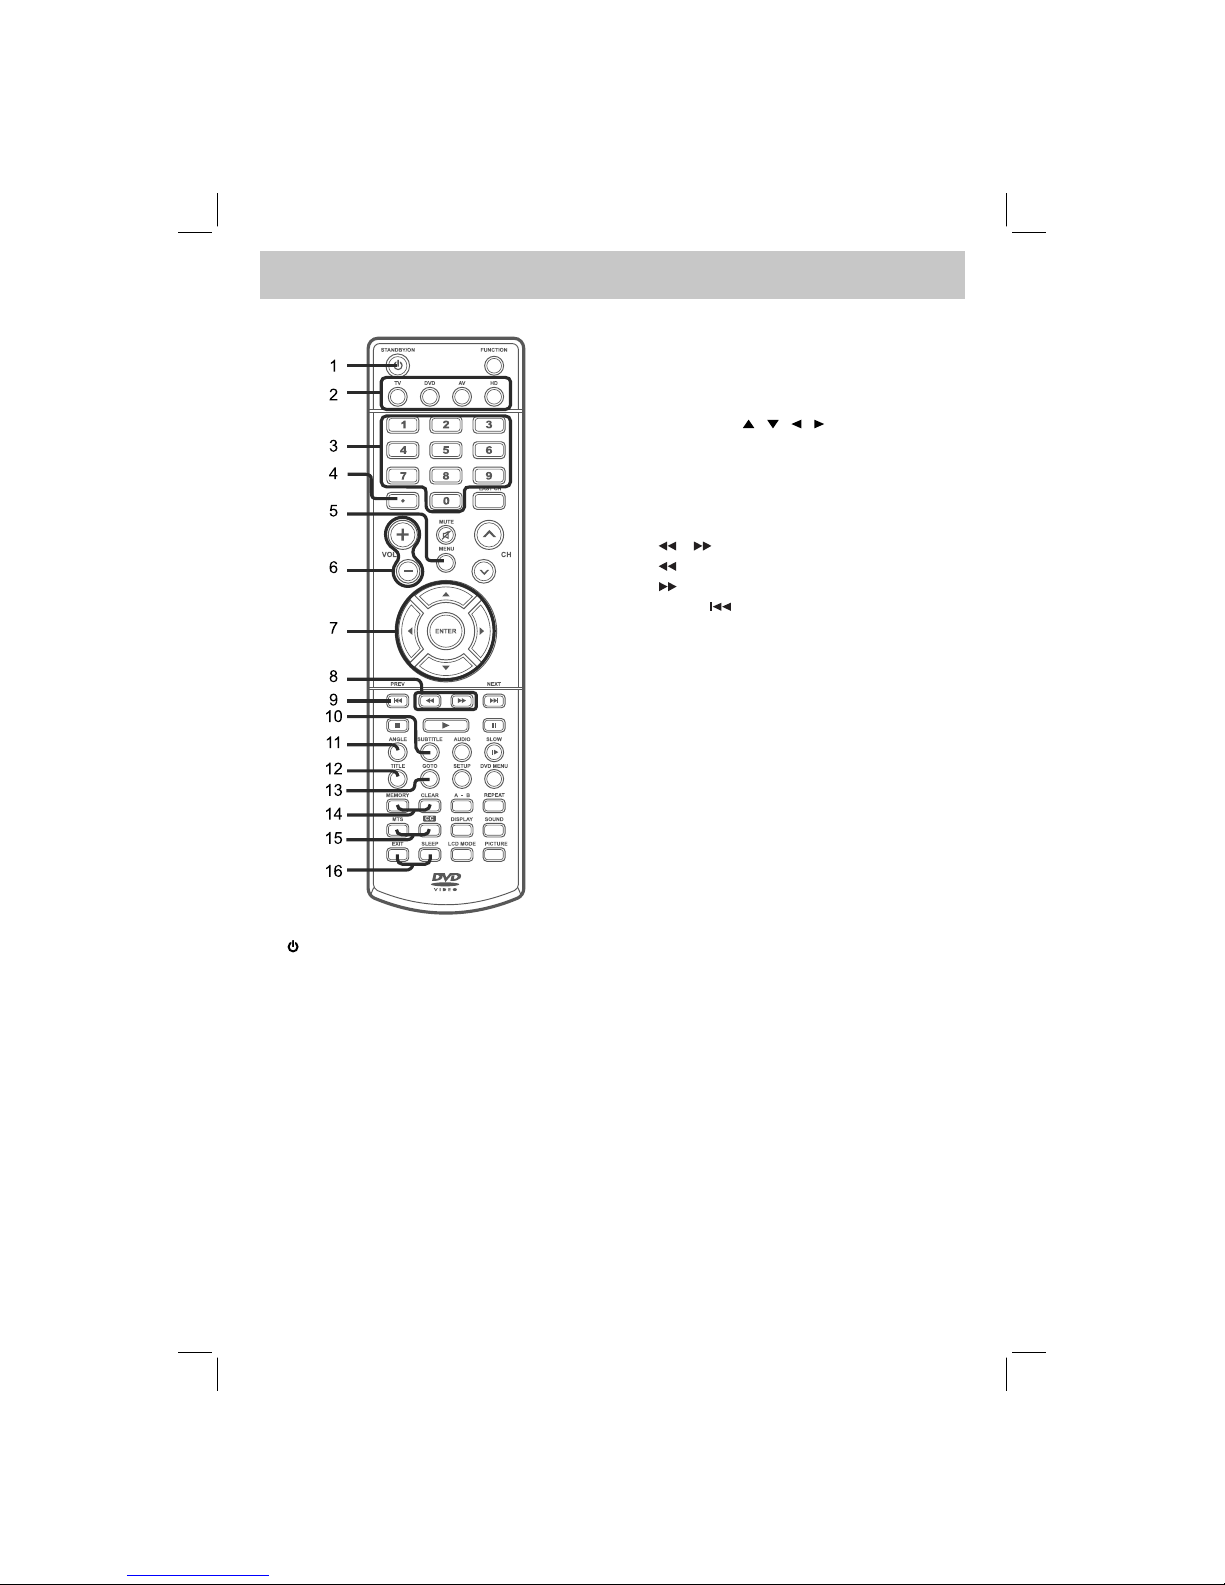
CONTROL REFERENCE GUIDE
1. STANDBY / ON button
Press to turn ON the unit or put it in
STANDBY (OFF) mode.
2. TV button
Press to switch to TV mode.
DVD button
Press to switch to DVD mode.
AV button
Press to switch to source connected to AV
IN.
HD button
Press to switch to source connected to
YUV IN (component).
3. Number (0 - 9) buttons
4. • [dot] button
Use to enter digital sub-channels. (i.e. 11.3
or 12.7)
5. MENU button
Press to display the on-screen TV menu.
6. VOLUME (- / +) buttons
Press to adjust the volume level.
7. CURSOR (
, , , ) buttons
Press to highlight selections on a menu
screen and adjust certain settings.
ENTER button
Press to confi rm selections on a menu
screen.
8. / buttons
: Fast reverse playback.
: Fast forward playback.
9. PREV button
Press to select previous chapters or tracks
on a disc.
10. SUBTITLE button
Press to select one of the subtitle languages
programmed on a DVD.
11. ANGLE button
Press to switch the camera angle of the
video presentation when scenes with
multiple camera angles are recorded on
a DVD.
12. TITLE button
Press to show the Title menu.
13. GOTO button
Press to skip directly to a specifi c location
on a DVD/CD.
14. MEMORY button
Press to set predetermined playback.
CLEAR button
Press to clear input selections.
15. MTS button
Press to switch between MONO sound,
STEREO sound and Secondary Audio
Program (SAP).
CC button
Press to activate the Closed Captioning
feature. This function only works on
programs broadcasted with captions.
16. EXIT button
Press to exit the TV SETUP menu and
return directly to normal viewing.
SLEEP button
Press to set the SLEEP timer. The unit will
remain on for the time that is set, and will
automatically shut off afterwards.
FPE1708DVS_UL_IB_MSTAR+MTK_E1-20.indd 7FPE1708DVS_UL_IB_MSTAR+MTK_E1-20.indd 7 3/11/2008 10:39:14 AM3/11/2008 10:39:14 AM
Page 9
E - 8
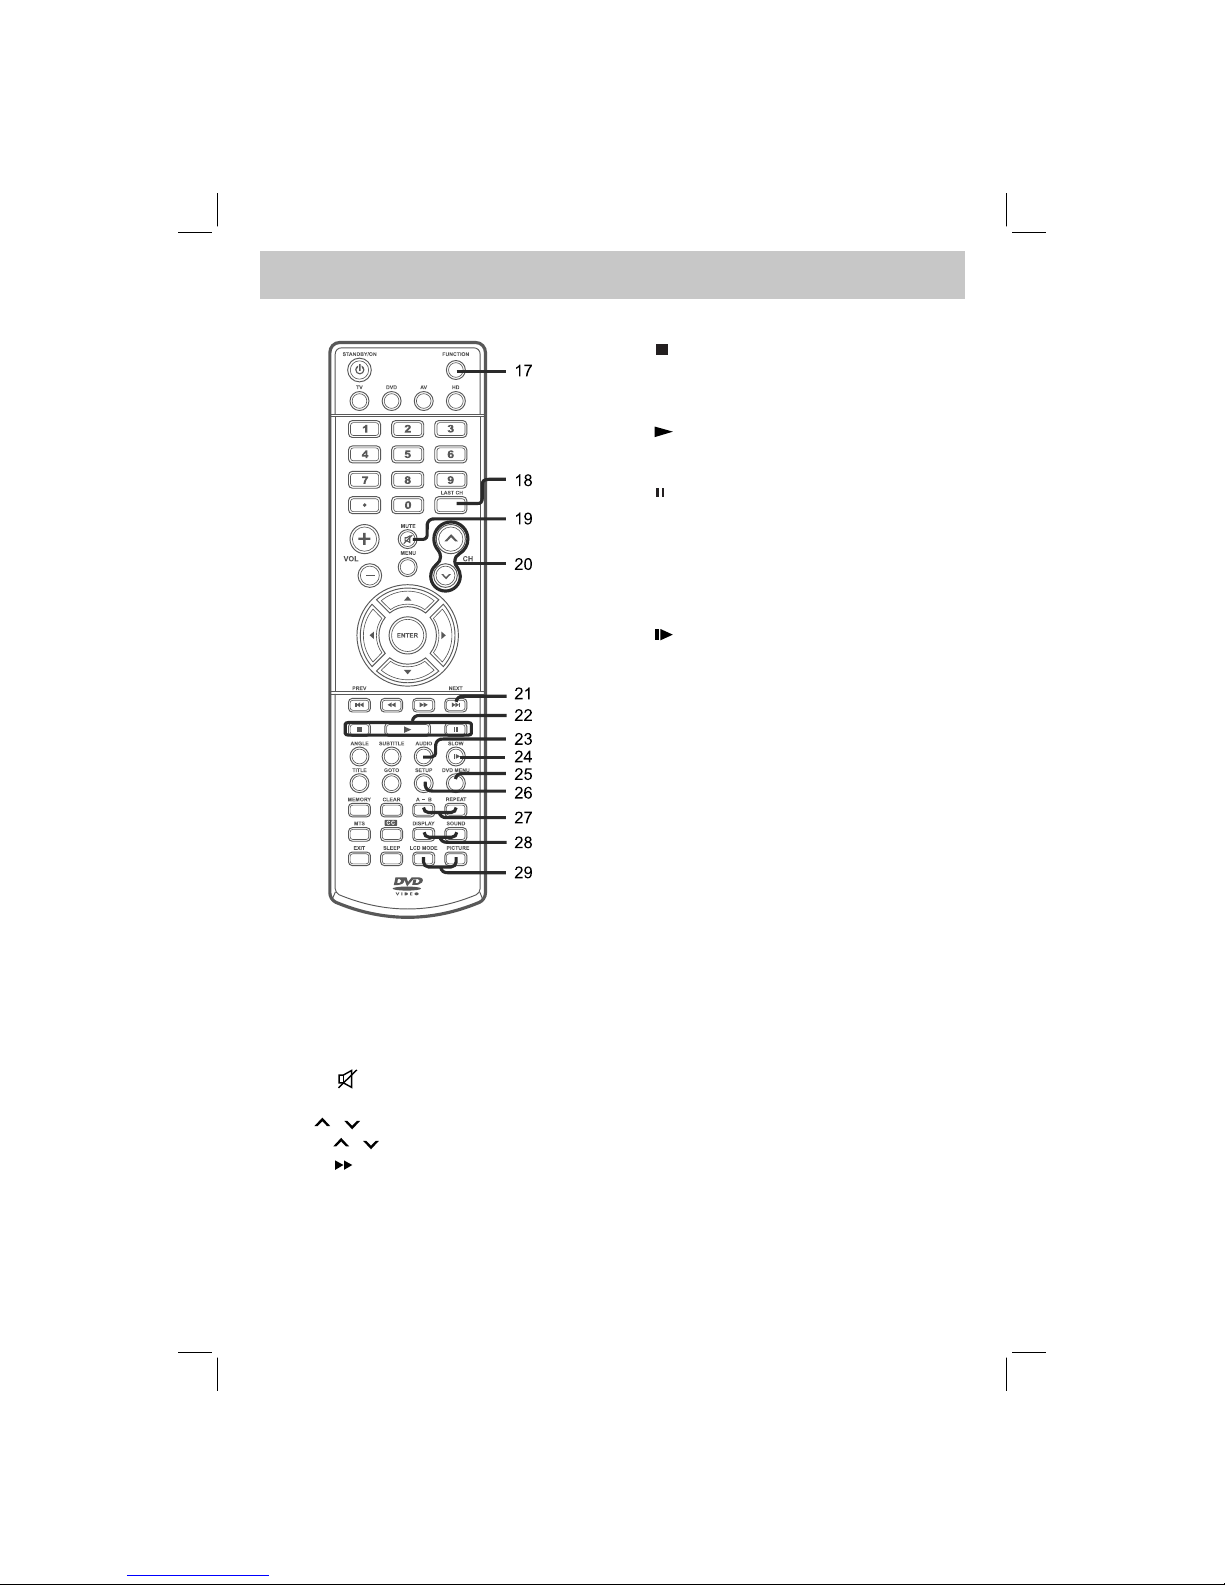
CONTROL REFERENCE GUIDE
17. FUNCTION button
Press to switch between TV / DVD / AV IN
/ YUV IN / PC IN.
18. LAST CH button
Press to switch repeatedly between the
last two channels displayed.
19. MUTE
button
Press to turn off the sound.
20. CH / CH buttons
Press / to change the channels.
21. NEXT button
Press to select the next title, chapter or
track on a disc.
22. button
Press to stop playing a disc.
Press to go to a folder list of picture fi le
list.
PLAY button
Press to start and resume playback of a
disc.
PAUSE button
Press to pause playback and single frame
advance.
23. AUDIO button
Press to select audio soundtracks on
a DVD or change the output mode of a
CD.
24. SLOW button
Press to perform slow forward playback of
a DVD.
25. DVD MENU button
Press to enter the main menu of the
DVD.
26. SETUP button
Press to enter and exit the SETUP menu
of the DVD.
27. A-B button
Press to perform point-to-point repeat
playback on a DVD or CD.
REPEAT button
Press to repeat a chapter or title of a
DVD.
Press to repeat a single track or whole
CD.
28. DISPLA Y button
Press to change disc status information
displayed on the screen.
SOUND button
Press to select from preset sound settings
to match the type of show you are watching.
(Standard / Personal / Music / Movie)
29. LCD MODE button
Press to set size of LCD display.
PICTURE button
Select from preset screen display settings
to match the type of show you are watching.
(Personal / Soft / Movie / Standard)
FPE1708DVS_UL_IB_MSTAR+MTK_E1-20.indd 8FPE1708DVS_UL_IB_MSTAR+MTK_E1-20.indd 8 3/11/2008 10:39:15 AM3/11/2008 10:39:15 AM
Page 10

E - 9
CONTROL REFERENCE GUIDE
1. Color LCD Screen
2. button
Turns the unit on and off.
3. PLAY button
Press to start or resume playback of a disc.
4. STOP button
Press to stop playing a disc.
5. MENU button
Press to display the on-screen TV menu.
6. FUNCTION button
Select TV / DVD / AV IN / YUV IN / PC IN.
7. CH buttons
Selects a TV channel and highlight selections
(Up & Down) on the menu screen.
button
Press PREV button to go back to previous
chapters/tracks.
Press and hold to fast reverse playback.
button
Press NEXT button to advance chapters/
tracks.
Press and hold to fast forward playback.
8. – VOLUME + controls
Adjusts the volume level and highlight
selections (Left & Right) on the menu
screen.
9. Remote Sensor
Do not block this sensor or the remote control
will not work.
10. Disc Door
11.
PUSH OPEN button
Push to open the disc door.
12. Removable stand
13. Speakers
14. AC Power Cord
15. AV OUT Video Output Jack
16. AV OUT Audio Output Jacks (Left/Right)
17. AV IN Video Input Jack
18. AV IN Audio Input Jacks (Left/Right)
19. PC IN MONITOR/VGA Jack
20. PC IN Audio Jack
21. YUV IN Component Video Input Jacks
(Y/PB/PR)
22. YUV IN Audio Input Jacks (Left/Right)
23. AV IN S-Video Input Jack
24. Headphone Jack
25. TV Antenna Cable Terminal - Coaxial TV
Antenna Input
14 15 16 17 18
25242322212019
FPE1708DVS_UL_IB_MSTAR+MTK_E1-20.indd 9FPE1708DVS_UL_IB_MSTAR+MTK_E1-20.indd 9 3/11/2008 10:39:16 AM3/11/2008 10:39:16 AM
Page 11

E - 10
CONNECTIONS
CONNECTING A TV ANTENNA / CABLE / SATELLITE
To view television channels correctly, a signal must be received from one of the following sources:
- An indoor or outdoor aerial antenna
- A cable system
- A satellite system
CONNECTING AN A/V DEVICE
To connect to other equipment such as a VCR, camcorder, satellite system or cable, etc.
NOTE
Please refer to the user manual
for the other equipment for more
information.
T o AUDIO
IN jacks
(AV IN)
T o S-VIDEO
IN jack
Connecting a Digital
Antenna
The tuner in this TV receives A TSC
TV signals from an antenna.
This digital TV can receive
standard (SDTV) and high
definition (HDTV) over the air
broadcasts.
Connecting an Analog
Antenna or Device
The tuner in this TV receives
NTSC TV signals, analog cable
signals or the RF output from a
satellite receiver, VCR or cable
box.
To S-VIDEO OUT /
AUDIO OUT jacks
Satellite, cable or TV
antenna cable to TV
ANTENNA terminal
(cable not included)
Connecting to a VCR /
Camcorder / Satellite
System / Cable
Connect the AUDIO and S-VIDEO
cable (not included) as shown.
Make sure you connect the cable
from the other equipment (AUDIO
OUT and S-VIDEO OUT) to this
unit (AUDIO IN and S-VIDEO
IN).
FPE1708DVS_UL_IB_MSTAR+MTK_E1-20.indd 10FPE1708DVS_UL_IB_MSTAR+MTK_E1-20.indd 10 3/11/2008 10:39:16 AM3/11/2008 10:39:16 AM
Page 12

E - 11
CONNECTIONS
CONNECTING DEVICES WITH A COMPOSITE (YELLOW RCA-TYPE) VIDEO
OUTPUT
To connect A/V devices such as a VCR, video game system or camcorder.
Connecting to a VCR / Video Game System / Camcorder
Connect the AUDIO / VIDEO cable (not included) as shown.
Make sure you connect the cable from the other equipment (AUDIO and VIDEO OUT) to this unit (AUDIO
and VIDEO IN).
NOTE
Please refer to the user manual for the other equipment for more information.
T o AUDIO
/ VIDEO IN
jacks
(AV IN)
To AUDIO / VIDEO
OUT jacks
CONNECTING DEVICES WITH A COMPOSITE (YELLOW RCA-TYPE) VIDEO
INPUT
To connect A/V devices such as a VCR, PVR or camcorder.
Connecting to a VCR /
PVR / Camcorder
Connect the AUDIO / VIDEO
cable (not included) as shown.
Make sure you connect the
cable from the other equipment
(AUDIO and VIDEO IN) to this
unit (AUDIO and VIDEO OUT).
NOTE
Please refer to the user manual
for the other equipment for more
information.
T o AUDIO
/ VIDEO
OUT jacks
To AUDIO / VIDEO IN jacks
FPE1708DVS_UL_IB_MSTAR+MTK_E1-20.indd 11FPE1708DVS_UL_IB_MSTAR+MTK_E1-20.indd 11 3/11/2008 10:39:16 AM3/11/2008 10:39:16 AM
Page 13

E - 12
CONNECTIONS
CONNECTING A HIGH-DEFINITION (HD) SOURCE
High-Defi nition (HD) Devices with component video output must be connected to the YUV input.
Connect the component video cable and audio cable (not included) as shown.
Make sure you connect the component video cable and audio cable from the other equipment (COMPONENT
VIDEO OUT and AUDIO OUT) to this unit (COMPONENT VIDEO IN and AUDIO IN - YUV IN).
NOTE
When connecting a DVD player to the television, the picture resolution is solely dependent upon the resolution
supported by the DVD player attached. DVD player resolutions vary from 480i to 1080i, and this unit can
support DVD players up to a maximum resolution of 1080i.
T o AUDIO
IN jacks
(YUV IN)
T o AUDIO
OUT jacks
To COMPONENT
VIDEO IN jacks
(YUV IN)
To COMPONENT
VIDEO OUT jacks
* May require a subscription
for receiving HD channels.
Check with your cable/
satellite service provider for
details.
CONNECTING A PC
Connect the 15-pin D-SUB PC/VGA connector from your computer to the 15-pin D-SUB PC/VGA input on
this unit using a monitor cable and an audio cable (not included) as shown.
Make sure you connect the
cable from the computer (PC
Connector and AUDIO - PC
OUT) to this unit (MONITOR /
VGA and AUDIO - PC IN).
To AUDIO jack (PC OUT)
To PC connector
FPE1708DVS_UL_IB_MSTAR+MTK_E1-20.indd 12FPE1708DVS_UL_IB_MSTAR+MTK_E1-20.indd 12 3/11/2008 10:39:17 AM3/11/2008 10:39:17 AM
Page 14

E - 13
CONNECTIONS
CONNECTING AN AUDIO AMPLIFIER
This connection allows you to use an audio amplifi er and external speakers.
Connect the AUDIO cable (not included) as shown.
Make sure you connect the cable from the other equipment (AUDIO IN) to this unit (AUDIO OUT).
To AUDIO OUT jacks
To AUDIO IN jacks
POWER SUPPLY
CONNECT THE POWER CORD
• Connect the AC power cord into a wall outlet.
• Press the STANDBY/ON button on the left of unit or remote control to turn on the unit.
Note:
• Be sure the AC power cord is disconnected and all functions are off before making connections.
• Make sure that all the components are connected correctly.
• To prevent electrical shock, match wide blade of plug to wide slot of wall outlet, then fully insert.
• When you are not going to use the unit for a long period of time, disconnect the power cord.
FPE1708DVS_UL_IB_MSTAR+MTK_E1-20.indd 13FPE1708DVS_UL_IB_MSTAR+MTK_E1-20.indd 13 3/11/2008 10:39:18 AM3/11/2008 10:39:18 AM
Page 15

E - 14
INSTALLATION
MOUNTING ON THE WALL
This unit is VESA-compliant, and is designed to be wall-mounted with a VESA-compliant 3 15/16” x 3 15/16”
(100mm x 100mm) mounting kit designed for fl at-panel TVs (sold separately). Mount this unit according to
the directions included with the mounting kit.
NOTE
Remove the base stand before mounting the unit on the wall.
REMOVING THE BASE STAND
WARNING: The LCD Display is very fragile, and must be protected at all times when removing the base
stand. Be sure that no hard or sharp object, or anything that could scratch or damage the LCD display,
comes into contact with it. Do NOT place pressure on the front of the unit at any time because the screen
could crack.
1. Disconnect any cables or cords connected to the unit.
2. Lay the unit down on a fl at surface, so the backside is facing up, making sure to place a soft cushioned
material (such as a pillow or thick piece of foam) beneath the screen.
3. Remove the four screws and then remove the BASE STAND from the TV.
FPE1708DVS_UL_IB_MSTAR+MTK_E1-20.indd 14FPE1708DVS_UL_IB_MSTAR+MTK_E1-20.indd 14 3/11/2008 10:39:18 AM3/11/2008 10:39:18 AM
Page 16

E - 15
USING HEADPHONES
• Turn down the volume before
connecting headphones to the
unit, then adjust the volume to
your desired level.
• When headphones are
connected, no sound will come
from the front speakers.
NOTE
Avoid listening to sound at high
levels for prolonged periods of
time. This may be harmful to you
and may cause hearing loss.
Headphones
(1/8” [3.5mm diameter plug)
TURNING THE UNIT ON
When the AC power adapter is connected, press the STANDBY/ON button on the
left of the unit to turn it on. Press the FUNCTION button to select the desired mode
(TV / DVD / AV IN / YUV IN / PC IN). If you select DVD, the DVD logo will appear on
the screen.
NOTE
When the unit is not going to be used for a long time, disconnect the AC power adapter
from AC power outlet.
DOLBY DIGITAL (FOR DVD)
Dolby Digital is a sound system developed by Dolby Laboratories Inc. This unit automatically recognizes
DVDs that have been recorded with Dolby Digital.
Not all Dolby Digital sources are recorded with 6 channels.
Some sources marked Dolby Digital may be recorded in Dolby Surround, a 2 channel system. Look for this
logo on your unit.
Manufactured under license from Dolby Laboratories.
‘Dolby’ and the double-D symbol are trademarks of Dolby Laboratories.
UNIT OPERATION
SOUND SYSTEM
FPE1708DVS_UL_IB_MSTAR+MTK_E1-20.indd 15FPE1708DVS_UL_IB_MSTAR+MTK_E1-20.indd 15 3/11/2008 10:39:18 AM3/11/2008 10:39:18 AM
Page 17

E - 16
TV SETUP
PICTURE MENU
1. Press the MENU button.
2. Press the button to enter PICTURE settings.
3. Use the or button to select the options (Picture
Mode, Contrast, Brightness, Sharpness, Tint or
Color). Adjust them using the or button (Screen
will change to your desired setting).
4. Repeat step 3 to adjust other options.
5. To exit the MAIN MENU and return to the normal screen,
press the EXIT or MENU button repeatedly.
Note: Some setting items on the menu screen may not activate depending on what mode the unit is
currently in (TV/AV in/YUV in/PC in/DVD mode).
Picture Mode : Select from preset screen display settings to match the type of show you are watching
(Standard, Soft, Movie and Personal). Select Personal mode to recall your custom settings
on contrast, brightness, sharpness, tint and color.
Contrast : Adjust to sharpen the picture quality. The black portions of the picture become richer in
darkness and the white become brighter.
Brightness : Adjust the brightness of the picture. Brighten or darken the whole picture.
Sharpness : Adjust the sharpness level to improve detail in the picture.
Tint : Adjust the tint of the picture. (toward purple / toward green)
Color : Adjust the color of the picture.
AUDIO MENU
1. Press the MENU button.
2. Use the or button to select AUDIO, then press the
button to enter the AUDIO settings.
3. Use the or button to select the options (Sound
Mode, Bass, Treble, Balance, Audio Language or
MTS). Adjust them using the or button.
4. Repeat step 3 to adjust other options.
5. To exit the MAIN MENU and return to the normal screen,
press the EXIT or MENU button repeatedly.
Sound Mode : Select from preset sound settings (Standard, Music, Movie or Personal) to match the
type of show you are watching. Select Personal mode to recall your custom settings
on bass, treble and balance.
Bass : Adjust the bass range.
Treble : Adjust the treble range.
Balance : Adjust the balance level toward the left or right speakers.
Audio Language : Select from English / Spanish / French. (A vailable for digital channels if multiple audio
languages are broadcasted.)
MTS (Multi Channel Television Sound) : Select Stereo / SAP (Secondary Audio Program) / Mono.
NOTE
Experiment with different sound settings until you fi nd the
settings you prefer.
NOTE
The SAP (Secondary Audio Programs) feature allows a TV station to broadcast other information, which
could be audio in another language.
FPE1708DVS_UL_IB_MSTAR+MTK_E1-20.indd 16FPE1708DVS_UL_IB_MSTAR+MTK_E1-20.indd 16 3/11/2008 10:39:19 AM3/11/2008 10:39:19 AM
Page 18

E - 17
TV SETUP
TIME MENU
1. Press the MENU button.
2. Use the or button to select TIME, then press the
button to enter the TIME settings.
3. Use the or button to select the options (OSD
Duration, Sleep Timer, Time Zone or Day Saving
Time). Adjust them using the or button.
4. Repeat step 3 to adjust other options.
5. To exit the MAIN MENU and return to the normal
screen, press the EXIT or MENU button repeatedly.
OSD (On Screen Display) Duration : Select the length of time for the On screen menu is displayed : 15
Sec / 30 Sec / 45 Sec / 60 Sec.
Sleep Timer : Select the length of time before the unit automatically changes to Standby mode : Off
-> 5 Minutes -> 10 Minutes -> 15 Minutes -> 30 Minutes -> 60 Minutes -> 90 Minutes
-> 120 Minutes -> Off.
Time Zone : Select the time zone from Eastern / Central / Mountain / Pacifi c / Alaska / Hawaii.
Day Saving Time : Select On to activate daylight savings time.
Clock : Display the current time.
SETUP MENU
1. Press the MENU button.
2. Use the or button to select SETUP, then press the
button to enter the SET UP settings.
3. Use the or button to select the options (OSD
Language, Color Mode, PC Set Up, Closed Caption
or Restore Setting). Adjust them using the or
button (Screen will change to your desired setting); or
press the button to go into the detailed settings.
4. Press the MENU button to return to the previous
menu.
5. Repeat steps 3 and 4 to adjust other options.
6. To exit the MAIN MENU and return to the normal screen,
press the EXIT or MENU button repeatedly.
OSD (On Screen Display) Language : Select On-screen menu language from English / French /
Spanish.
Color Mode : Adjust the three color temperature of the picture. Choose from Normal (balanced),
Warm (red white), or Cool (blue white) modes.
Restore Setting : If you reset the TV to the factory settings, all your present settings on PICTURE and
AUDIO will be erased and replaced by the factory’s default settings.
FPE1708DVS_UL_IB_MSTAR+MTK_E1-20.indd 17FPE1708DVS_UL_IB_MSTAR+MTK_E1-20.indd 17 3/11/2008 10:39:20 AM3/11/2008 10:39:20 AM
Page 19

E - 18
TV SETUP
PC Set Up (in PC mode only)
- Resolution : 1,440 x 900 max
- Refresh Frequency : 60Hz max
H - Pos : Center the image by moving it left or
right.
V - Pos : Center the image by moving it up or
down.
Clock : Adjusts the display clock to change
width of the image.
Phase : Adjusts the image if there is fl icker of
screen letters, color misalignment, or
blurring.
Auto Adjust : Adjust the image automatically.
Closed Caption
CC Mode : Select closed caption On, Off or CC on Mute.
Analog Closed Caption : Select the analog closed caption or turn it off.
Digital Closed Caption : Select the digital closed caption or turn it off.
Digital Caption Style : Select as Broadcaster to use the default digital caption style of the broadcaster.
Select Custom to activate the caption style items and set your desired detailed
settings.
NOTE
This function only works on ATSC
programs broadcast with captions.
PARENTAL MENU
Password
1. Press the MENU button.
2. Use the or button to select PARENTAL, then
press the button to enter the PARENTAL settings.
The menu locked screen will be displayed.
3. Enter a 4-digit password. Once entered, the screen
will enter the Parental menu. The preset password is
0000.
If you forget the password,
enter “ 8888 “ to unlock parental
control.
FPE1708DVS_UL_IB_MSTAR+MTK_E1-20.indd 18FPE1708DVS_UL_IB_MSTAR+MTK_E1-20.indd 18 3/11/2008 10:39:21 AM3/11/2008 10:39:21 AM
Page 20

E - 19
TV SETUP
Rating Enable : Select On to edit the following parental items. Select Off to disable parental control.
US : Set TV and MPAA ratings.
Canada : Set Canada English and Canada French ratings.
RRT Setting : Set Rating Region Table.
Reset RRT : Reset Rating Region Table to the default settings.
Parental
1. Use the or button to select various Parental settings.
Adjust them using the or button, or press the button
to go into the detailed settings.
2. Press the MENU button to return to the previous menu.
3. Repeat steps 1 - 2 to adjust other options.
4. To exit the MAIN MENU and return to the normal screen,
press the EXIT or MENU button repeatedly.
TV-Y : Recommended for all children.
TV-Y7 : Recommended for all children age 7 and above.
TV-G : General Audience.
TV-PG : Parental Guidance Suggested.
TV-14 : Parental Strongly Cautioned.
TV-MA : Mature Audience Only.
N/A : Not rated.
G : GENERAL AUDIENCES, Suitable for all ages.
PG : PARENT AL GUIDANCE SUGGESTED - Some material may not be suitable for
children.
PG-13 : PARENTS STRONGLY CAUTIONED - Some material may be inappropriate for
children under 13.
R : RESTRICTED, Under 17 requires accompanying parent or adult guardian for
viewing in movie theaters.
NC-17 : No one 17 or under admitted in movie theaters,
X : Adults Only.
E : Exempt.
C : Children.
C8+ : Recommended for children age 8 and older.
G : GENERAL AUDIENCES, Suitable for all ages.
PG : P ARENTAL GUIDANCE SUGGESTED - Some material may not be suitable for
children.
14+ : Viewers 14 years and older.
18+ : Adult Programming.
E : Exempt.
G : GENERAL AUDIENCES, Suitable for all ages.
8 ans+ : Not recommended for young children.
13 ans+ : Not suitable for children under the age of 13.
16 ans+ : Not suitable for children under the age of 16.
18 ans+ : Adult Programming.
U.S.
MPAA
Ratings
U.S. TV
Ratings
Canadian
English
Ratings
Canadian
French
Ratings
Change Password : Enter the old password (the preset
password is 0000 if you did not
change it), then enter new password
and confirm it.(Remember your
password!)
FPE1708DVS_UL_IB_MSTAR+MTK_E1-20.indd 19FPE1708DVS_UL_IB_MSTAR+MTK_E1-20.indd 19 3/11/2008 10:39:21 AM3/11/2008 10:39:21 AM
Page 21

E - 20
TV SETUP
Antenna : Air (over-the-air broadcasts, Ch 2-69) or CATV (cable/satellite broadcasts, CH 1-135)
mode are available.
Auto Scan : Search for usable stations and store them in memory.
Auto Scan Add CH : Search for more usable stations and add them in memory. The stations stored before
are still kept.
Channel Skip : Skip weak channels and the channels you don’t like.
Channel No. : Select a different TV channel.
Channel Label : Display and edit the channel label.
DTV Signal : Display the signal strength (for digital TV channels only).
TV MENU (For TV Mode Only)
1. Press the MENU button.
2. Use the or button to select TV, then press the
button to enter the TV settings.
3. Use the
or button to select the options (Antenna,
Auto Scan, Auto Scan Add CH, Channel Skip,
Channel No., Channel Label or DTV Signal). Adjust
them using the or button, or press the button
to go into the detailed settings.
4. Press the MENU button to return to the previous
menu.
5. Repeat steps 3 and 4 to adjust other options.
6. To exit the MAIN MENU and return to the normal
screen, press the EXIT or MENU button repeatedly.
Channel Skip
1. Use the or button to select a channel. (Press the
button to select the last channel of the page; press
again to go to the next page. Press the button to
select the fi rst channel of the page; press again to
return to the previous page.)
2. Press the ENTER button to shift between On / Off.
(Select On to skip the selected channel. The channel
will not appear when you press the CH / CH
button.)
Channel Label
You can edit a label for each channel.
1. Use the or button to select the number or letter.
Use the or button to move and edit the next
character.
2. After editing, the Channel and Channel Label will be
shown on the screen when you press the DISPLAY
button.
FPE1708DVS_UL_IB_MSTAR+MTK_E1-20.indd 20FPE1708DVS_UL_IB_MSTAR+MTK_E1-20.indd 20 3/11/2008 10:39:21 AM3/11/2008 10:39:21 AM
Page 22

E - 21
CD/DVD OPERATION
PLA YING A DISC
1. Press the STANDBY/ON button to turn on the unit.
2. Press the FUNCTION button repeatedly to select DVD mode or directly to press DVD button on the remote,
then press the ENTER button.
See CUSTOMIZING THE DVD FUNCTION SETTINGS before proceeding to step 3.
3. Press the PUSH OPEN button to open the disc door.
4. Hold the disc by its edge and gently push it onto the spindle with label side facing towards until hear a
“click”.
5. Push the disc tray to close the disc door.
It takes a short while for your unit to load the disc. After loading, the unit will automatically either bring
you to the main menu of DVD, or start playing the DVD. If the unit does not automatically start playing the
DVD, press the PLAY button.
PLAYING A PICTURE FILE DISC
This unit can play JPG fi les recorded on CD-R and CD-RW discs.
1. Press the PUSH OPEN button to open the disc door.
2. Hold the disc by its edge and gently push it onto the spindle with label side facing towards until hear a
“click”.
3. Push the disc tray to close the disc door.
4. The unit will load the disc and automatically display the contents of the disc on the screen, while also
beginning to play the picture fi le. These fi les will then be played back one by one.
5. Press the STOP button to go to the folder list.
6. Press the or button to highlight a fi le to play. Press the PLAY button to start playback.
NOTE
• You can press the
PAUSE button to interrupt playback, and press the PLAY button to resume
playback.
• You also can use the GOTO function or use the numbered buttons to enter the image number to quickly
select any image.
• Press the ANGLE button on the remote control to rotate the picture orientation by 90°.
PAUSING PLAYBACK (STILL MODE)
Press the PAUSE button. To resume normal playback, press the PLAY button. Each time you press
the PAUSE button, the picture advances one frame.
STOPPING PLAYBACK
Press the STOP button at the location where you want to interrupt playback. To resume playback at the
position where the disc was stopped, press the PLAY button.
If you press the STOP button twice, the unit’s memory will be cleared and pressing the PLAY button
will reset the disc to the beginning.
SKIPPING TO A DIFFERENT TRACK
• Press the PREV button to go back to previous chapters/tracks.
• Press the NEXT button to advance chapters/tracks.
• For an Audio CD, use the number buttons (remote control only) to jump directly to that track number.
This owner’s manual explains the basic instructions of this unit. Some DVDs are produced with limited
operation during playback. For example, many DVDs do not allow users to skip government warnings,
or in some cases previews or other features. This is not a defect in the unit. Refer to the instruction
notes of discs.
“
” may appear on the screen during operation. A “ ” means that the desired operation is not permitted
by the unit or disc.
FPE1708DVS_UL_IB_MSTAR+MTK_E21-27.indd 21FPE1708DVS_UL_IB_MSTAR+MTK_E21-27.indd 21 3/11/2008 10:41:43 AM3/11/2008 10:41:43 AM
Page 23

E - 22
FAST FORWARD / FAST REVERSE
1. Press the SEARCH or SEARCH button when a disc is playing.
• Each time the SEARCH
or SEARCH button is pressed, the speed of fast scan changes in the
following sequence:
2. Press the
PLAY button when you reach the desired point to resume playback at normal speed.
SLOW-MOTION PLAY (DVD)
1. Press the SLOW button on remote control in the play mode. Each time the SLOW button is pressed,
the speed of slow-motion playback changes in the following sequence:
2. Press the PLAY button to return to the normal playback speed.
AUDIO SELECTION (DVD)
On some discs, the sound is recorded in two or more formats. Follow the directions below to select the
preferred language and sound system.
1. While a disc is playing, press the AUDIO button to show the
current audio format number.
2. Press the AUDIO button repeatedly to select the desired audio format.
NOTE
• If only one audio format is recorded, the number does not change.
• About two seconds later, playback continues in the new audio format.
SUBTITLE SELECTION (DVD)
1. While a DVD is playing, press the SUBTITLE button to display the
current language setting, as shown in the example.
2. Press the SUBTITLE button repeatedly to select the desired subtitle language.
NOTE
• If only one language is recorded, the language does not change.
• About two seconds later, playback continues with the new subtitle you selected.
• The number of languages recorded differs depending on the disc.
• This function can only be used for discs on which subtitles have been recorded in multiple languages.
• On some DVDs, subtitles are activated from the main menu of the DVD. Press the DVD MENU button to
activate the main menu.
ANGLE SELECTION (DVD)
Some DVDs contain scenes which have been shot from a number of different angles. For these discs, the
same scene can be viewed from each of these different angles.
1. While you are playing a DVD with different angles recorded, press the ANGLE button to view the number
of the current angle available.
2. Press the ANGLE button repeatedly to change the scene to the
next angle in those recorded.
• About two seconds later, playback continues from the new angle
you selected.
• If no button is pressed within 10 seconds, playback continues
without changing the current angle.
NOTE
• This function can only be used for discs on which scenes shot
from multiple angles have been recorded.
• If only one angle is recorded, “
” is displayed.
Sequence of angle shots
(Example)
CD/DVD OPERATION
FPE1708DVS_UL_IB_MSTAR+MTK_E21-27.indd 22FPE1708DVS_UL_IB_MSTAR+MTK_E21-27.indd 22 3/11/2008 10:41:44 AM3/11/2008 10:41:44 AM
Page 24

E - 23
LOCATING A SPECIFIC TITLE (DVD)
If a DVD disc contains title numbers, you can locate a specifi c title by directly selecting a title number.
1. In STOP mode, press the GOTO button.
2. Press the or button to highlight a specifi c fi eld and press the
corresponding number button(s) for the title you want.
3. Press the ENTER button to confi rm. Playback starts from the selected title.
LOCATING A SPECIFIC CHAPTER / TRACK
If you know the chapter / track number you want to play, you can locate a specifi c chapter / track by directly
selecting a chapter / track number.
1. Press the GOTO button to search for your desired chapter / track.
2. Press the or button to highlight a chapter / track and press the
corresponding number button(s) for the chapter / track you want.
3. Press the ENTER button to confi rm. Playback starts from the selected chapter / track.
LOCATING A SPECIFIC TIME
You can move to a specifi c location by entering its corresponding time (hours, minutes, seconds)
1. Press the GOTO button.
2. Press the corresponding number button(s) for the setting point you want.
3. Press the ENTER button to confi rm. Playback starts from the selected section.
NOTE
• Some discs may not respond to this process.
• Some scenes may not be located as precisely as you specifi ed.
• This method for accessing specifi c locations is available only within the current title of the DVD disc.
DISPLAY FUNCTION (DVD)
While the disc is playing, press the DISPLAY button repeatedly to display information on operation status.
SPECIAL FUNCTIONS
You can play a specifi c title or chapter repeatedly. (Title repeat, chapter repeat, A-B repeat)
Repeating a chapter (DVD)
You can play the same chapter repeatedly.
1. While the disc is playing, press the REPEAT button until the “ ” indicator displays on the screen.
The current chapter is played repeatedly.
Repeating a title
You can play the same title repeatedly.
2. While the disc is playing, press the REPEAT button until the “
” indicator displays on the screen.
The current title is played repeatedly.
To resume normal playback
3. While the disc is playing, press the REPEAT button until the “ ” indicator displays on the
screen.
REPEAT PLAYBACK
FPE1708DVS_UL_IB_MSTAR+MTK_E21-27.indd 23FPE1708DVS_UL_IB_MSTAR+MTK_E21-27.indd 23 3/11/2008 10:41:44 AM3/11/2008 10:41:44 AM
Page 25

E - 24
You can play a single track or an entire disc repeatedly.
Repeating a single track (CD)
You can play the same track repeatedly.
1. While the disc is playing, press the REPEAT button until the “ ” indicator displays on the screen.
The current track is played repeatedly.
Repeating an entire disc
2. While the disc is playing, press the REPEAT button until the “ ” indicator displays on the screen.
The entire disc is played repeatedly.
To resume normal playback
3. Press the REPEAT button until the “ ” indicator displays on the screen.
Repeating a specifi c section (DVD) (CD)
You can play a specifi c section repeatedly.
1. While the disc is playing, press the A-B button at the beginning of the section ( is displayed) you want
to play repeatedly.
2. Press the A-B button again at the end of the section ( is displayed) you want to play repeatedly.
3. The unit will immediately begin replaying your selection.
To resume normal playback
4. While the disc is playing, press the A-B button until the “ ” indicator displays on the screen.
NOTE
• A-B repeat can only be used within the same title. If the start and end of the section to be repeated are
in different titles, A-B repeat is cancelled.
• The A-B repeat function does not operate in scenes where different camera angles are recorded.
REPEAT PLAYBACK
DVD PROGRAMMABLE PLAYBACK
PROGRAMMABLE MEMORY
The two types of programmed playback provided by this unit is title/chapter programmed playback.
TITLE/CHAPTER PROGRAMMED PLAYBACK (DVD)
1. Press the MEMORY button in PLAY mode.
2. Input the title (2 digits) and chapter (2 digits) by pressing the number buttons. (For example : 01 02, 02
05, 02 11.) It will move to the next item automatically.
3. Repeat steps 2 to add additional titles and chapters.
4. Press the PLAY button to start the programmed playback.
FPE1708DVS_UL_IB_MSTAR+MTK_E21-27.indd 24FPE1708DVS_UL_IB_MSTAR+MTK_E21-27.indd 24 3/11/2008 10:41:44 AM3/11/2008 10:41:44 AM
Page 26

E - 25
TV Display
Pan Scan
• When wide-screen video is played, this mode clips the right and left sides of the
image so that it can be viewed on a conventional screen.
• Some wide-screen DVDs that do not permit Pan Scan playback are automatically
played in Letter Box mode (black bands at top and bottom of screen).
Letter Box
• When wide-screen video is played in this mode on a conventional screen, black
bands appear at the top and bottom of the screen.
Wide-screen
• This is the correct mode for playing wide-screen videos on the unit screen or other
external wide-screens.
NOTE
• The displayable picture size is preset on the DVD discs. Therefore the playback
picture of some DVDs may not conform to the picture size you select.
• When you play DVDs recorded in the 4:3 aspect ratio, the playback picture will
always appear in the 4:3 aspect ratio regardless of the TV Display setting.
Default
It takes 3-5 seconds to reset the unit to the factory default.
Cut off when a wide-screen
video image is played.
Pan Scan
Letter Box
Wide-screen
VIDEO SETUP
1. Press the SETUP button in stop mode.
2. Use the or button repeatedly until VIDEO SETUP appears.
3. Use the or button to select the option (Tv Mode, Brightness or
Contrast), then press the button. Use the or button to make
adjustments, then press the ENTER button. (The screen will change
to your selected setting).
4. Repeat steps 2 and 3 above to adjust other options.
5. To exit the SETUP MENU and return to the normal screen, press the SETUP button.
SYSTEM SETUP
1. Press the SETUP button in stop mode.
2. Use the or button repeatedly until SYSTEM SETUP appears.
3. Use the or button to select the option (Tv Display or Default), then
press the button. Use the or button to make adjustments, then press
the ENTER button. (The screen will change to your selected setting).
4. Repeat steps 2 and 3 above to adjust other options.
5. To exit the SETUP MENU and return to the normal screen, press the
SETUP button.
CUSTOMIZING THE DVD FUNCTION SETTINGS
LANGUAGE SETUP
1. Press the SETUP button in stop mode.
2. Use the or button to select the option (OSD Language, Audio,
Subtitle or Disc Menu), press the button.
3. Use the or button to select your preferred language, then press the
ENTER button to confi rm.
4. Press the
button to go back to previous menu. Repeat steps 2 and 3
to adjust other options.
5. To exit the SETUP MENU and return to the normal screen, press the SETUP button.
NOTE
• Some DVDs may not play in the audio language you selected. A prior language may be programmed on the disc.
• Some DVDs may be set to display subtitles in a language other than the one you selected. A prior subtitle language
may be programmed on the disc.
• Some DVDs allow to change subtitle selections only via the disc menu. If this is the case, press the DVD MENU
button and choose the appropriate subtitle from the selection on the disc menu.
• Some DVDs may not included your pre-selected language. In this case, the DVD player automatically displays
disc menus consistent with the disc’s initial language setting.
FPE1708DVS_UL_IB_MSTAR+MTK_E21-27.indd 25FPE1708DVS_UL_IB_MSTAR+MTK_E21-27.indd 25 3/11/2008 10:41:44 AM3/11/2008 10:41:44 AM
Page 27

E - 26
TROUBLESHOOTING GUIDE
SYMPTOM CAUSE (AND REMEDY)
• The region number of the disc does not match the region number of this
unit.
The picture is not
clear.
No picture.
• Make sure that you select DVD mode.
• The system is in pause mode. Press the
PLAY button to return to normal
PLAY mode.
• Fast-forward or fast-reverse is performed. Press the PLA Y button to return
to normal play mode.
• Make sure the AUDIO / VIDEO output and AV IN input connections are
correct.
• The DTS DVD disc cannot be decoded to have speaker output.
• The unit is too hot. Shut off the unit for 30 minutes to cool it down.
The remote does not
function.
• Check that the AC power cord is connected.
• The unit is not turned on.
No power.
DVD
No sound or only a
very low-level sound
is heard.
• The plugs and jacks are dirty. Wipe them with a cloth slightly moistened with
alcohol.
• Clean the disc.
The disc does not
play.
Severe hum or noise
is heard.
• Remove any obstacles between the remote and the unit.
• Use the remote near the unit.
• Point the remote at the remote sensor on the unit.
• Replace the batteries in the remote with new ones.
• Clean the disc.
• The disc is scratched.
• There is no disc inside (“No Disc” appears on the screen).
• Insert the disc correctly with the playback side front down.
• Clean the disc.
• A non-valid disc has been inserted. The unit and disc region number are
incompatible.
• Condensation may have formed inside the unit due to a sudden change in
temperature. Wait about an hour for it to clear and try again.
• Check the location of the antenna and adjust it if necessary.
• Make sure the antenna cable is fi rmly connected.
• Make sure all input cables are fi rmly connected.
TV
Bad Picture (snow,
multiple images,
distortion, blurry)
• Check the PICTURE MENU within the TV SETUP MENU.
• Check to make sure the program you are watching is broadcast in color and
not black & white.
Black and white
picture.
• Make sure the unit is plugged in and turned on.
• Make sure that TV mode is selected.
• Try a new channel to check for possible station trouble.
• Make sure the antenna is connected properly.
• Increase the volume.
• Make sure the antenna or audio video source device is working properly.
• Make sure all cables are fi rmly connected.
• Check for local interference.
No picture or sound.
• Make sure there are no unshielded electrical devices nearby that are causing
interference.
• Turn the unit off for 30 minutes, then try it again.
Colored patches of
picture.
FPE1708DVS_UL_IB_MSTAR+MTK_E21-27.indd 26FPE1708DVS_UL_IB_MSTAR+MTK_E21-27.indd 26 3/11/2008 10:41:45 AM3/11/2008 10:41:45 AM
Page 28

E - 27
Unit : INCH
Printed in China
811-311791W151
17 7/8
14
41/16
7
0
1
10
65/8
8
/3
8
FPE1708DVS_UL_IB_MSTAR+MTK_E21-27.indd 27FPE1708DVS_UL_IB_MSTAR+MTK_E21-27.indd 27 3/11/2008 10:41:45 AM3/11/2008 10:41:45 AM
 Loading...