

Page 1
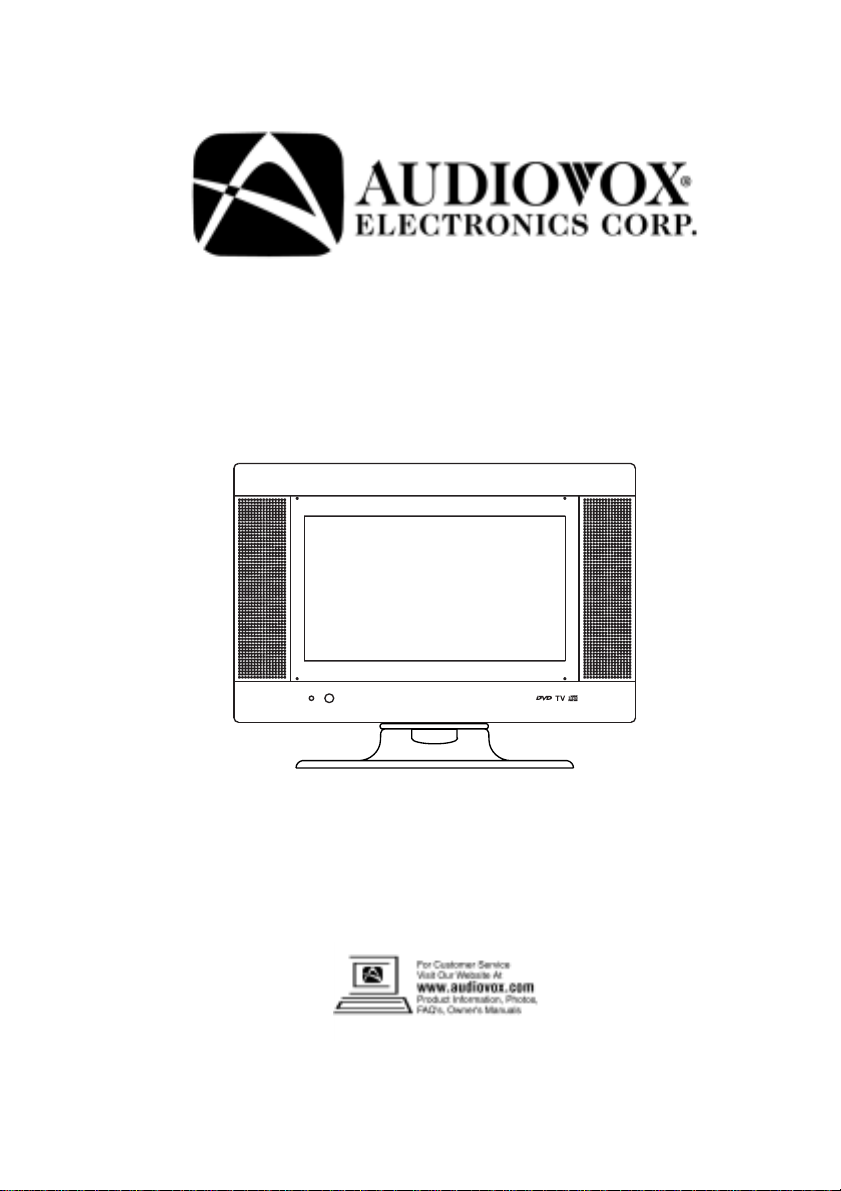
Operating Instructions
Model No.: FPE1078
7.7” LCD TV/DVD Player
For assistance, please call: 1-800-645-4994
Or Visit us at http://www.audiovox.com
1287367A
Page 2

Thank you. . .
. . . for choosing this tablet DVD player. For your own safety and in order
to learn all about the functions available, please read this manual and
keep it for future reference.
Note:
An LCD panel and/or video monitor may be installed in a motor vehicle
and visible to the driver if the LCD panel or video monitor is used for
vehicle information, system control, rear or side observation or
navigation. If the LCD panel or video monitor is used for television
reception, video or DVD play , the LCD panel or video monitor must be
installed so that these features will only function when the vehicle is in
“park” or when the vehicle’s parking brake is applied.
An LCD panel or video monitor used for television reception, video or
DVD play that operates when the vehicle is in gear or when the
parking brake is not applied must be installed to the rear of the driver’s
seat where it will not be visible, directly or indirectly , to the operator of
the motor vehicle.
Note:
This product incorporates copyright protection technology that is protected by
method claims of certain U.S. patents and other intellectual property rights
owned by Macrovision Corporation and other rights owners. Use of this
copyright protection technology must be authorized by Macrovision Corporation
, and is intended for home and other limited viewing uses only unless otherwise
authorized by Macrovision Corporation. Reverse engineering or disassembly is
prohibited.
2
Page 3

Table of Contents
A. Cautions and Warnings...........................................................................04
B . About This Manual............................................................................06
C . Desktop Base Installation............................................................................08
D . Prior to Operation.......................................................................09
E. Remote Control..........................................................................11
F. DVDPlayer...............................................................................12
G. Applying Power to the Unit ..................................................................13
H . Connections.......................................................................................14
I. Receiving TV Programs.....................................................................15
J . Reading SD (Secure Digital) and MMC (Multimedia) Card ........... 16
K. Playing DVDs......................................................................... 16
L. Playing CDs ........................................................................... 21
M. Playing MP3-CDs..............................................................................22
N . Playing JPEG Files...........................................................................24
O . Initial Settings....................................................................................26
P. Specifications....................................................................................32
Warranty .......................................................................................33
3
Page 4

A. Cautions and Warnings
All operation and maintenance instructions must be followed and warnings adhered
to.
• Do not expose the unit to excessive moisture.
• Do not place objects filled with liquids, such as vases, on the unit.
• Do not use the unit where there are temperature extremes (below 41°F , 5°C or
exceeding 95°F , 35°C).
• Adjust the volume to prevent damage to speakers.
• Sudden changes in the ambient temperature may cause condensation to form on
the optical lens inside the unit. If this happens, remove the disc, and allow about
2 hours to pass and then proceed with normal operation.
• T o ensure proper ventilation and proper operation, never cover or block the
slots and openings with a cloth or other material.
• Keep the unit away from strong magnets, heating sources, sunlight, and
excessive dust.
• Never allow objects of any kind or liquids to be pushed/spilled into the unit
openings as they may come into contact with dangerous voltages.
• Unplug the unit from the wall outlet before cleaning. Do not use liquid or
aerosol cleaners.
• Do not use accessories not recommended in this manual as they may be
hazardous.
• Power cords should be routed so that they are not likely to be walked on or
pinched by items placed upon or against them. Pay particular attention to plugs
and the point from which the cord exits the unit.
• Do not attempt to service this product yourself as opening or removing
covers may expose you to dangerous voltage points or other hazards. Refer all
servicing to qualified service personnel.
4
Page 5

• When replacement parts are required, be sure the service technician has used
replacement parts that are specified. Unauthorised substitutions may result in
fire, electric shock or other hazards.
• Upon completion of any service or repairs to the unit, ask the service
technician to perform operational checks to determine that the product is
operating correctly.
Handling the LCD panel
Do not press hard or jolt the LCD panel. It may cause the LCD panel glass to break
and injury may occur.
If the LCD panel is broken, do not touch liquid in the panel.
If the liquid in the LCD panel is ingested, immediately gargle and consult with your
doctor. Also, if the liquid gets in your eyes or touches your skin, consult with your
doctor after rising for at least 15 minutes or longer with clean water.
Contents
1. 1 x 7” LCD Monitor & DVD Player
2. 1 x RCA A V Cable
3. 1 x AC T o DC Adapter
4. 1 x Vehicle DC Power Adapter
5. 1 x Remote Control
5
Page 6

B. About This Manual
The operations described mainly refers to the use of the remote control.
Buttons with same or similar marking on the main unit have the same function as
those on the remote control.
If the symbol
not supported by the media type inserted in the DVD player. The unit will play
the following:
Many Disc Formats are supported
occurs on the screen during operation, the function requested is
DVD-Video
CD-R DVD+R
CD-RW DVD-ROM
CD Audio MP3
Photo CD DVD-RAM
DVD-RW CD-G
DVD-R HDCD
= YES = NO
Important Information
Note: Usually the unit plays CD-R, CD-RW and MP3 discs. But due to the variety
of disc types, recording computers, operating systems and software for burning we
cannot guarantee that every CD-R, CD-RW or DVD is playable within this unit.
DVD+RW
Please be aware of the following:
• This instruction manual explains the basic instruction of this unit.
• Some DVD discs have different functions that may not be explained in this
instruction manual. Y ou may need extra instructions. In this case, please follow
the instructions
• The disc information takes priority in various settings.
displayed on the screen or jacket or case of the disc.
6
Page 7

• In this manual, the language in the on-screen display is English. If you
change the language, please follow the selected language in the on-screen display.
• The screen shown as an example in this manual may be different from the
actual screen.
• On-screen displays subject to change without notice.
Note: The types of functions and operations that can be used for a particular
disc vary depending on the features of that disc. In some cases, these functions
and operations may differ from the descriptions given in this Owner’s Manual.
In this event, follow the instructions given on the screen and on the sleeve of the
disc.
Region Management Information
Region Management Information
This DVD player is designed and manufactured to respond to
the region management information that is recorded on a DVD
disc. If the region number described on the DVD disc does not
correspond to the Region number of this DVD player, this
DVD player cannot play this disc. The region number for this
DVD player is ‘1’.
1
Please note that the program of a DVD may be divided into several ‘titles’ (e.g.
main movie, bonus material, interviews etc.). Each of these titles can be divided
into ‘chapters’. The program of audio CD’s is divided into “tracks”.
3
16: 9
2
3
CC
LB
Multiple languages
Multi-aspect
Multi-language subtitles
Multi-angle
Closed caption
7
Page 8
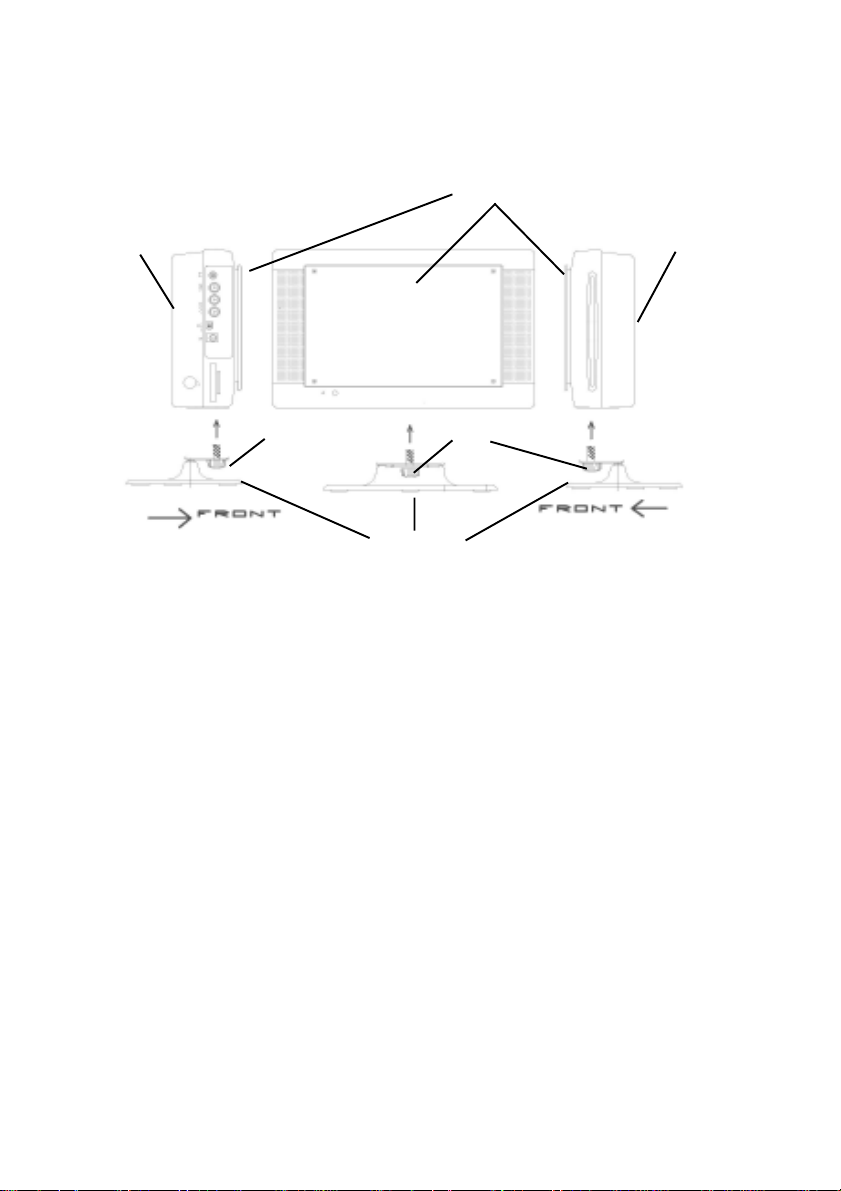
C. Desktop Base Installation
LCD Screen
Unit Rear
ThumbScrew
1. Place the tablet DVD player base on flat surface.
2. Align the thumb screw with the hole beneath the LCD Screen.
3. Thread the thumb screw into the hole beneath the LCD screen and turn the thumb
screw counter-clockwise to tighten the base to the DVD player.
Note:
Referring to the illustration above, the thumb screw must be positioned facing the
front of the DVD player or the unit will not be stable.
4. While holding the DVD player and the base, adjust the unit’s swivel angle for a
comfortable viewing position.
Thumb Screw
Unit Base
Unit Rear
8
Page 9
D. Prior to Operation
For setting up the unit please choose a location with sufficient air circulation
to prevent overheating.
The product must be positioned horizontally only. Do not place heavy
objects on its housing.
To protect the laser unit avoid dusty surroundings. If necessary, please use a
cleaning disc carefully following its operating instructions.
The unit was suddenly brought from a cold to a warm surrounding.
=> Please take out the disc and wait for about an hour,
until the unit has warmed up.
The unit was operated in a very humid surrounding.
=> Please choose a location with lower humidity.
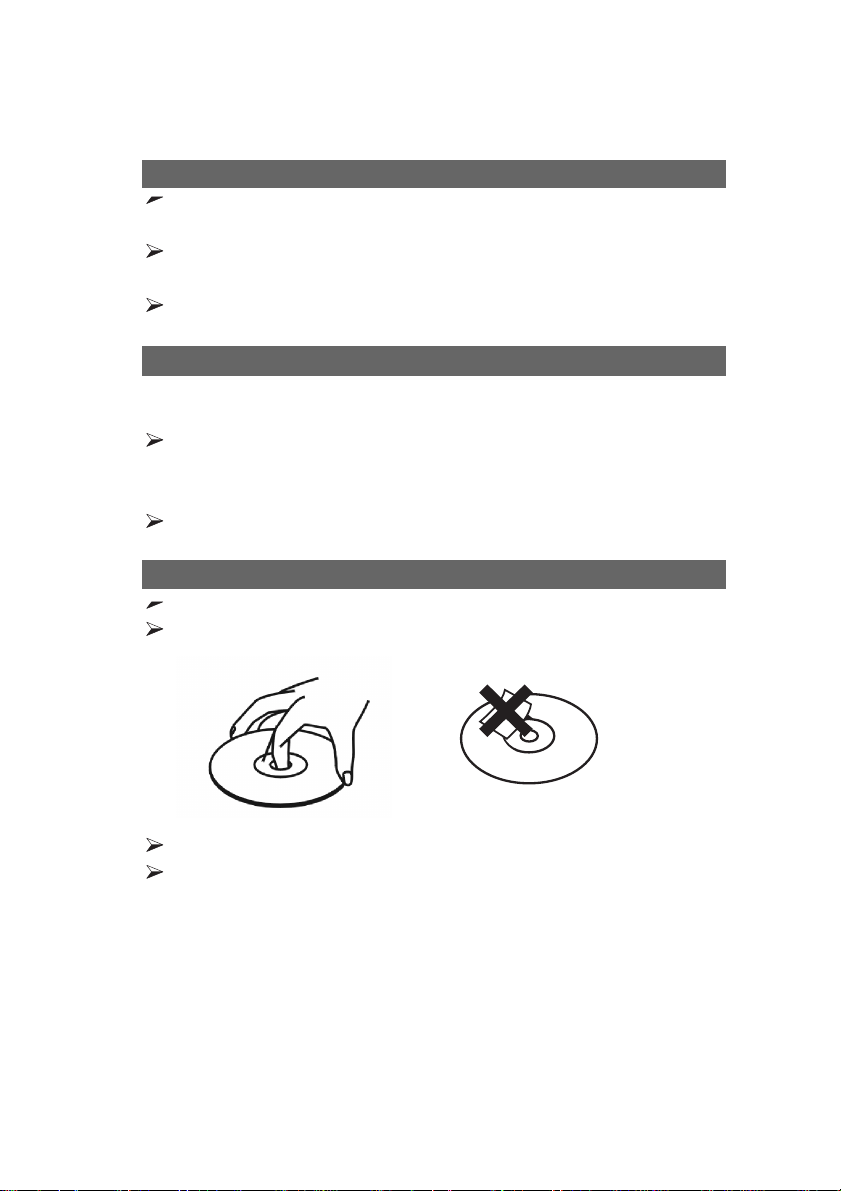
In order to keep the disc clean, never touch the shiny surface.
Never place a sticker or adhesive label on the disc.
Don’t expose discs to direct sunlight or other heat sources.
Please store the discs only in their sleeves.
9
Page 10
Cleaning a Disc
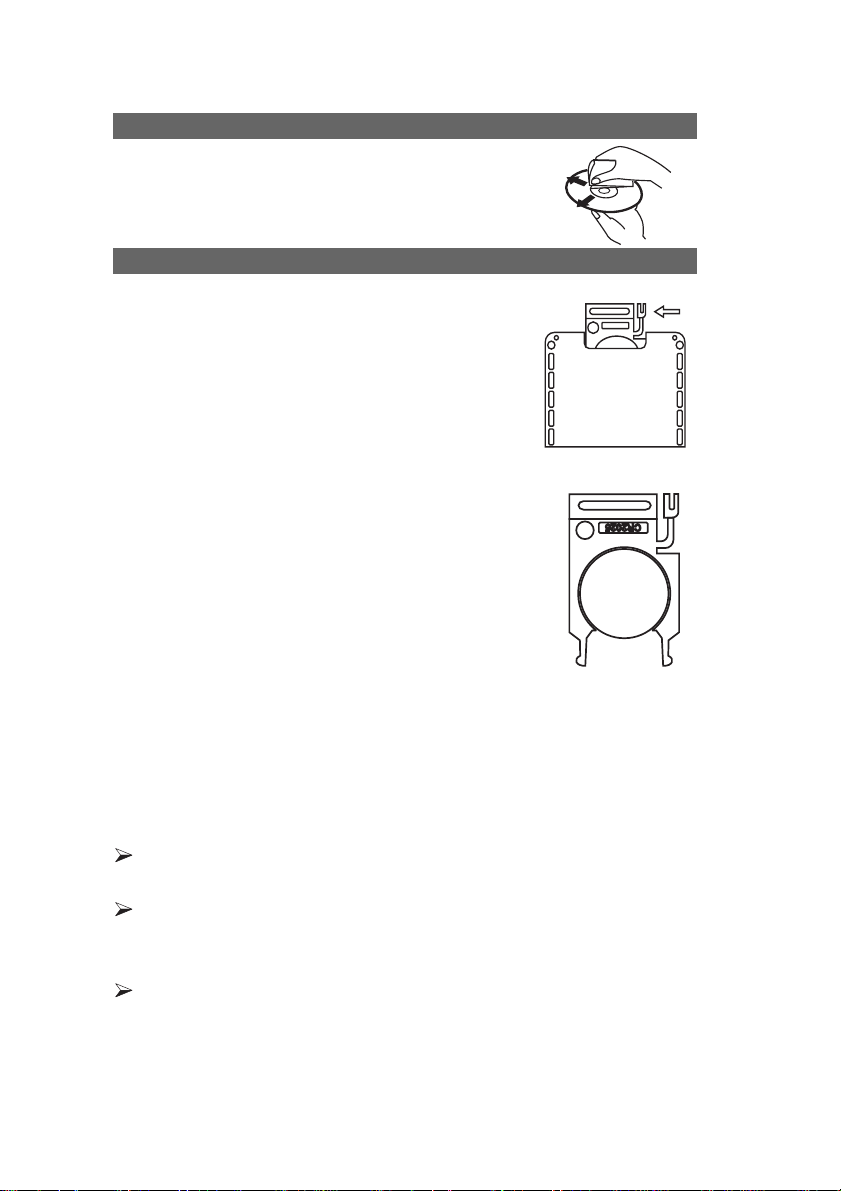
T o clean a disc use a soft cloth without any cleaning agents.
Only wipe from the center hole towards
the outer edge, never in toward the center .
Using the Remote Control Handset
1. The remote control uses a pre-installed Li-ion type
battery. To prevent the battery from discharging, we’ve
inserted an insulating strip. Please pull it
out prior to first use.
If the remote control should begin to operate unreliably
replace the battery with a new battery of the same type.
T o replace the battery open the battery
compartment. Push the retention clip in the direction of
arrow and pull out the battery mounting.
2. Before you remove the battery, remember the battery position. The ‘+’ marking must face upwards, otherwise
the remote control will not work and may be damaged. Replace the cover.
3. Please point the remote control towards the main unit when operating the buttons. The remote control works best with a distance less than 16 feet (5m) and
in an angle of up to 45o center of the front of the unit. Obstacles between the
remote control and infrared sensor will adversely affect operation of the remote
control.
Batteries should disposed in an environmentally correct manner . . Never
throw batteries into fire.
If the remote control is not to be used for an extended period of time, please
remove the battery from the compartment to prevent damage by battery
leakage.
When replacing the battery, please observe the polarity . The ‘+’ must face
upwards.
10
Page 11
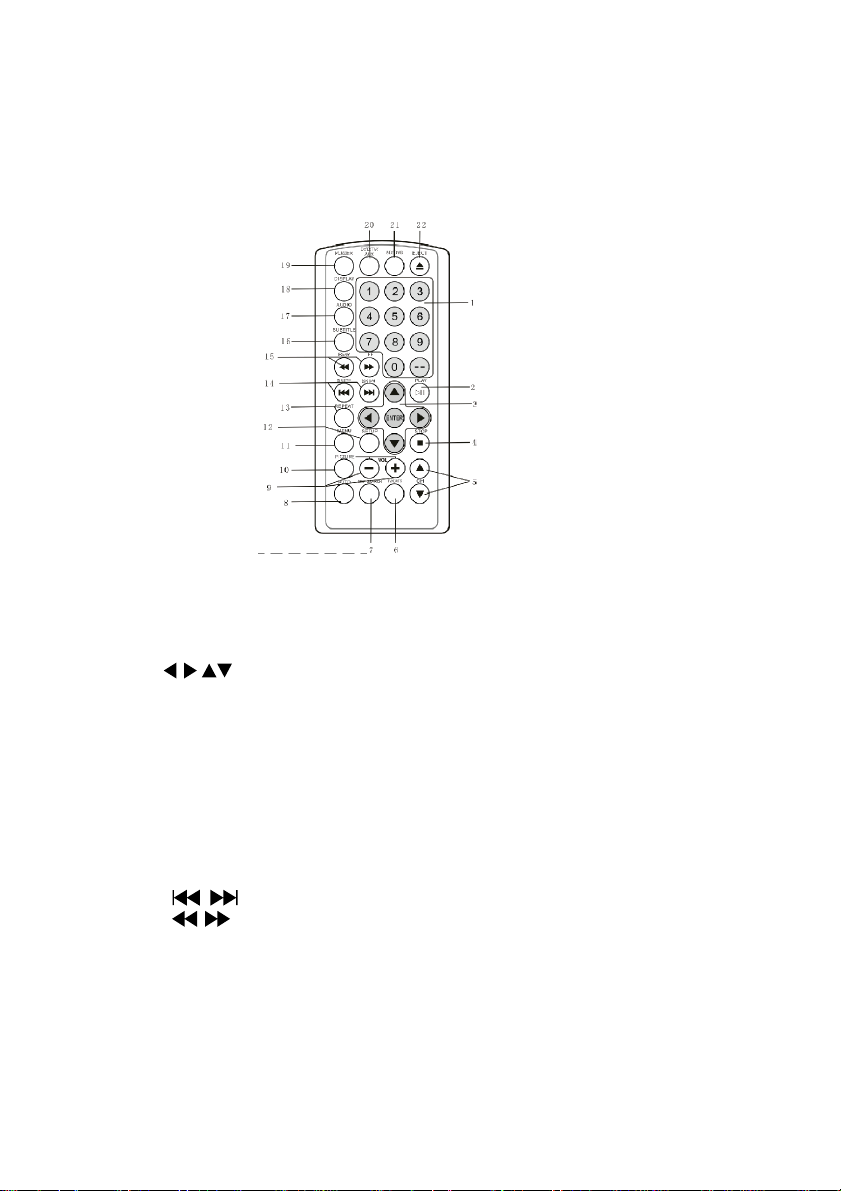
E. The Remote Control
1. 0-9
2. PLAY/ PAUSE
3. ENTER
4. STOP
5. CH+/ -
6. TV/CATV
7. SKIP SEARCH
8. AUTO
9. + / -
10. PICTURE
11. MENU
12. SETUP
13. REPEAT
14. SKIP+/ -
15. REW, FF
16. SUBTITLE
17. AUDIO
18. DISPLAY
19. POWER
20. DVD/TV/AUX
21. SD/DVD
22. EJECT
Numeric Buttons
Starts play or pauses the playback
Navigation keys to operate the menu. ENTER confirms the selection
Stops DVD playback
Selects previous or next channel while in TV mode
Selects the TV receiving mode (TV, IRC, HRC, STD)
Skips channels that the user wishes not to view.
Automatically searches for TV channels
Used with “PICTURE” function to increase or decrease the item you select
or the volume up or down
Selects the picture adjust setting
Provides access to On Screen Display (OSD)
Accesses the menus for basic setup
Activates repeat mode
Skips to previous/next chapter (DVD) or audio track (CD)
Speeds up playback backwards or forwards by 2x, 4x, 16x, up to 100 times
normal speed
Toggles the subtitle languages available
Toggles DVD audio languages
Provides the elapsed playing time, subtitle, audio
Turns the unit on or off
Selects signal from DVD/SD, TV and auxiliary equipment
Selects signal from DVD or SD card
Ejects the disk.
11
Page 12

F . DVD Player
22
21
20
19
18
17
16
15
12 3 411567 891011
12
1314
1. Power Button
2. Program Button
3. Channel +/- Button
4. Volume +/- Button
5. Picture Button
6. TV/AV Button
7. Wide Button
8. Previous/ Next Button
9. Play Button
10. Stop Button
11. Eject Button
12. Disk Slot
13. IR Remote Sensor
14. Power Indicated LED
15. Cable Antenna Connector
16. SD/MMC Slot (512 max)
17. DC 12V Input Jack
18. AV In/Out Switch
19. Audio Right Jack
20. Audio Left Jack
21. Video Jack
22. Headphone Jack
12
Page 13

G. Applying Power to the Unit
a. Using AC adaptor
Connect the supplied AC adaptor.
AC adaptor
INPUT: AC 100 ~ 240V, 50/60Hz, 0.7A
OUTPUT: DC 12V, 1.5A
b
• Use the unit only the supplied AC adaptor.
Use with non supplied AC adaptors may damage the unit.
• Do not touch the AC adaptor with wet hands. Doing so is dangerous which
could result in an electric shock.
• Do not use with a voltage other than the voltages displayed. Improper voltage
could cause fire, electrical shock, or damage.
b. Using the vehicle DC power adaptor
Connect the supplied DC power
adaptor to vehicle power outlet.
Caution using the vehicle DC power adaptor:
• Use only the supplied DC power adaptor. Using other DC power adaptors
could damage the unit.
• After use, disconnect the DC power adaptor plug from the unit and
the vehicle power socket.
• The DC power adaptor may cause interference with reception from the car
radio or another radio inside the vehicle. If this is the case, disconnect the
DC power adaptor from the vehicle power socket, or use the radio located at a
further distance from the vehicle power socket.
Vehicle DC Power Adapter
INPUT: DC 12-16V
OUTPUT: DC 12-16V
a
13
Page 14

After connecting the unit to power, press the “POWER” button, and the
logo picture will appear on the screen and the LED power indicator located on
lower left front of the unit will be light.
H. Connections
Although this unit has its own screen, the unit can also be connected to an
external television set as well.
1. Playing a Video Game
1) Slide the AV in/out button to
the “In” position.
2) Plug the AV output from your
game system into the Audio L+ R
and video input jack on the left side of
the unit following the corresponding colors:
(Audio Left = White, Audio Right = Red, Video = Y ellow).
3)Press “DVD/TV/AUX” until the word “AUX”
appears on the top right. Adjust the volume
control and the brightness control on the the top
of the unit to your individual preference.
2. Connecting to a TV or another monitor
You can also connect the DVD
player to a TV or monitor to
enjoy high quality stereo.
• Insert each cable firmly into its designated jack.
• If your antenna uses 300-ohm twin lead cables, do not coil the cables. Also, keep
the twin lead cables away from audio/video cables.
14
Page 15

1) Connect the supplied AV (RCA) cables into the Audio L+ R
and video input jack on the left side of the unit following the corresponding colors:
(AudioLeft= White, Audio Right= Red, Video=yellow).
2) Connect the supplied AV cables on the other end to your TV. Match the cable
by color code.
I. Receiving TV Programs
1. Press “DVD/TV/AUX” until the word “TV”
appears on the top right.
2. Press “AUTO”, the unit will search TV channels
automatically.
3. After the channels are searched, you can use CH+/to choose the channel you like.
Note:
a. The picture and audio are not visible when searching channels.
b. If you don’t like a channel, press “SKIP SEARCH”. The channel will not appear
when you press “CH+/-”.
J. Reading SD (Secure Digital) and MMC
(Multimedia) Card
You can enjoy high-quality pictures , music and cinema stored in a SD card.
Note:
The maximum card size is 512 Mb. A card size 1Gb or greater may result in abnormal
operation.
1. Press “DVD/TV/AUX” until the word “DVD” appears on the top right.
2. Press “SD/DVD” unit the word “SD” appears on the screen display;
3. Insert the SD card into the SD slot on the left side of the unit and the unit will
read it automatically.
4. Press the MENU button to switch between Music and Photos.
15
Page 16

K. Playing DVDs
DVD Playback
1. Press “DVD/TV/AUX” until the word “DVD” appears on the top right of the
screen.;
2. Insert the disk in the right side of the unit with label
facing to you. Then the disk will be pulled into the unit
and play will begin automatically.
DVD discs will usually show a menu to choose from. Use the navigation buttons
on the remote control.
Highlight the desired menu item and press the ENTER button to activate it. This
starts the playback of the selected title.
T o stop playback press the STOP button once. The
screen shows “
the location where playback was stopped.
Press the PLA Y button to resume playback there. But if
you press the STOP button again the unit will stop
and not recall the last position of playback.
The “resume play” is not supported by all discs.
”. The player will recall
If this symbol appears on the screen during operation, the function
requested is not supported by the media type inserted.
Volume: The V olume +/- is on the top of the unit. Press to
adjust the volume.
Picture: the button is on the top of the unit. Press it to
choose the item about picture you want to change. Then
press Volume +/- to adjust it.
16
Page 17

Display
Press the “DISPLAY” button. The picture below will appear . Y ou can change all
the items (except
functions are included in the disk.
) in the table with
r
and ENTER buttons if the
1/17
2/32
0:01:45
1.ENG
D
3/21
OFF
1/1
Normal
DVD Camera Angles
The movies on some DVDs have been recorded from various camera positions.
This feature lets you enjoy the same scene from different perspectives. The function will be on the DVD case if it is available on the DVD .
When playing a DVD, that provides various camera angles, the different views are
displayed simultaneously on the screen. Then press the DISPLAY button and
r
choose the Angle. Press ENTER and press
shown. The picture will be adjusted in 1 - 2 seconds. In the upper right corner you
see the number of the current/maximum number of angles.
until the desired perspective is
17
Page 18

Titles and Chapters
During DVD playback you
can skip through the DVD to
certain chapters. Press
“DISPLAY” and enter
the desired chapter number
directly. The playback will
continue with that chapter.
(Refer to the illustration to
the right “Display Mode” )
Skip & Search
Press
beginning of the previous or next chapter
(DVD) or audio track (CD).
, to playback the
1/ 17
2/ 32
0: 01: 45
1. E NG
D
3/ 21
OFF
1/ 1
No r mal
Enter the Chapter
Nu mber directly
T o pause the DVD, press the
button. T o protect the screen, a screen saver
(a flying DVD symbol) appears after several minutes
that picture is paused. Press this button again to
resume normal playback. Still Picture
These buttons activate a backward and forward search mode . Depending
on how often you press the button, playback speed increases to 2x, 4x, 16 or 100
times and the audio is muted. Press the PLAY button to resume playback at normal
speed with audio.
18
Page 19

Playback Speeds [FF ] [REW ]
Press the REW or FF ( ) buttons repeatedly
to select the fast forward or reverse play speeds
during playback. The display will change at the following speeds:
4X
2X
100X
Press the PLAY button to return to normal play.
Repeat Modes
Repeat Modes
Press the REPEAT button during playback. Each time the button is pressed, the
repeat mode changes as per the illustration
.
DVD
Chapter: Repeat of the chapter being played
Title: Repeat of the title being played
All: Repeat all
Off: Turn the repeat function off.
16X
19
Page 20

CD
Track: Repeats the track being played
All: Repeat all tracks
Off: Turns the repeat function off.
Change Soundtrack Language
During DVD playback press the AUDIO button to select a dif ferent audio
language (if the DVD contains various audio languages).
Change Subtitle Language
During DVD playback press the SUBTITLE button to select the language for
subtitles (if the DVD contains subtitle languages) or to deactivate that function.
DVD Menu
Pressing the MENU button of the remote control accesses the content menu of the
DVD (if available). This may include various titles, bonus material and specials.
When playing other media, press the ENTER button, to access the content
menu (if available). Press MENU again to resume playback in the same scene,
where you first pressed MENU.
Connecting Headphones
Y ou can connect one set of headphones with a 3.5 mm jack to the earphone socket
on the left side of unit. Plug the jack into the socket which will then disconnect the
built in speakers.
CAUTION:
When using headphones be careful with your hearing. Adjust the volume to
comfortable levels before using the headphones. Using headphones with excessive
volume may cause damage to your hearing.
20
Page 21

L. Playing CDs
During play back of an audio CD the following menu will appear:
1
0:03:08
01/05
2
3
1. Current file elapsed playing time
2. Playing Mode: , , , and so on.
3. Current file/ Total number of files in the folder .
USING THE REPEAT FEATURE
The default mode for the Repeat feature is OFF . Pressing REPEAT consecutively
changes the repeat options:
• Track- repeats the track that is playing.
• All- repeats the disc that is playing.
• Off
The selected repeat option will play continuously until it is turned off.
21
Page 22

M. PLA YING MP3-CDs
MP3 is a format for storing digital audio. CD-quality songs are compressed into
the MP3 format with very little loss of audio quality while taking up much less
disc space. CD-R/RW discs that have been encoded in MP3 format are compatible
with this system.
1
2
0:03:08 01/05
\...\F1: 032KBPS\TO1_AAAAAA
34
MP3 Playback Display
1. Current file elapsed playing time
, ,
2. Playing Mode:
3. The current file’s position.
4. Current file/ Total number of files in the folder .
• If the CD has both audio CD tracks and MP3 files, only the MP3 files will be
played.
• MP3 files take at a minute to be read depending on its structure.
• The unit can recognize up to 256 files or folders per disc. A CD with 257 files
or folders and over will function with this unit.
• MP3 CDs may not be played in their recorded order.
• Use MP3 software that can records data alphabetically or numerically.
• When composing MP3 files avoid creating subfolders when possible.
Note:
Some CD-R/RWs and MP3 CDs cannot be played back depending on how they
were recorded.
, and so on.
22
Page 23

Limitations on display
• The following letters are available display: capital or small letters A through Z,
“_”(underscore), “-” (hyphen), and numbers 0 through 9.
Note:
• WMA files cannot be played back.
1. Load the MP3 CD with the label facing front.
A folder list appears on the screen.
2. Press the
• Press the ENTER button (or the
or button to select the desired folder.
button) to display a table of contents in the
selected folder.
3. Press the or button to select the file to be played back.
4. Press the ENTER or PLAY
5. T o stop play , press the STOP
6. Press the PAUSE
button to start play.
button.
button during play. “ ” will appear on the screen.
7. Fast forwarding
Press the SKIP+
button (or the NEXT button on the unit) during
playback to skip to the next file.
8. Skipping backward
Press the SKIP-
button (or the PREVIOUS button on the unit) during
playback to skip to the beginning of the previous file.
Note:
Y ou can skip only within the selected folder.
9. Fast forwarding playback
Press the FF
or REW button repeatedly
to select the fast forward speed or reverse playback
speed. The display will change as per the following illustration:
Press ENTER or
2X
4X
8X
button to resume the normal play back.
2X
8X
23
4X
Page 24

10. USING THE REPEAT FEATURE
The default mode for the Repeat function is OFF. Pressing REPEAT consecutively
will access the following repeat options:
• Track- repeats the track that is playing.
• All- repeats the disc that is playing.
• Off
Program:
You can edit the files in the “Programe” Column with the items below:
” means add the file in the original disk you select;
“
“
“
” means add all files in present document of disk;
” means delete the file in the “Programe” Column you select;
“ ” means delete all files in “Programe” Column;
N. Playing JPEG Files
1. Load the JPEG CD with the label facing front.
A folder list appears on the screen.
2. Press the
• Press the ENTER button (or the button) to display a table of contents
of the selected folder.
• To return to the original folder from the sub-folder, press the button.
3. Press the or button to select the file to be played back.
4. Play
a. Press
to preview the picture you have selected.
or button to select the desired folder.
and choose “ ” using
or button. Press ENTER
24
Page 25

b. Choose “ ” and press and to choose the speed of picture
slide show.
c. Press ENTER on the file you want to view and the unit will display the
complete picture.
Note:
a. “1/20” stands for the current file and total file number.
b.Press “ ” one time to rotate the picture for 90 degrees counterclockwise and
press “ ” to rotate the picture for 90 degrees clockwise.
c. Press
will return to the previous picture. Press will go to the next picture.
d. Press to stop playback.
25
Page 26

O. Initial Settings
Once the initial settings have been completed, the settings will be retained in the
unit’s memory until they are changed, even if the power to the unit is turned off.
Setting “ Language ” page
1. Press the SETUP button. The setup screen and “LANGUAGE” appear. At
the same time, “ ” is highlighted.
Note:
T o close the setup screen, press the SETUP button.
Menu Language
Disc Audio
Disc Subtitle
Disc Menu
2. Press the
3. Press the
4. Press
5. Press the
button, “Menu Language” is highlighted.
or button to select the other menus on language page.
to enter the sub menu.
or button to select the sub menu and press the ENTER to
confirm your selection.
6. Repeat steps 3 through 5 for other menus.
LANGUAG E
Note: Press
to return the previous menu.
Menu Language:
Select the desired OSD/menu language.
> English
> English
> Off
>English
Disc Audio:
Select the desired audio language.
26
Page 27

Disc Subtitle:
Select the desired subtitle language.
Disc Menu:
Select the desired disk menu language.
Note: a. There are five languages to select from: English, French, Spanish, German
and Japanese.
b. Not all disks have five languages for audio, subtitle and menu language.
Setting “ Display” page
1. Press the SETUP button. The setup screen appears.
2. Press the
3. Press the
4. Press the
5. Press
6. Press the
and press the ENTER to confirm your selection.
7.Repeat steps 4-6 for other menus.
Note: Press
button to select “ ”. “DISPLAY” screen appears.
button, “TV Aspect” is highlighted.
or button to select the other menus in display page.
to enter the sub menu.
or button to select the sub menu
to return the previous menu.
TV A spec t
Display Mode
TV Out put
DISPLAY
> 16:9
> Wide scre en
> NTS C
TV Aspect and Display Mode:
Normal/PS (Panscan): 4:3 Cut off
When the wide screen
disc is played, the picture will be
cropped to fill your TV screen. The
left and right edges are cut off.
Normal/LB (Letterbox): 4:3
When the wide screen
disc is played, black bands appear
at the top and bottom of screen.
27
Page 28

WIDE: 16:9
This setting is used with a wide screen TV
set. Use“FULL” size.
(Setting the wide screen TV to
“FULL” mode is also necessary.)
Note:
• The screen size may differ depending on the DVD discs.
• If you select “WIDE” to remove the black bands on screen when a wide screen
disc is played, the picture may be slightly distorted.
• In some discs, even if “Normal/PS” is selected, the black bands may remain on
the screen.
Setting “Lock” page
1. Press the SETUP button. The setup screen appears.
2. Press the button to select “ ”. “LOCK” screen appears.
3. Press the
4. Press the
button, “Rating” is highlighted.
or button to select the menu as follow.
Rating
Passwo r d
OTHERS
> Adul t
> Change
DVD Ratings:
Some DVD discs contain a restriction level which enables parents to prevent
playback of discs by children. This unit is equipped with a password designed
to prevent children changing the level.
Y ou cannot play DVD discs rated higher than the level you selected unless you
change the level.
1 KID SAFE (Kid safe)
2 G (General audiences)
3 PG (Parental guidance suggested)
4 PG 13 (Parents strongly cautioned)
5 PGR (Parents very strongly cautioned)
6 R (Restricted)
7 NC-17 (No one 17 and under admitted)
8 ADULT (Adult)
28
Page 29

When selecting the rating level, a message appears. Please follow the instructions
displayed on the screen.
5. Press
to enter “ ” page .
6. Enter the 4 digital password and press ENTER to confirm.
7.Press the
or button to select the rating levels and press the ENTER to
confirm your selection.
Note: a. If you forget your password, enter 3308.
b. DVD discs may or may not respond to the parental lock settings. Make
sure this function works with your DVD discs.
Password:
Y ou can change the password according to the steps below
5. Press
to enter “ ” page .
6. Enter the 4 digital old password and press ENTER to confirm.
Note: If you use this unit for the first time, enter “3308”.
7. Then enter new password input page “
” and enter 4 other
digital password you’d like.
8. Then enter “ ” window and enter the new password again. Press
ENTER to confirm and you have change the password successfully. Press the
or button to select the rating levels and press the ENTER to confirm your
selection.
Others:
1. Press the SETUP button. The setup screen appears.
2. Press the button to select “ ”. “OTHERS” screen appears.
29
Page 30

3. Press the button, “Load Default” is highlighted.
4. Press the
or button to select the other menus
in “OTHER” page.
5. Press
6. Press the
to enter the sub menu.
or button to select the sub menu and
Load Default
Screen Saver
Last Memory
OTHERS
> Sele ct
> On
> On
press the ENTER to confirm your selection.
7. Repeat steps 3-5 for other menus.
Note: Press
to return the previous menu.
Load Default:
This will return the unit to the default settings.
Note:The password doesn’t change.
Screen Saver:
*On: screen saver enabled *Off: screen saver disabled
Last Memory:
If you open the disc cover during playback and then close the disc cover with the
(Memory: ON) function enabled playback will resume from the point where you
stopped.
Note:
If the POWER switch is set to the OFF position, the memory recall function is
disabled.
30
Page 31

Specifications:
Model Number: FPE1078 V er: 00
UPC number: 0-44476-02741-3
Display Features
Display type TFT-LCD
Screen Size 7.7" (diagonal)
Aspect Ratio 16:9
Panel Resolution 480x240
Brightness 250 Cd/m²
Contrast ratio 200:1
Viewing Angle 110° (H) : 50° (V)
Backlight life 20,000 Hrs
TV Reception:
TV System NTSC M
Channel CA TV - UHF/VHF 181 channels
Antenna Impedance 75ohm
Connector type F
Audio
Maximum Audio Output 3watt x 2
T otal number of speakers 2
Video Connections Quantity
NTSC Analog TV Tuner 1
Composite Video Input 1 (Input/Output
switchable)
Composite Video Output 1 (Input/Output
switchable)
Video Standards Supported
Composite Video input P AL/NTSC
RF NTSC
Audio Connections Quantity
RCA Input(Red, White) 1
Headphone:(Variable/Fixed) (3.5mm) 1 (V ariable)
31
Page 32

Playback Media Compatibility
Audio CD YES
CD-R YES
CD-RW YES
DVD-R YES
DVD-RW YES
DVD-Video YES
Picture CD YES
VCD YES
SVCD YES
SD/MMC YES*
Playable Format (Codec)
MP3 YES 32 - 320Kbps
CD-DA YES
VCD 1.1 YES
VCD 2.0 YES
Features
Built-in DVD Player
NTSC 181 Channel Cable/AIR tuner
Removable Tilt/Swivel stand
12VDC input for Car use
User friendly remote and On Screen Display (OSD)
Built-in Secure Digital (SD) and Multi-Media Card (MMC)*
MP3 playback on Disc and SD/MMC
Photo Show on Disc and SD/MMC
Accessories in the box
7.7" LCD/DVD unit
1xRCA A V Cable
1xAC/DC Adapter
1x12V Car Adapter
1x Remote Control
Owners manual
* - 512MB Max
32
Page 33

Power Requirements
Power Source 100-240 V AC 50/60Hz
0.7~0.3A
Unit input power 12VDC 2.5A
Power ON consumption 13W
Dimension (WxHxD)
Unit W/stand 10.75 x 8.5 x 4.6 (in)
Unit W/O stand 10.75 x 7 x 3 (in)
Weight (N.W.)
Unit W/stand 4.2 (lb)
Unit W/O Stand 3.7 (lb)
Warranty
Parts & Labor 90 day
Environment
Operating T emperature 41 - 95°F
Operating Humidity 10% - 95%
33
Page 34

90 DAY LIMITED WARRANTY
AUDIOVOX ELECTRONICS CORP. (the Company) warrants to the original retail purchaser of this product that should this product or any part
thereof, under normal use and conditions, be proven defective in
material or workmanship within ninety (90) days from the date of original
purchase, such defect(s) will be repaired or replaced with reconditioned
product (at the Company's option) without charge for parts and repair
labor. A game controller, if supplied, is similarly waranteed for ninety (90)
days.
To obtain repair or replacement within the terms of this Warranty, the
product is to be delivered with proof of warranty coverage (e.g. dated bill
of sale), specification of defect(s), transportation prepaid, to the Company at the address shown below.
This Warranty does not extend to the elimination of externally generated
static or noise, to correction of antenna problems, to costs incurred for
installation, removal or reinstallation of the product, or to damage to
digital memory cards, discs, speakers, accessories, or electrical systems.
This Warranty does not apply to any product or part thereof which, in the
opinion of the Company, has suffered or been damaged through
alteration, improper installation, mishandling, misuse, neglect, accident, or by removal or defacement of the factory serial number/bar code
label(s). THE EXTENT OF THE COMPANY'S LIABILITY UNDER THIS
WARRANTY IS LIMITED TO THE REPAIR OR REPLACEMENT PROVIDED ABOVE AND, IN NO EVENT, SHALL THE COMPANY'S LIABILITY
EXCEED THE PURCHASE PRICE PAID BY PURCHASER FOR THE
PRODUCT.
This Warranty is in lieu of all other express warranties or liabilities. ANY
IMPLIED WARRANTIES, INCLUDING ANY IMPLIED WARRANTY OF
MERCHANTABILITY, SHALL BE LIMITED TO THE DURATION OF THIS
WRITTEN WARRANTY. ANY ACTION FOR BREACH OF ANY WARRANTY HEREUNDER INCLUDING ANY IMPLIED WARRANTY OF
MERCHANTABILITY MUST BE BROUGHT WITHIN A PERIOD OF 24
MONTHS FROM DATE OF ORIGINAL PURCHASE. IN NO CASE SHALL
THE COMPANY BE LIABLE FOR ANY CONSEQUENTIAL OR INCIDENTAL DAMAGES FOR BREACH OF THIS OR ANY OTHER WARRANTY,
EXPRESS OR IMPLIED, WHATSOEVER. No person or representative
is authorized to assume for the Company any liability other than expressed herein in connection with the sale of this product.
Some states do not allow limitations on how long an implied warranty
lasts or the exclusion or limitation of incidental or consequential damage so the above limitations or exclusions may not apply to you. This
Warranty gives you specific legal rights and you may also have other
rights which vary from state to state.
U.S.A. : AUDIOVOX ELECTRONICS CORPORATION, 150 MARCUS BLVD., HAUPPAUGE,
NEW YORK 11788 z 1-800-645-4994
CANADA : CALL 1-800-645-4994 FOR LOCATION OF WARRANTY STATION SERVING YOUR AREA
© 2005 Audiovox Electronics Corporation
128-5556E
34
Applies to Audiovox Video Products
Page 35

35
 Loading...