

Page 1
AUDIOTOX-
ELECTRONICS CORP.
20" LCD TV
Operating Instructions
Model No. FP2000
For assistance, please call: 1-800-645-4994
Or visit us at WWW.AUDIOVOX.COM
Before connecting, operating or adjusting this product, please read these instructions completeiy.
Please keep this manual for future reference
For Cusbfner Service
Vcit OurWebsile At
win«.aij(liovD)(.toin
PrcOud in^mmalion.PhOtCi.
FAD'S, i>ner'4 Manuals
1286788
Page 2
AUDIOVOX
ELECTRONICS CORP.
Table of Contents
Page# ^
Important
Safety
Instructions
02
Overview
03 05
Safety
Cautions
Accessories
Start up
060708
Outdoor
V Antenna
Installation
Recognizing buttons and controis
09
Remote
Top / Front !
^ Control
Control
Panels :
10
j
Rear Panel
L Input/Output
r Connections
11
Remote
L Control
r Buttons
12
PC/Video/
L Speaker
rConnections
Page 3
Page#
13 15 16
Basic
Control
Menu
Setting List
(Diagram)
Picture
Settings
17
18 26 29 33
Volume
Settings
TV Setting
Functions
PC Setting TrouWeshoolin
/Other
34
Notices Product
Specifications
35 36
Product
Dimensions
Mounting
Wall
37
Maintenance
/ Repair
Page 4

AUDIOVOX
ELECTRONICS CORP.
Important Safety Instructions
CAUTION
CAUTION
RISK OF ELECTRIC
A
A
A
This Equipment has been tested and found to comply with the limits for a TV Broadcast
Receiver, pursuant to Part 15 of the FCC Rules. These limits are designed to provide
reasonable protection against harmful interference in a residential installation.
This equipment generates, uses and can radiate radio frequency energy and, if not installed
and used in accordance with the instructions, may cause harmful interference to radio
communications if this equipment does cause or receive interference, which can be
determined by turning equipment off and on, the user is encouraged to try to correct the
interference by one of the following measures:
• Reorient or relocate the TV antenna
• Increase the separation between TV and other equipment
• Connect TV into separate outlet from equipment
• Consult the dealer or an experienced raidon"V technician for help
SHOCK DO NOT OPEN
The Lightning flash with the arrowhead symbol within an equilateral
triangle is intended to alert the user to the presence of uninsulated
"DANGEROUS VOLTAGE" within the product's enclosure that may be
of sufficient magnitude to constitude a risk or electric shock to persons.
The Exclamation point within an equilateral triangle is intended to alert
the user to the presence of important operating and maintenance
{servicing instructions in the literature accompanying the product).
Federal Communication Commission Information
A
(FCC)
TO REDUCE THE RISK OF ELECTRIC SHOCK,
DO NOT REMOVE COVER (OR BCAK)
NO USER-DERVICEABLE PARTS INSIDE
REFER SERVICING TO CLIALIFIED SERVICE
PERSONNEL
FCC Caution: Any changes or modifications not expressly approved by the party
responsible for compliance could void the user's authority to operate the equipment.
Page 5

h
m
jj General Description
This Audiovox product is a Color Active Matrix Liquid Crystal Display with an
integral Cold Cathode Fluorescent Lamp (CCFL) backlight system. The matrix
employs a Thin Film Transistor as the active element. This TFT-LCD has a 20.1
inch diagonally measured active display area with SVGA resolution (600 vertical by
800 horizontal pixel array). Each pixel is divided into Red, Green, and Blue sub
pixels which are arranged in vertical stripes. The color palette is capable of more
then 16 million colors.
Important Information Regarding Use of Video Games, Computer-
Captions or other Fixed Image Displays
The Extended use of a fixed image program material can cause permanent
“Shadow Image” on the LCD Panel. The Background image is viewable on normal
programs in the form of stationary fixed image. This type of irreversible LCD panel
deterioration can be limited by observing the following steps:
Reduce the brightness/contrast setting to a minimum viewing level.
DO NOT display the fixed image for extended periods of time.
Turn the power off when not in actual use.
AUDIOTOX*
ELECTRONICS CORP.
Overview
Recycling
This product utilizes tin-lead solder, and has a fluorescent lamp containing a small
amount of mercury. Disposal of these materials may be regulated in your
community due to environmental considerations. For disposal or recycling
information please contact you local authorities, or the Electronics Industries
Alliance:
Page 6

AUDIOVOX
ELECTRONICS CORP.
Safety Cautions
Users are advised to read this user's guide before operating the product.
cord. Do not over load your
electrical outlet.
before performing any kind of
maintenance. When cleaning
the TV, do not use liquid
chemical cleaners or water
sprays. Use a damp cloth to
wipe out the dust.
<1^11 For safety reasons, do not
touch any part of the TV,
electrical cord, TV antenna
or cable during bad weather
and thunderstorms.
r'*3l safety reasons, this
product must be placed on
firm and stable surface at all
times. Unstable surface will
cause product to fall thus
damaging the product and
causing harm to those near it.
]
To avoid short circuit,
electrical shock or fire; keep
this product indoors and
away from rain and other
forms of liquid.
Keep this product away from
humid environments. Such as
near bath tubs, kitchen sinks,
washing areas, swimming
pools and basements.
Page 7
AUDIOTOX*
ELECTRONICS CORP.
Safety Cautions
[
other heat sources. Such as
heat generating electrical
appliances, heaters, gas
stoves.
This LCD TV will break if drop Never attempt to repair the
or hit; should such incident
occur, please send the product
back to manufacturer for
immediate repair.
Users are advised to read this user's guide before operating the product.
product away from
Avoid dropping the Remote
Control at any time.
TV yourself at any time.
When any fault occur, be
sure to unplug the cord from
the main electrical outlet
before calling our qualified
serviceman for repair.
Good ventilation is essential to
TV components' life span.
Do not place TV monitor on
book shelf or enclosed cabinets.
Never block TV airvents.
■3 If liquid or foreign objects
accidentally drops into the TV,
be sure to have qualified
serviceman check the product,
before turn the TV power on.
i Beware ■ If you are not going to use the TV set for a long period of time, unplug your cord from the main power
outlet to conserve electricity. This is because as long as your TV set is plugged in, It consumes electricity.
Page 8

AUDIOVOX
ELECTRONICS CORP.
Accessories
VGA Cable O-
Page 9
AUDIOTOX*
ELECTRONICS CORP.
Startup ^
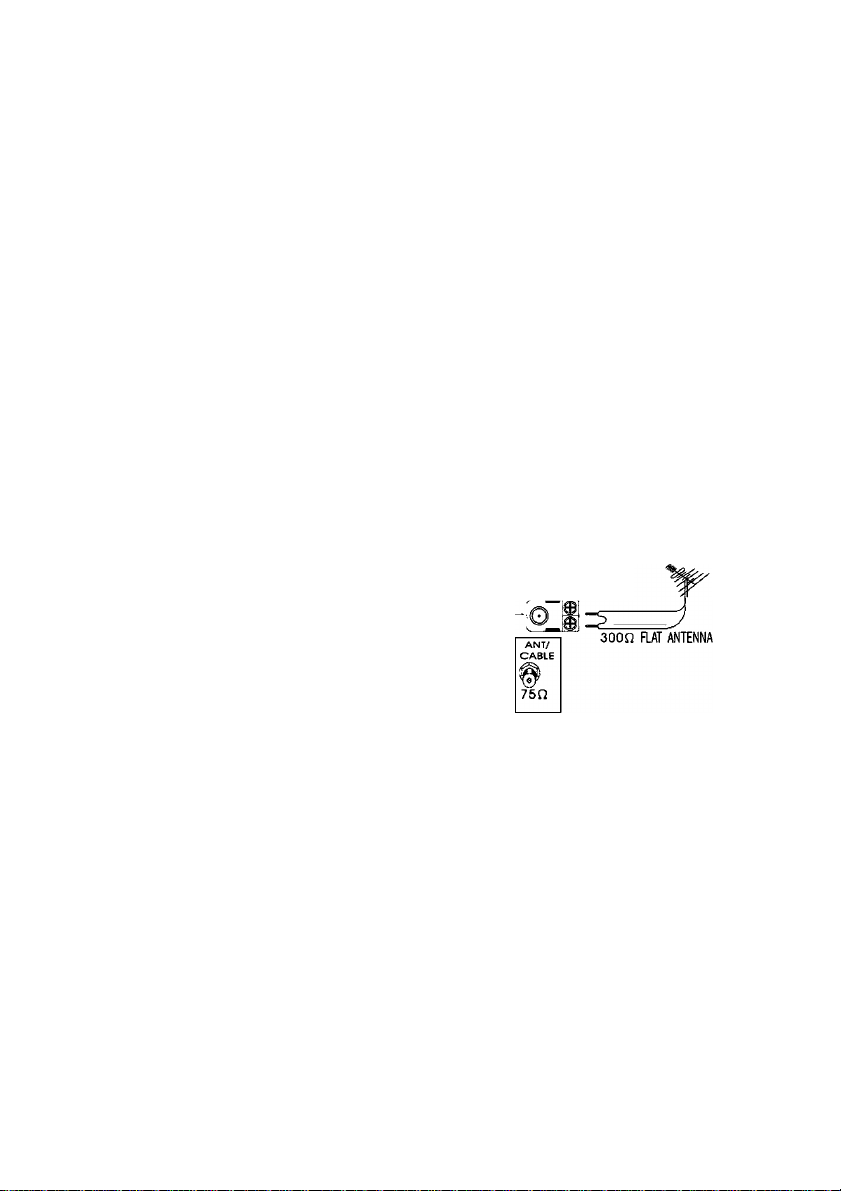
Antenna Installation
■ Using a good quality TV antenna accessories is essential to LCD TV reception,
of antenna systems on the market: below are connectors and the different types
1. The 75 n system with connonly seen F type round head connectors
which requires no tools tor easy installation.
2. The 300n system with the flat connectors system.
Can be used with adaptor on 300O-«—>75H connectors |
(Accessories not included)
Outdoor Antenna Installation
■ if you are installing an outdoor
antenna, you may use one of
the following methods:
1. Use VHF/UHF mixed outdoor
antenna.
2. Use independent VHF or
independent UHF outdoor
antenna.
■ Installing the outdoor antenna
to a TV tuner box.
Keep your TV antenna cabling to the minimum
required length to avoid unnecessary interference
viewing TV.
Avoid installing your TV antenna near steel framed
housings or other metallic objects.
Install your TV antenna on high location avoiding
main roads, neon lights and electrical power
stations.
A.VHF/UHF OUTDOOR ANTENNA
TV ANTENNA (VHF/UHF)
75Q ROUND CABLE
B.INDEPENDENT VHF OR
INDEPENDENT UHF OUTDOOR ANTENNA
VHF
TV ANTENNA
Or
Avoid sharing your TV antenna.
(i.e. using one antenna on more than cC
one TV set.) ‘^ * * *
★ Outdoor antenna are subjected to ^
constant weather wear and tear.
When poor reception occurs, please
consult your dealers or qualified sen/ice
personnel.
3000/75Q ADAPTOR
(NOT INCLDED)
-Or
UHF TV ANTENNA
3000
FLAT ANTENNA
3000 FLAT ANTENNA
750 ROUND CABLE
TV TUNER
JNOT INCLUDED)
INOUTI«0a§=-
____________
1^^
v
TV ANTENNA
(VHF/UHF)
ANT/
CABLE
750
Page 10
AUDIOVOX
ELECTRONICS CORP.
Start Up
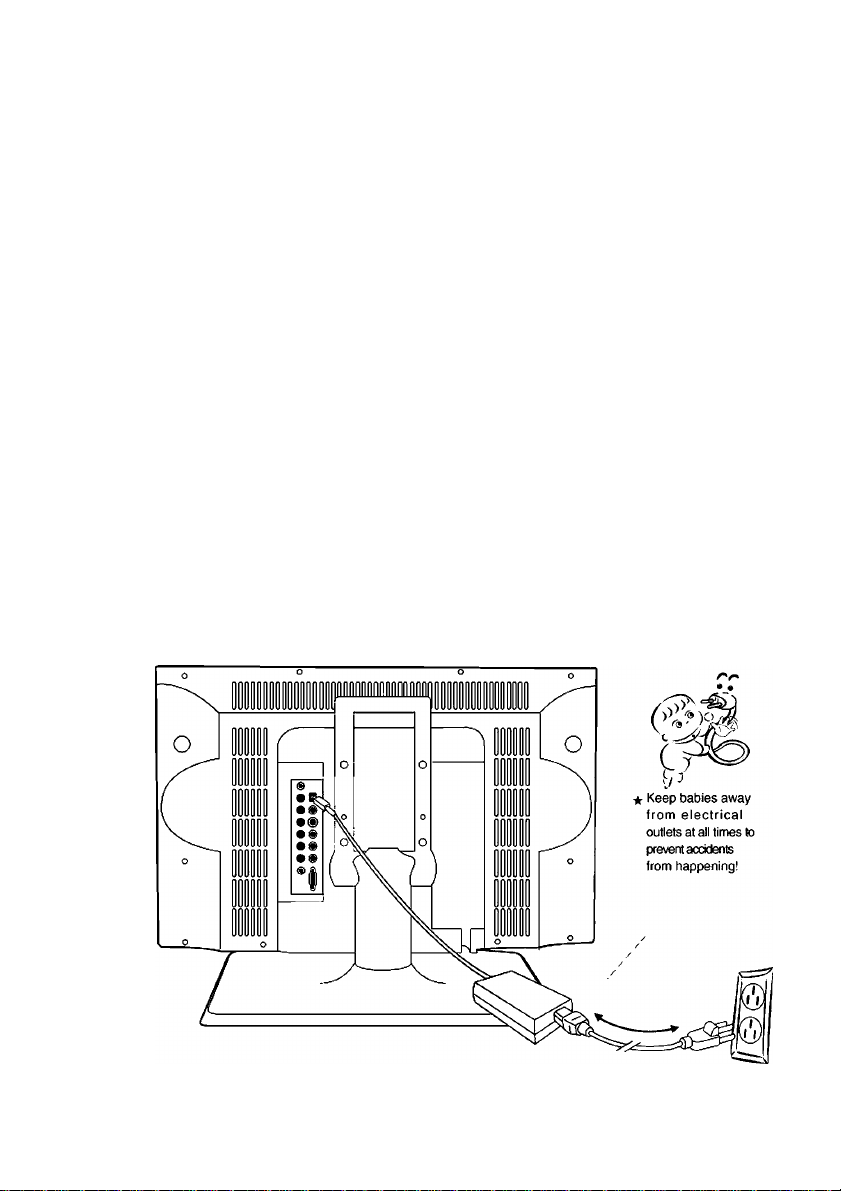
Power Connection
Power Connection
1. Remove power adapter from package. Connect the round end of power
adapter to the rear of the LCD TV monitor. Please refer to diagram instructions.
2. Take out the power cord and connect the flat end to the power adapter.
3. Plug the other end of the power cord into the wall outlet and the installation
is complete.
Page 11
AUDIOTOX*
ELECTRONICS CORP.
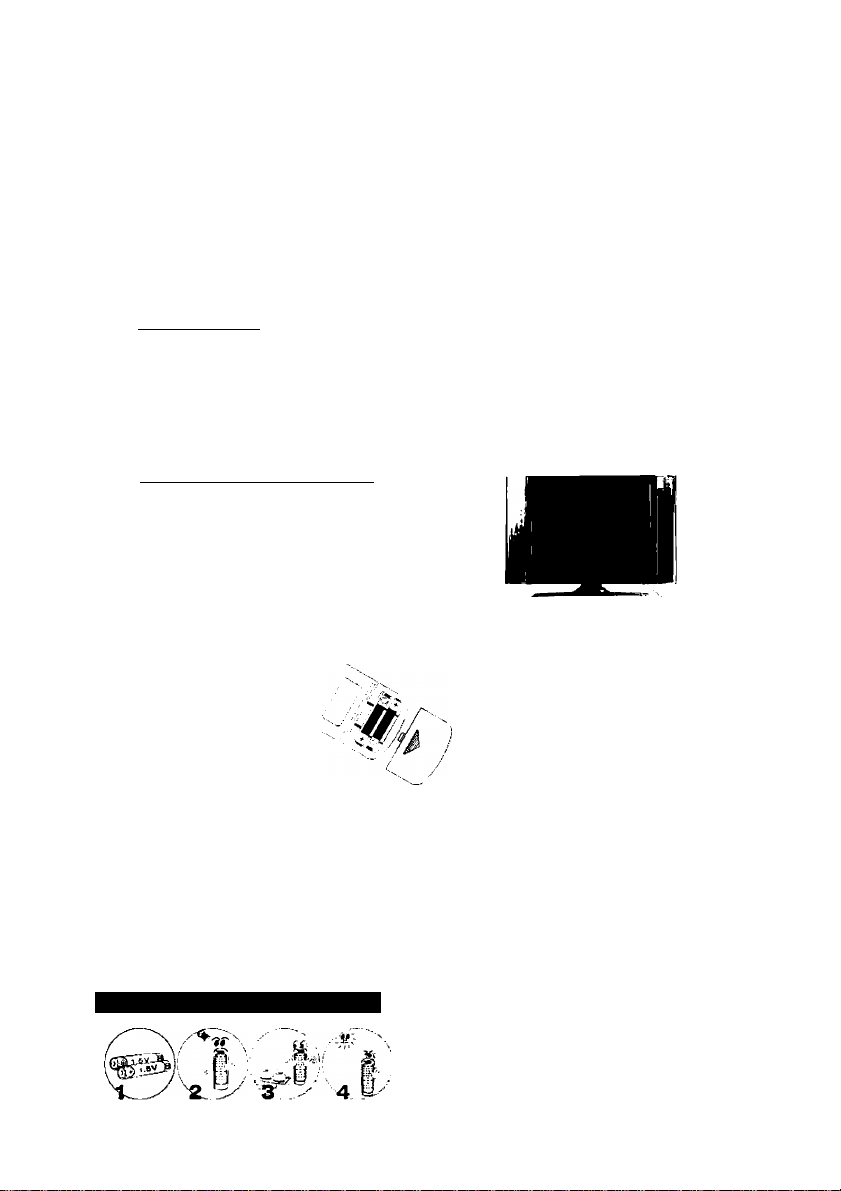
Remote Control - Put batteries into the remote
M Remote Operation
1 Aim remote directly at LCD TV monitor for clear signal.
2 Remote range is at approx, within 20 feet with angles of approx. 30 degrees.
3 Do not have obstructions between remote and TV reception.
4 Battery life span is between 6 months to one year depending on usage.
Once reception is weak, it is about time to replace batteries.
I Remote Control: battery installation
Depress the battery
cover and slide out
to the direction of the
arrow indicated on
cover.
1
Start Up
Install batteries in
correct order as
indicated.
2
Slide battery cover .
in reverse order as
indicated.
3
Batteries Installation Know how
★ note :
1. It is dangerous to install batteries
in the wrong direction.
Batteries may leak and cause
damage to the remote control!
2. Do not mix old and new
batteries together while
change batteries
3. Never recharge batteries which
are not rechargabie batteries.
4. Discard used batteries properly.
Do not puncture or throw used
batteries in fire as this may
cause explosions!
Note =
1. It is dangerous to install batteries in the wrong order.
Batteries may leak and cause damage to the remote control!
2. Do not mix different brands or new and old batteries together during battery
change!
3. Never recharge batteries which are not rechargabie!
4. Discard used batteries properly. Do not puncture or throw used batteries in
fire as this rr^y cause explosions!
Page 12
AUDIOVOX
ELECTRONICS CORP.
Recognizing buttons and controls
Top / Front Control Panels
oooooooo
1 Mute
IjJ TV/Video/PC
3 Menu
Channel selection (Previous)
5 Channel selection (Next)
(Autotune key in PC mode)
Liaht Indicator:
Red - The standby mode
Green - The power is on
Orange - The SLEEP TIMER is set to on
Note: The indicator will not light when the main power is off
Volume control (Decrease)
7 Volume control (Increase)
Power
9 Electric power light indicator
Remote Control Sensor
Page 13

Connectors
AUDIOTOX*
ELECTRONICS CORP.
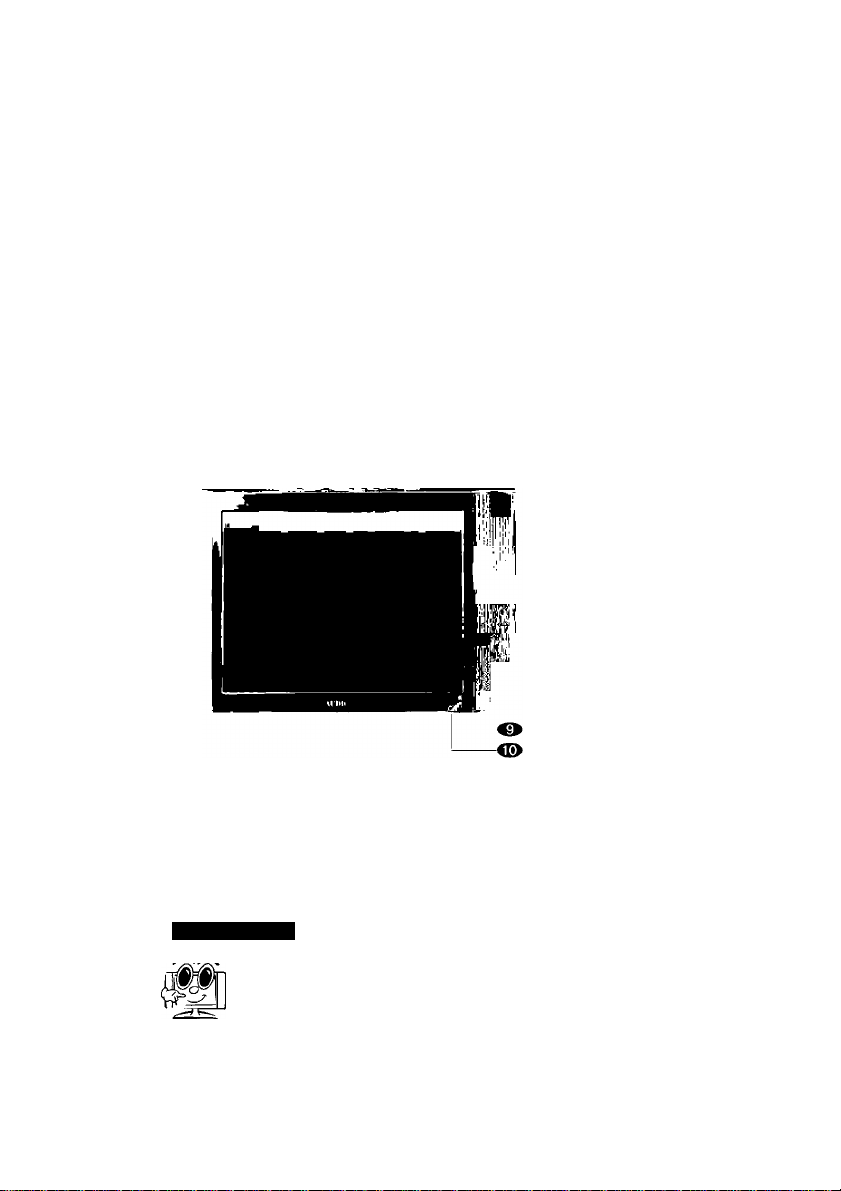
Recognizing buttons and controls
Rear Panel Input / Output Connections
AVI VIDEO AV2 S-VIDEO AV3 COMPONENT VGA
DC12V
HEADPHONE
Q
_____1_______
UDIO IN ■> R
earphone speakers speakers
(3.5<I>)
Input Connectors
Input Video Speakers
AVI Composite Stereo / AUDIO Connector
AV2 S-Video Stereo / AUDIO Connector
AV3
PC VGA(15 Pin D-SUB) Stereo /3.5 Earphone Connector
TV
Dutput Connectors
Output Video Speakers
Headphone None Stereo
_______
L R L R
1
1
Ommm
1
Y,Cb,Cr
Antenna Terminal
'' Cb Or
• €)
_________
Stereo / AUDIO Connector
Antenna Connector
O
1 '
--------L PC AUDIO IN 1
'
Page 14

AUDIOVOX
ELECTRONICS CORP.
Recognizing buttons and controls
Remote Control Buttons
O POWER
© TV
e Av
O BRIGHTNESS
© AUDIO
© MUTE
e PC
© MTS
© SLEEP
® VOL( +/ -)
® CH(A/T)
® CHANNEL SELECT
© DISPLAY
© SKIP ON/OFF
® ZOOM
© CLOSED CAPTION
® RECALL
Page 15

Rear Output Connectors
AUDIOTOX*
ELECTRONICS CORP.
Recognizing buttons and controls
PCA/ideo/Speaker Connections
PC
Video Connectors
Home Stereo
Speaker Connectors
★ Note :
1. Normal TV sounds broadcast via speaker connectors are more impressive to ears.
2. If your sound system does not have "Auxiliary" input connectors, you may select CD or Video
"Auxiliary" inputs.
Page 16

AUDIOVOX
ELECTRONICS CORP.
“ Basic Control
V
Press Power button once, light indicator changes from red to green.
TV monitor is now ON. Press power button again, light indicator changes from
green to red. TV monitor is now OFF.
J
Page 17

AUDIOTOX*
ELECTRONICS CORP.
Basic Control
Switching Channels
Use numeric buttons on remote control to select the channel you desire.
When selecting Single or Double digits channels (e.g., Channel 8) be sure to
complete the selection within 4 seconds.
Action 1: Press "0“ / Action 2: Press "8"
note: always include the digit "0"in front of Single digit channel selections. (e.g.,
Channel "8" is selected by pressing "08").
When selecting three digit channels (e.g., 118), please complete selection within
4 seconds. This is accomplished by doing the following:
Action 1: Press "100"
Action 2: Press "1"
Action 3: Press "8" to complete the 3 digit channel selection.
Make use of the channel selection buttons to scroll up and down.
Aerial antenna selection:
Press CH A Selection up, channel selection moves from ^
2^3^...^68t^69^2^3^...
Press CH ▼Selection down, channel selection moves from ^
3^2K..^69^68k-3^2^...
________________________________
J
Cable selection:
Press CH A Selection up, channel selection moves from ^
1^2^...^125^1^2^3^...
Press CHV Selection down, channel selection moves from ^
3>2> 125^..>3^2^1 ...
Page 18

AUDIOVOX
ELECTRONICS CORP.
Menu Setting List (Diagram)
(Q
CD
3
c
C/3
CD
0)
Q>
3
Menu: Picture / Volume / TV / Other fuction
BRIGHTNESS
CONTRAST
COLOR
SHARPNESS
RAOKI IRHT
[❖ /-+ SELECT
[Picture Setting]
CHANNEL INPUT
CHANNEL ATUO SCAN
CHANNEL SKIP
CLOSED CAPTION
V-CHIP BLOCK
!>/-+ SELECT
[TV Setting]
____________
C 50)
C100)
C 50)
C 3 )
C 0 )
BRIGHT
CCATV]
COFF]
C D
[ Volume Seting ]
[Other fuction Setting]
BALANCE
SOUND MODE
TREBLE
BASS
^/-+ SELECT
C 0 D
THEATER
C 0 ]
C 0 D
To locate the above settings do the following:
1. Press MENU to display the menu setting list
2. Press VOL (-/+) to select the desired item
3. Press CH(A/V) to scroll up or down to decide the selection
4. Press VOL (-/+) to change the setting
5. Press MENU to return
Page 19

AUDIOTOX
ELECTRONICS CORP.
Picture Settings
■ Picture Settings (1)
Directly Setting the brightness on the remote control, press "BRIGHT" to adjust the desired
brightness, or press MENU to select "BACKLIGHT" to odjust.
You have 3 selections to chose.
Maximum brightness 60% brightness suitable for
viewing in a well lit area
and save energy
■Picture Setting (2)
On the remote, press MENU. You may press on CH(A/T) button to scroll either up or down to
find the function you need to adjust then press left or right on the "VOL (-/+)" buttons to decide
your desired adjustments such as adjust the contrast, brightness or sharpness of the TV screen.
Action 1, Press "MENU"
Action 2, Press " CH " (A/T)
s J
Action 3, Press " VOL "(-/+)
When you have finished adjusting your selections, simply press the "MENU "button to exit.
Note : Under AVI AV2 AV3 TV modes, the setting are independent in each mode.
For example: In AV1 mode, the brightness setting is 100, but in AV2 or other modes, the
brightness setting may be 80, it depends on your setting in that mode.
111111111111111111111111111111111111111
BRIGHTNESS C 50)
iMiiiiiiiiinn iiiiiiiiiiimiMi
CONTRAST (50)
CONTRAST (48)
iiiMiiii III iiiiiiiiiMiimiiM
20% brightness
J
Page 20

AUDIOVOX
ELECTRONICS CORP.
Volume Settings
I Volume Setting (1)
1 .You can adjust the "BALANCE" of the speakers.
2.Simply go to "MENU " setting, locate the "BALANCE", and press "VOL" (-/+), and perform
the desired adjustment
■Volume Setting (2)
1. On the remote, press AUDIO. You have 4 sound modes to choose from;
1
THEATER
1
NEWS
HALL USER
2. Press MENU, press -/+ to
select" <l>5)", pressA/v to
select "SOUND MODE",
press -/+ to adjust the item to
your desired mode.
■Volume Setting (3)
You can adjust the TREBLE or BASS by following: Press MENU, set "SOUND MODE" to
[ USER} mode, then press (A/T) to select TREBLE or BASS controls, and press (-/+) to
perform the desired adjustment.
Page 21

AUDIOTOX*
ELECTRONICS CORP.
TV Setting
Multichannel Television Sound (MTS)
Your TV set is equipped with MTS (Multichannel Teievision Sound) decoding. This means you can view
your programs in the original sound track. (SAP, Second Audio Program).
1 .Simply press the "MTS' button to adjust the desired language heard.
2.Y0U may also select "MENU" to do the necessary
adjustments step by step. Simply press the select • * * ^J^Stereo^^2^Mts^^3^Mono^
and setting buttons to finalize your selection.
S.When you change a channel selection ,or if there is a break in electrical circuit, the TV screen will show your
present status as being "Stereo" and/ or "MTS" function, depending on the present status.
4. Yellow lettering on TV settings describes the TV's present status. E.g.
Present program has two ianguage settings broadcasting under mono-tone.
5. Weak antenna reception may result in poor Stereo Sound effects. Simply press the "MTS" button to change tone
settings from "Stereo" to "Mono" tone. This procedure will give you better sound reception.
6.If present program is being broadcasted under a secondary language selection, then stereo sound will not be
heard as a result. That is, secondary language and stereo sounds will not function together.
7. Cable reception is unusually strong ,may sometimes result in receiving multiple language interference during MTS mode.
8. Y0U may do various tasks with the "menu" selection mode.
(f)
(D
7X
CLOSED CAPTION
This TV set is equipped with an internal Closed Caption decoder. The closed caption broadcasts can be viewed in two
modes: (CAPTION) and (TEXT). For each mode, two chanhels are available: CHI and CH2
The (CAPTION) mode shows subscripts of dialogs and commentaries of TV dramas and news programs while
allowing a clear view of the picture.
The (TEXT) mode display various information over the picture (such as TV program schedule and weather forecasts,
etc.) that is independent of the TV programs
Simply press the "CLOSED CAPTION" button to select MODE or DATA
Or 1. Press MENU to display the MENU screen
1. Press "VOL(-/+) to move to CHANNEL SETTING
2. Press"CH (A/T) to CLOSED CAPTION
3. Press "VOL(-/+) to change the CLOSED CAPTION setting
4. Press" MENU" to exit
Note: The closed caption function is inactive in Componet mode.
Page 22

AUDIOVOX
ELECTRONICS CORP.
“ TV Setting
-
---------------------------------------
V-CHIP
This function allows TV programs to be restricted and TV usage to be controlled based on FCC data.
It prevents children from watching violent or sexual scenes that may be harmful.
Restriction of TV programs includes two rating that contain information about the program :
the MPAA rating and the TV Parental Guidelines. The MPAA is restricted by age. TV Parental
Guidelines are restricted by age and contact.
Since a TV program may use either the MPAA rating or the TV Guidelines, both should be adjusted
for complete control.
RATING
G GENERAL AUDIENCES. All ages admitted
■pG PARENTAL GUIDANCE SUGGESTED. Some material may
not be suitable for children
Age base
1 .Press MENU to display the MENU screen
2.Press VOL{-/+) and CH (A/V) to V-CHIP
3.INPUT SECRET NO. will be display. Input the
4-digit secret number (0000) by using channel
select keys
PG-13
R
NC-17 NO ONE 17 AND UNDER ADMITTED.
X
PARENTAL STRONGLY CAUTIONED. Some material may
be inappropriate for
children under 13.
RESTRICTED. Under 17 required
accompanying parent
or guardian.
X is an older rating that is unified with NC-17 but may
be encoded in the data of older movies
4. Press CH (A/V) to move the arrow to MPAA
5. Press VOL (-/+) to select BLOCK, if you set
PG to BLOCK PG-13, R, NC-17 and X are
automatically block.
6. Press MENU to return the main screen
-►V-CHIP BLOCK
« SELECT
Upper control panel of the main unit
r El EC ■r Cl 1
'-►V-CHIP BLCXK
♦ SELECT
INPUT SECRET NUMBER
- VOL(-I-)-®
■CH(A) —(g)
NEW SECRET NUMBER |
t ) 1
CHANGING OR CLEARING THE SECRET NUMBER
1. Press MENU to move the cursor to V-CHIP
2. Press and hold VOL(-r) on the upper control Panel,
do not set free, then press and hold CH(A) on the
TV set simultaneously until the message NEW
SECRET NO.
Page 23

AUDIOTOX*
ELECTRONICS CORP.
TV Setting
TV PARENTAL GUIDELINES
FV
RATING
TV-Y (All children)
TV-Y7 (Direct to Older Children) X
TV-G (General Audience)
TV-PG (Parental Guidance
Cautioned)
TV-14 (Parents its Strongly
Cautioned)
TV-MA (Mature Audience Only)
*
[x]: The content rating can be set, but this rating is not normaily broadcast by 1 / stations.
♦ X : The content rating can be set.
■ Setting BLOCK CONTENT
1. Press MENU to display the MENU screen
2. Press VOL(-/+) and CH (A/V) to V-CHIP
3. INPUT SECRET NO. (0000) will be display. Input the 4 digit secret number by using channel
select keys
4. Press CH (A/T) to move the arrow to TV PARENTAL GUIDELINES
5. Press VOL(-/+) to select BLOCK CONTENT
6. Press CH (A/T) to move the arrow to the desired item
7. Press VOL(-/+) to select BLOCK or -—(unblock)
8. Press” MENU” to exit
(Fantasy
violence)
S m
V
(Violence)s(Sexual
[X]
X X X X
X X X X
X X X X
content
Situation)
IE
S E E
S E E
L
(Adult
Language)
E E
(Sexually
Suggastive
Dialog
(f)
(D
7X
D
Note: V-CHIP HAS BEEN ACTIVATED will not be displayed if STATUS in not Configured to ON.
Note: Not all broadcasted channels display restrictions.
Page 24

AUDIOVOX
ELECTRONICS CORP.
TV Setting
Channel Input / Channel Auto Scan
CHANNEL INPUT (CATV/TV)
It is necessary to set the receiving mode to CATV or TV channels to receive
local broadcast TV programs
1. Press MENU to display MENU screen
2. Press VOL (-/+) tolcRI
3. Press CH (A/V) to move the cursor to CHANNEL INPUT
4. Press VOL (-/+) to select CATV or TV
5. Press MENU to exit
CHANNEL AUTO SCAN
From MENU, press VOL(-/+), then CH (A/T) to find CHANNEL AUTO SCAN
press VOL(-/+), channels will automatically select, adjust and set.
Aulo Scan
RED ( SKIP )
GREEN (ON AIR)
Page 25

AUDIOTOX*
ELECTRONICS CORP.
TV Setting
Channel Memory (Enable/Disable)
CHANNEL MEMORY (Disable Channel)
If you do not want a particular channel, you can delete it from memory as follows:
1. From your remote, press "CH''{A/T) up or down to find the channel you wish to
delete. You may also directly input the channel you wish to delete.
2. Press “SKIP ON/OFF" to delete the channel you wish. This action will delete the
channnel from your TV. The deleted channel lettering will also change color from
green to red.
Red
CHANNEL MEMORY (Enable Channel)
If you wish to replace a channel, proceed as follows:
1. From your remote, press "CH''(A/V) up or down to locate the channel you want.
You may also directly input the channel number you wish to add.
2. Press "SKIP ON/OFF" to add the channel you want. The newly added channel
lettering will change from that of red to green.
CO
(D
a
★ Note:
1. The above enable /disable channel action may also be carried out via the menu button.
2. From Menu, select, then set the channel you wish to add or delete. Remember that the
lettering color for added channels are green and the lettering for deleted channels are red
Page 26

AUDIOVOX
ELECTRONICS CORP.
TV Setting
Sleep Mode
1. To set sleep mode :
Press the “Sleep" button and select the time you wish to .
activate this function. The selected time (lettering in red)
will disappear from your screen, and your power indicator ^
will now change from the color green to that of orange, ^
indicating that the sleep mode is now active.
2. To cancel sleep mode:
Press “Sleep" button and the remaining time till sleep
mode activation will appear (lettering in green). Now select the time to show
[-—] and the screen will disappear. The power indicator will now change
from orange to green once again.
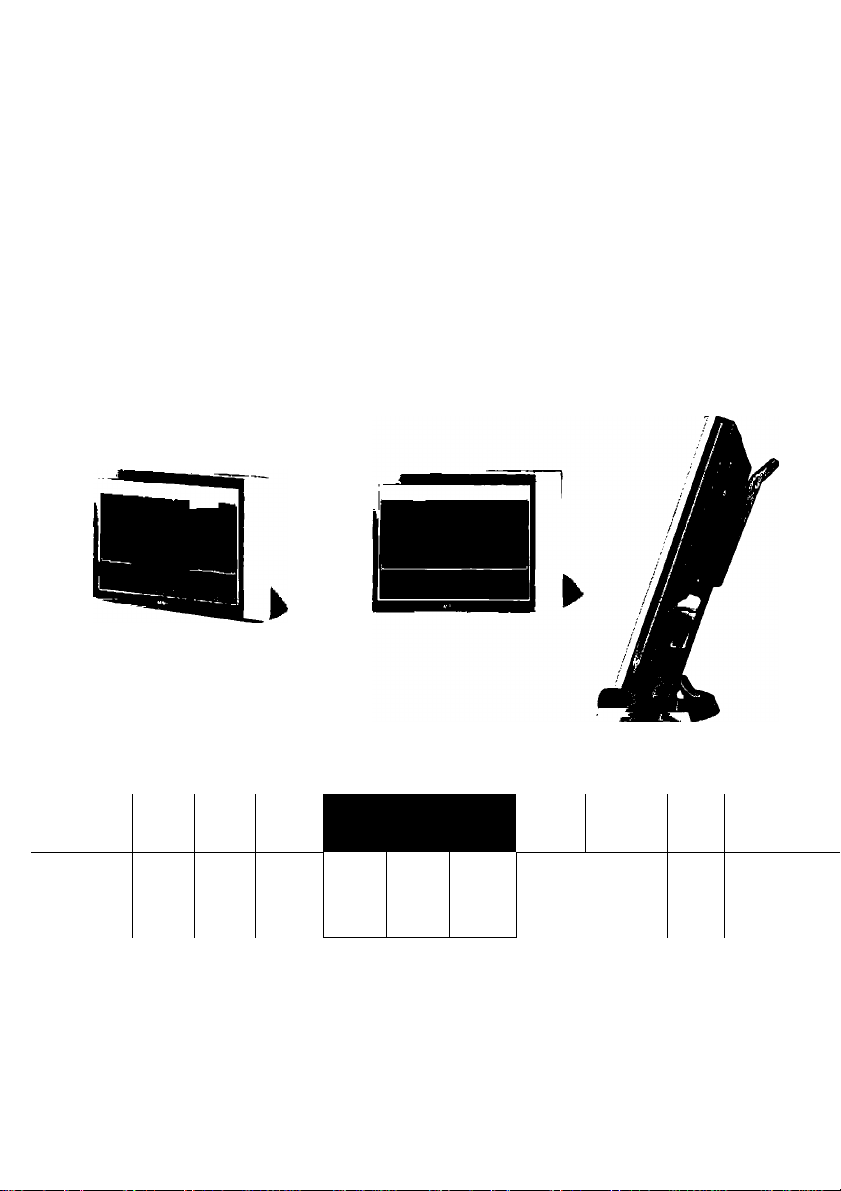
Adjusting the screen size
Press “ZOOM" button on the remote, and select 3 different screen size.
SOM
i
★ 16:9 setting is applicable only when signals have cut original picture's top and bottom portion as
shown below. Normally apply to DVD or theater mode movies.
1iii
itiilii
ijliii;;
lOliil
L
n
Page 27

AUDIOTOX
ELECTRONICS CORP.
TV Setting
Blue Screen Setting
Automatically turns the screen blue if a broadcast signal is not received.
Note:
When received signals are weak or
interferedwith some other signals, the
BLUE SCREENfunction may be activated. -»BLUE SCREEN
To watch the TV under such conditions.set
BLUE SCREEN to off.
Default Setting
From menu, press VOL(-/+), then
CH (A/T) and find "default setting"
then set.
DEFAULT t
C ON J
Auto Power Off (TV/AV Mode)
The power of the LCD TV set is turned off when there is no signal for 15 minutes.
Page 28

ZT
CO
TI
c
D
o
o'
D
CO
AUDIOVOX
ELECTRONICS CORP.
Other Functions
Mute
Press the mute button to silence the TV volume. The screen will show a red icon
on the TV screen indicating that the mute function has been activated. Press the
mute button again return to the original volume setting.
-*Note: Increasing or decreasing the volume setting will also disable on mute setting.
Channel Display
Press the "Display" button and the top right hand
corner of the TV screen will display your current
viewing channel, program and audio mode.
Channel Return
Press the "RECALL" button and you will return to your previous viewing channel.
Press it again and you will return to your present viewing channel. You may
alternate between these two channels.
Page 29

AUDIOTOX*
ELECTRONICS CORP.
---------------------------------- PC Setting
PC Settings
★ Simply press TVA/ideo/PC button to locate the PC mode.
★ To make adjustments under the PC mode, do the following:
1. Press the ''MENU"button
2. Select the function you desire
3. Press the "CH" up or down buttons to adjust or the "VOL+/-'' button for further adjustments.
4. To demostrate the "water level", move the light pointer to the "water level" position and the
letterings will be lit.
5. Press "VOL +/-" to adjust the screen left and right balance.
6. Press "MENU" button again to end single setting selection.
★ End (Single Setting instruction)
■Left unattended, any instructions desired will disappear,
press menu button to end selection process.
PC PATTERN
BRIGHTNESS
HOR. POSITION VER. POSITION
PHAS
SHARPNESS
LOAD DEFAULT NO SIGNAL INPUT
CONTRAST
IMAGE ADJUSTMEMT
LANGUAGE
Remote Control Functions
1. Press Menu to select
2. Press Select up and down buttons to
find desired mode
3. Press Set left or right buttons
to finalize selection
4. Press Menu to exit
Page 30

AUDIOVOX
ELECTRONICS CORP.
PC Setting
Brightness
Press menu, select brightness, and then set the
brightness functions
Contrast
Press menu, select Contrast, and then set
the contrast functions
Horizontal Position
Press menu, select horizontal Position , and
then set the horizontal position functions
Vertical Position
Press menu, select Vertical Position and then
set the vertical position functions
Page 31

AUDIOTOX
ELECTRONICS CORP.
PC Setting
Dii
Press menu, select Phase, then set the
phase functions
Note: Adjust if screen is not clear
Clock
Press menu, select Clock, then set your
current time
Load Default
Press menu, select, then set the setting to
default
note: if screen shows 'No Signals" this means that the
PC(VGA) signals has not yet been connected.
Autotune
«moHTNcss
CONTRAST
NOR POSmONI
VEfLPOSmON
Auto adjust the clock, phase, H-position and
V-position of the display to make the monitor
have the best efficiency.
Press CH A button on the front control panel
for 3 seconds till you release it, this monitor
will make auto adjustment.
Page 32

AUDIOVOX
ELECTRONICS CORP.
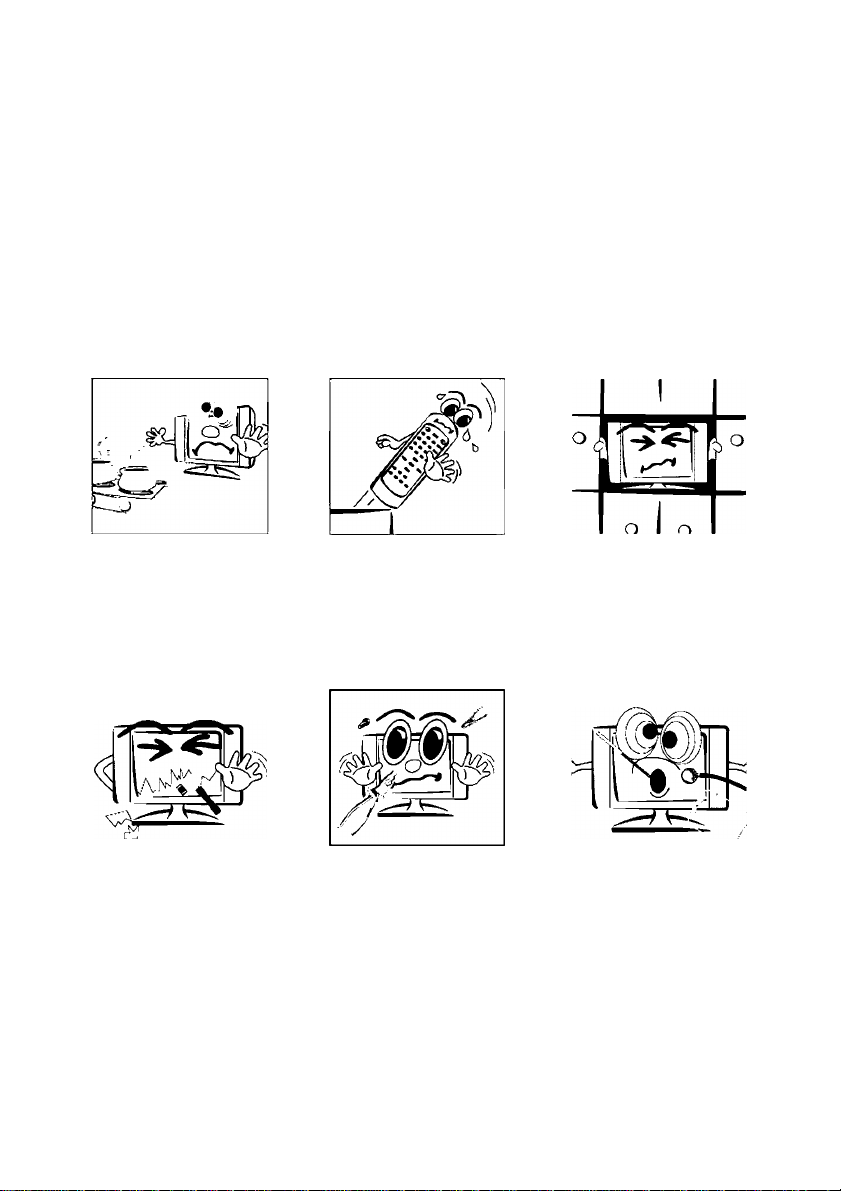
Troubleshooting
Interference
H Please note the following common TV reception interferences: J
Ignition effect
Black spots or vertical lines may appear. Screen jumps crazily or is very unstable.
This is commonly the result of car ignition system interference, neon lights, or other
forms of electrical interferences.
Ghost Shadows
This is the result of two signals : One being the original signal from the
antenna while the 2nd signal is a slightly delayed signal, normally the result of
bouncing off tall buildings or other obstructions. This problem might be corrected by
adjusting your outdoor antenna.
Flurries
Lots of tiny dots appears on your screen. This is the result of poor reception signals.
You may have to re-enforce your antenna signals.
★ note: note: If interferences occur while you are using a cable system, then the problem could be at the
cable source and not from your TV reception.
Page 33

AUDIOTOX*
ELECTRONICS CORP.
Troubleshooting
You may have problems that can be fixed with a few minor adjustments. Look for the type of
problem you are having below and then apply the suggestions to get your TV going again.
Picture with no sound
m
■ Check if you have accidentally pressed the "mute" button
■ Check other channels if the same problem exist. If other
channels are fine, then problem is with the TV program you
are viewing. This shouldn't be a concern
■ Verify all connections are firmly attached
■ Connect cable to another TV
■ If all checks fail, please contact our serviceman
Sound with no picture
■ Check if main power is switched on
■ Check brightness and contrast level to see if they have
been tuned to the minimum level thus making the screen dark
■ Unplug the cable and re-plug it in after two minutes
■ Check if you have accidentally pressed the “mute" button
■ Connect cable to another TV
m !
No Picture No Sound
■ Check main power source
■ Check other TV channels. If they are okay, problem is just
with the TV program you are viewing
■ Press the TVA/IDEO/PC button on the remote or on the top of
the unit to get to the desired display option
■ If you are using outdoor antenna, please check your
connections
■ Please check if your power cord is connected properly,
it may be loose
■ Switch off main power, disconnect cable. Reconnect cable
after two minutes rest then switch on the main power
■ Check if the antenna or cable are well connected
■ Check your Remote Control
■ Check power adapter and power cord if they have been
damaged
■ Connect cable to another TV
■ If all fails, please contact with serviceman immediately
Page 34

AUDIOVOX
ELECTRONICS CORP.
Troubleshooting
Picture too dark
■ Check your brightness level
■ Check your contrast level
■ In the on screen display (OSD) select default
■ Check your LCD monitor for possible demage
I##
Remote Control Failure
■ Check TV main power source
■ Check if remote control batteries are weak
■ Check if batteries have been correctly installed
■ Check if there are obstructions between your remote control
and the main TV remote sensor
■ Disconnect your cable tor two minutes before reinstalling it
■ If failure resulted from electrical interferences, lighting or
static, disconnect the TV main powerfor 10 seconds before
reinstalling it. Restart your TV
■ Try holding remote 2 inches from sensor
ti
Picture is blurry
■ Check other channels. Problem may be an isolated incidence
■ If using outdoor antenna, please check connections
■ Please check your accessories. Such as Video recorder,
VCD, DVD
■ Check your cable company or outdoor antenna reception
■ RF signal may be too slow
■ If all fails, please contact our sen/iceman immediately
Page 35

AUDIOTOX*
ELECTRONICS CORP.
Troubleshooting
Before calling our serviceman, please refer to the follow/ing chart to see if you can adjust
the problems yourself.
Checks and Adjustments
TV will not turn on BPIugTVin.
■ Plug something else into the outlet to make sure it is working.
■ Make sure batteries in the remote are not dead.
■ Make sure batteries are placed in the remote the right way.
■ Unplug TV for a few minutes and then turn it on again.
Poor sound or no sound ■Check volume settings and mute settings
■Check for possible interference sources
Blur picture or no picture
Some channels are not clear ■Check outdoor antenna and make necessary adjustments
Poor Color tone or No color ■Check memory settings
No reception from Cable ■Check if cable Is connected properly
Channels above 13 cannot receive ■Check TV channel settings (CATV/TV) are set properly( page 20)
Unable to operate remote
TV shut off
■Check antenna or TV cable
■Check for possible outside interferences
■Check picture settings
■Check possible outside interferences
■Check Color settings
■Check if program is in correct channel
■Check antenna and cable connections
■Check possible outside interferences
■Check if channels are selected properly
■Check if cable company are experiencing technical problems
■Check antenna and UHF settings
■Check for low batteries or possible obstructions between remote and TV sensor
■Check TV main power source
■ Electric power failure
■ Preset sleep mode features are on
■TV programs ended
Page 36

AUDIOVOX
ELECTRONICS CORP.
Notices
NOTICES
1. The contents stated in this document and the product may be subject to change
without prior notice. Please ask your distributor or go to WWW.AUDIOVOX.COM
for the latest information.
2. This product is developed and produced for usage onto normal electronic
products (home, office, automation equipment, game machine, etc) and is not
suitable for applications which need extremely high reliability and extreme safety
(aero- or space-use machines, control equipment for nuclear power, life keeping
equipments, etc.)
3. It is strictly prohibited to copy or publish a part or whole of this document without
our prior written approval.
4. Brightness depends on the temperature. (In lower temperature, it becomes
lower)
Optical Specification
Optical characteristics are determined after the unit has been 'ON' and stable for
approximately 30 minutes in a dark environment at 25c.
The values specified are at an approximate distance 50cm from the LCD surface at
a viewing angle of 0 degree.
Lamp Life
Lamp life is defined as the time when brightness becomes 50% of the
original value under standard condition.
Page 37

AUDIOVOX
ELECTRONICS CORP.
Product Specifications “
Monitor Display Specifications:
Screen Size 20.1"
Viewable Size 20.1" (Diagonal)
Aspect Ratio
Resolution
Pixel pitch 0.51 X 0.51 mm
Total Display Colors 16.7 Million
Viewing Angle H: 160/V: 160
Contrast Ratio 500:1 (typ)
Brightness (cd / m2) 500Cd / m2 (typ)
Backlight Lamp Life 50,000 hrs (min) '
Surface Treatment:
Hard Coating |
Connection Interfaces:
Hi-Resolution component Video (480i)
S-Video
Composite (RCA input)
Composite Audio input for each video input
Headphone
VGA (15 pin D-sub)
3.5mm Stereo Input
Con venie nce S pecifications;
Total Watt output 3WX2
Number of Speaker 2
Preset Sound Level
Parental Control with V-Chip
Closed Caption (CC)
Secondary Audio Program (SAP)
181 Channel Cable! AIR Ready
NTSC Cable Standard
Plug & Play for VGA
Sleep 30, 60,90,120 minutes
Remote Control Type Model Specific
VESA FPMPMI mounting standard
Lice nsinq :
FCC
UL
cUL
Mechanic al Dimensions:
WxHxD (With Stand) 23.5" X 17.5" X 8.5" (596.9 X 444.5 X 215.9 mm)
WxHxD(W / 0 Stand)
Weight W / Stand 25.2 LB
Power usage:
AC Power Source
DC Power Input
0.17
800 X 600
100 X 100 mm
23.5" X 15" X 2.75" (596.9 x 381 x 69.85 mm)
100V-240-1.7A. 50-60HZ
12V-5A
o
Q.
c
o
CO
■D
CO
o
Page 38

AUDIOVOX
ELECTRONICS CORP.
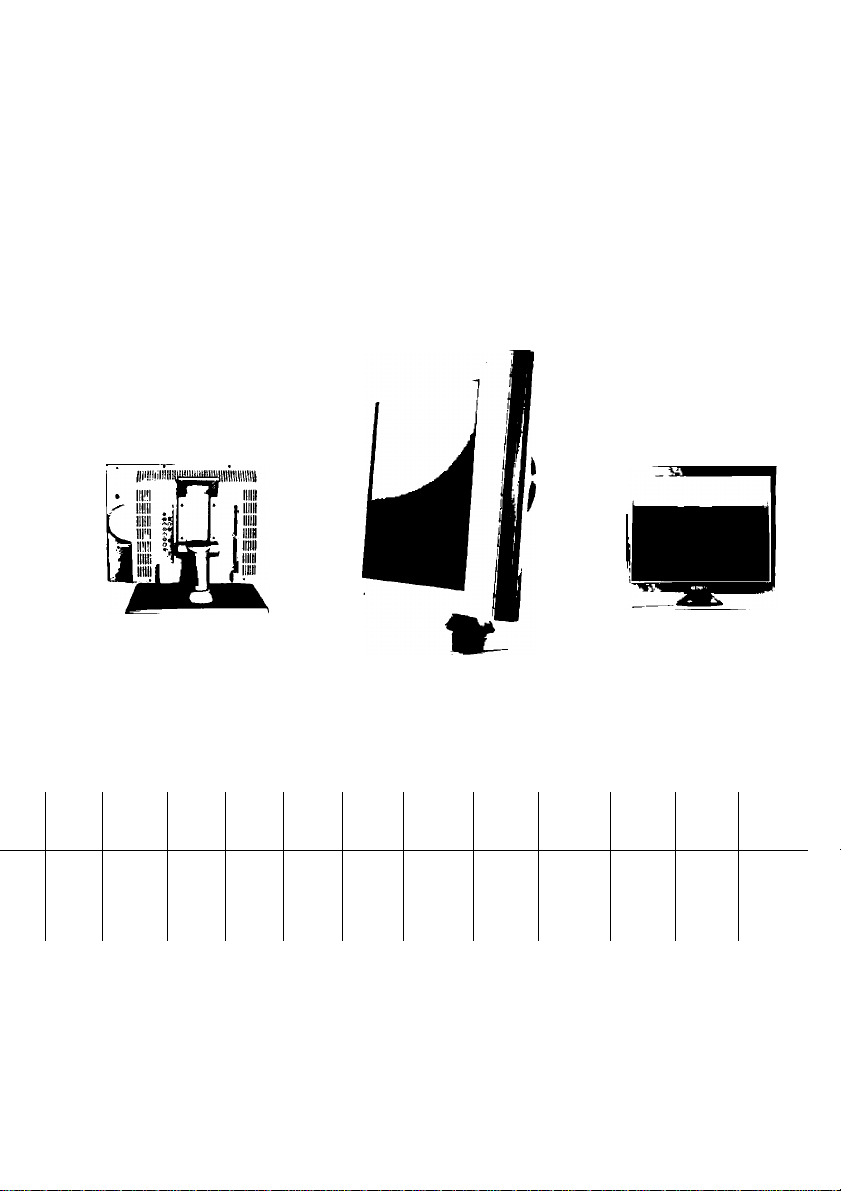
Adjustable Angles Drawings
O
Q.
C
o
g
3
Cf>
D
CO
o'
D
CO
Unit: inch
TURN RIGHT 40 DEGREE TURN LEFT 40 DEGREE
TOP VIEW DRAWING
Page 39

AUDIOTOX*
ELECTRONICS CORP.
Wall Mounting
Unit: inch
VESA 100 mm x 100 mm Mounting
Page 40

5.
CD
3
0)
3
o
CD
J]
CD
■D
AUDIOVOX
ELECTRONICS CORP.
Maintenance / Repair
Maintenance:
DO NOT wipe LCD with water
Clean the LCD using a dry soft cloth such as gauze. If the LCD is heavily soiled,
appy a cleaner for LCD panels to the cloth and wipe off gently.
DO NOT use chemical such as acetone,solvents as xylem or toluene.
WIPE the cabinet with a soft cloth
If the cabinet is heavily soiled, wipe with soft cloth dipped in water
Wfl REPAIR: (Important)
DO NOT SHIP PRODUCT BACK FOR REPAIR WITHOUT FIRST CONTACTING
AUDIOVOX AT 1-800-645-4994.
AUDIOVOX WILL PROVIDE A SPECIALLY DESIGNED TRANSPORT BOX FOR
YOUR UNIT. THIS BOX WILL BE PROVIDED TO YOU AT NO CHARGE.
THE BOX WILL CONTAIN A PREPAID SHIPPING LABLE SO THE PRODUCT
MAY BE RETURNED AT NO EXPENCE.
For assistance, please call: 1-800-645-4994
or visit us at WWW.AUDIOVOX.COM
Page 41

AUDIOTOX*
ELECTRONICS CORP.
Note
Page 42

AUDIOVOX
ELECTRONICS CORP.
Note
Customer Record:
This Model number and serial number of this product can be found on its rear panel.
You should note this serial number in the space provided below and retain this book, plus your
purchase receipt, as a permanent record of your purchase to aid in identification in the event of
theft or loss, and Warranty Service purpose.
Model Number:
Audiovox Electronics Corporation
150 Marcus Blve
Hauppauge, NY 11788
1-800-651-4994
FP2000 Serial Number:
For Customer Service
Visit Our Website At
www.audiovox.com
Product Information. Photos.
. FAQ's, Owner's Manuals
Page 43

AUDIOYOX
ELECTRONICS CORE.
AUDIOVOX ELECTRONICS CORPORATION (the Company) warrants to the original retail purchaser of this
product that should this product or any part thereof, under normal use and conditions, be proven defective in
material or workmanship within 90 days from the date of original purchase, such defect(s) will be repaired or
replaced with reconditioned product ( at the Company's option) without charge for parts and repair labor.
To obtain repair or replacement within the term of this Warranty, the products is to be delivered with proof of
warranty coverage (e.g. dated bill of sale), specification of defect(s), transportation prepaid, to the Company at the
address shown below.
This Warranty does not extend to the elimination of externally generated static or noise, to correction of antenna
problems, to costs incurred for installation, removal or reinstallation of the product, or to damage to tapes, discs,
speakers, accessories, or electrical systems.
This Warranty does not apply to any product or part thereof which, in the opinion of the Company , has suffered or
been damaged through alteration, improper installation, mishanding, misuse, neglect, accident, or by removal or
defacement of the factory serial number / bar code lable(s). THE EXTENT OF THE COMPANY'S LIABILITY
UNDER THIS WARRANTY IS LIMITED TO THE REPAIR OR REPLACEMENT PROVIDED ABOVE AND, IN NO
EVENT , SHALL THE COMPANY'S LIABILITY EXCEED THE PURCHASE PRICE PAID BY PURCHASER FOR
THE PRODUCT.
This Warranty is in lieu of all other express warranties or liabilities. ANY IMPLIED WARRANTIES, INCLUDING
ANY IMPLIED WARRANTY OF MERCHANTABILITY, SHALL BE LIMITED TO THE DURATION OF THIS
WRITTEN WARRANTY. ANY ACTION FOR BREACHY OF ANY WARRANTY HEREUNDER INCLUDING ANY
IMPLIED WARRANTY OF MERCHANTABILITY MUST BE BROUGHT WITHIN A PERIOD OF 30 MONTHS FROM
DATE OF ORIGINAL PURCHASE. IN NO CASE SHALL THE COMPANY BE LIABLE FOR ANY
CONSEQUENTIAL OR INCIDENTAL DAMAGES FOR BREACH OF THIS OR ANY OTHER WARRANTY,
EXPRESS OR IMPLIED, WHATSOEVER. No person or representative is authorized to assume for the Company
any liability other thatn expressed herein in connection with the sale of this product.
90 DAY LIMITED WARRANTY
Applies to Audiovox Video Products
Some states do not allow limitations on how tong an implied warranty lasts or the exclusion or limitation of llimitation
of incidental or consequential damage so the above limitation or exclusions may not apply to you. This Warranty
gives you specific legal rights and you may also have other rights which vary from state to state.
U.S.A.: AUDIOVOX ELECTRONICS CORPORATION, 150 MARCUS BLVD.,HAUPPAUGE, NEW YORK 11788 • 1-800-645-4994
CANADA: CALL 1-800-645-4994 FOR LOCATION OF WARRANTY STATION SERVING YOUR AREA
128-5556D
 Loading...